


Amana ATB1830ARQ, ATB1830ARW, ATB1836ARB, ATB1836ARQ, ATB1836ARS Owner's Manual
...
To p F r e e z e r
Refrigerator
Use & Care Guide
Table of Contents
Important Safety Instructions . . . . 1-2
Installation . . . . . . . . . . . . . . . . . . . . 3-6
Temperature Controls . . . . . . . . . . . . .7
Looking Inside . . . . . . . . . . . . . . . . . 6-7
Ice Service . . . . . . . . . . . . . . . . . . . . 8-9
Food Storage Tips . . . . . . . . . . . . 11-13
Storing the Refrigerator . . . . . . . . . . 14
Care & Cleaning . . . . . . . . . . . . . 14-15
Troubleshooting . . . . . . . . . . . . . . 16-18
Warranty & Service . . . . . . . . . . . . . . 19
Guide d’utilisation et
d’entretien . . . . . . . . . . . . . . . . . . . 20 Guía de uso y Cuidado . . . . . . . . . . . 40
Form No. F/12/05 |
Part No. 3013913010 |
 Important Safety Instructions
Installer: Please leave this manual with this appliance.
Consumer: Please read and keep this Use & Care Guide for future reference. This manual provides proper use and maintenance information.
Keep sales receipt and/or cancelled check as proof of purchase.
If you have questions, call: 1-800-688-9900 U.S.A. 1-800-688-2002 Canada
1-800-688-2080 (U.S. TTY for hearing or speech impaired) (Mon.-Fri., 8 a.m.-8 p.m. Eastern Time)
Have complete model and serial number identification of your refrigerator. This is located on a data plate inside the refrigerator compartment, on the upper left side. Record these numbers below for easy access.
Model Number ____________________________________
Serial Number_____________________________________
 DANGER
To reduce risk of injury or death, follow basic precautions, including the following:
IMPORTANT: Child entrapment and suffocation are not problems of the past. Junked or abandoned refrigerators are still dangerous – even if they sit out for “just a few days.” If you are getting rid of your old refrigerator, please follow the instructions below to help prevent accidents. 
Before you throw away your old refrigerator or freezer:
• Take off the doors.
• Leave the shelves in place so children may not easily climb inside.
Date of Purchase __________________________________
In our continuing effort to improve the quality and performance of our appliances, it may be necessary to make changes to the appliance without revising this guide.
What You Need to Know About Safety Instructions
Warning and Important Safety Instructions appearing in this manual are not meant to cover all possible conditions and situations that may occur. Common sense, caution and care must be exercised when installing, maintaining or operating appliance.
Always contact your dealer, distributor, service agent or manufacturer about problems or conditions you do not understand.
Recognize Safety Symbols, Words,
Labels
 DANGER
DANGER – Immediate hazards which WILL result in severe personal injury or death.
 WARNING
WARNING – Hazards or unsafe practices which COULD result in severe personal injury or death.
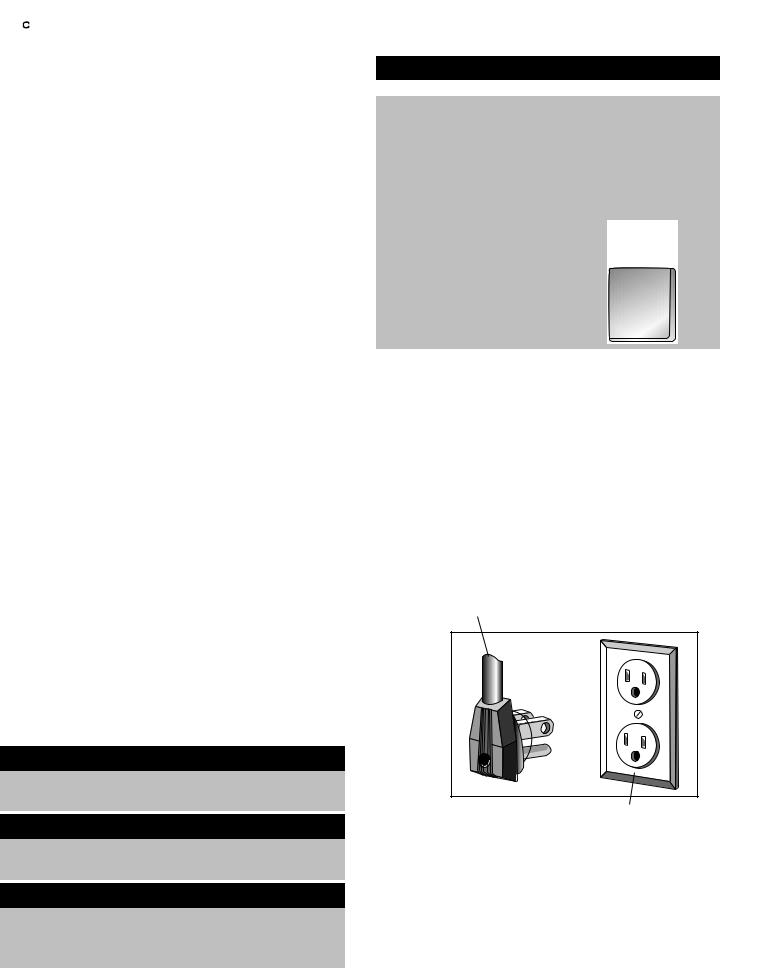
This appliance is equipped with a three-pronged grounding plug for your protection against possible electrical shock hazards. It must be plugged into a grounding receptacle. Where a standard two-prong wall receptacle is encountered, it is the personal responsibility and obligation of the customer to have it replaced with a properly grounded three-prong wall receptacle. Do not under any circumstances, cut or remove the third (ground) prong from the power cord. Do not use an adapter plug.
Power supply cord with three-prong grounding plug
Grounding type wall receptacle
 CAUTION
CAUTION – Hazards or unsafe practices which COULD result in minor personal injury or property damage.
1

 Important Safety Instructions
 WARNING
To reduce risk of fire, electric shock, serious injury or death when using your refrigerator, follow these basic precautions, including the following:
1.Read all instructions before using the refrigerator.
2.Observe all local codes and ordinances.
3.Be sure to follow grounding instructions.
4.Check with a qualified electrician if you are not sure this appliance is properly grounded.
5.Do not ground to a gas line.
6.Do not ground to a cold-water pipe.
7.Refrigerator is designed to operate on a separate 115 volt, 15 amp., 60 cycle line.
8.Do not modify plug on power cord. If plug does not fit electrical outlet, have proper outlet installed by a qualified electrician.
9.Do not use a two-prong adapter, extension cord or power strip.
10.Do not remove warning tag from power cord.
11.Do not tamper with refrigerator controls.
12.Do not service or replace any part of refrigerator unless specifically recommended in Use & Care Guide or published user-repair instructions. Do not attempt service if instructions are not understood or if they are beyond personal skill level.
13.Always disconnect refrigerator from electrical supply before attempting any service. Disconnect power cord by grasping the plug, not the cord.
14.Install refrigerator according to Installation Instructions. All connections for water, electrical power and grounding must comply with local codes and be made by licensed personnel when required.
15.Keep your refrigerator in good condition. Bumping or dropping refrigerator can damage refrigerator or cause refrigerator to malfunction or leak. If damage occurs, have refrigerator checked by qualified service technician.
16.Replace worn power cords and/or loose plugs.
17.Always read and follow manufacturer’s storage and ideal environment instructions for items being stored in refrigerator.
18.Your refrigerator should not be operated in the presence of explosive fumes.
19.Children should not climb, hang or stand on any part of the refrigerator.
20.Clean up spills or water leakage associated with water installation.
SAVE THESE INSTRUCTIONS FOR FUTURE REFERENCE
2
 Installation
Your new refrigerator was packed carefully for shipment. Remove and discard shelf packing and tape.
Location
•Allow for a free flow of air through the front base grille.
•Install the refrigerator where the room temperature will not go below 55° F (13° C). With temperatures below 55° F (13° C), the refrigerator will not run frequently enough to maintain proper temperature in the freezer.
•Allow a minimum 1⁄2" clearance on the sides, top and back for ease of installation. If refrigerator is placed with the door hinge side against a wall, you may want to allow additional space so the door can be opened wider.
•Use caution when installing the unit on vinyl or hardwood floors so as not to mark or otherwise damage the flooring. A piece of plywood, a rug or other material should be used to protect the floor while positioning the unit.
Leveling
To enhance its appearance and to maintain performance, your refrigerator should be leveled after it has been rolled into its final location.
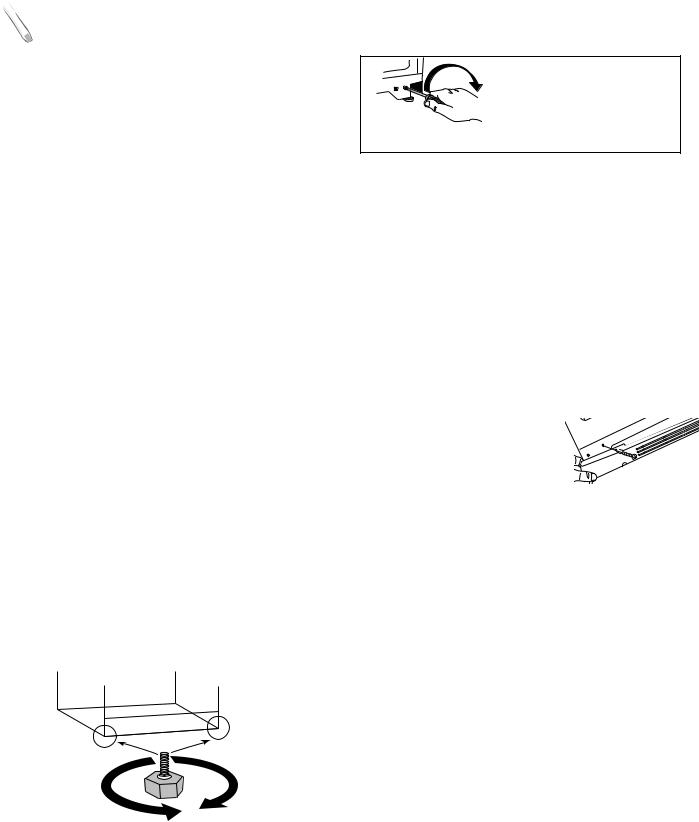
•Adjust the leveling/lock screws beneath each front corner at the base of the cabinet. Turn these leveling/lock screws clockwise to raise a cabinet corner and counterclockwise to lower a cabinet corner.
To lower |
To raise |
cabinet |
cabinet |
•If the floor is not level and it is necessary to raise the rear of the cabinet, we suggest rolling the rear wheels onto a piece of plywood or other shim material.
•Refrigerator models that have adjustable wheels can be leveled by removing the base grille and adjusting the wheels with a 1/4" socket or screwdriver. (See figure 2.)
TURN CLOCKWISE TO RAISE
CABINET CORNER
Figure 2  TURN COUNTER-CLOCKWISE TO
LOWER CABINET CORNER
Front Base Grille (on select models)
The front base grille (select models) which was packaged inside the refrigerator for shipment and should be installed after the refrigerator has been leveled.
“Snap on” style:
•To install, align the spring clips with the round openings in the cabinet and push each end in until the grille locks into place.
•To remove this style of base grille, grasp both ends and pull straight out.
“Screw on” style:
• Use a Phillips screwdriver to remove the two Phillips head screws at the base of the refrigerator.
•Align the base grille to the screw holes. (The cut out side on the base grille installs around the lower hinge of the door.)
•Secure the base grille into place by reinstalling the Phillips screws back into their original screw holes.
•Reverse these steps to remove this style of base grille.
Energy Saving Tips
•Locate the refrigerator away from heat producing appliances such as the range or dishwasher, heat vents and direct sunlight.
•Level the refrigerator and do not block ventilation around the front base grille.
•Let hot dishes cool slightly before putting into the refrigerator or freezer.
•Cover liquids.
•Keep the freezer full to near capacity so less cold air will escape during door openings. When the freezer is less than 2⁄3 full, place milk cartons half full of water in the freezer.
•Wipe moisture from the outside of containers before placing them into the refrigerator.
•Avoid opening the doors too often.
3
 Installation
 WARNING
To avoid electrical shock which can cause severe personal injury or death:
•Disconnect power to refrigerator before reversing doors.
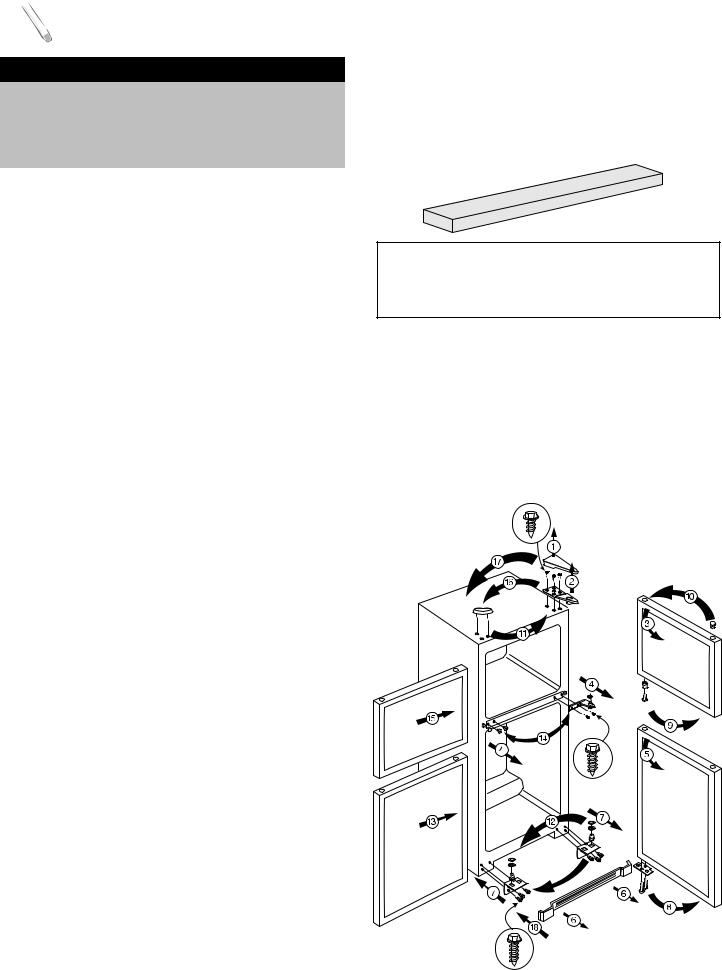
14.Attach the middle hinge with the screws removed from the opposite side and secure them using a 5⁄16” wrench.
15.Carefully place freezer door on top of hinge arm. Use foam door spacer to set gap.
Reversing Doors
Tools Required:
•5⁄16" end wrench
•Phillips screwdriver
•Putty knife
•5⁄16" socket and ratchet
Unplug the refrigerator.
1.Pry off hinge cap with a putty knife and set aside.
2.With a 5⁄16" socket and ratchet, remove screws from the upper hinge and set aside.
3.Carefully lift and remove freezer door (including the upper hinge) off the center hinge.
4.With a 5⁄16" socket and ratchet, remove the screws and middle hinge from the top of refrigerator door. With a putty knife, pry out the plug buttons and replace them on the opposite side.
5.Carefully lift and remove refrigerator door.
6.Remove front base grille and set aside (see p. 3).
7.With a 5⁄16" socket and ratchet, remove hinge plate from lower corner of refrigerator and secure it on the opposite side.
8.Remove plate from the underside of refrigerator door and secure it on the opposite side with a 5⁄16" socket and ratchet.
9.With a 5⁄16" socket and ratchet, remove the door stop from the underside of the freezer door and secure it on the opposite side.
10.With a putty knife, pry out the plug button(s) from tops of freezer and refrigerator doors and replace them on the opposite side.
11.Remove screw hole plugs from top of cabinet and replace on the opposite side.
12.With a 5⁄16" socket and ratchet, remove washers and stem from the inside of the hinge plate and place them on the outside of the hinge plate.
13.Carefully replace refrigerator door on the hinge plate in lower corner.
Note
•Do not discard the foam door spacer. Doors may settle with use.
16.Slide top hinge into place on freezer door and secure screws with 5⁄16" wrench.
Confirm that all screws have been tightened securely.
17.Snap hinge cap securely in place.
18.Replace front base grille (see p. 3).
Remember to plug in your refrigerator and reset the controls to the appropriate setting(s).
4
Fasten Installation |
|
|
|
|
|
|
|
|
SCREW |
|||
|
SCREW |
Phillips screw driver |
is required for |
|
||||||||
|
|
|
|
|
Note: |
|
|
|||||
|
|
|
|
|
installation. |
|
|
|
|
|
||
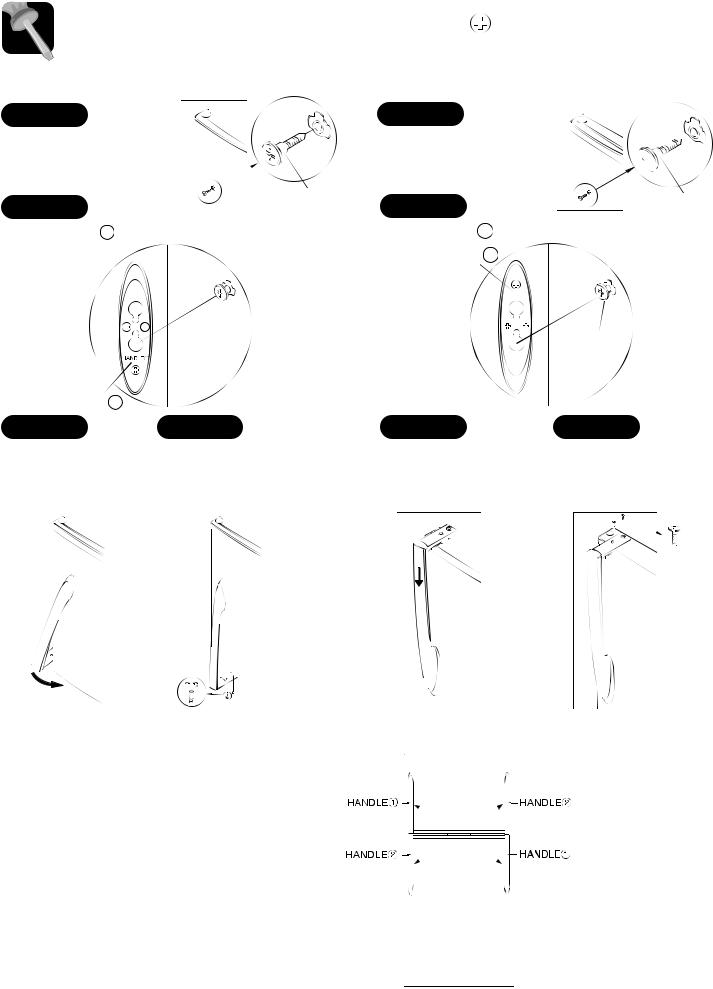
Freezer Door Handle Installation |
|
|
Refrigerator Door Handle Installation |
|||||||||
STEP |
1 |
|
|
|
|
|
STEP |
1 |
|
|
|
|
with screw |
|
|
|
|
Fasten with screw |
|
|
|||||
|
|
|
|
|
|
|
|
|
|
|
|
|
STEP |
2 |
|
|
|
|
|
STEP |
2 |
|
|
|
|
|
|
|
|
|
||||||||
|
|
|
|
|
|
|||||||
Align handle 1 with mounting screw |
|
|
Align handle 2 with mounting screw |
|
||||||||
|
|
|
|
|
|
|
HANDLE 2 |
|
||||
|
|
|
|
SCREW |
|
|
|
|
SCREW |
||
|
|
|
|
|
|
|
|
||||
|
|
|
|
|
|
|
|
|
|
|
|
HANDLE 1 |
|
|
|
|
|
|
|
|
|
||
|
|
|
|
|
|
|
|
|
|||
|
|
|
|
|
|
|
|
|
|||
STEP 3 |
|
|
STEP 4 |
|
STEP 3 |
|
|
STEP 4 |
|
||
Rotate handle |
|
Secure bottom end of |
Push handle down |
|
Secure top end of |
||||||
|
|
|
|
handle with two screws. |
|
|
|
|
handle with two screws |
||
|
|
|
|
Do not over-tighten |
|
|
|
|
Do not over-tighten |
||
Reversing Door Handles
To remove the handles, reverse the above steps. Flip the handles 180° and mount them on the opposite doors.
5
 Installation
Connecting the Water Supply
(select models)
 WARNING
To reduce the risk of injury or death, follow basic precautions, including the following:
•Read all instructions before installing ice maker.
•Do not attempt installation if instructions are not understood or if they are beyond personal skill level.
•Observe all local codes and ordinances.
•Do not service ice maker unless specifically recommended in Use & Care Guide or published user-repair instructions.
•Disconnect power to refrigerator before installing ice maker.
•Water damage due to an improper water connection may cause mold/mildew growth. Clean up spills or leakage immediately.
 CAUTION
To avoid property damage or possible injury, follow basic precautions, including the following:
•Consult a plumber to connect 1⁄4” O.D. copper tubing to household plumbing to assure compliance with local codes and ordinances.
•Confirm water pressure to water valve is between 35 and 100 pounds per square inch. 20 pounds per square inch if there is not a water filter.
•Do not use a self-piercing, or 3⁄16" saddle valve. Both reduce water flow and can become clogged over time, and may cause leaks if repair is attempted.
•Tighten nuts by hand to prevent cross threading. Finish tightening nuts with pliers and wrenches. Do not overtighten.
•Wait 2-3 hours before placing refrigerator into final position to check and correct any water leaks. Recheck for leaks after 24 hours.
•Verify the copper tubing under the sleeve is smooth and free from defects. Do not reuse an old sleeve.
Materials Needed
•1⁄4" outer diameter flexible copper tubing
•Shut-off valve (requires a 1⁄4" hole to be drilled into
water supply line before valve attachment)
•Adjustable wrench
•1⁄4" hex nut driver
Note
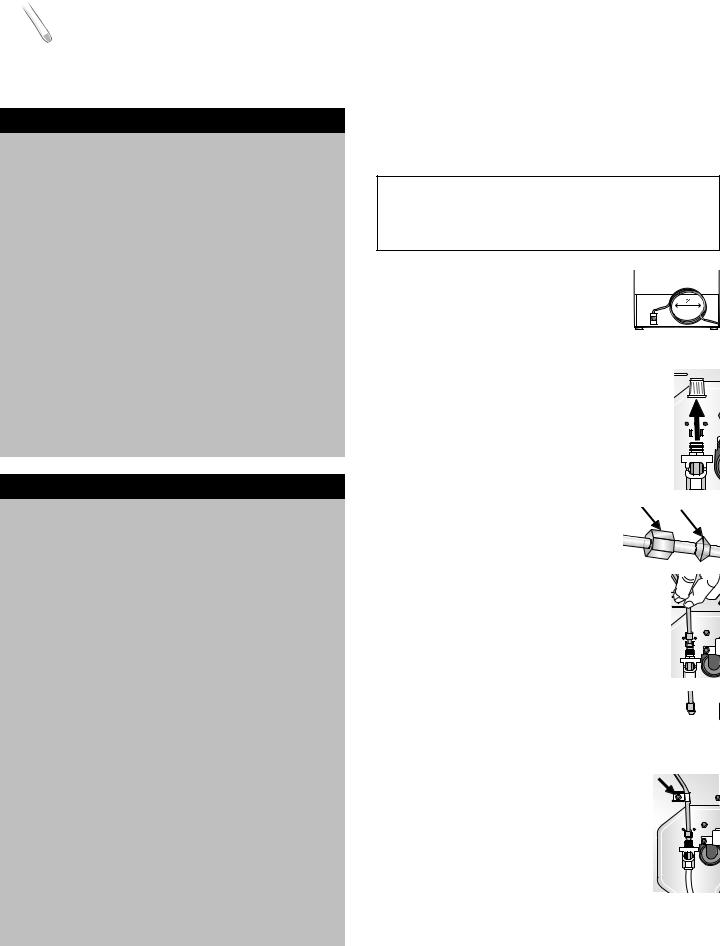
•Add 8' to tubing length needed to reach water supply for creation of service loop.
1. Create service loop with copper |
2’ diameter |
minimum |
|
tubing (minimum 2’ diameter). |
|
Avoid kinks in the copper tubing |
|
when bending it into a service |
|
loop. |
|
2. Remove plastic cap from water valve inlet port.
3. |
Place brass nut (A) and sleeve (B) on |
|
|
|
copper tube end as illustrated. |
A |
B |
|
Reminder: Do not use an old |
||
|
|
|
|
|
sleeve. |
|
|
4. |
Place end of copper tubing into |
|
|
|
water valve inlet port. Shape tubing |
|
|
|
slightly. Do not kink – so that tubing feeds |
|
|
|
straight into inlet port. |
|
|
5. Slide brass nut over sleeve and screw nut into inlet port. Tighten nut with wrench.
IMPORTANT: Do not overtighten. Cross threading may occur.
6. Pull on tubing to confirm connection is secure. Connect tubing to frame with C
water tubing clamp (C) and turn on water supply. Check for leaks and
correct if necessary. Continue to observe the water supply connection for two to three hours prior to moving
the refrigerator to its permanent location.
7.Monitor water connection for 24 hours. Correct leaks, if necessary.
6
 Temperature Controls
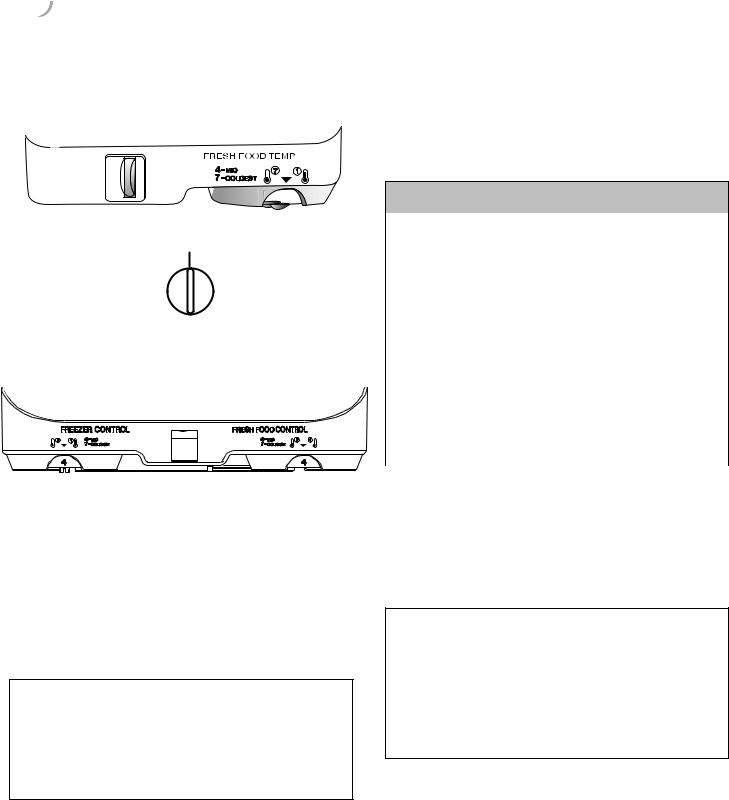
In some models the fresh food control is located at the top of the fresh food compartment and the freezer control is located at the back of the freezer compartment as show below:
4
INITIAL SETTING
COLDEST COLD
COLD
FREEZER CONTROL
In other models, both controls are located at the top of the fresh food compartment as shown below:
Initial Settings
•The fresh food control has settings from 1 (cold) to 7 (coldest). Initially set this control on 4.
•The freezer control, when located at the back of the freezer, has settings from cold to coldest. Initially set this control at the mid-line initial setting.
•When the freezer control is located at the top of the fresh food compartments, it has settings from 1 (cold) to 7 (coldest). Initially set this control on 4.
Note
•Your refrigerator will run continuously for several hours when you first start it. This is normal.
•Let the refrigerator run at least four hours before adding food.
Adjusting the Temperature
Controls
•24 hours after adding food, you may decide that one or both compartments should be colder or warmer. If so, adjust the control(s) as indicated in the following table.
•Except when starting the refrigerator, do not change either control more than one number at a time.
•Allow 24 hours for temperatures to stabilize before resetting.
•Changing either control will have some effect on the temperature of the other compartment.
TEMPERATURE CONTROL GUIDE
Fresh Food |
Adjust fresh food control |
Compartment |
to next higher setting. |
too Warm |
|
|
|
Fresh Food |
Adjust fresh food control |
Compartment |
to next lower setting. |
too Cold |
|
|
|
Freezer too Warm |
Adjust freezer control to |
|
next colder setting. |
|
|
Freezer too Cold |
Adjust freezer control to |
|
next warmer setting. |
|
|
Turn Refrigerator |
Set fresh food control to |
“OFF” |
“OFF”.* |
|
|
*Turning the fresh food control to “OFF” stops cooling in both compartments. It does not shut off power to the refrigerator.
No Defrosting
Your refrigerator is designed to defrost automatically.
Note
•During the automatic defrost cycle, you may notice a red glow/reflection in the vents on the back wall of the freezer compartment and you may hear the sound of water droplets coming into contact with the defrost heater. This is normal during the defrost cycle.
Warm Cabinet Surfaces
At times, the front of the refrigerator cabinet may be warm to the touch. This is a normal occurrence that helps prevent moisture from condensing on the cabinet. The condition will be more noticeable when you first start the refrigerator, during hot weather and after excessive or lengthy door openings.
7
 Looking Inside
Fresh Food Compartment
Shelves (style may vary)
 CAUTION
To avoid personal injury or property damage:
•Never attempt to adjust a shelf when it is loaded with food.
•Confirm that shelf is secure prior to loading items onto it.
•Handle glass shelves with care. Shelves may break suddenly if nicked, scratched or exposed to sudden temperature changes.
Select models are equipped with wire or glass full width shelves that are supported by rails molded into the interior walls of the fresh food compartment. These shelves can easily be adjusted to alternate positions within the compartment.
To Adjust a Full Width Shelf:
•Grasp each side of the shelf.
•Pull the shelf forward approximately 1".
•While supporting the shelf from underneath,
lift it up and out.
• Slide the shelf into the desired alternate position.
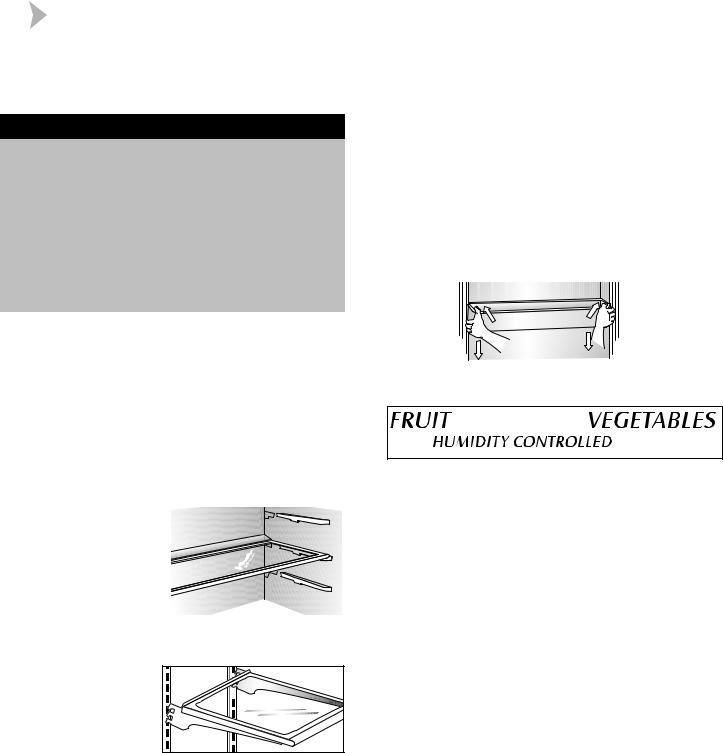
Shelves in other models hook into support rails located on the back wall of the fresh food compartment.
To Remove:
• Slightly tilt up the front and lift up the rear of the shelf, then pull the shelf straight out.
To Lock Into Another Position:
•Tilt up the front edge of the shelf.
•Insert the hooks into the desired frame openings and let the shelf settle into place.
•Be sure the shelf is securely locked at the rear.
•On certain models the outside edge of the shelf rests on rails formed into the side of the fresh food compartment.
The bucket-style Door Shelves accommodate a variety of container sizes and shapes.
To Remove:
•Grasp the shelf on each end.
•Lift the shelf up and out.
To Reinstall:
•While holding the shelf on each end, slide the shelf in and down.
•Push down on the interior center of the shelf to snap it completely into place.
The Crispers provide a storage area for fruit and vegetables. Some crisper drawers have slide humidity controls.
For fruit storage, slide the control (select models) to the left to provide lower humidity conditions in the drawer.
For vegetable storage, slide the control (select models) to the right to provide higher humidity conditions in the drawer.
For best results, keep the crispers tightly closed.
To Remove:
•Pull out the crisper until it stops.
•Tilt the drawer up slightly and pull it out.
To Reinstall:
•With the drawer tilted up slightly, align the drawer in the tracks and slide in.
The Crisper Top serves as the lower refrigerator shelf.
To Remove:
•Remove the crisper drawers.
•Slightly lift up the front of the shelf.
•Support the shelf from underneath to lift it up and then out of the cabinet.
To Reinstall:
•With the shelf front tilted slightly upward, carefully insert the crisper top back into the cabinet.
•Position the rear and sides of the shelf on the supports and let the crisper top settle into place.
8

 Looking Inside
Can Rack (select models)
The Can Rack slides out from underneath a shelf. It can hold up to twelve 12-ounce beverage cans.
To Remove:
•Pull rack out to full extension. Tilt up the front of rack and pull straight out.
To Install:
• Insert rack into frame rails and push back into place.
Tall Bottle Retainer/Snugger
(select models)
The Tall Bottle Retainer prevents tall bottles from tipping forward. The Retainer can be placed above any removable door bucket.
The Snugger attached to the Tall Bottle Retainer keeps bottles and other containers in place when the door is opened or closed. Adjust the Snugger by sliding from side to side. Select models also feature snuggers in the door bucket itself.
Egg Tray With Handle
(style may vary/select models)
The Egg Tray with Handle holds a “dozen-plus” eggs. It can be removed to carry to a work area or to be washed.
Dairy Compartment
The Dairy Compartment is covered and designed to store spreadable food items such as butter or margarine.
To use this compartment, simply raise the lid to store or retrieve items.
This compartment can be removed for cleaning. Rotate the cover open. Grasp the dairy compartment from the bottom and lift out
On select models, this compartment can be installed on the left or right side of the door.
Freezer Compartment
 CAUTION
To avoid personal injury or property damage:
•Never attempt to adjust a shelf when it is loaded with food.
•Confirm that shelf is secure prior to loading items onto it.
Some refrigerators have a full-width shelf in the freezer compartment. This shelf can be adjusted to accommodate a variety of frozen food loads.
To Adjust the Shelf:
•Slide the shelf to the left.
•Lift the left support bars out of the wall support cups.
•Reposition the shelf in the alternate position.
The Slide Out Freezer Basket (select models) is found in the main freezer compartment. It is a convenient storage area, providing easy access to items stored in the rear of the freezer. Slide the basket out to reach or store frozen foods.
To Remove the Basket:
•Pull the basket until it stops.
•Lift and pull the basket out.
To replace the basket, reverse the removal procedure.
The Drop Down Freezer Basket (select models) is found on the lower shelf of the freezer door. This area provides space for frozen food items that tend to shift or slide (such as bagged vegetables).
9
 Ice Service
Ice Cube Trays
Select models are equipped with ice cube trays. To release the ice cubes from a tray, hold the tray upside down over a container and twist both ends.
Automatic Ice Maker (optional)
Note
•Energy rating guides that are posted on the refrigerator at the time of purchase do not include optional ice maker energy usage.
Select models are automatic ice maker ready. The number of the appropriate ice maker kit needed for installation into these models appears on the data plate. The kit contains installation instructions and water connection instructions.
Other models have a factory installed ice maker.
Connect the ice maker to the water supply as instructed in the separate instructions furnished with the ice maker. Proper water flow and a level refrigerator is essential for optimal ice maker performance.
After your refrigerator has been connected to the water supply, move the sensor arm into the down position. The ice maker will fill with water when the freezer reaches the proper temperature.
Some ice makers are equipped with an adjustable sensor arm that allows you to adjust the amount of ice in your ice storage tray for times when less ice is needed.
OFF |
|
|
IICE |
ON |
LEVEL |
|
50% |
|
75% |
|
100% |
Wire Lever Arm |
|
LEVE |
|
50 |
|
75 |
Sensor |
100% |
|
|
|
|
Arm |
To adjust the amount of ice produced: (select models) Rotate the wire lever arm to provide the desired level of ice production. The 100% setting provides maximum ice production.
•It may be 8 to 12 hours before the ice maker furnishes any usable ice cubes. The first one or two batches will probably contain undersized and irregular cubes because of air in the supply line.
•The initial batch may also contain impurities from the new water supply piping. Therefore, all cubes from the first two or three batches should be discarded.
•When the ice cubes are ejected it is normal for several cubes to be joined together at the ends. They can easily be broken apart. The ice maker will continue to make ice until the supply of ice cubes raises the sensor arm, shutting the ice maker off.
•Certain sounds may accompany the various cycles of the ice maker. The motor may have a slight hum, the cubes will rattle as they fall into an empty storage pan and the water valve may click or “buzz” occasionally.
•If the ice is not used frequently, the ice cubes will become cloudy, shrink, stick together and taste stale. Empty the ice storage bin periodically and wash it in lukewarm water. Be sure to dry the bin before replacing it.
•To remove the ice bin, pull it forward, away from the ice maker. To avoid the ice maker dumping ice while the bin is removed, turn the ice maker off by lifting the sensor arm.
•To replace the ice bin, reverse the above procedure. Turn the ice maker on by lowering the sensor arm.
•Beverage and foods should not be placed in the ice storage bin for quick chilling. These items can block the sensor arm, causing the ice maker to malfunction.
•Turn off (arm up) the ice maker when the water supply is to be shut off for several hours.
 WARNING
To avoid personal injury or property damage:
•Do not place fingers or hands on the automatic ice making mechanism while the refrigerator is plugged in. This will help protect you from possible injury. It will also prevent interference with moving parts of the ejector mechanism and the heating element that releases the cubes.
•Under certain rare circumstances, ice cubes may be discolored, usually appearing with a greenbluish hue. The cause of this unusual discoloration can be a combination of factors such as certain characteristics of local waters, household plumbing and the accumulation of copper salts in an inactive water supply line which feeds the ice maker. Continued consumption of such discolored ice cubes may be injurious to health. If such discoloration is observed, discard the ice cubes and contact your dealer to purchase and install a water line filter.
•Water damage due to improper water connection may cause mold/mildew growth.
10

 Food Storage Tips
Fresh Food Storage
•The fresh food compartment of a refrigerator should be kept between 34° F (1° C) and 40° F (4° C) with an optimum temperature of 37° F (3° C). To check the temperature, place an appliance thermometer in a glass of water and place in the center of the refrigerator. Check after 24 hours. If the temperature is above 40° F (4° C) adjust the control as explained on page 7.
•Avoid overcrowding the refrigerator shelves. This reduces the circulation of air around the food and results in uneven cooling.
Fruits and Vegetables
•Storage in the crisper drawers traps humidity to help preserve the fruit and vegetable quality for longer time periods (see page 8).
•Sort fruits and vegetables before storage and use bruised or soft items first. Discard those showing signs of decay.
•Always wrap odorous foods such as onions and cabbage so the odor does not transfer to other foods.
•While vegetables need a certain amount of humidity to remain fresh, too much moisture can shorten storage times (especially leafy items). Drain vegetables well before storing.
Meat and Cheese
•Raw meat and poultry should be wrapped securely so leakage and contamination of other foods or surfaces does not occur.
•Occasionally mold will develop on the surface of hard cheeses (Swiss, Cheddar, Parmesan). Cut off at least an inch around and below the moldy area. Keep your knife or instrument out of the mold itself.
Do not try to save individual cheese slices, soft cheese, cottage cheese, cream, sour cream or yogurt when mold appears.
Dairy Food
•Most dairy foods such as milk, yogurt, sour cream and cottage cheese have freshness dates on their cartons for appropriate length of storage. Store these foods in the original carton and refrigerate immediately after purchasing and after each use.
Frozen Food Storage
•The freezer compartment of a refrigerator should be kept at approximately 0° F (-18° C). To check the temperature, place an appliance thermometer between the frozen packages and check after 24 hours. If the temperature is above 0° F (-18° C), adjust the control as explained on page 7.
•A freezer operates more efficiently when it is at least
2⁄3 full.
Packaging Foods for Freezing
•To minimize dehydration and quality deterioration use aluminum foil, freezer wrap, freezer bags or airtight containers. Force as much air out of the packages as possible and be sure they are tightly sealed. Trapped air can cause the food to dry out, change color and develop an off-flavor (freezer burn).
•Overwrap fresh meats and poultry with suitable freezer wrap prior to freezing.
•Do not refreeze meat that has completely thawed.
Loading the Freezer
•Avoid adding too much warm food to the freezer at one time. This overloads the freezer, slows the rate of freezing and can raise the temperature of frozen foods.
•Leave a space between the packages so cold air can circulate freely, allowing food to freeze as quickly as possible.
•Avoid storing hard-to-freeze foods such as ice cream and orange juice on the freezer door shelves. These foods are best stored in the freezer interior where the temperature varies less with door openings.
11

 Food Storage Tips
Food Storage Chart
Storage times are approximate and may vary depending on type of packaging, storage temperature, and the quality of the food when purchased.
|
FOODS |
REFRIGERATOR |
FREEZER |
STORAGE TIPS |
||||
|
DAIRY PRODUCTS |
|
|
|
||||
|
Butter |
|
1 month |
6-9 months |
Wrap tightly or cover. |
|||
|
Milk and cream |
1 week |
Not recommended |
Check carton date. Close tightly. |
||||
|
|
|
|
|
|
|
|
Don’t return unused portions to |
|
|
|
|
|
|
|
|
original container. Don’t freeze |
|
|
|
|
|
|
|
|
cream unless whipped. |
|
Cream cheese, cheese spread and |
1-2 weeks |
Not recommended |
Wrap tightly. |
||||
|
cheese food |
|
|
|
||||
|
Cottage cheese |
3-5 days |
Not recommended |
Store in original carton. Check |
||||
|
|
|
|
|
|
|
|
carton date. |
|
Sour cream |
10 days |
Not recommended |
|
||||
|
|
|
|
|
|
|
|
|
|
Hard cheese |
1-2 months |
4-6 months |
Wrap tightly. |
||||
|
(Swiss, Cheddar and Parmesan) |
|
May become crumbly |
Cut off any mold. |
||||
|
EGGS |
|
|
|
||||
|
|
|
|
|
|
|
|
|
|
Eggs in the shell |
3 weeks |
Not recommended |
Refrigerate small ends down. |
||||
|
Leftover yolks or whites |
2-4 days |
9-12 months |
For each cup of yolks to be frozen, |
||||
|
|
|
|
|
|
|
|
add 1 tsp. sugar for use in sweet, or |
|
|
|
|
|
|
|
|
1 tsp. salt for non-sweet dishes. |
|
|
|
|
|
|
|
||
|
FRUITS |
|
|
May also store unripe or hard |
||||
|
|
|
|
|
|
|
|
|
|
Apples |
1 month |
8 months (cooked) |
apples at 60-70° F (16-21° C). |
||||
|
|
|
|
|
|
|||
|
Bananas |
2-4 days |
6 months (whole/peeled) |
Ripen at room temperature before |
||||
|
|
|
|
|
|
|
|
refrigerating. Bananas and |
|
|
|
|
|
|
|
|
avocados darken when refrigerated. |
|
|
|
|
|
|
|||
|
Pears, plums, avocados |
3-4 days |
Not recommended |
|
||||
|
Berries, cherries, apricots |
2-3 days |
6 months |
|
||||
|
Grapes |
3-5 days |
1 month (whole) |
|
||||
|
Citrus fruits |
1-2 weeks |
Not recommended |
May also store at 60-70° F (16-21° |
||||
|
|
|
|
|
|
|
|
C). If refrigerated, store uncovered. |
|
Pineapples, cut |
2-3 days |
6-12 months |
Will not ripen after purchase. Use |
||||
|
|
|
|
|
|
|
|
quickly. |
|
|
|
|
|
|
|||
|
VEGETABLES |
|
|
Don’t wash before refrigerating. |
||||
|
Asparagus |
|
1-2 days |
8-10 months |
||||
|
Store in crisper. |
|||||||
|
|
|
|
|
|
|
|
|
|
|
|
|
|
||||
|
Brussels sprouts, broccoli, |
3-5 days |
8-10 months |
Wrap odorous foods. Leave peas in |
||||
|
cauliflower, green peas, |
|
|
pods. |
||||
|
lima beans, onions, peppers |
|
|
|
||||
|
Cabbage, celery |
1-2 weeks |
10-12 months |
Wrap odorous foods and refrigerate |
||||
|
|
|
|
|
|
|
|
in crisper. |
|
Carrots, parsnips, beets, and turnips |
7-10 days |
8-10 months |
Remove tops. Wrap odorous foods |
||||
|
|
|
|
|
|
|
|
and refrigerate in the crisper. |
|
|
|
|
|
||||
|
Lettuce |
7-10 days |
Not recommended |
|
||||
|
|
|
|
|
|
|
|
|
12

|
FOODS |
Food Storage |
|
Tips |
|
|
FREEZER |
|
overwrap with freezer wrap. |
|
|||
|
|
|
|
|
|||||||||
|
|
|
|
|
REFRIGERATOR |
|
|
|
STORAGE TIPS |
|
|||
|
POULTRY AND FISH |
|
|
|
|
|
|
|
|
|
|
||
|
Chicken and Turkey, whole |
|
1-2 days |
|
|
12 months |
|
Keep in original packaging for |
|
||||
|
Chicken and Turkey, pieces |
|
1-2 days |
|
|
9 months |
|
refrigeration. Place in the Meat |
|
||||
|
|
|
|
|
and Cheese Drawer. When |
|
|||||||
|
Fish |
|
|
|
|
1-2 days |
|
|
2-6 months |
|
|
||
|
|
|
|
|
|
|
|
freezing longer than 2 weeks, |
|
||||
|
|
|
|
|
|
|
|
|
|
|
|
|
|
|
|
|
|
|
|
|
|
|
|
|
|
|
|
|
MEATS |
|
|
|
|
|
|
|
|
|
|
|
|
|
Bacon |
|
|
|
|
7 days |
|
|
1 month |
|
|
|
|
|
Beef or lamb, ground |
|
|
1-2 days |
|
|
3-4 months |
|
Fresh meats can be kept in |
|
|||
|
|
|
|
|
|
|
|
|
|
|
|
original packaging for |
|
|
|
|
|
|
|
|
|
|
|
|
|
refrigeration. |
|
|
Beef or lamb, roast and steak |
|
3-5 days |
|
|
6-9 months |
|
Place in the Meat and Cheese |
|
||||
|
Ham, fully cooked, |
whole |
|
7 days |
|
|
1-2 months |
|
Drawer. When freezing longer |
|
|||
|
|
|
|
|
than 2 weeks, overwrap with |
|
|||||||
|
|
|
|
|
half |
|
5 days |
|
|
1-2 months |
|
|
|
|
|
|
|
|
|
|
|
|
freezer wrap. |
|
|||
|
|
|
|
|
slices |
|
3 days |
|
|
1-2 months |
|
|
|
|
|
|
|
|
|
|
|
|
|
|
|||
|
Luncheon meat |
|
|
3-5 days |
|
|
1-2 months |
|
Unopened, vacuum-packed |
|
|||
|
|
|
|
|
|
|
|
|
|
|
|
luncheon meat may be kept up |
|
|
|
|
|
|
|
|
|
|
|
|
|
to 2 weeks in the Meat and |
|
|
|
|
|
|
|
|
|
|
|
|
|
Cheese Drawer. |
|
|
Pork, roast |
|
|
3-5 days |
|
|
4-6 months |
|
|
|
|||
|
Pork, chops |
|
|
3-5 days |
|
|
4 months |
|
|
|
|||
|
Sausage, ground |
|
|
1-2 days |
|
|
1-2 months |
|
|
|
|||
|
Sausage, smoked |
|
|
7 days |
|
|
1-2 months |
|
|
|
|||
|
Veal |
|
|
|
|
3-5 days |
|
|
4-6 months |
|
Processed meats should be |
|
|
|
Frankfurters |
|
|
7 days |
|
|
1 month |
|
tightly wrapped and stored in |
|
|||
|
|
|
|
|
|
the Meat and Cheese Drawer. |
|
||||||
|
|
|
|
|
|
|
|
|
|
|
|
|
|
|
|
|
|
|
|
|
|
|
|
|
|
||
|
|
|
|
|
|
||||||||
|
Sources: |
United States Department of Agriculture; Food Marketing Institute; |
|
|
|
||||||||
|
|
|
Cooperative Extension Service, Iowa State University |
|
|
|
|
||||||
|
|
|
|
|
|
|
|
|
|
|
|
|
|
13

 Storing the Refrigerator
Vacations*
If you will be gone for a month or less, leave the controls at the usual settings.
During longer absences:
1.Remove all food.
2.Shut off the ice maker (if installed) and the valve where you tapped into the water line to supply the refrigerator.
3.Disconnect the refrigerator from the electrical outlet.
4.Bleed the water from the ice maker fill line and dry the ice maker thoroughly.
5.Clean and dry the refrigerator thoroughly.
6.Leave the doors open to prevent odors.
 WARNING
Water damage due to improper disconnection and drainage may cause mold/mildew growth.
Moving*
When moving, follow instructions listed in Vacations. In addition, remove and carefully pack any items that are easily removable. Ship the refrigerator in an upright position with the doors taped shut.
* If using an automatic ice maker, discard first two or three ice harvests, when refrigerator is put back into service.
 Care & Cleaning
Refer to the chart on the following page for specific refrigerator cleaning guidelines.
 WARNING
To avoid electrical shock which can cause severe personal injury or death:
•Disconnect the power cord before moving or cleaning the refrigerator.
•Disconnect the power cord before replacing the light bulb.
 CAUTION
To avoid personal injury:
•Wear gloves when changing a light bulb to protect against possible broken glass.
No Clean™ Condenser
A clean condenser means more efficient refrigerator operation. Thanks to the unique design of the No Clean™ Condenser, there is no longer a need for routine condenser cleaning in normal home usage surroundings.
Some operating environments may be particularly dusty or greasy. In these situations, the condenser can be periodically cleaned to insure maximum efficiency.
Cleaning Under the Refrigerator
1.Disconnect the power cord.
2.Raise the locking feet, if engaged (see page 3).
3.To prevent an accidental spill, drain any defrost water which may have accumulated in the defrost drain pan. This pan is located behind the front base grille. To remove the pan, push down on both sides and slide it out.
4.If your model has been connected to a water supply for an automatic ice maker, turn off the water before moving the refrigerator.
5.Pull the refrigerator out from the wall.
Replacing a Light Bulb
Always use a standard 40 watt appliance bulb.
Fresh Food Compartment
The light bulb is located under the top of the fresh food compartment.
•Remove light shield, if present.
•Unscrew the light bulb and replace.
Freezer Compartment
The freezer light (select models) is located on the back wall, near the upper right corner.
To remove the bulb cover:
• Grasp the top and bottom of the bulb cover. Press in the areas of the attachment tabs, applying enough pressure to unhook the tabs. At the same time, pivot the cover down and remove.
• Unscrew the lightbulb and replace.
• Replace the bulb cover by pivoting it back into place and
snapping the tabs into the appropriate slots.
14

 Care & Cleaning
 WARNING
To avoid electrical shock which can cause severe personal injury or death, disconnect power to refrigerator before cleaning. After cleaning, connect power.
Refrigerator Cleaning Chart
 CAUTION
To avoid personal injury or property damage, observe the following:
•Do not touch refrigerated surfaces with wet or damp hands, they may stick to the cold metal surfaces.
•Before cleaning the freezer, allow it to warm up.
•Allow glass shelves to warm up before immersing in warm water.
|
PART |
|
TIPS AND PRECAUTIONS |
||
|
REFRIGERATOR |
|
|
||
|
EXTERIOR |
|
|
|
|
|
Front base grille |
Mild detergent and warm water. |
Remove the front base grille (see page 3). |
||
|
|
|
|
Mild liquid sprays. |
|
|
|
|
|
Vacuum cleaner attachment. |
|
|
Condenser |
Cleaning brush (Part No. |
No need for cleaning unless environment is particularly |
||
|
|
|
|
20001017) available from your |
greasy, dusty or there is significant pet traffic in the home |
|
|
|
|
dealer. |
(see page 14). |
|
Door handles |
Mild detergent and warm water. |
|
||
|
|
|
|
Mild liquid sprays. |
|
|
Painted metal surfaces: |
Mild detergent and warm water. |
Dry with a clean, soft cloth. |
||
|
Cabinet, doors |
Mild liquid sprays. |
Do not wipe the refrigerator with a soiled dishwashing |
||
|
|
|
|
|
cloth or wet towel. These may leave residue that can |
|
|
|
|
|
scratch and weaken the paint. |
|
|
|
|
|
Do not use scouring pads, powdered cleansers, bleach or |
|
|
|
|
|
cleaners containing bleach. These products can scratch |
|
|
|
|
|
and erode the paint finish. |
|
|
|
|
|
Do not wax plastic or vinyl parts. |
|
Defrost Drain Pan |
Mild detergent and warm water. |
Routine cleaning usually not necessary unless environ- |
||
|
|
|
|
|
ment is particularly humid or dusty. Pan should be |
|
|
|
|
|
drained and cleaned prior to moving the refrigerator (see |
|
|
|
|
|
page 14). |
|
Stainless steel doors |
Light cleaning: mild detergent |
Use a soft cloth or sponge. |
||
|
(select models) |
and warm water. |
Always wipe with the grain of the stainless steel. |
||
|
|
|
|
Moderate soil: Bon Ami*. |
Do not use chlorine bleach or a cleaning product that |
|
|
|
|
Discolorations: Cameo |
contains chlorine bleach. |
|
|
|
|
Stainless Steel Cleaner*. |
After cleaning, rinse and dry. To retore luster and remove |
|
|
|
|
|
streaks follow with Stainless Steel Magic Spray* (Part No. |
|
|
|
|
|
20000008). |
|
Stainless look exterior |
Wash with a clean, soft cloth or |
Do not use abrasive or harsh cleaners, or cleaners |
||
|
finish |
sponge and a mild detergent in |
designed for Stainless Steel. Dry thoroughly with a soft |
||
|
|
|
|
warm water. |
cloth. |
|
|
|
|
|
|
|
REFRIGERATOR AND |
|
|
||
|
FREEZER INTERIOR |
|
|
||
|
Door gasket |
|
Baking soda and warm water. |
Use 1-2 tablespoons baking soda per quart of water. Be |
|
|
|
|
|
Mild detergent and warm water. |
sure to wring out excess water from sponge or cloth |
|
|
|
|
|
when cleaning around controls, lights, or electrical parts. |
|
Glass shelves |
Mild detergent and warm water. |
Allow the glass to warm up to room temperature |
||
|
|
|
|
Glass cleaner. |
before immersing in warm water. Never use hot |
|
|
|
|
Mild liquid sprays. |
water. |
|
Interior and door liner |
Mild detergent and warm water. |
See above for baking soda solution. |
||
|
|
|
|
Baking soda and warm water. |
Do not use abrasive cleaners, concentrated detergents, |
|
|
|
|
|
bleaches, cleaning waxes, solvents or polish cleaners to |
|
|
|
|
|
clean the refrigerator interior. |
|
Drawers, bins, |
Mild detergent and warm water. |
Dry thoroughly. |
||
|
shelves, etc. |
|
Do not wash in automatic dishwasher. |
||
|
|
|
|
|
|
15 * Brand names are the trademarks of the respective manufacturer
 Troubleshooting
Normal Operating Sounds
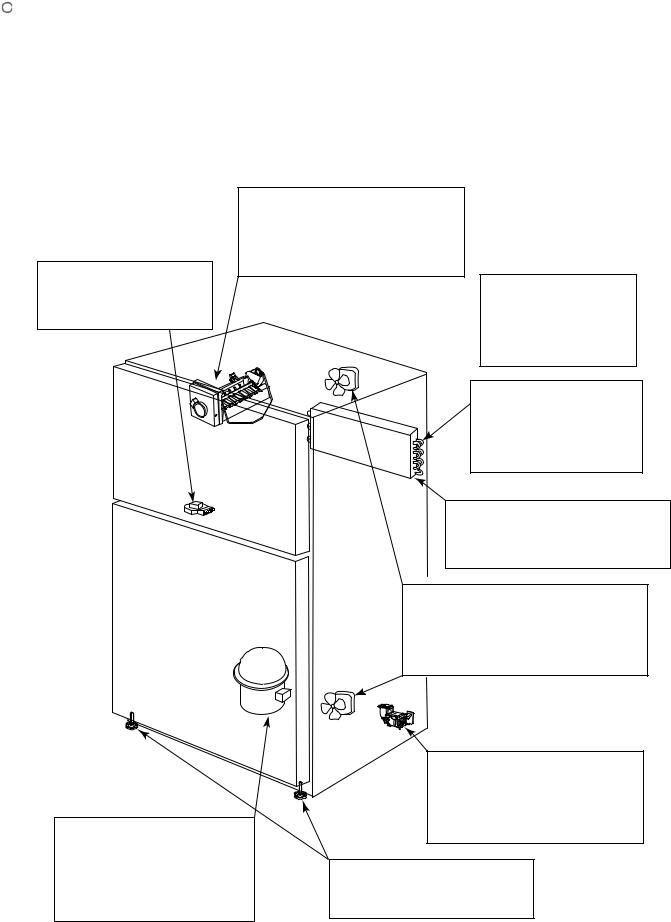
Improvements in refrigeration design may produce sounds in your new refrigerator that are different or were not present in an older model. These improvements were made to create a refrigerator that is better at preserving food, is more energy efficient, and is quieter overall. Because new units run quieter, sounds may be detected that were present in older units, but were masked by higher sound levels. Many of these sounds are normal. Please note that the surfaces adjacent to a refrigerator, such as hard walls, floors and cabinetry may make these sounds seem even louder. The following are some of the normal sounds that may be noticed in a new refrigerator.
|
ICE MAKER: (if equipped) The ice maker |
|
|
will occasionally generate a rattling sound |
|
|
when the ice cubes are ready to drop down |
|
|
into the ice bin. Also, the motor that ejects |
|
|
the ice from its tray prior to dropping the |
|
|
ice may also be detectable. These are |
|
DEFROST TIMER: Frost-free |
normal sounds necessary for making ice. |
|
refrigerators have a defrost timer |
DEFROST HEATER: During |
|
that will generate a clicking |
the automatic defrost cycle, a |
|
sound when it cycles the unit |
sizzling sound may be heard |
|
into and out of defrost cycle. |
as water droplets come into |
|
|
contact |
with the defrost |
|
heater. This is a normal |
|
|
sound heard during defrost. |
|
|
FREEZER |
COMPARTMENT |
|
CONTRACTION AND EXPAN- |
|
|
SION: A popping sound may |
|
|
occur in the freezer when the |
|
|
unit starts up due to contraction |
|
|
or expansion of the materials in |
|
|
the freezer area. |
|
|
REFRIGERANT FLOW: The flow of the |
|
|
refrigerant in your refrigerator may cause a |
|
|
gurgling or rattling sound when the unit is |
|
|
running or just after the unit cycles off. The |
|
|
refrigerant is still flowing in the tubing. |
|
|
AIRFLOW SOUNDS: Both the freezer |
|
|
evaporator fan and the condenser fan at the |
|
|
bottom of the cabinet will create airflow |
|
|
sounds. The evaporator fan is circulating the |
|
|
cold air throughout the refrigerator and freezer |
|
|
compartments. The condenser fan is removing |
|
|
the heat generated when the unit is cooled. |
|
|
WATER VALVE (if equipped): A buzzing |
||
|
sound may be detected in the back of |
||
|
the unit when the ice dispenser calls for |
||
|
the water valve to open to fill the ice |
||
|
maker tray. Following the ejection of the |
||
COMPRESSOR: In order for a new |
ice, there may be some water dripping |
||
sounds when the trays are being filled. |
|||
refrigerator to run more efficiently, |
|||
|
|
||
the refrigeration system may run |
|
|
|
longer to keep food at the desired |
CABINET LEVELING: |
An unlevel |
|
temperatures for freshness. That |
|||
cabinet may cause rattling or vibrating |
|||
new, high efficiency compressor may |
|||
noises. This can be fixed by adjusting |
|||
run longer and generate sounds such |
|||
the wheels or levelers properly. |
|||
as a higher pitched hum or pulsation. |
|||
|
|
||
16

 Troubleshooting
Review this chart of troubleshooting tips first…you may not need to call for service at all.
<![endif]>GENERAL OPERATION
<![if ! IE]><![endif]>TEMPERATURE NOISE
PROBLEM |
POSSIBLE CAUSES |
WHAT TO DO |
|
Won’t run |
Power cord not plugged in. |
Push plug into outlet. |
|
|
|
|
|
|
No power to outlet. |
Replace fuse, reset circuit breaker. |
|
|
|
|
|
|
Fresh food control set to “OFF” position. |
Set fresh food control (see page 7). |
|
|
|
|
|
|
Refrigerator is in automatic defrost. |
Wait 25 minutes for defrost cycle to end. |
|
|
|
|
|
|
Room temperature less than 55° F |
Relocate unit to proper climate (see Installation on |
|
|
(13° C). |
page 3). |
|
|
|
|
|
Runs too long, |
Today’s refrigerators start and stop more |
|
|
too frequently |
often to maintain even temperatures. |
|
|
|
|
|
|
|
Normal at startup for new or recently |
Wait 24 hours for refrigerator to completely cool down |
|
|
installed units. |
(see Temperature Controls on page 7). |
|
|
|
|
|
|
Prolonged or frequent door openings. |
This is normal. Minimize door openings. |
|
|
|
|
|
|
Door not sealing. |
Check to see if something is preventing door from closing. |
|
|
|
|
|
|
Front base grille blocked. |
Unblock to allow warm air to exit unit. |
|
|
|
|
|
Light not working |
Bulb burned out. |
Unplug refrigerator and change bulb (see page 14). |
|
|
|
|
|
|
No power to unit. |
Check to see if power cord is completely plugged in |
|
|
|
properly. |
|
|
|
|
|
Visible glow in |
Appearance of a red glow or reflection |
|
|
freezer vents |
is normal during the defrost cycle. |
|
|
|
|
|
|
Warm air from |
This is normal air flow for condenser |
|
|
cabinet bottom |
circulation. |
|
|
|
|
|
|
Cabinet vibrates |
Cabinet not level. Weak floor. |
Level cabinet (see page 3). |
|
|
|
|
|
Odor in cabinet |
Odor producing foods not covered. |
Cover or wrap odorous foods tightly. Clean cabinet. |
|
|
|
|
|
Noise, sounds |
Normal noise. |
See Normal Operating Sounds (page 16). |
|
and vibrations |
|
|
|
Cabinet not level. |
Level cabinet (see page 3). |
||
|
|||
|
|
|
|
Freezer, refrigerator |
Control set too warm. |
Adjust temperature control (see page 7). |
|
too warm |
Prolonged door openings. |
Minimize door openings. |
|
|
|
|
|
|
Room temperature less than 55° F |
Unit will not run often enough to maintain proper |
|
|
(13° C). |
temperatures. |
|
|
|
|
|
|
Products with high sugar content may |
|
|
|
not harden completely when frozen. |
|
|
|
|
|
|
Freezer, refrigerator |
Control set too cold. |
Adjust temperature control (see page 7). |
|
too cold |
|
|
|
|
|
|
17

 Troubleshooting
<![endif]>ICE
<![if ! IE]><![endif]>MOISTURE
PROBLEM |
POSSIBLE CAUSES |
WHAT TO DO |
|
Automatic icemaker |
Sensor arm in up position. |
Adjust sensor arm down to “ON” position. |
|
not working |
|
|
|
Cabinet not level. |
Level unit (see page 3). |
||
|
|||
|
|
|
|
|
Water supply not connected or |
Connect water supply, or clear obstructions. |
|
|
restricted. |
|
|
|
|
|
|
|
Freezer too warm. |
Adjust freezer temperature control (see page 7). |
|
|
|
|
|
Ice cubes have |
Old cubes. |
Discard; ice cubes may absorb odors which affect |
|
odor/taste |
|
taste. |
|
|
|
|
|
|
Bad water quality. |
Contact local water treatment company. |
|
|
|
|
|
|
Food transmitted odor/taste to ice. |
Wrap foods tightly. |
|
|
|
|
|
Ice cubes |
Residue from minerals in the water. |
Wipe trays with vinegar-soaked cloth until clean. |
|
sticking in tray |
|
|
|
|
|
|
|
Ice cubes |
Limited use of ice. |
Dump old ice cubes. |
|
evaporating |
|
|
|
|
|
|
|
Moisture on |
Not unusual during periods of high |
|
|
cabinet surface |
humidity. |
|
|
between doors |
|
|
|
|
|
|
|
Moisture on inside |
Hot humid weather. |
Normal. |
|
cabinet walls |
|
|
|
Frequent or prolonged door openings. |
Minimize door openings. |
||
or in crisper |
|||
|
|
||
|
Door not closed properly. |
Check to see if something is preventing door from |
|
|
|
closing. |
|
|
|
|
|
|
Food not wrapped properly. |
Wrap or cover all foods tightly. |
|
|
|
|
|
Foods dry out |
Crisper not tightly closed. |
Close crisper all the way. |
|
|
|
|
|
|
Temperature controls set too cold. |
Adjust temperature controls (see page 7). |
|
|
|
|
|
|
Packages not wrapped or sealed |
Wrap or cover all foods tightly. |
|
|
properly. |
|
|
|
|
|
|
Excessive moisture |
Hot, humid weather. |
Minimize door openings. |
|
in crisper |
|
|
|
Humidity slide on crisper needs |
Slide control to “Fruit” setting to allow more moisture |
||
|
|||
|
adjustment. |
to leave the drawer. |
|
|
|
|
|
|
Too much moisture on fresh produce |
Do not wash items prior to storage. Wait to wash |
|
|
before storing. |
fresh items until right before use. |
|
|
|
|
|
|
Foods not stored properly. |
Store leafy vegetables in a loosely closed plastic bag. |
|
|
|
Store items with an outer skin (i.e. apples, oranges, |
|
|
|
pears, grapes, cucumbers, etc.) in a vented bag or |
|
|
|
unwrapped in the drawer. |
|
|
|
Store mushrooms and berries in original vented |
|
|
|
cartons or boxes, not in plastic bags. |
|
|
|
|
18

 Warranty & Service
Warranty
Limited One Year Warranty - Parts and Labor
For one (1) year from the original retail purchase date, any part which fails in normal home use will be repaired or replaced free of charge.
Canadian Residents
The above warranties only cover an appliance installed in Canada that has been certified or listed by appropriate test agencies for a compliance to a National Standard of Canada unless the appliance was brought into Canada due to transfer of residence from the United States to Canada.
The specific warranties expressed above are the ONLY warranties provided by the manufacturer. These warranties give you specific legal rights, and you may also have other rights which vary from state to state.
CUSTOMER’S SOLE AND EXCLUSIVE REMEDY UNDER THIS LIMITED WARRANTY SHALL BE PRODUCT REPAIR AS PROVIDED HEREIN. IMPLIED WARRANTIES, INCLUDING WARRANTIES OF MERCHANTABILITY OR FITNESS FOR A PARTICULAR PURPOSE, ARE LIMITED TO ONE YEAR OR THE SHORTEST PERIOD ALLOWED BY LAW. MAYTAG CORPORATION SHALL NOT BE LIABLE FOR INCIDENTAL OR CONSEQUENTIAL DAMAGES. SOME STATES AND PROVINCES DO NOT ALLOW THE EXCLUSION OR LIMITATION OF INCIDENTAL OR CONSEQUENTIAL DAMAGES, OR LIMITATIONS ON THE DURATION OF IMPLIED WARRANTIES OF MERCHANTABILITY OR FITNESS, SO THESE EXCLUSIONS OR LIMITATIONS MAY NOT APPLY TO YOU. THIS WARRANTY GIVES YOU SPECIFIC LEGAL RIGHTS AND YOU MAY ALSO HAVE OTHER RIGHTS, WHICH VARY STATE TO STATE OR PROVINCE TO PROVINCE.
What is Not Covered By These Warranties
1.Conditions and damages resulting from any of the following:
a.Improper installation, delivery, or maintenance.
b.Any repair, modification, alteration, or adjustment not authorized by the manufacturer or an authorized servicer.
c.Misuse, abuse, accidents, unreasonable use, or acts of God.
d.Incorrect electric current, voltage, electrical and/or gas supply.
e.Improper setting of any control.
2.Warranties are void if the original serial numbers have been removed, altered, or cannot be readily determined.
3.Light bulbs, water filters and air filters.
4.Products purchased for commercial or industrial use.
5.The cost of service or service call to:
a.Correct installation errors. For products requiring ventilation, rigid metal ducting must be used.
b.Instruct the user on the proper use of the product.
c.Transport the appliance to and from the servicer.
6.Any food loss due to refrigerator or freezer product failures.
7.Expenses for travel and transportation for product service in remote locations.
8.Outside of the United States and Canada this warranty does not apply. Contact your dealer to determine if another warranty applies.
9.Consequential or incidental damages sustained by any person as a result of any breach of these warranties. Some states do not allow the exclusion or limitation of consequential or incidental damages, so the above exclusion may not apply.
If You Need Service
First see the Troubleshooting section in your Use and Care Guide or call the dealer from whom your appliance was purchased or call Maytag Services, LLC, Customer Assistance at 1-800-688-9900 USA and 1-800-688-2002 Canada to locate an authorized servicer.
•Be sure to retain proof of purchase to verify warranty status. Refer to WARRANTY for further information on owner’s responsibilities for warranty service.
•If the dealer or service company cannot resolve the problem, write to Maytag Services, LLC, Attn: CAIR® Center, P.O. Box 2370, Cleveland, TN 37320-2370, or call
1-800-688-9900 USA and 1-800-688-2002 Canada. U.S. customers using TTY for deaf, hearing impaired or speech impaired, call 1-800-688-2080.
•User’s guides, service manuals and parts information are available from Maytag Services, LLC, Customer Assistance.
Notes: When writing or calling about a service problem, please include:
a.Your name, address and telephone number;
b.Model number and serial number;
c.Name and address of your dealer or servicer;
d.A clear description of the problem you are having;
e.Proof of purchase (sales receipt).
19
 Loading...