


Bottom
Freezer
Refrigerator
Owner's
Manual
English ................................................................... |
2 |
Keep these instructions for future reference. Be sure this |
Español................................................................ |
21 |
manual stays with refrigerator. |
Français............................................................... |
41 |
|
Contents
Electrical Requirements ..................................................... |
2 |
Model Identification ............................................................ |
2 |
Service ............................................................................... |
2 |
Asure™ Extended Service Plan ......................................... |
2 |
Proper Disposal of your Refrigerator ................................. |
3 |
Cutout Dimensions ............................................................. |
3 |
Installation Instructions ....................................................... |
3 |
Door Reversal (Contour door models) ........................ |
3 |
Door Reversal (Front-mounted handle) ...................... |
3 |
Door Reversal (Side-mounted handle) ....................... |
5 |
Install Decorator Panels .............................................. |
7 |
Connect Ice Maker Water Supply Line |
|
(some models) ............................................................ |
8 |
Leveling Refrigerator .................................................. |
9 |
Installation Checklist ........................................................ |
10 |
Controls ............................................................................ |
11 |
Fresh Food and Deepfreeze® Controls ..................... |
11 |
Setting Controls ........................................................ |
11 |
Fresh Food Features ........................................................ |
11 |
Spillsaver™ Shelves ................................................. |
11 |
Deli Port™ ................................................................. |
11 |
Drawers ..................................................................... |
12 |
Covered Storage Bucket ........................................... |
12 |
Dairy Centers ............................................................ |
12 |
Door Buckets ............................................................. |
12 |
Door Shelf ................................................................. |
13 |
Adjustable Dividers ................................................... |
13 |
Tall Package Retainer ............................................... |
13 |
Deepfreeze® Features ...................................................... |
13 |
Automatic Ice Maker(some models) .......................... |
13 |
Ice Service Rack(some models) ............................... |
13 |
Slideout Shelf(some models) .................................... |
14 |
Vertical Shelf Divider(some models) ......................... |
14 |
Pivot Bin™ ................................................................ |
14 |
Care and Cleaning ........................................................... |
14 |
General ..................................................................... |
14 |
Odor Removal ........................................................... |
14 |
Adhesives ................................................................. |
15 |
Door Gaskets ............................................................ |
15 |
Condenser Coils ....................................................... |
15 |
Glass Shelves ........................................................... |
15 |
Light Bulbs ................................................................ |
15 |
Energy Tips ...................................................................... |
15 |
Vacation Tips .................................................................... |
16 |
Normal Operating Sounds ............................................... |
16 |
Before Calling For Service ............................................... |
17 |
Warranty ........................................................................... |
19 |
Note: Translation may sometimes cause variations in |
|
meaning. In all cases where meaning varies, the most |
|
accurate meaning will be the English version of this |
|
document. |
|
!Recognize this symbol as a safety precaution.
Electrical Requirements
!WARNING
To avoid electrical shock which could cause severe personal injury or death:
•Do not cut or remove grounding prong from plug.
•Do not use a two-prong adapter.
•Do not use an extension cord.
•Do not remove warning tag from power cord.
•Follow all grounding and connection instructions.
This refrigerator is equipped with a three-prong (grounding) plug for protection against possible 
 shock hazards. If a two-prong wall receptacle
 is encountered, contact a qualified electrician
  and have the two-prong wall receptacle
replaced with a properly grounded three-prong wall receptacle in accordance with the National Electrical Code.
Refrigerator is designed to operate on a separate 103 to 126 volt, 15 amp., 60 cycle line.
Model Identification
Thank you for purchasing this Amana® refrigerator. Please read this Owner's Manual thoroughly. This manual provides proper maintenance information. Any questions, call the Consumer Affairs Department at 1-800-843-0304 inside U.S.A. and 1-319-622-5511 outside U.S.A, or contact us on the internet at www.amana.com.
Complete registration card and promptly return. If registration card is missing, call the Consumer Affairs Department.
When contacting Amana Appliances, provide product information. Product information is on the serial plate, located on the ceiling of refrigerator section. Record the following information:
Model Number:
Manufacturing Number:
S/N or Serial Number:
Date of purchase:
Dealer’s name and address:
Service
Keep a copy of sales receipt for future reference or in case warranty service is required. Any questions or to locate an authorized servicer, call 1-800-NAT-LSVC (1- 800-628-5782) inside U.S.A. 319-622-5511 outside U.S.A., or contact us on the internet at www.amana.com.
Warranty service must be performed by an authorized servicer. Amana, also recommends contacting an authorized servicer if service is required after warranty expires.
Asure™ Extended Service Plan
Amana offers long-term service protection for this new refrigerator. Asure™ Extended Service Plan is specially designed to supplement Amana’s strong warranty. This plan covers parts, labor, and travel charges.
Call 1-800-528-2682, or contact us on the internet at www.amana.com for information.
For more information visit our web site:
www.amana.com
2
!DANGER
Proper Disposal of your
Refrigerator
IMPORTANT: Child entrapment and suffocation are not problems of the past. Junked or abandoned refrigerators are still dangerous—even if they sit for "just a few days". If you are getting rid of your old refrigerator, please follow the instructions below to help prevent accidents.
BEFORE YOU THROW AWAY YOUR OLD REFRIGERATOR OR FREEZER:
•Take off the doors.
•Leave the shelves in place so children may not easily climb inside.
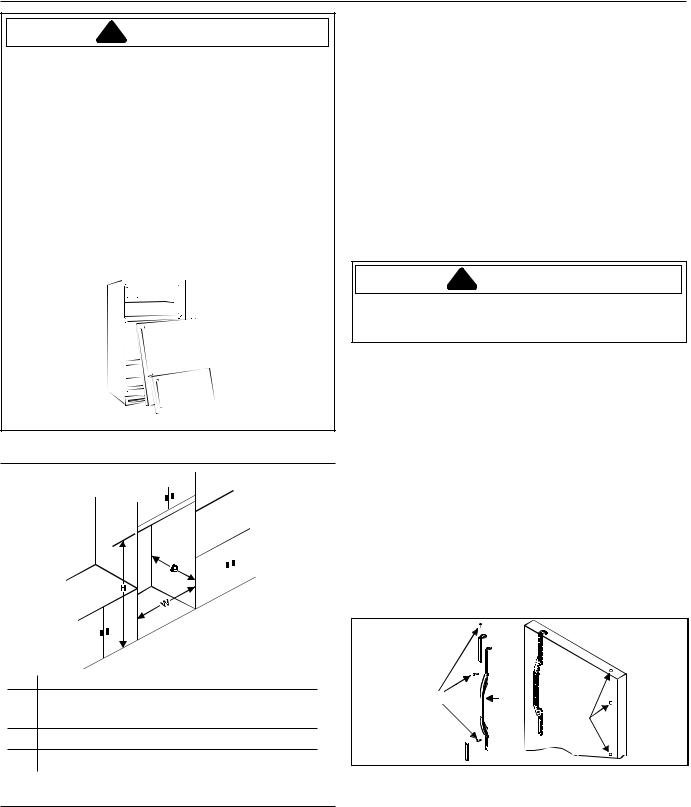
Cutout Dimensions
Single Installation
H• 69" with 12" deep cabinets above refrigerator.
• 70" with 24" deep cabinets above refrigerator.
W 36"
D 24"
Installation Instructions
Proper installation will ensure that this refrigerator operates most efficiently. Amana cannot be responsible for improper installation.
Service Notice: Contour Door Models Only
Only a qualified servicer can reverse this door. To have doors reversed, please call 1-800-843-0304. There is a fee charged for this service.
Tools Required |
|
|||
5/ |
16 |
" hex nut driver |
Phillips screwdriver |
|
3/ |
|
Blade screwdriver |
||
8 |
" hex nut driver |
|||
1/4 |
" hex nut driver |
|
||
Putty knife (blade covered by masking tape)
IMPORTANT:
•Save all screws for reuse.
•For plug removal requiring use of flat blade screwdriver or putty knife, blade of tool must be covered with masking tape to avoid damage to refrigerator finish. For plugs using a screwdriver or nut driver style head, use appropriate tool to avoid damage to plugs.
!CAUTION
To avoid personal injury or property damage caused by refrigerator tipping, stabilizing leg must be firmly against floor.
Door Reversal (Contour door model)
Only a qualified servicer can reverse this door. To have doors reversed, please call 1-800-843-0304. There is a fee charged for this service.
Door Reversal (Front mounted handle)
Some installations may require door reversal to achieve full door swing. To reverse door swing direction perform the following steps.
1.Remove refrigerator handle.
•Remove handle screw from top handle trim. Pry up edge of handle trim using a putty knife with the blade covered with masking tape. Remove handle from door by removing 1 remaining mounting screw at each end of handle.
•Remove 1 plug from top hinge side of door and 2 from front hinge side of door. Transfer plugs to opposite side of door to fill empty mounting holes.
|
|
|
A |
|
|
|
|
A |
|
|
C |
C |
B |
|
|
|
|
D |
|
|
|
|
|
|
|
|
A |
|
|
|
|
A |
|
|
A |
Handle trim |
|
C |
Screws |
B |
Handle |
|
D |
Plugs |
2.Remove freezer door handle.
•Open freezer door 90°. Locate two notches on back of freezer handle. Insert flat screwdriver blade or putty knife blade wrapped in masking tape. Pry up back edge of handle cap and remove from handle.
•Remove handle from door by removing two mounting screws.
3
• Remove 2 plugs from hinge side of freezer door and transfer to opposite side to fill holes left from handle removal.
 B
B
 C
C
D
A
A |
Handle |
C |
Screws |
B |
Handle cap |
D |
Plug |
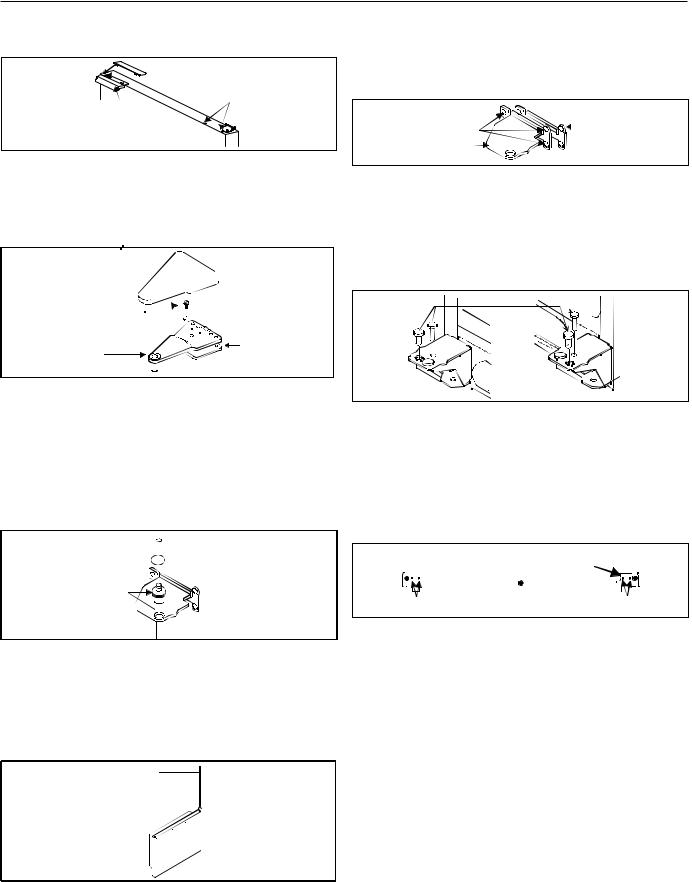
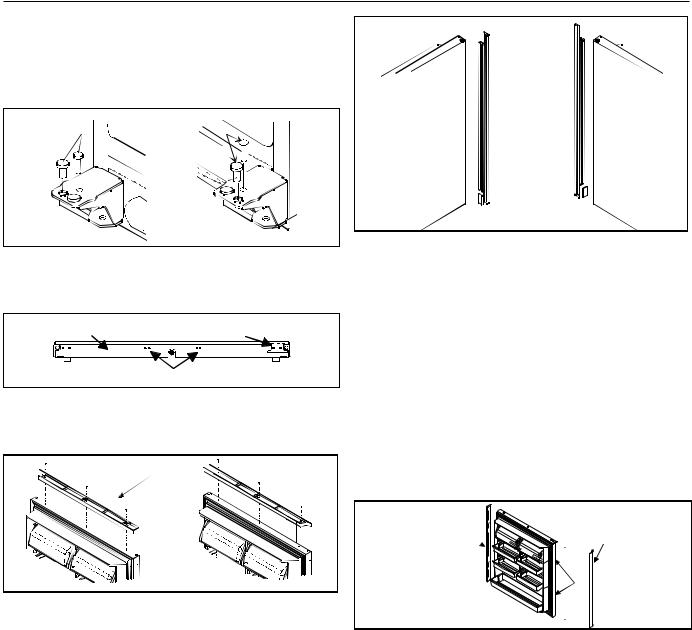
3.Remove doors.
•Remove top hinge cover. Top hinge cover snaps off.
Remove top hinge and hinge shim using 5/16” hex nut driver. Remove and retain all shims.
A

B 


|
C |
|
D |
|
|
|
|
A |
Top hinge cover |
C |
Top hinge |
B |
5/16" hex nut screws |
D |
Hinge shim |
•Remove refrigerator door by lifting door off door closure on center hinge pin assembly. Inspect door to verify all shims are with pin assembly.
•Remove and retain door closure from top of center hinge pin assembly. Remove assembly using ¼" hex nut driver. Due to tight fit of pin, firm pressure may need to be applied. Remove and retain all washer shims.
A


D

B
C


A |
Door closure |
C |
Center hinge |
B |
Center hinge pin assembly* |
D |
Washer shims |
* Hinge pin may come assembled or as separate parts
•Remove freezer door by lifting door off bottom hinge. An internal support rod may slide out of hinge socket. Remove from hinge socket and transfer rod to opposite side of freezer door.
A
A Support rod (some models)
4.Remove center hinge.
•Remove center hinge bracket and shims by removing screws using a Phillips screwdriver.
•Remove 3 screws opposite of center hinge and transfer to opposite side of cabinet.
•Install bracket on left side of cabinet with shims.
|
A |
C |
|
B |
|
A |
Phillips screws |
C Center hinge shim |
B |
Center hinge |
|
5.Reverse lower hinge pin and closure.
•Move bottom hinge pin and door closure from bottom hinge to opposite bottom hinge. Move plastic blugs from bottm hinge to opposite hinge using needle-nose pliers. Pinch tabs from underside of hinge to remove.
A  B
B
A Left side |
B Right side |
6.Reverse door stops.
•Locate door stop at bottom edge of refrigerator door. Unscrew two Phillips screws to remove door stop. Remove the two Phillips screws on opposite edge of door. Mount door stop on opposite side. Replace remaining screws in empty mounting holes.
•Repeat the above instructions to reverse door stop on freezer door.
|
B |
A |
A |
A Screws |
B Door stop |
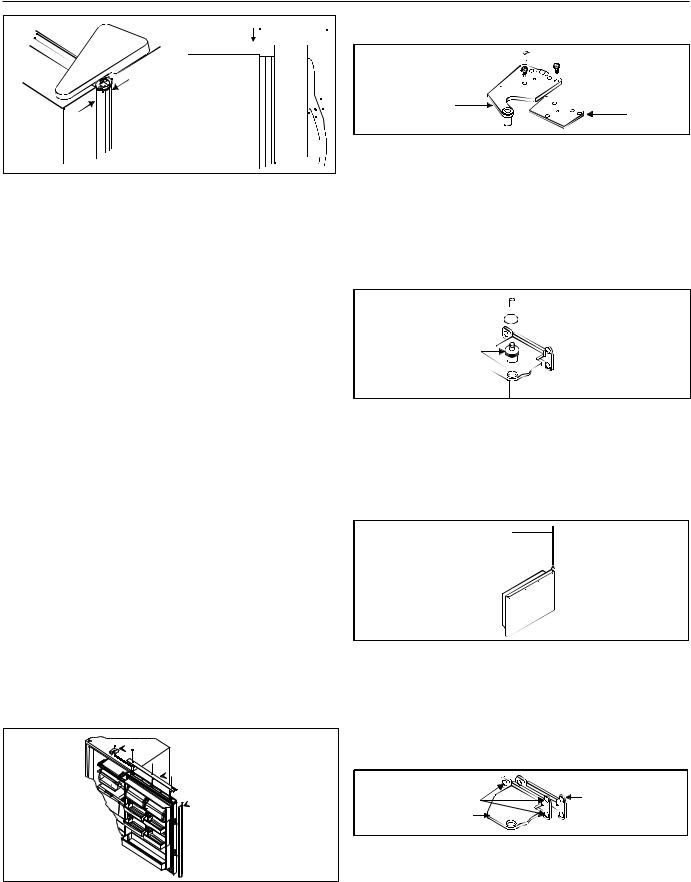
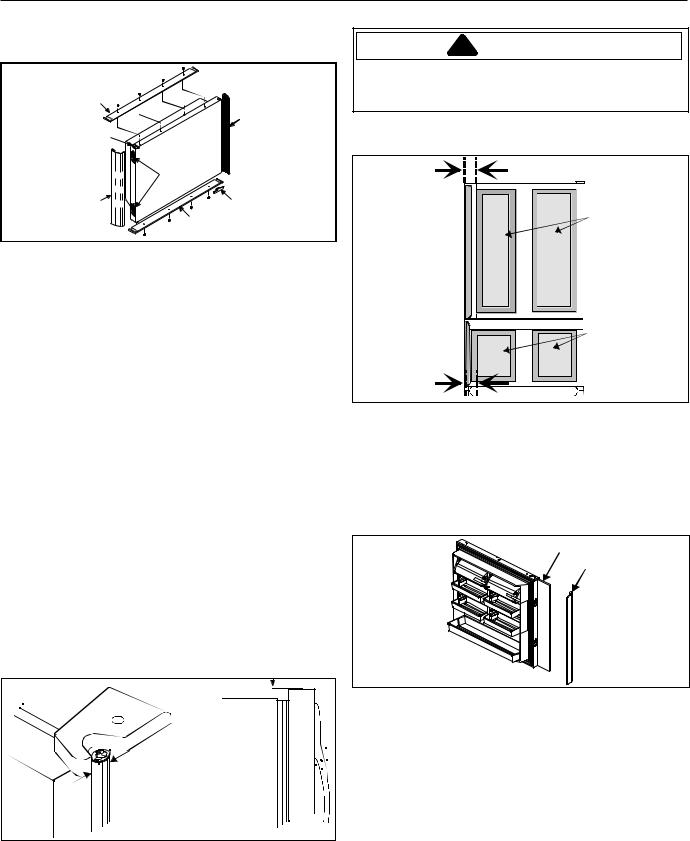
7.Replace doors.
•Rehang freezer door by setting left freezer door hinge hole on bottom left hinge pin.
Install center hinge pin in center hinge bracket with hex nut driver. Place center hinge door closure on center hinge pin.
•Locate 3 plugs at top of cabinet. Transfer plugs to holes left by hinge removal.
•Replace top hinge on opposite side of refrigerator
cabinet by installing rear screws loosely with a 5/16" hex nut driver. Set refrigerator door on center hinge door closure. Install remaining screw and tighten all screws. Snap on hinge cover.
•Use a dime to space door 11/16" (18 mm) from cabinet. Use plastic shims behind center hinge to provide more space if required.
•Handle side of door should be approximately 1/8" (3 mm) higher than hinge side of door. Door will become level when it is loaded with food.
4
1/8" 
 (3 mm)
11/16" (18 mm)
8.Reinstall handles.
•Mount refrigerator handle on opposite side of door using mounting screws removed in previous step.
•Snap handle trim into place and replace screw.
•Mount freezer handle to opposite side of door using mounting screws removed in previous step.
•Angle front edge of handle cap downward toward back lip of freezer handle. Verify bottom tab on freezer cap slides under rear lip of freezer handle. Snap rear edge of handle cap in place.
9.Check unit for proper leveling following instructions in section titled Leveling Refrigerator, starting with step three.
Door Reversal (Side mounted handles)*
*Non contour doors only
Tools Required
#1 & #2 Phillips Head Screw Driver Flat blade screwdriver
Rubber mallet ¼” hex nut driver
3/8” hex nut driver
5/16” hex nut driver
9/32” hex nut driver T-15 Torx head driver
IMPORTANT:
•Keep all discarded parts with literature assembly.
•Save all screws for reuse.
•For plug removal requiring use of flat blade screwdriver or putty knife, blade of tool must be covered with masking tape to avoid damage to refrigerator
finish. For plugs using a screwdriver or nut driver style head, use appropriate tool to avoid damage to plugs.
1.Remove top refrigerator door cap and hinge cover.
•Remove 3 Phillips screws to release top door cap.
•Remove hinge cover by unscrewing one Phillips screw.
 A
A
 B
B
C
A |
Hinge cover |
C Handle |
B |
Top door cap |
|
•Use 5/16" hex nut driver to remove top hinge screws. Remove and retain all shims.
A

B |
C |
|
|
A 5/16" hex nut screws |
C Top hinge shim |
BTop hinge
•Remove refrigerator door by lifting door off door closure on center hinge pin assembly. Inspect door to verify all shims are with pin assembly.
•Remove and retain door closure from top of center hinge pin assembly. Remove assembly using ¼" hex nut driver. Due to tight fit of pin, firm pressure may need to be applied. Remove and retain all washer shims.
A


D

B
C


A |
Door closure |
C |
Center hinge |
B |
Center hinge pin assembly* |
D |
Washer shims |
* Hinge pin may come assembled or as separate parts
•Remove freezer door by lifting door off bottom hinge. An internal support rod may slide out of hinge socket. Remove from hinge socket and transfer rod to opposite side of freezer door.
A
A Support rod (some models)
2.Remove center hinge.
•Remove center hinge bracket and shims by removing screws using a Phillips screwdriver.
•Remove 3 screws opposite of center hinge and transfer to opposite side of cabinet.
•Install bracket on opposite side of cabinet with shims.
|
A |
C |
|
B |
|
A |
Phillips screws |
C Center hinge shim |
B |
Center hinge |
|
5
3.Reverse lower hinge pin and closure.
•Move bottom hinge pin and door closure from right bottom hinge to left bottom hinge. Move plastic plugs from left bottom hinge to right bottom hinge using needle nose pliers. Pinch tabs from underside of hinge to remove.
A
B 


A Left side |
B Right side |
4.Remove door stops and reverse door extensions.
•Locate door stop and bottom of refrigerator door and freezer door. Remove with Phillips screwdriver.
A |
C |
|
B |
A Bottom door cap |
C Door stop |
BScrews
•Unscrew door extension on top of door with Phillips screw driver. Flip door extension and reinstall.
A 

 C
C 


B
A |
Before |
B After |
C |
Door extension |
|
5.Reverse handles.
•Remove bottom door cap with Phillips screwdriver.
•Using a soft rubber mallet, tap bottom of handle upward toward top of door. Handle will slide up approximately ¾" and release from door.
•Using a soft rubber mallet, tap bottom of door hinge trim upward toward top of door. Trim will slide up approximately ¾" and release from door.
•Turn trim 180° and remove plastic tab on top of trim. Return tab to literatature assembly. Locate alternate tab piece in literature assembly and place this in notch at bottom end of trim.
Right mounted handle
Left mounted handle
•Replace bottom door cap and transfer door stop to opposite side.
•Locate underside of new hinge side of door. Replace door stop with Phillips screws.
•Install hinge trim* by locating notches on the inside of trim(make sure plastic tab insert is facing bottom of door). Align notches of trim with metal mounting tabs on opposite side of door. Slide trim down until piece locks into place. Tap top of trim with rubber mallet to insure snug fit.
*In stainless steel models, replace trim with alternate trim shipped with unit.
•Reinstall handle by locating notches on inside of handle trim. Slide handle down until handle locks into place. Tap top of handle with rubber mallet to insure snug fit. End of trim should be flush with top of door.
A
 B
B
C
A Trim |
C Mounting tabs |
BRefrigerator handle
•Fasten top door cap securely over top of door and replace screws.
•Remove top door cap of freezer by removing 4 T-15 Torx screws from top of freezer door
•Verify that internal support rod has been moved to new hinge side of door.
•Move hinge plug on top of door to new handle side of door.
•To reverse freezer handle and trim, follow step 5.
6
Note: Trim is not rotated 180°. Freezer trim does not have plastic tab or alternate trim for stainless steel models.
|
A |
|
|
|
|
|
G |
|
B |
|
|
|
|
D |
|
|
C |
E |
F |
|
|
|
|
A |
Top door cap |
E |
Bottom door cap |
B |
Freezer hinge plug |
F |
Door stop |
C |
Handle |
G |
Trim |
DMounting tabs
•Replace top door cap with Torx-head driver.
6.Replace doors.
•Rehang freezer door by setting freezer door hinge hole on bottom hinge pin.
•Install center hinge pin in center hinge bracket with hex nut driver. Place center hinge door closure on center hinge pin.
•Locate 3 plugs at top of cabinet. Transfer plugs to holes left by hinge removal.
•Locate new top hinge found in literature assembly. Install top hinge on opposite side of refrigerator cabinet with shims from discarded hinge. Install rear
screws loosely with a 5/16" hex nut driver. Set refrigerator door on center hinge door closure. Install remaining screw and secure in place with Phillips driver. Install new hinge cover and screw in place with screw from previous hinge cover removal
•Use a dime to space door 11/16" (18 mm) from cabinet. Use plastic shims behind center hinge to provide more space if required.
•Handle side of door should be approximately 1/8" (3 mm) higher than hinge side of door. Door will
become level when it is loaded with food.
1/8"
(3 mm)
11/16" (18 mm)
Install Decorator Panels (some models)
!WARNING
To avoid personal injury or property damage, fresh food panel should not weigh more than 30 lbs (14 kgs) and freezer panel should not weigh more than 15 lbs (7 kgs).
If raised panels are used, allow 2½" minimum clearance between raised edge of panel and refrigertor handle.
A
B
C
A
A2½" clearance from raised panel edge to edge of door.
BRaised panel–41" x 35 5/8" (104 cm x 90.5 cm)
CRaise panel–23 11/16" x 35 5/8" (60.2 cm x 90.5 cm)
1.Remove top door cap and handle of refrigerator door. Slide panel into groove provided by bottom door cap. When replacing handle, press panel flat against door and slide handle down so that overlapping edge of handle slides over panel to secure it. Replace door cap.
A
B
A Refrigerator door panel |
B Refrigerator handle |
2.Open door 90° and unscrew freezer top door cap. Close door. Slide trim forward until free from door. Open door. Remove door handle per step 5.
7.Check unit for proper leveling following instructions in section titled Leveling Refrigerator, starting with step three.
7
3.Slide panel into groove provided by bottom door cap. When replacing handle, press panel flat against door and slide handle down so that overlapping edge of handle slides over panel to secure it. Replace door cap and screws.
loop. A service loop will allow refrigerator to be pulled away from the wall without disconnecting tubing.
Procedure
1.Remove plastic cap from water valve inlet port.
A 
 B
B
|
|
|
E |
|
B |
C |
D |
|
|
|
|
A |
Top door cap |
D |
Bottom door cap |
B |
Handle |
E |
Trim |
C |
Panel |
|
|
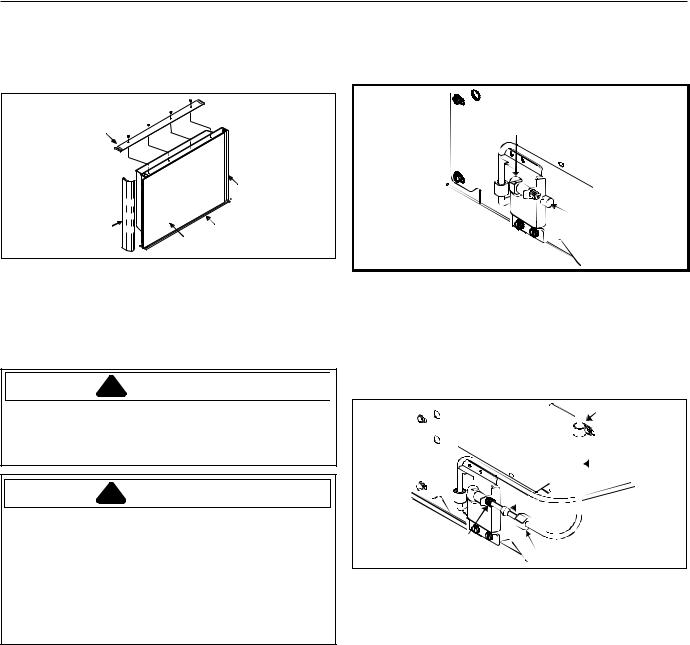
4.Review Installation Checklist.
Connect Ice Maker Water Supply Line
(some models)
!WARNING
To avoid electrical shock which can cause severe personal injury or death, disconnect power to refrigerator before connecting water supply. After connecting water supply, connect power.
!CAUTION
Observe the following to avoid property damage:
•Make sure water pressure to water valve is between 20 and 100 pounds per square inch.
•Tighten adapter fitting and nuts with pliers and wrenches. Do not overtighten.
•Check for water leaks and correct if necessary before returning refrigerator to normal location. After 24 hours check again for leaks.
Important
•Before connecting water supply, contact a plumber to connect copper tubing to household plumbing in compliance with local codes and ordinances.
•Amana does not recommend using a self-piercing, or
3/16" saddle valves! Both reduce water flow, become plugged with sediment over time and may cause leaks if repair is attempted. The correct type of shut-off valve
requires a 1/4" hole to be drilled in the water supply pipe prior to valve attachment. Amana is not responsible for property damage caused by improper water connection.
Materials Required
1/4" O.D. (6 mm) flexible copper tubing is required. Length of copper tubing must reach from water supply connection to water valve inlet port on back of refrigerator, plus additional 8'(2 m) of tubing for a service
A
A Plastic cap |
B Water valve inlet |
|
port |
2.Place brass nut and brass sleeve on copper tubing. (Brass nut and sleeve are found in your literature packet.) Insert copper tubing into water valve inlet port. Connect brass nut on copper tubing to water valve inlet port. Make sure copper tubing is secure by pulling on copper tubing.
|
|
|
|
|
|
|
|
|
|
|
|
|
|
|
|
|
|
|
|
|
|
|
|
|
|
A |
|
|
|
|
|
|
|
|
|
|
|
|
|
|
|
|
|
|
|
|
|
|
|
|
|
|
|
|
|
|
|
|
|
|
|
|
|
|
|
|
|
|
|
|
|
|
|
|
|
|
|
|
|
|
|
|
|
|
|
|
|
|
|
|
|
|
|
|
|
|
|
|
|
|
|
|
|
|
|
|
B |
|
|
|
|
|
|
|
|
|
|
|
|
|
|
|
|
|
|
|
|
|
|
|
|
|
|
|
|
|
|
|
|
|
|
|
|
|
|
|
|
|
|
|
|
|
|
|
|
|
|
|
|
|
|
|
|
|
|
|
|
|
|
|
|
|
|
|
|
|
|
|
|
|
|
|
|
|
|
|
|
|
|
|
|
|
|
|
|
|
|
|
|
|
|
|
|
|
|
|
|
|
|
|
|
|
|
|
|
|
|
|
|
|
|
|
|
|
|
|
|
|
|
|
|
|
|
|
|
|
|
|
|
|||
|
|
|
|
|
|
|
|
|
|
|
|
|
|
|
|
|
|
|
|
|
|
|
|
|
|
|
|
|
|
|
|
|
|
|
|
|
|
|
|
|
|
|
|
|
|
|
|
|
|
|
|
|
|
|
|
|
|
|
|
|
|
E |
|
|
|
|
|
|
C |
|
|
|
|
|
|
|||||
|
|
|
|
|
|
|
|
|
|
|
|
|
|
|
|
|
|
|
||||||||
|
|
|
|
|
|
|
|
|
|
|
|
|
|
|
|
|
|
|
|
|
|
|
|
|
|
|
|
|
|
|
|
|
|
|
|
|
|
|
|
|
|
|
|
|
|
|
|
|
|
|
|
|
|
|
|
|
|
|
|
|
|
|
|
|
|
|
|
|
|
|
|
|||||||||
|
|
|
|
|
|
|
|
|
|
|
|
|
|
|
||||||||||||
|
|
|
|
|
|
|
|
|
|
|
|
|
|
|
|
|
|
D |
|
|
|
|
|
|
||
A |
"P" clamp |
|
|
|
|
|
|
|
|
|
|
|
D |
Brass nut |
||||||||||||
B |
Copper tubing |
|
|
|
|
|
|
|
|
|
|
|
E |
Water valve inlet |
||||||||||||
C |
Brass sleeve |
|
|
|
|
|
|
|
|
|
|
|
|
|
port |
|||||||||||
3.Turn on water supply to refrigerator and check for leaks. Correct any leaks at connection. Be careful not to overtighten connection.
4.Create a service loop using extreme care to avoid kinks. Secure copper tubing to refrigerator cabinet with a "P" clamp.
8
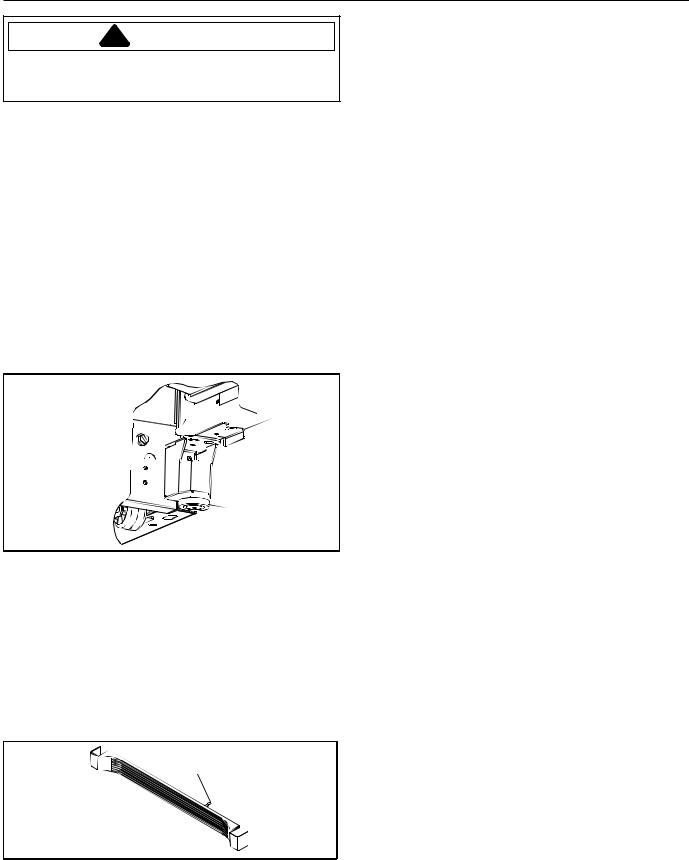
!CAUTION
To avoid property damage, protect soft vinyl or other flooring with cardboard, rugs, or other protective material when moving refrigerator.
Leveling Refrigerator
Some installation may require door reversal to achieve full door swing. If so proceed to Door Reversal section before leveling your refrigerator.
If your refrigerator requires ice maker water supply connection, proceed to Connect Ice Maker Water Supply section before leveling refrigerator.
1.Plug in power cord.
2.Move refrigerator into final location.
3.Level refrigerator using a level placed on top of the refrigerator.
•Remove toe grille by grasping both ends and pulling straight out from unit. Grille snaps free.
•The left and right corners of front cabinet base each contain 2 screws to allow individual adjustment of all four corners. Adjust the front and rear of each corner until leveling is complete.
A


B

|
|
C |
A |
Rear roller adjustment |
C Stabilizing leg* |
B |
Front roller adjustment |
*some models |
•Turn roller adjustment screws to the right to raise cabinet, or to the left to lower cabinet. Front of refrigerator must be ¼" (6 mm), or ½ bubble on your level, higher than the back of your refrigerator.
•After leveling, turn stabilizing leg (some models) to the right until firmly against floor.
•Locate metal clips mounted to inside of toe grille assembly. Hook bottom set of clips inside metal molding beneath freezer. Press forward on upper part of grille until top portion snaps into place.


 A
A
A Metal clips
9

Installation Checklist
This checklist is for personal records only.
Consumer Installer
Doors
Handles are solidly attached to doors.
Handle side of door is 1/8" (3 mm) higher than hinge side of door. (Door lowers when loaded with food.)
Doors seal completely to refrigerator cabinet.
Leveling
Refrigerator is tilted 1/4" (6 mm) from front to rear.
Stabilizing legs are against floor.
Toe grille is properly attached to refrigerator.
Ice Maker (some models)
Water supply to refrigerator is turned on.
Water leaks are not present at connection between household water supply and refrigerator. (After 24 hours, consumer should check connection for water leaks.)
Ice maker arm is down for ice production. (It may take up to 24 hours for first harvest of ice.)
Product Literature
Owner's manual is reviewed including the following information:
•product registration card
•Fresh Food and Deepfreeze®controls
•humidity controlled crisper drawer
•temperature controlled drawer
•normal operating sounds
Notes
Consumer's Signature |
Installer's Signature |
Installer's Company Name/Phone Number |
Date |
10

Controls
This refrigerator operates most efficiently in normal household temperatures of 55° to 110°F (13°C to 43°C).
Fresh Food and Deepfreeze® Controls
Fresh Food control is located on upper rear wall of Fresh Food section.
7 1
6 2
5 3
4
Spillsaver™ Shelves
Spillsaver™ shelves adjust to meet individual storage needs and hold simple spills for easier cleaning.
!CAUTION
To avoid personal injury or property damage, handle tempered glass shelves carefully. Shelves may break suddenly if nicked, scratched, or exposed to sudden temperature change.
•Remove shelves by lifting front, releasing hooks from metal track then pulling out.
•Replace shelves by inserting hooks into metal track and lowering front.
Deepfreeze® control is located on right front ceiling of Deepfreeze®section.
Deepfreeze Control
|
Cold |
|
|
4 |
|
|
Coldest |
|
|
|
|
|
|
|
|
|
|
When Deepfreeze®control is set to OFF, neither Fresh Food nor Deepfreeze® sections will cool. Initially, set both controls to 4. Wait 24 hours for Fresh Food and Deepfreeze®sections to reach desired temperatures. After 24 hours, adjust controls, one number at a time, as desired. 1 is warmest setting and 7 is coldest.
Setting Controls
Set controls precisely using a household thermometer that includes temperatures between -5° to 50°F
(-21° to 10°C).
Put thermometer snugly between frozen packages in Deepfreeze®section.Wait 5–8 hours. If Deepfreeze® temperature is not 0° to 2°F (-17° to -16°C), adjust control, one number at a time. Check again after 5–8 hours.
Put thermometer in a glass of water in middle of Fresh Food section. Wait 5–8 hours. If Fresh Food temperature is not 38° to 40°F (3° to 4°C), adjust control, one number at a time. Check again after 5–8 hours.
Fresh Food Features
!CAUTION
To avoid property damage, confirm shelf is secure before placing items on shelf.
EasyGlide™ shelves pull forward for easy access of items in back.
Deli Port™
Deli Port™ provides space saving storage underneath Spillsaver™ shelf and pulls forward for easy access.
•Remove shelf by pulling forward until shelf stops. Push tabs on sides of shelf in and pull shelf forward.
•Replace shelf by inserting shelf into track and sliding back.
A
A Tab
11
Drawers
Humidity Controlled Crisper Drawer
The right drawer is humidity controlled.This drawer keeps produce fresh longer.Wrap produce tightly. Do not wash produce before placing in drawer. Excess moisture could cause produce to spoil prematurely. Do not line drawer with paper towels. Paper towels will retain moisture. Humidity control is located below front shelf trim. Control adjusts humidity in drawer. Slide control to right for produce with leaves such as lettuce, spinach or cabbage. Slide control to left for produce with skins such as cauliflower, corn or tomatoes.
Temperature Controlled Drawer
The left drawer is temperature controlled.This drawer keeps food fresh longer and up to 5°F (3°C) colder than Fresh Food temperature. Use this drawer for deli storage or additional produce storage.
Temperature control is located below front shelf trim. Control adjusts amount of air circulating around drawer. Slide control left for normal Fresh Food temperature and right for colder temperature. Ice crystals may form on drawer or food on coldest setting. Cold air can decrease Fresh Food temperature. Fresh Food control may need to be adjusted.
Remove shelf and drawers by completing the following steps.
1.Open left* drawer.
*For doors hinged on left, open right drawer.
!CAUTION
To avoid personal injury or property damage, handle tempered glass shelves carefully. Shelves may break suddenly if nicked, scratched, or exposed to sudden temperature change.
2.Remove shelf by gently pushing up from underneath. Tilt one end up then pull out.
3.Remove left* drawer by lifting front while supporting underneath then pulling out.
*For doors hinged on left, remove right drawer.
4.Remove support post at recess in bottom center of Fresh Food section by lifting.
5.Remove other crisper by sliding to opposite wall. Lift front while supporting underneath then pull out.
6.Replace drawers and shelf by reversing steps 1–5.
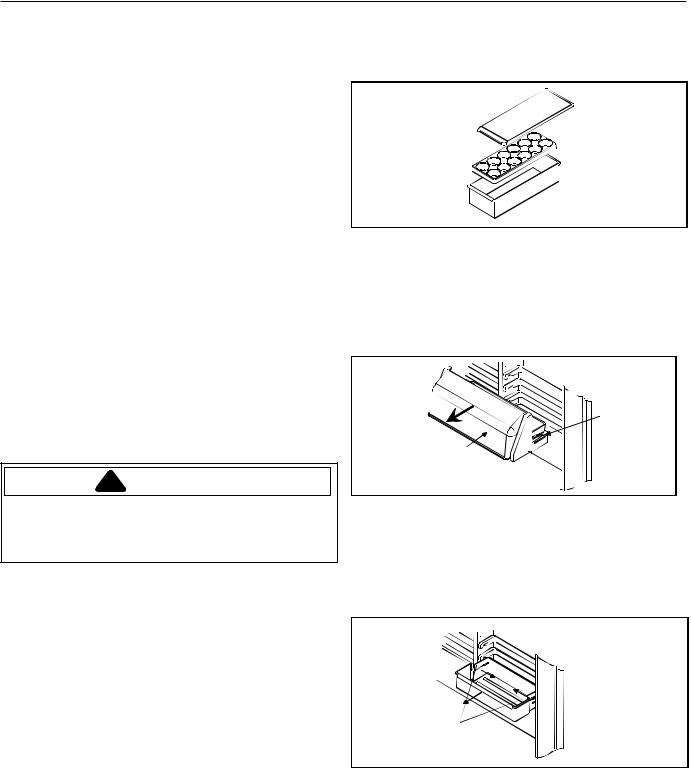
Covered Storage Bucket
Storage bucket has a lid and removable egg tray. When tray is removed, bucket will accept items such as a standard egg carton, ice, etc.
Dairy Centers
Dairy centers provide convenient storage for items such as butter, cheese, etc.
•Remove dairy centers by lifting door, pushing tabs toward center and pulling out.
•Replace dairy centers by sliding in until tabs lock into place and lowering door.
B
A
A Door |
B Tab |
Door Buckets
Door buckets adjust to meet individual storage needs.
•Remove door buckets by pushing tabs toward center and pulling out.
•Replace door buckets by sliding in until tabs lock into place.
A
A Tabs
12
DeepfreezeTM Features
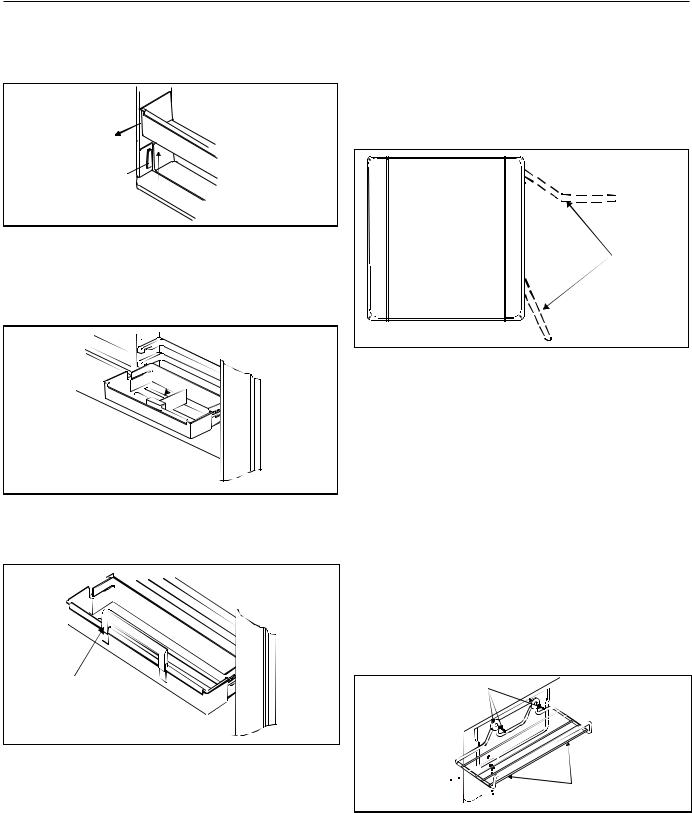
Door Shelf
•Remove door shelf by lifting ends and pulling out.
•Replace door shelf by placing shelf on glides and sliding down.
A
A Glide
Adjustable Dividers
Adjustable dividers keep items in place and adjust to meet individual storage needs. Divider fits in any Fresh Food door bucket or door shelf.
Tall Package Retainer
Tall package retainer keeps tall items secure. Retainer fits in any Fresh Food door bucket or door shelf.
A
A Tabs
Frost-Free System
The fresh food and freezer sections are completely frostfree. Defrosting is automatic under normal conditions. Fresh food and freezer sections never have to be defrosted.
Automatic Ice Maker (some models)
•Make sure ice bucket is in place and ice maker arm is down.
A
B
|
|
C |
A |
Off position |
C On position |
B |
Ice maker arm |
|
•After freezer section reaches normal temperature, the ice maker fills with water and begins operating. Allow 24–48 hours after installation before first harvest of ice. Ice maker produces 7 to 9 harvests of ice in a 24-hour period under ideal conditions.
•After ice is formed, ice maker drops ice cubes into ice storage bucket. During ice production, ice maker arm
raises and lowers. When ice storage bucket is full, ice maker arm turns ice maker off.
Note: Discard first 3 harvests of ice so any impurities left in the water line after installation are not consumed.
•If you wish to stop automatic ice production lift ice maker arm. A definite click is heard when proper position is reached. Ice maker arm will remain in that position until pushed down.
Ice Service Rack (some models)
Install ice service rack by placing ice service rack on washers and sliding down.
A
B
|
|
C |
A |
Washer |
C Ice service rack |
B |
Screws |
|
13
 Loading...