

TRANSACTIVE DRUMMER
QUICKSTART GUIDE
ENGLISH ( 1 – 2 )
MANUAL DE INICIO RÁPIDO
ESPAÑOL ( 3 – 4 )
GUIDE D'UTILISATION SIMPLIFIÉ
FRANÇAIS ( 5 – 6 )
GUIDA RAPIDA
ITALIANO ( 7 – 8 )
KURZANLEITUNG
DEUTSCH ( 9 – 10 )
e
s
QUICKSTART GUIDE (ENGLISH)
MIN
-15
MAX
+15
HEADPHONES
1. Make sure all items listed on the front of this guide are included in the box.
BASS
MASTER
VOLUME
MIN
-15
-15
MAX
+15
+15
iPod / AUX
TREBLE
MID
VOLUME
ADJUSTABLE iPod SUPPORT
iPod DOCK
iPod HEADPHONES
* Cabl
sold
separately
CD PLAYER, ETC.
DRUM MODULE MIXER
2. READ SAFETY INSTRUCTION BOOKLET BEFORE USING THE PRODUCT.
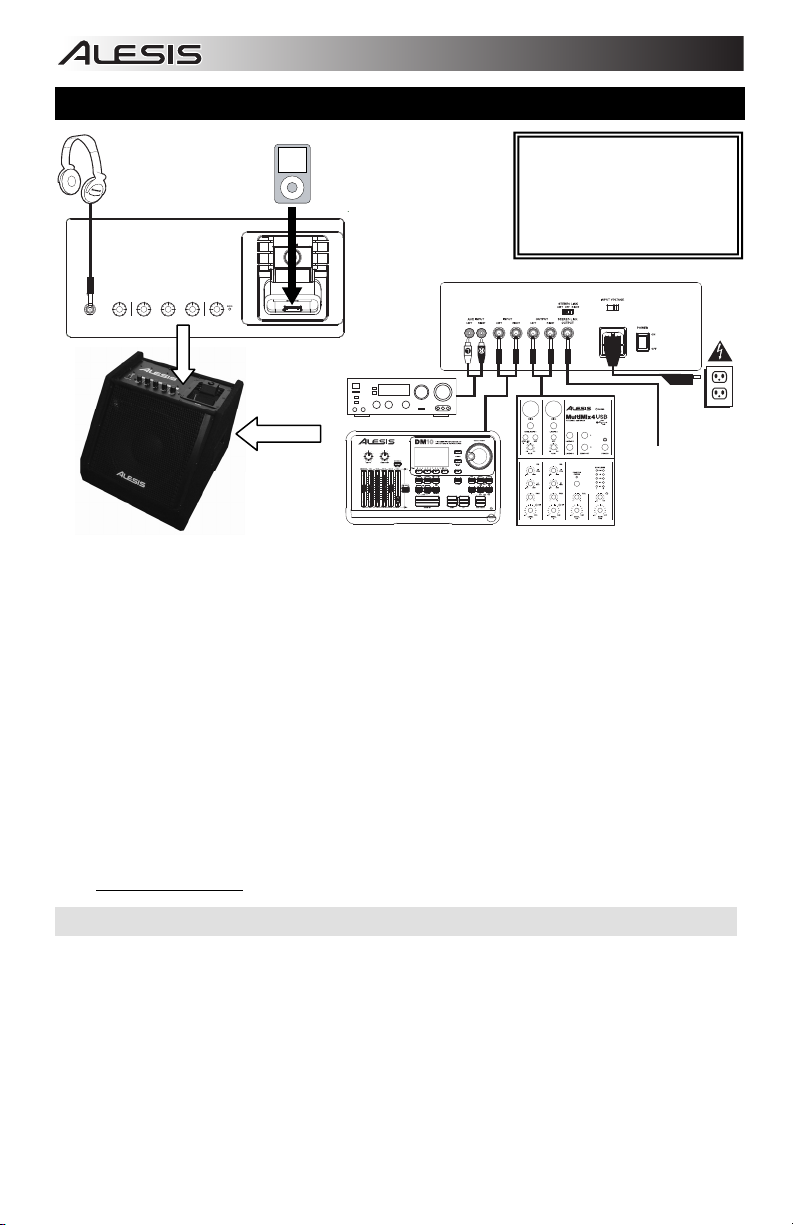
3. Study this setup diagram.
4. Place product in an appropriate position for operation.
5. Make sure all input devices such as microphones, CD players, MP3 players, and linked amplifiers/PAs
are turned off and volume settings are set at "zero."
6. Connect all devices as shown above.
7. Switch everything on in the following order.
i. audio input sources (i.e. microphones, instruments, CD/MP3 Players)
ii. TransActive Drummer
iii. any additional amplifiers
8. When shutting down, always reverse this operation by turning off:
i. any additional amplifiers
ii. TransActive Drummer
iii. audio input sources (i.e. microphones, instruments, CD/MP3 Players)
Go to http://www.alesis.com
for product registration.
IMPORTANT NOTES
If your sound is distorted at high volumes, please refer to the following troubleshooting scenarios:
• Input is clipping: Try lowering the input gain or the volume control on your sound source or music
instrument.
• Output is clipping: Lower the main volume level.
• There is too much bass: Try adjusting the tone or EQ control on your sound source to lower the bass
level. This will allow you to play the music louder before clipping (distortion) occurs.
Important:
• With all speakers, an initial "break-in" period is needed to perform at optimal levels. To properly "breakin" your TransActive Drummer, play an audio source at medium volume for a few hours.
• For best audio quality, avoid using this device in a high RF-radiated environment.
BOX CONTENTS
TransActive Drummer
Power Cable (standard IEC)
Quickstart Guide
Safety Instructions & Warranty
Information Booklet
STEREO LINK
LEFT OFF RIGHT
OUTPUT
INPUT
INPUT
AUX
RIGHT
LEFT
LEFT
(MONO)
STEREO LINK
RIGHT
RIGHT
OUTPUT
LEFT
INPUT VOLTAGE
POWER
To an input on
additional
TransActive
Drummer
(Cable sold
separately)
POWER
1
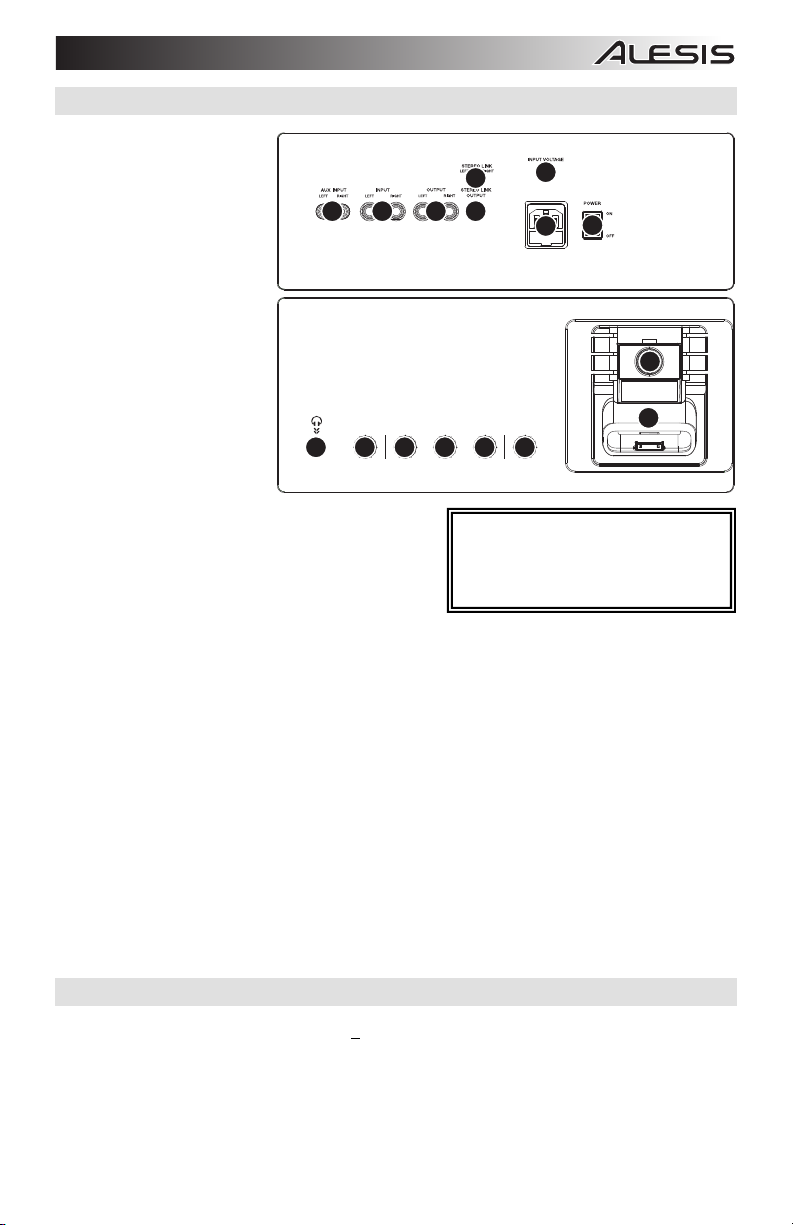
DIAGRAM AND PARTS DESCRIPTION
1. Power In (IEC): Use the
included power cable to
connect the TransActive
Drummer to a power
outlet. While the power is
switched off, plug the
power cable into the
AUX
RIGHT
LEFT
LEFT
(MONO)
4 5 6 7
RIGHT
LEFT
RIGHT
OUTPUT
INPUT
INPUT
STEREO LINK
LEFT OFF RIGHT
STEREO LINK
8
OUTPUT
INPUT VOLTAGE
2
1
POWER
3
TransActive Drummer
first, then plug the cable
into a power outlet.
2. Voltage Selector*: Set
ADJUSTABLE iPod SUPPORT
this to the correct voltage
for your location's
standard.
14
3. Power On/Off Switch:
Turns TransActive
Drummer on or off.
4. Auxiliary Input: This
stereo RCA input can be
used to connect a CD,
MP3, or other audio
10 11 11 11 12
9
MIN
-15
MAX
MASTER
VOLUME
BASS
HEADPHONES
-15
+15
MID
MIN
-15
TREBLE
MAX
+15
iPod / AUX
VOLUME
+15
13
iPod DOCK
source.
5. Line Input: Connect your external sound sources to
these inputs. Each input can accept a 1/4"
connection. This allows for several connection
options (e.g., 1 stereo source such as a drum module,
CD player, or sampler, 2 microphones, 1 or 2 mono
sources).
* WARNING: U.S. users should set this
switch to "100-120V" whereas U.K. and
most European users should set this to
"220-240V."Selecting the improper voltage
can damage the unit.
6. Master Output: Connect a mixer, PA system, or other device to these outputs using 1/4" cables.
Adjust the level of these outputs with the MASTER VOLUME knob on the top panel.
7. Stereo Link Output: Connect a 1/4" stereo (TRS) cable to this line-level output to connect another
amplification device, such as another TransActive Drummer. When you connect this output to another
TransActive Drummer, you will be able to use the inputs of both TransActive Drummers simultaneously
with a full stereo image and the combined wattage of 100 W.
8. Stereo Link Selector: When using two connected TransActive Drummers, set one speaker's Stereo
Link Selector to the "left" and the other to the "right" for a full stereo image. When in the "Off" position,
the summed left and right channels will be heard out of that speaker.
9. Headphones: Connect your 1/4" headphones to this output.
10. Master Volume Control: Adjusts the volume of the TransActive Drummer, the MASTER OUTPUT on
the rear panel and the HEADPHONE OUTPUT on the top panel. This master output includes iPod
playback plus any other devices connected to the INPUTS on the rear panel.
11. EQ: Use these knobs to adjust the levels of the Treble, Mid, and Bass frequencies.
12. iPod/Aux Volume: This knob controls the level of the iPod and the iPod/Auxiliary Input.
13. Dock: Connect your iPod here. Gently rock the iPod back and forth over the connector when attaching
or removing it.
14. Dock Adjuster: Turn this knob accordingly so your docked iPod rests against the support.
SPECIFICATIONS
Output Wattage: 50 W (THD: <
Frequency Response: 35 Hz – 20 kHz
Max Current: 0.84 A
Dimensions (W x D x H): 15" x 15" x 12.6" (390 mm x 390 mm x 320 mm)
Weight: 30 lbs. (13.6 kg)
0.1%)
2
e
s
MANUAL DE INICIO RÁPIDO (ESPAÑOL)
MIN
-15
HEADPHONES
MAX
BASS
MASTER
VOLUME
1. Asegúrese que todos los artículos incluidos al inicio de este manual estén incluidos en la caja.
MIN
-15
-15
+15
MAX
+15
+15
iPod / AUX
TREBLE
MID
VOLUME
ADJUSTABLE iPod SUPPORT
iPod DOCK
iPod AURICULARES
* Cabl
vendido
por separado
REPRODUCTOR
DE CD, ETC.
MÓDULO DE BATERÍA MEZCLADOR
2. LEA LAS INSTRUCCIONES DEL FOLLETO DE SEGURIDAD ANTES DE UTILIZAR EL PRODUCTO.
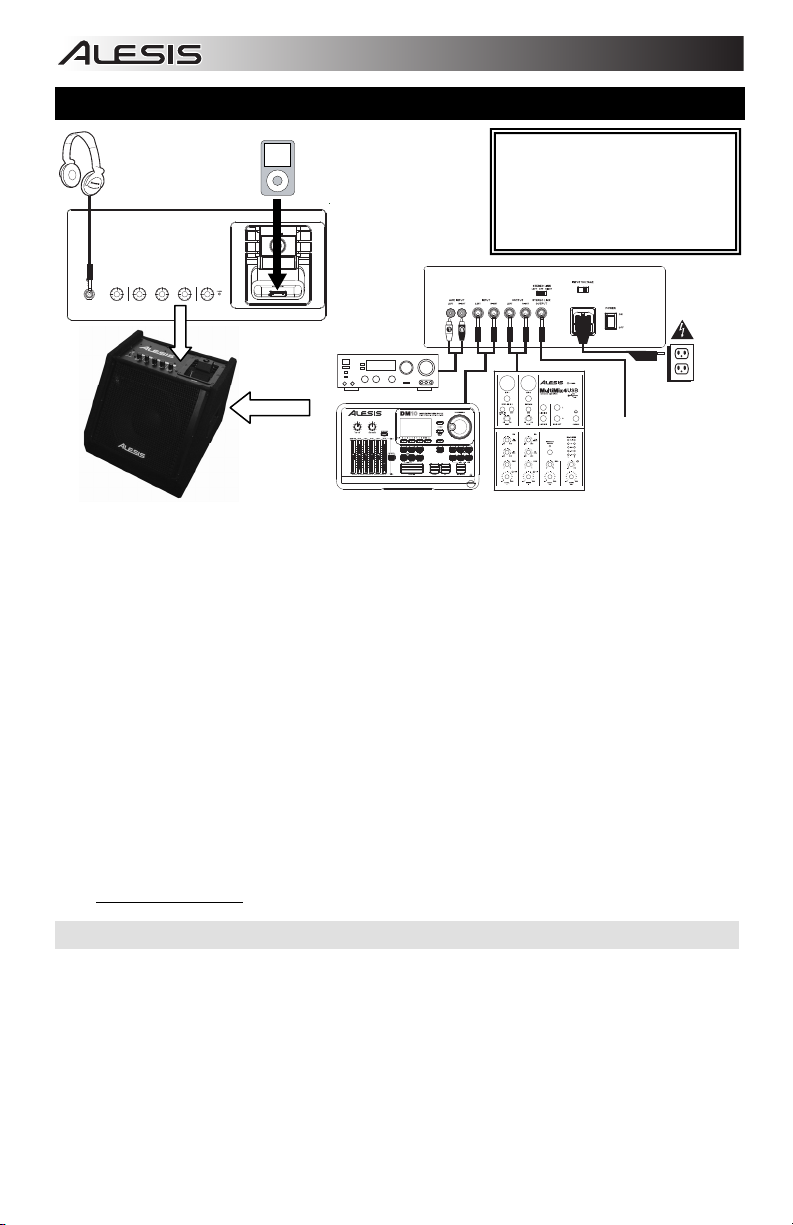
3. Estudie este diagrama de instalación.
4. Coloque el producto en una posición adecuada para su funcionamiento.
5. Asegúrese de que todos los dispositivos de entrada tales como micrófonos, reproductores de CD,
reproductores MP3 y amplificadores/sistemas de amplificadores para altavoces estén apagados y con el
control de volumen en "cero".
6. Conecte todos los dispositivos como se muestra arriba.
7. Encienda todo en el siguiente orden:
i. fuentes de entrada de audio (por ejemplo, micrófonos, instrumentos, reproductores de CD/MP3)
ii. TransActive Drummer
iii. amplificadores adicionales
8. Al apagar, realice siempre esta operación en sentido inverso. Apague:
i. amplificadores adicionales
ii. TransActive Drummer
iii. fuentes de entrada de audio (por ejemplo, micrófonos, instrumentos, reproductores de CD/MP3)
Visite http://www.alesis.com
para registrar el producto.
NOTAS IMPORTANTES
Si el sonido se distorsiona a volúmenes altos, consulte los siguientes escenarios de solución de problemas:
• El sonido está distorsionado: Intente reducer la ganacia o el volumen de su fuente de sonido o
instrumento musical. Asimismo, intente reducir el volumen del TransActive Drummer.
• Hay demasiado bajos: Ajustar el tono o EQ de su fuente de sonido para bajar el nivel de graves.
Importante:
• Un período inicial de "break-in" es necesaria para los amplificadores pueden jugar en los niveles
óptimos. Reproducir una fuente de audio a un nivel de volumen medio de unas pocas horas.
• Para mejor calidad de audio, evitar el uso de este dispositivo en un medio ambiente alto RF-radiada.
CONTENIDO DE LA CAJA
TransActive Drummer
Cable de alimentación
Manual de inicio rápido
Folleto de información sobre la
seguridad y la garantía
INPUT VOLTAGE
STEREO LINK
LEFT OFF RIGHT
OUTPUT
INPUT
INPUT
AUX
RIGHT
LEFT
STEREO LINK
RIGHT
RIGHT
LEFT
(MONO)
OUTPUT
LEFT
POWER
ALIMENTACIÓN
A entrado en
TransActive
Drummer
adicional
(Cable
vendido por
separado)
3

DIAGRAMA Y DESCRIPCIÓN
1. Entrada de IEC: Use el cable de
alimentación incluido para
conectar el TransActive Drummer
a un tomacorriente alimentado.
Mientras está desconectada la
alimentación eléctrica, enchufe la
fuente de alimentación al
TransActive Drummer primero, y
luego al tomacorriente.
2. Selector de voltaje*: Regule este
selector al voltaje correcto para la
norma de su localidad.
3. Interruptor de encendido /
apagado: Enciende y apaga el
TransActive Drummer.
4. Entrada auxiliar: Esta entrada se
puede usar para conectar un
reproductor de CD, MP3 u otra
fuente de audio.
5. Entradas de linéa: Conecte sus fuentes de
sonido externas a estas entradas. Cada
entrada puede aceptar una conexión de 1/4".
Esto permite varias opciones de conexión: 2
micrófonos, 1 fuente estéreo (como un
reproductor de CD, muestreador o caja de
ritmos), 1 ó 2 fuentes mono, etc.
6. Salida maestro: Conecte un sistema de
megafonía, mezclador u otros dispositivo a estas salidas, usando cables de 1/4". Ajuste el nivel de
estas salidas con la perilla volumen maestro del panel superior.
7. Salida de enlace estéreo: Conecte un cable estéreo de 1/4" (TRS) a esta salida de nivel de línea para
conectar otro dispositivo de amplificación, tal como otro TransActive Drummer. Cuando conecte esta
salida an otro TransActive Drummer, podrá usar las entradas de ambos TransActive Drummers
simultáneamente con una imagen estéreo completa y el vatiaje combinado de 100 W.
8. Selector de enlace estéreo: Cuando use dos TransActive Drummers conectados, ajuste el selector de
enlace estéreo de uno de los altavoces a "izquierda" y el otro a "derecha" para lograr una imagen
estéreo completa. Cuando está en la posición "Off", se oyen por ese altavoz los canales izquierdo y
derecho sumados.
9. Salida para auriculares: Conecte sus auriculares de 1/4" a esta salida.
10. Volumen maestro: Ajusta el volumen del TransActive Drummer, de la salida maestro del panel trasero
y de la salida para auriculares del panel superior. Esta salida maestra incluye reproducción del iPod
más cualquier otro dispositivo conectado a las entradas del panel trasero.
11. Ecualización: Use estas perillas para ajustar los niveles de las frecuencias agudas, medias y graves.
12. Volumen entrada iPod/auxiliar: La perilla controla el nivel del iPod y de la entrada auxiliar.
13. Estación de acoplamiento: Conecte aquí su iPod. Mueva delicadamente el iPod en uno y otro
sentido sobre el conector cuando lo conecte o lo retire."
14.
Ajustador de la estación de acoplamiento: Gire esta perilla de forma que su iPod acoplado se apoye
contra el soporte.
INPUT
INPUT
9
HEADPHONES
AUX
LEFT
RIGHT
RIGHT
LEFT
(MONO)
4 5 6 7
10 11 11 11 12
MIN
-15
MAX
BASS
MASTER
VOLUME
STEREO LINK
LEFT OFF RIGHT
OUTPUT
STEREO LINK
RIGHT
LEFT
-15
+15
+15
MID
OUTPUT
INPUT VOLTAGE
8
2
POWER
3
1
ADJUSTABLE iPod SUPPORT
14
13
MIN
-15
MAX
+15
iPod / AUX
TREBLE
VOLUME
iPod DOCK
* ADVERTENCIA: Los usuarios de EE.UU.
deben colocar este conmutador en "100-120V"
mientras que los usuarios del Reino Unido y la
mayoría de los países europeos deben colocarlo
e "220-240V". Si se selecciona el voltaje
incorrecto, se puede dañar la unidad.
DATOS TÉCNICOS
Potencia de salida: 50 W (THD: <0.1%)
Respuesta en frecuencia: 35 Hz – 20 kHz
Corriente máxima: 0.84 A
Dimensiones (ancho x prof x alto): 15" x 15" x 12.6" (390 mm x 390 mm x 320 mm)
Peso: 30 lbs. (13.6 kg)
4

GUIDE D'UTILISATION SIMPLIFIÉ (FRANÇAIS)
1. Assurez-vous que tous les articles énumérés sur la page couverture de ce guide sont inclus dans la
HEADPHONES
MIN
-15
MAX
BASS
MASTER
VOLUME
MIN
-15
-15
+15
MAX
+15
+15
iPod / AUX
TREBLE
MID
VOLUME
boîte.
2. VEUILLEZ LIRE LE LIVRET DES CONSIGNES DE SÉCURITÉ AVANT D'UTILISER LE PRODUIT.
3. Examinez bien le schéma d'installation.
4. Placez l'appareil en position de fonctionnement.
5. Assurez-vous que tous les appareils d'entrée tels que microphones, lecteur de disques compacts, lecteur
MP3 et les autres appareils branchés tels que les amplificateurs et les systèmes PA sont hors tension et
que leur volume soit réglé à « zéro ».
6. Connectez tous les appareils tel qu'indiqué sur le schéma.
7. Mettre tous les appareils sous tension dans l'ordre suivant:
i. source d'entrée audio (p. ex. microphones, instruments, lecteurs CD/MP3)
ii. TransActive Drummer
iii. des autres amplificateurs
8. Pour mettre hors tension, toujours inverser l'opération. Éteindre:
i. des autres amplificateurs
ii. TransActive Drummer
iii. source d'entrée audio (p. ex. microphones, instruments, lecteurs CD/MP3)
Allez à la http://www.alesis.com
NOTES IMPORTANTES
Si le son est déformé lorsque le volume est élevé, veuillez vous reporter aux scénarios suivants :
• Le son est déformé : Essayez de diminuer le gain ou le volume de votre source audio ou instrument
de musique. Aussi, essayez de réduire le volume du TransActive Drummer.
• Il y a trop des basses : Essayez de régler la tonalité ou EQ sur votre source audio pour baisser le
niveau de graves.
Important :
• Un premier période de "break-in" est nécessaire pour tous les amplificateurs de sorte qu'il peuvent
effectuer à un niveau optimal. Utilisez le TransActive Drummer à un volume moyen de quelques
heures.
• Pour la meilleure qualité audio, éviter d'utiliser cet appareil dans un environnement RF rayonnée.
iPod CASQUE D'ÉCOUTE
* Câbles vendus
LECTEUR CD,
ETC.
séparément
INPUT
AUX
RIGHT
LEFT
ADJUSTABLE iPod SUPPORT
iPod DOCK
MODULE DE LA BATTERIE CONSOLE DE MIXAGE
pour l'enregistrement du produit.
CONTENU DE LA BOÎTE
TransActive Drummer
Câble d’alimentation
Guide d'utilisation simplifié
Le livret des consignes de sécurité et
des informations concernant la garantie
INPUT VOLTAGE
STEREO LINK
LEFT OFF RIGHT
OUTPUT
INPUT
STEREO LINK
RIGHT
RIGHT
LEFT
(MONO)
OUTPUT
LEFT
POWER
ALIMENTATION
À entré sur
TransActive
Drummer
additionnel
5

pprop
SCHÉMA ET DESCRIPTION
1. Entrée d'alimentation (IEC) :
Utilisez le câble d’alimentation
inclus pour brancher le
TransActive Drummer dans une
prise d’alimentation murale.
Lorsque le TransActive
Drummer est hors tension,
branchez le câble
d'alimentation dans la console,
puis dans la prise de courant.
2. Sélecteur de tension* :
Assurez-vous que le sélecteur
soit réglé à la tension
appropriée pour votre pays.
3. Interrupteur Marche/Arrêt
(ON/OFF) : Permet de mettre le
TransActive Drummer sous et
hors tension.
4. Entrée auxiliaire : Cette entrée
permet de brancher un lecteur
de disques compacts, un
lecteur MP3 ou autres sources
audio.
5. Entrées : Ces entrées permettent de brancher des
sources audio externes. Chaque entrée peut accueillir
une connexion de 1/4 po. Ceci permet plusieurs options
de branchement : 2 microphones, 1 source stéréo (telle
qu'un lecteur CD, un échantillonneur ou une boîte à
rythmes), 1 ou 2 sources mono, etc.
6. Sortie master : Ces entrées permettent de brancher un
système de sonorisation, une console de mixsage ou
d’autres appareils de sortie à l’aide de câbles 1/4 po. Le niveau du signal de ces sorties est commandé par le
bouton volume master du panneau supérieur.
7. Sortie relais stéréo : Cette sortie permet de brancher un câble stéréo (TRS) de 1/4 po afin de raccorder un
autre appareil d’amplification, tel qu’un autre TransActive Drummer. Lorsque vous branchez cette sortie à un
autre TransActive Drummer, vous pourrez utiliser les entrées des deux TransActive Drummer simultanément
avec une image stéréo complète et une puissance combinée de 100 W.
8. Sélecteur relais stéréo : Lors de l’utilisation de deux TransActive Drummer, réglez le sélecteur relais stéréo
d’un des TransActive Drummer sur la position « gauche » et l’autre sur la position « droite » pour une image
stéréo complète. Sur la position « Off », le signal du canal assigné à la gauche et celui assigné à la droite
retentiront de ces haut-parleurs, respectivement.
9. Casque d’écoute : Permet de brancher un casque d’écoute 1/4 po.
10. Volume master : Ce bouton permet de régler le niveau du TransActive Drummer, du signal de la sortie master
du panneau arrière et du casque d’écoute du panneau supérieur. Cette sortie inclut le signal de lecture du iPod
en plus de ceux de tous les autres appareils branchés dans les entrées du panneau arrière.
11. EQ : Ces boutons permettent d'ajuster le niveau des fréquences aiguës, moyennes et basses.
12. Volume iPod/entrée auxiliaire : Le contrôle permet de régler le niveau de l'iPod et de l'entrée auxiliaire.
13. Socle : Branchez un iPod ici. Insérez le bas du iPod sur le connecteur en effectuant doucement un
mouvement d'avant arrière, procédez de même pour le retirer.
14. Bouton d’ajustement du socle : Ce bouton permet de régler l’emplacement du socle afin que l’iPod repose
correctement sur le support.
8
OUTPUT
INPUT VOLTAGE
2
1
POWER
3
ADJUSTABLE iPod SUPPORT
AUX
RIGHT
LEFT
LEFT
(MONO)
4 5 6 7
RIGHT
LEFT
RIGHT
OUTPUT
INPUT
INPUT
STEREO LINK
LEFT OFF RIGHT
STEREO LINK
14
13
10 11 11 11 12
9
HEADPHONES
MIN
MASTER
VOLUME
-15
-15
MAX
+15
BASS
MID
* MISE EN GARDE: Pour l’Amérique du
Nord, ce sélecteur doit être réglé sur « 100120 V », alors que pour le Royaume-Uni et la
majeure partie de l’Europe il doit être réglé sur
« 220-240 V ». L'utilisation d’une tension
ina
MIN
-15
TREBLE
MAX
+15
iPod / AUX
VOLUME
+15
riée pourrait endommager l’appareil.
iPod DOCK
SPÉCIFICATIONS
Puissance de sortie : 50 W (THD: <
Réponse en fréquence : 35 Hz – 20 kHz
Courant maximal: 0.84 A
Dimensions (LxPxH): 15" x 15" x 12.6" (390 mm x 390 mm x 320 mm)
Poids: 30 lbs. (13.6 kg)
0.1%)
6

e
GUIDA RAPIDA (ITALIANO)
MIN
-15
MAX
BASS
HEADPHONES
MASTER
1. Verificare che tutti gli elementi elencati sul frontespizio di questa guida siano inclusi nella confezione.
VOLUME
MIN
-15
-15
+15
MAX
+15
+15
iPod / AUX
TREBLE
MID
VOLUME
ADJUSTABLE iPod SUPPORT
iPod DOCK
iPod CUFFIE
* Cavi venduti
separatament
LETTORE CD, ETC.
MODULO BATTERIA MIXER
2. PRIMA DI UTILIZZARE IL PRODOTTO LEGGERE IL LIBRETTO DELLE ISTRUZIONI DI
SICUREZZA.
3. Esaminare attentamente lo schema di montaggio.
4. Posizionare il prodotto in maniera adeguata all’uso.
5. Assicurarsi che tutti i dispositivi d’ingresso quali microfoni, lettori CD, lettori MP3 e amplificatori/PA
collegati siano spenti e che il volume sia impostato su "zero"
6. Collegare tutti i dispositivi come illustrato in precedenza.
7. Accendere tutto nel seguente ordine:
i. sorgenti di ingresso audio (microfoni, strumenti, lettori CD/MP3)
ii. TransActive Drummer
iii. ulteriori amplificatori
8. Al momento dello spegnimento, invertire l’operazione. Spegnendo:
i. ulteriori amplificatori
ii. TransActive Drummer
iii. sorgenti di ingresso audio (microfoni, strumenti, lettori CD/MP3)
Recarsi sul sito http://www.alesis.com
per la registrazione del prodotto.
NOTE IMPORTANTI
Se ad alti volumi il suono è distorto, fare riferimento alle seguenti casistiche di risoluzione di problemi:
• Il suono è distorto: Provare a ridurre il guadagno o il volume del vostro suono fonte o strumento
musicale. Anche cercando di ridurre il volume del TransActive Drummer.
• Vi è troppo basso: Prova di adeguamento il tono o EQ del vostro suono fonte di abbassare il livello
dei bassi.
Importante:
• Un primo "break-in" periodo è necessaria in modo che l'amplificatori possono funzionare a livelli
ottimali. Gioca una sorgente audio a volume medio per un paio d'ore prima.
• Per la migliore qualità audio, evitare l'uso di questo dispositivo in un ambiente alto RF-irradiata.
CONTENUTI DELLA CONFEZIONE
TransActive Drummer
Cavo di alimentazione
Guida rapida
Libretto di istruzioni di sicurezza e
garanzia
INPUT VOLTAGE
STEREO LINK
LEFT OFF RIGHT
OUTPUT
INPUT
INPUT
AUX
RIGHT
LEFT
LEFT
(MONO)
STEREO LINK
RIGHT
RIGHT
OUTPUT
LEFT
POWER
ALIMENTAZIONE
A immesso su
TransActive
Drummer
supplementare
7

DIAGRAMMA E DESCRIZIONE
1. Ingresso di alimentazione
(IEC): Servirsi dell’adattatore di
alimentazione in dotazione per
collegare il mixer ad una presa di
alimentazione. Ad alimentazione
spenta, collegare l’alimentazione
elettrica innanzitutto nel mixer,
quindi ad una presa elettrica.
2. Selettore di voltaggio*:
impostare questo comando sulla
tensione adeguata agli standard
locali.
3. Interruttore ON/OFF
(accensione / spegnimento):
accende o spegne il TransActive
Drummer. Va notato che quando
il TransActive Drummer è
collegato ad una fonte di
alimentazione, non deve essere
necessariamente acceso per
caricare la batteria.
4. Ingresso ausiliario: Questo ingresso può
essere utilizzato per il collegamento di un CD,
MP3, o altra sorgente audio.
5. Ingressi de linea: Collegare a questi ingressi
le sorgenti sonore esterne. Ciascun ingresso è
in grado di accogliere un collegamento da 1/4".
Ciò consente diverse opzioni di collegamento: 2 microfoni, 1 sorgente stereo (quali un lettore CD, un
campionatore o una drum machine), 1 o 2 sorgenti mono, etc.
6. Uscita di linea: Collegare un sistema PA, un mixer o altri dispositivi a questa uscita servendosi di cavi
da 1/4". Regolare il livello di questa uscita servendosi della manopola volume master a livello del
pannello superiore.
7. Uscita Stereo Link: collegare un cavo stereo (TRS) da 1/4" a questa uscita a livello di linea per
collegare altri dispositivi di amplificazione, ad esempio un altro TransActive Drummer. Una volta
collegata questa uscita ad un altro TransActive Drummer, sarete in grado di utilizzare gli ingressi di
entrambi i TransActive Drummers simultaneamente con un’immagine stereo completa e il wattaggio
combinato di 100.
8. Selettore Stereo Link: quando si utilizzano due TransActive Drummer collegati, impostare il Selettore
Stereo Link di una delle casse su "sinistra" e l’altro su "destra" per un’immagine stereo completa.
Quando ci si trova su "Off", i canali sinistro e destro, sommati, si udranno a livello di quella cassa.
9. Cuffie: Collegare le cuffie da 1/4" a questa uscita.
10. Volume master: Regola il volume della uscita di linea sul pannello posteriore e della uscita cuffie sul
pannello superiore. Questa uscita master include la riproduzione iPod e di qualsiasi altro dispositivo
collegato agli ingressi del pannello posteriore.
11. EQ – Servirsi di queste manopole per regolare i livelli delle frequenze acute, medie e basse.
12.
Volume iPod/ingressi ausiliari: La manopola controlla il livello del iPod e dell'ingresso ausiliario.
13. Dock: Collegare l’iPod a questo livello. Far ondeggiare delicatamente l’iPod in avanti e indietro sul
connettore al momento di collegarlo o di staccarlo.
14. Regolatore dock: Girare debitamente questa manopola in modo che l’iPod inserito nel dock sia a
contatto con il supporto.
OUTPUT
INPUT VOLTAGE
8
2
POWER
3
1
ADJUSTABLE iPod SUPPORT
AUX
RIGHT
LEFT
LEFT
(MONO)
4 5 6 7
RIGHT
LEFT
RIGHT
OUTPUT
INPUT
INPUT
STEREO LINK
LEFT OFF RIGHT
STEREO LINK
14
13
10 11 11 11 12
9
HEADPHONES
MIN
-15
-15
MAX
+15
BASS
MASTER
VOLUME
MID
MIN
-15
TREBLE
MAX
+15
iPod / AUX
VOLUME
iPod DOCK
+15
* AVVERTENZA: gli utenti statunitensi devono
impostare l’interruttore su "100-120V", mentre i
residenti nel Regno Unito e nella maggior parte
dei Paesi europei devono impostarlo su "220240V". Selezionare il livello di tensione
inadeguato può danneggiare l’apparecchio.
SPECIFICHE TECNICHE
Wattaggio di uscita: 50 W (THD: <0.1%)
Risposta di frequenza: 35 Hz – 20 kHz
Corrente massima: 0.84 A
Dimensioni (LxPxH): 15" x 15" x 12.6" (390 mm x 390 mm x 320 mm)
Peso: 30 lbs. (13.6 kg)
8

KURZANLEITUNG (DEUTSCH)
1. Überprüfen Sie, dass sich alle auf dem Deckblatt genannten Teile in der Verpackung befinden.
HEADPHONES
MIN
-15
MAX
BASS
MASTER
VOLUME
MIN
-15
-15
+15
MAX
+15
+15
iPod / AUX
TREBLE
MID
VOLUME
ADJUSTABLE iPod SUPPORT
iPod DOCK
iPod KOPFHÖRER
* Kabel optional
erhältlich
CD SPIELER,
ETC.
DRUM-MODUL MIXER
2. LESEN SIE DIE SICHERHEITSHINWEISE, BEVOR SIE DIESES PRODUKT VERWENDEN.
3. Sehen Sie sich die Aufbauabbildung der an.
4. Stellen Sie den Produkt in einer für den Betrieb geeigneten Position auf.
5. Schalten Sie alle Eingangsquellen (Mikrofone, CD Player, MP3 Player und Verstärker/PAs aus und
drehen Sie deren Lautstärke auf "Null."
6. Verbinden Sie die Stereoausgänge mit den Verstärkern, Tape Decks, und/oder Signalquellen.
7. Schalten Sie das System in der folgenden Reihenfolge ein:
i. Eingangsquellen (z.B. Mikrofon, Instrumente und/oder CD-Player)
ii. TransActive Drummer
iii. die zusätzliche Verstärker
8. Gehen Sie beim Ausschalten in der genau umgekehrten Reihenfolge vor. Schalten Sie:
i. die Verstärker
ii. TransActive Drummer
iii. Eingangsquellen (z.B. Mikrofon, Instrumente und/oder CD-Player)
Registrieren Sie Ihr Produkt online unter http://www.alesis.com
WICHTIGE HINWEISE
Falls der Klang bei hohen Lautstärken verzerrt wird, lesen Sie die folgenden Tipps zur Fehlerbehebung
durch:
• Der Klang ist verzerrt: Versuchen Sie, zur Senkung der Gain oder das Lautstärke der Schallquelle
oder Musik-Instrument. Versuchen Sie auch, eine Senkung der Lautstärke der TransActive Drummer.
• Es ist zu viel Bässe: Versuchen Sie, zur Senkung der Ton der Schallquelle.
Wichtig:
• Eine erste "break-in"-Zeit benötigt wird, so dass ein Verstärker kann Funktion auf optimalem Niveau.
Spielen Sie eine Audio-Quelle in einer mittleren Band für ein paar Stunden zuerst.
• Für beste Audio-Qualität, um mit diesem Gerät eine hohe HF-Strahlungsleistung Umwelt.
INHALT DER VERPACKUNG
TransActive Drummer
Netzkabel
Kurzanleitung
Broschüre mit den Sicherheits- und
Garantierichtlinien
INPUT VOLTAGE
STEREO LINK
LEFT OFF RIGHT
INPUT
OUTPUT
INPUT
AUX
RIGHT
LEFT
STEREO LINK
RIGHT
RIGHT
LEFT
(MONO)
OUTPUT
LEFT
POWER
Zu eingegeben auf
zusätzlichem
TransActive
Drummer
.
NETZ
9

gt
BEDIENELEMENTE
1. Netzanschluss (IEC):
Verwenden Sie das beiliegende
Netzteil, um den TransActive
Drummer mit einer Steckdose zu
verbinden. Verbinden Sie,
während das Gerät
ausgeschaltet ist, das Netzteil
zuerst mit dem TransActive
Drummer und stellen Sie erst
dann die Verbindung zur
Steckdose her.
2. Spannungswahlschalter*:
Stellen Sie hier die richtige
Spannung für das Gebiet, in dem
Sie das Gerät einsetzen
möchten, ein.
3. Power ON/OFF Schalter:
Schaltet den TransActive
Drummer an oder aus.
4. Aux Eingang: Dieser Eingang
nimmt das Signal eines CD/MP3
Players oder einer anderen
Audioquelle auf.
5. Eingänge: Schließen Sie hier Ihre externen
Soundquellen an. Jeder Eingang ist mit einer
6,3 mm Klinkenbuchse ausgestattet. Deshalb
stehen verschiedene Anschlussoptionen zur
Verfügung: 2 Mikrofone, 1 Stereoquelle (wie
CD Player, Sampler oder Drum Computer), 1
oder 2 Monosignale, usw.
6. Master Ausgang: Verbinden sie diese Ausgänge mit einem PA System, einem Mixer oder einem anderen
Ausgangsgerät mit 6,3 mm Klinkenkabeln. Die Lautstärke der Ausgänge definieren Sie mit dem Master
Lautstärkenregler auf der Vorderseite des Gerätes.
7. Stereo-Link Ausgang: Mit einem 6,35 mm Stereokabel (TRS) kann an diesen Line-Level Ausgang ein
weiteres Verstärkungsgerät, wie z. B. ein weiterer TransActive Drummer angeschlossen werden. Wird an
diesen Ausgang ein weiterer TransActive Drummer angeschlossen, ist es möglich, die Eingänge beider
TransActive Drummer gleichzeitig mit voller Stereowiedergabe und einer zusammengefassten Wattleistung von
100 W zu verwenden.
8. Stereo-Link Auswahl: Bei Anschluss und Verwendung von zwei TransActive Drummers, die Stereo-Link
Auswahl des einen Lautsprechers auf "links" und die andere auf "rechts" stellen, um eine volle
Stereowiedergabe zu erhalten. In der Position "Aus" werden auf diesem Lautsprecher die zusammengefassten
linken und rechten Kanäle gehört.
9. Kopfhörer: Schließen Sie hier Ihren Kopfhörer mit 6,3 mm Klinkenstecker.
10. Master Lautstärke: Justiert die Lautstärke der Master Ausgang der Rückseite und des Kopfhörer Ausgang auf
der Oberseite. Diese Lautstärkeregelung beeinflusst die iPod Wiedergabe plus jedes andere Gerät, welches
an den Eingängen auf der Rückseite angeschlossen wurde.
11. EQ: Verwenden Sie diese Drehregler, um den Pegel der Höhen-, Mitten- und Bassfrequenzen.
12. iPod/Aux Lautstärke: Der Regler steuert das Niveau des iPod und des Aux Einganges.
13. Dock: Schließen Sie hier Ihren iPod an. Schieben Sie den iPod vorsichtig vor und zurück, wenn Sie ihn
einstecken oder entfernen wollen.
14. Dock adjuster: Drehen Sie dieses Rad, damit Ihr iPod sicher im Dock steckt.
OUTPUT
INPUT VOLTAGE
8
2
POWER
3
1
ADJUSTABLE iPod SUPPORT
AUX
RIGHT
LEFT
LEFT
(MONO)
4 5 6 7
RIGHT
LEFT
RIGHT
OUTPUT
INPUT
INPUT
STEREO LINK
LEFT OFF RIGHT
STEREO LINK
14
13
10 11 11 11 12
9
HEADPHONES
MIN
-15
-15
MAX
+15
BASS
MASTER
VOLUME
* ACHTUNG: Anwender in den USA sollten den
Schalter auf "100-120V" stellen, während Anwender in
den meisten europäischen Ländern und U.K. die "220240V" Position wählen sollten. Sollte der
Spannungswahlschalter falsch eingestellt sein, wird
beim Einschalten das Gerät beschädi
MID
MIN
-15
TREBLE
MAX
+15
iPod / AUX
VOLUME
iPod DOCK
+15
.
TECHNISCHE DATEN
Ausgangsleistung: 50 W (THD: <0.1%)
Frequenzgang: 35 Hz – 20 kHz
Höchststrom: 0.84 A
Abmessungen (BxTxH): 15" x 15" x 12.6" (390 mm x 390 mm x 320 mm)
Gewicht: 30 lbs. (13.6 kg)
10

www.alesis.com
7-51-0298-D
 Loading...