

Page 1

User Guide
English
Page 2

Table of Contents
Introduction ................................. 3
Box Contents............................ 3
Support ..................................... 3
Setup ........................................ 3
Features ....................................... 4
Top Panel ................................. 4
Rear Panel ................................ 6
Operation ..................................... 7
Navigation ................................ 7
Controls ..................................... 7
Overview .................................... 8
Kit Menu ................................ 8
Kit FX Mode ........................... 9
Voice Mode ........................... 9
Trigger Mode ......................... 9
Mixer Mode .......................... 10
Sample Mode ...................... 10
Utility Menu .......................... 10
Kits .......................................... 11
Selecting Kits ........................... 11
Editing Kits .............................. 12
Assigning Instruments .......... 12
Using Kit FX ......................... 13
Editing Voices ...................... 14
Saving Kits ............................... 17
Trigger Mode .......................... 18
About Crosstalk (XTalk) ........... 19
Hi-Hat Pedal Setup ................. 20
Metronome ............................. 21
Sample Mode ......................... 22
Recording Samples ................. 22
Editing Samples ...................... 23
Saving Samples ...................... 24
Assigning Samples .................. 25
Playing Loops.......................... 25
Utility Menu ............................ 26
Metronome (Metro) ................. 26
MIDI ......................................... 27
Trigger ..................................... 28
SysEx ...................................... 28
OS ........................................... 28
Appendix .................................... 29
Effects .................................... 29
Technical Specifications ........ 30
Trademarks & Licenses .......... 30
2
Page 3
Introduction
Box Contents
Strike Performance Drum Module
8 GB SDHC Card
Power Adapter
Quickstart Guide
Safety & Warranty Manual
Support
For the latest information about this product (documentation, technical specifications, system
requirements, compatibility information, etc.) and product registration, visit alesis.com.
For additional product support, visit alesis.com/support.
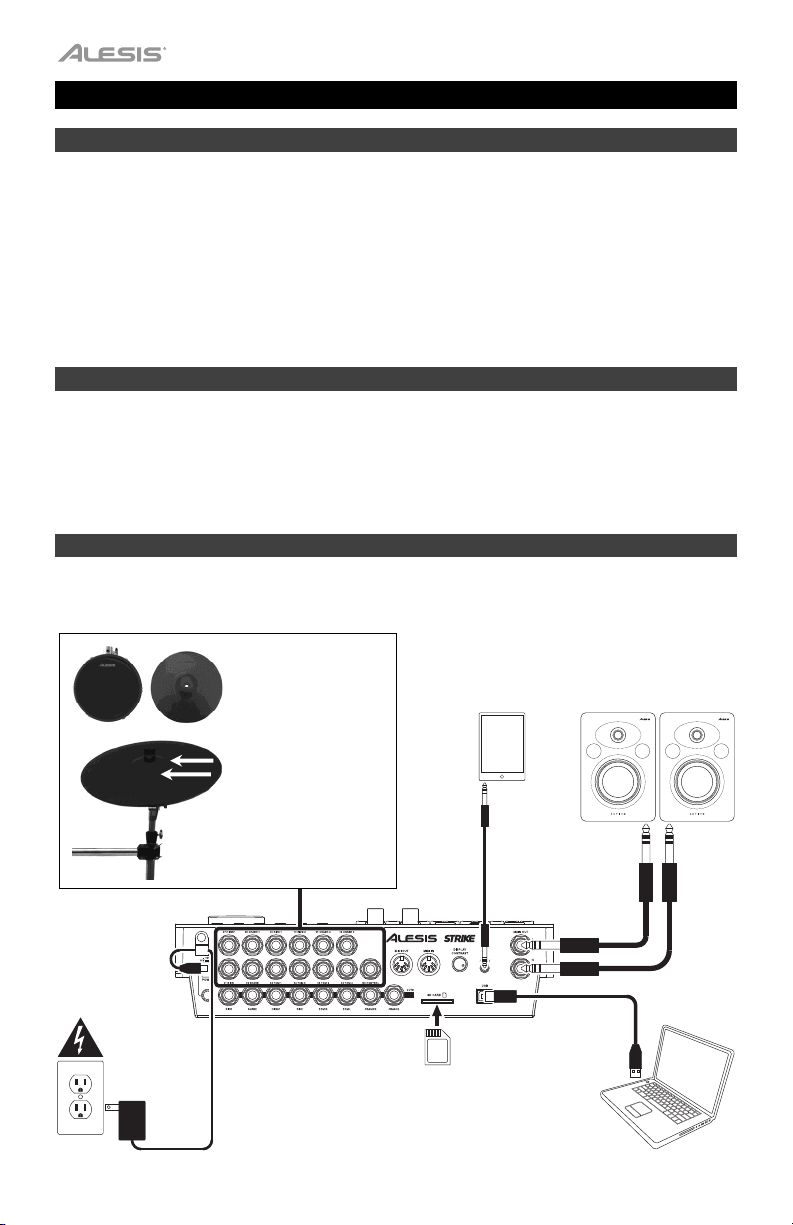
Setup
Items not listed in
(in module’s SD card slot)
Introduction > Box Contents are sold separately.
Connect the inputs to
the triggers of your
electronic drum kit.
External audio device
(tablet, smartphone, etc.)
Powered monitors
Power outlet
Ride 1
Ride 2
Connect the Ride 1 &
Ride 2 inputs to your
ride cymbal as shown
here.
SD card
(included)
Computer
3
Page 4
Features
Top Panel
12
17
13
18
14
19
7
15
20
16
21
8
22
4
1
2
5
3
6
11
10
9
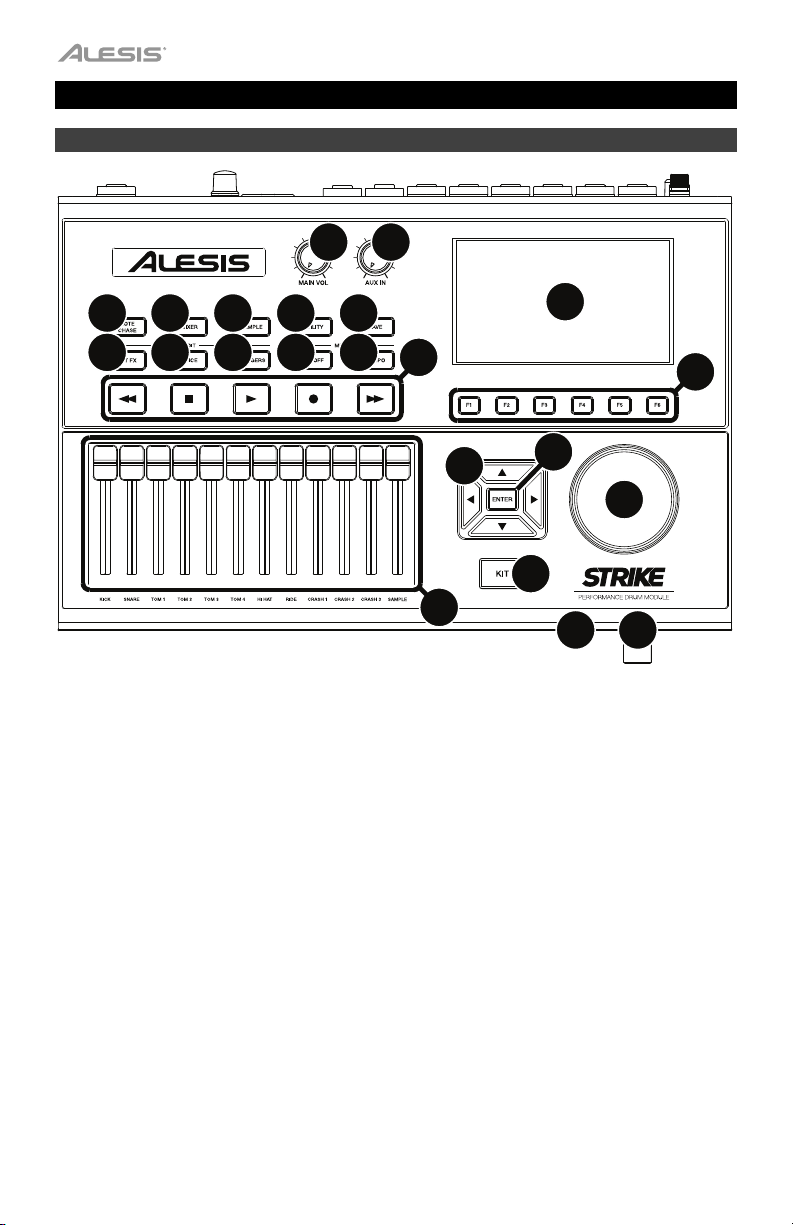
1. Display: This full-color display shows the current kit, settings, and other information. Use
the cursors to move through the menus and lists shown here. Use the Data Dial to scroll
through available options. Use the Function Buttons (F1–F6) to select tabs shown at the
bottom edge of the display.
2. Function Buttons (F1–F6): Press one of these 6 buttons to select the corresponding tab
shown above it (at the bottom edge of the display).
3. Data Dial: Turn this dial to scroll through available options shown in the display.
4. Cursors: Use these buttons to select different areas shown in the current page in the display.
5. Enter: Press this button to confirm a selection shown in the display.
6. Kit: Press this button to enter the Kit menu (the default view when you power on the drum
module).
7. Main Vol: Turn this knob to adjust the volume level of the Main Out on the rear panel. This
level is independent from the volume level of each voice or the overall kit.
8. Aux In: Turn this knob to adjust the volume level of the Aux In on the rear panel. This also
controls the input recording level of Sample Mode.
9. Headphone Out (1/4”/6.35 mm): Connect your stereo headphones to this input. Adjust the
volume with the Headphone Vol knob.
10. Headphone Vol: Turn this knob to adjust the volume level of the Headphone Out.
4
Page 5

11. Sliders: Use these sliders to adjust the independent volume level of each sound in your
current kit. The sound’s name is shown under the slider.
12. Note Chase: Press this button to activate or deactivate the Note Chase feature. When
active, hitting a trigger will automatically select it in the drum module. This is useful for
quickly making changes to multiple sounds on your kit, like selecting new instruments,
editing voice parameters, etc.
Alternatively, your Strike module’s menus allow you to select the current trigger using the
cursors and data dial.
13. Mixer: Press this button to enter Mixer Mode.
14. Sample: Press this button to enter Sample Edit Mode. This requires you to have an SD
card inserted into the Strike module’s SD card slot. If your SD card doesn’t already have
any WAV files, pressing this button will enter Sample Record Mode.
15. Utility: Press this button to show the Utility menu.
16. Save: Press this button to save the current kit or global settings (depending on the current
mode). When you’re in Kit Mode, pressing this button allows you to name/rename and
save the current kit to your SD card. When you’re in Trigger Mode or the Utility menu,
pressing this button allows you to save all of your current trigger, metronome, and global
MIDI settings.
17. Edit > Kit FX: Press this button to enter Kit Effects Mode where you can set the reverb
and other effects for each kit.
18. Edit > Voice: Press this button to enter Voice Mode where you can edit the assigned
instruments, reverb/FX Amount, MIDI output, and other settings for each drum or cymbal
pad.
19. Edit > Triggers: Press this button to enter Trigger Mode where you can adjust the
sensitivity and overall feel of each drum or cymbal pad. Strike’s default settings are
optimized for a wide range of playing styles and kit configurations. While trigger settings
normally don’t need any adjustment, you can still adjust the sensitivity of your triggers here.
20. Metro > On/Off: Press this button to turn the metronome on or off. Metronome settings
can be found in the Utility menu, in the Metro tab.
21. Metro > Tempo: Press this button 3 or more times in succession at the desired rate to
change the tempo of the metronome (in BPM). Alternatively, you can press and hold this
button and turn the data dial to change the BPM. The light above this button will flash at
the current tempo.
22. Transport Buttons: Use these buttons to control sample playback. These buttons work
even when the drum module is not in Sample Mode.
• Rewind/Fast-Forward (
/ ): Press and hold one of these buttons to “scrub”
backward or forward (respectively) through the sample.
• Play (
): Press this button to start sample playback or recording.
• Stop (): Press this button to stop sample playback or recording.
• Record (): Press this button to show the Sample Record screen. Press it again to
begin recording the signal from the Aux In, and then press it once more to stop the
recording. You will then be in Sample Edit Mode where you can edit and save your
new sample.
5
Page 6
Rear Panel
2
4
6
1
3
9
11
5
10
12
8
7
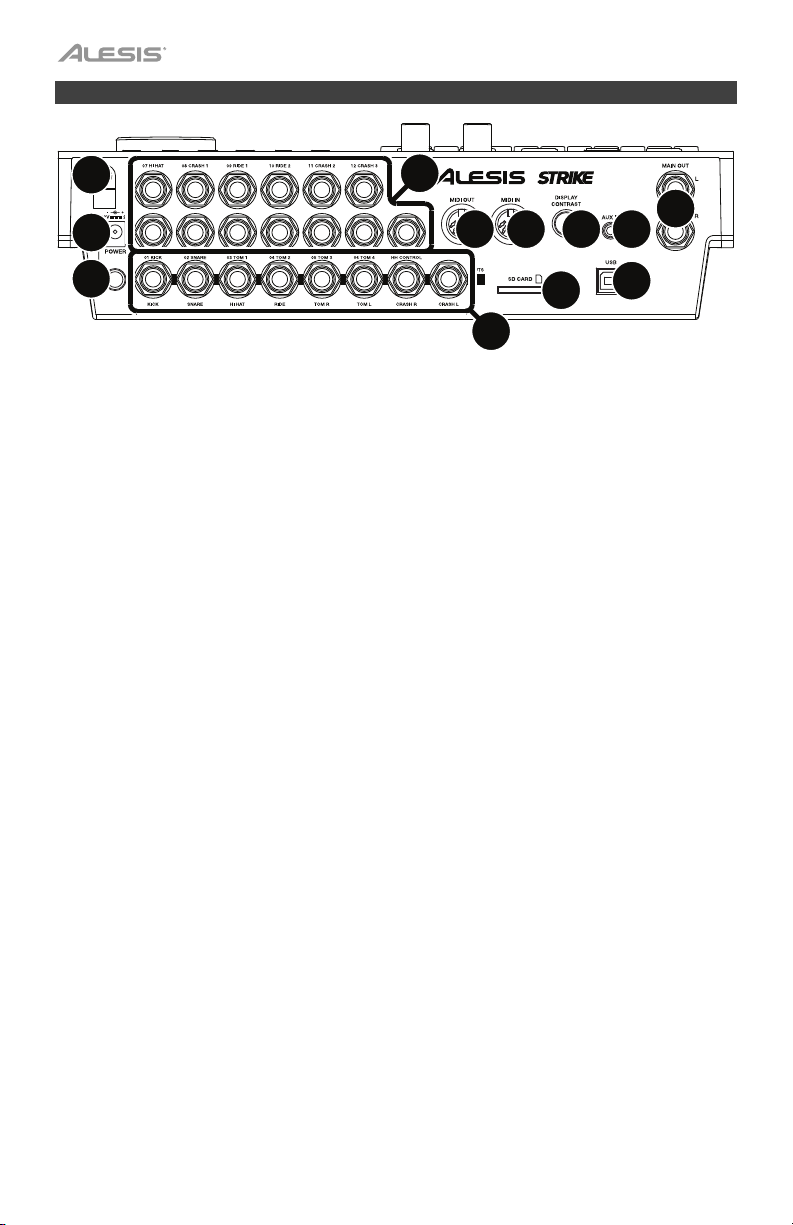
1. Power Input: Connect the included power adapter (12 V, 2 A, center-positive) to this input.
2. Cable Restraint: You can secure the cable of the power adapter to this restraint to help
prevent disconnecting it accidentally.
3. Power Switch: Press this button to power the drum module on or off. Power it on only
after you have connected all of your input devices and before you power on any connected
loudspeakers. Power off your loudspeakers before powering off the drum module.
4. Trigger Inputs (1/4”/6.35 mm, TRS): Connect these inputs to the triggers of your Strike
Kit. The cable snake included with your Strike Kit or Strike Pro Kit is labeled to match
these inputs. When connected, hitting a trigger will send an electric signal to the drum
module, which will trigger the corresponding sound.
5. Aux In (1/8”/3.5 mm, TRS): Connect this input to an optional external audio device
(computer, tablet, smartphone, etc.). Turn the Aux In knob on the top panel to adjust the
volume level. You can then listen and play long to your favorite backing tracks or record
the incoming audio signal in Sample Mode.
6. Main Out (1/4”/6.35 mm, TRS): Connect these outputs to your loudspeakers, audio
interface, etc. Turn the Main Vol knob on the top panel to adjust the volume level.
7. Direct Audio Outs (1/4”/6.35 mm, TRS or TS): Connect these mono outputs to your
external mixer, audio interface, etc. The independent audio signals of these triggers will be
sent out of these outputs: kick, snare, hi-hat, ride, the left and right channels for all toms,
and the left and right channels for the crash cymbals. The signal sent from these outputs
is fixed and without any effects applied.
8. MIDI In (5-pin DIN): Connect this input to the MIDI output of an external MIDI device
(synthesizer, drum machine, etc.).
9. MIDI Out (5-pin DIN): Connect this output to the MIDI input of an external MIDI device
(synthesizer, drum machine, etc.).
10. USB Port: Use a standard USB cable (included) to connect this USB port to an available
USB port on your computer. This connection sends and receives MIDI information to and
from the computer.
11. SD Card Slot: You can insert a standard SDHC card into this slot (an 8 GB card is already
included). An SD card is required to save kits, samples, or global settings. The SDHC card
must be Class 10, use a FAT32 file system, and have a maximum capacity of 64 GB.
12. Display Contrast: Turn this knob to adjust the contrast of the display.
6
Page 7
Operation
This chapter contains information on how to use your Strike Performance Drum Module.
Navigation
Controls
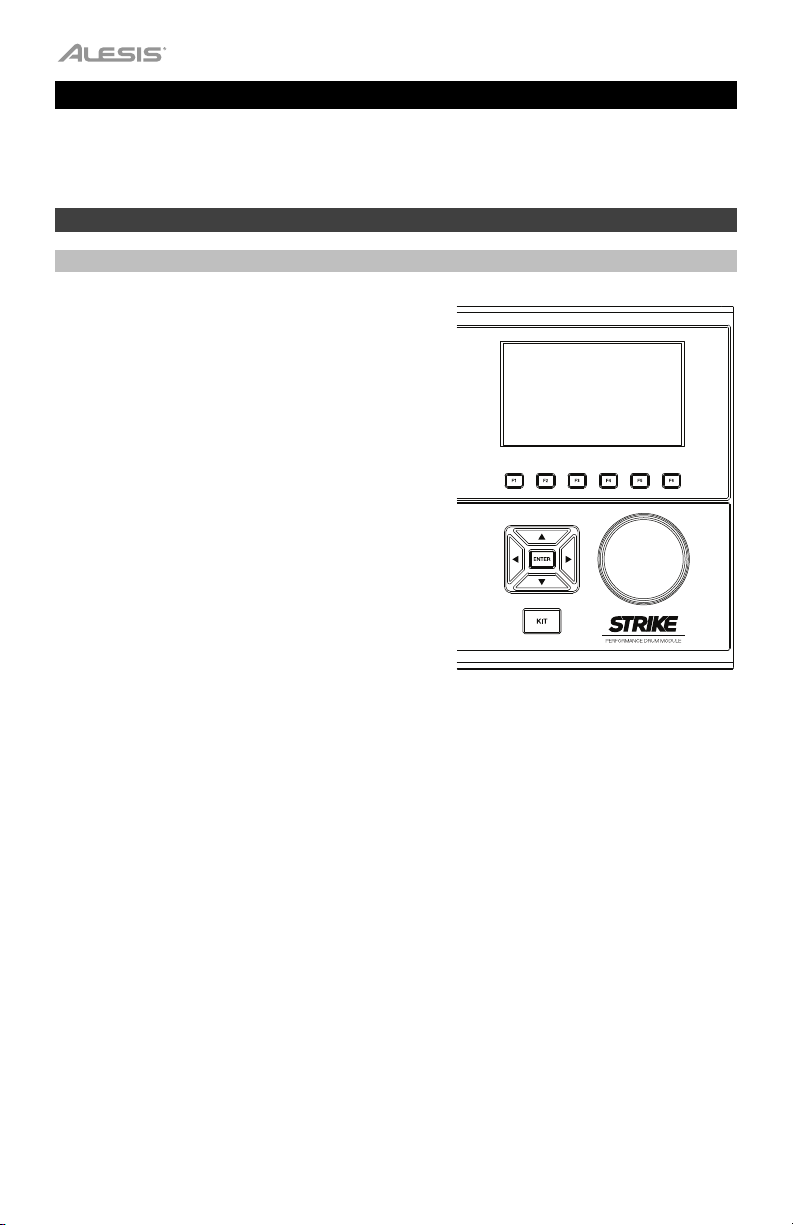
The Strike module’s display shows information about
its current mode and operations. You can navigate its
different modes, pages, etc. by using the following
controls:
• Data Dial: Use this dial to scroll through a menu
or to change the selected parameter value,
setting, etc. in the display.
• Cursors: Use these buttons to select different
areas shown in the current page in the display.
• Enter: Press this button to confirm a selection
shown in the display.
• Function Buttons (F1–F6): Press one of these 6
buttons to select the corresponding tab shown
above it (at the bottom edge of the display).
• Mode Buttons (not shown): Press one of these
buttons to enter its mode: Kit, Mixer, Sample,
Utility, Save, Kit FX, Voice, or Triggers. When
you power on the drum module, it’ll always start
in Kit Mode.
7
Page 8
Overview
This section provides an overview of each page shown in the display.
To learn how to perform specific operations in the drum module, see the Kits, Trigger Mode,
Metronome, Sample Mode, and Utility Menu chapters.
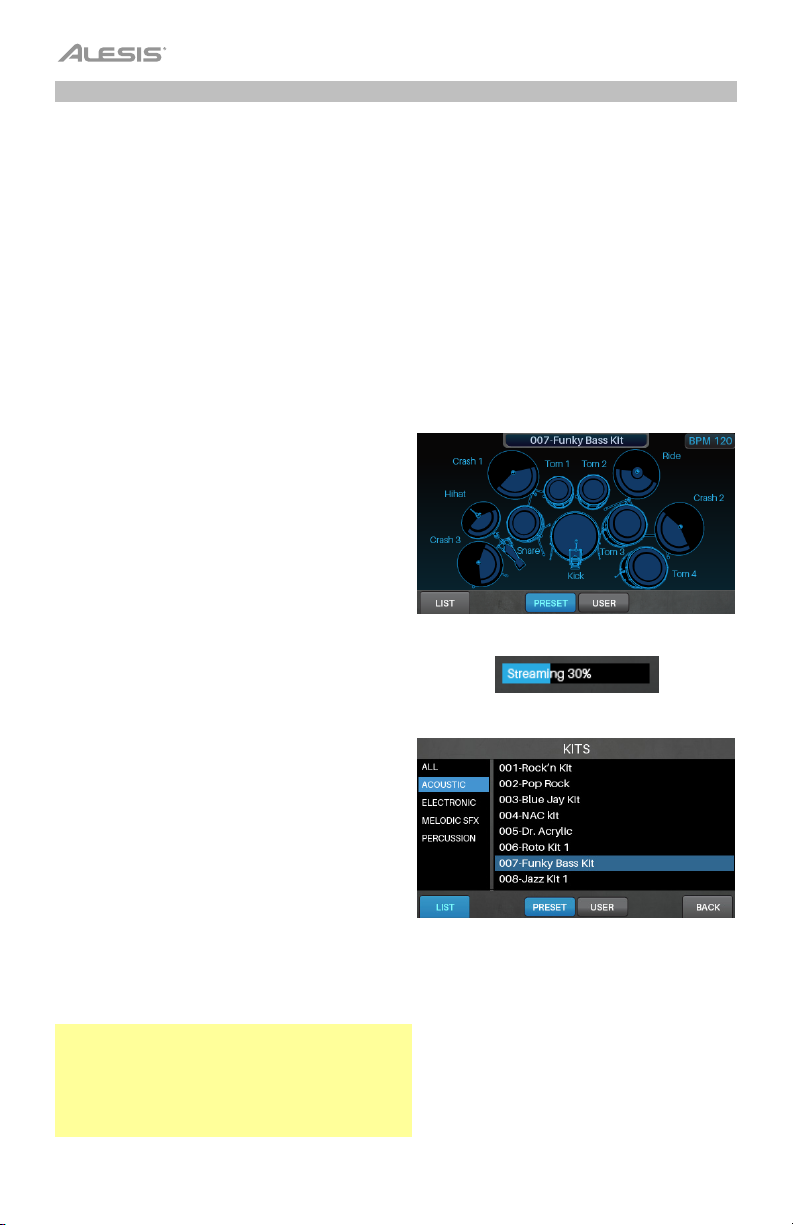
Kit Menu
This is the main menu where you can select kits or
select individual triggers to edit within the kit.
To view the Kit menu, press Kit.
To select a kit, do one of the following:
• Press F3/Preset to choose from your preset
kits or F4/User to choose from the user kits
on your SD card.
Turn the data dial to scroll through the list
(the current kit name is shown at the top of
the page). After you stop moving the data
dial, the kit will load automatically.
Your Strike module can load large amounts of
high-quality samples for an extremely realistic
playing experience—and you don’t have to
wait until it’s done loading to start playing. For
some of these larger kits, you can start playing
immediately as the drum module continues to
load samples “in the background”, shown by
the Streaming indicator.
• Press F1/List to choose from a list of
available kits.
Press F3/Preset to choose from your preset
kits or F4/User to choose from your user kits.
Use the cursors to switch between the kit
categories (left panel) and kits (right panel).
Turn the data dial to scroll through the list.
After you stop moving the data dial, the kit
will load automatically.
If you select a kit category in the list and
then return to the main Kit menu, you’ll then
be viewing the kits in that category only.
To save a kit, see Kits > Saving Kits.
Important: If you edit a preset kit and then save
it, the saved kit will be stored onto your SD card,
while the original preset kit remains unchanged
on the module’s internal memory. You must have
your SD card inserted into the SD card slot in
order to save changes to preset kits.
8
Page 9
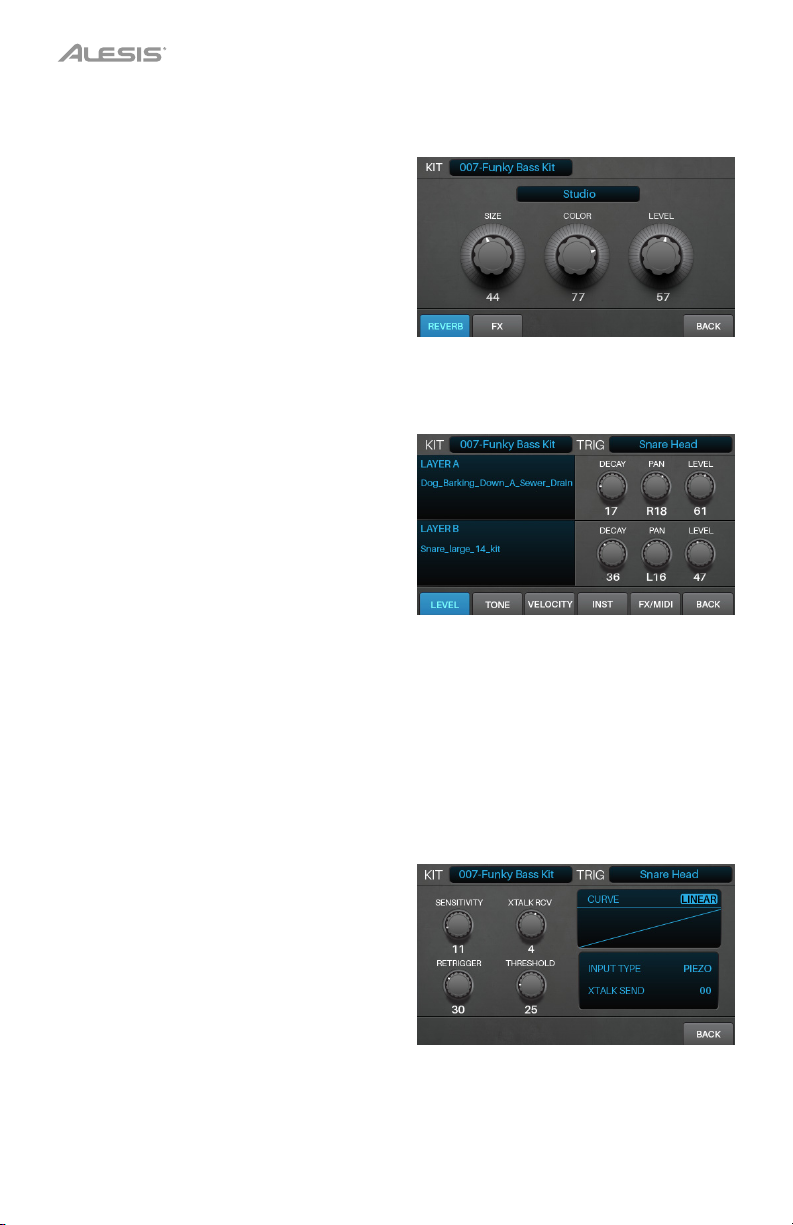
Kit FX Mode
Kit FX Mode lets you adjust the settings for the
Reverb and FX processors. You can then how
much of each to apply to each voice in the kit
(see Kits > Editing Kits > Editing Voices).
To enter Kit FX Mode, press Edit > Kit FX.
See Kits > Editing Kits for more information about
Kit FX Mode.
Voice Mode
Voice Mode shows the settings for each voice
within the kit. A voice is the sound produced by
each trigger of your Strike Kit.
Each tab in this screen lets you edit different
settings of each voice.
To enter Voice Mode, press Edit > Voice.
To select a trigger, do one of the following:
• Press Note Chase so it’s on. Strike the
desired trigger on your Strike Kit.
• Use the cursors to select the Trig field in
the upper-right corner. Turn the data dial to
select the desired trigger.
See Kits > Editing Kits for more information about
Voice Mode settings.
Trigger Mode
Trigger Mode shows the settings for each trigger
of your Strike Kit, including its sensitivity,
threshold, velocity curve, and crosstalk settings.
To enter Trigger Mode, press Edit > Trigger.
To select a trigger, do one of the following:
• Press Note Chase so it’s on. Strike the
desired trigger on your Strike Kit.
• Use the cursors to select the Trig field in
the upper-right corner. Turn the data dial to
select the desired trigger.
See Kits > Editing Kits for more information about
Trigger Mode settings.
9
Page 10
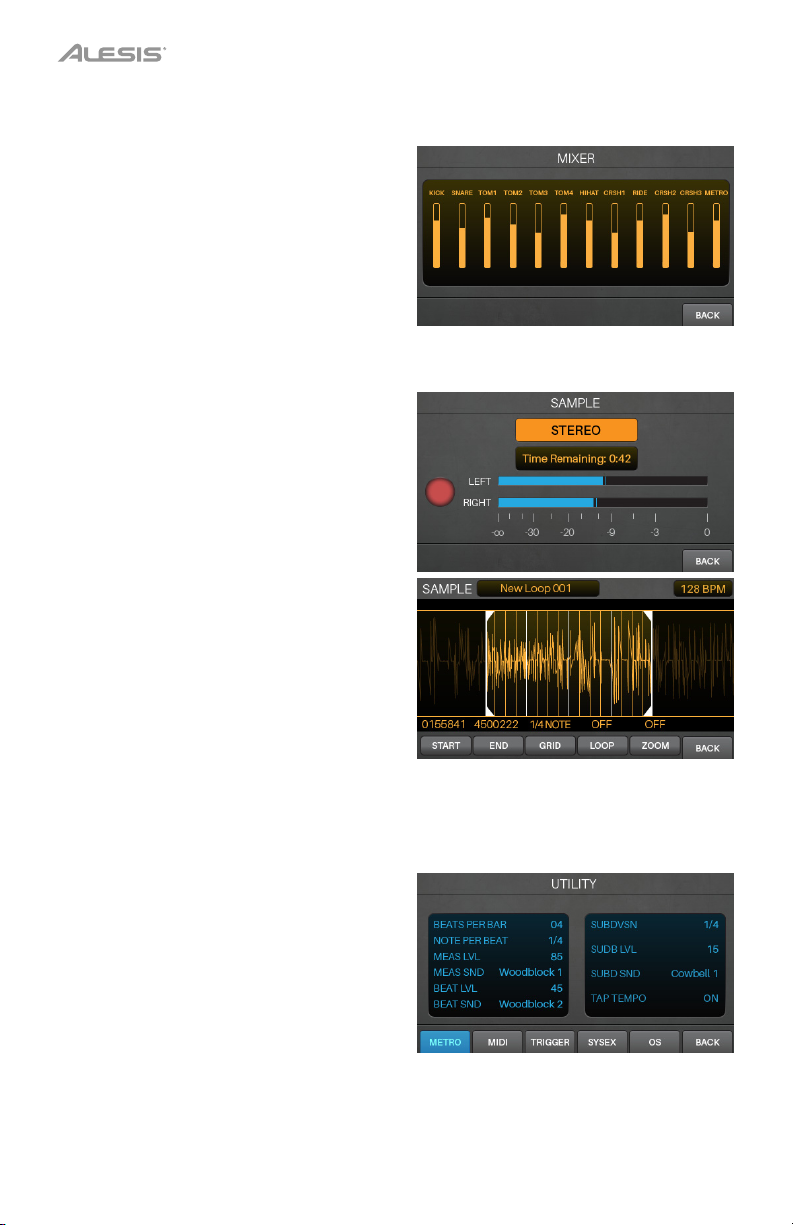
Mixer Mode
Mixer Mode shows you the output levels of each
trigger, represented by 12 channel faders.
To enter Mixer Mode, press Mixer.
To adjust the level of each trigger, move its
slider on the module up or down.
Sample Mode
Sample Record Mode contains controls for
recording samples (before recording) and editing
samples (after recording).
To enter Sample Record Mode, press the
Record () button.
To start recording, press the Record () button.
The button in the display will light red and the
Time Remaining counter will start counting.
To stop recording and show the Sample Edit
page, press the Record () button again.
See Sample Mode > Recording Samples to learn
more.
Sample Edit Mode lets you edit the sample you just
recorded. See Sample Mode > Editing Samples
for more information about this.
Utility Menu
The Utility menu contains settings that determine
the module’s overall operation, including global
metronome functions, global trigger settings,
and system information.
To view the Utility menu, press Utility.
See Utility Menu for more information about this.
10
Page 11

Kits
The Strike module contains 110 preset kits. You can also create and save your own user kits
onto an SD card. You can save as many user kits as your SD card can hold.
If you edit a preset kit and then save it, the saved kit will be stored onto your SD card, while
the original preset kit remains unchanged on the module’s internal memory.
You must have your SD card inserted into the SD card slot in order to save changes to preset
kits.
Selecting Kits
To select a kit:
1. Press Kit to show the Kit menu (the default
view when you power on the drum module).
2. Press F3/Preset to choose from your preset
kits or F4/User to choose from user kits on
your SD card. Turn the data dial to scroll
through the list (the current kit name is shown
at the top of the page). After you stop moving
the data dial, the kit will load automatically.
Alternatively, press F1/List to show all kits
as a list. Press F3/Preset to choose from
your preset kits or F4/User to choose from
your user kits. Use the cursors to switch
between the kit categories (left panel) and
kits (right panel). Turn the data dial to scroll
through the list. After you stop moving the
data dial, the kit will load automatically.
Important: Your Strike module can load
large amounts of high-quality samples for an
extremely realistic playing experience—and
you don’t have to wait until it’s done loading
to start playing. For some of these larger kits,
you can start playing immediately as the
drum module continues to load samples “in
the background”, shown by the Streaming
indicator.
11
Page 12

Editing Kits
You can edit several different areas of a kit: the instruments assigned to each layer, the effects
applied to the kit, the settings for each trigger, and more.
Assigning Instruments
To assign an instrument in a kit:
1. Press Kit to show the Kit menu, and select
a kit.
2. After selecting a kit, select a trigger: If the
Note Chase button is off, press it so it turns
on, and then strike the desired zone of the
trigger (drum or cymbal pad).
3. Press Voice and then press F4/Inst.
4. Press F1/Layer A or F2/Layer B to select
the desired layer (your Strike module can
layer two separate instruments on one
trigger zone).
5. Press F3/Preset to select an instrument from
the Strike module’s internal instrument library
or F4/User to select an instrument from your
SD card (if you’ve saved samples in Sample
Edit Mode, they’ll be on your SD card).
6. Use the cursors to select the left panel—
the instrument categories. Turn the data
dial to scroll through the list and select one.
7. Use the cursors to select the right panel—the
instruments in that category. Turn the data
dial to scroll through the list to select one.
To assign other instruments, use the
cursors to select the Trig field in the upper-
right corner, and turn the data dial to select
the desired zone of a trigger. Alternatively, if
Note Chase is on, strike the desired zone
of the trigger. Repeat Steps 4–5 to assign a
new instrument.
Important: Each kit can use up to 200 MB
worth of samples. The Memory Used meter
indicates how much space you are using of
that total capacity.
12
Page 13

V
Using Kit FX
Each kit has one reverb and one FX processor. The Kit FX Mode is where you adjust the
parameters for these effects. These settings are saved with each kit.
After editing these settings, you can use the then determine how much of each affect is
applied for each individual trigger zone. You can do this in the FX/MIDI tab of Voice Mode
(see Editing Voices > FX/MIDI).
To edit effects for an entire kit:
1. After selecting a kit, press Edit > Kit FX to
enter Kit FX Mode.
2. Press the function button under the type of
effect you want to apply: reverb (F1/Reverb)
or another effect (F2/FX).
3. Use the cursors to select the parameter
you want to edit.
Turn the data dial to change the parameter
value or setting.
To make adjustments to other kit effect
settings, repeat Steps 2–3.
To return to the previous screen, press
F6/Back.
These are the parameters in Kit FX Mode:
Parameter Description
Reverb Reverb lets you apply different types of
reverb to simulate your kit being played in a
specific kind of space.
Type
Size
This is the type of space the reverb will emulate.
This is the size of the virtual space
designated by the type of reverb. Higher
values result in a longer reverb time.
Color
This is the amount of high-frequency damping
of the reverb, which affects its tone. Higher
values result in a brighter reverb sound.
Level
This is the level of the reverb effect. If you’ve
already set how much reverb is applied to
each trigger zone, you can use this setting to
turn down the overall reverb level for the kit.
FX
Type
Parameters
FX lets you select from different types of
flanger, chorus, vibrato, and delay effects.
This is the type of effect.
The available parameters will depend on the
type of effect.
alues/Settings
See Appendix > Effects
00–99
00–99
00–99
See Appendix > Effects
See Appendix > Effects
13
Page 14

Editing Voices
Voice Mode shows the kit’s voice settings, which determine how each instrument sounds when
you strike each trigger. (When creating user kits, this is where you’ll spend most of your time.)
To edit voice settings:
1. After selecting a kit, press Edit > Voice to
enter Voice Mode.
2. Select a trigger by doing one of the following:
• If the Note Chase button is off, press
it so it turns on. Strike the desired
zone of the trigger whose voice you
want to edit.
• Use the cursors to select the Trig field in
the upper-right corner. Turn the data dial
to select the desired zone of a trigger.
3. You’ll see the Layers page first. Press the
function button under the settings you want
to edit: level settings (F1/Level), tone and
tuning settings (F2/Tone), or velocity settings
and dynamics (F3/Velocity). You’ll also see
F4/Inst, which lets you edit the instruments
of your kit (see Assigning Instruments).
To view the FX/MIDI page instead, press
F5/FX/MIDI, and press the function button
under other voice settings you want to edit:
effect settings (F1/FX), MIDI settings
(F2/MIDI), or other performance-related
settings (F3/Other). Press F5/
return to the Layers page.
4. Use the cursors to select the parameter
you want to edit.
Turn the data dial to change the parameter
value or setting.
To adjust other voice settings, repeat
Steps 2–4.
To return to the previous screen, press
F6/Back.
Layers to
14
Page 15

V
These are the parameters on the Layers page of Voice Mode (identical for both layers):
Parameter Description
alues/Settings
Level
Decay
Pan
Level
Tone
Tune
Fine
Filter
Type
Other
This determines how long the layer’s sound
Off, 01–99
can be heard before it decays into silence.
This is the position of the layer’s sound in
the stereo field.
Left (L01–L50)
Center (MID)
Right (R01–R50)
This is the volume level of the layer’s sound.
Off, 01–99
This is an offset of the tuning of the layer’s
-12 to 0 to +12
sound in half-steps (semitones).
This is an offset of the tuning of the layer’s
-50 to 00 +50
sound in cents.
This is determines the cutoff frequency of the
00–99
filter applied to the layer’s sound (see Tone >
Type below). The value is a percentage of
the frequency band, not the frequency itself.
This is the type of filter applied to the layer’s
sound.
Low-pass (LoPass)
High-Pass (HiPass)
Velocity>Decay
This determines how much the velocity of a
-99 to 00 to +99
strike will affect the decay time of the layer’s
sound.
Velocity>Filter
This determines how much the velocity of a
-99 to 00 to +99
strike will affect the layer’s filter cutoff
frequency.
Velocity>Level
This determines how much the velocity of a
-99 to 00 to +99
strike will affect the layer’s volume level.
Velocity>Pitch
This determines how much the velocity of a
-99 to 00 to +99
strike will affect the layer’s tuning.
15
Page 16

V
A
These are the parameters on the FX/MIDI page of Voice Mode (they affect both layers):
Parameter Description
FX
Reverb Send
This is the voice’s send level for the
alues/Settings
00–99
reverb effect. It determines how much
reverb you want to apply to the
selected voice.
FX Send
This is the voice’s send level for the
00–99
FX1 effect. It determines how much of
the FX processor you want to apply to
the selected voice.
MIDI
MIDI Chan
This is the MIDI channel the trigger will
01–16
use when sending MIDI notes over the
USB port and MIDI out.
MIDI Note
This is the MIDI note the trigger will
000 (C-2) – 127 (G8)
send over its USB port and MIDI out
when struck.
Gate Time
Note Off
This is the duration of the MIDI note
the trigger will send over its USB port
and MIDI out when struck.
This determines how the trigger will
send a MIDI Note Off message.
Off, 00–99 ms, 1/32, 1/32Trplt,
1/16, 1/16Trplt, 1/8, 1/8Trplt,
1/4, 1/4Trplt, 1/2, 1/2Trplt
Not Sent: The trigger will not
send MIDI Note Off messages.
Sent: The trigger will send a
MIDI Note Off message after the
Gate Time.
lternate: Striking a trigger will
cause it to alternate between
sending MIDI Note On messages
and MIDI Note Off messages.
Other
Priority
This determines the voice’s priority in
the Strike module’s overall polyphony.
If the module is playing the maximum
number of voices, triggering an
Low
Medium
High
additional voice will cause low-priority
voices to stop, allowing medium- and
high-priority voices to sound.
MuteGroup
This determines the voice’s mute group.
When two or more voices are assigned to
a mute group, triggering one of the
Off
01–09
voices will immediately mute all other
voices in that mute group.
Playback
This determines whether the voice on
this trigger will be allowed to sound
only once at any given time or multiple
Mono
Poly
times (limited only by the module’s
polyphony limit).
16
Page 17

Saving Kits
After editing a kit, you may want to save it as a user kit on an SD card for a later performance.
Important: If you edit a preset kit and then save it, the saved kit will be stored onto your SD
card, while the original preset kit remains unchanged on the module’s internal memory. You
must have your SD card inserted into the SD card slot in order to save changes to preset kits.
To save a user kit:
1. After editing the kit, press Kit to enter the
Kit Menu.
2. Press Save.
3. In the page that appears, enter the name of
the kit. Press F1/<< or F2/>> to move to the
previous or next character, and turn the
data dial to change the current character.
4. To save the kit, press F3/Save.
To return to the previous screen without
saving, press F6/Back.
Important: If you try to save a kit with a
name that already exists, the module will ask
if you want to overwrite (replace) the existing
kit. To overwrite the kit, press F1/Save. To
cancel, press F6/Back.
Tip: If you edit a preset kit, save it, and then
want to load that saved kit later, remember
that it is actually a user kit.
17
Page 18

V
Trigger Mode
Trigger Mode shows the settings that determine how the trigger sensor for each drum or
cymbal pad behaves when struck. If you want to make adjustments to the overall level of a
sound, do this in the Layers tab of Voice Mode instead (see Editing Voices); Trigger Mode
settings are already optimized to work with your Strike Kit or Strike Pro Kit, so they generally
won’t require adjustment.
These settings are global and retained in the module’s internal memory; they are not saved
with any kit. To save your trigger settings, simply press Save while in Trigger Mode.
To edit trigger settings:
1. After selecting a kit, press Edit > Triggers
to enter Trigger Mode.
2. Select a trigger by doing one of the following:
• If the Note Chase button is off, press it
so it turns on. Strike the desired zone of
the trigger whose voice you want to edit.
• Use the cursors to select the Trig field in
the upper-right corner. Turn the data dial
to select the desired zone of a trigger.
3. Use the cursors to select the parameter
you want to edit.
Turn the data dial to change the parameter
value or setting.
To adjust other voice settings, repeat
Steps 2–4.
These are the parameters in Trigger Mode:
Parameter Description
Sensitivity
This is the gain control for the trigger. The higher the
setting, the easier it’ll be to trigger louder sounds with
lighter hits. When setting this parameter, strike the
trigger listen to the sound. If it’s too loud even though
you are striking the pad lightly, lower this setting.
Retrigger
This is the minimum amount of time needed between
successive strikes of the same trigger for the second
one to produce a sound. If this setting is too high, some
notes may not trigger when you play faster or perform
rolls. If this setting is too low, you may trigger extra,
undesired notes while playing normally.
Threshold
This determines how much velocity (force) is required for
a voice to sound. At higher settings, you’ll need to strike
the trigger harder to produce a sound. At lower settings,
very light strikes on the trigger will produce sounds. If this
setting is too low, though, triggers may play randomly
without being struck. The default Threshold values are
already optimized to work with your Strike Kit or Strike
Pro Kit, so they generally won’t require adjustment.
alues/Settings
00–99
00–99
00–99
18
Page 19

V
X
X
A
Parameter Description
Curve
This determines how a sound’s volume is
affected by how hard you strike it—that is,
how responsive the trigger’s dynamics are to
changes in your playing. All triggers on your
Strike Kit or Strike Pro Kit use Linear as the
default setting, which provides the most
accurate and natural performance.
Input Type
This is the type of trigger connected to the
corresponding trigger input. Don’t change
this setting if you’re using your Strike or
Strike Pro Kit. If you want to use third-party
triggers with your Strike Kit or Strike Pro Kit,
please check with the manufacturer’s
alues/Settings
Linear
Log 1–4
Exp 1–4
Spline 1–4
Offset
Constant
Piezo: A pressure-sensitive
trigger like drum or cymbal
pads.
Switch: A dual-state trigger
like a footswitch.
documentation for the proper setting.
Talk Rcv
This determines how susceptible the trigger
00–07
is to “crosstalk” from other triggers. The
higher the value, the less likely crosstalk
from other triggers will affect it. See About
Crosstalk (XTalk) below.
Talk Send
This determines how likely the trigger will
00–07
cause “crosstalk” in other triggers. The
higher the value, the less likely it’ll be a
source of crosstalk on other triggers. See
bout Crosstalk (XTalk) below.
About Crosstalk (XTalk)
When striking a trigger causes another trigger to sound unexpectedly, it is referred to as
crosstalk (or XTalk). It’s not common, and your Strike module has already been optimized to
eliminate this when using your Strike Kit or Strike Pro Kit. However, like a real acoustic drum kit,
your kit can be positioned and played in many different ways depending on your preferences,
some of which may cause crosstalk. If that happens, follow these tips to troubleshoot crosstalk:
• Make sure your drum and cymbal pads aren’t touching each other or their clamps. For
example, if a tom is touching another tom or the rack itself, it can vibrate other pieces of
the kit much more easily.
• If possible, set up your kit on a soft, carpeted surface. Hard floors will generally cause
more vibration through the drum rack.
• Adjust the tightness of the cymbal wingnuts. Wingnuts that are too loose can let the
cymbal “bounce” which can cause unwanted vibrations through the boom arm and rack.
Alternatively, wingnuts that are too tight don’t allow enough “bounce,” so the force from a
strike will transfer directly to the rack.
• If a specific drum or cymbal pad seems to cause others to sound, increase the XTalk
Send setting for that specific trigger. XTalk Send is best used on the trigger that’s causing
the crosstalk.
• If a specific drum or cymbal pad seems susceptible to unexpected triggering from
crosstalk, adjust the XTalk Receive setting for that specific trigger.
19
Page 20

Hi-Hat Pedal Setup
While the trigger settings for the drums and cymbals of your Strike Kit or Strike Pro Kit have
already been optimized, you may need to make a small adjustment to optimize your hi-hat
pedal performance. Hi-hat pedal designs can vary and the Strike module has an easy
adjustment to help with this.
To adjust your hi-hat top cymbal:
1. See the Strike Kit or Strike Pro Kit Assembly Guide to be sure your hi-hat cymbal is
connected and positioned properly.
2. Loosen the hi-hat “clutch” and let the top cymbal rest lightly on the spring below.
3. Without pushing down on your hi-hat pedal, tighten the clutch.
Now that your hi-hat pedal is configured, select a kit with a realistic acoustic hi-hat sound and
play it. You should be able to hear a distinct “chick” sound when closing the hi-hat by
stepping on the pedal. While striking the top hi-hat cymbal and opening/closing the pedal, you
should be able to hear a transition from the appropriate open or closed hi-hat sound.
Note: Not all kits will have multiple hi-hat position sounds. For example, some kits in the
Electronic category may have unconventional instruments assigned to the hi-hat.
If you cannot get the “chick” sound to happen consistently:
1. Press Edit > Triggers to enter Trigger Mode.
2. Select the hi-hat bow or edge trigger by doing
one of the following:
• If the Note Chase button is off, press it
so it turns on. Press the hi-hat pedal or
strike the hi-hat.
• Use the cursors to select the Trig field in
the upper-right corner. Turn the data dial
to select HiHat Bow or HiHat Edge.
3. Press F1/F2/Pedal.
4. Turn the data dial to set the Open parameter
to 99 (the default).
5. Use the cursors to select the Closed parameter.
6. While repeatedly stepping on your hi-hat pedal,
adjust the value of the Closed parameter with
the data dial until you consistently get a
“chick” sound. If you are not hearing a “chick”
sound, try setting the Closed value higher.
20
Page 21

To adjust the transition between Open and Closed position sounds:
1. Press Edit > Triggers to enter Trigger Mode.
2. Select the hi-hat bow or edge trigger by doing one of the following:
• If the Note Chase button is off, press it so it turns on. Press the hi-hat pedal or strike
the hi-hat.
• Use the cursors to select the Trig field in the upper-right corner. Turn the data dial
to select HiHat Bow or HiHat Edge.
3. Press F1/F2/Pedal.
4. If you would like the Open position sounds to happen more easily, set the Open parameter
lower. We recommend keeping this setting at 99, though, as this will maximize the
versatility of your hi-hat performance.
5. If you would like the Closed position sounds to happen more easily, or if you have to push
down on your pedal too much to get a Closed position sound, set the Closed parameter
higher. Keep in mind that setting this parameter too high may cause the “chick” sound to
behave unexpectedly.
Metronome
To turn the metronome on or off, press Metro > On/Off.
To adjust the tempo of the metronome, do one of the following:
• Press Metro > Tempo at least 3 times at the desired rate.
• Press and hold Metro > Tempo, and then turn the data dial to select a new tempo.
To change the metronome settings, see Utility Menu > Metronome (Metro). You can change
the metronome sound, time signature, and volume levels. You can also enable or disable the
Metro > Tempo button.
21
Page 22

Sample Mode
You can use your Strike module to record, edit, and save samples from another audio source.
You can then assign those samples as instruments in a kit or play them back as loops or
backing tracks.
Recording Samples
Sample Record Mode contains controls for recording from an audio source connected to the
Strike module’s Aux In.
To record a sample:
1. Press Record () to enter Sample Record
Mode.
2. Use a 1/8” (3.5 mm) stereo/TRS cable to
connect your audio source to the aux in (on
the rear panel).
3. Turn the data dial to select the channels
you want to record: the left and right
channels in stereo (Stereo), the left channel
only (Mono Left), the right channel only
(Mono Right), or both channels summed
into a mono signal (Mono Summed).
4. Play your audio source and set its volume at
a listenable level, and then turn the Aux In
knob (on the top panel) to adjust the input
recording level, which will appear in the Left
and Right level meters. When you have set
an appropriate level, find the part of your
audio that you want to record.
5. Press the Record () button to start
recording. The button in the display will light
red and the Time Remaining counter will
start counting.
6. Play your audio source.
7. Press the Record () button again to stop
recording and enter Sample Edit Mode.
8. Stop playback from your audio source, or
turn the Aux In knob back down.
22
Page 23

Editing Samples
Sample Edit Mode lets you edit the sample you
just recorded. The module will automatically enter
Sample Edit Mode when you stop recording.
To enter Sample Edit Mode from another
screen, press Sample.
To adjust the start or end markers of the sample,
press F1/Start to select the Start (left) marker, or
press F2/End to select the End (right) marker.
To adjust the start or end markers with more
precision, press and hold F1/Start or F2/End
while turning the data dial. This will zoom in on
the Start or End marker so you can make fine
adjustments, which is important when creating a
loop that will repeat without pops or clicks.
To play the area of the sample between the
start and end markers, press Play (
To stop playback, press Stop ().
To zoom into the area of the waveform between
the start and end markers, press F5/Zoom.
Press it again to return to the preview view.
To set a quantization grid, press F3/Grid to
cycle through 1/4 Note, 1/8 Note, 1/16 Note,
and Off. This will lock the location of the End
marker to a musical grid, based off the Strike
module’s tempo.
To adjust the tempo (which affects the Grid
setting), do one of the following:
• Press Metro > Tempo three or more times
in succession at the desired rate.
• Press and hold Metro > Tempo and turn
the data dial.
• Use the cursors to select the BPM field in
the upper-right corner and then turn the
data dial.
To looping on or off, press F4/Loop. When on,
playing the sample will cause it to repeat until you
press Stop (). When off, playing the sample will
play it only once.
).
23
Page 24

Saving Samples
When you want to save the sample, you must select how you want to use it; you can save it as
a loop—a normal audio file that you can play back in Sample Playback Mode—or as an
instrument—a sound that you can assign to a voice in a kit.
Important: When you save a loop or instrument, it will be saved to your SD card only. You
cannot save or overwrite loops or instruments in your Strike module’s internal memory.
To save the sample:
1. Press Save.
2. In the window that appears, press a function
button to determine how you save the
sample:
To save the entire sample (without edits)
as a loop, press F1/Full.
To save the edited sample as a loop,
press F2/F3/Trimmed.
Note: We recommend saving samples
immediately as Full or Trimmed loops so
you can name the file. You can always
reload, edit, or play a loop later—or use it to
create an instrument—while an instrument
is simply for assigning to a trigger.
To save the edited sample as an
instrument, press F4/Inst. In the page that
appears, turn the data dial to select the
instrument category to which you want to
save it. Press Select to confirm your choice.
3. In the next page, enter the name of the loop
or instrument. Press F1/<< or F2/>> to move
to the previous or next character, and turn
the data dial to change the current
character.
4. To continue saving, press F3/Save.
To return to the previous screen (without
saving), press F6/Back.
Important: If you try to save a loop or
instrument with a name that already exists,
the module will ask if you want to overwrite
(replace) the existing one. To overwrite the
loop or instrument, press F1/Save. To
cancel, press F6/Back.
24
Page 25

Assigning Samples
Once you have saved your edited sample as an instrument, you can assign it to a kit.
To do this, see Kits > Editing Kits > Assigning Instruments. All samples saved as instruments
are found in the User tab.
Playing Loops
You can play your edited sample as a loop (e.g., as a backing track) in Sample Edit Mode.
To play a loop:
1. Press Sample to enter Sample Edit Mode.
2. Use the cursors to select the Sample field
at the top of the display.
3. Turn the data dial to select a sample, which
will appear in the waveform below.
4. Press Play (
finished, press Stop () to stop playback.
Alternatively:
1. Press the Record () button to enter Sample
Record Mode.
2. Press F1/List to show a list of samples on
your SD card.
3. Turn the data dial to select a sample.
4. Press Sample to enter Sample Edit Mode.
The sample you selected will appear in the
waveform below.
5. Press Play (
finished, press Stop () to stop playback.
) to start playback. When you’re
) to start playback. When you’re
25
Page 26

V
Utility Menu
The Utility menu contains settings that determine the module’s overall operation, including
global metronome functions, global trigger settings, and system information.
Press the corresponding function button to show its settings:
• F1/Metro: Metronome settings. See Metronome (Metro) in this chapter.
• F2/MIDI: MIDI settings. See MIDI in this chapter.
• F3/Trigger: Trigger settings. See Trigger in this chapter.
• F4/SysEx: Send the trigger settings as a MIDI SysEx file. See SysEx in this chapter.
• F5/OS: Current operating system information. See OS in this chapter.
On each page, use the cursors to select a setting, and turn the data dial to change it.
Metronome (Metro)
Setting Description
Beats Per Bar
This is the number of beats in each bar
(the top number of a time signature).
alues/Settings
00–99
Note Per Beat
Meas Lvl
Meas Snd
Beat Lvl
Beat Snd
This is the time division of each beat
(the bottom number of a time signature).
This is the volume level of the first beat
of each bar.
This is the sound used for the first beat
of each bar.
This is the volume level of each beat
except the first.
This is the sound used for each beat
except the first.
1/2, 1/4, 1/8, 1/16
00–99
Woodblock 1, Woodblock 2,
Cowbell 1, Cowbell 2, Shaker
00–99
Woodblock 1, Woodblock 2,
Cowbell 1, Cowbell 2, Shaker
26
Page 27

V
V
Setting Description
Subdvsn
This determines the subdivision of each
beat.
Subd Lvl
This is the volume level of subdivisions
of each bar.
Subd Snd
This is the sound used for subdivisions
of each bar.
Tap Tempo This is determines whether the Metro >
Tempo button is enabled or disabled.
MIDI
alues/Settings
Off, 1/4, 1/4Trplt, 1/8, 1/8Trplt,
1/16, 1/16Trplt, 1/32, 1/32Trplt,
1/64, 1/64Trplt
00–99
Woodblock 1, Woodblock 2,
Cowbell 1, Cowbell 2, Shaker
On, Off
Setting Description
Drum Chan
LocalCont
MIDI Thru
This is the MIDI channel over which
the module will receive MIDI data.
This determines whether the module
receives MIDI messages from the
triggers (connected to the trigger
inputs) or an external source (over
the USB port or MIDI In).
This determines whether or not the
module’s MIDI Out functions as a
MIDI Thru.
alues/Settings
Omni (all channels)
01–16
On: The module will receive MIDI
messages from your Strike Kit triggers.
Off: The module will receive MIDI
messages from an external MIDI
device like a sequencer.
Enabled: A MIDI device connected to
the module’s MIDI In will send its MIDI
messages through the module to the
device connected to the MIDI Out.
Disabled: Only MIDI messages
originating from the module itself will
be sent out of its MIDI Out.
27
Page 28

V
Trigger
Setting Description
Trig Sensitivity
This determines the overall sensitivity of all triggers
connected to the module’s trigger inputs.
alues/Settings
Low
Medium
High
HiHat
HiHat Splash
Cymbal Choke
This determines whether the hi-hat MIDI note will be
sent with or without a MIDI CC message (CC#4).
This determines whether or not the hi-hat “splash”
note (generated by quickly pressing then releasing
the pedal) will be sent.
This determines whether or not the cymbal “choke”
note (generated by grabbing the cymbal’s choke
strip) will be sent.
Note+CC#4
Note Only
Sent
Not Sent
Sent
Not Sent
SysEx
To send all trigger settings from the module as a SysEx file (over the USB port and MIDI
Out), press Enter.
To send a SysEx file to the module (over the USB port and MIDI In), send it any time from
your computer or external MIDI device.
OS
Setting Description
Trigger OS
DSP OS
This is the version of the trigger firmware.
This is the version of the module’s firmware.
28
Page 29

Appendix
Effects
Effect Name Parameters
Off
Mono Flanger
Stereo Flanger
Xover Flanger
Mono Chorus 1
Mono Chorus 2
Stereo Chorus
XOver Chorus
Mono Vibrato
Vibrato
Mono Doubler
Doubler
Mono Slapback
Slapback
Mono Delay
Delay
XOver Delay
Ping Pong
Rate Depth Feedback Level
Rate Depth Feedback Level
Rate Depth Feedback Level
Rate Depth Feedback Level
Rate Depth Feedback Level
Rate Depth Feedback Level
Rate Depth Feedback Level
Rate Depth Level
Rate Depth Level
Delay Level
Delay Level
Delay Level
Delay Level
Delay Feedback Damp Level
Delay L Feedback L Delay R Feedback R Damp Level
Delay L Delay R Feedback Damp Level
Delay Feedback Damp Level
29
Page 30

Technical Specifications
Kits & Sounds
110 preset factory kits
> 1,600 instruments
Unlimited user kits, depending on SD card size
(4 GB total)
(see requirements below)
Display
4.4” / 111 mm
3.8” x 2.2” / 96 x 55 mm
(diagonal)
(width x height)
Full-color LED-backlit display
Connections Inputs
(13) 1/4” (6.35 mm) TRS inputs
(1) 1/8” (3.5 mm) stereo input
(triggers)
(auxiliary audio device)
(1) 5-pin MIDI input
Outputs
(2) 1/4” (6.35 mm) TRS outputs
(8) 1/4” (6.35 mm) TRS outputs
(main outputs, left & right)
(direct audio)
(1) 5-pin MIDI output
(1) 1/4” (6.35 mm) stereo output
Other
(1) USB Type-B port
(1) SD card slot
(see requirements below)
(headphones)
(1) power adapter input
Mixer
SD Card
Specifications
Power
Dimensions
(width x depth x height)
Weight
(12) 45 mm sliders; digital mixer
Type
File System
Class
Size
via power adapter
SDHC
FAT32
Class 10
64 GB
(maximum, 8 GB card included)
(12 V, 2 A, center-positive, included)
12.0” x 8.0” x 3.0”
30.5 x 20.3 x 7.6 cm
3.45 lbs.
1.56 kg
Specifications are subject to change without notice.
Trademarks & Licenses
Alesis is a trademark of inMusic Brands, Inc., registered in the U.S. and other countries.
SD and SDHC are registered trademarks of SD-3C, LLC.
All other product names, company names, trademarks, or trade names are those of their respective owners.
30
Page 31

alesis.com
Manual Version 1.0
 Loading...