

Page 1

88
USB/MIDI KEYBOARD CONTROLLER
USER GUIDE
ENGLISH ( 3 – 10 )
GUÍA DEL USUARIO
ESPAÑOL ( 11 – 18 )
GUIDE D’UTILISATION
FRANÇAIS ( 19 – 26 )
GUIDA PER L'USO
ITALIANO ( 27 – 34 )
BENUTZERHANDBUCH
DEUTSCH ( 35 – 43 )
Page 2

Page 3

A
USER GUIDE (ENGLISH)
BOX CONTENTS
• Q88
• USB Cable
• Software DVD
• User Guide
• Safety Instructions & Warranty Information Booklet
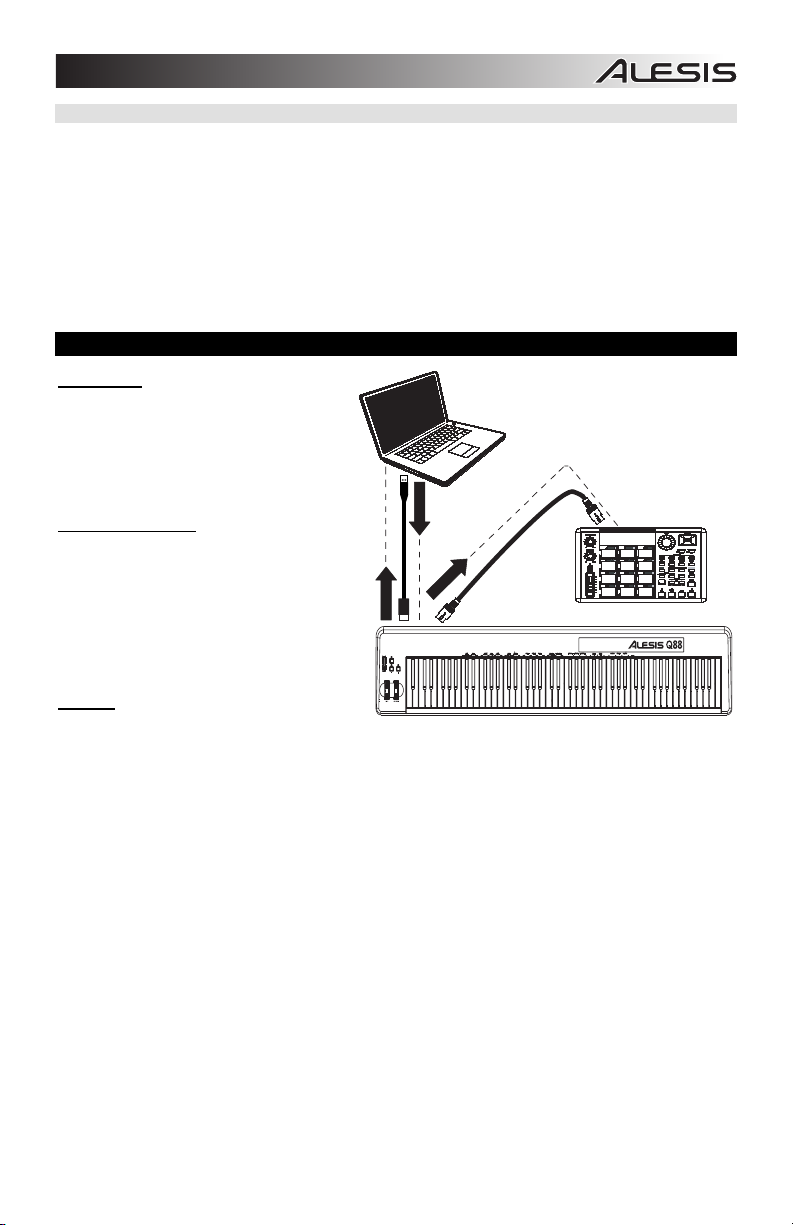
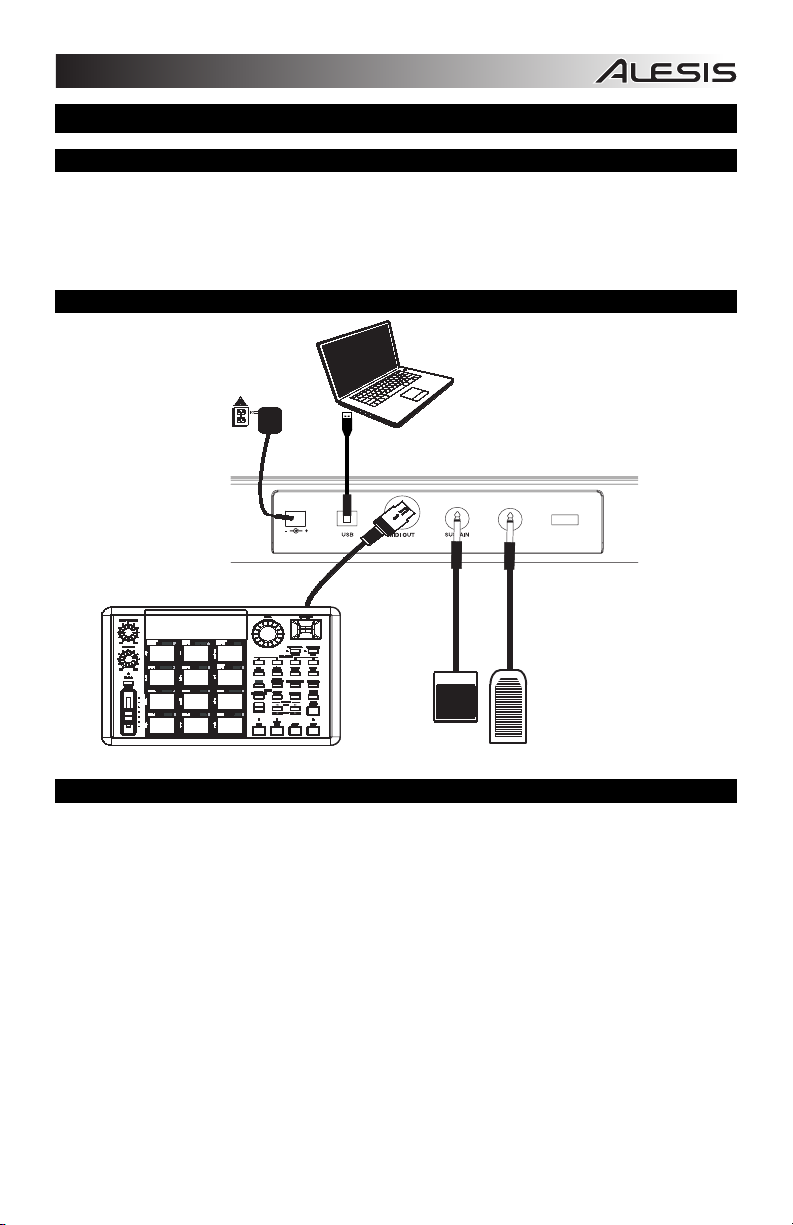
CONNECTION DIAGRAM
POWER
DAPTER*
9V DC 500mA
EXTERNAL MIDI DEVICE*
POWERING Q88
The Q88 can be powered by using a powered USB connection or an optional external power adapter (sold
separately).
Power and Connection via USB
1. Check that the on/off switch on the back of Q88 is set to “OFF”.
2. Connect the USB cable to a free USB port on your computer. Use a rear USB port on the computer for
better performance. If you are using a USB hub, make sure it is a powered hub.
3. Connect the other end of the USB cable to the USB port on Q88.
4. Turn Q88’s power switch on. The USB cable not only powers Q88 but also sends MIDI data to and from
your computer.
Using an External Power Adapter
You can use a power adapter (sold separately) with the following specification: 9V DC, 500 mA, center-pin
positive, 5.5 mm outside barrel diameter and 2.5 mm inside barrel diameter. If you are receiving power from
a powered USB hub, an external power adapter is not needed.
Note: Do not leave the power adapter plugged in for long periods of time if Q88 is not in use.
COMPUTER*
SUSTAIN
PEDAL*
VOLUME
ON/OFF
POWER
EXPRESSION
PEDAL*
*SOLD
SEPARATELY
3
Page 4
1
4
5
6
2
3
VOLUME
ON/OFF
POWER
9V DC 500mA
1
2
3
5
6
4
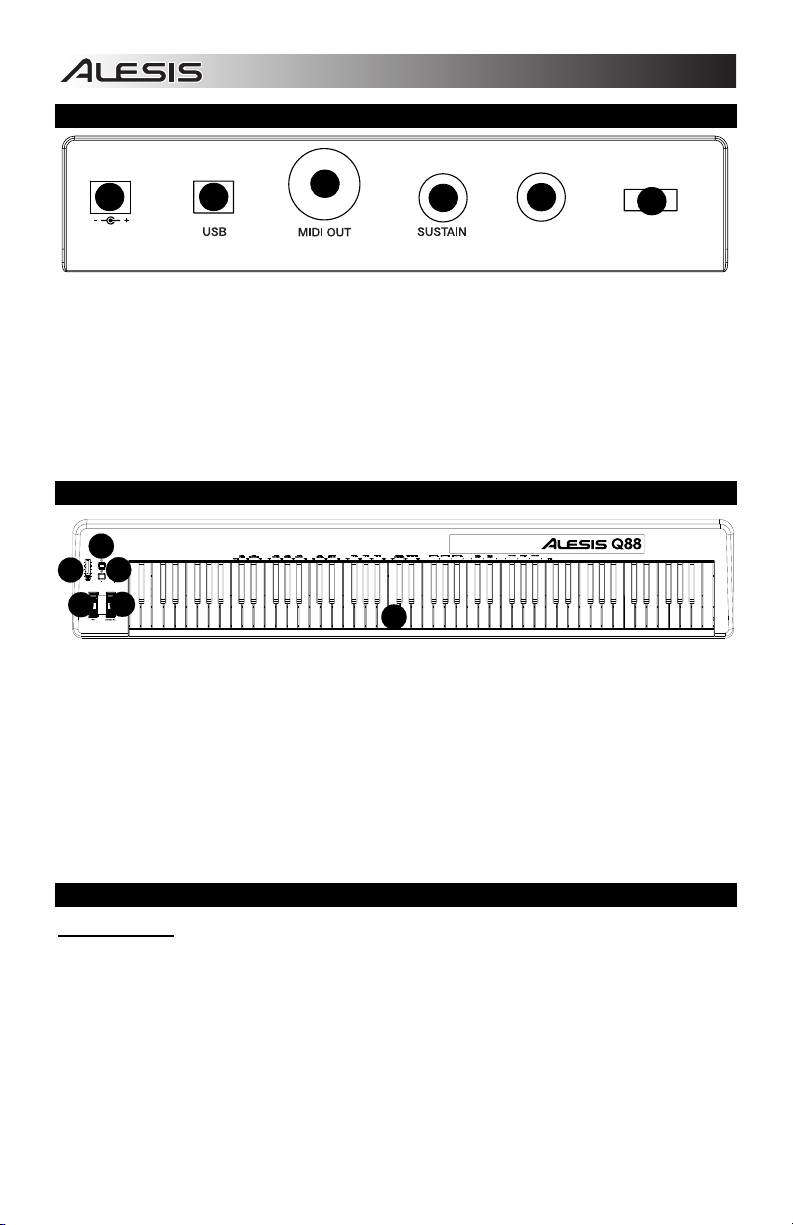
REAR PANEL OVERVIEW
ON/OFF
9V DC 500mA
1. POWER ADAPTER INPUT – Connect a power adapter here if you do not want to power Q88 by using
a USB connection.
2. USB CONNECTION – Connect the included USB cable here and then connect it to a USB port on your
computer.
3. MIDI OUT – Use a standard five-pin MIDI cable (sold separately) to connect this jack to the MIDI IN of
an external MIDI device (keyboard, drum machine, sequencer, etc.).
4. SUSTAIN PEDAL INPUT – Connect a 1/4" TS sustain pedal (sold separately) to this input.
5. EXPRESSION PEDAL INPUT – Connect a 1/4" TRS expression pedal (sold separately) to this input.
A connected Expression Pedal will control the Volume Slider's assigned function and disable the
Volume Slider.
6. POWER SWITCH – Turns the power on/off.
VOLUME
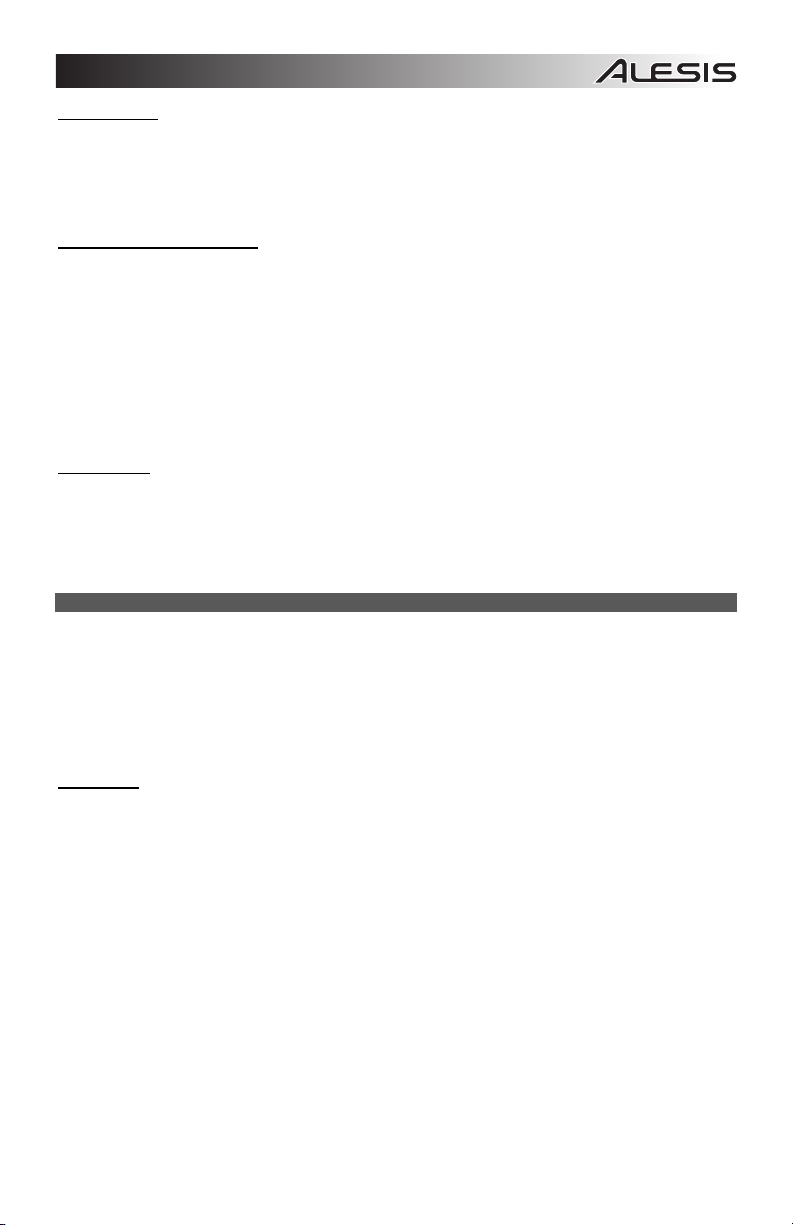
TOP PANEL OVERVIEW
ADVANCED
OCTAVEVOLUME
1. KEYBOARD – The keys on Q88 function as a standard MIDI keyboard but can also be used to adjust
MIDI settings and send MIDI messages.
2. PITCH BEND WHEEL – Transmits MIDI Pitch Bend information to temporarily raise or lower the pitch
of a note.
3. MODULATION WHEEL – Transmits continuous controller data (CC #1 - Modulation Depth by default).
The Modulation Wheel can also be assigned to different parameters such as pan, attack, reverb,
chorus, etc.
4. ADVANCED – Use this button to access the advanced MIDI settings listed above the keys.
5. VOLUME SLIDER – Transmits continuous controller data (CC#7 - Volume by default). The Volume
slider can also be assigned to different effects such as pan, attack, reverb, chorus etc.
6. OCTAVE - / + – Shifts the keyboard’s octave range up or down 3 octaves. To reset the octave to 0,
press both the Octave + and other functions such as transposition.
SELECTING & EDITING MIDI COMMANDS
Advanced Button
Pressing the ADVANCED button, along with the keyboard's keys, allows you to adjust and send precise MIDI
messages and information quickly and easily. In this mode, the black keys on the keyboard are used for
selecting functions, while the white keys are used for data entry and channel selection.
1. Press ADVANCED.
2. Press the key on Q88 whose MIDI setting (printed above the key) you want to adjust or send.
3. Enter a number value with the numeric keys.
4. Press the ENTER or CANCEL key to confirm or cancel your choice.
keys together. The Octave + and - keys can also be assigned to control
4
POWER
Page 5
MIDI Messages
MIDI CHANNELS – Selects the MIDI channel (1-16) over which Q88 will transmit MIDI messages. The
default is Channel 1.
MIDI OUT FROM USB – Enables/disables the Q88's ability to receive MIDI data from a USB connection (i.e.,
a DAW via a computer) and send it to an external sound engine.
Assignment Data Entry Group
DATA: OCTAVE – Allows you to adjust the octave range.
DATA: TRANSPOSE – Allows you to adjust the transposition.
DATA: PROGRAM – Allows you to adjust the program changes.
WHEEL ASSIGN – When in the ADVANCED menu, press the WHEEL ASSIGN key and use the Volume
Slider or the numeric keys to enter a MIDI CC# to assign a function to the wheel.
SLIDER ASSIGN – When in the ADVANCED menu, press the SLIDER ASSIGN key and then use the
Volume Slider or the numeric keys to enter a MIDI CC# to assign a function to the slider.
Octave Group
OCTAVE - – Lowers the octave range of the keyboard by one octave.
OCTAVE 0 – Sets the octave range to the default value, with the first key being A1.
OCTAVE + – Raises the octave range of the keyboard by one octave.
ADVANCED FUNCTIONS
In addition to setting an octave shift, the Octave + and - buttons can also be used to control other MIDI
functions. The keys that are labeled DATA: ________ are used to select the function for these octave
buttons. When the octave buttons are
remain on, regardless of the current function setting.
To select an alternate function:
1. Press the ADVANCED button.
2. Press the labeled black key that represents the function you want.
Octave Shift
The Octave + and - Keys
To shift the octaves using the Octave + and – buttons, first press the ADVANCED button and then use the
Octave + and - keys to shift the keyboard’s pitch up or down one or more octaves (one for each time
pressed). The default octave setting is 0 (when both LED’s are illuminated above the octave buttons) and will
be the octave setting each time you power up Q88.
To assign the Octave + and – buttons
1. Press the ADVANCED button.
2. Press the DATA: OCTAVE key.
To perform a quick octave change when the Octave + and - buttons are being used to control other MIDI
functions:
1. Press the ADVANCED button.
2. Press the OCTAVE + key to increase the octave by 1 (press it again to increase the octave by 2, and
so on).
3. Press the OCTAVE - key to decrease the octave by 1 (press it again to decrease the octave by 2, and
so on). Alternatively, press the OCTAVE 0 key to reset the octave to 0.
4. Press ENTER to confirm the change.
used to control these functions, both lights above the buttons will
to control the octave:
5
Page 6

Transposition
In some cases it is useful to reduce or raise or lower the keyboard's pitch by a number of semitones rather
than an entire octave. For example, if you are playing a song with a singer that is having difficulty singing
notes out of their vocal range, you can tranpose the pitch by one or two semitones to play the song in an
easier range for the singer. This is achieved by using a MIDI function called Transpose.
Note: A semitone is a half-step, the distance between two adjacent chromatic notes. Two semitones are
equal to a whole step. For example, one semitone higher than "C” would be "C#", and two semitones higher
than "C" would be "D".
Transpose works in the same way as Octave Shift, except the shift is +/- 12 semitones. There are two ways
to transpose the keyboard. You can use the Octave + and - buttons, or use the TRANSPOSE -,
TRANSPOSE 0 and TRANSPOSE + keys.
To assign the Octave + and - buttons to the transpose function:
1. Press the ADVANCED button.
2. Press the DATA: TRANSPOSE key.
Press the Octave + button or the Octave - button to hear the pitch of the note you play go up or down. Press
both Octave + and - buttons together to cancel the keyboard transposition.
MIDI Channel
MIDI data from Q88 can be sent on any of the 16 MIDI channels. However, certain MIDI devices and MIDI
software applications may require the keyboard to send MIDI data on a specific channel. If this is the case,
you can change the channel that the MIDI data is sent using the following method:
1. Press the ADVANCED button.
2. Press one of the 16 channel keys on Q88, according to the MIDI channel that you need.
The MIDI channel can also be assigned to the Octave + and - buttons. Once assigned, pressing + or - will
incrementally increase or decrease the channel. When channel 16 is reached and + is pressed, channel 1
will be selected. Pressing both the + and - buttons together will recall MIDI channel 1.
Program Change
Program changes are used to change the instrument or voice you are using. There are two ways to send a
program change message:
1. Increment/Decrement Program Change:
A. Press the ADVANCED button.
B. Press the DATA: PROGRAM key.
Now the Octave + and Octave - buttons can be used to change the program. Press the Octave + or Octave button and play the keys until you find the instrument that you want.
2. Quick Select Program Change:
A. Press the ADVANCED button.
B. Press the PROGRAM key.
Press the numeric keys to enter a program change number followed by the ENTER key. Alternatively, you
can use the Octave + and - buttons to change the value, and then press ENTER.
Bank LSB and Bank MSB
Program change messages are used to change MIDI instruments and voices. However, the number of
instruments accessible through program changes is limited to 128. Some devices have more than 128 voices
in various banks, requiring a different way to access these extra voices. Generally, these devices use Bank
LSB and Bank MSB messages.
Increment/Decrement Bank LSB and Bank MSB Changes:
1. Press the ADVANCED button.
2. Press the DATA: BANK LSB key
value.
to set the LSB value or press the DATA: BANK MSB to set the MSB
6
Page 7

Use the Octave + and - buttons to change the program. Press the + or - button and play the keys until you
find the instrument you want.
Using the Quick Select Method:
1. Press the ADVANCED button.
2. Press either the BANK LSB or BANK MSB key.
3. Use the numeric keys to enter the desired value, followed by the ENTER key. Alternatively, you can
use the Octave + and - buttons to change the value, and then press ENTER. Press the Octave + and buttons simultaneously
The Modulation Wheel
You can assign MIDI CC messages to the Modulation Wheel. Some useful values are:
• 01 Modulation
• 05 Portamento
• 07 Volume
• 10 Pan
For the MIDI CCs to have any effect on the sound, the receiving MIDI device must be able to read and
respond to these MIDI messages. Most devices will respond to at least
and pan data (CC #10).
To assign CC# to the Modulation Wheel:
1. Press the ADVANCED button.
2. Press the WHEEL ASSIGN key.
3. Use the numeric keys to enter the MIDI CC you want to assign to the Modulation Wheel. Alternatively,
you can use the Octave + and - buttons to change the value.
4. Press the ENTER key.
To cancel the numeric data you are entering, press the CANCEL key to exit Edit Mode without changing the
assignment of the Modulation Wheel.
Note: Each time Q88 is powered off, the value assigned to the Modulation Wheel will be lost and reset to the
default value of CC#1 (Modulation).
The Volume Slider
To assign the Volume Slider to any MIDI CC:
1. Press the ADVANCED button.
2. Press the SLIDER ASSIGN key.
3. Use the numeric keys to enter the number of the MIDI CC you want to assign to the Volume Slider.
Alternatively, you can use the Octave + and - buttons to change the value.
4. Press the ENTER key.
If you have made an error while entering the numeric data, you can press the CANCEL key to exit Edit Mode
without changing the assignment to the Volume Slider. Note that each time the keyboard is powered off, the
value assigned to the Volume Slider will be lost and reset to the default value of controlling volume.
Pitch Bend Sensitivity
You can alter the sensitivity of the Pitch Bend Wheel by assigning MIDI CC #128 to the Modulation Wheel or
Volume Slider. This will allow you to alter the pitch bend range up/down one octave.
to select Bank 0.
volume (CC #7), modulation (CC #1),
USING A SUSTAIN PEDAL
You can connect a sustain pedal (sold separately) to Q88 to control the length of notes, similar to the sustain
pedal on a piano. Connect the pedal before Q88 is powered on so it can to detect the correct polarity. To
reverse the default polarity of the pedal, press and hold the pedal while powering on Q88.
7
Page 8

SETTING UP Q88 WITH ABLETON LIVE LITE
1. CONFIGURING AS A CONTROL SURFACE
1. Open the software and go to the Options menu (Windows) or Live Lite menu (Mac),
and select Preferences.
2. In the Preferences menu, choose the MIDI Sync tab, and then open the Control Surface menu to
select Q88 from the Control Surface list.
3. Go to the Input and Output drop-down menus. On the Input drop-down menu, select Q88 as the MIDI
input device. Note: You may see USB Audio Device and not Q88.
4. Go to the Output drop-down menu and select the first MIDI output (which represents the USB MIDI
signal).
2. INPUT/OUTPUT OPTIONS
Q88 is now selected as the control surface. In the Input/Output menus, view the Track, Sync, and Remote
options:
1. The Track option routes any MIDI notes sent by Q88. When using Q88 to trigger virtual instruments in
Live Lite, turn Track On for the MIDI input.
2. The same can be done for the MIDI outputs. Generally, you will not need to turn Track On here.
However, if you need to route MIDI notes back out to an external MIDI device, turn Track On for MIDI
Output 2 (which represents the physical MIDI output port on Q88).
3. To use the Volume Slider, Pitch Bend Wheel, or Modulation Wheel to control Live Lite, turn Remote On
for the MIDI Input. This routes the MIDI CC messages into the software to control different functions in
the software.
3. SETUP WITH A VIRTUAL INSTRUMENT
1. Select a Virtual Instrument from Live Lite’s Live Devices list. For example, select Billy the Kid (in the
Brass folder) from the Instrument Rack.
2. Add the virtual instrument to your project by dragging it over the Clip/Device Drop Area (where it says
"Drop Files and Devices Here").
3. Click the Record Enable button at the bottom of the screen (in order to hear what you will be playing).
4. Click the drop-down menu for the MIDI input, labeled MIDI From and set this to All Ins.
5. If you have Q88 set to a specific MIDI channel that you would like only this virtual instrument to respond
to, you can choose the specific MIDI channel from the drop-down menu. Generally, this should stay on
All Channels.
6. Play the keys on Q88 to hear the audio from the Virtual Instrument track coming from your computer
speakers.
For more details, refer to Live’s Help documentation by navigating to Help > Help View. A pane on the right
will display helpful information.
4. CUSTOM ASSIGN CONTROLS
Follow these steps to customize Live Lite to respond to certain controls on Q88:
1. In Live Lite, bring up the MIDI assignment options menu by clicking the MIDI button in the upper right
corner. A purple sheen will be placed over the assignable options. Any option you see highlighted can
be mapped to the Volume Slider, Pitch Bend Wheel, or Modulation Wheel on Q88.
2. Click an assignable option on the screen.
3. Move the control you would like to assign. Its CC (Control Change) number will be shown for the
particular control that you moved.
4. Click the MIDI button in the upper right corner to exit MIDI assignment mode.
5. Move the control on Q88 that you assigned it will now move the assignment that you chose on-screen.
8
Page 9
5. VALUE SCALING VS. PICKUP MODE
In the Preferences menu, go to the Takeover Mode drop-down menu which has options for Pickup and
Value Scaling.
• When Set to Pickup, a control on Q88 will start moving its assigned software parameter only when
Q88's hardware control moves past the current value of that parameter.
Example: The Volume Slider on Q88 is all the way down. Fader 1 in the software is halfway up. When
set to Pickup, Fader 1 will not move until the Volume Slider on Q88 goes past the halfway point. It will
then “pickup” from this point and begin to move Fader 1 in the software.
• When set to Value Scaling, it will do the opposite.
Example: The Volume Slider on Q88 is all the way down. Fader 1 in the software is halfway up.
When set to Value Scaling, Fader 1 will move as soon as you move the Volume Slider on Q88.
MIDI TROUBLESHOOTING
All Notes Off
If you experience hanging notes that do not
stop playing, send an All Notes Off MIDI
message to stop this by performing the
following:
1. Press the ADVANCED button.
2. Press the ALL NOTES OFF key.
Reset All Controllers
If you find there is an effect on an instrument
that you do not want, rather than having to
isolate and identify that particular effect, you
can send a Reset All Controllers MIDI
message by performing the following:
1. Press the ADVANCED button.
2. Press the RESET ALL CONTROLLERS
key.
ADVANCED
OCTAVEVOLUME
MIDI Out
The MIDI Out port can be used to connect Q88 to an external sound module or another MIDI keyboard. By
default (when you power Q88 on), all controller data is sent out its MIDI output and USB connection.
However, if you want the MIDI output to act as a traditional USB-to-MIDI interface, follow the steps below:
1. Press the ADVANCED button.
2. Press the key labeled MIDI OUT FROM USB.
3. Select Q88 as the MIDI Out device in your sequencer software. Q88 will now receive MIDI data from
the computer through its USB connection and send it out its MIDI output. See the side diagram for MIDI
routing details.
9
Page 10
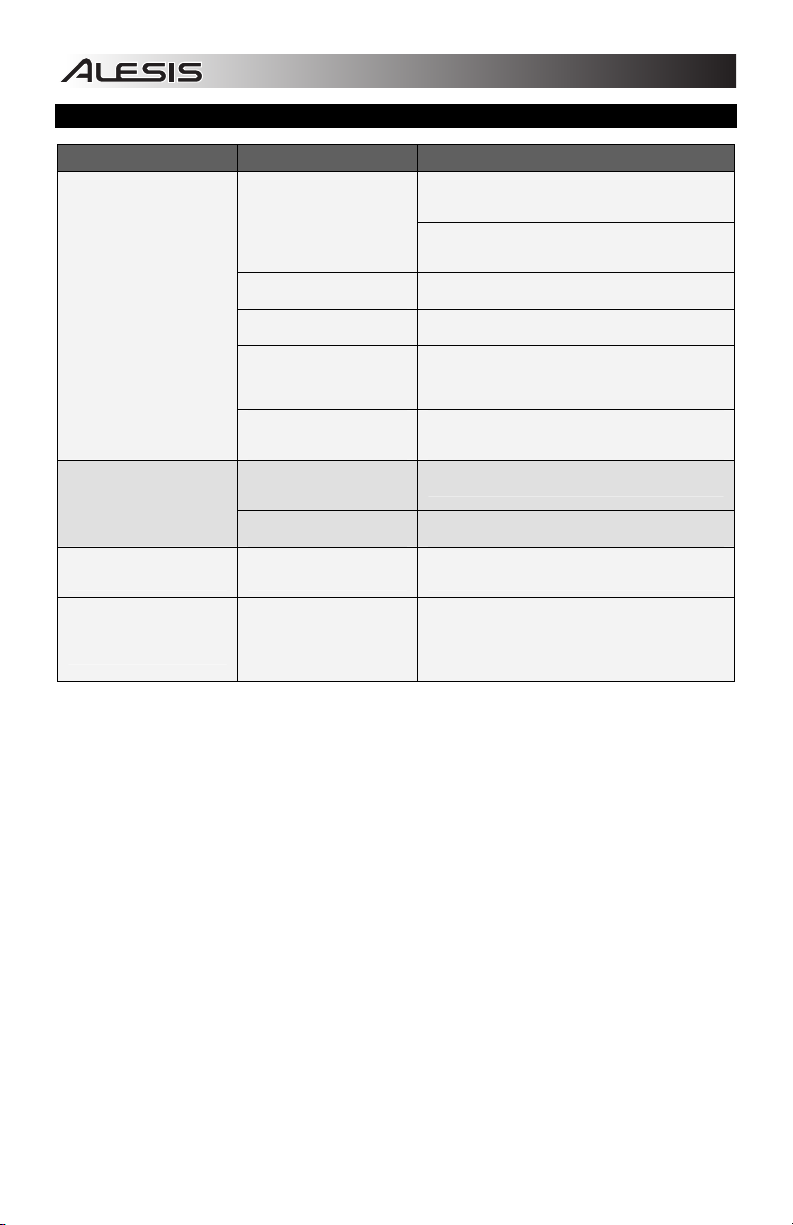
GENERAL TROUBLESHOOTING
PROBLEM CAUSE SOLUTION
Check your computer's USB connection to confirm that
the Q88 is recognized. If necessary, replug the
connection and restart your computer.
If controlling an external hardware module, make sure
that the MIDI cable is connected to Q88 and to the
device's MIDI IN port.
Restart the software application.
Unplug Q88 from the USB hub and connect directly to
the computer.
Ensure that Q88 or USB MIDI device is listed as an
active MIDI source in your application. Usually, the
MIDI settings can be accessed through the
application's Preferences menu.
Make sure that the Q88 is sending MIDI information on
the channel over which the target device is set to
receive it.
Power off Q88 for 10 seconds and then restart.
Turn Q88’s power off, wait 10 seconds, and then turn it
on again.
With the pedal plugged in, turn the Q88's power off,
wait a moment, and turn it on again.
Try to increase the buffer size for your software
program, use low-latency ASIO drivers, or temporarily
use a General MIDI instrument in place of a highlatency VST instrument while recording.
No sound from target device.
Notes sustain continuously.
Sustain pedal works in
reverse.
When I press a key, there is
a delay before I hear any
sound.
Q88 is not properly
connected.
Q88 was connected after the
software application started.
Problem is caused by use of
a USB hub.
Software is not set to receive
MIDI data from the Q88.
Q88's MIDI channel is not the
same as software's incoming
MIDI channel.
Sustain pedal was plugged in
after the Q88 was powered
on.
Stuck notes due to
incomplete MIDI data.
Sustain pedal was plugged in
after power was turned on.
This is software latency.
10
Page 11
A
A
MANUAL DEL USUARIO (ESPAÑOL)
CONTENIDO DE LA CAJA
• Q88
• Cable USB
• DVD de software
• Guía del usuario
• Folleto de instrucciones de seguridad e información sobre la garantía
DIAGRAMA DE CONEXIÓN
DAPTADOR DE
LIMENTACIÓN*
9V DC 500mA
DISPOSITIVO MIDI EXTERNO*
CÓMO ALIMENTAR EL Q88
El Q88 se puede alimentar usando una conexión USB alimentada o un adaptador de alimentación externo
opcional (que se vende por separado).
Alimentación y conexión por USB
1. Verifique que el interruptor de encendido de la parte trasera del Q88 esté en la posición “OFF”.
2. Conecte el cable USB a un puerto USB libre de su computadora. Use un puerto USB trasero de la
computadora para obtener un mejor resultado. Si está usando un concentrador (hub) USB, asegúrese
de que sea un concentrador alimentado.
3. Conecte el otro extremo del cable USB al puerto USB del Q88.
4. Encienda el Q88. EL cable USB no solo alimenta al Q88 sino que también envía datos MIDI desde y
hacia su computadora.
Cómo utilizar un adaptador de alimentación externo
Es posible usar un adaptador de alimentación (que se vende por separado) con la siguiente especificación: 9
V CC, 500 mi, pin central positivo, diámetro exterior del tubo 5.5 mm y diámetro interior del tubo 2.5 mm. Si
está recibiendo alimentación desde un concentrador USB alimentado, no se necesita el adaptador de
alimentación externo.
Nota: No deje el adaptador de alimentación enchufado durante períodos largos si el Q88 no se usa.
COMPUTADORA*
VOLUME
PEDAL DE
SOSTENIDO*
ON/OFF
POWER
PEDAL DE
EXPRESIÓN*
*SE VENDEN
POR
SEPARADO
11
Page 12

1
4
5
6
2
3
VOLUME
ON/OFF
POWER
9V DC 500mA
1
2
3
4 5
6
VISTA DEL PANEL TRASERO
ON/OFF
9V DC 500mA
VOLUME
1. ENTRADA DEL ADAPTADOR DE ALIMENTACIÓN – Conecte aquí un adaptador de alimentación si
no desea alimentar el Q88 usando una conexión USB.
2. CONEXIÓN USB – Conecte aquí el cable USB incluido y luego conéctelo a un puerto USB de su
computadora.
3. SALIDA MIDI – Use un cable MIDI estándar de cinco pines (que se vende por separado) para
conectar este conector hembra a la ENTRADA MIDI de un dispositivo MIDI externo (teclado, caja de
ritmos, secuenciador, etc.).
4. ENTRADA DE PEDAL DE SOSTENIDO – Conecte a esta entrada un pedal de sostenido TS de 1/4
pulg. (que se vende por separado).
5. ENTRADA DE PEDAL DE EXPRESIÓN – Conecte a esta entrada un pedal de expresión TRS de 1/4
pulg. (que se vende por separado).
El pedal de expresión conectado controla la función asignada al cursor de volumen y deshabilita dicho
cursor.
6. INTERRUPTOR DE ENCENDIDO – Se utiliza para encender y apagar la unidad.
VISTA DEL PANEL SUPERIOR
88
ADVANCED
OCTAVEVOLUME
1. TECLADO – Las teclas del Q88 funcionan como teclado MIDI estándar pero se pueden usar también
para ajustar los parámetros MIDI y enviar mensajes MIDI.
2. RUEDA DE INFLEXIÓN DE PITCH – Transmite información de inflexión de pitch MIDI para elevar o
bajar el tono de una nota temporalmente.
3. RUEDA DE MODULACIÓN – Transmite datos continuos del controlador (CC #1 - Profundidad de
modulación predeterminada).
parámetros tales como balance (pan) ataque, reverberación, coro, etc.
4. AJUSTES AVANZADOS – Use este botón para acceder a los ajustes MIDI avanzados listados arriba
de las teclas.
5. CURSOR DE VOLUMEN– Transmite datos continuos del controlador (CC#7 - Volumen
predeterminado). El cursor de volumen se puede asignar también a distintos efectos tales como
balance (pan) ataque, reverberación, coro, etc.
6. OCTAVA - / + – Se utiliza para desplazar la gama de octavas del teclado hacia arriba o abajo 3
octavas. Para restablecer la octava a 0, pulse al mismo tiempo ambas teclas Octave + y Octave + y - se pueden asignar también para controlar otras funciones tales como la transposición.
COMO SELECCIONAR Y EDITAR COMANDOS MIDI
Botón de ajustes avanzados
Al pulsar el botón ADVANCED junto con las teclas del teclado, usted puede ajustar y enviar mensajes e
información MIDI precisos en forma rápida y sencilla. En este modo, las teclas negras del teclado se usan
para seleccionar funciones, mientras que las blancas se usan para entrada de datos y selección de canales.
1. Pulse ADVANCED.
2. Pulse la tecla del Q88 cuyo parámetro MIDI (impreso arriba de la tecla) desea ajustar o enviar.
3. Ingrese un valor numérico con las teclas numéricas.
4. Pulse las teclas ENTER o CANCEL para confirmar o cancelar su selección, respectivamente.
DATA:
DATA:
DATA:
DATA:
DATA:
DATA:
OCTAVE
TRANSPOSE
CANCEL CH 1 CH 2 CH 3 CH 4 CH 5 CH 6 CH 7 CH 8 CH 9 CH 10 CH 11 CH 12 CH 13 CH 14 CH 15 CH 16 0 1 2 3 4 5 6 7 8
MIDI OUT
BANK LSB
BANK MSB
CHANNEL
FROM USB
PROGRAM
OCTAVE - OCTAVE 0 OCTAVE +
RESET ALL
ALL NOTES OFF TRANSPOSE - TRANSPOSE 0 TRANSPOSE +
CONTROLLERS
WHEEL
SLIDER
PROGRAM BANK LSB BANK MSB
ASSIGN
ASSIGN
La rueda de modulación se puede asignar también a distintos
12
9
ENTER
POWER
. Las teclas
Page 13
Mensajes MIDI
CANALES MIDI – Selecciona el canal MIDI (1 a 16) por el cual el Q88 transmite los mensajes MIDI. El valor
predeterminado es el Canal 1.
SALIDA MIDI DE USB – Habilita/deshabilita la capacidad del Q88 para recibir datos MIDI desde una
conexión USB (es decir, una DAW a través de una computadora) y enviarlos a un motor de sonido externo.
Grupo de entrada de datos de asignación
DATA: OCTAVE – Le permite ajustar la gama de octavas.
DATA: TRANSPOSE – Le permite ajustar la transposición.
DATA: PROGRAM – Le permite ajustar los cambios de programa.
WHEEL ASSIGN – Estando en el menú ADVANCED (Ajustes avanzados), pulse la tecla WHEEL ASSIGN
(Asignación de la rueda) y use luego el cursor de volumen o las teclas numéricas para ingresar un CC# MIDI
a fin de asignar una función a la rueda.
SLIDER ASSIGN – Estando en el menú ADVANCED, pulse la tecla SLIDER ASSIGN (Asignación del
cursor) y use luego el cursor de volumen o las teclas numéricas para ingresar un CC# MIDI a fin de asignar
una función al cursor.
Grupo de octavas
OCTAVE - – Baja la gama de octavas del teclado en una octava.
OCTAVE 0 – Ajusta la gama de octavas al valor predeterminado, siendo la primera tecla La1 (A1).
OCTAVE + – Eleva la gama de octavas del teclado en una octava.
FUNCIONES AVANZADAS
Además de ajustar el desplazamiento en una octava, los botones Octave + y - se pueden usar para controlar
otras funciones MIDI. Las teclas rotuladas DATA: ________ se usan para seleccionar la función de estos
botones de octava. Cuando se usan los botones de octava para
están arriba de estos botones permanecen encendidas, independientemente del ajuste actual de la función.
Para seleccionar una función alternativa:
1. Pulse el botón ADVANCED.
2. Pulse la tecla nueva rotulada que representa la función que desea.
Desplazamiento de octavas
Teclas Octave + y -
Para desplazar las octavas usando los botones Octave + y –, pulse primero el botón ADVANCED y luego
use las teclas Octave + y - para subir o bajar el tono del teclado una o más octavas (una por cada vez que
pulsa). El ajuste predeterminado de la octava es 0 (cuando están encendidos ambos LED que están arriba
de los botones de octava) y será el ajuste de octavas cada vez que encienda el Q88.
Para asignar los botones Octave + y –
1. Pulse el botón ADVANCED.
2. Pulse la tecla DATA: OCTAVE.
Para realizar un cambio rápido de octava cuando los botones Octave + y - se están usando para controlar
otras funciones MIDI:
1. Pulse el botón ADVANCED.
2. Pulse la tecla OCTAVE + para aumentar la octava en 1 (púlsela nuevamente para aumentar la octava
en 2 y así sucesivamente).
3. Pulse la tecla OCTAVE - para disminuir la octava en 1 (púlsela nuevamente para disminuir la octava
en 2 y así sucesivamente). Como alternativa, pulse la tecla OCTAVE 0 para restablecer la octava a 0.
4. Pulse ENTER para confirmar el cambio.
al control de octavas:
controlar estas funciones, las luces que
13
Page 14
Transposición
En algunos casos, es útil reducir o subir o bajar el tono del teclado en varios semitonos en lugar de una
octava completa. Por ejemplo, si está tocando un tema con un cantante que tiene dificultades para entonar
notas fuera de su gama vocal, usted puede transponder el tono en uno o dos semitonos para tocar dicho
tema en una gama más fácil para el cantante. Esto se logra usando una función MIDI llamada Transpose
(Transposición).
Nota: Un semitono es un medio paso, la distancia entre dos notas cromáticas adyacentes. Dos semitonos
equivalen a un paso completo. Por ejemplo, un semitono arriba de "Do” (C) sería "Do#" y dos semitonos
arriba de "Do" sería "Re" (D).
La tecla Transpose funciona de la misma manera que el desplazamiento de octavas, excepto que el
desplazamiento es de +/- 12 semitonos. Hay dos maneras de transponder el teclado. Puede usar los
botones Octave + y - o las teclas TRANSPOSE -, TRANSPOSE 0 y TRANSPOSE +.
Para asignar los botones Octave + y - a la función de transposición:
1. Pulse el botón ADVANCED.
2. Pulse la tecla DATA: TRANSPOSE.
Pulse el botón Octave + u Octave - para oír el tono de la nota que desea subir o bajar. Pulse ambos botones
Octave + y - al mismo tiempo para cancelar la transposición del teclado.
Canal MIDI
Los datos MIDI del Q88 se pueden enviar por cualquiera de los 16 canales MIDI. Sin embargo, ciertos
dispositivos y aplicaciones MIDI pueden requerir que el teclado envíe datos MIDI por un canal específico. En
este caso, usted puede cambiar el canal por el que se envían los datos MIDI usando el siguiente método:
1. Pulse el botón ADVANCED.
2. Pulse una de las 16 teclas de canales del Q88, según sea el canal MIDI que necesita.
El canal MIDI se puede asignar también a los botones Octave + y -. Una vez asignado, la pulsación de + o aumenta o disminuye incrementalmente el canal. Cuando se llega al canal 16 y se pulsa -, se selecciona el
canal 1. Si se pulsan los botones + y - al mismo tiempo, se vuelve al canal MIDI 1.
Cambio de programa
Los cambios de programa se usan para cambiar el instrumento o la voz que está usando. Hay dos maneras
de enviar un mensaje de cambio de programa:
1. Cambio de programa por incremento/decremento:
A. Pulse el botón ADVANCED.
B. Pulse la tecla DATA: PROGRAM.
Ahora los botones Octave + y Octave - se pueden usar para cambiar el programa. Pulse el botón Octave + u
Octave - y toque las teclas hasta que encuentre el instrumento que desea.
2. Cambio de programa por selección rápida:
A. Pulse el botón ADVANCED.
B. Pulse la tecla PROGRAM.
Pulse las teclas numéricas para ingresar un número de cambio de programa seguido por la tecla ENTER.
Como alternativa, puede usar los botones Octave + y - para cambiar este valor y luego pulse ENTER.
LSB y MSB del banco
Los mensajes de cambio de programa se usan para cambiar los instrumentos y las voces MIDI. No obstante,
el número de instrumentos accesibles mediante cambios de programa está limitado a 128. Algunos
dispositivos tienen más de 128 voces en diversos bancos y requieren una manera diferente de acceder a
estas voces adicionales. Generalmente, estos dispositivos usan los mensajes Bank LSB (LSB del banco) y
Bank MSB (MSB del banco).
14
Page 15

Cambios de LSB y MSB del banco por incremento/decremento:
1. Pulse el botón ADVANCED.
2. Pulse la tecla DATA: BANK LSB
ajustar el valor del MSB.
Use los botones Octave y+ y - para cambiar el programa. Pulse el botón + o - y toque las teclas hasta que
encuentre el instrumento que desea.
Cómo usar el método de selección rápida
1. Pulse el botón ADVANCED.
2. Pulse la tecla BANK LSB o BANK MSB.
3. Use las teclas numéricas para ingresar el valor deseado, seguido por la tecla ENTER. Como
alternativa, puede usar los botones Octave + y - para cambiar este valor y luego pulse ENTER. Pulse
los botones Octave + y - simultáneamente
Rueda de modulación
Es posible asignar mensajes CC MIDI a la rueda de modulación. Algunos valores útiles son:
• 01 Modulación
• 05 Portamento
• 07 Volumen
• 10 Balance (Panning)
Para que los CC MIDI tengan efecto en el sonido, el dispositivo MIDI receptor debe ser capaz de leer y
responder a estos mensajes MIDI. La mayoría de los dispositivos responden al menos al
modulación (CC #1), y datos de panning (CC #10).
Para asignar CC# a la rueda de modulación:
1. Pulse el botón ADVANCED.
2. Pulse la tecla WHEEL ASSIGN.
3. Use las teclas numéricas para ingresar el CC MIDI que desea asignar a la rueda de modulación. Como
4. Pulse la tecla ENTER.
Para cancelar los datos numéricos que está ingresando, pulse la tecla CANCEL para salir del modo de
edición sin cambiar la asignación de la rueda de modulación.
Nota: Cada vez que se apaga el Q88, se pierde el valor asignado a la rueda de modulación y se restablece
el valor predeterminado CC#1 (Modulación).
Cursor de volumen
Para asignar el cursor de volumen a un CC MIDI:
1. Pulse el botón ADVANCED.
2. Pulse la tecla SLIDER ASSIGN.
3. Use las teclas numéricas para ingresar el CC MIDI que desea asignar al cursor de volumen.
4. Pulse la tecla ENTER.
Si cometió un error al ingresar los datos numéricos, puede pulsar la tecla CANCEL para salir del modo de
edición sin cambiar la asignación del cursor de volumen. Tenga en cuenta que cada vez que se apaga el
teclado, se pierde el valor asignado al cursor de volumen y se restablece el valor predeterminado de control
de volumen.
Sensibilidad de la inflexión de pitch
Es posible alterar la sensibilidad de la rueda de inflexión de pitch asignando el CC #128 MIDI a la rueda de
modulación o al cursor de volumen. Esto le permite alterar la gama de inflexión de pitch en una octava hacia
arriba o abajo.
alternativa, puede usar los botones Octave + y - para cambiar este valor.
Como alternativa, puede usar los botones Octave + y - para cambiar el valor.
para ajustar el valor del LSB o la tecla DATA: BANK MSB para
para seleccionar el Banco 0.
volumen (CC #7),
CÓMO USAR UN PEDAL DE SOSTENIDO
Es posible conectar al Q88 un pedal de sostenido (que se vende por separado) para controlar
las notas, de la misma manera que con el pedal de sostenido de un piano. Conecte el pedal antes de
encender el Q88, de modo que pueda detectar la polaridad correcta. Para invertir la polaridad
predeterminada del pedal, manténgalo presionado mientras enciende el Q88.
la longitud de
15
Page 16

COMO CONFIGURAR EL Q88 CON ABLETON LIVE LITE
1. COMO CONFIGURARLO COMO UNA SUPERFICIE DE CONTROL
1. Abra el software y vaya al menú Options (Opciones) (Windows) o Live Lite (Mac),
y seleccione Preferences (Preferencias).
2. En el menú Preferences, elija la pestaña MIDI Sync (Sincronismo MIDI) y luego abra el menú Control
Surface (Superficie de control) para seleccionar Q88 en la lista Control Surface.
3. Vaya a los menús desplegables Input (Entrada) y Output (Salida). En el menú desplegable Input,
seleccione Q88 como dispositivo de entrada MIDI. Nota: Es posible que vea USB Audio Device
(Dispositivo de audio USB) y no Q88.
4. Vaya al menú desplegable Output (Salida) y seleccione la primera salida MIDI (que representa la
señal MIDI USB).
2. OPCIONES DE ENTRADA/SALIDA
El Q88 está seleccionado ahora como superficie de control. En los menús Input/Output, visualice las
opciones Track (Pista), Sync (Sincronismo), y Remote (Remoto):
1. La opción Track encamina las notas MIDI enviadas por el Q88. Cuando se usa el Q88 para disparar
instrumentos virtuales en Live Lite, active Track para la entrada MIDI.
2. Puede hacerse los mismo con las salidas MIDI. Generalmente, no necesita activar Track aquí. En
cambio, si necesita encaminar las notas MIDI hacia un dispositivo MIDI externo, active Track para la
salida MIDI 2 (que representa el puerto de salida MIDI físico del Q88).
3. Para usar el cursor de volumen, la rueda de inflexión de pitch o la rueda de modulación a fin de
controlar Live Lite, active Remote para la salida MIDI. De esta forma se encaminan los mensajes CC
MIDI al software para controlar distintas funciones del mismo.
3. CONFIGURACIÓN CON UN INSTRUMENTO VIRTUAL
1. Seleccione un Virtual Instrument (Instrumento virtual) en la lista Live Devices (Dispositivos en vivo)
de Live Lite. Por ejemplo, seleccione Billy the Kid (en la carpeta Brass (Bronces)) del Instrument
Rack (Rack de instrumentos).
2. Agregue el instrumento virtual a su proyecto arrastrándolo sobre el área de dejar caer clips/dispositivos
(donde dice "Drop Files and Devices Here").
3. Haga clic en el botón Record Enable (Habilitar grabación) de la pantalla (a fin de oír lo que tocará).
4. Haga clic en el menú desplegable correspondiente a la entrada MIDI, rotulado MIDI From (MIDI
desde) y configúrelo como All Ins (Todas las entradas).
5. Si ha configurado el Q88 a un canal MIDI específico que al que desearía que responda el instrumento
virtual únicamente, puede elegir el canal MIDI específico en el menú desplegable. Generalmente, debe
permanecer en All Channels (Todos los canales).
6. Toque las teclas del Q88 para oír el audio de la pista del instrumento virtual proveniente de los
altavoces de su computadora.
Para más detalles, consulte la documentación de Live Help navegando a Help > Help View (Ayuda > Vista
de ayuda). Un panel de la derecha muestra información útil.
4. CONTROLES DE ASIGNACIÓN PERSONALIZADA
Siga estos pasos para personalizar Live Lite a fin de que responda a ciertos controles del Q88:
1. En Live Lite, abra las opciones de asignación MIDI haciendo clic en el botón MIDI de la esquina
superior derecha. Aparece un brillo púrpura sobre las opciones asignables. Todas las opciones que
vea resaltadas se pueden asignar al cursor de volumen, la rueda de inflexión de pitch o la rueda de
modulación del Q88.
2. Haga clic en una opción asignable de la pantalla.
3. Mueva el control que desea asignar. Aparece su número de CC (cambio de control) correspondiente al
control particular que movió.
4. Haga clic en el botón MIDI de la esquina superior derecha para salir del modo de asignación MIDI.
5. Mueva el control del Q88 que asignó –moverá ahora la asignación que eligió en la pantalla.
16
Page 17

5. MODOS DE ESCALA DE VALORES Y CAPTURA
En el menú Preferences vaya al menú desplegable Takeover Mode (Modo de toma de control) que tiene
opciones Pickup (Captura) y Value Scaling (Escala de valores).
• Cuando se configura como Pickup, un control del Q88 comienza a mover su parámetro de software
asignado solo cuando el control de hardware del Q88 se mueve más allá del valor actual de ese
parámetro.
Ejemplo: El cursor de volumen del Q88 está totalmente hacia abajo. Fader 1 del software está a mitad
de recorrido hacia arriba. Cuando está configurado Pickup, el Fader 1 no se mueve hasta que el
cursor de volumen del Q88 va más allá del punto de mitad de recorrido. Lo “captura” desde ese punto
y entonces comienza a mover el Fader 1 en el software.
• Cuando se configura como Value Scaling, hace lo contrario.
Ejemplo: El cursor de volumen del Q88 está totalmente hacia abajo. Fader 1 del software está a
mitad de recorrido hacia arriba. Cuando está configurado Value Scaling, Fader 1 se mueve tan pronto
usted mueva el cursor de volumen en el Q88.
SOLUCIÓN DE PROBLEMAS DE MIDI
Desactivar todas las notas
Si experimenta que hay notas colgadas que no
dejan de tocarse, envíe un mensaje All Notes Off
(Desactivar todas las notas) para detenerla,
haciendo lo siguiente:
1. Pulse el botón ADVANCED.
2. Pulse la tecla ALL NOTES OFF.
Reiniciar todos los controladores
Si encuentra un efecto de un instrumento que no
desea, en vez de tener que aislar e identificar ese
efecto particular, puede enviar un mensaje MIDI
Reset All Controllers (Reiniciar todos los
controladores) haciendo lo siguiente:
1. Pulse el botón ADVANCED.
2. Pulse la tecla RESET ALL CONTROLLERS.
Salida MIDI
El puerto MIDI Out (Salida MIDI) se puede usar para conectar el Q88 a un módulo de sonido externo u otro
teclado MIDI. Como acción predeterminada (cuando se enciende el Q88), todos los datos de controladores
se envían por su salida MIDI y conexión USB.
En cambio, si desea que la salida MIDI actúe como interfaz USB a MIDI tradicional siga los pasos indicados
a continuación:
1. Pulse el botón ADVANCED.
2. Pulse la tecla rotulada MIDI OUT FROM USB.
3. Seleccione Q88 como dispositivo MIDI Out (Salida MIDI) en su software de secuenciador. El Q88
recibirá ahora los datos MIDI desde la computadora a través de su conexión USB y enviará su salida
MIDI. Consulte los detalles del encaminamiento MIDI en el diagrama del costado.
88
DATA:
DATA:
DATA:
DATA:
MIDI OUT
RESET ALL
WHEEL
DATA:
DATA:
OCTAVE
ADVANCED
OCTAVEVOLUME
TRANSPOSE
CANCEL CH 1 CH 2 CH 3 CH 4 CH 5 CH 6 CH 7 CH 8 CH 9 CH 10 CH 11 CH 12 CH 13 CH 14 CH 15 CH 16 0 1 2 3 4 5 6 7 8
OCTAVE - OCTAVE 0 OCTAVE +
BANK LSB
BANK MSB
CHANNEL
FROM USB
PROGRAM
ALL NOTES OFF TRANSPOSE - TRANSPOSE 0 TRANSPOSE +
CONTROLLERS
SLIDER
PROGRAM BANK LSB BANK MSB
ASSIGN
ASSIGN
9
ENTER
17
Page 18

SOLUCIÓN DE PROBLEMAS GENERALES
PROBLEMA CAUSA SOLUCIÓN
Verifique la conexión USB de su computadora para
confirmar que se reconoce el Q88. Si es necesario,
vuelva a enchufar la conexión y reinicie la
computadora.
Si está controlando un módulo de hardware externo,
asegúrese de que el cable MIDI esté conectado al Q88
y al puerto de ENTRADA MIDI del dispositivo.
Reinicie la aplicación de software.
Desenchufe el Q88 del hub USB y conéctelo
directamente a la computadora.
Asegúrese de que el Q88 o el dispositivo MIDI USB
esté en la lista de fuentes MIDI activas de su
aplicación. Habitualmente, puede accederse a los
parámetros MIDI a través del menú Preferencias de la
aplicación.
Asegúrese de que el Q88 esté enviando la información
MIDI por el canal al cual está configurado el dispositivo
destinatario para recibirla.
Apague el Q88 durante 10 segundos y luego reinícielo.
Apague el Q88, espere 10 segundos y enciéndalo otra
vez.
Con el pedal enchufado, apague el Q88, espere un
momento y enciéndalo otra vez.
Trate de aumentar el tamaño del búfer de su programa
de software, use drivers ASIO de baja latencia o use
temporalmente un instrumento General MIDI en lugar
de un instrumento VST de alta latencia mientras graba.
No hay sonido del dispositivo
destinatario.
Las notas se sostienen de
manera constante.
El pedal de sostenido
funciona de manera inversa.
Cuando pulso una tecla, hay
un retardo antes de que oiga
algún sonido.
El Q88 no está conectado
correctamente.
El Q88 se conectó antes de
que arrancara la aplicación
de software.
Problema causado por usar
un concentrador (hub) USB.
El software no está
configurado para recibir
datos MIDI desde el Q88.
El canal MIDI del Q88 no es
el mismo canal MIDI de
entrada del software.
El pedal de sostenido fue
enchufado después de
encender el Q88.
Notas pegadas debido a
datos MIDI incompletos.
El pedal de sostenido fue
enchufado después de
encender la unidad.
La causa es la latencia del
software.
18
Page 19

A
GUIDE D’UTILISATION (FRANÇAIS)
CONTENU DE LA BOÎTE
• Q88
• Câble USB
• DVD logiciel
• Guide d’utilisation
• Consignes de sécurité et informations concernant la garantie
SCHÉMA DE CONNEXION
CÂBLE
D’ALIMENTATION*
9V DC 500mA
PPAREIL MIDI EXTERNE*
DÉMARRAGE
Le Q88 peut être alimenté par une connexion USB ou par un câble d’alimentation externe vendu
séparément.
Alimentation et connexion USB
1. Vérifiez que l'interrupteur d'alimentation à l'arrière du Q88 est éteint (OFF).
2. Branchez le câble USB à un port USB sur votre ordinateur. Pour une meilleure performance, utilisez un
des ports USB sur le panneau arrière de l’ordinateur. Si vous utilisez un multiport USB, assurez-vous
qu’il est alimenté.
3. Branchez l’autre extrémité du câble USB au port USB du Q88.
4. Mettez le Q88 sous tension. Le câble USB permet non seulement d’alimenter le Q88, mais également
d’envoyer et de recevoir des données MIDI depuis et vers un ordinateur.
Utilisation d’un câble d’alimentation externe
Vous pouvez utiliser un câble d’alimentation externe (vendu séparément) doté des spécifications suivantes :
9 V c.c., 500 mA, fiche à centre positif de 5,5 mm diamètre externe et de 2,5 mm de diamètre interne. Si
vous utilisez un multiport USB, un câble d’alimentation externe n’est pas requis.
Remarque : Débranchez le câble d’alimentation lorsque vous ne prévoyez pas d’utiliser le Q88 pendant
longtemps.
ORDINATEUR*
PÉDALE DE
MAINTIEN*
VOLUME
PÉDALE
D’EXPRESSION*
ON/OFF
POWER
*VENDU
SÉPARÉMENT
19
Page 20

1
4
5
6
2
3
VOLUME
ON/OFF
POWER
9V DC 500mA
1
2
3
4 5
6
CARACTÉRISTIQUES DU PANNEAU ARRIÈRE
ON/OFF
9V DC 500mA
VOLUME
1. ENTRÉE D’ALIMENTATION – Branchez un câble d’alimentation externe à cette entrée si vous ne
désirez pas utiliser la connexion USB pour alimenter le Q88.
2. CONNEXION USB – Branchez le câble USB fourni dans cette sortie et l'autre extrémité dans le port
USB de votre ordinateur.
3. SORTIE MIDI – Vous pouvez brancher un câble MIDI à cinq broches standard (non inclus) à cette
sortie et à l’entrée MIDI d’un appareil MIDI externe, tels un clavier, un module de percussion, un
séquenceur, etc.
4. ENTRÉE DE PÉDALE DE MAINTIEN – Cette entrée permet de brancher une pédale de maintien TS
de 6,35 mm (1/4 po) vendue séparément.
5. ENTRÉE POUR PÉDALE D’EXPRESSION – Cette entrée permet de brancher une pédale
d’expression TRS de 6,35 mm (1/4 po) vendue séparément.
Une pédale d’expression permettra de commander la fonction affectée au potentiomètre volume et de
la désactiver.
6. INTERRUPTEUR D’ALIMENTATION – Cet interrupteur permet de mettre l’appareil sous et hors
tension.
CARACTÉRISTIQUES DU PANNEAU SUPÉRIEUR
88
ADVANCED
OCTAVEVOLUME
1. CLAVIER – Le clavier fonctionne comme un clavier MIDI standard, mais peut également être utilisé
pour ajuster les paramètres MIDI et envoyer des messages MIDI.
2. MOLETTE DE MODULATION DE LA HAUTEUR TONALE – Cette molette permet d’envoyer des
données MIDI concernant l’augmentation ou la réduction temporaire de la tonalité d’une note.
3. MOLETTE DE MODULATION – Cette molette peut être utilisée pour transmettre des données de
contrôleur en continu (CC #1 – Modulation Depth).
affectée à différents paramètres comme le panoramique, l'attaque, la réverbe, le chorus, etc.
4. TOUCHE ADVANCED – Cette touche permet d’accéder aux paramètres MIDI évolués indiqués au-
dessus des touches.
5. POTENTIOMÈTRE VOLUME – Ce potentiomètre peut être utilisé pour transmettre des données de
contrôleur en continu (CC #7 – Volume par défaut). Le potentiomètre volume peut également être
affecté à différents paramètres comme le panoramique, l’attaque, la réverbe, le chorus, etc.
6. TOUCHES OCTAVE -/+ – Ces touches vous permettent d'augmenter ou de diminuer la plage
d'octaves du clavier de 3 octaves. Appuyez sur les deux touches Octave simultanément afin de
remettre le clavier à l’octave du milieu par défaut. Les touches Octaves peuvent également être
affectées à d’autres fonctions comme la transposition.
DATA:
DATA:
DATA:
DATA:
DATA:
DATA:
OCTAVE
TRANSPOSE
CANCEL CH 1 CH 2 CH 3 CH 4 CH 5 CH 6 CH 7 CH 8 CH 9 CH 10 CH 11 CH 12 CH 13 CH 14 CH 15 CH 16 0 1 2 3 4 5 6 7 8
MIDI OUT
BANK LSB
BANK MSB
CHANNEL
FROM USB
PROGRAM
OCTAVE - OCTAVE 0 OCTAVE +
RESET ALL
ALL NOTES OFF TRANSPOSE - TRANSPOSE 0 TRANSPOSE +
CONTROLLERS
WHEEL
SLIDER
PROGRAM BANK LSB BANK MSB
ASSIGN
ASSIGN
La molette de modulation peut également être
20
9
ENTER
POWER
Page 21

SÉLECTION ET MODIFICATION DES COMMANDES MIDI
Touche Advanced
Enfoncer la touche ADVANCE en même temps que les touches du clavier permet de régler les paramètres
MIDI et d’envoyer des messages et des données MIDI précis rapidement et facilement. Dans ce mode, les
touches noires du clavier permettent de sélectionner les fonctions, alors que les blanches permettent de
saisir des données et de sélectionner le canal.
1. Appuyez sur ADVANCED.
2. Appuyez sur la touche du clavier correspondant au paramètre MIDI (identifiée au-dessus de la
touche) que vous désirez modifier ou envoyer.
3. Entrez la valeur à l’aide des touches numérotées du clavier.
4. Appuyez sur la touche ENTER ou CANCEL du clavier afin de confirmer ou d’annuler votre
sélection.
Messages MIDI
MIDI CHANNELS – Ces touches permettent de sélectionner le canal MIDI (1 à 16) sur lequel le Q88
transmettra les messages MIDI. Le canal 1 est celui par défaut.
MIDI OUT FROM USB – Cette touche permet d'activer/désactiver la fonction de réception de données MIDI
d’une connexion USB (p. ex., poste de travail audionumérique via un ordinateur) et de l’envoyer vers un
module de son externe.
Affectation des groupes d’entrée de données
DATA : OCTAVE – Ceci permet de modifier la plage d’octave.
DATA : TRANSPOSE – Ceci permet de modifier la transposition.
DATA : PROGRAM – Ceci permet de modifier les changements de programme.
WHEEL ASSIGN – À partir du menu ADVANCED, appuyez sur la touche WHEEL ASSIGN et utilisez le
potentiomètre volume ou les touches numérotées afin d’entrer un numéro CC MIDI à affecter à la molette.
SLIDER ASSIGN – À partir du menu ADVANCED, appuyez sur la touche SLIDER ASSIGN et utilisez le
potentiomètre volume ou les touches numérotées afin d’entrer un numéro CC MIDI à affecter au
potentiomètre.
Groupe d’octave
OCTAVE - – Cette touche permet d’abaisser la plage d’octave du clavier d'une octave.
OCTAVE 0 – Cette touche permet de régler la plage d’octave à la valeur par défaut, avec la première touche
étant A1.
OCTAVE + – Cette touche permet d’élever la plage d’octave du clavier d'une octave.
FONCTIONS ÉVOLUÉES
En plus de configurer le décalage d’octave, les touches Octave + et - peuvent également servir pour
commander d’autres fonctions MIDI. Les touches étiquetées DATA : ________ permettent de sélectionner la
fonction des touches Octave. Lorsque les touches Octave sont utilisées afin de commander ces fonctions,
les deux DEL au-dessus des touches demeurent allumées, peu importe la fonction qui leur est affectée.
Pour sélectionner une autre fonction :
1. Appuyez sur la touche ADVANCED.
2. Appuyez sur la touche noire étiquetée avec la fonction que vous désirez utiliser.
21
Page 22

Décalage d’octave
Les touches Octave + et -
Pour faire un décalage d'octave à l’aide des touches Octave + et –, appuyez sur la touche ADVANCED et
utilisez les touches Octave + et – afin d’augmenter ou de diminuer la tonalité du clavier d’une ou de plusieurs
octaves (une pour chaque enfoncement). Le réglage par défaut est 0 (lorsque les deux DEL sont allumées
au-dessus des touches Octave) et est réinitialisé chaque fois que le Q88 est remis sous tension.
Pour affecter les touches Octave + et - afin de commander l’octave :
1. Appuyez sur la touche ADVANCED.
2. Appuyez sur la touche DATA : OCTAVE du clavier.
Pour faire une modification d’octave rapide lorsque les touches Octave + et – sont utilisées pour commander
d’autres fonctions MIDI :
1. Appuyez sur la touche ADVANCED.
2. Appuyez sur la touche Octave + afin d’augmenter l’octave par 1 (appuyez de nouveau afin
d’augmenter l’octave par 2, et ainsi de suite).
3. Appuyez sur la touche Octave - afin de diminuer l’octave par 1 (appuyez de nouveau afin de diminuer
l’octave par 2, et ainsi de suite). Appuyez sur la touche OCTAVE 0 du clavier afin de réinitialiser
l’octave à 0.
4. Appuyez sur la touche ENTER pour confirmer.
Transposition
Dans certains cas, il est utile de diminuer ou d’augmenter la hauteur tonale du clavier par un nombre de
demi-tons plutôt que d’une octave entière. Par exemple, si vous jouez une chanson et que le chanteur a de
la difficulté à atteindre les notes, vous pouvez transposer la tonalité d’un ou de deux demi-tons afin de vous
rapprocher de la plage pour lui faciliter la tâche. Ceci est réalisé en utilisant la fonction MIDI Transpose.
Remarque : Un demi-ton représente la distance entre deux notes chromatiques adjacentes. Deux demi-tons
sont égaux à un ton entier. Par exemple, un demi-ton plus élevé que « C » est « C# », et deux demi-tons
plus élevés que « C » est « D ».
La fonction Transpose fonctionne de la même manière que le décalage d’octave, sauf que le décalage est de
+/- 12 demi-tons. Il y a deux façons de transposer le clavier. Vous pouvez utiliser les touches Octave + et ou utiliser les touches TRANSPOSE -, TRANSPOSE 0 et TRANSPOSE +.
Pour affecter les touches Octave + et - à la fonction de transposition :
1. Appuyez sur la touche ADVANCED.
2. Appuyez sur la touche DATA : TRANSPOSE.
Appuyez sur la touche Octave + ou Octave – afin d’entendre la tonalité de la note monter ou descendre.
Appuyez sur les deux touches Octave + et - simultanément afin de remettre le clavier à la transposition par
défaut.
Canal MIDI
Les données MIDI du Q88 peuvent être envoyées sur n’importe lequel des 16 canaux MIDI. Cependant,
certains appareils et applications MIDI peuvent nécessiter que le clavier achemine les données MIDI sur un
canal spécifique. Si tel est le cas, vous pouvez modifier le canal par lequel les données MIDI sont
acheminées en effectuant les étapes suivantes :
1. Appuyez sur la touche ADVANCED.
2. Appuyez sur une des 16 touches canal sur le Q88, en fonction du canal MIDI dont vous avez besoin.
Le canal MIDI peut également être affecté aux touches Octave + et -. Une fois affectée, la touche + ou permet d’augmenter ou de diminuer le canal par incrément. Lorsque le canal 16 est atteint et que la touche +
est enfoncée, le canal 1 sera sélectionné. Appuyez sur les deux touches Octave + et - simultanément permet
de rappeler le canal MIDI 1.
22
Page 23

Changement de programme
Les changements de programme permettent de modifier l’instrument ou la voix utilisé. Il y a deux façons
d’envoyer un message de changement de programme :
1. Modification de programme par incrémentation/décrémentation :
A. Appuyez sur la touche ADVANCED.
B. Appuyez sur la touche DATA : PROGRAM.
Maintenant les touches Octave + et Octave – peuvent être utilisées pour changer de programme. Appuyez
sur la touche Octave + ou Octave -, puis utilisez les touches du clavier pour trouver l’instrument que vous
désirez.
2. Changement de programme rapide :
A. Appuyez sur la touche ADVANCED.
B. Appuyez sur la touche PROGRAM.
Utilisez les touches numérotées du clavier afin d'entrer le numéro de changement de programme, puis
appuyez sur la touche ENTER. Vous pouvez également utiliser les touches Octave + et – afin de modifier la
valeur, puis appuyer sur la touche ENTER.
Banques LSB et MSB
Les messages de changement de programme permettent de modifier l’instrument ou la voix MIDI utilisé.
Cependant, le nombre d’instruments accessible avec le changement de programme est limité à 128.
Certains appareils disposent de plus de 128 voix dans différentes banques, nécessitant une autre façon
d’accéder à ces voix supplémentaires. Généralement, ces appareils utilisent les messages de banques LSB
et MSB.
Changement de messages de banques LSB et MSB par incrémentation/décrémentation :
1. Appuyez sur la touche ADVANCED.
2. Appuyez sur la touche DATA : BANK LSB afin de régler la valeur LSB ou sur DATA : BANK MSB afin
de régler la valeur MSB.
Utilisez les touches Octave + et Octave - afin de changer de programme. Appuyez sur la touche Octave + ou
sur la touche Octave -, puis utilisez les touches du clavier pour trouver l’instrument que vous désirez.
Utilisation de la méthode de réglage rapide :
1. Appuyez sur la touche ADVANCED.
2. Appuyez soit sur la touche BANK LSB, soit sur la touche BANK MSB.
3. Utilisez les touches numérotées du clavier afin d'entrer la valeur désirée, puis appuyez sur la touche
ENTER. Vous pouvez également utiliser les touches Octave + et - afin de modifier la valeur, puis
appuyer sur la touche ENTER. Enfoncez simultanément les touches Octave + et - afin de revenir à la
banque 0.
La molette de modulation
Vous pouvez affecter les messages MIDI CC à la molette de modulation. Voici quelques valeurs utiles :
• 01 Modulation
• 05 Portamento
• 07 Volume
• 10 Pan
Afin que les messages MIDI CC puissent avoir un effet sur le son, l’appareil recevant les messages doit être
en mesure de lire et de répondre à ces messages MIDI. La plupart des appareils répondent à volume (CC
#7), à modulation (CC #1) et aux données de panoramique (CC #10).
Affectation de CC# à la molette de modulation :
1. Appuyez sur la touche ADVANCED.
2. Appuyez sur la touche WHEEL ASSIGN.
3. Utilisez les touches numérotées afin d’entrer le message MIDI CC que vous désirez affecter à la
4. Appuyez sur la touche ENTER.
molette de modulation. Vous pouvez également utiliser les touches Octave + et – afin de modifier la
valeur.
23
Page 24

Pour annuler les données numériques entrées, appuyez sur la touche CANCEL afin de quitter le mode Edit
sans modifier l’affectation de la molette de modulation.
Remarque : Chaque fois que le Q88 est mis hors tension, la valeur affectée à la molette de modulation est
réinitialisée au réglage par défaut CC #1 (Modulation).
Potentiomètre volume
Afin d’affecter le potentiomètre volume à un message MIDI CC :
1. Appuyez sur la touche ADVANCED.
2. Appuyez sur la touche SLIDER ASSIGN.
3. Utilisez les touches numérotées afin d’entrer le message MIDI CC que vous désirez affecter au
potentiomètre volume.
Vous pouvez également utiliser les touches Octave + et - afin de modifier la valeur.
4. Appuyez sur la touche ENTER.
Pour annuler les données numériques entrées, appuyez sur la touche CANCEL afin de quitter le mode Edit
sans modifier l’affectation du potentiomètre volume. Chaque fois que le Q88 est mis hors tension, la valeur
affectée au potentiomètre volume est réinitialisée au réglage par défaut à la commande du volume.
Sensibilité de la molette de modulation de la hauteur tonale
Vous pouvez modifier la sensibilité de la molette de modulation de la hauteur tonale en affectant le message
MIDI CC #128 à la molette de modulation ou au potentiomètre volume. Ceci vous permet d’augmenter ou de
diminuer la plage tonale d’une octave.
UTILISATION D’UNE PÉDALE DE MAINTIEN (SUSTAIN)
Vous pouvez brancher une pédale de maintien (vendue séparément) au Q88 afin de commander la longueur
des notes comme la pédale de maintien d’un piano. Branchez la pédale avant de mettre le Q88 sous tension
afin qu'il puisse détecter la polarité adéquate à utiliser. Afin d’inverser la polarité par défaut de la pédale,
maintenez la pédale enfoncée lors de la mise sous tension du Q88.
CONFIGURATION DU Q88 POUR ABLETON LIVE LITE
1. CONFIGURATION COMME MODULE DE COMMANDE
1. Lancez le logiciel et cliquez sur le menu Options (Windows) ou sur le menu Live Lite (Mac) et
sélectionnez Preferences.
2. Dans le menu Preferences, sélectionnez l’onglet MIDI Sync, et ouvrez le menu Control Surface afin
de sélectionner le Q88 de la liste Control Surface.
3. Cliquez sur les menus déroulants Input et Output. À partir du menu déroulant Input, sélectionnez Q88
comme appareil d’entrée MIDI. Remarque : Il se peut que USB Audio Device soit affiché au lieu de
Q88.
4. À partir du menu déroulant Output, sélectionnez la première sortie MIDI (qui représente le signal MIDI
USB).
2. OPTIONS D’ENTRÉE/DE SORTIE
Le Q88 est maintenant sélectionné comme module de commande. Dans les menus Input/Output, vous
pouvez accéder aux options Track, Sync et Remote :
1. L’option Track permet d’acheminer n’importe quelle note MIDI envoyée par le Q88. Lorsque le Q88 est
utilisé afin de commander des instruments virtuels dans Live Lite, sélectionnez l’option Track On
comme entrée MIDI.
2. Il en va de même pour les sorties MIDI. Généralement, vous n’avez pas besoin d’activer l’option Track
On. Cependant, si vous avez besoin d’acheminer des notes MIDI vers un appareil MIDI externe,
activez Track On pour la sortie MIDI 2 (qui représente le port de sortie physique du Q88).
3. Pour utiliser le potentiomètre, la molette de modulation de la hauteur tonale ou la molette de
modulation afin de commander Live Lite, activez l'option Remote On pour l’entrée MIDI. Ceci permet
d’acheminer les messages MIDI CC vers le logiciel afin de commander les différentes fonctions du
logiciel.
24
Page 25

3. CONFIGURATION AVEC INSTRUMENT VIRTUEL
1. Sélectionnez un Virtual Instrument à partir de la liste Live Devices du Live Lite. Par exemple,
sélectionnez Billy the Kid (dans le dossier Brass) à partir de Instrument Rack.
2. Ajoutez l’instrument virtuel à votre projet en le glissant sur la zone « Drop Files and Devices Here ».
3. Cliquez sur le bouton Record Enable dans le bas de la fenêtre (afin d’entendre ce que vous jouerez).
4. Cliquez sur le menu déroulant MIDI From et sélectionner All Ins.
5. Si vous désirez affecter uniquement l’instrument virtuel sur un des canaux MIDI du Q88, sélectionnez
le canal MIDI à partir du menu déroulant. De manière générale, cette option est réglée sur All
Channels.
6. Jouez les touches du Q88 afin d’entendre l’audio de la piste Virtual Instrument provenant des haut-
parleurs de votre ordinateur.
Pour de plus amples détails, veuillez consulter la documentation d'aide de Live à partir de Help > Help View.
Une fenêtre avec des informations pratiques devrait s’afficher à droite.
4. PERSONNALISATION DES AFFECTATIONS
Veuillez suivre les étapes suivantes afin de personnaliser le Live Lite afin qu’il réponde à certaines
commandes du Q88 :
1. Dans Live Lite, accédez au menu des options d’affectation MIDI en cliquant sur le bouton MIDI dans le
coin supérieur droit. Les options d'affectation seront mises en surbrillance. Toute option mise en
surbrillance peut être affectée au potentiomètre volume, à la molette de modulation de la hauteur
tonale ou à la molette de modulation du Q88.
2. Cliquez sur une des options d’affectation sur l’écran.
3. Déplacez la commande que vous désirez affecter. Le numéro CC (changement de programme) pour la
commande que vous avez déplacée devrait s’afficher.
4. Cliquez sur le bouton MIDI dans le coin supérieur droit pour quitter le mode d’affectation MIDI.
5. Utilisez la commande sur le Q88 que vous venez d’affecter afin de vérifier si cela commande bien son
affectation dans le logiciel.
5. MODE VALUE SCALING CONTRE LE MODE PICKUP
Dans le menu Preferences, cliquez sur le menu déroulant Takeover Mode afin de sélectionner entre les
modes Pickup et Value Scaling.
• Lorsque le mode Pickup est sélectionné, une commande du Q88 permet de modifier un des
paramètres du logiciel, mais uniquement lorsque la commande du Q88 dépasse la valeur actuelle de
ce paramètre.
Exemple : Le potentiomètre volume du Q88 est complètement fermé. Le Fader 1 dans le logiciel est
réglé au centre. Lorsque le mode Pickup est sélectionné, le Fader 1 ne bougera pas tant que le
potentiomètre volume du Q88 ne dépasse pas le réglage du centre. Il commencera à bouger à partir de
ce point et déplacera le Fader 1 dans le logiciel.
• Avec le mode Value Scaling, le contraire se produit.
Exemple : Le potentiomètre volume du Q88 est complètement fermé. Le Fader 1 dans le logiciel est
réglé au centre. Lorsque le mode Value Scaling est sélectionné, le Fader 1 bouge aussitôt que vous
déplacez le potentiomètre volume du Q88.
DÉPANNAGE MIDI
Toutes notes fermées (All Notes Off)
Si des notes sont maintenues, vous pouvez envoyer un
message All Notes Off MIDI afin de les arrêter, veuillez
suivre les étapes ci-dessous :
1. Appuyez sur la touche ADVANCED.
2. Appuyez sur la touche ALL NOTES OFF du clavier.
25
88
DATA:
DATA:
DATA:
DATA:
MIDI OUT
RESET ALL
WHEEL
DATA:
TRANSPOSE
OCTAVE
ADVANCED
CANCEL CH 1 CH 2 CH 3 CH 4 CH 5 CH 6 CH 7 CH 8 CH 9 CH 10 CH 11 CH 12 CH 13 CH 14 CH 15 CH 16 0 1 2 3 4 5 6 7 8
OCTAVEVOLUME
DATA:
BANK LSB
BANK MSB
CHANNEL
FROM USB
PROGRAM
SLIDER
OCTAVE - OCTAVE 0 OCTAVE +
ALL NOTES OFF TRANSPOSE - TRANSPOSE 0 TRANSPOSE +
PROGRAM BANK LSB BANK MSB
CONTROLLERS
ASSIGN
ASSIGN
9
ENTER
Page 26

Réinitialisation de toutes les commandes
S’il y a un effet sur un instrument que vous ne désirez plus, plutôt que de devoir isoler et identifier cet effet,
vous pouvez envoyer un message Reset All Controllers MIDI en suivant les étapes ci-dessous :
1. Appuyez sur la touche ADVANCED.
2. Appuyez sur la touche RESET ALL CONTROLLERS du clavier.
Sortie MIDI
Le port de sortie MIDI (MIDI OUT) peut être utilisé afin de brancher le Q88 à un module de son externe ou à
un autre clavier MIDI. Par défaut (lors de la mise sous tension du Q88), toutes les données de commande
sont envoyées par la sortie MIDI et la connexion USB.
Si toutefois vous désirez utiliser la sortie MIDI comme interface USB à MIDI conventionnelle, veuillez suivre
les étapes ci-dessous :
1. Appuyez sur la touche ADVANCED.
2. Appuyez sur la touche MIDI OUT FROM USB du clavier.
3. Sélectionnez le Q88 comme appareil de sortie MIDI dans le logiciel du séquenceur. Le Q88 recevra
maintenant les données MIDI de l’ordinateur par le biais de sa connexion USB et enverra ses données
par le biais de sa sortie MIDI. Voir le schéma latéral pour de plus amples détails sur le routage MIDI.
GUIDE DE DÉPANNAGE GÉNÉRAL
PROBLÈME CAUSE SOLUTION
Vérifiez les connexions USB de votre ordinateur pour
vous assurer que le Q88 est reconnu par votre
ordinateur. Il peut s’avérer nécessaire de débrancher
puis de rebrancher les appareils, et de relancer votre
ordinateur.
Si vous commandez un module matériel externe,
assurez-vous que le câble MIDI est branché du Q88 à
l’entrée MIDI de l’appareil.
Relancez le logiciel.
Essayez de débrancher le Q88 du multiport USB et de
le brancher directement à l'ordinateur.
Assurez-vous que Q88 ou USB MIDI device est inscrit
comme source active MIDI dans votre application.
Généralement, les paramètres MIDI sont accessibles
via le menu Preferences de l'application.
Assurez-vous que le Q88 achemine bien les données
MIDI par le canal entrant de l'appareil.
Mettez le Q88 hors tension, attendez 10 secondes et
remettez-le sous tension.
Mettez le Q88 hors tension, attendez 10 secondes et
remettez-le sous tension.
Branchez la pédale, puis mettez le Q88 hors tension,
attendez quelques secondes et remettez-le sous
tension.
Afin d’augmenter la taille de la mémoire tampon de
votre logiciel, utilisez des pilotes ASIO à basse latence,
ou utilisez temporairement un instrument General MIDI
au lieu d'un instrument VST à haute latence lors
d’enregistrement.
Aucun son provenant de
l'appareil cible.
Les notes sont maintenues
de façon continue.
La pédale de maintien
(sustain) fonctionne à
l’envers.
Lorsque j’appuie sur une
touche, il y a un délai avant
d’entendre le son.
Le Q88 est mal branché.
Le Q88 fut branché après
que le logiciel soit lancé.
Problèmes causés par
l’utilisation d’un multiport
USB.
L'application logicielle n'est
pas configurée pour recevoir
des données MIDI provenant
du Q88.
Le canal MIDI du Q88 n’est
pas le même que celui du
canal MIDI entrant de
l’application.
La pédale de maintien
(Sustain) a été branchée
après que l'appareil a été mis
sous tension.
Certaines notes sont
bloquées parce que les
données MIDI sont
incomplètes.
La pédale de maintien
(Sustain) a été branchée
après que l'appareil a été mis
sous tension.
C’est le temps de latence du
logiciel.
26
Page 27

A
A
GUIDA PER L'USO (ITALIANO)
CONTENUTI DELLA CONFEZIONE
• Q88
• Cavo USB
• DVD recante il software
• Guida per l'uso
• Istruzioni di sicurezza e garanzia
SCHEMA DEI COLLEGAMENTI
DATTATORE DI
LIMENTAZIONE*
9V DC 500mA
DISPOSITIVO MIDI ESTERNO*
ALIMENTAZIONE DEL Q88
Il Q88 può essere alimentato tramite un collegamento USB o un adattatore di alimentazione esterno
opzionale (venduto separatamente).
Alimentazione e collegamento tramite USB
1. Assicurarsi che l'interruttore on/off posto sul retro del Q88 sia su “OFF”.
2. Collegare il cavo USB ad una porta USB disponibile del computer. Per ottenere migliori risultati, servirsi
di una porta USB posteriore del computer. Se si utilizza un hub USB, assicurarsi che sia alimentato.
3. Collegare l'altro capo del cavo USB alla porta USB del Q88.
4. Accendere il Q88 posizionando l'interruttore su on. Il cavo USB non solo alimenta il Q88, ma manda
dati MIDI da e verso il computer.
Utilizzo di un adattatore di alimentazione esterno
È possibile utilizzare un adattatore di alimentazione (venduto separatamente) avente le seguenti specifiche:
9V DC, 500 mA, polo centrale positivo, diametro del cilindro esterno 5,5 mm e diametro del cilindro interno
2,5 mm. Se si riceve alimentazione da un hub USB alimentato, non è necessario l'uso di un adattatore di
alimentazione esterno.
Nota bene: non lasciare l'adattatore di alimentazione collegato per lunghi periodi di tempo se il Q88 non è in
uso.
COMPUTER*
PEDALE
SUSTAIN*
VOLUME
PEDALE
DI
ESPRESSIONE*
ON/OFF
POWER
*VENDUTO
SEPARATAMENTE
27
Page 28

1
4
5
6
2
3
VOLUME
ON/OFF
POWER
9V DC 500mA
1
2
3
4 5
6
PANORAMICA PANNELLO POSTERIORE
ON/OFF
9V DC 500mA
VOLUME
POWER
1. INGRESSO ADATTATORE DI ALIMENTAZIONE – Collegare un adattatore di alimentazione a questo
livello se non si desidera alimentare il Q88 servendosi di un collegamento USB.
2. COLLEGAMENTO USB – Collegare a questo livello il cavo USB in dotazione e collegarlo ad una porta
USB del computer.
3. USCITA MIDI – Servirsi di un cavo MIDI standard a cinque poli (venduto separatamente) per collegare
questa uscita all’ingresso MIDI di un dispositivo MIDI esterno (tastiera, drum machine, sequenziatore,
ecc.).
4. INGRESSO PER PEDALE SUSTAIN – Collegare a questo ingresso un pedale sustain da 1/4" TS
(venduto separatamente).
5. INGRESSO PER PEDALE DI ESPRESSIONE – Collegare a questo ingresso un pedale di espressione
da 1/4" TRS (venduto separatamente).
Un pedale di espressione collegato controlla la funzione assegnata al cursore Volume e disabilita il
cursore stesso.
6. INTERRUTTORE DI ALIMENTAZIONE (POWER) – Accende e spegne l'alimentazione (on/off).
PANORAMICA PANNELLO SUPERIORE
88
ADVANCED
OCTAVEVOLUME
1. TASTIERA – I tasti sul Q88 funzionano come una tastiera MIDI standard, ma possono anche essere
utilizzati per regolare le impostazioni MIDI e inviare messaggi MIDI.
2. PITCH BEND WHEEL (rotella bend del pitch) – Trasmette le informazioni relative al bend del pitch
MIDI per alzare o abbassare temporaneamente il pitch di una nota.
3. ROTELLA DI MODULAZIONE – Trasmette dati controller continui (CC #1 - Modulation Depth in via
predefinita).
La rotella di modulazione può anche essere assegnata a parametri diversi quali pan,
attacco, reverb, chorus, ecc.
4. ADVANCED (avanzate) – Servirsi di questo tasto per accedere alle impostazioni MIDI avanzate
elencate sopra i tasti.
5. CURSORE VOLUME – Trasmette dati controller continui (CC#7 - Volume in via predefinita). Il cursore
Volume può anche essere assegnato a parametri diversi quali pan, attacco, reverb, chorus, ecc.
6. OCTAVE - / + – Alza o abbassa la gamma di ottave della tastiera di 3 ottave. Per riportare le ottave a
0, preremere contemporaneamente i tasti Octave + e -. I tasti Octave + e - possono anche essere
assegnati al controllo di altre funzioni quali la trasposizione.
SCELTA E MODIFICA DI COMANDI MIDI
Tasto Advanced (Avanzate)
La pressione del tasto ADVANCED (Avanzate) con i tasti della tastiera consente di regolare e inviare
messaggi e informazioni MIDI precisi in maniera semplice e rapida. In questa modalitä, i tasti neri della
tastiera sono utilizzati per selezionare funzioni, mentre quelli bianchi vengono utilizzati per inserire dati e per
selezionare canali.
1. Premere ADVANCED (Avanzate).
2. Premere sul Q88 i tasti le cui impostazioni MIDI (stampate sopra il tasto) si desidera regolare o
inviare.
3. Inserire un valore numerico servendosi dei tasti numerici.
4. Premere il tasto ENTER (Invio) o CANCEL (Canc) per confermare o annullare la scelta.
DATA:
DATA:
DATA:
DATA:
DATA:
DATA:
OCTAVE
TRANSPOSE
CANCEL CH 1 CH 2 CH 3 CH 4 CH 5 CH 6 CH 7 CH 8 CH 9 CH 10 CH 11 CH 12 CH 13 CH 14 CH 15 CH 16 0 1 2 3 4 5 6 7 8
MIDI OUT
BANK LSB
BANK MSB
CHANNEL
FROM USB
PROGRAM
RESET ALL
OCTAVE - OCTAVE 0 OCTAVE +
ALL NOTES OFF TRANSPOSE - TRANSPOSE 0 TRANSPOSE +
CONTROLLERS
28
WHEEL
SLIDER
PROGRAM BANK LSB BANK MSB
ASSIGN
ASSIGN
9
ENTER
Page 29

Messaggi MIDI
CANALI MIDI – Seleziona il canale MIDI (1-16) sul quale il Q88 trasmetterà messaggi MIDI. Quello
predefinito è il Canale 1.
USCITA MIDI DA USB – Abilita/disabilita la capacità del Q88 di ricevere dati MIDI da un collegamento USB
(ossia un DAW tramite un computer) e inviarli ad un motore audio esterno.
Gruppo assegnazione inserimento dati
DATI: OTTAVE – Consente di regolare la gamma delle ottave.
DATI: TRASPONI – Consente di regolare la trasposizione.
DATI: PROGRAMMA – Consente di regolare i cambiamenti di programma.
WHEEL ASSIGN (Assegnazione rotella) – Nel menu ADVANCED (Avanzate), premere il tasto WHEEL
ASSIGN (assegnazione rotella) e servirsi del cursore Volume o dei tasti numerici per inserire un MIDI CC#
per assegnare una funzione alla rotella.
SLIDER ASSIGN (Assegnazione cursore) – Nel menu ADVANCED (Avanzate), premere il tasto SLIDER
ASSIGN (assegnazione cursore) e servirsi del cursore Volume o dei tasti numerici per inserire un MIDI CC#
per assegnare una funzione al cursore.
Gruppo ottave
OTTAVA - – Abbassa la gamma delle ottave della tastiera di un'ottava.
OTTAVA 0 – Imposta la gamma delle ottave al valore predefinito, con il primo tasto ad A1.
OTTAVA + – Alza la gamma delle ottave della tastiera di un'ottava.
FUNZIONI AVANZATE
Oltre a stabilire uno spostamento di ottave, i tasti Octave + e - possono essere utilizzati per controllare altre
funzioni MIDI. I tasti che recano l'etichetta DATA (dati): ________ servono a selezionare la funzione di tali
tasti ottave. Quando i tasti ottave vengono
di sopra dei tasti rimangono accese, indipendentemente dall'attuale impostazione delle funzioni.
Per selezionare una funzione alternativa:
1. Premere il tasto ADVANCED (Avanzate).
2. Premere il tasto nero che rappresenta la funzione desiderata.
Spostamento di ottave
I tasti Ottave + e -
Per spostare le ottave servendosi dei tasti Octave + e –, innanzitutto premere il tasto ADVANCED (Avanzate)
e quindi servirsi dei tasti Octave + e - per alzare o abbassare il pitch della tastiera di una o più ottave (una
per ciascuna pressione). La configurazione predefinita delle ottave è 0 (quando entrambi i LED sono accesi
sopra i tasti ottave) e sarà l'impostazione delle ottave presente ad ogni accensione del Q88.
Per assegnare i tasti Octave + e –
1. Premere il tasto ADVANCED (Avanzate).
2. Premere il tasto DATI: OTTAVE.
Per eseguire un rapido cambiamento di ottave quando i tasti Octave + e - vengono utilizzati per controllare
altre funzioni MIDI:
1. Premere il tasto ADVANCED (Avanzate).
2. Premere il tasto OCTAVE + per aumentare le ottave di 1 (premerlo nuovamente per aumentare le
ottave di 2 e così via).
3. Premere il tasto OCTAVE - per diminuire le ottave di 1 (premerlo nuovamente per diminuire le ottave di
2 e così via). Alternativamente, premere il tasto OCTAVE 0 per resettare le ottave a 0.
4. Premere ENTER per confermare il cambiamento.
utilizzati per controllare tali funzioni, entrambe le spie presenti al
al controllo delle ottave:
29
Page 30

Trasposizione
In alcuni casi è utile ridurre o alzare o abbassare il pitch della tastiera di un certo numero di semitoni
piuttosto che di un'intera ottava. Ad esempio, se state suonando una canzone con un cantante che ha
difficoltà a cantare note al di fuori della sua gamma vocale, è possibile trasporre il pitch di uno o due semitoni
per suonare la canzone in una gamma più semplice per il cantante. Ciò può essere fatto servendosi di una
funzione MIDI denominata Trasponi.
Nota bene: un semitono è la distanza tra due note cromatiche adiacenti. Due semitoni equivalgono a un
intervallo. Ad esempio, un semitono più alto di "Do” è "Do diesis", e due semitoni più alto di "Do" è "Re".
Trasponi funziona come Octave Shift, tranne per il fatto che il passaggio è di +/- 12 semitoni. Vi sono due
modi per trasporre la tastiera. Si possono utilizzare i tasti Octave + e - oppure utilizzare i tasti TRANSPOSE , TRANSPOSE 0 e TRANSPOSE +.
Per assegnare i tasti Ottave "+" e "–" alla funzione Transpose (trasponi):
1. Premere il tasto ADVANCED (Avanzate).
2. Premere il tasto DATI: tasto TRANSPOSE (trasponi).
Premere il tasto Octave + o - per sentire il pitch della nota che si suona che sale o scende. Premere
contemporaneamente i tasti Octave + e - per annullare la trasposizione della tastiera.
Canale MIDI
I dati MIDI del Q88 possono essere inviati su uno qualsiasi dei 16 canali MIDI. Ciò nonostante, alcuni
dispositivi MIDI e applicazioni software MIDI possono richiedere che la tastiera invii dati MIDI su un canale
specifico. In questo caso, è possibile cambiare il canale cui sono inviati i dati MIDI procedendo come segue:
1. Premere il tasto ADVANCED (Avanzate).
2. Premere uno dei 16 tasti canale del Q88, in base al canale MIDI che occorre.
Il canale MIDI può anche essere assegnato ai tasti Octave + e -. Una volta assegnato, premendo + o + di
aumenterà o diminuirà il canale di incrementi. Quando viene raggiunto il canale 16 e si preme +, verrà
selezionato il canale 1. Premendo contemporaneamente + e - si richiama il canale MIDI 1.
Modifica Programma
Le modifiche di programma servono a cambiare lo strumento o la voce che si sta utilizzando. Vi sono due
modi per inviare un messaggio di modifica programma:
1. Aumenta/diminuisci modifica programma
A. Premere il tasto ADVANCED (Avanzate).
B. Premere il tasto DATI: tasto PROGRAM (programma).
Ora i tasti Octave + e Octave - possono essere utilizzati per cambiare il programma. Premere il tasto Octave
+ o Octave - e suonare i tasti fino a trovare lo strumento che si desidera.
2. Quick Select Program Change:
A. Premere il tasto ADVANCED (Avanzate).
B. Premere il tasto PROGRAM.
Premere i tasti numerici per inserire un numero di modifica programma seguito dal tasto INVIO.
Alternativamente, si possono utilizzare i tasti Octave + e - per cambiare il valore e premere INVIO.
Banco LSB e Banco MSB
I messaggi modifica programma servono a cambiare strumenti e voci MIDI. Ciò nonostante, il numero di
strumenti accessibile tramite modifica programma è limitato a 128. Alcuni dispositivi dispongono di più di 128
voci in vari banchi, con un modo diverso di accedere a tali voci extra. Solitamente, tali dispositivi si servono
di messaggi Banco LSB e Banco MSB.
Aumento/diminuzione modifiche banco LSB e banco MSB:
1. Premere il tasto ADVANCED (Avanzate).
2. Premere il tasto DATI: BANCO LSB
premere DATI: BANCO MSB per impostare il valore MSB (byte più significativo).
per impostare il valore LSB (byte meno significativo) oppure
30
Page 31

Servirsi dei tasti Octave + e - per cambiare il programma. Premere il tasto Octave + oppure Octave - e
suonare i tasti fino a trovare lo strumento che si desidera.
Quick Select Banco LSB e Banco MSB:
1. Premere il tasto ADVANCED (Avanzate).
2. Premere il tasto BANCO LSB o BANCO MSB.
3. Servirsi dei tasti numerici per inserire il valore desiderato, seguito dal tasto INVIO. Alternativamente, si
possono utilizzare i tasti Octave + e - per cambiare il valore e premere INVIO. Premere i tasti Octave +
e - contemporaneamente per selezionare il Banco 0.
La rotella di modulazione
Alla rotella di modulazione è possibile assegnare messaggi MIDI CC. Alcuni valori utili sono:
• 01 Modulazione
• 05 Portamento
• 07 Volume
• 10 Pan
Affinché i MIDI CC abbiano effetto sul suono, il dispositivo MIDI ricevente deve essere in grado di leggere e
rispondere a tali messaggi MIDI. La maggior parte dei dispositivi risponde almeno a
modulazione (CC #1), e pan dati (CC #10).
Per assegnare il n. di CC alla rotella di modulazione:
1. Premere il tasto ADVANCED (Avanzate).
2. Premere il tasto WHEEL ASSIGN.
3. Servirsi dei tasti numerici per inserire il MIDI CC che si desidera assegnare alla rotella di modulazione.
4. Premere il tasto INVIO.
Per cancellare i dati numerici che si stanno inserendo, premere il tasto CANC, per uscire dalla modalità Edit
senza cambiare l'assegnazione della rotella di modulazione.
Nota bene: ogni volta che il Q88 viene spento, il valore assegnato alla rotella di modulazione andrà perso e
tornerà al valore predefinito CC#1 (Modulazione).
Il cursore Volume
Per assegnare il cursore Volume a qualsiasi CC MIDI:
1. Premere il tasto ADVANCED (Avanzate).
2. Premere il tasto SLIDER ASSIGN.
3. Servirsi dei tasti numerici per inserire il numero del MIDI CC che si desidera assegnare al cursore
4. Premere il tasto INVIO.
Se è stato commesso un errore nell'inserimento dei dati numerici, è possibile premere il tasto CANC per
uscire dalla modalità Edit senza cambiare l'assegnazione del cursore Volume. Va notato che ogni volta che
viene spenta la tastiera, il valore assegnato al cursore Volume andrà perso e tornerà al valore predefinito di
controllo del volume.
Sensibilità di bend del pitch
Si può modificare la sensibilità della rotella di bend del pitch assegnando il canale MIDI n. 128 alla rotella di
modulazione o al cursore Volume. Questo consentirà di alterare la gamma di bend del pitch verso l'alto o
verso il basso di un'ottava.
volume (CC #7),
Alternativamente, si possono utilizzare i tasti Octave + e - per cambiare il valore.
Volume.
Alternativamente, si possono utilizzare i tasti Octave + e - per cambiare il valore.
UTILIZZO DI UN PEDALE SUSTAIN
Si può collegare un pedale sustain (venduto separatamente) al Q88 per controllare
in maniera simile a ciò che fa il pedale sustain di un pianoforte. Collegare il pedale prima di accendere il Q88
in modo che possa individuare la polarità corretta. Per invertire la polarità predefinita del pedale, premere e
tenere premuto il pedale durante l'accensione del Q88.
la lunghezza delle note,
31
Page 32

CONFIGURAZIONE DEL Q88 CON ABLETON LIVE LITE
1. CONFIGURAZIONE COME SUPERFICIE DI CONTROLLO
1. Aprire il software e recarsi al menu Options (Windows) o Live Lite (Mac),
e selezionare Preferences.
2. Nel menu Preferences scegliere la scheda MIDI Sync e aprire il menu Control Surface per
selezionare Q88 dall'elenco Control Surface.
3. Recarsi ai menu a discesa Input e Output. Nel menu a discesa Input selezionare il Q88 come
dispositivo di ingresso MIDI. Nota bene: potrebbe comparire USB Audio Device e non Q88.
4. Recarsi al menu a discesa Output e selezionare la prima uscita MIDI (che rappresenta il segnale MIDI
USB).
2. OPZIONI DI INGRESSO/USCITA
Il Q88 è ora selezionato quale superficie di controllo. Nei menu Input/Output visualizzare le opzioni Track,
Sync e Remote :
1. L'opzione Track convoglia qualsiasi nota MIDI inviata dal Q88. Quando si utilizza il Q88 per attivare
strumenti virtuali in Live Lite, accendere Track On per l'ingresso MIDI.
2. Lo stesso può essere fatto per le uscite MIDI. Solitamente, in questo caso non sarà necessario
accendere Track On . Ciò nonostante, se occorre convogliare indietro note MIDI ad un dispositivo MIDI
esterno, accendere Track On per MIDI Output 2 (che rappresenta la porta di uscita MIDI fisica del
Q88).
3. Per utilizzare il cursore Volume, la rotella di bend del pitch o la rotella modulazione per controllare il
Live Lite, accendere Remote On per l'ingresso MIDI. Così facendo, si convogliano i messaggi MIDI CC
nel software per controllare diverse funzioni nel software.
3. CONFIGURAZIONE CON UNO STRUMENTO VIRTUALE
1. Selezionare uno strumento virtuale dall'elenco Live Devices del Live Lite. Ad esempio, selezionare
Billy the Kid (nella cartella Brass, ottoni) dall'Instrument Rack.
2. Aggiungere lo strumento virtuale al progetto, trascinandolo nell'area Clip/Dispositivo (dove dice "Drop
Files and Devices Here", "lascia qui file e dispositivi").
3. Cliccare sul tasto Record Enable in fondo allo schermo (per ascoltare ciò che si suonerà).
4. Cliccare sul menu a discesa per l'ingresso MIDI, indicato con la scritta MIDI From (MIDI da) e
impostarlo suAll Ins (tutti gli ingressi).
5. Se il Q88 è impostato su un canale MIDI specifico cui si desidera che lo strumento virtuale risponda, è
possibile scegliere il canale MIDI specifico dal menu a discesa. Normalmente, dovrebbe stare su All
Channels(tutti i canali).
6. Suonare i tasti del Q88 per sentire l'audio della traccia dello strumento virtuale che proviene dagli
altoparlanti del computer.
Per maggiori dettagli, fare riferimento alla documentazione Live’s Help navigando su Help > Help View. Un
pannello sulla destra mostra informazioni utili.
4. ASSEGNAZIONE PERSONALIZZATA DEI COMANDI
Procedere come segue per personalizzare il Live Lite in modo che risponda a determinati comandi del Q88:
1. In Live Lite, richiamare il menu opzioni di assegnazione MIDI cliccando sul tasto MIDI nell'angolo
superiore destro. Una luce viola evidenzia le opzioni assegnabili. Qualsiasi opzione evidenziata può
essere mappata al cursore Volume, alla rotella di bend del pitch o alla rotella di modulazione del Q88.
2. Cliccare su un'opzione assegnabile sullo schermo.
3. Muovere il comando che si desidera assegnare. Il suo numero CC (modifica comando) comparirà per il
comando specifico spostato.
4. Cliccare sul tasto MIDI nell'angolo superiore destro per uscire dalla modalità di assegnazione MIDI.
5. Spostare il comando sul Q88 che è stato assegnato: ora sposterà l'assegnazione scelta su schermo.
32
Page 33

5. SCALA VALORI VS. MODALITÀ PICKUP
Nel menu Preferences recarsi al menu a discesa Takeover Mode che presenta le opzioni Pickup e Value
Scaling (scala valori).
• Quando impostato su Pickup, un comando del Q88 inizierà spostando il parametro software ad esso
assegnato solo quando il comando hardware del Q88 supera il valore attuale di tale parametro.
Esempio: il cursore Volume sul Q88 è completamente abbassato. Il Fader 1 nel software è mezzo
alzato. Quando impostato su Pickup, il Fader 1 non si muoverà fino a quando il cursore Volume del
Q88 non supera il punto intermedio. Eseguirà quindi il “pickup” da questo punto e inizierà a muovere il
Fader 1 nel software.
• Quando impostato su Value Scaling, farà l'opposto.
Esempio: il cursore Volume sul Q88 è completamente abbassato. Il Fader 1 nel software è mezzo
alzato. Quando impostato su Value Scaling, Fader 1 si muoverà non appena si muove il cursore
Volume sul Q88.
RISOLUZIONE DI PROBLEMI MIDI
All Notes Off (tutte le note spente)
Se si sperimentano note sospese che non smettono
di suonare, inviare un messaggio MIDI All Notes Off
per fermarle procedendo come segue:
1. Premere il tasto ADVANCED (Avanzate).
2. Premere il tasto ALL NOTES OFF.
Reset All Controllers (azzera tutti i controller)
Se si verifica la presenza di un effetto indesiderato
su uno strumento, anziché dover isolare e
identificare quell'effetto in particolare, è possibile
inviare un messaggio MIDI Reset All Controllers
perocedendo come segue:
1. Premere il tasto ADVANCED (Avanzate).
2. Premere il tasto RESET ALL
CONTROLLERS.
MIDI Out
La porta MIDI Out può essere utilizzata per collegare il Q88 ad un modulo audio esterno o ad un'altra tastiera
MIDI. In via predefinita (quando si accende il Q88), tutti i dati controller sono inviati tramite la sua uscita MIDI
e il collegamento USB.
Ciò nonostante, se si desidera che l'uscita MIDI agisca come un'interfaccia da USB a MIDI tradizionale,
procedere come segue:
1. Premere il tasto ADVANCED (Avanzate).
2. Premere il tasto contrassegnato dalla scritta MIDI OUT FROM USB (uscita MIDI da USB).
3. Selezionare il Q88 come dispositivo di uscita MIDI nel software del sequenziatore. Il Q88 riceverà ora
dati MIDI dal computer tramite il suo collegamento USB e lo invierà tramite la sua uscita MIDI. Si veda
lo schema a lato per maggiori dettagli sul convogliamento MIDI.
88
DATA:
DATA:
DATA:
DATA:
MIDI OUT
RESET ALL
WHEEL
DATA:
DATA:
OCTAVE
ADVANCED
OCTAVEVOLUME
TRANSPOSE
CANCEL CH 1 CH 2 CH 3 CH 4 CH 5 CH 6 CH 7 CH 8 CH 9 CH 10 CH 11 CH 12 CH 13 CH 14 CH 15 CH 16 0 1 2 3 4 5 6 7 8
OCTAVE - OCTAVE 0 OCTAVE +
BANK LSB
BANK MSB
CHANNEL
FROM USB
PROGRAM
CONTROLLERS
ALL NOTES OFF TRANSPOSE - TRANSPOSE 0 TRANSPOSE +
SLIDER
PROGRAM BANK LSB BANK MSB
ASSIGN
ASSIGN
9
ENTER
33
Page 34

RISOLUZIONE DI PROBLEMI GENERICI
PROBLEMA CAUSA SOLUZIONE
Verificare il collegamento USB del computer per
assicurarsi che il Q88 sia riconosciuto. Se necessario,
Il Q88 non è collegato bene.
Il Q88 è stato collegato dopo
il lancio dell'applicazione
Nessun suono dal dispositivo
target.
Le note sono sostenute in
maniera continua
Il pedale sustain funziona al
contrario.
Quando premo un tasto, c'è
un ritardo prima che si
sentano suoni.
software.
Il problema è causato
dall’uso di un hub USB.
Il software non è configurato
per ricevere dati MIDI dal
Q88.
Il canale MIDI del Q88 non è
lo stesso del canale MIDI in
ingresso del software.
Il pedale sustain è stato
collegato dopo che il Q88 è
stato acceso.
Note bloccate per via di dati
MIDI incompleti.
Il pedale sustain è stato
collegato dopo che
l’alimentazione è stata
accesa.
Si tratta di latenza software.
ricollegare l’apparecchio e riavviare il computer.
Se si controlla un modulo hardware esterno,
assicurarsi che il cavo MIDI sia collegato al Q88 e alla
porta MIDI IN del dispositivo.
Riavviare l'applicazione software.
Scollegare il Q88 dall’hub USB e collegarlo
direttamente al computer.
Assicurarsi che Q88 o dispositivo USB MIDI
devicesia elencato come sorgente MIDI attiva
nell'applicazione. Solitamente, è possibile accedere
alle impostazioni MIDI tramite il menu Preferences
dell’applicazione.
Assicurarsi che il Q88 stia inviando informazioni MIDI
sul canale sul quale il dispositivo target è impostato per
la ricezione.
Spegnere il Q88 per 10 secondi e riaccenderlo.
Spegnere il Q88, attendere 10 secondi, quindi
riaccenderlo.
Con il pedale collegato, spegnere il Q88, attendere
alcuni istanti, quindi riaccenderlo.
Provare ad aumentare le dimensioni del buffer per il
programma software, servirsi di driver ASIO a bassa
latenza o servirsi temporaneamente di uno strumento
MIDI generale al posto di uno strumento VST ad
elevata latenza durante la registrazione.
34
Page 35

BENUTZERHANDBUCH (DEUTSCH)
LIEFERUMFANG
• Q88
• USB-Kabel
• Software-DVD
• Benutzerhandbuch
• Sicherheitshinweise & Garantieinformationen
ANSCHLUSSÜBERSICHT
NETZTEIL*
9V DC 500mA
EXTERNES MIDI-GERÄT*
STROMVERSORGUNG DES Q88
Das Q88 kann über einen USB-Anschluss oder ein optionales, externes Netzteil (separat erhältlich) mit
Strom versorgt werden.
Stromversorgung und Anschluss über USB
1. Vergewissern Sie sich, dass der Ein-/Ausschalter auf der Rückseite des Q88 auf "OFF" steht.
2. Verbinden Sie das USB-Kabel mit einem freien USB-Port Ihres Computers. Verwenden Sie idealerweise
einen USB-Anschluss an der Rückseite des Computers. Wenn Sie einen USB-Hub verwenden, stellen Sie
sicher, dass der Hub mit Strom versorgt wird.
3. Stecken Sie das andere Ende des USB-Kabels in die USB-Buchse am Q88.
4. Schalten Sie das Q88 ein. Das USB-Kabel versorgt das Q88 nicht nur mit Strom, sondern überträgt auch
MIDI-Daten vom und zum Computer.
Verwendung eines externen Netzteils
Sie können ein Netzteil (separat erhältlich) mit folgenden Spezifikationen verwenden: 9V DC, 500 mA,
mittlerer Pin mit positiver Polarität, 5,5 mm äußerer Zylinderdurchmesser und 2,5 mm innerer
Zylinderdurchmesser. Wenn Sie Strom über einen mit Strom versorgten USB-Hub beziehen, ist kein
externes Netzteil erforderlich.
Hinweis: Lassen Sie das Netzteil nicht über längere Zeiträume hinweg angeschlossen, wenn das Q88 nicht
in Gebrauch ist.
COMPUTER*
SUSTAIN-
PEDAL*
VOLUME
ON/OFF
POWER
EXPRESSIONPEDAL*
*SEPARAT
ERHÄLTLICH
35
Page 36

1
4
5
6
2
3
VOLUME
ON/OFF
POWER
9V DC 500mA
1
2
3
4 5
6
ÜBERSICHT DER RÜCKSEITE
ON/OFF
9V DC 500mA
VOLUME
1. NETZTEILBUCHSE - Schließen Sie hier ein Netzteil an, wenn Sie das Q88 nicht über eine USB-
Verbindung mit Strom versorgen möchten.
2. USB-VERBINDUNG - Schließen Sie das mitgelieferte USB-Kabel hier an und verbinden es
anschließend mit einem USB-Port Ihres Computers.
3. MIDI OUT – Verwenden Sie ein fünfpoliges MIDI-Kabel (separat erhältlich), um diese Buchse mit dem
MIDI IN eines externen MIDI-Gerätes (Keyboard, Drum Machine, Sequencer etc.) zu verbinden.
4. SUSTAIN-PEDALEINGANG – Verbinden Sie ein 1/4" TS Sustain-Pedal (separat erhältlich) mit diesem
Eingang.
5. EXPRESSION-PEDALEINGANG - Schließen Sie ein 1/4" TRS Expression-Pedal (separat erhältlich)
an diesen Eingang an.
Ein angeschlossenes Expression-Pedal steuert die Funktionen, die dem Lautstärkeregler zugewiesen
wurden und deaktiviert den Lautstärkeregler.
6. EIN-/AUSSCHALTER – Schaltet das Gerät ein/aus.
ÜBERSICHT OBERSEITE
88
ADVANCED
OCTAVEVOLUME
1. KEYBOARD - Die Tasten des Q88 funktionieren wie ein gewöhnliches MIDI-Keyboard. Sie können
aber auch verwendet werden, um MIDI-Einstellungen anzupassen und MIDI-Nachrichten zu senden.
2. PITCH BEND-RAD - Überträgt MIDI Pitch Bend-Informationen zum vorübergehenden Anheben oder
Absenken der Tonhöhe einer Note.
3. MODULATIONSRAD - Überträgt Continuous Controller Daten (CC #1 oder standardmäßig den
Modulationsgrad).
Chorus etc. zugeordnet werden.
4. ERWEITERT - Verwenden Sie diese Taste, um auf die erweiterten MIDI-Einstellungen zuzugreifen, die
oberhalb der Tasten angeführt sind.
5. LAUTSTÄRKEREGLER - Überträgt Continuous Controller Daten (CC#7 - standardmäßig die
Lautstärke). Auch der Lautstärkeregler kann verschiedenen Effekten wie Pan, Attack, Reverb, Chorus
usw. zugeordnet werden.
6. OKTAVE - / + - Verschiebt den Oktavenbereich des Keyboards 3 Oktaven nach oben oder nach unten.
Um die Oktave auf 0 zurückzusetzen, drücken Sie gleichzeitig die Taste Oktave + und die Taste
Oktave -. Die Tasten Oktave + und - können auch für die Steuerung von anderen Funktionen, wie z.B.
der Transportfunktion, verwendet werden.
DATA:
DATA:
DATA:
DATA:
DATA:
DATA:
OCTAVE
TRANSPOSE
CANCEL CH 1 CH 2 CH 3 CH 4 CH 5 CH 6 CH 7 CH 8 CH 9 CH 10 CH 11 CH 12 CH 13 CH 14 CH 15 CH 16 0 1 2 3 4 5 6 7 8
MIDI OUT
BANK LSB
BANK MSB
CHANNEL
FROM USB
PROGRAM
OCTAVE - OCTAVE 0 OCTAVE +
RESET ALL
ALL NOTES OFF TRANSPOSE - TRANSPOSE 0 TRANSPOSE +
CONTROLLERS
WHEEL
SLIDER
PROGRAM BANK LSB BANK MSB
ASSIGN
ASSIGN
9
ENTER
Das Modulationsrad kann auch anderen Parametern wie Panorama, Attack, Reverb,
36
POWER
Page 37

AUSWAHL & BEARBEITUNG VON MIDI-NACHRICHTEN
Taste Erweitert
Wenn Sie gleichzeitig eine Keyboard-Taste und die Taste ERWEITERT drücken, können Sie MIDINachrichten anpassen und genaue MIDI-Informationen schnell und einfach senden. In diesem Modus
können mit den schwarzen Keyboard-Tasten Funktionen ausgewählt werden, während die weißen Tasten
der Dateneingabe und Kanalwahl dienen.
1. Drücken Sie ERWEITERT.
2. Drücken Sie jene Taste am Q88, deren MIDI-Einstellung Sie anpassen oder senden möchten
(oberhalb der Taste angegeben).
3. Geben Sie einen Zahlenwert mit den Zifferntasten ein.
4. Drücken Sie die Taste ENTER oder ABBRECHEN, um Ihre Wahl zu bestätigen oder
abzubrechen.
MIDI-Nachrichten
MIDI-KANÄLE - Wählt den MIDI-Kanal (1-16) aus, über den das Q88 die MIDI-Nachrichten überträgt. Die
Standardeinstellung ist Kanal 1.
MIDI OUT VIA USB - Aktiviert/deaktiviert die Fähigkeit des Q88, MIDI-Daten über eine USB-Verbindung (d.h.
eine DAW über einen Computer) zu empfangen und an eine externe Sound-Engine zu senden.
Eingabegruppe für die Datenzuweisung
DATEN: OKTAVE - Zum Einstellen des Oktavenbereichs.
DATEN: TRANSPONIEREN - Zur Einstellung der Transposition.
DATEN: PROGRAMM - Zur Anpassung der Programmwechsel.
FUNKTIONSZUWEISUNG FÜR DAS RAD - Wenn Sie sich im Menü ERWEITERT befinden, drücken Sie die
Taste FUNKTIONSZUWEISUNG FÜR DAS RAD und verwenden den Lautstärkeregler oder die Zifferntasten,
um eine MIDI CC # einzugeben, um dem Rad eine Funktion zuzuweisen.
FUNKTIONSZUWEISUNG FÜR DEN SCHIEBEREGLER - Wenn Sie sich im Menü ERWEITERT befinden,
drücken Sie die Taste FUNKTIONSZUWEISUNG FÜR DEN SCHIEBEREGLER und verwenden den
Lautstärkeregler oder die Zifferntasten, um eine MIDI CC # einzugeben, um dem Schieberegler eine
Funktion zuzuweisen.
Oktavengruppe
OKTAVE - – Senkt den Oktavenbereich des Keyboards um eine Oktave.
OKTAVE 0 – Bringt den Oktavenbereich auf den Standardwert, bei dem die erste Note A1 ist.
OKTAVE + – Erhöht den Oktavenbereich des Keyboards um eine Oktave.
ERWEITERTE FUNKTIONEN
Die Oktaventasten + und -können nicht nur zum Einstellen des Oktavenbereichs verwendet werden, sondern
auch zur Steuerung anderer MIDI-Funktionen. Die Tasten, die mit DATEN beschriftet sind: ________
werden verwendet, um die Funktion für diese Oktaventasten auszuwählen. Wenn die Oktaventasten
verwendet werden, um diese Funktionen zu steuern, leuchten beide Lichter über den Tasten weiterhin - ganz
unabhängig von der aktuellen Funktionseinstellung.
Um eine alternative Funktion auszuwählen:
1. Drücken Sie die Taste ERWEITERT.
2. Drücken Sie die schwarze Taste, die mit der gewünschten Funktion beschriftet ist.
37
Page 38

Oktaventransponierung
Die Tasten Oktave + und -
Um die Oktaven mit den Tasten Oktave + und - zu transponieren, drücken Sie zunächst auf die Schaltfläche
ERWEITERT und verwenden dann die Tasten Oktave + und -, um die Tonhöhe des Keyboards eine oder
mehrere Oktaven nach oben oder unten zu transponieren (je eine Oktave pro Tastendruck). Der
Standardwert für die Oktaveneinstellung ist 0 (wenn beide LEDs über den Oktaventasten leuchten) und wird
bei jedem Einschalten des Q88 aktiviert.
So weisen Sie die Tasten Oktave + und - zu, um die Oktave zu steuern:
1. Drücken Sie die Taste ERWEITERT.
2. Drücken Sie die Taste DATEN: OKTAVE.
So führen Sie einen schnellen Oktavenwechsel durch, wenn die Oktaventasten + und - verwendet werden,
um andere MIDI-Funktionen zu steuern:
1. Drücken Sie die Taste ERWEITERT.
2. Drücken Sie die Taste OKTAVE +, um die Oktave um 1 zu erhöhen (drücken Sie die Taste erneut, um
die Oktave um 2 zu erhöhen und so weiter).
3. Drücken Sie die Taste OKTAVE -, um die Oktave um 1 abzusenken (drücken Sie die Taste erneut, um
die Oktave um 2 abzusenken und so weiter). Wahlweise können Sie auch die Taste OKTAVE drücken,
um die Oktave auf 0 zurückzusetzen.
4. Drücken Sie ENTER, um die Änderung zu bestätigen.
Transposition
In manchen Fällen ist es sinnvoll, die Tonhöhe statt einer ganzen Oktave nur um einige Halbtöne zu senken
oder anzuheben. Wenn Sie zum Beispiel einen Song spielen, bei dem der Sänger Schwierigkeiten mit der
Tonhöhe hat, können Sie die Tonhöhe um ein oder zwei Halbtöne verändern, um den Song der Stimmlage
des Sängers anzupassen. Dies wird durch die Verwendung der MIDI-Funktion Transponieren ermöglicht.
Hinweis: Ein Halbton entspricht einem halben Schritt - also dem Abstand zwischen zwei benachbarten
chromatischen Tönen. Zwei Halbtöne entsprechen einem ganzen Schritt. Wenn Sie z.B. ein "C" einen
Halbton höher spielen, dann wird diese Note zum "C#". Wenn Sie ein "C" zwei Halbtöne höher spielen, dann
ist es ein "D".
Das Transponieren funktioniert genau wie das Verändern einer Oktave, nur dass beim Transponieren die
Töne um +/- 12 Halbtöne verschoben werden. Es gibt zwei Möglichkeiten das Keyboard zu transponieren.
Sie können die Oktaventasten + und - oder die Tasten TRANSPONIEREN -, TRANSPONIEREN 0 und
TRANSPONIEREN + verwenden.
So weisen Sie den Oktaventasten "-" und "+" eine Transpositionsfunktion zu:
1. Drücken Sie die Taste ERWEITERT.
2. Drücken Sie die Taste DATEN: TRANSPONIEREN.
Drücken Sie die Oktaventaste + oder die Oktaventaste -, um zu hören, wie die Tonhöhe der gespielten Note
nach oben oder unten verschoben wird. Drücken Sie beide Oktaventasten gleichzeitig, um die
Transponierung des Keyboards abzubrechen.
MIDI-Kanal
MIDI-Daten vom Q88 können von jedem der 16 MIDI-Kanäle gesendet werden. Bei manchen MIDI-Geräten
und MIDI-Softwares muss das Keyboard die MIDI-Daten jedoch über einen bestimmten Kanal senden. Wenn
dies der Fall ist, können Sie den Kanal, der die MIDI-Daten sendet, folgendermaßen einstellen:
1. Drücken Sie die Taste ERWEITERT.
2. Je nach benötigtem MIDI-Kanal drücken Sie eine der 16-Kanaltasten am Q88.
Der MIDI-Kanal kann auch den Oktaventasten + und - zugeordnet werden. Nach der Zuweisung drücken Sie
+ oder -, um den Kanal schrittweise zu erhöhen oder zu verringern. Wenn Sie Kanal 16 erreicht haben und +
drücken, springt die Auswahl wieder auf Kanal 1. Durch gleichzeitiges Drücken der Tasten + und - wird MIDIKanal 1 aufgerufen.
38
Page 39

Programmwechsel
Programmwechsel werden verwendet, um das verwendete Instrument oder die Stimme zu wechseln. Es gibt
zwei Möglichkeiten, um eine Programmwechsel-Nachricht zu senden:
1. Programmwechsel in Einzelschritten:
A. Drücken Sie die Taste ERWEITERT.
B. Drücken Sie die Taste DATEN: PROGRAMM.
Nun können die Oktavetasten + und - dazu verwendet werden, das Programm zu wechseln. Drücken Sie die
Oktaventasten + oder - und spielen Sie auf den Tasten, bis Sie das gewünschte Instrument finden.
2. "Quick Select"-Programwechsel:
A. Drücken Sie die Taste ERWEITERT.
B. Drücken Sie die Taste PROGRAMM.
Drücken Sie die Zifferntasten, um eine Programmwechselnummer einzugeben und drücken Sie
anschließend die ENTER-Taste. Wahlweise können Sie die Oktaventasten + und - drücken, um den Wert zu
ändern. Bestätigen Sie anschließend mit der ENTER-Taste.
Bank LSB und Bank MSB
Programmwechselnachrichten werden verwendet, um MIDI-Instrumente und Stimmen zu ändern. Die Anzahl
der Instrumente, auf die mithilfe eines Programmwechsels zugegriffen werden kann, ist auf 128 beschränkt.
Manche Geräte haben mehr als 128 Stimmen in verschiedenen Banken zur Verfügung, welche auf andere
Art und Weise angesteuert werden müssen. Im Allgemeinen verwenden diese Geräte Bank LSB- und Bank
MSB-Befehle.
Bank LSB- und Bank MSB-Wechsel in Einzelschritten:
1. Drücken Sie die Taste ERWEITERT.
2. Drücken Sie die Taste DATEN: BANK LSB, um den LSB-Wert einzustellen oder drücken Sie DATEN:
BANK MSB, um den MSB-Wert einzustellen.
Nun können die Oktavetasten + und - dazu verwendet werden, das Programm zu wechseln. Drücken Sie die
Oktaventasten + oder - und spielen Sie auf den Tasten, bis Sie das gewünschte Instrument finden.
Mit der Quick Select-Methode:
1. Drücken Sie die Taste ERWEITERT.
2. Drücken Sie entweder die Taste BANK MSB oder Bank LSB.
3. Verwenden Sie die Zifferntasten, um den gewünschten Wert einzugeben und bestätigen Sie mit der
ENTER-Taste. Wahlweise können Sie die Oktaventasten + und - drücken, um den Wert zu ändern.
Bestätigen Sie anschließend mit der ENTER-Taste. Drücken Sie die Tasten Oktave + und gleichzeitig,
Das Modulationsrad
Sie können dem Modulationsrad MIDI CC-Nachrichten zuweisen. Einige nützliche Werte sind:
• 01 Modulation
• 05 Portamento
• 07 Lautstärke
• 10 Pan
Damit die MIDI-CCs den Klang beeinflussen, muss das empfangende MIDI-Gerät in der Lage sein, die MIDINachrichten zu lesen und auf sie zu reagieren. Die meisten Geräte werden zumindest auf
#7), Modulation (CC #1) und Pan-Daten (CC #10) reagieren.
So weisen Sie dem Modulationsrad CC# zu:
1. Drücken Sie die Taste ERWEITERT.
2. Drücken Sie die Taste FUNKTIONSZUWEISUNG FÜR DAS RAD.
3. Verwenden Sie die Zifferntasten, um die MIDI CC einzugeben, die Sie dem Modulationsrad zuweisen
möchten. Wahlweise können Sie die Oktaventasten + und - drücken, um den Wert zu ändern.
4. Bestätigen Sie anschließend mit der ENTER-Taste.
um Bank 0 auszuwählen.
Lautstärke (CC
39
Page 40

Um die numerische Dateneingabe abzubrechen, drücken Sie die Taste ABBRECHEN, um den
Bearbeitungsmodus zu beenden ohne die Zuordnung des Modulationsrades zu ändern.
Hinweis: Jedes Mal, wenn das Q88 ausgeschaltet wird, wird der dem Modulationsrad zugewiesene Wert auf
den Standardwert von CC #1 (Modulation) zurückgesetzt.
Der Lautstärkeregler
So weisen Sie den Lautstärkeregler einem beliebigen MIDI-CC zu:
1. Drücken Sie die Taste ERWEITERT.
2. Drücken Sie die Taste FUNKTIONSZUWEISUNG FÜR DEN SCHIEBEREGLER.
3. Verwenden Sie die Zifferntasten, um die Nummer des MIDI CC einzugeben, das Sie dem
Lautstärkeregler zuweisen möchten.
Wahlweise können Sie die Oktaventasten + und - drücken, um den Wert zu ändern.
4. Drücken Sie die ENTER-Taste.
Wenn Sie einen Eingabefehler gemacht haben, können Sie die Taste ABBRECHEN drücken, um den
Bearbeitungsmodus zu beenden ohne die Zuordnung zum Lautstärkeregler zu verändern. Beachten Sie,
dass jedes Mal, wenn das Keyboard ausgeschaltet wird, der Wert, der dem Lautstärkeregler zugewiesen ist,
verloren geht und wieder auf den Standardwert für die Lautstärke zurückgesetzt wird.
Pitch Bend Empfindlichkeit
Sie können die Empfindlichkeit des Pitch Bend-Rads verändern, indem Sie MIDI CC #128 dem
Modulationsrad oder dem Lautstärkeregler zuweisen. So können Sie den Pitch Bend-Bereich um eine
Oktave (nach unten oder oben) verändern.
VERWENDUNG EINES SUSTAIN-PEDALS
Sie können ein Sustain-Pedal (separat erhältlich) an das Q88 anschließen, um die Länge der Noten zu
steuern, ähnlich dem Haltepedal eines Klaviers. Schließen Sie das Pedal an bevor Sie das Q88 einschalten,
damit es die richtige Polarität erkennt. Um die Standard-Polarität des Pedals umzukehren, halten Sie das
Pedal beim Einschalten des Q88 gedrückt.
EINRICHTEN DES Q88 MIT ABLETON LIVE LITE
1. KONFIGURATION ALS BEDIENOBERFLÄCHE
1. Öffnen Sie die Software und navigieren Sie zum Optionen-Menü (Windows) oder zum Live Lite-Menü
(Mac),
und wählen Einstellungen.
2. Im Menü Einstellungen wählen Sie die Registerkarte MIDI Sync und öffnen dann das Menü
Bedienoberfläche, um das Q88 aus der Liste der Bedienoberflächen auszuwählen.
3. Navigieren Sie zu den Auswahlmenüs Eingang und Ausgang. Im Auswahlmenü Eingang wählen Sie
Q88 als MIDI-Eingabegerät. Hinweis: Es kann sein, dass USB-Audiogerät anstelle von Q88
aufscheint.
4. Navigieren Sie zum Auswahlmenü Ausgang und wählen Sie den ersten MIDI-Ausgang (welches das
USB-MIDI-Signal repräsentiert).
2. EINGANGS- UND AUSGANGSOPTIONEN
Das Q88 ist jetzt als Bedienoberfläche ausgewählt. In den Menüs Eingang/Ausgang navigieren Sie zu
Track-, Sync-und Remote-Optionen:
1. Die Track-Option leitet alle MIDI-Noten weiter, die das Q88 sendet. Wenn Sie das Q88 zum Triggern
von virtuellen Instrumenten in Live Lite verwenden, wählen Sie beim MIDI-Eingang Track On.
2. Für die MIDI-Ausgänge können Sie das Gleiche tun. Im Allgemeinen müssen Sie die Einstellung Track
On hier nicht vornehmen. Wenn Sie jedoch MIDI-Noten wieder an ein externes MIDI-Gerät senden
möchten, wählen Sie Track On für den MIDI-Ausgang 2 (das entspricht dem physischen MIDIAusgang am Q88).
3. Um den Lautstärkeregler, das Pitch Bend-Rad oder das Modulationsrad zu verwenden, um Live Lite zu
steuern, wählen Sie für den MIDI-Eingang Remote On. Dadurch werden die MIDI CC-Nachrichten an
die Software gesendet, um verschiedene Softwarefunktionen anzusteuern.
40
Page 41

3. EINRICHTEN MIT EINEM VIRTUELLEN INSTRUMENT
1. Wählen Sie ein Virtuelles Instrument aus der Liste Live-Geräte von Live Lite. Wählen Sie zum
Beispiel Billy the Kid (im Ordner Blechblasinstrumente) aus dem Instrumente-Rack.
2. Fügen Sie Ihrem Projekt das virtuelle Instrument hinzu, indem Sie es in den Bereich Clip-/Geräteablage
ziehen (mit der Beschriftung "Dateien und Geräte hierhin ziehen").
3. Klicken Sie auf die Schaltfläche Aufnahme Aktivieren am unteren Rand des Bildschirms (um Ihr Spiel
hören zu können).
4. Klicken Sie auf das Auswahlmenü für den MIDI-Eingang mit der Beschriftung MIDI Von und wählen Sie
Alle Ins.
5. Wenn Sie Ihr Q88 auf einen bestimmten MIDI-Kanal eingestellt haben, den Sie nur für dieses virtuelle
Instrument verwenden möchten, können Sie diesen spezifischen MIDI-Kanal aus dem Auswahlmenü
wählen. Generell sollte dies auf Alle Kanäle eingestellt bleiben.
6. Spielen Sie auf den Tasten des Q88, um das Audiosignal des Virtuellen Instruments aus dem
Computer-Lautsprecher zu hören.
Für weitere Details lesen Sie bitte die Live-Dokumentation unter Hilfe > Hilfeansicht. Der Bereich auf
der rechten Seite zeigt hilfreiche Informationen an.
4. BENUTZERDEFINIERTE ZUWEISUNGEN FÜR STEUERELEMENTE
Befolgen Sie diese Schritte, um Live Lite individuell anzupassen, damit es auf bestimmte Steuerelemente
des Q88 reagiert:
1. Wählen Sie in Live Lite das Optionsmenü MIDI-Zuweisung, indem Sie auf die Schaltfläche MIDI in der
oberen rechten Ecke klicken. Ein lilafarbener Effekt wird nun über den zuweisbaren Optionen zu sehen
sein. Jede so markierte Option kann dem Lautstärkeregler, dem Pitch Bend-Rad oder dem
Modulationsrad des Q88 zugewiesen werden.
2. Klicken Sie auf eine zuweisbare Option auf dem Bildschirm.
3. Bewegen Sie den Regler, den Sie zuordnen möchten. Die CC-Nummer (Control Change) des
Steuerelements, das Sie betätigt haben, wird nun angezeigt.
4. Klicken Sie auf die Schaltfläche MIDI in der oberen rechten Ecke, um den MIDI-Zuweisungsmodus zu
beenden.
5. Betätigen Sie den Regler am Q88, für den Sie eine Zuordnung vorgenommen haben. Sie sehen nun,
wie sich die Zuordnungswerte am Bildschirm verändern.
5. SKALIERENDER MODUS VS. PICKUP-MODUS
Im Menü Einstellungen navigieren Sie zum Auswahlmenü Übernahme-Modus, das die Optionen Pickup
und Skalierung bietet.
• Wenn Pickup ausgewählt ist, wird ein Steuerelement des Q88 den ihm zugewiesenen Software-
Parameter erst dann bewegen, wenn das Hardware-Steuerelement des Q88 den aktuellen Wert dieses
Parameters übersteigt.
Beispiel: Der Lautstärkeregler am Q88 steht auf 0. Der Fader 1 in der Software steht auf mittlerer
Position. Ist Pickup eingestellt, wird der Fader 1 sich solange nicht bewegen, bis der Lautstärkeregler
des Q88 über diese mittlere Position hinaus bewegt wird. Ab diesem Punkt wird dann "übernommen"
und der Fader 1 beginnt sich in der Software zu bewegen.
• Bei der Einstellung Skalierung geschieht das Gegenteil.
Beispiel: Der Lautstärkeregler am Q88 steht auf 0. Der Fader 1 in der Software steht auf mittlerer
Position. Ist die Skalierung eingestellt, wird sich der Fader 1 bewegen, sobald Sie den
Lautstärkeregler am Q88 bewegen.
41
Page 42

MIDI-FEHLERSUCHE
Alle Noten Aus
Wenn eine Note "hängenbleibt" und durchgehend
zu hören ist, senden Sie die Nachricht Alle Noten
Aus, indem Sie wie folgt vorgehen:
1. Drücken Sie die Taste ERWEITERT.
2. Drücken Sie die Taste ALLE NOTEN AUS.
Alle Steuerelemente zurücksetzen
Wenn Sie einen unerwünschten Effekt bei einem
Instrument haben und diesen bestimmten Effekt
nicht erst getrennt herausfiltern möchten, können
Sie die MIDI-Nachricht Alle Steuerelemente
zurücksetzen senden. Dazu gehen Sie wie folgt
vor:
1. Drücken Sie die Taste ERWEITERT.
2. Drücken Sie die Taste ALLE
STEUERELEMENTE ZURÜCKSETZEN.
MIDI Out
Der MIDI Out-Anschluss kann verwendet werden, um das Q88 mit einem externen Sound-Modul oder einem
anderen MIDI-Keyboard zu verbinden. Standardmäßig werden (beim Einschalten des Q88) alle ControllerDaten von seinem MIDI-Ausgang und dem USB-Anschluss gesendet.
Wenn Sie den MIDI-Ausgang allerdings als herkömmliche USB-to-MIDI-Schnittstelle einsetzen möchten,
gehen Sie folgendermaßen vor:
1. Drücken Sie die Taste ERWEITERT.
2. Drücken Sie die Taste mit der Aufschrift MIDI OUT VIA USB.
3. Wählen Sie das Q88 als MIDI-Out-Gerät in Ihrer Sequenzer-Software. Q88 empfängt jetzt MIDI-Daten
vom Computer über die USB-Verbindung und sendet sie über seinen MIDI-Ausgang. Siehe
Seitendiagramm für Details zum MIDI-Routing.
42
88
DATA:
DATA:
DATA:
DATA:
MIDI OUT
RESET ALL
WHEEL
DATA:
DATA:
OCTAVE
ADVANCED
OCTAVEVOLUME
TRANSPOSE
CANCEL CH 1 CH 2 CH 3 CH 4 CH 5 CH 6 CH 7 CH 8 CH 9 CH 10 CH 11 CH 12 CH 13 CH 14 CH 15 CH 16 0 1 2 3 4 5 6 7 8
OCTAVE - OCTAVE 0 OCTAVE +
BANK LSB
BANK MSB
CHANNEL
FROM USB
PROGRAM
CONTROLLERS
ALL NOTES OFF TRANSPOSE - TRANSPOSE 0 TRANSPOSE +
SLIDER
PROGRAM BANK LSB BANK MSB
ASSIGN
ASSIGN
9
ENTER
Page 43

ALLGEMEINE FEHLERSUCHE
PROBLEM URSACHE LÖSUNG
Überprüfen Sie die USB-Verbindung Ihres Computers,
um sicherzustellen, dass das Q88 erkannt wird.
Stecken Sie das Gerät bei Bedarf erneut an und
starten Sie Ihren Computer neu.
Falls Sie ein externes Hardware-Modul ansteuern,
stellen Sie sicher, dass das MIDI-Kabel mit dem Q88
und dem MIDI IN-Anschluss des Geräts verbunden ist.
Starten Sie die Software erneut.
Stecke Sie das Q88 vom USB-Hub ab und verbinden
es direkt mit dem Computer.
Stellen Sie sicher, dass das Q88 oder das USB MIDI-
Gerät als aktive MIDI-Quelle in Ihrer Anwendung
aufgeführt ist. Normalerweise können die MIDIEinstellungen über das Menü Einstellungen der
Anwendung eingestellt werden.
Stellen Sie sicher, dass das Q88 MIDI-Daten über den
Kanal sendet, der am Zielgerät für den Empfang
eingestellt ist.
Schalten Sie das Q88 für einen Zeitraum von 10
Sekunden ab und schalten es dann wieder ein.
Schalten Sie das Q88 aus, warten Sie 10 Sekunden
und schalten es dann wieder ein.
Schließen Sie das Pedal an, schalten Sie das Q88 aus,
warten Sie einen Moment und schalten es dann erneut
ein.
Versuchen Sie die Puffergröße Ihrer Software zu
erhöhen, verwenden Sie ASIO-Treiber mit niedriger
Latenz oder verwenden Sie für die Aufnahme
vorübergehend ein General MIDI Instrument anstelle
eines VST-Instruments mit hoher Latenz.
Das Zielgerät gibt keinen Ton
aus.
Noten werden kontinuierlich
gehalten.
Der Effekt des SustainPedals ist umgekehrt.
Wenn ich eine Taste drücke,
wird der Ton mit einer
Verzögerung abgespielt.
Das Q88 ist nicht richtig
angeschlossen.
Das Q88 wurde
angeschlossen nachdem die
Software gestartet wurde.
Das Problem wird durch die
Verwendung eines USB-Hub
verursacht.
Die Software ist nicht
eingestellt, MIDI-Daten vom
Q88 zu erhalten.
Der MIDI-Kanal des Q88 ist
nicht der gleiche wie
eingehende MIDI-Kanal der
Software.
Ein Sustain-Pedal wurde
angeschlossen nachdem das
Q88 eingeschaltet wurde.
Noten bleiben aufgrund von
unvollständigen MIDI-Daten
hängen.
Ein Sustain-Pedal wurde
angeschlossen nachdem das
Q88 eingeschaltet wurde.
Hier handelt es sich um
Software-Latenz.
43
Page 44

MIDI IMPLEMENTATION CHART
1. Basic Information
MIDI channels 1-16 No Default = 1
Note numbers 0-127 No With Octave +/- buttons
Program change 1-128 No
Bank Select response Yes No 0-127
Modes supported: Mode 1: Omni-On, Poly
Note-On Velocity Yes No
Note-Off Velocity No No
Channel Aftertouch Yes No
Poly (Key) Aftertouch No No
Pitch Bend Yes No
Active Sensing No No
System Reset Yes No
Tune Request No No
Universal System Exclusive No No
Manufacturer or Non-Commercial System
Exclusive
NRPNs No No
RPNs No No
2. MIDI Timing and Synchronization
MIDI Clock No No
Song Position Pointer No No
Song Select No No
Start
Continue
Stop
MIDI Time Code No No
MIDI Machine Control No No
MIDI Show Control No No
Transmit/Export Recognize/Import Remarks
Mode 2: Omni-On, Mono
Mode 3: Omni-Off, Poly
Mode 4: Omni-Off, Mono
Multi Mode
No
No
Yes
No
No
No No
No
No
No
No
No
No
No
No
No
No
No
Via volume slider, when
assigned
44
Page 45

MIDI CC LIST
CC Number Description
0 Bank Select (MSB)
1 Modulation Wheel
2 Breath Controller
3 Undefined
4 Foot Pedal (MSB)
5 Portamento Time (MSB)
6 Data Entry (MSB)
7 Volume (MSB)
8 Balance (MSB)
9 Undefined
10 Pan (MSB)
11 Expression (MSB)
12-13 Effect Control (MSB)
14-15 Undefined
16-19 General Purpose Controllers
20-31 Undefined
32-63 LSB for Controllers 0-31
64 Damper Pedal
65 Portamento
66 Sostenuto
67 Soft Pedal
68 Legato Footswitch
69 Sustain
70-79 Sound Controller
80-83 General Purpose Controller
84 Portamento Control
85-90 Undefined
91-95 Effects Depth
96-97 Data Increment
98 NRPN LSB
99 NRPN MSB
100 RPN LSB
101 RPN MSB
102-119 Undefined
120 All Sound Off
121 All Controllers Off
122 Local Keyboard On/Off
123 All Notes Off
124 Omni Mode Off
125 Omni Mode On
126 Mono Mode
127 Poly Mode
45
Page 46

SPECIFICATIONS
POWER: USB; 9V DC, 500 mA, center pin-positive, 5.5 mm outside barrel diameter and 2.5
KEYBOARD: 88 keys
ACCESSORIES: USB cable, Software DVD, User Guide
MIDI OUTPUT: 5-pin jack
USB: 1 slave connector (MIDI over USB)
mm inside barrel diameter (sold separately)
www.alesis.com/Q88
46
Page 47

Page 48

www.alesis.com
7-51-0388-A
Page 49

Page 50

 Loading...