


9-885-031-37
DVD Player/Stereo Video Cassette Recorder
HV-DH10E
PAL
© 2003 Sony Corporation

ENGLISH
Safety Precautions
WARNING
To prevent fire or shock hazard, do not expose the unit to rain or moisture.
To avoid electrical shock, do not open the cabinet. Refer servicing to qualified personnel only.
Mains lead must only be changed at a qualified service shop.
This appliance is classified as a CLASS 1 LASER product. The CLASS 1 LASER PRODUCT MARKING is located on the rear exterior.
CAUTION
The use of optical instruments with this product will increase eye hazard. As the laser beam used in this DVD player/Video Cassette Recorder is harmful to eyes, do not attempt to disassemble the cabinet.
Refer servicing to qualified personnel only.
Precautions
Safety
•This unit operates on 200–240 V AC, 50 Hz. Check that the unit’s operating voltage is identical with your local power supply.
•To prevent fire or shock hazard, do not place objects filled with liquids, such as vases, on the apparatus.
•The player is not disconnected from the AC power source (mains) as long as it is connected to the wall outlet, even if the player itself has been turned off.
Installing
•Do not install the unit in an inclined position. It is designed to be operated in a horizontal position only.
•Keep the unit and discs away from equipment with strong magnets, such as microwave ovens, or large loudspeakers.
•Do not place heavy objects on the unit.
•Do not place the unit on surfaces (rugs, blankets, etc.) or near materials (curtains, draperies) that may block the ventilation slots.
Caution
For use of the VCR
Television programs, films, video tapes and other materials may be copyrighted.
Unauthorized recording of such material may be contrary to the provisions of the copyright laws. Also, use of this recorder with cable television transmission may require authorization from the cable television transmitter and/or program owner.
For use of the DVD player
This product incorporates copyright protection technology that is protected by method claims of certain U.S. patents, other intellectual property rights owned by Macrovision Corporation, and other rights owners. Use of this copyright protection technology must be authorized by Macrovision Corporation, and is intended for home and other limited viewing uses only unless otherwise authorized by Macrovision Corporation. Reverse engineering or disassembly is prohibited.
R
ShowView is a registered trademarks of Gemstar Development Corporation. The ShowView system is manufactured under license from Gemstar Development Corporation.
2

Table of Contents |
|
Introduction |
|
Safety Precautions ................................................. |
2 |
WARNING .......................................................... |
2 |
Caution ............................................................... |
2 |
Before Use .............................................................. |
4 |
About This Manual .............................................. |
4 |
Playable Discs .................................................... |
4 |
Precautions ........................................................ |
6 |
Notes on Discs ................................................... |
6 |
Front Panel and Display Window .......................... |
7 |
Rear Panel ............................................................... |
8 |
Remote Control ...................................................... |
9 |
Remote Control for DVD ..................................... |
9 |
Remote Control for VCR ................................... |
10 |
Preparing the Remote Control .......................... |
11 |
Preparation |
|
Basic Connections ............................................... |
12 |
Connecting to a TV ........................................... |
12 |
Tuning in a Video Channel on Your TV ............. |
13 |
Additional Connections ....................................... |
14 |
Connecting to a Pay TV Satellite Receiver, |
|
Cable Box or Decoder ................................... |
14 |
Connecting to an AV Receiver Equipped |
|
with a Digital Decoder ................................... |
15 |
Connecting to an AV Receiver Equipped |
|
with a Dolby Pro Logic Decoder .................... |
16 |
Connecting to a Stereo System ........................ |
17 |
Accessory Audio/Video (A/V) Connections |
|
to the Unit ...................................................... |
17 |
Before Operation – VCR Part.............................. |
18 |
Auto Set-up ....................................................... |
18 |
How to Use the Main Menu .............................. |
19 |
Setting the VCR Channels Manually ................ |
19 |
Changing the Order of TV Stations .................. |
21 |
Deleting TV Stations ......................................... |
22 |
How to Select Stored TV Stations .................... |
22 |
Setting the Clock Manually ............................... |
23 |
Setting the Language ....................................... |
24 |
Using the Pay TV Decoder ............................... |
24 |
Before Operation – DVD Part .............................. |
25 |
General Explanation ......................................... |
25 |
On-Screen Display ........................................... |
25 |
Initial Settings ................................................... |
26 |
Operation |
|
|
Operation with Tape ............................................. |
32 |
|
Playing a Tape .................................................. |
32 |
|
One-Touch Recording (OTR) ............................ |
33 |
|
ShowView Programming .................................. |
34 |
|
Timer Recording Using On Screen Display ...... |
36 |
|
Copying from DVD to VCR ............................... |
38 |
|
Recording from another Video Recorder .......... |
38 |
|
On Screen Display ............................................ |
39 |
|
Turning On/Off the On Screen Display ............. |
39 |
|
Child Lock ......................................................... |
39 |
|
REC. End Search ............................................. |
40 |
|
Playing at Various Speeds ................................ |
40 |
|
Hi-Fi Stereo Sound System .............................. |
41 |
|
To Set the Color System ................................... |
42 |
|
Wide Screen Compatibility 16:9 ....................... |
42 |
|
Operation with DVD and Video CD ..................... |
43 |
|
Playing Discs .................................................... |
43 |
|
General Features .............................................. |
44 |
|
• |
Moving to another TITLE ......................... |
44 |
• |
Moving to another CHAPTER/TRACK .... |
44 |
• |
Slow Motion ............................................. |
44 |
• |
Still Picture and Frame-by-frame |
|
|
Playback .................................................. |
45 |
• |
Search ..................................................... |
45 |
• |
Random ................................................... |
45 |
• |
Repeat ..................................................... |
45 |
• |
Repeat A-B .............................................. |
45 |
• |
Time Search ............................................ |
46 |
• |
3D Surround ............................................ |
46 |
• |
Changing the Audio Track ........................ |
46 |
• |
Zoom ....................................................... |
46 |
• |
Marker Search ......................................... |
47 |
Special DVD Features ...................................... |
47 |
|
• |
Camera Angle ......................................... |
47 |
• |
Changing the Audio Language ................ |
47 |
• |
Subtitles ................................................... |
47 |
• |
Child Lock ................................................ |
47 |
Operation with Audio CD and MP3 Discs .......... |
48 |
|
Notes on MP3 Discs ......................................... |
49 |
|
Programmed Playback......................................... |
50 |
|
Operation with DATA-CD containing |
|
|
JPEG files .......................................................... |
51 |
|
Displaying JPEGs ............................................ |
51 |
|
Playback of JPEG images ................................ |
51 |
|
Reference |
|
|
Troubleshooting ................................................... |
52 |
|
Country Code List ................................................ |
54 |
|
Language Code List ............................................. |
56 |
|
Specifications ....................................................... |
57 |
|
INTRODUCTION
3

Before Use
About This Manual
Most operations of the unit can be accomplished with the remote control. Operations which must be accomplished with controls on the front panel of the unit are also explained.
The meaning of the icon used in this manual is described below:
Icon |
Meaning |
Functions available for DVD VIDEOs, DVD-R/RWs or DVD+RWs in video mode
Functions available for VIDEO CDs without PBC (playback control) function
Functions available for VIDEO CDs with PBC (playback control) function
Functions available for DATA CDs (CD-
ROMs/CD-Rs/CD-RWs containing
MP3* audio tracks and JPEG files)
Functions available for music CDs or
CD-Rs/CD-RWs in music CD format
Indicates hazards that could harm the unit itself or other material damage.
Note(s) Indicates special operating features of the unit.
Tip(s) Indicates tips and hints for making the task easier.
*MP3 (MPEG 1 Audio Layer 3) is a standard format defined by ISO/MPEG which compresses audio data.
Playable Discs
DVD
(8 cm/12 cm disc)
Video CD
(8 cm/12 cm disc)
Audio CD
(8 cm/12 cm disc)
In addition, this unit can play a CD-R or CD-RW that contains audio titles or MP3 files.
Notes
The unit cannot play the following discs:
•All CD-ROMs/CD-Rs/CD-RWs other than those recorded in the following formats:
–music CD format
–video CD format
–MP3 format that conforms to ISO9660* Level 1/Level 2, or its extended format, Joliet
–JPEG format that conforms to ISO9660* Level 1/Level
2, or its extended format, Joliet
•Data part of CD-Extras
•DVD-R/RWs, DVD+RWs in VR mode
•DVD-ROMs
•DVD Audio discs
•HD layer on Super Audio CDs
* A logical format of files and folders on CD-ROMs, defined by ISO (International Standard Organization).
Also, the unit cannot play the following discs:
•A DVD with a different region code.
•A disc that has a non-standard shape (e.g., card, heart).
•A disc with paper or stickers on it.
•A disc that has the adhesive of cellophane tape or a sticker still left on it.
Some CD-R/RWs, DVD-R/RWs or DVD+RWs (in video mode) cannot be played on this unit due to the recording quality or physical condition of the disc, or the characteristics of the recording device.
Furthermore, the disc will not play if it has not been correctly finalized. For more information, see operating instructions for the recording device. Note that discs created in the
Packet Write format cannot be played.
Music discs encoded with copyright protection
technologies
This product is designed to playback discs that conform to the Compact Disc (CD) standard.
Recently, various music discs encoded with copyright protection technologies are marketed by some record companies. Please be aware that among those discs, there are some that do not conform to the CD standard and may not be playable by this product.
4
Before Use (Continued)
Notes on DVDs
Some playback operations of DVDs may be intentionally fixed by software manufacturers. As this unit plays DVDs according to disc content designed by the software manufacturer, some playback features of the unit may not be available or other functions may be added.
Refer also to the instructions supplied with the DVDs. Some DVDs made for business purposes may not be played on the unit.
Regional code of the unit and DVDs |
2 |
This unit is designed and manufactured |
|
for playback of Region 2 encoded DVD |
software. The region code on the labels
of some DVD discs indicates which type of the unit can play those discs. This unit can play only DVD discs labeled 2 or ALL. If you try to play any other discs, the message “Check Regional Code” will appear on the TV screen. Some DVD discs may not have a region code label even though their playback is prohibited by area limits.
Note on DTS-encoded CDs
When playing DTS-encoded CDs, excessive noise may be exhibited from the analog stereo output. To avoid possible damage to the audio system, turn down the volume before playing back such discs, adjust the volume gradually, and keep the volume level low. To enjoy DTS Digital SurroundTM playback, an external 5.1 channel DTS Digital SurroundTM decoder system must be connected to the digital output of the unit.
NOTES ON COPYRIGHTS
It is forbidden by law to copy, broadcast, show, broadcast via cable, play in public, or rent copyrighted material without permission.
This product features the copy protection function developed by Macrovision. Copy protection signals are recorded on some discs. When recording and playing the pictures of these discs on a VCR, picture noise will appear.
This product incorporates copyright protection technology that is protected by method claims of certain U.S. patents and other intellectual property rights owned by Macrovision Corporation and other rights owners. Use of this copyright protection technology must be authorized by Macrovision Corporation, and is intended for home and other limited viewing uses only unless otherwise authorized by Macrovision Corporation. Reverse engineering or disassembly is prohibited.
Disc-related Terms
Title (DVD only)
The main film content or accompanying feature content or music album.
Each title is assigned a title reference number enabling you to locate it easily.
Chapter (DVD only)
Sections of a picture or a musical piece that are smaller than titles. A title is composed of one or several chapters. Each chapter is assigned a chapter number to enable you to locate the chapter you want. Depending on the disc, chapters may not be labelled.
Track (audio CD only)
Sections of a musical piece on an audio CD. Each track is assigned a track number, enabling you to locate the track you want.
Types of Video CDs
There are two types of video CDs:
Video CDs equipped with PBC (Version 2.0)
PBC (Playback control) functions allow you to interact with the system via menus, search functions, or other typical computer-like operations. Moreover, still pictures of high resolution can be played if they are included in the disc.
Video CDs not equipped with PBC (Version 1.1)
Operated in the same way as audio CDs, these discs allow playback of video pictures as well as sound, but they are not equipped with PBC.
INTRODUCTION
5

Before Use (Continued)
Precautions
Handling the Unit
When shipping the unit
The original shipping carton and packing materials come in handy. For maximum protection, re-pack the unit as it was originally packaged at the factory.
When setting up the unit
The picture and sound of a nearby TV, VCR, or radio may be distorted during playback. In this case, position the unit away from the TV, VCR, or radio, or turn off the unit after removing the disc.
To keep the surface clean
Do not use volatile liquids, such as insecticide spray, near the unit. Do not leave rubber or plastic products in contact with the unit for a long period of time. They will leave marks on the surface.
Cleaning the Unit
To clean the cabinet
Use a soft, dry cloth. If the surfaces are extremely dirty, use a soft cloth lightly moistened with a mild detergent solution. Do not use strong solvents such as alcohol, benzine, or thinner, as these might damage the surface of the unit.
To obtain a clear picture
This unit is a high-tech, precision device. If the optical pick-up lens and disc drive parts are dirty or worn, the picture quality will be poor.
Regular inspection and maintenance are recommended after every 1,000 hours of use. (This depends on the operating environment.)
For details, please contact your nearest dealer.
Notes on Discs
Handling Discs
Do not touch the playback side of the disc.
Hold the disc by the edges so that fingerprints will not get on the surface.
Do not stick paper or tape on the disc.
Storing Discs
After playing, store the disc in its case.
Do not expose the disc to direct sunlight or sources of heat, or leave it in a parked car exposed to direct sunlight, as there may be a considerable temperature increase inside the car.
Cleaning Discs
Fingerprints and dust on the disc can cause poor picture quality and sound distortion. Before playing, clean the disc with a clean cloth. Wipe the disc from the center outward.
Do not use strong solvents such as alcohol, benzine, thinner, commercially available cleaners, or anti-static spray intended for older vinyl records.
6

Front Panel and Display Window
q |
w |
e |
r t y |
u |
|||||||||||
|
|
|
|
|
|
|
|
|
|
|
|
|
|
|
|
|
|
|
|
|
|
|
|
|
|
|
|
|
|
|
|
|
|
|
|
|
|
|
|
|
|
|
|
|
|
|
|
|
REC |
|
|
|
AV 3 IN |
CHANNEL |
VIDEO |
L – AUDIO – R |
|
|
|
DVD/VIDEO |
|
|
|
|
|
|
|
|
|
|
|
|
|
|
|
|
|
|
|
|
!6 |
!5 |
!4 !3 !2!1!0o i |
||||||
q I/6(POWER) switch |
o REC button |
|||||||
w Disc Tray (DVD deck) |
!0a(PAUSE) button |
|||||||
e z(OPEN/CLOSE) button |
!1g(fast-forward) button |
|||||||
r Cassette Compartment (VCR deck) |
!2f(rewind) button |
|||||||
t c(PLAY) button |
!3CHANNEL +/– buttons |
|||||||
y s(STOP) button |
!4Remote Sensor |
|||||||
u z(EJECT) button |
!5Display window |
|||||||
i AV 3 IN (VIDEO / L-AUDIO-R) |
!6DVD/VIDEO select button |
|||||||
INTRODUCTION
q w |
e |
r t |
|||||
|
|
|
|
|
|
|
|
|
|
|
|
|
|
|
|
DVD |
|
|
|
|
VCR |
||
|
|
|
|
|
|
|
REC |
|
|
|
|
|
|
|
TV |
|
|
|
|
|
|
|
|
y
u
i
|
|
|
|
|
|
|
|
|
o |
||
q DVD indicator |
|
y VCR indicator |
|
w Disc indicator |
|
u REC indicator |
|
e Repeat indicator |
|
i TV indicator |
|
r TIMER indicator |
|
o Total playing time/elapsed time/remaining time/ |
|
t Tape indicator |
|
current deck status indicator |
|
7

Rear Panel
q |
w |
e |
r |
|
VIDEO IN+OUT/DVD OUT |
|
|
AER IAL |
|
DVD/VIDEO |
DVD EXCLUSIVE |
|
EURO AV2 |
OUT |
OUT |
|
|
|
|
|
DECODER |
|
|
|
|
AUDIO |
AUDIO |
RF OUT |
EURO AV1 |
|
|
|
AUDIO/VIDEO |
|
|
DVD/VIDEO |
|
|
|
OUT |
|
|
COAXIAL |
u |
y |
|
t |
q AERIAL (antenna) input jack w EURO AV2 DECODER jack
e DVD/VIDEO OUT (AUDIO L/R) jacks
r DVD EXCLUSIVE OUT (AUDIO L/R) jacks
t COAXIAL audio output jack (DVD EXCLUSIVE
OUT)
y EURO AV1 AUDIO/VIDEO (VIDEO IN+OUT/DVD
OUT) jack
u RF OUT (DVD/VIDEO OUT) jack
Do not touch the inner pins of the jacks on the rear panel. Electrostatic discharge may cause permanent damage to the unit.
8

Remote Control
q w
@8
@7
@6
@5
@4
@3
@2
@1
@0 C.LOCK
!9
!8
!7
!6 |
SHOWVIEW |
e
r
t
y
u i o !0
!1
!2
!3
!4
!5
Remote Control for DVD
Things to know before starting
This remote control uses the same buttons for VCR and DVD functions (ex. C(PLAY)).
When using a DVD, first press the DVD button.
q z(OPEN/CLOSE) button w DVD select button
e I/6(POWER) button r DISC MENU button t OK/ENTER button y vRETURN button u sSTOP button
i t(SLOWT) button o C(PLAY) button
!0PROGRAM button
!1CLEAR button
!2SEARCH button
!3MARK button
!4ZOOM button
!5A-B repeat button
!6RANDOM button
!7 REPEAT button
!8ANGLE button
!9C.LOCK button
@0SUBTITLE button
@1AUDIO button
@2Numeric buttons (0–9) @3rbutton
@4aPAUSE button
@5TOP MENU button
@6i/SETUP button
@7j/l/i+/k– (left/right/up/down) buttons
@8DISPLAY button
INTRODUCTION
9

Remote Control (Continued)
q |
w |
Remote Control for VCR |
|
|
|
Things to know before starting |
|
|
|
This remote control uses the same buttons for VCR |
|
|
|
and DVD functions (ex. C(PLAY)). |
|
|
e |
When using a VCR, first press the VIDEO button. |
|
@3 |
r |
q z(EJECT) button |
|
|
|
w VIDEO select button |
|
@2 |
t |
e I/6(POWER) button |
|
|
|
r INPUT SELECT button |
|
@1 |
y |
t REC. END SEARCH button |
|
|
|
y OK/ENTER button |
|
@0 |
|
u wREC button |
|
|
|
i sSTOP button |
|
|
u |
o t(SLOWT)button |
|
!9 |
i |
!0C(PLAY) button |
|
!8 |
o |
!1CLEAR button |
|
|
!0 |
!2SHOWVIEW button |
|
|
|
!3SP/LP button |
|
!7 |
!1 |
!4CM SKIP button |
|
!5C.LOCK button |
|||
|
|
||
|
|
!6AUDIO button |
|
|
|
!7Numeric buttons (0–9) |
|
!6 |
|
!8rbutton |
|
|
!9aPAUSE/FRAMEFbutton |
||
C.LOCK |
|
||
|
@0i/SETUP button |
||
!5 |
|
||
|
@1CH/TRACKING i+/k–, j/l(left/right) buttons |
||
!4 |
!2 |
||
|
@2CLOCK/COUNTER button |
||
|
!3 |
||
|
@3TV/VIDEO button |
||
|
SHOWVIEW |
10
Remote Control (Continued)
Preparing the Remote Control |
Using the Remote Control |
||||
|
|
|
|
|
|
|
|
|
Point the remote control toward the remote sensor. |
||
Inserting the Batteries |
|
||||
|
|
||||
To prevent damage from leakage or explosion, follow the descriptions below.
•Insert two R03 (size AAA) batteries (supplied) with the 0and 9marks correctly as illustrated.
•Do not mix old batteries with new ones or different types of batteries.
•Do not throw the batteries into a fire, apply heat to them or take them apart.
•Do not carry the batteries with keys or other metallic objects.
Note
Remove the batteries when they have no more power, or when you do not use the remote control for a long period of time.
30
30 |
Remote sensor |
7m
Notes
•The remote control may not operate when there is any obstruction between the remote control and the remote sensor.
•Strong ambient light sources such as a fluorescent lamp or direct sunlight may cause unreliable operation.
•Using a TV with the same type of infrared remote control facing the same direction may cause incorrect operation.
•The maximum distance for effective control between the remote control and the remote sensor is 7 meters.
•Although you can use the remote control within an angle of up to 30 degrees in any direction from directly in front of the remote sensor, we recommend a narrower angle for stable operation.
INTRODUCTION
11
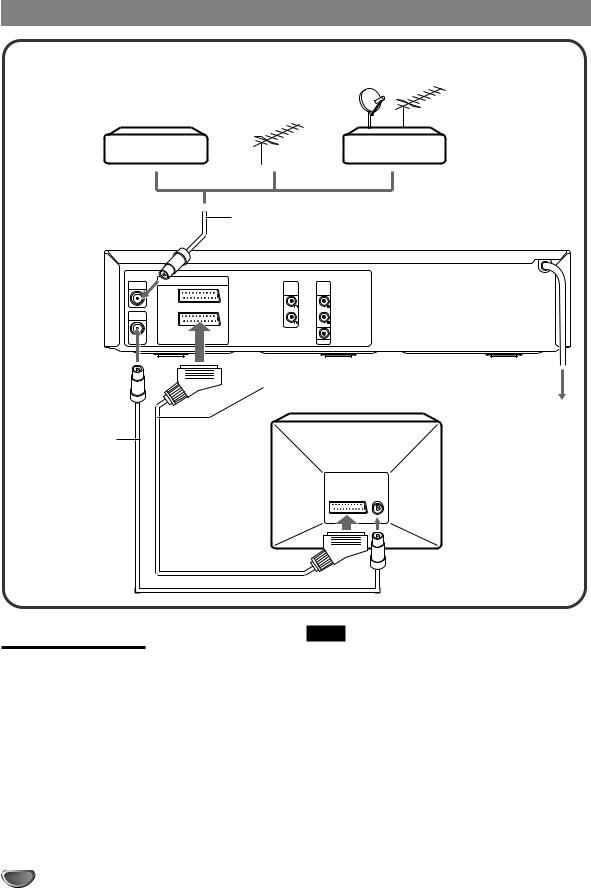
Basic Connections
Cable box |
Antenna |
Satellite receiver |
OR OR
1 Antenna cord (not supplied)
|
VIDEO IN+OUT/DVD OUT |
|
|
AER IAL |
|
DVD/VIDEO |
DVD EXCLUSIVE |
|
EURO AV2 |
OUT |
OUT |
|
|
|
|
|
DECODER |
|
|
|
|
AUDIO |
AUDIO |
RF OUT |
EURO AV1 |
|
|
|
AUDIO/VIDEO |
|
|
DVD/VIDEO |
|
|
|
OUT |
|
|
COAXIAL |
3 21-pin scart cord
(not supplied)
4 To AC outlet
2 Antenna cord (supplied)
Connecting to a TV
1 |
Disconnect the antenna cord from your TV and |
|
connect it to the AERIAL jack on this unit. |
2 |
Connect the supplied antenna cord to the RF. |
|
OUT (DVD/VIDEO OUT) jack on this unit and the |
|
aerial jack on your TV. |
3 |
Connect the optional 21-pin scart cord to the |
|
EURO AV1 AUDIO/VIDEO jack on this unit and |
the 21-pin scart jack on your TV.
Notes
•All connections should be made with both the unit and your TV unplugged from the AC outlet.
•If your TV has more than one 21-pin scart jack, please refer to the TV operation instructions.
•If you do not have a house hold antenna jack or you are uncertain of it, you should seek the advice of a local antenna dealer.
4 Connect the AC power cord to the AC outlet.
12

Basic Connections (Continued)
When connecting to a wide screen TV
This unit can playback a DVD and video cassette tape recorded with (16:9) wide screen format.To change the settings, see “TV Aspect” on page 27 and “Wide Screen Compatibility 16:9” on page 42.
Tuning in a Video Channel on Your TV
When using the unit, the signals passes from the antenna to the unit and then out to the TV. Before you use this unit, a video output channel must be set on your TV.
If you have connected the unit to the TV with a 21pin scart cord, this procedure is not necessary.
1 |
Press I/6on the remote control to turn on the |
|
unit. Make sure your TV is turned on. |
2 |
Press VIDEO on the remote control to switch out |
|
to the VCR. |
3 |
Select a spare channel position on the TV and |
tune the TV so that the blue screen appears clearly on the TV screen.
• Refer to the TV operating instructions for tuning.
• Whenever you want to play back a tape, select this channel position.
If there is interference on the picture (wavyline, picture roll, etc.)
1 During power off, press and hold CHANNEL + or
– on the front panel for more than 4 seconds. “RF 36” appears on the display window, and the following picture will be displayed on the TV screen.
RF CHANNEL |
36 |
PSET |
i |
R |
|
2 Press CHANNEL + or – to select another channel.
• You can select any number between 22 and 68.
3 Tune the TV so that the RF CHANNEL screen appears clearly on the TV screen.
•Refer to the TV operating instructions for tuning the
TV picture.
4 Press I/6to turn off the unit. The unit is now tuned to your TV.
•Whenever you want to play back a tape, select this channel position.
If there is still interference on the TV screen
Connect the unit to the TV with an optional 21-pin scart cord.
Whenever you want to play back a tape, simply select a channel on your TV called AV or AUX.
You can set RF out to OFF in step 2.
PREPARATION
13

Additional Connections
Pay TV decoder |
Pay TV satellite receiver/cable box |
||
DECODER |
DECODER |
VIDEO |
TV |
|
OR |
|
|
21-pin scart cord (not supplied)
|
VIDEO IN+OUT/DVD OUT |
|
|
AER IAL |
|
DVD/VIDEO |
DVD EXCLUSIVE |
|
EURO AV2 |
OUT |
OUT |
|
|
|
|
|
DECODER |
|
|
|
|
AUDIO |
AUDIO |
RF OUT |
EURO AV1 |
|
|
|
AUDIO/VIDEO |
|
|
DVD/VIDEO |
|
|
|
OUT |
|
|
COAXIAL |
Connecting to a Pay TV Satellite Receiver, Cable Box or Decoder
Connect the optional 21-pin scart cord to the EURO AV2 DECODER jack on this unit and the 21-pin scart jack on your Pay TV satellite receiver, cable box or decoder.
Set the Main menu correctly after connecting
Set the DECODER in the Main menu to ON (see “Using the Pay TV Decoder” on page 24).
Notes
•If your satellite receiver or cable box has more than two scart jacks, use the TV jack to connect to this unit and not the VIDEO jack. Otherwise you may not receive a proper picture.
•If you connect this unit to a cable box or satellite receiver, please refer to the operating instruction of those appliances.
14

Additional Connections (Continued)
If your AV receiver is equipped with a Dolby Digital or DTS decoder, you can enjoy high-quality audio playback.
|
VIDEO IN+OUT/DVD OUT |
|
|
AER IAL |
|
DVD/VIDEO |
DVD EXCLUSIVE |
|
EURO AV2 |
OUT |
OUT |
|
|
|
|
|
DECODER |
|
|
|
|
AUDIO |
AUDIO |
RF OUT |
EURO AV1 |
|
|
|
AUDIO/VIDEO |
|
|
DVD/VIDEO |
|
|
|
OUT |
|
|
COAXIAL |
Coaxial cord (not supplied)
 to the digital input jack
PREPARATION
Connecting to an AV Receiver Equipped with a Digital Decoder
Connect the COAXIAL audio output jack on this unit to the corresponding in jack on your AV receiver.
Set the setup menu correctly after connecting
Some AV receivers have digital decoders that use the bitstream signal directly from Dolby Digital or DTS inputs. If your AV receiver has a digital decoder for Dolby Digital or DTS inputs, set the output signal from your unit to DOLBY DIGITAL/PCM or Stream/PCM for that input. Otherwise, set the output to PCM (see “Initial Settings” on page 28 for details).
DO NOT select DOLBY DIGITAL/PCM or Stream/ PCM for the Digital Audio Output setting in the setup menu when connecting to an AV receiver not equipped with a Dolby Digital or DTS decoder (with a coaxial connecting cord).
Merely attempting to play a disc may cause a screeching noise that could be harmful to your ears and damage the speakers. Be sure to select PCM for the Digital Audio Output setting.
•Manufactured under license from Dolby Laboratories. “Dolby”, “Pro Logic” and the double-D symbol are trademarks of Dolby Laboratories. Confidential unpublished works. ©1992-1999 Dolby Laboratories. All rights reserved.
•“DTS” and “DTS Digital Out” are trademarks of Digital
Theater Systems, Inc.
15

Additional Connections (Continued)
|
VIDEO IN+OUT/DVD OUT |
|
|
AER IAL |
|
DVD/VIDEO |
DVD EXCLUSIVE |
|
EURO AV2 |
OUT |
OUT |
|
|
|
|
|
DECODER |
|
|
|
|
AUDIO |
AUDIO |
RF OUT |
EURO AV1 |
|
|
|
AUDIO/VIDEO |
|
|
DVD/VIDEO |
|
|
|
OUT |
|
|
COAXIAL |
Audio cord (not supplied)

 to the audio input L/R jacks
Connecting to an AV Receiver
Equipped with a Dolby Pro Logic
Decoder
Connect the Left and Right DVD EXCLUSIVE OUT AUDIO jacks on this unit to the audio left/right in jacks on your AV receiver.
16

Additional Connections (Continued)
You can connect your video camera or other video accessories by following the instructions below.
|
VIDEO IN+OUT/DVD OUT |
|
|
|
AER IAL |
EURO AV2 |
DVD/VIDEO |
DVD EXCLUSIVE |
Accessory Component: VCR, Camcorder, |
|
OUT |
OUT |
||
|
DECODER |
|
|
Video Camera, Satellite Receiver, Laser |
|
|
AUDIO |
AUDIO |
|
|
|
Disc Player |
||
RF OUT |
AUDIO/VIDEO |
|
|
|
EURO AV1 |
|
|
|
DVD/VIDEO |
|
OUT |
COAXIAL |
Jack panel of Accessory
|
AUDIO |
|
OUTPUT |
|
R |
Audio cord |
L |
(not supplied) |
|
|
VIDEO |
|
OUTPUT |
PREPARATION
Stereo system
Connecting to a Stereo System
Connect the optional audio cord to the DVD/VIDEO OUT (AUDIO L/R) jacks on this unit and the audio input jacks on your stereo system.
REC
AV 3 IN
VIDEO L – AUDIO – R
CHANNEL
Front of the unit
Accessory Audio/Video (A/V) Connections to the Unit
Connect the AV 3 IN jacks on the unit to the audio/ video out jacks on your accessory component, using optional audio/video cords.
17

Before Operation – VCR Part
VIDEO
 INPUT SELECT
 OK/ENTER, i+/k–, j/l
i/SETUP
Numeric 


buttons
Preparation:
•Turn on the TV and set the TV for the unit’s reception.
•When the unit and TV are connected with a 21-pin scart cord, set the TV to the AV mode.
•When they are connected with only the antenna cord, set the TV to the video output channel.
Auto Set-up
The Auto set-up function can search and tune all available TV station and assign them in the unit, then set the correct time automatically.
The following picture will display on the TV screen when you have just connected the unit for the very first time.
A |
B |
CH |
|
DK |
E F I |
N |
NL |
P S |
SF |
OTHERS |
|
Pr12 |
OK i |
ACMS |
1 Select the country according to your area with j and l.
A: Austria, B: Belgium, CH: Switzerland,
D: Germany, DK: Denmark, E: Spain, F: France, I: Italy, N: Norway, NL: Netherlands, P: Portugal, S: Sweden, SF: Finland, OTHERS: Others
2 Press OK/ENTER to start the automatic storing of the channels of the TV stations in your area. A scan bar appears on the TV screen.
01 C02 00 ARD
S |
E |
Pr12 |
i |
ACMS |
In about ten minutes, after the unit has finished setting the VCR channels and time, a list of channels appears on the screen.
|
|
|
|
|
|
|
|
|
|
|
01 |
C02 |
00 |
ARD |
|
|
|
||
02 |
C03 |
00 |
ZDF |
|
|
||||
03 |
C04 |
00 |
WDR 3 |
|
|
||||
04 |
C05 |
00 |
BR3 |
|
|
||||
05 |
C06 |
00 |
HR3 |
|
|
||||
06 |
C07 |
00 |
N 3 |
|
|
||||
07 |
C08 |
00 |
NDR 3 |
|
|
||||
08 |
C09 |
00 |
SWF3 |
|
|
||||
P |
|
MOVE : |
|
|
|
|
|
|
|
|
|
|
|
|
|
|
|||
|
DELETE : |
|
, |
|
|
|
|
||
RSET |
|
|
|
|
OK i |
|
|||
|
|
|
|
|
|
|
|
|
|
The name of the TV station is displayed if the broadcast has PDC/VPS information.
•When the unit receives a signal with PDC information, it sets the month, day, time and VCR channels. Set the year manually. See page 23.
•When the unit receives a signal with VPS information, it sets the time and VCR channels. Set the year, month and day manually. See page 23.
3 Press i/SETUP to return to the normal screen.
If the desired TV stations could not be set
Set the VCR channels manually. See page 19. (Setting the VCR channels is necessary for recording TV programs.)
If the clock could not be set
If the reception signal is weak, “—:—” appears on the display window. Set the clock manually. See page 23.
If the PDC/VPS signal is weak, the clock may not be able set with Auto set-up. In this case, set the clock manually.
18
 Loading...