


Upright Vacuum Cleaner for floors and carpets
FOR HOUSEHOLD USE
BEFORE OPERATING YOUR VACUUM, PLEASE READ THESE INSTRUCTIONS CAREFULLY.
947-1594 EA-02555

Important Safety Instructions
When using an electrical appliance, basic precautions should always be taken.
READ ALL INSTRUCTIONS BEFORE USING THIS VACUUM CLEANER
WARNING
To reduce the risk of fire, electrical shock or injury:
•Use only as described in this manual.
•Use only manufacturer's recommended attachments.
•Turn off appliance before connecting or disconnecting hose or power attachments.
•Do not use if hose is damaged, cut, or punctured. Avoid vacuuming sharp objects.
•Do not use without filter bag and/or exhaust afterfilter in place.
•Do not put any object into openings. Do not use with any opening blocked. Keep free of dust, lint, hair, or other materials that may reduce airflow.
•Do not handle plug or appliance with wet hands.
•Do not allow to be used as a toy.
•Do not allow appliance to be operated by or near children.
•Use extra care when cleaning on stairs.
•Do not use outdoors or on wet surfaces.
•Do not use to vacuum flammable or combustible liquids such as gasoline. Do not use in areas where such liquids may be present.
•Do not vacuum anything that is burning or smoking, such as cigarettes, matches, or hot ashes.
•Keep hair, loose clothing, fingers, and all parts of body away from openings and moving parts.
•Do not leave appliance unattended when plugged in. Unplug from outlet when not in use and before servicing.
•Do not change the plug in any way. Do not use adapters. To reduce risk of electrical shock, this appliance has a polarized plug. This plug will fit in an electrical outlet only one way. If it does not fit, contact a qualified electrician to install the proper outlet.
•Turn off all controls before unplugging.
•Do not unplug by pulling on cord. To unplug, grasp the plug, not the cord.
•Hold plug when rewinding onto cord reel. Do not allow plug to whip when rewinding.
•Unplug before connecting non-electrical mechanical accessories.
•Do not use with damaged cord or plug.
•Do not pull or carry by cord, use cord as a handle, close door on cord, or pull cord around sharp edges or corners.
Do not run appliance over cord. Keep cord away from heated surfaces.
•Do not attempt to service this unit. Return appliance to an authorized Aerus center if it is not working properly, has been dropped, damaged, left outdoors, or dropped into water.
Save These Instructions
2
We l c o m e t o t h e A e r u s Wo r l d o f
E x c e l l e n c e !
Your new Aerus Lux® Legacy has been designed and built to provide you with the best in cleaning power, convenience and durability.
With its powerful, two-motor cleaning system, light weight and maneuverability, this deluxe upright will provide you with years of easy and trouble-free vacuum cleaning.
Used with a variety of optional attachments, your Aerus Lux® Legacy becomes a complete home cleaning system, able to handle everything from big cleaning chores to quick tidying.
The following pages are designed to answer questions concerning the use of your Aerus Lux® Legacy. For additional information regarding this or any of our fine products please contact your local Aerus representative; or call Aerus customer service toll-free at:
1-800-243-9078 (in the U.S.)
1-800-668-0763 (in Canada)
|
|
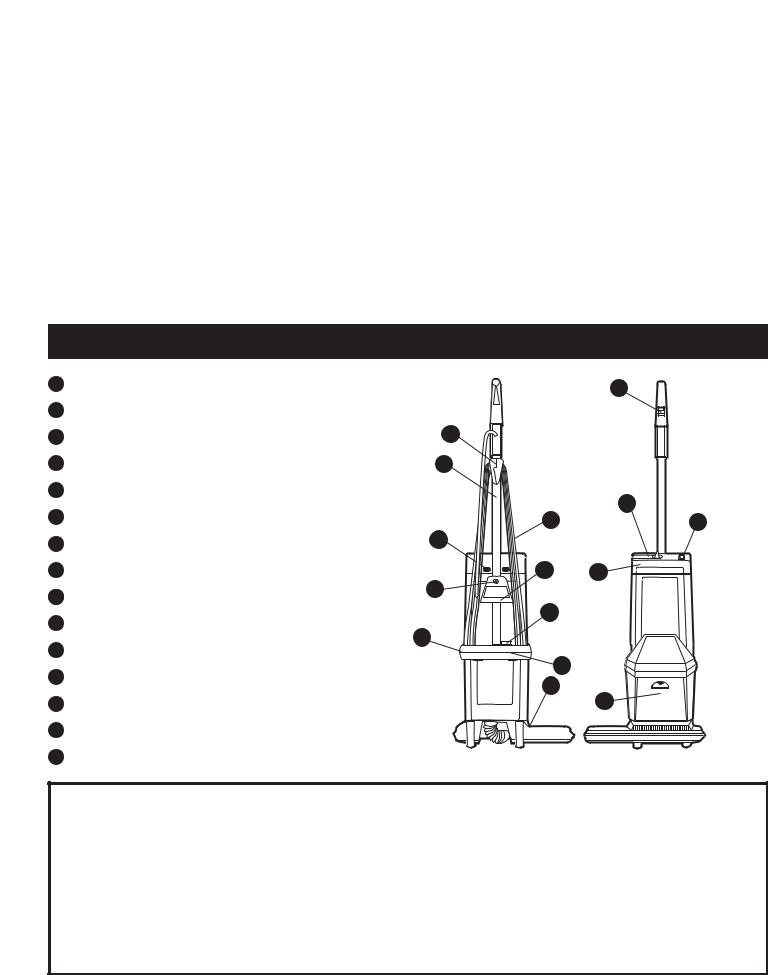
FEATURES |
|
1 |
Combination Cord Cleat/Cord Release |
|
11 |
2 |
Handle |
|
|
3 |
Bag Compartment Release Button |
1 |
|
4 |
Power Cord |
2 |
|
5 |
Handle Mounting Screw |
|
12 |
6 |
Carry Handle |
|
|
4 |
13 |
||
7 |
Lower Cord Wrap |
3 |
|
8 |
Reset Button |
6 |
14 |
9 |
Accessory Receptacle |
5 |
|
|
|
||
10 |
Bulkhead |
9 |
|
7 |
|
||
11 |
Control Switch |
|
|
|
|
||
12 |
Accessory Hose Port |
10 |
|
8 |
|
||
|
|
15 |
|
13 |
Bag Change Indicator |
|
|
14 |
Bag Compartment Lid |
|
|
15 |
Exhaust Afterfilter Housing Door |
|
|
Fill In and Save
Locate the serial number of your new upright vacuum cleaner behind the handle, above the recessed electrical receptacle. Write it here and retain for future reference.
Serial No. _____________________________________________________________________________
Model No. ____________________________________________________________________________
Date of Purchase ______________________________________________________________________
3
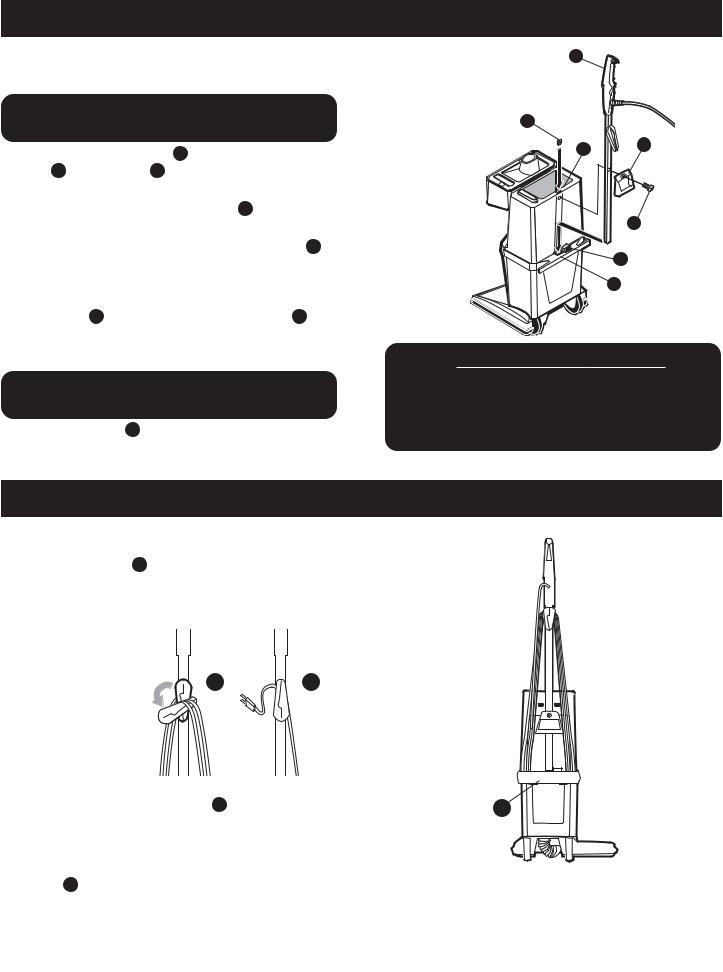
HANDLE ASSEMBLY
The operating handle of your new Lux® Legacy can easily be attached to your cleaner as follows:
CAUTION: Be sure unit is NOT plugged in before assembling handle.
• Locate |
1 . Remove the mounting |
screw 6 |
. |
• Open the cleaner bag compartment lid, remove the filter bag. Place the nut plate into the pocket 3 bag compartment as shown.
• Fit the end of |
4 |
IMPORTANT: Press down firmly when plugging |
|
into the receptacle. |
|
• Hold the handle against the bag compartment, |
the |
carry handle 7 |
|
through the handles into the nut plate. |
|
• Tighten the mounting screw securely using a screwdriver.
NOTE: The handle must be properly inserted |
|
receptacle for the screw to engage the nut |
. |
•The accessory plug 5
powered accessories such as the Sidekick®.
1
2
3 7
6
5
4
NOTE: This appliance has a polarized plug (one blade is wider than the other). This plug will fit in a polarized outlet only one way. If the plug does not fit fully in the outlet, reverse the plug. If it still does not fit, contact a qualified electrician to install the
POWER CORD STORAGE
Your cleaner includes a Combination Cord Cleat/Cord |
|
|
|
|
|
|
|
|
|
||||||||||||
Holder: To remove the cord rotate the cord cleat until the |
|
|
|
|
|
|
|
|
|
||||||||||||
power cord is released |
A |
cord from the lower |
|
|
|
|
|
|
|
|
|
||||||||||
cord wrap. Connect the |
|
|
|
into a 120V/60Hz |
|
|
|
|
|
|
|
|
|
|
|
||||||
|
|
|
|
|
|
|
|
|
|
|
|
|
|
||||||||
power supply. |
|
|
|
|
|
|
|
|
|
|
|
|
|
|
|
|
|
|
|
|
|
As an additional |
|
|
|
|
|
|
|
|
|
|
|
|
|
|
|
|
|
|
|
|
|
|
|
|
|
|
|
|
|
|
|
|
|
|
|
|
|
|
|
|
|
|
|
feature the cord |
|
|
|
|
|
|
|
|
|
|
|
|
|
|
|
|
|
|
|
|
|
cleat serves as a |
|
|
|
|
|
|
|
|
|
|
|
|
|
|
|
|
|
|
|
|
|
cord holder while |
|
|
|
|
|
|
A |
|
|
B |
|
|
|
|
|
|
|
|
|
|
|
|
|
|
|
|
|
|
|
||||||||||||||
the cleaner is in use. |
|
|
|
|
|
|
|
|
|
|
|
|
|
|
|
|
|
|
|
|
|
|
|
|
|
|
|
|
|
|
|
|
|
|
|
|
|
|
|
|
|
|
|
Rotate the cord |
|
|
|
|
|
|
|
|
|
|
|
|
|
|
|
|
|
|
|
|
|
|
|
|
|
|
|
|
|
|
|
|
|
|
|
|
|
|
|
|
|
|
|
|
|
|
|
|
|
|
|
|
|
|
|
|
|
|
|
|
|
|
|
|
|
cleat until it snaps |
|
|
|
|
|
|
|
|
|
|
|
|
|
|
|
|
|
|
|
|
|
into the "Release" |
|
|
|
|
|
|
|
|
|
|
|
|
|
|
|
|
|
|
|
|
|
position, the top |
|
|
|
|
|
|
|
|
|
|
|
|
|
|
|
|
|
|
|
|
|
portion of the cord |
|
|
|
|
|
|
|
|
|
|
|
|
|
|
|
|
|
|
|
|
|
|
|
|
|
|
|
|
|
|
|
|
|
|
|
|
|
|
|
|
|
|
|
|
|
|
|
|
|
|
|
|
|
|
|
|
|
|
|
|
|
|
|
|
|
cleat forms a cord |
|
|
|
|
|
|
B and the cord |
|
|
|
|
|
|
|
|
|
|
|
|||
holder. Snap |
|
|
|
|
|
|
|
|
C |
||||||||||||
be held out of the way while you vacuum. |
|
|
|
|
|
|
|
|
|
|
|
||||||||||
To store the cord: Rotate the cord |
into the "Storage" |
|
|
|
|
|
|
|
|
|
|||||||||||
position. Wrap the cord around the |
cleat and the lower |
|
|
|
|
|
|
|
|
|
|||||||||||
cord wrap C |
the end of the |
plug over the cord |
|||||||||||||||||||
for secure storage. |
|
|
|
|
|
|
|
|
|
|
|
|
|
|
|
|
|
|
|
|
|
4
 Loading...