


GUARDIAN HEATER
PORTABLE HEATING SYSTEM • OWNER’S MANUAL
SYSTÈME DE CHAUFFAGE PORTATIF • MANUEL DU PROPRIÉTAIRE
PLEASE SAVE THESE INSTRUCTIONS • VEUILLEZ S’IL VOUS PLAÎT CONSERVER CES CONSIGNES
WARNING: READ THIS OWNER’S MANUAL CAREFULLY BEFORE USE.
MISE EN GARDE : LIRE CE MANUEL ATTENTIVEMENT AVANT D’UTILISER LE SYSTÈME DE CHAUFFAGE.
947-1780 EA-03315

IMPORTANT SAFETY INSTRUCTIONS
When using this electric unit, basic safety precautions should always be followed to reduce the risk of fire, electric shock, and injury to persons, basic precautions should always be taken.
R E A D A L L I N S T R U C T I O N S B E F O R E U S I N G T H I S P O R T A B L E H E A T I N G S Y S T E M
WARNING
To reduce the risk of fire, electrical shock, or injury:
•CAUTION: Risk of Electric Shock. DO NOT open or try to repair the heater yourself.
•This heater may get hot when in use. To avoid burns, DO NOT let bare skin touch hot surfaces. Use caution when moving this heater.
•Keep combustible materials, such as furniture, pillows, bedding, paper, clothes, and curtains at least 3 ft from the front of the heater and keep them away from the sides, top, and rear. DO NOT place towels or other objects on the heater.
•Extreme caution is necessary when any heater is used by or near children or the disabled, or when the heater is left operating and unattended.
•DO NOT operate any heater with a damaged cord or after the heater malfunctions, has been dropped or damaged in any manner. Return heater to authorized service facility for examination, electrical or mechanical adjustment, or repair.
•This heater is not intended for use in bathrooms, laundry areas and similar indoor locations. NEVER locate heater where it may fall into a bathtub or other water container. To protect against electrical hazards, DO NOT immerse in water or other liquids.
•DO NOT touch the control panel or plug with a wet hand.
•DO NOT run cord under carpeting. DO NOT cover cord with throw rugs, runners, or similar coverings. Arrange cord away from traffic area and where it will not be tripped over.
•DO NOT insert or allow foreign objects to enter any ventilation or exhaust opening as this may cause an electric shock or fire, or damage the heater.
•To prevent a possible fire, DO NOT block the air intakes or exhaust in any manner. DO NOT use on soft surfaces, like a bed, where openings may become blocked.
•The heater has hot parts inside. Do not use it in areas where gasoline, paint, or flammable liquids are used or stored.
•Always plug heaters directly into a wall outlet/receptacle. Never use with an extension cord or relocatable power tap (outlet/power strip).
•Never operate heater without filter in place.
•To avoid fire or shock hazard, plug the unit directly into a 120 V AC electrical outlet.
•To disconnect heater, turn controls to OFF, then remove plug from outlet. Pull firmly on the plug, DO NOT unplug by pulling on the cord.
•Always unplug the unit before moving or cleaning, or whenever the heater is not in use.
•Use only for intended household use as described in this manual. Any other use not recommended by the manufacturer may cause fire, electric shock, or injury to persons. The use of attachments not recommended or sold by unauthorized dealers may cause hazards.
•Use only on a floor that is a dry, level surface.
•DO NOT use outdoors or on wet surfaces.
•DO NOT attempt to repair or adjust any electrical or mechanical functions on this unit. Doing so will void your warranty. The inside of the unit contains no user serviceable parts. Qualified personnel should perform all servicing only.
•Connect to properly grounded outlets only.
•Check your heater cord and plug connections.
a)Faulty wall outlet connections or loose plugs can cause the outlet or plug to overheat. Be sure the plug fits tight in outlet.
b)Heaters draw more current than small appliances. Overheating of the outlet may occur even if it has not occurred with the use of other appliances.
c)During use, check frequently to determine if your plug outlet or faceplate is HOT!
d)If so, discontinue use of the heater and have a qualified electrician check and/or replace faulty outlet(s).
•To reduce the risk of electrical shock, this appliance has a grounded plug (with a third prong). This plug will fit in a grounded outlet only one way. If it does not fit, contact a qualified electrician to install the proper outlet. Do not change the plug in any way. Do not use adaptors.
Save These Instructions
2
Welcome to the Aerus family and thank you for choosing a Guardian Heater to provide a warm and comfortable environment for your family. This owner’s manual will provide you with valuable information necessary for the proper care and maintenance of your new Guardian Heater. Please take a few moments to thoroughly read the instructions and familiarize yourself with all the operational aspects of your new heater.
SPECIFICATIONS
Electrical:
•Voltage: 120V~ 60Hz
•Power consumption: 1000–1500 Watts.
•Heat output: rated at 5,100 BTU.
•Automatic shut-off: heat can be set to automatically shut off in 2,4,6 or 8 hours.
•Expected lifecycle: up to 80,000 hours
SAFETY FEATURES
Tip-Over Safety Feature
This heater is equipped with a tip-over safety feature. Once the heater is tipped over, an internal switch will automatically shut the heater off. Once the heater is restored an upright position, the heater will reset. To continue operation, turn on the heater using the supplied remote control or the control panel on the heater.
Coverage:
•Coverage: Up to 1000ft2
Variables such as your insulation, type and number of windows, number of stories, construction type, etc. will greatly affect the required Btu’s per square for heating.
Size:
•Dimensions: 16 4/5” high x 13” wide x 16 3/5” deep
•Weight: 22 pounds
Warranty
• 3 year limited Warranty.
Safety Protection:
•Overheat safety feature
•Tip-over safety feature
•Auto-lock feature
Other Features:
•Washable filter
•Remote control
When not in use, unit should be stored in a clean/dry environment 60 - 80º F (15 - 27º C)) and 50 - 60% RH.
IN THE BOX
•Portable Heating System
•Remote Control with battery installed.
•Owner’s Manual
Overheat Safety Feature
This heater is equipped with a overheat safety feature. When the heaters internal components reach a certain temperature that could cause overheat and possible fire, the heater will automatically shut off.
Auto-Lock Feature
Auto-lock can prevent children from changing settings on the heater. It can be set with the unit either power on, to prevent changes to the temperature or fan setting, or power off, to prevent turning the unit on. When locked, control panel and remote control failed to function.
NOTE:
It is normal for the power cord to feel warm to the touch; however, a loose fit between the outlet and the plug may cause overheating of the plug. If this occurs, try inserting the plug into a different outlet. Contact a qualified electrician to inspect the original outlet for damage.
CAUTION: Do not power off the heater using the main power switch or unplugging it, except in an emergency. A cool down period prevents damage to the heater before turning off the fan. By turning off the heater using the main power switch or unplugging it from the power source, it does not cool down properly.
3
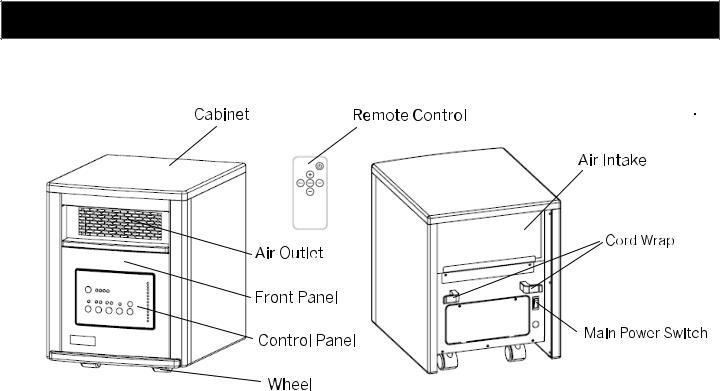
PRODUCT DIAGRAM
4
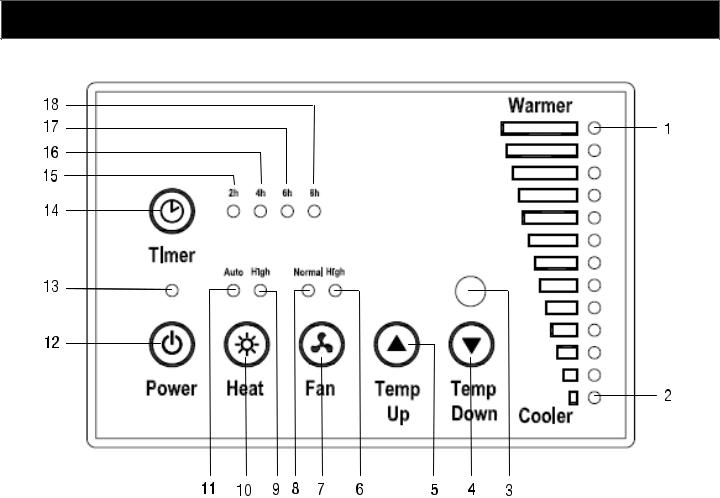
CONTROL PANEL
1.Maximum temperature indicator: all lights are on when set at the highest temperature
2.Minimum temperature indicator: bottom light is on when set at the lowest temperature
3.Remote control signal: window for receiving remote control signal
4.Temperature down button: for setting temperature lower
5.Temperature up button: for setting temperature higher
6.High fan speed indicator: light is on when high fan speed is selected
7.Fan speed button: for selecting fan speed
8.Normal fan speed indicator: light is on when normal fan speed is selected
9.High heat mode indicator: light is on when High heat mode is selected
10.Heat button for selecting either Automatic heat mode or High heat mode
11.Automatic heat mode indicator: light is on when Automatic heat mode is selected
12.Power button: for power on or off
13.Power supply light light is on when the unit is connected to electric supply
14.Timer button for adjusting the length of time unit runs and turning on the timer
15.2 hours indicator: light is on when you set the timer for 2 hours
16.4 hours indicator: light is on when you set the timer for 4 hours
17.6 hours indicator: light is on when you set the timer for 6 hours
18.8 hours indicator: light is on when you set the timer for 8 hours
5
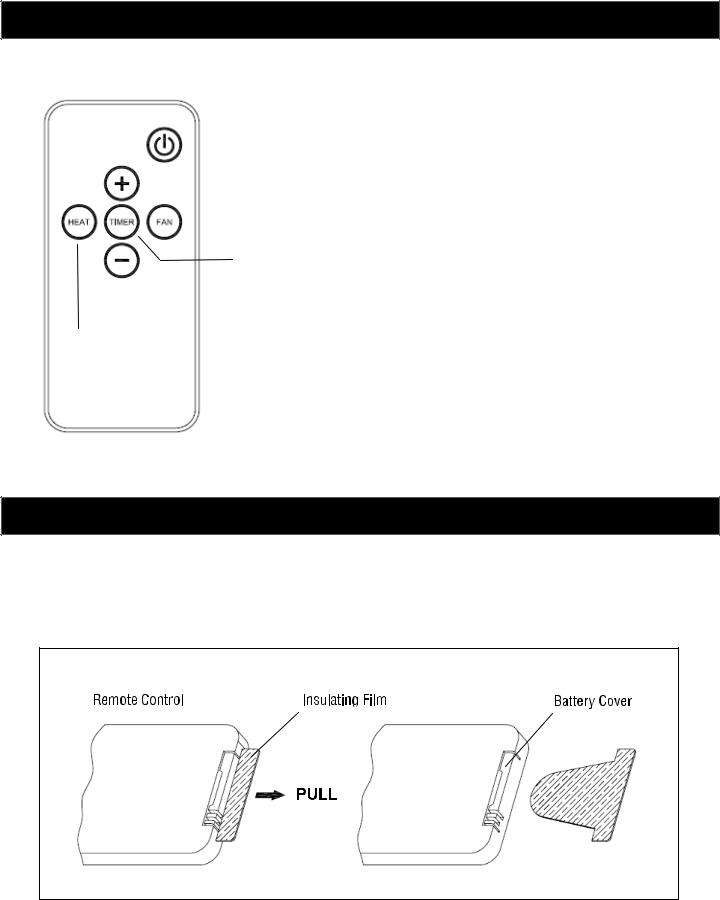
REMOTE CONTROL

 Power button: for power on or off

 Temperature up button: for setting temperature higher

 Fan speed button: for selecting fan speed
 Timer button for adjusting the length of time unit runs and turning

 Temperature down button: for setting temperature lower

 Heat button for selecting either Automatic heat mode or High heat mode
PREPARATION
Place the heater on a firm, level surface and plug into a grounded 120V 60Hz power outlet. Turn on the power switch in the rear of the unit. Only operate heater in an upright position with caster wheels attached.
When using remote control, please pull out the insulating film as illustrated below.
6

OPERATING INSTRUCTIONS
Start and select working mode
Turn the heater on by pressing the Power button on the control panel or by pressing the Power button on the supplied remote control.
Select a heat setting.
Press the Heat button to alternate between the two heat settings.
Automatic heat mode - user adjusts the temperature manually to desired level.
High heat mode - Heater will operate at the maximum output.
Press Fan button either on the control panel or remote control to select fan speed. Choose either normal speed or high speed.
Use Normal speed for typical, consistent use. Use High speed to diffuse heat at an increased speed.
Setting room temperature
Caution: Temperature can only be set in Automatic heat mode.
Adjust the thermostat by pressing the arrows on the control panel or remote control.
Once you have chosen the desired temperature, the heater will remain on until the room temperature increases to the set temperature. The heater will cycle on and off to maintain the desired room temperature.
7
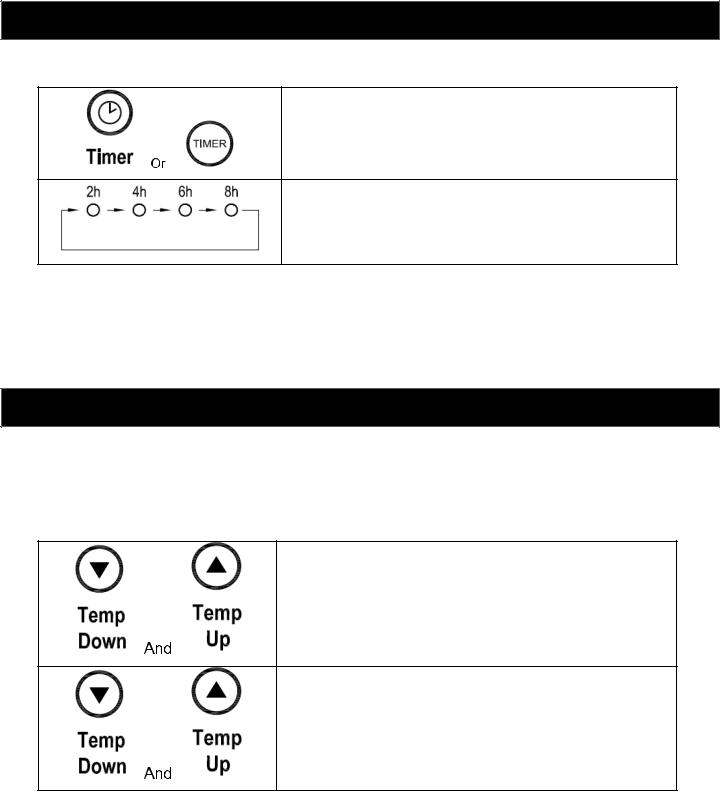
SETTING THE TIMER
Press Timer button either on the control panel or remote control.
Indicator lights signal the length of the timer. To set the length of time, press the Timer button continuously until the indictor of desired length lights. Timer will begin immediately. Timer can be set at a 2h-4h-6h-8h circulation. When all 4 lights are off, that indicates the timer is not set.
SETTING AUTO-LOCK
Auto-lock can prevent children from changing settings on the heater. It can be set with the unit either power on, to prevent changes to the temperature or fan setting, or power off, to prevent turning the unit on. When locked, control panel and remote control fail to function.
Press Temp Up and Temp Down buttons simultaneously and hold for 3 seconds. Unit is locked when a beep sounds. When locked, control panel and remote control fail to function.
To release the Auto-Lock feature, press Temp Up and Temp Down buttons simultaneously for 3 seconds. Unit is unlocked when a beep sounds. Lock indication disappears. Control panel and remote control return to normal function.
8
 Loading...