

Aerus Lux 2000 OWNER’S MANUAL

947-1588 EA-02523 48758
C A N I S T E R V A C U U M C L E A N E R
f o r f l o o r s a n d c a r p e t s
O W N E R 's M A N U A L
FOR HOUSEHOLD USE ONLY

2
Important Safety Instructions
When using an electrical appliance, basic precautions should always be taken.
READ ALL INSTRUCTIONS BEFORE USING THIS VACUUM CLEANER
WARNING
To reduce the risk of fire, electrical shock or injury:
• Use only as described in this manual.
• Use only manufacturer's recommended attachments.
•Turn off appliance befor
e connecting or disconnecting hose or power attachments.
• Do not use if hose is damaged, cut, or punctured. Avoid vacuuming sharp objects.
• Do not use without filter bag and/or filter in place.
• Do not put any object into openings. Do not use with any opening blocked. Keep free of dust, lint, hair, or other materials that may
reduce airflow.
• Do not handle plug or appliance with wet hands.
• Do not allow to be used as a toy.
• Do not allow appliance to be operated by or near children.
• Use extra care when cleaning on stairs.
• Do not use outdoors or on wet sur
faces.
• Do not use to vacuum flammable or combustible liquids such as gasoline. Do not use in areas where such liquids may be present.
• Do not vacuum anything that is burning or smoking, such as cigarettes, matches, or hot ashes.
• Keep hair, loose clothing, fingers, and all par
ts of body away from openings and moving parts.
• Do not leave appliance unattended when plugged in. Unplug fr
om outlet when not in use and before servicing.
• Do not change the plug in any way. Do not use adapters. To reduce risk of electrical shock, this appliance has a polarized plug. This
plug will fit in an electrical outlet only one way. If it does not fit, contact a qualified electrician to install the proper outlet.
•T
urn off all contr
ols before unplugging.
• Do not unplug by pulling on cord. To unplug, grasp the plug, not the cord.
• Hold plug when rewinding onto cord reel. Do not allow plug to whip when rewinding.
• Unplug before connecting non-electrical mechanical accessories.
• Do not use with damaged cor
d or plug.
• Do not pull or carry by cord, use cord as a handle, close door on cord, or pull cord around sharp edges or corners. Do not run
appliance over cord. Keep cord away from heated surfaces.
• Do not attempt to ser
vice this unit.
Return appliance to a service center if it is not working properly, has been dropped, damaged,
left outdoors, or dropped into water.
Save These Instructions

Welcome to the Aerus™ World of
E x c e l l e n c e !
The Lux 2000 by Electrolux®vacuum cleaner is a durable and versatile cleaning system designed for convenience, ease of operation, and
consumer safety.
The cleaner is equipped with specially designed fans and a quiet and powerful motor to give the highest level of cleaning power.
With a new high efficiency electrostatic afterfilter, you can be assured of the cleanest and freshest air for your family and home.
Wide wheels allow it to glide smoothly over the deepest carpets.Vinyl wrap-around end and side bumpers protect furniture from damage.
Together with a variety of attachments, this cleaner provides the versatility needed to efficiently clean all types of floors and surfaces.
FEATURES
It is important to know your vacuum cleaner parts and what accessories you will be using with your unit. As you unpack the cleaner,
check to see that you have received all of the parts shown on this page and inspect these parts before using. If any parts are missing,
call the nearest Aerus location for replacement.
01 - Carry handle
02 - ON/OFF toe switch
03 - Thumb latch for bag change
04 - Hose release tab
05 - Hose receptacle
06 - Side bumper
07 - Automatic cordwinder
08 - Filter cover release
09 - Blower hose receptacle
(under filter cover)
10 - Accessory clip
FILL IN AND SAVE
Stand your new Aerus™ cleaner upright and locate the serial number on the bottom side near the front castor wheel.
Write it here and retain it for future reference.
Model No. _____________________________________________________________________________________________________
Serial No. _____________________________________________________________________________________________________
Date of Purchase _______________________________________________________________________________________________
The Lux
®
2000 vacuum cleaner is a durable and versatile clean-
ing system designed for convenience, ease of operation, and
consumer safety.
The cleaner is equipped with specially designed fans and a quiet
and powerful motor to give the highest level of cleaning power.
With a new high efficiency electrostatic afterfilter, you can be
assured of the cleanest and freshest air for your family and
your home.
Wide wheels allow it to glide smoothly over the deepest carpets.
Vinyl wrap-around end and side bumpers protect furniture
from damage.
Together with a variety of attachments, this cleaner provides
the versatility needed to efficiently clean all types of floors
and surfaces.
3
4
2
1
6
7
8
9
10
15
18
19
20
11
12
17
16
14
5
13
11 - Steel power nozzle wand
12 - Sheath
13 - Filter bag
14 - Power nozzle
15 - Power hose and handle
16 - Crevice tool
17 - Combo dusting brush/
upholstery tool
18 - Afterfilter
19 - Accessory wands
20 - Swivel floor tool
4
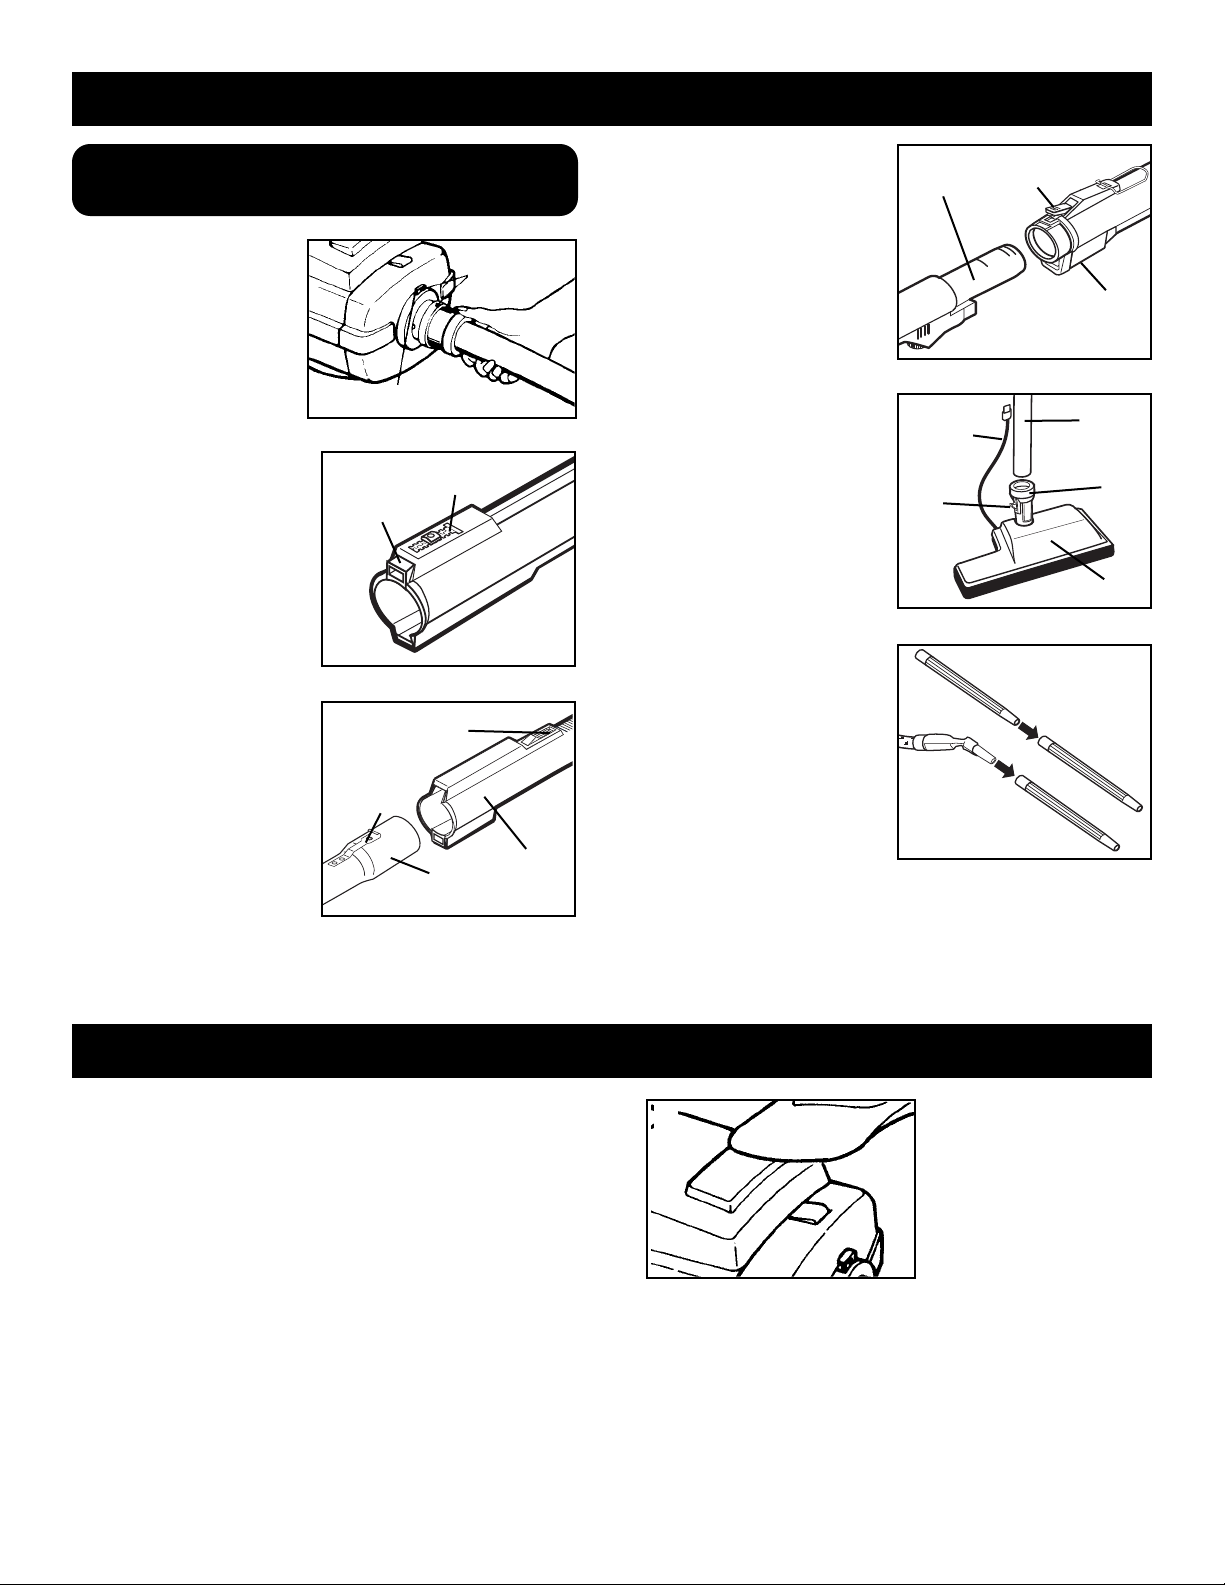
CAUTION:
Turn the cleaner OFF before connecting
or disconnecting wands, power nozzle and hose.
To install power hose,
align arrows on hose (A)
with those on the suction
end of cleaner.Insert hose
until it clicks.
To remove power hose,
press release tab (B)and
pull hose out.
Note: Before assembling
wand (E), check that the
electric cord connector (C)
at end of sheath is properly
positioned in its receptacle
(D).
To assemble wand, insert
the lower wand,large end
first (E), into sheath (F) until
latch (G) engages.
To disassemble wand, slide
release button (H) forward
and pull lower wand from
sheath.
To connect hose handgrip
(I) to the sheath wand (J),
align electrical connections
on underside of sheath
wand and hose handgrip,
and insert until latch clicks.
To remove hose handgrip
(I), press latch (K) and pull
handgrip out.
To attach power nozzle (L),
slide end of wand (M) into
elbow (N) on nozzle. Plug
cord (O) on power nozzle
into connector in sheath(F).
To disassemble power
nozzle (L), unplug cord,
press release button (P) and
pull wand (M) out.
To assemble accessory
wands (Q),insert the narrow
end of the wand into the
large end of the second
wand.
To attach accessory wand
to hose handgrip (R), insert
the hose handle into the
large end of the wand.
O
P
M
N
L
The motor of this cleaner shuts off when the temperature
rises above the proper operating level.This prevents damage
from overheating,and prolongs the life of the motor.
If the cleaner shuts off automatically due to overheating
protection:
• Depress the ON/OFF toe switch (S) and disconnect
power cord.
• Check the wands, hose, power nozzle, filter bag and afterfil-
ter for blockage.
• Replace the filter bag if it is full of debris or it has been used
to vacuum up fine particles, such as talculm powder or
sheetrock dust, which will prematurely clog the bag.
• With the power cord disconnected from outlet,allow the
machine to cool for a minimum of 30 minutes before using
again.
• After the 30 minute cool down period,plug power cord in,
turn cleaner ON and resume cleaning.
K
OVERHEATING PROTECTION
S
B Release Tab
A Alignment
Mark
C
D
H
G
E
F
I
J
Q
R
ASSEMBLING THE HOSE, WANDS, AND POWER NOZZLE
5
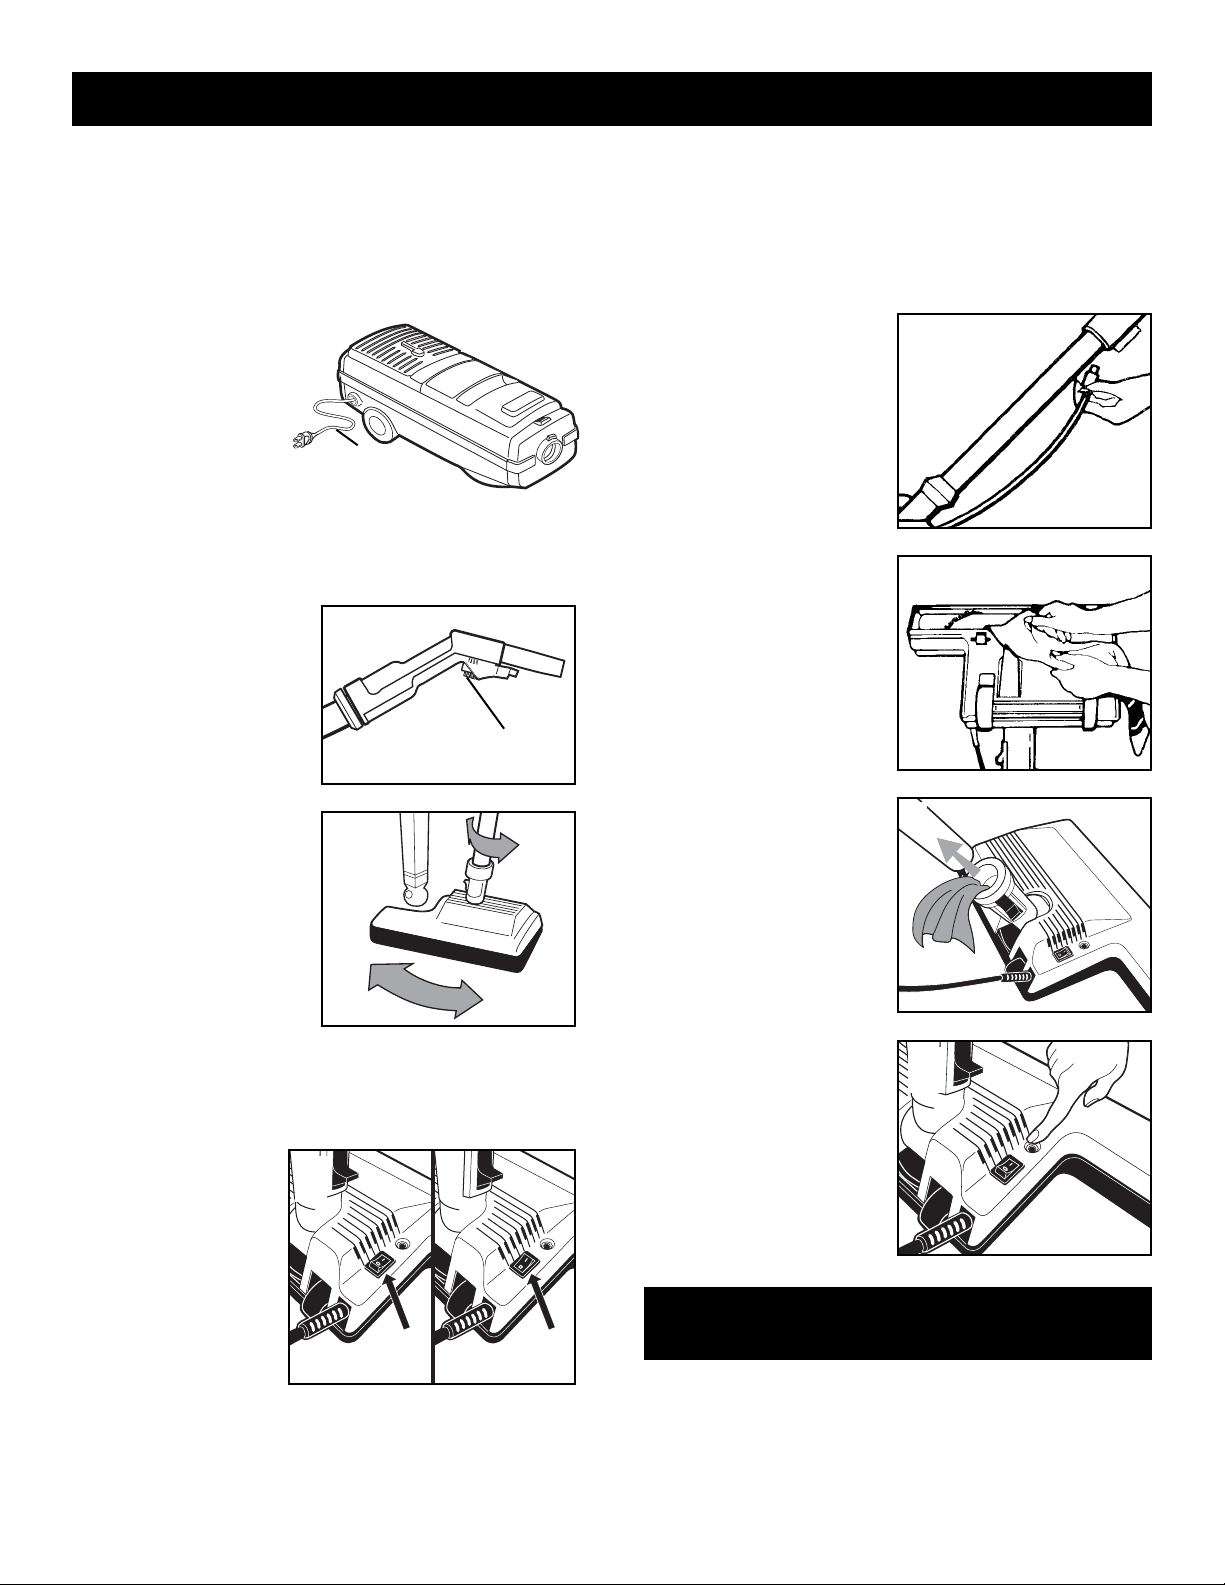
To connect the power cord (T) to wall outlet, pull the cord
out to the length required.A yellow band on the power cord
indicates the limit of extension. Do not pull the cord beyond
that point. Cord will not lock at any length unless the canister is
in a horizontal (wheels on the floor) position. Connect the plug
into wall outlet.
To rewind the power cord (T), give the
power cord a light tug and it will
automatically rewind.During
rewinding, hold onto the plug,
feed the power cord slowly
into the unit; do not allow
the cord to whip
into cordwinder.
To start the cleaner, gently press the toe switch (S)
on top of the unit.To stop the machine, press the ON/OFF toe
switch again. Always switch the cleaner OFF before discon-
necting power cord.
Open the suction control
(U) to reduce suction for
gentle cleaning of delicate
fabrics, lightweight rugs,
lamp shades or net curtains.
The suction control always
needs to be open when
using the crevice tool.
Use the power nozzle for
every type of dry floor
cleaning. The power noz-
zle’s self-adjusting action
adapts to different carpet
heights as well as hard surface floors. It maneuvers
easily around furniture and
right up to walls, providing
superior edge cleaning and
two-sided corner cleaning
(V).
POWER ON/OFF
There are two settings
on the power nozzle
(W):
• Setting the switch to
“I” (ON) engages the
high speed brush to
dig embedded grit
from carpets and
whisk up dust and
dirt from hard surface
floors. Use the suction
control (U) to reduce suction when cleaning delicate rugs.
• Setting the switch to “O”(OFF) disengages the brush and
only the canister’s suction is used to clean hard surface
floors. Operating the power nozzle without the brush rotating will help prevent marring of hard surface floors.
CAUGHT OBJECTS
If an object becomes caught in the power nozzle it will
automatically shut off.
To restart power nozzle follow these instructions:
Depress the ON/OFF toe
switch and unplug power
nozzle cord (X).
If the object is caught in the
revolving brush turn the
power nozzle over and
gently remove the caught
object from the brush (Y).
If the object is caught
further in the unit, detach
the wand and remove the
object through the elbow
(Z).
Reattach the wand and
power nozzle cord.Reset red
circuit breaker button (AA)
and turn cleaner ON.
T
OPERATION
U
V
Y
X
ON
“I”
OFF
“O”
W
Contact an authorized Aerus™ location for service
if these solutions do not correct the problem.
AA
Z
 Loading...