

D GB
MC 4469 DAB_EN-DE@2016.07.21_new 03.08.16
Bedienungsanleitung / Garantie 02
Instruction Manual 17
D Stereo-Musikcenter mit DAB+
GB Stereo music center with DAB+
STEREO-
MUSIKCENTER
MIT DAB+
MC 4469 DAB+
Bedienungsanleitung
Vielen Dank für den Kauf des DAB Radio mit FM, Bluetooth
und CD-Player.
Wir empfehlen, dass sie etwas Zeit damit verbringen,
diese Bedienungsanleitung zu lesen, um alle angebotenen
Betriebseigenschaften vollständig zu verstehen. Sie finden
auch eine Fehlerbehebung, um Ihnen bei der Lösung von
Problemen zu helfen.
Lesen Sie alle Sicherheitsanweisungen sorgfältig vor der
Verwendung und bewahren Sie diese Bedienungsanleitung
für zukünftige Referenz auf.
Symbole in dieser Gebrauchsanweisung
Wichtige Informationen für Ihre Sicherheit sind speziell
markiert. Es ist notwendig, diese Anweisungen einzuhalten,
um Unfälle zu vermeiden und Schäden an der Maschine zu
verhindern:
WARNUNG:
Warnungen vor Gefahren für Ihre Gesundheit und gibt
mögliche Verletzungsrisiken an.
ACHTUNG:
Gibt mögliche Gefahren für das Gerät oder andere Ge
genstände an.
HINWEIS: Hebt Tipps und Informationen für Sie hervor.
-
Inhalt
Sicherheitshinweise ........................................................................2
Gerät auspacken ............................................................................ 4
Übersicht der Bedienelemente / Lieferumfang ....................... 4
Betrieb Ihrer Fernbedienung ....................................................... 7
Anschlüsse ....................................................................................... 7
ECO-Power / Standby-Eigenschaft ............................................ 8
Grundbetrieb .................................................................................. 8
Einstellung von Uhrzeit und Datum............................................9
Einstellung des Sleeptimers .........................................................9
Einstellung des Ein- / Aus-Timers ............................................... 9
Tonqualität ....................................................................................... 9
Bluetooth-Betrieb .......................................................................... 9
AUDIO IN- / AUX-Betrieb ..........................................................10
DAB-Betrieb .................................................................................. 10
FM-Betrieb ....................................................................................12
CD-Betrieb ....................................................................................12
Verwendung von USB .................................................................13
Wartung .........................................................................................14
Störungsbehebung .....................................................................14
Technische Daten .........................................................................15
Hinweis zur Richtlinienkonformität............................................15
Garantie ..........................................................................................15
Entsorgung ....................................................................................16
Sicherheitshinweise
• Lesen Sie alle Anweisungen sorgfältig vor der Verwendung des Geräts und bewahren Sie sie für zukünftige
Referenz auf.
• Behalten Sie die Anleitung. Wenn Sie das Gerät an
Dritte weitergeben, muss diese Betriebsanweisung
ebenfalls weitergegeben werden.
• Überprüfen Sie, dass die auf dem Typenschild angegebener Spannung Ihrer Netzspannung entspricht.
Schaden
• Überprüfen Sie das Gerät auf Schäden, bevor sie es
ausprobieren.
• Betreiben Sie das Gerät nicht weiter, wenn Sie Zweifel
haben, dass es normal funktioniert oder wenn es auf
irgend eine Weise beschädigt ist - schalten Sie das
Gerät ab, ziehen Sie den Netzstecker und konsultieren
Sie Ihren Händler.
Standort des Geräts
• Das Gerät muss auf einer flachen stabilen Oberfläche
platziert sein und sollte keinen Vibrationen ausgesetzt
sein.
• Platzieren Sie das Gerät nicht auf schrägen oder insta
bilen Oberflächen, da das Gerät herunterfallen oder
umkippen könnte.
• Die Netzsteckdose muss sich in der Nähe des Geräts
befinden und sollte leicht zugänglich sein.
Temperatur
• Vermeiden Sie extreme Temperaturen, entweder heiß
oder kalt. Platzieren Sie das Gerät entfernt von Wärme
quellen, wie Radiatoren oder Gas- / Elektroöfen.
• Vermeiden Sie die Aussetzung zu direktem Sonnenlicht
oder anderen Wärmequellen.
Offene Flammen
• Platzieren Sie niemals heiße Gegenstände oder offene
Flammen, wie angezündete Kerzen, auf oder in der
Nähe des Geräts.
Feuchtigkeit
• Um die Brand-, Stromschlag- oder Produktschadenge
fahr zu mindern, setzen Sie das Gerät keinem Regen,
Feuchtigkeit, Tropfen oder Spritzern aus. Sollten keine
Gegenstände auf dem Gerät verziert werden, die mit
Flüssigkeiten gefüllt sind, wie beispielsweise Vasen.
• Wenn eine Flüssigkeit in das Gerät gekommen ist, kann
es zu ernsthaften Schäden führen. Schalten Sie das Gerät sofort ab, ziehen Sie den Netzstecker und konsultieren Sie Ihren Händler.
-
-
-
2
Belüftung
• Um elektrische Schläge und Brandgefahr aufgrund
von Überhitzung zu verhindern, stellen Sie sicher, dass
Vorhänge und andere Materialien nicht die Belüftungs
-
schlitze blockieren.
• Installieren oder platzieren Sie dieses Gerät nicht in
einem Bücherregal, Einbauschrank oder einer anderen
beschränkten Fläche.
Gewährleisten Sie, dass dieses Gerät gut belüftet ist.
Sicherheit
• Ziehen Sie den Stecker immer aus der Netzsteckdose,
bevor sie andere Geräte anschließen / trennen oder das
Gerät bewegen.
• Ziehen Sie den Stecker des Geräts aus der Netzsteckdo
-
se vor einem Gewitter.
Netzkabel
• Stellen Sie sicher, dass das Gerät oder der Ständer des
Geräts nicht auf dem Netzkabel steht, da das Gewicht
des Geräts das Kabel beschädigen und eine Sicherheits
-
gefahr erzeugen könnte.
• Ein beschädigtes Netzkabel muss von dem Hersteller,
dem Serviceagenten oder ähnlich qualifizierten Personen ausgetauscht werden, um Gefahren zu vermeiden.
Kopfhörer
• Das Hören von lauten Klängen für einen längeren Zeit
-
raum kann Ihr Gehör schädigen.
• Bevor sie Kopfhörer einsetzen drehen Sie die Lautstärke
herunter, setzen Sie dann die Kopfhörer ein und erhöhen
Sie die Lautstärke langsam, bis Sie einen komfortablen
Lautstärkepegel erreichen.
Störung
• Platzieren Sie das Gerät nicht auf oder in der Nähe von
Geräten, die elektromagnetische Störungen verursachen
können. Wenn Sie dies tun, kann es die Betriebsleistung
des Geräts nachteilig beeinflussen und ein verzerrtes
Bild oder einen verzerrten Ton verursacht.
Standby
• Die Taste EIN / STANDBY auf der Fernbedienung schal
tet das Gerät nicht komplett ab. Das Gerät wird weiterhin Strom von der Netzsteckdose beziehen, während es
im Standby-Modus ist. Im Interesse der Sicherheit und
um unnötigen Energieverbrauch zu vermeiden, lassen
Sie das Gerät niemals im Standby-Modus, während sie
es für einen längeren Zeitraum unbeaufsichtigt lassen
z.B. über Nacht, im Urlaub oder während sie außer Haus
sind. Schalten Sie es ab und trennen Sie den Netzstecker von der Netzsteckdose.
Batterien
ACHTUNG:
• Die Batterien, die in der Fernbedienung für dieses Ge
rät verwendet werden, können leicht von Kleinkindern
verschluckt werden und das ist gefährlich.
• Halten Sie Lose Batterien von Kleinkindern fern und
stellen Sie sicher, dass das Batteriefach sicher in der
Fernbedienung ist. Suchen Sie medizinischen Rat,
wenn Sie glauben, dass eine Zelle verschluckt wurde.
• Entsorgen die Batterien korrekt, indem Sie die Beratung in dieser Anleitung befolgen.
Beobachtung
WARNUNG:
• Kinder sollten beobachtet werden, um zu gewährleis
ten, dass sie nicht mit dem Gerät und der Fernbedienung spielen.
• Lassen Sie niemanden, insbesondere keine Kinder,
etwas in die Löcher, Schlitze oder andere Öffnungen
in dem Gehäuse stecken - dies könnte zu einem
tödlichen Stromschlag führen.
Klasse 1 Laser-Produkt
• Dieses Gerät verwendet ein Laser.
Werden die Bedienelemente,
Einstellungen oder Verfahrens
-
KLASSE 1
LASER-PRODUKT
durchführungen anders gehandhabt, als in diesem Handbuch angegeben, kann dies zu
gefährlichen Strahlungen führen.
• Bevor Sie das Gerät bewegen, stellen Sie sicher, dass
das CD-Fach leer ist.
• Entfernen Sie die CD immer, wenn das Gerät nicht in
Verwendung ist.
• Geschieht dies nicht, könnte es seinem ernsthaften
Schaden der CD und des Geräts kommen.
• Stapeln sie keine Geräte.Wärme von anderen Geräten
könnte die Leistung des Geräts beeinträchtigen.
ACHTUNG
STROMSCHLAGGEFAHR
NICHT ÖFFNEN
Das gezackte Blitz-Pfeilsymbol in einem
gleichschenkligen Dreieck dient zur Warnung
des Benutzers vor nicht isolierter, „gefährlicher Spannung“ im Gehäuse des Produkts,
die ausreichen kann, um einen elektrischen
Schlag zu verursachen.
Das Ausrufungszeichen in einem gleichseitigen Dreieck soll den Benutzer auf das
Vorhandensein wichtiger Anweisungen für
Bedienung und Wartung (Instandhaltung) in
der das Gerät begleitenden Dokumentation
aufmerksam machen.
-
-
3
Service
• Um die Stromschlaggefahr zu verringern, entfernen
Sie keine Schrauben. Das Gerät beinhaltet keine vom
Anwender zu wartenden Teile. Überlassen Sie die Wartungsarbeiten qualifi ziertem Personal.
• Öffnen Sie keine befestigten Abdeckungen, da dies
gefährliche Spannungen freilegen könnte.
RCA-Kabel
AC-Stromkabel
Wartung
• Stellen Sie sicher, dass Sie den Stecker des Geräts vor
der Reinigung aus der Netzsteckdose ziehen.
• Verwenden Sie keine scharfen oder lösungsmittelhaltige Reinigungsmittel, da diese Oberfl äche des Geräts
beschädigen können.
• Verwenden Sie keine Flüssigkeiten um das Gerät zu
reinigen.
Gerät auspacken
Entfernen Sie die gesamte Verpackung vom Gerät. Behalten
Sie die Verpackung. Wenn Sie diese entsorgen, tun Sie dies
gemäß Ihren lokalen Richtlinien.
Die folgenden Gegenstände sind inbegriffen:
Hauptgerät
Fernbedienung
Bedienungsanleitung
Übersicht der Bedienelemente /
Lieferumfang
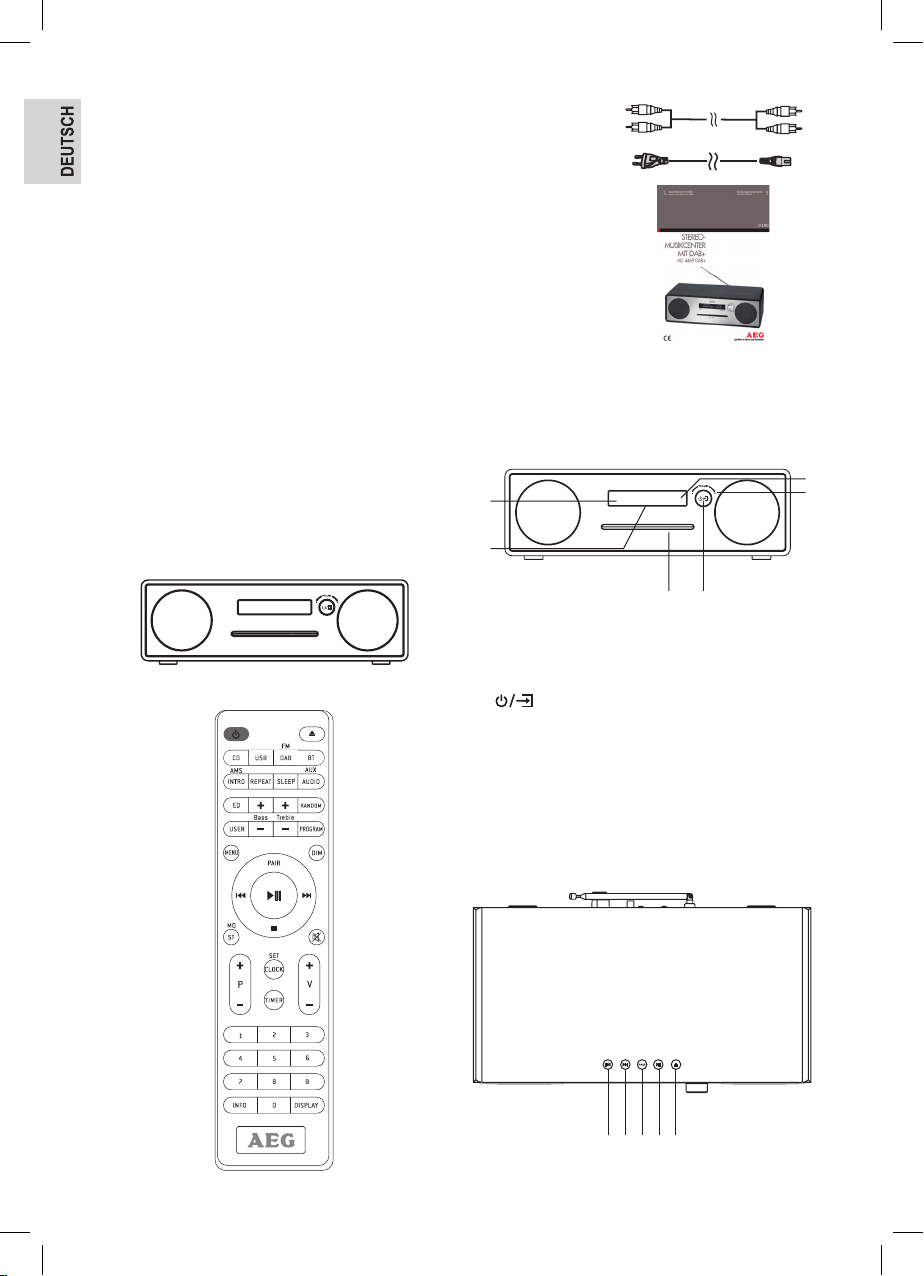
Vorderansicht
1
2
4 5
1 Fernbedienungssensor
2 Anzeige
3 Standby-Anzeige
4 CD-Tür
5
• Zum Ein- und ausschalten drücken und gedrückt
halten.
• Kurz drücken, um die Quelle nach dem Einschalten
zu wechseln.
6 VOL+/VOL–
Drehen, um den Lautstärkepegel zu erhöhen oder zu
senken.
3
6
Obenansicht
7
4
11
10
8
9
7
• Drücken, um den vorherigen Titel in USB und CD
auszuwählen.
• Drücken, um die Senderliste in DAB anzuzeigen.
• Drücken, um den Menübildschirm in DAB und FM
nach oben zu ziehen.
• Drücken zur Feinabstimmung in FM.
8
• Drücken, um den nächsten Titel in USB und CD
auszuwählen.
• Drücken, um die Senderliste in DAB anzuzeigen.
• Drücken, um den Menübildschirm in DAB und FM
nach unten zu ziehen.
• Drücken zur Feinabstimmung in FM.
9 PAIR
Taste drücken und gedrückt halten, um die Kopplungs
funktion in BT zu aktivieren und / oder das vorhandene
gekoppelte BT-Gerät zu trennen.
10
• Drücken, um in CD, USB und BT abzuspielen und zu
pausieren.
• Um nachfolgendes Menü in DAB und FM auszuwählen oder zu überspringen.
11
• Drücken, um eine CD im CD-Modus auszuwerfen
oder zu laden.
• Drücken, um das Menü in DAB und FM anzuzeigen.
Rückansicht
12
13
Fernbedienung
-
10
19
11
1
14
16
2
3
4
5
6
7
15
17
18
19
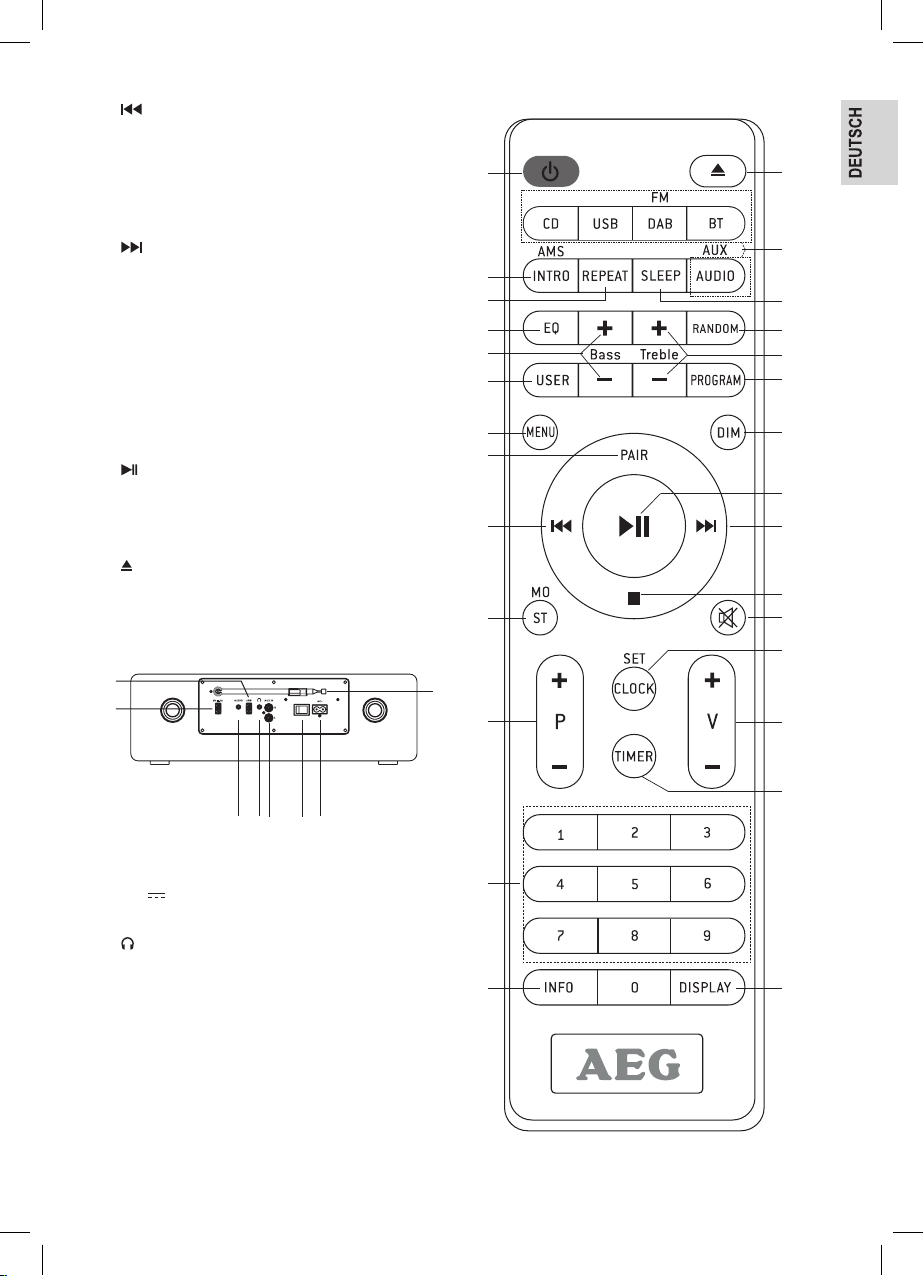
1
20
8
21
9
22
23
24
25
26
15
14
16 17
18
12 USB-Buchse für Musikwiedergabe
13 USB-Buchse zum Aufladen von mobilen Geräten
(5 V 1 A)
14 AUDIO-Eingang
15
Kopfhörer
16 AUX IN Cinch-Buchsen (R / L)
17 Power-Schalter
18 AC~ Eingang
19 DAB- / FM-Antenne
27
12
13 28
5
1
Schalten Sie das Gerät zwischen dem Modus EIN und
STANDBY.
2 INTRO / AMS
• Drücken, um das Scannen aller Titel im CD- und
USB-Modus zu starten.
• Drücken, um automatisch nach einem Sender im
FM-Modus zu suchen. Während der Suche, drücken
Sie erneut, um zu stoppen.
3 REPEAT
Drücken, um einen wiederholten Wiedergabemodus im
CD- und USB-Modus auszuwählen.
4 EQ
Drücken, um Toneigenschaften auszuwählen:
CLASS / POP / ROCK / JAZZ / NORMAL.
5 BASS +/–
Drücken, um den BASS nach Drücken der Taste USER
auszuwählen.
6 USER
Drücken, um den Bass- und Höhenpegel anzupassen.
7 MENU
Drücken, um das Menü in DAB und FM anzuzeigen.
8 PAIR
Drücken und gedrückt halten, um die Kopplungsfunktion in BT zu aktivieren und / oder das vorhandene
gekoppelte BT-Gerät zu trennen.
9
• Drücken und gedrückt halten für schnelles Zurückspulen in CD und USB.
• Drücken, um den vorherigen Titel in CD und USB
auszuwählen.
• Drücken, um die Senderliste in DAB anzuzeigen.
• Drücken, um den Menübildschirm in DAB und FM
nach oben zu ziehen.
• Drücken zur Feinabstimmung in FM.
10 MO / ST
Drücken, um den Stereo- oder Mono-Tonmodus einzustellen.
11 P +/–
• Drücken, um den Anfang eines aktuellen / vorherigen / nachfolgenden Albums zu überspringen.
• Drücken, um die vorherige / nächste Radiostation in
FM und DAB auszuwählen.
• Drücken und gedrückt halten zur manuellen Abstimmung in FM.
12 0-9 Nummerntasten
13 INFO
• Drücken, um die ID3-Informationen in CD und USB
ein- / auszuschalten.
• Drücken, um die Informationen in DAB und FM
anzusehen.
14
Drücken, um eine CD im CD-Modus auszuwerfen oder
zu laden.
15 SLEEP
Drücken, um den Sleeptimer einzustellen.
16 CD / USB / DAB/FM / BT / AUDIO/AUX
Drücken, um den entsprechenden Betriebsmodus auszuwählen (CD / USB / DAB / FM / BT / AUDIO / AUX).
17 RANDOM
Drücken, um Titel zufällig im CD- und USB-Modus
abzuspielen.
18 TREBLE +/–
Drücken, um die HÖHEN nach Drücken der Taste USER
auszuwählen.
19 PROGRAM
Drücken, um im CD-, USB-, DAB- und FM-Modus zu
programmieren.
20 DIM
Drücken, um unterschiedliche Helligkeitsstufen für die
Anzeige auszuwählen.
21
• Drücken, um Titel zufällig im BT-, CD- und USBModus abzuspielen / zu pausieren.
• Um nachfolgendes Menü im DAB- und FM-Modus
auszuwählen oder zu überspringen.
22
• Drücken und gedrückt halten für schnelles Vorspulen
im CD und USB-Modus.
• Drücken, um den nächsten Titel im CD- und USBModus auszuwählen.
• Drücken, um die Senderliste im DAB-Modus anzuzeigen.
• Drücken, um den Menübildschirm im DAB- und FMModus nach unten zu ziehen.
• Drücken zur Feinabstimmung im FM-Modus.
23
Drücken, um Titel im CD- und USB-Modus anzuhalten.
24
Drücken, um den Ton stummzuschalten oder lautzuschalten.
25 CLOCK
Drücken und gedrückt halten, um die Uhr im StandbyModus einzustellen.
26 V +/–
Drücken, um den Lautstärkepegel zu erhöhen / zu
senken.
27 TIMER
• Drücken, um den Timer im Standby-Modus ein- /
auszustellen.
• Drücken, um die Timer-Funktion bei Aktivierung ein/ auszuschalten.
• Drücken und gedrückt halten, für Timer-Einstellungen im Standby-Modus.
28 DISPLAY
Drücken, um die Uhr im eingeschalteten Modus anzu-
zeigen.
6
Betrieb der Fernbedienung
1. Drücken und schieben Sie die
Rückseite, um das Batteriefach
der Fernbedienung zu öffnen.
2. Setzen Sie zwei AAA-Batterien
(nicht mitgeliefert) ein. Stellen
Sie sicher, dass die (+) und (–)
Enden der Batterien mit den (+) und (–) Anschlüssen
übereinstimmen, die auf dem Batteriefach angegeben
sind.
3. Funktioniert die Fernbedienung nicht mehr einwandfrei,
wechseln Sie die Batterien.
Handhabung der Batterien
WARNUNG:
Setzen Sie Batterien keiner hohen Wärme, wie z. B.
Sonnenschein, Feuer oder ähnlichem aus. Es besteht
Explosionsgefahr!
ACHTUNG:
• Unsachgemäße oder falsche Verwendung der
Batterien, könnte eine Korrosion oder das Auslaufen
der Batterie verursachen, welche zu einem Brand, Per
sonenverletzung oder Schäden am Eigentum führen
kann.
• Installieren Sie die Batterien korrekt, indem sie die
Polaritäts (+ und –) Anzeigen auf dem Batteriefach
befolgen.
• Wenn die Batterien verbraucht sind, wird die Fernbedienung nicht funktionieren.
• Verwenden Sie nur den Batterietyp, der in dieser
Anleitung angegeben ist.
• Entsorgen Sie die verbrauchten Batterien nicht im
Haushaltsabfall. Entsorgen Sie sie gemäß den lokalen
Richtlinien.
Handhabung der Fernbedienung
WARNUNG:
Achten Sie auf Ihre Fingernägel, wenn Sie die Batterieab
deckung und die Batterien entfernen.
• Lassen Sie die Fernbedienung nicht herunterfallen.
• Erlauben Sie nicht, dass die Fernbedienung von etwas
beeinflusst wird.
• Lassen Sie kein Wasser oder eine andere Flüssigkeit auf
die Fernbedienung laufen.
• Platzieren Sie die Fernbedienung nicht auf einem nassen
Gegenstand.
• Platzieren Sie die Fernbedienung nicht unter direktem
Sonnenlicht oder in der Nähe von exzessiven Wärme
quellen.
• Batterien können auslaufen und Batteriesäure verlieren.
Wird das Gerät längere Zeit nicht genutzt, entnehmen
Sie die Batterien.
-
-
-
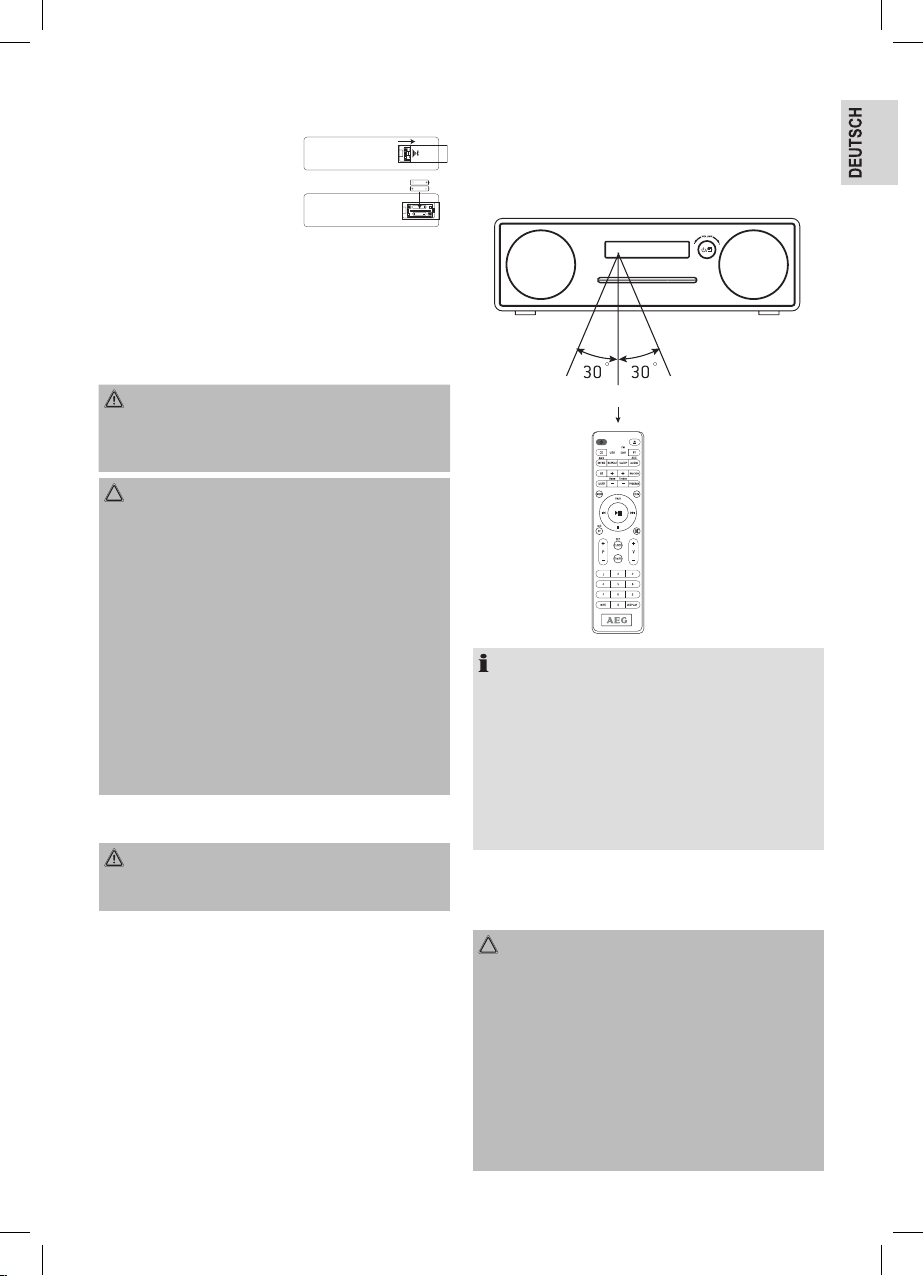
Betriebsbereich der Fernbedienung
Richten Sie die Fernbedienung, nicht weiter als 5 Meter
vom Fernbedienung Sensor entfernt und innerhalb von 60°
horizontal und 20° vertikal von der Vorderseite des Geräts.
Der Betriebsabstand kann abhängig von der Helligkeit des
Raumes variieren.
Innerhalb von etwa 5 m
HINWEIS:
• Stellen Sie sicher, dass es kein Hindernis zwischen dem
Fernbedienungssensor des Geräts und der Fernbedienung gibt. Wenn Sie das Gerät auf einem TV-Ständer
etc. installieren, kann sich der Fernbedienungsbereich
abhängig von der Dicke oder Farbe des Glases des
TV-Ständern verringern.
• Setzen Sie den Infrarotsensor der Fernbedienung nicht
direktem Sonnenlicht oder anderem starken Licht aus,
wie wechselgerichteten Leuchtstofflampen.
Anschlüsse
AC-Stromanschluss
ACHTUNG:
• Gefahr eines Produktschadens! Stellen Sie sicher,
dass die Netzeingangsspannung mit der auf dem
Typenschild auf der Rückseite oder auf der Unterseite
des Geräts gedruckten Spannung übereinstimmt.
• Vor dem Anschluss des AC-Netzkabels, stellen Sie
sicher, dass sie alle anderen Anschlüsse hergestellt
haben.
• Schließen Sie das kleine Ende der AC-Buchse auf der
Rückseite des Geräts an und stecken Sie den Stecker
des AC-Netzkabels in eine Standard-AC-Wandsteck
dose.
-
7
ACHTUNG:
• Stellen Sie sicher, dass sie das Netzkabel ziehen, wenn
das Gerät für einen längeren Zeitraum nicht in Betrieb
ist.
• Der NETZ-Stecker oder ein Gerätekoppler als Trennvorrichtung verwendet wird, die Transferrichtung sollte
betriebsbereit bleiben.
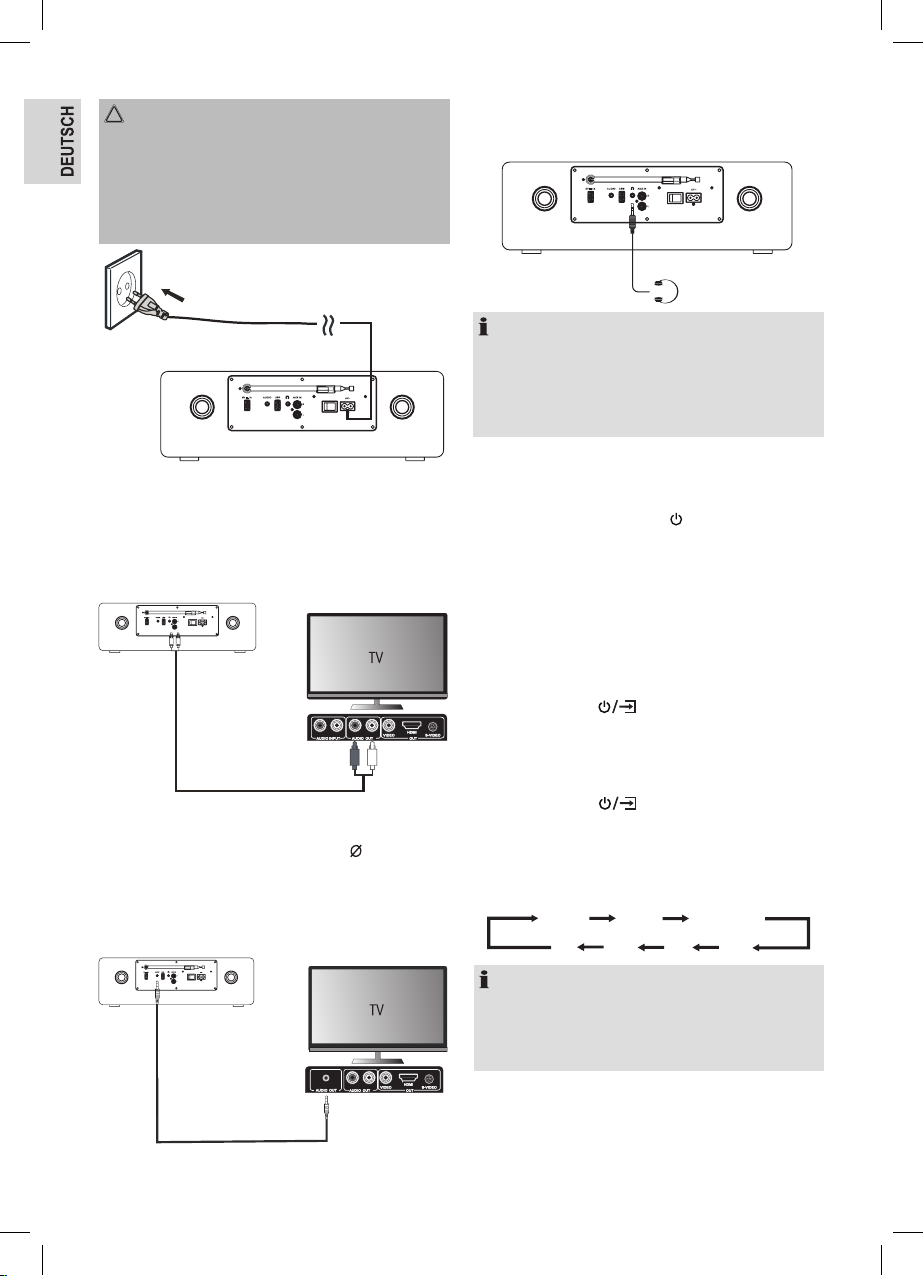
Analoger Eingangsanschluss
Anschluss der DVD-Player- / TV-Ausgänge an den analogen
Eingang des Geräts.
• Verwenden Sie ein RCA-Audiokabel (mitgeliefert), um
die DVD-Player- / TV-Audioausgänge an die Buchse
AUX IN (L/R) des Geräts anzuschließen.
Kopfhöreranschluss
Schließen Sie Ihre Kopfhörer an die Kopfhörerbuchse auf
der Rückseite des Geräts an.
HINWEIS:
• Stellen Sie sicher, dass Sie die Lautstärke herunter
drehen, bevor Sie die Kopfhörer anschließen oder
einschalten.
• Ein übermäßiger Schalldruck von Ohrhörern und
Kopfhörern kann zu einem Hörverlust führen.
ECO-Power / Standby-Eigenschaft
Dieses Gerät verfügt über einen ECO-Power- / Standby-Modus. Drücken Sie EIN / STANDBY auf der Fernbedienung
oder auf dem Gerät, um den Standby-Modus zu öffnen. Die
Uhr wird angezeigt.
Wenn Sie möchten, dass die Uhr während des StandbyModus ausgeschaltet ist, können Sie die DIM-Taste auf der
Fernbedienung drücken.
AUX IN-Eingang
DVD-Player- / TV-Ausgänge
Anschluss der DVD-Player- / TV-Ausgänge an den analogen
Eingang des Geräts.
• Verwenden Sie ein Line-In-Audiokabel (
3,5 mm)
∅
(mitgeliefert), um die DVD-Player- / TV-Ausgänge an die
AUDIO-Eingangsbuchse von der Soundkarte anzuschließen. Können auch eine Kopfhörerbuchse eines externen
Audiogeräts an diese Buchse AUDIOIN anschließen,
wie MP3-Player, iPod
AUDIO IN-Eingang
®
oder iPhone®, etc.
DVD-Player- /
TV-AUDIO-Ausgang
8
Grundbetrieb
Einschalten des Geräts
Drücken Sie die Taste
oder auf der Fernbedienung und halten Sie diese gedrückt,
um das Gerät einzuschalten.
Betriebsmodus auswählen
Drücken Sie die Taste
DAB, FM, USB, BLUETOOTH, AUDIO, AUX oder CD auszuwählen.
Sie können auch die Kurzwahltasten auf der Fernbedienung
(DAB/FM, USB, BT, AUDIO/AUX oder CD) drücken, um
Ihren gewünschten Modus auszuwählen.
USB
FM
HINWEIS:
Wenn es kein Audiosignal gibt, wird das Gerät automatisch innerhalb von 19 Minuten ausschalten, um Energie
zu sparen (außer im FM). Im AUDIO-Modus, beträgt die
Zeit 4 Stunden.
auf der Vorderseite des Geräts
auf dem Gerät wiederholt, um
CD
AUDIO
AUX
BT
DAB
Einstellung von Uhrzeit und Datum
Manuelle Einstellung der Uhrzeit
1. Stellen Sie das Gerät in den Standby-Modus ein.
2. Drücken Sie die Taste CLOCK auf der Fernbedienung
und halten Sie diese gedrückt.
3. Geben Sie das Datum, die Stunde und die Minuten
durch die Nummerntasten auf der Fernbedienung ein.
4. Taste CLOCK zum Bestätigen der Einstellung drücken.
Anzeige der Uhr
Drücken Sie im DAB- oder FM-Modus die Taste DISPLAY
auf der Fernbedienung.
3. Drücken Sie die Taste TIMER und halten Sie diese
Einstellung des Sleeptimers
Verwenden Sie den Sleeptimer im Wiedergabemodus, um
das Gerät nach einer bestimmten Minutenanzahl auszuschalten. Durch Einstellung des Sleeptimers, können Sie mit
Musik einschlafen und sie haben Gewissheit, dass das Gerät
von alleine abschaltet und nicht die ganze Nacht Musik
abspielt.
Um den Sleeptimer einzustellen, drücken Sie die Taste
SLEEP auf der Fernbedienung wiederholte, die auf der
Anzeige angezeigte Minutenanzahl in dieser Sequenz wird
geändert:
120 90 60 30 15 OFF
Nach Einstellung der Notenanzahl für den Sleeptimer, wird
die Anzeige zur vorherigen Anzeige zurückkehren.
Das Gerät ist jetzt so eingestellt, dass es nach der eingestellten Minuten Anzahl abschaltet.
Überprüfung des Sleeptimers
Wenn die Taste SLEEP auf der Fernbedienung einmal
gedrückt wird, wird die verbleibende Sleep-Zeit angezeigt.
Warten Sie 1 Sekunde, bis die Anzeige zur Originalanzeige
zurückkehrt.
Abbrechen des Sleeptimers
Drücken Sie die Taste SLEEP wiederholt auf der Fernbedienung, bis “SLEEP:OFF” angezeigt wird.
Das Abschalten des Geräts bricht auch den Sleeptimer ab.
Einstellung des Ein- / Aus-Timers
Sie können den Ein- / Aus-Timer verwenden, damit sich das
Gerät jeden Tag zu einer bestimmten Zeit vom Standby
automatisch ein- und ausschaltet.
Die Uhr muss richtig eingestellt sein, damit der Timer richtig
funktioniert.
1. Stellen Sie das Gerät in den Standby-Modus ein.
2. Drücken Sie die Taste TIMER um die Funktion Ein- /
Aus-Timer aufzurufen.
Anpassung der Lautstärke
Um die Lautstärke zu erhöhen oder zu senken, drehen Sie
die Taste VOL+/– auf dem Gerät oder drücken Sie die
Tasten V+/– auf der Fernbedienung.
• Wenn Sie den Ton stummschalten möchten, drücken
Anpassung des Bass
Drücken Sie die Taste USER auf der Fernbedienung und drü
cken Sie dann die Tasten BASS +/– auf der Fernbedienung,
um den Bass zu erhöhen oder zu senken.
Anpassung der Höhe
Drücken Sie die Taste USER auf der Fernbedienung und
drücken Sie dann die Tasten TREBLE +/– auf der Fernbedie
nung, um die Höhe zu erhöhen oder zu senken.
Voreinstellung des Equalizers
Sie können die Toneigenschaften wie CLASS / POP / ROCK /
JAZZ / NORMAL auswählen, indem Sie die Taste EQ drücken.
Sie können Titel von einem Mediengerät hören, wenn es an
das Gerät über Bluetooth angeschlossen ist.
Sie müssen Ihr Bluetooth-Gerät mit diesem Gerät koppeln,
für die Timer-Einstellung gedrückt. Wählen Sie die
Audioquelle, indem sie die Tasten
Geben Sie dann die Zeit für die Einschaltung des Timers
mit den Nummerntasten auf der Fernbedienung ein.
Stellen Sie danach die Lautstärke mit den Tasten /
ein. Geben Sie jetzt die Zeit für die Abschaltung des
Timers mit den Nummerntasten auf der Fernbedienung
ein.
HINWEIS:
Sie müssen alle Schritte durchführen, um die Taste
TIMER zur Bestätigung zu drücken und zum nächsten
Schritt zu gehen. Wenn es innerhalb von 10 Sekunden
keinen Betrieb gibt, wird die Einstellung automatisch
geschlossen.
HINWEIS:
Wenn die ausgewählte Quelle BUZZER ist, dann ist die
Einstellung TIMER OFF nicht verfügbar.
/ verwenden.
Tonqualität
Sie die Taste auf der Fernbedienung. Drücken Sie die
Taste erneut oder drücken Sie die Taste VOL+/–, um
zum normalen Hören zurückzukehren.
HINWEIS:
Wenn Sie die Lautstärke über 26 anpassen, dann schalten
Sie das Gerät ab und wieder ein. Die Lautstärke wird
automatisch auf die Werkseinstellungen gespeichert.
Bluetooth-Betrieb
-
-
9
bevor Sie es zum ersten Mal anschließen.
HINWEIS:
Um Störungen zu vermeiden, deaktivieren Sie WLAN auf
ihrem Gerät (Smartphone, Tablet etc.), wenn Sie Musik
unter Verwendung von Bluetooth abspielen.
Koppeln von Bluetooth-fähigen Geräten
HINWEIS:
• Der Betriebsbereich zwischen diesem Gerät und
einem Bluetooth-Gerät beträgt etwa 10 Meter (ohne
einen Gegenstand zwischen dem Bluetooth-Gerät
und dem Gerät).
• Bevor Sie ein Bluetooth-Gerät an dieses Gerät
anschließen, stellen Sie sicher, dass sie die Fähigkeiten
des Geräts kennen.
• Jedes Hindernis zwischen diesem Gerät und dem
Bluetooth-Gerät kann den Betriebsbereich reduzieren.
• Wenn die Signalstärke schwach ist, kann sich Ihr
Bluetooth-Gerät trennen, aber es wird automatisch in
den Kopplungsmodus zurückkehren.
1. Während des Modus EIN, drücken Sie die Taste BT auf
der Fernbedienung, um den Bluetooth-Modus auszuwählen oder ändern Sie die Quelle zu BT, indem Sie
kurz die Taste
Gerät nicht mit einem Bluetooth-Gerät gekoppelt ist,
öffnet das System automatisch den Kopplungsmodus
oder sie müssen die Taste PAIR drücken und zum Start
der Kopplung gedrückt halten.
2. Aktivieren Sie die Bluetooth-Funktion auf Ihrem Gerät
und wählen Sie den Suchmodus aus. „AEG MC 4469“
wird auf ihrem Bluetooth-Gerät erscheinen.
3. Um die Bluetooth-Funktion zu trennen, schalten Sie zu
einer anderen Funktion auf dem Gerät oder deaktivieren
Sie die Funktion von Ihrem Bluetooth-Gerät.
HINWEIS:
• Wenn es schon einen vorhandenen Anschluss gibt,
drücken Sie die Taste PAIR, um den Kopplungsmodus
wieder zu aktivieren. Der vorhandene Anschluss wird
unterbrochen.
• Das Gerät wird auch getrennt, wenn ihr Gerät jenseits
des Betriebsbereichs bewegt wird.
• Wenn Sie Ihr Gerät wieder an dieses Gerät anschließen möchten, platzieren Sie es innerhalb des Betriebsbereichs.
• Wenn das Gerät jenseits des Betriebsbereichs bewegt
wird, wenn es zurückgebracht wird, überprüfen Sie, ob
das Gerät immer noch an das Gerät angeschlossen ist.
• Wenn der Anschluss verloren ist, befolgen Sie die
oben genannten Anweisungen, um ihr Gerät erneut
mit dem Gerät zu koppeln.
auf dem Gerät drücken. Wenn das
Musik hören vom Bluetooth-Gerät
• Wenn das verbundene Bluetooth-Gerät Advanced Audio
Distribution Profi le (A2DP) unterstützt, können Sie die auf
dem Gerät gespeicherte Musik durch dieses Gerät hören.
• Wenn das Gerät auch Audio Video Remote Control Profi le (AVRCP) unterstützt, können Sie die Fernbedienung
des Geräts verwenden, um die auf dem Gerät gespeicherte Musik abzuspielen.
1. Koppeln Sie Ihr Gerät mit diesem Gerät.
2. Spielen Sie Ihre Musik über Ihr Gerät ab (wenn es A2DP
unterstützt).
3. Verwenden Sie die mitgelieferte Fernbedienung, um die
Wiedergabe zu steuern (wenn es AVRCP unterstützt).
- Um die Wiedergabe zu pausieren / fortzusetzen,
drücken Sie die Taste
- Um einen Titel zu überspringen, drücken Sie die
Tasten
oder .
.
AUDIO IN- / AUX-Betrieb
1. Drücken Sie die Taste AUDIO auf der Fernbedienung
oder drücken Sie die Taste auf dem Gerät, um den
AUDIO-Modus auszuwählen. Zweimaliges Drücken der
Taste aktiviert den AUX-Modus.
2. Betreiben Sie Ihr Audiogerät direkt für Wiedergabeeigenschaften.
3. Drücken Sie die Taste VOL +/–, um die Lautstärke auf
Ihren gewünschten Pegel anzupassen.
DAB-Betrieb
Der DAB-Radiomodus empfängt DAB- / DAB+-Digitalradio
und zeigt Informationen über die Station und das
Programm / den Titel als Broadcast an.
1. Scanning nach Stationen
Wenn Sie das Gerät zum ersten Mal verwenden oder wenn
die Stationsliste leer ist, für das Radio automatisch einen
vollständigen Scan durch, welche Stationen verfügbar sind.
Sie müssen eventuell auch einen Scan manuell starten, um
die Stationsliste zu aktualisieren, aus einem der folgenden
Gründe:
• Neue Stationen können von Zeit zu Zeit verfügbar werden.
• Stationen schließen oder können nicht länger empfangen
werden (In der Stationsliste werden ungültige Stationen
mit einem Fragezeichen vor ihrem Namen angezeigt).
• Wenn der Empfang nach dem Originalscan nicht gut
war (zum Beispiel war die Antenne nicht oben), kann dies
zu einer leeren oder unvollständigen Liste verfügbarer
Stationen führen.
• Wenn Sie einen schlechten Empfang von einigen Stationen haben was dazu führt dass das Audio unterbricht,
können Sie sich nur Stationen mit einer guten Signalstärke aufl isten lassen.
10

Vollständiger Scan
Wählen Sie MENU > Full scan
Sobald ein gern vollständig ist, kehrt das Radio in den
Abspielmodus der vorher gewählten Station oder der ersten
Station auf der Stationsliste zurück.
Entfernen von Stationen, die aufgelistet, aber nicht ver
fügbar sind
Wählen Sie MENU > Prune
Dies entfernt alle ungültigen Stationen, die in der Stationsliste
mit einem „?“ vor ihrem Stationsnamen angegeben sind.
2. Auswahl von Stationen
Ändern einer Station
Verwenden Sie die
zu scrollen und drücken Sie die Taste , um eine Station zu
ändern.
Der Bildschirm Wird abgespielt wird mit den neuen Stationsdetails angezeigt.
Einige Stationen sind sekundäre Services in Zusammenhang
mit einem primären Sender und nur zu bestimmten Zeiten
verfügbar Jede Station, die über verbundene sekundäre Ser
vices verfügt, wird mit einem Doppelwinkel, der nach rechts
zeigt angezeigt. Die Station der sekundären Servicestation
werden immer neben der Primärstation angezeigt, anstatt der
normalen, die mit einem Doppelwinkel, der nach links zeigt,
angezeigt wird. In der Stationsliste ist die sekundäre alphabe
tische Reihenfolge.
3. Voreinstellungen
Das Gerät verfügt über 40 voreingestellte Speicherstandorte
für DAB.
Das Speichern einer Station in einem voreingestellten
Speicherstandort
Drücken Sie die Taste PROGRAM und halten Sie diese etwa
3~5 Sekunden gedrückt, bis die Anzeige Preset # Stored.
anzeigt. Voreinstellungen (1-40) werden entweder als Leer
Verwenden Sie die Taste
Speicher auszuwählen, drücken Sie dann die Taste
aktuele abspielende Station zu speichern.
Nach der Bestätigung, dass die voreingestellte Station
gespeichert ist, kehrt die Anzeige zum Bildschirm Wird abge-
spielt.
Eine vor eingestellte Station wieder aufrufen
Drücken Sie kurz die Taste PROGRAM (die Anzeige wird
Preset Recall). anzeigen.Wählen Sie eine der aufgelisteten
voreingestellten Stationen, indem Sie die Taste
verwenden und drücken Sie die Taste m die angezeigt vor
eingestellte Station auszuwählen.
/
Taste, um durch die Stationsliste
/ , um einen voreingestellter
/
-
,
um die
-
-
4. Manuelle Abstimmung
So wie die normale Scanmethode, können Sie auch manuell
einen bestimmten Kanal / Frequenz abstimmen. Dies kann
nützlich sein zur Anpassung ihrer Antenne, um den bestmög
lichen Empfang zu erreichen und einen bestimmten Kanal zu
scannen, um die Stationsliste zu aktualisieren.
Manuelle Abstimmung
Drücken Sie MENU > Manual tune, verwenden Sie dann die
Taste
/ , um einen bestimmten Kanal / Frequenz anzuzeigen und drücken Sie die Taste , um auf den Kanal / Frequenz abzustimmen. Die Anzeige zeigt eine Live-Anzeige der
empfangenen Signalstärke auf der ausgewählten Frequenz
an. Anpassungen Ihrer Antenne werden in der empfangenen
angezeigten Signalstärke sichtbar gemacht.
HINWEIS:
Das leicht größere Dreieck gibt den Schwellenwert der Audioqualität an. Wenn die Signalstärke, wie von den festen
Dreiecken angegeben, unter diesen Schwellenwert fällt,
wird die Audioqualität sich verschlechtern. Zur gleichen
Zeit scannt das Gerät DAB-Stationen in der ausgewählten
Frequenz und aktualisiert die Stationsliste mit allen neu
gefundenen Stationen. Um eine der gefundenen Stationen zu hören, kehren Sie zum Bildschirm Wird abgespielt
zurück und wählen Sie die angeforderte Station von der
Stationsliste wie normal aus.
5. Information Wird abgespielt
Während eine Station abgespielt wird, zeigt der Bildschirm
den Namen und die DLS (Dynamic Label Segment)Information an, die von der Station gesendet wird, wie den
Programmnamen, den Titel und Kontakt Details.
Lange DLS-Info, über 16 Zeichen laufen über die Anzeige.
Ansicht weiterer Informationen
Drücken Sie die Taste INFO.
edes Mal, wenn Sie die Taste INFO drücken, wird der nächs
te Informationssatz angezeigt und durchläuft: DLS-Text, DL
Plus-Information (diese wird nur angezeigt, wenn sie von
der Station gesendet wird), Signalstärke, Programmtyp, En
semblename, Sendernummer / Frequenz, Signalfehlerrate,
Bitrate, Codec / DAB-Variant, Uhrzeit und Datum.
HINWEIS:
Dl-Plus stellt zusätzliche Informationen dar, die von Stationen gesendet und temporär auf Ihrem Radio gespeichert
werden können.
Um jederzeit zum Standardbildschirm Wird abgespielt
zurückzukehren, drücken Sie die Taste INFO und halten
Sie diese gedrückt.
-
-
-
11

6. Andere Einstellungen
Kompression des Dynamikbereichs (DRC)
Diese Funktion reduziert den Unterschied zwischen dem
lautesten und leisesten Audiosignal, welches gesendet wird.
Tatsächlich macht dies leise Töne vergleichsweise lauter und
laute Töne vergleichsweise leise.
HINWEIS:
DRC wird nur, wenn es vom Sender für eine spezifi sche
Station aktiviert ist.
Änderung der DRC-Einstellung
Wählen Sie MENU > DRC > off | low | high.
FM-Betrieb
Der FM-Radiomodus empfängt analoges Radio vom FMBand und zeigt RDS (Radio Data System)-Information über
die Station und Show an (wo gesendet).
1. Auswahl von Stationen
Das erste Mal, wenn sie das FM-Radio auswählen, ist das
Gerät auf die niedrigsten Frequenz im FM-Band eingestellt.
Suche nach einer Station im FM-Modus
Drücken Sie die Taste AMS. Das Gerät scannt durch die
Frequenzen des FM-Bands, indem es die aktuelle Frequenz
und den Text „Scanning…“ auf der Bildschirmanzeige
anzeigt.
Ein Scan stoppt, wenn kein Signal gefunden wird. Das Gerät
kann für einen Stopp bei jeder Station oder nur bei Stationen mit einem starken Signal eingestellt werden (für Details
siehe Scaneinstellungen auf der nächsten Seite).
Alternativ können Sie die Tasten
verwenden, in 50 kHz-Schritten.
2. Voreinstellungen
Das Gerät hat 40 voreingestellt Speicherstandorte für FM,
die genauso funktionieren wie die DAB-Modusvoreinstellungen, wie vorher in den Voreinstellungen auf der vorherigen
Seite beschrieben.
3. Information Wird abgespielt
Während das FM-Radio läuft, zeigt der Bildschirm die
Frequenz oder wenn RDS-Information verfügbar ist, den
Stationsnamen und weitere „Radio-Text“-Informationen.
Wenn keine Information verfügbar ist, wird nur die Frequenz
und eine No Radio Text-Nachricht angezeigt.
Ansicht weiterer Informationen über die Sendung
Drücken Sie die Taste INFO.
Jedes Mal, wenn Sie die Taste INFO drücken, wird der
nächste Informationssatz angezeigt und durchläuft:
RDS-Radiotext, Programmtyp, Frequenz, Mono / Stereo,
Uhrzeit und Datum.
12
/ zur Abstimmung
Rückkehr zum Standardbildschirm Wird abgespielt
Drücken Sie die Taste INFO und halten Sie diese gedrückt.
4. Andere Einstellungen
Scan-Einstellung
Standardmäßig stoppt der FM-Scan bei jeder verfügbaren
Station (ALL Stations). Dies könnte zu schlechter Audioqualität von schwachen Stationen führen.
Optionen: All stations | Strong stations only
Änderung der Scan-Einstellung, um nur bei Stationen
mit guter Signalstärke zu stoppen
Wählen Sie MENU > Scan setting, dann Strong stations
only.
HINWEIS:
Das Sternchen gibt an, dass „Strong stations only“ der
aktuell eingestellte Wert ist.
Audioeinstellung
Wählen Sie MENU > Audio setting. Standardmäßig
werden alle Stereostationen in Stereo wiedergegeben. Für
schwache Stationen, könnte dies zu schlechter Audioqualität führen. Die Audioqualität kann durch Verwendung von
Mono verbessert werden.
Optionen: Stereo allowed | Forced mono
Abspielen von schwachen Stationen in Mono
Wählen Sie MENU > Audio setting > Forced mono.
HINWEIS:
Das Sternchen gibt an, dass „Stereo allowed“ der aktuell
eingestellte Wert ist.
CD-Betrieb
Kompatible CD-Typen
CD-Typen Beschreibbarer Inhalt
CD-R (CD beschreibbar – Audio/
MP3 / WMA)
CD-RW (CD-Wiederbeschreibbar – Audio / MP3 / WMA)
AUDIO-CD (Compact Disc
Digital Audio)
HINWEIS:
Einige aufgenommene Dateien können eventuell nicht
abgespielt wären, aufgrund des Typs und Formats der CD
oder der Aufnahmebedingung.
CD-Wiedergabe
1. Drücken Sie die Taste
räts wiederholt, bis „CD“ angezeigt wird oder drücken
Sie die Taste CD auf der Fernbedienung, um die CDFunktion auszuwählen.
AUDIO / MP3 / WMA
AUDIO / MP3 / WMA
AUDIO
auf der Oberseite des Ge-

2. Stecken Sie die CD in die CD-Tür, das Gerät wird die CD
lesen und automatisch abspielen.
3. Drücken Sie die Taste
HINWEIS:
Im Stopp-Modus, drücken Sie die Taste
dergabe der CD zu starten.
4. Drücken Sie die Taste
sieren.
5. Um die Wiedergabe fortzusetzen, drücken Sie die Taste
erneut.
6. Drücken Sie die Taste
Wiedergabe der CD zu stoppen.
HINWEIS:
Während die CD abgespielt wird, werden die aktuelle
Titelnummer und die abgelaufene Zeit angezeigt.
Überspringe der Suche oder Suche und Wiedergabe
• Drücken Sie die Taste
einen oder mehrere Titel auf der CD rückwärts zu überspringen.
• Drücken Sie die Taste
einen oder mehrere Titel auf der CD vorwärts zu überspringen.
• Drücken Sie die Taste auf der Fernbedienung und
halten Sie diese gedrückt, um rückwärts nach der Titelposition zu suchen, von der Sie die Wiedergabe starten
möchten.
• Drücken Sie die Taste
halten Sie diese gedrückt, um vorwärts nach der Titelposition zu suchen, von der Sie die Wiedergabe starten
möchten.
Wiederholte Wiedergabe
Für CD, kann die wiederholte Wiedergabe von SINGLE und
ALL eingestellt werden, indem die Taste REPEAT auf der
Fernbedienung wiederholt gedrückt wird.
Zufällige Wiedergabe
Für CD, kann die zufällige Wiedergabe eingestellt werden, indem die Taste RANDOM auf der Fernbedienung
gedrückt wird.
Programm
Bei der Wiedergabe der Musik, drücken Sie die Taste
Fernbedienung, drücken Sie dann die Taste PROGRAM
und die folgenden Informationen werden auf dem Bildschirm angezeigt: P01 T001.
Sie können den Titel durch die Nummerntasten auf der
Fernbedienung auswählen, um als P01, P02 etc. speichern.
Bei diesem Vorgang drücken Sie die Taste PROGRAM, um
zur nächsten Titeleinstellung zu gehen.
, um die CD auszuwerfen.
, um die Wie-
, um die Wiedergabe zu pau-
auf der Fernbedienung, um die
einmal oder mehrmals, um
einmal oder mehrmals, um
auf der Fernbedienung und
ALL DIR
OFF SINGLE
Nach Beenden der Einstellung, drücken Sie die Taste
zum Abschließen.
Im Programm Wiedergabe, sind die Nummerntasten auf
der Fernbedienung ungültig. Sie können nur die Tasten
/ drücken, um den Titel zu ändern.
Ändern Sie die Quelle oder drücken Sie die Taste
um die Programmeinstellung zu löschen.
HINWEIS: Die max. Titelzahl ist 20.
zweimal,
Verwendung von USB
Schließen Sie ein USB-Massenspeichergerät (einschließlich,
USB-Flash-Speicher, USB-Flash-Player oder Speicherkarten)
an dieses Gerät an, um die gespeicherte Musik auf dem
Gerät durch die leistungsfähigen Lautsprecher dieses Gerät
zu genießen.
1. Stecken Sie den USB-Stecker des USB-Geräts in den
Port auf der Rückseite des Geräts.
2. Drücken Sie die Taste
Geräts oder drücken Sie die Taste USB auf der Fernbedienung, um die USB-Funktion auszuwählen.
3. Die auf dem Gerät gespeicherte Musik wird automatisch
abgespielt.
Wiederholte Wiedergabe
Für USB-Geräte, kann die wiederholte Wiedergabe von
ONE und ALL eingestellt werden, indem die Taste REPEAT
auf der Fernbedienung gedrückt wird.
Zufällige Wiedergabe
Für Musikdateien auf dem USB-Gerät, kann die zufällige
Wiedergabe eingestellt werden, indem die Taste RANDOM
auf der Fernbedienung gedrückt wird.
Programm
Bei der Wiedergabe von Musik, drücken Sie die Taste
der Fernbedienung. Drücken Sie dann die Taste PROGRAM
und die folgenden Informationen werden auf dem Bildschirm angezeigt: P01 T001.
Sie können einen Titel durch die Nummerntasten auf der
Fernbedienung auswählen, um ihn als P01, P02, etc zu
speichern. Drücken Sie während dieses Vorgangs die Taste
PROGRAM, um zur nächsten Titeleinstellung zu gehen.
Nach Beenden der Einstellung, drücken Sie die Taste
zum Abschließen.
Während der Programmwiedergabe, sind die Nummerntasten auf der Fernbedienung ungültig. Sie können nur die
Tasten
Um die Programmeinstellung zu löschen, ändern Sie die
Quelle oder drücken Sie die Taste
/ drücken, um den Titel zu ändern.
auf der Oberseite des
ALL DIR
OFF SINGLE
zweimal.
auf
13

HINWEIS: Die max. Titelzahl ist 20.
Geräte mit einem USB-Kabel
1. Stecken Sie einen Stecker des USB-Kabels (nicht mitge
liefert) in den Port auf der Rückseite des Geräts.
2. Stecken Sie den anderen Stecker des USB-Kabels in den
USB-Anschluss des USB-Geräts.
USB-Aufladung (nur 5 V 1 A Buchse)
Sie können ein USB Kabel (nicht mitgeliefert) in die 5 V /
1 A USB-Buchse einstecken, um ein mobiles Gerät aufzuladen. Die Ausgangsspannung und der Strom betragen 5 V /
1000 mA.
HINWEIS:
Wenn das USB-Gerät beschädigt ist, kann das Gerät nicht
die darauf gespeicherte Musik erkennen und abspielen.
Formatieren Sie das USB-Massenspeichergerät und speichern Sie die Musik auf dem Gerät mit einem Computer
erneut.
-
Wartung
Reinigung des Geräts
WARNUNG:
Stellen Sie sicher, dass der Stecker des Geräts vor der
Reinigung vollständig aus der Netzsteckdose gezogen ist.
• Um das Gerät zu reinigen, wischen sie das Gehäuse
mit einem leicht feuchten, fusselfreien Tuch ab.
• Verwenden Sie keine Reinigungsflüssigkeiten, die
Alkohol, Ammoniak oder Schleifmittel beinhalten.
• Sprühen Sie keine Sprühdose auf oder in der Nähe
des Geräts.
Handhabung von CDs
Reinigung von CDs
Fingerabdrücke und Staub auf der CD können Bild- und
Klangverzerrungen verursachen. Wischen Sie die CD von
der Mitte nach außen mit einem weichen Tuch ab. Halten
Sie die CD immer sauber.
• Wenn Sie den Staub nicht mit einem weichen Tuch
abwischen können, wischen die die CD leicht mit einem
leichtangefeuerten Tuch ab und gehen Sie erneut mit
einem trockenen Tuch darüber.
• Verwenden Sie kein Lösungsmittel wie Verdünner,
Benzine, kommerziell verfügbare Reinigungsmittel oder
antistatische Sprays. Sie können die CD beschädigen.
CDs lagern
Lagern Sie keine CDs an Orten, die direktem Sonnenlicht
ausgesetzt sind oder in der Nähe von Wärmequellen.
• Lagern Sie keine CDs an Orten, die Feuchtigkeit und
Staub ausgesetzt sind wie ein Bad oder in der Nähe
eines Luftbefeuchters.
• Lagern Sie CDs vertikal in einer Hülle, das Stapeln von
CDs oder das Platzieren von Gegenständen auf CDs
außerhalb ihrer Hülle könnte zu Kratzern führen.
Störungsbehebung
Kein Strom
• Stellen Sie sicher, dass das Netzkabel sicher angeschlossen ist.
• Stellen Sie sicher, dass das Gerät eingeschaltet ist.
Die Fernbedienung funktioniert nicht richtig
• Verwenden Sie die Fernbedienung in der Nähe des
Geräts.
• Richten Sie die Fernbedienung in Richtung des Fernbe
dienungssensors auf dem Gerät.
• Ersetzen Sie die Batterien in der Fernbedienung durch
neue.
• Entfernen Sie alle Hindernisse zwischen der Fernbedienung und dem Gerät.
-
Wiedergabeseite
• Berühren Sie nicht die Wiedergabeseite der CD.
• Befestigen Sie kein Papier oder Klebeband auf der CD.
14
Lautes Brummen oder Geräusch
• Die Stecker und Buchsen sind schmutzig. Wischen Sie
sie mit einem Tuch ab, das leicht mit einem nicht scheu
ernden Reinigungsmittel angefeuchtet ist.
Das Gerät antwortet nicht beim Drücken der Tasten
• Das Gerät kann während der Verwendung einfrieren.
Schalten ab und ziehen sie dann den Hauptstecker des
Geräts aus der Hauptsteckdose, um es zurückzusetzen.
-

Kein Tonausgang
• Stellen Sie sicher, dass das Gerät nicht stummgeschal
tet ist. Drücken Sie die Taste oder die Taste V+ das
normale Hören fortzusetzen.
• Stellen Sie sicher, dass die Audio Einstellung der Ein
gangsquelle (z.B. TV, Spielekonsole, DVD-Player etc.) auf
den PCM-Modus eingestellt ist.
Der Bluetooth-Name Geräts kann nicht auf dem Blue
tooth-Gerät zur Bluetooth-Kopplung gefunden werden
• Stellen Sie sicher, dass das Gerät eingeschaltet ist.
• Stellen Sie sicher, dass die Bluetooth-Funktion auf Ihrem
Bluetooth-Gerät aktiviert ist.
• Das Gerät hat eine Bluetooth-Funktion, die innerhalb
von 10 Metern ein Signal empfangen kann.
CD ist eingelegt, aber das Gerät startet die Wiedergabe
nicht
• Stellen Sie sicher, dass das CD-Etikett nach oben zeigt.
• Stellen Sie sicher, dass die CD sauber ist.
• Der Modus PAUSE könnte aktiviert sein, deaktivieren Sie
diesen.
• Die CD könnte beschädigt oder schmutzig sein.Über
prüfen und reinigen Sie die CD.
Die CD springt
• Stellen Sie sicher, dass dieses Gerät an einem sicheren
Standort ist. Vibrationen oder Rütteln, können dazu
führen, dass die CD springt.
FM-Empfang
• Stellen Sie sicher, dass die FM-Teleskopantenne vollstän
dig ausgezogen ist.
• Elektrische Störungen in ihrem Zuhause können zu
schlechtem Empfang führen. Bewegen Sie das Gerät
weg davon (besonders diese mit Motoren und Transformatoren).
Das Gerät schaltet automatisch während der Wiederga
be ab
• Erhöhen Sie die Lautstärkepegel auf Ihrem Eingangs
quellenabspielgerät wie dem DVD-Player / TV etc.
Störungen in den Lautsprechern
• Überprüfen Sie, dass keine Mobiltelefone in der Nähe
des Geräts sind.
-
-
-
-
-
-
Technische Daten
Modell: .................................................................. MC 4469 DAB+
Stromversorgung: ......................................200-240 V~ 50 / 60 Hz
Stromverbrauch: ................................................................. 22 Watt
Stromverbrauch (Standby-Modus): ...............................< 1 Watt
Stromausgang: .............................................................2 x 15 Watt
Schutzklasse: ...................................................................................
Lautsprecherimpedanz: ......................................................8 Ohm
USB-Buchse: .................................................. 5 V 1 A Ausgang
S/N (A Gewicht): .................................................................≥ 65 dB
THD (1kHz, 1W):....................................................................... 0,5%
Frequenzgang:.........................................................40 Hz~20 kHz
DAB-Frequenzbereich: ........................................... 174-240 MHz
FM-Frequenzbereich: ............................................. 87,5-108 MHz
Abmessungen:.............................................. 396 x 120 x 205 mm
Bluetooth-Version: ................................................................... V3.0
Arbeitsbereich: .............................................................ca.10 Meter
Übertragungsfrequenz: ....................................2,402~2,480 GHz
Protokolle: .................................................................A2DP/AVRCP
Technische und gestalterische Änderungen im Zuge stetiger
Produktentwicklungen vorbehalten.
Hinweis zur Richtlinienkonformität
Hiermit erklärt der Hersteller, dass sich das Gerät MC 4469
DAB+ in Übereinstimmung mit den folgenden Anforderungen befindet:
• Europäische Niederspannungsrichtlinie 2014 / 35 / EU
• EU-Richtlinie für elektromagnetische Verträglichkeit
2014 / 30 / EU
• Ökodesign Richtlinie 2009 / 125 / EG
-
• RoHS-Richtlinie 2011 / 65 / EU
• Grundlegende Anforderungen und den anderen rele
vanten Vorschriften der R&TTE Richtlinie 1999 / 5 / EC
Fundstelle der EG-Konformitätserklärung
Die Konformitätserklärung kann unter folgender Internetadresse gefunden werden: www.sli24.de
Garantie
Garantiebedingungen
1. Gegenüber Verbrauchern gewähren wir bei privater
Nutzung des Geräts eine Garantie von 24 Monaten ab
Kaufdatum.
Ist das Gerät zur gewerblichen Nutzung geeignet, ge
währen wir beim Kauf durch Unternehmer für das Gerät
eine Garantie von 12 Monaten.
Die Garantiezeit für Verbraucher reduziert sich auf 12
Monate, sofern sie ein zur gewerblichen Nutzung geeig
netes Gerät – auch teilweise – gewerblich nutzen.
2. Voraussetzung für unsere Garantieleistungen sind der
Kauf des Geräts in Deutschland bei einem unserer Ver
tragshändler sowie die Übersendung einer Kopie des
Kaufbelegs und dieses Garantiescheins an uns.
-
-
-
-
15

Befindet sich das Gerät zum Zeitpunkt des Garantiefalls
im Ausland, muss es auf Kosten des Käufers uns zur Er
bringung der Garantieleistungen zur Verfügung gestellt
werden.
3. Mängel müssen innerhalb von 14 Tagen nach Erkennbar
keit uns gegenüber schriftlich angezeigt werden. Besteht
der Garantieanspruch zu Recht, entscheiden wir, auf
welche Art der Schaden/Mangel behoben werden soll,
ob durch Reparatur oder durch Austausch eines gleichwertigen Geräts.
4. Garantieleistungen werden nicht für Mängel erbracht,
die auf der Nichtbeachtung der Gebrauchsanweisung,
unsachgemäßer Behandlung oder normaler Abnutzung
des Geräts beruhen. Garantieansprüche sind ferner aus
geschlossen für leicht zerbrechliche Teile, wie zum Beispiel Glas oder Kunststoff. Schließlich sind Garantieansprüche ausgeschlossen, wenn nicht von uns autorisierte
Stellen Arbeiten an dem Gerät vornehmen.
5. Durch Garantieleistungen wird die Garantiezeit nicht ver
längert. Es besteht auch kein Anspruch auf neue Garantieleistungen. Diese Garantieerklärung ist eine freiwillige
Leistung von uns als Hersteller des Geräts. Die gesetzlichen Gewährleistungsrechte (Nacherfüllung, Rücktritt,
Schadensersatz und Minderung) werden durch diese
Garantie nicht berührt.
Stand 06 2012
Garantieabwicklung
24 Stunden am Tag, 7 Tage in der Woche
Sollte Ihr Gerät innerhalb der Garantiezeit einen Mangel
aufweisen, steht Ihnen die schnellste und komfortabelste
Möglichkeit der Reklamationsanmeldung über unser SLI Internet-Serviceportal zur Verfügung.
www.sli24.de
Bitte melden Sie direkt den Servicevorgang auf unserem
Online Serviceportal www.sli24.de an. Sie erhalten wenige
Sekunden nach Abschluss der Anmeldung ein kostenloses
Versandticket per E-Mail übermittelt. Zusätzlich erhalten Sie
weitere Informationen zur Abwicklung Ihrer Reklamation.
Mit Ihren persönlichen Zugangsdaten, die direkt nach Ihrer
Anmeldung per E-Mail an Sie übermittelt werden, können
Sie den Status Ihres Vorgangs auf unserem Serviceportal
www.sli24.de online verfolgen.
Sie brauchen das kostenlose Versandticket nur noch auf die
Verpackung Ihres gut verpackten Gerätes zu kleben und das
Paket bei der nächsten Annahmestelle der Deutschen Post/
DHL abzugeben. Der Versand erfolgt für Sie kostenlos an
unser Servicecenter bzw. Servicepartner.
So einfach kann Service sein!
1. Anmelden
2. Einpacken
3. Ab zur Post damit
Fertig, so einfach geht es!
16
-
-
-
Bitte vergessen Sie nicht, dem Gerät eine Kopie Ihres
Kaufbeleges (Kassenbon, Rechnung, Lieferschein) als Ga
rantienachweis beizulegen, da wir sonst keine kostenlosen
Garantieleistungen erbringen können.
Unser Serviceportal www.sli24.de bietet Ihnen weitere
Leistungen an:
• Downloadbereich für Bedienungsanleitungen
• Downloadbereich für Firmwareupdates
• FAQ‘s, die Ihnen Problemlösungen anbieten
• Kontaktformular
• Zugang zu unseren Zubehör- und Ersatzteile-Webs
hops
Auch nach der Garantie sind wir für Sie da! – Kosten
günstige Reparaturen zum Festpreis!
Bitte nehmen Sie in keinem Fall eine unfreie Einsendung
Ihres Gerätes vor. Unfreie Lieferungen werden von uns nicht
angenommen. Es entstehen Ihnen damit erhebliche Kosten.
Stand 06 2012
Entsorgung
Bedeutung des Symbols „Mülltonne“
Schonen Sie unsere Umwelt, Elektrogeräte
gehören nicht in den Hausmüll.
Nutzen Sie die für die Entsorgung von Elekt
rogeräten vorgesehenen Sammelstellen und
geben dort Ihre Elektrogeräte ab, die Sie nicht
mehr benutzen werden.
Sie helfen damit die potenziellen Auswirkungen, durch
falsche Entsorgung, auf die Umwelt und die menschliche
Gesundheit zu vermeiden.
Sie leisten damit Ihren Beitrag zur Wiederverwertung, zum
Recycling und zu anderen Formen der Verwertung von
Elektro- und Elektronik-Altgeräten.
Informationen, wo die Geräte zu entsorgen sind, erhalten
Sie über Ihre Kommunen oder die Gemeindeverwaltungen.
-
-
-
-

Instruction Manual
Thank you for purchasing the DAB radio with FM, Bluetooth
and CD player.
We recommend that you spend some time reading this
instruction manual in order that you fully understand all the
operational features it offers. You will also find troubleshooting to help you resolve any issues.
Read all the safety instructions carefully before use and keep
this instruction manual for future reference.
Symbols in these Instructions for Use
Important information for your safety is specially marked.
It is essential to comply with these instructions in order to
avoid accidents and prevent damage to the machine:
WARNING:
Warns of dangers for your health and indicates potential
risks of injury.
CAUTION:
Indicates potential dangers for the appliance or other
objects.
NOTE: Highlights tips and information for you.
Safety Instructions
• Read all the instructions carefully before using the appliance and keep them for future reference.
• Retain the manual. If you pass the appliance to a third
party, these operating instructions must also be handed
over.
• Check that the voltage indicated on the rating label
corresponds to your mains voltage.
Damage
• Check the appliance for any damage after unpacking.
• Do not continue to operate the appliance if you are in
any doubt about it working normally, or it is damaged
in any way - switch off, withdraw the mains plug and
consult your dealer.
Location of the Appliance
• The appliance must be placed on a flat stable surface
and should not be subjected to vibrations.
• Do not place the appliance on sloped or unstable
surfaces as the appliance may fall off or tip over.
• The mains socket must be located near the appliance
and should be easily accessible.
Table of Contents
Safety Instructions ....................................................................... 17
Unpacking .....................................................................................19
Overview of the Components / Delivery Scope ................... 19
Operating Your Remote Control .............................................21
Connections ................................................................................. 22
ECO-Power / Standby Feature ................................................23
Basic Operation ........................................................................... 23
Setting the Clock and the Date ................................................23
Setting the Sleep Timer ............................................................. 23
Setting the On / Off Timer ........................................................ 24
Sound Quality .............................................................................. 24
Bluetooth Operation .................................................................. 24
AUDIO IN / AUX Operation ..................................................... 25
DAB Operation ............................................................................25
FM Operation .............................................................................. 26
CD Operation .............................................................................. 27
Using USB ..................................................................................... 27
Maintenance ................................................................................ 28
Troubleshooting .......................................................................... 28
Technical Data .............................................................................. 29
Disposal ......................................................................................... 29
Temperature
• Avoid extreme temperatures, either hot or cold. Place
the appliance away from heat sources, such as radiators
or gas / electric ovens.
• Avoid exposure to direct sunlight and other heat sourc
es.
Naked Flames
• Never place hot objects or open flame sources, such as
lighted candles, on or close to the appliance.
Moisture
• To reduce the risk of fire, electric shock or product
damage, do not expose this appliance to rain, moisture,
dripping or splashing. No objects filled with liquids,
such as vases, should be placed on the appliance.
• If any liquid has been spilled into the appliance, it can
cause serious damages. Immediately switch off the
appliance, withdraw the mains plug and consult your
dealer.
Ventilation
• To prevent the risk of electric shock or fire hazard due to
overheating, ensure that curtains and other materials do
not obstruct the ventilation vents.
• Do not install or place this appliance in a bookcase,
built-in cabinet or in another confined space.
Ensure the appliance is well ventilated.
-
17

Safety
• Always disconnect the appliance from the mains supply
before connecting / disconnecting other devices or
moving the appliance.
• Unplug the appliance from the mains socket before a
thunderstorm.
Mains Cable
• Make sure the appliance or the stand of the appliance
is not resting on top of the mains cable, as the weight
of the appliance may damage the cable and create a
safety hazard.
• If the mains cable is damaged it must be replaced by
the manufacturer, its service agent or similarly qualified
persons in order to avoid a hazard.
Earphones
• Listening to loud sounds for prolonged periods of time
may permanently damage your hearing.
• Before putting on earphones turn the volume down,
then put the earphones on and slowly increase the
volume until you reach a comfortable listening level.
Interference
• Do not place the appliance on or near devices which
may cause electromagnetic interference. If you do, it
may adversely affect the operating performance of the
appliance, and cause a distorted picture or sound.
Standby
• The ON / STANDBY button on the remote control does
not switch off the appliance completely. The appliance
will continue to draw electricity from the mains supply
while in standby mode. In the interests of safety and to
avoid unnecessary energy consumption, never leave the
appliance in standby mode while unattended for long
periods of time, e.g. overnight, while on holiday or while
out of the house. Switch it off and disconnect the mains
plug from the mains socket.
Batteries
CAUTION:
• Batteries used in the remote control for this appliance
are easily swallowed by young children and this is
dangerous.
• Keep loose batteries away from young children and
make sure that the battery holder tray is secure in the
remote control. Seek medical advice if you believe a
cell has been swallowed.
• Dispose of batteries correctly by following the guid
-
ance in this manual.
Supervision
WARNING:
• Children should be supervised to ensure that they do
not play with the appliance and the remote control.
• Never let anyone especially children push anything
into the holes, slots or any other openings in the case
- this could result in a fatal electric shock.
Class 1 Laser Product
• This appliance utilises a laser.
Use of controls, adjustments or
performance of procedures other
CLASS 1
LASER PRODUCT
than those specified herein may
result in hazardous radiation exposure.
• Before moving the appliance, ensure the disc tray is
empty.
• Always remove the disc when the appliance is not in
use.
• Failure to do so will risk severely damaging the disc and
the appliance.
• Do not stack appliances. Heat from other appliances
may affect the performance of the appliance.
CAUTION
RISK OF ELECTRIC SHOCK
DO NOT OPEN
The lightning flash with arrowhead symbol,
within an equilateral triangle, is intended to
alert the user to the presence of uninsulated
“dangerous voltage” within the appliance’s
enclosure that may be of sufficient magnitude
to constitute a risk of electric shock.
The exclamation point within an equilateral
triangle is intended to alert the user to the
presence of important operating and maintenance (servicing) instructions in the manual
accompanying the appliance.
Service
• To reduce the risk of electric shock, do not remove any
screws. The appliance does not contain user-serviceable
parts. Leave all maintenance work to qualified person
nel.
• Do not open any fixed covers as this may expose dangerous voltages.
Maintenance
• Ensure to unplug the appliance from the mains socket
before cleaning.
• Do not use any type of abrasive pad or abrasive clean
ing solutions as these may damage the surface of the
appliance.
• Do not use liquids to clean the appliance.
-
-
18

Unpacking
Remove all packaging from the appliance. Retain the packaging. If you dispose of it please do so according to local
regulations.
The following items are included:
Main unit
Remote Control
Instruction Manual
Overview of the Components /
Delivery Scope
Front View
1
2
4 5
1 Remote sensor
2 Display
3 Standby indicator
4 Disc door
5
• Press and hold for power on and power off.
• Briefl y press to change the source after power on.
6 VOL+/VOL–
Rotate to increase and decrease the volume level.
3
6
RCA cable
AC Power Cord
Top View
1110987
19

7
• Press to select previous track in USB and CD.
• Press to display channel list in DAB.
• Press to move up on the menu screen in DAB and
FM.
• Press for fine tuning in FM.
8
• Press to select next track in USB and CD.
• Press to display channel list in DAB.
• Press to move down on the menu screen in DAB
and FM.
• Press for fine tuning in FM.
9 PAIR
Press and hold the button to activate the pairing function in BT and / or disconnect the existing paired BT
device.
10
• Press to play and pause in CD, USB and BT.
• To select or skip to subsequent menu in DAB and
FM.
11
• Press to eject or load a disc in CD mode.
• Press to display the menu in DAB and FM.
Rear View
12
13
19
Remote Control
1
2
3
4
5
6
7
8
9
10
14
16
15
17
18
19
1
20
21
22
23
24
25
15
14
16 17
18
12 USB socket for music playback
13
USB socket for charging mobile devices only (5 V 1 A)
14 AUDIO input
15
Earphone
16 AUX IN Cinch sockets (R / L)
17 Power switch
18 AC~ input
19 DAB / FM antenna
20
11
26
27
12
13 28

1
Switch the appliance between ON and STANDBY
mode.
2 INTRO / AMS
• Press to start scanning of all tracks in CD and USB
mode.
• Press to automatically search for a channel in FM
mode. During searching, press again to stop.
3 REPEAT
Press to select a repeat playback mode in CD and USB
mode.
4 EQ
Press to select sound characteristics:
CLASS / POP / ROCK / JAZZ / NORMAL.
5 BASS +/–
Press to adjust the BASS after pressing the USER button.
6 USER
Press to adjust the bass and treble level.
7 MENU
Press to display the menu in DAB and FM.
8 PAIR
Press and hold to activate the pairing function in BT
and / or disconnect the existing paired BT device.
9
• Press and hold for fast backward in CD and USB.
• Press to select the previous track in CD and USB.
• Press to display channel list in DAB.
• Press to move up on the menu screen in DAB and
FM.
• Press for fine tuning in FM.
10 MO / ST
Press to set stereo or mono sound mode.
11 P +/–
• Press to skip to the beginning of a current /
previous / subsequent album.
• Press to select previous / next radio station in FM
and DAB.
• Press and hold for manual tuning in FM.
12 0-9 Numeric keys
13 INFO
• Press to on / off the ID3 information in CD and USB.
• Press to view information in DAB and FM.
14
Press to eject or load a disc in CD mode.
15 SLEEP
Press to set the sleep timer.
16 CD / USB / DAB/FM / BT / AUDIO/AUX
Press to select the corresponding audio mode
(CD / USB / DAB / FM / BT / AUDIO / AUX).
17 RANDOM
Press to play tracks randomly in CD and USB mode.
18 TREBLE +/–
Press to adjust the TREBLE after pressing the USER
button.
19 PROGRAM
Press to program in CD, USB, DAB and FM mode.
20 DIM
Press to select different levels of brightness for the
display.
21
• Press to play / pause in BT, CD and USB mode.
• To select or skip to a subsequent menu in DAB and
FM mode.
22
• Press and hold for fast forward in CD and USB
mode.
• Press to select the next track in CD and USB mode.
• Press to display channel list in DAB mode.
• Press to move down on the menu screen in DAB
and FM mode.
• Press for fine tuning in FM mode.
23
Press to stop playing in CD and USB mode.
24
Press to mute or unmute the sound.
25 CLOCK
Press and hold to set clock in standby mode.
26 V+/–
Press to increase / decrease the volume level.
27 TIMER
• Press to set the timer on / off in standby mode.
• Press to turn on / off the timer function when activated.
• Press and hold for timer settings in standby mode.
28 DISPLAY
Press to display the clock in power on mode.
Operating the Remote Control
1. Press and slide the back cover
to open the battery compartment of the remote control.
2. Insert two AAA size batteries
(not included). Make sure the
(+) and (–) ends of the batteries match the (+) and (–)
connectors indicated in the battery compartment.
3. Close the battery compartment cover.
Handling the Batteries
WARNING:
The batteries shall not be exposed to excessive heat such
as sunshine, fire or the like. Danger of explosion!
CAUTION:
• Improper or incorrect use of batteries may cause
corrosion or battery leakage, which could cause fire,
personal injury or damage to property.
• Install the batteries correctly by following the polarity (+
and –) indications in the battery compartment.
21

CAUTION:
• When the batteries are exhausted, the remote control
will not function.
• Only use the battery type indicated in this manual.
• Do not dispose of the used battery as domestic waste.
Dispose them in accordance with local regulations.
Handling the Remote Control
WARNING:
Be aware of your fingernails when removing the battery
cover and the batteries.
• Do not drop the remote control.
• Do not allow anything to impact the remote control.
• Do not spill water or any liquid on the remote control.
• Do not place the remote control on a wet object.
• Do not place the remote control under direct sunlight
or near sources of excessive heat.
• Batteries can leak battery acid. If the device is out of use
for a long period of time, remove the batteries.
Remote Control Operation Range
Point the remote control at the appliance no more than 5
metres from the remote control sensor and within 60° hori
zontally and 20° vertically of the front of the appliance. The
operating distance may vary depending on the brightness
of the room.
-
NOTE:
• Make sure that there is no obstacle between the
remote sensor of the appliance and remote control.
If you install the appliance on a TV stand, etc., the
remote control range may decrease depending on
the thickness or colour of the glass of the TV stand.
• Do not expose the infrared remote sensor to direct
sunlight or other strong light, such as inverter fluorescent light.
Connections
AC Power Connection
CAUTION:
• Risk of product damage! Ensure that the power
supply voltage corresponds to the voltage printed on
the rating label on the back or on the underside of the
appliance.
• Before connecting the AC power cable, ensure that
you have completed all other connections.
• Connect the small end of AC socket at the back of
appliance and insert the plug of the AC power cable
into a standard AC wall outlet.
• Be sure to unplug the power cable from the outlet
when the appliance is not in use for an extended
period of time.
• The MAINS plug or an appliance coupler is used as
the disconnect device, the disconnect device shall
remain readily operable.
Analogue Inputs Connection
Connecting DVD player / TV outputs to analogue input of
the appliance.
• Use a RCA audio cable (supplied) to connect the DVD
player / TV audio outputs with the AUX IN (L/R) socket
of the appliance.
22

AUX IN input
DVD player / TV outputs
Connecting DVD player / TV outputs to analogue input of
the appliance.
• Use a line-in audio cable (
connect the DVD player / TV outputs with the AUDIO
input socket from the sound board. You can also to
connect an external audio device headphone socket
to this AUDIO IN socket at the appliance, such as MP3
player, iPod
®
or iPhone®, etc.
3.5 mm) (not supplied) to
∅
Basic Operation
Switching the Appliance on
Press and hold the
or on the remote control to turn the appliance on.
Selecting Modes
Press the
DAB, FM, USB, BLUETOOTH, AUDIO, AUX or CD.
You can also press the short-cut keys on the remote control
(DAB/FM, USB, BT, AUDIO/AUX or CD) to select your
desired mode.
USB
FM
NOTE:
If there is no audio signal, the appliance will switch off
automatically within 19 minutes to save energy (except in
FM). In the AUDIO mode, the time is 4 hours.
button at the front of the appliance
button on the appliance repeatedly to select
CD
AUDIO
AUX
BT
DAB
AUDIO IN input
DVD player / TV
AUDIO output
Headphones Connection
Connect your headphones to the headphones socket at the
rear of the appliance.
NOTE:
• Be sure to turn down the volume before connecting
or putting on headphones.
• Excessive sound pressure from earphones and headphones can cause hearing loss.
ECO-Power / Standby Feature
This appliance features a ECO Power / Standby mode. Press
the ON / STANDBY on the remote control or on the appli-
ance to enter standby mode. The clock will be displayed.
If you want to let the clock disappear during the standby
mode, you can press the DIM button on the remote control.
Setting the Clock and the Date
Setting the Clock Manually
1. Set the appliance to the standby mode.
2. Press and hold the CLOCK button on the remote con-
trol.
3. Input the date, hour and minutes by numeric keys on
the remote control.
4. Press the CLOCK button to confi rm the setting.
Display the Clock
In DAB or FM mode press the DISPLAY button on the
remote control.
Setting the Sleep Timer
Use the sleep timer in the play mode to turn off the appliance after a certain number of minutes. By setting the sleep
timer, you can fall asleep with music and you will know that
your appliance will turn off itself rather than playing music all
night.
To set the sleep timer press the SLEEP button on the remote control repeatedly, it changes the number of minutes
shown on the display in this sequence:
120 90 60 30 15 OFF
After setting the number of minutes for the sleep timer, the
display will return to the previous display.
The appliance is now set to turn off after the number of
minutes you have set.
Checking the Sleep Timer
When the SLEEP button on the remote control is pressed
once, the remaining sleep time is displayed. Wait for a
second until the display returns to the original display.
23

Canceling the Sleep Timer
Press the SLEEP button repeatedly on the remote control
until “SLEEP:OFF” is displayed.
Turning off the appliance also cancels the sleep timer.
Setting the On / Off Timer
You can use the on / off timer to make the appliance automatically turn on and off at a certain time every day from
standby.
The clock must be set correctly for the timer for correct
operation.
1. Set the appliance to the standby mode.
2. Press the TIMER button to call the on / off timer func-
tion.
3. Press and hold the TIMER button for timer setting.
Select the audio source by using the
Then input the time for timer on with the numeric keys
on the remote control. Set afterwards the volume with
the / buttons. Now enter the time for timer off
with the numeric keys on the remote control.
NOTE:
You need for all steps to press the TIMER button for
confi rmation and to go to the next step. If there is no
operation within 10 seconds, it will exit the setting
automatically.
NOTE:
If the selected source is BUZZER, then the TIMER OFF
setting is not available.
/ buttons.
Sound Quality
Adjusting the Volume
To increase or decrease the volume, rotate the VOL+/–
button on the appliance or press the V +/– buttons on the
remote control.
• If you want to mute the sound, press the button on
the remote control. Press the button again or press the
VOL+/– button to return to normal listening.
NOTE:
If you adjust the volume above 26, then power off and
power on again. The volume will be automatically restored to the factory setting.
Adjusting the Bass
Press the USER button on the remote control, and then press
the BASS +/– buttons on the remote control to increase /
decrease the bass.
Adjusting the Treble
Press the USER button on the remote control, and then press
the TREBLE +/– buttons on the remote control to increase /
decrease the treble.
24
Preset the Equalizer
You can select sound characteristics such as CLASS / POP /
ROCK / JAZZ / NORMAL by pressing the EQ button.
Bluetooth Operation
You can listen to tracks from a media device if it is connected to the appliance via Bluetooth.
You need to pair your Bluetooth device with this appliance
before you connect it for the fi rst time.
NOTE:
In order to avoid interferences, deactivate Wi-Fi on your
device (Smartphone, tablet, etc.) when playing music
using Bluetooth.
Pair Bluetooth-enabled Devices
NOTE:
• The operational range between this appliance and a
Bluetooth device is approximately 10 meters (without
any object between the Bluetooth device and the
appliance).
• Before you connect a Bluetooth device to this appliance, ensure that you know the capabilities of the
device.
• Any obstacle between this appliance and the Bluetooth device can reduce the operational range.
• If the signal strength is weak, your Bluetooth device
may disconnect, but it will reenter automatically into
pairing mode.
1. During ON mode, press the BT button on the remote
control to select the Bluetooth mode or change source
to BT by pressing briefl y the
pliance. If the appliance is not paired to any Bluetooth
device, the system enters automatically into pairing
mode or you need to press and hold the PAIR button to
start pairing.
2. Activate the Bluetooth function on your device and
select the search mode. “AEG MC 4469” will appear
on your Bluetooth device.
3. To disconnect the Bluetooth function, switch to another
function on the appliance or disable the function from
your Bluetooth device.
NOTE:
• If there is already an existing connection, press the
PAIR button to re-activate the pairing mode. The
existing connection will be interrupted.
• The appliance will also be disconnected when your
device is moved beyond the operational range.
• If you want to reconnect your device to this appliance,
place it within the operational range.
• If the device is moved beyond the operational range,
when it is brought back, check if the device is still
connected to the appliance.
button on the ap-

NOTE:
• If the connection is lost, follow the above instructions
to pair your device again to the appliance.
Listen to music from Bluetooth device
• If the connected Bluetooth device supports Advanced
Audio Distribution Profi le (A2DP), you can listen to music
stored on the device through this appliance.
• If the device also supports Audio Video Remote Control
Profi le (AVRCP), you can use the remote control of the
appliance to play music stored on the device.
1. Pair your device with this appliance.
2. Play music via your device (if it supports A2DP).
3. Use supplied remote control to control playback (if it
supports AVRCP).
- To pause / resume playback, press the
- To skip to a track, press the
or
button.
buttons.
AUDIO IN / AUX Operation
1. Press the AUDIO button on the remote control or press
the button on the appliance to select the AUDIO
mode. Pressing the button twice activates the AUX
mode.
2. Operate your audio device directly for playback features.
3. Press the VOL +/– button to adjust the volume to your
desired level.
DAB Operation
DAB radio mode receives DAB / DAB+ digital radio and
displays information about the station and the program /
track as broadcast.
1. Scanning for Stations
The fi rst time you use the appliance, or if the station list is
empty, the radio automatically performs a full scan to see
what stations are available. You may also need to start a scan
manually to update the list of stations for one of the following
reasons:
• New stations may become available from time to time.
• Stations close or can no longer be received (In the station
list, invalid stations are indicated with a question mark in
front of their name).
• If reception was not good after the original scan (for
example the antenna was not up), this may result in an
empty or incomplete list of available stations.
• If you have poor reception of some stations causing the
audio to break up, you may wish to list only stations with
good signal strength.
Full Scan
Select MENU > Full scan
Once a scan is complete, the radio returns to playing the
previously selected station or fi rst station on the station list.
Removing of stations that are listed but not available
Select MENU > Prune
This removes all invalid stations, indicated in the station list
with a “?” in front of the station name.
2. Selecting Stations
Changing a station
Use the
/
and press the button to change a station.
The Now playing screen is displayed with the new station
details.
Some stations are secondary services associated with a Primary channel and only available at certain times. Any station
that has associated secondary services is indicated with a
double chevron pointing to the right. The secondary service
station stations are always listed next to their primary station
rather than the normal is indicated with a double chevron
pointing left. In the Station List is secondary alphabetical
order.
3. Presets
The appliance has 40 preset memory locations for DAB.
Storing a station in a preset memory location
Press and hold the PROGRAM button about 3~5 seconds
until the display shows Preset # Stored. Presets (1-40) are
displayed as either Empty or with the currently stored station
name.
Use the
press the button to store the currently playing station.
After confi rming the preset station is stored, the display
reverts to the Now playing screen.
Recalling a Preset Station
Press the PROGRAM button briefl y (the display will show
Preset Recall). Select one of the listed preset stations using
the
/
displayed preset station.
4. Manual Tune
As well as the normal method of scanning, you can also
manually tune to a particular channel / frequency. This can be
useful for adjusting your antenna to achieve the best possible
reception and scanning a particular channel to update the
station list.
Manual Tuning
Press MENU > Manual tune then use the
display a particular channel / frequency and press the button to tune to that channel / frequency. The display shows a
live indication of the received signal strength on the selected
frequency. Adjustments to your antenna will be manifested in
the received signal strength displayed.
button to scroll through the Station List
/
button to choose a preset memory then
button and press the button to choose the
/
button to
25

NOTE:
The slightly larger rectangle indicates the audio quality
threshold. If the signal strength, as indicated by the solid
rectangles, falls below this threshold the audio quality will
deteriorate. At the same time the appliance scans for any
DAB stations on the selected frequency and updates the
station list with any new stations found. To listen to any
stations found, return to the Now playing screen and
select the required station from the station list as normal.
Scanning for a station in FM mode
Press the AMS button. The appliance scans up through the
frequencies of the FM band, showing the current frequency
and the text “Scanning…” on the screen display.
A scan stops when a signal is found. The appliance can be
set to stop at each station or only at stations with a strong
signal (for details see Scan settings on the next page).
Alternatively, you can use the
50 kHz steps.
/ buttons to tune, in
5. Now Playing Information
While a station is playing, the screen shows its name and
DLS (Dynamic Label Segment) information broadcast by
the station such as program name, track title and contact
details.
Long DLS info, over 16 characters scrolls a cross the display.
Viewing Further Information
Press the INFO button.
Each time you press the INFO button the next set of infor
mation is displayed, cycling through: DLS text, DL Plus information (this is only displayed if broadcast by the station),
signal strength, program type, ensemble name, channel
number / frequency, signal error rate, bit rate, codec / DAB
variant, time and date.
NOTE:
DL Plus presents additional information that can be broadcast by stations and stored temporarily on your radio.
To return to the default Now playing screen at any time,
press and hold the INFO button.
6. Other Settings
Dynamic range compression (DRC)
This function reduces the difference between the loudest
and quietest audio signal being broadcast.
Effectively, this makes quiet sounds comparatively louder
and loud sounds comparatively quieter.
NOTE:
DRC only works if it is enabled by the broadcaster for a
specific station.
Changing the DRC Setting
Select MENU > DRC > off | low | high.
-
FM Operation
FM radio mode receives analogue radio from the FM band
and displays RDS (Radio Data System) information about
the station and show (where broadcast).
1. Selecting Stations
The first time you select FM radio, the appliance is set to
the lowest frequency in the FM band.
26
2. Presets
The appliance has 40 preset memory locations for FM,
which work in the same way as DAB mode presets, as
described earlier in Presets on previous page.
3. Now Playing Information
While FM radio is playing, the screen shows its frequency, or
if RDS information is available, station name and any further
“Radio Text” information.
If no information is available just the frequency and a No
Radio Text message is shown.
Viewing further information about the broadcast
Press the INFO button.
Each time you press the INFO button the next set of infor
mation is displayed, cycling through:
RDS Radio Text, program type, frequency, mono / stereo,
time and date.
Returning to the default Now playing screen
Press and hold the INFO button.
4. Other Settings
Scan Setting
By default, FM scans stop at any available station (ALL
Stations). This may result in poor quality audio from weak
stations.
Options: All stations | Strong stations only
Changing the scan setting to stop only at stations with
good signal strength
Select MENU > Scan setting, then Strong stations only.
NOTE:
The asterisk indicates “Strong stations only” is the
currently set value.
Audio Setting
Select MENU > Audio setting. By default, all stereo
stations are reproduced in stereo. For weak stations, this
may result in poor quality audio. The audio quality can be
improved using mono.
Options: Stereo allowed | Forced mono
-

Playing Weak Stations in Mono
Select MENU > Audio setting > Forced mono.
NOTE:
The asterisk indicates “Stereo allowed” is the currently
set value.
CD Operation
Compatible Disc Types
Disc Types Recorded Content
CD-R (CD Recordable – Audio /
MP3 / WMA)
CD-RW (CD-Rewritable – Audio /
MP3 / WMA)
AUDIO-CD (Compact Disc
Digital Audio)
NOTE:
Some recorded fi les may not be able to be played due to
the type and format of disc or condition of the recording.
CD Playing
1. Press repeatedly the
pliance until “CD” is displayed or press the CD button
on the remote control to select CD function.
2. Insert the disc into the disc door, the appliance will read
the disc and play it automatically.
3. Press the button to eject the disc.
NOTE:
If in stop mode, press the
disc.
4. Press the
5. To resume playback, press the
6. Press the button on the remote control to stop the
disc playing.
NOTE:
While the CD is playing the current track number and the
elapsed time will be displayed.
Skipping Search or Search and Play
• Press the
one or more tracks on the disc.
• Press the button once or more to skip forward one
or more tracks on the disc.
• Press and hold the button on the remote control to
search backward for the track position that you want to
start playing from.
• Press and hold the button on the remote control to
search forward for the track position that you want to
start playing from.
button to pause the playback.
button once or more to skip backward
AUDIO / MP3 / WMA
AUDIO / MP3 / WMA
AUDIO
button on the top of the ap-
button to start playing the
button again.
Playing Repeatedly
For CD disc, SINGLE and ALL repeat playback can be set
by repeatedly pressing the REPEAT button on the remote
control.
Playing Random
For CD disc, random playback can be set by pressing the
RANDOM button on the remote control.
Program
When playing back music, press the
control, then press the PROGRAM button and the following information will be displayed on the screen: P01 T001.
You can choose track by the numeric keys on the remote
control to store as P01, P02 etc. At this process, press the
PROGRAM button to go to the next track setting.
After fi nished setting, press the
In program playing back, the numeric keys on the remote
control are invalid. You can only press the
to change the track.
Change the source or press the
program setting.
NOTE: The max. track count is 20.
ALL DIR
OFF SINGLE
button on the remote
button to fi nalize.
button twice to clear
/ buttons
Using USB
Connect a USB mass storage device (including USB fl ash
memory, USB fl ash players or memory cards) to this appliance to enjoy the stored music on the device through the
powerful speakers of this appliance.
1. Insert the USB device’s USB plug into the
rear of the appliance.
2. Press the button repeatedly on the top of the appliance or press the USB button on the remote control
to select the USB function.
3. The music stored on the device will be played back
automatically.
Repeated Playback
For USB devices, ONE and ALL repeat play can be set by
repeatedly pressing the REPEAT button on the remote con-
trol.
ALL DIR
OFF SINGLE
Random Playback
For music fi les on the USB device, random playback can
be set by pressing the RANDOM button on the remote
control.
port at the
27

Program
When playing music, press the
trol. Then press the PROGRAM button and the following
information will be displayed on the screen: P01 T001.
You can choose a track by the numeric keys on the remote
control to store as P01, P02, etc. Press during this process
the PROGRAM button to go to next track setting.
After the setting is finished, press the
During program playback the numeric keys on the remote
control are invalid. You can only press the
to change the track.
To delete the program setting, change the source or press
the
button twice.
NOTE: The max. track count is 20.
button on the remote con-
button to finalize.
/ buttons
Handling CDs
Playback side
• Do not touch the playback side of the CD.
• Do not attach paper or tape to the CD.
Cleaning CDs
Devices with a USB Cable
1. Insert one plug of the USB cable (not supplied) to the
port at the rear of the appliance.
2. Insert the other plug of the USB cable to the USB out
put terminal of the USB device.
USB Charging (5 V 1 A socket only)
You can plug an USB cable (not supplied) into the 5 V / 1 A
USB socket to charge a mobile device. The output voltage
and the current are 5 V / 1000 mA.
NOTE:
If the USB device is corrupted, this appliance will not be
able to detect and play the music stored on it. Format the
USB mass storage device and restore the music on the
device with a computer.
-
Maintenance
Cleaning the Appliance
WARNING:
Ensure the appliance is fully unplugged from the mains
socket before cleaning.
• To clean the appliance, wipe the case with a slightly
moist, lint-free cloth.
• Do not use any cleaning fluids containing alcohol,
ammonia or abrasives.
• Do not spray an aerosol at or near the appliance.
Fingerprints and dust on the CD can cause picture and
sound deterioration. Wipe the CD from the centre outwards
with a soft cloth. Always keep the CD clean.
• If you cannot wipe off the dust with a soft cloth, wipe the
CD lightly with a slightly moistened cloth and finish with
a dry cloth.
• Do not use any type of solvent such as thinner, benzine,
commercially available cleaners or antistatic spray. They
may damage the CD.
Storing Discs
Do not store CD in places subjected to direct sunlight or
near heat sources.
• Do not store CD in places subjected to moisture and
dust such as a bathroom or near a humidifier.
• Store CD vertically in a case, stacking discs or placing
objects on CDs outside of their cases may cause warp
ing.
-
Troubleshooting
No Power
• Ensure that the mains cable is connected securely.
• Ensure that the appliance is switched on.
The remote control does not function correctly
• Use the remote control near to the appliance.
• Point the remote control towards the remote control
sensor at the appliance.
• Replace the batteries in the remote control with new
ones.
• Remove any obstacles between the remote control and
the appliance.
Loud Hum or Noise
• The plugs and sockets are dirty. Wipe them with a cloth
slightly moistened with an appropriate non-abrasive
cleaning solution.
28

The appliance does not respond when pressing any of
the buttons
• The appliance may freeze up during use. Switch off and
then pull the mains plug of the appliance out of the
mains socket to reset it.
No Sound Output
• Make sure that the appliance is not muted. Press the
button or V+ button to resume normal listening.
• Ensure that the audio setting of the input source (e.g.
TV, game console, DVD player, etc.) is set to PCM
mode.
The Bluetooth name of this appliance cannot be found
on the Bluetooth device for Bluetooth pairing
• Ensure that the appliance is switched on.
• Ensure that the Bluetooth function is activated on your
Bluetooth device.
• The appliance has a Bluetooth function that can receive
a signal within 10 metres.
CD inserted, but the appliance doesn’t start playback
• Ensure that the CD label is facing up.
• Ensure that the CD is clean.
• PAUSE mode may be activated, deactivate it.
• The CD may be damaged or dirty. Check and clean the
CD.
The CD Skips
• Ensure the appliance is on a secure location. Vibrations
or jarring can cause the CD to skip.
FM Reception
• Ensure the FM telescopic antenna is fully extended.
• Electrical interference in your home can cause poor re
ception. Move the appliance away from them (especially
those with motors and transformers).
The appliance switches off automatically during play
back
• Increase the volume level on your input source player
like DVD player / TV, etc.
Interferences in Speakers
• Check that there is no mobile phone near the appli
ance.
-
-
-
Technical Data
Model: .................................................................MC 4469 DAB+
Power Supply: .......................................... 200-240 V~ 50 / 60 Hz
Power Consumption:.......................................................22 Watt
Power Consumption (standby mode): .......................< 1 Watt
Power Output: ............................................................2 x 15 Watt
Protection Class: ...........................................................................
Speaker Impedance: ........................................................ 8 Ohm
USB Socket: ..................................................... 5 V 1 A output
S/N (A Weight): ................................................................ ≥ 65 dB
THD (1kHz, 1W):.....................................................................0.5%
Frequency Response: ...........................................40 Hz~20 kHz
DAB Frequency range: .........................................174-240 MHz
FM Frequency range: ...........................................87.5-108 MHz
Dimensions: .................................................396 x 120 x 205 mm
Bluetooth version: .................................................................. V3.0
Work range: ....................................................approx. 10 metres
Transmission frequency: ................................ 2.402~2.480 GHz
Protocols: ................................................................A2DP/AVRCP
The right to make technical and design modifications in
the course of continuous product development remains
reserved.
This device has been tested according to all relevant cur
rent CE guidelines, such as electromagnetic compatibility
and low voltage directives, and has been constructed in
accordance with the latest safety regulations.
-
Disposal
Meaning of the “Dustbin” Symbol
Protect our environment: do not dispose of
electrical equipment in the domestic waste.
Please return any electrical equipment that
you will no longer use to the collection points
provided for their disposal.
This helps avoid the potential effects of incorrect disposal
on the environment and human health.
This will contribute to the recycling and other forms of
re-utilisation of electrical and electronic equipment.
Information concerning where the equipment can be
disposed of can be obtained from your local authority.
29


MC 4469 DAB+
Stand 07 / 2016
MC 4469 DAB_EN-DE@2016.07.21_new 03.08.16
Elektro-technische Vertriebsges. mbH
www.etv.de
AEG is a registered trademark used
under license from AB Electrolux (publ)
 Loading...