


LAVAMAT 46010
User manual |
Washing machine |

2
Dear Customer
Thank you for choosing one of our high-quality products.
With this appliance you will experience the perfect combination of functional design and cutting edge technology.
Convince yourself that our appliances are engineered to deliver the best performance and control - indeed we are setting the highest standards of excellence.
In addition to this you find environmental and energy saving aspects as an integral part of our products.
To ensure optimal and regular performance of your appliance please read this instruction manual carefully. It will enable you to navigate all processes perfectly and most efficiently.
To refer to this manual any time you need to, we recommend you to keep it in a safe place. And please pass it to any future owner of the appliance.
We wish you much joy with your new appliance.
Contents |
3 |
|
|
Contents
Warnings |
5 |
Use |
5 |
Precautions to be taken against frost |
6 |
Description of the appliance |
7 |
Dispenser box |
7 |
Control panel |
8 |
Display |
8 |
Personalisation |
9 |
Child safety |
9 |
Audible signal |
9 |
How to run a wash cycle |
10 |
Loading washing |
10 |
Proportioning of detergents |
10 |
Selecting the programme |
10 |
Selecting the spin speed |
11 |
Selecting options |
11 |
Prewash |
11 |
Stain |
12 |
Sensitive |
12 |
Time saving |
12 |
Rinse plus |
12 |
Selecting a start delay |
12 |
Start of the programme |
13 |
Programme sequence |
13 |
Adding washing during the first 10 minutes |
13 |
Modifying the programme in progress |
13 |
Cancelling the programme |
14 |
End of the programme |
14 |
Standby mode |
14 |
Washing guide |
15 |
Sorting and preparing the washing |
15 |
Wash loads depending on type of materials |
15 |
Detergents and additives |
16 |
International symbols |
17 |
Programmes table |
18 |
Consumption |
20 |
Technical specifications |
21 |

4 |
|
Contents |
|
|
|
|
|
|
|
Care and cleaning |
22 |
|
||
|
Descaling the appliance |
22 |
|
|
|
The exterior |
22 |
|
|
|
Dispenser box |
22 |
|
|
|
Drainage filter |
24 |
|
|
|
Water inlet filters |
25 |
|
|
Operating problems |
26 |
|
||
Warnings |
29 |
|
||
Installation |
30 |
|
||
|
Unpacking |
30 |
|
|
|
Untying |
32 |
|
|
|
Water supply |
34 |
|
|
|
Drainage |
35 |
|
|
|
Electrical connection |
36 |
|
|
|
Positioning |
36 |
|
|
Environment |
38 |
|
||
|
Disposing of the appliance |
38 |
|
|
|
Protecting the environment |
38 |
|
|
The following symbols have been used in this user guide :
Important information about concerning your safety and information on how to avoid damaging the appliance.
General information.
Information concerning the environment.

Warnings 5
Warnings
Keep this user manual with your appliance. If the appliance is sold or given to another person, please make sure this user manual is included. This way, the new user will have the relevant operating instructions and warnings.
These warnings are for the safety of you and others around you. Please read these points carefully before installing and using your appliance. Thank you for your attention.
Use
•Unpack or ask for the appliance to be unpacked immediately upon arrival. Check the outside of the appliance is not damaged in any way. Put any complaints you may have in writing on your copy of the delivery receipt.
•Your appliance has been designed for use by adults. Ensure children do not touch the appliance or use it as a toy.
•Do not modify or attempt to modify this appliance. This would put yourself in danger.
•Your appliance is intended for normal domestic use. Do not use the appliance for commercial or industrial purposes or for any purpose other than the one it was designed for : washing, rinsing and spinning.
•Unplug and close inlet hose tap after using appliance.
•Only wash items suitable for this treatment. Refer to the instructions on the label of each item.
•Do not machine wash clothes with ribbing, unfinished or torn material.
•Ensure that all coins, safety pins, brooches, screws etc have been removed before starting a washing programme. If left in washing, they can seriously damage the appliance.
•Do not put items into the washing machine which have had stains removed with petrol, alcohol, trichlorethylen etc. If such stain removers have been used, wait until the product has evaporated before putting these items into the drum.
•Put small items together (socks, belts etc.) in a small linen bag or pillow case.
•Use the amount of detergent recommended in the paragraph “Using the right amount of detergent”.
•Always disconnect the power supply from the appliance before cleaning or maintenance.

6 Warnings
Precautions to be taken against frost
If your appliance is exposed to temperatures below 0°C, the following precautions must be taken :
•Close the tap and disconnect the inlet hose.
•Place the end of this hose and the drain hose in a basin on the floor.
•Select the Drain programme let it run until the end of the cycle.
•Disconnect the appliance from the power supply by turning the program selector to “Stop”.
•Unplug the appliance.
•Screw the inlet hose back on and replace the drain hose.
This way, the water remaining in the hoses will be drained away, avoiding any ice formation which would damage your appliance.
Before turning your appliance on again, ensure that it is installed in an area where the temperature will not fall below freezing.
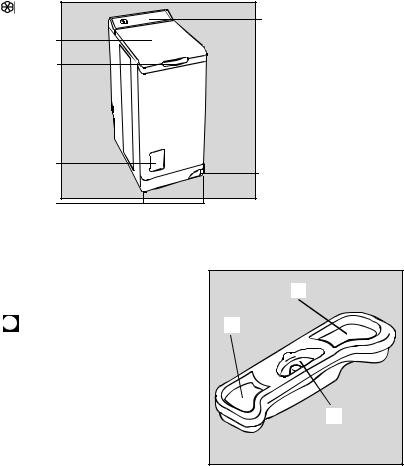
Description of the appliance |
7 |
|
|
Description of the appliance
|
The control panel |
Lid |
|
Lid handle |
|
Filter access cover |
Lever for moving the |
|
appliance |
Adjustable levelling feet |
|
Dispenser box
 Prewash
 Wash
Wash
 Softener (do not fill above the MAX symbol M )

8 Description of the appliance
Control panel
Programme selector |
Display |
Delay start |
|
|
pushbutton |
|
|
|
|
|
|
|
|
|
|
|
|
|
|
|
|
|
|
|
|
|
|
|
|
|
|
|
|
|
|
|
|
|
|
|
|
|
|
|
|
|
|
|
|
|
|
|
|
|
|
|
|
|
|
|
|
|
|
|
|
|
|
|
|
|
|
|
|
|
|
|
|
|
|
|
|
|
|
|
|
|
|
|
|
|
|
|
|
|
|
|
|
|
|
|
|
|
|
|
|
|
|
|
|
|
|
|
|
|
|
|
|
|
|
|
|
|
|
|
|
|
|
|
|
|
|
|
|
|
|
|
|
|
|
|
|
|
|
|
|
|
|
|
|
|
|
|
|
|
|
|
|
|
|
|
|
|
|
|
|
|
|
|
|
|
|
|
|
|
|
|
|
|
|
|
|
|
|
|
|
|
|
|
|
|
|
|
|
|
|
|
|
|
|
|
|
|
|
|
|
|
|
|
|
|
|
|
|
|
|
|
|
|
|
|
|
|
|
|
|
|
|
|
|
|
|
|
|
|
|
|
|
|
|
|
|
|
|
|
|
|
|
|
|
|
|
|
|
|
|
|
|
|
|
|
|
|
|
|
|
|
|
|
|
|
|
|
|
|
|
|
|
|
|
|
|
|
|
|
|
|
|
|
|
|
|
|
|
|
|
|
|
|
|
|
|
|
|
|
|
|
|
|
|
|
|
|
|
|
|
|
|
|
|
|
|
|
|
|
|
|
|
|
|
|
|
|
|
|
|
|
|
|
|
|
|
|
|
|
|
|
|
|
|
|
|
|
|
|
|
|
|
|
|
|
|
|
|
|
|
|
|
|
|
|
|
|
|
|
|
|
|
|
|
|
|
|
|
|
|
|
|
|
|
|
|
|
|
|
|
|
|
|
|
|
|
|
|
|
|
|
|
|
|
|
|
|
|
|
|
|
|
|
|
|
|
|
|
|
|
|
|
|
|
|
|
|
|
|
|
|
|
|
|
|
|
|
|
|
|
|
|
|
|
|
|
|
|
|
|
|
|
|
|
|
|
|
|
|
|
|
|
|
|
|
|
|
|
|
|
|
|
|
|
|
|
|
|
|
|
|
|
|
|
|
|
|
|
|
|
|
|
|
|
|
|
|
|
|
|
|
|
|
|
|
|
|
|
|
|
|
|
|
|
|
|
|
|
|
|
|
|
|
|
|
|
|
|
|
|
|
|
|
|
|
|
|
|
|
|
|
|
|
|
|
|
|
|
|
|
|
|
|
|
|
|
|
|
|
|
|
|
|
|
|
|
|
|
|
|
|
|
|
|
|
|
|
|
|
|
|
|
|
|
|
|
|
|
|
|
|
|
|
|
|
|
|
|
|
|
|
|
|
|
|
|
|
|
|
|
|
|
|
|
|
|
|
|
|
|
|
|
|
|
|
|
|
|
|
|
|
|
|
Pushbuttons and |
|
Indicators Start/Pause |
||||||||||||||||||||||||
|
|
|
|
|
their functions |
|
|
|
|
|
|
|
|
|
|
|
|
|
|
pushbutton |
|||||||||
Display
Length of cycle or |
|
|
|
|
|
|
Delay start |
||
|
|
|
|
|
|
||||
|
|
|
|
|
|
||||
Timer delay |
|
|
|
|
|
|
|
|
Child safety |
|
|
|
|
|
|
|
|
||
countdown |
|
|
|
|
|
|
|
||
|
|
|
|
|
|
|
|||
|
|
|
|
|
|
|
|
|
|
|
|
|
|
|
|
|
|
|
|
|
|
|
|
|
|
|
|
|
|

Description of the appliance |
9 |
|
|
Personalisation
Child safety
This option provides two types of locking :
-if the option is activated after the cycle has started, no changes to the options or program are possible.
The cycle runs and you must deactivate the option to run a new cycle.
-if the option is activated before the cycle has started, the appliance cannot be started.
To activate the child safety device, you
must : 1.Switch the appliance on. 2.Press the STAIN and SENSITIVE buttons at
the same time until confirmation with the
 symbol in the display window. The appliance memorises the selection of
this option.
To deactivate child safety, repeat the process.
Audible signal
The end of the programme and operating anomalies are indicated by acoustic beeps. If you want to remove these acoustic signals, please do the following :
1.Switch the appliance on. 2.Press the PREWASH and STAIN buttons
until confirmation with an acoustic beep.
3.The acoustic signal is removed. The signal is only active if alarm sounds.
If you want to reactivate the acoustic signal, please follow the same procedure.
10 How to run a wash cycle
How to run a wash cycle ?
Before you wash laundry in your washing machine for the first time, we recommend you run a preliminary wash at 95°C, with no laundry but with detergent. This will clean the tub.
Loading washing
•Open the lid of the appliance.
•Open the drum by depressing the locking button A : The two shutters unlock automatically.
•Load the washing, close the drum and the lid of your washing machine.
A |
Important : Before closing the lid of your appliance, ensure that the drum is properly closed : •When the two shutters are closed,
•Locking button A released.
Proportioning of detergents
Your washing machine has been designed to reduce your water and detergent consumption. You can therefore reduce the amounts recommended by detergent manufacturers.
Pour the dose of powder detergent into the wash  and prewash
  compartments if you have chosen a programme with prewash. Pour fabric softener into the compartment if necessary
  .
.
If you use another detergent type, refer to the section “detergents and additives” in the washing guide.
Selecting the programme
Turn the programme dial to the required wash programme, based on the kind of laundry and how dirty it is (see Programme Table). The indicator for the START/PAUSE button flashes in red. The duration of the selected programme is displayed in the display window.
The OFF  position switches the washing machine off (it is on in all the
How to run a wash cycle 11
other positions). This programme dial can be turned to the right or to the left.
If the programme dial is turned while the washing machine is on a washing cycle, the error code “Err” appears in the display window and the START/PAUSE button flashes in yellow for a few seconds. The programme then continues without taking any notice of the new position of the dial. To remedy the problem, put the dial back to its initial position. The breakdown of the cycle phases reappears in the display window.
Selecting the spin speed
Press the RPM button until the indicator for the desired spin speed lights up. You can also select the NO SPIN*, RINSE HOLD  * or NIGHT SILENCE PLUS*.
The maximum speed is 1000 rpm for all the programmes.
At the end of the programme, if you
have selected RINSE HOLD  or NIGHT SILENCE PLUS, you then need to select a SPIN or DRAIN programme to finish the cycle.
RINSE HOLD 
The last rinse water is not drained at the end of the selected programme to avoid creasing the washing if it is not taken out of the drum immediately.
Selecting options
Options can be added to a wash programme that has already been selected. Press the button for the desired option. The corresponding indicator lights up.
To deactivate an option, do the same thing. The corresponding indicator goes out.
Prewash
Prewash at around 30°C before the main wash cycle which then proceeds automatically.
* depending on model

12 How to run a wash cycle
Stain
For very dirty or stained washing. A stain removing product can be poured into the prewash compartment  in the product dispenser.
Sensitive
Rinsing action increased by an additional rinse cycle with, at the same time, reduced drum movement (fabric protection). Ideal for frequent washes, for example, in the case of very sensitive skin (not compatible with the Rinse plus option).
Time saving
This function allows you to reduce the length of the cycle depending on the type of programme selected.
Rinse plus
This option means one or more rinses can be added to the programmes Cotton, Synthetics and Delicates (not compatible with the Sensitive option).
You are able to activate it permanently by proceeding in the following way : Press the RPM and PREWASH buttons for a few seconds. The RINSE PLUS indicator lights up. The option is permanently activated, even if the appliance is switched off.
To deactivate permanently, repeat the same operation.
If the option selected is not possible, “Err” is displayed in the display window and the indicator for the START/PAUSE button flashes in yellow.
Selecting a start delay
This option allows you to delay the start of a wash programme by 30, 60, 90, 2
hours to 20 hours.
Press the DELAY START button until the display window indicates the period at
the end of which you want the programme to start (0’ indicates immediate start). The corresponding symbol is displayed in the display window.
You can change or cancel the delayed start time at any time before you press the START/PAUSE pushbutton, by pressing the DELAY START.
If you have already pressed the START/PAUSE pushbutton and you want to change or cancel the delayed start, proceed as follows :
• To cancel the delayed start and start the cycle immediately, press START/
 Loading...