

Page 1

Using
Updated 5 March 2009
ADOBE® FLASH® CS4 PROFESSIONAL
Page 2

Copyright
Updated 5 March 2009
© 2008 Adobe Systems Incorporated. All rights reserved.
Using Adobe
® Flash® CS4 Professional for Windows® and Mac OS
If this guide is distributed with software that includes an end user agreement, this guide, as well as the software described in it, is furnished under license and
may be used or copied only in accordance with the terms of such license. Except as permitted by any such license, no part of this guide may be reproduced, stored
in a retrieval system, or transmitted, in any form or by any means, electronic, mechanical, recording, or otherwise, without the prior written permission of Adobe
Systems Incorporated. Please note that the content in this guide is protected under copyright law even if it is not distributed with software that includes an end
user license agreement.
The content of this guide is furnished for informational use only, is subject to change without notice, and should not be construed as a commitment by Adobe
Systems Incorporated. Adobe Systems Incorporated assumes no responsibility or liability for any errors or inaccuracies that may appear in the informational
content contained in this guide.
Please remember that existing artwork or images that you may want to include in your project may be protected under copyright law. The unauthorized
incorporation of such material into your new work could be a violation of the rights of the copyright owner. Please be sure to obtain any permission required
from the copyright owner.
Any references to company names in sample templates are for demonstration purposes only and are not intended to refer to any actual organization.
Adobe, the Adobe logo, Adobe AIR, Adobe Premiere, ActionScript, After Effects, Authorware, ColdFusion, Creative Suite, Director, Dreamweaver, Fireworks,
Flash, Flash Lite, Flex, Flex Builder, FrameMaker, FreeHand, Illustrator, InCopy, InDesign, Kuler, Pixel Bender, Photoshop, PostScript, Soundbooth, and
Version Cue are either registered trademarks or trademarks of Adobe Systems Incorporated in the United States and/or other countries.
ActiveX, Vista, and Windows are either registered trademarks or trademarks of Microsoft Corporation in the United States and/or other countries. Macintosh
and Mac OS are trademarks of Apple Inc. registered in the U.S. and other countries. Java is a trademark or registered trademark of Sun Microsystems, Inc. in
the United States and other countries. Intel is a registered trademark of Intel Corporation in the U.S. and other countries. Helvetica is a trademark of
Heidelberger Druckmaschinen AG exclusively licensed through Linotype Library GmbH, and may be registered in certain jurisdictions. Arial is a trademark of
The Monotype Corporation registered in the U.S. Patent and Trademark Office and certain other jurisdictions. All other trademarks are the property of their
respective owners.
This product includes software developed by the Apache Software Foundation (
MPEG Layer-3 audio compression technology licensed by Fraunhofer IIS and Thomson Multimedia (
www.apache.org).
http://www.iis.fhg.de/amm/). You cannot use the mp3
compressed audio within the Software for real time or live broadcasts. If you require an mp3 decoder for real time or live broadcasts, you are responsible for
obtaining this mp3 technology license.
Speech compression and decompression technology licensed from Nellymoser, Inc. (
www.nellymoser.com)
Video compression and decompression is powered by On2 TrueMotion video technology. © 1992-2005 On2 Technologies, Inc. All Rights Reserved.
http://www.on2.com.
This product includes software developed by the OpenSymphony Group (
http://www.opensymphony.com/)
This product contains either BSAFE and/or TIPEM software by RSA Security, Inc.
Sorenson Spark™ video compression and decompression technology licensed from Sorenson Media, Inc.
Adobe Systems Incorporated, 345 Park Avenue, San Jose, California 95110, USA.
Notice to U.S. Government End Users: The Software and Documentation are “Commercial Items,” as that term is defined at 48 C.F.R. §2.101, consisting of
“Commercial Computer Software” and “Commercial Computer Software Documentation,” as such terms are used in 48 C.F.R. §12.212 or 48 C.F.R. §227.7202,
as applicable. Consistent with 48 C.F.R. §12.212 or 48 C.F.R. §§227.7202-1 through 227.7202-4, as applicable, the Commercial Computer Software and
Commercial Computer Software Documentation are being licensed to U.S. Government end users (a) only as Commercial Items and (b) with only those rights
as are granted to all other end users pursuant to the terms and conditions herein. Unpublished-rights reserved under the copyright laws of the United States.
Adobe agrees to comply with all applicable equal opportunity laws including, if appropriate, the provisions of Executive Order 11246, as amended, Section 402
of the Vietnam Era Veterans Readjustment Assistance Act of 1974 (38 USC 4212), and Section 503 of the Rehabilitation Act of 1973, as amended, and the
regulations at 41 CFR Parts 60-1 through 60-60, 60-250, and 60-741. The affirmative action clause and regulations contained in the preceding sentence shall be
incorporated by reference.
Page 3

Contents
Updated 5 March 2009
Chapter 1: Resources
Activation and registration
Help and support
Services, downloads, and extras
Getting started in Flash
What’s new
Chapter 2: Workspace
Flash workflow and workspace
Working with ConnectNow
Using the Stage and Tools panel
The Timeline
Using Flash authoring panels
Undo, redo, and history
Automating tasks with the Commands menu
Accessibility in the Flash workspace
Set preferences in Flash
Keyboard shortcuts
. . . . . . . . . . . . . . . . . . . . . . . . . . . . . . . . . . . . . . . . . . . . . . . . . . . . . . . . . . . . . . . . . . . . . . . . . . . . . . . . . . . . . . . . . . . . . . . . . . . . . . 2
. . . . . . . . . . . . . . . . . . . . . . . . . . . . . . . . . . . . . . . . . . . . . . . . . . . . . . . . . . . . . . . . . . . . . . . . . . . . . . . . . . . . . . . . . . . . . . . . . . . . . . . . . . . 6
. . . . . . . . . . . . . . . . . . . . . . . . . . . . . . . . . . . . . . . . . . . . . . . . . . . . . . . . . . . . . . . . . . . . . . . . . . . . . . . . . . . . . . . . . . . . . . . . . . . . . . . . . 22
. . . . . . . . . . . . . . . . . . . . . . . . . . . . . . . . . . . . . . . . . . . . . . . . . . . . . . . . . . . . . . . . . . . . . . . . . . . . . . . . . . . . . . . . . . . . 1
. . . . . . . . . . . . . . . . . . . . . . . . . . . . . . . . . . . . . . . . . . . . . . . . . . . . . . . . . . . . . . . . . . . . . . . . . . . . . . . . . . . . . . . . . . . . . . . . 4
. . . . . . . . . . . . . . . . . . . . . . . . . . . . . . . . . . . . . . . . . . . . . . . . . . . . . . . . . . . . . . . . . . . . . . . . . . . . . . . . . . . . . . . . . . . 16
. . . . . . . . . . . . . . . . . . . . . . . . . . . . . . . . . . . . . . . . . . . . . . . . . . . . . . . . . . . . . . . . . . . . . . . . . . . . . . . . . . . . . . . . . 25
. . . . . . . . . . . . . . . . . . . . . . . . . . . . . . . . . . . . . . . . . . . . . . . . . . . . . . . . . . . . . . . . . . . . . . . . . . . . . . . . . . . . . . . . . . . . . . . 29
. . . . . . . . . . . . . . . . . . . . . . . . . . . . . . . . . . . . . . . . . . . . . . . . . . . . . . . . . . . . . . . . . . . . . . . . . . . . . . . . . . . . . . . . . . . . . . . 37
. . . . . . . . . . . . . . . . . . . . . . . . . . . . . . . . . . . . . . . . . . . . . . . . . . . . . . . . . . . . . . . . . . . . . . . . . . . . . . . . . . . . . . . . . . . . . . . . . . . 40
iii
. . . . . . . . . . . . . . . . . . . . . . . . . . . . . . . . . . . . . . . . . . . . . . . . . . . . . . . . . . . . . . . . . . . . . . . . . . . . . . . . . . . . . . . . 3
. . . . . . . . . . . . . . . . . . . . . . . . . . . . . . . . . . . . . . . . . . . . . . . . . . . . . . . . . . . . . . . . . . . . . . . . . . . . . . . . . . . . . . . . 9
. . . . . . . . . . . . . . . . . . . . . . . . . . . . . . . . . . . . . . . . . . . . . . . . . . . . . . . . . . . . . . . . . . . . . . . . . . . . . . . . . . . . . . 17
. . . . . . . . . . . . . . . . . . . . . . . . . . . . . . . . . . . . . . . . . . . . . . . . . . . . . . . . . . . . . . . . . . . . . . . . . 32
. . . . . . . . . . . . . . . . . . . . . . . . . . . . . . . . . . . . . . . . . . . . . . . . . . . . . . . . . . . . . . . . . . . . . . . . . . . . . . . . . . . 33
Chapter 3: Managing documents
Working with Flash documents
Printing Flash documents
Working with projects
Find and Replace
Templates
Chapter 4: Using imported artwork
Placing artwork into Flash
Working with Fireworks files
Working with Illustrator AI files
Working with Photoshop PSD files
Imported bitmaps
Chapter 5: Creating and Editing Artwork
Drawing
Reshaping objects
Moving, arranging, and deleting artwork
Colors, gradients, and strokes
3D graphics
Chapter 6: Symbols, instances, and library assets
Working with symbols
Working with symbol instances
Working with the library
. . . . . . . . . . . . . . . . . . . . . . . . . . . . . . . . . . . . . . . . . . . . . . . . . . . . . . . . . . . . . . . . . . . . . . . . . . . . . . . . . . . . . . . . . . . . . . . . . . . . . . . . . . . . 62
. . . . . . . . . . . . . . . . . . . . . . . . . . . . . . . . . . . . . . . . . . . . . . . . . . . . . . . . . . . . . . . . . . . . . . . . . . . . . . . . . . . . . . . . . . . . . . . . . . . . . . . . . . . . . 91
. . . . . . . . . . . . . . . . . . . . . . . . . . . . . . . . . . . . . . . . . . . . . . . . . . . . . . . . . . . . . . . . . . . . . . . . . . . . . . . . . . . . . . . . . . . . . . . . . . . . . . . . . 139
. . . . . . . . . . . . . . . . . . . . . . . . . . . . . . . . . . . . . . . . . . . . . . . . . . . . . . . . . . . . . . . . . . . . . . . . . . . . . . . . . . . . . . . . . . . . . . . . 52
. . . . . . . . . . . . . . . . . . . . . . . . . . . . . . . . . . . . . . . . . . . . . . . . . . . . . . . . . . . . . . . . . . . . . . . . . . . . . . . . . . . . . . . . . . . . . . . . . . . . . 58
. . . . . . . . . . . . . . . . . . . . . . . . . . . . . . . . . . . . . . . . . . . . . . . . . . . . . . . . . . . . . . . . . . . . . . . . . . . . . . . . . . . . . . . . . . . . . . . . . . . . 86
. . . . . . . . . . . . . . . . . . . . . . . . . . . . . . . . . . . . . . . . . . . . . . . . . . . . . . . . . . . . . . . . . . . . . . . . . . . . . . . . . . . . . . . . . . . . . . . . . . . 111
. . . . . . . . . . . . . . . . . . . . . . . . . . . . . . . . . . . . . . . . . . . . . . . . . . . . . . . . . . . . . . . . . . . . . . . . . . . . . . . . . . . . . . . . . . . . . . . 147
. . . . . . . . . . . . . . . . . . . . . . . . . . . . . . . . . . . . . . . . . . . . . . . . . . . . . . . . . . . . . . . . . . . . . . . . . . . . . . . . . . . . . . . 43
. . . . . . . . . . . . . . . . . . . . . . . . . . . . . . . . . . . . . . . . . . . . . . . . . . . . . . . . . . . . . . . . . . . . . . . . . . . . . . . . . . . . . . . . . . . . . 50
. . . . . . . . . . . . . . . . . . . . . . . . . . . . . . . . . . . . . . . . . . . . . . . . . . . . . . . . . . . . . . . . . . . . . . . . . . . . . . . . . . . . . . . . . . . . 63
. . . . . . . . . . . . . . . . . . . . . . . . . . . . . . . . . . . . . . . . . . . . . . . . . . . . . . . . . . . . . . . . . . . . . . . . . . . . . . . . . . . . . . . . . . 67
. . . . . . . . . . . . . . . . . . . . . . . . . . . . . . . . . . . . . . . . . . . . . . . . . . . . . . . . . . . . . . . . . . . . . . . . . . . . . . . . . . . . . . . 69
. . . . . . . . . . . . . . . . . . . . . . . . . . . . . . . . . . . . . . . . . . . . . . . . . . . . . . . . . . . . . . . . . . . . . . . . . . . . . . . . . . . . 78
. . . . . . . . . . . . . . . . . . . . . . . . . . . . . . . . . . . . . . . . . . . . . . . . . . . . . . . . . . . . . . . . . . . . . . . . . . . . . 118
. . . . . . . . . . . . . . . . . . . . . . . . . . . . . . . . . . . . . . . . . . . . . . . . . . . . . . . . . . . . . . . . . . . . . . . . . . . . . . . . . . . . . . . . 126
. . . . . . . . . . . . . . . . . . . . . . . . . . . . . . . . . . . . . . . . . . . . . . . . . . . . . . . . . . . . . . . . . . . . . . . . . . . . . . . . . . . . . . 152
. . . . . . . . . . . . . . . . . . . . . . . . . . . . . . . . . . . . . . . . . . . . . . . . . . . . . . . . . . . . . . . . . . . . . . . . . . . . . . . . . . . . . . . . . . . . . 157
Page 4

USING FLASH CS4 PROFESSIONAL
Updated 5 March 2009
Contents
Sharing library assets . . . . . . . . . . . . . . . . . . . . . . . . . . . . . . . . . . . . . . . . . . . . . . . . . . . . . . . . . . . . . . . . . . . . . . . . . . . . . . . . . . . . . . . . . . . . . . . . 162
Working with button symbols . . . . . . . . . . . . . . . . . . . . . . . . . . . . . . . . . . . . . . . . . . . . . . . . . . . . . . . . . . . . . . . . . . . . . . . . . . . . . . . . . . . . . . . 164
Scaling and caching symbols
Symbols and ActionScript
. . . . . . . . . . . . . . . . . . . . . . . . . . . . . . . . . . . . . . . . . . . . . . . . . . . . . . . . . . . . . . . . . . . . . . . . . . . . . . . . . . . . . . . . 166
. . . . . . . . . . . . . . . . . . . . . . . . . . . . . . . . . . . . . . . . . . . . . . . . . . . . . . . . . . . . . . . . . . . . . . . . . . . . . . . . . . . . . . . . . . . 168
Chapter 7: Timelines and Animation
Working with timelines
Working with scenes
Timelines and ActionScript
Animation basics
Motion tweens
. . . . . . . . . . . . . . . . . . . . . . . . . . . . . . . . . . . . . . . . . . . . . . . . . . . . . . . . . . . . . . . . . . . . . . . . . . . . . . . . . . . . . . . . . . . . . . . . . . . . . . 187
Working with classic tweens
Shape tweening
Frame-by-frame animation
Using mask layers
Using inverse kinematics
. . . . . . . . . . . . . . . . . . . . . . . . . . . . . . . . . . . . . . . . . . . . . . . . . . . . . . . . . . . . . . . . . . . . . . . . . . . . . . . . . . . . . . . . . . . . . . 172
. . . . . . . . . . . . . . . . . . . . . . . . . . . . . . . . . . . . . . . . . . . . . . . . . . . . . . . . . . . . . . . . . . . . . . . . . . . . . . . . . . . . . . . . . . . . . . . . 178
. . . . . . . . . . . . . . . . . . . . . . . . . . . . . . . . . . . . . . . . . . . . . . . . . . . . . . . . . . . . . . . . . . . . . . . . . . . . . . . . . . . . . . . . . . 180
. . . . . . . . . . . . . . . . . . . . . . . . . . . . . . . . . . . . . . . . . . . . . . . . . . . . . . . . . . . . . . . . . . . . . . . . . . . . . . . . . . . . . . . . . . . . . . . . . . . . 183
. . . . . . . . . . . . . . . . . . . . . . . . . . . . . . . . . . . . . . . . . . . . . . . . . . . . . . . . . . . . . . . . . . . . . . . . . . . . . . . . . . . . . . . . . 210
. . . . . . . . . . . . . . . . . . . . . . . . . . . . . . . . . . . . . . . . . . . . . . . . . . . . . . . . . . . . . . . . . . . . . . . . . . . . . . . . . . . . . . . . . . . . . . . . . . . . . 218
. . . . . . . . . . . . . . . . . . . . . . . . . . . . . . . . . . . . . . . . . . . . . . . . . . . . . . . . . . . . . . . . . . . . . . . . . . . . . . . . . . . . . . . . . . 220
. . . . . . . . . . . . . . . . . . . . . . . . . . . . . . . . . . . . . . . . . . . . . . . . . . . . . . . . . . . . . . . . . . . . . . . . . . . . . . . . . . . . . . . . . . . . . . . . . . . 221
. . . . . . . . . . . . . . . . . . . . . . . . . . . . . . . . . . . . . . . . . . . . . . . . . . . . . . . . . . . . . . . . . . . . . . . . . . . . . . . . . . . . . . . . . . . . 223
Chapter 8: Filters and Blends
About filters
Applying filters
Applying blend modes
. . . . . . . . . . . . . . . . . . . . . . . . . . . . . . . . . . . . . . . . . . . . . . . . . . . . . . . . . . . . . . . . . . . . . . . . . . . . . . . . . . . . . . . . . . . . . . . . . . . . . . . . . 234
. . . . . . . . . . . . . . . . . . . . . . . . . . . . . . . . . . . . . . . . . . . . . . . . . . . . . . . . . . . . . . . . . . . . . . . . . . . . . . . . . . . . . . . . . . . . . . . . . . . . . . 235
. . . . . . . . . . . . . . . . . . . . . . . . . . . . . . . . . . . . . . . . . . . . . . . . . . . . . . . . . . . . . . . . . . . . . . . . . . . . . . . . . . . . . . . . . . . . . . 242
iv
Chapter 9: Text
About text and fonts
Creating text
Setting text attributes
About multilanguage text
Creating multilanguage text
XML file format for multilanguage text
Multilanguage text and ActionScript
. . . . . . . . . . . . . . . . . . . . . . . . . . . . . . . . . . . . . . . . . . . . . . . . . . . . . . . . . . . . . . . . . . . . . . . . . . . . . . . . . . . . . . . . . . . . . . . . 244
. . . . . . . . . . . . . . . . . . . . . . . . . . . . . . . . . . . . . . . . . . . . . . . . . . . . . . . . . . . . . . . . . . . . . . . . . . . . . . . . . . . . . . . . . . . . . . . . . . . . . . . . 246
. . . . . . . . . . . . . . . . . . . . . . . . . . . . . . . . . . . . . . . . . . . . . . . . . . . . . . . . . . . . . . . . . . . . . . . . . . . . . . . . . . . . . . . . . . . . . . . 254
. . . . . . . . . . . . . . . . . . . . . . . . . . . . . . . . . . . . . . . . . . . . . . . . . . . . . . . . . . . . . . . . . . . . . . . . . . . . . . . . . . . . . . . . . . . 258
. . . . . . . . . . . . . . . . . . . . . . . . . . . . . . . . . . . . . . . . . . . . . . . . . . . . . . . . . . . . . . . . . . . . . . . . . . . . . . . . . . . . . . . . . 263
. . . . . . . . . . . . . . . . . . . . . . . . . . . . . . . . . . . . . . . . . . . . . . . . . . . . . . . . . . . . . . . . . . . . . . . . . . . . . . . 267
. . . . . . . . . . . . . . . . . . . . . . . . . . . . . . . . . . . . . . . . . . . . . . . . . . . . . . . . . . . . . . . . . . . . . . . . . . . . . . . . . 270
Chapter 10: Sound
Using sounds in Flash
Exporting Sounds
Sound and ActionScript
. . . . . . . . . . . . . . . . . . . . . . . . . . . . . . . . . . . . . . . . . . . . . . . . . . . . . . . . . . . . . . . . . . . . . . . . . . . . . . . . . . . . . . . . . . . . . . . . 273
. . . . . . . . . . . . . . . . . . . . . . . . . . . . . . . . . . . . . . . . . . . . . . . . . . . . . . . . . . . . . . . . . . . . . . . . . . . . . . . . . . . . . . . . . . . . . . . . . . . 278
. . . . . . . . . . . . . . . . . . . . . . . . . . . . . . . . . . . . . . . . . . . . . . . . . . . . . . . . . . . . . . . . . . . . . . . . . . . . . . . . . . . . . . . . . . . . . 280
Chapter 11: Video
Digital video and Flash
. . . . . . . . . . . . . . . . . . . . . . . . . . . . . . . . . . . . . . . . . . . . . . . . . . . . . . . . . . . . . . . . . . . . . . . . . . . . . . . . . . . . . . . . . . . . . . 283
Import video for streaming or progressive download
Embed video in a SWF file
Export QuickTime video files
. . . . . . . . . . . . . . . . . . . . . . . . . . . . . . . . . . . . . . . . . . . . . . . . . . . . . . . . . . . . . . . . . . . . . . . . . . . . . . . . . . . . . . . . . . . 290
. . . . . . . . . . . . . . . . . . . . . . . . . . . . . . . . . . . . . . . . . . . . . . . . . . . . . . . . . . . . . . . . . . . . . . . . . . . . . . . . . . . . . . . . . 293
Working with Adobe Premiere Pro and After Effects
Controlling external video playback with ActionScript
Chapter 12: Creating e-learning content
Getting started with Flash e-learning
. . . . . . . . . . . . . . . . . . . . . . . . . . . . . . . . . . . . . . . . . . . . . . . . . . . . . . . . . . . . . . . . . . . . . . . . . . . . . . . . . 301
. . . . . . . . . . . . . . . . . . . . . . . . . . . . . . . . . . . . . . . . . . . . . . . . . . . . . . . . . . . . . . . . . 288
. . . . . . . . . . . . . . . . . . . . . . . . . . . . . . . . . . . . . . . . . . . . . . . . . . . . . . . . . . . . . . . . . . 294
. . . . . . . . . . . . . . . . . . . . . . . . . . . . . . . . . . . . . . . . . . . . . . . . . . . . . . . . . . . . . . . . 296
Page 5

USING FLASH CS4 PROFESSIONAL
Updated 5 March 2009
Contents
Chapter 13: Creating accessible content
About accessible content . . . . . . . . . . . . . . . . . . . . . . . . . . . . . . . . . . . . . . . . . . . . . . . . . . . . . . . . . . . . . . . . . . . . . . . . . . . . . . . . . . . . . . . . . . . . 302
Using Flash to enter accessibility information for screen readers
Specifying advanced accessibility options for screen readers
Creating accessibility with ActionScript
. . . . . . . . . . . . . . . . . . . . . . . . . . . . . . . . . . . . . . . . . . . . . . . . . . . . . . . . . . . . . . . . . . . . . . . . . . . . . . 312
. . . . . . . . . . . . . . . . . . . . . . . . . . . . . . . . . . . . . . . . . . . . . . . . . . . . . . 305
. . . . . . . . . . . . . . . . . . . . . . . . . . . . . . . . . . . . . . . . . . . . . . . . . . . . . . . . . . 310
Chapter 14: Working with screens
Screen-based documents and the screen authoring environment
Working with screens
Adding content to screens
. . . . . . . . . . . . . . . . . . . . . . . . . . . . . . . . . . . . . . . . . . . . . . . . . . . . . . . . . . . . . . . . . . . . . . . . . . . . . . . . . . . . . . . . . . . . . . . . 318
. . . . . . . . . . . . . . . . . . . . . . . . . . . . . . . . . . . . . . . . . . . . . . . . . . . . . . . . . . . . . . . . . . . . . . . . . . . . . . . . . . . . . . . . . . . 323
. . . . . . . . . . . . . . . . . . . . . . . . . . . . . . . . . . . . . . . . . . . . . . . . . . . . . 316
Chapter 15: ActionScript
Working with ActionScript
Script Assist mode and behaviors
Writing and managing scripts
Debugging ActionScript 1.0 and 2.0
Debugging ActionScript 3.0
Working with Flash and Flex
Printing at runtime
ActionScript publish settings
. . . . . . . . . . . . . . . . . . . . . . . . . . . . . . . . . . . . . . . . . . . . . . . . . . . . . . . . . . . . . . . . . . . . . . . . . . . . . . . . . . . . . . . . . . . 330
. . . . . . . . . . . . . . . . . . . . . . . . . . . . . . . . . . . . . . . . . . . . . . . . . . . . . . . . . . . . . . . . . . . . . . . . . . . . . . . . . . . . 337
. . . . . . . . . . . . . . . . . . . . . . . . . . . . . . . . . . . . . . . . . . . . . . . . . . . . . . . . . . . . . . . . . . . . . . . . . . . . . . . . . . . . . . . . 339
. . . . . . . . . . . . . . . . . . . . . . . . . . . . . . . . . . . . . . . . . . . . . . . . . . . . . . . . . . . . . . . . . . . . . . . . . . . . . . . . . . 350
. . . . . . . . . . . . . . . . . . . . . . . . . . . . . . . . . . . . . . . . . . . . . . . . . . . . . . . . . . . . . . . . . . . . . . . . . . . . . . . . . . . . . . . . . 360
. . . . . . . . . . . . . . . . . . . . . . . . . . . . . . . . . . . . . . . . . . . . . . . . . . . . . . . . . . . . . . . . . . . . . . . . . . . . . . . . . . . . . . . . . 364
. . . . . . . . . . . . . . . . . . . . . . . . . . . . . . . . . . . . . . . . . . . . . . . . . . . . . . . . . . . . . . . . . . . . . . . . . . . . . . . . . . . . . . . . . . . . . . . . . . 366
. . . . . . . . . . . . . . . . . . . . . . . . . . . . . . . . . . . . . . . . . . . . . . . . . . . . . . . . . . . . . . . . . . . . . . . . . . . . . . . . . . . . . . . . 371
v
Chapter 16: Publishing and Exporting
Publishing Flash documents
Publish settings
. . . . . . . . . . . . . . . . . . . . . . . . . . . . . . . . . . . . . . . . . . . . . . . . . . . . . . . . . . . . . . . . . . . . . . . . . . . . . . . . . . . . . . . . . . . . . . . . . . . . . 383
Publishing for Adobe AIR
HTML publishing templates
About exporting from Flash
Exporting Images and Graphics
Exporting video and sound
. . . . . . . . . . . . . . . . . . . . . . . . . . . . . . . . . . . . . . . . . . . . . . . . . . . . . . . . . . . . . . . . . . . . . . . . . . . . . . . . . . . . . . . . . 379
. . . . . . . . . . . . . . . . . . . . . . . . . . . . . . . . . . . . . . . . . . . . . . . . . . . . . . . . . . . . . . . . . . . . . . . . . . . . . . . . . . . . . . . . . . . . 398
. . . . . . . . . . . . . . . . . . . . . . . . . . . . . . . . . . . . . . . . . . . . . . . . . . . . . . . . . . . . . . . . . . . . . . . . . . . . . . . . . . . . . . . . . . 406
. . . . . . . . . . . . . . . . . . . . . . . . . . . . . . . . . . . . . . . . . . . . . . . . . . . . . . . . . . . . . . . . . . . . . . . . . . . . . . . . . . . . . . . . . . 410
. . . . . . . . . . . . . . . . . . . . . . . . . . . . . . . . . . . . . . . . . . . . . . . . . . . . . . . . . . . . . . . . . . . . . . . . . . . . . . . . . . . . . . 412
. . . . . . . . . . . . . . . . . . . . . . . . . . . . . . . . . . . . . . . . . . . . . . . . . . . . . . . . . . . . . . . . . . . . . . . . . . . . . . . . . . . . . . . . . . 415
Chapter 17: Best practices
Structuring FLA files
. . . . . . . . . . . . . . . . . . . . . . . . . . . . . . . . . . . . . . . . . . . . . . . . . . . . . . . . . . . . . . . . . . . . . . . . . . . . . . . . . . . . . . . . . . . . . . . . . 418
Organizing ActionScript in an application
Behaviors conventions
Video conventions
. . . . . . . . . . . . . . . . . . . . . . . . . . . . . . . . . . . . . . . . . . . . . . . . . . . . . . . . . . . . . . . . . . . . . . . . . . . . . . . . . . . . . . . . . . . . . . 421
. . . . . . . . . . . . . . . . . . . . . . . . . . . . . . . . . . . . . . . . . . . . . . . . . . . . . . . . . . . . . . . . . . . . . . . . . . . . . . . . . . . . . . . . . . . . . . . . . . 423
SWF application authoring guidelines
Accessibility guidelines
Advertising with Flash
Optimizing FLA files for SWF output
. . . . . . . . . . . . . . . . . . . . . . . . . . . . . . . . . . . . . . . . . . . . . . . . . . . . . . . . . . . . . . . . . . . . . . . . . . . . . . . . . . . . . . . . . . . . . . 429
. . . . . . . . . . . . . . . . . . . . . . . . . . . . . . . . . . . . . . . . . . . . . . . . . . . . . . . . . . . . . . . . . . . . . . . . . . . . . . . . . . . . . . . . . . . . . . . 434
. . . . . . . . . . . . . . . . . . . . . . . . . . . . . . . . . . . . . . . . . . . . . . . . . . . . . . . . . . . . . . . . . . . . . . . . . . . . . . . . . . 436
Tips for creating content for mobile devices
Index
...............................................................................................................453
. . . . . . . . . . . . . . . . . . . . . . . . . . . . . . . . . . . . . . . . . . . . . . . . . . . . . . . . . . . . . . . . . . . . . . . . . . . . 420
. . . . . . . . . . . . . . . . . . . . . . . . . . . . . . . . . . . . . . . . . . . . . . . . . . . . . . . . . . . . . . . . . . . . . . . . . . . . . . . . 425
. . . . . . . . . . . . . . . . . . . . . . . . . . . . . . . . . . . . . . . . . . . . . . . . . . . . . . . . . . . . . . . . . . . . . . . . . . 445
Page 6

Chapter 1: Resources
Updated 5 March 2009
Before you begin working with your software, take a few moments to read an overview of activation and the many
resources available to you. You have access to instructional videos, plug-ins, templates, user communities, seminars,
tutorials, RSS feeds, and much more.
Activation and registration
Help with installation
For help with installation issues, see the Installation Support Center at www.adobe.com/go/cs4install.
License activation
During the installation process, your Adobe software contacts Adobe to complete the license activation process. No
personal data is transmitted. For more information on product activation, visit the Adobe website at
www.adobe.com/go/activation.
1
A single-user retail license activation supports two computers. For example, you can install the product on a desktop
computer at work and on a laptop computer at home. If you want to install the software on a third computer, first
deactivate it on one of the other two computers. Choose Help > Deactivate.
Register
Register your product to receive complimentary installation support, notifications of updates, and other services.
❖ To register, follow the on-screen instructions in the Registration dialog box, which appears after you install the
software.
If you postpone registration, you can register at any time by choosing Help > Registration.
Adobe Product Improvement Program
After you use your Adobe software a certain number of times, a dialog box may appear asking whether you want to
participate in the Adobe Product Improvement Program.
If you choose to participate, data about your use of Adobe software is sent to Adobe. No personal information is
recorded or sent. The Adobe Product Improvement Program only collects information about which features and tools
you use and how often you use them.
You can opt in to or out of the program at any time:
• To participate, choose Help > Adobe Product Improvement Program and click Yes, Participate.
• To stop participating, choose Help > Adobe Product Improvement Program and click No, Thank You.
Page 7

USING FLASH CS4 PROFESSIONAL
Updated 5 March 2009
Resources
ReadMe
A ReadMe file for your software is available online and on the installation disc. Open the file to read important
information about topics such as the following:
• System requirements
• Installation (including uninstalling the software)
• Activation and registration
• Font installation
• Troubleshooting
• Customer support
• Legal notices
Help and support
Community Help
Community Help is an integrated environment on Adobe.com that gives you access to community-generated content
moderated by Adobe and industry experts. Comments from users help guide you to an answer.
2
Community Help draws on a number of resources, including:
• Videos, tutorials, tips and techniques, blogs, articles, and examples for designers and developers.
• Complete online product Help, which is updated regularly by the Adobe documentation team.
• All other content on Adobe.com, including knowledgebase articles, downloads and updates, Developer
Connection, and more.
Choose Help > product name Help in the application to access the Help and Support page, the portal to all of the
Community Help content for your product. You can also use the Help search field in some Creative Suite 4
applications, or press F1 (Windows), to access Community Help for your product.
The sites searched by the default Community Help search engine are hand-selected and reviewed for quality by Adobe
and Adobe Community Experts. Adobe experts also work to ensure that the top search results include a mixture of
different kinds of content, including results from online product Help.
For more information on using Community Help, see http://help.adobe.com/en_US/CommunityHelp/.
For a video overview of Community Help, see www.adobe.com/go/lrvid4117_xp.
Product Help
Adobe provides a comprehensive user guide for each product in several formats, including online product Help, PDF,
and printed book. Results from online product Help are included in your results whenever you search Community Help.
If you’re connected to the Internet, the Help menu within the product opens the product Help and Support page by
default. This page is a portal to all of the Community Help content for the product. If you want to consult or search
online product Help only, you can access it by clicking the product Help link in the upper-right corner of the Help and
Support page. Be sure to select the This Help System Only option before you do your search.
Page 8

USING FLASH CS4 PROFESSIONAL
Updated 5 March 2009
Resources
If you’re not connected to the Internet, the Help menu within the product opens local Help, a subset of the content
available in online product Help. Because local Help is not as complete or up-to-date as online product Help, Adobe
recommends that you use the PDF version of product Help if you want to stay offline. A downloadable PDF of
complete product Help is available from two places:
• The product’s Help and Support page (upper-right corner of the page)
• Local and web Help (top of the Help interface)
For more information on accessing product help, see http://help.adobe.com/en_US/CommunityHelp/.
If you are working in Adobe InDesign, Photoshop, Illustrator, Flash, Fireworks, or Dreamweaver, and you want to turn
off Community Help so that local Help opens by default, do the following:
1 Open the Connections panel (Window > Extensions > Connections).
2 From the Connections panel menu , select Offline Options.
3 Select Keep Me Offline and click OK.
Note: When you disable web services from the Connections panel, all other web services (such as Adobe Kuler and Adobe
ConnectNow) are also disabled.
Printed resources
Printed versions of the complete online product Help are available for the cost of shipping and handling at
www.adobe.com/go/store.
3
Support resources
Visit the Adobe Support website at www.adobe.com/support to learn about free and paid technical support options.
Services, downloads, and extras
You can enhance your product by integrating a variety of services, plug-ins, and extensions in your product. You can
also download samples and other assets to help you get your work done.
Adobe creative online services
Adobe® Creative Suite® 4 includes new online features that bring the power of the web to your desktop. Use these
features to connect with the community, collaborate, and get more from your Adobe tools. Powerful creative online
services let you complete tasks ranging from color matching to data conferencing. The services seamlessly integrate
with desktop applications so you can quickly enhance existing workflows. Some services offer full or partial
functionality when you’re offline too.
Visit Adobe.com to learn more about available services. Some Creative Suite 4 applications include these initial
offerings:
Kuler™ panel Quickly create, share, and explore color themes online.
Adobe® ConnectNow Collaborate with dispersed working teams over the web, sharing voice, data, and multimedia.
Resource Central Instantly access tutorials, sample files, and extensions for Adobe digital video applications.
For information on managing your services, see the Adobe website at www.adobe.com/go/learn_creativeservices_en.
Page 9

USING FLASH CS4 PROFESSIONAL
Updated 5 March 2009
Resources
Adobe Exchange
Visit the Adobe Exchange at www.adobe.com/go/exchange to download samples as well as thousands of plug-ins and
extensions from Adobe and third-party developers. The plug-ins and extensions can help you automate tasks,
customize workflows, create specialized professional effects, and more.
Adobe downloads
Visit www.adobe.com/go/downloads to find free updates, tryouts, and other useful software.
Adobe Labs
Adobe Labs at www.adobe.com/go/labs gives you the opportunity to experience and evaluate new and emerging
technologies and products from Adobe. At Adobe Labs, you have access to resources such as these:
• Prerelease software and technologies
• Code samples and best practices to accelerate your learning
• Early versions of product and technical documentation
• Forums, wiki-based content, and other collaborative resources to help you interact with like-minded users.
Adobe Labs fosters a collaborative software development process. In this environment, customers quickly become
productive with new products and technologies. Adobe Labs is also a forum for early feedback. The Adobe
development teams use this feedback to create software that meets the needs and expectations of the community.
4
Adobe TV
Visit Adobe TV at http://tv.adobe.com to view instructional and inspirational videos.
Extras
The installation disc contains a variety of extras to help you make the most of your Adobe software. Some extras are
installed on your computer during the setup process; others are located on the disc.
To view the extras installed during the setup process, navigate to the application folder on your computer.
• Windows®: [startup drive]\Program Files\Adobe\[Adobe application]
• Mac OS®: [startup drive]/Applications/[Adobe application]
To view the extras on the disc, navigate to the Goodies folder in your language folder on the disc. Example:
• /English/Goodies/
Getting started in Flash
If you’re new to Flash, get a good overview by viewing these videos.
Learn Flash Professional CS4 - Getting Started Series
Understanding Flash
Understanding Flash file types
Exploring the Flash interface
Page 10

Setting up workspaces
Updated 5 March 2009
Using the drawing tools
Object and merge drawing
Understanding symbols
Working with bitmap graphics
Working with sound
Working with video
Understanding tweens
Creating shape tweens
Creating motion tweens
Using the Motion Editor
Working with motion presets
Animating bones (inverse kinematics)
ActionScript 3.0
USING FLASH CS4 PROFESSIONAL
Resources
5
Building an application
Creating a Flash web movie
Learn Flash Professional CS4 Series
Introducing Flash CS4 Professional
Managing Design Suite Workspaces (Demo is in Photoshop)
Using Motion Presets
Creating motion tweens: Part 1
Creating motion tweens: Part 2
Using the Motion Editor
Using inverse kinematics
Working with 3D art
Using the decorative drawing tools
Understanding Flash Integration (InDesign import)
Using InDesign Export to Flash (XFL)
Exporting artboards to Flash (Illustrator import)
Working with Soundbooth and Flash
Exporting from After Effects to Flash via XFL
Using Kuler color themes
Using ConnectNow to share your screen (Demo is in Dreamweaver)
Introducing Adobe Device Central CS4
Page 11

USING FLASH CS4 PROFESSIONAL
Updated 5 March 2009
Resources
What’s new
New features
The following features are new to Adobe® Flash® CS4 Professional.
Object-based animation
Object-based animation dramatically simplifies designing in Flash while simultaneously providing greater control.
Tweens are now applied directly to objects instead of keyframes, providing precise control over each of the individual
animation attributes. For more information, see “Motion tweens” on page 187.
Motion Editor panel
Experience complete independent control over every keyframe parameter including rotation, size, scale, position,
filters, and more using the keyframe editor. Use the keyframe editor to graphically control easing using curves. For
more information, see “Editing property curves with the Motion Editor” on page 203.
Motion Tween Presets
Apply pre-built animations to any object to jumpstart your project. Select from dozens of pre-built presets, or create
and save your own. Share presets across teams to save animation time. For more information, see “Applying motion
presets” on page 189.
6
Inverse Kinematics with the Bone tool
Easily create chain-like effects with a series of linked objects or quickly distort single objects using the Bones tool. For
mor information, see “Using inverse kinematics” on page 223.
3D Transformation
Animate 2D objects through 3D space with new 3D transformation tools. Transformation tools including rotate and
translate allow you to animate across X, Y, and Z axes. Apply local or global rotation to rotate an object within
relationship to itself or to the Stage. For more information, see “3D graphics” on page 139.
Decorative drawing with the Deco tool
Easily turn any symbol into an instant design tool. Whether creating patterns that can then be applied using the brush
or fill tools, or creating kaleidoscope-like effects using single or multiple symbols with the deco symmetry tool, Deco
provides a new way to design with symbols. For more information, see “Drawing patterns with the Decorative drawing
tools” on page 108.
Adobe Kuler panel
The Kuler panel is your portal to groups of colors, or themes, created by an online community of designers. You can
use it to browse thousands of themes on the Kuler web site, and then download selected themes to edit or to include
in your own projects. You can also use the Kuler panel to create and save themes, and then share them with the Kuler
community. For more information, see “Kuler panel” on page 137.
Authoring for Adobe AIR
Deliver interactive experiences to the desktop with new Publish to AIR. Adobe® AIR™, a new cross-operating system
runtime allows you to leverage local desktop resources and data to deliver even more personal, engaging experiences.
Using the same skills you use to deliver to the Flash® Player, your content can now reach even more audiences across
more devices – web, mobile and now the desktop. For more information, see “Publishing for Adobe AIR” on page 398.
Page 12

USING FLASH CS4 PROFESSIONAL
Updated 5 March 2009
Resources
Sample Sounds library
A new included library of sound effects makes creating content with sound even easier. For more information, see
“Importing sounds” on page 273.
Vertical Property inspector
The Property inspector is now vertically displayed taking better advantage of wider screens to provide you with more
Stage real estate.
New Project Panel
Work with multiple-file projects more easily with the new project panel. Apply property changes to multiple files, save
symbols to a designated file folder at the time they are created, and more. For more information, see “Working with
projects” on page 52.
Adobe Media Encoder with H.264 support
Deliver the highest quality video with more control than ever before. Encode to any format recognized by Adobe Flash
Player with the same tool found in other Adobe video products such as Adobe® Premiere® Pro and After Effects®. For
more information, see Adobe Media Encoder help.
Adobe ConnectNow integration
Adobe® ConnectNow™ lets you share your screen and meet with other users online. You can open ConnectNow
directly from the application interface by choosing File > Share My Screen. For more information, see Working with
ConnectNow.
7
Edit in Soundbooth
Users of Adobe® Soundbooth™ can now edit imported sounds in Soundbooth directly from within Flash. The Adobe
ASND sound file format enables non-destructive editing of sound files. For more information, see “Edit a sound in
Soundbooth” on page 277.
Enhanced metadata support
New XMP panel enables users to quickly and easily assign metadata tags to their SWF content. Enables addition of
metadata into SWF files that is recognized by Adobe® Bridge and other Creative Suite® applications that recognize
XMP metadata. Improves organization and enables fast find and retrieval of SWF files. Fore more information, see
“Add XMP metadata to a document” on page 45.
Collaborate with Flex developers
Import code-only ActionScript® 3.0 SWC components developed in Flex™ Builder™. For more information, see
“Creating components for Flex” on page 364.
XFL import
Import content from InDesign® and After Effects with complete file integrity. XFL is a new file format which enables
designers to easily deliver content for further development in Flash. For more information see “Opening XFL files” on
page 47.
Support for Adobe Pixel Bender
Easily apply custom filters and effects at runtime for real-time creative expression. Use Adobe® Pixel Bender™ to create
unique filters, blends, and fills - which are now portable to multiple applications with Adobe Pixel Bender - to produce
compelling, on-demand visual effects for the Adobe Flash Player runtime environment. Write a filter once, and then
share it or apply it multiple times using ActionScript 3.0.
Page 13

USING FLASH CS4 PROFESSIONAL
Updated 5 March 2009
Resources
JPEG deblocking
This publish settings option reduces the the appearance of the common artifacts found in highly compressed JPEG
files. For more information, see “Specify publish settings for SWF files” on page 383.
Improved Library panel
Work with assets more easily, thanks to a new, improved Library panel that includes search capability, sorting, and the
ability to set properties on multiple library items at once. For more information, see “About the Library panel” on
page 26.
New Creative Suite user interface
Boost your efficiency with intuitive panel docking and spring-loaded behaviors that help streamline your interaction
with tools throughout Adobe’s Creative Suites. For more information, see “Workspace” on page 9.
New Font menus
The font menu in Flash now includes previews of each font and each style included in the font. For more information,
see “Setting text attributes” on page 254.
Hardware Acceleration
Published SWF files can now take better advantage of available hardware for better playback performance. For more
information, see “Specify publish settings for SWF files” on page 383.
8
Community Help
Community Help is an integrated environment on adobe.com that gives you access to community-generated content
moderated by Adobe and industry experts. Comments and ratings from users help guide you to an answer. Search
Community Help to find the best content on the web about Adobe products and technologies. For more information,
see “Help and support” on page 2.
Page 14

Chapter 2: Workspace
Updated 5 March 2009
The Adobe® Flash® CS4 Professional workspace includes tools and panels that help you create and navigate your
documents. Understanding these tools will help you maximize the application’s capabilities.
Flash workflow and workspace
General Flash workflow
To build a Flash application, you typically perform the following basic steps:
Plan the application.
Decide which basic tasks the application will perform.
Add media elements.
Create and import media elements, such as images, video, sound, and text.
9
Arrange the elements.
Arrange the media elements on the Stage and in the Timeline to define when and how they appear in your application.
Apply special effects.
Apply graphic filters (such as blurs, glows, and bevels), blends, and other special effects as you see fit.
Use ActionScript to control behavior.
Write ActionScript® code to control how the media elements behave, including how the elements respond to user
interactions.
Test and publish your application.
Test to verify that your application is working as you intended and find and fix any bugs you encounter. You should
test the application throughout the creation process. Publish your FLA file as a SWF file that can be displayed in a web
page and played back with Flash® Player.
Depending on your project and your working style, you might use these steps in a different order.
For more help getting started with the Flash workflow, see the following:
• Article: Introducing Adobe Flash CS4 Professional: http://www.adobe.com/devnet/logged_in/dwinnie_flcs4.html
• Article: Creating a simple document in Flash CS4 Professional:
http://www.adobe.com/devnet/flash/articles/flash_cs4_createfla.html
• Video: Flash CS4 Workflow Basics: http://www.adobe.com/go/lrvid4053_fl
Page 15
USING FLASH CS4 PROFESSIONAL
Updated 5 March 2009
Workspace
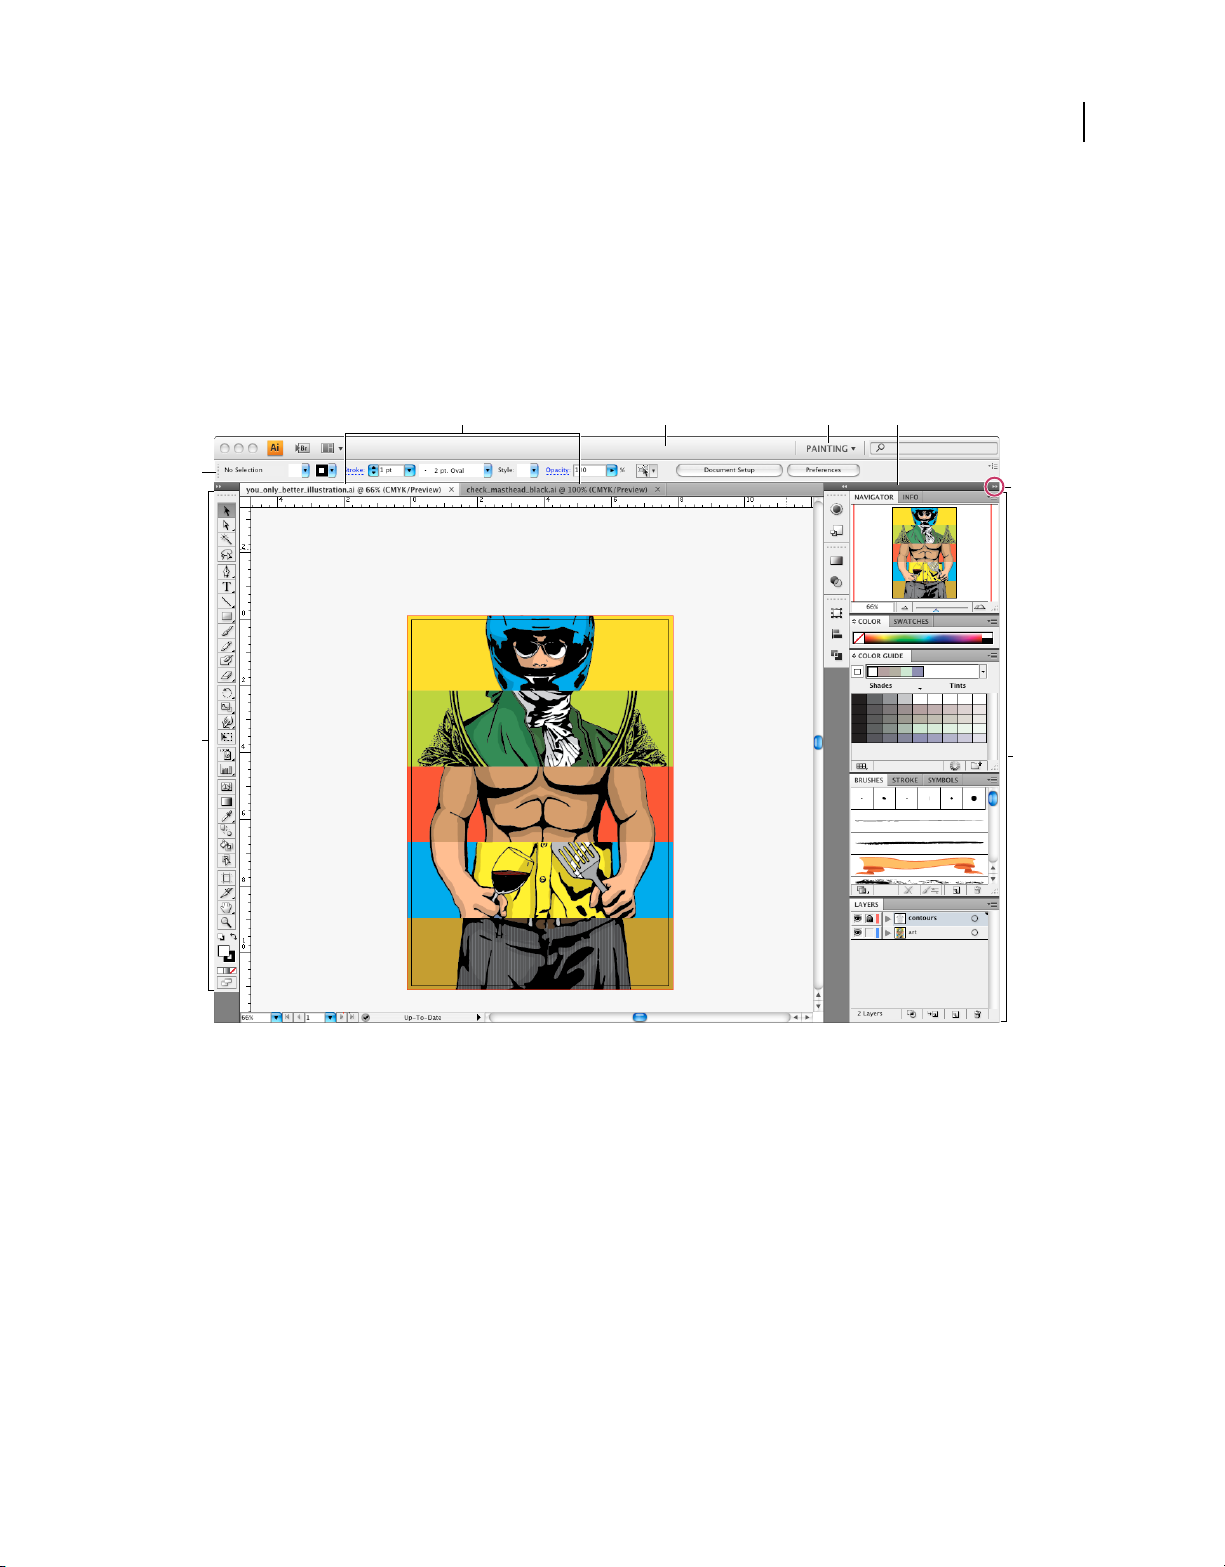
Workspace overview
You create and manipulate your documents and files using various elements, such as panels, bars, and windows. Any
arrangement of these elements is called a workspace. The workspaces of the different applications in Adobe® Creative
Suite® 4 share the same appearance so that you can move between the applications easily. You can also adapt each
application to the way you work by selecting from several preset workspaces or by creating one of your own.
Although the default workspace layout varies in different products, you manipulate the elements much the same way
in all of them.
10
A
E
F
B DC
G
H
Default Illustrator workspace
A. Tabbed Document windows B. Application bar C. Workspace switcher D. Panel title bar E. Control panel F. Tools panel G. Collapse To
Icons button H. Four panel groups in vertical dock
• The Application bar across the top contains a workspace switcher, menus (Windows only), and other application
controls. On the Mac for certain products, you can show or hide it using the Window menu.
• The Tools panel contains tools for creating and editing images, artwork, page elements, and so on. Related tools are
grouped.
• The Control panel displays options for the currently selected tool. The Control panel is also known as the options
bar in Photoshop. (Adobe Flash®, Adobe Dreamweaver®, and Adobe Fireworks® have no Control panel.)
• Flash, Dreamweaver, and Fireworks have a Property inspector that displays options for the currently selected
element or tool.
• The Document window displays the file you’re working on. Document windows can be tabbed and, in certain cases,
grouped and docked.
Page 16

USING FLASH CS4 PROFESSIONAL
Updated 5 March 2009
Workspace
• Panels help you monitor and modify your work. Examples include the Timeline in Flash, the Layers panel in Adobe
Photoshop®, and the CSS Styles panel in Dreamweaver. Panels can be grouped, stacked, or docked.
• On the Mac, the Application frame groups all the workspace elements in a single, integrated window that lets you
treat the application as a single unit. When you move or resize the Application frame or any of its elements, all the
elements within it respond to each other so none overlap. Panels don’t disappear when you switch applications or
when you accidentally click out of the application. If you work with two or more applications, you can position each
application side by side on the screen or on multiple monitors. If you prefer the traditional, free-form user interface
of the Mac, you can turn off the Application frame. In Adobe Illustrator®, for example, select Window > Application
Frame to toggle it on or off. (In Flash, the Application frame is on permanently. Dreamweaver does not use an
Application frame.)
Hide or show all panels
• (Illustrator, Adobe InCopy®, Adobe InDesign®, Photoshop, Fireworks)To hide or show all panels, including the
Tools panel and Control panel, press Tab.
• (Illustrator, InCopy, InDesign, Photoshop) To hide or show all panels except the Tools panel and Control panel,
press Shift+Tab.
You can temporarily display hidden panels if Auto-Show Hidden Panels is selected in Interface preferences. It’s
always on in Illustrator. Move the pointer to the edge of the application window (Windows®) or to the edge of the
monitor (Mac OS®) and hover over the strip that appears.
11
• (Flash, Dreamweaver, Fireworks) To hide or show all panels, press F4.
Display panel options
❖ Click the panel menu icon in the upper-right corner of the panel.
You can open a panel menu even when the panel is minimized.
(Illustrator) Adjust panel brightness
❖ In User Interface preferences, move the Brightness slider. This control affects all panels, including the Control
panel.
Reconfigure the Tools panel
You can display the tools in the Tools panel in a single column, or side by side in two columns. (This feature is not
available in the Tools panel in Fireworks and Flash.)
In InDesign and InCopy, you also can switch from single-column to double-column (or single-row) display by setting
an option in Interface preferences.
❖ Click the double arrow at the top of the Tools panel.
Manage windows and panels
You can create a custom workspace by moving and manipulating Document windows and panels. You can also save
workspaces and switch among them.
Note: The following examples use Photoshop for demonstration purposes. The workspace behaves the same in all the
products.
Page 17

USING FLASH CS4 PROFESSIONAL
Updated 5 March 2009
A
B
C
Narrow blue drop zone indicates Color panel will be docked on its own above the Layers panel group.
A. Title bar B. Tab C. Drop zone
In Photoshop, you can change the font size of the text in the Control panel, in the panels, and in tool tips. Choose a
size from the UI Font Size menu in Interface preferences.
Manage Document windows
When you open more than one file, the Document windows are tabbed.
• To rearrange the order of tabbed Document windows, drag a window’s tab to a new location in the group.
• To undock a Document window from a group of windows, drag the window’s tab out of the group.
• To dock a Document window to a separate group of Document windows, drag the window into the group.
Note: Dreamweaver does not support docking and undocking Document windows. Use the Document window’s
Minimize button to create floating windows.
12
Workspace
• To create groups of stacked or tiled documents, drag the window to one of the drop zones along the top, bottom, or
sides of another window. You can also select a layout for the group by using the Layout button on the Application bar.
Note: Some products do not support this functionality. However, your product may have Cascade and Tile commands
in the Window menu to help you lay out your documents.
• To switch to another document in a tabbed group when dragging a selection, drag the selection over the document’s
tab for a moment.
Note: Some products do not support this functionality.
Dock and undock panels
A dock is a collection of panels or panel groups displayed together, generally in a vertical orientation. You dock and
undock panels by moving them into and out of a dock.
Note: Docking is not the same as stacking. A stack is a collection of floating panels or panel groups, joined top to bottom.
• To dock a panel, drag it by its tab into the dock, at the top, bottom, or in between other panels.
• To dock a panel group, drag it by its title bar (the solid empty bar above the tabs) into the dock.
• To remove a panel or panel group, drag it out of the dock by its tab or title bar. You can drag it into another dock
or make it free-floating.
Page 18
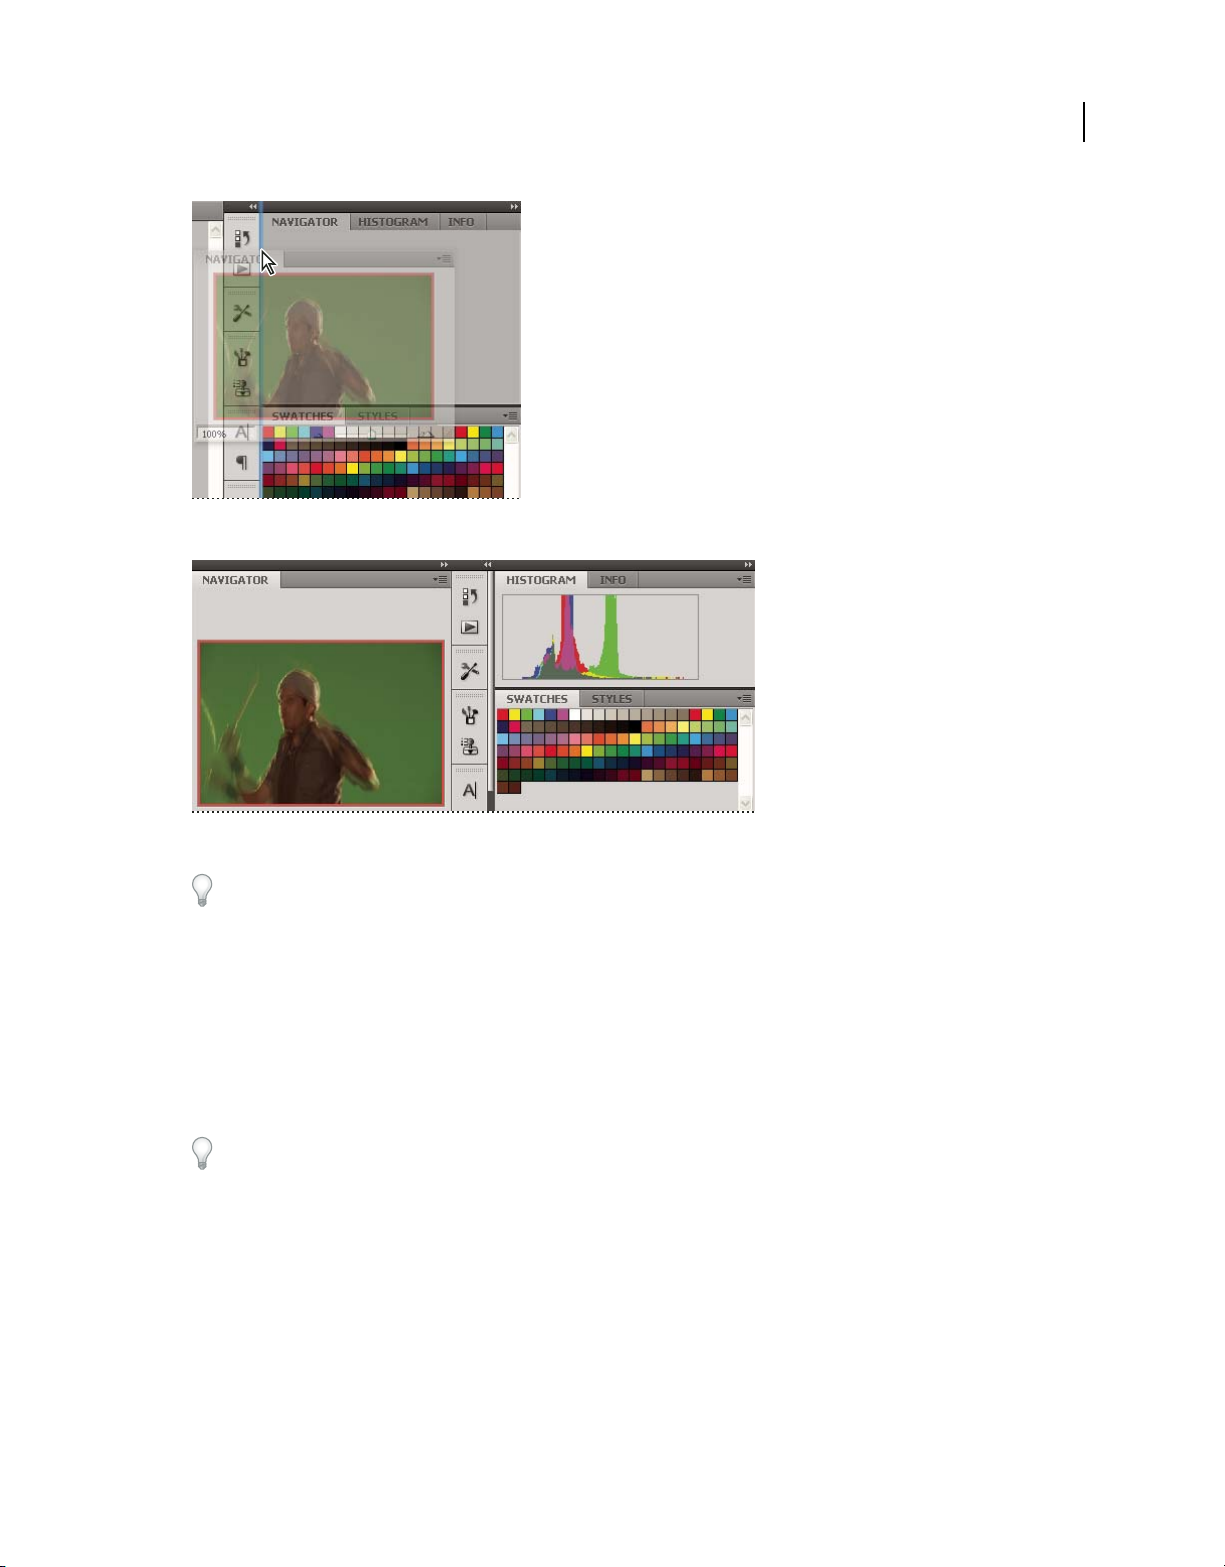
Navigator panel being dragged out to new dock, indicated by blue vertical highlight
Updated 5 March 2009
USING FLASH CS4 PROFESSIONAL
Workspace
13
Navigator panel now in its own dock
You can prevent panels from filling all the space in a dock. Drag the bottom edge of the dock up so it no longer meets
the edge of the workspace.
Move panels
As you move panels, you see blue highlighted drop zones, areas where you can move the panel. For example, you can
move a panel up or down in a dock by dragging it to the narrow blue drop zone above or below another panel. If you
drag to an area that is not a drop zone, the panel floats freely in the workspace.
• To move a panel, drag it by its tab.
• To move a panel group or a stack of floating panels, drag the title bar.
Press Ctrl (Windows) or Command (Mac OS) while moving a panel to prevent it from docking. Press Esc while
moving the panel to cancel the operation.
Note: The dock is stationary and can’t be moved. However, you can create panel groups or stacks and move them
anywhere.
Add and remove panels
If you remove all panels from a dock, the dock disappears. You can create a dock by moving panels to the right edge
of the workspace until a drop zone appears.
• To remove a panel, right-click (Windows) or Control-click (Mac) its tab and then select Close, or deselect it from
the Window menu.
• To add a panel, select it from the Window menu and dock it wherever you want.
Page 19
USING FLASH CS4 PROFESSIONAL
Updated 5 March 2009
Workspace
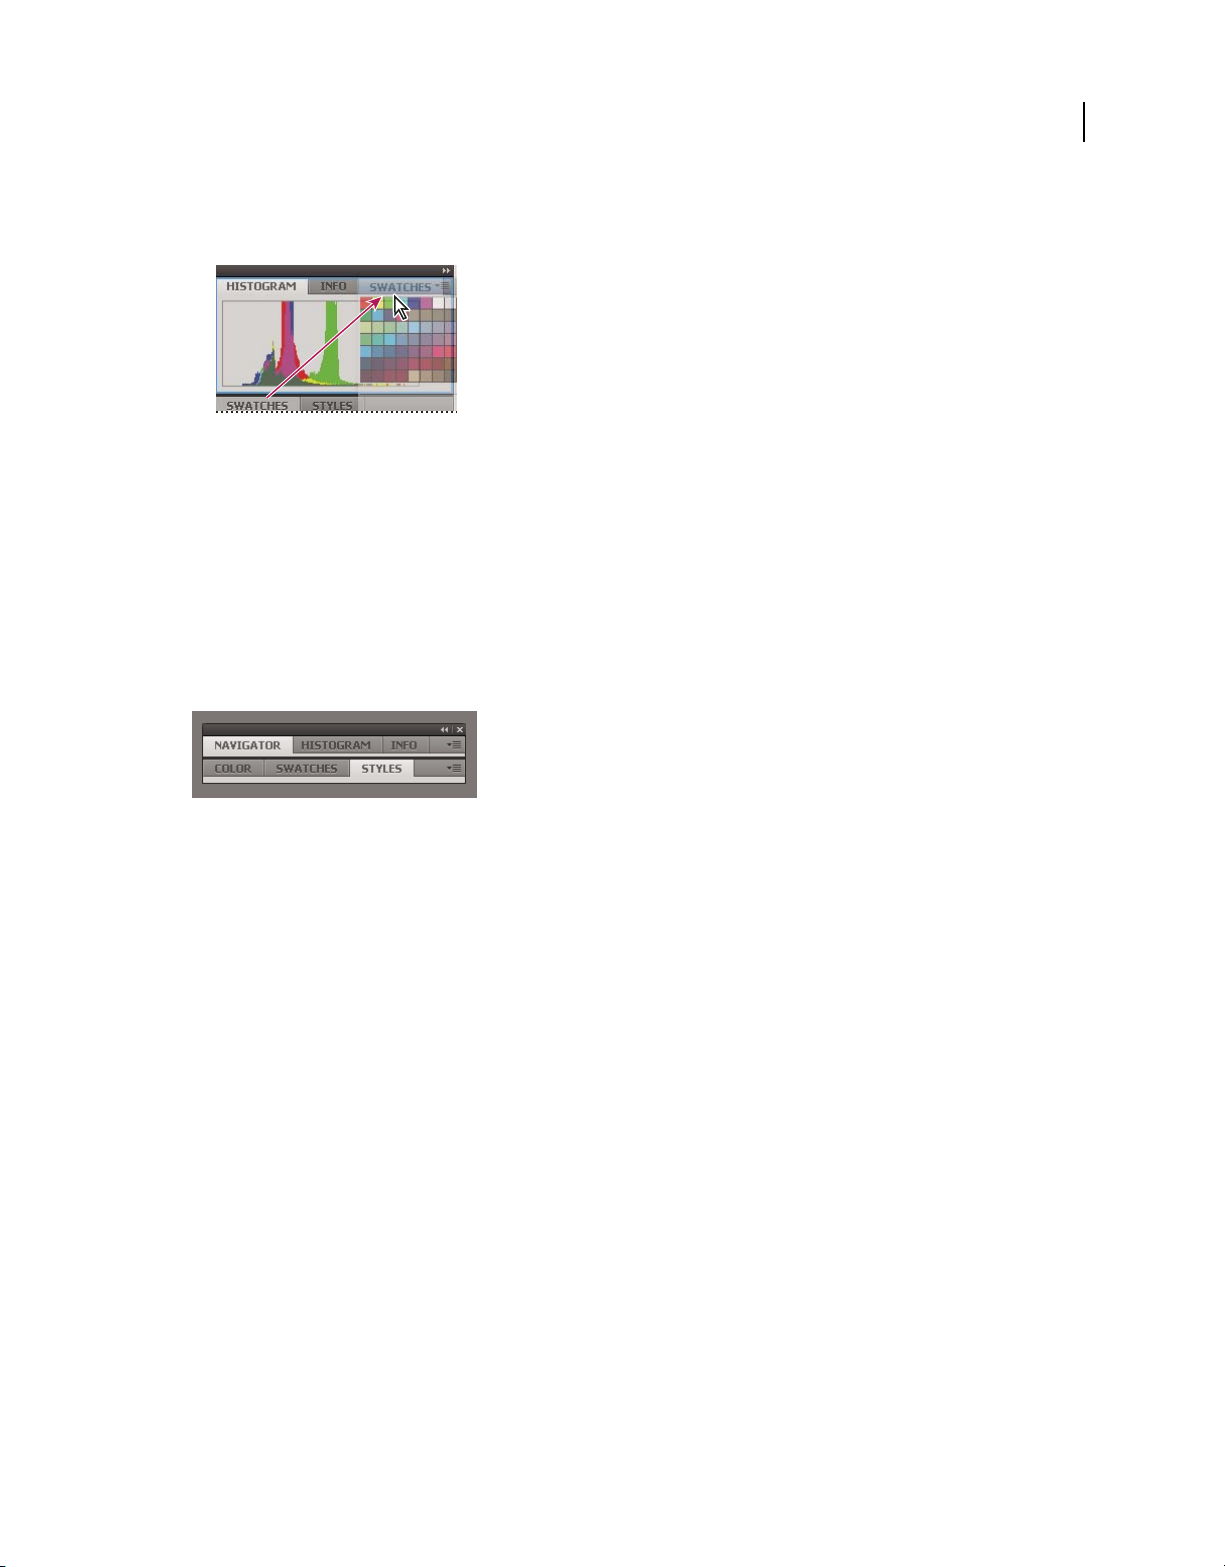
Manipulate panel groups
• To move a panel into a group, drag the panel’s tab to the highlighted drop zone in the group.
Adding a panel to a panel group
• To rearrange panels in a group, drag a panel’s tab to a new location in the group.
• To remove a panel from a group so that it floats freely, drag the panel by its tab outside the group.
• To move a group, drag the title bar (the area above the tabs).
Stack floating panels
When you drag a panel out of its dock but not into a drop zone, the panel floats freely. The floating panel allows you
to position it anywhere in the workspace. You can stack floating panels or panel groups so that they move as a unit
when you drag the topmost title bar. (Panels that are part of a dock cannot be stacked or moved as a unit in this way.)
14
Free-floating stacked panels
• To stack floating panels, drag a panel by its tab to the drop zone at the bottom of another panel.
• To change the stacking order, drag a panel up or down by its tab.
Note: Be sure to release the tab over the narrow drop zone between panels, rather than the broad drop zone in a title bar.
• To remove a panel or panel group from the stack, so that it floats by itself, drag it out by its tab or title bar.
Resize panels
• To minimize or maximize a panel, panel group, or stack of panels, double-click a tab. You can also single-click the
tab area (the empty space next to the tabs).
• To resize a panel, drag any side of the panel. Some panels, such as the Color panel in Photoshop, cannot be resized
by dragging.
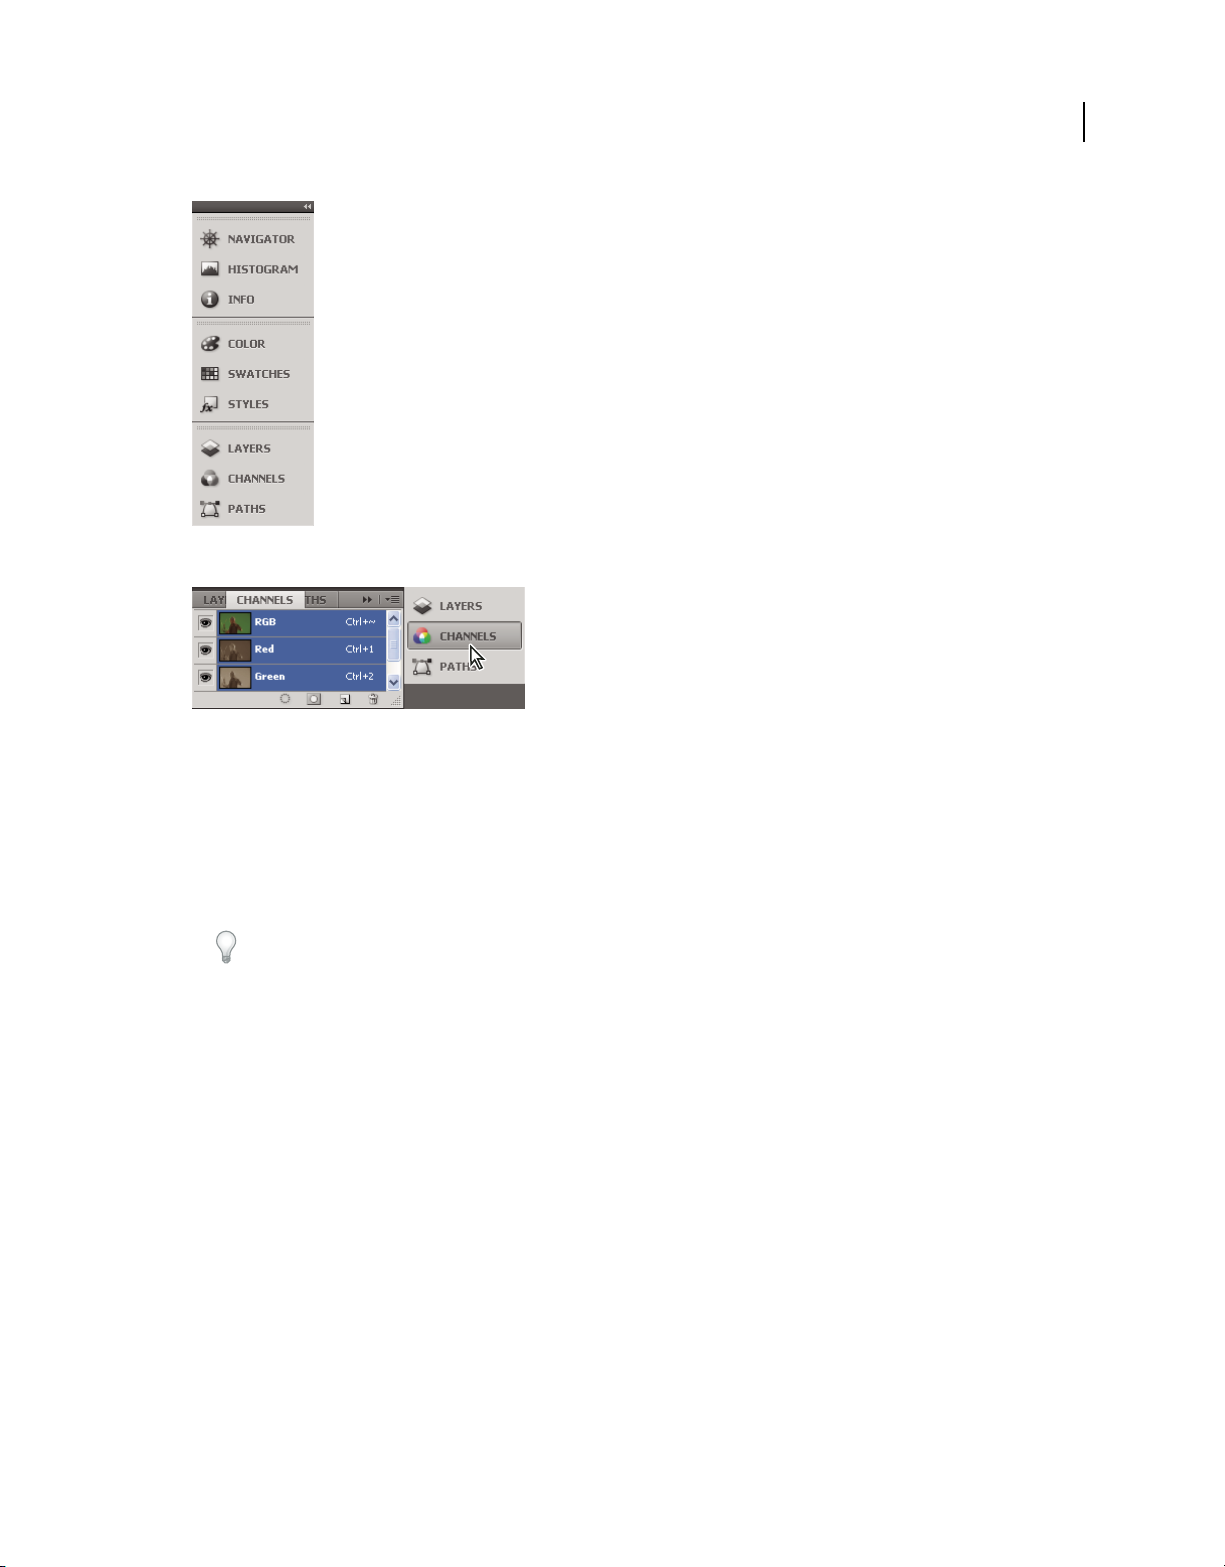
Manipulate panels collapsed to icons
You can collapse panels to icons to reduce clutter on the workspace. In some cases, panels are collapsed to icons in the
default workspace.
Page 20
Panels collapsed to icons
Updated 5 March 2009
USING FLASH CS4 PROFESSIONAL
Workspace
15
Panels expanded from icons
• To collapse or expand all panel icons in a dock, click the double arrow at the top of the dock.
• To expand a single panel icon, click it.
• To resize panel icons so that you see only the icons (and not the labels), adjust the width of the dock until the text
disappears. To display the icon text again, make the dock wider.
• To collapse an expanded panel back to its icon, click its tab, its icon, or the double arrow in the panel’s title bar.
In some products, if you select Auto-Collapse Icon Panels from the Interface or User Interface Options preferences,
an expanded panel icon collapses automatically when you click away from it.
• To add a floating panel or panel group to an icon dock, drag it in by its tab or title bar. (Panels are automatically
collapsed to icons when added to an icon dock.)
• To move a panel icon (or panel icon group), drag the icon. You can drag panel icons up and down in the dock, into
other docks (where they appear in the panel style of that dock), or outside the dock (where they appear as floating,
expanded panels).
Restore the default workspace
• Select the default, Essentials workspace from the workspace switcher in the Application bar.
• (Photoshop) Select Window > Workspace > Essentials (Default).
• (InDesign, InCopy) Select Window > Workspace > Reset [Workspace Name].
Save and switch workspaces
By saving the current size and position of panels as a named workspace, you can restore that workspace even if you
move or close a panel. The names of saved workspaces appear in the workspace switcher in the Application bar.
In Photoshop, the saved workspace can include a specific keyboard shortcut set and menu set.
Page 21

USING FLASH CS4 PROFESSIONAL
Updated 5 March 2009
Save a custom workspace
1 With the workspace in the configuration you want to save, do one of the following:
• (Photoshop, Illustrator) Choose Window > Workspace > Save Workspace.
• (InDesign, InCopy) Choose Window > Workspace > New Workspace.
• (Dreamweaver) Choose Window > Workspace Layout > New Workspace.
• (Flash) Choose New Workspace from the workspace switcher in the Application bar.
• (Fireworks) Choose Save Current from the workspace switcher in the Application bar.
2 Type a name for the workspace.
3 (Photoshop, InDesign) Under Capture, select one or more options:
Panel Locations Saves the current panel locations.
Keyboard shortcuts Saves the current set of keyboard shortcuts (Photoshop only).
Menus Saves the current set of menus.
4 Click OK or Save.
Display or switch workspaces
❖ Select a workspace from the workspace switcher in the Application bar.
In Photoshop, you can assign keyboard shortcuts to each workspace to navigate among them quickly.
16
Workspace
Delete a custom workspace
• Select Manage Workspaces from the workspace switcher in the Application bar, select the workspace, and then
click Delete. (The option is not available in Fireworks.)
• (Photoshop, InDesign, InCopy) Select Delete Workspace from the workspace switcher.
• (Illustrator) Choose Window > Workspace > Manage Workspaces, select the workspace, and then click the Delete icon.
• (InDesign) Choose Window > Workspace > Delete Workspace, select the workspace, and then click Delete.
(Photoshop) Start with the last or default panel locations
When you start Photoshop, panels can either appear in their original default locations, or appear as you last used them.
In Interface preferences:
• To display panels in their last locations on startup, select Remember Panel Locations.
• To display panels in their default locations on startup, deselect Remember Panel Locations.
Working with ConnectNow
Adobe® ConnectNow™ lets you share your screen and meet with other users online. You can open ConnectNow
directly from the application interface by choosing File > Share My Screen.
Page 22

USING FLASH CS4 PROFESSIONAL
Updated 5 March 2009
Workspace
Working with ConnectNow
Adobe® ConnectNow provides you with a secure, personal online meeting room where you can meet and collaborate
with others via the web in real time. With ConnectNow, you can share and annotate your computer screen, send chat
messages, and communicate using integrated audio. You can also broadcast live video, share files, capture meeting
notes, and control an attendee's computer.
You can access ConnectNow directly from the application interface.
1 Choose File > Share My Screen.
2 In the Share My Screen dialog box, enter your Adobe ID and password, and click Sign In. If you don’t have an
Adobe ID and password, click the Create a Free Adobe ID link at the top of the dialog box.
3 To share your screen, click the Share My Computer Screen button at the center of the ConnectNow application
window.
For complete instructions on using ConnectNow, see
http://help.adobe.com/en_US/Acrobat.com/ConnectNow/index.html.
Using the Stage and Tools panel
17
Welcome screen overview
When Flash is running with no documents open, the Welcome screen appears. The Welcome screen contains the
following four areas:
Open a Recent Item Lets you open your most recent documents (click the Open icon).
Create New Lists Flash file types, such as Flash documents and ActionScript® files.
Create from Template Lists the templates most commonly used to create Flash documents.
Extend Links to the Flash Exchange website, where you can download helper applications, extensions, and related
information.
The Welcome screen also offers quick access to Help resources. You can take a tour of Flash, learn about
documentation resources, and find Adobe Authorized Training facilities.
• To hide the Welcome screen, select Don’t Show Again.
• To show the Welcome screen, select Edit > Preferences (Windows®) or select Flash > Preferences (Macintosh®), and
select Welcome Screen from the On Launch menu in the General category.
Using the Stage
The Stage is the rectangular area where you place graphic content when creating Flash documents. The Stage in the
authoring environment represents the rectangular space in Flash Player or in a web browser window where your
document appears during playback. To change the view of the Stage as you work, zoom in and out. To help you
position items on the Stage, you can use the grid, guides, and rulers.
Page 23

USING FLASH CS4 PROFESSIONAL
Updated 5 March 2009
Workspace
18
The Timeline and Stage with content.
Zoom the Stage
To view the entire Stage on the screen, or to view a particular area of your drawing at high magnification, change the
magnification level. The maximum magnification depends on the resolution of your monitor and the document size.
The minimum value for zooming out on the Stage is 8%. The maximum value for zooming in on the Stage is 2000%.
• To zoom in on an element, select the Zoom tool in the Tools panel, and click the element. To switch the Zoom
tool between zooming in or out, use the Enlarge or Reduce modifiers (in the options area of the Tools panel
when the Zoom tool is selected) or Alt-click (Windows) or Option-click (Macintosh).
• To zoom in so that a specific area of your drawing fills the window, drag a rectangular selection on the Stage with
the Zoom tool.
• To zoom in on or out of the entire Stage, select View > Zoom In or View > Zoom Out.
• To zoom in or out by a specified percentage, select View > Magnification, and select a percentage from the submenu
or select a percentage from the Zoom control at the upper-right corner of the document window.
• To scale the Stage so that it fits completely in the application window, select View > Magnification > Fit in Window.
• To show the contents of the current frame, select View > Magnification > Show All, or select Show All from the
Zoom control at the upper-right side of the application window. If the scene is empty, the entire Stage appears.
• To show the entire Stage, select View > Magnification > Show Frame or select Show Frame from the Zoom control
at the upper-right corner of the document window.
• To show the workspace surrounding the Stage, or to view elements in a scene that are partly or completely outside
of the Stage area, select View > Pasteboard. The pasteboard appears in light gray. For example, to have a bird fly
into a frame, initially position the bird outside of the Stage in the pasteboard and animate it into the Stage area.
Page 24

USING FLASH CS4 PROFESSIONAL
Updated 5 March 2009
Workspace
Move the view of the Stage
When the Stage is magnified, you may not be able to see all of it. To change the view without having to change the
magnification, use the Hand tool to move the Stage.
❖ In the Tools panel, select the Hand tool and drag the Stage. To temporarily switch between another tool and the
Hand tool, hold down the Spacebar and click the tool in the Tools panel.
Use rulers
When rulers show, they appear along the top and left sides of the document. You can change the unit of measure used
in the rulers from the default of pixels to another unit. When you move an element on the Stage with the rulers
displayed, lines indicating the element’s dimensions appear on the rulers.
• To show or hide rulers, select View > Rulers.
• To specify the rulers’ unit of measure for a document, select Modify > Document, and select a unit from the Ruler
Units menu.
See also
“Snapping art into position” on page 122
19
Use guides
When rulers show (View > Rulers), you can drag horizontal and vertical guides from the rulers onto the Stage.
When you create nested timelines, draggable guides appear on the Stage only when the Timeline in which they were
created is active.
To create custom guides or irregular guides, use guide layers.
• To display or hide the drawing guides, select View > Guides > Show Guides.
Note: If the grid is visible and Snap to Grid is turned on when you create guides, guides snap to the grid.
• To turn snapping to guides on or off, select View > Snapping > Snap to Guides.
Note: Snapping to guides takes precedence over snapping to the grid in places where guides fall between grid lines.
• To move a guide, click anywhere on the ruler with the Selection tool and drag the guide to the desired place on the
Stage.
• To remove a guide, use the Selection tool with guides unlocked to drag the guide to the horizontal or vertical ruler.
• To lock guides, select View > Guides > Lock Guides or use the Lock Guides option in the Edit Guides (View >
Guides > Edit Guides) dialog box.
• To clear guides, select View > Guides > Clear Guides. If you are in document-editing mode, all guides in the
document are cleared. If you are in symbol-editing mode, only guides used in symbols are cleared.
See also
“Guide layers” on page 177
Set guide preferences
1 Select View > Guides > Edit Guides and do any of the following:
• To set Color, click the triangle in the color box and select a guide line color from the palette. The default guide color
is green.
Page 25

USING FLASH CS4 PROFESSIONAL
Updated 5 March 2009
• To display or hide guides, select or deselect Show Guides.
• To turn snapping to guides on or off, select or deselect Snap To Guides.
• Select or deselect Lock Guides.
• To set Snap Accuracy, select an option from the pop-up menu.
• To remove all guides, click Clear All. Clear All removes all guides from the current scene.
• To save the current settings as the default, click Save Default.
2 Click OK.
Use the grid
The grid appears in a document as a set of lines behind the artwork in all scenes.
Display or hide the drawing grid
❖ Do one of the following:
• Select View > Grid > Show Grid.
• Press Control+'' (quote) (Windows) or Command+'' (quote) (Macintosh).
20
Workspace
Turn snapping to grid lines on or off
❖ Select View > Snapping > Snap to Grid.
Set grid preferences
1 Select View > Grid > Edit Grid and select from the options.
2 To save the current settings as the default, click Save Default.
About the main toolbar and edit bar
The menu bar at the top of the application window contains menus with commands for controlling functionality.
The edit bar, at the top of the Stage, contains controls and information for editing scenes and symbols, and for
changing the magnification level of the Stage.
See also
“Symbols, instances, and library assets” on page 147
“Working with scenes” on page 178
Tools panel overview
The tools in the Tools panel let you draw, paint, select, and modify artwork, as well as change the view of the Stage.
The Tools panel is divided into four sections:
• The tools area contains drawing, painting, and selection tools.
• The view area contains tools for zooming and panning in the application window.
• The colors area contains modifiers for stroke and fill colors.
• The options area contains modifiers for the currently selected tool. Modifiers affect the tool’s painting or editing
operations.
Page 26

USING FLASH CS4 PROFESSIONAL
Updated 5 March 2009
Workspace
To specify which tools to display in the authoring environment, use the Customize Tools Panel dialog box.
See also
“Creating and Editing Artwork” on page 91
“Selecting objects” on page 118
Use the Tools panel
To show or hide the Tools panel, select Window > Tools.
Select tools
❖ Do one of the following:
• Click the tool in the Tools panel. Depending on the tool you select, a set of modifiers might appear in the options
area at the bottom of the Tools panel.
• Press the tool’s keyboard shortcut. To view the keyboard shortcuts, select Edit > Keyboard Shortcuts (Windows) or
Flash > Keyboard Shortcuts (Macintosh). On the Macintosh, you might need to move the mouse to see the new
pointer appear.
• To select a tool located in the pop-up menu for a visible tool such as the Rectangle tool, press the icon of the visible
tool and select another tool from the pop-up menu.
21
Customize the Tools panel
To specify which tools appear in the authoring environment, use the Customize Tools Panel dialog box to add or
remove tools from the Tools panel.
When more than one tool appears in a location, the top tool in the group (the most recently used) appears with an
arrow in the lower-right corner of its icon. This arrow indicates that additional tools are present in a pop-up menu.
The same keyboard shortcut functions for all tools in the pop-up menu. When you press and hold the mouse button
on the icon, the other tools in the group appear in a pop-up menu.
1 To show the Customize Tools Panel dialog box, do one of the following:
• (Windows) Select Edit > Customize Tools panel.
• (Macintosh) Select Flash > Customize Tools panel.
The Available Tools menu indicates the tools that are currently available. The Current Selection menu indicates the
tools currently assigned to the selected location in the Tools panel.
2 To browse through the tools to specify the location to assign to another tool, click a tool in the image of the Tools
panel or use the arrows.
3 To add a tool to the selected location, select the tool in the Available Tools list and click Add. You can assign a tool
to more than one location.
4 To remove a tool from the selected location, select the tool in the Current Selection scroll list and click Remove.
5 To restore the default Tools Panel layout, click Restore Default in the Customize Tools Panel dialog box.
6 Click OK to apply your changes and close the Customize Tools Panel dialog box.
Page 27
USING FLASH CS4 PROFESSIONAL
Updated 5 March 2009
Workspace
Use context menus
Context menus contain commands relevant to the current selection. For example, when you select a frame in the
Timeline window, the context menu contains commands for creating, deleting, and modifying frames and keyframes.
Context menus exist for many items and controls in many locations, including on the Stage, in the Timeline, in the
Library panel, and in the Actions panel.
❖ Right-click (Windows) or Control-click (Macintosh) an item.
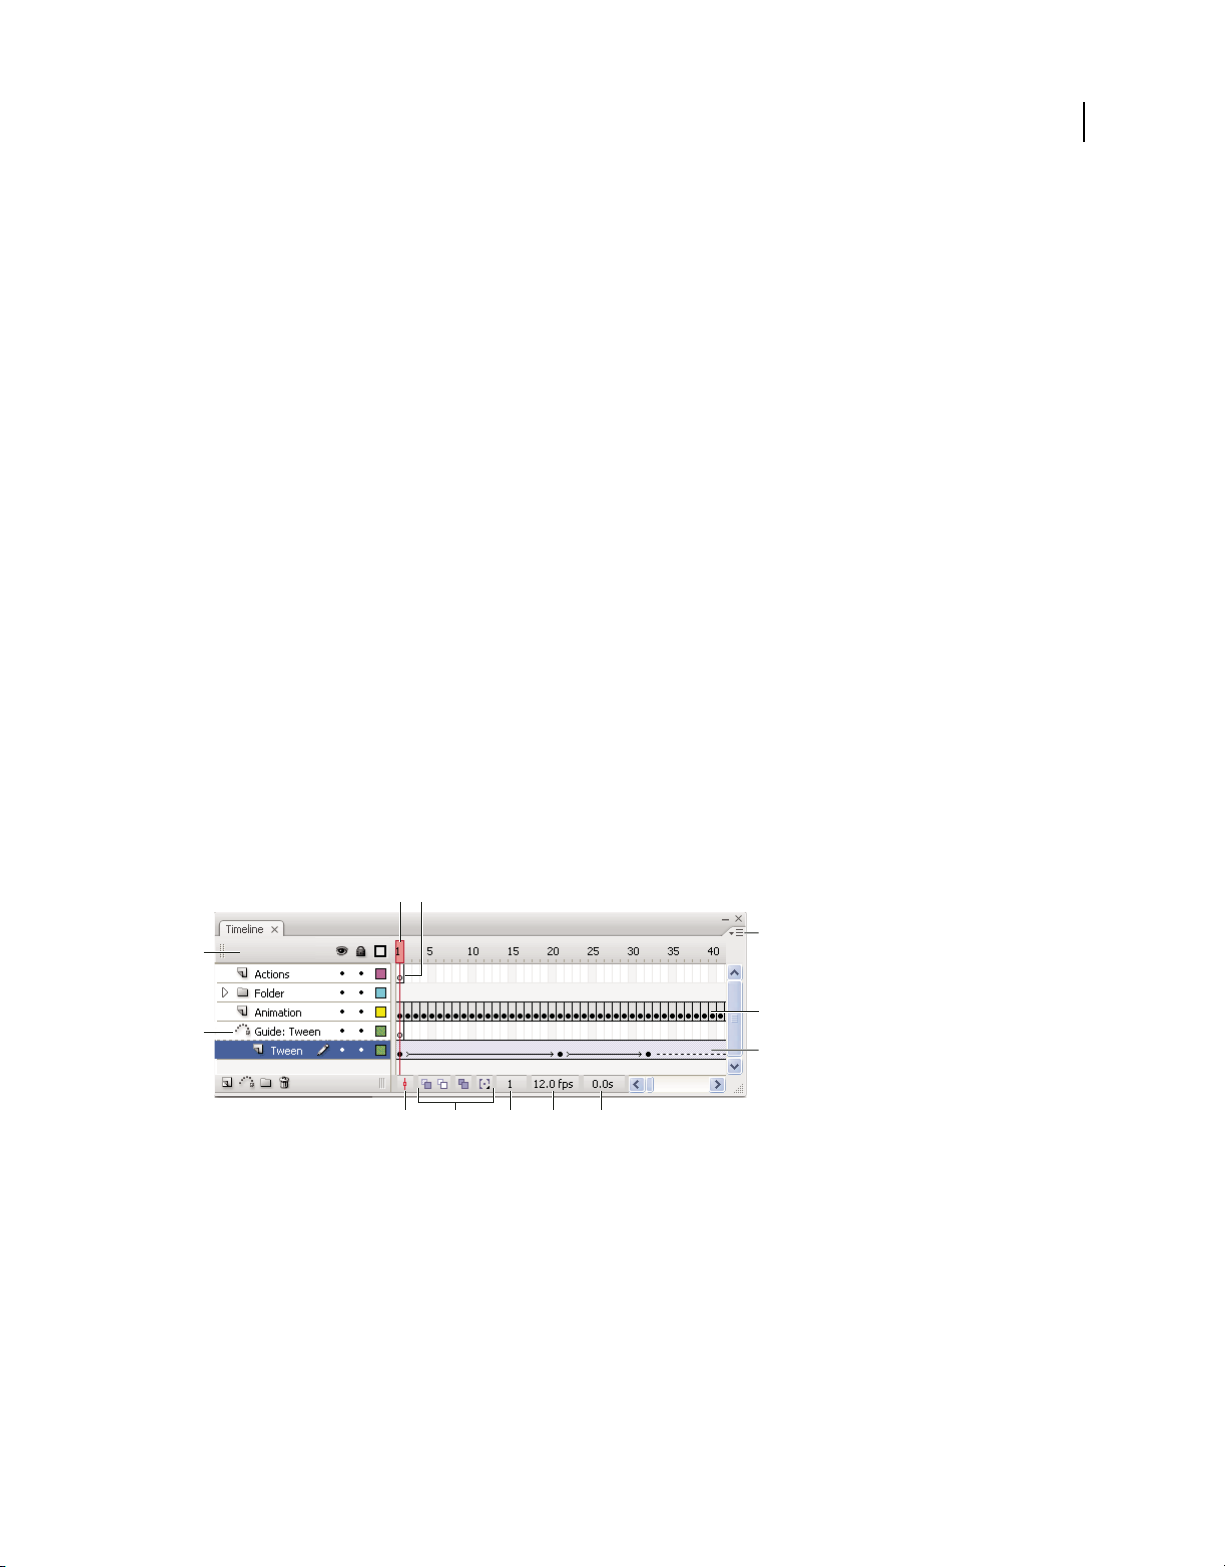
The Timeline
About the Timeline
The Timeline organizes and controls a document’s content over time in layers and frames. Like films, Flash documents
divide lengths of time into frames. Layers are like multiple film strips stacked on top of one another, each containing
a different image that appears on the Stage. The major components of the Timeline are layers, frames, and the
playhead.
Layers in a document are listed in a column on the left side of the Timeline. Frames contained in each layer appear in
a row to the right of the layer name. The Timeline header at the top of the Timeline indicates frame numbers. The
playhead indicates the current frame displayed on the Stage. As a document plays, the playhead moves from left to
right through the Timeline.
22
The Timeline status displayed at the bottom of the Timeline indicates the selected frame number, the current frame
rate, and the elapsed time to the current frame.
Note: When an animation is played, the actual frame rate is displayed; this may differ from the document’s frame rate
setting if the computer can’t calculate and display the animation quickly enough.
AB
C
D
HI J K L
Parts of the Timeline
A. Playhead B. Empty keyframe C. Timeline header D. Guide layer icon E. Frame View pop-up menu F. Frame-by-frame animation
G. Tweened animation H. Scroll To Playhead button I. Onion-skinning buttons J. Current Frame indicator K. Frame Rate indicator
L. Elapsed Time indicator
E
F
G
The Timeline shows where animation occurs in a document, including frame-by-frame animation, tweened
animation, and motion paths.
Controls in the layers section of the Timeline let you hide, show, lock, or unlock layers, as well as display layer contents
as outlines. You can drag frames to a new location on the same layer or to a different layer.
Page 28
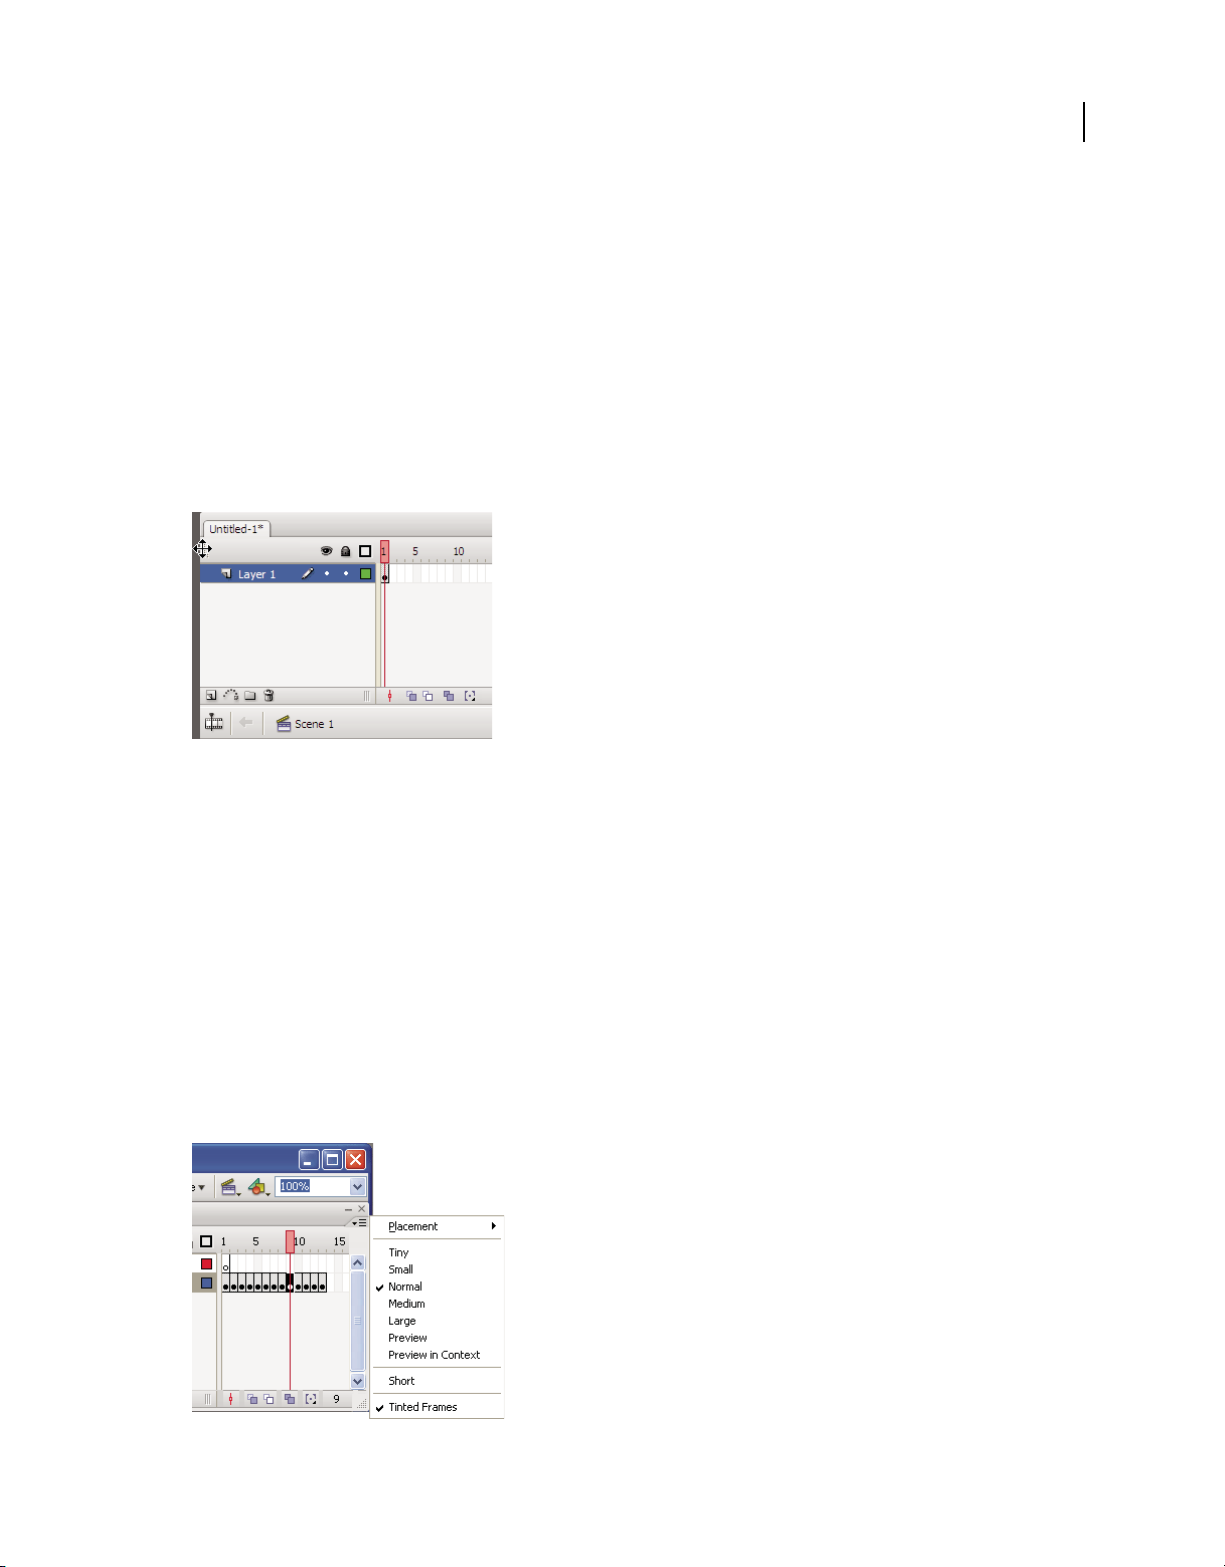
USING FLASH CS4 PROFESSIONAL
Updated 5 March 2009
Workspace
See also
“Working with timelines” on page 172
“Motion tweens” on page 187
Change the appearance of the Timeline
By default, the Timeline appears below the main document window. To change its position, detach the Timeline from
the document window and float it in its own window or dock it to any other panel you choose. You can also hide the
Timeline.
To change the number of layers and frames that are visible, resize the Timeline. To view additional layers when the
Timeline contains more layers than can be displayed, use the scroll bars on the right side of the Timeline.
23
Dragging the Timeline
• To move the Timeline when it is docked to the document window, drag the title bar tab at the upper-left corner of
the Timeline.
• To dock an undocked Timeline to the application window, drag the title bar tab to the top or bottom of the
document window.
• To dock an undocked Timeline to other panels, drag the Timeline title bar tab to the location you choose. To
prevent the Timeline from docking to other panels, press Control while you drag. A blue bar appears to indicate
where the Timeline will dock.
• To lengthen or shorten layer name fields in the Timeline panel, drag the bar separating the layer names and the
frames portions of the Timeline.
Change the display of frames in the Timeline
1 To display the Frame View pop-up menu, click Frame View in the upper-right corner of the Timeline.
Frame View pop-up menu.
Page 29
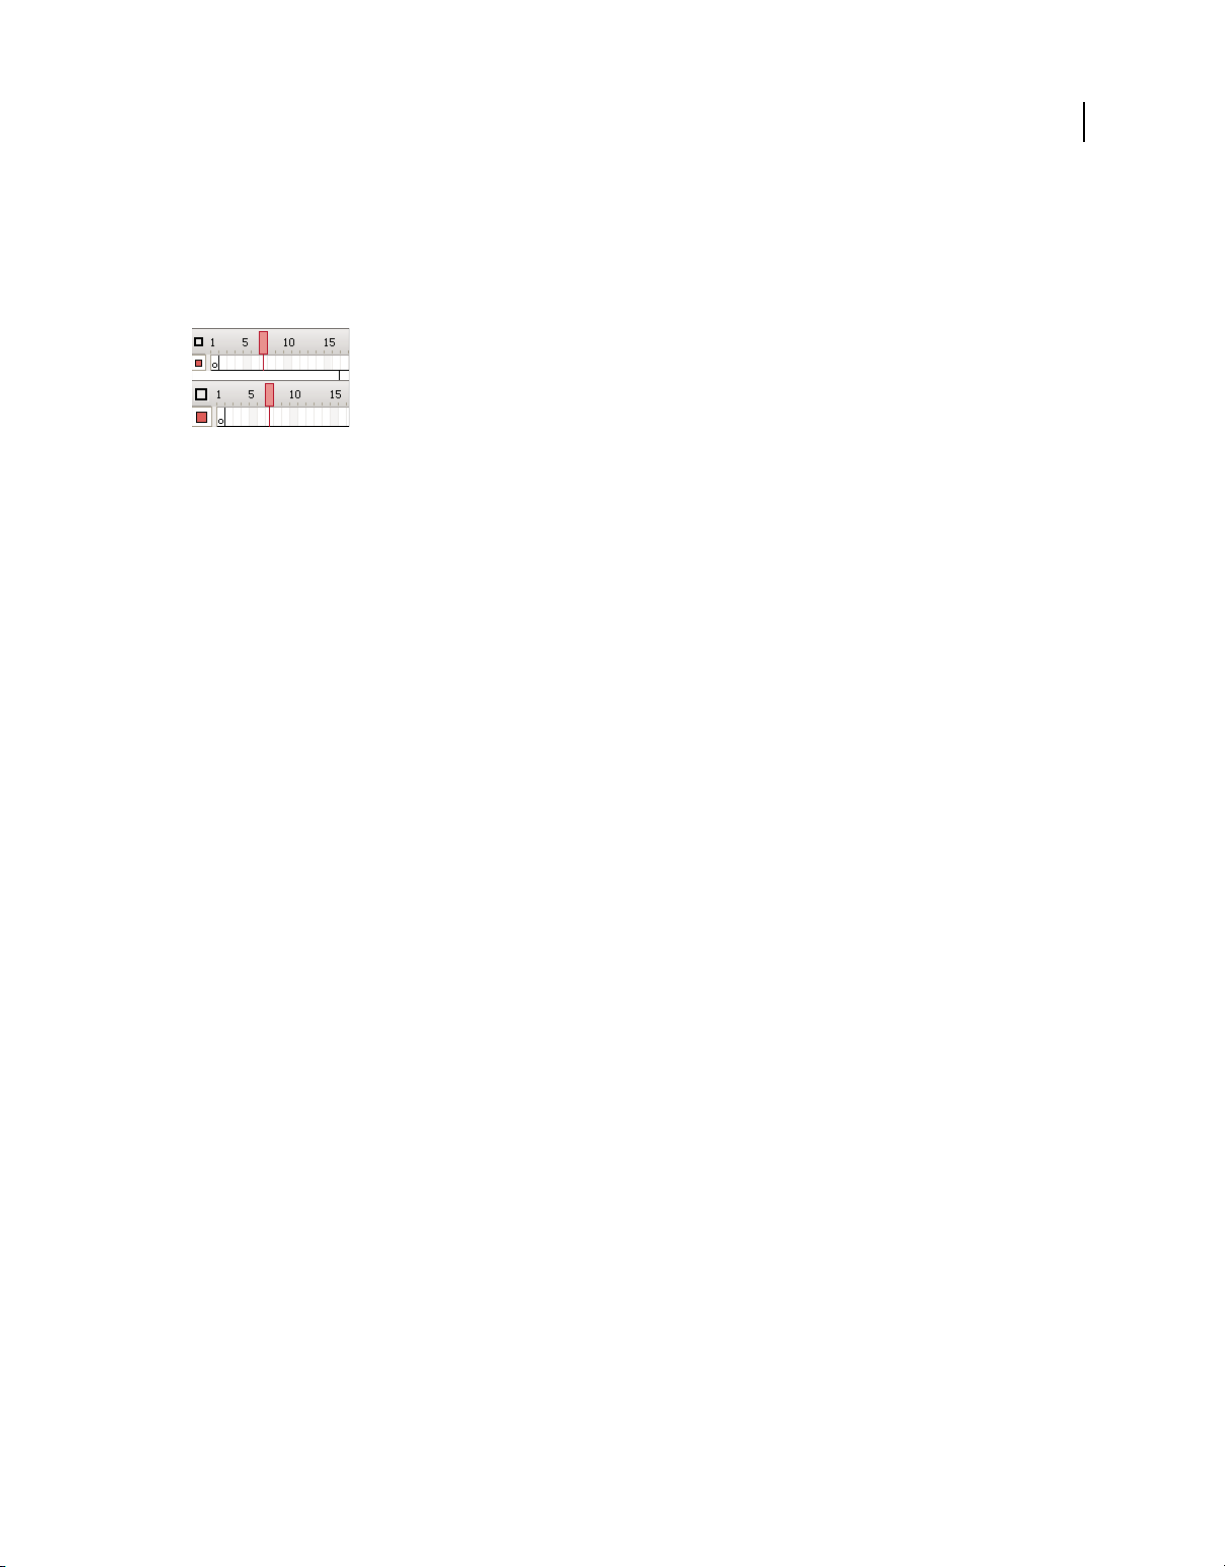
USING FLASH CS4 PROFESSIONAL
Updated 5 March 2009
Workspace
2 Select from the following options:
• To change the width of frame cells, select Tiny, Small, Normal, Medium, or Large. (The Large frame-width setting
is useful for viewing the details of sound waveforms.)
• To decrease the height of frame cell rows, select Short.
Short and Normal frame view options.
• To turn the tinting of frame sequences on or off, select Tinted Frames.
• To display thumbnails of the content of each frame scaled to fit the Timeline frames, select Preview. This can cause
the apparent content size to vary and requires extra screen space.
• To display thumbnails of each full frame (including empty space), select Preview In Context. This is useful for
viewing the way elements move in their frames over the course of the animation, but previews are generally smaller
than with the Preview option.
24
Change layer height in the Timeline
1 Do one of the following:
• Double-click the layer’s icon (the icon to the left of the layer name) in the Timeline.
• Right-click (Windows) or Control-click (Macintosh) the layer name and select Properties from the context menu.
• Select the layer in the Timeline and select Modify > Timeline > Layer Properties.
2 In the Layer Properties dialog box, select an option for Layer Height and click OK.
Resize the Timeline
• If the Timeline is docked to the main application window, drag the bar separating the Timeline from the Stage area.
• If the Timeline is not docked to the main application window, drag the lower-right corner (Windows) or the size
box in the lower-right corner (Macintosh).
Move the playhead
The playhead moves through the timeline as a document plays to indicate the current frame displayed on the Stage.
The Timeline header shows the frame numbers of the animation. To display a frame on the Stage, move the playhead
to the frame in the Timeline.
To display a specific frame when you’re working with a large number of frames that can’t all be displayed in the
Timeline at once, move the playhead along the Timeline.
• To go to a frame, click the frame’s location in the Timeline header, or drag the playhead to the desired position.
• To center the Timeline on the current frame, click the Scroll To Playhead button at the bottom of the Timeline.
Page 30
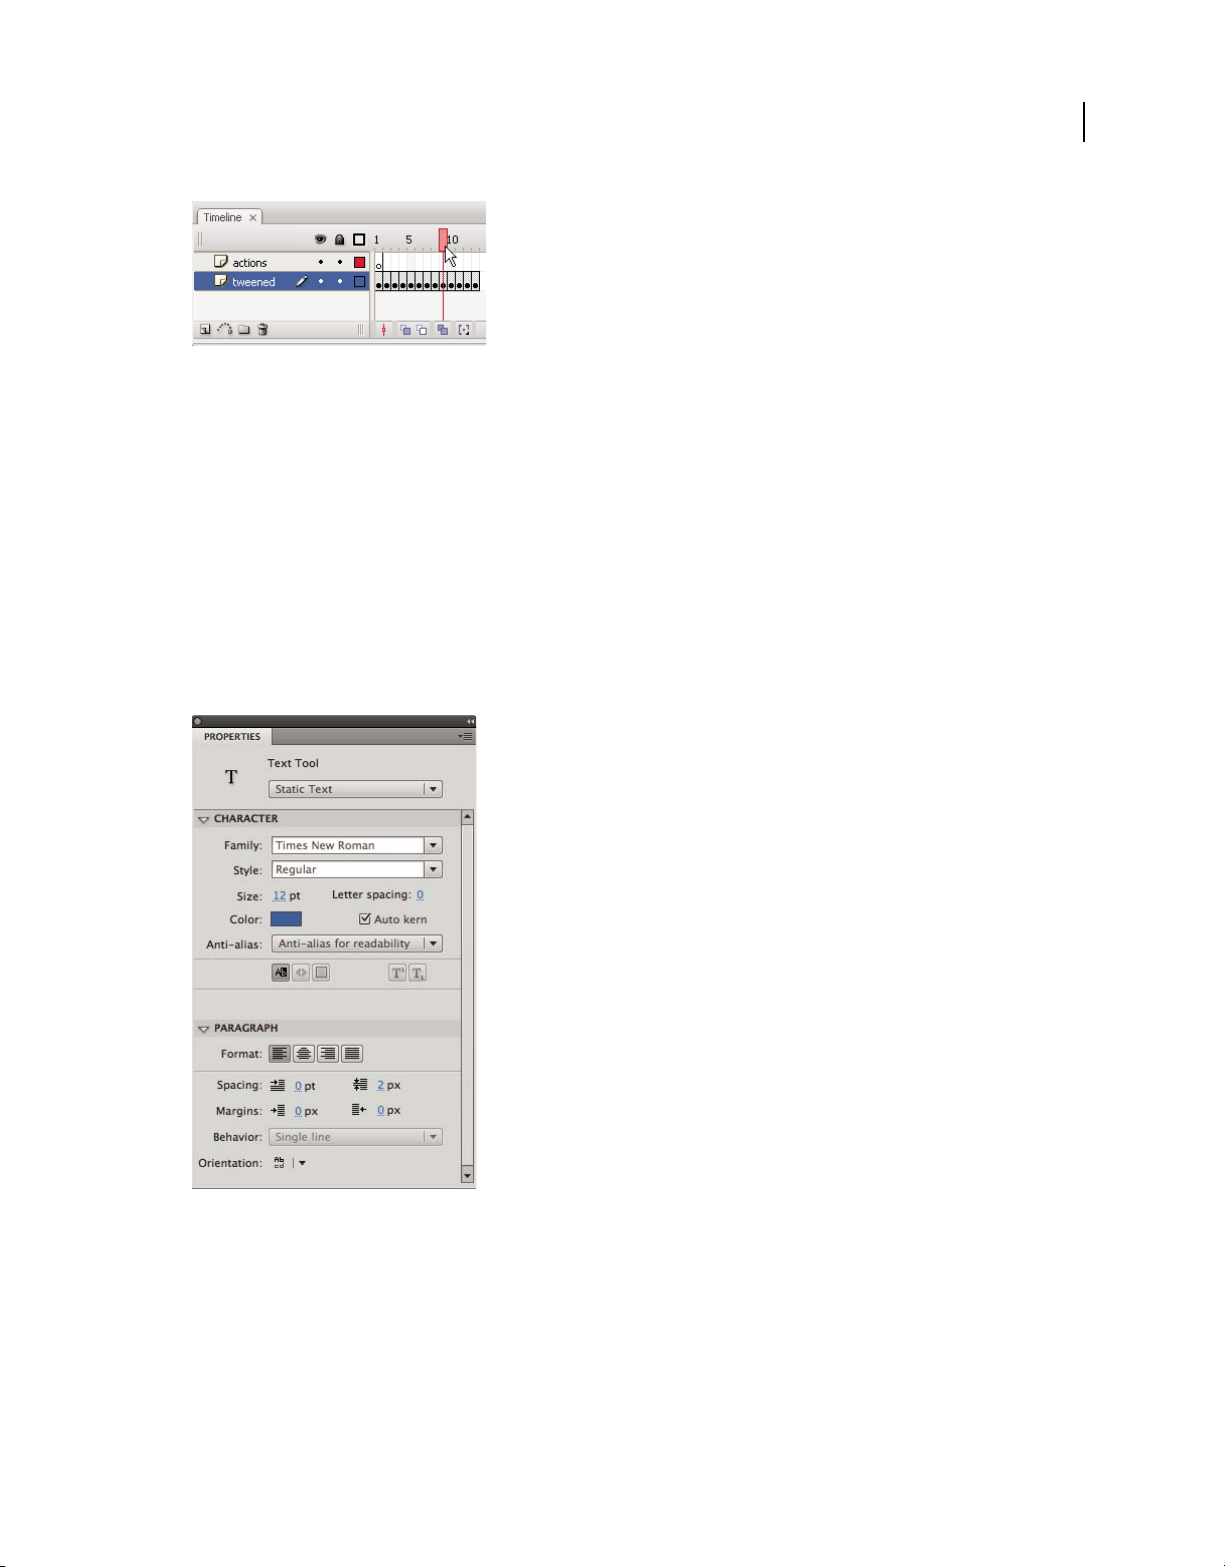
USING FLASH CS4 PROFESSIONAL
Updated 5 March 2009
Workspace
Moving the playhead
Using Flash authoring panels
About the Property inspector
The Property inspector provides easy access to the most commonly used attributes of the current selection, either on
the Stage or in the Timeline. You can make changes to the object or document attributes in the Property inspector
without accessing the menus or panels that also control these attributes.
Depending on what is currently selected, the Property inspector displays information and settings for the current
document, text, symbol, shape, bitmap, video, group, frame, or tool. When two or more different types of objects are
selected, the Property inspector displays the total number of objects selected.
25
The Property inspector showing the properties for the Text tool.
To display the Property inspector, Select Window > Properties, or press Control+F3 (Windows) or Command+F3
(Macintosh).
Page 31

USING FLASH CS4 PROFESSIONAL
Updated 5 March 2009
Workspace
About the Library panel
The Library panel (Window > Library) is where you store and organize symbols created in Flash, as well as imported
files, including bitmap graphics, sound files, and video clips. The Library panel lets you organize library items in
folders, see how often an item is used in a document, and sort items by name, type, date, use count, or ActionScript®
linkage identifier. You can also search the Library panel with the search field and set properties on most multipleobject selections.
26
The Library panel showing a movie clip symbol.
See also
“Managing assets with the library” on page 157
About the Actions panel
The Actions panel lets you create and edit ActionScript code for an object or frame. Selecting a frame, button, or movie
clip instance makes the Actions panel active. The Actions panel title changes to Button Actions, Movie Clip Actions,
or Frame Actions, depending on what is selected.
The Actions panel showing a stop() action in a frame.
Page 32

USING FLASH CS4 PROFESSIONAL
Updated 5 March 2009
Workspace
To display the Actions panel, select Window > Actions or press F9.
See also
“Actions panel overview” on page 332
“Script window overview” on page 334
Use the Movie Explorer
The Movie Explorer lets you view and organize the contents of a document and select elements in the document for
modification. It contains a display list of currently used elements, arranged in a navigable hierarchical tree.
Use the Movie Explorer to perform the following actions:
• Filter which categories of items in the document appear in the Movie Explorer.
• Display the selected categories as scenes, symbol definitions, or both.
• Expand and collapse the navigation tree.
• Search for an element in a document by name.
• Familiarize yourself with the structure of a Flash document that another developer created.
• Find all the instances of a particular symbol or action.
• Print the navigable display list that appears in the Movie Explorer.
The Movie Explorer has a Panel menu and a context menu with options for performing operations on selected items
or modifying the Movie Explorer display. A check mark with a triangle below it in the Movie Explorer panel indicates
the Panel menu.
27
Note: The Movie Explorer has slightly different functionality when you are working with screens.
See also
“Working with screens” on page 316
View the Movie Explorer
❖ Select Window > Movie Explorer.
Filter the categories of items that appear in the Movie Explorer
• To show text, symbols, ActionScript, imported files, or frames and layers, click one or more of the filtering buttons
to the right of the Show option. To customize which items to show, click the Customize button. Select options in
the Show area of the Movie Explorer Settings dialog box to view those elements.
• To show items in scenes, select Show Movie Elements from the Movie Explorer Panel menu.
• To show information about symbols, select Show Symbol Definitions from the Movie Explorer Panel menu.
Note: The Movie Elements option and the Symbol Definitions option can be active at the same time.
Search for an item using the Find box
❖ In the Find box, enter the item name, font name, ActionScript string, or frame number. The Find feature searches
all items that appear in the Movie Explorer.
Page 33

USING FLASH CS4 PROFESSIONAL
Updated 5 March 2009
Workspace
Select an item in the Movie Explorer
❖ Click the item in the navigation tree. Shift-click to select more than one item.
The full path for the selected item appears at the bottom of the Movie Explorer. Selecting a scene in the Movie Explorer
shows the first frame of that scene on the Stage. Selecting an element in the Movie Explorer selects that element on the
Stage if the layer containing the element is not locked.
Use the Movie Explorer Panel menu or context menu commands
1 Do one of the following:
• To view the Panel menu, click the Panel menu control in the Movie Explorer panel.
• To view the context menu, right-click (Windows) or Control-click (Macintosh) an item in the Movie Explorer
navigation tree.
2 Select an option from the menu:
Go To Location Jumps to the selected layer, scene, or frame in the document.
Go To Symbol Definition Jumps to the symbol definition for a symbol that is selected in the Movie Elements area of
the Movie Explorer. The symbol definition lists all the files associated with the symbol. (The Show Symbol Definitions
option must be selected. See its definition in this list.)
Select Symbol Instances Jumps to the scene containing instances of a symbol that is selected in the Symbol Definitions
area of the Movie Explorer. (The Show Movie Elements option must be selected.)
28
Show In Library Highlights the selected symbol in the document’s library. (Flash opens the Library panel if it is not
already visible.)
Rename Lets you enter a new name for a selected element.
Edit In Place Lets you edit a selected symbol on the Stage.
Edit In New Window Lets you edit a selected symbol in a new window.
Show Movie Elements Shows the elements in your document organized into scenes.
Show Symbol Definitions Shows all the elements associated with a symbol.
Copy All Text To Clipboard Copies selected text to the clipboard. For spell checking or other editing, paste the text into
an external text editor.
Cut, Copy, Paste, And Clear Performs these common functions on a selected element. Modifying an item in the display
list modifies the corresponding item in the document.
Expand Branch Expands the navigation tree at the selected element.
Collapse Branch Collapses the navigation tree at the selected element.
Collapse Others Collapses the branches in the navigation tree that do not contain the selected element.
Print Prints the hierarchical display list that appears in the Movie Explorer.
About Flash components and the Components panel
A component in Flash is a reusable, packaged module that adds a particular capability to a Flash document.
Components can include graphics as well as code, so they're pre-built functionality that you can easily include in your
Flash projects. For example, a component can be a radio button, a dialog box, a preload bar, or even something that
has no graphics at all, such as a timer, a server connection utility, or a custom XML parser.
Page 34

USING FLASH CS4 PROFESSIONAL
Updated 5 March 2009
Workspace
If you are less experienced with writing ActionScript, you can add components to a document, set their parameters in
the Property inspector or Component inspector, and use the Behaviors panel to handle their events. For example, you
could attach a Go To Web Page behavior to a Button component that opens a URL in a web browser when the button
is clicked without writing any ActionScript code.
If you are a programmer who wants to create more robust applications, you can create components dynamically, use
ActionScript to set properties and call methods at run time, and use the event listener model to handle events.
Insert a component using the Component panel
When you first add a component to a document, Flash imports it as a movie clip into the Library panel. You can also
drag a component from the Components panel directly to the Library panel and then add an instance of it to the Stage.
In any case, you must add a component to the library before you can access its class elements.
1 Select Window > Component panel.
2 Select an instance of a component in the Component panel, and drag it to the Stage or Library panel. After a
component is added to the library, you can drag multiple instances to the Stage.
3 Configure the component as needed using either the Property inspector or the Components inspector. For
information on the parameters the component uses, refer to the appropriate component documentation for the
version of ActionScript you are using in the Flash document.
29
Enter parameters for a component using the Component inspector
1 Select Window > Component Inspector.
2 Select an instance of a component on the Stage.
3 Click the Parameters tab and enter values for any of the listed parameters.
About the Web Services panel
You can view a list of web services, refresh web services, and add or remove web services in the Web Services panel
(Window > Other Panels > Web Services). When you add a web service to the Web Services panel, the web service is
then available to any application you create.
You can use the Web Services panel to refresh all your web services at once by clicking the Refresh Web Services
button. If you are not using the Stage but instead are writing ActionScript code for the connectivity layer of your
application, you can use the Web Services panel to manage your web services.
For detailed information about using the web services panel, see www.adobe.com/go/learn_fl_web_services.
Undo, redo, and history
Undo, Redo, and Repeat commands
To undo or redo actions on individual objects, or all objects within the current document, specify either object-level
or document-level Undo and Redo commands (Edit > Undo or Edit Redo). The default behavior is document-level
Undo and Redo.
You cannot undo some actions when using object-level Undo. Among these are entering and exiting Edit mode;
selecting, editing, and moving library items; and creating, deleting, and moving scenes.
• To remove deleted items from a document after using the Undo command, use the Save And Compact command.
Page 35

USING FLASH CS4 PROFESSIONAL
Updated 5 March 2009
Workspace
• To reapply a step to the same object or to a different object, use the Repeat command. For example, if you move a
shape named shape_A, select Edit > Repeat to move the shape again, or select another shape, shape_B, and select
Edit > Repeat to move the second shape by the same amount.
By default, Flash supports 100 levels of undo for the Undo menu command. Select the number of undo and redo levels,
from 2 to 9999, in Flash Preferences.
By default, when you undo a step by using Edit > Undo or the History panel, the file size of the document does not
change, even if you delete an item in the document. For example, if you import a video file into a document, and undo
the import, the file size of the document still includes the size of the video file. Any items that you delete from a
document when performing an Undo command are preserved to in order to be able to restore the items with a Redo
command. To permanently remove the deleted items from the document, and reduce the document file size, select
File > Save And Compact.
See also
“Set preferences in Flash” on page 37
“Automating tasks with the Commands menu” on page 32
Using the History panel
The History panel (Window > Other Panels > History) shows a list of the steps you’ve performed in the active
document since you created or opened that document, up to a specified maximum number of steps. (The History panel
doesn’t show steps you’ve performed in other documents.) The slider in the History panel initially points to the last
step that you performed.
30
• To undo or redo individual steps or multiple steps at once, use the History panel. Apply steps from the History
panel to the same object or to a different object in the document. However, you cannot rearrange the order of steps
in the History panel. The History panel is a record of steps in the order in which they are performed.
Note: If you undo a step or a series of steps and then do something new in the document, you can no longer redo the
steps in the History panel; they disappear from the panel.
• To remove deleted items from a document after you undo a step in the History panel, use the Save And Compact
command.
By default, Flash supports 100 levels of undo for the History panel. Select the number of undo and redo levels, from
2 to 9999, in Flash Preferences.
• To erase the history list for the current document, clear the History panel. After clearing the history list, you cannot
undo the steps that are cleared. Clearing the history list does not undo steps; it removes the record of those steps
from the current document’s memory.
Closing a document clears its history. To use steps from a document after that document is closed, copy the steps with
the Copy Steps command or save the steps as a command.
See also
“Set preferences in Flash” on page 37
“Automating tasks with the Commands menu” on page 32
Page 36

USING FLASH CS4 PROFESSIONAL
Updated 5 March 2009
Workspace
Undo steps with the History panel
When you undo a step, the step is dimmed in the History panel.
• To undo the last step performed, drag the History panel slider up one step in the list.
• To undo multiple steps at once, drag the slider to point to any step, or click to the left of a step along the path of the
slider. The slider scrolls automatically to that step, undoing all subsequent steps as it scrolls.
Note: Scrolling to a step (and selecting the subsequent steps) is different from selecting an individual step. To scroll to a
step, click to the left of the step.
Replay steps with the History panel
When you replay steps with the History panel, the steps that play are the steps that are selected (highlighted) in the
History panel, not necessarily the step currently indicated by the slider.
Apply steps in the History panel to any selected object in the document.
Replay one step
❖ In the History panel, select a step and click the Replay button.
31
Replay a series of adjacent steps
1 Select steps in the History panel by doing one of the following:
• Drag from one step to another. (Don’t drag the slider; drag from the text label of one step to the text label of another
step.)
• Select the first step, then Shift-click the last step; or select the last step and Shift-click the first step.
2 Click Replay. The steps replay in order, and a new step, labeled Replay Steps, appears in the History panel.
Replay nonadjacent steps
1 Select a step in the History panel, and Control-click (Windows) or Command-click (Macintosh) other steps. To
deselect a selected step, Control-click or Command-click.
2 Click Replay.
Copy and paste steps between documents
Each open document has its own history of steps. To copy steps from one document and paste them into another, use
the Copy Steps command in the History panel options menu. If you copy steps into a text editor, the steps are pasted
as JavaScript™ code.
1 In the document containing the steps to reuse, select the steps in the History panel.
2 In the History panel options menu, select Copy Steps.
3 Open the document to paste the steps into.
4 Select an object to apply the steps to.
5 Select Edit > Paste to paste the steps. The steps play back as they’re pasted into the document’s History panel. The
History panel shows them as only one step, called Paste Steps.
Page 37

USING FLASH CS4 PROFESSIONAL
Updated 5 March 2009
Workspace
Automating tasks with the Commands menu
Create and manage commands
To repeat the same task, create a command in the Commands menu from steps in the History panel and reuse the
command. Steps replay exactly as they were originally performed. You can’t modify the steps as you replay them.
To use steps the next time you start Flash, create and save a command. Saved commands are retained permanently,
unless you delete them. Steps that you copy using the History panel Copy Steps command are discarded when you copy
something else.
Create a command from selected steps in the History panel. Rename or delete commands in the Manage Saved
Commands dialog box.
See also
“Copy and paste steps between documents” on page 31
Create a command
1 Select a step or set of steps in the History panel.
2 Select Save As Command from the History panel options menu.
3 Enter a name for the command and click OK. The command appears in the Commands menu.
Note: The command is saved as a JavaScript file (with the extension .jsfl) in your Commands folder. This folder is in the
following locations: Windows 2000 or Windows XP: boot drive\Documents and Settings\<user>\Local
Settings\Application Data\Adobe\Flash CS4\<language>\Configuration\Commands; Mac OS® X: Macintosh
HD/Users/<username>/Library/Application Support/Adobe/Flash CS4/<language>/Configuration/Commands.
32
Edit the names of commands in the Commands menu
1 Select Commands > Manage Saved Commands.
2 Select a command to rename.
3 Click the Rename button.
4 Enter the new name and click OK.
Delete a name from the Commands menu
1 Select Commands > Manage Saved Commands, and select a command.
2 Click Delete, click Yes in the warning dialog box, and click OK.
Run commands
• To use a saved command, select the command from the Commands menu.
• To run a JavaScript or Flash JavaScript command, select Commands > Run Command, navigate to the script to run,
and click Open.
Page 38

USING FLASH CS4 PROFESSIONAL
Updated 5 March 2009
Workspace
Get more commands
Use the Get More Commands option in the Commands menu to link to the Flash Exchange website at
www.adobe.com/go/flash_exchange and download commands that other Flash users have posted. For more
information on the commands posted there, see the Flash Exchange website.
1 Make sure you are connected to the Internet.
2 Select Commands > Get More Commands.
Steps that can’t be used in commands
Some tasks can’t be saved as commands or repeated using the Edit > Repeat menu item. These commands can be
undone and redone, but they cannot be repeated.
Examples of actions that can’t be saved as commands or repeated include selecting a frame or modifying a document
size. If you attempt to save an unrepeatable action as a command, the command is not saved.
Accessibility in the Flash workspace
The Adobe® Flash® CS4 Professional workspace is keyboard-accessible for users who may have difficulty using a
mouse.
33
About accessibility support
Accessibility support in the authoring environment provides keyboard shortcuts for navigating and using interface
controls, including panels, the Property inspector, dialog boxes, the Stage, and objects on the Stage, so that you can
work with these interface elements without using the mouse.
Note: Certain keyboard controls and authoring environment accessibility features are available only in Windows.
To customize the keyboard shortcuts for accessibility in the authoring environment, use the Workspace Accessibility
Commands section of the Keyboard Shortcuts dialog box.
See also
“Customize keyboard shortcut sets” on page 41
About Flash authoring accessibility on the Macintosh
Accessibility for the authoring environment on the Macintosh has the following limitations:
• The Panel Focus keyboard shortcut (Command+Option+Tab) is not supported for the Property inspector.
• The Panel Control Focus keyboard shortcut (Tab) is supported only for the Timeline, not for other panels or the
Property inspector.
Select panels or the Property inspector with keyboard shortcuts
To select a panel or the Property inspector (also referred to as applying focus to the panel or Property inspector), use
the keyboard shortcut Control+F6 (Windows) or Command+F6 (Macintosh).
Apply focus to a panel or the Property inspector only when the panel or Property inspector is visible in the application
window. The panel can be expanded or collapsed.
Page 39

USING FLASH CS4 PROFESSIONAL
Updated 5 March 2009
Workspace
When you use the keyboard shortcut to select panels, focus is applied to panels using the following criteria:
• Docked panels are given focus first.
• If the Timeline is showing and docked, the Timeline is given focus the first time you press Control+F6 (Windows)
or Command+F6 (Macintosh).
• If the Timeline is not showing and docked, or if you press the keyboard shortcut again, focus moves to the rightmost
and highest docked panel. Pressing the keyboard shortcut repeatedly then moves the focus through the other
docked panels, from right to left and from top to bottom of the workspace.
• If you move the focus through all the docked panels, or if no docked panels are showing, focus moves to the
rightmost and highest floating panel. Pressing the keyboard shortcut repeatedly then moves the focus through the
other floating panels, from right to left and from top to bottom of the workspace.
Use keyboard shortcuts to select or deselect, expand, or collapse panels or the Property inspector
• To move the focus through the panels currently displayed in the workspace, press Control+F6 (Windows) or
Command+F6 (Macintosh). A dotted line appears around the title of the currently focused panel.
• To move the focus to the previously selected panel, press Control+Shift+F6 (Windows) or Command+Shift+F6
(Macintosh).
• To deselect a panel, press Escape, or move, dock, or undock the panel.
• To move the focus to the panel above or below the current panel in a panel group, press Up Arrow or Down Arrow.
• To hide all panels and the Property inspector, press F4. To display all panels and the Property inspector, press F4
again.
34
Use keyboard shortcuts to expand or collapse panels or the Property inspector
1 Press Control+F6 (Windows) or Command+F6 (Macintosh) until the panel to expand or collapse has focus. A
dotted line appears around the title of the currently focused panel.
2 To expand or collapse the currently selected panel, press the Spacebar.
Select controls in a panel or the Property inspector using keyboard shortcuts
To move the focus through the panel controls when a panel or the Property inspector has the current focus, use the
Tab key. To activate the control that has the current focus, use the Spacebar (that is, pressing Spacebar is equivalent to
clicking a control in the panel).
When you use the keyboard shortcut for panel controls, focus is applied to a control and the control is activated using
the following criteria:
• To select a control in the panel with the Tab key, the panel with the current focus must be expanded. If the panel is
collapsed, pressing Tab has no effect.
• When the panel with the current focus is expanded, pressing Tab the first time moves the focus to the panel’s Panel
menu.
• To move the focus between the Panel menu and the panel title bar, use Right Arrow and Left Arrow.
• If the focus is on the Panel menu, press Tab again to move the focus through the other controls in the panel.
Pressing Tab again does not return the focus to the Panel menu.
• To display the Panel menu items when the Panel menu has the focus, press Enter (Windows only).
Page 40

USING FLASH CS4 PROFESSIONAL
Updated 5 March 2009
Workspace
• To move the focus between the Panel menus of the panels in the group in panels that are grouped, use Up Arrow
and Down Arrow.
• You can move the focus to a panel control only if the control is active. If a control is dimmed (inactive), you cannot
apply focus to the control.
Move the focus from a panel title bar to a panel options menu
❖ Do one of the following:
• Press Tab.
• Press Right Arrow. To return the focus to the panel title bar, press Left Arrow or Shift+Tab.
• To move the focus to the Panel menu of the panel immediately above the panel with the current focus if the panel
is in a group, press Up Arrow. To move the focus to the Panel menu of the panel immediately below the panel with
the current focus, press Down Arrow.
Move the focus through the items in the Panel menu of a panel
1 To display the Panel menu items when the focus currently applied to the Panel menu, press the Spacebar.
2 To move through the items in the Panel menu, press Down Arrow.
3 To activate the currently selected Panel menu item, press Enter (Windows) or Return (Macintosh).
35
Move the focus through the controls in a panel
1 Press Tab when the focus is currently applied to the Panel menu. To move the focus through the controls in the
panel, press Tab repeatedly.
2 To activate the currently selected panel control, press Enter (Windows only).
Navigate dialog box controls using keyboard shortcuts (Windows only)
• To move through the controls in the dialog box, press Tab.
• To move through the controls within one section of a dialog box, press Up Arrow and Down Arrow.
• To activate the button (equivalent to clicking the button), when the focus is applied to a dialog box control button,
press Enter.
• To apply the current settings and close the dialog box (equivalent to clicking OK), when the focus is not applied to
any dialog box control button, press Enter.
• To close the dialog box without applying the changes (equivalent to clicking Cancel), press Escape.
• To view the Help content for the dialog box (equivalent to clicking Help), when the focus is applied to the Help
button, press Enter or Spacebar.
Select the Stage or objects on the Stage using keyboard shortcuts
Selecting the Stage with a keyboard shortcut is equivalent to clicking on the Stage. Any other element currently selected
becomes deselected when the Stage is selected.
After the Stage is selected, use the Tab key to navigate through all objects on all layers, one at a time. You can select
instances (including graphic symbols, buttons, movie clips, bitmaps, videos, or sounds), groups, or boxes. You cannot
select shapes (such as rectangles) unless those shapes are instances of symbols. You cannot select more than one object
at a time using keyboard shortcuts.
Page 41

USING FLASH CS4 PROFESSIONAL
Updated 5 March 2009
Workspace
To select the Stage or objects on the Stage, use the following techniques:
• To select the Stage, press Control+Alt+Home (Windows) or Command+Option+Home (Macintosh).
• To select an object on the Stage, with the Stage selected, press Tab.
• To select the previous object when an object is currently selected, press Shift+Tab.
• To select the first object that was created on the active frame in the active layer, press Tab. When the last object on
the top layer is selected, press Tab to move to the next layer beneath it and select the first object there, and so on.
• When the last object on the last layer is selected, press Tab to move to the next frame and select the first object on
the top layer there.
• Objects on layers that are hidden or locked cannot be selected with the Tab key.
Note: If you are currently typing text in a box, you cannot select an object using the keyboard focus. You must first change
the focus to the Stage and then select an object.
Navigate tree structures using keyboard shortcuts
To navigate tree structures, the hierarchical displays of file structures in certain Flash panels, use keyboard shortcuts.
• To expand a collapsed folder, select the folder and press Right Arrow.
• To collapse an expanded folder, select the folder and press Left Arrow.
• To move to the parent folder of an expanded folder, press Left Arrow.
• To move to the child folder of an expanded folder, press Right Arrow.
36
Work with library items using keyboard shortcuts
1 To copy or paste a selected library item, press Control+X (Windows) or Command+X (Macintosh) to cut the item,
or press Control+C (Windows) or Command+C (Macintosh) to copy the item.
2 To paste a cut or copied item, click the Stage or in another library to set the insertion point, and press Control+V
(Windows) or Command+V (Macintosh) to paste in the center of the Stage; or press Control+Shift+C (Windows)
or Command+Shift+C (Macintosh) to paste in place (in the same location as the original).
To cut, copy, and paste items, use the following techniques:
• Cut or copy one item or multiple items.
• Cut or copy an item from the Library panel and paste it onto the Stage or into another library, or paste a folder into
another library.
• You cannot paste a shape from the Stage into the library.
• You cannot paste a library item into a common library, because common libraries cannot be modified. However,
you can create a common library.
• When you paste a library item onto the Stage, the item is centered.
• If you paste a folder, each item in the folder is included.
• To paste a library item into a folder in the destination library, click the folder before pasting.
• You can paste a library item into a different location in the same library where it originated.
• If you attempt to paste a library item into a location containing another item by the same name, select whether to
replace the existing item.
Page 42

USING FLASH CS4 PROFESSIONAL
Updated 5 March 2009
See also
“Work with common libraries” on page 160
Set preferences in Flash
You can set preferences for general application operations, editing operations, and clipboard operations.
37
Workspace
The General category in the Preferences dialog box.
See also
“Drawing preferences” on page 96
“Change the appearance of the Timeline” on page 23
“About the Timeline” on page 22
“Managing documents” on page 43
“Substituting missing fonts” on page 253
“Pen tool preferences” on page 107
“Illustrator object import options” on page 76
“Photoshop file importer preferences” on page 84
Page 43

USING FLASH CS4 PROFESSIONAL
Updated 5 March 2009
Workspace
Set preferences
1 Select Edit > Preferences (Windows) or Flash > Preferences (Macintosh).
2 Make a selection in the Category list and select from the respective options.
Set AutoFormat preferences for ActionScript
❖ Select any of the options. To see the effect of each selection, look in the Preview pane.
Set text preferences
• For Font Mapping Default, select a font to use when substituting missing fonts in documents you open in Flash.
• For Vertical Text options, select Default Text Orientation (deselected by default).
• To reverse the default text display direction, select Right To Left Text Flow (deselected by default).
• To turn off kerning for vertical text, select No Kerning (deselected by default). Turning off kerning is useful to
improve spacing for some fonts that use kerning tables.
• For Input Method, select the appropriate language.
38
Set warning preferences
• To receive a warning when you try to save documents with content that is specific to the
Adobe® Flash® CS4 Professional authoring tool as a Flash 8 file, select Warn On Save For Adobe Flash 8 and CS3
Compatibility (default).
• To receive a warning if the URL for a document changed since the last time you opened and edited it, select Warn
On URL Changes In Launch And Edit.
• To place a red X over any Generator objects as a reminder that Generator objects are not supported in Flash 8, select
Warn On Reading Generator Content.
• To receive an alert when Flash inserts frames in your document to accommodate audio or video files that you
import, select Warn On Inserting Frames When Importing Content.
• To receive an alert when selecting Default Encoding that could potentially lead to data loss or character corruption,
select Warn On Encoding Conflicts When Exporting ActionScript Files. (For example, if you create a file with
English, Japanese, and Korean characters and select Default Encoding on an English system, the Japanese and
Korean characters are corrupted.)
• To receive a warning when you attempt to edit a symbol with timeline effects applied to it, select Warn On
Conversion Of Effect Graphic Objects.
• To receive a warning when you create a site in which the local root folder overlaps with another site, select Warn
On Sites With Overlapped Root Folder.
• To receive a warning when you convert a symbol with a behavior attached to a symbol of a different type—for
example, when you convert a movie clip to a button—select Warn On Behavior Symbol Conversion.
• To receive a warning when you convert a symbol to a symbol of a different type, select Warn On Symbol
Conversion.
• To receive a warning when Flash converts a graphic object drawn in Object Drawing mode to a group, select Warn
On Automatically Converting From Drawing Object To Group.
• To display warnings on controls for features not supported by the Flash Player version that the current FLA file is
targeting in its publish settings, select Show Incompatibility Warnings On Feature Controls.
Page 44

USING FLASH CS4 PROFESSIONAL
Updated 5 March 2009
Workspace
Set General preferences
On Launch Specify which document opens when you start the application.
Document- or Object-level undo Document-level undo maintains a single list of all your actions for the entire Flash
document. Object-level undo maintains separate lists of your actions for each object in your document. Object-level
lets you undo an action on one object without having to also undo actions on other objects that might have been
modified more recently than the target object.
Undo levels To set the number of undo or redo levels, enter a value from 2 to 300. Undo levels require memory; the
more undo levels you use, the more system memory is consumed. The default is 100.
Workspace To open a new document tab in the application window when you select Control > Test Movie, select
Open Test Movie In Tabs. The default is to open the test movie in its own window. To have panels in icon mode auto
collapse when you click outside them, select Auto-Collapse Icon Panels.
Selection To control how multiple elements are selected, select or deselect Shift Select. When Shift Select is off,
clicking additional elements adds them to the current selection. When Shift Select is on, clicking additional elements
deselects other elements unless you hold down Shift.
Show Tooltips Shows tooltips when the pointer pauses over a control. To hide the tooltips, deselect this option.
Contact Sensitive Selects objects when any part of them is included in the marquee rectangle when dragging with the
Selection or Lasso tools. The default is that objects are only selected when the tool’s marquee rectangle completely
surrounds the object.
39
Show axes for 3D Displays an overlay of the X, Y, and Z axes on all 3D movie clips. This makes them easier to identify
on the Stage.
Timeline To use span-based selection in the Timeline, rather than the default frame-based selection, select Span Based
Selection.
Named Anchor On Scene Make the first frame of each scene in a document a named anchor. Named anchors let you
use the Forward and Back buttons in a browser to jump from scene to scene.
Highlight Color To use the current layer’s outline color, select a color from the panel, or select Use Layer Color.
Version Cue Select this option to enable Version Cue®.
Printing (Windows only) To disable PostScript® output when printing to a PostScript printer, select Disable PostScript.
By default, this option is deselected. Select this option if you have problems printing to a PostScript printer; however,
this option slows down printing.
Clipboard preferences
Bitmaps (Windows only)
To specify Color Depth and Resolution parameters for bitmaps copied to the clipboard, select their respective options.
To apply anti-aliasing, select Smooth.
To specify the amount of RAM that is used when placing a bitmap image on the Clipboard, enter a value in the
Size Limit text field. Increase this value when working with large or high-resolution bitmap images.
Gradient Quality To specify the quality of gradient fills placed in the Windows metafile, select an option. Choosing a
higher quality increases the time required to copy artwork. To specify gradient quality when pasting items to a location
outside of Flash, use this setting. When you are pasting in Flash, the full gradient quality of the copied data is preserved
regardless of the Gradients setting on the Clipboard.
Page 45

USING FLASH CS4 PROFESSIONAL
Updated 5 March 2009
Workspace
PICT Settings (Macintosh only) To specify how PICT files are handled, use the following settings.
• Type To preserve data copied to the Clipboard as vector artwork, select Objects. To convert the copied artwork to
a bitmap, select one of the bitmap formats.
• Resolution Enter a value.
• Include PostScript Select to include PostScript data.
• Gradient Quality To specify gradient quality in the PICT file, select an option. Choosing a higher quality increases
the time required to copy artwork. To specify gradient quality when pasting items to a location outside of Flash, use
the Gradients setting. When you are pasting in Flash, the full gradient quality of the copied data is preserved regardless
of the Gradient setting.
• FreeHand Text To keep text editable in a pasted FreeHand® file, select Maintain Text As Blocks.
Keyboard shortcuts
Create and modify custom keyboard shortcuts
You can create and modify keyboard shortcuts in Flash.
40
Customize keyboard shortcuts
1 Select Edit > Keyboard Shortcuts (Windows) or Flash > Keyboard Shortcuts (Macintosh).
The Keyboard Shortcuts dialog box appears.
2 Use the following options to add, delete, or edit keyboard shortcuts:
Current Set Lets you choose a set of predetermined shortcuts (listed at the top of the menu), or any custom set you’ve
defined.
Commands Lets you select a category of commands to edit (for example, menu commands). The command list
displays the commands associated with the category you selected from the Commands pop-up menu, along with the
assigned shortcuts. The Menu Commands category displays this list as a tree view that replicates the structure of the
menus. The other categories list the commands by name (such as Quit Application), in a flat list.
Shortcuts Displays all shortcuts assigned to the selected command.
Add Shortcut Adds a new shortcut to the current command. To add a new blank line to the Shortcuts box, click this
button. To add a new keyboard shortcut for this command, enter a new key combination and click Change. Each
command can have two different keyboard shortcuts; if two shortcuts are already assigned to a command, the Add
Item button does nothing.
Remove Shortcut Removes the selected shortcut from the list of shortcuts.
Press Key Displays the key combination you enter when you’re adding or changing a shortcut.
Change Adds the key combination shown in the Press Key box to the list of shortcuts, or changes the selected shortcut
to the specified key combination.
Duplicate Set Duplicates the current set. Give the new set a name; the default name is the current set’s name with
the word copy appended to it.
Rename Set Renames the current set.
Export Set As HTML Saves the current set in an HTML table format for easy viewing and printing. Open the HTML
file in your browser and print the shortcuts for easy reference.
Page 46

USING FLASH CS4 PROFESSIONAL
Updated 5 March 2009
Workspace
Delete Set Deletes a set. You cannot delete the active set.
3 Click OK.
Remove a shortcut from a command
1 From the Commands pop-up menu, select a command category, select a command from the Commands list, and
select a shortcut.
2 Click Remove Shortcut .
Add a shortcut to a command
1 From the Commands pop-up menu, select a command category and select a command.
2 Prepare to add a shortcut by doing one of the following:
• If fewer than two shortcuts are already assigned to the command, click Add Shortcut . A new blank line appears
in the Shortcuts box, and the insertion point moves to the Press Key box.
• If two shortcuts are already assigned to the command, select one of them to be replaced by the new shortcut, and
click in the Press Key box.
3 Press a key combination.
Note: If a problem occurs with the key combination (for example, if the key combination is already assigned to another
command), an explanatory message appears just below the Shortcuts box and you may be unable to add or edit the
shortcut.
41
4 Click Change.
Edit an existing shortcut
1 From the Commands pop-up menu, select a command category, select a command from the Commands list, and
select a shortcut to change.
2 Click in the Press Key box, enter a new key combination, and click Change.
Note: If a problem occurs with the key combination (for example, if the key combination is already assigned to another
command), an explanatory message appears just below the Shortcuts box and you may be unable to add or edit the
shortcut.
Customize keyboard shortcut sets
To match the shortcuts you use in other applications, or to streamline your workflow, select keyboard shortcuts. By
default, Flash uses built-in keyboard shortcuts designed for the application. You can also select a built-in keyboard
shortcut set from one of several graphics applications.
View or print the current set of keyboard shortcuts
1 Select Edit > Keyboard Shortcuts (Windows) or Flash > Keyboard Shortcuts (Macintosh).
2 In the Keyboard Shortcuts dialog box, select the shortcut set to view from the Current Set pop-up menu.
3 Click the Export Set As HTML button .
4 Select a name and location for the exported HTML file. The default file name is the name of the selected shortcut set.
5 Click Save.
6 Find the exported file in the folder you selected and open the file in a web browser.
7 To print the file, use the browser’s Print command.
Page 47

USING FLASH CS4 PROFESSIONAL
Updated 5 March 2009
Workspace
Select a keyboard shortcut set
1 Select Edit > Keyboard Shortcuts (Windows) or Flash > Keyboard Shortcuts (Macintosh).
2 In the Keyboard Shortcuts dialog box, select a shortcut set from the Current Set pop-up menu.
Create a keyboard shortcut set
1 Select a keyboard shortcut set and click the Duplicate Set button .
2 Enter a name for the new shortcut set and click OK.
Rename a custom keyboard shortcut set
1 In the Keyboard Shortcuts dialog box, select a shortcut set from the Current Set pop-up menu.
2 Click the Rename Set button , enter a new name, and click OK.
Add or remove a keyboard shortcut
1 Select Edit > Keyboard Shortcuts (Windows) or Flash > Keyboard Shortcuts (Macintosh) and select the set to
modify.
2 From the Commands pop-up menu, select a category to view shortcuts for the selected category.
3 In the Commands list, select the command for which you want to add or remove a shortcut. An explanation of the
selected command appears in the description area in the dialog box.
4 Do one of the following:
• To add a shortcut, click the Add Shortcut (+) button.
• To remove a shortcut, click the Remove Shortcut (-) button and proceed to step 6.
5 If you are adding a shortcut, enter the new shortcut key combination in the Press Key box.
Note: To enter the key combination, press the keys on the keyboard. You do not need to spell out key names, such as
Control, Option, and so on.
42
6 Click Change.
7 Repeat this procedure to add or remove additional shortcuts, and click OK.
Delete a keyboard shortcut set
1 Select Edit > Keyboard Shortcuts (Windows) or Flash > Keyboard Shortcuts (Macintosh). In the Keyboard
Shortcuts dialog box, click Delete Set .
2 In the Delete Set dialog box, select a shortcut set and click Delete.
Note: You cannot delete the keyboard shortcut sets built into Flash.
Page 48

Chapter 3: Managing documents
Updated 5 March 2009
When you create and save Adobe® Flash® CS4 Professional documents within the Flash authoring environment, the
documents are in FLA file format. To display a document in Adobe® Flash® Player, you must publish or export the
document as a SWF file.
You can add media assets to a Flash document and manage the assets in the library, and you can use the Movie
Explorer to view and organize all the elements in a Flash document. The Undo and Redo commands, the History panel,
and the Commands menu let you automate tasks in a document.
Working with Flash documents
About Flash files
In Flash, you can work with a variety of file types, each of which has a separate purpose:
• FLA files, the primary files you work with in Flash, contain the basic media, timeline, and script information for a
Flash document. Media objects are the graphic, text, sound, and video objects that comprise the content of your
Flash document. The Timeline is where you tell Flash when specific media objects should appear on the Stage. You
can add ActionScript® code to Flash documents to more finely control their behavior and to make them respond to
user interactions.
• SWF files, the compiled versions of FLA files, are the files you display in a web page. When you publish your FLA
file, Flash creates a SWF file.
• AS files are ActionScript files—you can use these to keep some or all of your ActionScript code outside of your FLA
files, which is helpful for code organization and for projects that have multiple people working on different parts
of the Flash content.
• SWC files contain the reusable Flash components. Each SWC file contains a compiled movie clip, ActionScript
code, and any other assets that the component requires.
• ASC files are files used to store ActionScript that will be executed on a computer running Flash Media Server. These
files provide the ability to implement server-side logic that works in conjunction with ActionScript in a SWF file.
• JSFL files are JavaScript files that you can use to add new functionality to the Flash authoring tool.
For video tutorials about working with Flash files, see the following:
43
• www.adobe.com/go/vid0117
• www.adobe.com/go/vid0118
See also
“About the Timeline” on page 22
Create a new document
You can create a new document or open a previously saved document in Flash, and you can open a new window as
you work. You can set properties for new or existing documents.
For a video tutorial, see Working with Flash Files at www.adobe.com/go/vid0117.
Page 49

USING FLASH CS4 PROFESSIONAL
Updated 5 March 2009
Managing documents
See also
“Set preferences in Flash” on page 37
“Publishing and Exporting” on page 379
Create a new document
1 Select File > New.
2 On the General tab, select Flash Document.
On Windows, you can create a new document of the same type as the last document created by clicking the New File
button in the main toolbar.
Create a new document from a template
1 Select File > New.
2 Click the Templates tab.
3 Select a category from the Category list, select a document from the Category Items list, and click OK. You can
select standard templates that come with Flash or a template you have already saved.
Open an existing document
1 Select File > Open.
2 In the Open dialog box, navigate to the file or enter the path to the file in the Go To box.
3 Click Open.
44
Open a new window for the current document
❖ Select Window > Duplicate Window.
Set properties for a new or existing document
1 With the document open, select Modify > Document.
The Document Properties dialog box appears.
2 For Frame Rate, enter the number of animation frames to appear every second.
For most computer-displayed animations, especially those playing from a website, 8 frames per second (fps) to 15 fps
is sufficient. When you change the frame rate, the new frame rate becomes the default for new documents.
3 For Dimensions, set the Stage size:
• To specify the Stage size in pixels, enter values in the Width and Height boxes. The minimum size is 1 x 1 pixels;
the maximum is 2880 x 2880 pixels.
• To set the Stage size so that there is equal space around the content on all sides, click the Contents option to the
right of Match. To minimize document size, align all elements to the upper-left corner of the Stage, and then click
Contents.
• To set the Stage size to the maximum available print area, click Printer. This area is determined by the paper size
minus the current margin selected in the Margins area of the Page Setup dialog box (Windows) or the Print Margins
dialog box (Macintosh).
• To set the Stage size to the default size, 550 x 400 pixels, click Default.
4 To set the background color of your document, click the triangle in the Background Color control and select a color
from the palette.
Page 50

USING FLASH CS4 PROFESSIONAL
Updated 5 March 2009
Managing documents
5 To specify the unit of measure for rulers that you can display along the top and side of the application window,
select an option from the Ruler Units menu in the lower left. (This setting also determines the units used in the
Info panel.)
6 Do one of the following:
• To make the new settings the default properties for the current document only, click OK.
• To make the new settings the default properties for all new documents, click Make Default.
Change document properties using the Property inspector
1 Deselect all assets, then select the Selection tool.
2 In the Property inspector (Window > Properties), click the Edit button next to the Size property to display the
Document Properties dialog box.
3 To select a background color, click the triangle in the Background Color control and select a color from the palette.
4 For Frame Rate, enter the number of animation frames to play each second.
5 For publish settings, click the Edit button next to the Profile property. Flash displays the Publish Settings dialog box
with the Flash tab selected. Choose appropriate options from the dialog box. For more information, see “Publishing
Flash documents” on page 379.
45
Add XMP metadata to a document
You can include Extensible Metadata Platform (XMP) data such as title, author, description, copyright, and more in
your FLA files. XMP is a metadata format that certain other Adobe applications can understand. The metadata is
viewable in Flash and in Adobe® Bridge. For more information about XMP metadata, see Metadata and Keywords in
Bridge Help.
Embedding metadata improves the ability of web-based search engines to return meaningful search results for Flash
content. The search metadata is based on the XMP (Extensible Metadata Platform) specifications and is stored in the
FLA file in a W3C-compliant format.
A file’s metadata contains information about the contents, copyright status, origin, and history of the file. In the File
Info dialog box, you can view and edit the metadata for the current file.
Depending on the selected file, the following types of metadata may appear:
Description Contains author, title, copyright, and other information.
IPTC Displays editable metadata. You can add captions to your files, as well as copyright information. IPTC Core is a
specification that was approved by the IPTC (International Press Telecommunications Council) in October 2004. It
differs from the older IPTC (IIM, legacy) in that new properties were added, some property names were changed, and
some properties were deleted.
Camera Data (Exif) Displays information assigned by digital cameras, including the camera settings used when the
image was taken.
Video Data Displays metadata for video files, including pixel aspect ratio, scene, and shot.
Audio Data Displays metadata for audio files, including artist, album, track number, and genre.
Mobile SWF Lists information about SWF files, including title, author, description, and copyright.
History Keeps a log of changes made to images with Photoshop.
Note: The History Log preference must be turned on in Photoshop for the log to be saved with the file’s metadata.
Version Cue Lists any Version Cue file-version information.
Page 51

USING FLASH CS4 PROFESSIONAL
Updated 5 March 2009
Managing documents
DICOM Displays information about images saved in the Digital Imaging and Communications in Medicine (DICOM)
format.
To add metadata:
1 Choose File > File Info.
2 In the File Info dialog box that appears, enter the metadata that you want to include. You can add or remove
metadata in the FLA file at any time.
View a document when multiple documents are open
When you open multiple documents, tabs at the top of the Document window identify the open documents and let
you easily navigate among them. Tabs appear only when documents are maximized in the Document window.
❖ Click the tab of the document you want to view.
By default, tabs appear in the order in which the documents were created. You can drag the document tabs to change
their order.
Save Flash documents
You can save a Flash FLA document using its current name and location or using a different name or location.
46
When a document contains unsaved changes, an asterisk (*) appears after the document name in the document title
bar, the application title bar, and the document tab. When you save the document, the asterisk is removed.
Save a Flash document
1 Do one of the following:
• To overwrite the current version on the disk, select File > Save.
• To save the document in a different location and/or with a different name, or to compress the document, select
File > Save As.
2 If you selected Save As, or if the document has never been saved before, enter the filename and location.
3 Click Save.
Revert to the last saved version of a document
❖ Select File > Revert.
Save a document as a template
1 Select File > Save As Template.
2 In the Save As Template dialog box, enter a name for the template in the Name box.
3 Select a category from the Category pop-up menu, or enter a name to create a new category.
4 Enter a description of the template in the Description box (up to 255 characters), and click OK.
The description appears when the template is selected in the New Document dialog box.
Save a document as a Flash CS3 document
1 Select File > Save As.
2 Enter the filename and location.
Page 52

USING FLASH CS4 PROFESSIONAL
Updated 5 March 2009
Managing documents
3 Select Flash CS3 Document from the Format pop-up menu, and click Save.
Important: If an alert message indicates that content will be deleted if you save in Flash CS3 format, click Save As Flash
CS3 to continue. This might happen if your document contains features that are available only in Flash CS4. Flash does
not preserve these features when you save the document in Flash CS3 format.
Save documents when quitting Flash
1 Select File > Exit (Windows) or Flash > Quit Flash (Macintosh).
2 If you have documents open with unsaved changes, Flash prompts you to save or discard the changes for each
document.
• Click Yes to save the changes and close the document.
• Click No to close the document without saving the changes.
Working with other Adobe applications
Flash is designed to work with other Adobe® applications to enable a broad range of creative workflows. You can
import Illustrator® and Photoshop® files directly into Flash. You can also create video from Flash and edit it in Adobe®
Premiere® Pro or After Effects®, or import video from either of those applications into Flash. When publishing your
SWF files, you can use Dreamweaver® to embed the content in your web pages and launch Flash directly from within
Dreamweaver to edit the content.
47
See also
“Working with Illustrator and Flash” on page 70
“Working with Photoshop and Flash” on page 78
“Working with Adobe Premiere Pro and After Effects” on page 294
“Edit a SWF file from Dreamweaver in Flash” on page 48
Opening XFL files
An XFL file is a type of Flash file that stores the same information as a FLA file, but in XML format. XFL is a set of XML
files and other assets (JPEG, GIF, FLV, MP3, WAV, etc.) saved into a compressed XFL package file.
Other Adobe applications, such as InDesign® and After Effects can export files in XFL format. This allows you to work
on a project in a separate application first and then continue working with it in Flash.
You can open and work with XFL files in Flash in the same way you would open an FLA file. When you open an XFL
file in Flash, you can then save the file as a FLA file. You cannot save XFL files from within Flash.
To open an XFL file in Flash:
1 In another Adobe application, such as InDesign or After Effects, export your work as an XFL file.
The application preserves all of the layers and objects of the original file in the XFL file.
2 In Flash, choose File > Open and navigate to the XFL file. Click Open.
The XFL file opens in Flash in the same way as an FLA file. All of the layers of the original file appear in the Timeline
and the original objects appear in the Library panel.
You can now work with the file normally.
3 To save the file, choose File > Save.
Page 53

USING FLASH CS4 PROFESSIONAL
Updated 5 March 2009
Managing documents
Flash prompts you to name the new FLA file in the Save As dialog box.
4 Type a name and save the FLA file.
Note: For a video tutorial about exporting XFL files from After Effects, see Importing and exporting XFL files between
Flash and After Effects at www.adobe.com/go/lrvid4098_xp.
Edit a SWF file from Dreamweaver in Flash
If you have both Flash and Dreamweaver installed, you can select a SWF file in a Dreamweaver document and use
Flash to edit it. Flash does not edit the SWF file directly; it edits the source document (FLA file) and re-exports the
SWF file.
1 In Dreamweaver, open the Property inspector (Window > Properties).
2 In the Dreamweaver document, do one of the following:
• Click the SWF file placeholder to select it; then in the Property inspector click Edit.
• Right-click (Windows) or Control-click (Macintosh) the placeholder for the SWF file, and select Edit With Flash
from the context menu.
Dreamweaver switches the focus to Flash, and Flash attempts to locate the Flash authoring file (FLA) for the selected
SWF file. If Flash cannot locate the Flash authoring file, you are prompted to locate it.
48
Note: If the FLA file or SWF file is locked, check out the file in Dreamweaver.
3 In Flash, edit the FLA file. The Flash Document window indicates that you are modifying the file from within
Dreamweaver.
4 When you finish making edits, click Done.
Flash updates the FLA file, re-exports it as a SWF file, closes, and then returns the focus to the Dreamweaver document.
Note: To update the SWF file and keep Flash open, in Flash select File > Update for Dreamweaver.
5 To view the updated file in the document, click Play in the Dreamweaver Property inspector or press F12 to preview
your page in a browser window.
Create mobile content with Adobe Device Central and Flash
1 Start Flash.
2 On the main Flash screen, select Create New > Flash File (Mobile).
Flash opens Adobe® Device Central and displays the New Document tab.
3 In Device Central, select a Player version and ActionScript version.
The Available Devices list on the left is updated. Devices that do not support the selected Player version and
ActionScript version are dimmed.
4 Select a content type.
The Available Devices list on the left is updated and shows the devices that support the content type (as well as the
Player version and ActionScript version) selected.
5 In the Available Devices list, select a single target device or multiple devices (or select a set or individual device in
the Device Sets list).
Page 54

USING FLASH CS4 PROFESSIONAL
Updated 5 March 2009
Managing documents
Device Central lists proposed document sizes based on the device or devices you selected (if the devices have different
display sizes). Depending on the design or content you are developing, you can create a separate mobile document for
each display size or try to find one size appropriate for all devices. When choosing the second approach, you may want
to use the smallest or largest suggested document size as a common denominator. You can even specify a custom size
at the bottom of the tab.
6 Click Create.
Flash starts up and creates a document with preset publish settings from Device Central, including the correct size for
the device (or group of devices) specified.
7 Add content to the new Flash document.
8 To test the document, select Control > Test Movie.
The new document is displayed in the Device Central Emulator tab. If one or more devices were selected in the
Available Devices list in step 5, a new device set is created (named according to the FLA file) and listed in the Device
Sets panel. The device shown in the Emulator tab is listed in the Device Sets panel with a special icon . To test the
new Flash document on another device, double-click the name of a different device in the Device Sets or Available
Devices lists.
See also
Using Device Central with Flash
49
Creating mobile content in Flash
About Version Cue
Version Cue acts as a virtual server that lets designers work collaboratively on a set of common files. Designers can
easily track and manipulate multiple versions of files.
Version Cue consists of two pieces: the Version Cue Server and Adobe Drive. The Version Cue Server can be installed
locally or on a dedicated computer, and it hosts Version Cue projects and PDF reviews. Adobe Drive connects to
Version Cue CS4 servers. The connected server appears like a hard drive or mapped network drive in Explorer, Finder,
and dialog boxes such as Open and Save As.
AB C
Version Cue
A. Version Cue server B. Users connect to server using Adobe Drive C. Users check out and save different versions of a file
Use Version Cue to track versions of a file as you work and to enable workgroup collaboration such as file sharing,
version control, backups, online reviews, and the ability to check files in and out. You can organize Version Cuemanaged files into private or shared projects.
Page 55

USING FLASH CS4 PROFESSIONAL
Updated 5 March 2009
Managing documents
Version Cue is integrated with Adobe Bridge: Use Adobe Bridge as a file browser for Version Cue projects. With
Adobe Bridge, you can access Version Cue Servers, projects, and files, and view, search for, and compare information
about Version Cue-managed assets.
Use Version Cue Server Administration to create and manage user access, projects, and PDF reviews; administer
backups; export content; and specify advanced Version Cue Server information.
Note: Version Cue is not available in Adobe Bridge with Adobe Photoshop® Elements for Macintosh.
For a video on setting up Version Cue, see www.adobe.com/go/lrvid4038_vc.
See also
Version Cue video
Printing Flash documents
Print from Flash documents
To preview and edit your documents, print frames from Adobe® Flash® CS4 Professional documents, or specify frames
to be printable from Flash Player by a viewer.
50
When printing frames from a Flash document, use the Print dialog box to specify the range of scenes or frames to print
and the number of copies. In Windows, the Page Setup dialog box specifies paper size, orientation, and various print
options—including margin settings and whether all frames are to be printed for each page. On the Macintosh, these
options are divided between the Page Setup and the Print Margins dialog boxes.
The Print and Page Setup dialog boxes are standard in either operating system, and their appearance depends on the
selected printer driver.
1 Select File > Page Setup (Windows) or File > Print Margins (Macintosh).
2 Set page margins. Select both Center options to print the frame in the center of the page.
3 In the Frames menu, select whether to print all frames in the document or only the first frame of each scene.
4 In the Layout menu, select from the following options:
Actual Size Prints the frame at full size. Enter a value for Scale to reduce or enlarge the printed frame.
Fit On One Page Reduces or enlarges each frame so it fills the print area of the page.
Storyboard Prints several thumbnails on one page. Select from Boxes, Grid, or Blank. Enter the number of thumbnails
per page in the Frames box. Set the space between the thumbnails in the Frame Margin box, and select Label Frames
to print the frame label as a thumbnail.
5 To print frames, select File > Print.
Use frame labels to disable printing
To choose not to print any of the frames in the main Timeline, label a frame as !#p to make the entire SWF file
nonprintable. Labeling a frame as
the Flash Player context menu.
!#p dims the Print command in the Flash Player context menu. You can also remove
If you disable printing from Flash Player, the user can still use the browser Print command to print frames. Because
this command is a browser feature, you cannot use Flash to control or disable it.
Page 56

USING FLASH CS4 PROFESSIONAL
Updated 5 March 2009
See also
“Publishing overview” on page 379
Disable printing in the Flash Player context menu
1 Open or make active the Flash document (FLA file) to publish.
2 Select the first keyframe in the main Timeline.
3 Select Window > Properties to view the Property inspector.
4 In the Property inspector, for Frame Label enter !#p to specify the frame as non-printing.
Specify only one
!#p label to dim the Print command in the context menu.
51
Managing documents
Note: You can also select a blank frame (rather than a keyframe) and label it
#p.
Disable printing by removing the Flash Player context menu
1 Open or make active the Flash document (FLA file) to publish.
2 Select File > Publish Settings.
3 Select the HTML tab and deselect Display Menu and click OK.
Specify a print area when printing frames
1 Open the Flash document (FLA file) containing the frames you will set to print.
2 Select a frame that you have not specified to print with a #p frame label that is on the same layer as a frame that is
labeled with a
To organize your work, select the next frame after a frame labeled
3 Create a shape on the Stage the size of the desired print area. To use a frame’s bounding box, select a frame with
any object of the appropriate print area size.
4 Select the frame in the Timeline that contains the shape to use for the bounding box.
5 In the Property inspector (Window > Properties), enter #b for Frame Label to specify the selected shape as the
bounding box for the print area.
Only one
#b frame label per Timeline is allowed. This option is the same as selecting the Movie bounding box option
with the Print action.
#p.
#p.
Change the printed background color
You can print the background color set in the Document Properties dialog box. Change the background color for only
the frames to be printed by placing a colored object on the lowest layer of the Timeline being printed.
1 Place a filled shape that covers the Stage on the lowest layer of the Timeline that will print.
2 Select the shape and select Modify > Document. Select a color for the printing background.
This action changes the entire document’s background color, including that of movie clips and loaded SWF files.
3 Do one of the following:
• To print that color as the document’s background, designate to print the frame in which you placed the shape.
• To maintain a different background color for non-printing frames, repeat steps 2 and 3. Then place the shape on
the lowest layer of the Timeline, in all the frames that are not designated to print.
Page 57

USING FLASH CS4 PROFESSIONAL
Updated 5 March 2009
Managing documents
Print from the Flash Player context menu
Use the Print command in the Flash Player context menu to print frames from any Flash SWF file.
The context menu’s Print command cannot print transparency or color effects and cannot print frames from other
movie clips; for more advanced printing capabilities, use the
1 Open the document.
The command prints the frames labeled
If you haven’t designated specific frames to print, all frames in the document main Timeline print.
2 Select File > Publish Preview > Default or press F12 to view your Flash content in a browser.
3 Right-click (Windows) or Control-click (Macintosh) in the Flash content in the browser window to display the
Flash Player context menu.
4 Select Print from the Flash Player context menu to display the Print dialog box.
5 In Windows, select the print range to select which frames to print.
6 On the Macintosh, in the Print dialog box, select the pages to print.
7 Select other print options, according to your printer’s properties.
8 Click OK (Windows) or Print (Macintosh).
Note: Printing from the context menu does not interact with calls to the
#p by using the Stage for the print area or the specified bounding box.
PrintJob object or the print() function.
PrintJob object.
52
Working with projects
About projects
You can use Flash projects to manage multiple document files in a single project. Flash projects allow you to group
multiple, related files together to create complex applications.
A Flash project can contain any Flash or other file type, including previous versions of FLA and SWF files.
Create and manage projects
You use the Project panel (Window > Other Panels > Project) to create and manage projects. The panel displays the
contents of a Flash project in a collapsible tree structure. The panel title bar displays the project name.
If certain types of project files are missing (not in the specified location), a dialog specifying which items are missing
will alert you to the missing files, and give you an opportunity to browse for their locations. Missing files are most
commonly external folders not inside the root project folder. All other files are automatically updated based on the
root project folder location.
When you publish a project, each FLA file in the Publish List (denoted by a check mark next to the FLA name) is
published with the publish profile specified for that file.
Only one project can be open at one time. If a project is open and you open or create another project, Flash
automatically saves and closes the first project.
Page 58

A B
Updated 5 March 2009
C
D E F
The Project panel
A. Project menu B. Options menu C. Pin D. New folder E. New file F. Create class
USING FLASH CS4 PROFESSIONAL
Managing documents
53
See also
“Using publish profiles” on page 397
Create a project
1 From the Project menu select New Project.
2 Browse for a folder.
3 Choose a name for your project. The Project panel uses the name of the folder containing the project by default.
4 From the ActionScript Version menu, choose the type of project you would like to create: ActionScript 3.0 or
ActionScript 2.0.
Flash adds the project to the Project menu, and the Project Panel displays the contents of the directory that contains
the selected folder.
Flash reads the directory of the initial folder you choose. To change directories, create another project.
Create a Quick Project
The Project panel allows you to quickly create a project based on the currently open FLA file. A Quick Project is
identical to any other project.
❖ Select Quick Project from the Project menu.
Flash creates a project using the front most FLA file as the default document. The Quick Project will be named after
the FLA file.
To remove the Quick Project, delete it from the Project menu.
Multiple Quick Projects are allowed.
Note: Creating a Quick Project from a FLA file that resides in the root of another project changes the name of the other
project to the name of the FLA file, and sets the default document to the FLA file.
Page 59

USING FLASH CS4 PROFESSIONAL
Updated 5 March 2009
Managing documents
Open an existing project
1 Select Window > Other Panels > Project to open the Project panel.
2 Select Open Project from the Project pop-up menu in the Project panel.
3 Using the Browse For Folder dialog box, navigate into the folder containing the project and click OK.
Note: You cannot open Dreamweaver projects in the Flash Project panel.
Close a project
❖ Select Close Project from the Options pop-up menu.
Delete a project
1 Open the Project you want to delete.
2 From the Options pop-up menu select Delete Project.
3 Select how to delete the project:
• Delete the currently active project from the Project Panel.
• Delete the currently active project from the Project Panel and all of the files stored in the project directory. This
deletes all of the selected files from the file system.
Flash removes the selected project from the Project panel.
54
Convert previous projects to the new project format
In previous versions of Flash, projects used an XML file with the filename extension .flp—for example, myProject.flp.
To use projects created in previous versions of Flash, you must convert the old project to the new format.
1 Select Window > Other Panels > Project to open the Project panel.
2 Select Open Project from the Project pop-up menu in the Project panel.
3 Using the Browse For Folder dialog box, navigate to the folder containing the FLP file, and click OK, specifying that
folder as the converted project’s root folder.
The contents of the specified folder will be displayed in the Project panel.
Add a new file or folder to a project
The Project panel allows you to open, create, and remove files and folders.
The Project panel filters files by filename extension. However, you can manually hide files by preceding the filename
with a special character, such as an underscore. To enable this feature, enter the special characters to filter in the “Hide
files or folders beginning with” section of the Panel Preferences (Options > Panel Preferences).
By default, the Project panel only shows Flash document types (FLA, SWF, SWC, AS, JSFL, ASC, MXML, TXT, XML),
but you can add custom types in the Settings tab of the Panel Preferences (Options > Panel Preferences).
The Project panel shows all files opened recently in the panel in the Recent Files folder at the top of the project tree.
Recent Files are sorted in the order they were opened. Only files opened with the Project panel appear in this list. To
disable/enable the recent files folder, toggle the Show Recent Files checkbox in the Settings Tab of the Panel
Preferences. You can also specify how many files are shown in the list.
Page 60

USING FLASH CS4 PROFESSIONAL
Updated 5 March 2009
Managing documents
To clear the Recent Files list, select Clear Recent Files from the Options menu, or right-click the Recent Files folder,
and select Clear Recent Files from the context menu. Clearing the recent files list does not remove the files from your
computer.
1 Select the folder in which you want to create the file or folder. If there is no selection, Flash creates the file or folder
in the project root folder.
2 Click the New File or New Folder button at the bottom of the panel.
3 Choose a name and a file type (files only). Select the Open File After Creation checkbox to open the new file in
Flash. Then click Create File.
Note: If a file or folder with the name you’ve specified already exists, a dialog alerts you about the existing file or folder.
The new file appears in the file list.
Rename a project
1 Select the project name in the Project panel.
2 Select Rename Project from the Options pop-up menu.
3 Enter a new name and click OK.
Open a file from the Project panel in Flash
❖ Double-click the filename in the Project panel.
If the file is of a native file type (a type supported by the Flash authoring tool), the file opens in Flash. If the file is a
non-native file type, the file opens in the application used to create it.
55
Remove a file or folder from a project
1 Select the file or folder you want to remove from the file list.
2 Click the Delete icon in the far right of the icon tray, or press the Delete key.
You can also right-click on the file or folder and choose Delete from the context menu.
3 In the dialog box that appears, confirm your selection.
Flash deletes the file from your hard drive completely. Deleting a file or directory cannot be undone. Deleting a folder
also removes its files and subdirectories.
Add an external folder to a project
The Project panel allows for the addition of folders external to the project root folder, referred to as locations. Folder
paths can be added (and shown or hidden) on a global basis, or per project. Locations act as any other folder, and have
all the same functionality as folders in the project root folder.
1 Open the Panel or Project Preferences.
2 Select the Locations tab.
3 To make locations visible in the project file list, select the “Specify additional source folders outside of the root
project folder” checkbox.
4 Click the “+” button.
5 Browse to the external folder you want to add.
6 Give the location a name.
Page 61

USING FLASH CS4 PROFESSIONAL
Updated 5 March 2009
Managing documents
Location names can be changed at any time in the Project or Panel preferences by selecting the desired location and
clicking on the Rename Location button.
7 When you are finished adding locations, click OK to close the dialog. Location folders appear above all other folders
in the file list.
You cannot delete or remove a location in the operating system file browser. Remove them using the Locations tab in
the Project or Panel preferences.
Create ActionScript classes
The Project panel supports creating template-based ActionScript classes within an ActionScript package structure.
Use the Create Class button to add class files to specified packages. ActionScript 3.0 and ActionScript 2.0 templates are
supported.
Use the panel preferences to specify options for classes. If you specify a folder in the Save Classes In text box in the
Classes tab of the Panel preferences, the Project panel shows that folder in the project directory with a <> symbol to
indicate that it is the default location for new classes. Flash adds this folder to the class path when publishing via the
Project panel.
This class path folder can reside in a subdirectory of your project folder, in a directory relative to your project folder,
or anywhere on your computer. You can set the class path globally in the Panel preferences, or per project in the Project
preferences. By default, all class packages are stored in the root of your project.
56
The classes’ folder visibility can be toggled in the Project panel preferences Settings tab.
1 Click the Create Class button at the bottom of the Project panel.
2 Enter the package path of your class.
3 Select Bind Class to Library Symbol to create a movie clip in your library (in the same folder structure as your
package path). To bind to an existing movie clip, select a movie clip in the library, and select Use Selected Library
Symbol in the Create Class dialog box. Flash moves the movie clip to the appropriate location in the library, and
updates the symbol linkage to reflect the new class.
4 Select Declare Stage Instances to add variable declarations and import statements to the new class file to account
for all of the named instances on the timeline of the selected movie clip.
5 Select Open File After Creation to open your class file for editing after it is created.
6 Click Create Class.
The Project panel creates the class file based on the class template, and places it in the appropriate package directory,
creating directories if necessary.
Clicking the Create Class button does not overwrite class files. If the file exists, it does not create a new file. This can
be useful if you would like to bind an existing class to a movie clip, move the movie clip into the appropriate library
folder, and set the appropriate linkages.
Create class templates
The Project panel supports a simple template structure, used when creating class files. This system is composed of four
files. All the base files are located in the Flash Configuration folder, in the /Project/templates/ subdirectory.
The four files are:
1 boundClass_as2.as
2 boundClass_as3.as
3 standardClass_as2.as
Page 62

USING FLASH CS4 PROFESSIONAL
Updated 5 March 2009
Managing documents
4 standardClass_as3.as
Each of these template files has custom template tags that are replaced with dynamic data when a new class is created.
You can place these tags anywhere in your class template file.
The following are the tags included in each file:
• All classes:
%PACKAGE_NAME%
%CLASS_NAME%
%BASE_CLASS_NAME% (AS3 only)
• Bound class only:
%LINKAGE_ID%
%AUTO_IMPORTS%
%AUTO_ELEMENTS%
To create a template file, you can either modify the template files, or create your own class template. To change the
default class templates, open the Panel Preferences and browse to the correct template file. Flash then uses this file for
all your projects.
57
The Project preferences dialog contains a similar tab that allows you to set template files on a per-project basis.
The templates set in the Panel preferences is only used when creating new projects. To change a template path for a
project, set it in the Project preferences. Template paths in the Project and Panel preferences must be absolute. Relative
paths are not supported.
Pin a directory
When dealing with large projects, you can reduce clutter by only showing files in a specific directory.
1 Select the directory you would like to pin.
2 Click the Pin Directory button.
The Pin Directory button changes to the Unpin Directory button, and the selected directory appears at the root of the
project listing.
To pin a different directory, un-pin the current pinned directory first.
Locations and the classes folder (and their subdirectories) can also be pinned. When a location or the classes folder (or
subfolder) is pinned, the classes folder is not visible.
Compiling FLA files
• To test, publish or export a FLA file, right-click (Windows) or command-click (Macintosh) on any FLA file in the
project tree and select the appropriate action from the context menu.
• To test a project, click the Test Project button.
Flash compiles the movie specified as the default document and opens the resulting SWF file. You can change the
default document at any time by right-clicking (Windows) or Command-clicking (Macintosh) on any FLA file and
choosing Make Default Document from the context menu.
The Project panel allows you to create a publish list. This is a list of FLA files that can be batch-compiled at any time.
• To add or remove files from the publish list, select the checkbox to the right of each FLA file in the project list.
Page 63

USING FLASH CS4 PROFESSIONAL
Updated 5 March 2009
Managing documents
• To publish the files in the publish list, click Publish List in the Project panel Options menu.
If one of the FLA files has errors when compiling, the Project panel stops compiling the list and displays the error
in the Output panel.
Create Flash projects for use with Flex class files
Flash lets you create skins and other visual elements for use in Flex, as well as allowing you to create ActionScript code
in Flex but publish the resulting SWF file using Flash. To support the use Flex class files in Flash, the Project panel
provides support for identifying the Flex SDK.
To use Flex classes in Flash, you must specify the location of the Flex SDK.
1 Create a project.
2 Select Project Properties from the Options pop-up menu.
3 Select the Paths tab, and enter the directory path or browse to the Flex SDK. For example: C:\Program Files\Adobe
FlexBuilder 3\sdks\3.0.0
4 From the Paths tab, select the Source tab and add the path to any folders containing ActionScript class files.
Click the Plus (+) button to enter a path, or the Browse button to select a folder containing class files. To delete a path,
select it and click the Minus (-) button.
58
5 Select the Library tab, and enter the path to SWC (Flash component) files or folders containing SWC files.
Click the Plus (+) button to enter a path, or the Browse button to select a folder containing SWC files. To delete an
SWC file or folder, select it and click the Minus (-) button.
6 Select the External Library tab, and enter the path to SWC (Flash component) files or folders containing SWC files
loaded as runtime shared libraries.
Click the Plus (+) button to enter a path or the Browse button to select a folder containing SWC files. To delete an SWC
file or folder, select it and click the Minus (-) button.
7 Click OK.
Find and Replace
About Find and Replace
The Find and Replace feature lets you do the following:
• Search for a text string, a font, a color, a symbol, a sound file, a video file, or an imported bitmap file.
• Replace the specified element with another element of the same type. Different options are available in the Find and
Replace dialog box depending on the type of specified element.
• Find and replace elements in the current document or the current scene.
• Search for the next occurrence or all occurrences of an element, and replace the current occurrence or all
occurrences.
Note: In a screen-based document, you can find and replace elements in the current document or the current screen, but
you can’t use scenes.
The Live Edit option lets you edit the specified element directly on the Stage. If you use Live Edit when searching for
a symbol, Flash opens the symbol in edit-in-place mode.
Page 64

USING FLASH CS4 PROFESSIONAL
Updated 5 March 2009
Managing documents
The Find and Replace Log at the bottom of the Find and Replace dialog box shows the location, name, and type of the
elements for which you are searching.
See also
“Working with screens” on page 316
Find and replace text
1 Select Edit > Find and Replace.
2 Select Text from the For pop-up menu.
3 In the Text box, enter the text to find.
4 In the Replace With Text box, enter the text to replace the existing text.
5 Select options for searching text:
Whole Word Searches for the specified text string as a whole word only, bounded on both sides by spaces, quotes, or
similar markers. When Whole Word is deselected, the specified text can be searched as part of a larger word. For
example, when Whole Word is deselected, a search for place will yield the words replace, placement, and so on.
Match Case Searches for text that exactly matches the case (uppercase or lowercase character formatting) of the
specified text when finding and replacing.
59
Regular Expressions Searches for text in regular expressions in ActionScript. An expression is any statement that Flash
can evaluate that returns a value.
Text Field Contents Searches the contents of a text field.
Frames/Layers/Parameters Searches frame labels, layer names, scene names, and component parameters.
Strings in ActionScript Searches strings (text between quotation marks) in ActionScript in the document or scene
(external ActionScript files are not searched).
ActionScript Searches all ActionScript, including code and strings.
6 To select the next occurrence of the specified text on the Stage and edit it in place, select Live Edit.
Note: Only the next occurrence is selected for live editing, even if you select Find All in step 7.
7 To find text, do one of the following:
• To find the next occurrence of the specified text, click Find Next.
• To find all occurrences of the specified text, click Find All.
8 To replace text, do one of the following:
• To replace the currently selected occurrence of the specified text, click Replace.
• To replace all occurrences of the specified text, click Replace All.
Find and replace fonts
1 Select Edit > Find and Replace.
2 Select Font from the For pop-up menu, then select from the following options:
• To search by font name, select Font Name and select a font from the pop-up menu or enter a font name in the box.
When Font Name is deselected, all fonts in the scene or document are searched.
Page 65

USING FLASH CS4 PROFESSIONAL
Updated 5 March 2009
Managing documents
• To search by font style, select Font Style and select a font style from the pop-up menu. When Font Style is
deselected, all font styles in the scene or document are searched.
• To search by font size, select Font Size and enter values for minimum and maximum font size to specify the range
of font sizes to be searched. When Font Size is deselected, all font sizes in the scene or document are searched.
• To replace the specified font with a different font name, select Font Name under Replace With and select a font
name from the pop-up menu or enter a name in the box. When Font Name is deselected under Replace with, the
current font name remains unchanged.
• To replace the specified font with a different font style, select Font Style under Replace With and select a font style
from the pop-up menu. When Font Style is deselected under Replace with, the current style of the specified font
remains unchanged.
• To replace the specified font with a different font size, select Font Size under Replace With and enter values for
minimum and maximum font size. When Font Size is deselected under Replace With, the current size of the
specified font remains unchanged.
3 To select the next occurrence of the specified font on the Stage and edit it in place, select Live Edit.
Note: Only the next occurrence is selected for live editing, even if you select Find All in step 4.
4 To find a font, do one of the following:
• To find the next occurrence of the specified font, click Find Next.
• To find all occurrences of the specified font, click Find All.
5 To replace a font, do one of the following:
• To replace the currently selected occurrence of the specified font, click Replace.
• To replace all occurrences of the specified font, click Replace All.
60
Find and replace colors
You cannot find and replace colors in grouped objects.
Note: To find and replace colors in a GIF or JPEG file in a Flash document, edit the file in an image-editing application.
1 Select Edit > Find and Replace.
2 Select Color from the For pop-up menu.
3 To search for a color, click the Color control and do one of the following:
• Select a color swatch from the color pop-up window.
• Enter a hexadecimal color value in the Hex Edit box in the color pop-up window.
• Click the System Color Picker button and select a color from the system color picker.
• To make the eyedropper tool appear, drag from the Color control. Select any color on your screen.
4 To select a color to replace the specified color, click the Color control under Replace With and do one of the
following:
• Select a color swatch from the color pop-up window.
• Enter a hexadecimal color value in the Hex Edit box in the color pop-up window.
• Click the System Color Picker button and select a color from the system color picker.
• To make the eyedropper tool appear, drag from the Color control. Select any color on your screen.
Page 66

USING FLASH CS4 PROFESSIONAL
Updated 5 March 2009
Managing documents
5 To specify which occurrence of the color to find and replace, select the Fills, Strokes, or Text option or any
combination of those options.
6 To select the next occurrence of the specified color on the Stage and edit it in place, select Live Edit.
Note: Only the next occurrence is selected for live editing, even if you select Find All in the next step.
7 Find a color.
• To find the next occurrence of the specified color, click Find Next.
• To find all occurrences of the specified color, Click Find All.
8 Replace a color.
• To replace the currently selected occurrence of the specified color, click Replace.
• To replace all occurrences of the specified color, click Replace All.
Find and replace symbols
To find and replace symbols, search for a symbol by name. Replace a symbol with another symbol of any type—movie
clip, button, or graphic.
1 Select Edit > Find and Replace.
2 Select Symbol from the For pop-up menu.
3 For Name, select a name from the pop-up menu.
4 Under Replace With, for Name select a name from the pop-up menu.
5 To select the next occurrence of the specified symbol on the Stage and edit it in place, select Live Edit.
Note: Only the next occurrence is selected for editing, even if you select Find All in the next step.
61
6 To find a symbol, do one of the following:
• To find the next occurrence of the specified symbol, click Find Next.
• To find all occurrences of the specified symbol, click Find All.
7 To replace a symbol, do one of the following:
• To replace the currently selected occurrence of the specified symbol, click Replace.
• To replace all occurrences of the specified symbol, click Replace All.
Find and replace sound, video, or bitmap files
1 Select Edit > Find and Replace.
2 Select Sound, Video, or Bitmap from the For pop-up menu.
3 For Name, enter a sound, video, or bitmap filename or select a name from the pop-up menu.
4 Under Replace With, for Name enter a sound, video, or bitmap filename or select a name from the pop-up menu.
5 To select the next occurrence of the specified sound, video, or bitmap on the Stage and edit it in place, select Live
Edit.
Note: Only the next occurrence is selected for editing, even if you select Find All in the next step.
6 Find a sound, video, or bitmap.
• To find the next occurrence of the specified sound, video, or bitmap, click Find Next.
Page 67

USING FLASH CS4 PROFESSIONAL
Updated 5 March 2009
Managing documents
• To find all occurrences of the specified sound, video, or bitmap, click Find All.
7 Replace a sound, video, or bitmap.
• To replace the currently selected occurrence of the specified sound, video, or bitmap, click Replace.
• To replace all occurrences of the specified sound, video, or bitmap, click Replace All.
Templates
Templates are FLA files that are preconfigured with content that you can customize for your own purposes. There are
several different templates available.
About templates
Flash templates provide you with easy-to-use starting points for common projects. There are several templates for
advertising projects included with Flash.
For more information on authoring Flash files for mobile devices, see the Adobe Mobile Devices site at
www.adobe.com/go/devnet_devices.
62
Advertising templates
Advertising templates facilitate the creation of standard rich media types and sizes defined by the Interactive
Advertising Bureau (IAB) and accepted by the industry. For more information on IAB-endorsed ad types, see the IAB
site at IAB.net.
Test ads for stability in a variety of browser and platform combinations. Your application is considered stable if it
doesn’t cause error messages, browser crashes, or system crashes.
Work with web masters and network administrators to create detailed testing plans that include tasks relevant to your
users. Make these plans publicly available and update them regularly. Vendors should publish detailed plans indicating
the browser and platform combinations in which their technologies are stable. Examples are available at the IAB Rich
Media testing section of IAB.net. Size and file format requirements of ads might vary by vendor and site. Check with
your vendor, ISP, or the IAB to learn about these requirements that can affect the ad’s design.
Use templates
1 Select File > New.
2 Click the Templates tab.
3 Select a template and click OK.
4 Add content to the FLA file.
5 Save and publish the file.
Page 68

Chapter 4: Using imported artwork
Updated 5 March 2009
A key advantage of Adobe® Flash® CS4 Professional is that you can import artwork created in other applications and
use those assets in your Flash documents. You can import vector graphics and bitmap images in a variety of file
formats, making Adobe® Flash® CS4 Professional a versatile media arts tool.
When you import a bitmap, you can apply compression and anti-aliasing, place the bitmap directly in an
Adobe® Flash® CS4 Professional document, use the bitmap as a fill, edit the bitmap in an external editor, break the
bitmap apart into pixels and edit it in Adobe® Flash® CS4 Professional, or convert the bitmap to vector artwork.
Placing artwork into Flash
About importing artwork into Flash
Adobe® Flash® CS4 Professional can use artwork created in other applications. You can import vector graphics and
bitmaps in a variety of file formats. If you have QuickTime® 4 or later installed on your system, you can import
additional vector or bitmap file formats. You can import Adobe® FreeHand® files (version MX and earlier) and Adobe®
Fireworks® PNG files directly into Flash, preserving attributes from those formats.
63
Graphic files that you import into Flash must be at least 2 pixels x 2 pixels in size.
To load JPEG files into a Flash SWF file during runtime, use the
information, see loadMovie (MovieClip.loadMovie method) in ActionScript 2.0 Language Reference or Working with
movie clips in Programming ActionScript 3.0.
Flash imports vector graphics, bitmaps, and sequences of images as follows:
• When you import Adobe® Illustrator® and Adobe® Photoshop® files into Flash, you can specify import options that
let you preserve most of your artwork's visual data, and the ability to maintain the editability of certain visual
attributes with the Flash authoring environment.
• When you import vector images into Flash from FreeHand, select options for preserving FreeHand layers, pages,
and text blocks.
• When you import PNG images from Fireworks, import files as editable objects to modify in Flash, or as flattened
files to edit and update in Fireworks.
• Select options for preserving images, text, and guides.
Note: If you import a PNG file from Fireworks by cutting and pasting, the file is converted to a bitmap.
• Vector images from SWF and Windows® Metafile Format (WMF) files that you import directly into a Flash
document (instead of into a library) are imported as a group in the current layer.
• Bitmaps (scanned photographs, BMP files) that you import directly into a Flash document are imported as single
objects in the current layer. Flash preserves the transparency settings of imported bitmaps. Because importing a
bitmap can increase the file size of a SWF file, consider compressing imported bitmaps.
Note: Bitmap transparency might not be preserved when bitmaps are imported by dragging and dropping from an
application or desktop to Flash. To preserve transparency, use the File > Import To Stage or Import To Library
command for importing.
loadMovie action or method. For detailed
Page 69

USING FLASH CS4 PROFESSIONAL
Updated 5 March 2009
Using imported artwork
• Any sequence of images (for example, a PICT or BMP sequence) that you import directly into a Flash document is
imported as successive keyframes of the current layer.
See also
“Imported bitmaps” on page 86
“Video” on page 283
“Sound” on page 273
“Set bitmap properties” on page 87
Import artwork in Flash
Flash lets you import artwork in various file formats either directly to the Stage, or to the library.
See also
“Symbols, instances, and library assets” on page 147
Import a file into Flash
1 Do one of the following:
• To import a file directly into the current Flash document, select File > Import > Import To Stage.
• To import a file into the library for the current Flash document, select File > Import > Import To Library. (To use
a library item in a document, drag it onto the Stage. )
2 Select a file format from the Files Of Type (Windows) or Show (Macintosh) pop-up menu.
3 Navigate to the desired file and select it. If an imported file has multiple layers, Flash might create new layers
(depending on the import file type). Any new layers appear in the Timeline.
4 Click Open.
5 If the name of the file you are importing ends with a number and additional sequentially numbered files are in the
same folder, do one of the following:
• To import all the sequential files, click Yes.
• To import only the specified file, click No.
The following are examples of filenames that can be used as a sequence:
64
Frame001.gif, Frame002.gif, Frame003.gif
Bird 1, Bird 2, Bird 3
Walk-001.ai, Walk-002.ai, Walk-003.ai
Paste a bitmap from another application directly into the current Flash document
1 Copy the image in the other application.
2 In Flash, select Edit > Paste In Center.
Page 70

USING FLASH CS4 PROFESSIONAL
Updated 5 March 2009
Using imported artwork
Supported file formats for vector or bitmap files
Flash can import different vector or bitmap file formats depending on whether QuickTime 4 or later is installed on
your system. Using Flash with QuickTime 4 installed is especially useful for collaborative projects in which authors
work on both Windows and Macintosh platforms. QuickTime 4 extends support for certain file formats (including
PICT, QuickTime Movie, and others) to both platforms.
You can import the following vector or bitmap file formats into Flash 8 or later, regardless of whether QuickTime 4 is
installed:
File type Extension Windows Macintosh
Adobe Illustrator (version 10 or earlier) .ai • •
Adobe Photoshop .psd • •
65
AutoCAD
® DXF
Bitmap .bmp • •
Enhanced Windows Metafile .emf •
FreeHand .fh7, .fh8, .fh9, .fh10, .fh11 • •
FutureSplash Player .spl • •
GIF and animated GIF .gif • •
JPEG .jpg • •
PNG .png • •
Flash Player 6/7 .swf • •
Windows Metafile .wmf • •
.dxf • •
You can import the following bitmap file formats into Flash only if QuickTime 4 or later is installed:
File type Extension Windows Macintosh
MacPaint .pntg • •
PICT .pct, .pic • (As bitmap) •
QuickTime Image .qtif • •
Silicon Graphics Image .sgi • •
TGA .tga • •
TIFF .tif • •
Import FreeHand MX files
You can import FreeHand files in version 7 or later directly into Flash. FreeHand is a good choice for creating vector
graphics for import into Flash, because you can preserve FreeHand layers, text blocks, library symbols, and pages, and
choose a page range to import. If the imported FreeHand file is in CMYK color mode, Flash converts the file to RGB.
Page 71

USING FLASH CS4 PROFESSIONAL
Updated 5 March 2009
Using imported artwork
Keep the following guidelines in mind when importing FreeHand files:
• When importing a file with overlapping objects to preserve as separate objects, place the objects on separate layers
in FreeHand, and select Layers in the FreeHand Import dialog box in Flash. (If overlapping objects on a single layer
are imported into Flash, the overlapping shapes are divided at intersection points, just as with overlapping objects
that you create in Flash.)
• Flash can support up to eight colors in a gradient fill. If a FreeHand file contains a gradient fill with more than eight
colors, Flash creates clipping paths to simulate the appearance of a gradient fill. Clipping paths can increase file size.
To minimize file size, use gradient fills with eight colors or fewer in FreeHand.
• Flash imports each step in a blend as a separate path. Thus, the more steps a blend has in a FreeHand file, the larger
the imported file size is in Flash.
• When you import files with strokes that have square caps, Flash converts the caps to round caps.
• Flash converts placed grayscale images to RGB images. This conversion can increase the imported file’s size.
• When you import files with placed EPS images, select the Convert Editable EPS When Imported option in
FreeHand Import Preferences before you place the EPS into FreeHand. If you do not select this option, the EPS
image is not viewable when imported into Flash. In addition, Flash does not display information for an imported
EPS image (regardless of the Preferences settings used in FreeHand).
1 Select File > Import > Import To Stage or File > Import To Library.
2 Select FreeHand from the Files Of Type (Windows) or Show (Macintosh) pop-up menu.
3 Navigate to a FreeHand file and select it.
4 Click Open.
5 For Mapping Pages, select a setting:
Scenes Converts each page in the FreeHand document to a scene in the Flash document.
66
Keyframes Converts each page in the FreeHand document to a keyframe in the Flash document.
6 For Mapping Layers, select one of the following:
Layers Converts each layer in the FreeHand document to a layer in the Flash document.
Keyframes Converts each layer in the FreeHand document to a keyframe in the Flash document.
Flatten Converts all layers in the FreeHand document to a single flattened layer in the Flash document.
7 For Pages, do one of the following:
• To import all pages from the FreeHand document, select All.
• To import a page range from the FreeHand document, enter page numbers for From and To.
8 For Options, select any of the following options:
Include Invisible Layers Imports all layers (visible and hidden) from the FreeHand document.
Include Background Layer Imports the background layer with the FreeHand document.
Maintain Text Blocks Preserves text in the FreeHand document as editable text in the Flash document.
9 Click OK.
About AutoCAD DXF files
Flash supports the AutoCAD® DXF format in AutoCAD 10.
Page 72

USING FLASH CS4 PROFESSIONAL
Updated 5 March 2009
Using imported artwork
DXF files do not support the standard system fonts. Flash tries to map fonts appropriately, but the results can be
unpredictable, particularly for text alignment.
Because the DXF format does not support solid fills, filled areas are exported as outlines only. For this reason, the DXF
format is most appropriate for line drawings, such as floor plans and maps.
You can import two-dimensional DXF files into Flash. Flash does not support three-dimensional DXF files.
Although Flash doesn’t support scaling in a DXF file, all imported DXF files produce 12-inch x 12-inch files that you
can scale using Modify > Transform > Scale. Also, Flash supports only ASCII DXF files. If your DXF files are binary,
convert them to ASCII before importing them into Flash.
Working with Fireworks files
About imported Fireworks PNG files
You can import Adobe® Fireworks PNG files into Flash as flattened images or as editable objects. When you import a
PNG file as a flattened image, the entire file (including any vector artwork) is rasterized, or converted to a bitmap
image. When you import a PNG file as editable objects, vector artwork in the file is preserved in vector format. Choose
to preserve placed bitmaps, text, filters (called effects in Fireworks), and guides in the PNG file when you import it as
editable objects.
67
About imported filters and blends from Fireworks PNG files
When you import Fireworks® PNG files, you can retain many of the filters and blending modes applied to objects in
Fireworks and continue to modify those filters and blends using Flash.
Flash only supports modifiable filters and blends for objects imported as text and movie clips. If an effect or blend
mode is not supported, Flash rasterizes or ignores it when it is imported. To import a Fireworks PNG file that contains
filters or blends that Flash does not support, rasterize the file during the import process. After this operation, you
cannot edit the file.
Fireworks effects supported in Flash
Flash imports the following Fireworks effects as modifiable filters:
Fireworks effect Flash filter
Drop shadow Drop shadow
Solid shadow Drop shadow
Inner shadow Drop shadow (with Inner shadow automatically selected)
Blur Blur (where blurX = blurY=1)
Blur more Blur (where blurX = blurY=1)
Gaussian blur Blur
Adjust color brightness Adjust color
Adjust color contrast Adjust color
Fireworks blend modes supported in Flash
Flash imports the following Fireworks blend modes as modifiable blends:
Page 73

USING FLASH CS4 PROFESSIONAL
Updated 5 March 2009
Using imported artwork
Fireworks blending mode Flash blending mode
Normal Normal
Darken Darken
Multiply Multiply
Lighten Lighten
Screen Screen
Overlay Overlay
Hard light Hard light
Additive Add
Difference Difference
Invert Invert
Alpha Alpha
Erase Erase
Flash ignores all other blending modes imported from Fireworks. The blending modes that Flash does not support are
Average, Negation, Exclusion, Soft Light, Subtractive, Fuzzy Light, Color Dodge, and Color Burn.
68
Importing text from Fireworks into Flash
When you import text from Fireworks into Flash 8 or later, the text is imported with the default anti-alias setting of
the current document.
If you import the PNG file as a flattened image, you can start Fireworks from Flash and edit the original PNG file (with
vector data).
When you import multiple PNG files in a batch, you select import settings one time. Flash uses the same settings for
all files in the batch.
Note: To edit bitmap images in Flash, convert the bitmap images to vector artwork or break apart the bitmap images.
1 Select File > Import > Import To Stage or Import To Library.
2 Select PNG Image from the Files Of Type (Windows) or Show (Macintosh) pop-up menu.
3 Navigate to a Fireworks PNG image and select it.
4 Click Open.
5 Select one of the following for Location:
Import All Page(s) into New Scene(s) Imports all pages in the PNG file as scenes within a movie clip, with all of their
frames and layers intact inside the movie clip symbol. A new layer is created that uses the name of the Fireworks PNG
file name. The first frame (page) of the PNG document is placed on a keyframe that starts at the last keyframe; all other
frames (pages) follow.
Import One Page into Current Layer Imports the selected page (identified in the Page Name pop-up menu) of the PNG
file into the current Flash document in a single new layer as a movie clip. The contents of the selected page are
imported as a movie clip, with all of their original layer and frame structure intact. If the page movie clip has frames
inside it, each frame is a movie clip in itself.
Page Name Specifies the Fireworks page you want to import into the current scene.
Page 74

USING FLASH CS4 PROFESSIONAL
Updated 5 March 2009
Using imported artwork
6 Select one of the following for File Structure:
Import As Movie Clip And Retain Layers Imports the PNG file as a movie clip, with all of its frames and layers intact
inside the movie clip symbol.
Import Page(s) as New Layer(s) Imports the PNG file into the current Flash document in a single new layer at the top
of the stacking order. The Fireworks layers are flattened into the single layer. The Fireworks frames are contained in
the new layer.
7 For Objects, select one of the following:
Rasterize If Necessary To Maintain Appearance Preserves Fireworks fills, strokes, and effects in Flash.
Keep All Paths Editable Keeps all objects as editable vector paths. Some Fireworks fills, strokes, and effects are lost on
import.
8 For Text, select one of the following:
Rasterize If Necessary To Maintain Appearance Preserves Fireworks fills, strokes, and effects in text imported into
Flash.
Keep All Paths Editable Keeps all text editable. Some Fireworks fills, strokes, and effects are lost on import.
9 To flatten the PNG file into a single bitmap image, select Import As A Single Flattened Bitmap. When this option
is selected, all other options are dimmed.
10 Click OK.
69
See also
“Edit a bitmap in an external editor” on page 88
“Convert a bitmap to a vector graphic” on page 89
“Break apart a bitmap and create a bitmap fill” on page 89
Working with Illustrator AI files
About Adobe Illustrator AI files
Flash lets you import Adobe® Illustrator® AI files and preserves the majority of the editability and visual fidelity of your
artwork. The AI Importer also provides you with a great degree of control in determining how your Illustrator artwork
is imported into Flash, letting you specify how to import specific objects into an AI file.
The Flash AI Importer provides the following key features:
• Preserves editability of the most commonly used Illustrator effects as Flash filters.
• Preserves editability of blend modes that Flash and Illustrator have in common.
• Preserves the fidelity and editability of gradient fills.
• Maintains the appearance of RGB (red, green, blue) colors.
• Imports Illustrator Symbols as Flash Symbols.
• Preserves the number and position of Bezier control points.
• Preserves the fidelity of clip masks.
• Preserves the fidelity of pattern strokes and fills.
Page 75

USING FLASH CS4 PROFESSIONAL
Updated 5 March 2009
Using imported artwork
• Preserves object transparency.
• Converts the AI file layers to individual Flash layers, keyframes, or a single Flash layer. You can also import the AI
file as a single bitmap image, in which case Flash flattens (rasterizes) the file.
• Provides an improved copy-and-paste workflow between Illustrator and Flash. A copy-and-paste dialog box
provides settings to apply to AI files being pasted onto the Flash stage.
For video tutorials about working with Illustrator and Flash, see:
• Using symbols between Illustrator and Flash: www.adobe.com/go/vid0198
• Using text between Illustrator and Flash: www.adobe.com/go/vid0199
Compatibility between Flash and Illustrator
Certain visual attributes can either not be accurately imported, or, after they are imported, lose their ability to be
further edited in the Flash authoring environment. The AI Importer provides you with several options to import and
place artwork to best maintain its visual appearance and editability. However, certain visual attributes cannot be
preserved. Use the following guidelines to improve the appearance of AI files imported into Flash:
• Flash supports only the RGB color space, and not the CMYK color space, which is common in printing. Flash can
convert CMYK images to RGB, however, colors are better preserved if you convert the colors to RGB in Illustrator.
• To preserve the drop shadow, inner glow, outer glow, and Gaussian blur AI effects as editable Flash filters, Flash
imports the objects to which they are applied as a Flash movie clip. If you attempt to import an object with these
attributes as something other than a movie clip, Flash displays an incompatibility alert, and recommends importing
the object as a movie clip.
70
Working with Illustrator and Flash
You can move Illustrator artwork into the Flash editing environment or directly into Flash Player. You can copy and
paste artwork, save files in SWF format, or export artwork directly to Flash. In addition, Illustrator provides support
for Flash dynamic text and movie clip symbols. For a video on using Flash and Illustrator together, see
www.adobe.com/go/lrvid4099_xp.
You can also use Device Central to see how Illustrator artwork will appear in Flash Player on different handheld
devices.
Pasting Illustrator artwork
You can create graphically rich artwork in Illustrator and copy and paste it into Flash simply, quickly, and seamlessly.
When you paste Illustrator artwork into Flash, the following attributes are preserved:
• Paths and shapes
• Scalability
• Stroke weights
• Gradient definitions
• Text (including OpenType fonts)
• Linked images
• Symbols
• Blending modes
Page 76

USING FLASH CS4 PROFESSIONAL
Updated 5 March 2009
Using imported artwork
In addition, Illustrator and Flash support pasted artwork in the following ways:
• When you select entire top-level layers in Illustrator artwork and paste them into Flash, the layers are preserved
along with their properties (visibility and locking).
• Non-RGB Illustrator colors (CMYK, grayscale, and custom) convert to RGB in Flash. RGB colors paste as expected.
• When you import or paste Illustrator artwork, you can use various options to preserve effects (such as drop shadow
on text) as Flash filters.
• Flash preserves Illustrator masks.
Exporting SWF files from Illustrator
From Illustrator, you can export SWF files that match the quality and compression of SWF files exported from Flash.
When you export, you can choose from a variety of presets to ensure optimal output, and you can specify how to
handle multiple artboards, symbols, layers, text, and masks. For example, you can specify whether Illustrator symbols
are exported as movie clips or graphics, or you can choose to create SWF symbols from Illustrator layers.
Importing Illustrator files into Flash
When you want to create complete layouts in Illustrator and then import them into Flash in one step, you can save
your artwork in the native Illustrator format (AI) and import it, with high fidelity, into Flash using the File > Import
To Stage or File > Import To Library commands in Flash.
71
If your Illustrator file contains multiple artboards, you select the artboard you want to import from the Import dialog
box in Flash, and specify settings for each layer in that artboard. All objects on the selected artboard import as a single
layer in Flash. If you import another artboard from that same AI file, the objects from that artboard import as a new
layer in Flash.
When you import Illustrator artwork as an AI, EPS, or PDF file, Flash preserves the same attributes as for pasted
Illustrator artwork. In addition, when an imported Illustrator file contains layers, you can import them in any of the
following ways:
• Convert Illustrator layers to Flash layers
• Convert Illustrator layers to Flash frames
• Convert all Illustrator layers to a single Flash layer
Symbol workflow
Symbol workflow in Illustrator is similar to symbol workflow in Flash.
Symbol creation When you create a symbol in Illustrator, the Symbol Options dialog box lets you name the symbol
and set options specific to Flash: movie clip symbol type (which is the default for Flash symbols), Flash registration
grid location, and 9-slice scaling guides. In addition, you can use many of the same symbol keyboard shortcuts in
Illustrator and Flash (such as F8 to create a symbol).
Isolation mode for symbol editing In Illustrator, double-click a symbol to open it in isolation mode for easier editing.
In isolation mode, only the symbol instance is editable—all other objects on the artboard are dimmed and unavailable.
After you exit isolation mode, the symbol in the Symbols panel, and all instances of that symbol are updated
accordingly. In Flash, symbol-editing mode and the Library panel work in a similar fashion.
Symbol properties and links Using the Symbols panel or the Control panel, you can easily assign names to symbol
instances, break links between instances and symbols, swap a symbol instance with another symbol, or create a copy
of the symbol. In Flash, the editing features in the Library panel work in a similar way.
Page 77

USING FLASH CS4 PROFESSIONAL
Updated 5 March 2009
Using imported artwork
Static, dynamic, and input text objects
When you bring static text from Illustrator into Flash, Flash converts the text to outlines. In addition, you can set up
your text in Illustrator as dynamic text. Dynamic text enables you to edit text content programmatically in Flash, and
easily manage projects that require localization in multiple languages.
In Illustrator, you can specify individual text objects as static, dynamic, or input text. Dynamic text objects in
Illustrator and Flash have similar properties. For example, both use kerning that affects all characters in a text block
rather than individual characters, both anti-alias text the same way, and both can be linked to an external XML file
containing text.
About importing AI files to the Flash library
Importing an AI file into the library is similar to importing to the Stage, the difference being that the entire AI file is
encapsulated as a Flash symbol. The content is imported into the library and organized by the layering and grouping
structure of the AI file.
When you import an AI file into the library, the root folder uses the name of the AI file. After the AI file is imported
into the library, you can change the name of the root folder, or move the layers out of the folder.
Note: The Library panel orders the contents of the imported AI file alphabetically. The hierarchical grouping and folder
structure remains the same, but the library reorders them alphabetically.
72
When converting AI layers to keyframes, the AI file is imported as a movie clip; converting the AI layers to Flash layers,
or as a single Flash layer, imports the AI file as a graphic symbol. The resulting movie clip or graphic symbol contains
all of the content of the AI file imported to its timeline, as if the content were imported to the Stage. Almost all movie
clips have a bitmap or other asset associated with them. To minimize confusion and naming conflicts, these assets are
stored in an Assets folder in the same folder as the movie clip.
Note: When you import to the library, the AI file's contents are imported to the movie clip's timeline, not the main Flash
timeline.
The Library panel after importing an AI file
AI File Importer preferences
The Flash Preferences dialog box lets you set import preferences for AI files and the AI File Import dialog box. The
preferences you specifiy for importing AI files affect the options the AI Import dialog box is initially populated with
for the Illustrator object types.
Page 78

USING FLASH CS4 PROFESSIONAL
Updated 5 March 2009
Using imported artwork
Note: To override the preferences specified for different layer types on an object by object basis, use the AI Import dialog
box. Select the layer, object, or group to change its import options, and specify the necessary options.
General Preferences that affect how the AI Importer will respond when importing AI files:
• Show Import Dialog Box Specifies that the AI File Import Dialog dialog box appears.
• Exclude Objects Outside Crop Area Excludes objects on the Illustrator canvas which fall outside the artboard or
crop area.
• Import Hidden Layers Specifies that hidden layers be imported by default.
Import Text As Lets you specify the following import preferences for text objects:
• Editable Text Specifies that imported Illustrator text is editable Flash text. The appearance of the text may be
compromised to maintain the editability of the text.
• Vector Outlines Converts text to vector paths. Use this option to preserve the visual appearance of the text. Some
visual effects might be sacrificed—such as unsupported blend modes and filters—but visual attributes such as text on
a path are maintained if the text is imported as a movie clip. The text itself is no longer editable, but opacity and
compatible blend modes maintain their editability.
Note: To preserve the drop shadow, inner glow, outer glow, and Gaussian blur that AI effects applied to text as editable
Flash filters, select Create Movie Clip Import to import the text as a movie clip.
73
• Bitmaps Rasterizes the text into a bitmap to preserve the exact appearance of the text as it was in Illustrator. If filters
or other effects are applied that are not compatible with Flash, importing the text as a bitmap preserves the visual
appearance. Rasterized text is no longer editable.
• Create Movie Clips Specifies that text objects be imported inside a movie clip. To maintain supported blend modes,
AI effects, and transparency of less than 100% between Illustrator and Flash, specify that the text object be imported
as a movie clip.
Import Paths As Lets you specify the following path import preferences:
• Editable Paths Creates an editable vector path. Supported blend modes, effects, and object transparency are
preserved, but attributes not supported in Flash are discarded.
• Bitmaps Rasterizes the path into a bitmap to preserve the exact appearance of the path in Illustrator. A rasterized
image is no longer editable.
• Create Movie Clips Specifies that path objects be imported inside a movie clip.
Images Lets you specify the import preference for images:
• Flatten Bitmaps To Maintain Appearance Rasterizes the image into a bitmap to preserve the appearance of
blending modes and effects that are not supported in Flash. A rasterized image is no longer editable.
• Create Movie Clips Specifies that images be imported inside a movie clip.
Groups Lets you specify the import preferences for groups:
• Import As Bitmaps Rasterizes the group into a bitmap to preserve the appearance of the objects as they appeared in
Illustrator. After a group is converted to a bitmap, the objects in it cannot be selected or renamed.
• Create Movie Clips Specifies that all objects in the group be encapsulated into a single movie clip.
Layers Lets you specify the import preferences for layers:
• Import As Bitmaps Rasterizes the layer into a bitmap to preserve the appearance of the objects as they appeared in
Illustrator.
• Create Movie Clips Specifies that the layer is encapsulated into a movie clip.
Page 79

USING FLASH CS4 PROFESSIONAL
Updated 5 March 2009
Using imported artwork
Movie Clip Registration Specifies a global registration point for movies that are created. This setting applies to the
registration point for all object types. This option can be changed on an object by object basis in the AI File Import
dialog box; this is the initial setting for all object types. For more information on movie clip registration, see “Edit
symbols” on page 150.
See also
“Set preferences in Flash” on page 37
Import Adobe Illustrator files
Flash can import Illustrator AI files in version 10 or earlier. If the raster file in Illustrator is linked, only JPEG, GIF, and
PNG are imported with native format preserved. All other files are converted to PNG format in Flash. Additionally,
conversion to PNG depends on the version of QuickTime installed.
Note: The AI Importer was developed to import AI files created with Illustrator CS3 and later. While there are no known
issues importing AI files created in earlier versions of Illustrator, we recommend importing AI files created using
Illustrator CS3 and later. If you encounter issues importing AI files created in an earlier version of Illustrator, open the
file in Illustrator CS3 or later, save the AI file as a CS3 or later compatible file, and re-import it into Flash. To import an
Illustrator EPS or Adobe® Acrobat® PDF file, open the file in Illustrator CS3 or later, save it as a CS3 or later compatible
AI file, and import the resulting AI file into Flash.
74
For video tutorials about working with Illustrator and Flash, see:
• Importing Illustrator files: www.adobe.com/go/vid0197
• Using symbols between Illustrator and Flash: www.adobe.com/go/vid0198
• Using text between Illustrator and Flash: www.adobe.com/go/vid0199
In certain instances, you may need to ungroup all the Illustrator objects on all layers when Flash cannot group items
on import. After all the objects are ungrouped, they can be manipulated like any other Flash object.
A
B
Illustrator AI Import dialog box
A. Layers panel B. Import options available for the selected object
Page 80

USING FLASH CS4 PROFESSIONAL
Updated 5 March 2009
Using imported artwork
Choose from the following options when importing Adobe Illustrator files:
• Convert layers to Flash layers or keyframes, or single Flash layers.
• Import text as editable text, vector outlines, or bitmaps.
• Import as a single bitmap image. Choosing this option imports the AI file as a single bitmap image and disables the
layers list and import options within the AI Import dialog box.
1 Select File > Import To Stage or Import To Library.
2 Navigate to the AI file to import, select it, and click OK. The Import Illustrator Document To Stage or The Import
Illustrator Document To Library dialog box appears.
This dialog box provides options to import the Illustrator file. Depending on the types of objects in the Illustrator file
you’re importing, the options available to you vary.
3 (Optional) To generate a list of items in the AI file that are incompatible with Flash, click Incompatibility Report.
The Incompatibility Report button appears only if incompatibilities exist with Flash in the AI file.
The incompatibilty report analyzes possible incompatibilities between Illustrator and Flash. The Import Options area
(next to the Alert button) of the AI Import dialog box displays recommendations to obtain the maximum
compatibility for any incompatible item.
The incompatibilty report includes an Apply Recommended Import Settings checkbox. If checked, Flash
automatically applies the recommended import options to any incompatible objects within the AI file. The exceptions
to this are when the AI document is larger in size than that supported by Flash, and when the AI document uses the
CMYK color mode. To correct either of these incompatibilities, reopen the document in Illustrator CS3, and adjust
the size of the document, or change the color mode to RGB.
75
4 (Optional) In the AI Import dialog box, select layers, groups, and individual objects, and choose how to import each
item. For information on the import options available for the different types of Illustrator layers and objects, see
“Illustrator object import options” on page 76.
5 For Convert Layers To, select one of the following:
Flash Layers Converts each layer in the imported document to a layer in the Flash document.
Keyframes Converts each layer in the imported document to a keyframe in the Flash document.
Single Flash Layer Converts all layers in the imported document to a single flattened layer in the Flash document.
6 For the remaining options, select from the following:
Place Objects At Original Position The contents of the AI file retain the exact position that they had in Illustrator. For
example, if an object was positioned at X = 100 Y = 50 in Illustrator, it assumes the same coordinates on the Flash
Stage.
If this option is not selected, the imported Illustrator layers are centered within the current view. The items in the AI
file remain relative to each other when imported; however, all objects are centered as one block in the current view.
This feature can be useful if you are zoomed in to an area of the Stage and are importing a specific object for that area
of the Stage. If you imported the object using the original coordinates, you might not see it imported, because it might
be placed outside of the current stage view.
Note: When importing the AI file into the Flash library, this option is not available.
Set Stage Size To Same Size As Illustrator Artboard The Flash stage size resizes to the same size as the Illustrator
artboard (or active crop area) used to create the AI file. This option is not selected by default.
Note: When importing the AI file into the Flash library, this option is not available.
Page 81

USING FLASH CS4 PROFESSIONAL
Updated 5 March 2009
Using imported artwork
Import Unused Symbols Any symbols in the AI file’s library that have no instances on the artboard are imported into
the Flash library. If this option is not selected, the unused symbols are not imported into Flash.
Import As A Single Bitmap Image Imports the AI file as a single bitmap image and disables the layers list and import
options within the AI Import dialog box.
7 Click OK.
See also
“Import Photoshop PSD files” on page 80
“Exporting Images and Graphics” on page 412
Illustrator object import options
Layers manage all the items that make up Illustrator artwork. By default, all items are organized in a single, parent
layer. You can import all items in a given parent layer as a single, flattened bitmap, or, individually select each object
and specify import options specific to the type of object it is (text, path, group, and so on). The AI Importer provides
options to select layers in the artwork you are importing and specify individual import options based on preserving
the visual appearance of an object, or its editability in Flash.
76
Correcting incompatible graphic effects
1 To generate an incompatibilty report, click Incompatibility Report. The incompatibility report lists items in the AI
file that are incompatible with Flash.
2 Select Change Import Settings To Resolve Object Incompatibilities. Many incompatibilities between Illustrator and
Flash can be automatically corrected using the incompatibility report and the import recommendations suggested
in the Import options area of the AI Import dialog box.
Select individual objects
1 Select the object to specify import options for. Illustrator objects that you can select include layers, groups,
individual paths, text, and images.
2 Review the import options available for the type of object you’ve selected in the object options section of the dialog
box. Note whether any incompatibilities are listed and what the recommended correction is to import the object.
3 Select the desired import options, and select another object to specify import options for, or click OK.
Selecting layers
The Layers panel lists the objects in a document. By default, every Illustrator document contains at least one layer, and
each object in a given file is listed under that layer.
When an item in the Layers panel contains other items, a triangle appears to the left of the item’s name. To show or
hide the content, click the triangle. If no triangle appears, the layer contains no additional items.
Note: You can expand or collapse all groups and layers using the AI Importer context menu. Right-click to display the
context menu and select Expand All or Collapse All.
Selection column Controls whether items are selected for import or not. If an item is checked, you can select that layer
and specify import options; if Edit is not checked, the layer is dimmed and you cannot specify any import setting for
the item in that layer.
Page 82

USING FLASH CS4 PROFESSIONAL
Updated 5 March 2009
Using imported artwork
Object Type column An icon indicates what the Flash object type located on that layer will be when imported and, if
visible, that the item is selected. The object types are:
• Text
• Path
• Group
• Movie clip
• Graphic symbol
• Image
Text import options
Flash lets you import text as editable text, vector outlines, or a flattened bitmap. To maintain supported blend modes,
AI effects, and transparency of less than 100% between Illustrator and Flash, import text as a movie clip. Importing
text as a movie clip preserves the editability of compatible visual effects.
Editable Text By default, Illustrator text imports as editable Flash text. The appearance of the text can be compromised
to maintain the editability of the text.
Vector Outlines Converts text to vector paths. Use this option to preserve the visual appearance of the text. Some visual
effects might be sacrificed—such as unsupported blend modes and filters—but visual attributes such as text on a path
are maintained if the text is imported as a movie clip. The text itself is no longer editable, but opacity and compatible
blend modes maintain their editability.
77
Note: To preserve the drop shadow, inner glow, outer glow, and Gaussian blur that AI effects applied to text as editable
Flash filters, select Create Movie Clip Import to import the text as a movie clip.
Bitmap Rasterizes the text into a bitmap to preserve the exact appearance of the text as it was in Illustrator. If filters or
other effects are applied that are not compatible with Flash, importing the text as a bitmap preserves the visual
appearance. Rasterized text is no longer editable.
Path import options
A path is the line that results from drawing in Illustrator. A path is either open, like an arc, or closed, like a circle. For
an open path, the starting and ending anchor points for the path are called endpoints. Editable paths can be imported
into Flash, however, if certain blend modes, filters, or other effects are applied to the path, those effects might not be
compatible with Flash.
Bitmap Rasterizes the path into a bitmap to preserve the exact appearance of the path in Illustrator. A rasterized image
is no longer editable.
Editable Path Creates an editable vector path. Supported blend modes, effects, and object transparency are preserved,
but attributes not supported in Flash are discarded.
Image import options
Bitmap images are the most common electronic medium for continuous-tone images, such as photographs or digital
paintings. Illustrator creates bitmap effects by using filters, effects, and graphic styles. While many of these effects are
compatible with Flash, some might need to be flattened—or rasterized—to preserve their visual appearance.
Page 83

USING FLASH CS4 PROFESSIONAL
Updated 5 March 2009
Using imported artwork
Note: If a raster file in Illustrator is linked, only JPEG, GIF, and PNG are imported with their native format preserved.
All other file types are converted to the PNG format in Flash. Additionally, the conversion (to PNG) depends on the
version of QuickTime® installed on your computer.
Flatten Bitmap To Maintain Appearance Rasterizes the image into a bitmap to preserve the appearance of blending
modes and effects that are not supported in Flash. A rasterized image is no longer editable.
Create Movie Clip Imports Illustrator images as movie clips.
Group import options
Groups are collections of graphic objects that are treated as a single unit. Grouping lets you move or transform a
number of objects without affecting their attributes or relative positions. For example, you might group the objects in
a logo design so that you can move and scale the logo as one unit. Groups can also be nested. That is, they can be
grouped in other objects or groups to form larger groups.
Groups appear as <Group> items in the Import panel. When an item such as a group contains other items, a triangle
appears to the left of the item’s name. Click the triangle to show or hide the contents of the group. If no triangle
appears, the item contains no additional items.
Import As Bitmap Rasterizes the group into a bitmap to preserve the appearance of the objects as they appeared in
Illustrator. After a group is converted to a bitmap, the objects in it cannot be selected or renamed.
78
Create Movie Clip Encapsulates all objects in the group into a single movie clip.
Copy and pasting between Illustrator and Flash
If you copy and paste (or drag-and-drop) artwork between Illustrator and Flash, the Paste dialog box appears, which
provides import settings for the AI file being copied (or pasted).
Paste As Bitmap Flattens the file being copied into a single bitmap object.
Paste Using AI File Importer Preferences Imports the file using the AI file import setting specified in Flash Preferences
(Edit > Preferences).
Apply Recommended Import Settings To Resolve Incompatibilities Enabled by default when Paste Using AI File
Importer Preferences is selected. Automatically fixes any incompatibilities detected in the AI file.
Maintain Layers Enabled by default when Paste Using AI File Importer Preferences is selected. Specifies that layers in
the AI file be converted to Flash layers (the same as if you selected Convert To Flash Layers from the AI Import dialog
box). If deselected, all layers are flattened into a single layer.
Working with Photoshop PSD files
Working with Photoshop and Flash
You can use Adobe® Photoshop® and Adobe® Flash® together to create visually compelling web-based applications,
animations, or interactive messaging elements. Photoshop lets you create still images and artwork, providing a high
degree of creative control. Flash lets you bring those still images together and incorporate them into interactive
Internet content.
The Photoshop drawing and selection tools provide you with a greater degree of creative control than the tools found
in Flash. If you have to create complex visual images, or retouch photographs for use in interactive presentations, use
Photoshop to create your artwork, and then import the finished images into Flash.
Page 84

USING FLASH CS4 PROFESSIONAL
Updated 5 March 2009
Using imported artwork
Importing still images into Flash
Flash can import still images in many formats, but you usually use the native Photoshop PSD format when importing
still images from Photoshop into Flash.
When importing a PSD file, Flash can preserve many of the attributes that were applied in Photoshop, and provides
options for maintaining the visual fidelity of the image and further modifying the image. When you import a PSD file
into Flash, you can choose whether to represent each Photoshop layer as a Flash layer, individual keyframes, or a single,
flattened image. You can also encapsulate the PSD file as a movie clip.
Exchanging movies
You can exchange QuickTime video files between Photoshop and Flash. For example, you can render a QuickTime
movie directly from Photoshop and then import it into Flash, converting it into an FLV (video for Adobe Flash Player)
file, which can be played in Flash® Player.
When you use Photoshop to modify video footage, you can paint nondestructively on its frames. When you save a
Photoshop file with a video layer, you are saving the edits that you made to the video layer, not edits to the footage itself.
Note: When you import a QuickTime video file from Photoshop to Flash, use the Import Video dialog box (File > Import
Video). Using the Photoshop PSD import feature to import video only imports the first frame of a video file.
You can also export Flash documents as QuickTime video, and import them into Photoshop where you can paint
nondestructively on the video frames. For example, you can create an animated sequence in Flash, export the Flash
document as a QuickTime video, and then import the video into Photoshop.
79
Color
Flash works internally with colors in the RGB or HSB (hue, saturation, brightness) color space. Although Flash can
convert CMYK images to RGB, you should create Photoshop artwork in RGB. Before you import CMYK artwork from
Photoshop into Flash, convert the image to RGB in Photoshop.
See also
“Import Photoshop PSD files” on page 80
“Export QuickTime” on page 416
About importing Photoshop PSD files
Flash lets you import Photoshop PSD files and preserves most of your artwork's data. The PSD Importer also lets you
control how your Photoshop artwork is imported into Flash, letting you specify how to import specific objects in a PSD
file, as well as specifying that the PSD file be converted to a Flash movie clip.
The Flash PSD Importer provides the following key features:
• PSD files imported into Flash maintain their color fidelity from Photoshop.
• Preserves editability of blend modes that both Flash and Photoshop have in common.
• Smart Objects in the PSD file are rasterized, and imported into Flash as bitmaps which preserves object
transparency.
• Converts the PSD file layers to individual Flash layers or keyframes or imports the PSD file as a single bitmap image,
in which case Flash flattens (rasterizes) the file.
• Drag-and-drop from Photoshop to Flash invokes the PSD file importer, letting you choose how to import your
Photoshop artwork.
For a video tutorial about designing websites with Photoshop and Flash, see www.adobe.com/go/vid0201.
Page 85

USING FLASH CS4 PROFESSIONAL
Updated 5 March 2009
Using imported artwork
Compatibility between Flash and Photoshop
Certain visual attributes can either not be accurately imported, or, after they are imported, lose their ability to be
further edited in the Flash authoring environment. The PSD Importer provides you with several options to import and
place artwork to best maintain its visual appearance and editability. However, certain visual attributes cannot be
preserved. Use the following guidelines to improve the appearance of PSD files imported into Flash:
• Flash supports only the RGB color space, and not the CMYK color space, which is common in printing. Flash can
convert CMYK images to RGB; however, colors are better preserved if you convert CMYK colors to RGB in
Photoshop.
• Flash can import the following Photoshop blend modes, and maintain their editability: Normal, Darken, Multiply,
Lighten, Screen, Hard Light, Difference, and Overlay.
If you use a blend mode that Flash does not support, you can rasterize the layer to maintain its visual appearance,
or remove the blend mode from the layer.
• Flash cannot import Photoshop Smart Objects as editable objects. To preserve the visual attributes of Smart
Objects, they are rasterized and imported into Flash as bitmaps.
• Flash can only import the first frame of Photoshop Video layers.
• Image and Fill layers are always rasterized when imported into Flash.
• PNG objects in Photoshop are converted to JPG files when imported into Flash. Transparency in the original PNG
is preserved in the resulting JPG file.
• Photoshop does a better job of scaling bitmap images than Flash. If you know that you plan to scale a bitmap that
is coming from Photoshop into Flash, scale the bitmap in Photoshop before importing it into Flash.
• When importing objects containing transparent areas as flattened bitmaps, any objects on the layers behind the
transparent portion of the object will be visible through the transparent area—assuming the objects behind the
object containing transparency are also being imported. To prevent this, import only the transparent object as a
flattened bitmap.
To import multiple layers and maintain transparency without having any visible remnants of the layers behind the
transparency, import the PSD file using the Bitmap Image With Editable Layer Styles option. This will encapsulate
the imported objects as a movie clip, and use the movie clip's transparency. This is particularly useful if you need
to animate the different layers in Flash.
80
Import Photoshop PSD files
Photoshop format (PSD) is the default Photoshop file format. Flash can directly import PSD files and preserve many
Photoshop features, retaining the image quality and editability of the PSD file in Flash. You can also flatten PSD files
when importing them, creating a single bitmap image file that retains the image’s visual effects but removes the
hierarchical layer information native to the PSD file format.
For a video tutorial about designing websites with Photoshop and Flash, see www.adobe.com/go/vid0201.
Page 86

USING FLASH CS4 PROFESSIONAL
Updated 5 March 2009
Using imported artwork
81
A
The PSD Import dialog box
A. Layers in the PSD file being imported B. Import options available for the selected layer or object
B
1 Select File > Import To Stage or Import To Library.
2 Navigate to the Adobe Photoshop PSD file to import, select it, and click OK.
3 (Optional) In the PSD Import dialog box, select layers, groups, and individual objects and choose how to import
each item.
4 For Convert Layers To, select one of the following:
Flash Layers All selected layers in the Select Photoshop layers list are placed on their own layer. Each layer is labeled
with the name of the layer in the Photoshop file. The layers in Photoshop are objects on the individual layers. The
objects also have the name of the layer in Photoshop when put into the Library panel.
Keyframes All selected layers in the Select Photoshop layers list are placed in individual keyframes on a new layer. The
new layer is named for the Photoshop file (for example, myfile.psd). The layers in Photoshop become objects on the
individual keyframes. The objects also have the name of the layer in Photoshop when put into the Library panel.
5 For the remaining options, select from the following:
Place Layers At Original Position The contents of the PSD file retain the exact position that they had in Photoshop. For
example, if an object was positioned at X = 100 Y = 50 in Photoshop, it assumes the same coordinates on the Flash
Stage.
If this option is not selected, the imported Photoshop layers are centered on the Stage. The items in the PSD file remain
relative to each other when imported; however, all objects are centered as one block in the current view. This feature
can be useful if you are zoomed in to an area of the Stage and are importing a specific object for that area of the Stage.
If you imported the object using the original coordinates, you might not see it imported, because it might be placed
outside of the current stage view.
Note: When you import the PSD file to the Flash library, this option is not available.
Set Stage Size To Same Size As Photoshop Canvas The Flash Stage size resizes to the same size as the Photoshop
document size (or active crop area) used to create the PSD file. This option is not selected by default.
Note: When you import the PSD file to the Flash library, this option is not available.
Page 87

USING FLASH CS4 PROFESSIONAL
Updated 5 March 2009
Using imported artwork
6 Click OK.
Importing PSD files to the Flash library
Importing a PSD file into the library is similar to importing to the Stage. When you import a PSD file into the library,
the root folder uses the name of the PSD file. After the PSD file is imported into the library, you can change the name
of the root folder, or move the layers out of the folder.
Note: The library orders the contents of the imported PSD file alphabetically. The hierarchical grouping and folder
structure remains the same, but the library reorders them alphabetically.
A movie clip is created that contains all of the content of the PSD file imported to its timeline, as if the content were
imported to the Stage. Almost all movie clips have a bitmap or other asset associated with them. To minimize
confusion and naming conflicts, these assets are stored in an Assets folder in the same folder as the movie clip.
Note: When you import to the library, the PSD file's contents are imported to the movie clip's timeline, not the main Flash
timeline.
Photoshop Import options
When you import a Photoshop PSD file that contains multiple layers, you can set the following options:
Layer Comp If the Photoshop file contains layer comps, you can specify which version of the image to import. A layer
comp is a snapshot of a state of the Photoshop Layers palette. Layer comps record three types of layer options, all of
which are imported into Flash:
82
• Layer visibility: whether a layer is displayed or hidden.
• Layer position in the document.
• Layer appearance: whether a layer style is applied to the layer and the layer’s blending mode.
If no layer comps are present, this pop-up menu is hidden. Flash supports all aspects of the layer comp’s fidelity,
including visibility, position, and layer style.
Select Photoshop Layers Lists all layers, groups, and layer effects in an image. To select which layers to import, use the
options to the left of the layer’s thumbnail. By default, all layers visible in Photoshop are checked and invisible layers
are not checked.
Note: Adjustment layers do not have a compatible layer type in Flash. For this reason, when importing as a flattened
bitmap, the visual effect of the adjustment layer is applied to maintain the appearance of the Photoshop layer being
imported. If you’ve selected other import options, the adjustment layers will not be applied.
Merge Layers Merge (or collapse) two or more layers into a single bitmap, and then import the resulting single bitmap
object rather than individual objects. You can only merge layers that are on the same level and the selection must be
contiguous. For example, you cannot select an item inside a folder and an item outside a folder and merge them.
Instead, select the folder and the item outside the folder to merge them. You cannot Control-click individual items that
are out of sequence and merge them.
Note: If you select a merged bitmap object, the Merge Layers button changes to the Separate button. To separate any
merged bitmap objects you create, select the resulting single bitmap, and click the Separate button.
Page 88

USING FLASH CS4 PROFESSIONAL
Updated 5 March 2009
Using imported artwork
Importing text objects
Text objects are text layers in Photoshop. Choose how to import text into Flash.
Editable Text Creates an editable text object from the text on the selected Photoshop layer. The appearance of the text
might be compromised to maintain the editability of the text. If you import the text as a movie clip, the movie clip
contains an editable text object.
Note: When importing editable text into the library, it must be inside a movie clip. Only movie clips, bitmaps, and graphic
symbols can be stored in the library. When Editable Text is selected as an option for a text layer being imported into the
library, it is automatically imported as a graphic symbol.
Vector Outlines Converts text to vector paths to preserve the visual appearance of the text. The text itself is no longer
editable, but opacity and compatible blend mode maintain their editability. If this option is selected, the object must
be converted to a movie clip.
Flattened Bitmap Image Rasterizes the text into a bitmap to preserve the exact appearance of the text layer in
Photoshop. Rasterized text is no longer editable.
Note: When importing text on a path you must import it as a flattened bitmap image to preserve the visual fidelity of the
object.
Importing shape objects
A Shape Layer object is an object that was originally a shape layer in Photoshop or an image layer with a vector clipping
mask on it.
83
Editable Paths And Layer Styles Creates an editable vector shape with a bitmap clipped inside the vector. Supported
blend modes, filters, and opacity are maintained. Unsupported blend modes that cannot be reproduced in Flash are
removed. The object must be converted to a movie clip.
Flattened Bitmap Image Rasterizes the shape into a bitmap to preserve the exact appearance of the shape layer in
Photoshop. A rasterized image is no longer editable.
Importing image or fill layers
If the image or fill layer is associated with a vector mask, it is treated as a shape layer object.
Bitmap Image With Editable Layer Styles Creates a movie clip with a bitmap inside. Supported blend modes, filters,
and opacity are maintained. Unsupported blend modes that cannot be reproduced in Flash are removed. The object
must be converted to a movie clip.
Flattened Bitmap Image Rasterizes the image into a bitmap to preserve the exact appearance of the image or fill layer
in Photoshop.
Importing merged bitmap objects and objects in a merged bitmap
A merged bitmap is an object that contains more than one Photoshop layer that is flattened (or merged) into a single
bitmap when imported into Flash. Objects in a merged bitmap represent layers in Photoshop. To create a merged
bitmap, select two or more layers, and select the Merge Layers button.
Importing multiple objects of different types
If you import multiple objects of different types, Flash only lets you import the selected objects with the import options
they share in common, such as Create Movie Clip and Registration.
Page 89

USING FLASH CS4 PROFESSIONAL
Updated 5 March 2009
Using imported artwork
Importing multiple objects of the same type
If you import multiple objects of the same type, the import options displayed are the same as if a single object of that
type was selected. If the objects do not share the same attributes, the import options displayed are in an indeterminate
state, and your results may not be as expected.
Importing a Group folder
When you import a group folder, you can import it as a movie clip, or place each layer in the group on its own layer
or keyframe on the timeline.
If you select Import As Movie Clip, each layer in the group folder is placed on a layer in a movie clip, which is then
placed on its own layer or keyframe on the timeline. The movie clip uses the same name as that group folder had in
Photoshop, and if you import the movie clip to a Flash layer, the layer uses the same name.
If you do not place the group in a movie clip, each layer is converted to the type that is currently set for it, and each
layer in the group is imported to its own Flash layer. The Flash layers are named for the individual layers in the PSD file.
Importing and merging layers
The PSD Importer lets you merge two or more layers into a merged bitmap that is imported as a single bitmap file
rather than individual objects.
The layers you select to create a merged bitmap must be a continuous range of two or more layers at the same level.
For example, you cannot select one layer inside a group and a layer outside that group, and merge them. Instead, you
must select the entire group and the separate layer.
84
Setting publish options
The publish settings in the PSD Importer let you specify the degree of compression and document quality to apply to
the image when publishing the Flash document as a SWF file. These settings take effect only when you publish the
document as a SWF file and have no effect on the image when you import it to the Flash Stage or library.
Compression Lets you choose either lossy or lossless compression formats:
• Lossy Lossy (JPEG) compresses the image in JPEG format. To use the default compression quality specified for the
imported image, select Use Publish Setting. To specify a new quality compression setting, select the Custom option
and enter a value between 1 and 100 in the Quality text field. (A higher setting preserves greater image integrity but
yields a larger file size.)
• Lossless Lossless (PNG/GIF) compresses the image with lossless compression, in which no data is discarded from
the image.
Note: Use lossy compression for images with complex color or tonal variations, such as photographs or images with
gradient fills. Use lossless compression for images with simple shapes and relatively few colors.
Calculate Bitmap Size Determines the number of bitmaps that are created for a given layer based on your import
selections and the compressed size in kilobytes of the resulting bitmaps on the layer. For example, if you select a layer
with a drop shadow and a blur and maintain layer styles, the Calculate Bitmap Size information states that three
bitmaps will result from the import—one for each filter effect and another for the image itself. To calculate the size of
all the bitmaps to be imported, select all of the layers and click Calculate Bitmap Size.
Photoshop file importer preferences
The Flash Preferences dialog box lets you set import preferences for Photoshop PSD files. The preferences you specify
for importing PSD files affect the options the PSD Import dialog box is initially populated with for the Photoshop layer
types.
Page 90

USING FLASH CS4 PROFESSIONAL
Updated 5 March 2009
Using imported artwork
Note: To override the preferences specified for different layer types on an object by object basis, use the PSD Import dialog
box. Select the layer to change import options for, and specify the necessary options.
See also
“Set preferences in Flash” on page 37
Import Image Layers Preferences
These options specify how the import options for image layers will initially be set. You can import image layers as any
of the following:
Bitmap Images With Editable Layer Styles Creates a movie clip with a bitmap nested inside. Specifying this option
maintains supported blend modes and opacity, but other visual attributes that cannot be reproduced in Flash will be
removed. If this option is selected, the object must be converted into a movie clip.
Flattened Bitmap Images Rasterizes any text into a flattened bitmap image to maintain the exact appearance the text
layer had in Photoshop.
Create Movie Clips Specifies that the image layers be converted to movie clips when imported into Flash. This option
can be changed in the PSD Import dialog box on a layer by layer basis if you do not want all of the image layers to be
converted to movie clips.
85
Text layer import preferences
These options specify how the import options for text layers will initially be set.
Editable Text
Creates an editable text object from the text on the Photoshop text layer. The appearance of the text will be
sacrificed to maintain the editability of the text. If this option is selected, the object must be converted into a movie clip.
Vector Outlines Vectorizes the text into paths. The appearance of the text may be altered, but visual attributes will be
maintained. If this option is selected, the object must be converted into a movie clip.
Flattened Bitmap Images Rasterize the text to maintain the exact appearance the text layer had in Photoshop.
Create Movie Clips Automatically converts the text layer to a movie clip when imported into Flash. This option can be
changed in the PSD Import dialog box on an object by object basis if you do not want all of the text layers to be
converted to movie clips. This option is required when either Editable Text or Vector Outlines is selected.
Shape layer import preferences
These options specify how the import options for shape layers will initially be set.
Editable Paths And Layer Styles This option will create an editable vector shape with a bitmap clipped inside the
vector shape. Supported blend modes and opacity will also be maintained with this option, but other visual attributes
that cannot be reproduced in Flash will be sacrificed. If this option is selected, then the object must be converted into
a movie clip.
Flattened Bitmap Images This option will rasterize the shape and maintain the exact appearance the shape layer had
in Photoshop.
Create Movie Clips This option will set the shape layers to be converted to a movie clip when imported into Flash. This
option can be changed on an object by object basis if you do not want some shape layers to be converted to movie clips.
This option is disabled if the Maintain Editable Paths and Layers Styles checkbox is checked.
Page 91

USING FLASH CS4 PROFESSIONAL
Updated 5 March 2009
Using imported artwork
Layer group import preferences
This option specifies how the options for layer groups will initially be set.
Create Movie Clips Specifies that all groups be converted to a movie clip when imported into Flash. This can be
changed on an object by object basis if you do not want some layer groups to be movie clips.
Merged bitmap import preferences
This option specifies how the import options for merged bitmaps will initially be set.
Create Movie Clips This option will set the merged bitmaps to be converted to a movie clip when imported into Flash.
This option can be changed on an object by object basis if you do not want some merged bitmaps to be converted to
movie clips. This option is disabled if the Maintain Editable Paths And Layers Styles checkbox is checked.
Movie clip registration import preferences
Specifies a global registration point for movies that are created. This setting applies to the registration point for all
object types. This option can be changed on an object by object basis in the PSD Import dialog box; this is the initial
setting for all object types. For more information on movie clip registration, see “Edit symbols” on page 150.
Publish settings for imported images
The publish settings preferences for a FLA file let you specify the degree of compression and document quality to apply
to images when publishing the Flash document as a SWF file. These settings take effect only when you publish the
document as a SWF file, and have no effect on the image when you import it to the Flash stage or library.
86
Compression Lets you choose either lossy or lossless compression formats:
• Lossy Lossy (JPEG) compresses the image in JPEG format. To use the default compression quality specified for the
imported image, select Use Publish Setting. To specify a new quality compression setting, select the Custom option
and enter a value between 1 and 100 in the Quality text field. (A higher setting preserves greater image integrity but
yields a larger file size.)
• Lossless Lossless (PNG/GIF) compresses the image with lossless compression, in which no data is discarded from
the image.
Note: Use lossy compression for images with complex color or tonal variations, such as photographs or images with
gradient fills. Use lossless compression for images with simple shapes and relatively few colors.
Quality Lets you set a quality level for the comression.
• Use Publish Setting Applies the current JPEG Quality setting from the Publish Settings.
• Custom Lets you specify a separate specific quality setting.
Imported bitmaps
Work with imported bitmaps
When you import a bitmap into Flash, you can modify that bitmap and use it in your Flash document in a variety of ways.
If a Flash document displays an imported bitmap at a size larger than the original, the image may be distorted. To be
sure that images are displayed properly, preview imported bitmaps.
Page 92

USING FLASH CS4 PROFESSIONAL
Updated 5 March 2009
Using imported artwork
When you select a bitmap on the Stage, the Property inspector displays the bitmap’s symbol name and its pixel
dimensions and position on the Stage. Using the Property inspector, you can swap an instance of a bitmap—that is,
replace the instance with an instance of another bitmap in the current document.
Display the Property inspector with bitmap properties
1 Select an instance of a bitmap on the Stage.
2 Select Window > Properties.
Replace an instance of a bitmap with an instance of another bitmap
1 Select a bitmap instance on the Stage.
2 Select Window > Properties, and click Swap.
3 Select a bitmap to replace the one currently assigned to the instance.
Set bitmap properties
You can apply anti-aliasing to an imported bitmap to smooth the edges in the image. You can also select a compression
option to reduce the bitmap file size and format the file for display on the web.
1 Select a bitmap in the Library panel and click the Properties button at the bottom of the Library panel.
2 Select Allow Smoothing. Smoothing improves the quality of bitmap images when they are scaled.
3 For Compression, select one of the following options:
Photo (JPEG) Compresses the image in JPEG format. To use the default compression quality specified for the imported
image, select Use Document Default Quality. To specify a new quality compression setting, deselect Use Document
Default Quality and enter a value between 1 and 100 in the Quality text field. (A higher setting preserves greater image
integrity but yields a larger file size.)
87
Lossless (PNG/GIF) Compresses the image with lossless compression, in which no data is discarded from the image.
Note: Use Photo compression for images with complex color or tonal variations, such as photographs or images with
gradient fills. Use lossless compression for images with simple shapes and relatively few colors.
4 To determine the results of the file compression, click Test. To determine if the selected compression setting is
acceptable, compare the original file size to the compressed file size.
5 Click OK.
Note: JPEG Quality settings that you select in the Publish Settings dialog box do not specify a quality setting for imported
JPEG files. Specify a quality setting for each imported JPEG file in the Bitmap Properties dialog box.
Import a bitmap at runtime
To add bitmaps to a document at runtime, use the ActionScript® 2.0 or the ActionScript 3.0 BitmapData command.
To do so, specify a linkage identifier for the bitmap. For more information, see Assigning linkage to assets in the library
in Learning ActionScript 2.0 in Adobe Flash or Exporting library symbols for ActionScript in Programming
ActionScript 3.0.
1 Select the bitmap in the Library panel.
2 Do one of the following:
• Select Linkage from the Panel menu in the upper-right corner of the panel.
Page 93

USING FLASH CS4 PROFESSIONAL
Updated 5 March 2009
Using imported artwork
• Right-click (Windows) or Control-click (Macintosh) the bitmap name in the Library panel, and select Properties
from the context menu.
If the Linkage properties aren’t visible in the Properties dialog box, click Advanced.
3 For Linkage, select Export For ActionScript.
4 Enter an identifier string in the text field, and click OK.
Apply a bitmap as a fill
To apply a bitmap as a fill to a graphic object, use the Color panel. Applying a bitmap as a fill tiles the bitmap to fill the
object. The Gradient Transform tool allows you to scale, rotate, or skew an image and its bitmap fill.
1 To apply the fill to existing artwork, select a graphic object or objects on the Stage.
2 Select Window > Color.
3 Select Bitmap from the pop-up menu in the upper right of the panel.
4 To use a larger preview window to display more bitmaps in the current document, click the arrow in the lower-right
corner to expand the Color panel.
5 Click a bitmap to select it.
The bitmap becomes the current fill color. If you selected artwork in step 1, the bitmap is applied as a fill to the artwork.
88
See also
“Transform gradient and bitmap fills” on page 134
Edit a bitmap in an external editor
If you are editing a Fireworks PNG file imported as a flattened image, edit the PNG source file for the bitmap, when
available.
Note: You cannot edit bitmaps from Fireworks PNG files imported as editable objects in an external image editor.
If you have Fireworks 3 or later or another image-editing application installed on your system, you can start the
application from Flash to edit an imported bitmap.
Edit a bitmap with Fireworks 3 or later
1 In the Library panel, right-click (Windows) or Control-click (Macintosh) the bitmap’s icon and select Edit With
Fireworks 3.
2 Specify whether to open the PNG source file or the bitmap file.
3 Perform the desired modifications to the file in Fireworks.
4 In Fireworks, select File > Update.
5 Return to Flash.
The file is automatically updated in Flash.
Edit a bitmap with another image-editing application
1 In the Library panel, right-click (Windows) or Control-click (Macintosh) the bitmap’s icon, and select Edit With.
2 Select an image-editing application to open the bitmap file, and click OK.
3 Perform the desired modifications to the file in the image-editing application.
Page 94

USING FLASH CS4 PROFESSIONAL
Updated 5 March 2009
Using imported artwork
4 Save the file in the image-editing application.
The file is automatically updated in Flash.
5 Return to Flash to continue editing the document.
Break apart a bitmap and create a bitmap fill
Breaking apart a bitmap on the Stage separates the on-Stage image from its library item and converts it from a bitmap
instance to a shape. When you break apart a bitmap, you can modify the bitmap with the Flash drawing and painting
tools. Using the Lasso tool with the Magic Wand modifier, you can select areas of the bitmap that contain the same or
similar colors.
To paint with a broken-apart bitmap, select the bitmap with the Eyedropper tool and apply the bitmap as a fill with the
Paint Bucket tool or another drawing tool.
See also
“Adjust Stroke and Fill color” on page 130
Break a bitmap apart
1 Select a bitmap in the current scene.
2 Select Modify > Break Apart.
89
Change the fill of areas of a broken-apart bitmap
1 Select the Lasso tool, click the Magic Wand modifier, and set the following options:
• For Threshold, enter a value between 1 and 200 to define how closely the color of adjacent pixels must match to be
included in the selection. A higher number includes a broader range of colors. If you enter 0, only pixels of the exact
same color as the first pixel you click are selected.
• For Smoothing, select an option to define how much the edges of the selection are smoothed.
2 To select an area, click the bitmap. To add to the selection, continue clicking.
3 To fill the selected areas in the bitmap, select the fill to use from the Fill Color control.
4 To apply the new fill, select the Paint Bucket tool and click anywhere in the selected area.
Use the Eyedropper tool to apply a bitmap fill
1 Select the Eyedropper tool and click the broken-apart bitmap on the Stage. The Eyedropper tool sets the bitmap to
be the current fill and changes the active tool to the Paint Bucket.
2 Do one of the following:
• To apply the bitmap as a fill, click an existing graphic object with the Paint Bucket tool.
• Select the Oval, Rectangle, or Pen tool, and draw a new object. The object is filled with the broken-apart bitmap.
To scale, rotate, or skew the bitmap fill, use the Paint Bucket tool.
Convert a bitmap to a vector graphic
The Trace Bitmap command converts a bitmap into a vector graphic with editable, discrete areas of color. You
manipulate the image as a vector graphic, and you can reduce the file size.
Page 95

USING FLASH CS4 PROFESSIONAL
Updated 5 March 2009
Using imported artwork
When you convert a bitmap to a vector graphic, the vector graphic is no longer linked to the bitmap symbol in the
Library panel.
Note: If the imported bitmap contains complex shapes and many colors, the converted vector graphic might have a larger
file size than the original bitmap. To find a balance between file size and image quality, try a variety of settings in the
Trace Bitmap dialog box.
You can also break apart a bitmap to modify the image with Flash drawing and painting tools.
1 Select a bitmap in the current scene.
2 Select Modify > Bitmap > Trace Bitmap.
3 Enter a Color Threshold value.
When two pixels are compared, if the difference in the RGB color values is less than the color threshold, the two pixels
are considered the same color. As you increase the threshold value, you decrease the number of colors.
4 For Minimum Area, enter a value to set the number of surrounding pixels to consider when assigning a color to a
pixel.
5 For Curve Fit, select an option to determine how smoothly outlines are drawn.
6 For Corner Threshold, select an option to determine whether sharp edges are retained or smoothed out.
To create a vector graphic that looks most like the original bitmap, enter the following values:
90
• Color Threshold: 10
• Minimum Area: 1 pixel
• Curve Fit: Pixels
• Corner Threshold: Many Corners
Page 96

Chapter 5: Creating and Editing Artwork
Updated 5 March 2009
Drawing
About drawing
The drawing tools in Adobe® Flash® CS4 Professional let you create and modify shapes for the artwork in your
documents.
Before you draw and paint in Flash, it is important to understand how Flash creates artwork, and how drawing,
painting, and modifying shapes can affect other shapes on the same layer.
For a text tutorial on drawing, see “Draw in Flash” on the Flash Tutorials page at
www.adobe.com/go/learn_fl_tutorials.
For a video tutorial about drawing, see www.adobe.com/go/vid0119. This video describes drawing in Flash CS3 and
later.
91
Vector and bitmap graphics
Computers display graphics in either vector or bitmap format. Understanding the difference between the two formats
helps you work more efficiently. Using Flash, you can create and animate compact vector graphics. Flash also imports
and manipulates vector and bitmap graphics that were created in other applications.
Vector graphics
Vector graphics describe images by using lines and curves, called vectors, that also include color and position
properties. For example, the image of a leaf is described by points through which lines pass, creating the leaf’s outline.
The color of the leaf is determined by the color of the outline and the color of the area enclosed by the outline.
Lines in vector art.
When you edit a vector graphic, you modify the properties of the lines and curves that describe its shape. Move, resize,
reshape, and change the color of a vector graphic without changing the quality of its appearance. Vector graphics are
resolution independent; that is, they can be displayed on output devices of varying resolutions without losing any
quality.
Bitmap graphics
Bitmap graphics describe images using colored dots, called pixels, arranged in a grid. For example, the image of a leaf
is described by the specific location and color value of each pixel in the grid, creating an image in much the same
manner as a mosaic.
Page 97

USING FLASH CS4 PROFESSIONAL
Updated 5 March 2009
Creating and Editing Artwork
Pixels in bitmap art.
When you edit a bitmap graphic, you modify pixels rather than lines and curves. Bitmap graphics are resolution
dependent, because the data describing the image is fixed to a grid of a particular size. Editing a bitmap graphic can
change the quality of its appearance. In particular, resizing a bitmap graphic can make the edges of the image ragged
as pixels are redistributed within the grid. Displaying a bitmap graphic on an output device that has a lower resolution
than the image itself also degrades its quality.
Paths
Whenever you draw a line or shape in Flash, you create a line called a path. A path is made up of one or more straight
or curved segments. The beginning and end of each segment is denoted by anchor points, which work like pins holding
a wire in place. A path can be closed (for example, a circle), or open, with distinct endpoints (for example, a wavy line).
92
You change the shape of a path by dragging its anchor points, the direction points at the end of direction lines that
appear at anchor points, or the path segment itself.
A
C
B
D
Components of a path
A. Selected (solid) endpoint B. Selected anchor point C. Unselected anchor point D. Curved path segment E. Direction point F. Direction line.
E
F
Paths can have two kinds of anchor points: corner points and smooth points. At a corner point, a path abruptly changes
direction. At a smooth point, path segments are connected as a continuous curve. You can draw a path using any
combination of corner and smooth points. If you draw the wrong type of point, you can always change it.
A B C
Points on a path
A. Four corner points B. Four smooth points C. Combination of corner and smooth points.
A corner point can connect any two straight or curved segments, while a smooth point always connects two curved
segments.
Page 98

USING FLASH CS4 PROFESSIONAL
Updated 5 March 2009
Creating and Editing Artwork
A corner point can connect both straight segments and curved segments.
Note: Don’t confuse corner and smooth points with straight and curved segments.
A path outline is called a stroke. A color or gradient applied to an open or closed path interior area is called a fill. A
stroke can have weight (thickness), color, and a dash pattern. After you create a path or shape, you can change the
characteristics of its stroke and fill.
Direction lines and direction points
When you select an anchor point that connects curved segments (or select the segment itself), the anchor points of the
connecting segments display direction handles, which consist of direction lines that end in direction points. The angle
and length of the direction lines determine the shape and size of the curved segments. Moving the direction points
reshapes the curves. Direction lines don’t appear in the final output.
93
After selecting an anchor point (left), direction lines appear on any curved segments connected by the anchor point (right).
A smooth point always has two direction lines, which move together as a single, straight unit. When you move a
direction line on a smooth point, the curved segments on both sides of the point are adjusted simultaneously,
maintaining a continuous curve at that anchor point.
In comparison, a corner point can have two, one, or no direction lines, depending on whether it joins two, one, or no
curved segments, respectively. Corner point direction lines maintain the corner by using different angles. When you
move a direction line on a corner point, only the curve on the same side of the point as that direction line is adjusted.
Adjusting direction lines on a smooth point (left) and a corner point (right).
Direction lines are always tangent to (perpendicular to the radius of) the curve at the anchor points. The angle of each
direction line determines the slope of the curve, and the length of each direction line determines the height, or depth,
of the curve.
Page 99

USING FLASH CS4 PROFESSIONAL
Updated 5 March 2009
Creating and Editing Artwork
Moving and resizing direction lines changes the slope of curves.
Drawing modes and graphic objects
In Flash, you can create several different kinds of graphic objects by using different drawing modes and drawing tools.
Each kind has its own advantages and disadvantages. By understanding the capabilities of the different graphic object
types, you can make good decisions about which types of objects to use in your work.
Note: In Flash, graphic objects are items on the Stage. Flash lets you move, copy, delete, transform, stack, align, and group
graphic objects. “Graphic objects” in Flash are different from “ActionScript objects,” which are part of the ActionScript®
programming language. Do not confuse the two uses of the term “objects.” For more information on objects in the
programming language, see About Data Types in Learning ActionScript 2.0 in Adobe Flash, or Data types in
Programming ActionScript 3.0.
94
Merge Drawing mode
The default drawing mode automatically merges shapes that you draw when you overlap them. When you draw shapes
that overlap each other in the same layer, the top-most shape cuts away the part of the shape underneath it that it
overlaps. In this way, drawing shapes is a destructive drawing mode. For example, if you draw a circle and overlay a
smaller circle on top of it, and then select the smaller circle and move it, the portion of the second circle that overlaid
the first circle is removed.
When a shape has both a stroke and a fill, they are considered separate graphic elements that can be selected and moved
independently.
Shapes created with the Merge Drawing mode merge together when they overlap. Selecting a shape and moving it results in the overlaid shape
being altered.
Enter Merge Drawing mode
1 Select the Merge Drawing option in the Tools panel.
Page 100

USING FLASH CS4 PROFESSIONAL
Updated 5 March 2009
Creating and Editing Artwork
2 Select a drawing tool from the Tools panel and draw on the Stage
Note: By default, Flash uses the Merge Drawing mode.
Object Drawing mode
Creates shapes referred to as drawing objects. Drawing objects are separate graphic objects that do not automatically
merge together when overlaid. This lets you overlap shapes without altering their appearance if you move them apart,
or rearrange their appearance. Flash creates each shape as a separate object that you can individually manipulate.
When a drawing tool is in Object Drawing mode, the shapes you create with it are self-contained. The stroke and fill
of a shape are not separate elements, and shapes that overlap do not alter one another. When you select a shape created
using Object Drawing mode, Flash surrounds the shape with a rectangular bounding box to identify it.
Note: Set preferences for contact sensitivity when selecting shapes created using the Object Drawing mode.
95
Shapes created with the Object Drawing mode remain separate objects that you can manipulate individually.
Enter Object Drawing mode
To draw shapes using Object Drawing mode, you must explicitly enable it.
1 Select a drawing tool that supports Object Drawing mode (the Pencil, Line, Pen, Brush, Oval, Rectangle, and
Polygon tools).
2 Select the Object Drawing button from the Options category of the Tools panel, or press the J key to toggle
between the Merge and Object Drawing modes. The Object Drawing button toggles between the Merge and Object
Drawing modes. You can set preferences for contact sensitivity when you select shapes created with Object
Drawing mode.
3 Draw on the Stage.
Convert a Merge Drawing mode created shape to an Object Drawing mode shape
1 Select the shape on the Stage.
2 To convert the shape into an Object Drawing mode shape, select Modify > Combine Objects > Union. After
conversion, the shape is treated like a vector-based drawing object that does not alter its appearance by interacting
with other shapes.
Note: To join two or more shapes into a single, object-based shape, use the Union command.
 Loading...