

Page 1

Adobe® Flash® Professional CC
Help
Page 2

Legal notices
Legal notices
For legal notices, see http://help.adobe.com/en_US/legalnotices/index.html.
Last updated 6/12/2015
Page 3

Contents
Chapter 1: What's New
New features summary . . . . . . . . . . . . . . . . . . . . . . . . . . . . . . . . . . . . . . . . . . . . . . . . . . . . . . . . . . . . . . . . . . . . . . . . . . . . . . . . . . . . . . . . . . . . . . . . .1
New features summary - 2014 . . . . . . . . . . . . . . . . . . . . . . . . . . . . . . . . . . . . . . . . . . . . . . . . . . . . . . . . . . . . . . . . . . . . . . . . . . . . . . . . . . . . . . . . . .9
What's new in Flash Professional CS6 . . . . . . . . . . . . . . . . . . . . . . . . . . . . . . . . . . . . . . . . . . . . . . . . . . . . . . . . . . . . . . . . . . . . . . . . . . . . . . . . . . 15
New features summary . . . . . . . . . . . . . . . . . . . . . . . . . . . . . . . . . . . . . . . . . . . . . . . . . . . . . . . . . . . . . . . . . . . . . . . . . . . . . . . . . . . . . . . . . . . . . . . 18
Chapter 2: Platforms
Convert to other document formats . . . . . . . . . . . . . . . . . . . . . . . . . . . . . . . . . . . . . . . . . . . . . . . . . . . . . . . . . . . . . . . . . . . . . . . . . . . . . . . . . . . 27
Custom Platform Support . . . . . . . . . . . . . . . . . . . . . . . . . . . . . . . . . . . . . . . . . . . . . . . . . . . . . . . . . . . . . . . . . . . . . . . . . . . . . . . . . . . . . . . . . . . . . 28
Creating and publishing an HTML5 Canvas document . . . . . . . . . . . . . . . . . . . . . . . . . . . . . . . . . . . . . . . . . . . . . . . . . . . . . . . . . . . . . . . . . 29
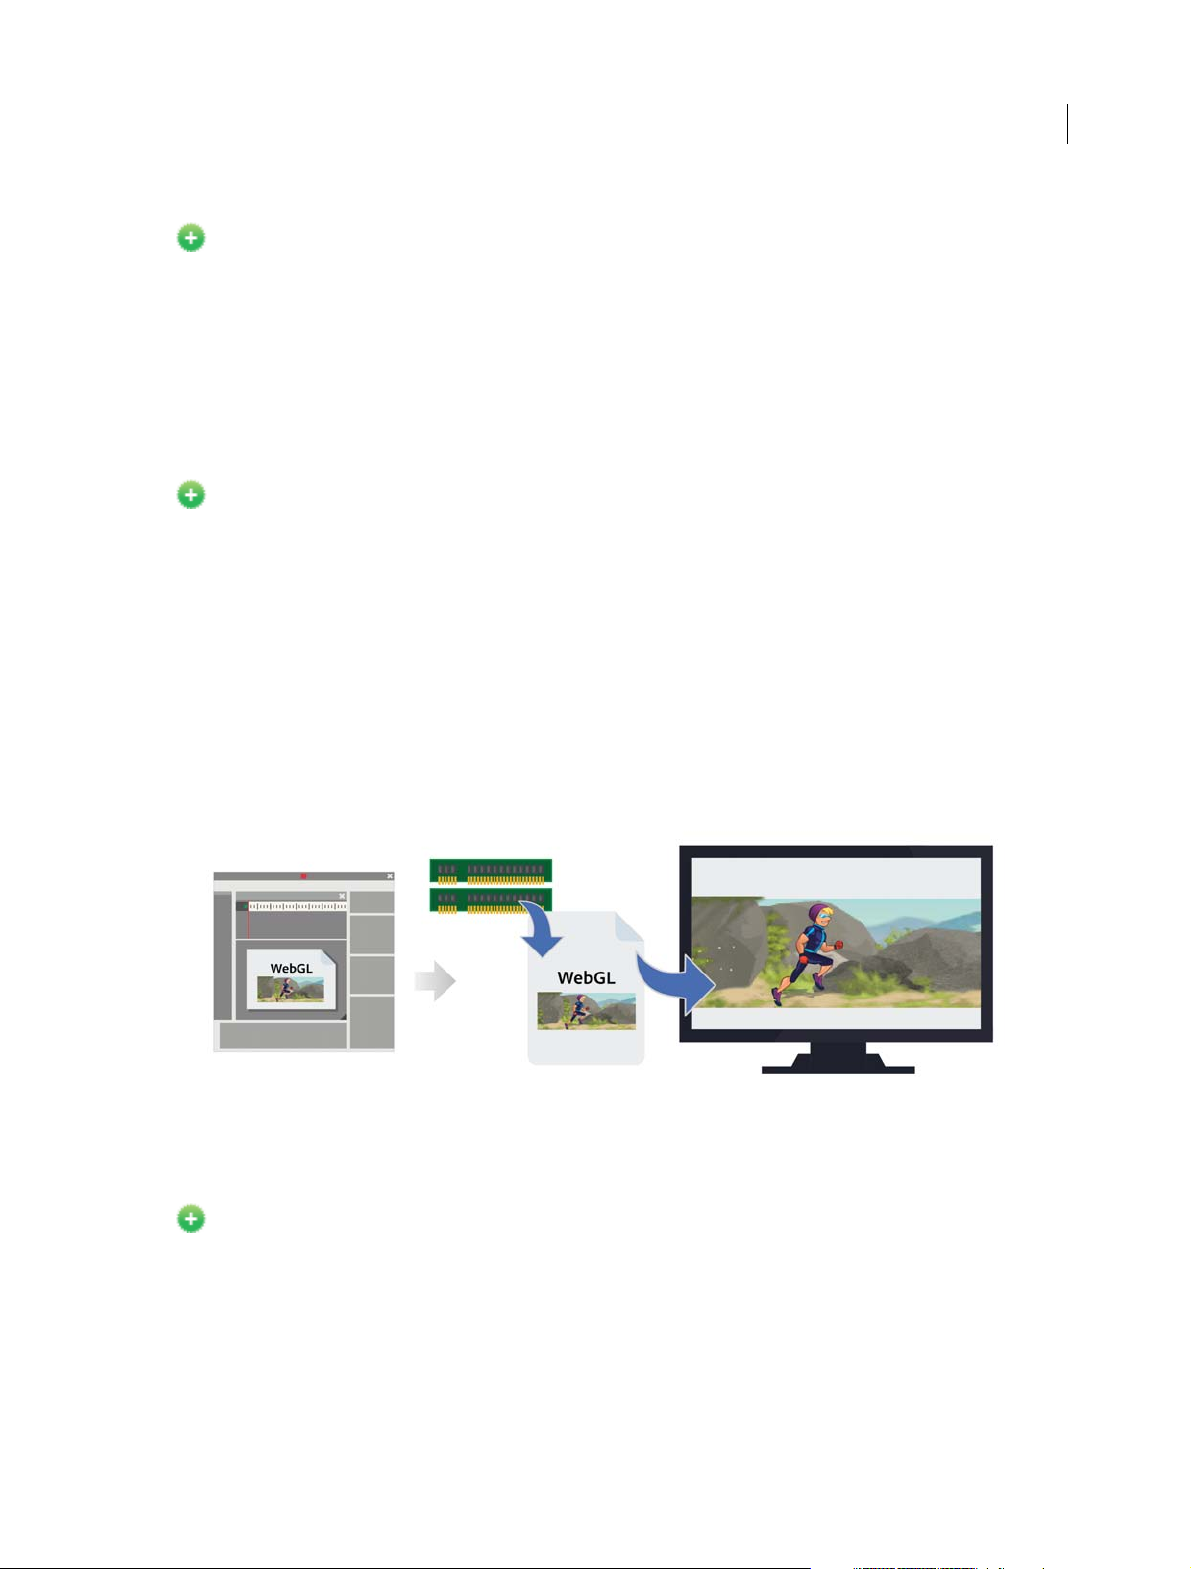
Creating and publishing a WebGL document . . . . . . . . . . . . . . . . . . . . . . . . . . . . . . . . . . . . . . . . . . . . . . . . . . . . . . . . . . . . . . . . . . . . . . . . . . 36
Packaging applications for AIR for iOS . . . . . . . . . . . . . . . . . . . . . . . . . . . . . . . . . . . . . . . . . . . . . . . . . . . . . . . . . . . . . . . . . . . . . . . . . . . . . . . . . 41
Publishing AIR for Android applications . . . . . . . . . . . . . . . . . . . . . . . . . . . . . . . . . . . . . . . . . . . . . . . . . . . . . . . . . . . . . . . . . . . . . . . . . . . . . . . 46
Publishing for Adobe AIR for desktop . . . . . . . . . . . . . . . . . . . . . . . . . . . . . . . . . . . . . . . . . . . . . . . . . . . . . . . . . . . . . . . . . . . . . . . . . . . . . . . . . 51
ActionScript publish settings . . . . . . . . . . . . . . . . . . . . . . . . . . . . . . . . . . . . . . . . . . . . . . . . . . . . . . . . . . . . . . . . . . . . . . . . . . . . . . . . . . . . . . . . . 57
Custom Platform Support API Reference . . . . . . . . . . . . . . . . . . . . . . . . . . . . . . . . . . . . . . . . . . . . . . . . . . . . . . . . . . . . . . . . . . . . . . . . . . . . . . 63
Creating accessible content . . . . . . . . . . . . . . . . . . . . . . . . . . . . . . . . . . . . . . . . . . . . . . . . . . . . . . . . . . . . . . . . . . . . . . . . . . . . . . . . . . . . . . . . . . . 64
Best practices - Accessibility guidelines . . . . . . . . . . . . . . . . . . . . . . . . . . . . . . . . . . . . . . . . . . . . . . . . . . . . . . . . . . . . . . . . . . . . . . . . . . . . . . . . 76
Accessibility in the Flash workspace . . . . . . . . . . . . . . . . . . . . . . . . . . . . . . . . . . . . . . . . . . . . . . . . . . . . . . . . . . . . . . . . . . . . . . . . . . . . . . . . . . . 80
Debugging ActionScript 3.0 . . . . . . . . . . . . . . . . . . . . . . . . . . . . . . . . . . . . . . . . . . . . . . . . . . . . . . . . . . . . . . . . . . . . . . . . . . . . . . . . . . . . . . . . . . 83
Writing and managing scripts . . . . . . . . . . . . . . . . . . . . . . . . . . . . . . . . . . . . . . . . . . . . . . . . . . . . . . . . . . . . . . . . . . . . . . . . . . . . . . . . . . . . . . . . . 87
Enabling Support for Custom Platforms . . . . . . . . . . . . . . . . . . . . . . . . . . . . . . . . . . . . . . . . . . . . . . . . . . . . . . . . . . . . . . . . . . . . . . . . . . . . . . . 97
Working with Custom Platform Support Plug-in . . . . . . . . . . . . . . . . . . . . . . . . . . . . . . . . . . . . . . . . . . . . . . . . . . . . . . . . . . . . . . . . . . . . . . 102
Best practices - Organizing ActionScript inan application . . . . . . . . . . . . . . . . . . . . . . . . . . . . . . . . . . . . . . . . . . . . . . . . . . . . . . . . . . . . . 104
Enabling Support for Custom Platforms . . . . . . . . . . . . . . . . . . . . . . . . . . . . . . . . . . . . . . . . . . . . . . . . . . . . . . . . . . . . . . . . . . . . . . . . . . . . . . 105
Export to HTML5 from Flash Professional . . . . . . . . . . . . . . . . . . . . . . . . . . . . . . . . . . . . . . . . . . . . . . . . . . . . . . . . . . . . . . . . . . . . . . . . . . . . . 110
Using SWC files to build large Flash and AIR projects with multiple SWF files for iOS . . . . . . . . . . . . . . . . . . . . . . . . . . . . . . . . . . . 110
iii
Chapter 3: Workspace and workflow
Using the Stage and Tools panel . . . . . . . . . . . . . . . . . . . . . . . . . . . . . . . . . . . . . . . . . . . . . . . . . . . . . . . . . . . . . . . . . . . . . . . . . . . . . . . . . . . . . 111
Flash workflow and workspace . . . . . . . . . . . . . . . . . . . . . . . . . . . . . . . . . . . . . . . . . . . . . . . . . . . . . . . . . . . . . . . . . . . . . . . . . . . . . . . . . . . . . . . 114
Timelines and ActionScript . . . . . . . . . . . . . . . . . . . . . . . . . . . . . . . . . . . . . . . . . . . . . . . . . . . . . . . . . . . . . . . . . . . . . . . . . . . . . . . . . . . . . . . . . . 122
Working with multiple timelines . . . . . . . . . . . . . . . . . . . . . . . . . . . . . . . . . . . . . . . . . . . . . . . . . . . . . . . . . . . . . . . . . . . . . . . . . . . . . . . . . . . . . 126
Set preferences in Flash . . . . . . . . . . . . . . . . . . . . . . . . . . . . . . . . . . . . . . . . . . . . . . . . . . . . . . . . . . . . . . . . . . . . . . . . . . . . . . . . . . . . . . . . . . . . . . 127
Using Flash authoring panels . . . . . . . . . . . . . . . . . . . . . . . . . . . . . . . . . . . . . . . . . . . . . . . . . . . . . . . . . . . . . . . . . . . . . . . . . . . . . . . . . . . . . . . . 132
Timeline layers . . . . . . . . . . . . . . . . . . . . . . . . . . . . . . . . . . . . . . . . . . . . . . . . . . . . . . . . . . . . . . . . . . . . . . . . . . . . . . . . . . . . . . . . . . . . . . . . . . . . . . 136
Moving and copying objects . . . . . . . . . . . . . . . . . . . . . . . . . . . . . . . . . . . . . . . . . . . . . . . . . . . . . . . . . . . . . . . . . . . . . . . . . . . . . . . . . . . . . . . . . 142
Sync Flash Professional Preferences with Creative Cloud . . . . . . . . . . . . . . . . . . . . . . . . . . . . . . . . . . . . . . . . . . . . . . . . . . . . . . . . . . . . . . 143
Working with Adobe Color panel . . . . . . . . . . . . . . . . . . . . . . . . . . . . . . . . . . . . . . . . . . . . . . . . . . . . . . . . . . . . . . . . . . . . . . . . . . . . . . . . . . . . . 147
Tem p la te s . . . . . . . . . . . . . . . . . . . . . . . . . . . . . . . . . . . . . . . . . . . . . . . . . . . . . . . . . . . . . . . . . . . . . . . . . . . . . . . . . . . . . . . . . . . . . . . . . . . . . . . . . . . 149
Create a sprite sheet . . . . . . . . . . . . . . . . . . . . . . . . . . . . . . . . . . . . . . . . . . . . . . . . . . . . . . . . . . . . . . . . . . . . . . . . . . . . . . . . . . . . . . . . . . . . . . . . . 150
Find and Replace in Flash . . . . . . . . . . . . . . . . . . . . . . . . . . . . . . . . . . . . . . . . . . . . . . . . . . . . . . . . . . . . . . . . . . . . . . . . . . . . . . . . . . . . . . . . . . . . 151
Undo, redo, and the History panel . . . . . . . . . . . . . . . . . . . . . . . . . . . . . . . . . . . . . . . . . . . . . . . . . . . . . . . . . . . . . . . . . . . . . . . . . . . . . . . . . . . . 154
Last updated 6/12/2015
Page 4

FLASH PROFESSIONAL
Content s
Keyboard shortcuts . . . . . . . . . . . . . . . . . . . . . . . . . . . . . . . . . . . . . . . . . . . . . . . . . . . . . . . . . . . . . . . . . . . . . . . . . . . . . . . . . . . . . . . . . . . . . . . . . . 157
Creating HTML extensions . . . . . . . . . . . . . . . . . . . . . . . . . . . . . . . . . . . . . . . . . . . . . . . . . . . . . . . . . . . . . . . . . . . . . . . . . . . . . . . . . . . . . . . . . . . 158
Chapter 4: Animation and Interactivity
Bone tool . . . . . . . . . . . . . . . . . . . . . . . . . . . . . . . . . . . . . . . . . . . . . . . . . . . . . . . . . . . . . . . . . . . . . . . . . . . . . . . . . . . . . . . . . . . . . . . . . . . . . . . . . . . 161
Animation Guide . . . . . . . . . . . . . . . . . . . . . . . . . . . . . . . . . . . . . . . . . . . . . . . . . . . . . . . . . . . . . . . . . . . . . . . . . . . . . . . . . . . . . . . . . . . . . . . . . . . . 171
Working with classic tween animation . . . . . . . . . . . . . . . . . . . . . . . . . . . . . . . . . . . . . . . . . . . . . . . . . . . . . . . . . . . . . . . . . . . . . . . . . . . . . . . 174
Motion tween animation . . . . . . . . . . . . . . . . . . . . . . . . . . . . . . . . . . . . . . . . . . . . . . . . . . . . . . . . . . . . . . . . . . . . . . . . . . . . . . . . . . . . . . . . . . . . 184
Editing Motion Tweens using Motion Editor . . . . . . . . . . . . . . . . . . . . . . . . . . . . . . . . . . . . . . . . . . . . . . . . . . . . . . . . . . . . . . . . . . . . . . . . . . 203
Shape tweening . . . . . . . . . . . . . . . . . . . . . . . . . . . . . . . . . . . . . . . . . . . . . . . . . . . . . . . . . . . . . . . . . . . . . . . . . . . . . . . . . . . . . . . . . . . . . . . . . . . . . 209
Frames and keyframes . . . . . . . . . . . . . . . . . . . . . . . . . . . . . . . . . . . . . . . . . . . . . . . . . . . . . . . . . . . . . . . . . . . . . . . . . . . . . . . . . . . . . . . . . . . . . . . 214
Frame-by-frame animation . . . . . . . . . . . . . . . . . . . . . . . . . . . . . . . . . . . . . . . . . . . . . . . . . . . . . . . . . . . . . . . . . . . . . . . . . . . . . . . . . . . . . . . . . . 217
Custom Brushes . . . . . . . . . . . . . . . . . . . . . . . . . . . . . . . . . . . . . . . . . . . . . . . . . . . . . . . . . . . . . . . . . . . . . . . . . . . . . . . . . . . . . . . . . . . . . . . . . . . . . 219
Animation basics . . . . . . . . . . . . . . . . . . . . . . . . . . . . . . . . . . . . . . . . . . . . . . . . . . . . . . . . . . . . . . . . . . . . . . . . . . . . . . . . . . . . . . . . . . . . . . . . . . . . 222
Creating buttons . . . . . . . . . . . . . . . . . . . . . . . . . . . . . . . . . . . . . . . . . . . . . . . . . . . . . . . . . . . . . . . . . . . . . . . . . . . . . . . . . . . . . . . . . . . . . . . . . . . . 226
Working with multiple timelines . . . . . . . . . . . . . . . . . . . . . . . . . . . . . . . . . . . . . . . . . . . . . . . . . . . . . . . . . . . . . . . . . . . . . . . . . . . . . . . . . . . . . 229
Working with scenes . . . . . . . . . . . . . . . . . . . . . . . . . . . . . . . . . . . . . . . . . . . . . . . . . . . . . . . . . . . . . . . . . . . . . . . . . . . . . . . . . . . . . . . . . . . . . . . . 230
Best practices - Advertising with Flash . . . . . . . . . . . . . . . . . . . . . . . . . . . . . . . . . . . . . . . . . . . . . . . . . . . . . . . . . . . . . . . . . . . . . . . . . . . . . . . . 231
Add interactivity with code snippets . . . . . . . . . . . . . . . . . . . . . . . . . . . . . . . . . . . . . . . . . . . . . . . . . . . . . . . . . . . . . . . . . . . . . . . . . . . . . . . . . 234
Using mask layers . . . . . . . . . . . . . . . . . . . . . . . . . . . . . . . . . . . . . . . . . . . . . . . . . . . . . . . . . . . . . . . . . . . . . . . . . . . . . . . . . . . . . . . . . . . . . . . . . . . 236
Five steps to learning Flash Professional . . . . . . . . . . . . . . . . . . . . . . . . . . . . . . . . . . . . . . . . . . . . . . . . . . . . . . . . . . . . . . . . . . . . . . . . . . . . . . 238
Learn Flash Professional CS6 video tutorials . . . . . . . . . . . . . . . . . . . . . . . . . . . . . . . . . . . . . . . . . . . . . . . . . . . . . . . . . . . . . . . . . . . . . . . . . . 238
Altering the Curve of a motion . . . . . . . . . . . . . . . . . . . . . . . . . . . . . . . . . . . . . . . . . . . . . . . . . . . . . . . . . . . . . . . . . . . . . . . . . . . . . . . . . . . . . . . 238
Animation Learning Guide for Flash . . . . . . . . . . . . . . . . . . . . . . . . . . . . . . . . . . . . . . . . . . . . . . . . . . . . . . . . . . . . . . . . . . . . . . . . . . . . . . . . . . 238
Graphic Effects Learning Guide for Flash . . . . . . . . . . . . . . . . . . . . . . . . . . . . . . . . . . . . . . . . . . . . . . . . . . . . . . . . . . . . . . . . . . . . . . . . . . . . . 239
Spring for Bones . . . . . . . . . . . . . . . . . . . . . . . . . . . . . . . . . . . . . . . . . . . . . . . . . . . . . . . . . . . . . . . . . . . . . . . . . . . . . . . . . . . . . . . . . . . . . . . . . . . . . 239
Text Layout Framework . . . . . . . . . . . . . . . . . . . . . . . . . . . . . . . . . . . . . . . . . . . . . . . . . . . . . . . . . . . . . . . . . . . . . . . . . . . . . . . . . . . . . . . . . . . . . . 239
Using the Deco Tool . . . . . . . . . . . . . . . . . . . . . . . . . . . . . . . . . . . . . . . . . . . . . . . . . . . . . . . . . . . . . . . . . . . . . . . . . . . . . . . . . . . . . . . . . . . . . . . . . 239
Avoiding common authoring mistakes in Flash Professional . . . . . . . . . . . . . . . . . . . . . . . . . . . . . . . . . . . . . . . . . . . . . . . . . . . . . . . . . . 239
iv
Chapter 5: Multimedia and Video
Working with video cue points . . . . . . . . . . . . . . . . . . . . . . . . . . . . . . . . . . . . . . . . . . . . . . . . . . . . . . . . . . . . . . . . . . . . . . . . . . . . . . . . . . . . . . . 240
Add video to Flash . . . . . . . . . . . . . . . . . . . . . . . . . . . . . . . . . . . . . . . . . . . . . . . . . . . . . . . . . . . . . . . . . . . . . . . . . . . . . . . . . . . . . . . . . . . . . . . . . . . 241
Create video files for use in Flash . . . . . . . . . . . . . . . . . . . . . . . . . . . . . . . . . . . . . . . . . . . . . . . . . . . . . . . . . . . . . . . . . . . . . . . . . . . . . . . . . . . . . 247
Using sounds in Flash . . . . . . . . . . . . . . . . . . . . . . . . . . . . . . . . . . . . . . . . . . . . . . . . . . . . . . . . . . . . . . . . . . . . . . . . . . . . . . . . . . . . . . . . . . . . . . . . 252
Transforming and combining graphic objects . . . . . . . . . . . . . . . . . . . . . . . . . . . . . . . . . . . . . . . . . . . . . . . . . . . . . . . . . . . . . . . . . . . . . . . . 259
Working with the library . . . . . . . . . . . . . . . . . . . . . . . . . . . . . . . . . . . . . . . . . . . . . . . . . . . . . . . . . . . . . . . . . . . . . . . . . . . . . . . . . . . . . . . . . . . . . 264
Draw lines and shapes . . . . . . . . . . . . . . . . . . . . . . . . . . . . . . . . . . . . . . . . . . . . . . . . . . . . . . . . . . . . . . . . . . . . . . . . . . . . . . . . . . . . . . . . . . . . . . . 269
Check spelling . . . . . . . . . . . . . . . . . . . . . . . . . . . . . . . . . . . . . . . . . . . . . . . . . . . . . . . . . . . . . . . . . . . . . . . . . . . . . . . . . . . . . . . . . . . . . . . . . . . . . . . 281
Working with Photoshop PSD files in Flash . . . . . . . . . . . . . . . . . . . . . . . . . . . . . . . . . . . . . . . . . . . . . . . . . . . . . . . . . . . . . . . . . . . . . . . . . . . 282
3D graphics . . . . . . . . . . . . . . . . . . . . . . . . . . . . . . . . . . . . . . . . . . . . . . . . . . . . . . . . . . . . . . . . . . . . . . . . . . . . . . . . . . . . . . . . . . . . . . . . . . . . . . . . . 291
Apply patterns with the Spray Brushtool . . . . . . . . . . . . . . . . . . . . . . . . . . . . . . . . . . . . . . . . . . . . . . . . . . . . . . . . . . . . . . . . . . . . . . . . . . . . . 298
Arranging objects . . . . . . . . . . . . . . . . . . . . . . . . . . . . . . . . . . . . . . . . . . . . . . . . . . . . . . . . . . . . . . . . . . . . . . . . . . . . . . . . . . . . . . . . . . . . . . . . . . . 299
Automating tasks with the Commands menu . . . . . . . . . . . . . . . . . . . . . . . . . . . . . . . . . . . . . . . . . . . . . . . . . . . . . . . . . . . . . . . . . . . . . . . . . 301
Drawing in Flash . . . . . . . . . . . . . . . . . . . . . . . . . . . . . . . . . . . . . . . . . . . . . . . . . . . . . . . . . . . . . . . . . . . . . . . . . . . . . . . . . . . . . . . . . . . . . . . . . . . . 303
Drawing with the Pen tool . . . . . . . . . . . . . . . . . . . . . . . . . . . . . . . . . . . . . . . . . . . . . . . . . . . . . . . . . . . . . . . . . . . . . . . . . . . . . . . . . . . . . . . . . . . 309
Embed fonts for consistent text appearance . . . . . . . . . . . . . . . . . . . . . . . . . . . . . . . . . . . . . . . . . . . . . . . . . . . . . . . . . . . . . . . . . . . . . . . . . . 315
Last updated 6/12/2015
Page 5

FLASH PROFESSIONAL
Content s
Drawing preferences . . . . . . . . . . . . . . . . . . . . . . . . . . . . . . . . . . . . . . . . . . . . . . . . . . . . . . . . . . . . . . . . . . . . . . . . . . . . . . . . . . . . . . . . . . . . . . . . 317
Scaling and caching symbols . . . . . . . . . . . . . . . . . . . . . . . . . . . . . . . . . . . . . . . . . . . . . . . . . . . . . . . . . . . . . . . . . . . . . . . . . . . . . . . . . . . . . . . . 318
Graphic filters . . . . . . . . . . . . . . . . . . . . . . . . . . . . . . . . . . . . . . . . . . . . . . . . . . . . . . . . . . . . . . . . . . . . . . . . . . . . . . . . . . . . . . . . . . . . . . . . . . . . . . . 321
Exporting SVG files . . . . . . . . . . . . . . . . . . . . . . . . . . . . . . . . . . . . . . . . . . . . . . . . . . . . . . . . . . . . . . . . . . . . . . . . . . . . . . . . . . . . . . . . . . . . . . . . . . 329
Sharing library assets across files . . . . . . . . . . . . . . . . . . . . . . . . . . . . . . . . . . . . . . . . . . . . . . . . . . . . . . . . . . . . . . . . . . . . . . . . . . . . . . . . . . . . . 332
Reshape lines and shapes . . . . . . . . . . . . . . . . . . . . . . . . . . . . . . . . . . . . . . . . . . . . . . . . . . . . . . . . . . . . . . . . . . . . . . . . . . . . . . . . . . . . . . . . . . . . 335
Strokes, fills, and gradients . . . . . . . . . . . . . . . . . . . . . . . . . . . . . . . . . . . . . . . . . . . . . . . . . . . . . . . . . . . . . . . . . . . . . . . . . . . . . . . . . . . . . . . . . . . 338
Working with Fireworks files inFlash . . . . . . . . . . . . . . . . . . . . . . . . . . . . . . . . . . . . . . . . . . . . . . . . . . . . . . . . . . . . . . . . . . . . . . . . . . . . . . . . . . 345
Using Flash Professional with Adobe Scout . . . . . . . . . . . . . . . . . . . . . . . . . . . . . . . . . . . . . . . . . . . . . . . . . . . . . . . . . . . . . . . . . . . . . . . . . . . 348
Working with Text Layout Framework (TLF) text . . . . . . . . . . . . . . . . . . . . . . . . . . . . . . . . . . . . . . . . . . . . . . . . . . . . . . . . . . . . . . . . . . . . . . 349
Working with Illustrator AI files in Flash . . . . . . . . . . . . . . . . . . . . . . . . . . . . . . . . . . . . . . . . . . . . . . . . . . . . . . . . . . . . . . . . . . . . . . . . . . . . . . . 362
Working with InDesign files inFlash . . . . . . . . . . . . . . . . . . . . . . . . . . . . . . . . . . . . . . . . . . . . . . . . . . . . . . . . . . . . . . . . . . . . . . . . . . . . . . . . . . 371
Working with symbol instances . . . . . . . . . . . . . . . . . . . . . . . . . . . . . . . . . . . . . . . . . . . . . . . . . . . . . . . . . . . . . . . . . . . . . . . . . . . . . . . . . . . . . . 371
Working with symbols . . . . . . . . . . . . . . . . . . . . . . . . . . . . . . . . . . . . . . . . . . . . . . . . . . . . . . . . . . . . . . . . . . . . . . . . . . . . . . . . . . . . . . . . . . . . . . . 376
Working with Adobe Premiere Proand After Effects . . . . . . . . . . . . . . . . . . . . . . . . . . . . . . . . . . . . . . . . . . . . . . . . . . . . . . . . . . . . . . . . . . . 381
Chapter 6: Exporting and Publishing
About exporting from Flash . . . . . . . . . . . . . . . . . . . . . . . . . . . . . . . . . . . . . . . . . . . . . . . . . . . . . . . . . . . . . . . . . . . . . . . . . . . . . . . . . . . . . . . . . . 385
Publishing Flash documents . . . . . . . . . . . . . . . . . . . . . . . . . . . . . . . . . . . . . . . . . . . . . . . . . . . . . . . . . . . . . . . . . . . . . . . . . . . . . . . . . . . . . . . . . 387
Exporting Sounds . . . . . . . . . . . . . . . . . . . . . . . . . . . . . . . . . . . . . . . . . . . . . . . . . . . . . . . . . . . . . . . . . . . . . . . . . . . . . . . . . . . . . . . . . . . . . . . . . . . 391
Export QuickTime video files . . . . . . . . . . . . . . . . . . . . . . . . . . . . . . . . . . . . . . . . . . . . . . . . . . . . . . . . . . . . . . . . . . . . . . . . . . . . . . . . . . . . . . . . . 394
Best practices - Tips for creating content for mobile devices . . . . . . . . . . . . . . . . . . . . . . . . . . . . . . . . . . . . . . . . . . . . . . . . . . . . . . . . . . . 395
Best practices - Structuring FLA files . . . . . . . . . . . . . . . . . . . . . . . . . . . . . . . . . . . . . . . . . . . . . . . . . . . . . . . . . . . . . . . . . . . . . . . . . . . . . . . . . . 401
Best practices - Behaviors conventions . . . . . . . . . . . . . . . . . . . . . . . . . . . . . . . . . . . . . . . . . . . . . . . . . . . . . . . . . . . . . . . . . . . . . . . . . . . . . . . 403
Best practices - SWF application authoring guidelines . . . . . . . . . . . . . . . . . . . . . . . . . . . . . . . . . . . . . . . . . . . . . . . . . . . . . . . . . . . . . . . . 405
Best practices - Optimizing FLAfiles for SWF output . . . . . . . . . . . . . . . . . . . . . . . . . . . . . . . . . . . . . . . . . . . . . . . . . . . . . . . . . . . . . . . . . . . 409
Best practices - Video conventions . . . . . . . . . . . . . . . . . . . . . . . . . . . . . . . . . . . . . . . . . . . . . . . . . . . . . . . . . . . . . . . . . . . . . . . . . . . . . . . . . . . 419
Controlling external video playback with ActionScript . . . . . . . . . . . . . . . . . . . . . . . . . . . . . . . . . . . . . . . . . . . . . . . . . . . . . . . . . . . . . . . . 420
Working with Flash Pro and FlashBuilder . . . . . . . . . . . . . . . . . . . . . . . . . . . . . . . . . . . . . . . . . . . . . . . . . . . . . . . . . . . . . . . . . . . . . . . . . . . . . 425
Exporting Projector files . . . . . . . . . . . . . . . . . . . . . . . . . . . . . . . . . . . . . . . . . . . . . . . . . . . . . . . . . . . . . . . . . . . . . . . . . . . . . . . . . . . . . . . . . . . . . 428
ActionScript publish settings . . . . . . . . . . . . . . . . . . . . . . . . . . . . . . . . . . . . . . . . . . . . . . . . . . . . . . . . . . . . . . . . . . . . . . . . . . . . . . . . . . . . . . . . 429
Exporting Video with Flash Professional CS6 . . . . . . . . . . . . . . . . . . . . . . . . . . . . . . . . . . . . . . . . . . . . . . . . . . . . . . . . . . . . . . . . . . . . . . . . . . 435
HTML publishing templates . . . . . . . . . . . . . . . . . . . . . . . . . . . . . . . . . . . . . . . . . . . . . . . . . . . . . . . . . . . . . . . . . . . . . . . . . . . . . . . . . . . . . . . . . . 437
v
Last updated 6/12/2015
Page 6
Chapter 1: What's New
New features summary
The 2015 release of Adobe® Flash Professional® CC reintroduces the IK bone tool that enables you to create bone
armatures using symbols or shapes that can be easily turned into life-like animation. The release also comes with H.264
vi de o im por t, un iver sal d ocum ent type c onver ter, i nte grat ion with the l ate st Fl ash Play er a nd AI R SD K, a nd ma ny m ore
enhancements. Continue reading for a quick introduction to new features available with the latest update to Flash
Professional CC, and links to other resources that provide more information.
1
Adobe Flash Professional CC 2015 release provides you capabilities to create great cartoon characters with lifelike movements using the new bone tool, convert your projects to any document type using the universal document
type converter, import H.264 videos, work with the latest Flash Player and AIR SDK, and many more cool capabilities
that help you to take your graphics and animation projects to the next level.
Adobe Flash Professional CC 2015 Release
Bone tool
New in Flash Professional CC 2015
The Flash Professional CC 2015 Release offers you the capability to lend life-like movements to your animation
characters using the all-new bone tool.
The bone tool gives you inverse kinematics (IK) capabilities within Flash. IK is a way of animating objects using bones
ch aine d into l inea r or bran che d arm atu res in pa ren t-ch ild r ela tio nshi ps. Whe n one bone mov es, conn ecte d b one s mo ve
in relation to it. Inverse kinematics lets you easily create natural motion. To animate using inverse kinematics, specify
the start and end positions of bones on the Timeline. Flash automatically interpolates the positions of the bones in the
armature between the starting and ending frames.
You can use IK in the following ways:
• By using a shape as a container for multiple bones. For example, you can add bones to a drawing of a snake so that
it slithers realistically. You can draw these shapes in Object Drawing mode.
• By chaining symbol instances. For example, you can link movie clips showing a torso, arm, lower arm, and hand so
that they move realistically in relation to each other. Each instance has only one bone.
Last updated 6/12/2015
Page 7

What's New
Bone tool comes with on-stage controls to ensure greater precision in movements. The onstage controls allows you to
switch between Locked, Open, and Constrained states for Rotation and Translation properties of individual bones in
the IK armature. You can now directly adjust these constraints on stage with accuracy using clear visual feedback.
For more information on using the bone tool, see Bone tool
Import H.264 videos with audio
New in Flash Professional CC 2015
In addition to FLV videos, this release also introduces an option to embed H.264 videos in the timeline. When an H.264
video is embedded, the frames of the video are rendered on the stage when you scrub the timeline. This feature enables
you to use videos as a guide to synchronize your animation on stage. Since the Flash Player and other run-times do not
support rendering embedded H.264 videos, they are not published. Importing H.264 videos is a design-time-only
feature.
2
Audio playback is enabled for H.264 videos. You can now select the ‘Include audio’ option while importing H.264
videos. Once imported to the stage (with ‘place instance on stage’ option selected), scrubbing the timeline must play
the audio for the relevant frames. Playing the timeline (Enter) must play back the animation at the fps of the imported
video so that the audio is in sync with the video frames on stage.
To learn more about importing H.264 videos, see Add video to Flash.
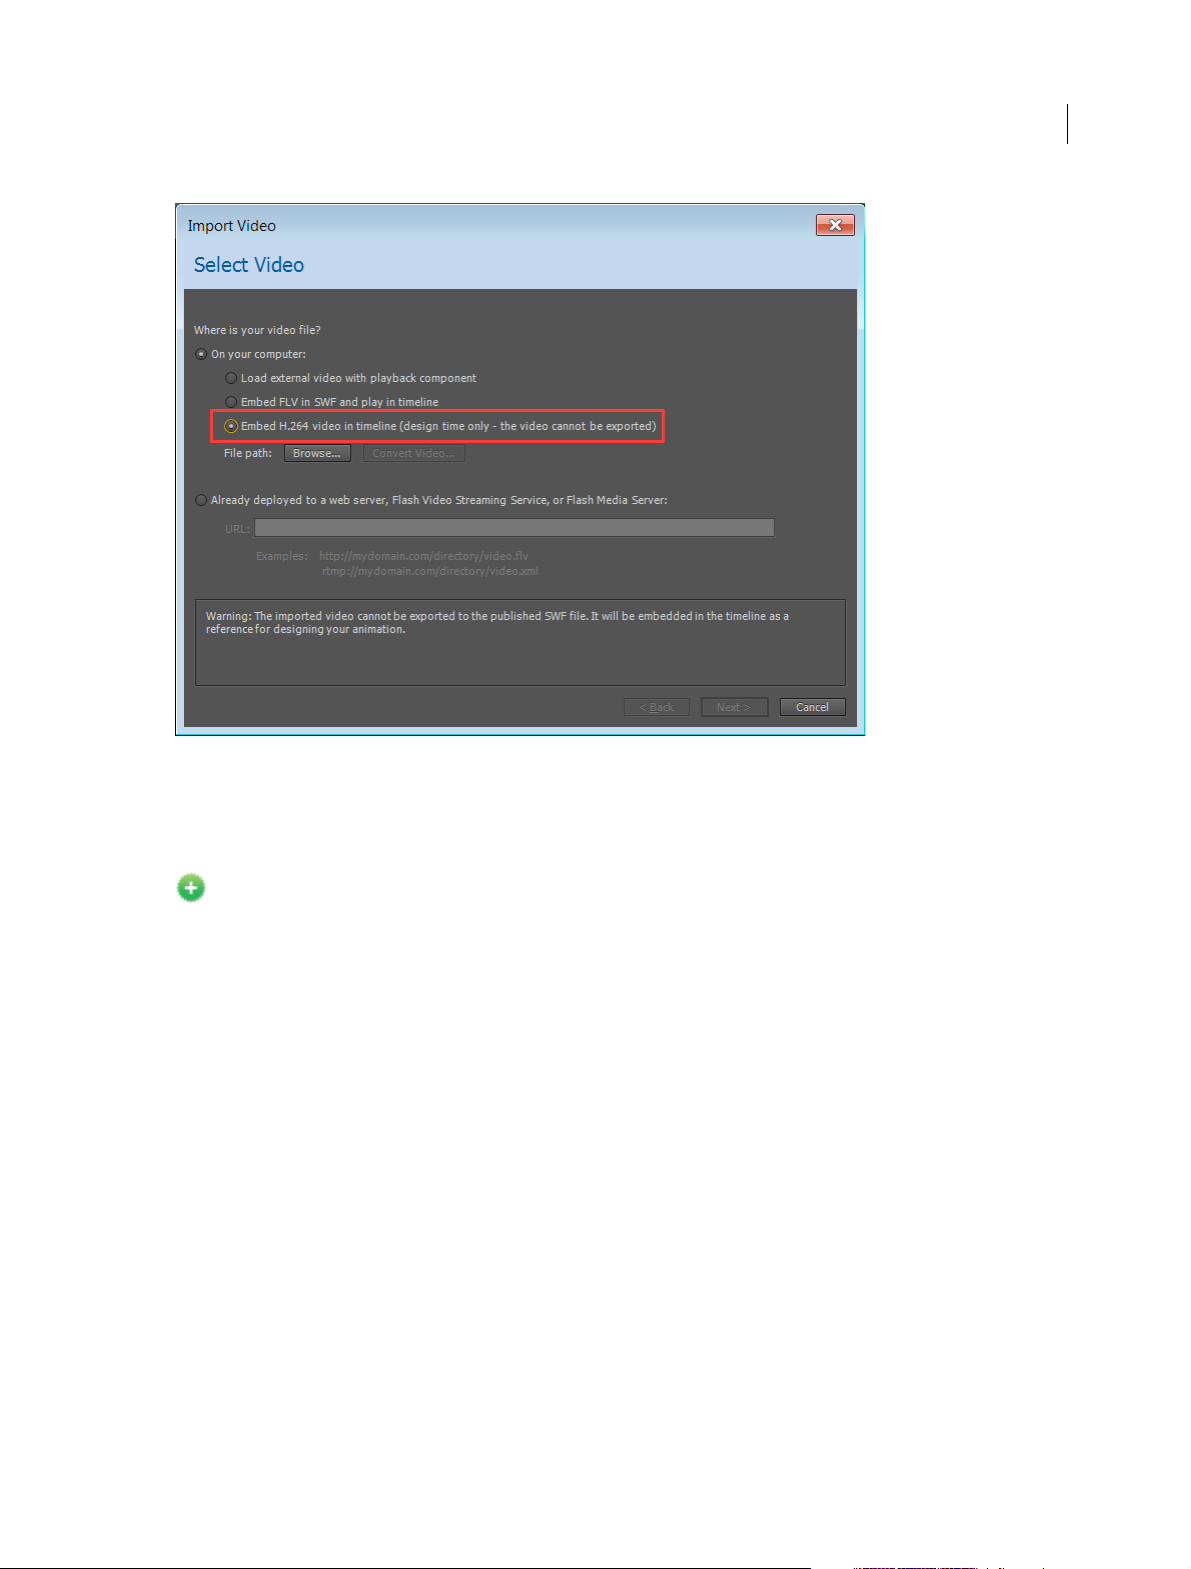
To impor t v id e o :
Click File > Import > Import Video and select the Embed H.264 video in the timeline (design time only – the video
cannot be exported) option as shown in the following image:
Last updated 6/12/2015
Page 8

What's New
3
For more information about using audio, see Using sounds in Flash.
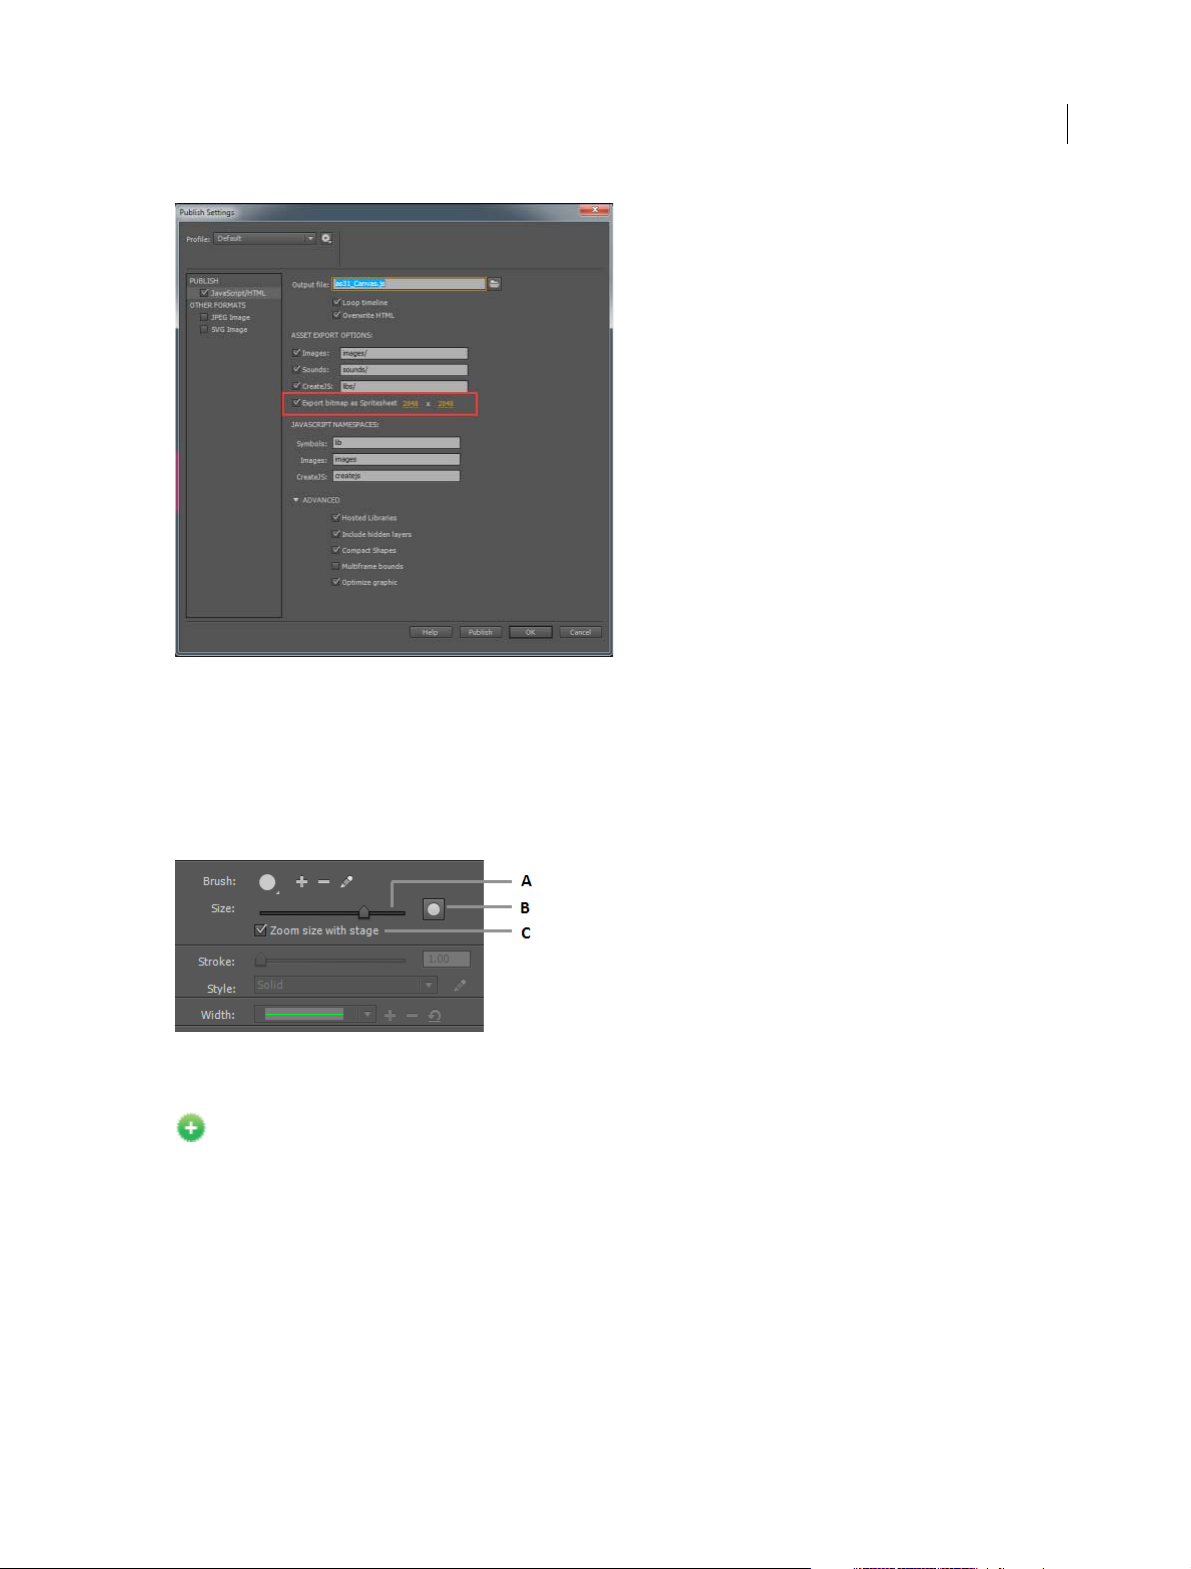
Export bitmaps as spritesheet for HTML5 Canvas
New in Flash Professional CC 2015
Export sprite sheet as bitmap allows you to pack all the bitmaps in canvas document in to a sprite sheet. A new Export
the Bitmap as Sprite Sheet check box has been added and enabled by default. You can specify the maximum size of the
sprite sheet by giving the height and width values in the publish settings. This enhancement reduces the number of
server requests, which in turn results in improved performance.
Last updated 6/12/2015
Page 9

What's New
4
Brush scaling with stage zoom
With this release, Flash Professional scales the brush size proportionately to the changing zoom level of the stage.
Proportionate zooming allows you to draw seamlessly adjusting to any zoom level and preview your work as you draw.
If you want to revert to the earlier default behavior of brushes maintaining a constant pixel size even when you change
the zoom level of the stage, you must disable the 'Stage zoom level' checkbox in the brush Property Inspector.
A Increase/decrease brush size B Brush size preview C Option to scale brush size according to the zoom level of the stage
Universal document type converter
New in Flash Professional CC 2015
The universal document type converter enables conversion of your existing FLA projects (of any type) to any other
document type such as HTML5 Canvas or WebGL.
To use this feature, click Commands > Convert to Other Document Formats and then select the target document type
and specify the path of the converted file.
To learn more about universal document type converter, see .
Last updated 6/12/2015
Page 10

What's New
Improved audio workflows
New in Flash Professional CC 2015
Enhanced import workflow
In earlier versions of Flash Pro, you had to import the audio file in to the library and then add it to a layer on the
timeline. In this release, you can directly import audio in to your stage/timeline by dragging and dropping the file to a
layer or by using the File > Import > Import to Stage option.
Split Audio option in context menu
The stream audio embedded on the timeline can be split at ease using the Split Audio context menu. Split Audio enables
you to pause the audio when it is necessary and then resume the audio playback from the point it was stopped at a later
frame on the timeline.
5
Remember audio sync options in PI
Flash Pro now remembers the sync options in property inspector. If a sound is selected from the “Sound” section of the
Property Inspector, then on trying to set another sound on a new keyframe from the Property Inspector, Flash
remembers the sync options “Stream” or “Event” of the previous sound.
Improved Motion Editor
New in Flash Professional CC 2015
The Paste functionality has been enhanced as follows:
• Paste: Until the 2014.1 release, when you copy a curve in the Motion Editor and use the Paste option to paste it in a
new range, it pastes within the current curve’s range and not with absolute values. In this release, the Paste option
pastes the curve with absolute values.
• Paste to fit current range: This option now replicates the old Paste operation and pastes the curve within the
current curve’s range and not with absolute values.
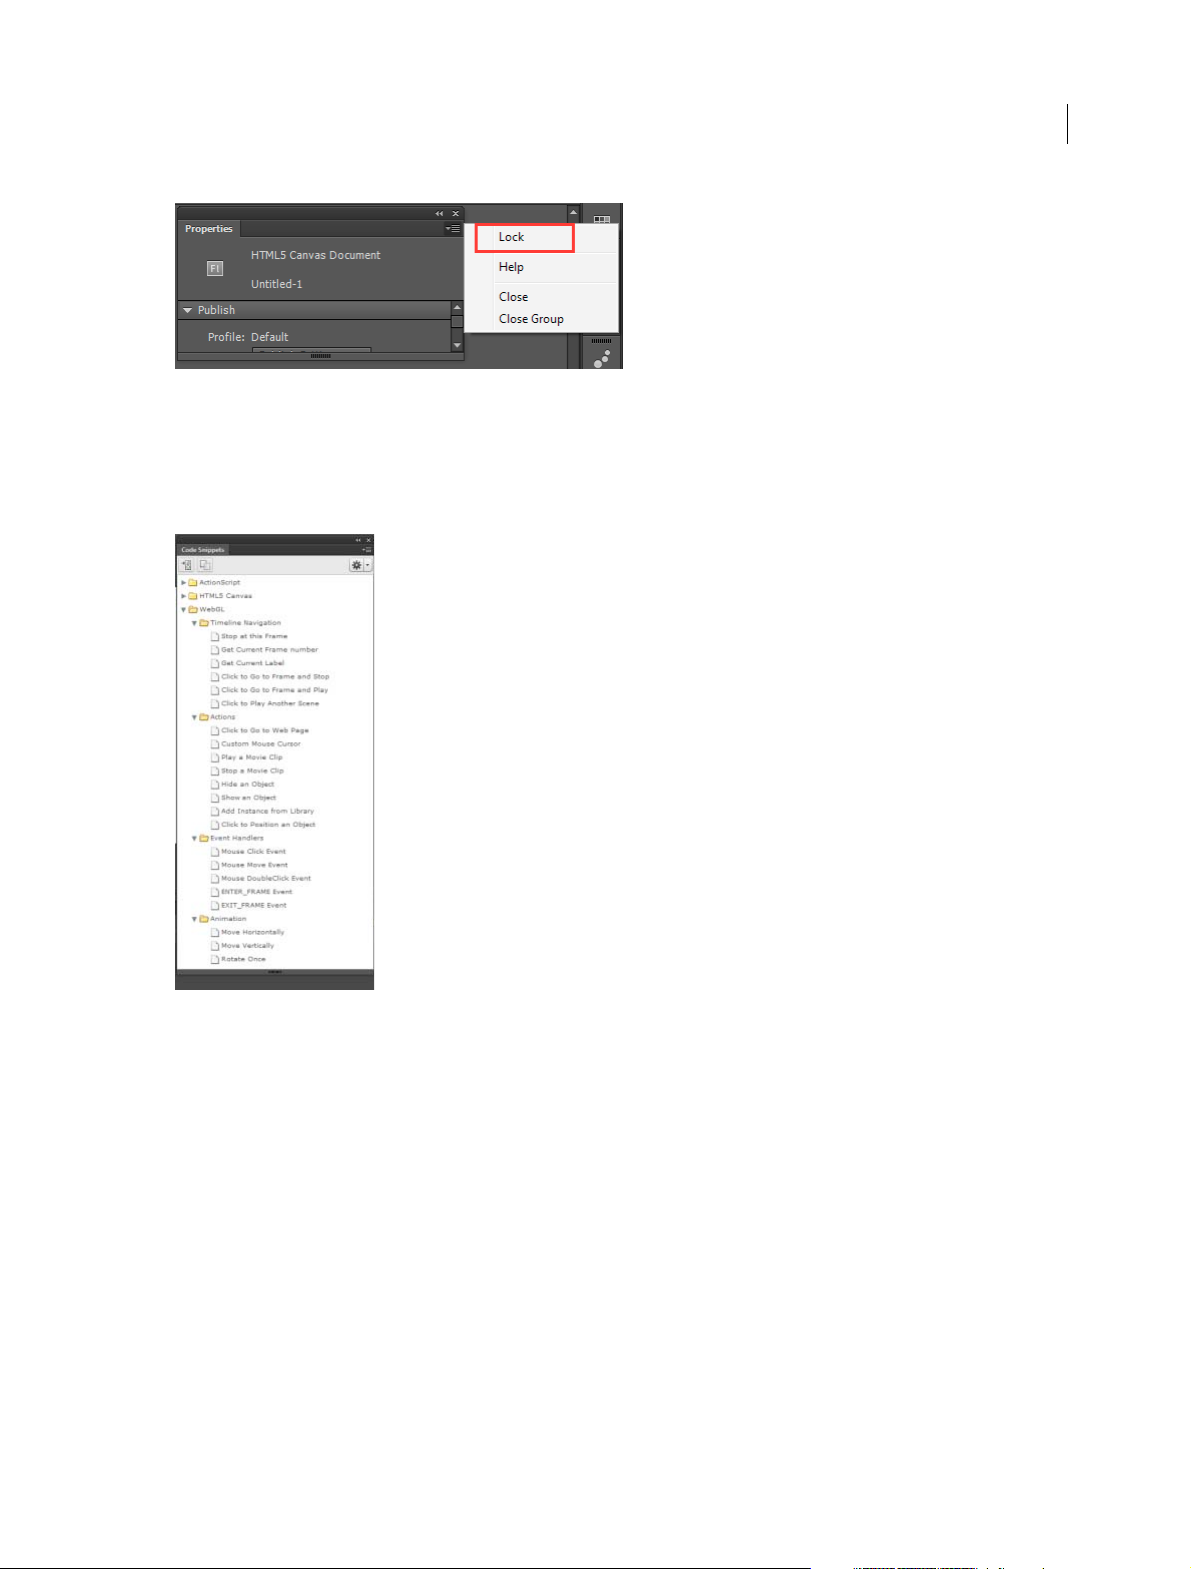
Panel locking
A new option, Lock/Unlock, has been added to the fly-out menu of the panels to lock the dock. Once a dock is locked,
all the panels in the dock can be resized, but cannot be moved. This feature helps you prevent accidental drag and resize
of panels.
Last updated 6/12/2015
Page 11
What's New
Code snippet support for WebGL
From this release, code snippets are available for some commonly used actions in the WebGL document type.
Note: This enhancement is available only in the English language version.
6
Enhancements in Custom Platform Support SDK
This release includes the following enhancements to Custom Platform Support SDK and the sample plug-in:
• Ability to query the type of a library symbol: ILibraryItem::GetProperties() returns an additional key "SymbolType"
for symbols. The value of key can be "Button," "MovieClip," or "Graphic."
• Ability to distinguish between button and movie-clip: Until the previous release, the button instances were treated
as movie clips by both the DOM and the IFrameCommandGenerator service. Starting with Flash Pro CC 2015, an
interface has been added to support button instances. If the IMovieClip instance also implements the IButton
interface, then it can be treated as a button instance. The four states of a button namely, Up, Over, Down, and Hit
are always mapped to the frames 0, 1, 2, and 3 respectively. See the file IButton.h to know more about the button
instance.
• New API to get the bounds of IClassicText objects: The AddClassicText function in ITimelineBuilder interface now
returns an object of CLASSIC_TEXT_INFO_2 (instead of the old CLASSIC_TEXT_INFO), which contains a new
field "bounds" representing the bounds of the IClassicText object.
Last updated 6/12/2015
Page 12

What's New
Integration of latest Flash Player and AIR SDK
This release comes to you with the Flash Player version 17.0 and AIR SDK 17.0 integrated.
Integration of latest CreateJS libraries
This release of Flash Professional comes with the latest CreateJS libraries integrated.
Since the latest libraries are not yet hosted via CDN, clear the Hosted LIbraries checkbox under the Advanced section
of the Publish Settings dialog box (Edit > Publish Settings > Advanced) to see the output.
Other enhancements
New in Flash Professional CC 2015
Save optimizations
This release comes with the following Save optimizations:
• Save algorithm optimization resulting in faster saving of FLA
• File corruption issues while saving files over the network are now resolved
Auto-recovery optimizations
The following auto-recovery enhancements are part of this release:
7
• Flash Professional does not create unnecessary auto-recovery files. An auto-recovery file is created only if the
document is modified after the last auto-recovery files were created.
• Progress bar is displayed only when the Flash Pro application is in focus.
• Auto-recovery file is removed only after completing a successful save operation.
The following auto-recovery changes help you avoid continuous loop of auto-recovery for short auto-recovery
duration:
• At each auto-recovery interval, snapshot for all files modified after last auto-recovery are created.
• Next auto recovery timer is started only after this process is completed.
Organize imported GIFs in library
This enhancement allows you to import Animated GIF files in a more organized way so that you can keep your library
in proper order. In previous releases, the imported GIF assets were placed in the library root folder without proper
naming. In this release, a folder with the GIF filename is created and all the associated bitmaps are organized under it.
As shown in the following image, the bitmaps are now named appropriately based on their sequence.
Library search by linkage name
In this release, the library search panel has been enhanced to include searching for symbols by ActionScript linkage
names in addition to searching by symbol names.
Last updated 6/12/2015
Page 13
What's New
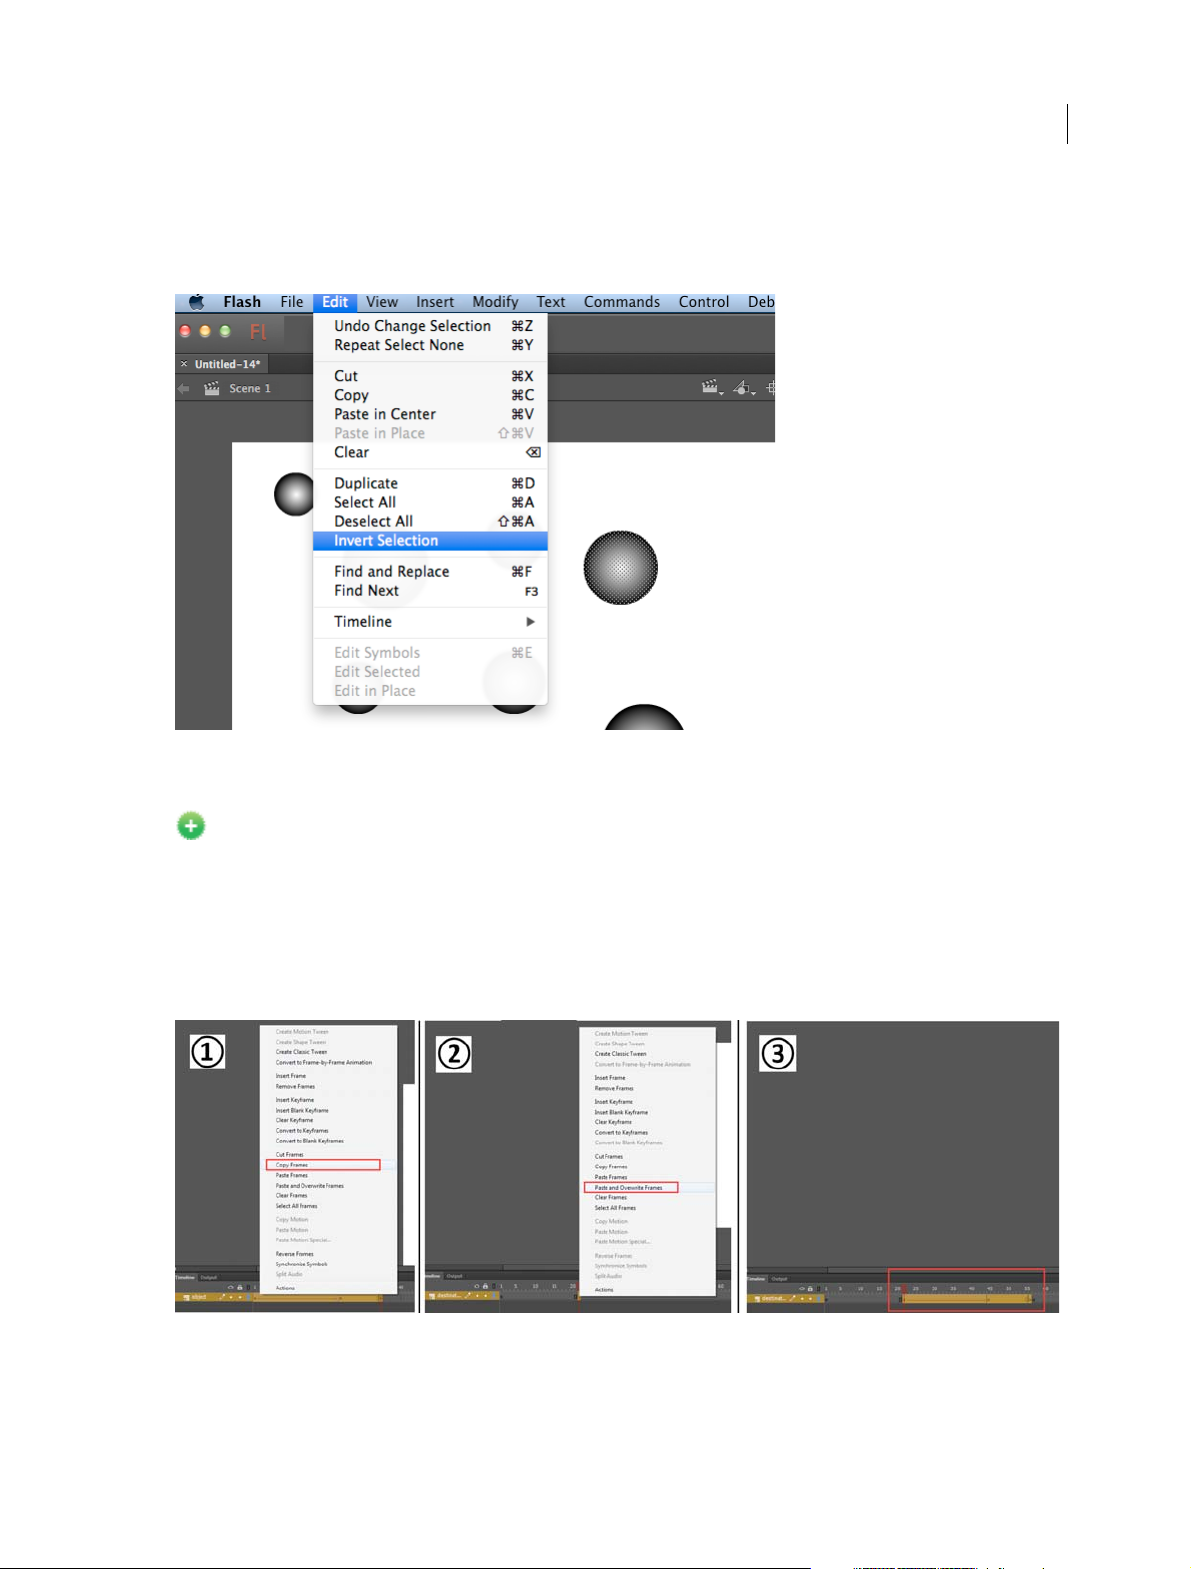
Invert selection
This new option in the Edit menu and the Stage context menu inverts the selection of currently selected objects or
shapes on the stage.
8
Paste and overwrite frames
New in Flash Professional CC 2015
The new 'Paste and Overwrite Frames' timeline context menu option enables you to paste the copied frames by
replacing the exact number of frames without pushing the frames forward. This replaces the existing way of selecting
the exact number of frames which you want to replace with the same number of copied frames. For example, if you
want to copy ten frames from a timeline and replace the exact number of frames in another timeline, copy the ten
frames and use the Paste and Overwrite Frames frames to paste it at the starting frame-the next ten frames are
overwritten with the copied frames.
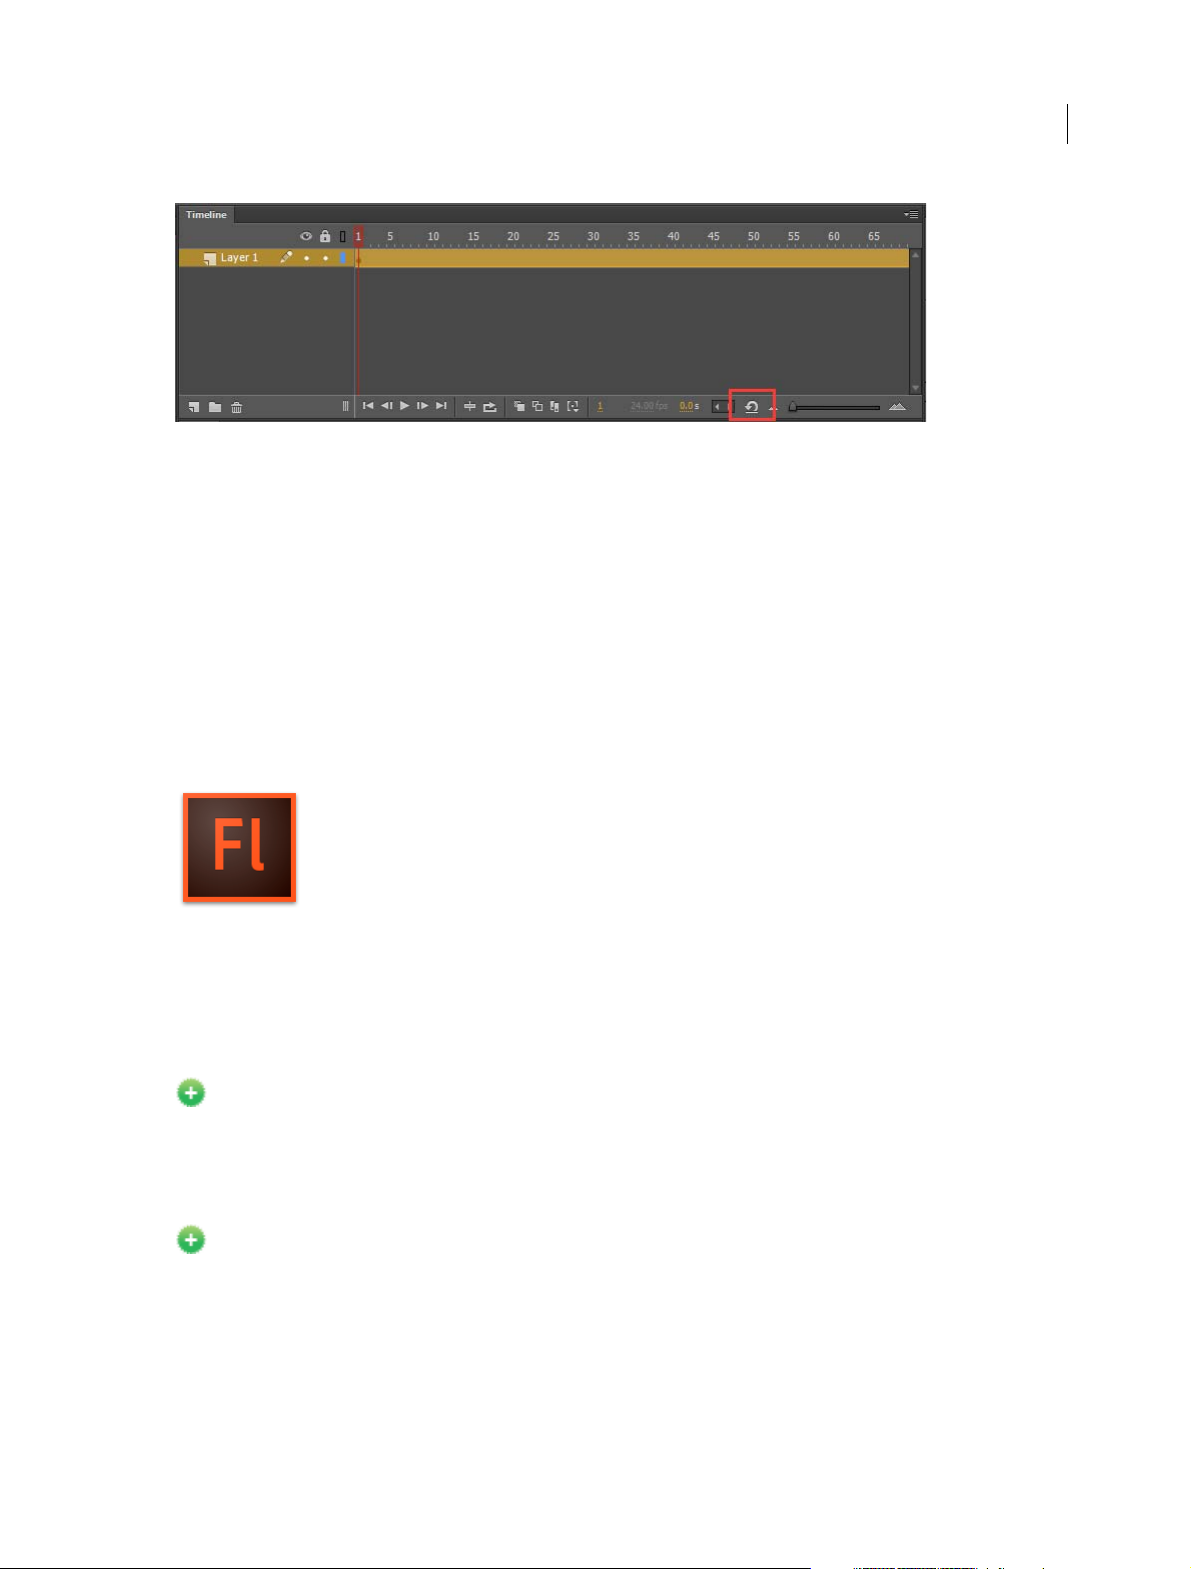
Reset timeline zoom to the default level
You can now reset the timeline zoom to the default level with one click as shown in the image.
Last updated 6/12/2015
Page 14
What's New
System Requirements
See the system requirements for Adobe Flash Professional CC 2015 at System Requirements | Flash Professional .
More Help topics
Flash Professional CC 2015 Release Notes
What's new in Flash Professional CC | 2014
9
New features summary - 2014
The 2014 release of Adobe® Flash Professional® CC provides an authoring environment for creating animation and
multimedia content for the Web, enabling visual designers to build interactive experiences that present consistently
across desktops and mobile devices. Continue reading for a quick introduction to new features available with the latest
update to Flash Professional CC, and links to other resources that provide more information.
Adobe Flash Professional CC 2014 update for July 2014 exposes the Web Graphics Library (WebGL) runtime API
that allows you to add interactivity to your WebGL animation by modifying elements in a scene and controlling the
playback.
Adobe Flash Professional CC 2014 | February 2015 Release
New in Flash Professional CC 2014 | February 2015 Release
The February 2015 update to Flash Professional CC 2014 Release offers you the capability to package 64-bit binaries to
comply with the mandatory requirement of Apple® starting February 1, 2015. The AIR 16.0 for iOS allows you to
generate 64-bit binaries using the Enable Faster Packaging option under the Deployment tab of AIR for iOS Setting
dialog, which is enabled by default.
Note: Since AIR 16.0 has not been released for Android yet, shared runtime is not available for the version. You can use
the embedded AIR runtime for Android applications.
Last updated 6/12/2015
Page 15

What's New
For more information on packaging AIR for iOS, see Packaging applications for AIR for iOS.
HTML5 Canvas optimizations
New in Flash Professional CC 2014 | February 2015 Release
This release helps you optimize the HTML5 Canvas document type output by not exporting the unused media assets
such as sound and bitmaps present in the library. This setting is on by default, which means that any unused media
without linkages are not exported and only the media items (sound, bitmaps) that are used on the stage are included in
the output. This results in large savings in the output size, particularly if you had a large number of such media items
in the library that were unused.
Flash Professional CC does not export the following items in your HTML5 Canvas library:
• All unused library-items such as symbols, sounds, and bitmaps with no linkages
• Assets on guide layers
• Assets on the hidden layer, if ‘Include hidden layers’ not selected in Publish Settings
• Assets on unused frames of graphic symbols
If your content has assets that fall into any of the above-mentioned categories, Flash Professional optimizes the size of
your published output by leaving out all unused and hidden assets.
10
For more information about this feature, see Creating and publishing an HTML5 Canvas document.
Audio splitting
New in Flash Professional CC 2014 | February 2015 Release
You can split the stream audio embedded on the timeline using the Split Audio context menu. Split Audio enables you
to pause the audio when it is necessary and then resume the audio playback from the point it was stopped at a later
frame on the timeline.
To split an audio clip on your timeline:
1 Select File > Import > Import to library.
2 Select the audio clip and import it to library.
3 Create a new layer on your timeline and add the clip to the layer.
4 Under Properties > Sound, select the Sync type as Streaming.
5 Right-click on the frame at which you want to split the audio and click Split Audio.
For more information about audio splitting, see Using sounds in Flash.
Masking support in Custom Platform Support SDK
New in Flash Professional CC 2014 | February 2015 Release
This release supports masking in the IFrameCommandGenerator service. The new interface ITimelineBuilder2 that is
from the existing ITimelineBuilder interface contains the functions that the plugin has to implement to make this
feature work.
Download the CustomPlatformSupport_Eshwar_M04.zip file from the downloads section to work with the latest
custom platform support SDK and sample plugin.
For more information about using the custom platform support SDK, see Enabling Support for Custom Platforms.
Last updated 6/12/2015
Page 16

What's New
Adobe Flash Professional CC 2014 | October Release
New in Flash Professional CC 2014 | October Release
Flash Professional CC 2014 October Release offers you the Custom Platform Support development kit that will help
you extend the capabilities of the poweful Flash platform to custom formats that are not natively supported by Flash.
The Custom Platform Support APIs and the sample code in the development kit allow you to create plugins for new
formats and distribute them through the Adobe Add-ons website. Users can download the appropriate plugin for their
publishing requirements from the Adobe Add-ons page, install the plugin with Flash Professional CC 2014, and start
creating and publishing creative assets.
For more information on Custom Platform Support see Custom Platform Support
To learn how to build a plugin using the Custom Platform Support development kit, see Enabling Support for Custom
Platforms.
For instructons to download, install and use custom platform support plugins, see Working w i t h Custom P l a t for m
Support Plug-in.
For complete reference documentation for the custom platform support APIs. see Custom Platform Support API
Reference.
Animation Guide
New in Flash Professional CC 2014 | October Release
11
The animation guide in Adobe Flash Professional CC now helps you enhance the animation you create by defining a
path for the objects you animate. This is particularly helpful when you are working on an animation that follows a path
that is not a straight line. This process requires two layers to carry out an animation. One layer containing the object
that you are about to animate, and the other defining the path, which the object is supposed to follow during the
animation. Animation guide works only on Classic Tweens.
For more information on Animation Guide and examples, see Animation Guide
Custom Brush
New in Flash Professional CC 2014 | October Release
The Brush Tool (B) in Adobe Flash Professional CC allows you to custom-define a brush by setting parameters of the
brush such as shape and angle. This enables you to create natural artwork in your projects by customizing the brush
tool to suit your drawing needs. You can create a custom brush in Flash Professional by selecting the Brush tool in the
toolbox of the Property Inspector.
For more information on creating and modifying custom brushes, see Custom Brushes
Audio and scripting support in WebGL documents
New in Flash Professional CC 2014 | October Release
The WebGL document type has been enhanced with the following features:
Audio: The WebGL document type in Flash Professional now supports audio playback. You can import and embed
audio into your WebGL document, control the playback via different sync settings (event, start and stop) and play the
timeline audio at runtime.
Scripting: You can now write Javascript code in the Actions panel, which will be executed on the player enters the
frame. The 'this' variable in the context of frame scripts refers to the instance of the MovieClip it belongs to. In addition,
frame scripts can access Javascript functions and variables declared in the container HTML file. When you copy a frame
or layer from an ActionScript document and paste it in a WebGL document, the scripts will be commented out.
Last updated 6/12/2015
Page 17

What's New
Code hinting: The WebGL document type now comes with code hinting support, which eases WebGL coding with
contextual code suggestions.
Performance: The optimized publishing process for WebGL enables faster publishing. This release also includes several
performance enhancements to the WebGL documents that help them run faster on devices.
For more information on creating and publishing interactive WebGL documents, see Creating and publishing a WebGL
document
Usability enhancements
New in Flash Professional CC 2014 | October
This release contains the following usability enhancements:
• The Flip Horizontal and Flip Vertical options have been added to the Transform Panel.
• The context menu has been enhanced by adding the missing options such as Transform, Arrange, and Align.
• The Motion Editor context menu now contains the Flip option that helps you flip the motion property curves.
Publish applications for Intel x86-based Android devices
New in Flash Professional CC 2014 | October
12
This release of Flash Professional allows application developers to package their AIR applications in captive as well as
shared runtime modes for Intel x86-based Android devices.
Publish AIR applications with shared runtime
New in Flash Professional CC 2014 | October
Starting with this release, application developers can use the shared runtime option for packaging their AIR
applications. Shared runtime helps reduce the size of the application as compared to captive runtime, which bundles
AIR. When you select the shared runtime option while publishing, the installer downloads the runtime from a specified
location during installation.
Import SWF files
New in Flash Professional CC 2014 | October
You can now import SWF files into Flash Professional. The SWF import feature has been one of the most-requested
functionalities among the Flash Professional user community. This will help bring assets in a primitive form into Flash
Professional for further modifications.
However, since SWF is a rendered file, many types of data such as sound, tweens, layering details, and motion paths
cannot be reimported into Flash.
Adobe Flash Professional CC 2014 | July Release
New in Flash Professional CC 2014 | July
Flash Professional CC July 2014 offers you the Web Graphics Library (WebGL) runtime API library. The API allows
you to modify the elements in a scene and control the playback in the GPU-accelerated animations that you create in
the WebGL document format.
For more information on the WebGL runtime API, Web GL Runtime API Refe rence - Ind e x .
Follow the steps described in the Getting Started with WebGL Animation page to learn how to create an interactive
WebGL animation.
Last updated 6/12/2015
Page 18
What's New
New and improved Motion Editor
New in Flash Professional CC 2014 | June
Flash Professional CC June 2014 reintroduces the Motion Editor in a highly intuitive and streamlined form. The new
Motion Editor is designed to provide a smoother experience when refining Motion Tweens. Besides being easily
accessible from within the Timeline, the Motion Editor has been greatly improved to facilitate simpler and focused
editing of Property curves. With the new Motion Editor you can create complex and engaging tweens in simple steps
to emulate real world behavior of objects.
For more information, see Editing Motion Tweens using Motion Editor.
Creating and publishing WebGL content
New in Flash Professional CC 2014 | June
Flash Professional CC offers native support for Web Graphics Library (WebGL) format. You can now create and publish
WebGL content from within Flash Professional CC. The latest update, adds a new WebGL (preview) document type
that contains preset document and publish settings. You can now work with the familiar Timeline, Workspace, Tools,
and other functionalities of Flash Pro, and produce WebGL content.
Flash Professional CC leverages the GPU accelerated usage of processing and rendering of WebGL content, which is
integrated with most modern-day browsers.
13
For more information, see Creating and publishing a WebGL document.
NOTE: The WebGL document type is an experimental feature only available as Preview, and includes limited support
for interactivity.
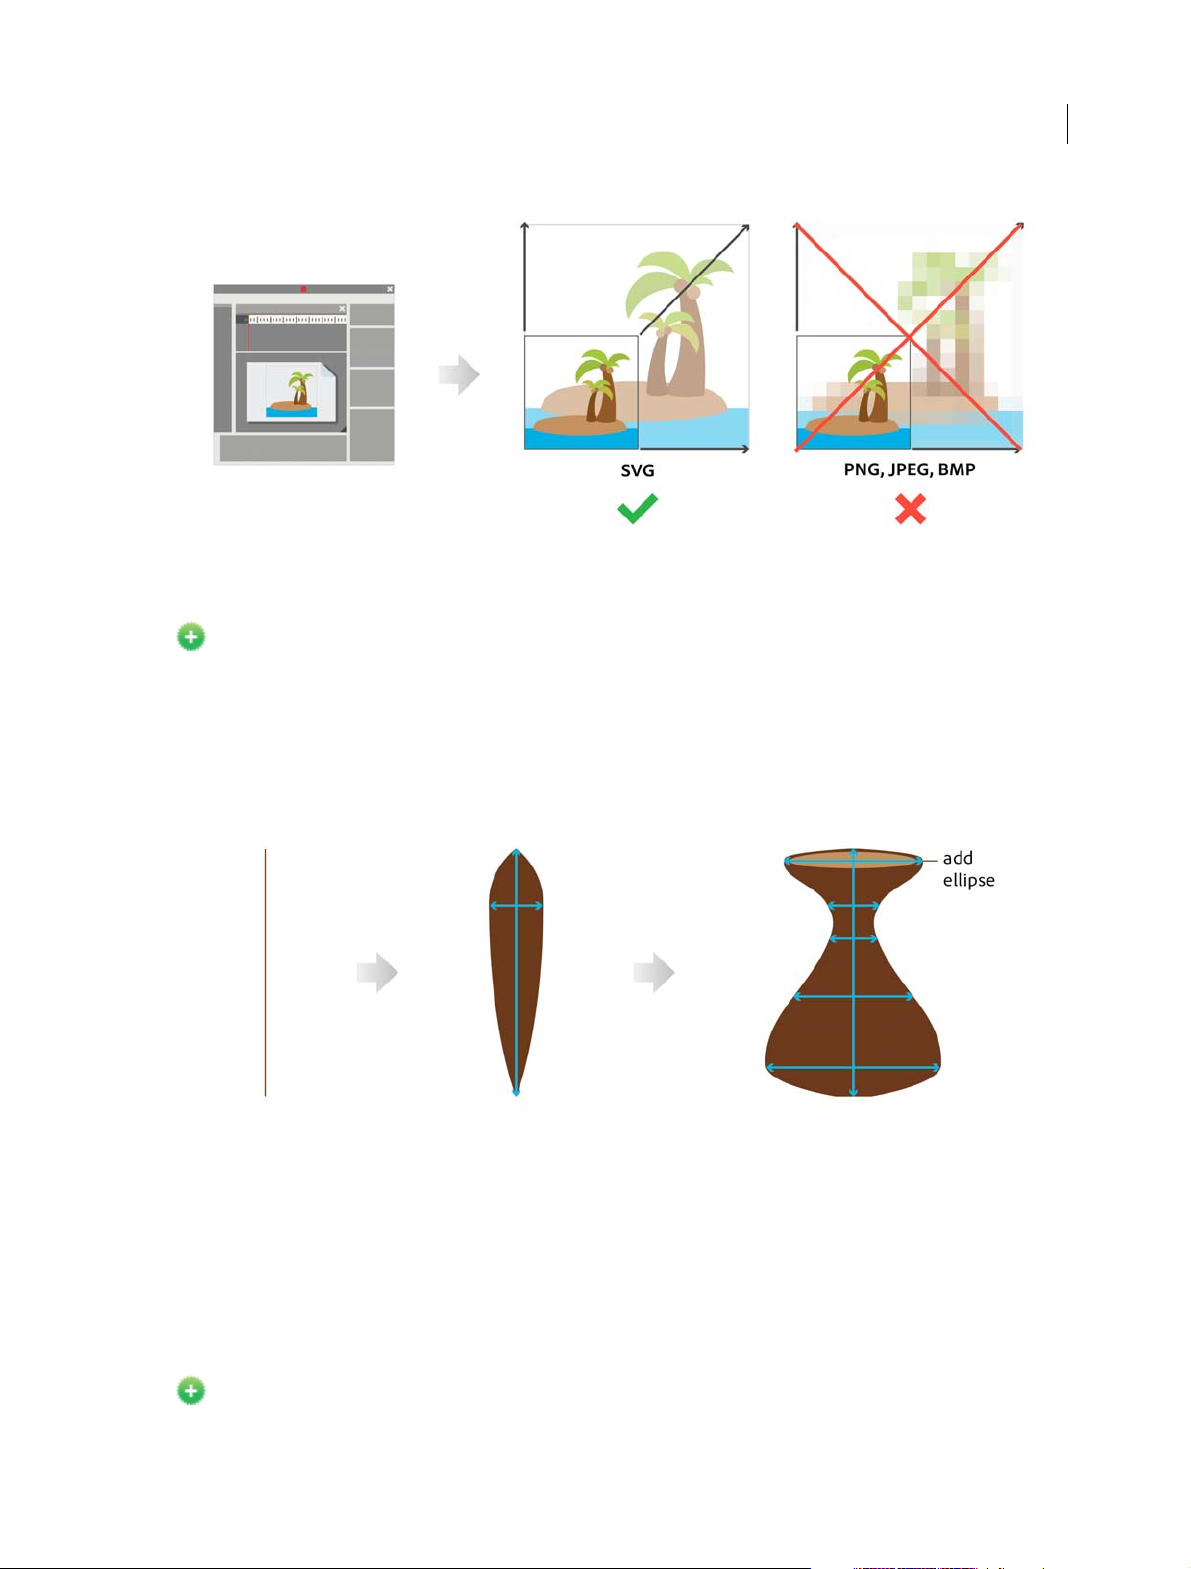
Exporting to SVG format
New in Flash Professional CC 2014 | June
Flash Professional CC allows you to export artwork to Scalable Vector Graphics (SVG) format. SVG is an open web
standard for creating and publishing vector graphics. With SVG, you can create and easily embed high quality artwork
within most web pages.
Common image formats such as JPEG, PNG, BMP, and GIF offer low resolution artwork and are generally bulky,
affecting load-times of web pages. With SVG support, Flash Professional CC allows you to produce graphics of superior
quality that do not rasterize on scaling (resolution-independent).
For more information, see Exporting SVG files.
Last updated 6/12/2015
Page 19
What's New
Enhancing strokes using Variable Width Tool
New in Flash Professional CC 2014 | June
Enhance strokes using the Variable Width Tool in Flash Professional CC. The Width tool allows you to add widths of
varying forms and thickness to drawings on Stage. By adding variable width, simple strokes can be easily transformed
into rich artwork. Flash Professional CC allows you to create and save Width profiles, which can be used to apply
variable width to drawings on stage.
14
For more information, see Enhancing strokes using the Width tool .
Tweening strokes with Variable Width
You can now shape-tween strokes with Variable Width. Earlier, Flash Pro only allowed tweening of Solid Strokes.
However, you can now tween fancy strokes created using the Variable Width Tool. Flash Pro also allows you to tween
solid strokes that are associated with default or custom Width Profiles.
For more information, see Shape tweening strokes with Variable Width .
Kuler Panel
New in Flash Professional CC 2014 | June
Last updated 6/12/2015
Page 20

What's New
Flash Professional CC is now integrated with Kuler panel, a cloud-based application to create color themes using
iPhone or desktop browser. With Kuler panel, you can sync your color inspirations right to Flash Professional CC via
Creative Cloud. To create color themes using Kuler, visit
For more information, see .
this link.
Creating HTML5 extensions for Flash Professional CC
Enhanced in Flash Professional CC 2014 | June
You can extend Flash Professional CC using HTML extensions. Earlier, Flash Professional CC could only be integrated
with SWF extensions packaged using Adobe Extension Builder. However, with
create and package HTML extensions that can be submitted to Adobe Exchange. Flash Professional CC has been
enhanced to leverage HTML extensions packaged using Extension Builder 3. These extensions can be downloaded
using Adobe Exchange and managed using
For more information, see Creating HTML extensions.
Adobe Extension Manager from within Flash Professional CC.
Adobe Extension Builder 3 you can
Synchronizing Workspaces with Adobe Creative Cloud
Enhanced in Flash Professional CC 2014 | June
You can now sync the Flash Professional CC Workspace settings with Creative Cloud. You can customize the workspace
to suit your design needs, and via Creative Cloud, you can replicate the customizations across multiple machines.
15
For more information, see Sync Flash Professional Preferences with Creative Cloud.
Other key enhancements
The Object level undo option has been re-enabled and can be accessed on the Preferences dialog. For more
information, see Undo, Redo, and Repeat commands.
Exporting projector files has now been re-enabled, as well. Note that the option to export projector files is
available within the Commands menu. For more information, see Exporting Projector files.
System Requirements
See the system requirements for Adobe Flash Professional CC 2014 at System Requirements | Flash Professional .
More Help topics
What's new in Flash Professional CC | 2013
What's new in Flash Professional CS6
This article gives you an overview of What's new with Adobe Flash Professional CS6.
Support for Adobe AIR 3.4 (Flash Professional CS6 Update 12.0.2 only)
By virtue of Flash Professional CS6 Update 12.0.2, Flash Professional extends support for AIR 3.4 and Flash Player 11.4.
This update also allows Flash Professional to leverage features exposed by AIR 3.4 that enhance application
development workflow for iOS devices.
• Deploying AIR applications on iOS devices directly
Last updated 6/12/2015
Page 21

What's New
• Testing and debugging AIR applications using the native iOS simulator
• Publishing AIR applications for devices with High Resolution Retina Display support
Toolkit for CreateJS 1.2
The Toolkit for CreateJS 1.2 release extends support for converting Buttons to HTML5. The update also includes fixes
to several JSX related errors. Other issues such as omission of multiple empty keyframes have also been addressed in
this update.
You can download and install Toolkit for CreateJS 1.2 from Adobe Extension Manager CS6. For more information on
the Toolkit, see
Using the Flash Professional Toolkit for CreateJS.
Mobile content simulation for AIR
The new mobile content simulator allows you to simulate Hardware keys, acceleromenter, Multi-touch, and Geolocation.
Choose network interface for remote debugging for AIR
When you publish an AIR app to an Android or iOS device, you can choose the network interface to use for remote
debugging. Flash Pro will package the IP address of the selected network interface into the debug mode mobile
application. The app can then auto-connect to the host IP to start a debug session when it launches on the target mobile
device. To access the setting, choose File > Publish Settings, and then select the Deployment tab in the AIR Settings
dialog box. For more information, see
desktop articles.
Packaging applications for AIR for iOS and Publishing for Adobe AIR for
16
Toolkit for Create JS
The Adobe Flash Professional Toolkit for CreateJS is an extension for Flash Professional CS6 that enables designers and
animators to create assets for HTML5 projects using the open source CreateJS JavaScript libraries. The extension
supports most of the core animation and illustration capabilities of Flash Professional, including vectors, bitmaps,
classic tweens, sounds, motion guides, animated masks, and JavaScript timeline scripting. With one click, the Toolkit
for CreateJS exports the contents on the stage and in the library as JavaScript that can be previewed in the browser to
help you start building expressive HTML5-based content in noTime.
The Toolkit for CreateJS is designed to help Flash Pro users make the transition to HTML5. It turns symbols in the
Library and content on the Stage into cleanly formatted JavaScript that is understandable, editable and easily reusable
by developers who can add interactivity using JavaScript and the CreateJS APIs that will be familiar to ActionScript 3
users. The Toolkit for CreateJS also publishes a simple HTML page that provides a quick way to preview the assets. For
more information, see
this article.
Export sprite sheets
You can now export a sprite sheet by selecting a symbol in the Library or on the Stage. A sprite sheet is a single graphic
image file that contains all the graphic elements used in the selected symbol. The elements are arranged in tiled format
in the file. You can also include bitmaps in the Library when selecting a symbol in the Library. To create a sprite sheet,
follow these steps:
1 Select a symbol in the Library or on the Stage.
2 Right-click and choose Export Sprite Sheet.
Last updated 6/12/2015
Page 22

What's New
High efficiency SWF compression
For SWFs that target Flash Player 11 or later, a new compression algorithm, LZMA, is available. The new compression
can be up to 40% more efficient, particularly for files that contain a lot of ActionScript or vector graphics.
1 Choose File > Publish Settings
2 In the Advanced section of the dialog box, select the Compress movie option and choose LZMA from the menu.
Direct Mode publishing
A new window mode called Direct is available which enables hardware accelerated content using Stage3D. (Stage3D
requires Flash Player 11 or later.)
1 Choose File > Publish Settings
2 Select HTML Wrapper.
3 Select Direct from the Window Mode menu.
For more information see this article.
Support for Direct render mode in AIR plugins
This feature brings Flash Player's Direct mode rendering support for StageVideo/Stage3D to AIR applications. A new
renderMode=direct setting can be used in the application descriptor file of an AIR application. Direct mode can be set
for AIR for Desktop, AIR for iOS and AIR for Android.
17
Debug iOS through Wi-Fi
You can now debug AIR applications on iOS through Wi-Fi, including breakpoints, step-in and step-out, variable
watcher, and trace.
For more information about debugging AIR applications, see AIR Debug Launcher.
Support for captive runtime for AIR
The Publish Settings dialog for AIR now has an option for embedding the AIR runtime into the application package.
An application with the runtime embedded can run on any desktop, Android, or iOS device without the shared AIR
runtime installed.
Adobe recommends:
View the videos Adobe AIR with Captive Runtime Support for Mobile and Desktop.
Native extensions for AIR
You can incorporate native extensions into the AIR applications you develop in Flash Pro. By using native extensions,
your applications can access all of the features of your target platform, even if the runtime itself doesn't have built-in
support for them.
Adobe recommends:
View these videos: Android Native Extensions, Part 1 and Part 2.
Last updated 6/12/2015
Page 23
What's New
Get latest Flash Player from within Flash Pro
You can now go directly to the Flash Player download page on Adobe.com from the Help menu in Flash Pro.
Export PNG sequence
Use this feature to generate image files that Flash Pro or other applications can use to generate content. For example,
PNG sequences are often used in gaming applications. This feature allows you to export a sequence of PNG files from
a Library item or individual movie clips, graphic symbols, and buttons on the Stage.
1 Select a single movie clip, button or graphic symbol in the Library or the Stage
2 Right-click it to display the context menu.
3 Choose Export PNG Sequence.
4 In the system Save dialog, choose a location for the output. Click OK.
5 In the Export PNG dialog box, set your options. Click Export to export the PNG sequence.
New features summary
18
The 2015 release of Adobe® Flash Professional® CC reintroduces the IK bone tool that enables you to create bone
armatures using symbols or shapes that can be easily turned into life-like animation. The release also comes with H.264
vi de o im por t, un iver sal d ocum ent type c onver ter, i nte grat ion with the l ate st Fl ash Play er a nd AI R SD K, a nd ma ny m ore
enhancements. Continue reading for a quick introduction to new features available with the latest update to Flash
Professional CC, and links to other resources that provide more information.
Adobe Flash Professional CC 2015 release provides you capabilities to create great cartoon characters with lifelike movements using the new bone tool, convert your projects to any document type using the universal document
type converter, import H.264 videos, work with the latest Flash Player and AIR SDK, and many more cool capabilities
that help you to take your graphics and animation projects to the next level.
Adobe Flash Professional CC 2015 Release
Bone tool
New in Flash Professional CC 2015
The Flash Professional CC 2015 Release offers you the capability to lend life-like movements to your animation
characters using the all-new bone tool.
Last updated 6/12/2015
Page 24
What's New
The bone tool gives you inverse kinematics (IK) capabilities within Flash. IK is a way of animating objects using bones
ch aine d into l inea r or bran che d arm atu res in pa ren t-ch ild r ela tio nshi ps. Whe n one bone mov es, conn ecte d b one s mo ve
in relation to it. Inverse kinematics lets you easily create natural motion. To animate using inverse kinematics, specify
the start and end positions of bones on the Timeline. Flash automatically interpolates the positions of the bones in the
armature between the starting and ending frames.
You can use IK in the following ways:
• By using a shape as a container for multiple bones. For example, you can add bones to a drawing of a snake so that
it slithers realistically. You can draw these shapes in Object Drawing mode.
• By chaining symbol instances. For example, you can link movie clips showing a torso, arm, lower arm, and hand so
that they move realistically in relation to each other. Each instance has only one bone.
Bone tool comes with on-stage controls to ensure greater precision in movements. The onstage controls allows you to
switch between Locked, Open, and Constrained states for Rotation and Translation properties of individual bones in
the IK armature. You can now directly adjust these constraints on stage with accuracy using clear visual feedback.
19
For more information on using the bone tool, see Bone tool
Import H.264 videos with audio
New in Flash Professional CC 2015
In addition to FLV videos, this release also introduces an option to embed H.264 videos in the timeline. When an H.264
video is embedded, the frames of the video are rendered on the stage when you scrub the timeline. This feature enables
you to use videos as a guide to synchronize your animation on stage. Since the Flash Player and other run-times do not
support rendering embedded H.264 videos, they are not published. Importing H.264 videos is a design-time-only
feature.
Audio playback is enabled for H.264 videos. You can now select the ‘Include audio’ option while importing H.264
videos. Once imported to the stage (with ‘place instance on stage’ option selected), scrubbing the timeline must play
the audio for the relevant frames. Playing the timeline (Enter) must play back the animation at the fps of the imported
video so that the audio is in sync with the video frames on stage.
To learn more about importing H.264 videos, see Add video to Flash.
To impor t v id e o :
Click File > Import > Import Video and select the Embed H.264 video in the timeline (design time only – the video
cannot be exported) option as shown in the following image:
Last updated 6/12/2015
Page 25
What's New
20
For more information about using audio, see Using sounds in Flash.
Export bitmaps as spritesheet for HTML5 Canvas
New in Flash Professional CC 2015
Export sprite sheet as bitmap allows you to pack all the bitmaps in canvas document in to a sprite sheet. A new Export
the Bitmap as Sprite Sheet check box has been added and enabled by default. You can specify the maximum size of the
sprite sheet by giving the height and width values in the publish settings. This enhancement reduces the number of
server requests, which in turn results in improved performance.
Last updated 6/12/2015
Page 26
What's New
21
Brush scaling with stage zoom
With this release, Flash Professional scales the brush size proportionately to the changing zoom level of the stage.
Proportionate zooming allows you to draw seamlessly adjusting to any zoom level and preview your work as you draw.
If you want to revert to the earlier default behavior of brushes maintaining a constant pixel size even when you change
the zoom level of the stage, you must disable the 'Stage zoom level' checkbox in the brush Property Inspector.
A Increase/decrease brush size B Brush size preview C Option to scale brush size according to the zoom level of the stage
Universal document type converter
New in Flash Professional CC 2015
The universal document type converter enables conversion of your existing FLA projects (of any type) to any other
document type such as HTML5 Canvas or WebGL.
To use this feature, click Commands > Convert to Other Document Formats and then select the target document type
and specify the path of the converted file.
To learn more about universal document type converter, see .
Last updated 6/12/2015
Page 27

What's New
Improved audio workflows
New in Flash Professional CC 2015
Enhanced import workflow
In earlier versions of Flash Pro, you had to import the audio file in to the library and then add it to a layer on the
timeline. In this release, you can directly import audio in to your stage/timeline by dragging and dropping the file to a
layer or by using the File > Import > Import to Stage option.
Split Audio option in context menu
The stream audio embedded on the timeline can be split at ease using the Split Audio context menu. Split Audio enables
you to pause the audio when it is necessary and then resume the audio playback from the point it was stopped at a later
frame on the timeline.
22
Remember audio sync options in PI
Flash Pro now remembers the sync options in property inspector. If a sound is selected from the “Sound” section of the
Property Inspector, then on trying to set another sound on a new keyframe from the Property Inspector, Flash
remembers the sync options “Stream” or “Event” of the previous sound.
Improved Motion Editor
New in Flash Professional CC 2015
The Paste functionality has been enhanced as follows:
• Paste: Until the 2014.1 release, when you copy a curve in the Motion Editor and use the Paste option to paste it in a
new range, it pastes within the current curve’s range and not with absolute values. In this release, the Paste option
pastes the curve with absolute values.
• Paste to fit current range: This option now replicates the old Paste operation and pastes the curve within the
current curve’s range and not with absolute values.
Panel locking
A new option, Lock/Unlock, has been added to the fly-out menu of the panels to lock the dock. Once a dock is locked,
all the panels in the dock can be resized, but cannot be moved. This feature helps you prevent accidental drag and resize
of panels.
Last updated 6/12/2015
Page 28

What's New
Code snippet support for WebGL
From this release, code snippets are available for some commonly used actions in the WebGL document type.
Note: This enhancement is available only in the English language version.
23
Enhancements in Custom Platform Support SDK
This release includes the following enhancements to Custom Platform Support SDK and the sample plug-in:
• Ability to query the type of a library symbol: ILibraryItem::GetProperties() returns an additional key "SymbolType"
for symbols. The value of key can be "Button," "MovieClip," or "Graphic."
• Ability to distinguish between button and movie-clip: Until the previous release, the button instances were treated
as movie clips by both the DOM and the IFrameCommandGenerator service. Starting with Flash Pro CC 2015, an
interface has been added to support button instances. If the IMovieClip instance also implements the IButton
interface, then it can be treated as a button instance. The four states of a button namely, Up, Over, Down, and Hit
are always mapped to the frames 0, 1, 2, and 3 respectively. See the file IButton.h to know more about the button
instance.
• New API to get the bounds of IClassicText objects: The AddClassicText function in ITimelineBuilder interface now
returns an object of CLASSIC_TEXT_INFO_2 (instead of the old CLASSIC_TEXT_INFO), which contains a new
field "bounds" representing the bounds of the IClassicText object.
Last updated 6/12/2015
Page 29

What's New
Integration of latest Flash Player and AIR SDK
This release comes to you with the Flash Player version 17.0 and AIR SDK 17.0 integrated.
Integration of latest CreateJS libraries
This release of Flash Professional comes with the latest CreateJS libraries integrated.
Since the latest libraries are not yet hosted via CDN, clear the Hosted LIbraries checkbox under the Advanced section
of the Publish Settings dialog box (Edit > Publish Settings > Advanced) to see the output.
Other enhancements
New in Flash Professional CC 2015
Save optimizations
This release comes with the following Save optimizations:
• Save algorithm optimization resulting in faster saving of FLA
• File corruption issues while saving files over the network are now resolved
Auto-recovery optimizations
The following auto-recovery enhancements are part of this release:
24
• Flash Professional does not create unnecessary auto-recovery files. An auto-recovery file is created only if the
document is modified after the last auto-recovery files were created.
• Progress bar is displayed only when the Flash Pro application is in focus.
• Auto-recovery file is removed only after completing a successful save operation.
The following auto-recovery changes help you avoid continuous loop of auto-recovery for short auto-recovery
duration:
• At each auto-recovery interval, snapshot for all files modified after last auto-recovery are created.
• Next auto recovery timer is started only after this process is completed.
Organize imported GIFs in library
This enhancement allows you to import Animated GIF files in a more organized way so that you can keep your library
in proper order. In previous releases, the imported GIF assets were placed in the library root folder without proper
naming. In this release, a folder with the GIF filename is created and all the associated bitmaps are organized under it.
As shown in the following image, the bitmaps are now named appropriately based on their sequence.
Library search by linkage name
In this release, the library search panel has been enhanced to include searching for symbols by ActionScript linkage
names in addition to searching by symbol names.
Last updated 6/12/2015
Page 30

What's New
Invert selection
This new option in the Edit menu and the Stage context menu inverts the selection of currently selected objects or
shapes on the stage.
25
Paste and overwrite frames
New in Flash Professional CC 2015
The new 'Paste and Overwrite Frames' timeline context menu option enables you to paste the copied frames by
replacing the exact number of frames without pushing the frames forward. This replaces the existing way of selecting
the exact number of frames which you want to replace with the same number of copied frames. For example, if you
want to copy ten frames from a timeline and replace the exact number of frames in another timeline, copy the ten
frames and use the Paste and Overwrite Frames frames to paste it at the starting frame-the next ten frames are
overwritten with the copied frames.
Reset timeline zoom to the default level
You can now reset the timeline zoom to the default level with one click as shown in the image.
Last updated 6/12/2015
Page 31

What's New
System Requirements
See the system requirements for Adobe Flash Professional CC 2015 at System Requirements | Flash Professional .
More Help topics
Flash Professional CC 2015 Release Notes
What's new in Flash Professional CC | 2014
26
Last updated 6/12/2015
Page 32

Chapter 2: Platforms
Convert to other document formats
Convert your Flash Professional document to another document format
The universal document type converter enables conversion of your existing FLA projects (of any type) to any other
document type such as HTML5 Canvas, ActionScript/AIR, WebGL, or a custom document type. When you convert to
a format, you can take advantage of the authoring features that Flash Professional offers for that document type.
Converting your Flash document using the document type converter
To convert your Flash document to another document type:
27
1 Open the document that you want to convert and click Commands > Convert to Other Document Formats. The
Document Type Converter dialog box appears.
2 In the Convert your document to drop-down, select the document type that you want the convert the document to.
3 Click Browse to select the directory in which you want to save the converted file and click OK.
Note: When you try to convert any multi-scene document to HTML5 Canvas doctype, all the scenes are saved as
separate files because HTML5 Canvas document type does not support multiple scenes. Place all your scenes within
separate symbols if you want to use them in a single document.
You can conver t your exis ting Flash projects to an othe r format or reus e assets in a pro ject by simply copying and p asting
layers and library symbols.
Last updated 6/12/2015
Page 33

Platforms
Custom Platform Support
Flash Professional supports creating rich graphics and animations using document types such as ActionScript,
HTML5, and WebGL. The Custom Platform Support feature helps to extend the power of Flash Professional CC to
support platforms that are not native to Flash.
Custom Platform Support can be added to Flash Professional by implementing a plugin using a set of Application
Programming Interfaces (APIs) that are provided as part of the Custom Platform Support Development Kit. The
developers can create custom platform support plugins for Flash using these interfaces and referring to the the sample
code. By installing a platform support plugin for a new document type, users can create their art using the rich feature
set of Flash Professional and publish it in the output format of the custom platform.
Workflows
The Custom Platform Support feature includes two parts: one for the developer who creates custom platform support
plugins and the other for the user who installs and uses the plugin.
Developer
If you are a developer who builds add-ons for Flash Professional, you can use the following workflow to develop and
distribute your plugins:
28
Note: For instructions on how to develop Custom Platform Support plugins using the development kit, see Enabling Support
for Custom Platforms.For detailed documentation of APIs in the development kit, see Custom Platform Support API
Reference.
User
Last updated 6/12/2015
Page 34

Platforms
If you are a Flash Pro user, you can acquire a Custom Platform Plugin using one of the following methods:
• Download the Custom Platform Support plugin for a platform of your choice from the Adobe Add-ons page. The
Adobe Add-on page allows you to acquire a plugin and install it using the Adobe Creative Cloud application.
• Get a .zxp file from a plugin developer and install it using the Adobe Extension Manager application.
The following workflow illustrates how you can install a custom platform support plugin and create your custom
platform document.
29
More Help topics
Enabling Custom Platform Support
Custom Platform Support API Reference
Working with Custom Platform Support Plugins
Creating and publishing an HTML5 Canvas document
Last updated 6/12/2015
Page 35

Platforms
What is HTML5 Canvas?
Canvas is a new element in HTML5, which provides APIs that allow you to dynamically generate and render graphics,
charts, images, and animation. The presence of the Canvas API for HTML5, strengthens the HTML5 platform by
providing two-dimensional drawing capabilities. These capabilities are supported on most modern operating systems
and browsers.
Essentially, Canvas is a bitmap rendering engine, and the drawings are final and cannot be resized. Furthermore, objects
drawn on Canvas are not part of the web page's DOM.
Within a web page, you can add Canvas elements using the <Canvas> tag. These elements can then be enhanced using
JavaScript to build interactivity. For more information, see
this link.
The new HTML5 Canvas document-type
Flash Professional CC enables you to create an HTML5 Canvas document with rich artwork, graphics, animations, and
so on. A new document type (HTML5 Canvas) has been added to Flash Pro that provides native support for creating
rich and interactive HTML5 content. It means that you can use the traditional Flash Professional timeline, workspace,
and tools to create content, but produce HTML5 output. With a few simple clicks, you are ready to create an HTML5
Canvas doc and generate a fully functional output. To its end, within Flash Pro, the document and publish options are
preset to generate HTML5 output.
30
Flash Professional CC is integrated with CreateJS, which enables rich interactive content on open web technologies via
HTML5. Flash Pro CC generates HTML and JavaScript for content (includes bitmaps, vectors, shapes, sounds, tweens,
and so on) created on stage. The output can be run on any device or browser that supports HTML5 Canvas.
Flash Professional and the Canvas API
Flash Pro publishes to HTML5 by leveraging the Canvas API. Flash Pro seamlessly translates objects created on stage
in to their Canvas counterparts. By providing a 1-to-1 mapping of Flash features with the APIs within Canvas, Flash
Pro enables you to publish complex content to HTML5.
Creating an HTML5 Canvas document
To create an HTML5 Canvas document, do the following:
1 Launch Flash Professional CC.
2 On the Welcome Screen, click the HTML5 Canvas option. This opens a new FLA with Publish Settings modified to
produce HTML5 output.
3 Alternatively, select File> New to display the New Document dialog. Click the HTML5 Canvas option.
You can now begin creating HTML5 content using the tools within Flash Pro. As you begin working with the HTML5
Canvas document, you will notice that certain features and tools are not supported and are disabled. This is because,
Flash Professional supports those features that are in-turn supported by the Canvas element within HTML5. For
example, 3D transformations, dotted lines, bevel effects are not supported.
Adding interactivity in HTML5 Canvas document
Flash Professional CC publishes HTML5 content using the CreateJS libraries. CreateJS is a suite of modular libraries
and tools which enable rich interactive content on open web technologies via HTML5. The CreateJS suite comprises
of: EaselJS, TweenJS, SoundJS, PreloadJS, and Zoë. CreateJS converts content created on stage to HTML5 using these
individual libraries to produce HTML and JavaScript output files. You can also manipulate this JavaScript file to
enhance your content.
Last updated 6/12/2015
Page 36

Platforms
However, Flash Professional CC allows you to add interactivity to objects on stage created for HTML5 Canvas from
within. It means that you can actually add JavaScript code to individual objects on stage from within Flash Pro and
preview at author-time. In turn, Flash Pro provides native support for JavaScript with useful features within the codeeditor to help improve workflow efficiency of programmers.
You can choose individual frames and keyframes on the Timeline to add interactivity to your content. For an HTML5
Canvas document, you can add interactvity using JavaScript. For more information about writing JavaScript code, see
this link.
JavaScript code can be written directly in the Actions panel, and it supports the following features while writing the
JavaScript code:
Code Hinting Al lows you to quickl y insert and edit JavaSc ript cod e and without mi stakes. As you t ype char acters in t he
Actions Panel, you can see a list of candidates that possibly complete your entry.
Additionally, Flash Professional also supports some features inherent to Actions Panel when working with HTML5
Canvas. These features help improve workflow efficiency when adding interactivity to objects on stage. They are:
Syntax Highlighting Displays code in different fonts or colors according to the syntax. This feature allows you to write
code in a structured manner, helping you visually distinguish correct code and syntax errors.
Code Coloring Displays cod e in dif ferent colors accord ing to the syntax. This allows you to v isually distinguish various
parts of a syntax.
31
Bracket Automatically adds closing brackets and parentheses for open when writing JavaScript code.
You can add interactivity to shapes or objects on stage using JavaScript. You can add JavaScript to individual frames and
keyframes.
1 Select the frame you want to add JavaScript to.
2 Select Wi nd o w > Actions to open the Actions Panel.
Using JavaScript Code Snippets
You can add interactivity using JavaScript code snippets available within Flash Professional CC. To access and use Code
Snippets, select Wi n d ow s > Code Snippets. For more information about adding JavaScript code snippets, see
article .
this
Last updated 6/12/2015
Page 37

Platforms
References to CreateJS documentation
CreateJS Library API Documentation Code Samples on Github
32
EaselJS http://createjs.com/Docs/EaselJS/modules/Ea
selJS.html
Twee nJS http://createjs.com/Docs/TweenJS/modules/
TweenJS.html
SoundJS http://createjs.com/Docs/SoundJS/modules/
SoundJS.html
PreloadJS http://createjs.com/Docs/PreloadJS/modules
/PreloadJS.html
https://github.com/createjs/easeljs/
https://github.com/createjs/tweenjs/
https://github.com/createjs/soundjs/
https://github.com/createjs/preloadjs/
Publishing animations to HTML5
To publish the content on stage to HTML5, do the following:
1 Select File > Publish Settings.
2 On the Publish Settings dialog, specify the following settings:
Output The directory the FLA is published to. This defaults to the same directory as the FLA, but can be changed by
clicking the browse button "...".
Loop Timeline If checked the timeline loops, if not it stops when it plays to the end.
Publish HTML If deselected, the HTML file is not generated.
Asset Export Options The relative URLs to export images, sounds, and supporting CreateJS JavaScript libraries to. If
the check box to the right is not checked, those assets are not exported from the FLA, but the specified path is still used
to assemble their URLs. It expedites publishing from an FLA with many media assets, or avoid overwriting modified
JavaScript libraries.
The Export all bitmaps as Spritesheets option allows you to pack all the bitmaps in canvas document in to a sprite sheet,
which reduces the number of server requests and improves performance. You can specify the maximum size of the
sprite sheet by giving the height and width values.
Last updated 6/12/2015
Page 38

Platforms
JavaScript Namespaces The namespace in which symbols, images, and the CreateJS libraries are placed into and
referenced from.
Hosted Libraries If checked, it uses copies of the libraries hosted on the CreateJS CDN at code.createjs.com. It allows
the libraries to be cached and shared between various sites.
33
Include Hidden Layers If deselected, hidden layers are not included in the output.
Compact Shapes If checked, vector instructions are outputted in a compact form. Deselect to export readable, verbose
instructions (useful for learning purposes).
Multiframe bounds If checked, timeline symbols include a frameBounds property containing an array of Rectangles
corresponding to the bounds of each frame in the timeline. Multiframe bounds significantly increases publish time.
❖ Click Publish to publish your content to the specified location.
Note: An animation designed using nested timelines, with a single frame, cannot be looped.
Optimizing HTML5 Canvas output
Flash Professional optimizes HTML5 Canvas output size and performance by:
• Exporting bitmaps and sprite sheet by selecting the option under Asset Export Options.
• Excluding hidden layers (by deselecting the Include hidden layers check box) and guide layers from published
output (default).
• Excluding all unused assets such as sounds and bitmaps, and all assets on unused frames (default).
• Specifying not to export the assets from the FLA by deselecting the asset export options for images, sounds, and
supporting CreateJS JavaScript libraries and using the relative URLs to export.
Last updated 6/12/2015
Page 39

Platforms
Note: Starting Flash Professional CC 2015 release, the Optimize Graphic check box has been removed from the Publish
Settings dialog box as Flash Professional performs this optimization implicitly while publishing HTML5 Canvas
documents.
Export bitmaps as sprite sheet
Exporting a number of bitmaps that you have used in your HTML5 Canvas document as a single sprite sheet reduces
the number of server requests, reduces the output size, and improves performance. You can specify the maximum size
of the sprite sheet by giving the height and width values.
1 Under Asset Export Options, select the Export all bitmaps and Spritesheets check box.
2 In Maximum size of Spritesheets, specify the maximum height and width of the sprite sheet.
34
Understanding the HTML5 Canvas output
The published HTML5 output contains the following files:
HTML file Contains definitions for all shapes, objects, and artwork within the Canvas element. It also invokes the
CreateJS namespace to convert Flash to HTML5 and the corresponding JavaScript file that contains interactive
elements.
JavaScript file Contains dedicated definitions and code for all interactive elements of the animation. Also defined
within the JavaScript file are, code for all types of tweens.
These files are copied to the same location as that of the FLA by default. You can change the location by providing the
output path on the Publish Settings dialog (File > Publish Settings).
Migrating existing content to HTML5 Canvas
You can migrate existing content within Flash Pro to generate an HTML5 output. To its end, Flash Pro allows you to
migrate content by manually copying or importing individual layers, symbols, and other library items. Alternatively,
you could run the Convert AS3 to HTML5 Canvas document command to automatically port existing ActionScript
content to a new HTML5 Canvas document. For more information, see
However, when working the HTML5 document type in Flash Professional CC, you can notice that certain Flash
features are not supported. This is because, the features within Flash do not have corresponding features within the
Canvas API. And hence, these features cannot be used within the HTML5 Canvas document type. This may affect you
during content migration, when you attempt to:
Copy content (layers or library symbols) from a traditional Flash document type (such as ActionScript 3.0, AIR for
Android, AIR for Desktop, and so on) into an HTML5 document. In this case, an unsupported content-type is either
removed or converted to supported defaults.
this link .
For example, copying 3D animation will remove all 3D transformations applied to objects on stage.
Import a PSD or AI file that contain unsupported content. In this case, the content is either removed or converted to
supported defaults.
Last updated 6/12/2015
Page 40

Platforms
For example, import a PSD file that has Gradient Bevel effect applied. Flash Pro removes the effect.
Work with multiple document types (for example, ActionScript 3.0 and HTML5 Canvas) simultaneously, you switch
documents with an unsupported tool or option selected. In this case, Flash Pro CC visually indicates that the feature is
not supported.
For example, you created a dotted line in an ActionScript 3.0 document and switch to HTML5 Canvas with the Line
tool still selected. Observe the pointer and the the Properties Inspector, they display icons to indicate that dotted line
is not supported within HTML5 Canvas.
Scripts ActionScr ipt component s are remove d and the co de is comme nted out. And also, if you have JavaSc ript written
within the comment block (for Toolkit for CreateJS with Flash Professional CC 13.0), ensure that you manually
uncomment the code.
For example, if you copied layers that contain buttons, they are removed.
Changes applied to content after migrating
The following are the types of changes that are applied when you migrate legacy content to an HTML5 Canvas
document.
Content is removed Content types that are not supported in HTML5 Canvas are removed. For example:
• 3D Transformations are removed
35
• ActionScript code is commented out
• Videos ar e remove d
Content is modified to a supported default value Content type or feature is supported, but a property of the feature is
not. For example:
• Overlay Blendmode is not supported; is modified to Normal.
• Dotted Line is not supported; is modified to Solid.
For a full list of features that are not supported and their fallback values during migration, see this article .
Converting ActionScript 3 to HTML5 Canvas document using JSFL script
Flash Professional CC provides a JSFL script to convert an AS3 document to HTML5 Canvas document. When run,
the JSFL script does the following:
• Creates a new HTML5 Canvas document.
• Copies all layers, symbols, and library items to the new HTML5 Canvas document.
• Applies defaults to unsupported features, sub-features, or feature-properties.
• Creates separate FLA files for each scene, because HTML5 Canvas document does not support multiple scenes.
To convert an AS3 document to HTML5 Canvas document, do the following:
1 Open the ActionScript 3 document in Flash Professional CC.
2 Select Commands > Convert AS3 to HTML5 Canvas document.
Note: Ensure that you read through Warnings in the Output panel. These warnings give you information about changes
that were applied to content during the conversion.
Last updated 6/12/2015
Page 41

Platforms
Creating and publishing a WebGL document
What is WebGL?
WebGL is an open web standard for rendering graphics on any compatible browser, without the need for additional
plug-ins. WebGL is integrated completely into all the web standards of the browser allowing GPU accelerated usage of
image processing and effects as part of the web page canvas. WebGL elements can be embedded with other HTML
elements and composited with other parts of the page.
Although, most modern-day browsers support WebGL, visit this link to know more details about the exact versions
that are supported.
Some browsers do not have WebGL enabled by default. To enable WebGL on your browser, see this article.
Note: Ensure that you enable WebGL on your browser, because some browsers disable WebGL by default.
The WebGL document type
Flash Professional CC allows you to create and publish rich interactive content to the Web Graphics Library (WebGL)
format. Since WebGL is fully integrated into browsers, it allows Flash Professional to leverage GPU accelerated usage
of graphics processing and rendering, as part of the web page canvas.
36
In Flash Professional CC, a new document type has been added for WebGL. This allows you to create content and
quickly publish to a WebGL output. You can leverage powerful tools within Flash to create rich content, but render
WebGL output that runs on any compatible browser. This means that you can use the traditional Flash timeline,
workspace, and drawing tools to natively author and produce WebGL content. Most commonly used browsers support
WebGL, there by, allowing Flash Pro to render content on most web platforms.
Creating a WebGL document
In Flash Professional CC, the WebGL document allows you to quickly create and publish content for the WebGL
format. To create a WebGL document:
1 Launch Flash Professional CC.
2 On the Welcome Screen, click the WebGL(Preview) option. Alternatively, select File > New menu option to display
the New Document dialog. Click the WebGL(Preview) option.
Previewing WebGL content on browsers
You can use the Test Movie feature of Flash Pro to preview or test your content. To preview, do the following:
❖ Within Flash Professional CC, press Ctrl+Enter on Windows and CMD+Enter on MAC. This launches your default
browser and renders the WebGL content.
Flash Professional CC requires a web server to run WebGL content. Flash Pro CC has a built-in Web Server that is
configured to run WebGL content on Port #8090. If a server is already using this port, Flash Pro automatically detects
and resolves the conflict.
Publishing content to the WebGL format
Flash Pro allows you to create and publish WebGL content natively from within.
Last updated 6/12/2015
Page 42

Platforms
To publish your WebGL document, do the following:
1 Select File> Publish Settings to display the Publish Settings dialog. Alternatively, select File > Publish. if you have
already specified Publish Settings for WebGL.
2 On the Publish Settings dialog, specify values for:
Output file Provide a meaningful name for the output. Also, browse to or enter the location where you want to publish
the WebGL output.
Overwrite HTML Lets you specify whether to overwrite the HTML Wrapper or not everytime you publish your WebGL
project. You may uncheck this option if you have made any external changes to the published HTML file and wish to
retain them while updating any changes made to the animation or assets in Flahs Pro.
Include Hidden Layers Includes all hidden layers in the WebGL output. Deselecting Include Hidden Layers prevents all
layers (including layers nested inside movie clips) marked as hidden from being exported in the resulting WebGL. This
lets you easily test different versions of WebGL document by making layers invisible.
Loop Timeline Repeats the content when it reaches the last frame. Deselect this option to stop the content when it
reaches the last frame.
37
❖ Click Publish to publish WebGL content to the specified location.
Note: The maximum FPS that could specified for WebGL content that run on browsers is 60FPS.
Understanding the WebGL output
The published WebGL output contains the following files:
HTML Wrapper file It includes the runtime, calls for assets, and also, initializes the WebGL renderer. The file is named
as <FLA_name>.html by default. You can provide a different name for the HTML file in the Publish Settings dialog
(File > Publish Settings).
The HTML file is placed in the same directory as that of the FLA by default. You can provide a different location on the
Publish Settings dialog.
JavaScript File (WebGL Runtime) Renders published content on WebGL. Is published in the libs/ folder of the WebGL
document. The file is named as: flwebgl-<version>.min.js
The HTML wrapper makes use of this JS file to render WebGL content.
Tex tu re At las Stores all the color value ( of shapes ) including the bitmap instances on the stage.
Adding audio to your WebGL document
You can import and embed audio to the your WebGL document, control the playback using the sync settings (event,
start, and stop), and play timeline audio at runtime. WebGL currently supports only .wav and .mp3 formats.
For more information on working with audio, see Using sounds in Flash.
Last updated 6/12/2015
Page 43

Platforms
Migrating existing content to a WebGL document
You can migrate existing content within Flash Pro to a WebGL document. To its end, Flash Pro allows you to migrate
via copying or importing content manually. Also, when working with multiple documents within Flash, it is a common
practice to copy content across documents as Layers or assets in the Library. Although, most features of Flash Pro are
supported, some content types are modified to better accommodate the WebGL format.
Flash Professional contains several powerful features that help produce visually rich content. However, considering that
some of these features are native to Flash Pro, they will not be supported in a WebGL document. Flash Pro has been
designed to modify such content to a supported format, and visually indicate when a tool or feature is not supported.
Copy content (layers or library symbols) from a traditional Flash document type (such as ActionScript 3.0, AIR for
Android, AIR for Desktop, and so on) into a WebGL document. In this case, an unsupported content-type is either
removed or converted to supported defaults.
For example, copying 3D animation will remove all 3D transformations applied to objects on stage.
Import a PSD or AI file that contain unsupported content. In this case, the content is either removed or converted to
supported defaults.
For example, import a PSD file that has Blur effects applied. Flash Pro removes the effect.
Work with multiple document types (for example, ActionScript 3.0 and WebGL) simultaneously, you switch
documents with an unsupported tool or option selected. In this case, Flash Pro CC visually indicates that the feature is
not supported.
38
For example, you created a dotted line in an ActionScript 3.0 document and switch to WebGL with the Line tool still
selected. Observe the pointer and the Properties Inspector, they visually indicate that dotted line is not supported
within WebGL.
Scripts You can write Javascript code in the Actions panel, which will be executed after player enters the frame. The
'this' variable in the context of frame scripts refers to the instance of the MovieClip it belongs to. In addition, frame
scripts can access Javascript functions and variables declared in the container HTML file. When you copy a frame or
layer from an ActionScript document and paste it in a WebGL document, scripts if any will be commented.
Changes applied to content after migrating
The following are the types of changes that are applied when you migrate legacy content to an WebGL document.
Content is removed Content types that are not supported in HTML5 Canvas are removed. For example:
Filters are not supported. The effect will be removed, and the shape will assume a solid fill, instead.
Last updated 6/12/2015
Page 44

Platforms
39
Content is modified to a supported default value Content type or feature is supported, but a property of the feature is
not. For example:
Radial Gradient is modified to assume Solid fill using the primary color.
For a full list of features that are not supported and their fallback values during migration, see this article .
Last updated 6/12/2015
Page 45

Platforms
Improving rendering performance with bitmap caching
Runtime bitmap caching lets you optimize rendering performance by specifying that a static movie clip (for example,
a background image) or button symbol be cached as a bitmap at runtime. By default, vector items are redrawn in every
frame. Caching a movie clip or button symbol as a bitmap prevents the browser from having to continually redraw the
item, because the image is a bitmap and its position does not change. This provides a significant improvement in
performance of rendering WebGL content.
For example, when you create an animation with a complex background, create a movie clip containing all the items
included in the background. Then select Cache as Bitmap for the background movie clip in the Property inspector.
During playback, the background is rendered as a bitmap stored at the current screen depth. Browser draws the bitmap
on the Stage quickly and only once, letting the animation play faster and more smoothly.
Bitmap caching lets you use a movie clip and freeze it in place automatically. If a region changes, vector data updates
the bitmap cache. This process minimizes the number of redraws that browser must perform, and provides smoother,
faster rendering performance.
To enab le Cache as Bitmap property for a movieclip symbol, select the movieclip instance, and select Cache as Bitmap
from the Render drop-down on Properties Inspector (Window > Properties).
40
Considerations when using Cache as Bitmap
When using Cache as Bitmap property on WebGL content, consider the following:
• Maximum size of the movieclip symbol is limited to 2048x2048. Note that the actual bounds of the movie clip
instance that can be cached are lesser than 2048x2048, WebGL reserves some pixels.
• If there is more than one instance of the same movieclip, Flash Professional generates the cache with the size of the
first instance encountered. However, the cache is not re-generated and Cache as Bitmap property is not ignored,
even if the transform of the movie clip changes to a large extent. And hence, if the movieclip symbol is greatly scaled
during the course of animation, the animation may appear pixelated.
Last updated 6/12/2015
Page 46

Platforms
Packaging applications for AIR for iOS
Flash Professional includes support for publishing applications for AIR for iOS. AIR for iOS applications can run on
the Apple iPhone and iPad. When you publish for iOS, Flash converts your FLA files into native iPhone applications.
For information about hardware and software requirements for desktop and mobile AIR applications, see AIR system
requirements.
For detailed instructions about packaging applications for the iPhone, see Building Adobe AIR Applications with the
Packager for iPhone.
Note: Flash Pro allows you to add path to the iOS SDK only when the AIR application includes an ANE file. Go to File >
ActionScript Settings > Library Path to include an ANE file.
Support for AIR 17.0 and Flash Player 17.0
AIR 17.0 for iOS allows you to generate 64-bit binaries along with the default 32-bit binaries of your applications to
comply with the Apple requirement for iOS applications. With the AIR 17.0 update for iOS, the Enable Faster Packaging
option under the Deployment tab of AIR for iOS Setting dialog has been enabled by default.
Deploying AIR applications on iOS devices directly
An important change to the AIR application deployment workflow allows you to deploy AIR applications directly to
iOS devices. Earlier, to deploy applications to iOS devices, invoking AIR applications from iTunes was necessary.
41
However, with Flash Professional, you can deploy AIR applications on iOS directly, bypassing the usage of iTunes. This
feature reduces the time required to publish an AIR application for iOS and improves productivity and performance
significantly.
Note: It is necessary that you install iTunes on the machine that has Flash Professional installed.
To enable direct deployment on an iOS device, do the following:
1 Ensure that iTunes is installed on the machine on which you have Flash Professional installed.
2 In Flash Professional, on the Properties panel, click the button, beside the Target drop-down to bring up the AIR
for iOS Settings dialog.
Last updated 6/12/2015
Page 47

Platforms
❖ On the Deployment tab, select Install Application On The Connected iOS Device option.
42
❖ Click Publish.
Testing and debugging AIR applications using the native iOS simulator
Flash Professional can be integrated with Apple Xcode to enable Native iOS Simulator to test and debug AIR
applications written for iOS. The iOS Simulator is highly useful when you do not have access to actual devices (iPhone
or iPad). With the Native iOS Simulator, you can also test and debug AIR applications across multiple devices (iPhone
and iPad). However, the iOS Simulator can be integrated with Flash Professional CS6 that runs on Macintosh systems
only.
To use the iOS Simulator, Flash Professional requires you to download and install Xcode. For more information, see
Setting up Xcode for iOS Simulator Support .
Note:
• Download and install the latest version of AIR to work with the iOS simulator.
• Since SDK version 16 onwards (CC 2014.2 update), Flash Professional CC installs and launches the iOS app on the
IOS simulator.
Setting up Xcode for iOS Simulator Support
1 Download and install Xcode from http://developer.apple.com or download from Mac App Store.
2 Launch Flash Professional.
Last updated 6/12/2015
Page 48

Platforms
3 Create or open an existing AIR for iOS document.
4 On the Properties panel, set the Player target to the latest AIR version.
5 Click the button, beside the Target drop-down to bring up the AIR for iOS Settings dialog.
43
❖ On the General tab, provide the fully qualified path to the iOS Simulator SDK manually or browse to location. For
example:
Applications/Xcode.app/Contents/Developer/Platforms/iPhoneSimulator.platform/Developer/SDKs/
iPhoneSimulator6.0.sdk
❖ On the Deployment tab, provide the Certificate and Password. Optionally, provide the Provisioning Profile for the
AIR application.
❖ Click OK to finish.
You can now use the iOS Simulator to test and debug your application. For information, see Testing AIR applications
using the Natives iOS Simulator and Debugging AIR applications using the Native iOS Simulator .
Last updated 6/12/2015
Page 49

Platforms
Testing AIR applications using the Native iOS Simulator
Ensure that you have set up Xcode and set the path to iPhone SDK before testing your AIR application. For more
information, see
1 In Flash Professional, Control > Test Movie > on iOS Simulator to bring up the iOS Simulator. However, if you have
not set the iOS Simulator SDK path in AIR for iOS Settings dialog, an error is thrown to indicate the same.
2 Browse to your application on the iOS Simulator, and click to launch.
Setting Up Xcode for iOS Simulator .
Debugging AIR applications using the Native iOS Simulator
Ensure that you have set up Xcode and set the path to iPhone SDK path before debugging your AIR application. For
more information, see
1 In Flash Professional, select Debug > Debug Movie > on iOS Simulator to bring up the iOS Simulator. However, if
you have not set the iOS Simulator SDK path in AIR for iOS Settings dialog, an error is thrown to indicate the same.
2 In Flash Professional, select Debug > Begin Remote Debugging Session > ActionScript 3.0.
3 Browse to your application on iOS Simulator, and click to launch.
Setting Up Xcode for iOS Simulator .
Publishing AIR applications for devices with High Resolution Retina Display support
Flash Professional allows you to create rich AIR applications for iOS with an extended support for High-resolution
Retina display. You can choose to select High-resolution Retina Display when publishing AIR applications.
44
1 In Flash Professional, create or open an existing AIR for iOS document.
2 On the Properties panel, click the button beside the Target drop-down to bring up the AIR for iOS Settings
dialog.
❖ On the General tab, set the Resolution as High.
Last updated 6/12/2015
Page 50

Platforms
❖ Click Publish.
Test and debug using Interpreter Mode
New in Flash Professional CC
The Interpreter Mode allows you to quickly debug or test your AIR applications written for iOS. When the Interpreter
Mode is selected, AIR applications are installed without converting to ARM code.
To enable the Interpreter Mode, do the following:
1 On the Properties panel, click the button, beside the Target drop-down to bring up the AIR for iOS Settings
dialog.
45
2 On the Deployment tab, select Device Testing In Interpreter Mode or Device Debugging In Interpreter Mode for
the iOS deployment type option.
3 Click OK to finish.
Note: You can package and load multiple SWFs that contain ActionScript byte code using both the Interpreter and AOT
(Ahead of Time) modes. For more information, see
Note: The Interpreter Mode should only be used for testing or debugging purposes. The AIR installation files produced using
the Interpreter Mode cannot be uploaded to the Mac App Store.
this blog.
Testing and debugging on iOS via USB
New with Flash Professional CC
You can test and debug applications on iOS devices connected via USB. This adds on to the remote testing and
debugging functionality via wi-fi available within Flash Professional CC. However, by connecting devices via USB,
testing, and debugging workflows are simplified by reducing the number of manual steps and in effect, expediting the
testing and debugging processes.
To enable testing or debugging via USB, do one of the following:
• (For debugging) Select Debug > Debug Movie > on Device Via USB.
• (For testing) Select Control >Test Movie > on Device Via USB.
Multi-device connectivity via USB
New with Flash Professional CC
Flash Professional supports testing of applications on multiple devices simultaneously. You can connect to and test
multiple devices via USB.
Last updated 6/12/2015
Page 51

Platforms
You can take advantage of this feature to test by deploying to multiple devices of varying screen sizes, OS versions, and
hardware configurations simultaneously. This allows you to analyze performance of your application across a spectrum
of devices at once.
1 On the Properties panel, click the button, beside the Target drop-down to bring up the AIR for iOS Settings
dialog.
2 On the Deployment tab, a list of all connected devices is displayed. Select devices on to which you wish to publish
the application.
3 Click Publish.
Adding xxhdpi icons (144x144)
New in Flash Professional CC | November 2013
You can manually add xxhdpi icons for an AIR application using the app-descriptor.xml file. Flash Pro CC allows you
to add xhdpi icons (96x96) icons using the Manage AIR SDK dialog. However, if you wish to add icons of higer
resolution, you can manually add them in the app-descriptor.xml file for your AIR application using the following tag:
<icon><image144x144>{Location of png}/[icon_name-144x144].png</image144x144></icon>
For more information about the app-descriptor.xml file, see this help article.
46
Troubleshooting
• Publishing an AIR for iOS application fails if the file name specified for the FLA or the SWF contain double-byte
characters.
• When publishing an AIR for iOS application, Flash Pro hangs if the device is unplugged.
Publishing AIR for Android applications
Flash Professional CS 5.5 and later versions allow you to publish content for Adobe® AIR™ for Android.
This article describes configuring the AIR for Android publish settings in Flash Professional. For complete information
about developing Adobe AIR™ applications, see
For information about hardware and software requirements for desktop and mobile AIR applications, see AIR system
requirements.
For complete AIR developer documentation see the Adobe AIR Reference.
Videos and tutorials
The following video tutorials describe how to create AIR™ for Android applications in Flash Pro:
• Vi de o: AIR for Android - Part 1: Set up your development environment (GotoAndLearn.com, 18:49)
• Vi de o: AIR for Android - Part 2: Access the camera on an Android device (GotoAndLearn.com, 13:35)
• Vi de o: AIR for Android GPU Acceleration (GotoAndLearn.com, 15:55)
• Blog/Video: One Application, Five Screens (Christian Cantrell, Adobe blogs)
• Article: Developing a Mobile Application with Flash (John Hattan, gamedev.net)
Building Adobe AIR Applications.
Last updated 6/12/2015
Page 52

Platforms
Note: (AIR 3.7 only) Packaging applications with only captive runtime (Android)With AIR 3.7, packaging of AIR
applications for Android in any target will embed the AIR runtime. This would help in improving the user-experience as
there would be no need to download the AIR runtime separately. A side-effect would however be that there would be an
increase in app size of around 9MB.Flash Professional displays warnings if an AIR for Android application was packaged
using the Shared Runtime option.
Create an Adobe AIR for Android file
You can create Adobe AIR for Android documents in Flash using the File > New command. You can also create an
ActionScript® 3.0 FLA file and convert it to an AIR for Android file through the Publish Settings dialog box.
To create an AIR for Android file, do one of the following:
• Choose AIR for Android from the Welcome screen or the New Document dialog box (File > New).
• Open an existing FLA file and convert it to an AIR for Android file. Select AIR for Android from the Target menu
in the Publish Settings dialog box (File > Publish Settings).
Preview or publish an AIR for Android application
You c an pr evi e w a Flash AIR for Android SWF file as it would appear in the AIR application window. Previewing is
useful when you want to see what the visible aspects of the application look like without packaging and installing the
application.
47
1 Make sure you’ve set the Target setting in the Publish Settings dialog box to AIR for Android.
2 Select Control > Test Movie > Test or press Control+Enter.
If you have not set application settings through the Application & Installer Settings dialog box, Flash generates a default
application descriptor file (swfname-app.xml) for you. Flash creates the file in the same folder where the SWF file is
written. If you have set application settings using the Application & Installer Settings dialog box, the application
descriptor file reflects those settings.
To pu b l i sh an AIR for Android file, do one of the following:
• Click the Publish button in the Publish Settings dialog box.
• Click the Publish button in the AIR for Android Settings dialog box.
• Choose File > Publish.
• Choose File >Publish Preview.
When you Publish an AIR file, Flash Pro creates a SWF file and XML application descriptor file. Then Flash packages
copies of both, along with any other files you have added to your application, into an AIR installer file (swfname.apk).
Creating AIR for Android applications
After you’ve finished developing your application, specify the settings for the AIR for Android application descriptor
and installer files required to deploy it. Flash Pro creates the descriptor and installer files along with the SWF file when
you publish an AIR for Android file.
You specify the settings for these files in the AIR for Android - Application & Installer Settings dialog box. Once you
have created an AIR for Android file, this dialog box can be opened from the document Property inspector. You can
also access it from the Player menu Settings button in the Flash tab of the Publish Settings dialog box.
Create the Adobe AIR application file
1 In Flash, open the FLA file or set of files that make up your Adobe AIR application.
Last updated 6/12/2015
Page 53

Platforms
2 Save the AIR for Android FLA file before you open the AIR Application & Installer Settings dialog box.
3 Select File > AIR for Android Settings.
4 Complete the AIR for Android Application & Installer Settings dialog box, and then click Publish.
When you click the Publish button, the following files are packaged:
• The SWF file
• The application descriptor file
• The application icon files
• The files listed in the Included Files text box
Note: Publishing an AIR for Android application fails if the file name specified for the FLA or the SWF contain doublebyte characters.
The AIR for Android Application and Installer Settings dialog box is divided into four tabs: General, Deployment,
Icons, and Permissions.
General settings
The General tab of the AIR for Android Application and Installer Settings dialog box contains the following options:
Output file The name and location of the AIR file to create when using the Publish command. The output filename
extension is APK.
48
App Name The name used by the AIR application installer to generate the application filename and the application
folder. The name must contain only valid characters for filenames or folder names. Defaults to the name of the SWF file.
App ID Identifies your application with a unique ID. You can change the default ID if you prefer. Do not use spaces or
special characters in the ID. The only valid characters are 0-9, a-z, A-Z, and . (dot), from 1 to 212 characters in length.
Defaults to com.adobe.example.applicationName.
Ver sion Optional. Specifies a version number for your application. Defaults to 1.0.
Version label Optional. A string to describe the version.
Aspect Ratio Allows you to select Portrait, Landscape, or Auto orientation for the application. When Auto is selected
along with Auto orientation, the application launches on the device depending on its current orientation.
Full Screen Sets the application to run in full screen mode. This setting is deselected by default.
Auto orientation Allows the application to switch from portrait to landscape mode, depending on the current
orientation of the device. This setting is deselected by default.
Render mode Allows you to specify which method the AIR runtime uses to render graphic content. The options
include:
• Auto - automatically detect and use the fastest rendering method available on the host device.
• CPU - Use the CPU.
• GPU - Use the GPU. If no GPU is available, the CPU is used.
• Direct - Render using Stage3D. This is the fastest available rendering method.
For a list of processors that do not support Direct mode, see Stage3D unsupported chipsets, drivers | Flash Player 11,
AIR 3.
Processor: Allows you to select the processor type of the devices that you are publishing the application for. The
supported processor types are ARM and Intel x86. Support for x86 processors is available since the Flash Professional
CC 2014.1 release.
Last updated 6/12/2015
Page 54

Platforms
49
Included Files Specifies which additional files and folders to include in your application package. Click the Plus (+)
button to add files, and the folder button to add folders. To delete a file or folder from your list, select the file or folder
and click the Minus (-) button.
By default, the application descriptor file and the main SWF file are automatically added to the package list. The
package list shows these files even if you have not yet published the Adobe AIR FLA file. The package list displays the
files and folders in a flat structure. Files in a folder are not listed, and full paths to files are shown but are truncated if
necessary.
If you have added any AIR native extension files to the ActionScript library path, those files will appear in this list as
well.
Icon files are not included in the list. When Flash packages the files, it copies the icon files to a temporary folder that is
relative to the location of the SWF file. Flash deletes the folder after packaging is complete.
Last updated 6/12/2015
Page 55

Platforms
Deployment settings
The Deployment tab of the AIR for Android Application and Installer Settings dialog box lets you specify the following
settings.
Certificate The digital certificate for the application. You can browse to a certificate or create a new one. For
information about creating a digital certificate, see
must have a validity period set to at least 25 years.
Password The password for the selected digital certificate.
Deployment type Specifies which type of package to create.
• The Device Release setting allows you to create packages for the marketplace or any other distribution medium such
as a website.
• The Emulator Release setting allows you to create packages for debugging in the Mobile Device Simulator.
• The Debug setting allows you to do on-device debugging, including setting breakpoints in Flash and remote
debugging the application running on the Android device. You can also choose which netwirk interface and IP
address to use for debugging sessions.
AIR runtime Specifies how the application should behave on devices that do not already have the AIR runtime installed.
• Embed AIR runtime with application adds the runtime to the application installer package so that no additional
download will be required. This increases the size of your application package significantly.
Signing your application. Note certificates for Android applications
50
• Get AIR runtime from makes the installer to download the runtime from Google Playstore or Amazon Appstore.
After publish Allows you to specify whether to install the application on a currently connected Android device, and
whether to immediately launch the application after the installation.
Icons settings
The Icons tab of the AIR for Android Application And Installer Settings dialog box lets you specify an icon for the
Android application. The icon is shown after you install the application and run it in the AIR for Android runtime. You
can specify three different sizes for the icon (36, 48, 72, 96 pixels) to allow for the different views in which the icon
appears. The icons you choose for Android do not have to strictly adhere to these sizes.
To specify an icon, click an icon size in the Icons tab and then navigate to the file you want to use for that size. The files
must be in PNG (Portable Network Graphics) format.
If you do not supply an image for a particular icon size, Adobe AIR scales one of the supplied images to create the
missing icon image.
Permissions settings
The Permissions tab allows you to specify which services and data the application has access to on the device.
• To apply a permission, select its checkbox.
• To see a description of a permission, click the permission name. The description appears below the permission list.
• To manually manage permissions instead of using the dialog box, select “Manually manage permissions and
manifest additions in the application descriptor file”.
Last updated 6/12/2015
Page 56

Platforms
Languages settings
The Languages pane alllows you to select the languages that you want your application to be associated with in the
application store or marketplace. By selecting a language, you enable users of the Android operating system in that
language to download your application. Note that these language settings do not do anything else to localize your
application user interface.
If no languages are selected, the application is published with all languages supported. This prevents you from needing
to select every language. The languages listed are those supported by Adobe AIR. Android may support additional
languages.
Publishing for Adobe AIR for desktop
About Adobe AIR
Adobe® AIR™ is a cross-operating system runtime that allows you to leverage your existing web development skills
(Adobe® Flash® Professional, Adobe® Flex™, Adobe® Flash Builder™ HTML, JavaScript®, Ajax) to build and deploy Rich
Internet Applications (RIAs) to the desktop. AIR enables you to work in familiar environments, to leverage the tools
and approaches you find most comfortable, and by supporting Flash, Flex, HTML, JavaScript, and Ajax, to build the
best possible experience that meets your needs.
51
Users interact with AIR applications in the same way that they interact with native desktop applications. The runtime
is installed once on the user's computer, and then AIR applications are installed and run just like any other desktop
application. The runtime provides a consistent cross-operating system platform and framework for deploying
applications and therefore eliminates cross-browser testing by ensuring consistent functionality and interactions across
desktops. Instead of developing for a specific operating system, you target the runtime.
AIR dramatically changes how applications can be created, deployed, and experienced. You gain more creative control
and can extend your Flash, Flex, HTML, and Ajax-based applications to the desktop, without learning traditional
desktop development technologies.
For information about hardware and software requirements for desktop and mobile AIR applications, see AIR system
requirements.
For complete information about developing Adobe AIR™ applications, see Building Adobe AIR Applications.
Create an Adobe AIR file
You can create Adobe AIR Flash documents using the Flash Welcome screen, or the File > New command, or you can
create an ActionScript® 3.0 Flash File and convert it to an Adobe AIR file through the Publish Settings dialog box.
To create an Adobe AIR file, do one of the following:
• Start Flash. The Welcome screen appears. If you have already started Flash, close any open documents to return to
the Welcome screen. In the Welcome screen, select Adobe AIR 2 (CS5) or AIR (CS5.5).
Note: If you’ve disabled the Flash Welcome screen, you can display it again by selecting Edit > Preferences and selecting
Welcome Screen from the On Launch pop-up menu in the General category.
• Choose File > New and select Adobe AIR 2 (CS5) or AIR (CS5.5) and click OK.
Last updated 6/12/2015
Page 57

Platforms
• Open an existing Flash file and convert it to an AIR file by selecting Adobe AIR from the Player menu in the Flash
tab of the Publish Settings dialog box (File > Publish Settings).
Note: (Flash CS5 only) If you save a Flash CS5 AIR file in Flash CS4 format, set the Player version to AIR 1.5 manually in
the Publish Settings dialog box when opening the file in Flash CS4. Flash CS4 only supports publishing to AIR 1.5.
Preview or publish an Adobe AIR application
You can preview a Flash AIR SWF file as it would appear in the AIR application window. Previewing is useful when you
want to see what the visible aspects of the application look like without packaging and installing the application.
1 Make sure you’ve set the Target setting in the Flash tab of the Publish Settings dialog box to Adobe AIR.
2 Select Control > Test Movie > Test or press Control+Enter.
If you have not set application settings through the AIR - Application And Installer Settings dialog box, Flash generates
a default application descriptor file (swfname-app.xml) for you in the same folder where the SWF file is written. If you
have set application settings using the AIR Application & Installer Settings dialog box, the application descriptor file
reflects those settings.
To publish an AIR file, do one of the following:
• Click the Publish button in the Publish Settings dialog box.
• Click the Publish button in the AIR Application & Installer Settings dialog box.
52
• Choose File > Publish.
• Choose File >Publish Preview.
When you Publish an AIR file, Flash Pro creates a SWF file and XML application descriptor file and packages copies of
both, along with any other files you have added to your application, into an AIR installer file (swfname.air).
Note: (Windows only) Publishing of AIR application fails if the file name contains non-english characters.
Creating AIR application and installer files
After you’ve finished developing your application, specify the settings for the AIR application descriptor and installer
files required to deploy it. Flash Pro creates the descriptor and installer files along with the SWF file when you publish
an AIR file.
You specify the settings for these files in the AIR - Application & Installer Settings dialog box. Once you have created
an AIR file, this dialog box can be opened from either the document Property inspector or the Player menu Settings
button in the Flash tab of the Publish Settings dialog box.
Create the Adobe AIR application and installer files
1 In Flash, open the FLA file or set of files that make up your Adobe AIR application.
2 Save the Adobe AIR FLA file before you open the AIR Settings dialog box.
3 Select File > AIR 2 Settings.
4 Complete the AIR Settings dialog box, and then click Publish.
When you click the Publish button, the following files are packaged: the SWF file, the application descriptor file, the
application icon files, and the files listed in the Included Files text box. If you have not already created a digital
certificate, Flash displays the Digital Signature dialog box when you click the Publish button.
The AIR Application And Installer Settings dialog box is divided into 4 tabs: General, Signature, Icons, and Advanced.
For more information on these settings, see the following sections.
Last updated 6/12/2015
Page 58

Platforms
General settings
The General tab of the AIR Application And Installer Settings dialog box contains the following options:
Output file The name and location of the .air file to create when using the Publish command.
Output as The type of package to create.
• AIR package - Creates a standard AIR installer file that assumes the AIR runtime can be separately downloaded
during installation or is already installed on the target device.
• Mac installer - Creates a complete Macintosh installer file.
• Application with runtime embedded - Creates an AIR installer file that contains the AIR runtime so no additional
download is required.
Windows Installer Select this option to compile a native, platform specific Windows installer (.exe) instead of a
platform-independent AIR installer (.air).
Name The name of the main file of the application. Defaults to the name of the FLA file.
Ver sion Optional. Specifies a version number for your application. Defaults to 1.0.
App ID Identifies your application with a unique ID. You can change the default ID if you prefer. Do not use spaces or
special characters in the ID. The only valid characters are 0-9, a-z, A-Z, . (dot), and - (dash), from 1 to 212 characters
in length. Defaults to com.adobe.example.applicationName.
53
Description Optional. Lets you enter a description of the application to display in the installer window when the user
installs the application. Defaults to blank.
Copyright Optional. Lets you enter a copyright notice. Defaults to blank.
Window Style Specifies what window style (or chrome) to use for the user interface when the user runs the application
on their computer. You can specify System Chrome (the default), which refers to the standard window visual style that
the operating sys tem uses . You can also specif y Custom Ch rome (opa que) or Custom Chrome (transparent). To display
your application without the system chrome, select None. System Chrome surrounds the application with the
operating-system standard window control. Custom Chrome (opaque) eliminates the standard system chrome and lets
you create a chrome of your own for the application. (You build the custom chrome directly in the FLA file.) Custom
Chrome (transparent) is like Custom Chrome (opaque), but it adds transparent capabilities to the edges of the page.
These capabilities allow for application windows that are not square or rectangular in shape.
Render mode Allows you to specify which method the AIR runtime uses to render graphic content. The options
include:
• Auto - automatically detect and use the fastest rendering method available on the host device.
• CPU - Use the CPU.
• Direct - Render using Stage3D. This is the fastest available rendering method.
For a list of processors that do not support Direct mode, see Stage3D unsupported chipsets, drivers | Flash Player 11,
AIR 3.
Profiles Which profiles to include when building the AIR file. To limit your AIR application to a specific profile,
deselect the unneeded profiles. For more information about AIR profiles, see
Application profiles .
Included Files Specifies which additional files and folders to include in your application package. Click the Plus (+)
button to add files, and the folder button to add folders. To delete a file or folder from your list, select the file or folder
and click the Minus (-) button.
By default, the application descriptor file and the main SWF file are automatically added to the package list. The
package list shows these files even if you have not yet published the Adobe AIR FLA file. The package list displays the
Last updated 6/12/2015
Page 59

Platforms
files and folders in a flat structure. Files in a folder are not listed, and full path names to files are shown but are truncated
if necessary.
If you have added any AIR native extension files to the ActionScript library path, those files will appear in this list as
well.
Icon files are not included in the list. When Flash packages the files, it copies the icon files to a temporary folder that is
relative to the location of the SWF file. Flash deletes the folder after packaging is complete.
Signature settings
The Signature tab of the AIR Application & Installer Settings dialog box allows you to specify a code signing certificate
for your application.
For more information about digital signatures, see Signing your applicationand Digitally signing an AIR file.
Icons settings
The Icons tab of the AIR Application And Installer Settings dialog box lets you specify an icon for the application. The
icon is shown after you install the application and run it in the Adobe AIR runtime. You can specify four different sizes
for the icon (128, 48, 32, and 16 pixels) to allow for the different views in which the icon appears. For example, the icon
can appear in the file browser in thumbnail, detail, and tile views. It can also appear as a desktop icon and in the title of
the AIR application window, as well as in other places.
54
The icon image defaults to a sample AIR application icon if no other icon files are specified (Flash CS5 only).
To specify an icon, click an icon size at the top of the Icons tab and then navigate to the file you want to use for that size.
The files must be in PNG (Portable Network Graphics) format.
If you do specify an image, it must be the exact size (either 128x128, 48x48, 32x32, or 16x16). If you do not supply an
image for a particular icon size, Adobe AIR scales one of the supplied images to create the missing icon image.
Advanced settings
The Advanced tab allows you to specify additional settings for the application descriptor file.
You can specify any associated file types that your AIR application should handle. For example, if you wanted your
application to be the principal application for handling HTML files, you would specify that in the Associated File Types
text box.
You can also specify settings for the following aspects of the application:
• The size and placement of the initial window
• The folder in which the application is installed
• The Program menu folder in which to place the application.
The dialog box has the following options:
Associated file types Lets you specify associated file types that the AIR application will handle. Click the Plus (+)
button to add a new file type to the text box. Clicking the Plus bu tto n di spla ys t he Fil e Typ e S ett ings dialo g box . Cli ckin g
the Minus (-) button removes an item that is selected in the text box. Clicking the Pencil button displays the File Type
Settings dialog box and allows you to edit an item that you’ve selected in the text box. By default, the Minus (-) and
Pencil buttons are dimmed. Selecting an item in the text box enables the Minus (-) and Pencil buttons, allowing you to
remove or edit the item. The default value in the text box is None.
Initial window settings Lets you specify size and placement settings for the initial application window.
• Width: Specifies the initial width of the window in pixels. The value is blank by default.
Last updated 6/12/2015
Page 60

Platforms
• Height: Specifies the initial height of the window in pixels. The value is blank by default.
• X: Specifies the initial horizontal position of the window in pixels. The value is blank by default.
• Y: Specifies the initial vertical position of the window in pixels. The value is blank by default.
• Maximum Width and Maximum Height: Specify the maximum size of the window in pixels. These values are blank
by default.
• Minimum Width and Minimum Height: Specify the minimum size of the window in pixels. These values are blank
by default.
• Maximizable: Lets you specify whether the user can maximize the window. This option is selected (or true) by
default.
• Minimizable: Lets you specify whether the user can minimize the window. This option is selected (or true) by
default.
• Resizable: Lets you specify whether the user can resize the window. If this option is not selected, Maximum Width,
Maximum Height, Minimum Width, and Minimum Height are dimmed. This option is selected (or true) by default.
• Visible: Lets you specify whether the application window is visible initially. The option is selected (or true) by
default.
Other Settings Lets you specify the following additional information regarding the installation:
55
• Install Folder: Specifies the folder in which the application is installed.
• Program Menu Folder (Windows only): Specifies the name of the program menu folder for the application.
• Use Custom UI for Updates: Specifies what happens when a user opens an AIR installer file for an application that’s
already installed. By default, AIR displays a dialog box that allows the user to update the installed version with the
version in the AIR file. If you don’t want the user to make that decision and you want the application to have
complete control over its updates, select this option. Selecting this option overrides the default behavior and gives
the application control over its own updates.
Languages settings
The Languages pane alllows you to select the languages that you want your application to be associated with in the
application store or marketplace. By selecting a language, you enable users of operating systems in that language to
download your application. Note that these language settings do not do anything else to localize your application user
interface.
If no languages are selected, the application is published with all languages supported. This prevents you from needing
to select every language. The languages listed are those supported by Adobe AIR. Android may support additional
languages.
File type settings
Flash displays the File Type Settings dialog box if you click the Plus (+) button or the Pencil button in the Associated
File Types section of the Advanced tab to add or edit associated file types for the AIR application.
The only two required fields in this dialog box are Name and Extension. If you click OK and either of those fields is
blank, Flash displays an error dialog box.
You can specify the following settings for an associated file type:
Name The name of the file type (for example, Hypertext Markup Language, Text File, or Example).
Last updated 6/12/2015
Page 61

Platforms
Extension The filename extension (for example, html, txt, or xmpl), up to 39 basic alphanumeric characters, (A-Za-z0-
9), and without a leading period.
Description Optional. A description of the file type (for example, Adobe Video File).
Content type Optional. Specifies the MIME type for the file.
File Type Icon Settings Optional. Lets you specify an icon that’s associated with the file type. You can specify four
different sizes for the icon (128x128, 48x48, 32x32, and 16x16 pixels) to allow for the different views in which the icon
appears. For example, the icon can appear in the file browser in thumbnail, detail, and tile views.
If you specify an image, it must be of the size that you specify. If you do not specify a file for a particular size, AIR uses
the image of the closest size and scales it to fit for the given occurrence.
To specify an icon, either click the folder for the icon size and select an icon file to use or enter the path and filename
for the icon file in the text box next to the prompt. The icon file must be in PNG format.
After a new file type is created, it is shown in the File Type list box in the Advanced Settings dialog box.
Failure to create application and installer files
The application and installer files fail to be created in the following instances:
• The application ID string has an incorrect length or contains invalid characters. The application ID string can be
from 1 to 212 characters and can include the following characters: 0-9, a-z, A-Z, . (dot), - (hyphen).
56
• Files in the Included Files list do not exist.
• The sizes of custom icon files are incorrect.
• The AIR destination folder does not have write access.
• You have not signed the application or have not specified that it is an Adobe AIRI application that will be signed
later.
Signing your application
All Adobe AIR applications must be signed to be installed on another system. Flash provides the ability, however, to
create unsigned Adobe AIR installer files so that the application can be signed later. These unsigned Adobe AIR
installer files are called an AIRI (AIR Intermediate) package. This capability provides for cases in which the certificate
is on a different machine or signing is handled separately from application development.
Sign an Adobe AIR application with a pre-purchased digital certificate from a root certificate authority
1 Choose File > AIR 2 Settings and then click on the Signature tab.
This tab has two radio buttons that allow you to either sign your Adobe AIR application with a digital certificate or
prepare an AIRI package. If you sign your AIR application, you can either use a digital certificate granted by a root
certificate authority or create a self-signed certificate. A self-signed certificate is easy to create but is not as
trustworthy as a certificate granted by a root certificate authority.
2 Select a certificate file from the pop-up menu or click the Browse button to locate a certificate file.
3 Select the certificate.
4 Enter a password.
5 Click OK.
For more information on signing your AIR application, see Digitally signing an AIR file .
Last updated 6/12/2015
Page 62

Platforms
Create a self-signed digital certificate
1 Click the Create button. The Self-Signed Digital Certificate dialog box opens.
2 Complete the entries for Publisher Name, Organization Unit, Organization Name, Country, Password, and Confirm
Password. For Country, you can select from the menu or enter a 2-letter country code that does not appear in the
menu. For a list of valid country codes, see
3 Specify the type of certificate.
http://www.iso.org/iso/country_codes.
The Type option refers to the level of security that the certificate carries. 1024-RSA uses a 1024-bit key (less secure),
and 2048-RSA uses a 2048-bit key (more secure). The default is 2048-RSA.
4 Save the information in a certificate file by completing the Save As entry or clicking the Browse button to browse to
a folder location.
5 Click OK.
6 In the Digital Signature dialog box, enter the password you assigned in the second step of this procedure and click
OK.
To have Flash remember the password you used for this session, click Remember Password For This Session.
If the Timestamp option is unselected when you click OK, a dialog box warns that the application will fail to install
when the digital certificate expires. If you click Yes in response to the warning, time stamping is disabled. If you click
No, the Timestamp option is automatically selected and time stamping is enabled.
57
For more information on creating a self-signed digital certificate, see Digitally signing an AIR file.
You can also create an AIR Intermediate (AIRI) application without a digital signature. A user cannot install the
application on a desktop, however, until you add a digital signature.
Prepare an AIRI package that will be signed later
❖ In the Signature tab, select Prepare An AIR Intermediate (AIRI) File That Will Be Signed Later, and click OK.
The digital signature status changes to indicate that you have chosen to prepare an AIRI package that will be signed
later, and the Set button changes to a Change button.
If you choose to sign the application later, you will need to use the command-line AIR Developer Tool included with
Flash Pro and with the AIR SDK. For more information, see
Building Adobe AIR Applications.
Add or remove a version of the AIR SDK
You can add new releases and custom versions of the AIR SDK to Flash Pro. Once added, the new SDK appears in the
player target list in the Publish Settings.
To add an new verision of the SDK:
1 Download the new AIR SDK folder.
2 In Flash Pro, choose Help > Manage AIR SDK.
3 In the Manage AIR SDK dialog, click the plus "+" button and then browse to the new AIR SDK folder. Click OK.
4 Click OK in the Manage AIR SDK dialog box.
The new SDK appears in the Player Target list in Publish Settings. The lowest acceptable SDK version should be greater
than the version included with Flash Pro.
To remove a version of the SDK:
1 In Flash Pro, choose Help > Manage AIR SDK.
Last updated 6/12/2015
Page 63

Platforms
2 In the Manage AIR SDK dialog, select the SDK you want to remove.
3 Click the minus "-" button. Click OK.
ActionScript publish settings
Modify ActionScript publish settings
When you create a new FLA document, Flash asks you which version of ActionScript you want to use. You can change
this setting if you decide later to write your scripts in a different version of ActionScript.
Note: ActionScript 3.0 is not compatible with ActionScript 2.0. The ActionScript 2.0 compiler can compile all ActionScript
1.0 c ode, except for the slash ( /) syntax u sed to indicate movie clip paths (for e xample , parentClip/testMC:varName= "h ello
world"). To avoid this problem, either rewrite your code using dot (.) notation, or select the ActionScript 1.0 compiler.
1 Select File > Publish Settings.
2 Select the ActionScript version from the Script menu.
58
Class files and configuration files
When you install Flash Professional, several ActionScript-related configuration folders and files are placed on your
system. If you modify these files to customize the authoring environment, back up the original files.
ActionScript classes folder Contains all of the built-in ActionScript 2.0 classes (AS files). Typical paths to this folder
are as follows:
• Windows 7 and 8: Hard Disk\Program Files\Adobe\Adobe Flash CC\Common\Configuration\ActionScript
3.0\Configuration\Classes
• Macintosh: Hard Disk/Users/user/Library/Application Support/Adobe/Flash CC/language/Configuration/Classes
The Classes folder is organized into classes for Flash Player 10 and classes for Flash Player 11. For more information
on the organization of this directory, see the Read Me file in the Classes folder.
Include class folder Contains all of the global ActionScript include files. Locations are as follows:
• Windows 7 and 8: Hard Disk\Program Files\Adobe\Adobe Flash CC\Common\Configuration\ActionScript
3.0\libs\
• Macintosh: Hard Disk/Users/user/Library/Application Support/Adobe/Flash CC/language/Configuration/Include
ActionsPanel.xml configuration file Includes the configuration file for ActionScript code hinting. Separate files
provide configuration for each version of ActionScript and Flash Lite, and for JavaScript. Locations are as follows:
• Windows 7 and 8: Hard Disk\Program Files\Adobe\Adobe Flash CC\Common\Configuration\ActionScript
3.0\libs\
• Macintosh: Hard Disk/Users/user/Library/Application Support/Adobe/Flash
CC/language/Configuration/ActionsPanel
AsColorSyntax.xml configuration file The configuration file for ActionScript code color syntax highlighting. Locations
are as follows:
• Windows 7 and 8: Hard Disk\Program Files\Adobe\Adobe Flash CC\Common\Configuration\ActionScript
3.0\libs\
Last updated 6/12/2015
Page 64

Platforms
• Macintosh: Hard Disk/Users/user/Library/Application Support/Adobe/Flash
CC/language/Configuration/ActionsPanel
Declare an ActionScript 3.0 document class
When you use ActionScript 3.0, a SWF file may have a top-level class associated with it. This class is called the
document class. When the SWF is loaded by Flash Player, an instance of this class is created to be the SWF file's toplevel object. This object of a SWF file can be an instance of any custom class you choose.
For example, a SWF file that implements a calendar component can associate its top level with a Calendar class, with
methods and properties appropriate to a calendar component. When the SWF is loaded, Flash Player creates an
instance of this Calendar class.
1 Deselect all objects on the Stage and in the Timeline by clicking a blank area of the Stage. This displays the
Document properties in the Property inspector.
2 Enter the filename of the ActionScript file for the class in the Document Class text box in the Property inspector.
Do not include the .as filename extension.
Note: You can also enter the Document Class information in the Publish Settings dialog box.
Note: Optionally, you can also enter the name of the Class within a SWC file, linked in Library Path, that you want to set
as the Document Class.
59
Set the location of ActionScript files
To use an ActionScript class that you’ve defined, Flash Professional must locate the external ActionScript files that
contain the class definition. The list of folders in which Flash Professional searches for class definitions is called the
classpath for ActionScript 2.0 and the source path for ActionScript 3.0. Classpaths and source paths exist at the
application (global) and document level. For more information about classpaths, see Classes in
2.0 in Adobe Flash or “Packages ” in Learning ActionScript 3.0.
You can set the following ActionScript locations in Flash Professional:
• ActionScript 2.0
• Application level (available to all AS2 FLA files):
• Classpath (set in ActionScript preferences)
• Document level (available only to the FLA file that specifies this path):
• Classpath (set in Publish Settings)
• ActionScript 3.0
• Application level (available to all AS3 FLA files):
• Source path (set in ActionScript preferences)
• Library path (set in ActionScript preferences)
• External library path (set in ActionScript preferences)
• Document level (available only to the FLA file that specifies these paths):
• Source path (set in Publish Settings)
• Library path (set in Publish Settings)
• Document class (set in Document Property inspector)
Learning ActionScript
Last updated 6/12/2015
Page 65

Platforms
The Library path specifies the location of pre-compiled ActionScript code which resides in SWC files you have created.
The FLA file that specifies this path loads every SWC file at the top level of this path and any other code resources that
are specified within the SWC files themselves. If you use the Library path, be sure none of the compiled code in the
SWC files is duplicated in uncompiled AS files in the Source path. The redundant code will slow down compilation of
your SWF file.
You can specify more than one path for Flash Professional to look in. Resources found in any of the paths specified will
be used. When you add or modify a path, you can add absolute directory paths (for example, C:/my_classes) and
relative directory paths (for example, ../my_classes or ".").
Set the classpath for ActionScript 2.0
note: ActionScript 2.0 is deprecated with Flash Professional CC. For more information, see this article.To set the
document-level classpath:
1 Select File > Publish Settings, and click Flash.
2 Verify that ActionScript 2.0 is selected in the ActionScript Version pop-up menu, and click Settings.
3 Specify the frame where the class definition should reside in the Export Frame for Classes text field.
4 To add paths to the classpath list, do any of the following:
• To add a folder to the classpath, click the Browse to Path button , browse to the folder to add, and click OK.
• To add a new line to the Classpath list, click the Add New Path button. Double-click the new line, type a relative
or absolute path, and click OK.
60
• To edit an existing classpath folder, select the path in the Classpath list, click the Browse to Path button, browse
to the folder to add, and click OK. Alternatively, double-click the path in the Classpath list, type the desired path,
and click OK.
• To delete a folder from the classpath, select the path in the Classpath list and click the Remove Selected Path
button
.
To set the application-level classpath:
1 Choose Edit Preferences (Windows) or Flash > Preferences (Macintosh) and click the ActionScript category.
2 Click the ActionScript 2.0 Settings button and add the path(s) to the Classpath list
Set the source path for ActionScript 3.0
To set the document-level source path:
1 Select File > Publish Settings, and click Flash.
2 Verify that ActionScript 3.0 is selected in the ActionScript Version pop-up menu, and click Settings. Your Flash
Player version must be set to Flash Player 9 or later to use ActionScript 3.0.
3 Specify the frame where the class definition should reside in the Export Classes in Frame text field.
4 Specify the Errors settings. You can select Strict Mode and Warnings Mode. Strict Mode reports compiler warnings
as errors, which means that compilation will not succeed if those types of errors exist. Warnings Mode reports extra
warnings that are useful for discovering incompatibilities when updating ActionScript 2.0 code to ActionScript 3.0.
5 (Optional) Select Stage to automatically declare stage instances.
6 Specify ActionScript 3.0 or ECMAScript as the dialect to use. ActionScript 3.0 is recommended.
Last updated 6/12/2015
Page 66

Platforms
7 To add paths to the source path list, do any of the following:
• To add a folder to the source path, click the Source path tab and then click the Browse To Path button , browse
to the folder to add, and click OK.
• To add a new line to the Source path list, click the Add New Path button. Double-click the new line, type a
relative or absolute path, and click OK.
• To edit an existing Source path folder, select the path in the Source path list, click the Browse To Path button,
browse to the folder to add, and click OK. Alternatively, double-click the path in the Source path list, type the
desired path, and click OK.
• To delete a folder from the source path, select the path in the Source path list and click the Remove From Path
button
To set the application-level source path:
1 Choose Edit Preferences (Windows) or Flash > Preferences (Macintosh) and click the ActionScript category.
2 Click the ActionScript 3.0 Settings button and add the path(s) to the Source path list.
.
Set the Library path for ActionScript 3.0 files
To set the document-level Library path, the procedure is similar to setting the Source path:
61
1 Choose File Publish Settings.
2 Make sure ActionScript 3.0 is specified in the Script menu and click the ActionScript Settings button.
3 In the Advanced ActionScript 3.0 Settings dialog box, click the Library path tab.
4 Add the library path to the Library path list. You can add folders or individual SWC files to the path list.
5 To set the Link Type property, double-click Link Type in the property tree of the path. The choices for Link Type are:
• Merged into code: The code resources found in the path are merged into the published SWF file.
• External: The code resources found in the path are not added to the published SWF file, but the compiler verifies
that they are in the locations you specified.
• Runtime shared library (RSL): Flash Player downloads the resources at runtime.
To set the Application-level Library path:
1 Choose Edit Preferences (Windows) or Flash > Preferences (Macintosh) and click the ActionScript category.
2 Click the ActionScript 3.0 Settings button and add the path(s) to the Library path list.
Compiling ActionScript conditionally
You can use conditional compilation in ActionScript 3.0 in the same way that it has been used in C++ and other
programming languages. For example, you can use conditional compilation to turn blocks of code throughout a project
on of off, such as code that implements a certain feature or code used for debugging.
Using config constants that you define in the publish settings, you can specify whether certain lines of ActionScript
code are compiled or not. Each constant takes the following form:
CONFIG::SAMPLE_CONSTANT
In this form, CONFIG is the config namespace and SAMPLE_CONSTANT is the constant that you will set to true or
false in the publish settings. When the value of the constant is true, the line of code that follows the constant in
ActionScript is compiled. When the value is false, the line of code that follows the constant is not compiled.
Last updated 6/12/2015
Page 67

Platforms
For example, the following function has 2 lines of code that are compiled only if the value of the constant that precedes
them is set to true in the publish settings:
public function CondCompTest() {
CONFIG::COMPILE_FOR_AIR {
trace("This line of code will be compiled when COMPILE_FOR_AIR=true.");
}
CONFIG::COMPILE_FOR_BROWSERS {
trace("This line of code will be compiled when COMPILE_FOR BROWSERS=true.");
}
}
To define a config constant using the Publish Settings dialog box:
1 Choose File > Publish Settings.
2 Ensure that the Script menu set to ActionScript 3.0 and click the Settings button next to the menu.
3 In the Advanced ActionScript 3.0 Settings dialog box, click the Config Constants tab.
4 To add a constant, click the Add button.
5 Type the name of the constant you want to add. The default config namespace is CONFIG and the default constant
name is CONFIG_CONST.
Note: The config namespace CONFIG is declared by the Flash Professional compiler automatically. You can add your
own config namespaces by entering them with a constant name in the publish settings and adding them to your
ActionScript code using the following syntax:
62
config namespace MY_CONFIG;
6 Enter the value you want for the constant, either true or false. You change this value in order to turn on or off
compilation of specific lines of code.
Customizing context menus in Flash documents (CS5.5)
You can customize the standard context menu and the text-editing context menu that appears with SWF files in Flash
Player 7 and later.
• The standard context menu appears when a user right-clicks (Windows) or Control-clicks (Macintosh) on a SWF
file in Flash Player, in any area except an editable text field. You can add custom items to the menu, and hide any
built-in items in the menu except Settings and Debugger.
• The editing context menu appears when a user right-clicks (Windows) or Control-clicks (Macintosh) in an editable
text field in a SWF file in Flash Player. You can add custom items to this menu. You cannot hide any built-in items.
Note: Flash Player also displays an error context menu when a user right-clicks (Windows) or Control-clicks (Macintosh)
in Flash Player and no SWF file is loaded. You cannot customize this menu.
Customize context menus in Flash Player 7 by using the ContextMenu and ContextMenuItem objects in ActionScript
2.0. For more information on using these objects, see ContextMenu in the
Remember the following conditions when creating custom context menu items for Flash Player:
• Custom items are added to a context menu in the order in which they are created. You cannot modify this order after
the items are created.
• You can specify the visibility and enabling of custom items.
ActionScript 2.0 Language Reference.
• Custom context menu items are automatically encoded using Unicode UTF-8 text encoding.
Last updated 6/12/2015
Page 68

Platforms
Configuration folders installed with Flash (CS5.5)
Flash Professional places several configuration folders on your system when you install the application. The
configuration folders organize files associated with the application into appropriate levels of user access. You may want
to view the contents of these folders when you are working with ActionScript® or components. The configuration
folders for Flash Professional are as follows:
Application-level configuration folder
Because it is in the application level, non-administrative users do not have write access to this directory. Typical paths
to this folder are as follows:
• In Microsoft Windows XP or Microsoft Windows Vista, browse to boot drive\Program Files\Adobe\Adobe Flash
CS3\language\Configuration\.
• On the Macintosh, browse to Macintosh HD/Applications/Adobe Flash CS3/Configuration/.
First Run folder
This sibling to the application-level configuration folder facilitates sharing configuration files among users of the same
computer. Folders and files in the First Run folder are automatically copied to the user-level configuration folder. Any
new files placed in the First Run folder are copied to the user-level configuration folder when you start the application.
Typical paths to the First Run folder are as follows:
63
• In Windows XP or Vista, browse to boot drive\Program Files\Adobe\Adobe Flash CS3\language\First Run\.
• On the Macintosh, browse to Macintosh HD/Applications/Adobe Flash CS3/First Run/.
User-level configuration folder
Found in the user profile area, this folder is always writable by the current user. Typical paths to this folder are as
follows:
• In Windows XP or Vista, browse to boot drive\Documents and Settings\username\Local Settings\Application
Data\Adobe\Flash CS3\language\Configuration.
• On the Macintosh, browse to Macintosh HD/Users/username/Library/Application Support/Adobe/Flash
CS3/language/Configuration/.
All-user-level configuration folder
Found in the common user profile area, this folder is part of the standard Windows and Macintosh operating system
installations and is shared by all users of a particular computer. The operating system makes available to all users of the
computer any files placed in this folder. Typical paths to this folder are as follows:
• In Windows XP or Vista, browse to boot drive\Documents and Settings\All Users\Application Data\Adobe\Flash
CS3\language\Configuration\.
• On the Macintosh, browse to Macintosh HD/Users/Shared/Application Support/Adobe/Flash
CS3/language/Configuration/.
Restricted Users configuration folder
For users with restricted privileges on a workstation, typically, in a networked environment, only system administrators
have administrative access to workstations. All other users are given restricted access, which usually means that these
users can’t write to application-level files (such as the Program Files directory in Windows or the Applications folder in
Macintosh OS X).
Last updated 6/12/2015
Page 69

Platforms
Custom Platform Support API Reference
The Custom Platform Support development kit includes a set of header files, sample plugins, and project files that you
can use for building a plugin for Flash.
Flash Professional provides a uniform way to integrate various publishers and document types in the Flash Pro
authoring environment. Publishers and document types developed by third-party developers can be plugged into
FlashPro "document creation" and "publish/test movie" workflows using the pre-defined C++ interfaces.
The APIs or the C++ header files contained in the development kit define the Document Object Model (DOM) and
Flash Component Model (FCM), which you can use to build a custom platform support plugin.
Detailed API reference documentation is available at the following location:
Custom Platform Support API Reference
More Help topics
Custom Platform Support Overview
Enabling Support for Custom Platforms
Working with Custom Platform Support Plugins
64
Creating accessible content
About accessible content
Accessibility overview
You can create content that is accessible to all users, including those with disabilities, using the accessibility features that
Adobe Flash Professional provides in the authoring environment user interface, taking advantage of ActionScript®
designed to implement accessibility. As you design accessible Flash Professional applications, consider how users might
interact with the content and follow recommended design and development practices.
For a tutorial about accessible content, see Create Accessible Flash Content on the Flash Tutorials page at
www.adobe.com/go/learn_fl_tutorials.
For a sample of accessible rich media content, see the Flash Samples page at www.adobe.com/go/learn_fl_samples.
Download and decompress the Samples zip file and navigate to the Accessibility\AccessibleApplications folder to access
the sample.
For the latest information on creating and viewing accessible Flash Professional content, including supported
platforms, screen reader compatibility, articles, and accessible examples, see the Flash Professional Accessibility web
www.adobe.com/go/learn_flash_accessibility_en/.
page at
Last updated 6/12/2015
Page 70

Platforms
Worldwide accessibility standards
Many countries have adopted accessibility standards based on the standards developed by the World Wide Web
Consortium (W3C). The W3C publishes the Web Content Accessibility Guidelines, a document that prioritizes actions
designers should take to make web content accessible. For information about the Web Accessibility Initiative, see the
W3C website at w3.org.
In the United States, the law that governs accessibility is commonly known as Section 508, which is an amendment to
the U.S. Rehabilitation Act.
For additional information about Section 508, see the following websites:
• The US government-sponsored website at section508.gov
• The Adobe accessibility site at www.adobe.com/accessibility/
Understanding screen reader technology
Screen readers are software applications that visually impaired users can use to navigate a website and read the web
content aloud. To enable a screen reader to read nontextual objects in your application, such as vector art and
animations, use the Accessibility panel to associate a name and description with the object. The keyboard shortcuts you
define can allow users to use the screen reader to navigate through your document with ease.
To expose graphic objects, use the Accessibility panel or ActionScript to provide a description.
65
You cannot control how any screen reader behaves; you can control only the content, which you can mark up in your
Flash Professional applications to expose the text and ensure that screen reader users can activate the controls. You
decide which objects in the Flash Professional application are exposed to screen readers, provide descriptions for them,
and decide the order in which they are exposed to screen readers. You cannot force screen readers to read specific text
at specific times or control the manner in which that content is read. Test your applications with a variety of screen
readers to ensure that they perform as you expect.
Sound is the most important medium for most screen reader users. Consider how any sound in your document
interacts with the text spoken aloud by screen readers. It might be difficult for screen reader users to hear what their
screen readers are saying if your Flash Professional application contains loud sounds.
Platform requirements
You can only create Flash Professional content designed for use with screen readers with Windows platforms. Viewers
of Flash Professional content must have Macromedia Flash® Player 6 from Adobe or later and Internet Explorer on
Windows 98 or later.
Flash and Microsoft Active Accessibility (Windows only)
Flash Player is optimized for Microsoft Active Accessibility (MSAA), which provides a descriptive and standardized
way for applications and screen readers to communicate. MSAA is available only for Windows operating systems. For
more information on Microsoft Accessibility Technology, visit the Microsoft Accessibility website at
www.microsoft.com/enable/default.aspx.
The Windows ActiveX (Internet Explorer plug-in) version of Flash Player 6 supports MSAA, but Windows Netscape
and Windows stand-alone players do not.
Note: MSAA is currently not supported in the opaque windowless and transparent windowless modes. (These modes are
options in the HTML Publish Settings panel, available for use with the Windows version of Internet Explorer 4.0 or later,
with the Flash ActiveX control.) To make your Flash Professional content accessible to screen readers, avoid using these
modes.
Last updated 6/12/2015
Page 71

Platforms
Flash Player makes information about the following types of accessibility objects available to screen readers that use
MSAA.
Dynamic or static text T he pr inc ipal pro perty of a text obj ec t is its n ame . To c omply with MSAA con ven tion s, t he na me
is equal to the contents of the text string. A text obj ect can also have an associ ated description string. Flash Professional
uses the static or dynamic text immediately above or to the left of an input text field as a label for that field.
note: Any text that is a label is not passed to a screen reader, but is used as the name of the object that it labels. Labels are
never assigned to buttons or text fields that have author-supplied names.
Input text fields Have a value, an optional name, a description string, and a keyboard shortcut string. An input text
object’s name can come from a text object that is above or to the left of it.
Buttons Have a state (pressed or not pressed), support a programmatic default action that causes the button to depress
momentarily, and optionally have a name, a description string, and a keyboard-shortcut string. Flash Professional uses
any text entirely inside a button as a label for that button.
note: For accessibility purposes, Flash Player considers movie clips used as buttons with button event handlers such as
onPress to be buttons, not movie clips.
Components Provide special accessibility implementation.
Movie clips Exposed to screen readers as graphic objects when they do not contain any other accessible objects, or
when you use the Accessibility panel to provide a name or a description for a movie clip. When a movie clip contains
other accessible objects, the clip itself is ignored, and the objects inside it are made available to screen readers.
66
note: All Flash Professional Video objects are treated as simple movie clips.
Basic accessibility support in Flash Player
By default, the following objects are defined as accessible in all Flash Professional documents and are included in the
information that Flash Player provides to screen reader software. This generic support for documents that do not use
any accessibility features includes the following:
Dynamic or static text Text is transferred to the screen reader program as a name, but with no description.
Input text fields Text is transferred to the screen reader. No names are transferred, except where a labeling relationship
is found for the input text, such as a static text field positioned close to the input text field. No descriptions or keyboard
shortcut strings are transferred.
Buttons The state of the button is transferred to the screen reader. No names are transferred, except where labeling
relationships are found, and no descriptions or keyboard shortcut strings are transferred.
Documents The document state is transferred to the screen reader, but with no name or description.
Accessibility for hearing-impaired users
Include captions for audio content that is integral to comprehending the material. A video of a speech, for example,
might require captions for accessibility, but a quick sound associated with a button probably wouldn’t.
Methods to add captions to a Flash Professional document include the following:
• Add text as captions, ensuring that the captions are synchronized with the audio in the Timeline.
• Use Hi-Caption Viewer, a component available from Hi Software that works with Hi-Caption SE for use with Flash
Professional (see
SE, a white paper, explains how to use Hi-Caption SE and Flash Professional together to create a captioned
document (see
www.adobe.com/go/accessible_captions). Captioning Macromedia Flash Movies with Hi-Caption
www.adobe.com/go/accessibility_papers).
Last updated 6/12/2015
Page 72

Platforms
Provide animation accessibility for the visually impaired
You can change the property of an accessible object during SWF file playback. For example, to indicate changes that
take place on a keyframe in an animation. However, different vendor’s screen readers treat new objects on frames
differently. Some screen readers might read only the new object, whereas other screen readers might re-read the entire
document.
To reduce the chance of causing a screen reader to emit extra “chatter” that can annoy users, avoid animating the text,
buttons, and input text fields in your document. Also, avoid making your content loop.
Flash Player can’t determine the actual text content of features such as Text Break Apart to animate text. Screen readers
can only provide accurate accessibility to information-carrying graphics such as icons and gestural animation, if you
provide names and descriptions for these objects in your document or for the entire Flash Professional application. You
can also add supplementary text to your document or shift important content from graphics to text.
1 Select the object for which you want to change the accessibility properties.
2 Select Window > Other Panels > Accessibility.
3 Change the properties for the object.
Alternatively, use ActionScript to update accessibility properties.
Testing accessible content
When you test your accessible Flash Professional applications, follow these recommendations:
67
• Download several screen readers and test your application by playing it in a browser with the screen reader enabled.
Check that the screen reader is not attempting to “talk over” places in your document where you inserted separate
audio. Several screen reader applications provide a demonstration version of the software as a free download; test as
many screen readers as you can to ensure compatibility across screen readers.
• Test interactive content and verify that users can navigate your content effectively using only the keyboard. Different
screen readers work in different ways when processing input from the keyboard; your Flash Professional content
might not receive keystrokes as you intended. Test all keyboard shortcuts.
Using Flash to enter accessibility information for screen readers
Flash for screen readers and accessibility
Screen readers read aloud a description of the content, read text, and assist users as they navigate through the user
interfaces of traditional applications such as menus, toolbars, dialog boxes, and input text fields.
By default, the following objects are defined as accessible in all Flash Professional documents and are included in the
information that Flash Player provides to screen reader software:
• Dynamic text
• Input text fields
• Buttons
• Movie clips
• Entire Flash Professional applications
Last updated 6/12/2015
Page 73

Platforms
Flash Player automatically provides names for static and dynamic text objects, which are the contents of the text. For
each of these accessible objects, you can set descriptive properties for screen readers to read aloud. You can also
control how Flash Player decides which objects to expose to screen readers—for example, you can specify that
certain accessible objects are not exposed to screen readers at all.
The Flash Accessibility panel
The Flash Accessibility panel (Window > Other Panels > Accessibility) lets you provide accessibility information to
screen readers and set accessibility options for individual Flash Professional objects or entire Flash Professional
applications.
Note: Alternatively, use ActionScript code to enter accessibility information.
If you select an object on the Stage, you can make that objec t accessible and specify options and tab order for the object.
For movie clips, you can specify whether child object information is passed to the screen reader (the default when you
make an object accessible).
With no objects selected on the Stage, use the Accessibility panel to assign accessibility options for an entire Flash
Professional application. You can make the entire application accessible, make child objects accessible, have Flash
Professional label objects automatically, and give specific names and descriptions to objects.
All objects in Flash Professional documents must have instance names for you to apply accessibility options to them.
Create instance names for objects in the Property inspector. The instance name is used to refer to the object in
ActionScript.
68
The following options are available in the Accessibility panel:
Make Object Accessible (Default) Instructs Flash Player to pass the accessibility information for an object to a screen
reader. When the option is disabled, accessibility information for the object is not passed to screen readers. Disabling
this option as you test content for accessibility can be useful because some objects might be extraneous or decorative
and making them accessible could produce confusing results in the Screen Reader. You can then apply a name manually
to the labeled object, and hide the labeling text by deselecting Make Object Accessible. When Make Object Accessible
is disabled, all other controls on the Accessibility panel are disabled.
Make Child Objects Accessible (Movie clips only ; Default) Instructs Flash Player to pass child object information to the
screen reader. Disabling this option for a movie clip causes that movie clip to appear as a simple clip in the accessible
object tree, even if the clip contains text, buttons, and other objects. All objects in the movie clip are then hidden from
the object tree. This option is useful mainly for hiding extraneous objects from screen readers.
note: If a movie clip is used as a button—it has a button event handler assigned to it, such as onPress or onRelease—the
Make Child Objects Accessible option is ignored because buttons are always treated as simple clips, and their children are
never examined, except in the case of labels.
Auto Label Instructs Flash Professional to automatically label objects on the Stage with the text associated with them.
Name Specifies the object name. Screen readers identify objects by reading these names aloud. When accessible objects
don’t have specified names, a screen reader might read a generic word, such as Button, which can be confusing.
Note: Do not confuse object names specified in the Accessibility panel with instance names specified in the Property
inspector. Giving an object a name in the Accessibility panel does not give it an instance name.
Description Lets you enter a description of the object to the screen reader. The screen reader reads this description.
Shortcut Describes keyboard shortcuts to the user. The screen reader reads the text in this text field. Entering keyboard
shortcut text here does not create a keyboard shortcut for the selected object. You must provide ActionScript keyboard
handlers to create shortcut keys.
Last updated 6/12/2015
Page 74

Platforms
Tab Index ( only) Creates a tab order in which objects are accessed when the user presses the tab key. The tab index
feature works for keyboard navigation through a page, but not for screen reader reading order.
For more information, see the Flash Professional Accessibility web page at
www.adobe.com/go/learn_flash_accessibility_en/.
For a tutorial about accessible content, see Create Accessible Flash Content on the Flash Tutorials page at
www.adobe.com/go/learn_fl_tutorials.
For a sample of accessible rich media content, see the Flash Samples page at www.adobe.com/go/learn_fl_samples.
Download and decompress the Samples zip file and navigate to the Accessibility\AccessibleApplications folder to access
th
sample.
e
Selecting names for buttons, text fields, and entire SWF applications
Use the Accessibility panel in the following ways to assign names to buttons and input text fields so that the screen
reader identifies them appropriately:
• Use the auto label feature to assign text adjacent or in the object as a label.
• Enter a specific label in the Accessibility panel name field.
Flash Professional automatically applies the name that you place on top of, in, or near a button or text field as a text
labe
l. Labels for buttons must appear within the bounding shape of the button. For the button in the following
example, most screen readers would first read the word button, then read the text label Home. The user can press
Return or Enter to activate the button.
69
A form might include an input text field where users enter their names. A static text field, with the text Na
me appears
next to the input text field. When Flash Player discovers such an arrangement, it assumes that the static text object
serves as a label for the input text field.
For example, when the following part of a form is encountered, a screen reader reads “Enter your name here.”
In the Accessibility panel, turn off automatic labeling if it is not appropriate for your document. You can also turn
off automatic labeling for specific objects in your document.
Provide a name for an object
You can turn off automatic labeling for part of an application and provide names for the objects in the Accessibility
panel. If you have automatic labeling turned on, you can select specific objects and provide names for the objects in the
Name text field in the Accessibility panel so that the name is used instead of the object text label.
When a button or input text field doesn’t have a text label, or when the label is in a location that Flash Player can’t detect,
you can specify a name for the button or text field. You can also specify a name if the text label is near a button or text
field, but you don’t want that text to be used as that object’s name.
In the following example, the text that describes the button appears outside and to the right of the button. In this
location, Flash Player does not detect the text, and the screen reader does not read it.
Last updated 6/12/2015
Page 75

Platforms
To correct this situation, open the Accessibility panel, select the button, and enter the name and description. To prevent
repetition, make the text object inaccessible.
Note: An object’s accessibility name is unrelated to the ActionScript instance name or ActionScript variable name
associated with the object. (This information generally applies to all objects.) For information on how ActionScript handles
instance names and variable names in text fields, see About text field instance and variable names in Learning ActionScript
2.0 in Adobe Flash at
www.adobe.com/go/learn_cs5_learningas2_en.
Specify a name and description for a button, text field, or entire SWF application
1 Do one of the following:
• To provide a name for a button or text field, select the object on the Stage.
• To provide a name for an entire Flash Professional application, deselect all objects on the Stage.
2 Select Window > Other Panels > Accessibility.
3 Select either Make Object Accessible (for buttons or text fields) or the default, Make Movie Accessible (for entire
Flash Professional applications).
4 Enter a name and description for the button, text field, or Flash Professional application.
Define accessibility for a selected object in a SWF application
1 Select Window > Other Panels > Accessibility.
2 Do one of the following:
• Select Make Object Accessible (the default setting) to expose the object to screen readers and to enable other
options in the panel.
• Deselect Make Object Accessible to hide the object from screen readers and disable the other options in the
panel.
70
3 Enter a name and a description for the selected object as needed:
Dynamic text To provide a description for static text, you must convert it to dynamic text.
Input text fields or buttons Enter a keyboard shortcut.
Movie clips Select Make Child Objects Accessible to expose the objects inside the movie clip to screen readers.
note: If you can describe your application in a simple phrase that a screen reader can easily convey, turn off Make
Children Accessible, and type a suitable description.
Make an entire SWF application accessible
After a Flash Professional document is complete and ready to be published or exported, make the entire Flash
Professional application accessible.
1 Deselect all elements in the document.
2 Select Window > Other Panels > Accessibility.
3 Select Make Movie Accessible (the default setting) to expose the document to screen readers.
4 Select or deselect Make Children Accessible to expose or omit any accessible objects in the document to screen
readers.
5 If you selected Make Movie Accessible in step 2, enter a name and description for the document as needed.
Last updated 6/12/2015
Page 76

Platforms
6 Select Auto Label (the default setting) to use text objects as automatic labels for accessible buttons or input text fields
contained in the document. Deselect this option to turn off automatic labeling and expose text objects to screen
readers as text objects.
Viewing and creating tab order and reading order
The two aspects to tab indexing order are the tab order in which a user navigates through the web content and the order
in which things are read by the screen reader, called the reading order.
Flash Player uses a tab index order from left to right and top to bottom. Customize both the tab and reading order by
using the tabIndex property in ActionScript (in ActionScript, the tabIndex property is synonymous with the reading
order).
Note: Flash Player no longer requires that you add all of the objects in a FLA file to a list of tab index values. Even if you
do not specify a tab index for all objects, a screen reader reads each object correctly.
Tab order The order in which objects receive input focus when users press the Tab key. Use ActionScript to create the
tab order, or if you have Adobe Flash Professional, use the Accessibility panel. The tab index that you assign in the
Accessibility panel does not necessarily control the reading order.
Reading order The order in which a screen reader reads information about the object. To create a reading order, use
ActionScript to assign a tab index to every instance. Create a tab-order index for every accessible object, not just the
focusable objects. For example, dynamic text must have tab indexes, even though a user cannot tab to dynamic text. If
you do not create a tab index for every accessible object in a given frame, Flash Player ignores all tab indexes for that
frame whenever a screen reader is present, and uses the default tab ordering instead.
71
Create a tab-order index for keyboard navigation in the Accessibility panel
You can create a custom tab-order index in the Accessibility panel for keyboard navigation for the following objects:
• Dynamic text
• Input text
• Buttons
• Movie clips, including compiled movie clips
• Components
• Screens
note: You can also use ActionScript code to create a tab-order index for keyboard navigation.
Tab focus occurs in numerical order, starting from the lowest index number. After tab focus reaches the highest tab
index, focus returns to the lowest index number.
When you move tab-indexed objects that are user-defined in your document, or to another document, Flash
Professional retains the index attributes. Check for and resolve index conflicts (for example, two different objects on
the Stage with the same tab-index number).
Note: If two or more objects have the same tab index in any given frame, Flash Professional follows the order in which
the objects were placed on the Stage.
1 Select the object in which to assign a tab order.
2 Select Window > Other Panels > Accessibility.
3 If you’re providing an index for the selected object only, in the Tab Index text field, enter a positive integer (up to
65535) that reflects the order in which the selected object should receive focus.
Last updated 6/12/2015
Page 77

Platforms
4 To view a tab order, select View > Show Tab Order. Tab index numbers for individual objects appear in the upper-
left corner of the object.
Note: Tab indexes created with ActionScript code do not appear on the Stage when the Show Tab Order option is
enabled.
Specifying advanced accessibility options for screen readers
72
Turn off automatic labeling and specify an object name for screen readers
1 On the Stage, select the button or input text field for which you want to control labeling.
2 Select Window > Other Panels > Accessibility.
3 Select Make Object Accessible (the default setting).
4 Enter a name for the object. The name is read as the label for the button or text field.
5 To turn off accessibility for the automatic label (and hide it from screen readers), select the text object on the Stage.
6 If the text object is static tex t, convert it to dynamic text (in the Proper ty inspector, select Text type > Dynamic Text).
7 Deselect Make Object Accessible.
Hide an object from the screen reader
You can hide a selected object from screen readers, and you can decide to hide accessible objects that are contained
inside a movie clip or Flash Professional application and expose only the movie clip or Flash Professional application
to screen readers. note: Only hide objects that are repetitive or convey no content.
When an object is hidden, the screen reader ignores the object.
1 On the Stage, select the button or input text field to hide from the screen reader.
2 Select Window > Other Panels > Accessibility.
3 In the Accessibility panel, do one of the following:
• If the object is a movie clip, button, text field, or another object, deselect Make Object Accessible.
• If the object is the child of a movie clip, deselect Make Child Objects Accessible.
Last updated 6/12/2015
Page 78

Platforms
Create a keyboard shortcut to an object for screen readers
You can create a keyboard shortcut for an object, such as a button, so users can navigate to it without listening to the
contents of an entire page. For example, you can create a keyboard shortcut to a menu, a toolbar, the next page, or a
submit button.
To create a keyboard shortcut, write ActionScript code for an object. If you provide a keyboard shortcut for an input
text field or button, you must also use the ActionScript Key class to detect the key the user presses during Flash
Professional content playback. See Key in the ActionScript 2.0 Language Reference. See Capturing keypresses in
Learning ActionScript 2.0 in Adobe Flash at
www.adobe.com/go/learn_cs5_learningas2_en.
Select the object and add the name of the keyboard shortcut to the Accessibility panel so the screen reader can read it.
Test your Flash Professional content with multiple screen readers. Keyboard shortcut functionality also depends on the
screen reader software used. The key combination Control+F, for example, is a reserved keystroke for both the browser
and the screen reader. The screen reader reserves the arrow keys. Generally, you can use the 0 to 9 keys on the keyboard
for keyboard shortcuts, however, screen readers increasingly use even these keys.
Create a keyboard shortcut
1 On the Stage, select the button or input text field to create a keyboard shortcut for.
2 Select Window > Other Panels > Accessibility.
73
3 In the Shortcut field, type the name of the keyboard shortcut, using the following conventions:
• Spell out key names, such as Control or Alt.
• Use capital letters for alphabetic characters.
• Use a plus sign (+) between key names, with no spaces (for example, Control+A).
Note: Flash Professional does not check that the ActionScript to code the keyboard shortcut was created.
Map a keyboard shortcut to a button instance Control+7 to myButton instance
1 Select the object on the Stage, display the Accessibility panel, and in the Shortcut field, type the key combination of
the shortcut. For example, Control+7.
2 Enter the following ActionScript 2.0 code in the Actions panel:
Note: In this example the shortcut is Control+7.
function myOnPress() {
trace( "hello" );
}
function myOnKeyDown() {
if (Key.isDown(Key.CONTROL) && Key.getCode() == 55) // 55 is key code for 7
{
Selection.setFocus(myButton);
myButton.onPress();
}
}
var myListener = new Object();
myListener.onKeyDown = myOnKeyDown;
Key.addListener(myListener);
myButton.onPress = myOnPress;
myButton._accProps.shortcut = "Ctrl+7"
Accessibility.updateProperties();
Last updated 6/12/2015
Page 79

Platforms
Note: The example assigns the Control+7 keyboard shortcut to a button with an instance name of myButton and makes
information about the shortcut available to screen readers. In this example, when you press Control+7, the myOnPress
function displays the text “hello” in the Output panel. See addListener (IME.addListener method) in ActionScript 2.0
Language Reference at
www.adobe.com/go/learn_cs5_as2lr_en.
Creating accessibility with ActionScript
About ActionScript and accessibility
You can create accessible documents with ActionScript® code. For accessibility properties that apply to the entire
document, you can create or modify a global variable called _accProps. See the _accProps property in ActionScript 2.0
Language Reference at
For properties that apply to a specific object, you can use the syntax instancename._accProps. The value of _accProps
is an object that can include any of the following properties:
www.adobe.com/go/learn_cs5_as2lr_en.
74
Property Typ e Equivalent selection in the
Accessibility panel
.silent Boolean Make Movie Accessible/Make
Object Accessible (inverse logic)
.forceSimple Boolean Make Child Objects Accessible
(inverse logic)
.name string Name Entire documents
.description string Description Entire documents
.shortcut string Shortcut Buttons
Applies to
Entire documents
Buttons
Movie clips
Dynamic text
Input text
Entire documents
Movie clips
Buttons
Movie clips
Input text
Buttons
Movie clips
Dynamic text
Input text
Movie clips
Input text
Note: With inverse logic, a value of true in ActionScript corresponds to a check box that is not selected in the Accessibility
panel, and a value of false in ActionScript corresponds to a selected check box in the Accessibility panel.
Modifying the _accProps variable has no effect by itself. You must also use the Accessibility.updateProperties method
to inform screen reader users of Flash Professional content changes. Calling the method causes Flash Player to
re-examine all accessibility properties, update property descriptions for the screen reader, and, if necessary, send events
to the screen reader that indicate changes have occurred.
Last updated 6/12/2015
Page 80

Platforms
When updating accessibility properties of multiple objects at once, include only a single call to
Accessiblity.updateProperties (too frequent updates to the screen reader can cause some screen readers to become too
verbose).
See the Accessibility.updateProperties method in the ActionScript 2.0 Language Reference at
www.adobe.com/go/learn_cs5_as2lr_en.
Implementing screen reader detection with the Accessibility.isActive() method
To create Flash Professional content that behaves in a specific way if a screen reader is active, use the
Accessibility.isActive() ActionScript method, which returns a value of true if a screen reader is present, and false
otherwise. You can then design your Flash Professional content to perform so that it’s compatible with screen reader
use (for example, by hiding child elements from the screen reader). For more information, see the Accessibility.isActive
method in the ActionScript 2.0 Language Reference at
For example, you could use the Accessibility.isActive() method to decide whether to include unsolicited animation.
Unsolicited animation happens without the screen reader doing anything, which can be confusing for screen readers.
The Accessibility.isActive() method provides asynchronous communication between the Flash Professional content
and Flash Player; a slight real-time delay can occur between the time the method is called and the time when Flash
Player becomes active, returning an incorrect value of false. To ensure that the method is called correctly, do one of the
following:
www.adobe.com/go/learn_cs5_as2lr_en.
75
• Instead of using the Accessibility.isActive() method when the Flash Professional content first plays, call the method
whenever you need to make a decision about accessibility.
• Introduce a short delay of one or two seconds at the beginning of your document to give the Flash Professional
content enough time to contact Flash Player.
For example, you can use an onFocus event to attach this meth od t o a button. Thi s approa ch g enera lly giv es t he S WF
file enough time to load and you can assume a screen reader user will tab to the first button or object on the Stage.
Use ActionScript to create a tab order for accessible objects
To create the tab order with ActionScript® code, assign the tabIndex property to the following objects:
• Dynamic text
• Input text
• Buttons
• Movie clips, including compiled movie clips
• Timel i ne frames
• Screens
Provide a complete tab order for all accessible objects. If you create a tab order for a frame and you don’t specify a tab
order for an accessible object in the frame, Flash Player ignores all the custom tab-order assignments. Additionally, all
objects assigned to a tab order, except frames, must have an instance name specified in the Instance Name text field of
the Property inspector. Even items that are not tab stops, such as text, need to be included in the tab order if they are to
be read in that order.
Because static text cannot be assigned an instance name, it cannot be included in the list of the tabIndex property
values. As a result, a single instance of static text anywhere in the SWF file causes the reading order to revert to the
default.
To specify a tab order, assign an order number to the tabIndex property, as the following example shows:
Last updated 6/12/2015
Page 81

Platforms
_this.myOption1.btn.tabIndex = 1
_this.myOption2.txt.tabIndex = 2
See tabIndex in Button, MovieClip, and TextField in the ActionScript 2.0 Language Reference at
www.adobe.com/go/learn_cs5_as2lr_en.
You can also use the tabChildren() or tabEnabled() methods to assign custom tab order. See MovieClip.tabChildren,
MovieClip.tabEnabled, and TextField.tabEnabled in the ActionScript 2.0 Language Reference at
www.adobe.com/go/learn_cs5_as2lr_en.
Using accessible components
A core set of UI components accelerates building accessible applications. These components automate many of the
most common accessibility practices related to labeling, keyboard access, and testing and help ensure a consistent user
experience across rich applications. Flash Professional includes the following set of accessible components:
• SimpleButton
• CheckBox
• RadioButton
• Label
• Te x tI n pu t
• Te x tA r e a
• ComboBox
76
• ListBox
• Wi nd ow
• Alert
• DataGrid
Accessible Flash Professional components must contain ActionScript that defines their accessible behavior. For
information on which accessible components work with screen readers, see the Flash Professional Accessibility web
www.adobe.com/go/learn_flash_accessibility_en/.
page at
For general information about components, see “About Components” in Using ActionScript 2.0 Components at
www.adobe.com/go/learn_cs5_usingas2components_en.
For each accessible component, enable the accessible portion of the component with the enableAccessibility()
command. This command includes the accessibility object with the component as the document is compiled. Because
no simple way exists to remove an object after it is added to the component, these options are disabled by default.
Therefore, it’s important that you enable accessibility for each component. Perform this step only once for each
component; you do not need to enable accessibility for each instance of a component for a given document. See “Button
component”, “CheckBox component”, “ComboBox component”, “Label component”, “List component”, “RadioButton
component”, and “Window component” in the ActionScript 2.0 Components Language Reference at
www.adobe.com/go/learn_cs5_as2lr_en.
Best practices - Accessibility guidelines
Last updated 6/12/2015
Page 82

Platforms
About accessibility guidelines
Screen readers are complex, and you can easily encounter unexpected results in FLA files developed for use with screen
readers, which is software that visually impaired users run to read websites aloud. Text is read aloud using specially
designed software. A screen reader can only interpret textual content. However, any descriptions that you provide for
the overall SWF file, movie clips, images, or other graphical content are also read aloud. Write descriptions for the
important images and animations so that the screen reader can also interpret these assets in your SWF file. This is the
SWF file equivalent to alt text in an HTML web page.note: Flash Professional applications must be viewed in Internet
Explorer on Windows, because Microsoft Active Accessibility (MSAA) support is limited to this browser.
Flash Player uses Microsoft Active Accessibility (MSAA) to expose Flash Professional content to screen readers. MSAA
is a Windows-based technology that provides a standardized platform for information exchange between assistive
technologies, such as screen readers, and other applications. Events (such as a change in the application) and objects
are visible to screen readers by using MSAA.
Note: Flash Player 7 (and later) does not work with all screen-reader technologies. The third-party software provider must
handle the information that MSAA provides.
Creating accessible sites
Making a website accessible involves several different criteria:
77
Expose the information to screen readers
Make text or images realizable Some visitors might have difficulty reading small text or seeing small graphics. Allow
users to zoom in on these elements, taking advantage of scalable vector graphics in SWF files.
Provide audio narration Consider providing an audio narration for visitors without a screen reader, or where screen
readers might not work, such as with video content.
Provide captions for audio narrations Some visitors might not be able to hear an audio narration for your site or a
video. Consider providing captions for these visitors.
Do not rely on color to communicate information Many visitors might be color blind. If you rely on color to
communicate information (such as: Click the green button to go to page 1, click the red button to go to page 2), provide
text or speech equivalents.
Historically, many online presentations (such as videos) provide alternative ways for visually impaired visitors to access
the content, for instance, a textual description of a video. However, Flash Professional provides textual information
directly to the screen reader. Although this usually means you need to make additional settings or ActionScript in a
FLA file, you do not have to create a completely separate version.
Part s of your S WF f ile can be expos ed t o sc ree n read ers . Text elements (such as text fields, static text, and dynamic text),
buttons, movie clips, components, and the entire SWF file can be interpreted by MSA-compliant screen readers.
Section 508 is United States legislation that provides guidelines for making information accessible to people with
disabilities. Section 508 specifically addresses the need for websites to be accessible in several ways. Some websites,
including all federal websites, must comply with these guidelines. If a SWF file does not communicate all of the
information to the screen reader, the SWF file is no longer Section 508-compliant. For more information, see the
Section 508 website.
Many nations have specified guidelines to follow to create accessible web sites, or follow guidelines established by other
organizations. For more information on accessibility and web standards, see the World Wide Web Consortium (W3C)
Web Accessibility Initiative website. These standards and guidelines describe what factors you must address when you
create accessible HTML websites, and some of this information applies to Flash Professional.
Last updated 6/12/2015
Page 83

Platforms
Exposing SWF file structure and navigation
Because of the visual nature of some SWF files, the layout and navigation of the page can be complex and difficult for
screen readers to translate. An overall description of the SWF file is important to communicate information about its
structure and how to navigate through the site’s structure. You can provide this description by clicking the Stage and
entering a description into the Accessibility panel. You can also create a separate area of the site to provide this
description or overview.
Note: If you enter a description for the main SWF file, this description is read each time the SWF file refreshes. You can
avoid this redundancy by creating a separate informational page.
Inform the user about any navigational elements that change in the SWF file. Perhaps an extra button is added, or the
text on the face of a button changes, and this change is read aloud by the screen reader. Flash Player 7 and later supports
updating these properties by using ActionScript. You can update the accessibility information in your applications if
the content changes at runtime.
Controlling descriptions and repetition
Designers and developers can assign descriptions for the animations, images, and graphics in a SWF file. Provide names
for graphics so the screen reader can interpret them. If a graphic or animation does not communicate vital information
to the SWF file (perhaps it is decorative or repetitive), or you outlined the element in the overall SWF file description,
do not provide a separate description for that element. Providing unnecessary descriptions can be confusing to users
who use screen readers.
78
Note: If you divide text or use images for text in your SWF files, provide either a name or description for these elements.
If you have several nested movie clips that serve a single purpose or convey one idea, ensure that you do the following:
• Group these elements in your SWF file.
• Provide a description for the parent movie clip.
• Make all the child movie clips inaccessible.
This is extremely important, or the screen reader tries to describe all the irrelevant nested movie clips, which will
confuse the user, and might cause the user to leave your website. Make this decision whenever you have more than
one o bje ct, suc h as many mov ie cli ps, in a SWF fil e. If t he o veral l messa ge i s be st c onve yed usi ng a sin gle des cri ption ,
provide a description on one of the objects, and make all the other objects inaccessible to the screen reader.
Looping SWF files and applications cause screen readers to constantly refresh because the screen reader detects new
content on the page. Because the reader thinks the content is updated, it returns to the top of the web page and starts
rereading the content. Make inaccessible to screen readers any looping or refreshing objects that do not have to be
reread.
note: Do not type a description in the Description field of the Accessibility panel for instances (such as text) that the
screen reader reads aloud.
Using color
You must make decisions about using colors in an accessible file. You must not rely only on color to communicate
particular information or directives to users. A color-blind user cannot operate a page if it asks to click on the blue area
to launch a new page or the red area to hear music. Offer text equivalents on the page or in an alternate version to make
your site accessible. Also, check that significant contrast exists between foreground and background colors to enhance
read abil ity. If you pl ace light g ray text on a w hite backg round, users cann ot easily rea d it. Simil arly, sm all text is difficult
for many visitors to read. Using high-contrast and large or resizable text benefits most users, even those without
impairments.
Last updated 6/12/2015
Page 84

Platforms
Ordering, tabbing, and the keyboard
Reading order and tabbing are important considerations for making accessible Flash Professional websites. When you
design an interface, the order that it appears on the page might not match the order in which the screen reader describes
each instance. You can control and test reading order, as well as control tabbing in the SWF file.
Controlling reading order
The default reading order is not predictable and does not always match the placement of your assets or the visual layout
of the page. Keeping the layout simple can help create a logical reading order without using ActionScript. However, you
have more control over reading order if you use ActionScript and test the reading order in your SWF files.
Note: Do not miss ordering a single instance in your SWF file, or the reading order reverts to the default (and
unpredictable) reading order.
Controlling tabbing and content
Visitors who rely on screen readers to describe a site’s content typically use tabbing and keyboard controls to navigate
the operating system and web pages, because using the mouse is not useful when the screen cannot be seen. Use the
tabIndex and tabEnabled properties with the movie clip, button, text field, or component instances to offer intelligent
tabbing control in accessible SWF files. In addition to tabbing, you can use any key-press actions to navigate through
the SWF file, but you must communicate that information using the Accessibility panel. Use the Key class in
ActionScript to add key-press scripts to the SWF file. Select the object for which you want to use the key-press script,
and add the shortcut key in the Shortcut field on the Accessibility panel. Add keyboard shortcuts to essential and
frequently used buttons in your SWF file.note: In ActionScript 3.0, tabIndex and tabEnabled are properties of the
InteractiveObject class. In ActionScript 2.0, they do not require a class reference.
79
Note: Avoid invisible buttons in accessible SWF files, because screen readers do not recognize these buttons. (Invisible
buttons are buttons for which you define only a hit area, the clickable region, for the button.)
Many SWF files have a rapid succession of information, and screen readers frequently cannot keep up with this pace.
Provide controls for the SWF file, letting the user use buttons to navigate through the file at their own pace, and letting
them pause the process if necessary.
Handling audio, video, and animation
When you provide audio narrations or video that contains speech, provide captions for those users who cannot hear.
You can use text fields in Flash Professional, import video that contains captions, or even use an XML caption file. You
can use video cue points to specify when a text field should update text information at runtime.
For information on using Hi-Caption SE and the Hi-Caption Viewer component, see
www.adobe.com/go/flash_extensions. This third-party extension lets you create captions that you save in an XML file
and load into the SWF file at runtime, among other advanced controls. Alternatively, you can use cue points and a text
field to display caption information.
Accessibility and extending Flash
With the extensibility layer in Flash Professional, developers can create extensions that enable advanced authoring. This
lets third-party companies develop extensions that involve accessibility. You have several options for validating your
SWF files or adding captions.
For example, a validation tool can examine your SWF file for missing descriptions. It checks to see if a description is
added for a group of instances, or if text has a label for the instance, and tells you about any problems. The tool also
examines the reading order in your SWF file, and finds all instances that must be specified. You can specify reading
order by using a dialog box after the SWF file is analyzed.
Last updated 6/12/2015
Page 85

Platforms
For information on the currently available third-party extensions, see www.adobe.com/go/flash_extensions.
Testing files and making changes
Test a ny S WF fi le th at is int end ed fo r us e w ith scre en r eade rs. Test you r SWF fi les when each new v ers ion o f Fl ash P lay er
is released, including minor revisions, and test it with the following scenarios:
• Using the Window Eyes and JAWS for Windows screen readers. These each handle SWF files differently, so you
could get different results.
• In a browser without a screen reader, and navigate through your site without using the mouse.
• Turn off your monitor and use only the screen reader to navigate your website.
• If you use audio narration, test your site without speakers.
• With several users who are representative of your target web site visitors.
Note: You do not have to test different browsers, because the technology used to expose SWF files to screen readers (MSAA)
is supported only by Internet Explorer on Windows.
When listening to your SWF file using a screen reader, check the following points:
• Is the reading order correct?
• Do you have descriptions for shortcuts in your SWF file?
• Do you have adequate and complete descriptions for the elements in the interface?
80
• Do you have adequate descriptions for navigating the site’s structure?
• Is the SWF file content read when it is updated or refreshed?
• If you change the context of any elements on the Stage (such as a button that changes from Play to Pause), is that
change announced by the screen reader?
No official tool is available for validating SWF files, unlike HTML validation. However, some third-party tools exist
to help you validate the file. For more information on these extensions, see
www.adobe.com/go/flash_extensions.
More Help topics
Creating accessibility with ActionScript
Using Flash to enter accessibility information for screen readers
Creating accessibility with ActionScript
Accessibility for hearing-impaired users
Accessibility in the Flash workspace
The Adobe Flash Professional workspace is keyboard-accessible for users who may have difficulty using a mouse.
Note: Complete, updated Help is on the web. The application did not detect an Internet connection. For a complete version
of this topic, click the link below or search complete
Flash Professional Help.
The Adobe Flash Professional workspace is keyboard-accessible for users who may have difficulty using a mouse.
See the discussion of Flash Professional workspace accessibility in Help on the web to learn about navigating the user
interface without a mouse.
Last updated 6/12/2015
Page 86

Platforms
About accessibility support
Accessibility support in the authoring environment provides keyboard shortcuts for navigating and using interface
controls, including panels, the Property inspector, dialog boxes, the Stage, and objects on the Stage, so that you can
work with these interface elements without using the mouse.
Note: Certain keyboard controls and authoring environment accessibility features are available only in Windows.
To customize the keyboard shortcuts for accessibility in the authoring environment, use the Workspace Accessibility
Commands section of the Keyboard Shortcuts dialog box.
• To hide all panels and the Property inspector, press F4. To display all panels and the Property inspector, press F4
again.
Select controls in a panel using keyboard shortcuts
To move the focus through the panel controls when a panel or the Property inspector has the current focus, use the Tab
key. To activate a menu that has the current focus, use the Spacebar (that is, pressing Spacebar is equivalent to clicking
the menu in the panel). Flash Pro does not support moving from panel to panel with the Tab key.
When you use the keyboard shortcut for panel controls, focus is applied to a control and the control is activated using
the following criteria:
81
• To select a control in the panel with the Tab key, the panel with the current focus must be expanded. If the panel is
collapsed, pressing Tab has no effect.
• To display the Panel menu items when the Panel menu has the focus, press the Space bar.
• You can move the focus to a panel control only if the control is active. If a control is dimmed (inactive), you cannot
apply focus to the control.
Move the focus through the items in the Panel menu of a panel
1 To display the Panel menu items when the focus currently applied to the Panel menu, press the Spacebar.
2 To move through the items in the Panel menu, press Down Arrow.
3 To activate the currently selected Panel menu item, press Enter (Windows) or Return (Macintosh).
Move the focus through the controls in a panel
1 Press Tab when the focus is currently applied to the Panel menu. To move the focus through the controls in the
panel, press Tab repeatedly.
2 To activate the currently selected menu in a panel , press Enter or Return.
3 To edit a numerical Hot Text value, type the number and press Enter or Return.
Navigate dialog box controls using keyboard shortcuts
• To move through the controls in the dialog box, press Tab.
• To move through the controls within one section of a dialog box, press Up Arrow and Down Arrow.
• To activate the button (equivalent to clicking the button), when the focus is applied to a dialog box control button,
press Enter.
• To apply the current settings and close the dialog box (equivalent to clicking OK), when the focus is not applied to
any dialog box control button, press Enter.
• To close the dialog box without applying the changes (equivalent to clicking Cancel), press Escape.
Last updated 6/12/2015
Page 87

Platforms
• To view the Help content for the dialog box (equivalent to clicking Help), when the focus is applied to the Help
button, press Enter or Spacebar.
Select the Stage or objects on the Stage using keyboard shortcuts
Selecting the Stage with a keyboard shortcut is equivalent to clicking on the Stage.
After the Stage is selected, use the Tab key to navigate through all objects on all layers, one at a time. You can select
instances (including graphic symbols, buttons, movie clips, bitmaps, videos, or sounds), groups, or boxes. You cannot
select shapes (such as rectangles) unless those shapes are instances of symbols. You cannot select more than one object
at a time using keyboard shortcuts.
To select objects on the Stage, use the following techniques:
• To select an object on the Stage, with the Stage selected, press Tab.
• To select the previous object when an object is currently selected, press Shift+Tab.
• To select the first object that was created on the active frame in the active layer, press Tab. When the last object on
the top layer is selected, press Tab to move to the next layer beneath it and select the first object there, and so on.
• When the last object on the last layer is selected, press Tab to move to the next frame and select the first object on
the top layer there.
• Objects on layers that are hidden or locked cannot be selected with the Tab key.
82
Note: If you are currently typing text in a box, you cannot select an object using the keyboard focus. You must first press
the Escape key and then select an object.
Navigate tree structures using keyboard shortcuts
To navi gate tree structures, the hierarchical displays of file structures in certain Flash Professional panels, use keyboard
shortcuts.
• To expand a collapsed folder, select the folder and press Right Arrow.
• To collapse an expanded folder, select the folder and press Left Arrow.
• To move to the parent folder of an expanded folder, press Left Arrow.
• To move to the child folder of an expanded folder, press Right Arrow.
Work with library items using keyboard shortcuts
1 To copy or paste a selected library item, press Control+X (Windows) or Command+X (Macintosh) to cut the item,
or press Control+C (Windows) or Command+C (Macintosh) to copy the item.
2 To paste a cut or copied item, click the Stage or in another library to set the insertion point, and press Control+V
(Windows) or Command+V (Macintosh) to paste in the center of the Stage; or press Control+Shift+V (Windows)
or Command+Shift+V (Macintosh) to paste in place (in the same location as the original).
To cut, copy, and paste items, use the following techniques:
• Cut or copy one item or multiple items.
• Cut or copy an item from the Library panel and paste it onto the Stage or into another library, or paste a folder
into another library.
• You cannot paste a shape from the Stage into the library.
Last updated 6/12/2015
Page 88

Platforms
• You cannot paste a library item into a common library, because common libraries cannot be modified. However,
you can create a common library.
• When you paste a library item onto the Stage, the item is centered.
• If you paste a folder, each item in the folder is included.
• To paste a library item into a folder in the destination library, click the folder before pasting.
• You can paste a library item into a different location in the same library where it originated.
• If you attempt to paste a library item into a location containing another item by the same name, select whether
to replace the existing item.
More Help topics
Accessibility in the Flash workspace
Flash Professional Keyboard Shortcuts
(Deprecated with Flash Professional CC) Work with common libraries
Debugging ActionScript 3.0
83
About the ActionScript 3.0 debugger
Additional resources
The following resources provide additional detailed information about debugging ActionScript 3.0:
• Article: Understanding ActionScript 3 debugging in Flash (Adobe.com)
• Article: Introducing the ActionScript 3 debugger (Adobe.com)
• Vi de o: Mobile device debugging via USB (Adobe.com)
Enter debugging mode
The way you begin a debugging session depends on the type of file you are working on. During a debugging session,
Flash interrupts the execution of ActionScript when it encounters a breakpoint or a runtime error.
When Flash Pro initiates a debug session, it adds special information to the SWF file that it exports for the session. This
information allows the debugger to provide the specific line numbers in the code where errors are encountered.
You can include this special debugging information in all SWF files created from a specific FLA file in the Publish
settings. This allows you to debug the SWF file even if you do not explicitly initiate a debug session. This debugging
information makes the SWF file slightly larger.
Choose a default debugging environment
• Choose Debug > Debug Movie and then choose one of the following:
• Flash Professional
• AIR Debug Launcher (Desktop)
• AIR Debug Launcher (Mobile)
Last updated 6/12/2015
Page 89

Platforms
• on Device via USB (CS5.5 only)
All debug sessions will take place in the environment you choose. You can change the default environment at any
time.
Start debugging from a FLA file
❖ Select Debug > Debug
(Flash Professional CS6 and earlier) Select Debug > Debug Movie > Debug.
Start debugging from an ActionScript 3.0 AS file
1 With the ActionScript file open in the Script window, select the FLA file that the ActionScript file should be
compiled with from the Target menu at the top of the Script window. The FLA file must also be open in Flash to
appear in this menu.
2 Select Debug > Debug
(Flash Professional CS6 and earlier) Select Debug > Debug Movie > Debug.
Add debugging information to all SWF files created from a FLA file
1 With the FLA file open, select File > Publish Settings.
2 In the Publish Settings dialog box, click the Flash tab (CS5) or Flash category (CS5.5).
84
3 Select Permit Debugging.
Exit debugging mode
❖ Click the End Debug Session button in the Debug Console.
Set and remove breakpoints
Add breakpoints to ActionScript code to interrupt the execution of the code. After execution is interrupted, you can
step through and execute the code line by line, view different sections of your ActionScript, view the values of variables
and expressions, and edit variable values.
Note: Breakpoints cannot be added to ASC (ActionScript for Communication) or JSFL (Flash JavaScript) files.
Set a breakpoint
❖ In the Ac tions pan el or S cript w ind ow, cl ick in t he l eft mar gin nex t to the li ne o f co de w her e you w ant th e brea kpo int
to appear.
Remove a breakpoint
❖ In the Actions panel or Script window, click on the breakpoint to remove.
Step through lines of code
After the ActionScript execution is interrupted at a breakpoint or runtime error, you can step through the code line by
line. You may choose to step into function calls or step over them. You can also choose to continue executing the code
without stepping.
Step into code line by line
❖ Click the Step In button in the Debug Console.
Step over a function call
❖ Click the Step Over button in the Debug Console.
Last updated 6/12/2015
Page 90

Platforms
Step out of a function call
❖ Click the Step Out button in the Debug Console.
Resume normal code execution
❖ Click the Continue button in the Debug Console.
Display and examine scripts in the call stack
When code execution stops in the debugger, you can view the call stack in the Debug Console and display the scripts
containing the functions in the call stack. The call stack shows the current list of nested function calls that are waiting
to complete execution.
You can view the individual scripts that contain each function.
❖ In the Debug Console panel, double click the name of the script in the call stack.
Display and modify variable values
View and edit the values of variables and properties in the Variables panel.
View a variable value
85
1 In the Variables panel, select the types of variables to display from the Panel menu.
• Show Constants displays the values constants (variables having a fixed value).
• Show Statics displays variables that belong to the class, rather than to instances of the class.
• Show Inaccessible Member Variables displays variables that are not accessible to other classes or namespaces.
This includes variables that are protected, private or internal to the namespace.
• Show Additional Hexadecimal Display adds hexadecimal values wherever decimal values are displayed. This is
mainly useful for color values. Hexadecimal values are not displayed for decimal values from 0 through 9.
• Show Qualified Names displays variables types with both the package name and the class name.
2 Expand the tree view of the object structure of the FLA until you see the variable to view.
Edit the value of a variable
1 In the Variables panel, double click on the value of the variable.
2 Enter the new value for the variable and press Enter. The new value is used during subsequent code execution.
Control compiler warnings
Control the types of compiler warnings that the ActionScript compiler generates in the Compiler Errors panel. When
the compiler reports an error, double-click the error to navigate to the line of code that caused the error.
1 Select File > Publish Settings.
2 Click Flash.
3 Click the ActionScript Settings button.
4 Select among the Errors options:
• Strict Mode reports warnings as errors, which means that compilation will not succeed if those errors exist.
• Warnings Mode reports extra warnings that are useful for discovering incompatibilities when updating
ActionScript 2.0 code to ActionScript 3.0.
Last updated 6/12/2015
Page 91

Platforms
Navigate to errors in code
When Flash encounters an error in ActionScript code, either during compiling or execution, it reports the error in the
Compiler Errors panel. Navigate to the line of code that caused the error from the Compiler Errors panel.
❖ Double click the error in the Compiler Errors panel.
Debug a remote ActionScript 3.0 SWF file
With ActionScript 3.0, you can debug a remote SWF file by using the stand-alone, ActiveX, or plug-in version of the
Debug Flash Player, which you can find in the Flash install directory/Players/Debug/ directory. However, in the
ActionScript 3.0 Debugger, remote debugging is limited to files located on the same localhost as the Flash authoring
application, being played in the stand-alone debug player, ActiveX control, or plugin.
To permit remote debugging of the file, enable debugging in the Publish settings. You can also publish your file with a
debugging password to ensure that only trusted users can debug it.
As in JavaScript or HTML, users can view client-side variables in ActionScript. To store variables securely, send them
to a server-side application instead of storing them in your file. However, as a developer, you may have other trade
secrets, such as movie clip structures, that you do not want to reveal. You can use a debugging password to protect your
work.
Enable remote debugging of a SWF file and set a debugging password
86
In Ac tionS cript 3 .0 F LA f iles , co de i n frame scr ipts cann ot b e de bugge d. O nly cod e in ext ern al AS files can be debu gge d
with the ActionScript 3.0 Debugger.
1 Open the FLA file.
2 Select File > Publish Settings.
3 In the Publish Settings dialog box, click the Flash tab (CS5) or Flash category (CS5.5), and then select Permit
Debugging.
4 Close the Publish Settings dialog box, and select one of the following commands:
• File > Export > Export Movie
• File > Publish
5 Leave the SWF file on the local machine to perform a remote debug session on the localhost, or upload it to your
web server.
The SWF file contains no breakpoint information, so if you upload the file to a remote server you will not be able to
step through code. Use the localhost to perform this task.
6 In Flash, select Debug > Begin Remote Debug Session > ActionScript 3.0.
Flash opens the ActionScript 3.0 Debugger and waits for a debug Flash Player to connect. You have 2 minutes to
start the debug Flash Player. If more than 2 minutes elapse, repeat this step.
7 Open the SWF file in the debug version of the Flash Player plugin, ActiveX control, or stand-alone player. The debug
stand-alone player is located in the Flash install directory/Players/Debug/ directory. Do not connect to a file on
another machine, as debugger will not be able to receive any breakpoint information.
The debug session begins when the debug player connects to the Flash ActionScript 3.0 Debugger panel.
Note: Remote debugging does not function if you select the Default Network Interface for AIR 3.4. Instead, select the
options to provide Network Interface name and IP Address of the system.
Last updated 6/12/2015
Page 92

Platforms
Activate the Debugger from a remote location
1 Open the Flash authoring application if it is not already open.
2 Select Debug > Begin Remote Debug Session > ActionScript 3.0.
3 In a browser or in the debugger version of the stand-alone player, open the published SWF file from the remote
location.
If the Remote Debug dialog box does not appear, right-click (Windows) or Control-click (Macintosh) in the SWF
file to display the context menu, and select Debugger.
4 In the Remote Debug dialog box, select Localhost and select the file to open.
The display list of the SWF file appears in the Debugger. If the SWF file doesn’t play, the Debugger might be paused,
so click Continue to start it.
Writing and managing scripts
87
Format code
Your code can be formatted and indented automatically when typing. If you use dynamic font mapping, you ensure that
the correct fonts are used for multilingual text.
(Deprecated with Flash Professional CC) Set Auto Format options
1 Do one of the following:
• From the panel menu (at the upper-right corner of the Actions panel), select Preferences.
• In the Script window, select Edit > Preferences (Windows) or Flash > Preferences (Macintosh).
2 In the Preferences dialog box, select Auto Format.
3 Select any of the Auto Format options.
After you set Auto Format options, your settings are applied automatically to the code you write, but not to existing
code; you must apply your settings to existing code manually.
(Deprecated with Flash Professional CC) Format code according to Auto Format settings
• Click Auto Format in the Actions panel or Script window toolbar.
• From the panel menu (at the upper-right corner of the Actions panel), select Auto Format.
• Press Control+Shift+F (Windows) or Command+Shift+F (Macintosh).
• In the Script window, select Tools > Auto Format.
(Deprecated with Flash Professional CC) Use dynamic font mapping
❖ To turn dynamic font mapping on or off, select or deselect Use Dynamic Font Mapping in the Preferences dialog
box.
Dynamic font mapping is turned off by default because it increases performance time when you are scripting. If you
are working with multilingual text, turn on dynamic font mapping because it helps to ensure that the correct fonts
are used.
Last updated 6/12/2015
Page 93

Platforms
Use automatic indentation
❖ To turn automatic indentation on or off, select or deselect Automatic Indentation in the Preferences dialog box.
When automatic indentation is turned on, the text you type after an opening parenthesis “(“ or opening curly brace
“{“ is automatically indented according to the Tab Size setting in ActionScript preferences.
In your scripts, you can indent a line by selecting it and pressing Tab. To remove the indent, select the line and press
Shift+Tab.
Comment sections of code
Code comments are parts of code that the ActionScript compiler ignores. A comment lines explains what your code is
doing, or temporarily deactivates code that you don’t want to delete. Comment a line of code by beginning it with a
double slash (//). The compiler ignores all text on that line after the double slash. You can also comment larger blocks
of code by placing a slash and asterisk (/*) at the beginning of the block and an asterisk and slash (*/) at the end of the
block.
You can type these comment markers manually, or you can use buttons at the top of the Actions panel or Script window
to add them.
Comment a line of code
1 Place the insertion point at the beginning of the line or at the character where you want the comment to begin.
2 Right-click and select Comment. You can also use the keyboard shortcuts Ctrl + M (Windows) or Command + M
or go to Edit > Comment Selection.
A double slash (//) is placed at the insertion point.
88
Comment multiple lines of code
1 Select the lines to comment. (The first and last lines of the selection can be partial lines.)
2 Right-click and select Comment. You can also use the keyboard shortcuts Ctrl + M (Windows) or Command + M
or go to Edit > Comment Selection.
Block comment characters are placed at the beginning (/*) and end (*/) of the selection.
Note: If there are comments in between the selected lines of text, a line comment will be applied on all selected lines.
Remove a comment
1 Place the insertion point in the line that contains the comment, or select the block of code that is commented.
2 Right-click and select Uncomment. You can also use the keyboard shortcuts Ctrl + Shift + M (Windows) or
Command + Shift + M or go to Edit > Uncomment Selection.
Use syntax coloring
In ActionScript, as in any language, syntax is the way elements are put together to create meaning. If you use incorrect
ActionScript syntax, your scripts cannot work.
To highlight syntax errors, set a color-code for parts of your scripts. For example, suppose you set the syntax coloring
preference to make keywords appear in blue. When you type var, the word var appears in blue. However, if you
mistakenly type vae, the word vae remains black, which shows that you made a typing error.
Last updated 6/12/2015
Page 94

Platforms
Do one of the following:
• Select Edit > Preferences (Windows) or Flash > Preferences (Macintosh), click Code Editor in the Category list, and
specify Syntax Coloring settings.
• With the insertion point in the Script pane, press Control-U (Windows) or Command-U (Macintosh).
Note: When you write scripts in the Actions panel, commands that are not supported by the version of the player you are
targeting appear in yellow in the Actions toolbox. For example, if the Flash Player SWF file version is set to Flash 7,
ActionScript that only Flash Player 8 supports appears in yellow in the Actions toolbox.
Using the identifier and keyword list at runtime
On launching FlashPro, the identifier and keyword lists are read from the resource file and cached. Apart from reading
the default lists from the resource, it also scans for additional keywords and identifier list in the Preference folder. It is
possible for you to add additional keywords and identifiers by adding ".txt files" in following folders:
• C:\Users\<Username>[AppData]\Roaming\Adobe\Flash Pro\13.0[ActionscriptKeywords]\
• C:\Users\<UserName>[AppData]\Roaming\Adobe\Flash Pro\13.0[ActionscriptIdentifiers]\
• C:\Users\<UserName>[AppData]\Roaming\Adobe\Flash Pro\13.0[JavascriptKeywords]\
• C:\Users\<UserName>[AppData]\Roaming\Adobe\Flash Pro\13.0[JavascriptIdentifiers]\
89
Use line numbers and word wrap
When you edit or modify code, line numbers make code easier to scroll and parse. Word wrap helps you avoid
horizontally scrolling long lines of code (especially when you work in the authoring environment, or at low screen
resolutions).
Enable or disable line numbers
• In the Script window, select View > Line Numbers.
• Press Control+Shift+L (Windows) or Command+Shift+L (Macintosh).
Highlight a specific line
• In the Script window, select Edit > Go To Line.
Enable or disable line word wrap
• In the Script window, select View > Word Wrap.
• Press Control+Shift+W (Windows) or Command+Shift+W (Macintosh).
Display hidden characters
Characters such as spaces, tabs, and line breaks are hidden in ActionScript code. You may need to display these
characters; for example, you must find and remove double-byte spaces that are not part of a string value, because they
cause compiler errors.
• Press Control+Shift+8 (Windows) or Command+Shift+8 (Macintosh).
The following symbols are used to display hidden characters.
Last updated 6/12/2015
Page 95

Platforms
Hidden character Symbol
Single-byte space .
Double-byte space l
Tab >>
line break
Find text in a script
The Find tool lets you find and replace text strings in your scripts.
Note: To search through text in every script in a Flash document, use the Movie Explorer.
Find text
1 In the Actions panel or Script window, click Find or press Control+F (Windows) or Command+F (Macintosh).
2 Enter the search string.
3 Click Find Next.
90
Find and replace text in a script
1 In the Actions panel or Script window, click Find or press Control+F (Windows) or Command+F (Macintosh).
2 Enter the search string.
3 In the Replace box, enter the new string.
4 Click Find Next.
5 To replace the string, click Replace; to replace all occurrences of the string, click Replace All.
(Deprecated with Flash Professional CC) Repeat a search in the Actions panel
❖ From the panel menu (at the upper-right corner of the Actions panel), select Find Again.
(Deprecated with Flash Professional CC) Repeat a search in the Script window
❖ Select Edit > Find Again.
(Deprecated with Flash Professional CC) Check syntax and punctuation
You can do a quick check of your ActionScript code without publishing the FLA file.
When you check syntax, the current script is checked. If the current script calls ActionScript classes, those classes are
also checked. Other scripts that might be in the FLA file are not checked.
For ActionScript 2.0 files, Check Syntax runs the code through the compiler, generating syntax and compiler errors.
For ActionScript 3.0 files, Check Syntax generates only syntax errors. To generate compiler errors, such as type
mismatches, improper return values, and variable or method name misspellings, you must use the Control > Test
command.
Last updated 6/12/2015
Page 96

Platforms
Check syntax
To check syntax, do one of the following:
• In the Actions panel or Script window, click Check Syntax .
• Click in the Script pane, and then press Control+T (Windows) or Command+T (Macintosh). Clicking or typing in
the Script pane gives it the focus. If an object on the Stage has the focus, the Transform panel opens instead.
Syntax errors are listed in the Compiler Errors panel.
Note: In an external ActionScript class file in the Script window, the global classpath (AS2) or source path (AS3) affects the
syntax check. Even if the global classpath or source path is set correctly, you might generate errors, because the compiler is
not aware that this class is being compiled.
Check for punctuation balance
1 Click between braces {}, brackets [], or parentheses () in your script.
2 In Windows, press Control+' (single quote); on the Macintosh, press Command+' (single quote). The text between
braces, brackets, or parentheses is highlighted, and you can check that opening punctuation has corresponding
closing punctuation.
(Deprecated with Flash Professional CC) Import and export scripts
You can import a script into the Actions panel or Script window. You can also export your scripts from the Actions
panel to external ActionScript files. (When you use the Script window, exporting is unnecessary because you can
instead save the AS file.)
91
If text in your scripts doesn’t look as expected when you open or import a file, change the import encoding preference.
Import an external AS file
1 In the Script pane, place the insertion point where you want to locate the first line of the external script.
2 Do one of the following:
• In the Actions panel, select Import Script from the panel menu, or press Control+Shift+I (Windows) or
Command+Shift+I (Macintosh).
• In the Script window, select File > Import Script or press Control+Shift+I (Windows) or Command+Shift+I
(Macintosh).
Export a script from the Actions panel
1 Select the script to export. Then select Export Script from the Actions Panel menu, or press Control+Shift+X
(Windows) or Command+Shift+X (Macintosh).
2 Save the ActionScript (AS) file.
Set text encoding options
1 Select Edit > Preferences (Windows) or Flash > Preferences (Macintosh), and select ActionScript in the Category
list.
2 Set any of these options:
Open/Import Select UTF-8 Encoding to open or import using Unicode encoding, or select Default Encoding to
open or import using the encoding form of the language currently used by your system.
Last updated 6/12/2015
Page 97

Platforms
Save/Export Select UTF-8 Encoding to save or export using Unicode encoding, or select Default Encoding to save
or export using the encoding form of the language currently used by your system.
Turn the export encoding warning off or on
1 Select Edit > Preferences (Windows) or Flash > Preferences (Macintosh), and select Warnings in the Category list.
2 Select or deselect Warn On Encoding Conflicts When Exporting ActionScript Files.
(Deprecated with Flash Professional CC) Encoding for imported and exported scripts
You can set ActionScript preferences to specify the type of encoding to use in imported or exported ActionScript files.
UTF-8 Encoding is 8-bit Unicode format, which lets you include text in multiple languages in your file; Default
En codi ng is the e ncod ing s upp orte d by the l ang uage you r sys tem i s cur ren tly u sin g, al so cal le d th e traditional code page.
Note: When you use a non-English application on an English system, the Test Movie command fails if any part of the SWF
file path has characters that cannot be represented by using the Multibyte Character Sets (MBCS) encoding scheme. For
example, Japanese paths, which work on a Japanese system, won’t work on an English system. Be sure to use English-only
path names on English systems. All areas of the application that use the Test Movie player are subject to this limitation.
92
(Deprecated with Flash Professional CC) Pin scripts in the Actions panel
If you don’t organize the code within your FLA file into one central location, or if you’re using behaviors, you can pin
individual scripts in the Actions panel to move among them more easily. To pin a script means that you can keep the
lo cation of the co de open i n the Actions panel, and easi ly click be tween op en scr ipts . This can b e espe cially usef ul when
debugging.
In the following figure, the script associated with the current location on the timeline is on Frame 1 of the layer named
Cleanup. (The tab at the far left always follows your location along the timeline.) That script is also pinned (it is shown
as the rightmost tab). Two other scripts are pinned: one on Frame 1 and the other on Frame 15 of the layer named Intro.
You can move among the pinned scripts by clicking the tabs or by using keyboard shortcuts. Moving among pinned
scripts does not change your current position on the timeline.
If the content in the Script pane doesn’t change to reflect the location you select on the timeline, the Script pane is
probably showing a pinned script. Click the tab at the lower left of the Script pane to show the script associated with
your location along the timeline.
Pin a script
1 Click the Timeline so the script appears in a tab at the lower left of the Script pane in the Actions panel.
2 Do one of the following:
• Click the Pushpin icon to the right of the tab.
• Right-click (Windows) or Control-click (Macintosh) the tab, and select Pin Script.
• From the panel menu (at the upper-right corner of the Actions panel), select Pin Script.
Last updated 6/12/2015
Page 98

Platforms
Unpin a script
• If a pinned script appears in a tab at the lower left of the Script pane in the Actions panel, click the Pushpin icon on
the right of the tab.
• Right-click (Windows) or Control-click (Macintosh) a tab, and select Close Script or Close All Scripts.
• From the panel menu (at the upper-right corner of the Actions panel), select Close Script or Close All Scripts.
Keyboard shortcuts for pinned scripts
When the insertion point is in the Script pane, use the following keyboard shortcuts to work with pinned scripts.
Action Windows shortcut key Macintosh shortcut key
Pin script Control+= (equal sign) Command+=
Unpin script Control+- (minus sign) Command+-
Move focus to tab on the right Control+Shift+. (period) Command+Shift+.
Move focus to tab on the left Control+Shift+, (comma) Command+Shift+,
Unpin all scripts Control+Shift+- (minus sign) Command+Shift+-
93
Insert target paths
Many script actions are meant to affect movie clips, buttons, and other symbol instances. In your code, you can
reference symbol instances on a timeline by inserting a target path—the address of the instance you want to target. You
can set either an absolute or relative target path. An absolute path contains the entire address of the instance. A relative
path contains only the part of the address that is different from the address of the script itself in the FLA file, and will
no longer work if the script is moved to another location.
1 In the Actions panel, click an action in your script.
2 Click Target Path .
3 Enter the path to the target instance, or select the target from the list.
4 Select either the Absolute or Relative path option.
Use code hints
When you work in the Actions panel or Script window, the software can detect what action you are entering and display
a code hint. There are two types of code hint: a tooltip that contains the complete syntax for that action, and a pop-up
menu that lists possible ActionScript elements, such as method or property names (sometimes referred to as a form of
code completion).
Code hints are enabled by default. By setting preferences, you can disable code hints or determine how quickly they
appear. When code hints are disabled in preferences, you can still manually display a code hint for a specific command.
Note: If you cannot display code hints for a variable or object you created in ActionScript 2.0, but code hints are enabled
in ActionScript preferences, make sure you named your variable or object with the proper suffix or that you used strict
typing for your variable or object.
Enabling code hinting
You can trigger code hints in various ways.
Strict typing for objects
Last updated 6/12/2015
Page 99

Platforms
Wh en you u se Act ion Sc rip t 2. 0 and use s tric t t ypi ng f or a v aria ble that is b as ed o n a bu ilt -in c lass (suc h as Butt on, Array,
and so on), the Script pane displays code hints for the variable. For example, suppose you enter the following two lines
of code:
var foo:Array = new Array();
foo.
As soon as you enter the period (.), Flash displays a list of methods and properties available for Array objects in a popup menu, because you typed the variable as an array.
Suffixes and code hints
If you use ActionScript 1.0 or you want to display code hints for objects without strictly typing them, add a suffix to the
name of each object when you create it. For example, the suffix that triggers code hinting for the Camera class is _cam.
Suppose you type the following code: var my_array = new Array(); var my_cam = Camera.get();
If you then enter my_cam followed by a period, code hints for the Camera object appear.
For objects that appear on the Stage, use the suffix in the Instance Name box in the Property inspector. For example, to
display code hints for MovieClip objects, use the Property inspector to assign instance names with the _mc suffix to all
MovieClip objects. Then, whenever you type the instance name followed by a period, code hints appear.
var my_array = new Array();
var my_cam = Camera.get();
94
Although suffixes are not required for triggering code hints when you use strict typing for an object, using suffixes
consistently helps make your code understandable.
The following table lists the suffixes that trigger code hints in ActionScript 2.0:
Object type Variable suffix
Array _array
Button _btn
Camera _cam
Color _color
ContextMenu _cm
ContextMenuItem _cmi
Date _date
Error _err
LoadVars _lv
LocalConnection _lc
Microphone _mic
MovieClip _mc
MovieClipLoader _mcl
PrintJob _pj
NetConnection _nc
NetStream _ns
SharedObject _so
Last updated 6/12/2015
Page 100

Platforms
Object type Variable suffix
Sound _sound
String _str
Tex t Fie ld _txt
TextFormat _fmt
Video _video
XML _xml
XMLNode _xmlnode
XMLSocket _xmlsocket
Comments and code hints
You can also use ActionScript comments to specify an object’s class for code hints. In the following example, a comment
tells ActionScript that the class of the theObject instance is Object, and so on.
// Object theObject;// Array theArray;// MovieClip theMC;
If you subsequently enter theMC followed by a period, code hints that display the list of MovieClip methods and
properties appear. If you enter theArray followed by a period, code hints that display the list of Array methods and
properties appear, and so on.
95
Instead of this technique, however, Adobe recommends that you use strict data typing or suffixes, because these
techniques enable code hints automatically and make your code more understandable.
Specify preference settings for automatic code hints
• In the Actions panel or Script window, select Edit > Preferences (Windows) or Flash > Preferences (Macintosh), click
Code Editor in the Category list, and then enable or disable Code Hints.
(Deprecated with Flash Professional CC) Specify a delay for code hints
1 In the Actions panel or Script window, select Edit > Preferences (Windows) or Flash > Preferences (Macintosh).
2 Click ActionScript in the Category list.
3 Use the slider to select an amount of delay, in seconds.
Use tooltip-style code hints
1 Display the code hint by typing an opening parenthesis “(“ after an element that requires parentheses (for example,
after a method name, a command such as if or do..while, and so on).
2 Enter a value for the parameter.
For multiple parameters, separate the values with commas. For functions or statements, such as the for loop,
separate the parameters with semicolons.
Last updated 6/12/2015
 Loading...