

Page 1

Owner's Guide
®
®
CASCADE
2615 Cart
and 3175
Wall Mount
85.0664.00
Page 2
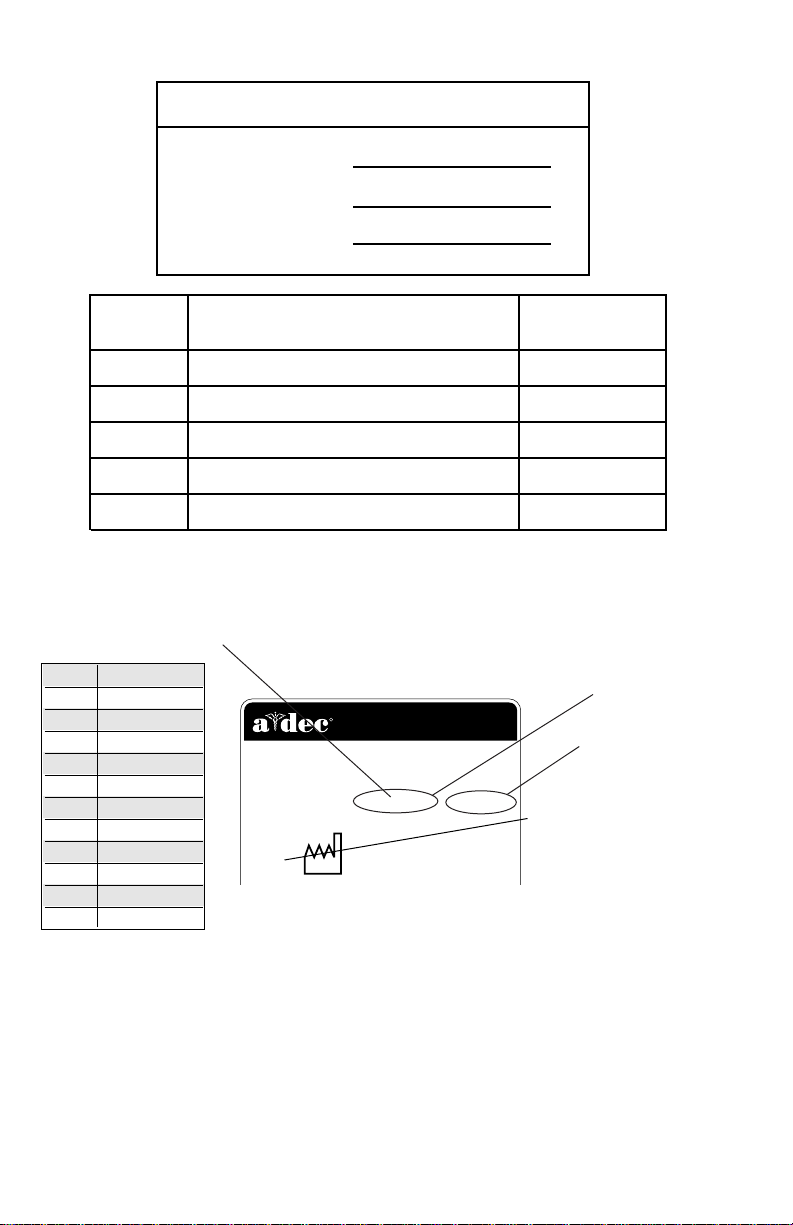
Warranty Information
Serial Number
Model Number
Date Purchased
Date of
Service
Model/Description of Service
Technician's
Initials
R
NEWBERG, OREGON 97132 USA
2601 CRESTVIEW DRIVE
Designated EU Representative: A-dec Dental U.K., Ltd.
Austin House, 11 Liberty Way, Attleborough Fields,
Nuneaton, Warwickshire, England CV116RZ
Tele: (44) 1203-350901
SN: J828287 REF: 2122
1993
ALPHABETICAL
EQUIVALENT TO THE
NUMERAL OF THE MONTH
MANUFACTURED
A January
B February
C March
D April
E May
F June
G July
H August
I September
J October
K November
L December
SERIAL
NUMBER
MODEL
NUMBER
YEAR
MANUFACTURED
SERIAL NUMBER
IDENTIFICATION
Serial Number Location:
• Located on the underside of the assistant’s work surface.
For service information contact your local authorized A-dec dealer.
Check with local codes and A.D.A. (Americans with Disabilities
Act) Requirements for Installation of this product.
Page 3
A-dec warrants its products against defects in material or
®
workmanship for one year from time of delivery (except
for handpieces which have a warranty period of six
months). A-dec’s sole obligation under the warranty is to
provide parts for the repair, or at its option, to provide the
replacement product (excluding labor). The buyer shall
have no other remedy. (All special, incidental, and
coincidental damages are excluded.) Written notice of
breach of warranty must be given to A-dec within the
warranty period. The warranty does not cover damage
resulting from improper installation or maintenance,
accident or misuse. The warranty does not cover damage
resulting from the use of cleaning, disinfecting or
sterilization chemicals and processes. The warranty also
does not cover light bulbs. Failure to follow instructions
provided in A-dec’s Operation and Maintenance
Instructions (Owner’s Guide) may void the warranty.
NO OTHER WARRANTIES AS TO
MERCHANTABILITY OR OTHERWISE ARE MADE
Warranty
All product names used in this document are trademarks or
registered trademarks of their respective holders.
Printed in USA • Copyright © 1999 • All Rights Reserved
Page 4
Cascade 2615 Cart / Cascade 3175 Wall Mount
Cascade 2615 Assistant’s Cart
Cascade 3175 Assistant’s Wall Mount
Page 5

Cascade 2615 Cart / Cascade 3175 Wall Mount
Serial Number Location, Service Information,
and Warranty Information are located on the
inside front cover and front page.
CONTENTS
About Your Assistant’s Unit ............................. 2
Assistant’s Instrumentation ............................. 3
Autoclavable HVE &
Autoclavable Saliva Ejector ................. 3
Solids Collector ........................................... 4
Autoclavable Syringe ................................ 4
Tray Holder (Optional) ........................................ 5
Left/Right Conversion ................................ 5
System Air and Water
Pressure Adjustments ................................. 6
Care Instructions............................................... 6
Wall Mount Adjustments ................................. 6
Leveling ...................................................... 6
Arm Spring Tension ................................... 8
Arm Brake Adjustment............................... 9
Cart Adjustments............................................ 11
Work Surface Height ................................ 11
Wall Mount & Cart Adjustments ................... 12
Left/Right Conversion .............................. 12
Work Surface Leveling ............................. 12
Maintenance................................................... 14
Adjustments and Specifications ..................... 14
Identification of Symbols................................ 16
Classification of Equipment (EN 60601-1)..... 17
1
Page 6
Cascade 2615 Cart / Cascade 3175 Wall Mount
OPERATION
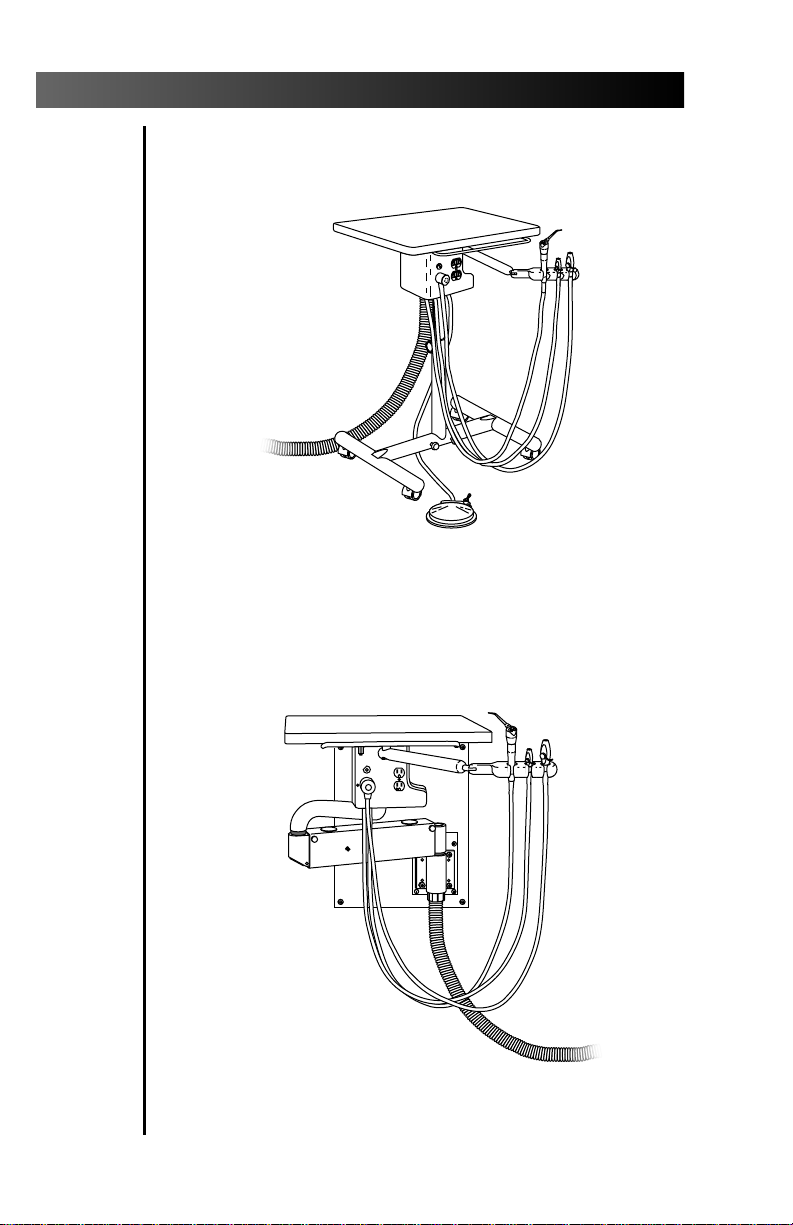
About Your Assistant’s Unit
Your Cascade 2615 Assistant’s Cart or Cascade
3175 Assistant’s Wall Mount is equipped with the
following instrumentation: autoclavable syringe,
autoclavable saliva ejector, and autoclavable HVE
(two HVEs optional). The unit’s post box contains a
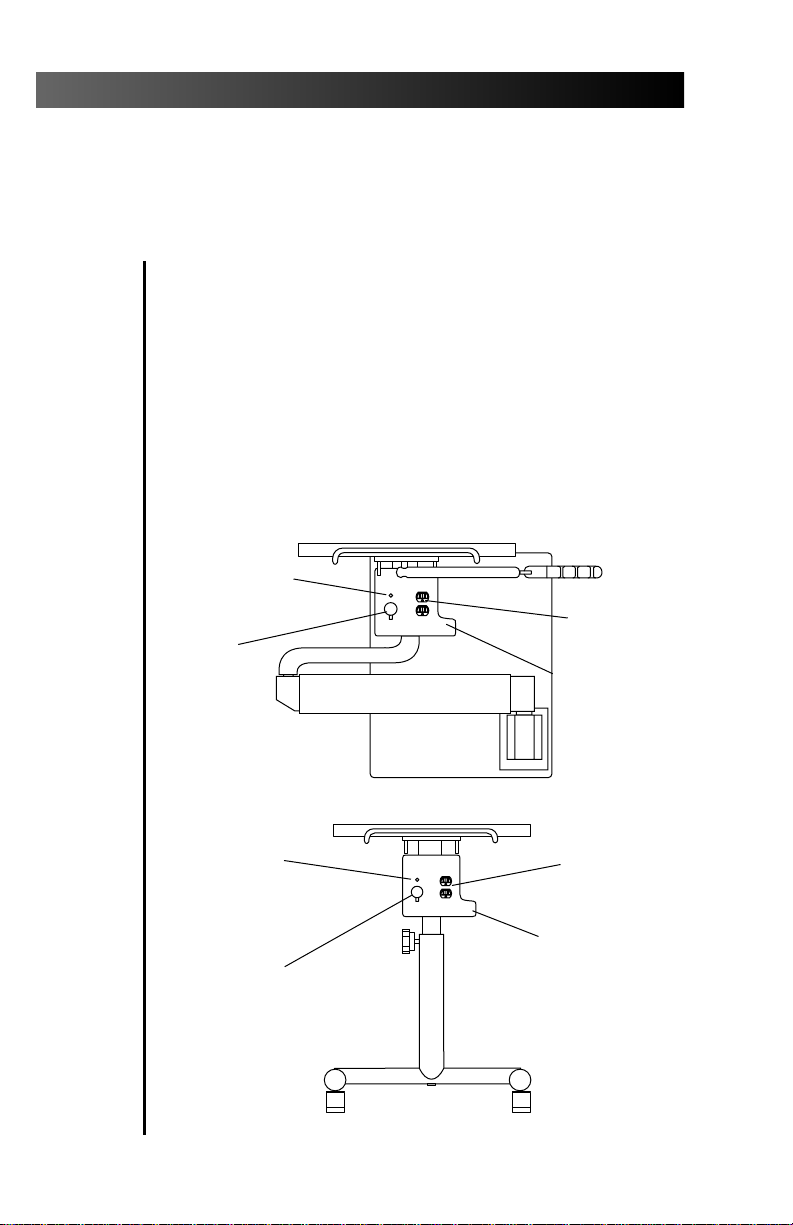
solids collector, a water quick disconnect (QD), and
a power supply duplex (see Figure 1). An optional
tray holder is easily fitted for right-hand or lefthand usage (refer to page 5).
WATER QUICK
DISCONNECT (QD)
SOLIDS
COLLECTOR
POWER
SUPPLY
DUPLEX
POST BOX
WATER QUICK
DISCONNECT (QD)
SOLIDS COLLECTOR
Figure 1. Cart & Wall Mount Post Box
POWER
SUPPLY
DUPLEX
POST BOX
2
Page 7
Cascade 2615 Cart / Cascade 3175 Wall Mount
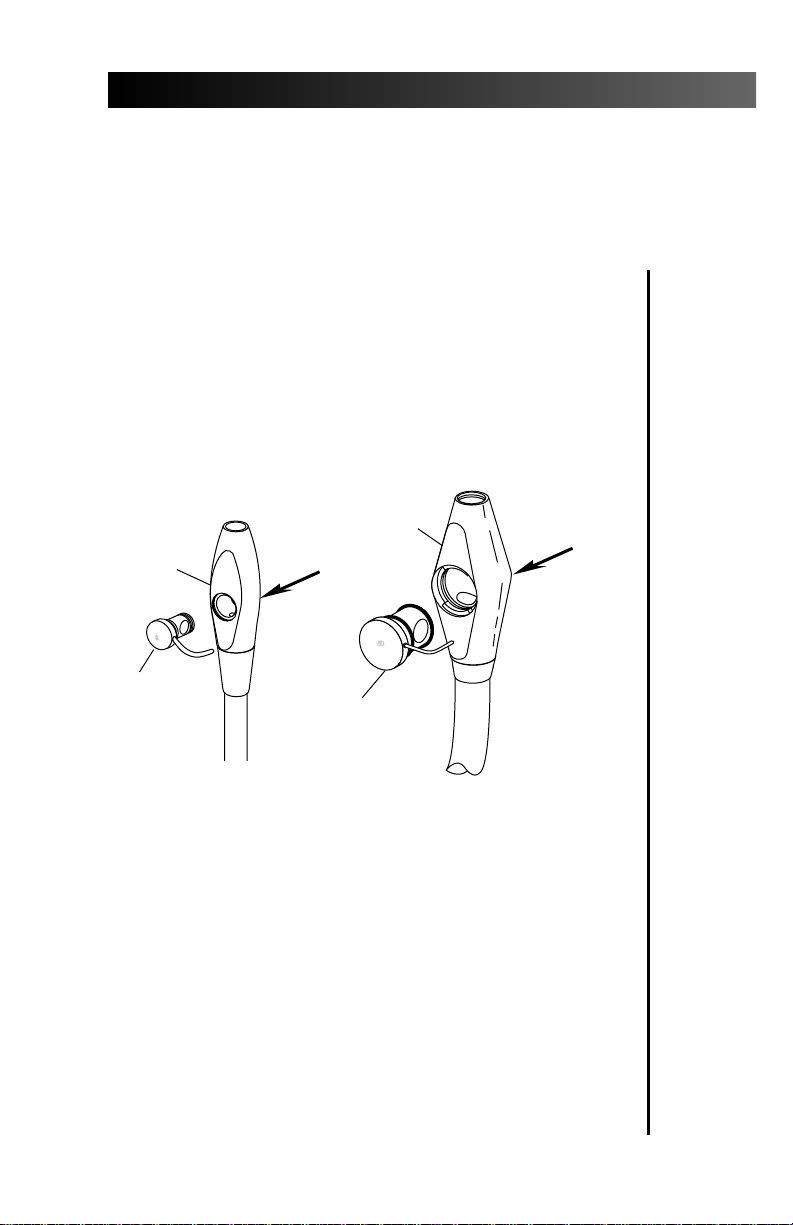
Assistant’s Instrumentation
Autoclavable HVE & Autoclavable Saliva Ejector
To operate the autoclavable HVE and saliva
ejector, simply turn the control valve.
The autoclavable HVE and saliva ejector can be
easily converted for right- or left-hand operation.
To convert, press the control valve out of the valve
body (see Figure 3). Rotate the control valve 180°,
then press it back into the valve body.
VALVE
BODY
VALVE
BODY
CONTROL
VALVE
AUTOCLAVABLE
SALIVA EJECTOR
CONTROL
VALVE
AUTOCLAVABLE HVE
Figure 2. Right- to Left-Hand Conversion
Refer to your Assistant’s Instrumentation
Owner's Guide (A-dec Publication No. 85.2610.00)
for complete instructions on cleaning your HVE
and saliva ejector.
3
Page 8

Cascade 2615 Cart / Cascade 3175 Wall Mount
Solids Collector
The solids collector (see Figure 3) prevents solids
from entering the central vacuum system.
HVE TUBING
ASSEMBLY
Figure 3. Solids Collector
SOLIDS
COLLECTOR
SCREEN
Refer to your Assistant’s Instrumentation
Owner’s Guide (A-dec Publication No. 85.2610.00) for
complete solids collector maintenance instructions.
Autoclavable Syringe
CAP
To operate the syringe (see Figure 4):
• Move the on/off toggle to the ON position.
• Air — Press the right button down.
• Water – Press the left button down.
• Spray – Press both buttons down.
AIR
WATER
SPRAY
Figure 4. Autoclavable Syringe
Refer to your Autoclavable Syringe Owner’s Guide
(A-dec Publication No. 85.0680.00) for complete
syringe operation and maintenance instructions.
4
Page 9

Cascade 2615 Cart / Cascade 3175 Wall Mount
Tray Holder (Optional)
Left/Right Conversion
The optional tray holder can be easily mounted
on either side of the unit’s work surface (see Figure 5).
LEFT-HAND
MOUNTING
LOCATION
TRAY HOLDER
(Shown mounted
for right-hand use.)
WORK SURFACE
(top view)
Figure 5. Tray Holder Left/Right Conversion
1. Remove the plug from the work surface corner
opposite the current tray holder location.
2. Remove the tray holder from the unit’s work
surface and set aside.
3. Remove the brass tray holder bushing from
the work surface by removing the 9⁄16" hex
nut (located on the underside of the unit’s
work surface) that secures the bushing to the
work surface.
4. Lift the brass bushing from its seat and move it
to the opposite side of the unit work surface.
5. Install the 9⁄16" hex nut to the new position
and tighten the hex nut.
6. Install the tray holder into the brass bushing.
7. Place the plug into the open tray holder hole.
5
Page 10

Cascade 2615 Cart / Cascade 3175 Wall Mount
System Air and Water Pressure
For system air and water pressure adjustments,
refer to your Floor Boxes Owner’s Guide(A-dec
Publication No. 85.2611.00).
Care Instructions
For recommended asepsis instructions, refer
to your Equipment Asepsis Owner’s Guide
(A-dec Publication No. 85.0696.00) .
For recommended self-contained water system
care, refer to A-dec Self-contained Water System
Owner’s Guide (A-dec Publication No. 85.0675.00).
Wall Mount Adjustments
Leveling
6
Your wall-mounted unit is leveled during
installation and should not require adjustment.
However, if the unit needs to be leveled, the
following procedures will help you.
Leveling Front-To-Back:
Two leveling setscrews are supplied with the unit.
These will be either in the top or bottom leveling
screw holes (see Figure 6).
If the unit tilts forward from the wall (see Figure 6A),
1. Place a leveling device on the work surface.
2. Loosen the bottom two mounting screws.
3. Install the leveling setscrews in the bottom two
holes, then tighten them until the unit is level.
4. Retighten the mounting screws.
Page 11

Cascade 2615 Cart / Cascade 3175 Wall Mount
If the unit tilts toward the wall (see Figure 6B):
1. Place a leveling device on the work surface.
2. Loosen the top two mounting screws.
3. Place the leveling setscrews in the top two
holes, then tighten until the unit is level.
4. Retighten the mounting screws.
FRONT TO BACK
LEVELING
A
BACKBOARD
Figures 6A & 6B
LEVELING SETSCREW
POSITIONS (For Front-
to-Back Leveling)
LEVELING CAM
(Use 3/4" openend wrench.)
B
SIDE-TO-SIDE LEVELING
MOUNTING
SCREWS
(mounting panel)
Figure 6. Leveling the Wall Mount
Leveling Side-To-Side:
1. Loosen the four hex screws in the mounting
panel, about 1/4 of a turn.
2. Place a leveling device on the work surface.
3. Using a 3⁄4" open-end wrench, gently turn the
leveling cam (see Figure 6) until the unit is level.
4. Retighten the mounting screws.
7
Page 12

Cascade 2615 Cart / Cascade 3175 Wall Mount
Arm Spring Tension
When you move the unit, it should stay where
you place it. If the unit tends to drift up or down,
the tension of the arm’s internal spring needs to
be adjusted.
NOTE
The spring tension should be adjusted with a
“normal” load on the work surface. The brake
on/off toggle should be in the OFF position.
1. Locate the adjustment screw under the arm
(see Figure 7).
1/4" HEX KEY
Figure 7. Arm Spring Tension Adjustment
2. Use a 1⁄4" hex key to make the adjustment.
• If the unit drifts down, turn the screw
clockwise to increase spring tension.
• If the unit drifts up, turn the screw
counterclockwise to decrease spring tension.
8
Page 13

Cascade 2615 Cart / Cascade 3175 Wall Mount
Arm Brake Adjustment
NOTE
Adjust arm spring tension prior to arm brake
adjustment (refer to page 8). Retest the brake
after spring adjustment.
The air-actuated arm brake on your wallmounted unit has been set at the factory and
should not need further adjustment. If the
brake does not hold, first check to be sure that
the brake on/off toggle is in the ON position,
and that there is air (at least 60 psi) to the unit.
Refer to your Floor Box Owner’s Guide
(A-dec Publication No. 85.2611.00) for complete
air pressure adjustment procedures.
If the brake will not hold, the brake may be
too loose. A brake which is too tight will cause
a screeching or scraping noise as you move the
unit up or down when the brake is not on.
To adjust the brake:
1. Move the brake on/off toggle to the OFF position.
2. Remove the plug from the access hole on the
left side of the arm (see Figure 8).
ACCESS
HOLE
PLUG
Figure 8. Arm Brake
(Continued on page 10.)
9
Page 14

Cascade 2615 Cart / Cascade 3175 Wall Mount
Arm Brake Adjustment (continued)
3. Push down on the arm until the inner hole
lines up with the outer hole, then insert a
5/32" hex key.
ACCESS
HOLE
5/32"
HEX KEY
7/16" OPEN-END (or
crescent) WRENCH
Figure 9. Arm Brake Adjustment
10
NOTE
Adjust the nut in small increments and retest
the brake. Overtightening or overloosening
the adjustment nut may damage the brake.
4. Locate the adjustment nut under the arm
(see Figure 9).
• To tighten the brake, use a 7/16" open-end wrench
to hold the adjustment nut while you turn the
hex key clockwise
• To loosen the brake, use a 7/16" open-end wrench
to hold the adjustment nut while you turn the
hex key counterclockwise.
Page 15

Cascade 2615 Cart / Cascade 3175 Wall Mount
Cart Adjustments
Work Surface Height
WARNING
The cart is very heavy. Cart height adjustment requires two people to safely complete.
Firmly tighten the knob after adjusting the
cart height, serious bodily injury may result
if the knob is not secure.
1. Securely hold the cart top so it will not drop,
loosen the knob.
Figure 10. Cart Height Adjustment
2. Lift or lower the cart top until the work surface
is at the desired height.
3. Firmly tighten the knob. If the top lowers, the
knob was not tightened enough.
11
Page 16

Cascade 2615 Cart / Cascade 3175 Wall Mount
Wall Mount & Cart Adjustments
Left/Right Conversion
Your assistant’s cart or wall mount can be easily
converted for opposite-hand delivery.
Simply rotate the assistant’s arm to the opposite
side of the work surface (see Figure 11).
Figure 11. Left/Right Conversion
Work Surface Leveling
To level your assistant’s unit work surface:
1. Place a leveling device on the work surface.
2.Check for level front-to-back and side-to-side.
3.Locate the four mounting screws found in the
leveling plate on the underside of the work
surface (see Figure 12). Using a 3⁄16" hex key,
loosen but do not remove these screws.
12
Page 17

Cascade 2615 Cart / Cascade 3175 Wall Mount
MOUNTING
SCREWS
LEVELING
LEVELING
SETSCREWS
PLATE
MOUNTING
SCREWS
WORK SURFACE HANDLE
LEVELING
SETSCREWS
Figure 12. Leveling the Work Surface
(Viewed from the bottom of the work surface and
shown without assistant’s arm or post box.)
4. Locate the four leveling setscrews
(there is one in each corner of the leveling
plate underneath the unit work surface).
Front-to Back Leveling:
Face the work surface handle.
If the work surface tilts toward you, use a 3⁄16" hex
key and tighten the two leveling setscrews closest
to you until the work surface is level.
If the work surface tilts away from you, tighten the
two leveling setscrews furthest away until the
work surface is level.
Side-to-Side Leveling:
Face the work surface handle.
If the work surface tilts to the left, tighten the two
leveling setscrews on the left side of the leveling
plate until the work surface is level.
If the work surface tilts to the right, tighten the two
leveling setscrews on the right side of the leveling
plate until the work surface is level.
5. When you have completed these steps tighten
the four mounting screws, then check the work
surface again for level.
13
Page 18

Cascade 2615 Cart / Cascade 3175 Wall Mount
Maintenance
Solids Collector.........................................page 4
Also refer to the following documentation for
more maintenance information:
Assistant’s Instrumentation
Assistant’s Instrumentation
Owner’s Guide ..............................85.2610.00
Autoclavable Syringe
Owner’s Guide ..............................85.0680.00
Care Instructions
Equipment Asepsis
Owner’s Guide ..............................85.0696.00
Self-contained Water
Owner’s Guide ..............................85.0675.00
Power Supplies
Floor Boxes
Owner’s Guide ..............................85.2611.00
Adjustments and Specifications
Wall Mount Adjustments:
Leveling..............................................page 6
Arm Spring Tension ...........................page 8
Arm Brake Adjustment......................page 9
Cart Adjustments:
Work Surface Height ..........................page 11
Wall Mount & Cart Adjustments:
Tray Holder (optional)
Left/Right Conversion..................page 5
Left/Right Conversion........................page 12
Work Surface Leveling .......................page 12
14
Page 19

Cascade 2615 Cart / Cascade 3175 Wall Mount
Adjustments and Specifications
Service Requirements for Unit Operation:
Minimum Air:
2.50 cfm (70.80 l/min) at 80 psi (551 kPa)
Minimum Water:
1.50 gpm (5.68 l/min) at 40 psi (276 kPa)
Minimum Vacuum:
12 cfm (339.84 l/min)
at 8 inches of mercury (27 kPa)
Cart Specifications:
25 lb (11.34 kg) vertical load is the maximum
safe load capability of the work surface.
5 lb (2.27 kg) vertical load is the maximum
safe load capability of the optional tray holder.
Wall Mount Specifications:
40 lb (18.14 kg) vertical load on work surface
will be supported by the arm brake.
100 lb (45.36 kg) maximum unit weight.
200 ft-lb (270 N·m) maximum moment
created at the wall by the freestanding unit.
5 lb (2.27 kg) vertical load is the maximum
safe load capability of the optional tray holder.
(continued)
Any optional non-A-dec attachments and/or
accessories must comply with EN 60601-1 and
EN 60601-1-2.
Also refer to the following documentation for
more adjustment and specification information:
System Air and Water Pressure Adjustments
Floor Box
Owner’s Guide ..............................85.2611.00
Specifications are subject to change without notice.
15
Page 20

Cascade 2615 Cart / Cascade 3175 Wall Mount
LISTED
®
!
Identification of Symbols
Recognized by Underwriters Laboratories Inc. ® with respect to
electric shock, fire and mechanical hazards only in accordance
with UL 2601-1. Recognized with respect to electric shock, fire,
mechanical and other specified hazards only in accordance with
CAN/CSA C22.2, No. 601.1.
UL listed to US (UL 544) and Canadian (CAN/CSA C22.2, No.
125) safety standards.
Classified by Underwriters Laboratories Inc. ® with respect to
electric shock, fire and mechanical hazards only in accordance
with UL 2601-1. Classified with respect to electric shock, fire,
mechanical and other specified hazards only in accordance with
CAN/CSA C22.2, No. 601.1.
Conforms to European Directives
Protective earth (ground).
Functional earth (ground).
Attention, consult accompanying documents.
TYPE B APPLIED PART.
CLASS II EQUIPMENT.
(refer to Declaration Statement)
16
Page 21

Cascade 2615 Cart / Cascade 3175 Wall Mount
Classification of Equipment (EN 60601-1)
Type of shock protection:
CLASS I EQUIPMENT
(Dental Chairs, Dental Lights, & Power Supplies)
CLASS II EQUIPMENT
(Chair, Wall, & Cart Mounted Delivery Systems)
Degree of shock protection:
TYPE B APPLIED PART (All products)
Degree of protection against water ingress:
ORDINARY EQUIPMENT (All products)
Mode of operation
CONTINUOUS OPERATION
(All models except Dental Chairs)
Mode of operation
CONTINUOUS OPERATION
WITH INTERMITTENT LOADING (Dental Chairs)
17
Page 22

2601 Crestview Drive
®
Newberg, Oregon 97132 U.S.A.
Telephone 1-800-547-1883
(503) 538-7478
Fax (503) 538-0276
Designated Representative’s Address:
A-dec Dental U.K., Ltd.
Austin House
11 Liberty Way
Attleborough Fields
Nuneaton, Warwickshire
England. CV11 6RZ
Telephone: 0800 233285 (within UK)
00 44 24 7635 0901 (outside UK)
Fax: 00 44 24 7634 5106
Designated Representative’s Address:
A-dec Australia
41-43 Bowden Street
Alexandria, N.S.W. 2015, Australia
Telephone: (61) 1.800.225010
85.0664.00
1999-06
Rev K (01076)
Made with 50% waste paper
Printed in USA.
Copyright © 1999,
All Rights Reserved.
 Loading...