


Adam Equipment
PGL SERIES
(P.N. 309669326, Revision E, November 2011)
© Adam Equipment Company 2011

Easy Reference:
Model name of the scale:
Serial number of the unit:
Software revision number
(Displayed when power is first turned on):
Date of Purchase:
Name of the supplier and place:
© Adam Equipment Company 2011
|
CONTENTS |
|
2.0 |
INTRODUCTION ................................................................................... |
3 |
3.0 |
SET UP ................................................................................................. |
4 |
3.1 |
UNPACKING AND SETTING UP YOUR SCALE................................................. |
4 |
3.2 |
ASSEMBLING THE BALANCE (PGL 203 to PGL 8001) ..................................... |
4 |
3.3 |
LEVELLING THE BALANCE................................................................................ |
5 |
3.4 |
WARM-UP TIME.................................................................................................. |
5 |
4.0 |
DISPLAY............................................................................................... |
7 |
5.0 |
KEYPAD ............................................................................................... |
8 |
5.1 |
NUMERIC ENTRY METHOD............................................................................... |
9 |
6.0 |
BASIC OPERATION ........................................................................... |
10 |
6.1 |
INITIALISATION ................................................................................................ |
10 |
6.2 |
PASSCODES..................................................................................................... |
11 |
6.3 |
WEIGHING ........................................................................................................ |
11 |
6.4 |
WEIGHING UNITS............................................................................................. |
12 |
7.0 |
FUNCTIONS ....................................................................................... |
13 |
7.1 |
PARTS COUNTING ........................................................................................... |
13 |
7.2 |
PERCENT WEIGHING ...................................................................................... |
14 |
7.3 |
CHECK WEIGHING........................................................................................... |
15 |
7.4 |
DENSITY DETERMINATION............................................................................ |
17 |
8.0 |
CALIBRATION .................................................................................... |
20 |
8.1 |
MANUAL CALIBRATION ................................................................................... |
20 |
8.2 |
AUTOMATIC CALIBRATION ............................................................................. |
21 |
8.3 |
CALIBRATION ERRORS................................................................................... |
21 |
8.4 |
CALIBRATION REPORT ................................................................................... |
22 |
9.0 |
RS-232 INTERFACE ........................................................................... |
23 |
9.1 |
HARDWARE ...................................................................................................... |
23 |
9.2 |
STANDARD FORMAT ....................................................................................... |
25 |
9.3 |
INPUT COMMANDS USING REMOTE KEYS................................................... |
25 |
10.0 BATTERY OPERATION...................................................................... |
27 |
|
11.0 ERROR CHECKING ........................................................................... |
27 |
|
12.0 |
SUPERVISOR MENUS ...................................................................... |
28 |
12.1 |
ENABLE WEIGHING UNITS ............................................................................. |
28 |
12.2 |
ENABLE WEIGHING MODES ........................................................................... |
29 |
12.3 |
ENABLE SERIAL INTERFACE PARAMETERS ................................................ |
29 |
12.4 |
SETUP PARAMETERS ..................................................................................... |
31 |
12.5 |
CALIBRATION SETUP ...................................................................................... |
32 |
12.6 |
PASSCODES..................................................................................................... |
33 |
13.0 |
SPECIFICATIONS ............................................................................. |
34 |
14.0 |
WARRANTY STATEMENT ................................................................ |
36 |
1 | P a g e © Adam Equipment Company 2011
2 | P a g e © Adam Equipment Company 2011

2.0 INTRODUCTION
Thank you for selecting the PGL Balance.
This Instruction Manual will familiarize you with the installation, accessories, trouble-shooting, after sales service information, general maintenance of the balance, etc. and will guide you through the various applications.
Please read this Manual thoroughly before starting the operation. If you need any clarifications, feel free to contact your supplier or Adam Equipment.
PRODUCT OVERVIEW
The PGL balances are ideal for laboratory and general purpose weighing. The balances can also be used for some advanced weighing functions.
FEATURES:
∙Large easy to read LCD display with backlight
∙Standard applications include weighing, check weighing, percentage weighing, parts counting, and density determination
∙Bi-directional RS-232 interface
∙Can be configured to print a GLP Compliant report after each calibration to include the time, date, balance number and a verification of the calibration
PGL series
∙Multiple weighing units
∙Capacity tracker
∙Date and time
∙Easy to use, sealed keypad
∙Below balance weighing facility
∙Password protection
∙Security locking point (up to PGL 8001)
∙Robust metal casing
3 | P a g e © Adam Equipment Company 2011

3.0SET UP
3.1UNPACKING AND SETTING UP YOUR SCALE
Remove the balance from the packing by carefully lifting it out of the box. Inside the box you will find everything needed to start using the balance-
AC adapter
Stainless Steel Top Pan
Draught shield (for mg models only)
This User Manual
3.2ASSEMBLING THE BALANCE (PGL 203 TO PGL 8001)
Locate the balance on a solid surface, free from vibration
Gently place the pan support (if not already fitted) and then the stainless steel pan on the weighing platform
Gently place the 4 pan supports (if not already fitted) and then the stainless steel pan on the weighing platform
Place the draught shield frame and the top cover around the pan (PGL 203, 303 models only)
Level the balance using the adjustable feet and spirit level
Connect power to the balance
For best performance, let the balance warm up for 30 minutes and calibrate before using
4 | P a g e © Adam Equipment Company 2011

3.3LEVELLING THE BALANCE
After placing the balance in a suitable place, level it by using the spirit level on the rear of the balance. To level the balance turn the two adjustable feet at the rear of the balance until the bubble in the spirit level is centered.
3.4WARM-UP TIME
Attach the power supply cable to the connector on the rear of the balance. Plug the power supply module into the mains. The display will indicate the balance serial number (if set) and the software revision number followed by the capacity of the balance. Next the balance will run a self-test by displaying all segments followed by a symbol indicating the balance is in busy mode. If the balance serial number is not set the display will show dashes. The display will show zeroes accompanied by the
0 symbol.
Before you start weighing, you have to wait for the balance to achieve a stable internal temperature.
A stable sign ~ is shown when the balance is in stable condition. It will turn off if the balance is not stable.
Exact zero is shown when the “ 0 “ symbol is on to the left of the display area.
5 | P a g e © Adam Equipment Company 2011
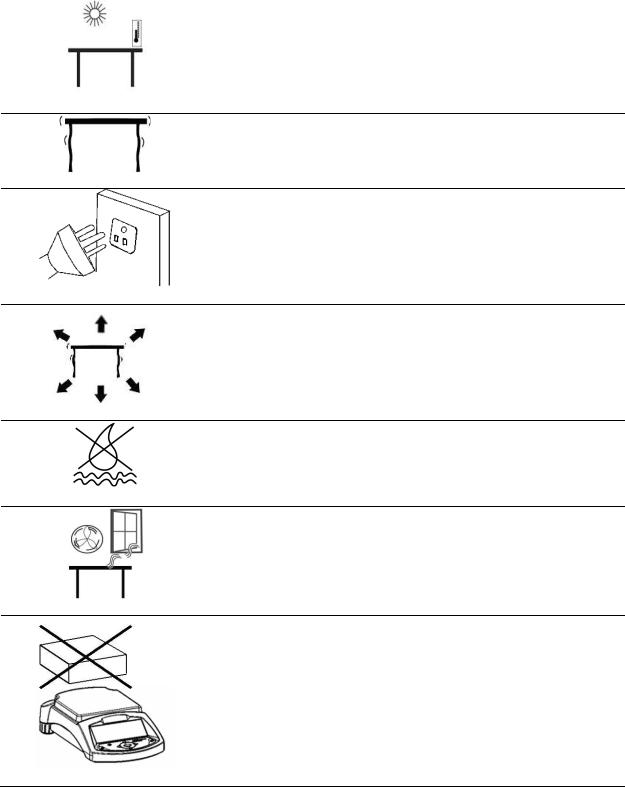
3.5LOCATING AND PROTECTING YOUR SCALE
In order to keep your scale functioning at its best we suggest that you do the following:
Avoid extremes of temperature. Do not place in direct sunlight or near air conditioning vents.
Make sure the scale is located on a strong table and free from vibration.
Avoid unstable power sources. Do not use near large users of electricity such as welding equipment or large motors. Use only the factory approved power adapter supplied with the machine.
Keep free from vibration. Do not place near heavy or vibrating machinery.
Avoid high humidity that might cause condensation. Keep away from direct contact with water. Do not spray or immerse the scales in water.
Do not place near open windows, air-conditioning vents or fans that may cause a draft and unstable readings.
Keep the scales clean. Do not stack material on the scale / balance when it is not in use.
6 | P a g e © Adam Equipment Company 2011

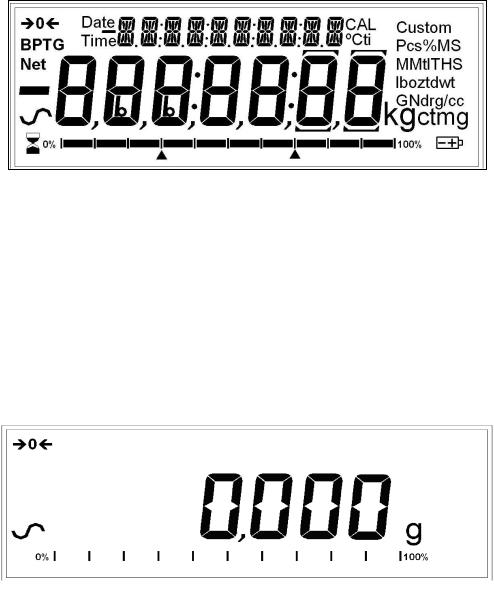
4.0 DISPLAY
The LCD has unique symbols to indicate the following:
0 |
Zero |
|
|
|
Stable |
|
|
Net |
Net weight |
|
|
|
A bar graph indicating the proportion of the |
|
balance capacity being used by the weight on |
|
the pan |
|
|
g, kg, ct, oz, lb, ozt, GN, dwt, dr, tl H, tl |
Symbols shown for the units |
T, tl S, MM, T, ti, N, g/cc, Pcs, %, M, and |
Not all weighing units are used |
S |
|
|
|
|
Low Battery symbol. On when the battery |
|
voltage is low, signaling the battery should |
|
be recharged. |
|
|
INDICATORS
“CAL” When calibration is occurring or is requested
“ºC” When a temperature is shown
“ti” For a time driven calibration
“Net” When a net weight is shown
“0%”, When the capacity tracker is showing percent of maximum range
“100%” used
7 | P a g e © Adam Equipment Company 2011
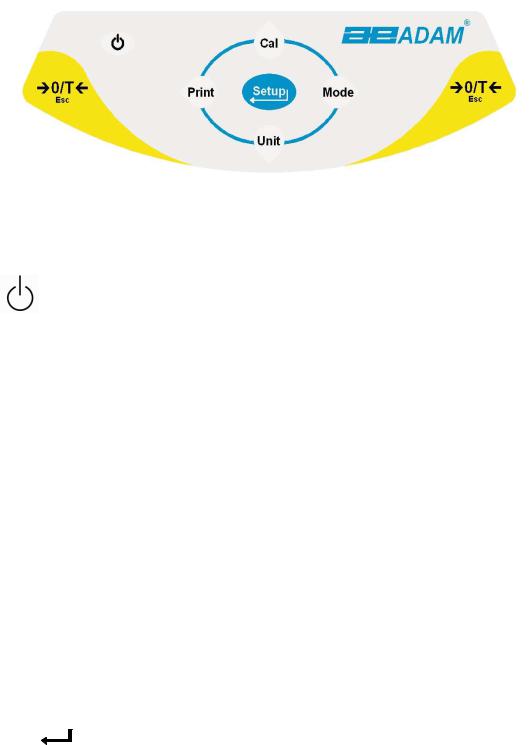
5.0 KEYPAD
The keypad has the following keys to operate the balance.
Keys |
Primary function |
Secondary function |
|||||
|
|
|
|
|
|
|
|
|
|
|
|
|
|
To turn the balance to ON or Standby |
- |
|
|
|
|||||
[ 0/T] or [Esc] |
A combined zero and tare function |
To escape from setup functions |
|||||
|
|
|
|
|
|
|
and modes |
|
|
|
|||||
[Unit] / or |
-Selects weighing units by cycling |
To decrement or change a |
|||||
[Down] |
through a set of enabled units |
displayed value or scroll through |
|||||
|
|
|
|
|
|
-Scrolls through the options |
options backwards |
|
|
|
|
|
|
|
|
|
|
|
|||||
[Mode] / or |
Enters the Mode Selection Menu |
To advance a flashing digit by one |
|||||
[move right] |
|
position to the right. |
|||||
|
|
|
|
|
|
|
To go back by one step during |
|
|
|
|
|
|
|
setup functions |
|
|
|
|||||
[Print] / or |
Instructs the balance to print data |
To advance a flashing digit by one |
|||||
[move left] |
|
position to the left |
|||||
|
|
|
|||||
[Cal] / or [Up] |
Starts the calibration function |
To increase or change a displayed |
|||||
|
|
|
|
|
|
|
value or scroll through options |
|
|
|
|
|
|
|
forward |
|
|
|
|
|
|
|
|
[Setup]/ |
|
|
|
|
|
Enters the Setup parameters |
Enters a function or saves a value |
|
|
||||||
|
|
|
|
||||
or [Enter] |
(Supervisor Menus) |
while manually entering unit |
|||||
|
|
|
|
|
|
|
weight or check weighing limits |
|
|
|
|
|
|
|
|
8 | P a g e © Adam Equipment Company 2011
5.1NUMERIC ENTRY METHOD
To set a value when required, use the keys as given below-
- [Up] and [Down] keys to increase or decrease the flashing digit
-[Advance] and [Back] keys to advance or move back the digit
-[Enter] key to accept the value
9 | P a g e © Adam Equipment Company 2011
6.0BASIC OPERATION
6.1INITIALISATION
1)When the balance is first switched on, it will display the balance serial number (if set), software revision, model capacity and then all segments on the display will be shown. Overall the time taken is usually 5 -10 seconds.
2)If a passcode has been set, the display will show “PASSCODE” and the main display will show a zero. In this case you must enter the passcode to continue using the numeric entry method (see section 5.1). A different passcode may be set for a Supervisor to weigh or to have access to the selected User menus. If the passcode has not been set the balance will continue as below.
3) The display will show zero reading along with the zero symbol “→0←” and the weighing unit last used. If automatic time calibration is enabled the balance will calibrate after power up and again after the pre-set time interval.
10 | P a g e © Adam Equipment Company 2011
 Loading...