


Adam Equipment
CORE SERIES(EN)
SERIES CORE(FR)
CORE SERIE(DE)
SERIE CORE(ES)
SERIE CORE(IT)
(P.N.308669539, Revision B6, Mar2017)
© Adam Equipment 2016
ENGLISH: |
P1 17 |
FRANÇAIS: |
P18 37 |
DEUTSCH: |
P38 58 |
ESPAÑOL: |
P59 74 |
ITALIANO: |
P75 92 |
EU DECLARATION: |
P93 |
© Adam Equipment 2016

EN
Easy Reference:
Model name of the balance:
Serial number of the unit:
Software revision number
(Displayed when power is first turned on): Date of Purchase:
Name of the supplier and place:
© Adam Equipment 2016 |
1 |
308669539revB6-Mar17 |

EN |
|
|
|
CONTENTS |
|
1.0 |
CONTENTS........................................................................................................................................... |
2 |
2.0 |
SET UP.................................................................................................................................................. |
3 |
2.1 |
UNPACKING AND SETTING UP YOUR BALANCE ........................................................................ |
3 |
2.2 |
INSTALLING BATTERIES ................................................................................................................ |
4 |
2.3 |
OVERVIEW - DISPLAY / KEY BOARD ............................................................................................ |
4 |
2.4 |
LOCATING AND PROTECTING YOUR BALANCE ......................................................................... |
6 |
2.5 |
STORING WHEN NOT IN USE ........................................................................................................ |
7 |
3.0 |
BASIC OPERATION.............................................................................................................................. |
8 |
3.1 |
TURNING ON THE BALANCE ......................................................................................................... |
8 |
3.2 |
ZEROING / TARE ............................................................................................................................. |
8 |
3.3 |
WEIGHING........................................................................................................................................ |
9 |
3.4 |
WEIGHING UNITS............................................................................................................................ |
9 |
4.0 |
PARAMETERS.................................................................................................................................... |
10 |
4.1 |
AUTO POWER OFF........................................................................................................................ |
10 |
4.2 |
SETTING THE BACKLIGHT........................................................................................................... |
11 |
4.3 |
ENABLING THE WEIGHING UNITS .............................................................................................. |
11 |
5.0 |
CALIBRATION..................................................................................................................................... |
13 |
6.0 |
TROUBLE SHOOTING ....................................................................................................................... |
14 |
6.1 |
ERROR MESSAGES...................................................................................................................... |
14 |
6.2 |
REPLACEMENT PARTS AND ACCESSORIES ............................................................................ |
15 |
7.0 |
SPECIFICATIONS............................................................................................................................... |
16 |
8.0 |
WARRANTY STATEMENT ................................................................................................................. |
17 |
© Adam Equipment 2016 |
2 |
308669539revB6-Mar17 |
EN
2.0SETUP
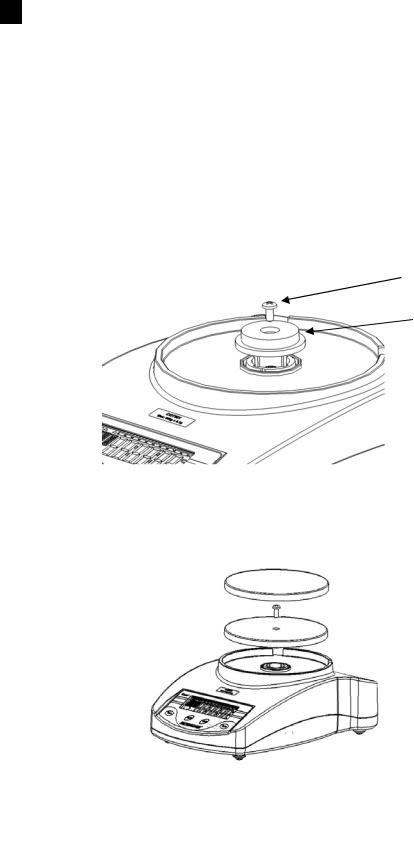
2.1UNPACKINGANDSETTINGUPYOURBALANCE
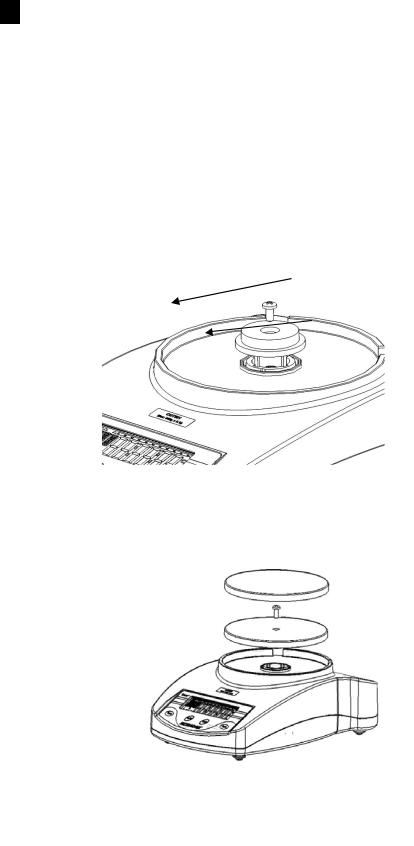
1)Remove the shipping protection screw and round cover as shown below using the Allen key supplied in the plastic bag. (It is advisable to keep the shipping protection screw and the round cover along with the packing box for using during shipping to another location in future).
Shipping protection screw
Round cover around the screw
2)Place the pan (which comes separately packed) in the receptacles on the top cover.
Gently place the plastic pan support into the receptacle and secure with the screw supplied in the plastic bag. Be careful when putting the screw in that you do not use too much force as it can damaged the loadcell. You should just be able to use light force to secure the screw.
3)Place the stainless steel pan on top of the plastic pan.
4)Place the balance on a firm and flat surface for accurate weighing.
© Adam Equipment 2016 |
3 |
308669539revB6-Mar17 |
EN
2.2INSTALLINGBATTERIES
Remove the battery compartment cover and insert six batteries (R6P/LR6 /AA size) into the battery compartment.
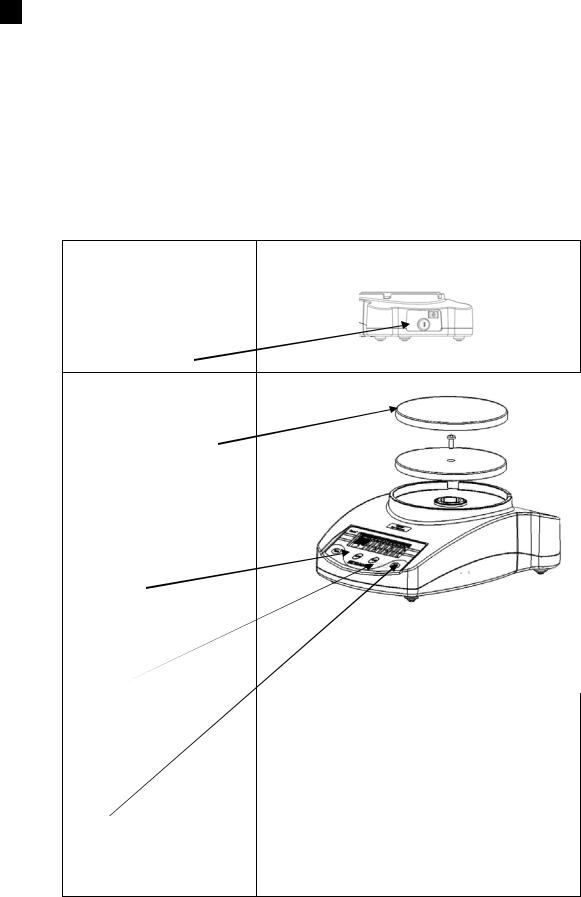
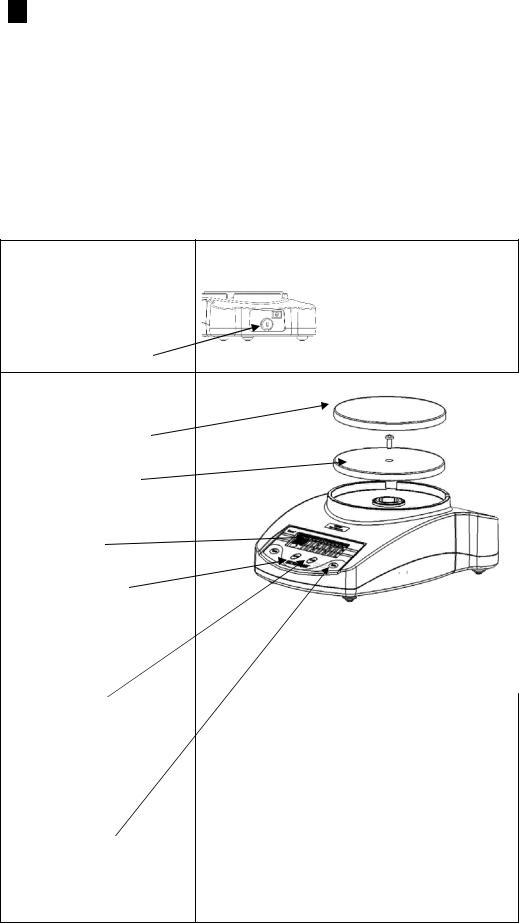
2.3OVERVIEW DISPLAY/KEYBOARD
BEHIND
DC adapter socket
Lock down slot
TOP
Stainless Steel pan
Plastic Pan 
LCD display
[On/Off] key Turns the balance power on/off
[Unit] key Changes weighing
units. Also used when calibrating
[Tare] key
Sets display to zero or tares the balance
© Adam Equipment 2016 |
4 |
308669539revB6-Mar17 |
EN
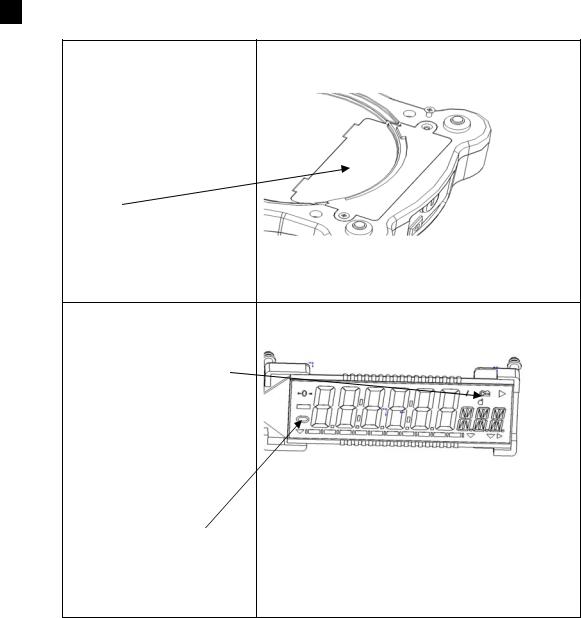
BOTTOM
Battery compartment screws 
Battery compartment cover
Batteries are not included DISPLAY
 battery indicator
ZERO indicator  Indicates when the
balance zero is correct.
STABLE indicator Indicates when the reading is stable.
© Adam Equipment 2016 |
5 |
308669539revB6-Mar17 |

EN
2.4LOCATINGANDPROTECTINGYOURBALANCE
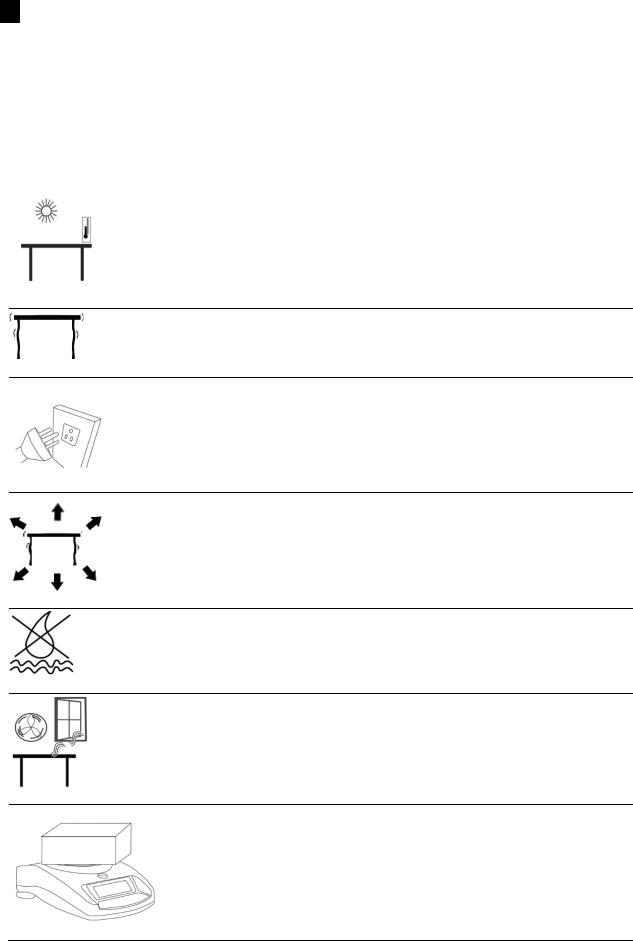
In order to keep your balance functioning at its best we suggest that you do the following:
Avoid extremes of temperature. Do not place in direct sunlight or near air conditioning vents.
Make sure the balance is located on a strong table and free from vibration.
Avoid unstable power sources. Do not operate near large users of electricity such as welding equipment or large motors. Do not leave batteries in the balance if you are not using it for a long time.
Keep free from vibration. Do not place near heavy or vibrating machinery.
Avoid high humidity that might cause condensation, and keep away from direct contact with water.
Do not place near open windows, air conditioning vents or fans that may cause a draft and unstable readings.
Keep the balances clean, and do not stack material on the balance when it is not in use. The Core has a stacking feature allowing more than one unit to be stacked on top of each other. For more details on this see the section on storing.
© Adam Equipment 2016 |
6 |
308669539revB6-Mar17 |
EN
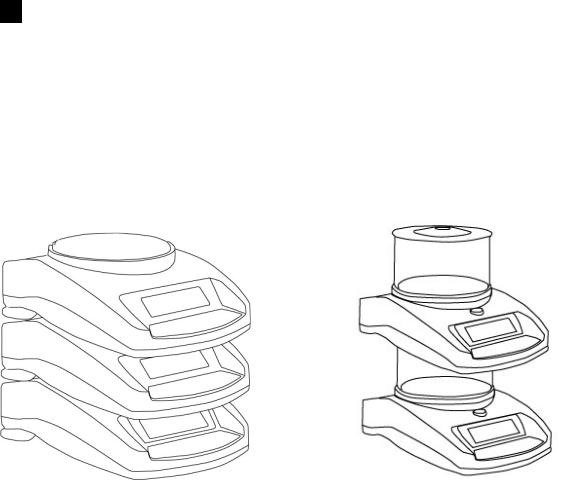
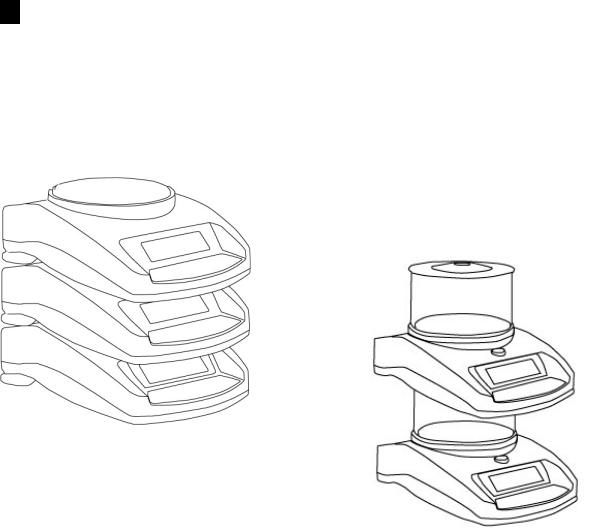
2.5STORINGWHENNOTINUSE
If you have any of the HighlandTM series or Core BalanceTM lines you can store them easily on top of each other. This helps to save space and protect them from damage.
Without Shield |
With Shield |
Note: Only 4.7” / 120mm ø pan size models can be stacked for storage. Core models with 5.7” / 145mm ø may be stacked at the top of the pile but machines cannot be stacked on top of them due to the larger pan size.
© Adam Equipment 2016 |
7 |
308669539revB6-Mar17 |

EN
3.0BASICOPERATION
3.1TURNINGONTHEBALANCE
Plug in the unit using the DC adapter or power from the batteries.
1) Press the On/Off button and the balance will automatically show Cqt-1.0 Cqt then count from 0 to 9 for a few seconds, and show the voltage X.X Vol where x.x is the voltage of the battery or the DC adapter. Finally it will display "0.00" along with the last selected weighing unit, Stable symbol, and Zero symbol.
2)The balance is ready to be used.
3)To turn the balance off after use press the [on/off] key again. There is an auto power off function that will automatically turn the unit off, this can be set in the parameters section.
3.2ZEROING/TARE
You can press the [Tare] key to set a new zero point. Zero will be set if the reading on the balance is less than 3% of the balances capacity. This may be necessary if the weight is not reading zero with nothing on the pan. The zero indicator will show up in the top left corner of the LCD.
If you are using a container to weigh then you can place this on the platform and press the [Tare] key, providing the container weight is more than 3% of the maximum capacity of the balance, the display will show zero and NET will light up on the display. You can then weigh your object in the container. Tared weight is subtracted from the total balance’s capacity.
Note: When the container is removed a negative value will be shown. If the balance was tared just before removing the container, this value is the gross weight of the container plus all items inside the container which were removed.
© Adam Equipment 2016 |
8 |
308669539revB6-Mar17 |
EN
3.3WEIGHING
To determine the weight of a sample, first tare an empty container (if used), then place the sample in the container. The display will show the weight and the unit of weight currently in use. The stable indicator will light up when the reading is stable.
3.4WEIGHINGUNITS
To change the weighing units, press [Unit] to cycle through the available units. See the Parameter section to enable or disable the weighing units. Once the unit has been selected, the weight will be displayed in the selected unit and a symbol for the weight will be shown.
© Adam Equipment 2016 |
9 |
308669539revB6-Mar17 |

EN
4.0 PARAMETERS
The balance has 3 parameters that can be set by the user.
FUNCTION |
SECTION |
DESCRIPTION |
Auto Off |
See section 5.1 |
Sets the auto power off function |
Backlight |
See section 5.2 |
Sets the backlight |
|
|
OFF BL backlight is off |
|
|
1 BL backlight is automatic |
|
|
2 BL backlight is always on |
|
|
|
Weighing unit |
See section 5.3 |
Sets theunits to be used |
|
|
kg – g – lb – oz – ct – dr – GN – N tl.t |
4.1AUTOPOWEROFF
The auto power off function helps conserve power when using the batteries or DC adapter. The Auto switch-off time may be set up by the user and is the time after a period of inactivity i.e. no weight movement or key presses.
1)To set this parameter turn the power off, press and hold the [Tare] key then press the [on/off] key once, then release the [Tare] key.
2)The display will show the first function XX PWR, where XX is the last setting.
3)Press [Tare] to select the settings as follows:
Off PWR |
Auto power off |
|
10 seconds before the power will switch off |
10 PWR |
|
|
20 seconds before the power will switch off |
20 PWR |
|
|
30 seconds before the power will switch off |
30 PWR |
|
|
40 seconds before the power will switch off |
40 PWR |
|
|
50 seconds before the power will switch off |
50 PWR |
|
|
60 seconds before the power will switch off |
60 PWR |
|
|
70 seconds before the power will switch off |
70 PWR |
|
|
80 seconds before the power will switch off |
80 PWR |
|
|
90 seconds before the power will switch off |
90 PWR |
|
|
|
4)Press the [Unit] key to confirm the setting
5)To exit turn the balance off and back on again
© Adam Equipment 2016 |
10 |
308669539revB6-Mar17 |

EN
4.2SETTINGTHEBACKLIGHT
The backlight may be enabled or disabled by the user. If the backlight is disabled, the battery life will be greater.
The following settings are available:
1 BL |
Sets the backlight to operate automatically when a weight is |
|
placed on the balance or a key is pressed. |
2 BL |
Sets the backlight to be on allthetime. |
|
|
OFF BL |
Sets the backlight to be off. |
|
|
1)To set this parameter turn the power off, press and hold the [Tare] key then press the [on/off] key once, then release the [Tare] key.
2)The display will show the first function PWR
3)Press the [Unit] key until the display shows XX BL where XX is the last setting
4)Press [Tare] key to select the settings as follows 1 BL 2 BL – OFF BL
5)Press the [Unit] key to confirm the setting
6)To exit turn the balance off and back on again
4.3ENABLINGTHE WEIGHINGUNITS
You can enable and disable the weighing units available to the user when they press the [Unit] key as described in section 4.4 Weighing Units.
1)To set this parameter turn the power off, press and hold the [Tare] key then press the [on/off] key once, then release the [Tare] key.
2)The display will show the first function PWR
3)Press the [Unit] key until the display shows you XX g where XX is the last setting on or off.
4)Press the [Tare] key to select on or oFF.
5)Press the [Unit] key to move to the next weighing unit.
6)Repeat steps 5 and 6 until you have set all of the weighing units.
© Adam Equipment 2016 |
11 |
308669539revB6-Mar17 |

EN
7) To exit turn the balance off and back on again
The following table shows the different weighing units which are available to the user and the conversion factors for each.
Name of the |
Description |
Conversion |
Display |
Units |
|
Factor |
Symbol |
|
|
0.001 |
|
Kilograms |
A standard metric unit |
Kg |
|
|
|
1.0 |
|
Grams |
A standard metric unit |
G |
|
Pounds |
Standard weighing unit in UK/USA. |
0.002205 |
Lb |
Ounce |
Avoirdupois ounce. |
0.03528 |
OZ |
|
16 ounces make a pound. |
|
|
|
|
5.0 |
|
Carat |
Used for weighing jewelry and gems, |
ct |
|
|
etc. |
|
|
|
|
0.564383 |
|
Dram |
Avoirdupois unit there are 16 DR in an |
DR |
|
|
ounce. |
|
|
|
|
15.432 |
|
Grains |
A basic weighing unit in the imperial |
GN |
|
|
system. Used to weigh gun powder. |
|
|
|
|
0.009808 |
|
Newtons |
Used to measure force |
N |
|
|
|
0.026666 |
|
Taiwanese |
Used to weigh coral, pearlsetc. |
Tl.t |
|
taels |
|
|
|
|
|
|
|
© Adam Equipment 2016 |
12 |
308669539revB6-Mar17 |

EN
5.0 CALIBRATION
Calibration may be required when the balance is initially installed or moved to a new location. Over time and use, mechanical deviations may occur so it is recommended that you calibrate you balance regularly for peak performance.
Before calibrating your should make sure you have the correct weights. The weights should be known to an accuracy that is appropriate for the balance being calibrated, for example, OIML Class M1 type or ASTM E617 Class 4. If you do not have the correct weights do not attempt calibration.
Model |
CQT 202 |
CQT 251 |
CQT 601 |
CQT 1501 |
CQT 2601 |
CQT 2000 |
CQT 5000 |
Calibration |
|
|
200g |
500g |
|
|
1000g |
Weight |
100g |
100g |
Or |
Or |
1000g |
1000g |
Or |
|
Or |
Or |
400g |
1000g |
Or |
Or |
3000g |
|
200g |
200g |
Or |
Or |
2000g |
2000g |
or |
|
|
|
600g |
1500g |
|
|
5000g |
|
|
|
|
|
|
|
|
1)To calibrate the balance apply power and switch the balance on, whilst the display is cycling through it’s test routine press the [Tare] and [Unit] keys at the same time, then release after 1 second .
2)The display will show UnLOAD remove any objects from the pan.
3)Press the [Tare] key to enter a zero value.
4)The value last used for calibration will be displayed (see above table). To select a different calibration weight, press the [Unit] key.
5)Once you have selected the calibration weight to be used press the [Tare] key.
6)LOAD will be displayed, place the calibration weight on the pan.
7)Once the stable sign is shown press the [Tare] key.
8)If the weight is within 5% of the last calibration value the display will show PASS and exit the calibration mode. If the calibration is not successful the display will show FAIL and exit the calibration mode, if the calibration fails try it again.
© Adam Equipment 2016 |
13 |
308669539revB6-Mar17 |

EN
6.0TROUBLESHOOTING
6.1ERRORMESSAGES
If an error message is shown, repeat the step that caused the message. If the error message is still shown then contact your dealer for support.
ERROR |
DESCRIPTION |
POSSIBLE CAUSES |
Solutions |
CODE |
|
|
Remove any weightfrom the |
ADO |
A/D Value too high. |
Weight on the pan when turning |
|
|
|
on. |
stainless steel pan. |
|
|
Improper calibration of the |
Recalibrate. |
|
|
balance. |
|
|
|
Damaged load cell. |
|
|
|
Damaged Electronics. |
|
|
|
|
Install pan and power back |
ADL |
A/D Value too low. |
Pan is not installed when turning |
|
|
|
on. |
on. |
|
|
Calibration not correct. |
|
|
|
Damaged load cell. |
Recalibrate. |
|
|
|
Remove any weight from the |
----- |
A/D count is not correct |
Load cell damaged. |
|
|
when turning the |
Electronics damaged. |
stainless steel pan and try |
|
balance on. |
|
rebooting. Try calibrating the |
|
|
balance. |
|
|
|
|
|
Unit-E |
Unit error. |
|
Charge the battery. |
|
Low battery indicator. |
Batteries may be flat. |
|
|
|
|
Try to recalibrate, check that |
FAIL |
Calibration failure. |
Incorrect mass used to calibrate. |
|
|
|
The user calibration is not within |
the weight used to calibrate |
|
|
5% of factory calibration. |
matches that of the value of |
|
|
Possible damaged to loadcell. |
the balance. |
|
Unstable – machine |
Possible damage to the Loadcell. |
Make sure the balance is on a |
|
cannot get a stable |
|
flat surface and away from |
|
reading. |
|
vibration. |
|
No Power when turning |
Battery may be flat. DC adapter |
Change the batteries. Or use |
|
on. |
may not be working. |
the DC adapter |
© Adam Equipment 2016 |
14 |
308669539revB6-Mar17 |

EN
6.2REPLACEMENTPARTSAND ACCESSORIES
If you need to order any spare parts and accessories, contact your supplier or Adam Equipment. A partial list of the more common items follows:
Part Number Description |
|
7.00.4.0.0023 POWER SUPPLY STANDARD MODEL 12VDC 500mA - UK |
|
7.00.4.0.0024 POWER SUPPLY STANDARD MODEL 12VDC 500mA - USA |
|
7.00.4.0.0025 POWER SUPPLY STANDARD MODEL 12VDC 500mA - OZ |
|
7.00.4.0.0026 POWER SUPPLY STANDARD MODEL 12VDC 500mA - EURO |
|
7.00.4.0.0027 POWER SUPPLY STANDARD MODEL 12VDC 800mAa - SA |
|
3.08.1.2.2009 |
TOP PAN 120mm |
3.08.1.2.2011 |
TOP PAN 145mm |
3.08.2.3.2031 BREEZE SHIELD WITH LID |
|
3.08.2.3.2033 |
IN USE COVER |
7.00.1.0.0046 SECURITY LOCK AND CABLE |
|
© Adam Equipment 2016 |
15 |
308669539revB6-Mar17 |

EN
7.0 SPECIFICATIONS
Model # |
CQT 202 |
CQT 251 |
|
CQT 601 |
|
CQT 1501 |
CQT 2601 |
|
CQT 2000 |
|
CQT 5000 |
|
Maximum Capacity |
200g |
250g |
|
600g |
|
1500g |
|
2600g |
|
2000g |
|
5000g |
Readability |
0.01g |
0.1g |
|
0.1g |
|
0.1g |
|
0.1g |
|
1g |
|
1g |
Resolution |
1:20000 |
1:2500 |
|
1:6000 |
|
1:15000 |
|
1:26000 |
|
1:2000 |
|
1:5000 |
Repeatability (Std |
0.02g |
0.1g |
|
0.1g |
|
0.2g |
|
0.2g |
|
1g |
|
1g |
Dev) |
|
|
|
|
|
|||||||
|
|
|
|
|
|
|
|
|
|
|
|
|
|
|
|
|
|
|
|
|
0.2g |
|
|
|
|
Linearity ± |
0.02g |
0.1g |
|
0.1g |
|
0.2g |
|
|
1g |
|
1g |
|
Units of Measure |
|
|
|
kg / g / lb / oz / ct / dr / GN / N/tl.t |
|
|
|
|||||
Stabilisation Time |
3 seconds |
2 seconds |
|
3 seconds |
|
2 seconds |
||||||
Operating |
|
|
|
|
|
0ºC to 40ºC |
|
|
|
|
|
|
Temperature |
|
|
|
|
|
32ºF to 104ºF |
|
|
|
|
|
|
|
12VDC adapter 800mA South Africa, 500mA rest of world), or 6x AA batteries |
|||||||||||
Power Supply |
||||||||||||
Calibration |
|
|
Push button calibration using external mass |
|
||||||||
Calibration Mass |
200g |
250g |
|
600g |
|
1500g |
|
2000g |
|
2000g |
|
5000g |
Display |
|
|
|
6 digit LCD, |
18mm digits, |
with backlight |
|
|
|
|
||
Draft shield |
|
132mm ø x 82mm |
|
|
|
|
|
N/A |
|
|||
(diameter x h) |
|
(5.2” ø x 3.2”) |
|
|
|
|
|
|
||||
|
|
|
|
|
|
|
|
|
||||
|
|
|
|
|
|
|
|
|
|
|
|
|
Balance Housing |
|
|
|
|
|
ABS Plastic |
|
|
|
|
|
|
Pan Size |
|
120mm ø (4.7” ø) |
|
|
|
145mm ø (5.7” ø) |
|
|||||
Overall Dimensions |
|
|
|
173 x 255 x 86mm (6.8” |
x 10” x 3.4”) |
|
|
|
||||
(w x d x h) |
|
|
|
|
Without draft shield |
|
|
|
||||
|
|
|
|
|
|
820g (1.8lb) |
|
|
|
|
|
|
Net Weight |
|
|
|
|
|
|
|
|
|
|
||
© Adam Equipment 2016 |
16 |
308669539revB6-Mar17 |

EN
8.0 WARRANTY STATEMENT
Adam Equipment offers Limited Warranty (Parts and Labour) for any components that fail due to defects in materials or workmanship. Warranty starts from the date of delivery.
During the warranty period, should any repairs be necessary, the purchaser must inform its supplier or Adam Equipment Company. The company or its authorised Technician reserves the right to repair or replace the components at any of its workshops at no additional cost, depending on the severity of the problems. However, any freight involved in sending the faulty units or parts to the Service Centre should be borne by the purchaser.
The warranty will cease to operate if the equipment is not returned in the original packaging and with correct documentation for a claim to be processed. All claims are at the sole discretion of Adam Equipment.
This warranty does not cover equipment where defects or poor performance is due to misuse, accidental damage, exposure to radioactive or corrosive materials, negligence, faulty installation, unauthorised modifications or attempted repair, or failure to observe the requirements and recommendations as given in this User Manual.
This product may include a rechargeable battery that is designed to be removed and replaced by the user. Adam Equipment warrants that it will provide a replacement battery if the battery manifests a defect in materials or workmanship during the initial period of use of the product in which the battery is installed.
As with all batteries, the maximum capacity of any battery included in the product will decrease with time or use, and battery cycle life will vary depending on product model, configuration, features, use, and power management settings. A decrease in maximum battery capacity or battery cycle life is not a defect in materials or workmanship, and is not covered by this Limited Warranty.
Repairs carried out under the warranty do not extend the warranty period. Components removed during warranty repairs become company property.
The statutory rights of the purchaser are not affected by this warranty. The terms of this warranty is governed by the UK law. For complete details on Warranty Information, see the terms and conditions of sale available on our web-site.
© Adam Equipment 2016 |
17 |
308669539revB6-Mar17 |

FR
Adam Equipment
SERIES CORE
(P.N. 9539, Révision B5, Mars 2017)
© Adam Equipment 2016 |
18 |
308669539revB6-Mar17 |
FR
Référence simple:
Nom du modèle de la balance:
Numéro de série de l’unité:
Numéro de révision du logiciel (Affiche lors de la mise en marche): Date d’achat:
Nom du fournisseur et lieu:
© Adam Equipment 2016 |
19 |
308669539revB6-Mar17 |

FR |
|
|
1.0 |
TABLEDESMATIERES |
|
1.0 |
TABLE DES MATIERES ..................................................................................................................... |
20 |
2.0 |
INTRODUCTION................................................................................................................................. |
21 |
3.0 |
INSTALLATION................................................................................................................................... |
22 |
3.1 |
DEBALLAGE ET INSTALLATION DE VOTRE BALANCE.................................................................. |
22 |
3.2 |
INSTALLATION DES PILES ............................................................................................................... |
23 |
3.3 |
DESCRIPTION -ECRAN / CLAVIER................................................................................................... |
23 |
3.4 |
POSITIONNER ET PROTEGER VOTRE BALANCE.......................................................................... |
25 |
3.5 |
RANGER LES BALANCES LORSQU’ELLES NE SONT PAS UTILISEES........................................ |
25 |
4.0 |
FONCTIONNEMENT DE BASE.......................................................................................................... |
27 |
4.1 |
MISE EN MARCHE DE LA BALANCE................................................................................................ |
27 |
4.2 |
REMISE A ZERO / TARE.................................................................................................................... |
27 |
4.3 |
PESAGE.............................................................................................................................................. |
28 |
4.4 |
UNITES PESAGE................................................................................................................................ |
28 |
5.0 |
PARAMETERES.................................................................................................................................. |
29 |
5.1 |
AUTO EXTINCTION............................................................................................................................ |
29 |
5.2 |
REGLAGE DU RETRO ECLAIRAGE.................................................................................................. |
30 |
5.3 |
ACTIVATION DES UNITES DE PESAGE .......................................................................................... |
30 |
6.0 |
CALIBRAGE........................................................................................................................................ |
32 |
7.0 |
GUIDE DE DEPANNAGE.................................................................................................................... |
33 |
7.1 MESSAGES D’ERREUR............................................................................................................................ |
33 |
|
7.2 |
REMPLACEMENT DES PIECES DETACHEES ET ACCESSOIRES................................................ |
34 |
8.0 |
CARACTERISTIQUES........................................................................................................................ |
35 |
9.0 |
CERTIFICAT DE CALIBRAGE............................................................................................................ |
36 |
10.0 |
INFORMATION SUR LA GARANTIE.................................................................................................. |
37 |
© Adam Equipment 2016 |
20 |
308669539revB6-Mar17 |

FR
2.0 INTRODUCTION
Nous vous remercions pour l’achat de votre nouvelle balance CoreTM. Toutes les séries de balances Core possèdent une étendue de fonctions et d’options les rendant idéales pour le laboratoire et les classes. Nous espérons que vous profiterez de l’utilisation de votre nouvelle balance Core.
© Adam Equipment 2016 |
21 |
308669539revB6-Mar17 |
FR
3.0INSTALLATION
3.1DEBALLAGEETINSTALLATIONDEVOTREBALANCE
5)Retirez la vis de protection d’expédition et le capuchon comme illustré ci dessous en utilisant la clé Allen fournie avec l’emballage. (il est recommandé de garder la vis de protection d’expédition et le capuchon avec l’emballage lors de tout déplacement vers un nouvel endroit).
Vis de protection d’expédition
Capuchon autour de la vis
6)Placez le plateau (emballé séparément) dans les réceptacles sur le dessus de la balance.
Utilisez la vis que vous avez retirée pour viser le plateau en plastique en place. Faite attention lorsque vous vissez de ne pas appuyez trop fort si ce qui pourrait endommager le capteur. Vous devez seulement serrer légèrement la vis.
7)Placez le plateau en acier inoxydable sur le plateau en plastique.
8)Placez la balance sur une surface plate et stable afin d’obtenir un pesage précis.
© Adam Equipment 2016 |
22 |
308669539revB6-Mar17 |
FR
3.2INSTALLATIONDESPILES
Retirez le couvercle du compartiment des piles et insérez les six piles (R6P/LR6 /AA size) dans le compartiment à piles.
3.3DESCRIPTION ECRAN/CLAVIER
ARRIERE
Prise adaptateur DC 
Connexion anti vol
DESSUS
Plateau inox
Plateau plastique
Ecran LCD
Touche [On/Off] Mise marche de la balance on/off
Touche [Unit] Change les unités de pesage. Utilisé également lors du calibrage
Touche [Tare] Règle l’écran zéro ou tare la balance
© Adam Equipment 2016 |
23 |
308669539revB6-Mar17 |

FR
DESSOUS
Vis du compartiment des piles
Couvercle du  compartiment des piles
Les piles ne sont pas incluses
ECRAN
 Indicateur batterie
Indicateur ZERO Indique quand le zéro
de la balance est juste.
Indicateur STABLE Indique quand la lecture est stable.
© Adam Equipment 2016 |
24 |
308669539revB6-Mar17 |
FR
3.4POSITIONNERETPROTEGERVOTREBALANCE
De façon à toujours faire fonctionner votre balance de manière optimale nous suggérons que vous suiviez ces quelques recommandations :
Evitez les températures extrêmes. Ne pas la placer sous les rayons directs du soleil ou proche d’un ventilateur ou climatiseur.
Soyez sûr que la balance soit localisée sur une table stable et sans vibration.
Evitez des sources d’alimentations instables. Ne pas fonctionner prés de gros utilisateurs d’électricités tels que les postes à souder ou gros moteurs. Ne pas laisser les piles dans la balance si vous ne les utilisez pas pendant une longue période.
Gardez les à distances des vibrations. Ne pas les placer prés de machines vibrantes ou industrielles.
Eviter les zones très humides qui pourraient causer de la condensation, et gardez loin de tout contact avec l’eau.
Ne pas les placer prés de fenêtres ouvertes, climatisation, ventilateurs, qui pourraient causer des courants d’air et donc des lectures instables.
Gardez les balances propres, et ne pas empiler du matériel dessus quand elles ne sont pas utilisées. La Core possède la fonction d’empilement permettant d’empiler les balances les unes sur les autres. Pour plus de renseignements sur cette fonction allez à la section suivante.
3.5RANGERLESBALANCESLORSQU’ELLESNESONTPASUTILISEES
© Adam Equipment 2016 |
25 |
308669539revB6-Mar17 |
FR
Si vous avez une des balances de la serie HighlandTM ou Core BalanceTM vous pouvez alors les empiler facilement les unes sur les autres ainsi vous economiserez de la place et les protegerez contre les endommagements.
Sans cage de pesée
Avec cage de pesée
Note: Seulement les modèles avec des plateaux de 120mm de ø peuvent être empilés pour le rangement. Les modèles Core avec des plateaux de 145mm ø peuvent seulement être posés sur le dessus des modèles avec le plus petit plateau mais ne peuvent pas être elles mêmes empilées à cause de leur plus grande taille de plateau.
© Adam Equipment 2016 |
26 |
308669539revB6-Mar17 |

FR
4.0FONCTIONNEMENTDEBASE
4.1MISEEN MARCHEDELABALANCE
Branchez la balance en utilisant l’adaptateur DC ou bien en utilisant l’alimentation par les piles.
4) Appuyez sur [On/Off] et la balance affichera automatiquement Cqt-1.0 Cqt ensuite comptera de 0 à 9 pendant quelques secondes et affichera X.X Vol ou x.x est la tension des piles ou de l’adaptateur DC. Enfin la balance affichera "0.00" avec la dernière unité de pesage utilisée, le symbole de stabilité et le symbole du zéro.
5)La balance est prête à être utilisée.
6)Pour éteindre la balance après utilisation, appuyez de nouveau sur [on/off]. Il y a une fonction d’auto extinction qui éteindra automatiquement balance, cette fonction peut être réglée comme expliqué dans la section paramètre.
4.2REMISEAZERO/TARE
Vous pouvez appuyer sur [Tare] pour régler le nouveau point zéro. Le zéro sera réglé si la lecture sur la balance est inférieure à 3% de la capacité de la balance. Ceci peut être nécessaire si une faible valeur de poids est affichée sur l’écran quand le plateau est vide. L’indicateur de zéro sera affiché dans le coin en haut à gauche de l’écran LCD.
Si vous utilisez un récipient pour peser, alors vous pouvez le placer sur le plateau et appuyez sur [Tare], en vous assurant que le poids du récipient n’est pas plus important que 3% de la capacité maximum de la balance, l’écran affichera le zéro et NET s’allumera sur l’écran. Vous pouvez ensuite peser vos objets dans le récipient.
Faire la tare revient à soustraire le poids de la capacité total de la balance.
Note: Lorsque le récipient est enlevé, une valeur négative sera affichée. Si la balance a été tarée juste avant de retirer le récipient, cette valeur sera alors le poids brut du récipient plus tous les objets qui ont été retirés.
© Adam Equipment 2016 |
27 |
308669539revB6-Mar17 |

FR
4.3PESAGE
Pour déterminer le poids d’un échantillon, premièrement tarer un récipient vide (si utilisé), ensuite placez l’échantillon dans le récipient. L’écran affichera le poids et l’unité de pesage actuellement utilisée. L’indicateur de stabilité sera allumé et la lecture sera stable.
4.4UNITESPESAGE
Pour changer les unités de pesage, appuyez sur [Unit] pour faire défiler les unités disponibles. Voir la section Paramètre pour activer et désactiver les unités de pesage. Une fois que l’unité a été sélectionnée, le poids sera affiché dans l’unité sélectionnée et un symbole pour le poids sera indiqué.
© Adam Equipment 2016 |
28 |
308669539revB6-Mar17 |
 Loading...