


Adam Equipment EPB 723e, EPB 723i, EPB 363i, EPB 1203i, EPB 2103i Instruction Manual
...Adam Equipment
EQUINOX
Software revision c18.00.180 102
© Adam Equipment 2018

Easy Reference:
Model name of the scale:
Serial number of the unit:
Software revision number
(Displayed when power is first turned on): Date of Purchase and Address:
Name and address of the supplier:
© Adam Equipment 2018
CONTENT
PN3.01.6.6.14277,RevA,April2018
1 |
SAFETY INSTRUCTIONS AND WARNINGS............................................................................ |
3 |
|
2 |
STORAGE CONDITIONS............................................................................................................... |
3 |
|
|
2.1 |
OVERVIEW AND ACCESSORIES INSTALLATION.............................................................................. |
4 |
|
2.2 |
INSTALLATION LOCATION............................................................................................................. |
6 |
|
2.3 |
START-UP...................................................................................................................................... |
6 |
3 |
SERIAL INTERFACE CONNECTIONS ...................................................................................... |
8 |
||
|
3.1 |
TOUCH SCREEN DISPLAY OPERATION.......................................................................................... |
9 |
|
|
3.1.1 Operating instructions of the numeric and alphanumeric keypads for entering data......... |
11 |
||
4 STANDBY, LOGOUT, SWITCHING OFF FUNCTIONS........................................................ |
13 |
|||
5 |
SIMPLE WEIGHING..................................................................................................................... |
14 |
||
6 |
CUSTOMISED SETTINGS ........................................................................................................... |
16 |
||
|
6.1 |
SELECTING THE LANGUAGE........................................................................................................ |
17 |
|
|
6.2 |
SETTING DATE AND TIME ............................................................................................................ |
18 |
|
|
6.3 |
CREATING,CHANGING AND SELECTING THE USER PROFILE........................................................ |
19 |
|
|
6.3.1 Recovering and removing passwords.................................................................................... |
24 |
||
|
6.4 |
PREFERENCES:LANGUAGE,DISPLAY APPEARANCE,BRIGHTNESS AND BEEPER.......................... |
25 |
|
|
6.5 |
SETTING THE WEIGHING PARAMETERS........................................................................................ |
26 |
|
|
6.6 |
SELECTING THE UNIT OF MEASUREMENT.................................................................................... |
27 |
|
|
6.7 |
SELECTING THE CUSTOM MEASUREMENT UNITS......................................................................... |
28 |
|
|
6.8 |
CALIBRATING AND SETTING THE CALIBRATION MODE ............................................................... |
29 |
|
|
6.9 |
SETTING THE PERIPHERALS......................................................................................................... |
32 |
|
|
6.10 |
INFO ABOUT THE SOFTWARE....................................................................................................... |
36 |
|
|
6.11 |
SERVICE ...................................................................................................................................... |
36 |
|
|
6.11.1 System data backup and restore........................................................................................ |
36 |
||
|
6.11.2 |
Factory reset...................................................................................................................... |
38 |
|
|
6.11.3 |
Software update ................................................................................................................. |
40 |
|
|
6.11.4 |
Balance technical service.................................................................................................. |
40 |
|
7 |
FUNCTIONS MENU....................................................................................................................... |
41 |
||
|
7.1 |
USING THE DATABASE ................................................................................................................ |
42 |
|
|
7.2 |
PARTS COUNTING FUNCTION....................................................................................................... |
43 |
|
|
7.2.1 Parts count screen with “Statistics” function....................................................................... |
45 |
||
|
7.2.2 Parts count screen with “Check weighing” function. .......................................................... |
46 |
||
|
7.3 |
“CHECK WEIGHING”FUNCTION. ................................................................................................. |
47 |
|
|
7.3.1 “Check weight” screen function ........................................................................................... |
48 |
||
|
7.4 |
“PERCENTAGE WEIGHT %”FUNCTION....................................................................................... |
49 |
|
|
7.4.1 Percentage Weight % with “Statistics” function.................................................................. |
51 |
||
|
7.4.2 Screen of Weight % with “Check weighing” function. ........................................................ |
52 |
||
|
7.5 |
DENSITY FUNCTION.................................................................................................................... |
53 |
|
|
7.5.1 “Density of a solid” calculation function screen. ................................................................ |
55 |
||
|
7.5.2 “Density of a liquid” calculation function screen................................................................ |
55 |
||
|
7.5.3 “Density index” calculation function screen........................................................................ |
56 |
||
|
7.6 |
“STATISTICS”FUNCTION............................................................................................................. |
57 |
|
|
7.6.1 “Simple statistics” function screen ....................................................................................... |
58 |
||
1
7.6.2 “Database statistics” function screen .................................................................................. |
59 |
|
7.7 |
“TEXTILE”FUNCTION.................................................................................................................. |
61 |
7.7.1 |
“Textile” function screen. ..................................................................................................... |
62 |
7.7.2 Textile function database with statistics enabled screen...................................................... |
63 |
|
7.8 |
DYNAMIC/ANIMAL WEIGHING FUNCTION.................................................................................. |
65 |
7.9 |
“PEAK HOLD”FUNCTION............................................................................................................. |
67 |
7.10 |
“FORMULATION”FUNCTION ....................................................................................................... |
68 |
7.10.1 Simple formulation function screen. ................................................................................. |
71 |
|
7.10.2 Database formulation function screen.............................................................................. |
72 |
|
7.11 |
SETTING THE GLPDATA............................................................................................................. |
74 |
8 TECHNICAL FEATURES............................................................................................................. |
76 |
|
2

1 Safety instructions and warnings
CAUTION!
Please read these instructions for installation and operation carefully before starting your work with the new balance. Using a balance other than the one in this manual does not guarantee the safety of the product. Carefully store the instruction manual.
Equinox balances comply with the directives and standards for electrical equipment, electromagnetic compatibility and safety requirements.
If the installation is not performed in accordance with the instructions given or is improperly used, all warranty rights will lapse.
Do not use the balance in areas at risk of explosion.
Before starting the balance for the first time, check if the power supply unit or the power cord is damaged and check if the power voltage corresponds to the mains voltage.
To disconnect the balance from mains power, unplug the power cord first.
2 Storage conditions
Storage temperature: +5 °C…+40°C
Storage humidity: 45% - 75%.
Keep the balance packaging. In the event of return for service; disconnect all cables, top pans and any accessories to prevent unnecessary damage in transit.
Do not expose the balance to extremes of temperature and humidity, and avoid violent shocks.
© Adam Equipment 2018 |
3 |
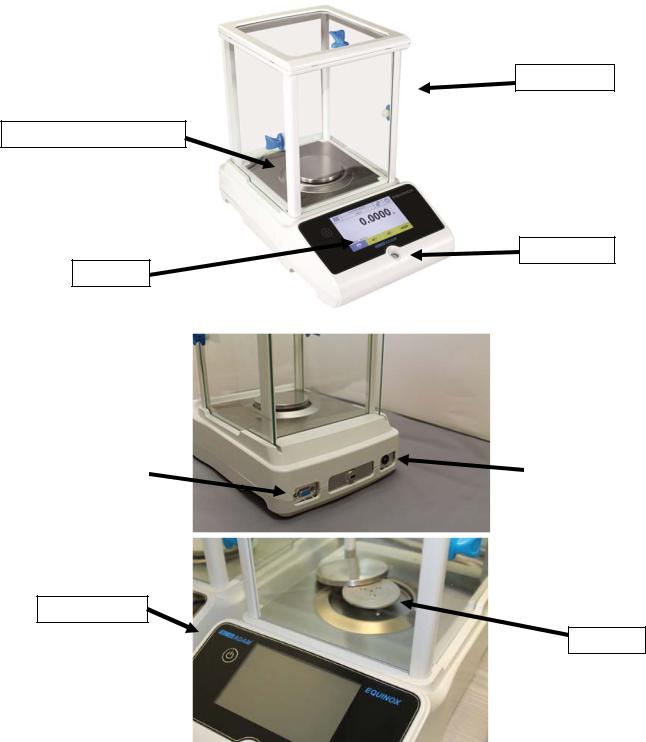
2.1 Overview and accessories installation
EAB & EPB models
Draft shield
Weighing plate/ Top pan
Spirit level
Keypad
RS-232 connection |
|
Mains connection |
|
|
|
Power button
Sub pan
© Adam Equipment 2018 |
4 |
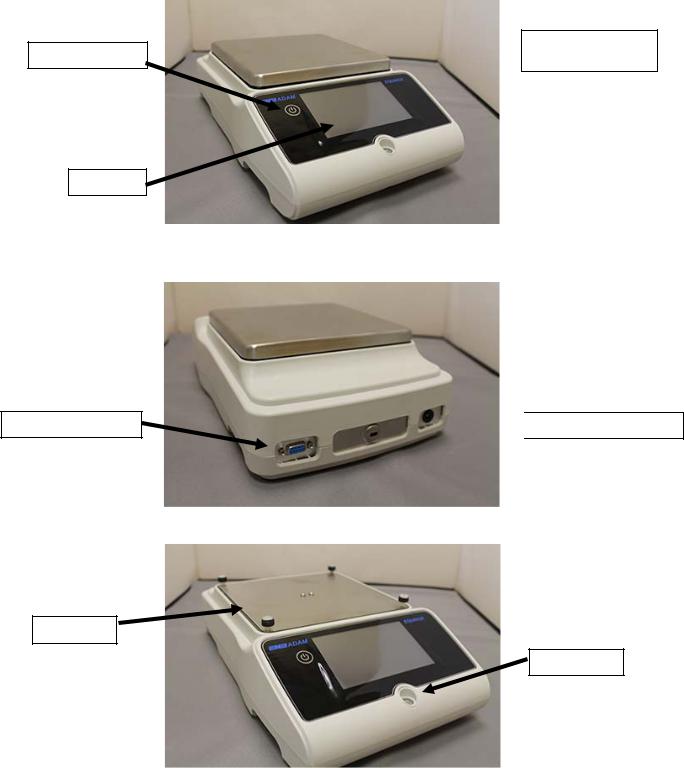
ETB models
Power button
Keypad
RS-232 connection
Sub pan
© Adam Equipment 2018
Weighing plate/  Top pan
 Mains connection
Spirit level
5
2.2 Installation location
Remove the balance and all its accessories, from the packaging and check for visible damage to the balance.
Do not install the balance in any room where there are any air currents, strong heat shifts, and vibrations.
Do not use the balance in explosive atmospheres.
The ambient humidity to use the balance should be between 45% and 75%.
2.3 Start-up
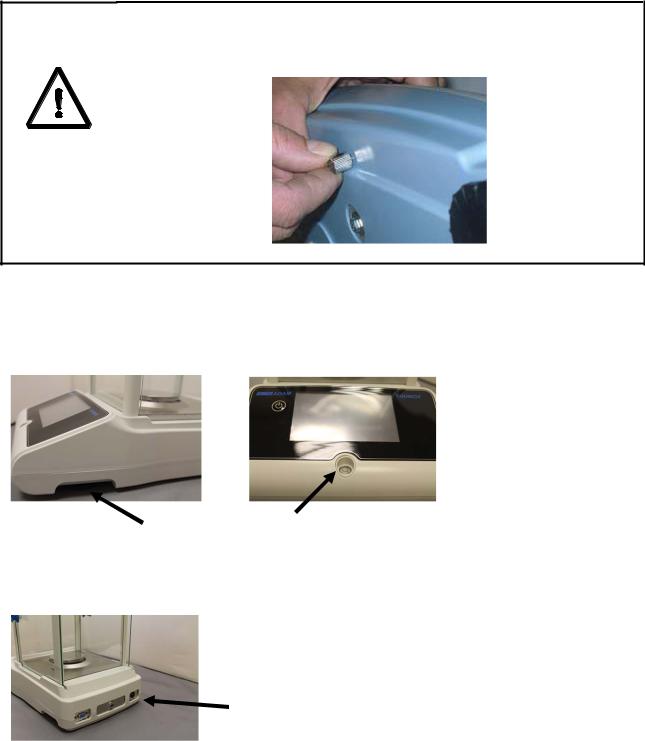
For internal calibration models, manually remove the brass screw at the bottom left-hand of the balance and in its place, insert the chrome screw.
CAUTION!
EAB & EPB models
1) Level the balance by adjusting the legs on the front of the balance.
|
|
Spirit level |
Adjustable feet |
|
|
|
|
|
|
||
|
|
|
2) Insert the supplied power supply unit jack into the connector on the back of the balance.
6
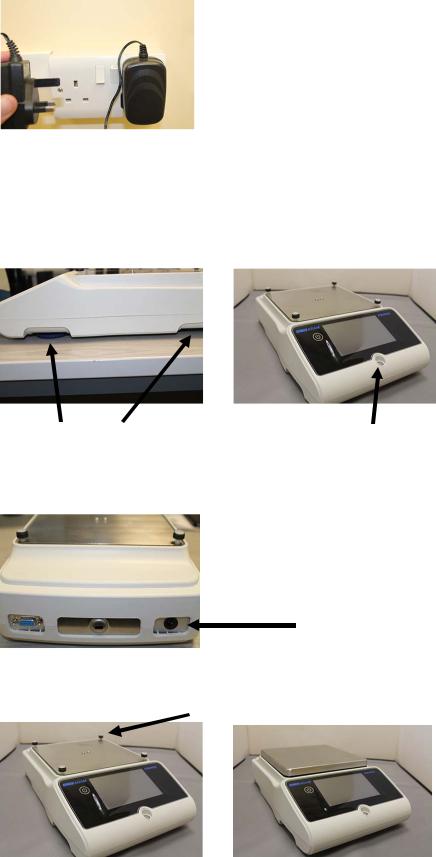
3) Then connect the power adapter to the power outlet near the balance. Do not use cables/extensions that do not comply with applicable regulations.
N.B. Check that the power shown on the balance plate label corresponds to the one in use in the country of use.
ETB models
1) Level the balance by adjusting the legs on the front of the balance.
Adjustable feet |
|
|
|
Spirit level |
|
|
|
|
2) Insert the supplied power supply unit jack into the connector on the back of the balance.
3) Fit the top pan onto the 4 prongs located on the sub pan, adjust until stable.
4) Then connect the power adapter to the power outlet near the balance. Do not use cables/extensions that do not comply with applicable regulations.
© Adam Equipment 2018 |
7 |
N.B. Check that the power shown on the balance plate label corresponds to the one in use in the country of use.
All models:
Wait 30 minutes after switching on and calibrate the balance after leveling it. For calibration procedures, please refer to the "calibration chapter". Perform the balance calibration whenever it is moved to another place.
Do not drop excess weight objects on the balance weighing plate to prevent damaging it.
Service must be performed by specialized personnel and the spare parts used must be genuine. To do so, contact the dealer or Adam Equipment at www.adamequipment.com.
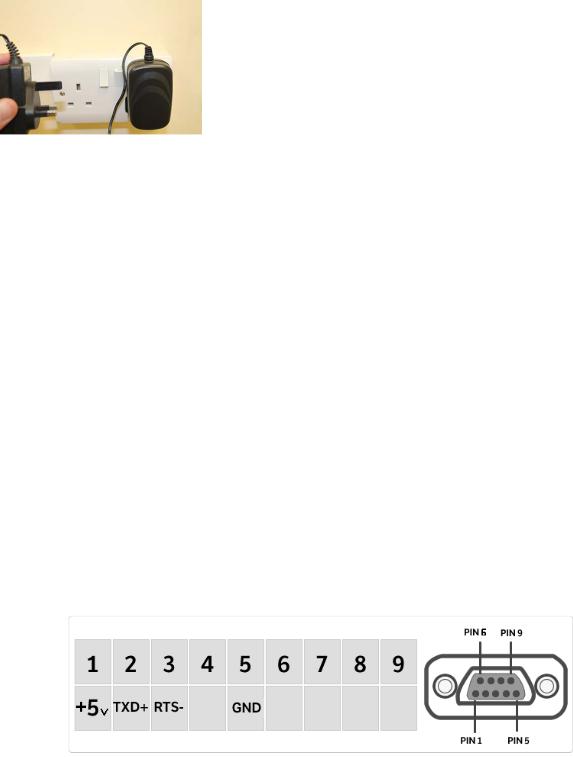
3 Serial interface connections
The balance is equipped with an RS 232C interface for connection to a serial printer.
To ensure communication between the balance and a printer, the following conditions must be met:
Connect the printer using a suitable cable matching the position of the pin outputs with the balance pin outputs shown below.
Set the transmission speed and type of printer correctly according to the parameters of the printer. See Chapter 7.7
N.B. It is recommended that you use the Adam ATP printer to ensure proper print operation. (If you are using different printers, you may not be able to print the chart).
© Adam Equipment 2018 |
8 |
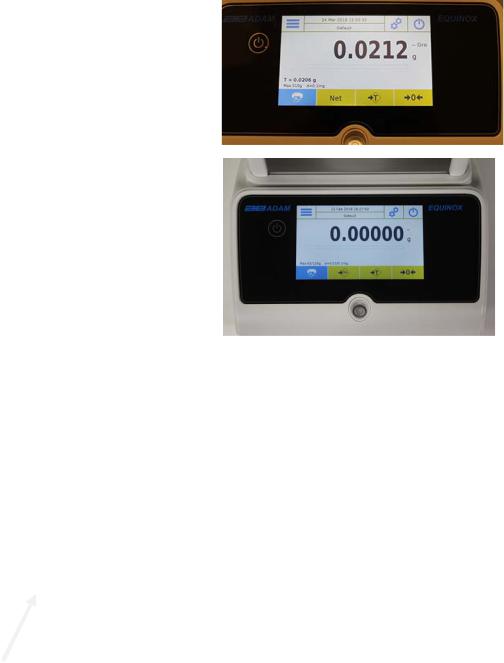
3.1 Touch Screen Display Operation
The balance comes with a 5” colour touch screen display that lets you touch the screen in active areas to quickly access the various menus and features.
2
1 
3 
1
Indication area for weighing values
gMeasuring unit indication, by tapping the symbol, you can access the measurement unit menu and select the desired unit.
Stability indicator.
Capacity tracker
 Shows the balance maximum capacity and increment.
© Adam Equipment 2018 |
9 |

2
The Top Bar displays the date, time, user selection, access to weighing functions, weighing and balance shutdown parameters setting.
|
Tap this area to access the available function menu. |
|
|
Tap this area to access the menus for weighing settings, display |
|
|
preferences, peripheral units setup, and user customisation. |
|
|
Tap this area to access the switching on or off menu for the balance |
|
|
standby parameters. |
|
Default |
Tap this area to access the users menu to quickly select |
|
programmed users. |
||
|
3
Function key display bar.
Touching the keys displayed in this area, operates the corresponding function. Below are all the keys available in the simple weighing screen. The function key display bar varies according to the selected applications.
Key bars available in simple weighing screens:
 Print: Data printing key.
 -0-: Zero key.
 -T-: Tare operation key.
 Tm: Key for manually entering a tare value.
© Adam Equipment 2018 |
10 |
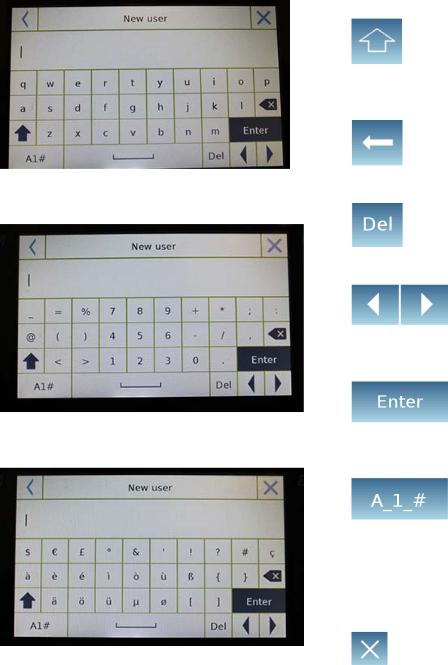
3.1.1 Operating instructions of the numeric and alphanumeric keypads for entering data
The operation of the alphanumeric keyboard described below works for all data entry operations in the various operating modes.
Mode 1
Alphanumeric keypad.
Selection key for entering uppercase or lower case letters
Delete key of the last entered character
Mode 2
Delete key for all entered characters
Back and forward cursor movement key on the inserted data string
Key to confirm and store the entry
Mode 3
Keyboard character selection key. Tap this key to rotate the various characters available for entry:
Mode 1, Mode 2, Mode 3
Cancel key.
© Adam Equipment 2018 |
11 |
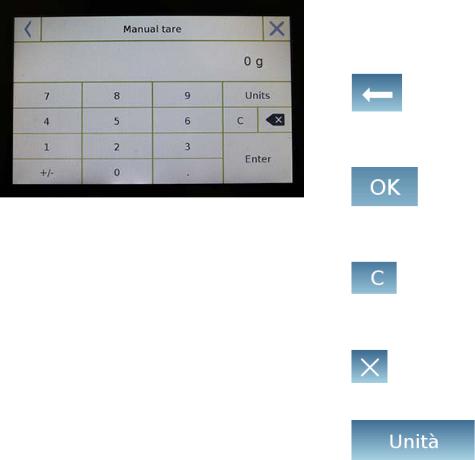
Numeric keypad.
Delete key of the last entered character
Key to confirm and store the entry
Delete key for all entered characters
Input operation cancellation key.
Key for selecting the unit of measurement.
© Adam Equipment 2018 |
12 |

4 Standby, logout, switching off functions
After inserting the power cord into the mains socket, the balance will automatically turn on showing the basic weighing screen.
Tap the area with the symbol below to access the power off menu.
There are 3 power off modes:
Display off.
Logout.
Power off.
Display off
By selecting the display off mode, the balance will enter standby mode, the display will be off and it will remain ON only in the lower-right command to turn on the system again.
Touch the symbol to return to the basic weighing screen.
Logout
Select the logout mode and touch the
“Start” key to open the user login, if the user is password-protected, you will be required to enter it.
Touching the key  , will let you select another user and start the balance again.
Switching off
By selecting the power-off command, the balance will be off. To restart, you will need to press the on/off button or remove the power plug and reinsert it.
© Adam Equipment 2018 |
13 |

5 Simple weighing
Stability symbol
On the entry weighing screen, the area displaying the weight shows the weight value on the top of the balance’s weighing plate/ Top pan.
Use the -0- key to set a new zero point and reset all tare values.
If working with containers, first zero the balance. Place the container and press the “-T-”key.
Or use the Tm key to enter a known tare value manually.
The Net symbol on the display indicates the net weight. Press “Net” to see the gross weight “Lrd”.
“T= “indicates the tare value captured.
Place the material to be weighed on the balance and wait for the stability symbol (see previous image) to light up before detecting the value.
© Adam Equipment 2018 |
14 |
Press “Gro” and “Net” to display the gross and net weights and vice versa.
To reset the balance, remove all items from the plate and press the “- 0 -“key.
If you entered a manual tare, press “T- Man/ Tm” and “C” key to clear the tare value.
© Adam Equipment 2018 |
15 |

6 Customised settings
This section explains all the customisation features of the balance. Each function described below will allow you to set up the balance differently for each user.
N.B. Some settings can only be modified by users with administrator permissions.
Calibration menu
Setup
Users setup
Preferences
Info
Service
To access the settings menu, tap the button in the top bar of the display:
The following screens will be displayed with all the functions of the setup menu.
To scroll through the next and back |
Return to the |
pages, tap on the arrows. |
previous screen |
Function indicator not available or not enabled for users without administrator rights.
© Adam Equipment 2018 |
16 |
Exit from the menu
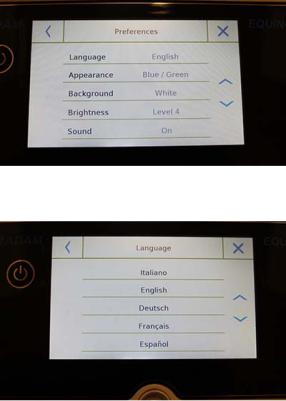
6.1 Selecting the language
In the settings menu, select the "Preferences" function.
Tap “Language” in the menu list.
You can select the balance's use language.
Then select the desired language. Automatically, all screens will be translated into the selected language.
N.B. The selected language will only be assigned to the user with whom the selection was made.
© Adam Equipment 2018 |
17 |

6.2 Setting date and time
Select “Setup” in the setup menu.
Enter the new date and time values. You can also select the 24-hour or 12-hour format for the hour.
N.B. The date and time setting is not customisable for each user, but once defined it will be changed for all users.
Tap “Date and time” in the menu list.
Tap “Date” in the menu list to change the date.
Tap “Time” in the menu list to change the time
Tap “24h – 12h” in the menu list to set the time format.
A numeric keypad will be displayed for entering the date and time in
"“dd/mm/yyyy” mode for the date and
“hh:mm:ss” for the time
Tap “OK” to confirm the new settings, “C” to delete all entered data or tap “X” to exit without changing the value.
© Adam Equipment 2018 |
18 |
6.3 Creating, changing and selecting the user profile
The balance can be customised for multiple users. You can create up to 10 different user profiles. When first turned on, the “Default” user is enabled and this user cannot be either deleted or renamed.
Each user can then fully customise all the database settings. Once you've created your profile, just touch "User Area" on the Home screen and select the user you want. All settings for the selected user will then be loaded. From this moment on, any changes made to the enabled user will be stored and made available each time the user is selected.
You can create two types of user:
Administrator
Standard
Creating an administrator user allows the user to access all the balance setting features and changing or deleting other users.
Creating a standard user allows the user to access only some of the balance setting features.
The “No Access” display that appears when you touch a feature that is not available for the standard user is: 
You must log on with an administrator user to change the protected functions. After you have created an administrator and standard user, you will be able to assign an access password that will be required each time you select the user and turn on the balance.
Below are all operations related to user modification and deletion.
In the settings menu, select "Setup Users"
This screen allows you to enter the following functions:
New user
Edit user
Rename user
Copy users
Delete user
User Password
© Adam Equipment 2018 |
19 |
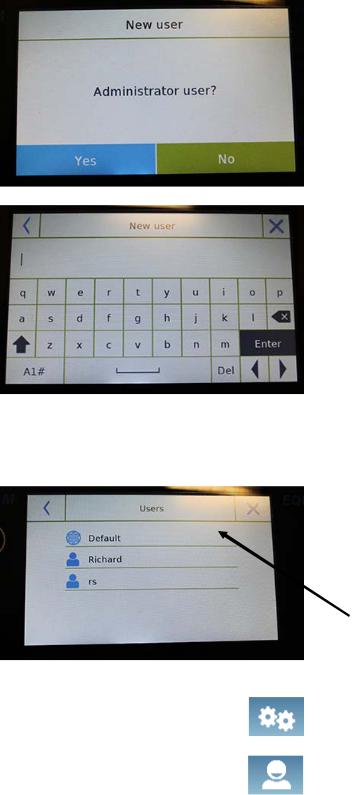
New user
By selecting the "New User" function, you can define a new user. The maximum number of users that can be entered is 10.
You will be prompted to select whether the user you want to create must have administrator powers or be a standard user.
The keyboard for entering the username will then be automatically activated.
The maximum number of characters allowed is 30.
The insertion method distinguishes between uppercase and lowercase letters, for example, a user entered as "TEST" will be different from a user entered as a "test".
After searching for a new user, go back to the main screen.
Tap the user selection area and select the user you have just created.
From now on, all changes to the functions, databases, or analytics results will be associated with the user, and each time they are called, they will be automatically reloaded.
The left-hand symbol of the username indicates the type of user:
Administrator
Standard
© Adam Equipment 2018 |
20 |
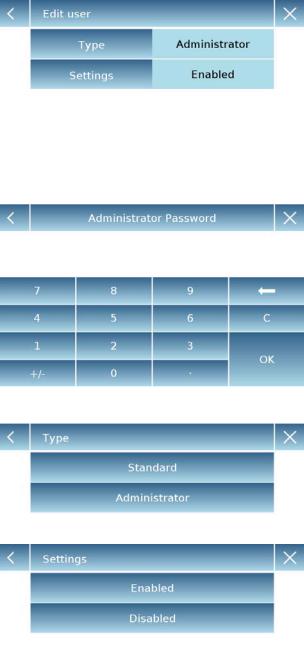
Edit user
In the "Edit user” menu, you can change the user type ("Standard or Administrator") and temporarily unlock the standard user locked settings.
Type
If the user is a standard type in order to modify the user type, a user's password with administrator rights will be required.
Select “Standard” to set the user in standard mode or select “Administrator” to set the user with administrator rights.
Settings
Selecting this function will prompt you to enter a user's password with administrator rights.
Then select the "Enable" function to temporarily unlock the standard user or select the "Disable" function to lock the user again.
After you unlock the user in the base screen on the left side of the username, an open padlock will appear.
Unlocking will remain active until it is locked again through the user editing menu, or when another user is selected or the balance is turned off.
© Adam Equipment 2018 |
21 |

Rename users
By selecting the "Rename Users" function, you can change the name of the selected user.
Select the user you want to rename.
The name change keyboard will be displayed.
Tap “X “to cancel the operation or change the name and confirm with the "Enter" key.
Copy users
By selecting the "Copy Users" function, you can create a new user with the same configuration as an existing user. Existing databases will not be copied and no new password protection will be enabled. To copy the databases of another user, you need to export and import them to the desired user.
Select the user you want to duplicate.
Enter the name to assign to the new user and confirm with the "Enter" key.
|
Delete users |
|
By selecting the "Delete Users" function, |
|
you can permanently delete a user and its |
|
databases. |
|
The list of stored users will be displayed, |
|
then select the user to delete. |
© Adam Equipment 2018 |
22 |
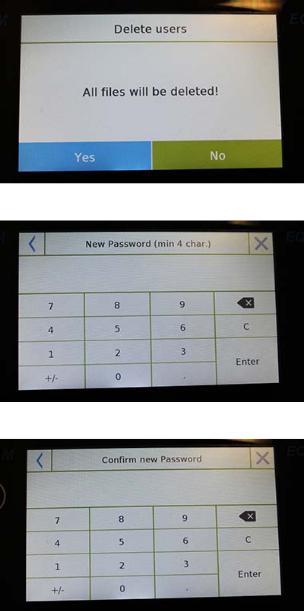
Confirm by tapping the "Yes" key or cancel the operation by tapping the "No" key.
User password
By selecting the "User Password" function, you will be able to assign a "Standard" or "Administrator" user password.
You will then be asked to re-enter the password for confirmation.
Enter it and tap the "OK" key.
From this moment on, every time you want to access the user, you will be required to enter your password.
N.B. Write down your password and store it in a safe place.
Warning! In case of loss, you will only be able to recover the password for the "Standard" user. The recovery procedure is described in chapter 8.3.1.
© Adam Equipment 2018 |
23 |
 Loading...