


Adam Equipment GFK 600aM, GFK 150aM, GBK 30aM, GBK 150aM, GBK 60aM User Manual
...Adam Equipment
GK / GBK / GFK SCALE
(P.N. 3056610542, Revision C2, July 2013)
Adam Equipment strives to be more environmentally focused and uses recycled materials and environmentally friendly packaging where possible. As part of this initiative we have developed a short manual that uses less paper and ink to describe the main functions of your new Adam indicator/scale. A complete version is available at www.adamequipment.com. Thank you for your support of Adam Equipment and we hope that you enjoy your new scale.
© Adam Equipment Company 2013
© Adam Equipment Company 2013
CONTENT
1.0 |
SETTING UP AND TURNING ON THE SCALES................................ |
3 |
2.0 |
OPERATION ......................................................................................... |
3 |
2.1 |
ZEROING ........................................................................................... |
3 |
2.2 |
TARING.............................................................................................. |
3 |
2.3 |
PARTS COUNTING ........................................................................... |
4 |
2.4 |
CHECK-WEIGHING ........................................................................... |
5 |
2.5 |
PERCENT WEIGHING....................................................................... |
6 |
2.6 |
ANIMAL (Dynamic) WEIGHING........................................................ |
7 |
2.7 |
ACCUMULATED TOTAL................................................................... |
8 |
3.0 |
RS-232 SPECIFICATION...................................................................... |
9 |
4.0 |
CALIBRATION.................................................................................... |
10 |
4.1 |
CALIBRATION COUNTER FOR APPROVED SCALES............... |
10 |
5.0 |
SPECIFICATIONS............................................................................... |
11 |
6.0 |
ERROR MESSAGES .......................................................................... |
16 |
7.0 |
MENU STRUCTURE........................................................................... |
17 |
8.0 |
WARRANTY INFORMATION ............................................................. |
18 |
P a g e 1 |
© Adam Equipment Company 2013 |
P a g e 2 |
© Adam Equipment Company 2013 |

1.0SETTING UP AND TURNING ON THE SCALES
GK indicator: It must be connected to a load cell platform and calibrated as necessary to match the platform and user requirements.
GBK/GFK scales: There is a pillar which must be attached to the base frame first using the 4 bolts supplied. The pillar is secured to the bracket using 2 sets of screws. Then place the platform in the base. Level the scale by adjusting the four feet. Attach the indicator module to the pillar by sliding it over the bracket with the flanges engaged in the groves on the base. Attach the cable from the base to the connector on the rear of the indicator. Attach the power to the indicator.
After completion of setting up, press the [On/Off] key on the rear of the indicator. The software revision number will be displayed followed by a self-test showing all digits before the zero is displayed along with the unit of weight that was selected last.
NOTE: The GK and GBK/GFK can be operated from the rechargeable battery. With a single load cell and backlight disabled the life is approximately 70 hours before needing to be recharged. The battery should be charged for 12 hours for full capacity.
2.0OPERATION
2.1ZEROING
You can press the [Zero] key at any time to set the zero point from which all other weighing and counting is measured. The scales have an automatic re-zeroing function to account for minor drifting or accumulation of material on a connected platform. However you may need to press [Zero] to re-zero the indicator if small amount of weight is still shown when the platform is empty.
2.2TARING
To determine a weight of sample which is using a container, you need to tare the empty container. GK/GBK/GFK scales supply two methods of tare: manual tare and preset tare.
Manual Tare
Zero the indicator by pressing [Zero]. The zero indicator will be on. Place a container on the pan.
Press [Tare] when the reading is stable. The weight that was displayed is stored as the tare value, leaving zero on the display. The stable and Net indicator will be on.
As a sample is added only the weight of the product will be shown. The indicator could be tared a second time if another type of product was added to the first one.
Press [Tare] or [Zero] to remove the tare value and display zero. The Net indicator will disappear.
P a g e 3 |
© Adam Equipment Company 2013 |
Preset Tare
When the indicator or scale is at zero with no weight on the platform it is possible to enter a preset tare. First zeroing the scale, enter a value using the numeric keys. Press [Tare] to tare the indicator. The value that was entered is stored as the tare value and it is subtracted from the display, leaving a negative number on the display.
To change the weighing unit press the [Unit] key. The only alternative weighing unit is pounds. OIML Approved models, GK-M, GBK-M, GFK-M do not allow pounds units
NOTE: This function is not available in GK-M, GBK-M, GFK-M models.
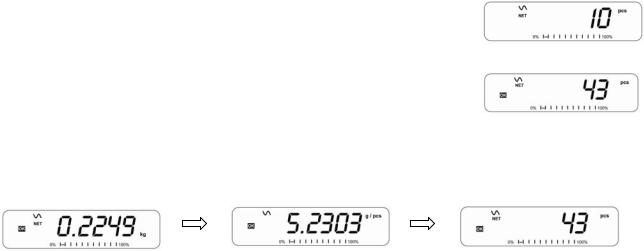
2.3PARTS COUNTING
The scale can be used to count parts based on the average weight of a sample weighed. If a container is to be used, place this container on the platform before entering parts counting and press [Tare]. Press [Cnt] to enter the Parts Counting mode.
The display will show the last sample size used. For example, “10 Pcs”. To change the sample size, you can press [CE] to clear the last values and then enter the value 20 using the numeric keypad.
Place the right number of parts on the platform. Then press [Cnt] to determine an average piece weight. After the sample has been weighed the scale will count any other parts added by applying the average piece weight to the weight of the parts to be counted.
During parts counting the display can be changed to show the net weight, unit weight and number of parts by each time pressing the [Func] key.
To count a different sample quantity, press the [Count] key. And operate as above. To return to weighing, press [Unit] when “XX pcs” is displayed.
NOTE: If the parts are too light to measure accurately, the count may become faulty. It is suggested that the samples to be weighed should each weigh more than the resolution of the indicator.
P a g e 4 |
© Adam Equipment Company 2013 |

2.4CHECK-WEIGHING
Check-weighing is a procedure to display an indicator or sound an alarm when the weight on the platform meets or exceeds the values stored in the memory. The memory holds values for a high limit and a low limit. Either or both the limits can be set by the user.
The LCD display will indicate whenever the weight is within or exceeds the limits by showing “OK” (mass is between the limits), “HI”(mass is above the high limit) or “LO”( mass is below the low limit).
The limits can be locked by the manager (see the menu structure section) .A Limit Password must be used to change the limits or recall other limits from memory.
Setting up the limits
In normal weighing, Press the [Low Limit] key. It will show the current low limit. The “LO” symbol will appear on the display.
Press the [CE] key to clear the old value and then enter the new low limit using the numeric keys. Then press [Tare] to accept the value. If you want to reset the value to zero, press [CE] to clear the value. The limits are displayed in the weighing unit in use.
To set the high limit press [High Limit], the “HI” symbol will be on. Set the high limit in the same way the low limit was set. Pressing the [Tare] key to enter the value will return the scale to weighing, with the Checkweighing function enabled. During parts counting and percent weighing, the limits are set in the same way as above. The limits are displayed in pcs or %.
To disable the check weighing function, enter zero into both the limits as described above. When the current limits are shown, press [CE] to clear the settings, then press [Tare] to store the zero values.
NOTE: The weight must be greater than 20 scale divisions for check-weighing to operate.
Limits storing and recalling
The indicator can store up to 10 sets of high and low limits in memory along with the weighing units in use (including pcs and %) as well as settings for the beeper and bar graph. During Check weighing the current limits can be stored or previously stored units can be recalled.
If you are already in the check weighing mode the display will ask if you wish to store the current limits by showing “StOrE” or recall another set of limits by showing “rECALL”. The [Lim] key can be used to toggle between “StOrE” and
“rECALL”.
If you want to store the limits, when “StOrE” is displayed press the [Tare] key. The display shows “St ”. Enter a number corresponding to the desired memory
location (0 to 9). “St X” will be displayed for 2 seconds indicating the location X where the current limits, weighing units and settings for the beeper and bar graph are stored. The indicator will continue to work with the current settings as active.
P a g e 5 |
© Adam Equipment Company 2013 |
 Loading...