


Model WB-01
Mini Gaming
Wheel
User manual Vartotojo instrukcija Lietošanas instrukcija Kasutujhend Руководство пользователя


EN
ACME Mini Gaming Wheel
Packing list:
•Mini PC Wheel
•Foot pedals
•Table Clamp
•User Manual
•Warranty card
Specifications:
•Port: USB
•6 stage of sensitivity adjustment for wheel and program function
•3 different color LED to indicate different function setting
•12 buttons
•Desk clamp and screw for holding the base tightly on the desktop
•Mini pedals for more realistic sense
•Auto switching of hand levers function when pedals disconnected
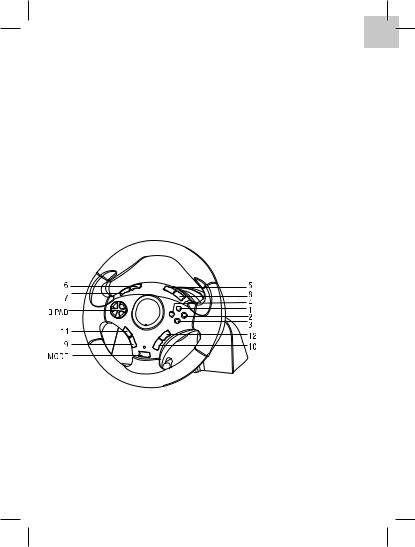
Button Assignment:
PC platform
Wheel Assembly:
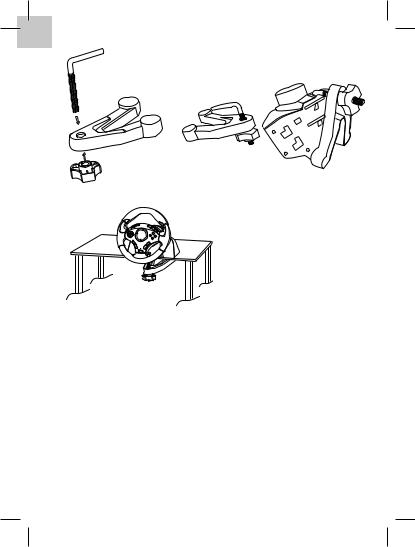
Please assembly the wheel on the desk or table. Step 1. Fit the clamp as shown in Figures 1-2 below.
Step 2. Place the PC wheel in a comfortable driving position (on a desk or table) and press the base unit down firmly on the surface.
Step 3. Turn the clamp screw until the base is firmly connected. (See Figure 3)

EN
Figure 1 |
Figure 2 |
Figure 3
System requirements:
•IBM PC
•Windows 98SE or higher
•Free USB port
•20MB free hard disk space
•DirectX8.0 or later
Wheel installation:
1.Connect the wheel and pedals first
2.Connect the USB plug to the USB port of the PC
3.Turn on PC
4.Windows will detect wheel and install drivers
5.Start your game play
Note: Do not connect the steering wheel to a USB hub. It only works when connected directly to the USB port of the PC.
Note: Before connecting wheel to PC, the wheel must be placed at the center position (not turned).

EN
The gaming wheel sensitivity adjustment:
This wheel has six stages of sensitivity adjustment, level 1 is the lowest sensitivity, level 6 – the highest, level 3 is set by default. To change sensitivity press BUTTON 9 + RIGHT (on D-pad). Different color LED will flash for three seconds to indicate selected sensitivity level:
Level 1: blue LED Level 2: green LED Level 3: red LED
Level 4: blue and green LED Level 5: green and red LED Level 6: blue and red LED
Trouble shooting
The gaming wheel doesn’t respond:
1.Check that the game you have chosen supports the current operating mode.
2.Reconnect cables using another USB port on your computer.
The pedals don’t respond:
1.Check the cable connection between pedals and steering wheel.
2.Check that the pedals are activated in the game.
Gaming wheel programming function
1. Programming function
If you want to acquire the hand lever, pedal and other default function of the button, please see the attached of the button form. Through programming operation, users can change the function of Hand lever and Pedal according to their habit and interest.
1.Programmable Left & Right Hand Levers - Gas and Brake Pedals
The hand lever and pedal can be reassigned to 1, 2, 3, 4, 5, 6, 7, 8, 11, 12 RY axis.
2.Programming operation
step 1. Press BUTTON 9 for 3 seconds, the LED will light, indicating that wheel is in programing mode.
step 2. Press the button which you want to change it’s function.
step 3. Press that button which you would like to assign, so the program to the first button is finished. After that, the LED will flash three kinds of color, it means you can program other button. If you continue to program other buttons, repeat step 2 and step 3.

EN
For example:
In the PC platform, program Brake function of the Left Pedal into the button 5.
1)Press BUTTON 9 for 3 seconds, the LED will flash three kinds of color.
2)Press Left Pedal button, LED will flare blue and green lighting, and then press the button 5 you would like to assign.
3)After above, the LED will flash three kinds of color lighting at the same time, it shows that buttons were programmed successfully.
4)Go to your next programming.
5)Press BUTTON 9 to exit programing mode.
3.To Exit programming:
1)During programming, when LED flashing, do not touch any button, 6 seconds later, the programming function exits automatically.
2)Press BUTTON 9 one time, this will exit programming mode.
Note: Do not program any button during gaming, or it will influence the operation.
Reset:
Press MODE button for 3 seconds, then relax it, after that wheel returns to the default function and sensitivity.
2. Hot plug for pedals
Product can support pedals hot plug. When pedals are not connected with the wheel, left and right hand levers perform the same functions as the Brake and Acceleration pedals.
Connect pedals and wheel, they will keep the default function again.
3. Vibration function state
1.The wheel has default vibration function. Press BUTTON 9 + UP (on D-pad) for one second, the LED will flash three kinds of color lighting at the same time. It shows the vibration function is turned off.
2.Press BUTTON 9 + UP (on D-pad) for one second again to turn on vibration function.
LT
ACME Mini žaidimų vairas
Pakuotę sudaro:
•Mini žaidimų vairas
•Pedalai
•Veržiklis prie stalo
•Vartotojo instrukcija
•Garantinė kortelė
Specifikacijos:
•Jungtis: USB
•6 vairo jautrumo lygiai
•3 skirtingų spalvų lemputės, parodančios skirtingų funkcijų režimus
•12 mygtukų
•Tvirtinimo prie stalo komplektas, kad vairas tvirtai laikytųsi ant stalo paviršiaus
•„Mini pedalai“, suteikiantys tikroviškumo jausmą žaidžiant
•Automatinis perjungimas į rankinės svirties funkciją, kai atjungiami pedalai
Mygtukų išsidėstymas:
PC platforma
Žaidimų vairo surinkimas
Žaidimo vairo tvirtinimas ant stalo ar kito kieto paviršiaus: Žingsnis 1. Pritvirtinkite prispautuvą prie vairo, kaip parodyta 1-2 paveiksliukuose apačioje.
Žingsnis 2. Uždėkite žaidimų vairą, taip, kad jums būtų patogu žaisti (ant stalo ar kito kieto paviršiaus) ir prispauskite korpusą atsargiai žemyn prie paviršiaus. Žingsnis 3. Prisukite prispaustuvą, kad vairas tvirtai laikytųsi ant stalo.
(Žiūrėkite paveiksliuką 3)
LT
1 paveikslas |
2 paveikslas |
3 paveikslas
Reikalavimai sistemai:
•Personalinis kompiuteris su USB jungtimi
•Windows 98SE arba naujesnė operacinė sistema
•20 megabaitų laisvos kietojo disko vietos
•DirectX8 arba naujesnis
Žaidimų vairo prijungimas prie kompiuterio:
1.Prijunkite pedalus prie žaidimų vairo
2.Įkiškite USB kištuką į asmeninio kompiuterio USB jungtį
3.Įjunkite kompiuterį
4.Windows sistema aptiks vairą ir įdiegs jo tvarkykles
5.Galite pradėti žaisti
Pastaba: prieš prijungiant vairą prie kompiuterio, vairas privalo būti išcentruotas (nepasuktas).
Pastaba: nejunkite vairo į USB šakotuvą. Jis veikia tik tiesiogiai įjungus į kompiuterio USB jungtį.
 Loading...