


www.acme.eu
Model: V-150
MP3 player


4 GB User’s manual 39 Warranty card
9 LT Vartotojo gidas 40 Garantinis lapas
14 LV Lietošanas instrukcija 41 Garantijas lapa
19 EE Kasutusjuhend 42 Garantiileht
24 PL Instrukcja obsługi 43 Karta gwarancyjna
29 DE Bedienungsanleitung 44 Garantieblatt
34 RU Инструкция пользователя 45 Гарантийный талон
33
GB
Thank You
Congratulations on your purchase of an MP3 player. This manual is designed to help you easily set up and begin
using your new player straight away. Please read this manual carefully and retain it for future reference. Please rea d
these instructions carefully before using your player.
Package Contents
Please make sure that the items shown below are included in the package. Should an item be missing, please
contact the local retailer from which you purchased this product.
• MP3 player V-150
• Stereo earphones
• USB adapter
• User manual
• Warranty card
This package may contain plastic bags or other materials that pose a hazard to children. Please be sure to that you
safely dispose of all packing materials after opening.
Features
• Integrated ash memory
• Plays MP3 and WMA digital music les
• Mobile data storage
• USB 2.0 for fast le transfers
• Integrated rechargeable battery
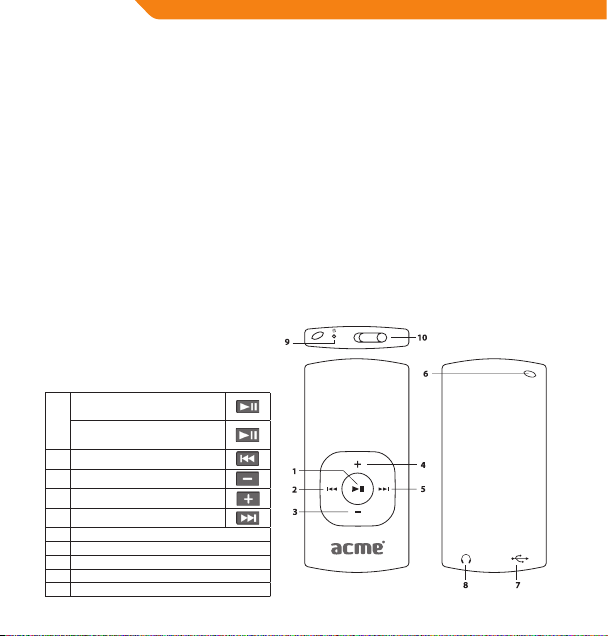
Controls at a Glance
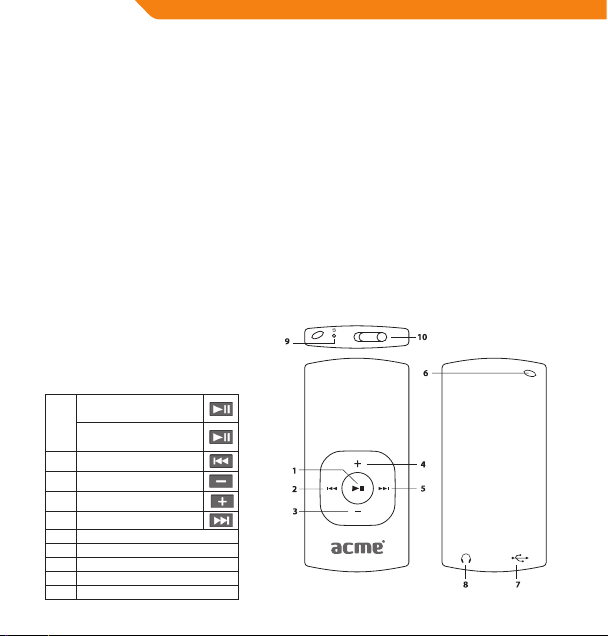
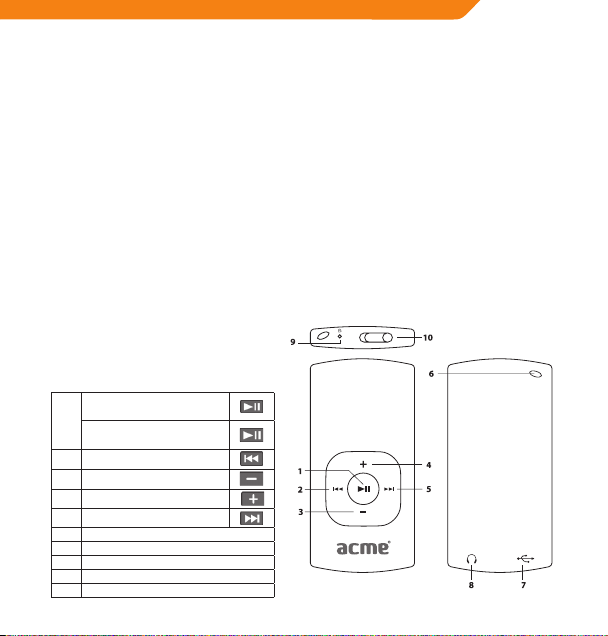
Play/Pause:
Press Button
1.
Power On/O:
Press and Hold Button
2. Previous/Reverse
3. Volume Down
4. Volume Up
5. Next/Forward
6. Hole for Neck strap
7. USB Port
8. Headphone Output Jack
9. LED Status Indicator
10. Power Switch
4

Powering Your Player
Your player has an integrated rechargeable battery. Typical music playtime is up to three hours.
Upon initial use, the battery should be charged fully (for four hours) to ensure the very best performance and a long
battery life.
Music play time is an estimated value. Actual play time may vary depending on the encoding method used and
upon other factors.
Charging Your Player
Your player can be charged through a PC’s USB connection. Plug one end of the USB cable into the player’s USB Port
and plug the other end into the USB port of a computer which has been switched on.
If the player is connected to a computer through a USB hub, the hub must be self-powered in order to charge the player’s
battery.
Carrying out le transfers will extend the charging time.
The battery used in this device may pose a risk of re or chemical burn if mistreated. Do not disassemble, incinerate, or
heat the battery.
Do not connect the player to a power source other than that which is indicated here or on the label, as this may pose a risk
of re or electric shock.
Turning Your Player On/Off
• To turn your player on, slide the power switch to the left. The LED indicator will illuminate.
• To turn your player o, slide the power switch to the right. The LED indicator will go dark.
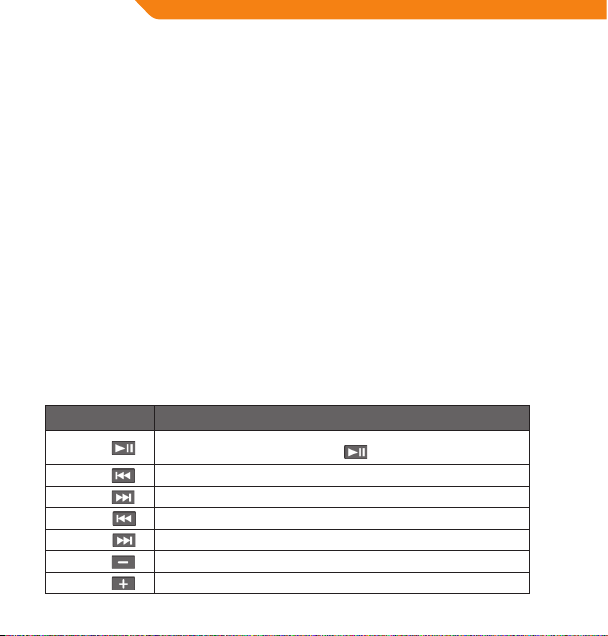
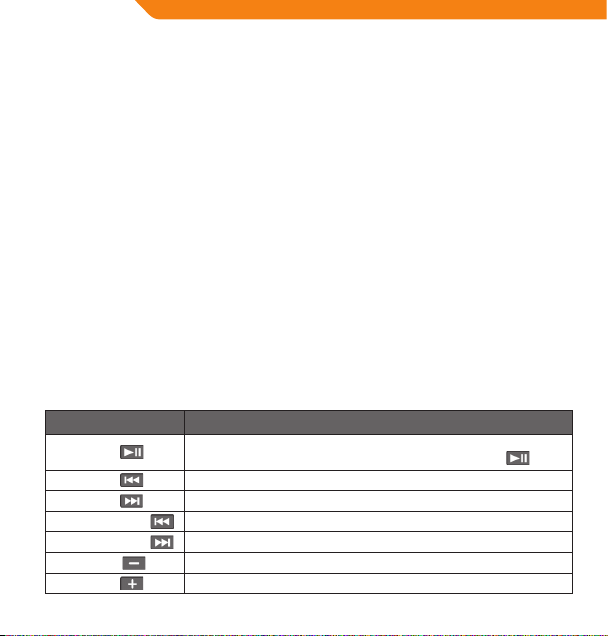
Music Playback Controls
Use the following controls during music playback. The LED indicator will ash during music playback.
Key Action Function
Press
Press
Press
Hold
Hold
Press
Press
Start/Pause music playback. While playback is paused, press to resume.
Play the previous track.
Play the next track.
Rewind through the current track.
Fast-forward through the current track.
Decrease the volume level.
Increase the volume level.
GB
5

GB
Connecting to a Computer
Connect the player to a computer with the USB cable provided in order to:
• Transfer les to and from your player
• Perform basic le management procedures.
Once you have connected your player:
• Your computer will automatically recognize the player as a Removable Disk. An icon representing your player will
appear under “Devices with Removable Storage” when you open “My Computer”.
• It may take Windows several minutes to recognize and set up the device the rst time it is connected, depending
upon your hardware conguration.
Transferring/Managing Files
The USB 2.0 connection makes it easy to transfer music quickly between the player and your computer. Simply use
the player as you would any removable disk using basic operating system commands.
You can also use your player to store video, photos, or any other type of les.
If you need further assistance with transferring and managing les, please refer to your operating system’s instruction
manual or on-screen help. If you are using media management software such as iTunes, WinAmp, or Windows Media
Player, please refer to their documentation for support.
Do not disconnect or otherwise interrupt the player during le transfer - this could damage or corrupt the player’s rmware
or your les.
For more information and support regarding music transfer and synchronization with Windows Media Player (WMP),
please see the help section included with WMP (click “Help > Synchronizing Content to Devices”).
Disconnecting from a Computer
Disconnect your player as instructed below to prevent data loss or le/rmware corruption.
Microsoft Windows
1. Double-click the green arrow in the taskbar located on the lower-right side of the computer screen (Safely
Remove Hardware).
2. Safely Remove Hardware: Select “USB Mass Storage Device” from the list that appears and then click on “Stop”.
Stop a Hardware Device: Select “USB Mass Storage Device” from the list that appears and then click on “OK”.
3. When the “Safe to Remove Hardware” window appears, click the OK button and disconnect the USB cable from
the player and your computer.
Macintosh OS X
1. On the left side of the Finder Window, identify the appropriate Removable Disk icon.
2. Click on the “Eject” arrow on the right of the Removable Disk icon.
3. Disconnect the USB cable from the player and your computer.
6

Troubleshooting
If you have a problem with this device, please read the troubleshooting guide below.
The player does not turn on.
• Ensure that the player is fully charged. Try charging the player overnight (for a period of eight hours).
The buttons do not work.
• Ensure that the player is fully charged. Try charging the player overnight (for a period of eight hours).
• Ensure that the Power switch is ON.
I cannot transfer les to the player.
• Ensure that your computer is running a supported operating system.
• If using a USB extension cable, ensure that it is securely attached to the player and the PC, or try using another
USB cable.
• If you have connected the player through a USB hub, try connecting the player directly to your computer.
• Ensure that the player’s memory capacity is not full.
• Ensure that the Power switch is ON.
There is no sound during playback.
• Check the volume level.
• Ensure that the headphones are attached securely to the player.
The sound quality of the music is poor.
• Try playing the le on your computer. If the sound quality is still poor, try downloading the le again or reencoding the le yourself.
• Ensure that the bit rate of the le is not too low. The higher the le’s bit rate, the better it will sound. The minimum
recommended bit rate is 128kbps for MP3s and 96kbps for WMAs.
• Try lowering the volume of the player.
• Ensure that the headphones are attached securely to the player.
The player will not play my music le.
• Ensure that the le is in a compatible format.
• The le may be copy-protected and you no longer have authorization to play this le. If you feel this is in error,
please contact the service from which you downloaded the le.
GB
7
GB
Specifications
Power indicator LED
Memory Integrated Memory 2 GB
Audio Format Support MP3, WMA (>64kbps, Class 1)
DRM Support --
Song Info Support --
PC Interface USB 2.0 Hi-Speed (MSC)
Plug and Play Support Windows 2000/XP or newer
Audio Output Ø3.5mm Stereo (Headphone)
Signal-to-Noise Ratio 90dB
Frequency Response 20H z – 20kHz
Power Supply Rechargeable Li-Poly Battery
Unit Dimensions 30(W) x 62(H) x 9(D) mm
8
Mac OS X
USB Charge
Dėkojame
Sveikiname įsigijus MP3 grotuvą. Šis vartotojo vadovas skirtas padėti Jums lengvai nustatyti ir pradėti naudoti savo
naują grotuvą. Prašom atidžiai perskaityti šį vartotojo vadovą ir išsaugoti jį ateičiai. Prašom pr ieš pradeda nt naudoti
grotuvą atidžiai perskaityti šias instrukcijas.
Pakuotės turinys
Prašom įsitikinti, kad pakuotėje yra visi toliau nurodyti elementai. Jei kurios nors dalies trūksta, susisiekite su
vietiniu pardavėju, iš kurio pirkote šį produktą.
• MP3 grotuvas V-150
• Ausinės
• USB adapteris
• Naudojimo instrukcija
• Garantinė kortelė
Šioje pakuotėje gali būti plastikinių maišelių ar kitų medžiagų, kurios yra pavojingos vaikams. Prašom po atidarymo
saugiai išmesti visas pakavimo medžiagas.
Funkcijos
• Vidinė „Flash“ atmintinė
• Atkuria MP3 ir WMA skaitmenines muzikos rinkmenas
• Mobilioji duomenų laikmena
• USB 2.0 greitai persiųsti rinkmenoms
• Vidinė įkraunamoji baterija
Valdymo funkcijos glaustai
Leisti / pauzė
Spausti mygtuką
1.
Įjungimas / išjungimas
Spausti ir palaikyti mygtuką
2. Ankstesnė daina / atsukti
3. Pritildyti
4. Pagarsinti
5. Kita daina / prasukti
6. Hole for Neck strap
7. USB lizdas
8. Ausinių lizdas
9. LED būsenos indikatorius
10. Maitinimo jungiklis
LT
9
LT
Grotuvo įjungimas
Jūsų grotuvas turi vidinę įkraunamąją bateriją. Įprastas muzikos grojimo laikas – iki trijų valandų.
Pirmą kartą naudojant, bateriją reikia visiškai įkrauti (keturias valandas), kad užtikrintumėte geriausią veikimą ir ilgą
baterijos naudojimo laiką.
Muzikos grojimo laikas yra apskaičiuojama reikšmė. Tikrasis grojimo laikas priklauso nuo naudojamo kodavimo būdo
ir kitų veiksnių.
Grotuvo įkrovimas
Grotuvą galima įkrauti per kompiuterio USB jungtį. Vieną USB laido galą įkiškite į grotuvo USB lizdą, o kitą – į įjungto
kompiuterio USB lizdą.
Jei grotuvas prie kompiuterio prijungiamas per USB skirstytuvą, šis turi turėti atskirą maitinimą, kad galėtų įkrauti grotuvo
bateriją.
Rinkmenų persiuntimas pailgins įkrovimo laiką.
Netinkamai grotuvą naudojant, jo baterija gali sukelti gaisro ar cheminio nudegimo pavojų. Neišmontuokite, nedeginkite
ir nekaitinkite baterijos.
Nejunkite grotuvo prie kitokio maitinimo šaltinio, nei nurodyta čia ar ant etiketės, nes galite sukelti elektros smūgio pavojų.
Grotuvo įjungimas / išjungimas
• Norėdami grotuvą įjungti, stumtelkite maitinimo jungiklį į kairę. Užsidegs LED indikatorius.
• Norėdami grotuvą išjungti, stumtelkite maitinimo jungiklį į dešinę. LED indikatorius užges.
Muzikos valdymas
Muzikos grojimo metu naudokite šiuos valdymo mygtukus. Muzikos grojimo metu LED indikatorius mirksi.
Mygtuko veiksmas Funkcija
Spauskite
Spauskite
Spauskite
Laikykite
Laikykite
Spauskite
Spauskite
10
Pradėti / sustabdyti muzikos grojimą.
Kai grojimas sustabdytas, spauskite
Groti ankstesnę dainą.
Groti kitą dainą.
Atsukti dainą atgal.
Prasukti dainą į priekį.
Nutildyti.
Pagarsinti.
, kad grojimą pratęstumėte.

Prijungimas prie kompiuterio
Prijunkite grotuvą prie kompiuterio naudodami pateikiamą USB laidą, kad:
• Perkeltumėte rinkmenas į grotuvą ar iš jo.
• Atliktumėte pagrindines rinkmenų tvarkymo procedūras.
Kai prijungsite grotuvą:
• Jūsų kompiuteris automatiškai atpažins grotuvą kaip keičiamąjį diską. Atidarius „My computer“, skyrelyje „Devices
with Removable Storage“ bus vaizduojama Jūsų grotuvo piktograma.
• Priklausomai nuo Jūsų įrangos kongūracijos, pirmą kartą prijungus įrenginį, „Windows“ operacinei sistemai gali
prireikti kelių minučių, kad grotuvą atpažintų ir nustatytų.
Rinkmenų persiuntimas / tvarkymas
USB 2.0 jungtis leidžia lengvai persiųsti muziką iš kompiuterio į grotuvą ir atvirkščiai. Naudokite grotuvą taip, kaip
naudotumėte įprastą keičiamąjį diską, vykdydami paprasčiausias sistemines komandas.
Grotuve taip pat galite laikyti vaizdo rinkmenas, nuotraukas ar bet kurias kitas rinkmenas.
Jei Jums reikia papildomos pagalbos, kaip siųsti ir tvarkyti rinkmenas, skaitykite savo operacinės sistemos instrukciją
arba elektroninį pagalbos žinyną. Jei naudojate medijos tvarkymo programinę įrangą, pvz., „iTunes“, „WinAmp“ arba
„Windows Media Player“, skaitykite jų dokumentaciją.
Neatjunkite ar kitaip netrikdykite grotuvo rinkmenų persiuntimo metu – galite pažeisti ar panaikinti grotuvo
mikroprogramas ar rinkmenas.
Jei reikia išsamesnės informacijos ar pagalbos persiunčiant muziką ir sinchronizuojant su „Windows Media Player“ (WMP),
skaitykite su WMP pateikiamos pagalbos skyrių (spustelėkite „Help“ > „Synchronizing Content to Devices“).
Atjungimas nuo kompiuterio
Grotuvą atjunkite pagal toliau pateikiamas instrukcijas, kad išvengtumėte duomenų praradimo ar rinkmenos /
mikroprogramų sugadinimo.
Microsoft Windows
1. Dukart spustelėkite užduočių juostos apačioje, dešinėje, esančią žalią rodyklę („Safely Remove Hardware“).
2. Saugiai pašalinti įrangą: iš sąrašo išsirinkite „USB Mass Storage Device “ ir spauskite „Stop “.
Sustabdyti įrenginį“: iš sąrašo išsirinkite „USB Mass Storage Device “ ir spauskite „OK“.
3. Atsidarius langui „Safe to Remove Hardware“, spustelėkite mygtuką „OK“ ir atjunkite USB laidą nuo grotuvo ir
kompiuterio.
Macintosh OS X
1. Paieškos lango kairėje pusėje raskite reikiamą disko pašalinimo piktogramą.
2. Spustelėkite disko pašalinimo piktogramos dešinėje esančią rodyklę „Eject“.
3. Nuo grotuvo ir kompiuterio atjunkite USB laidą.
LT
11

LT
Trikčių šalinimas
Jei turite problemų dėl įrenginio, prašom perskaityti trikčių šalinimo instrukciją.
Grotuvas neįsijungia
• Įsitikinkite, kad grotuvas visiškai įkrautas. Bandykite įkrauti jį pernakt (aštuonias valandas).
Mygtukai neveikia
• Įsitikinkite, kad grotuvas visiškai įkrautas. Bandykite įkrauti jį pernakt (aštuonias valandas).
• Įsitikinkite, kad maitinimas ĮJUNGTAS.
Negalite perkelti rinkmenų į grotuvą
• Įsitikinkite, kad kompiuteris veikia su palaikoma operacine sistema.
• Jei naudojate USB prailginimo laidą įsitikinkite, kad jis saugiai prijungtas prie grotuvo ir kompiuterio, pabandykite
naudoti kitą USB laidą.
• Jei prijungėte grotuvą per USB šakotuvą, pabandykite prijungti jį teisiai prie kompiuterio.
• Įsitikinkite, kad grotuvo atmintis nėra užpildyta.
• Įsitikinkite, kad maitinimas ĮJUNGTAS.
Grojimo metu nieko nesigirdi
• Patikrinkite garso lygį.
• Įsitikinkite, kad ausinės gerai prijungtos prie grotuvo.
Muzikos garso kokybė labai prasta
• Pabandykite paleisti rinkmeną kompiuteryje. Jei garso kokybė bloga, pabandykite rinkmeną atsisiųsti dar kartą
arba ją perkoduoti.
• Įsitikinkite, kad rinkmenos spar ta bitais nėra per žema. Kuo didesnė rinkmenos sparta bitais, tuo geresnis garsas.
Mažiausia rekomenduojama sparta bitais yra 128 kbps MP3 rinkmenoms ir 96 kbps WMA rinkmenoms.
• Pabandykite sumažinti grotuvo garsą.
• Įsitikinkite, kad ausinės gerai prijungtos prie grotuvo.
Grotuvas nepaleidžia muzikos rinkmenos
• Įsitikinkite, kad rinkmenų formatas tinkamas.
• Gali būti saugomos rinkmenos autoriaus teisės ir Jūs galite neturite leidimo jos groti. Jei manote, kad tai klaida,
susisiekite su paslaugos teikėju, iš kurio rinkmeną atsisiuntėte.
12

Specifikacijos
Maitinimo indikatorius LED
Atmintis Vidinė atmintis 2 GB
Palaikomi garso formatai MP3, WMA (> 64 kbps, Class 1)
DRM palaikymas --
Dainų informacijos palaikymas --
Kompiuterio sąsaja USB 2.0 „Hi-Speed“ (MSC)
„Plug and Play“ palaikymas Windows 2000/XP“ ar naujesnė
Garso išvestis Ø 3,5 mm stereoausinės
Signalo ir triukšmo santykis 90 dB
Dažnių atkuriamumas 20 Hz–20 kHz
Maitinimas Įkraunama ličio polimerų baterija
Įrenginio matmenys 30 (P) x 62 (A) x 9 (G) mm
Mac OS X
Įkrovimas per USB
LT
13
LV
Paldies!
Apsveicam ar MP3 atskaņotāja iegādi! Rokasgrāmata palīdzēs sagatavot atskaņotāju pirmajai lietošanas reizei. Lūdzu,
rūpīgi izlasiet rokasgrāmatu un saglabājiet turpmākām atsaucēm. Pirms sākat lietot atskaņo tāju, l ūdzu, r ūpīgi
izlasiet šīs lietošanas instrukcijas.
Iepakojuma saturs
Lūdzu, pārbaudiet, vai iepakojumā ir iekļauti turpmāk minētie piederumi. Ja kāds no piederumiem trūkst,
lūdzu, sazinieties ar vietējo izplatītāju, pie kura attiecīgo izstrādājumu iegādājāties:
• MP3 atskaņotājs V-150;
• Stereo austiņas;
• USB adapteris;
• Lietotāja rokasgrāmata;
• Garantijas kartīte.
Iepakojums satur plastmasas maisiņus vai citus materiālus, kas ir bīstami maziem bērniem. Lūdzu, nodrošiniet
iepakojuma materiālu pareizu likvidēšanu.
Funkcijas
• Iebūvēta zibatmiņa;
• Atskaņo MP3 un WMA formāta ciparu mūzikas datnes;
• Mobila datu glabātuve;
• USB 2.0 ātrai datņu kopēšanai;
• Iebūvēta atkārtoti uzlādējama baterija.
Vadības ierīču pārskats
Atskaņošanai/pauzēšanai
nospiediet taustiņu:
1.
Ieslēgšanai/izslēgšanai
nospiediet un turiet taustiņu:
2. Iepriekšējā dziesma/attīšana:
3. Skaļuma samazināšana:
4. Skaļuma palielināšana:
5. Nākamā dziesma/pārtīšana:
6. Siksniņas pieslēgvieta
7. USB pieslēgvieta
8. Austiņu pieslēgvieta
9. Gaismas diožu statusa indikators
10. Ieslēgšanas/izslēgšanas slēdzis
14

Atskaņotāja ieslēgšana
Atskaņotājam ir iebūvēta atkārtoti uzlādējama baterija. Normāls mūzikas atskaņošanas laiks ir trīs stundas.
Lai nodrošinātu atskaņotāja optimālu darbību un ilgu baterijas kalpošanas laiku, baterija pirms pirmās lietošanas reizes ir
pilnībā jāuzlādē. Baterija jāuzlādē vismaz četras stundas.
Normālais mūzikas atskaņošanas laiks ir teorētiski aprēķināts lielums. Faktiskais atskaņošanas laiks ir atkarīgs no mūzikas
datnes kodēšanas metodes un citiem faktoriem.
Atskaņotāja baterijas uzlādēšana
Atskaņotāju var uzlādēt no datora USB pieslēgvietas. Pieslēdziet vienu USB vada galu pie atskaņotāja USB
pieslēgvietas, bet otru – datora. Datoram jābūt ieslēgtam.
Ja atskaņotājs ir pieslēgts datoram caur USB centrmezglu, lai uzlādētu atskaņotāja bateriju, centrmezglam jānodrošina
autonoma barošana.
Datņu kopēšana pagarina baterijas uzlādes laiku.
Nepareizas lietošanas gadījumā šajā ierīcē izmantotā baterija var radīt ugunsgrēka vai ķīmisko apdegumu risku. Bateriju
nedrīkst izjaukt, pakļaut liesmu vai pārmērīga karstuma iedarbībai.
Atskaņotāju drīkst pieslēgt tikai pie šajā rokasgrāmatā vai uz uzlīmes aprakstītā barošanas avota. Pretējā gadījumā
radīsiet ugunsgrēka vai elektriskās strāvas trieciena risku!
Atskaņotāja ieslēgšana/izslēgšana
• Lai atskaņotāju ieslēgtu, pārslēdziet ieslēgšanas/izslēgšanas slēdzi pa kreisi. Gaismas diožu indikators iedegsies.
• Lai atskaņotāju izslēgtu, pārslēdziet ieslēgšanas/izslēgšanas slēdzi pa labi. Gaismas diožu indikators nodzisīs.
Mūzikas atskaņošanas vadības ierīces
Mūzikas atskaņošanas laikā ir pieejamas turpmāk aprakstītās vadības ierīces. Mūzikas atskaņošanas laikā gaismas
diožu indikators mirgo.
Taustiņš Funkcija
(nospiest un turēt)
(nospiest un turēt)
Sāk/pauzē mūzikas atskaņošanu.
Lai turpinātu mūzikas atskaņošanu, vēlreiz nospiediet
Atskaņot iepriekšējo dziesmu.
Atskaņot nākamo dziesmu.
Pašreiz atskaņotā dziesma tiek paātrināti atskaņota atpakaļ.
Pašreiz atskaņotā dziesma tiek paātrināti atskaņota uz priekšu.
Samazina atskaņošanas skaļumu.
Palielina atskaņošanas skaļumu.
LV
15

LV
Savienošana ar datoru
Izmantojot komplektā iekļauto USB kabeli, atskaņotāju var pieslēgt datoram, lai:
• Kopētu datnes no datora uz atskaņotāju un otrādi;
• Veiktu pamata datņu pārvaldīšanas darbības.
Kad atskaņotājs ir savienots ar datoru:
• Jūsu dators automātiski atpazīs atskaņotāju kā noņemamo disku. Atverot My Computer logu, atskaņotājs būs
redzams sadaļā Devices with Removable Storage;
• Pirmoreiz pieslēdzot ierīci datoram, Windows operētājsistēmā ierīces atpazīšana un iestatīšana var aizņemt
vairākas minūtes.
Datņu kopēšana/pārvaldīšana
USB 2.0 savienojums ļauj ātri pārsūtīt mūzikas datnes no atskaņotāja uz datoru un otrādi. Vienkārši lietojiet
atskaņotāju kā standarta noņemamo disku.
Jūs varat lietot atskaņotāju arī kā video materiālu, fotoattēlu un citu datņu glabātuvi.
Ja jums ir nepieciešama turpmāka palīdzība saistībā ar datņu pārsūtīšanu un pārvaldīšanu, lūdzu, skatiet
operētājsistēmas instrukciju rokasgrāmatu un ekrānā redzamās palīdzības norādes. Ja lietojat multivides
pārvaldīšanas programmu (piemēram, iTunes, WinAmp vai Windows Media Player), lūdzu, skatiet attiecīgās
programmatūras dokumentāciju.
Ņemiet vērā, ka datņu kopēšanas laikā ierīci nedrīkst atvienot no datora vai jebkādā citā veidā pārtraukt datora un ierīces
savienojumu, pretējā gadījumā pakļausiet atskaņotāja programmaparatūru vai datnes bojājumu riskam.
Papildu informācijai un atbalstam saistībā ar mūzikas datņu kopēšanu un sinhronizēšanu ar Windows Media Player
(WMP), lūdzu, skatiet atbilstošo WMP palīdzības sadaļu (noklikšķiniet “Help > Synchronizing Content to Devices”).
Atvienošana no datora
Lai nepieļautu datu zudumu vai datnes/programmaparatūras bojājumus, atvienojiet atskaņotāju saskaņā ar turpmāk
aprakstītajām instrukcijām.
Microsoft Windows
1. Dubultklikšķis uz datora ekrāna apakšējā labajā stūrī redzamās zaļās bultiņas (Safely Remove Hardware).
2. Droši noņemt aparatūru:
sarakstā izvēlieties USB Mass Storage Device un noklikšķiniet uz Stop.
Aparatūras ierīces apturēšana: sarakstā izvēlieties USB Mass Storage Device un noklikšķiniet uz OK.
3. Kad parādās Safe to Remove Hardware logs, noklikšķiniet uz OK (labi) pogas un atvienojiet USB kabeli no
atskaņotāja un datora.
Macintosh OS X
1. Meklētāja logs kreisajā pusē atlasiet atbilstošo noņemamā diska ikonu.
2. Noklikšķiniet uz Eject bultiņas, kas atrodas noņemamā diska ikonas labajā pusē.
3. Atvienojiet USB kabeli no atskaņotāja un datora.
16

Traucējummeklēšana
Ja ierīces ekspluatācijas laikā gadās problēmas, lūdzu, skatiet turpmāk aprakstītās traucējummeklēšanas instrukcijas.
Atskaņotājs neieslēdzas:
• Pārbaudiet, vai baterija nav izlādējusies. Uzlādējiet bateriju vismaz astoņas stundas.
Atskaņotāja taustiņi nedarbojas:
• Pārbaudiet, vai baterija nav izlādējusies. Uzlādējiet bateriju vismaz astoņas stundas;
• Pārbaudiet, vai ieslēgšanas/izslēgšanas slēdzis ir ON (ieslēgts) pozīcijā.
Datnes nekopējas uz atskaņotāju:
• Pārbaudiet, vai datoram ir uzstādīta atbilstošā operētājsistēma;
• Ja lietojat USB pagarinājuma vadu, pārbaudiet, vai tas ir stingri pieslēgts atskaņotājam un datoram, nomainiet
USB kabeli;
• Ja atskaņotājs ir pieslēgts caur USB centrmezglu, mēģiniet atskaņotāju pieslēgt tieši datoram;
• Pārbaudiet, vai atskaņotāja atmiņā ir pietiekami daudz brīvas vietas;
• Pārbaudiet, vai ieslēgšanas/izslēgšanas slēdzis ir ON (ieslēgts) pozīcijā.
Atskaņošanas laikā nav dzirdama skaņa:
• Pārbaudiet atskaņošanas skaļumu;
• Pārbaudiet, vai austiņas ir pareizi savienotas ar atskaņotāju.
Zema mūzikas atskaņošanas kvalitāte:
• Mēģiniet datni atskaņot datorā. Ja skaņas kvalitāte joprojām ir zema, mēģiniet lejupielādēt datni vēlreiz vai
atkārtojiet kodēšanu;
• Pārbaudiet, vai datnes bitu ātrums nav pārāk zems. Jo augstāks ir datnes bitu ātrums, jo augstāka ir skaņas
kvalitāte. Minimālais ieteicamais bitu ātrums ir 128 kbps MP3s formāta gadījumā un 96 kbps WMA formāta
gadījumā;
• Samaziniet atskaņošanas skaļumu;
• Pārbaudiet, vai austiņas ir pareizi savienotas ar atskaņotāju.
Atskaņotājs neatskaņo mūzikas datni:
• Pārbaudiet, vai datne ir savietojamā formātā;
• Iespējams, datnei ir pretkopēšanas aizsardzība, un jums vairs nav datnes atskaņošanai nepieciešamo pilnvaru.
Ja uzskatāt, ka tā ir kļūda, lūdzu, sazinieties ar pakalpojumu sniedzēju, no kura attiecīgo datni lejupielādējāt.
LV
17

LV
Tehniskās specifikācijas
Enerģijas indikators Gaismas diode
Atmiņa Iebūvētā atmiņa 2 GB
Audio formātu atbalsts MP3, WMA (> 64 kbps, 1. klase)
DRM atbalsts --
Dziesmu informācijas atbalsts --
Personālā datora saskarne USB 2.0, liela ātruma (MSC)
Standarta Plug and Play atbalsts
Audio izvads Ø3.5 mm stereo (austiņas)
Signāla un trokšņa robeža 90 dB
Frekvenču diapazons 20 Hz – 20 kHz
Barošanas avots
Izmēri 30x62x9 mm (platums, augstums, garums)
18
Windows 2000/XP vai jaunāka operētājsistēma
Mac OS X
Uzlādējama litija jona baterija
USB pieslēgvieta

Täname
Meil on hea meel, et ostsite MP3-mängija. See juhend aitab teil uut mängijat lihtsalt seadistada ning seda kohe
kasutama hakata. Lugege see juhend hoolikalt läbi ning hoidke edaspidiseks kasutamiseks alles. Lugege need juhised
enne mängija kasutamist hoolikalt läbi.
Pakendi sisu
Kontrollige, kas pakendis on allpool loetletud esemed. Kui mõni ese on puudu, pöörduge edasimüüja poole,
kellelt toote ostsite.
• MP3-mängija V-150
• Stereokõrvaklapid
• USB-adapter
• Kasutusjuhend
• Garantiikaart
See pakend võib sisaldada kilekotte ja muid lastele ohtlikke materjale. Kõrvaldage ohutult kõik pakendimaterjalid
pärast pakendi avamist.
Funkcijas
• Integreeritud välkmälu
• Mängib MP3- ja WMA-digimuusikafaile
• Mobiilne andmemälu
• USB 2.0 kiireks failiedastuseks
• Integreeritud laetav aku
Juhtelementide ülevaade
Mängi/paus:
vajutage nuppu
1.
Toide sees/väljas:
vajutage ja hoidke all nuppu
2. Eelmine/tagasi
3. Helitugevus väiksemaks
4. Helitugevus suuremaks
5. Järgmine/edasi
6. Kaelapaela ava
7. USB-port
8. Kõrvaklapiväljund
9. LED-olekuindikaator
10. Toitelüliti
EE
19

EE
Mängija toide
Teie mängijal on integreeritud laetav aku. Tavaline muusika mängimise aeg on kuni kolm tundi.
Enne esimest kasutamist tuleks aku selle suurima võimsuse ja pika kasutusea tagamiseks täiesti täis laadida (neli tundi).
Muusika esitamise aeg on hinnanguline. Tegelik mänguaeg võib sõltuvalt kasutatavast kodeerimisajast ja muudest
teguritest erineda.
Mängija laadimine
Teie mängijat saab laadida arvuti USB-liidese kaudu. Ühendage USB-kaabli üks ots mängija USB-porti ja teine ots
sisselülitatud arvuti USB-porti.
Kui mängija on ühendatud arvutiga USB-jaoturi kaudu, peab jaotur olema pingestatud, et mängija akut oleks võimalik
laadida.
Failiedastus pikendab laadimisaega.
Selles seadmes kasutatav aku võib valel käitlemisel kujutada tulekahju- või keemilise söövituse ohtu. Ärge lammutage,
põletage ega kuumutage akut.
Ärge ühendage mängijat elektrikontakti, mis ei vasta seadme sildil olevatele andmetele, vastasel korral võib tekkida
tulekahju või elektrilöögi oht.
Mängija sisse- ja väljalülitamine
• Mängija sisselülitamiseks lükake toitelüliti vasakule. LED-indikaator süttib.
• Mängija väljalülitamiseks lükake toitelüliti paremale. LED-indikaator kustub.
Muusika taasesituse juhtelemendid
Kasutage muusika taasesitamise ajal järgmisi juhtelemente. LED-indikaator vilgub muusika taasesituse ajal.
Nupp Funktsioon
Vajutage nuppu
Vajutage nuppu
Vajutage nuppu
Hoidke all nuppu
Hoidke all nuppu
Vajutage nuppu
Vajutage nuppu
20
Muusika taasesitamise alustamine/peatamine.
Kui taasesitus on peatatud, vajutage jätkamiseks nuppu
Mängib eelmist lugu.
Mängib järgmist lugu.
Praeguse loo kerimine.
Kerib praegust lugu kiiresti edasi.
Helitugevuse vähendamine.
Helitugevuse suurendamine.

Arvutiga ühendamine
Ühendage mängija arvutiga kaasasoleva USB-kaabli abil. Nüüd saate:
• Teisaldada mängijasse ja mängijast faile;
• Kasutada peamisi failihalduse funktsioone.
Pärast mängija ühendamist:
• Tuvastab arvuti mängija automaatselt eemaldatava plaadina. Pärast jaotise „My Computer“ avamist on suvandi
„Devices with Removable Storage” all näha mängijat kujutav ikoon.
• Esimesel korral võib Windowsil kuluda seadme tuvastamiseks ja seadistamiseks mitu minutit sõltuvalt teie
riistvara konguratsioonist.
Failide teisaldamine/haldamine
USB 2.0 ühendus lihtsustab muusika kiiret teisaldamist mängija ja arvuti vahel. Kasutage mängijat nii nagu
eemaldatavat plaati, rakendades operatsioonisüsteemi põhifunktsioone.
Samuti võib mängijat kasutada videote, fotode ja muud tüüpi failide salvestamiseks.
Kui vajate failide teisaldamisel ja haldamisel täiendavat abi, lugege oma operatsioonisüsteemi kasutusjuhendit
või ekraanispikrit. Kui kasutate meediahaldustarkvara, nt iTunes, WinAmp ja Windows Media Player, lugege abi
saamiseks nende juhendeid.
Ärge lahutage ega katkestage mängijat failiteisalduse ajal muul viisil – mängija püsivara või failid võivad saada
kahjustada või muutuda kasutuskõlbmatuks.
Lisateavet ja tuge muusika teisaldamise ning Windows Media Playeriga (WMP) sünkroonimise kohta saate WMP-d
käsitlevast jaotisest (klõpsake menüüs „Help > Synchronizing Content to Devices”).
Arvutist lahutamine
Andmekao ning failide/püsivara kahjustumise vältimiseks lahutage mängija arvutist allpool kirjeldatud viisil.
Microsoft Windows
1. Tehke topeltklõps arvutiekraani paremas alumises nurgas tegumiribal asuval rohelisel noolel (Safely Remove
Hardware).
2. Riistvara ohutu eemaldamine: Valige kuvatavast loendist suvand „USB Mass Storage Device” ja klõpsake
seejärel nuppu „Stop”.
Riistvaraseadme seiskamine: Valige kuvatavast loendist suvand „USB Mass Storage Device” ja klõpsake seejärel
nuppu „OK”.
3. Pärast akna „Safe to Remove Hardware” kuvamist klõpsake nuppu „OK“ ja lahutage USB-kaabel mängijast ja
arvutist.
Macintosh OS X
1. Finderi akna vasakpoolsel küljel on vastav eemaldatava plaadi ikoon.
2. Klõpsake eemaldatava plaadi ikooni paremal pool olevat noolt „Eject”.
3. Lahutage USB-kaabel mängijast ja arvutist.
EE
21

EE
Tõrkeotsing
Kui teil tekib seadmega probleeme, lugege allolevaid tõrkeotsingu juhiseid.
Mängija ei lülitu sisse.
• Mängija peab olema täielikult laetud. Püüdke laadida mängijat öösel (kaheksa tundi).
Nupud ei tööta.
• Mängija peab olema täielikult laetud. Püüdke laadida mängijat öösel (kaheksa tundi).
• Jälgige, et toitelüliti oleks sees (ON).
Faile ei saa mängijasse teisaldada.
• Jälgige, et arvuti töötaks toetatava operatsioonisüsteemiga.
• USB-pikenduskaabli kasutamisel tuleb veenduda, et see oleks kindlalt mängija ja arvutiga ühendatud. Võite
proovida ka mõnda teist USB-kaablit.
• Kui olete ühendanud mängija USB-jaoturi kaudu, proovige ühendada mängija otse arvutiga.
• Jälgige, et mängija mälu ei oleks täis.
• Jälgige, et toitelüliti oleks sees (ON).
Taasesituse ajal ei ole heli.
• Kontrollige helitugevuse taset.
• Kontrollige, et kõrvaklapid oleksid kindlalt mängijaga ühendatud.
Muusika helikvaliteet on halb.
• Proovige mängida faili arvutis. Kui helikvaliteet on ikka kehv, proovige fail uuesti alla laadida või kodeerige fail
ise ümber.
• Jälgige, et faili bitikiirus ei oleks liiga madal. Mida suurem on bitikiirus, seda parem on heli. Minimaalne soovituslik
bitikiirus on 128 kbps MP3-del ja 96 kbps WMA-del.
• Proovige vähendada mängija helitugevust.
• Kontrollige, et kõrvaklapid oleksid kindlalt mängijaga ühendatud.
Mängija ei mängi mu muusikafaile.
• Jälgige, et fail oleks ühilduvas vormingus.
• Fail võib olla kopeerimiskaitsega ning teil pole õigust faili mängida. Kui arvate, et tegemist on veaga, pöörduge
pakkuja poole, kellelt faili alla laadisite.
22

Spetsifikatsioon
Toiteindikaator LED
Mälu Integreeritud mälu 2 GB
Toetatavad audiovormingud MP3, WMA (>64 kbps, 1. klass)
DRM-tugi --
Looinfo tugi --
PC-liides USB 2.0 Hi-speed (MSC)
Plug and Play tugi Windows 2000/XP või uuem versioon
Audioväljund Ø 3,5 mm stereo (kõrvaklapid)
Signaali-müra suhe 90 dB
Sagedus 20 Hz – 20 kHz
Toide Laetav Li-Poly aku
Seadme mõõtmed 30 (l) x 62 (k) x 9 (s) mm
Mac OS X
USB-laadimine
EE
23

PL
Dziękujemy
Gratulujemy zakupu odtwarzacza MP3. Niniejsza instrukcja obsługi pomoże Państwu szybko rozpocząć użytkowanie
Państwa nowego odtwarzacza. Prosimy o uważne zapoznanie się z niniejszą instrukcją obsługi oraz o zachowanie jej na
przyszłość. Przed rozpoczęciem użytkowania odtwarzacza, prosimy uważnie przeczytać niniejszą instrukcję obsługi.
Zawartość opakowania
Należy upewnić się, że przedmioty zilustrowane poniżej znajdują się w opakowaniu. Jeśli brakuje któregoś z
elementów zestawu, należy skontaktować się z lokalnym sprzedawcą, od którego niniejszy produkt został nabyty.
• Odtwarzacz MP3 V-150
• Słuchawki stereo
• Przejściówka USB
• Instrukcja obsługi
• Karta gwarancyjna
Niniejsze opakowanie może zawierać torebki z tworzyw sztucznych, jak również inne materiały, mogące stanowić
zagrożenie dla dzieci. Po otwarciu opakowania należy w sposób bezpieczny zutylizować wszystkie znajdujące się w
nim materiały pakunkowe.
Charakterystyka
• Wbudowana pamięć ash
• Odtwarza cyfrowe pliki muzyczne MP3 oraz WMA
• Przenośne przechowywanie danych
• Transmisja USB 2.0 o dużej szybkości
• Wbudowana bateria wielokrotnego ładowania
Przyciski sterujące
Odtwarzaj/Pauza (Play/Pause):
Naciśnij przycisk
1.
Włączanie/wyłączanie (On/O):
Naciśnij i przytrzymaj przycisk
Poprzedni/przewijanie
2.
(Previous/Reverse)
3. Zmniejszanie poziomu głośności
4. Zwiększanie poziomu głośności
Następny/przewijanie do
5.
przodu (Next/Forward)
6. Otwór na pasek na szyję
7. Port USB
8. Wyjście słuchawkowe
9. Dioda LED
10. Włącznik/wyłącznik
24

Zasilanie odtwarzacza
Niniejszy odtwarzacz wyposażony jest we wbudowaną baterię wielokrotnego ładowania. Standardowy czas
odtwarzania wynosi do trzech godzin.
Aby zmaksymalizować wydajność i czas życia baterii, przy pierwszym użyciu baterię należy w pełni naładować (przez
cztery godziny).
Czas odtwarzania muzyki jest wartością szacunkową. Rzeczywisty czas odtwarzania muzyki może być inny, w zależności
od zastosowanej metody kodowania oraz innych czynników.
Ładowanie odtwarzacza
Odtwarzacz może zostać naładowany poprzez łącze komputerowe USB. Należy podłączyć jeden koniec kabla USB do
portu USB odtwarzacza, a drugi koniec do portu USB włączonego komputera.
Jeśli odtwarzacz został podłączony do komputera przez koncentrator (hub) USB, należy upewnić się, że
koncentrator posiada własne zasilanie, w przeciwnym wypadku naładowanie odtwarzacza nie będzie możliwe.
Transfer plików spowoduje zwiększenie czasu ładowania.
Bateria, w którą wyposażony jest niniejszy odtwarzacz może, w razie nieodpowiedniego postępowania, stanowić
zagrożenie pożarem lub oparzeniem chemicznym. Baterii nie należy demontować, palić ani podgrzewać.
Podłączanie odtwarzacza do źródeł zasilania innych niż to, które jest dołączone do urządzenia lub wskazane na plakietce,
grozi pożarem lub porażeniem elektrycznym.
Włączanie/wyłączanie odtwarzacza.
• Aby włączyć odtwarzacz należy przesunąć przełącznik zasilania w lewo. Zaświeci się dioda LED sygnalizująca
zasilanie.
• Aby wyłączyć odtwarzacz należy przesunąć przełącznik zasilania w prawo. Zgaśnie dioda LED.
Kontrola odtwarzania muzyki
Odtwarzanie muzyki można kontrolować w następujący sposób. Dioda LED będzie mrugać w czasie odtwarzania
muzyki.
Działanie przycisku Funkcja
Naciśnij
Naciśnij
Naciśnij
Przytrzymaj
Przytrzymaj
Naciśnij
Naciśnij
Rozpocznij/Zatrzymaj odtwarzanie muzyki. Gdy odtwarzanie muz yki jest
zatrzymane, należy nacisnąć przycisk
Odtwórz poprzedni utwór.
Odtwórz kolejny utwór.
Przewiń obecnie odtwarzane nagranie do tyłu.
Przewiń obecnie odtwarzane nagranie do przodu.
Zmniejsz poziom głośności.
Zwiększ poziom głośności.
aby je wznowić.
PL
25

PL
Łączenie z komputerem
Należy użyć kabla USB, dołączonego do niniejszego zestawu, aby połączyć odtwarzacz z komputerem w celu:
• Transferu plików do i z odtwarzacza
• Wykonywania podstawowych funkcji zarządzania plikami.
Po podłączeniu odtwarzacza:
• Komputer automatycznie rozpozna odtwarzacz jako zewnętrzny nośnik danych. W oknie „My Computer”, pośród
„Devices with Removable Storage” pojawi się ikona przedstawiająca odtwarzacz.
• Przy pierwszym podłączeniu do komputera system Windows może potrzebować kilku minut, aby rozpoznać i
skongurować odtwarzacz, w zależności od konguracji sprzętowej komputera.
Przesyłanie plików oraz zarządzanie nimi
Połączenie USB 2.0 pozwala na łatwy transfer muzyki pomiędzy odtwarzaczem a komputerem. Należy po prostu
używać odtwarzacza tak, jak dowolnego innego, przenośnego dysku, przy pomocy podstawowych komend systemu
operacyjnego.
Odtwarzacz może być również wykorzystywany do przechowywania lmów wideo, zdjęć oraz plików dowolnego
typu.
Jeśli potrzebują Państwo dodatkowej pomocy w zakresie przesyłania plików i zarządzania nimi, prosimy zapoznać się
z instrukcją użytkowania Państwa systemu operacyjnego lub z pomocą dostępną na ekranie komputera. Jeśli używacie
Państwo oprogramowania do zarządzania multimediami, takiego jak iTunes, WinAmp lub Windows Media Player,
prosimy zapoznać się z dokumentacją tego oprogramowania.
W czasie przesyłania plików nie należy odłączać odtwarzacza od komputera lub w inny sposób zakłócać pracy
odtwarzacza, gdyż może to spowodować uszkodzenie oprogramowania odtwarzacza lub uszkodzenie przesyłanych
plików.
Więcej informacji oraz wsparcie techniczne na temat przesyłania plików muzycznych oraz synchronizacji za pomocą
Windows Media Player (WMP) dostępne jest w sekcji pomocy programu WMP (należy kliknąć „Help > Synchronizing
Content to Devices”).
Odłączanie od komputera
Aby uniknąć utraty danych lub uszkodzenia plików/oprogramowania odtwarzacz należy odłączać zgodnie z
poniższymi instrukcjami.
Microsoft Windows
1. Należy dwukrotnie kliknąć na zielonej strzałce znajdującej się po prawej stronie pasku zadań (Safely Remove
Hardware).
2. Bezpieczne usuwanie sprzętu: Z listy, która się pojawi, należy wybrać „USB Mass Storage Device”, a następnie
wybrać „Stop”.
Zatrzymywanie pracy urządzenia sprzętowego: Z listy, która się pojawi, należy wybrać „USB Mass Storage
Device”, a następnie kliknąć „OK”.
3. Kiedy pojawi się komunikat „Safe to Remove Hardware” należy kliknąć „OK”, a następnie odłączyć kabel USB od
odtwarzacza oraz od komputera.
26

Macintosh OS X
1. Należy zlokalizować odpowiednie, odłączalne urządzenie po lewej stronie okna wyszukiwania.
2. Należy kliknąć na strzałce „Eject”, znajdującej się po prawej stronie ikony symbolizującej odłączalne urządzenie.
3. Należy odłączyć kabel USB od odtwarzacza oraz od komputera.
Rozwiązywanie problemów
W przypadku problemów z urządzeniem należy zastosować się do poniższych instrukcji.
Odtwarzacz się nie włącza.
• Należy upewnić się, że odtwarzacz jest w pełni naładowany. Należy naładować odtwarzacz (przez 8 godzin).
Przyciski nie działają.
• Należy upewnić się, że odtwarzacz jest w pełni naładowany. Należy naładować odtwarzacz (przez 8 godzin).
• Należy upewnić się, że przełącznik zasilania jest w pozycji WŁĄCZONY.
Transfer plików do odtwarzacza nie jest możliwy.
• Należy upewnić się, że komputer pracuje pod kontrolą odpowiedniego systemu operacyjnego.
• W przypadku uży wania przedłużającego kabla USB należy upewnić się, że kabel jest odpowiednio podłączony do
odtwarzacza oraz do komputera lub spróbować użyć innego kabla.
• Jeśli odtwarzacz został podłączony przez koncentrator (hub) USB, należy spróbować podłączyć odtwarzacz
bezpośrednio do komputera.
• Należy upewnić się, że pamięć odtwarzacza nie jest pełna.
• Należy upewnić się, że przełącznik zasilania jest w pozycji WŁĄCZONY.
W czasie odtwarzania muzyki brak jest dźwięku.
• Należy sprawdzić poziom głośności.
• Należy upewnić się, że słuchawki zostały odpowiednio podłączone do odtwarzacza.
Jakość dźwięku jest niska.
• Należy spróbować odtworzyć plik na komputerze. Jeśli jakość dźwięku nadal jest niska, należ y ponownie pobrać
plik lub nagrać go samodzielnie.
• Należy upewnić się, że liczba bitów na sekundę nie jest zbyt niska. Im wyższa jest liczba bitów na sekundę w pliku,
tym lepsza jest jakość dźwięku. Najniższa zalecana liczba bitów na sekundę w przypadku plików MP3 to 128kbps,
a w przypadku plików WMA 96kbps.
• Należy spróbować obniżyć poziom głośności odtwarzacza.
• Należy upewnić się, że słuchawki zostały odpowiednio podłączone do odtwarzacza.
Odtwarzacz nie odtwarza pliku muzycznego.
• Należy upewnić się, że format pliku jest wspierany przez odtwarzacz.
• Plik może być chroniony przed kopiowaniem, a Państwo możecie nie mieć autoryzacji, aby go odtworzyć. W
przypadku, gdzy sądzicie Państwo, że problem tkwi w prawach autorskich (ochrona przed kopiowaniem), należy
skontaktować się z usługodawcą, od którego plik został pobrany.
PL
27

PL
Parametry
Wskaźnik zasilania LED
Pamięć Wbudowana pamięć 2 GB
Wspierane typy plików MP3, WMA (>64kbps, Klasa 1)
Wsparcie dla DRM --
Wsparcie dla informacji o utworach (Song Info) --
Interfejs PC USB 2.0 Hi-Speed (MSC)
Wsparcie Plug and Play
Wyjście audio Ø3.5mm Stereo (słuchawki)
Stosunek sygnał/szum 90dB
Zakres częstotliwości 20Hz – 20kHz
Zasilanie
Wymiary urządzenia 30(szer.) x 62(wys.) x9(głęb.) mm
28
Windows 2000/XP lub nowsze
Mac OS X
Bateria Li-Poly wielokrotnego ładowania
Ładowanie przez USB

Vielen Dank
Glückwunsch zum Kauf von diesem MP3 Player. Dieses Handbuch soll Ihnen die ersten Schritte erleichtern, damit
Sie Ihren Player sofort benutzen können. Lesen Sie sich dieses Handbuch genau durch und heben Sie es zum
Nachschlagen auf. Bitte lesen Sie diese Anleitung genau durch, bevor Sie Ihren Player verwenden.
Lieferumfang
Überprüfen Sie, ob alle unten aufgeführten Bestandteile im Lieferumfang enthalten sind. Sollte ein Bestandteil
fehlen, kontaktieren Sie bitte Ihren Händler vor Ort, bei dem Sie das Gerät gekauft haben.
• MP3 Player V-150
• Stereokopfhörer
• USB-Adapter
• Benutzerhandbuch
• Garantiekarte
Dieses Produkt kann Plastiktüten oder andere für Kleinkinder gefährliche Materialien enthalten. Entsorgen Sie bitte
sämtliches Verpackungsmaterial nach dem Önen.
Funktionen
• Integrierter Flash-Speicher
• Spielt digitale MP3- und WMA-Musikdateien ab
• Mobiler Datenspeicher
• USB 2.0 zur schnellen Dateiübertragung
• Integrierter Akku
Bedienelemente auf einen Blick
Wiedergabe/Pause:
Drücken Sie die Taste
1.
Ein/Aus:
Halten Sie die Taste gedrückt
2. Voriges/Rücklauf
3. Leiser
4. Lauter
5. Nächstes/Vorlauf
6. Loch für Halsband
7. USB-Anschluss
8. Kopfhöreranschluss
9. LED-Statusanzeige
10. Ein-/Aus-Schalter
DE
29
DE
Aufladen des Akkus
Ihr Player verfügt über einen eingebauten Akku. Normalerweise können damit bis zu drei Stunden Musik
wiedergegeben werden.
Vor der ersten Benutzung sollte der Akku vollständig aufgeladen werden (vier Stunden), um eine lange Akkulebensdauer
zu gewährleisten.
Die Wiedergabedauer ist nur ein geschätzter Wert. Die tatsächliche Wiedergabedauer kann je nach Kodierung und
anderen Faktoren variieren.
Aufladen des Players
Ihr Player kann über den USB-Anschluss eines PCs aufgeladen werden. Stecken Sie ein Ende des USB-Kabels in den
USB-Anschluss des Players und das andere in den USB-Anschluss eines eingeschalteten Computers.
Wenn der Player über einen USB-Hub mit dem Computer verbunden wird, muss der Hub selbst mit Strom versorgt werden,
damit über ihn der Akku des Players aufgeladen wird.
Werden Dateien übertragen, verlängert dies die benötigte Zeit zum Auaden des Players.
Die falsche Handhabung des Akkus in diesem Gerät kann zu Bränden und chemischen Verätzungen führen. Demontieren,
verbrennen oder erhitzen Sie den Akku nicht.
Verbinden Sie den Player nie mit einer anderen Stromquelle als den hier oder auf dem Gerät angegebenen, sonst drohen
Gefahren durch Feuer oder einen elektrischen Schlag.
Ein-/Ausschalten des Players
• Um Ihren Player einzuschalten, schieben Sie den Ein-/Aus-Schalter nach links. Die LED-Anzeige leuchtet auf.
• Um Ihren Player auszuschalten, schieben Sie den Ein-/Aus-Schalter nach rechts. Die LED-Anzeige erlischt.
Bedienelemente zur Musikwiedergabe
Benutzen Sie die folgenden Bedienelemente während der Musikwiedergabe. Die LED-Anzeige blinkt während der
Musikwiedergabe.
Tastendruck Funktion
Drücken von
Drücken von
Drücken von
Gedrückthalten von
Gedrückthalten von
Drücken von
Drücken von
30
Startet die Musikwiedergabe/hält sie an.
Wenn die Musikwiedergabe pausiert ist, drücken Sie zum Fortsetzen
Gibt den vorigen Titel wieder.
Gibt den nächsten Titel wieder.
Schnellrücklauf durch den aktuellen Titel.
Schnellvorlauf durch den aktuellen Titel.
Stellt die Lautstärke leiser.
Stellt die Lautstärke lauter.

Verbindung mit einem Computer
Verbinden Sie den Player über das mitgelieferte USB-Kabel mit einem Computer:
• Zum Übertragen von Dateien auf und von Ihrem Player und
• Zur generellen Dateiverwaltung.
Sobald Sie Ihren Player verbunden haben:
• Erkennt Ihr Computer automatisch den Player als Wechseldatenträger und es erscheint ein Symbol für Ihren
Player im Arbeitsplatz unter „Devices with Removable Storage“.
• Je nach Hardwarekonguration benötigt Windows eventuell einige Minuten, um das Gerät zu erkennen und
einzurichten, wenn es zum ersten Mal angeschlossen wird.
Übertragung/Verwaltung von Dateien
Die USB-2.0-Verbindung vereinfacht die Übertragung von Musik zwischen Ihrem Player und Ihrem Computer.
Verwenden Sie den Player genauso, wie Sie auch andere Wechseldatenträger verwenden.
Auf Ihrem Player können Sie auch Videos, Fotos und andere Dateitypen speichern.
Weitere Hinweise und Tipps zur Übertragung und Verwaltung von Dateien nden Sie im Handbuch Ihres
Betriebssystems oder in der Bildschirmhilfe. Falls Sie Software zur Musikverwaltung nutzen, z.B. iTunes, WinAmp oder
Windows Media Player, lesen Sie bei Problemen bitte die zugehörigen Handbücher.
Trennen Sie den Player nie während der Dateiübertragung vom PC. Dies kann die Firmware des Players oder Ihre Dateien
beschädigen.
Weitere Informationen und Hilfe zur Musikübertragung und Synchronisierung mit Windows Media Player (WMP) nden
Sie über die Hilfe des WMP. Klicken Sie dazu im WMP auf „Help > Synchronizing Content to Devices“.
Trennen der Verbindung mit einem Computer
Trennen Sie Ihren Player wie nachfolgend beschrieben vom Computer, um Schäden an der Datei oder Firmware zu
vermeiden.
Microsoft Windows
1. Doppelklicken Sie den grünen Pfeil in der Taskleiste unten rechts auf dem Computerbildschirm (Safely Remove
Hardware).
2. Hardware sicher entfernen: Wählen Sie „USB Mass Storage Device“ aus der sich önenden Liste und klicken Sie
auf „Stop“.
Beenden eines Hardware-Geräts: Wählen Sie „USB Mass Storage Device“ aus der sich önenden Liste und
klicken Sie auf „OK“.
3. Wenn der Hinweis „Safe to Remove Hardware“ erscheint, klicken Sie auf OK und trennen Sie das USB-Kabel vom
Player und Computer.
Macintosh OS X
1. Wählen Sie links im Finder das entsprechende Symbol für den Wechseldatenträger.
2. Klicken Sie auf den „Eject“-Pfeil rechts neben dem Symbol für den Wechseldatenträger.
3. Trennen Sie das USB-Kabel vom Player und vom Computer.
DE
31

DE
Fehlersuche
Falls ein Problem mit diesem Gerät auftritt, lesen Sie bitte folgenden Ratgeber zur Fehlersuche.
Der Player lässt sich nicht einschalten.
• Überprüfen Sie, ob der Player vollständig aufgeladen ist. Laden Sie den Player über Nacht vollständig auf (für
ca. 8 Stunden).
Die Tasten reagieren nicht.
• Überprüfen Sie, ob der Player vollständig aufgeladen ist. Laden Sie den Player über Nacht vollständig auf (für
ca. 8 Stunden).
• Vergewissern Sie sich, dass der Player eingeschaltet ist.
Ich kann keine Dateien auf den Player übertragen.
• Überprüfen Sie, ob Ihr Computer mit einem unterstützten Betriebssystem läuft.
• Achten Sie bei Verwendung eines USB-Kabels darauf, dass dieses korrekt an den Player und den PC angeschlossen
ist, oder versuchen Sie es mit einem anderen Kabel.
• Falls Sie den Player über einen USB-Hub mit dem Computer verbunden haben, versuchen Sie, ob der Fehler sich
beheben lässt, wenn Sie den Player direkt mit dem PC verbinden.
• Vergewissern Sie sich, dass der Speicher des Players nicht voll ist.
• Vergewissern Sie sich, dass der Player eingeschaltet ist.
Bei der Wiedergabe höre ich keinen Ton.
• Überprüfen Sie den Lautstärkepegel.
• Vergewissern Sie sich, dass die Kopfhörer korrekt an den Player angeschlossen sind.
Die Klangqualität der Musik ist schlecht.
• Testen Sie die Datei auf Ihrem Computer. Wenn die Klangqualität immer noch schlecht ist, laden Sie die Datei
erneut herunter bzw. kodieren Sie sie erneut.
• Achten Sie darauf, dass die Bitrate der Datei nicht zu niedrig ist. Je höher die Bitrate der Datei, desto besser wird
die Klangqualität. Als Mindestbitrate wird 128 kbps für MP3s und 96 kbps für WMAs empfohlen.
• Drehen Sie die Lautstärke leiser.
• Vergewissern Sie sich, dass die Kopfhörer korrekt an den Player angeschlossen sind.
Der Player spielt meine Musikdatei nicht ab.
• Vergewissern Sie sich, dass die Datei in einem kompatiblen Format vorliegt.
• Die Datei ist unter Umständen kopiergeschützt und Sie haben nicht die Berechtigung zur Wiedergabe dieser
Datei. Falls dies Ihrer Meinung nach ein Fehler ist, kontaktieren Sie bitte den Anbieter, bei dem Sie die Datei
heruntergeladen haben.
32

Spezifikationen
Energieanzeige LED
Speicher Integrierter Speicher 2 GB
Unterstützte Audioformate
DRM-Unterstützung --
Unterstützung für Titelinformation --
PC-Schnittstelle USB 2.0 Hi-Speed (MSC)
Unterstützung für Plug & Play
Audioausgang Ø 3,5 mm Stereo (Kopfhörer)
Signal-Rausch-Abstand 90 dB
Frequenzbereich 20 Hz – 20 kHz
Stromversorgung
Geräte-abmessungen 30 (B) x 62 (H) x 9 (T ) mm
MP3, WMA
(>64 kbps, Klasse 1)
Windows 2000/XP oder höher
Mac OS X
Wiederauadbarer LiPoly-Akku
USB-Auadung
DE
33

RU
Благодарим вас
Поздравляем вас с покупкой MP3-плеера. Данное руководство предназначено для помощи в настройке и начале
использования вашего нового плеера. Внимательно прочтите данное руководство и сохраните для дальнейшего
использования. Перед использованием плеера внимательно прочтите данные инструкции.
Содержимое комплекта
Убедитесь, что в комплект включены все представленные ниже предметы. При отсутствии какого-либо из них,
обратитесь к розничному продавцу, у которого вы приобрели данный продукт.
• MP3-плеер V-150
• Стереонаушники
• USB-адаптер
• Руководство пользователя
• Гарантийный талон
Данная упаковка может включать полиэтиленовые пакеты и другие материалы, которые являются опасными
для детей. Просим вас обеспечить надлежащую утилизацию всех упаковочных материалов.
Особенности
• Встроенная флеш-память
• Воспроизводит цифровые музыкальные файлы MP3 и WMA
• Функция съемного носителя данных
• USB 2.0 для быстрого перемещения файлов
• Встроенный заряжаемый аккумулятор
Обзор кнопок управления
Воспроизведение/Пауза:
Нажать кнопку
1.
Питание вкл./выкл.:
Нажать и удерживать кнопку
2. Предыдущий/Перемотка
3. Уменьшить громкость
4. Увеличить громкость
5. Следующий/Вперед
Отверстие под крепление шейного
6.
ремешка
7. USB-порт
8. Разъем для наушников
9. Светодиодный индикатор состояния
10. Выключатель питания
34

Питание плеера
В плеер встроен перезаряжаемый аккумулятор. Обычное время проигрывания музыки плеером составляет
до восьми часов.
При первом использовании следует полностью зарядить аккумулятор (в течение четырех часов) для
обеспечения оптимальной работы и длительной службы аккумулятора.
Время проигрывания музыки является расчетным значением. Фактическое время проигрывания
музыки может меняться в зависимости от используемого метода кодирования и других факторов.
Зарядка плеера
Ваш плеер можно зарядить с помощью подключения к USB-порту ПК. Подключите один конец USB-кабеля к
USB-порту плеера, а другой конец к USB-порту включенного компьютера.
Если плеер подключен к компьютеру через USB-хаб (концентратор), хаб должен быть самозаряжаемым для
зарядки аккумулятора плеера.
Выполнение переноса файлов увеличит время зарядки.
При неправильном использовании аккумулятор устройства может представлять риск огневого или
химического ожога. Не разбирайте, не жгите или не нагревайте аккумулятор.
Не подключайте плеер к источнику питания, отличному от указанного на этикетке, так как это может
привести к риску пожара или удара электрическим током.
Включение и выключение плеера
• Для включения плеера переместите выключатель питания влево. Загорится светодиодный индикатор.
• Для выключения плеера переместите выключатель питания вправо. Погаснет светодиодный индикатор.
Воспроизведение музыки
Кнопки управления проигрыванием музыки
Используйте следующие кнопки проигрывания музыки во время воспроизведения. Во время проигрывания
музыки светодиодный индикатор будет мигать.
Кнопка действия Функция
Нажмите
Нажмите
Нажмите
Удерживайте
Удерживайте
Нажмите
Нажмите
Начало/остановка проигрывания музыки. Во время остановки проигрывания
нажмите
Проигрывать предыдущий трек.
Проигрывать следующий трек.
Перемотка текущего трека.
Быстрая перемотка текущего трека.
Уменьшить уровень громкости.
Увеличить уровень громкости.
для возобновления воспроизведения.
RU
35

RU
Подключение к компьютеру
Подключите плеер к компьютеру с помощью USB-кабеля, включенного в комплект, для следующего:
• Переноса фалов на ваш плеер и с него;
• Выполнения основных процедур управления файлами.
После подключение плеера:
• Ваш компьютер автоматически распознает плеер в качестве съемного диска. В Devices with Removable
Storage в My Computer появится пиктограмма, отображающая ваш плеер.
• Распознавание и установка устройства в Windows в первый раз может занять несколько минут в
зависимости от конфигурации аппаратных средств.
Перенос/управление файлами
Подключение USB 2.0 обеспечивает простоту быстрого переноса музыки между плеером и вашим
компьютером. Просто используйте плеер аналогично любому съемному диску, применяя основные команды
операционной системы.
Также вы можете использовать свой плеер для хранения видеороликов, фотографий или файлов любого
другого типа.
При необходимости в дополнительной помощи в переносе данных и управлении файлами, см. руководство
по вашей операционной системе или справку на экране. Если вы используете программное обеспечение
управления медиафайлами, такое как iTunes, WinAmp или Windows Media Player, см. их документацию.
Не отключайте или каким-либо иным образом не прерывайте работу плеера во время переноса данных – это
может повредить или изменить прошивку плеера или ваши файлы.
Для получения более подробной информации и поддержки по переносу и синхронизации музыки в Windows Media
Player (WMP) см. раздел справочной информации, включенный в WMP (нажмите Help > Synchronizing Content to
Devices).
Отключение от компьютера
Отключите плеер в соответствии с инструкциями ниже для предотвращения потери данных или повреждения
файла/прошивки.
Microsoft Windows
1. Дважды нажмите на зеленую стрелку на панели задач справа
внизу экрана компьютера (Safely Remove Hardware).
2. Безопасное удаление аппаратных средств: выберите USB Mass Storage Device в появившемся списке и
нажмите Stop.
Остановить аппаратное средство: выберите USB Mass StorageDevice из появившегося списка, затем
нажмите ОК.
3. При появлении окна Safe to Remove Hardware нажмите кнопку OK и отключите USB-кабель от плеера и
компьютера.
36

ОС Macintosh X
1. В левой части окна Поиск найдите соответствующую пиктограмму съемного диска.
2. Нажмите на стрелку Eject справа от пиктограммы съемного диска.
3. Отключите USB-кабель от плеера и своего компьютера.
Поиск и устранение неисправностей
При возникновении проблем с устройством, прочтите инструкции по поиску и устранению неисправностей,
представленные ниже.
Плеер не включается.
• Убедитесь, что плеер полностью заряжен. Попробуйте поставить плеер на зарядку на ночь (на восемь
часов).
Не работают кнопки.
• Убедитесь, что плеер полностью заряжен. Попробуйте поставить плеер на зарядку на ночь (на восемь
часов).
• Убедитесь, что выключатель питания ВКЛ.
Я не могу перенести файлы на плеер.
• Убедитесь, что ваш компьютер работает с поддерживаемой операционной системой.
• При использовании удлинительного USB-кабеля, убедитесь, что он надежно подключен к плееру и ПК, или
попробуйте использовать другой USB-кабель.
• Если вы подключили плеер через USB-хаб (концентратор), попробуйте подключить плеер напрямую к
компьютеру.
• Убедитесь, что память плеера не занята полностью.
• Убедитесь, что выключатель питания ВКЛ.
Во время проигрывания музыки нет звука.
• Проверьте уровень громкости.
• Убедитесь, что наушники надежно подключены к плееру.
Плохое качество звука.
• Попробуйте прослушать файл на компьютере. Если качество звука все равно плохое, попробуйте загрузить
файл еще раз или перекодируйте файл сами.
• Убедитесь, что битрейт файла не слишком низкий. Чем выше битрейт файла, тем лучше звук. Минимальный
рекомендуемый битрейт составляет 128 кбит/с для MP3-файлов и 96 Кбит/с для WMA-файлов.
• Попробуйте уменьшить громкость плеера.
• Убедитесь, что наушники надежно подключены к плееру.
Плеер не проигрывает мои музыкальные файлы.
• Убедитесь, что файл представляет собой файл поддерживаемого формата.
• Файл может быть защищен от копирования, и у вас может не быть прав для проигрывания данного файла.
Если вы думаете, что именно в этом ошибка, свяжитесь со службой, у которой вы загрузили файл.
RU
37

RU
Технические характеристики
Индикатор питания СИД
Память Встроенная память 2 GB
Поддержка аудиоформата MP3, WMA (>64 Кбит/с, класс 1)
Поддержка DRM --
Поддержка информации о песне --
Интерфейс ПК USB 2.0 высокоскоростной (MSC)
Поддержка технологии «включил
и работай»
Аудиовыход Ø3,5 мм с терео (наушники)
Отношение сигнал/шум 90 дБ
Частотная характеристика 20 Гц – 20 кГц
Источник питания Перезаряжаемый литий-полимерный аккумулятор
Размеры устройства 30(Ш) x 62(В) x 9(Г) мм
38
Windows 2000/XP и более поздние версии
ОС Mac X
Зарядка от USB

Warranty card www.acme.eu/warranty
Product Product model
Product purchase date Seller name, address
Failures (date, description, position of the person who accepts the product, rst name, last name and signature)
GB
1. Warranty period
Warranty enters into force starting with the day when
the buyer acquires the product from the seller. Warranty
period is indicated on the package of the product.
2. Warranty conditions
The warranty is valid only by providing an original
document of the product acquisition and this warranty
sheet, which includes name of the product model,
product purchase date, name and address of the seller.
If it is noticed during the warranty period that the
product has faults and these faults where not caused
by any of the reasons when the warranty is not applied
as indicated in the paragraphs below, manufacturer
undertakes to replace the product.
The warranty is not applied to regular testing,
maintenance and repair or replacement of the parts
which are worn out naturally.
The warranty is not applied if damage or failures occurred
due to the following reasons:
• Inappropriate installation of the product,
inappropriate usage and/or operating the product
without following the manual, technical requirements
and safety standards as provided by the manufacturer,
and additionally, inappropriate warehousing, falling
from heights as well as hard strikes.
• Corrosion,mud,waterandsand.
• Repair works, modications or cleaning, which
were performed by a service not authorised by the
manufacturer.
• Usage of the spare parts, software or consumptive
materials which do not apply to the product.
• Accidents or eventsor any other reasons which do
not depend on the manufacturer, which includes
lightning, water, re, magnetic eld and inappropriate
ventilation.
• If the product does not meet standards and
specications of a particular country, in which it was
not bought. Any attempt to adjust the product in
order to meet technical and safety requirements such
as those in the other countries withdraws all the rights
to the warranty service.
If no failures are detected in the product, all the expenses
in relation to the service are covered by the buyer.
39

LT
Garantinis lapas www.acme.eu/warranty
Gaminys Gaminio modelis
Gaminio pirkimo data Pardavėjo pavadinimas, adresas
Gedimai (data, aprašymas, gaminį priėmusio asmens pareigos, vardas, pavardė ir parašas)
1. Garantinis laikotarpis
Garantija galioja nuo tos dienos, kada pirkėjas nusipirko
šį gaminį iš pardavėjo. Garantijos laikotarpis nurodyats
ant gaminio pakuotės.
2. Garantijos sąlygos
Garantija galioja tik pateikus gaminio pirkimo dokumento
originalą ir šį garantijos lapą, kuriame nurodyta gaminio
modelio pavadinimas, gaminio pirkimo data, pardavėjo
pavadinimas ir adresas.
Jei garantiniu laikotarpiu bus aptikta gaminio defektų,
kurie neatsirado dėl priežaščių, išvardintų pastraipose
garantija netaikoma, gamintojas įsipareigoja gaminį
sutaisyti arba pakeisti.
Garantija netaikoma reguliariam tikrinimui, priežiūrai
ir įprastiniu būdu nusidėvėjusių dalių remontui arba
keitimui.
Garantinija netaikoma, jei žala arba gedimai atsirado dėl:
• netinkamo gaminio instaliavimo, netink amo
naudojimo ir/arba darbo su gaminiu nesilaikant
gamintojo pateiktų naudojimo instrukcijų, techninių
reikalavimų ar saugumo standartų, be kita ko ir dėl
netinkamo sandėliavimo, kritimo ant žemės ir stiprių
smūgių.
40
• korozijos,purvo,vandensarbasmėlio.
• remonto, modikacijų arba valymo, atlikto ne
gamintojo įgaliotame serviso centre.
• gaminiui netinkamų atsarginių dalių, programinės
įrangos arba sąnaudinių medžiagų naudojimo.
• nelaimingų atsitikimų arba įvykių arba bet kokių
priežasčių, kurioms gamintojas neturi įtakos, be kita
ko ir dėl žaibo, vandens, ugnies, magnetinių laukų ir
netinkamo vėdinimo.
• jei gaminys neatitinka konkrečios šalies, kuri nėra
pirkimo šalis, standartų arba specikacijų. Bet koks
bandymas pritaikyti gaminį kitų valstybių techniniams
ar saugumo reikalavimams panaikina visas teises į
garantinį aptarnavimą.
Gaminyje neaptikus gedimų visas su aptarnavimu
susijusias išlaidas apmoka pirkėjas.

Garantijas lapa www.acme.eu/warranty
Izstrādājums I zstrādājuma modelis
Izstrādājuma pirkšanas datums Pārdevēja nosaukums, adrese
Bojājumi (datums, apraksts, izstrādājumu pieņēmušās personas amats, vārds, uzvārds un paraksts)
LV
1. Garantijas laiks
Garantija ir spēkā no tās dienas, kad pircējs ir nopircis šo
izstrādājumu no pārdevēja. Garantijas laiks ir norādīts uz
izstrādājuma iepakojuma.
2. Garantijas noteikumi
Garantiju var izmantot tikai tad, ja iesniedz izstrādājuma
pirkšanas dokumenta oriģinālu un šo garantijas lapu,
kurā ir norādīts modeļa nosaukums, izstrādājuma
pirkšanas datums, pārdevēja nosaukums un adrese.
Ja garantijas laikā tiek konstatēti tādi izstrādājuma
defekti, kas nav radušies tādu cēloņu dēļ, kuri uzskaitīti
sarakstā “Garantija zaudē spēku...”, tad ražotājs apņemas
izstrādājumu salabot vai apmainīt pret citu.
Garantija neattiecas uz regulāru pārbaudīšanu, apskati
un parastā veidā nolietojušos daļu remontu un nomaiņu.
Garantija zaudē spēku, ja kaitējums vai bojājumi ir
radušies šādu iemeslu dēļ:
• izstrādājuma nepareiza uzstādīšana, nepareiza
lietošana un/vai darbs ar izstrādājumu, kura laikā
tiek pārkāptas ražotāja sniegtās lietošanas instrukci-
jas, tehniskās prasības vai drošības standarti, tostarp
nepiemērota uzglabāšana, krišana zemē un stipri
triecieni;
• korozija,dubļi,ūdensvaismiltis;
• tādsremonts,modikācijasvaitīrīšana,k asnavveikta
ražotāja pilnvarotā servisa centrā;
• izstrādājumam nepiemērotu rezerves daļu,
programmatūras vai izlietojamo materiālu lietošana;
• nelaimes gadījumivai citi notikumi, vai jebkādi citi
iemesli, ko ražotājs nespēj ietekmēt, tostarp zibens,
ūdens, uguns, magnētiskā lauka un nepiemērotas
vēdināšanas ietekme;
• ja izstrādājums neatbilst tās valsts standartiem vai
specikācijām, kurā tas nav ticis pirkts. Jebkāds
mēģinājums piemērot izstrādājumu citu valstu
tehniskajām vai drošības prasībām anulē tiesības uz
garantijas apkalpošanu.
Ja izstrādājumā netiek atrasti bojājumi, tad visas izmaksas
par apkalpošanu sedz pircējs.
41

EE
Garantiileht www.acme.eu/warranty
Toote nimetus Toote mudel
Toote ostmise kuupäev Müüja ärinimi, aadress
Puudused (kuupäev, kirjeldus, toote vastuvõtnud isiku amet, ees- ja perekonnanimi ning allkiri)
1. Müügigarantii tähtaeg
Müügigarantii kehtib alates päevast, mil ostja käesoleva
toote müüjalt ostis. Müügigarantii tähtaeg on märgitud
toote pakendile.
2. Garantiitingimused
Garantii kehtib ainult toote ostudokumendi originaali
ja käesoleva garantiilehe esitamisel. Garantiilehele
peab olema märgitud toote mudeli nimetus, toote
müügikuupäev, müüja ärinimi ja aadress.
Kui garantiiaja vältel avastatakse tootel defekt ning kui
seda ei põhjustanud allpool toodud garantii kehtetuks
tunnistamise sätetes märgitud asjaolud, siis kohustub
tootja toote parandama või välja vahetama.
Garantiid ei kohaldata regulaarse kontrolli, hoolduse
ja loomulikul teel kulunud osade remondi või
väljavahetamise suhtes.
Garantiid ei kohaldata juhul, kui kahju või rikked on
põhjustanud
• toote ebaõige installeerimine, ebaõige k asutamine
ja/või tootja esitatud toote kasutamisjuhendite,
42
tehniliste nõuete või ohutusstandardite eiramine
tootega töötamisel, samuti juhul, kui puudused
põhjustas ebakorrektne ladustamine, toote
mahakukkumine või tugevad löögid;
• korrosioon,muda,vesivõiliiv;
• tootjapoolt volitamatateeninduskeskusessooritatud
remont, parandamine või puhastamine;
• tootele ebasobivate varuosade, tarkvara või
kulumaterjalide paigaldamine;
• õnnetusjuhtumid või juhtumid või mis tahes muud
asjaolud, mis toimusid mitte tootja süül, sh ka äikese,
vee, tulekahju või magnetvälja toime ja ebaõige
ventilatsioon;
• juhulkuitoodeeivastakonkreetseriigi,miseioleostu
sooritamise riik, standardite või spetsikatsioonide
nõuetele. Mis tahes katse kohandada toodet teiste
riikide tehnilistele nõuetele või ohutusnõuetele
tühistab kõik õigused garantiiteenindusele.
Juhul kui tootel riket ei leita, tasub ostja kõik
teeninduskulud.

Karta gwarancyjna www.acme.eu/warranty
Nazwa wyrobu Model wyrobu
Data nabycia wyrobu Nazwa i adres sprzedawcy
Awarie (data, opis, imię, nazwisko, nazwa stanowiska i podpis osoby odbierającej wyrób)
PL
1. Okres gwarancyjny
Gwarancja jest ważna od dnia nabycia wyrobu przez
kupującego. Okres gwarancyjny jest wskazany na opakowaniu.
2. Warunki gwarancji
Gwarancja jest ważna jedynie w przypadku okazania
oryginału dokumentu potwierdzającego zakup wyrobu
i tej karty gwarancyjnej, na której jest wskazana nazwa
modelu i data nabycia wyrobu oraz nazwa i adres
sprzedającego.
W przypadku awarii wyrobu w okresie gwarancyjnym,
o ile nie jest ona spowodowana przyczynami wymienionymi w punkcie Gwarancji nie udziela się, na wytwórcy
leży obowiązek naprawy lub zamiany wyrobu.
Gwarancja nie obejmuje okresowych przeglądów, prac
konserwacyjnych oraz naturalnego zużycia poszczególnych części wyrobu.
Gwarancji nie udziela się w przypadku, gdy wady wyrobu
były spowodowane:
• niewłaściwą instalacją, użytkowaniem i/lub obsługą
wyrobu, opartą na nieprzestrzeganiu wskazówek
producenta, wymogów technicznych lub zasad
bezpieczeństwa, niewłaściwym magazynowaniem,
silnym uderzeniem lub upadkiem na ziemię;
• korozją,zabrudzeniem,działaniemwodylubpiasku;
• interwencjąuż ytkownika,naprawami,modyk acjami
lub czyszczeniem, wykonywanym poza warsztatem
autoryzowanym producenta;
• stosowaniem nieodpowiednich dla danego wyrobu
części zamiennych, oprogramowania lub materiałów
eksploatacyjnych;
• nieszczęśliwym prz ypadkiem lub innym wydarzeniem, na które producent nie ma żadnego wpływu,
między innymi, błyskawicą, wodą, ogniem, polem
magnetycznym lub niewłaściwą wentylacją;
• niezgodnością wyrobu z normami i specykacjami konkretnego państwa, które nie jest państwem
nabywcy. Każda próba dostosowania wyrobu do
wymogów technicznych i zasad bezpieczeństwa innego państwa anuluje wszelkie prawa na obsługę
gwarancyjną wyrobu.
W przypadku, gdy badanie nie wykazuje żadnych wad
zgłoszonego wyrobu, wszelkie koszty związane z obsługą
obciążają kupującego.
43
DE
Garantieblatt www.acme.eu/warranty
Produkt Modell des Produktes
Kaufdatum des Produktes Benennung, Adresse des Verkäufers
Defekte (Datum, Beschreibung, Funktion der Person, die das Produkt angenommen hat, Vorname, Name und
Unterschrift)
1. Garantiezeit
Die Garantie ist ab dem Tag gültig, an dem der Käufer dieses Produkt vom Verkäufer gekauft hat. Die Garantiezeit
ist auf der Verpackung des Produkts angegeben.
2. Garantiebedingungen
Die Garantie gilt nur im Zusammenhang mit der Originalkaufurkunde des Produktes und mit diesem Garantieblatt, in dem die Benennung des Produktmodells, das
Kaufdatum des Produktes, die Benennung und Adresse
des Verkäufers stehen.
Wenn in der Garantiezeit solche Defekte des Produktes
festgestellt werden, deren Ursachen nicht in den erwähnten Absätzen stehen, wird keine Garantie erteilt.
Der Hersteller verpichtet sich das Produkt zu reparieren
oder auszutauschen.
Die Garantieleistungen schließen die regelmäßige Kontrolle, Wartung und Reparatur sowie den Ersatz von
gewöhnlich verschleißten Teilen nicht ein.
Es wird keine Garantie erteilt, wenn die Ursache des
Schadens oder der Defekte wie folgt war:
• Fehlerhafte Installation des Produktes, falsche
Bedienung und/oder Arbeit mit dem Produkt ohne
die Bedienungsanleitungen des Herstellers, fehlende
Einhaltung von technische Anforderungen oder
44
Sicherheitsbestimmungen sowie ungeeignete
Lagerung, Sturz auf den Boden und harte Schläge.
• Korrosion,Schlamm,WasseroderSand.
• Reparatur, Modikationen oder Reinigung in einem,
vom Hersteller nicht bevollmächtigten ServiceZentrum.
• Verwendung von für das Produkt ungeeigneten
Ersatzteilen, Software oder Betriebsmaterialien.
• Unfälle oder Ereignisse sowie jegliche andere
Ursachen, auf die der Hersteller keinen Einuss hat,
wie Blitzeinschlag, Wasser, Feuer, Magnetfelder und
nicht ausreichende Lüftung.
• Wenn das Produkt nicht den Standards oder
Spezikationen des konkreten Landes entspricht,
in dem das Produkt gekauft wurde. Ein beliebiger
Versuch, das Produkt den technischen oder
Sicherheitsanforderungen anderer Länder
anzupassen, führt zum Verlust aller Rechte auf die
Garantieleistungen.
Wenn keine Defekte beim Produkt festgestellt werden,
sind die mit der Bedienung verbundenen Kosten dem
Käufer in Rechnung zu stellen.

Гарантийный талон www.acme.eu/warranty
Изделие Модель изделия
Дата покупки изделия Наименование продавца, адрес
Неисправности (дата, описание, должность, имя, фамилия и подпись лица, принявшего изделие)
RU
1. Гарантийный срок
Гарантия действует со дня приобретения
покупателем данного изделия у продавца.
Гарантийный срок указан на упаковке изделия.
2. Условия гарантии
Гарантия действует лишь при предъявлении
подлинника документа, подтверждающего покупку
изделия, и насто-ящего гарантийного талона,
содержащего наименование модели изделия, дату
покупки изделия, наименование и адрес продавца.
В случае установления в течение действия гарантийных обязательств дефектов изделия, следствием
возник-новения которых не явились причины,
перечисленные выше, гарантия не действует,
производитель обязуется изделие отремонтировать
либо заменить.
Действие гарантии не распространяется на
регулярные проверки, обслуживание и ремонт
естественно изнаши-вающихся частей либо их
замену.
Гарантия не распространяется на случаи, при
которых вред или неисправности возникли
вследствие:
• ненадлежащей установки, эксплуатации
изделия и/или несоблюдения представленных
производителем инструкций по эксплуатации
изделия и работе с ним, технических
требований или стандартов безопасности, а также
ненадлежащего складирования, падения на землю
или сильных ударов;
• действия коррозии, попадания грязи, воды или
песка;
• ремонта, модификации или чистки, выполненных
не в авторизированном сервисном центре
производителя;
• использования неподходящих для изделия
запасных частей, программного обеспечения или
расходных материалов;
• несчастных случаев или происшествий или
любых причин, на которые производитель не в
состоянии оказывать влияние, а также вследствие
воздействия молнии, воды, огня, магнитных полей и
ненадлежащей вентиляции;
• несоответствия изделия стандартам и
спецификациям конкретной страны, в которой
изделие не было при-обретено. Любая попытка
привести в соответствие из-делия с техническими
требованиями или требованиями безопасности
другой страны лишает покупателя всех прав на
гарантийное обслуживание.
В случае необнаружения в изделии неисправностей,
все связанные с обслуживанием расходы
оплачиваются покупателем.
45

Model: V-150
MP3 player
www.acme.eu
 Loading...