


STi racing wheel
www.acme.eu


4 |
GB |
User’s manual |
173 |
Warranty card |
17 |
LT |
Vartotojo gidas |
174 |
Garantinis lapas |
30 |
LV |
Lietošanas instrukcija |
175 |
Garantijas lapa |
43 |
EE |
Kasutusjuhend |
176 |
Garantiileht |
56 |
RU |
Инструкция пользователя |
177 |
Гарантийный талон |
69 |
PL |
Instrukcja obsługi |
178 |
Karta gwarancyjna |
82 |
DE |
Bedienungsanleitung |
179 |
Garantieblatt |
95 |
UA |
Інструкція |
180 |
Гарантійний лист |
108 |
RO |
Manual de utilizare |
181 |
Fişa de garanţie |
121 |
BG |
Ръководство за употреба |
182 |
Гаранционен лист |
134 |
ES |
Manual de usuario |
183 |
Hoja de garantía |
147 |
FR |
Manuel de l’utilisateur |
184 |
Document de garantie |
160 |
PT |
Manual do usuário |
185 |
Folha de garantia |
3

GB
Introduction
Thank you for purchasing ACME gaming wheel. Please read this manual carefully FIRST, before using the device.
For your convenience, record the complete model number and the date you received the product together with your purchase receipt and attach it to the warranty and service information. Retain them in the event warranty service is required. If you found this product faulty or damaged due to quality problems, please return it to our repair department or the agency where you bought it.
Package contents
•STi racing wheel
•Foot pedals
•Drivers CD
•User‘s manual + warranty pages inside
Features and specification
•2 axes, a D-Pad and 12 separate action buttons
•Built-in motors let you feel every inch of the road for maximum control
•Digital mode and Analog mode are interchangeable
•Works with Windows-based PC: Windows2000/XP/Vista/7™
•Auto-calibration function(DRIVER installation is required)
•180° wheel rotation
•Powerful function for driver settings
4
GB
•Auto cruise lets you enjoy driving with hands-free and comfort
•Spring-loaded pedals for acceleration and brakes create a driving experience
•5 big and durable suction cups make the wheel fixed in place and easy to operate
•2.0 m wheel cable and 1.6 m pedal cable
•Working current is lower than 170mA
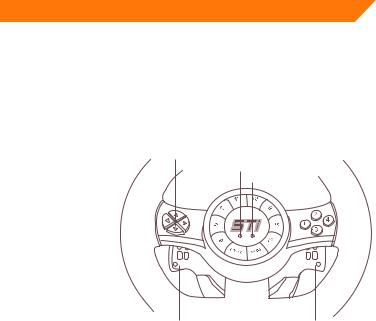
Buttons layout
Front Buttons
D-pad
Power LED
Mode-LED
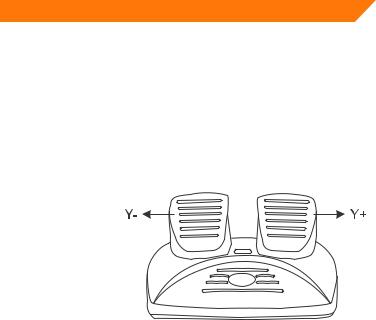
Brake(Y-) |
Acceleration (ACC) (Y+) |
5
GB
Ports
Port for Pedal Cable |
USB cable |
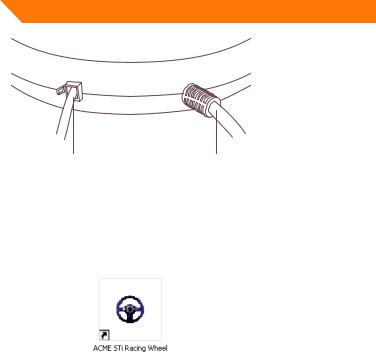
Driver installation and settings
Driver Installation
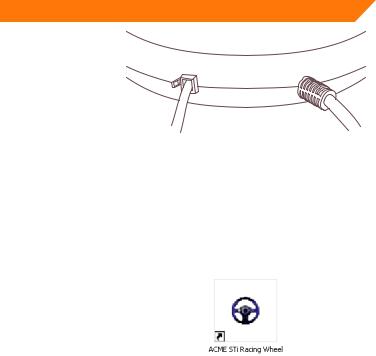
•Connect the wheel to the PC. Put the CD into the CD-ROM drive. Your PC will detect the driver automatically. Follow onscreen prompts to complete the installation. A shortcut will be created on the desktop when installation is done (see Picture 2 as below). Users can simply click this icon to test and set up
Picture 2
6

GB
•Double click the shortcut “ACME Sti Racing Wheel” to enter game controllers (see picture 3 as below)
Picture 3
7
GB
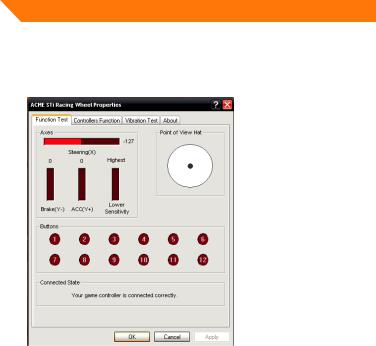
Product Test
• Test Interface
Click the “Test” button as seen in the above Picture 3. Enter the wheel test interface as below (see
Picture 4) to test axis and buttons.
Picture 4
8

GB
Driver Function Test
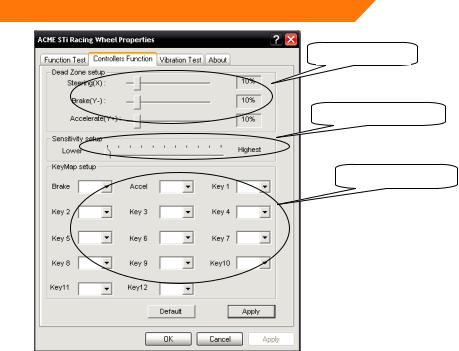
•You can set the original dead zone for wheel direction (X axis), gas (Y+ axis), brake (Y-axis) as below. (see picture 5 “Dead Zone setup”)
•Wheel sensitivity can be adjusted from low to high in different degrees as below. (see Picture 5 “sensitivity setup”)
•Wheel acceleration, brake and key 1 to key 12 is interchangeable (key mapping). (See Picture 5 “KeyMap setup” as below.)
•When driver is installed, default is set the first time you press the MODE button. There is no need for a manual calibration.
Note: The first time you press the wheel MODE button, please do not press any other buttons
•Auto Cruise Setup and Cancel
Depress the gas pedal to any position. Press the CRUISE button. Then release the pedal. The gas volume will be recorded and functioning for auto cruise. When brake or gas control is out of the volume, auto cruise function will be cancelled and normal operation will be active
9

GB
DeadDeadZoneZoneSetSet--up
SensitivitySensitivityAdjustmeadjustmentt
KeyMapKeyMapSetSet-up-up
Picture 5
10
GB
Vibration Test
•Vibration strength can be adjusted to different degrees as below. (See Picture 6 “vibration strength”)
•Motor test methods (See Picture 6)
SensitivityVibrationAdjustmentstrength
MothorDead Zonetest Setmethods-up
Sensitivity Adjustment
Picture 6
11
GB
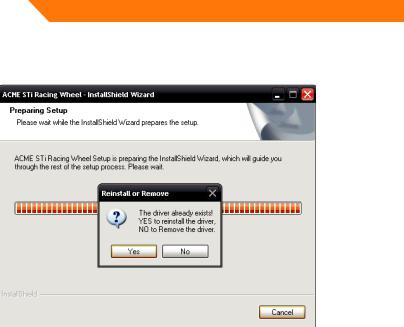
Driver Uninstall
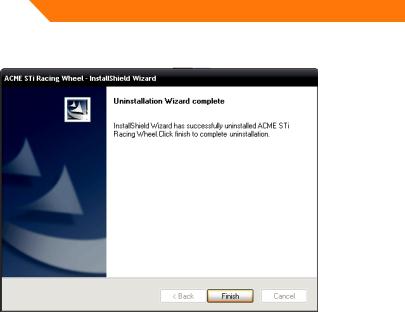
•Rerun the driver. Click NO to remove the driver. Click YES to reinstall the driver. (See Picture 7 as below)
Picture 7
12
GB
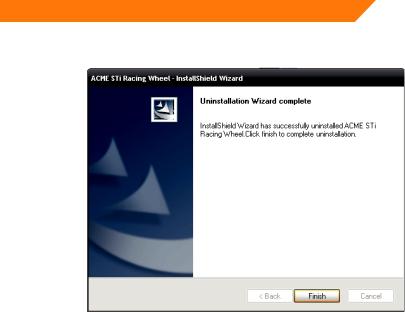
• Click “Finish” to save and quit. (See picture 8 as below)
Picture 8
13
GB
Troubleshooting
•The wheel is not working when software and hardware installation is completed on the PC. Please check whether the wheel cable is properly connected to your PC. If the problem still exists, please restart your PC
•The motors do not vibrate in PC racing games (e.g. Need for Speed 5). Quit the game and restart it. Do not insert or pull the wheel cable when gaming. If the problem still exists, please restart your PC.
•Certain axis will be automatically functioning when the game starts (e.g. Need for Speed 5). Please check whether the wheel is calibrated or set after calibration.
Enter Option > Controllers > Dead Zone.
Adjust the range of Dead Zone and keep the axis within the range
Active Zone |
Dead Zone |
Active Zone |
Axis
Axis
•Settings for Driver “Controller Function” are not functioning
You probably have forgotten to confirm the settings. Click “Apply” when settings are selected
14
GB
Precautions
•Please carefully read this manual before using the wheel
•Do not hit, drop or otherwise abuse it.
•Do not disassemble, modify or try to repair it by yourself
•Do not store it in places that are moist, hot or greasy.
Pedals appendix
Preset: Small Pedals
15

GB
Caution!
•Do not expose the gaming wheel to direct sunlight, moisture or extremely hot environment. Use the device in temperature of 5 ~ 35°C.
•Do not allow liquids to penetrate inside the device.
•Do not put heavy objects on the device.
•Do not disassemble.
•Do not pull or twist the USB cable of the device.
•Avoid dropping or breaking.
Waste Electrical and Electronic Equipment (WEEE) Symbol
The use of the WEEE symbol indicates that this product may not be treated as household waste. By ensuring this product is disposed of correctly, you will help protect the environment. For more detailed information about the recycling of this product, please contact your local authority, your household waste disposal service provider or the shop where you purchased the product.
16

LT
Įvadas
Dėkojame, kad įsigijote žaidimams skirtą vairą „ACME“. Prieš naudodami įrenginį, IŠ PRADŽIŲ perskaitykite šį vadovą.
Dėl savo paties patogumo užsirašykite visą modelio numerį ir datą, kada įsigijote šį gaminį, kartu su savo pirkinio kvitu prisekite ją prie garantijos ir techninės priežiūros informacijos lapelio. Laikykite juos tam atvejui, jei prireiktų atlikti techninę priežiūrą. Jei pastebėjote, kad ši gaminys su defektais arba neveikia dėl su kokybe susijusių problemų, grąžinkite jį į mūsų taisyklą arba atstovybę, iš kurios jį pirkote.
Pakuotės turinys
•Žaidimų vairas
•Kojomis valdomi pedalai
•Tvarkyklių CD
•Naudotojo vadovas ir garantiniai puslapiai jo viduje
Funkcijos ir specifikacijos
•2 ašys, krypčių klaviatūra ir 12 atskirų veiksmų mygtukų.
•Vidinis variklis leidžia pajusti kiekvieną kelio centimetrą ir užtikrinti gerą valdymą.
•Galima keisti tarp skaitmeninio ir analoginio režimų.
•Veikia„Windows“ kompiuteriuose:„Windows2000“/„XP“/„Vista“/„7™“.
•Automatinio kalibravimo funkcija (reikia įdiegti TVARKYKLĘ).
•180° vairo pasukimas.
17

LT
•Didelė vairavimo funkcijų nustatymų įvairovė.
•Autopiloto funkcija leidžia patogiai mėgautis vairavimu.
•Stabdžių ir akseleratoriaus pedalai užtikrina realistišką vairavimo pojūtį.
•5 dideli ir patikimi siurbtukai leidžia gerai pritvirtinti vairą ir lengvai jį valdyti.
•2,0 m ilgio vairo USB laidas ir 1,6 m pedalų laidas.
•Darbinė srovė mažesnė nei 170 mA.
Mygtukų išdėstymas
Priekiniai mygtukai
Krypčių mygtukai
Maitinimo
indikatorius Režimo indikatorius
Stabdis |
|
(Y-) |
Akceleratorius |
|
(ACC) (Y+) |
|
|
18
LT
Lizdai
|
|
|
|
|
|
|
|
Paminų kabelio lizdas |
USB kabelis |
||
Tvarkyklių įdiegimas ir nustatymas
Tvarkyklių įdiegimas
•Prijunkite vairą prie kompiuterio. Į CD-ROM įrenginį įdėkite kompaktinį diską. Kompiuteris automatiškai aptiks tvarkykles. Sekdami nurodymus, pateikiamus ekrane, užbaikite įdiegimą. Baigus įdiegimą darbalaukyje bus sukurta nuoroda (žr. 2 pav.). Vartotojas, norėdamas keisti nuostatas ar patikrinti įrangą, gali paprasčiausiai paspausti šią piktogramą
2 pav.
19

LT
•Dukart spustelėkite nuorodą „ACME Sti racing Wheel“, kad atidarytumėte žaidimų valdiklių langą (žr. 3 pav.).
3 pav.
20
LT
Produkto patikrinimas
• Tikrinimo sąsaja
Spustelėkite mygtuką „Test“, kaip parodyta 3 pav. Įjunkite vairo patikrinimo sąsają, kaip nurodyta toliau (žr. 4 pav.), kad patikrintumėte ašis ir mygtukus.
4 pav.
21

LT
Vairavimo funkcijų patikrinimas
•Galite nustatyti originalią nejautrumo zoną vairo krypčiai (X ašis), greičio (Y + ašis), stabdžio (Y- ašis) paminoms, kaip nurodyta toliau (žr. 5 pav. Nejautrumo zonų nustatymas).
•Vairo jautrumą galima nustatyti nuo mažiausio iki didžiausio, parenkant skirtingus toliau nurodytus laipsnius (žr. 5 pav. Jautrumo nustatymas).
•Vairo akceleravimo, stabdymo funkcija ir 1–12 mygtukai yra keičiami (galima priskirti įvairias funkcijas) (žr. 5 pav. Mygtukų nuostatos).
•Kai įdiegta tvarkyklė, pirmą kartą paspaudus„MODE“ (režimo) mygtuką, nustatomos numatytos nuostatos. Nereikia rankinio kalibravimo.
Pastaba: kai pirmą kartą spaudžiate vairo„MODE“ (režimo) mygtuką, nespauskite jokių kitų mygtukų.
•Autopiloto nustatymas ir atšaukimas. Nuspauskite greičio pedalą iki bet kurios padėties. Tada spauskite„CRUISE“ (autopiloto) mygtuką. Paskui atleiskite pedalą. Bus įsiminta akceleratoriaus padėtis autopiloto funkcijai. Kai stabdymo ar akceleravimo reikšmė viršijama, autopiloto funkcija atšaukiama ir aktyvuojamas įprastas veikimas.
22
LT
Nejautrumo zonų
Dead Zone Set-up
nustatymas
SensitivityJautrumoAdjustmentnustatymas
KeyMapMygtukųSetnuostatos-up
5 pav.
23

LT
Vibracijos patikrinimas
•Galima nustatyti skirtingus vibracijos stiprumo lygius, kaip parodyta toliau (žr. 6 pav.)
•Variklio patikrinimo būdai (žr. 6 pav.)
SensitivityVibracijosAdjuststiprumasent
VariklioDead patikrinimoZone Set-upbūdai
Sensitivity Adjustment
6 pav.
24

LT
Tvarkyklių pašalinimas
•Iš naujo paleiskite tvarkyklę. Spustelėkite „NO“ (Ne), kad tvarkyklę pašalintumėte. Spustelėkite „YES“ (Taip), kad tvarkyklę įdiegtumėte iš naujo (žr. 7 pav.).
7 pav.
25
LT
• Norėdami išsaugoti pakeitimus ir išeiti, spustelėkite„Finish“ (baigti) (žr. 8 pav.).
8 pav.
26
LT
Trikčių šalinimas
•Įdiegus programinę ir techninę įrangą kompiuteryje vairas neveikia. Patikrinkite, ar prie kompiuterio tinkamai prijungti vairo laidai.
Jei jis vis tiek neveikia, kompiuterį paleiskite iš naujo.
•Žaidimuose (pvz.,„Need For Speed 5“) vairas nevibruoja. Išeikite iš žaidimo ir paleiskite jį iš naujo. Žaisdami neištraukite ir neįkiškite laido. Jei jis vis tiek neveikia, kompiuterį paleiskite.
•Kai kurios ašys paleidus žaidimą (pvz.,„Need For Speed 5“) veiks automatiškai. Prašom patikrinti, ar vairas sukalibruotas arba nustatytas po kalibravimo
Įveskite Option > Controllers > Dead Zone.
Sureguliuokite nejautrios zonos ribas ir laikykite ašis toje zonoje
Aktyvi zona |
Neaktyvi zona |
Aktyvi zona |
Ašis
Ašis
•Tvarkyklės„Valdiklio funkcijos“ nuostatos neveikia.
Greičiausiai pamiršote patvirtinti nuostatas. Pasirinkę nuostatas spustelėkite„Apply“.
27

LT
Atsargumo priemonės
•Prieš naudodami vairą, atidžiai perskaitykite šią instrukciją.
•Netrankykite, nenumeskite ar kitaip nepakenkite įrenginiui.
•Neišrinkite, nekeiskite ir nebandykite patys taisyti įrenginio.
•Nelaikykite drėgnose, karštose vietose ar ten, kur yra daug riebalų.
Priedas – pedalai
Komplektacija: nedideli pedalai.
28

LT
Perspėjimai
•Nelaikykite žaidimų vairo ant tiesioginių saulės spindulių, drėgnoje arba karštoje aplinkoje. Naudokite įrenginį esant temperatūrai (5-35°C).
•Neleiskite patekti skysčiams į įrenginio vidų.
•Nedėkite sunkių daiktų ant įrenginio.
•Neardykite.
•Netraukinėkite ir nesukinėkite įrenginio USB kabelio.
•Nemėtykite ir nedaužykite.
Elektroninių atliekų ir elektroninės įrangos (WEEE) ženklas
WEEE ženklu nurodoma, kad gaminys gali būti panaudotas kaip namų apyvokos atlieka. Užtikrindami, kad šis gaminys būtų išmestas pagal taisykles, Jūs padėsite aplinkai. Norėdami sužinoti daugiau informacijos apie šio gaminio perdirbimą, susisiekite su savo vietinės valdžios institucija, Jūsų namų ūkiui priklausančiu atliekų paslaugų teikėju arba parduotuve, iš kurios pirkote šį gaminį
29

LV
Ievads
Pateicamies, ka iegādājāties ACME spēļu stūri! PIRMS izstrādājuma lietošanas, lūdzu, rūpīgi izlasiet šo rokasgrāmatu.
Pierakstiet modeļa numuru, izstrādājuma iegādāšanās datumu, kā arī čeka numuru un pievienojiet garantijas un tehniskās apkopes informācijai. Šī informācija ir nepieciešama garantijas tehniskās apkopes gadījumā. Ja konstatējat, ka izstrādājums ir bojāts vai tam ir darbības traucējumi, lūdzu, nogādājiet izstrādājumu atpakaļ mūsu tehniskās apkopes nodaļā vai tirdzniecības vietā, kur izstrādājumu iegādājāties.
Iepakojuma saturs
•Spēļu stūre
•Kāju pedāļi
•Instalācijas CD
•Lietošanas instrukcija un garantijas lapa (iekšpusē)
Funkcijas un tehniskā specifikācija
•divas asis, D-Pad un 12 vadības pogas;
•iebūvētie motori ļauj sajust katru ceļa seguma sprīdi un nodrošina vislabāko vadāmību;
•digitālā un analogā režīma atbalsts;
•atbalsta Windows operētājsistēmas Windows2000/XP/Vista/7™;
•automātiskās kalibrēšanas funkcija (nepieciešama draiveru instalēšana);
•stūri var pagriezt par 180°;
30
 Loading...