


Micro-Clip MP3 Player with LCD Display MP3 grotuvas su skystųjų kristalų ekranu MP3 atskaņotājs ar šķidro kristālu ekrānu MP3 mängija vedelkristallekraaniga
MP3 проигрыватель с жидкокристаллическим экраном
User's Manual Vartotojo instrukcija Lietošanas instrukcija Kasutusjuhend Инструкция пользователя
Please read this manual carefully before operation
Prieš naudodamiesi gaminiu, atidžiai perskaitykite šią instrukciją. Pirms sākat lietot atskaņotāju, rūpīgi izlasiet šo instrukciju
Toote kasutamise eel lugege käesolev kasutusjuhend hoolikalt läbi
Перед использованием изделия внимательно прочитайте данную инструкцию
V-110
EN
Package Contents
Please make sure that the items shown below are included in the package. Should an item be missing, please contact the local retailer from which you purchased this product.
1.Acme V-110 MP3 player
2.Stereo Earphones
3.USB Cable
4.User’s Manual
5.Warranty Card
Features
•Integrated flash memory
•High-Contrast LCD display with 7-color backlight
•Plays MP3 and WMA digital music files
•ID3 tag support for song Information display
•Random (shuffle) music playback
•Hold feature prevents accidental key presses
•Mobile data storage function
•USB 2.0 for fast file transfers
•Integrated rechargeable battery
Acme MP3 V-110 at a Glance
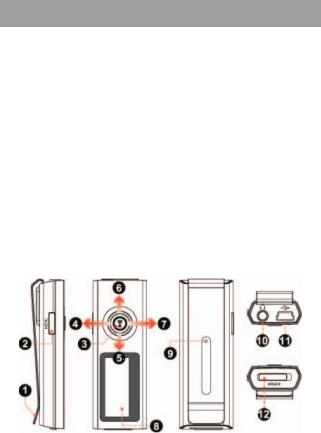
Controls at a Glance
Top Side |
|
|
1. |
Clip |
|
2. |
MENU |
[MENU] |
Front Side |
|
3. Play/Pause: |
|
Press Joystick |
[>||] |
3

EN
|
Power On/Off: |
|
|
Press and Hold Joystick |
[Hold >||] |
4. |
Volume Up |
↑ |
5. |
Previous/Reverse |
← |
6. |
Next/Forward |
→ |
7. |
Volume Down |
↓ |
8.LCD Display
Back Side
9.Reset
Right Side
10.Headphone Out Jack
11.USB Port
Left Side
12. Hold Switch
Display at a Glance
Getting Started
Charging/Powering Your Player
Your player has an integrated rechargeable battery.
Upon initial use, the battery should be charged fully (about 4 hours) to ensure optimal performance and battery life.
Music play time is an estimated value. Actual play time may vary depending on encoding method used and other factors.
4

EN
Your player can be charged through a PC USB connection. Plug one end of the USB cable into the player’s USB Port and plug the other end into the USB port of a powered-on computer.
If the player is connected to a computer through a USB hub, the hub must be self-powered to charge the player’s battery.
File transfers will extend the charging time.
The battery used in this device may present a fire or chemical burn if mistreated. Do not disassemble, incinerate, or heat the battery.
Do not connect the player to a power source other than that which is indicated here or on the label as this may result in the risk of fire or electric shock.
Power On/Off
•To turn your player on, press and hold [>||]. The LCD will display the Acme logo.
•To turn your player off, press and hold [>||] until the LCD displays “BYE BYE” or something like that.
Hold Switch
The Hold feature locks (disables) your player’s controls to prevent accidental key presses when it is in your pocket or bag.
•To lock the player’s controls, slide the HOLD switch down in the direction of the arrow. A Lock icon will be displayed on the screen.
•To unlock the player’s controls, slide the HOLD switch up away from the arrow.
Reset Function
You may reset your player if it should freeze or otherwise behave abnormally.
1.Disconnect your player if it is connected to a computer.
2.Use a paper clip to gently press the RESET key located on the rear of the player.
Connecting Earphones
Connect earphones to the earphones Out jack for private listening.
•Lower the volume level before connecting earphones, then gradually increase the volume for comfortable listening.
•Hearing experts advise against the constant use of personal stereos played at high volume.
•Constant high-volume use can lead to hearing loss. If you experience ringing in your ears or hearing loss, discontinue use immediately and seek medical advice.
Main Menu
The Main Menu gives you access to the different function modes of your player.
Play Music
Play your digital MP3 or WMA music files.
FM Tuner
Listen to FM radio.
Setting
Set your player’s internal options.
Version
View your player’s firmware information.
Info
View your player’s memory information.
Folder
Play or view files from your player.
5

EN
•To enter the Main Menu, hold [MENU].
•To select a function mode in the Main Menu, press ← or → to highlight the mode, and then press [>||] to confirm.
•To exit the Main Menu, hold [MENU].
Play Music Mode
Enter PLAY MUSIC mode from the Main Menu to play digital MP3 or WMA music files.
PLAY MUSIC mode will play all compatible audio files on your player, regardless of directory.
For more information about how to get music onto your player, please refer to the section “Connecting to a Computer > Transferring Files”.
Music Playback Controls
Use the following controls during music playback.
Key Action |
Function |
|
|
|
|
Press >|| |
Start/Pause music playback. |
|
While playback is paused, press to resume. |
||
|
||
Press ← |
Play the previous track. |
|
Press → |
Play the next track. |
|
Hold ← |
Reverse through the current track. |
|
Hold → |
Fast-forward through the current track. |
|
Press ↓ |
Decrease the volume level. |
|
Press ↑ |
Increase the volume level. |
FM TUNER MODE
Enter FM TUNER mode from the Main Menu to listen to FM radio broadcasts.
Earphones or headphones must be connected to the headphone jack for radio operation (the earphone cord is used as an FM antenna).
FM Tuner Controls
Use the following controls in FM TUNER mode.
Key |
Function |
|
|
Press [→] |
Preset Tuning: Tune to a higher preset station. |
Hold [→] |
Enter the Manual Tuning and auto-seek the next highest frequency. |
Press [←] |
Preset Tuning: Tune to a lower preset station. |
Hold [←] |
Enter the Manual Tuning mode and auto-seek the next lowest frequency. |
Press [↓] |
Decrease the volume level. |
Press [↑] |
Increase the volume level. |
Press [MENU] |
Enter the FM Tuner Menu. |
Automatically Saving Preset Stations
To automatically scan and save all available broadcast frequencies to Preset Station memory:
•Enter the FM Tuner menu (press [MENU]).
•Select and enter “Auto Scan”.
Auto Scan will overwrite any previously stored Preset Stations.
6
EN
Manually Saving Preset Stations
•Manually tune to the station you would like to save as a Preset Station (e.g., “92.7”).
•Enter the FM Tuner menu (press [MENU]).
•Select and enter “Save Station”.
•Press [↑] or [↓] to select a Preset Station number (e.g., “CH03”) and press [ >||] to confirm.
•Press [←] or [→] to select “YES” and press [>||] to confirm. (The station “92.7” has now been saved as Preset Station “CH03”.)Press [M] to cancel the save process.
Deleting Preset Stations
•Enter the FM Tuner menu (press [MENU] ).
•Select and enter “Delete Station”.
•Press [↑] or [↓] to select a Preset Station number to delete (e.g., “03”) and press [>||] to confirm.
•Press [←] or [→] to select “YES” and press [>||] to confirm. (Preset Station “03” will be deleted.)
Press [MENU] to cancel the delete process.
FM Tuner Menu
To enter the FM Tuner menu, press [MENU] while the player is in FM Tuner mode.
Item |
Description |
|
|
|
|
Play Music |
Enter PLAY MUSIC Mode. (Select this to exit FM Tuner menu and return to Main |
|
Menu). |
||
|
||
Save Station |
Save a Preset Station. |
|
Delete Station |
Delete a Preset Station |
|
Auto Scan |
Automatically scan and save all available broadcast frequencies to Preset Stations. |
Setting Mode
Enter the SETTING mode from the Main Menu to set your player’s system options.
The Settings menu contains the following options: Music, Display, System, Sleep, and Language.
•To browse the setting options, press ←or →. To select an item, press [>||].
•Press ↑to cancel and return to the previous screen.
•Press and hold [MENU] to return to the Main Menu.
Please refer to the table below for a description of the player’s setting options.
Item
Music |
Repeat Mode |
|
|
||
|
Equalizer |
|
Display |
Contrast |
|
BLight Time |
||
|
||
System |
BLight Color |
|
Default Set |
||
|
||
|
|
Description
Set a Repeat Mode option.
Normal: |
Play tracks in sequential order |
Repeat One: |
Repeat the current track. |
Folder Once: |
Play all tracks in current folder once. |
Folder Repeat: |
Repeat all tracks in current folder. |
All Repeat: |
Repeat all tracks. |
Random: |
Play tracks in random order (shuffle). |
Set a digital equalizer preset. The options are Normal, 3D, Rock, Pop, Classical, Bass, and Jazz.
Adjust the contrast of the display.
Adjust the duration of time (in seconds) that the backlight will remain on after a key press. A setting of “Always On” will keep the backlight on continuously.
Set the color of the backlight.
Restore all of the player’s options to their factory-default state.
7

EN
Item |
Description |
|
|
|
|
Sleep |
Set the duration of time (in minutes) that the player will remain on when it is |
|
idle. The setting of “OFF” will disable the Power Saving feature. |
||
|
||
Language |
Set the Language that the menus appear in. |
Folder Mode
Enter FOLDER mode from the Main Menu to browse all folders and files loaded on your player.
View all folders and files, or select a compatible MP3 or WMA file to start playback.
Folder Controls
•Press ↑to browse up the list; press ↓to browse down the list.
•Press [>||] to select an item.
•If a folder has been selected, the contents of the folder will be displayed.
•If a music file has been selected, the player will enter PLAY MUSIC mode for playback.
•Press ←to go back to the previous folder.
•Press and hold [MENU] to return to the Main Menu.
Connecting to a Computer
Connecting to a Computer
Connect the player to your computer with the supplied USB cable. Upon connection:
•Your computer will automatically recognize the player as a Removable Disk. An icon representing your player will appear under “Devices with Removable Storage” when you open “My Computer”.
•It may take Windows several minutes to recognize and set up the device the first time it is connected depending on your hardware configuration.
Transferring Files
The USB 2.0 connection makes it easy to transfer music quickly between the player and your computer. Simply use the player as you would any removable disk using basic operating system commands.
You can also use your player to store video, photo, or any other type of files.
If you need further assistance with transferring and managing files, please refer to your operating system’s instruction manual or on-screen help. If you are using media management software such as iTunes, Winamp or Windows Media Player, please refer to their documentation for support.
Do not disconnect or otherwise interrupt the player during file transfer—this could damage or corrupt the player’s firmware or your files.
Disconnecting from a Computer
Disconnect your player as instructed below to prevent data loss or file/firmware corruption.
Microsoft Windows
1.Double-click the green arrow in the taskbar located on the lower-right side of the computer screen (Safely Remove Hardware).
2.Safely Remove Hardware:
Select “USB Mass Storage Device” from the list that appears and then click on “Stop”.
Stop a Hardware Device: Select “USB Mass Storage Device” from the list that appears and then click on “OK”.
3.When the“Safe to Remove Hardware”window appears, click the OK button and disconnect the USB cable from the player and your computer.
Macintosh OS X
1.On the left side of the Finder Window, identify the appropriate Removable Disk icon.
2.Click on the “Eject” arrow on the right of the Removable Disk icon.
3.Disconnect the USB cable from the player and your computer.
8

EN
Troubleshooting
If you have a problem with this device, please read the troubleshooting guide below.
The player does not turn on.
•Ensure that the player is fully charged. Try charging the player at least 4 hours, or charge the player overnight.
•Ensure that the Hold/Lock switch is disengaged.
The buttons do not work.
•Ensure that the player is fully charged. Try charging the player at least 4 hours, or charge the player overnight.
•Ensure that the Hold/Lock switch is disengaged.
I cannot transfer files to the player.
•Ensure that your computer is running a supported operating system.
•If using a USB extension cable, ensure that it is securely attached to the player and the PC, or try using another USB cable.
•If you have connected the player through a USB hub, try connecting the player directly to your computer.
•Ensure that the player’s memory capacity is not full.
•Ensure that the Hold/Lock switch is disengaged.
There is no sound during playback.
•Check the volume level.
•Ensure that the earphones are attached securely to the player.
The sound quality of the music is poor.
•Try playing the file on your computer. If the sound quality is still poor, try downloading the file again or re-encoding the file yourself.
•Ensure that the bit rate of the file is not too low. The higher the bit rate of the file, the better it will sound. The minimum recommended bitrate is 128kbps for MP3s and 96kbps for WMAs.
•Try lowering the volume of the player.
•Ensure that the earphones are attached securely to the player.
The player will not play my music file.
•Ensure that the file is in a compatible format.
•The file may be copy-protected and you no longer have authorization to play this file. If you feel this is in error, please contact the service from which you downloaded the file.
9
LT
Pakuotės turinys
Įsitikinkite, kad toliau išvardinti daiktai yra pakuotėje. Jei kurio nors jų trūksta, kreipkitės į vietos mažmenininką, iš kurio gaminį nusipirkote.
1.„Acme V–110“ MP3 grotuvas
2.Ausinės
3.USB kabelis
4.Naudojimo instrukcija
5.Garantinė kortelė
Techninės charakteristikos
•Integruota atmintis
•Didelio kontrasto skystųjų kristalų ekranas su 7 spalvų apšvietimu
•Groja MP3 ir WMA formatų skaitmeninius muzikos failus
•ID3 gairių palaikymas dainos informacijai rodyti
•Muzikos failų grojimas atsitiktine tvarka
•Užrakinimo funkcija padeda išvengti netyčinio mygtukų paspaudimo
•Nešiojamosios laikmenos funkcija
•USB 2.0 failams greitai perkelti
•Integruota įkraunama baterija
„Acme MP3 V–110“ apžvalga
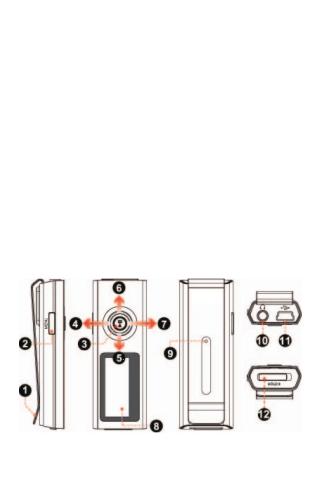
Valdymo mygtukų apžvalga
Viršutinė dalis |
|
|
1. |
Spaustukas |
|
2. |
Meniu: |
[MENU] |
Priekinė dalis |
|
3. Paleidimas arba pauzė: |
|
paspauskite valdymo svirtelę |
[>||] |
10
LT
|
Įjungimas arba išjungimas: |
|
|
paspauskite ir palaikykite valdymo svirtelę |
[>||] |
4. |
Garsumo didinimas |
↑ |
5. |
Ankstesnis arba greitas sukimas atgal |
← |
6. |
Kitas arba greitas sukimas pirmyn |
→ |
7. |
Garsumo mažinimas |
↓ |
8.Skystųjų kristalų ekranas
Užpakalinė dalis
9.Atstatymas
Dešinysis šonas
10.Ausinių lizdas
11.USB prievadas
Kairysis šonas
12. Užrakinimo jungiklis
Ekrano apžvalga
Pradžia
Grotuvo įkrovimas ir maitinimas
Jūsų grotuve integruota įkraunama baterija.
Prieš naudojant prietaisą pirmą kartą, jo bateriją reikia įkrauti pilnai (apie 4 valandas), kad būtų užtikrintas optimalus veikimas ir naudojimosi laikas.
Muzikos grojimo laikas yra apskaičiuojama vertė. Tikrasis grojimo laikas gali kisti, priklausomai nuo naudoto užkodavimo metodo ir kitų veiksnių.
11

LT
Grotuvą įkrauti galite prijungę jį prie asmeninio kompiuterio USB jungtimi. Prijunkite vieną USB kabelio galą prie grotuvo USB prievado, o kitą — prie USB prievado kompiuteryje.
Jeigu grotuvas prijungtas prie kompiuterio per USB šakotuvą, jis turi turėti atskirą maitinimą iš maitinimo šaltinio, kad įkrautų grotuvo bateriją.
Failų perkėlimas pailgina įkrovimo laiką.
Netinkamai naudojama, šio prietaiso baterija gali užsidegti ar sprogti. Neardykite, nedeginkite ir nekaitinkite jos.
Neprijunkite prietaiso prie kito maitinimo šaltinio nei nurodyta čia ar ant etiketės, nes dėl to gali kilti gaisras ar elektros šokas.
Įjungimas ir išjungimas
•Norėdami įjungti grotuvą, paspauskite ir palaikykite [>||]. Skystųjų kristalų ekrane atsiras „Acme“ logotipas.
•Norėdami išjungti grotuvą, paspauskite ir palaikykite [>||], kol skystųjų kristalų ekrane atsiras užrašas „Viso gero !“.
Užrakinimo jungiklis
Užrakinimo funkcija užblokuoja grotuvo valdymo mygtukus, kad grotuvui esant kišenėje ar krepšyje, netyčia jų nepaspaustumėte.
•Norėdami užrakinti grotuvo valdymo mygtukus, pastumkite [HOLD] (užrakinimo) mygtuką žemyn rodyklės kryptimi. Ekrane atsiras užrakto piktograma.
•Norėdami atrakinti grotuvo valdymo mygtukus, pastumkite [HOLD] (užrakinimo) mygtuką aukštyn priešinga rodyklei kryptimi.
Atstatos funkcija
Grotuvo atstatą galite atlikti tada, kai jis užstringa arba kai atsiranda kitų sutrikimų.
1.Atjunkite grotuvą, jei jis buvo prijungtas prie kompiuterio.
2.Popieriaus sąvaržėle švelniai paspauskite atstatos mygtuką, esantį griuvo užpakalinėje dalyje.
Ausinių prijungimas
Prijunkite ausines prie ausinių lizdo, jei muzikos norite klausytis asmeniškai.
•Prieš prijungdami ausines, sumažinkite garsumo lygį, tada palaipsniui didinkite garsumo lygį iki tinkamo klausytis.
•Klausos specialistai nerekomenduoja klausytis muzikos per ausines labai garsiai.
•Ausis nuolat veikiant dideliam garsui, galima apkursti. Jei ausyse pradeda spengti arba prarandate klausą, nedelsdami nustokite naudotis ausinėmis ir kreipkitės į mediką.
Pagrindinis meniu
Pagrindinis meniu
Iš pagrindinio meniu galite įjungti skirtingas grotuvo funkcijas.
Groti Muziką
Paleiskite savo skaitmeninius MP3 arba WMA formato muzikos failus.
FM imtuvas
Paleiskite FM imtuvą ir klausykite mėgstamas radio stotis.
Nustatymai
Nustatykite savo grotuvo parinktis.
Versija
Peržiūrėkite savo grotuvo mikroprogramos informaciją.
12

LT
Informacija
Peržiūrėkite savo grotuvo atminties informaciją.
Katalogai
Paleiskite arba peržiūrėkite failus, esančius grotuve.
•Norėdami atidaryti pagrindinį meniu, palaikykite paspaudę mygtuką [MENU].
•Norėdami pasirinkti funkciją pagrindiniame meniu, spauskite „←“ arba „→“ parinkčiai pažymėti ir tada paspauskite mygtuką„>||“ pasirinkimui patvirtinti.
•Norėdami išjungti pagrindinį meniu, palaikykite paspaudę mygtuką [MENU].
Muzikos paleidimas
Pagrindiniame meniu įjunkite „Groti Muziką“ funkciją, skaitmeniniams MP3 arba WMA formato muzikos failams paleisti.
„Groti Muziką“ funkcija bus paleidžiami visi suderinami garso failai, nepaisant jų katalogo.
Daugiau informacijos apie muzikos failų perkėlimą į grotuvą rasite skyriaus „Prijungimas prie kompiuterio“ skyrelyje „Failų perkėlimas“.
Muzikos perklausos valdymo mygtukai
Muzikos perklausos metu naudokitės toliau nurodytais valdymo mygtukais.
Valdymo |
Funkcija |
|
veiksmas |
||
|
||
|
|
|
Paspaudus„>||“ |
Paleidžiamas muzikos failas arba įjungiama pauzė. |
|
Kai įjungta pauzė, iš naujo paleidžiamas failas. |
||
|
||
Paspaudus„←“ |
Paleidžiamas ankstesnis takelis. |
|
Paspaudus„→“ |
Paleidžiamas kitas takelis. |
|
Palaikius„←“ |
Greitai sukamas atgal tuo metu grojamas takelis. |
|
Palaikius„→“ |
Greitai sukamas pirmyn tuo metu grojamas takelis. |
|
Paspaudus„↓“ |
Sumažinamas garsumo lygis. |
|
Paspaudus„↑“ |
Padidinamas garsumo lygis. |
FM imtuvo valdymas
Pasirinkite „FM imtuvas“ režimą iš Pagrindinio Meniu, norėdami klausytis radio transliacijų.
Norint klausytis radio translecijų, ausinės turi būti prijungtos prie ausinių lizdo grotuve (ausinių laidas yra naudojamas kaip FM antena).
FM imtuvo valdymas
FM imtuvo režime, galite naudotis šiomis funcijomis.
Valdymo veiksmas |
Funkcija |
|
|
|
|
|
|
Paspaudus [→] |
Pereiti prie aukštesnio dažnio nustatytos FM stoties. |
|
|
Palaikius [→] |
Įjungiamas Rankinio Nustatymo režimas |
ir automatinis |
aukštesnio |
dažnio FM stoties aptikimas ir nustatymas. |
|
|
|
|
|
|
|
Paspaudus [←] |
Pereiti prie žemesnio dažnio nustatytos FM stoties. |
|
|
Palaikius [←] |
Įjungiamas Rankinio Nustatymo režimas |
ir automatinis |
žemesnio |
dažnio FM stoties aptikimas ir nustatymas. |
|
|
|
|
|
|
|
Paspaudus [↓] |
Sumažinti garsumo lygį. |
|
|
13
 Loading...