


 Loading...
Acer TRAVELMATE 4235, TRAVELMATE 5530, TRAVELMATE 4335, TRAVELMATE 5230, TRAVELMATE 5530G User Manual
TravelMate Series
Generic User Guide
Copyright © 2008. Acer Incorporated.
All Rights Reserved.
TravelMate Series Generic User Guide
Original Issue: 08/2008
This company makes no representations or warranties, either express or implied, with respect to the contents hereof and specifically disclaims the implied warranties of merchantability or fitness for a particular purpose. Although care has been taken to ensure accuracy, this company shall not be liable for any errors (including, but not limited to, typos, factual errors, etc.) contained in this publication.
Changes may be made periodically to the information in this publication without obligation to notify any person of such revisions or changes. Such changes will be incorporated in new editions of this manual or supplementary documents and publications. This company makes no representations or warranties, either expressed or implied, with respect to the contents hereof and specifically disclaims the implied warranties of merchantability or fitness for a particular purpose.
Record the model number, serial number, purchase date and place of purchase information in the space provided below. The serial number and model number are recorded on the label affixed to your computer. All correspondence concerning your unit should include the serial number, model number and purchase information.
No part of this publication may be reproduced, stored in a retrieval system, or transmitted, in any form or by any means, electronically, mechanically, by photocopy, recording or otherwise, without the prior written permission of Acer Incorporated.
TravelMate Series Notebook PC
Model number: __________________________________
Serial number: ___________________________________
Date of purchase: ________________________________
Place of purchase: ________________________________
Acer and the Acer logo are registered trademarks of Acer Incorporated. Other companies' product names or trademarks are used herein for identification purposes only and belong to their respective companies.
iii
Information for your safety and comfort
Safety instructions
Read these instructions carefully. Keep this document for future reference. Follow all warnings and instructions marked on the product.
Turning the product off before cleaning
Unplug this product from the wall outlet before cleaning. Do not use liquid cleaners or aerosol cleaners. Use a damp cloth for cleaning.
CAUTION for plug as disconnecting device
Observe the following guidelines when connecting and disconnecting power to the power supply unit:
Install the power supply unit before connecting the power cord to the AC power outlet.
Unplug the power cord before removing the power supply unit from the computer.
If the system has multiple sources of power, disconnect power from the system by unplugging all power cords from the power supplies.
CAUTION for Accessibility
Be sure that the power outlet you plug the power cord into is easily accessible and located as close to the equipment operator as possible. When you need to disconnect power to the equipment, be sure to unplug the power cord from the electrical outlet.
CAUTION for bundled dummy cards (only for certain models)
Your computer shipped with plastic dummies installed in the card slots. Dummies protect unused slots from dust, metal objects or other particles. Save the dummies for use when no cards are in the slots.
CAUTION for Listening
To protect your hearing, follow these instructions.
•Increase the volume gradually until you can hear clearly and comfortably.
•Do not increase the volume level after your ears have adjusted.
•Do not listen to music at high volumes for extended periods.
•Do not increase the volume to block out noisy surroundings.
•Decrease the volume if you can't hear people speaking near you.
iv
Warnings
•Do not use this product near water.
•Do not place this product on an unstable cart, stand or table. If the product falls, it could be seriously damaged.
•Slots and openings are provided for ventilation to ensure reliable operation of the product and to protect it from overheating. These openings must not be blocked or covered. The openings should never be blocked by placing the product on a bed, sofa, rug or other similar surface. This product should never be placed near or over a radiator or heat register, or in a built-in installation unless proper ventilation is provided.
•Never push objects of any kind into this product through cabinet slots as they may touch dangerous voltage points or short-out parts that could result in a fire or electric shock. Never spill liquid of any kind onto or into the product.
•To avoid damage of internal components and to prevent battery leakage, do not place the product on a vibrating surface.
•Never use it under sporting, exercising, or any vibrating environment which will probably cause unexpected short current or damage rotor devices, HDD, Optical drive, and even exposure risk from lithium battery pack.
•Your device and its enhancements may contain small parts. Keep them out of the reach of small children.
Using electrical power
•This product should be operated from the type of power indicated on the marking label. If you are not sure of the type of power available, consult your dealer or local power company.
•Do not allow anything to rest on the power cord. Do not locate this product where people will walk on the cord.
•If an extension cord is used with this product, make sure that the total ampere rating of the equipment plugged into the extension cord does not exceed the extension cord ampere rating. Also, make sure that the total rating of all products plugged into the wall outlet does not exceed the fuse rating.
•Do not overload a power outlet, strip or receptacle by plugging in too many devices. The overall system load must not exceed 80% of the branch circuit rating. If power strips are used, the load should not exceed 80% of the power strip's input rating.
•This product's AC adapter is equipped with a three-wire grounded plug. The plug only fits in a grounded power outlet. Make sure the power outlet is properly grounded before inserting the AC adapter plug. Do not insert the plug into a non-grounded power outlet. Contact your electrician for details.

v
Warning! The grounding pin is a safety feature. Using a power outlet that is not properly grounded may result in electric shock and/or injury.
Note: The grounding pin also provides good protection from unexpected noise produced by other nearby electrical devices that may interfere with the performance of this product.
•Use the product only with the supplied power supply cord set. If you need to replace the power cord set, make sure that the new power cord meets the following requirements: detachable type, UL listed/CSA certified, type SPT-2, rated 7 A 125 V minimum, VDE approved or its equivalent, 4.6 meters (15 feet) maximum length.
Product servicing
Do not attempt to service this product yourself, as opening or removing covers may expose you to dangerous voltage points or other risks. Refer all servicing to qualified service personnel.
Unplug this product from the wall outlet and refer servicing to qualified service personnel when:
•the power cord or plug is damaged, cut or frayed
•liquid was spilled into the product
•the product was exposed to rain or water
•the product has been dropped or the case has been damaged
•the product exhibits a distinct change in performance, indicating a need for service
•the product does not operate normally after following the operating instructions
Note: Adjust only those controls that are covered by the operating instructions, since improper adjustment of other controls may result in damage and will often require extensive work by a qualified technician to restore the product to normal condition.
Guidelines for safe battery usage
This notebook uses a Lithium-ion battery. Do not use it in a humid, wet or corrosive environment. Do not put, store or leave your product in or near a heat source, in a high temperature location, in strong direct sunlight, in a microwave oven or in a pressurized container, and do not expose it to temperatures over 60°C (140°F). Failure to follow these guidelines may cause the battery to leak acid, become hot, explode or ignite and cause injury and/or damage. Do not pierce, open or disassemble the battery. If the battery leaks and you come into

vi
contact with the leaked fluids, rinse thoroughly with water and seek medical attention immediately. For safety reasons, and to prolong the lifetime of the battery, charging will not occur at temperatures below 0°C (32°F) or above 40°C (104°F).
The full performance of a new battery is achieved only after two or three complete charge and discharge cycles. The battery can be charged and discharged hundreds of times, but it will eventually wear out. When the operation time becomes noticeably shorter than normal, buy a new battery. Use only Acer approved batteries, and recharge your battery only with Acer approved chargers designated for this device.
Use the battery only for its intended purpose. Never use any charger or battery that is damaged. Do not short-circuit the battery. Accidental short-circuiting can occur when a metallic object such as a coin, clip or pen causes direct connection of the positive (+) and negative (-) terminals of the battery. (These look like metal strips on the battery.) This might happen, for example, when you carry a spare battery in your pocket or purse. Short-circuiting the terminals may damage the battery or the connecting object.
The capacity and lifetime of the battery will be reduced if the battery is left in hot or cold places, such as in a closed car in summer or winter. Always try to keep the battery between 15°C and 25°C (59°F and 77°F). A device with a hot or cold battery may not work temporarily, even when the battery is fully charged. Battery performance is especially limited in temperatures well below freezing.
Do not dispose of batteries in a fire as they may explode. Batteries may also explode if damaged. Dispose of batteries according to local regulations. Please recycle when possible. Do not dispose as household waste.
Wireless devices may be susceptible to interference from the battery, which could affect performance.
Replacing the battery pack
The notebook uses lithium batteries. Replace the battery with the same type as that which came bundled with your product. Use of another battery may present a risk of fire or explosion.
Warning! Batteries may explode if not handled properly. Do not disassemble or dispose of them in fire. Keep them away from children. Follow local regulations when disposing of used batteries.
Telephone line safety
•Disconnect all telephone lines from the equipment when not in use and/or before servicing.
•To avoid the remote risk of electric shock from lightning, do not connect the telephone line to this equipment during lightning or thunderstorms.

vii
Warning! For safety reasons, do not use non-compliant parts when adding or changing components. Consult your reseller for purchase options.
Operating environment
Warning! For safety reasons, turn off all wireless or radio transmitting devices when using your laptop under the following conditions. These devices may include, but are not limited to: wireless lan (WLAN), Bluetooth and/or 3G.
Remember to follow any special regulations in force in any area, and always switch off your device when its use is prohibited or when it may cause interference or danger. Use the device only in its normal operating positions. This device meets RF exposure guidelines when used normally, and it and its antenna are positioned at least 1.5 centimeters (5/8 inches) away from your body (refer to the figure below). It should not contain metal and you should position the device the above-stated distance from your body. To successfully transmit data files or messages, this device requires a good quality connection to the network. In some cases, transmission of data files or messages may be delayed until such a connection is available. Ensure that the above separation distance instructions are followed until the transmission is completed. Parts of the device are magnetic. Metallic materials may be attracted to the device, and persons with hearing aids should not hold the device to the ear with the hearing aid. Do not place credit cards or other magnetic storage media near the device, because information stored on them may be erased.
Medical devices
Operation of any radio transmitting equipment, including wireless phones, may interfere with the functionality of inadequately protected medical devices. Consult a physician or the manufacturer of the medical device to determine if they are adequately shielded from external RF energy or if you have any questions. Switch off your device in health care facilities when any regulations posted in these areas instruct you to do so. Hospitals or health care facilities may be using equipment that could be sensitive to external RF transmissions..
Pacemakers. Pacemaker manufacturers recommend that a minimum separation of 15.3 centimeters (6 inches) be maintained between wireless devices and a pacemaker to avoid potential interference with the pacemaker. These recommendations are consistent with the independent research by and recommendations of Wireless Technology Research. Persons with pacemakers should do the following:
•Always keep the device more than 15.3 centimeters (6 inches) from the pacemaker
•Not carry the device near your pacemaker when the device is switched o. If you suspect interference, switch off your device, and move it.
viii
Hearing aids. Some digital wireless devices may interfere with some hearing aids. If interference occurs, consult your service provider.
Vehicles
RF signals may affect improperly installed or inadequately shielded electronic systems in motor vehicles such as electronic fuel injection systems, electronic antiskid (antilock) braking systems, electronic speed control systems, and air bag systems. For more information, check with the manufacturer, or its representative, of your vehicle or any equipment that has been added. Only qualified personnel should service the device, or install the device in a vehicle. Faulty installation or service may be dangerous and may invalidate any warranty that may apply to the device. Check regularly that all wireless equipment in your vehicle is mounted and operating properly. Do not store or carry flammable liquids, gases, or explosive materials in the same compartment as the device, its parts, or enhancements. For vehicles equipped with an air bag, remember that air bags inflate with great force. Do not place objects, including installed or portable wireless equipment in the area over the air bag or in the air bag deployment area. If in-vehicle wireless equipment is improperly installed, and the air bag inflates, serious injury could result. Using your device while flying in aircraft is prohibited. Switch off your device before boarding an aircraft. The use of wireless teledevices in an aircraft may be dangerous to the operation of the aircraft, disrupt the wireless telephone network, and may be
illegal.
Potentially explosive environments
Switch off your device when in any area with a potentially explosive atmosphere and obey all signs and instructions. Potentially explosive atmospheres include areas where you would normally be advised to turn off your vehicle engine. Sparks in such areas could cause an explosion or fire resulting in bodily injury or even death. Switch off the device at refueling points such as near gas pumps at service stations. Observe restrictions on the use of radio equipment in fuel depots, storage, and distribution areas; chemical plants; or where blasting operations are in progress. Areas with a potentially explosive atmosphere are often, but not always, clearly marked. They include below deck on boats, chemical transfer or storage facilities, vehicles using liquefied petroleum gas (such as propane or butane), and areas where the air contains chemicals or particles such as grain, dust or metal powders. Do not switch the notebook on when wireless phone use is prohibited or when it may cause interference or danger.
Emergency calls
Warning: You cannot make emergency calls through this device. To make an emergency call you shall dial out through your mobile phone or other telephone call system.

ix
Disposal instructions
Do not throw this electronic device into the trash when discarding. To minimize pollution and ensure utmost protection of the global environment, please recycle. For more information on the Waste from Electrical and Electronics Equipment (WEEE) regulations, visit http://global.acer.com/about/sustainability.htm
Mercury advisory
For projectors or electronic products containing an LCD/CRT monitor or display: Lamp(s) inside this product contain mercury and must be recycled or disposed of according to local, state or federal laws. For
more information, contact the Electronic Industries Alliance at www.eiae.org. For lamp-specific disposal information, check www.lamprecycle.org.
Rechargeable Recycling Program in US and Canada
Acer supports the efforts of the Rechargeable Battery Recycling Corporation's Call2Recycle (RBRC) program. The RBRC is deigned to recycle rechargeable batteries at no cost to the consumer.
Disposal
To safety dispose of battery or rechargeable battery pack, including: Nickel Metal Hydride "Ni-MH", Lithium Ion "Li-ion", and Small Sealed Lead "Pb" rechargeable batteries weighing up to 2 lbs, we recommend that you take it to a participating collection center. For a list of locations, go to www.rbrc.org or Call 1-800-8-BATTERY (1-800-822-8837).

x
ENERGY STAR is a government program (public/private partnership) that gives people the power to protect the environment in a cost effective way and without sacrificing quality or product features. Products that earn the ENERGY STAR prevent greenhouse gas emissions by meeting strict energy efficiency guidelines set by the US Environmental Protection Agency (EPA) and the US Department of Energy (DOE). In the average home, 75% of all electricity used to power home electronics is consumed while the products are turned off. ENERGY STAR qualified home electronic products in the off position use up to 50% less energy than conventional equipment. More information refers to http://www.energystar.gov and http://www.energystar.gov/ powermanagement.
Note: The statement above is applicable only to Acer notebooks with an ENERGY STAR sticker located in the bottom right-hand corner of the palm rest.
As an ENERGY STAR partner, Acer Inc. has determined that this product meets the ENERGY STAR guidelines for energy efficiency.
This product has been shipped enabled for power management:
•Activate display’ Sleep mode within 15 minutes of user inactivity.
•Activate computer’s Sleep mode within 30 minutes of user inactivity.
•Wake the computer from Sleep mode by pushing power button.
•More power management settings can be done through Acer ePower Management.
Tips and information for comfortable use
Computer users may complain of eyestrain and headaches after prolonged use. Users are also at risk of physical injury after long hours of working in front of a computer. Long work periods, bad posture, poor work habits, stress, inadequate working conditions, personal health and other factors greatly increase the risk of physical injury.
Incorrect computer usage may lead to carpal tunnel syndrome, tendonitis, tenosynovitis or other musculoskeletal disorders. The following symptoms may appear in the hands, wrists, arms, shoulders, neck or back:
•numbness, or a burning or tingling sensation
•aching, soreness or tenderness
•pain, swelling or throbbing
•stiffness or tightness
•coldness or weakness
If you have these symptoms, or any other recurring or persistent discomfort and/or pain related to computer use, consult a physician immediately and inform your company's health and safety department.
xi
The following section provides tips for more comfortable computer use.
Finding your comfort zone
Find your comfort zone by adjusting the viewing angle of the monitor, using a footrest, or raising your sitting height to achieve maximum comfort. Observe the following tips:
•refrain from staying too long in one fixed posture
•avoid slouching forward and/or leaning backward
•stand up and walk around regularly to remove the strain on your leg muscles
•take short rests to relax your neck and shoulders
•avoid tensing your muscles or shrugging your shoulders
•install the external display, keyboard and mouse properly and within comfortable reach
•if you view your monitor more than your documents, place the display at the center of your desk to minimize neck strain
Taking care of your vision
Long viewing hours, wearing incorrect glasses or contact lenses, glare, excessive room lighting, poorly focused screens, very small typefaces and low-contrast displays could stress your eyes. The following sections provide suggestions on how to reduce eyestrain.
Eyes
•Rest your eyes frequently.
•Give your eyes regular breaks by looking away from the monitor and focusing on a distant point.
•Blink frequently to keep your eyes from drying out.
Display
•Keep your display clean.
•Keep your head at a higher level than the top edge of the display so your eyes point downward when looking at the middle of the display.
•Adjust the display brightness and/or contrast to a comfortable level for enhanced text readability and graphics clarity.
•Eliminate glare and reflections by:
•placing your display in such a way that the side faces the window or any light source
•minimizing room light by using drapes, shades or blinds
•using a task light
•changing the display's viewing angle
•using a glare-reduction filter
•using a display visor, such as a piece of cardboard extended from the display's top front edge
•Avoid adjusting your display to an awkward viewing angle.

xii
•Avoid looking at bright light sources, such as open windows, for extended periods of time.
Developing good work habits
Develop the following work habits to make your computer use more relaxing and productive:
•Take short breaks regularly and often.
•Perform some stretching exercises.
•Breathe fresh air as often as possible.
•Exercise regularly and maintain a healthy body.
Warning! We do not recommend using the computer on a couch or bed. If this is unavoidable, work for only short periods, take breaks regularly, and do some stretching exercises.
Note: For more information, please refer to "Regulations and safety notices" on page 57 in the AcerSystem User Guide.

xiii
First things first
We would like to thank you for making an Acer notebook your choice for meeting your mobile computing needs.
Your guides
To help you use your Acer notebook, we have designed a set of guides:
First off, the Just for Starters...poster helps you get started with setting up your computer.
TravelMate Series Generic User Guide contains useful information applying to all models in the TravelMate product series. It covers basic topics such as Acer’s Empowering Technology, using the keyboard, Audio, etc. Please understand that due to its nature, the Generic User Guide as well as the AcerSystem User Guide mentioned below will occasionally refer to functions or features which are only contained in certain models of the series, but not necessarily in the model you purchased. Such instances are marked in the text with language such as "only for certain models".
Quick Guide introduces you to the basic features and functions of your new computer. For more on how your computer can help you to be more productive, please refer to the AcerSystem User Guide. This guide contains detailed information on such subjects as system utilities, data recovery, expansion options and troubleshooting. In addition it contains warranty information and the general regulations and safety notices for your notebook. It is available in Portable Document Format (PDF) and comes preloaded on your notebook. Follow these steps to access it:
1Click on 


 Start, All Programs, AcerSystem.
2Click on AcerSystem User Guide.
Note: Viewing the file requires Adobe Reader. If Adobe Reader is not installed on your computer, clicking on AcerSystem User Guide will run the Adobe Reader setup program first. Follow the instructions on the screen to complete the installation. For instructions on how to use Adobe Reader, access the Help and Support menu.
Basic care and tips for using your computer
Turning your computer on and off
To turn on the computer, simply press and release the power button below the LCD screen beside the easy-launch buttons. Please refre to "Quick Guide" for the location of the power button.

xiv
To turn the power off, do any of the following:
•Use the Windows shutdown command
Click on Start  then click on Shut Down.
•Use the power button
You can also put the computer in sleep mode by pressing the sleep hotkey <Fn> + <F4>.
Note: If you cannot power off the computer normally, press and hold the power button for more than four seconds to shut down the computer. If you turn off the computer and want to turn it on again, wait at least two seconds before powering up.
Taking care of your computer
Your computer will serve you well if you take care of it.
•Do not expose the computer to direct sunlight. Do not place it near sources of heat, such as a radiator.
•Do not expose the computer to temperatures below 0 ºC (32 ºF) or above 50 ºC (122 ºF).
•Do not subject the computer to magnetic fields.
•Do not expose the computer to rain or moisture.
•Do not spill water or any liquid on the computer.
•Do not subject the computer to heavy shock or vibration.
•Do not expose the computer to dust or dirt.
•Never place objects on top of the computer.
•Do not slam the computer display when you close it.
•Never place the computer on uneven surfaces.
Taking care of your AC adapter
Here are some ways to take care of your AC adapter:
•Do not connect the adapter to any other device.
•Do not step on the power cord or place heavy objects on top of it. Carefully route the power cord and any cables away from foot traffic.
•When unplugging the power cord, do not pull on the cord itself but pull on the plug.
•The total ampere ratings of the equipment plugged in should not exceed the ampere rating of the cord if you are using an extension cord. Also, the total current rating of all equipment plugged into a single wall outlet should not exceed the fuse rating.
xv
Taking care of your battery pack
Here are some ways to take care of your battery pack:
•Use only batteries of the same kind as replacements. Turn the power off before removing or replacing batteries.
•Do not tamper with batteries. Keep them away from children.
•Dispose of used batteries according to local regulations. Recycle if possible.
Cleaning and servicing
When cleaning the computer, follow these steps:
1Turn off the computer and remove the battery pack.
2Disconnect the AC adapter.
3Use a soft, moist cloth. Do not use liquid or aerosol cleaners.
If either of the following occurs:
•the computer has been dropped or the body has been damaged;
•the computer does not operate normally
Please refer to "Frequently asked questions" on page 22 .
xvi
Information for your safety and comfort |
iii |
Safety instructions |
iii |
Operating environment |
vii |
Medical devices |
vii |
Vehicles |
viii |
Potentially explosive environments |
viii |
Emergency calls |
viii |
Disposal instructions |
ix |
Mercury advisory |
ix |
Rechargeable Recycling Program in US and Canada |
ix |
Tips and information for comfortable use |
x |
First things first |
xiii |
Your guides |
xiii |
Basic care and tips for using your computer |
xiii |
Turning your computer on and off |
xiii |
Taking care of your computer |
xiv |
Taking care of your AC adapter |
xiv |
Taking care of your battery pack |
xv |
Cleaning and servicing |
xv |
Acer Empowering Technology |
1 |
Launching Acer Empowering Technology |
1 |
Empowering Technology password |
2 |
Acer ePower Management |
|
(only for certain models) |
4 |
Acer eRecovery Management |
|
(only for certain models) |
6 |
Windows Mobility Center |
8 |
Indicators |
9 |
Easy-launch buttons |
10 |
Productivity keys |
|
(only for certain models) |
11 |
Touchpad |
12 |
Touchpad basics (with fingerprint reader) |
12 |
Touchpad basics (with two-click buttons) |
13 |
FineTrack and FineTrack buttons |
|
(only for certain models) |
14 |
FineTrack basics |
14 |
Using a computer security lock |
14 |
Using the keyboard |
15 |
Lock keys and embedded numeric keypad |
15 |
Windows keys |
16 |
Hotkeys |
17 |
Special keys (only for certain models) |
18 |
Contents
Audio |
18 |
Acer PureZone (only for certain models) |
18 |
Acer Bio-Protection (only for certain models) |
19 |
Acer GridVista (dual-display compatible) |
20 |
Frequently asked questions |
22 |
Requesting service |
25 |
International Travelers Warranty (ITW) |
25 |
Before you call |
25 |
Battery pack |
26 |
Battery pack characteristics |
26 |
Maximizing the battery's life |
26 |
Installing and removing the battery pack |
27 |
Charging the battery |
28 |
Checking the battery level |
28 |
Optimising battery life |
28 |
Battery-low warning |
29 |
Taking your notebook PC with you |
30 |
Disconnecting from the desktop |
30 |
Disconnecting from Acer ezDock II/II+ |
30 |
Moving around |
30 |
Preparing the computer |
30 |
What to bring to meetings |
31 |
Taking the computer home |
31 |
Preparing the computer |
31 |
What to take with you |
31 |
Special considerations |
32 |
Setting up a home office |
32 |
Traveling with the computer |
32 |
Preparing the computer |
32 |
What to take with you |
32 |
Special considerations |
33 |
Traveling internationally with the computer |
33 |
Preparing the computer |
33 |
What to bring with you |
33 |
Special considerations |
33 |
Securing your computer |
34 |
Using a computer security lock |
34 |
Using passwords |
34 |
Entering passwords |
35 |
Setting passwords |
35 |
Expanding through options |
36 |
Connectivity options |
36 |
Fax/data modem |
36 |
Built-in network feature |
37 |
Fast Infrared (FIR) (only for certain models) |
37 |
Universal Serial Bus (USB) |
38 |
IEEE 1394 port (only for certain models) |
38 |
High-Definition Multimedia Interface |
|
(only for certain models) |
39 |
PC Card slot |
39 |
ExpressCard |
40 |
Installing memory |
41 |
BIOS utility |
43 |
Boot sequence |
43 |
Enable disk-to-disk recovery |
43 |
Password |
43 |
Using software |
44 |
Playing DVD movies |
44 |
Power management |
45 |
Acer eRecovery Management |
46 |
Burn backup discs |
47 |
Create a user backup |
48 |
Manage user backups |
50 |
Restore |
51 |
Restore Windows Vista from backup discs |
52 |
Troubleshooting |
55 |
Troubleshooting tips |
55 |
Error messages |
55 |
Regulations and safety notices |
57 |
FCC statement |
57 |
Modem notices |
58 |
Laser compliance statement |
61 |
LCD pixel statement |
61 |
Radio device regulatory notice |
62 |
General |
62 |
The FCC RF safety requirement |
62 |
Canada — Low-power license-exempt radio |
|
communication devices (RSS-210) |
63 |
Exposure of humans to RF fields (RSS-102) |
63 |
LCD panel ergonomic specifications |
64 |
Index |
65 |
1
Acer Empowering Technology
The Empowering Technology toolbar makes it easy for you to access frequently used functions and manage your new Acer system. Activated by pressing the Empowering Key, it provides access to the following utilities:
Note: The following content is for general reference only. Actual product specifications may vary.
•Acer ePower Management optimizes battery usage via customizable power plans (only for certain models).
•Acer eRecovery Management backs up and recovers data flexibly, reliably and completely (only for certain models).
For more information, right-click on the Empowering Technology toolbar, then
select Help. For help with a particular utility, launch the utility and click the  icon at the buttom of the active window.
Launching Acer Empowering Technology
To launch Acer Empowering Technology:
1Press the Empowering Key to display the Acer Empowering Technology toolbar on the desktop.
2To hide the toolbar, press the Empowering Key again or click the hide
button  on the toolbar.
You may also launch Acer Empowering Technology by running the program from the Acer Empowering Technology program group in the Start menu, or by
double-clicking the |
icon if you have created a desktop shortcut. |
To launch Acer Empowering Technology applications:
Technology Empowering
1On the Acer Empowering Technology toolbar, click the icon that corresponds to the application you want to launch.
2
|
2 When you mouse over an application icon, a quick menu appears below |
|||
TechnologyEmpowering |
||||
the toolbar. The quick menu allows you to perform certain tasks simply |
||||
|
||||
|
and quickly. |
|||
|
|
|
|
|
|
|
|
|
|
|
|
|
|
|
3You may also run the application by selecting it from the Acer Empowering Technology program group in the Start menu.
Empowering Technology password
You must set the Empowering Technology password to use the password protection feature of Acer eRecovery Management.
To set the Empowering Technology password:
1Launch Acer eRecovery Management.
2Click the Restore tab.
3Click Password settings. The Empowering Technology Password Center dialog box pops up.
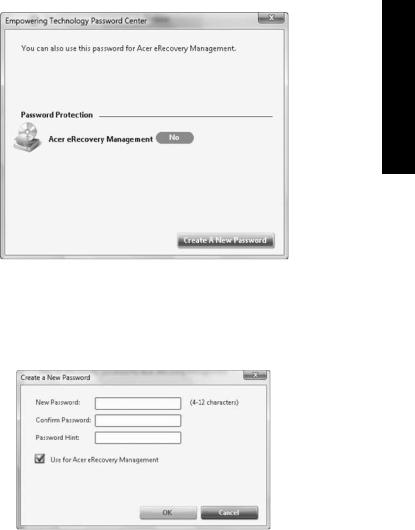
3
4 Click Create a new password.
Technology Empowering
5In the Create a New Password dialog box, key in and confirm your password in the appropriate boxes. Your password should have a minimum of 4 and a maximum of 12 characters.
6Enter a password hint that will help you remember your password.
7Make sure the box Use for Acer eRecovery Management is checked.
8Click OK to set the password.
Empowering Technology
4
Acer ePower Management  (only for certain models)
Acer ePower Management features a straightforward user interface for configuring your power management options. To access this utility, select Acer ePower Management from the Empowering Technology toolbar, run the program from the Acer Empowering Technology program group in Start menu, or right-click the Windows power icon in the system tray and select Acer ePower Management.
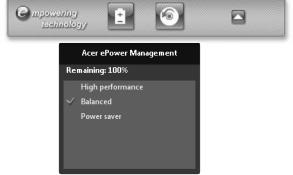
Using power plans
Acer ePower Management comes with three predefined power plans: Balanced, High performance and Power saver. You can also create customized power plans. You can create, switch between, edit, delete and restore power plans, as described below.
View and adjust settings for On Battery and Plugged In modes by clicking the
appropriate tabs. For more power options, click |
in the Acer ePower |
Management utility, or right-click the Windows power icon in the system tray and select Power Options.
Note: You cannot delete the predefined power plans.
To create a new power plan:
Creating customized power plans allows you to save and quickly switch to a personalized set of power options.
1 Click the New power plan option or icon |
. |
2Enter a name for your new power plan.
3Choose a predefined power plan to base your customized plan on.
4If necessary, change the display, sleep and hibernation settings you want your computer to use.
5Click OK to save your new power plan.
To switch between power plans:
1Mouse over the Acer ePower Management application on the Acer Empowering Technology toolbar. The quick menu appears. Select the power plan you want to switch to.

5
2You may also switch between power plans by launching the Acer ePower Management application. Select the power plan you wish to switch to, then click Apply.
To edit a power plan:
Editing a power plan allows you to adjust system settings like LCD brightness and CPU speed.
1Switch to the power plan you wish to edit.
2Adjust settings as required.
3Click Apply to save your new settings.
To delete a power plan:
You cannot delete the power plan you are currently using. If you want to delete the active power plan, switch to another one first.
1Select the power plan you wish to delete.
2Click the Delete Power Plan icon. 
Battery status
1The quick menu shows the remaining battery life based on current usage.
2You can also launch the Acer ePower Management application and refer to the Battery status panel located just below the power plans.
3Click the Battery tab to view remaining battery life, battery status, and remaining battery life in standby and hibernate modes.
Technology Empowering

Empowering Technology
6
Acer eRecovery Management  (only for certain models)
Acer eRecovery Management is a versatile backup utility. It allows you to create full or incremental backups, burn the factory default image to optical disc, and restore from previously created backups or reinstall applications and drivers. By default, user-created backups are stored to the D:\ drive.
Acer eRecovery Management provides you with:
•Backup:
•Back up factory default to CD/DVD
•Back up drivers and applications to CD/DVD
•Create user backup
•Manage user backups
•Restore:
•Restore system to factory default
•Reinstall applications/drivers
•Restore system from user backup
•Password settings
To use the password protection feature of Acer eRecovery Management to protect your data, you must first set the Empowering Technology password. To set the password, refer to the section "Empowering Technology password".
Loading...