

Page 1
VCX™ Business Telephone
Guide
VCX™ V7000 IP Telephony Solution
System Release 7.1
Part Number 900-0397-01 Rev AC
Published March 2007
http://www.3com.com/
Page 2

3Com Corporation
350 Campus Drive
Marlborough, MA
01752-3064
Copyright © 2006 – 2007 3Com Corporation. All rights reserved. No part of this documentation may be
reproduced in any form or by any means or used to make any derivative work (such as translation,
transformation, or adaptation) without written permission from 3Com Corporation.
3Com Corporation reserves the right to revise this documentation and to make changes in content from
time to time without obligation on the part of 3Com Corporation to provide notification of such revision
or change.
3Com Corporation provides this documentation without warranty, term, or condition of any kind, either
implied or expressed, including, but not limited to, the implied warranties, terms, or conditions of
merchantability, satisfactory quality, and fitness for a particular purpose. 3Com may make improvements
or changes in the product(s) and/or the program(s) described in this documentation at any time.
If there is any software on removable media described in this documentation, it is furnished under a
license agreement included with the product as a separate document, in the hardcopy documentation, or
on the removable media in a directory file named LICENSE.TXT or !LICENSE.TXT. If you are unable to
locate a copy, please contact 3Com and a copy will be provided to you.
UNITED STATES GOVERNMENT LEGENDS:
If you are a United States government agency, then this documentation and the software described herein
are provided to you subject to the following:
United States Government Legend: All technical data and computer software is commercial in nature
and developed solely at private expense. Software is delivered as Commercial Computer Software as
defined in DFARS 252.227-7014 (June 1995) or as a commercial item as defined in FAR 2.101(a) and as
such is provided with only such rights as are provided in 3Com’s standard commercial license for the
Software. Technical data is provided with limited rights only as provided in DFAR 252.227-7015 (Nov
1995) or FAR 52.227-14 (June 1987), whichever is applicable. You agree not to remove or deface any
portion of any legend provided on any licensed program or documentation contained in, or delivered to
you in conjunction with guide.
Unless otherwise indicated, 3Com registered trademarks are registered in the United States and may or
may not be registered in other countries.
3Com and the 3Com logo are registered trademarks of 3Com Corporation. VCX is a trademark of 3Com
Corporation.
Other brand and product names may be registered trademarks or trademarks of their respective holders.
Page 3

CONTENTS
ABOUT THIS GUIDE
Conventions 10
Figures 10
Related Documentation 11
Comments 12
1 GETTING STARTED
VCX Telephone Overview 14
Initial Voice Mailbox Setup 15
Configuration Options 16
Additional Information Sources 16
2 VCX BUSINESS TELEPHONE — MODEL 2102
Buttons and Controls 18
Access Buttons 20
Line Status Lights 22
Assigning Model 2102 Access Button Functions Using the TUI 22
Default Model 2102 Button Assignments 23
Viewing and Changing Speed Dial Button Information 24
3 VCX BUSINESS TELEPHONE — MODEL 3102
Buttons and Controls 26
Access Buttons 29
Status Lights 30
Assigning Model 3102 Access Button Functions Using the TUI 31
Default Model 3102 Button Assignments 31
Viewing and Changing Speed Dial Button Information 33
4 3105 ATTENDANT CONSOLE
3105 Attendant Console 36
Page 4

4
Access Buttons 36
Feature Buttons 36
Printing Labels 38
Attendant Console Status Lights 39
5 BASIC TELEPHONE OPERATION
Logging In to Your Telephone 42
Changing Your Password 43
Answering a Call 44
Making Calls 44
Making Internal Calls 44
Redialing a Call 45
Making External Calls 45
Making a Call to a Remote Office 45
Using Unique Extensions 45
Class of Service Override 46
Terminating Calls 47
Using the Telephone Display Panel 47
Controlling the Volume 49
Using the Hands Free Feature 50
Using a Headset 50
Returning to the Headset After a Long Delay 51
Putting a Call on Hold 51
Music on Hold 51
Dialing a New Call While on a Call 52
Answering a New Call While on a Call 52
Transferring a Call 52
Unattended Transfer 53
Attended Transfer 53
Serial Transfer 54
Mapped Button Method 54
Serial Transfer Feature Code Method 54
Muting Calls 54
Mute Ringer 55
Activating Do Not Disturb 55
Activating Malicious Call Trace 56
Page 5

6 FEATURE CODES
Feature Code Overview 60
Using Feature Codes 60
Feature Codes 61
7 STANDARD FEATURES
Viewing the Call Logs 68
Viewing the User Directory 69
Controlling Caller ID 70
Setting up a Conference Call 71
Setting up an Unannounced Conference 71
Setting up an Announced Conference 71
Adding a Recipient to an Existing Conference 72
Creating a Cascaded Conference 72
Dropping Conference Recipients 72
Camping on a Busy Extension 73
Transferring Your Phone Settings to Another Phone 74
Forwarding Calls to Voice Mail 74
Transferring a Call to Another User’s Voice Mail 75
Call Waiting 76
Speed Dialing 77
Configuring Personal Speed Dial Numbers 78
Editing Personal Speed Dial Numbers 79
Dialing Personal Speed Dial Numbers 79
Dialing System Speed Dial Numbers 80
Call Forwarding 81
Call Forward Ring No Answer 82
Call Forward Busy Line 82
Call Forward Universal 82
Call Park 82
Paging 84
Paging a Group 84
Call Pickup 85
Directed Call Pickup 85
Group Call Pickup 86
Call Pickup Interaction With Other Features 86
Silent Monitor and Barge In 86
5
Page 6

6
Monitoring a Call 88
Barging In 89
Blocking Call Monitoring 89
Remote Call Forward 90
Hunt Groups 91
Hunt Group Types 93
Logging In to a Hunt Group 95
Hunt Group Interaction With Other Features 95
Viewing Hunt Group Membership and Status 97
Emergency Phone Number Dialing Service 98
8 USING THE VCX USER INTERFACE
Accessing the VCX User Interface 100
VCX User Interface Overview 100
Enabling Call Forwarding 104
Configuring a Call Coverage Point 105
Assigning Access Button Functions Using the VCX User Interface 106
Enabling Bridged Extensions 107
Bridged Line Interaction with Other Features 110
Do Not Disturb and Bridged Line Calls 110
Hands Free and Bridged Line Calls 111
Call Forward, Forward to Voice Mail, and Bridged Line Calls 112
Call Transfer, Call Conferencing, and Bridged Line Calls 112
Call Park and Bridged Line Calls 113
Call Pickup and Bridged Line Calls 113
Attendant Console and Bridged Line Calls 114
Hunt Groups and Bridged Line Calls 114
Message Waiting Indication and Bridged Line Calls 114
Personal Speed Dial Access Buttons 114
Logging Out 115
A TELEPHONE INSTALLATION AND MAINTENANCE
Connecting the Telephone 118
Installing the 3102 Telephone Label Plate 120
Attaching and Adjusting the Articulating Support Bracket 120
Attaching and Adjusting the Fixed Support Bracket 122
Low-Profile and High-Profile Positions 122
Page 7

Wall-Mount Position 123
Security Wall-Mount Bracket 124
Opening the 3105 Attendant Console Label Cover 125
Moving Your Telephone 125
Swapping Telephones 125
Cleaning Your Telephone 126
Troubleshooting Problems 126
INDEX
7
Page 8

8
Page 9

ABOUT THIS GUIDE
This guide describes how to set up and use 3Com® VCX™ telephones
and consoles.
This guide is for users of the following VCX hardware and software:
■ VCX 2102 Business Telephone
■ VCX 3102 Business Telephone
■ VCX 3105 Attendant Console
If release notes are shipped with your product and the information there
differs from the information in this guide, follow the instructions in the
release notes.
CAUTION: The 3Com telephone system operates over the Ethernet local
area network (LAN), not through a traditional telephone connection.
Your telephone is connected to the 3Com system through an RJ45
Ethernet connector instead of through an RJ11 telephone connection.
Your telephone will not work unless it is connected correctly.
For information about installing your telephone, see the packing sheet
that came in the box with your telephone. The model number is on the
underside of the telephone. Contact your administrator if you have
questions about your telephone connection.
For information about the voice mail system and features, see the IP
Messaging Module User Guide - 3Com Native Interface or the IP
Messaging Module User Guide - Traditional Interface, depending on the
Telephone User Interface (TUI) enabled for your phone.
Page 10
10 ABOUT THIS GUIDE
Conventions Table 1 and Table 2 list conventions that are used throughout this guide.
Tab le 1 Icons
Icon Type Description
Information note Information about important features or
instructions.
Caution Alerts you to potential loss of data or
potential damage to an application, system,
device, or network.
Warning Alerts you to potential personal injury.
Tab le 2 Text Conventions
Convention Description
Screen displays This typeface represents information as it appears on the
screen
Commands The word “command” means that you must enter the
command exactly as shown and then press Return or Enter.
Commands appear in bold. Example:
To remove the IP address, enter the following command:
SETDefault!0 -IP NETaddr = 0.0.0.0
Words in italics Italics are used to:
■ Emphasize a point.
■ Denote a new term at the place where it is defined in the
text.
Figures This guide provides figures and screen captures that contain sample data.
This data may vary from the data on an installed system.
Page 11

Related Documentation 11
Related Documentation
These 3Com documents contain additional information about the
products in this release that are a part of or support the 3Com
Convergence Application Suite.
The following documents are a part of the VCX IP Telephony Module:
■ VCX
■ VCX
■ VCX Administration Guide
■ VCX Basic Telephone Quick Reference Guide
■ VCX Business
■ VCX
■ VCX
■ VCX Telephone Display Quick Reference Guide
■ VCX Basic Telephone Guide
■ VCX Business Telephone Guide
■ VCX Manager’s Telephone Guide
■ VCX Security Guide
Installation Guide
Maintenance Guide
Telephone Quick Reference Guide
Manager’s Telephone Quick Reference Guide
Feature Codes for Analog Telephones Quick Reference Guide
The following documents are a part of the IP Messaging Module:
■ IP Messaging Quick Reference Guide - 3Com Native Interface
■ IP Messaging Module User Guide - 3Com Native Interface
■ IP Messaging Quick Reference Guide - Traditional Interface
■ IP Messaging Module User Guide - Traditional Interface
■ IP Messaging Module Operations and System Administration Guide
■ E-Mail Reader Application Quick Start Guide
The following documents are a part of the IP Conferencing Module:
■ IP Conferencing Module Installation Guide
■ IP Conferencing Module Administration Guide
■ IP Conferencing Module User Guide
■ Convergence Center Client User and Administration Guide
Page 12

12 ABOUT THIS GUIDE
The following documents provide information on products that support
this release:
Enterprise Management Suite
■ Enterprise Management Suite Getting Started Guide, Version 2.3
■ Enterprise Management Suite User Guide, Version 2.3
■ Enterprise Management Suite 2.3 for VCX 7.1 User Guide
Digital Gateways
■ V7122 and V6100 Digital User Guide, Version 4.8
■ V6100 Digital Fast Track Installation Guide, Version 4.8
■ V7122 Digital Fast Track Installation Guide, Version 4.8
Analog Gateways
■ V7111 Analog Fast Track Installation Guide, Version 4.8
■ V7111 Analog User Guide, Version 4.8
■ V6000 Analog Fast Track Installation Guide, Version 4.8
■ V6000 Analog User Guide, Version 4.8
Comments Send e-mail comments about this guide or about any Voice product
documentation to:
Voice_Techcomm_comments@3com.com
Include the following information with your comments:
■ Document title
■ Document part number (found on the front page)
■ Page number
■ Your name and organization (optional)
Example:
VCX Business Telephone Guide
System Release 7.1
Part Number 900-0397-01 Rev AC
Page 25
Please address all questions regarding the 3Com software to your
authorized 3Com coordinator.
Page 13

1
GETTING STARTED
This chapter provides a general description of your VCX telephone and
describes the steps you must complete to use your phone.
This chapter includes the following topics:
■ VCX Telephone Overview
■ Initial Voice Mailbox Setup
■ Configuration Options
■ Additional Information Sources
Page 14

14 CHAPTER 1: GETTING STARTED
VCX Telephone Overview
Your VCX telephone must be configured to work in an IP network. This
means your phone must be assigned an IP address so it can communicate
with other VCX phones and devices. Typically, your administrator assigns
IP values, including an IP address, as part of the installation process.
During the installation process, your administrator creates an account for
you. This account includes a telephone number and a voice mailbox. Your
administrator also assigns a password that associates your telephone
number and a voice mailbox with your account.
This chapter assumes that your administrator has either logged you in to
your telephone or has given you login instructions.
■ If you are logged in, the Display Panel on your phone shows the
current date and time, and your extension.
■ If you are not logged in, see Logging In to Your Telephone.
This guide describes the features available with your telephone, such as
telephone button functions, making and forwarding calls, and speed
dialing. In addition, your account includes a voice mailbox. Voicemail
features are provided by 3Com IP Messaging software. These features,
such as listening to or sending messages, are described in the IP
Messaging guide associated with your messaging system. See Additional
Information Sources.
The settings on your telephone, including your extension, personal
settings, and system settings, remain the same even when you move your
telephone from one Ethernet jack to another, as long as both Ethernet
connections are part of the same network.
One of the benefits of a telephone configured with an IP address is
portability. Depending on how your administrator has configured the
VCX system, you may be allowed to configure another VCX phone in the
system to duplicate your primary phone simply by logging in to the other
phone using your password (see Transferring Your Phone Settings to
Another Phone).
Your VCX telephone can provide many features. Some of these features
are optional. Your administrator determines which features are available
for your telephone.
Page 15

Initial Voice Mailbox Setup 15
Initial Voice Mailbox Setup
When a caller dials your telephone number and you are unable to answer
the call, the caller hears a recording and is prompted to leave a message.
Before you can listen to messages in your voice mailbox, you must record
your name, a personal greeting, and change the default password you
use to access your mailbox.
Your administrator will provide you with the default password for initial
mailbox access. Typically, the default password is the last 4 digits of your
phone number. The first time you access your voice mailbox, the system
prompts you to change your password, record your name, and record a
personal greeting.
Note that the password you use to access your voice mailbox is not the
same password you use to log in to your telephone. When you change
the default voicemail password in the following procedure, you do not
change the telephone login password.
To initialize your mailbox:
1 Lift the handset.
2 Press the message button on your phone (see the chapter in this guide
that describes the buttons and controls for your particular phone model).
3 At the password prompt, use the keypad to enter your default password.
The voice prompt system describes the initialization process and
introduces the Setup Assistant function.
4 Follow the voice prompts to:
a Enter a new password (ask your administrator for password length
requirements; use digits only, * and # are invalid characters).
b Record a name announcement.
c Record a personal greeting.
5 Hang up.
Page 16

16 CHAPTER 1: GETTING STARTED
Configuration Options
Simple VCX telephone operations (for example, making a call,
transferring a call, and putting a call on hold) require no configuration.
These operations are described in Chapter 5
Many VCX features, however, do require configuration (for example, call
forwarding and speed dialing). In general, you can configure these
features using one of the following methods:
■ The Telephone User Interface (TUI) is a phone-based interface that
allows you to manage your user account and VCX telephone by
entering commands using the telephone keypad. The command used
to enable or disable a feature is executed by entering a feature code.
Configuration options and prompts are displayed on the telephone
Display Panel. See Chapter 7
Many options configured through the TUI require entering a feature
code.
■ Basic telephone operation, such as making calls and putting a call
on hold, is described in Chapter 5
■ Features that must be configured, such as speed dialing and call
forwarding, are described in Chapter 7
■ Feature codes are described in Chapter 6.
■ The VCX User Interface is a web browser-based application that allows
you to manage your user account and VCX telephone. Most of the
options available through this interface are also available through the
TUI. See Chapter 7
Interface.
for more information on using the VCX 7000 User
for more information on using the TUI.
.
.
.
Additional Information Sources
You may also want to refer to the following documents in the VCX
documentation set for additional information:
■ VCX
■ IP Messaging Module User Guide - 3Com Native Interface or the IP
Basic Telephone Quick Reference Guide — Provides a single-sheet
reference that describes commonly used Model 2101 and Model 3101
telephone features.
Messaging Module User Guide - Traditional Interface — Provides
information about the voicemail system and features available on your
phone. The Guide you should reference depends on the Telephone
User Interface (TUI) enabled on your phone. Ask your administrator for
details.
Page 17

VCX BUSINESS TELEPHONE —
2
MODEL 2102
This chapter describes the buttons and controls on the3Com® VCX™
Model 2102 Business Telephone.
This chapter includes the following topics:
■ Buttons and Controls
■ Access Buttons
■ Line Status Lights
■ Assigning Model 2102 Access Button Functions Using the TUI
For information about the Model 3102 Business Telephone, see
Chapter 3
For information about the 3105 Attendant Console, see Chapter 4.
To verify the model number of your telephone, refer to the label under
the phone.
.
Page 18
18 CHAPTER 2: VCX BUSINESS TELEPHONE — MODEL 2102
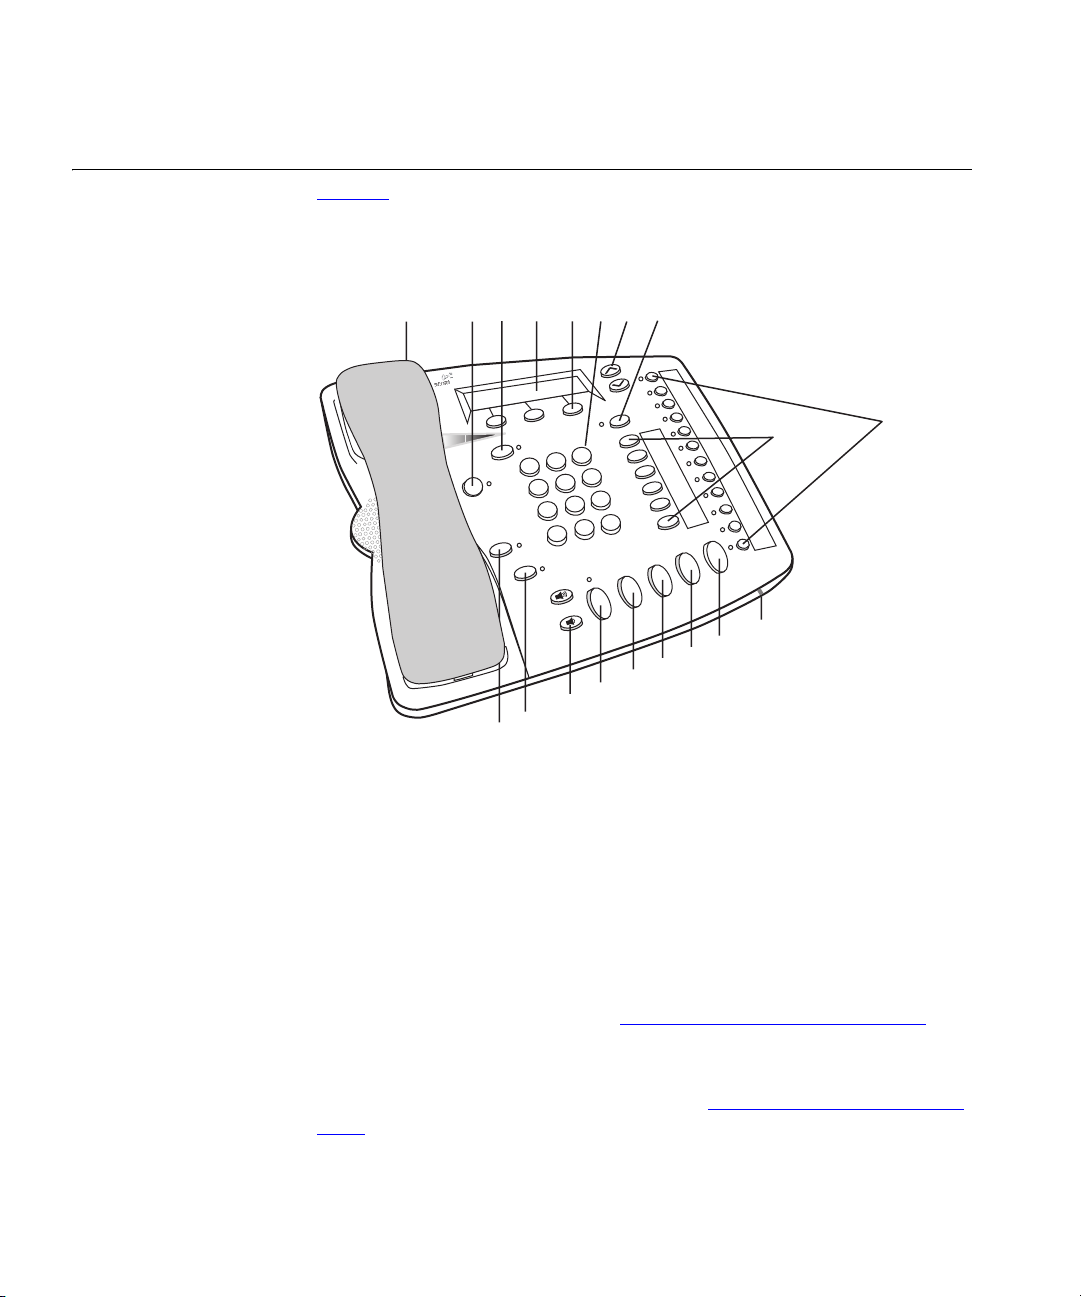
Buttons and Controls
Figure 1 shows the buttons and controls on the Model 2102 Business
Telephone.
Figure 1 3Com 2102 Business Telephone
AL
AL
AL
AF
AF
AF
The Model 2102 Business Telephone includes the following features:
1 Handset
2 MSG (Message) button and Message Waiting Light — Press MSG to
access your messages through the voice mail system; see the IP
Messaging Module User Guide. The light next to the MSG button stays
red as long as there is at least one unreviewed message (voice, e-mail, or
fax) in your mailbox.
3 FWD MAIL button — Directs all incoming calls to your call coverage
point (by default, voice mail). See Configuring a Call Coverage Point
.
4 Display Panel — Displays telephone status messages, Caller ID
information (if enabled), and the number of new messages (voice, e-mail,
and fax) that you have in your mailbox (see Using the Telephone Display
Panel for more information on how message status determines the
message list).
Page 19

Buttons and Controls 19
You can also use the Display Panel to view or enable features available
through the Main menu and with feature codes (see Chapter 6
information on using feature codes). You can access the Main menu by
pressing the Program button. The following features are available:
■ User Directory — Displays a directory of the people in your
organization. See Viewing the User Directory
■ Call History — Displays logs of your recent missed, answered, and
dialed calls. See Viewing the Call Logs
■ Personal Speed Dial — Personal speed dial numbers can be
configured at the telephone or through the VCX User Interface, which
is accessed through the web (see Chapter 8
■ System Speed Dial — System speed dial numbers can be configured
at the telephone or through the VCX User Interface, which is accessed
through the web (see Chapter 8
■ Advanced Settings — Configures network parameters.
CAUTION: This option is for administrator use only. Unauthorized
modification of these parameters will disconnect your phone.
5 Soft buttons — Use the soft buttons to navigate through Display Panel
options. A button’s function depends on the option selected. The buttons
are, left to right:
.
).
.
).
for
■ Slct (Select) — Use this button to select a displayed item. For example,
you can use this button to automatically dial a previously placed or
received call or a missed call.
■ Back — Use this button to move the cursor backwards one space and
delete the current space). You can also use this button to sort
displayed items.
■ Exit — Use this button to exit the currently displayed option.
6 Telephone key pad — Use these buttons to dial telephone numbers and
to access additional features.
7 Scroll buttons — Use these buttons to scroll through items shown on
the Display Panel.
8 Program button — Use this button to access and view the Display Panel
Main menu.
9 Access buttons with indicator lights — Your administrator assigns
default functions for these buttons and may allow you to reprogram a
button’s function (for example, create more personal speed dial buttons).
See Access Buttons
and Line Status Lights.
Page 20

20 CHAPTER 2: VCX BUSINESS TELEPHONE — MODEL 2102
10 Access buttons without indicator lights — See Access Buttons.
For both sets of Access buttons, the telephone label maker utility,
available through the 3Com web site, enables you to define and print a
new label for your Access buttons. See Printing Labels
11 Microphone (located on the underside of the telephone) — Activated
when the telephone is in speaker phone mode; that is, after you press the
Speaker button or the Hands Free button. For best results, keep the
area around the microphone free of obstructions.
.
12 Hold button — Places a caller on hold. See Putting a Call on Hold
13 Transfer button — Sends the currently active call to another telephone.
See Transferring a Call
14 Conference button — Enables you to set up a conference call
(3-way calling). See Setting up a Conference Call
15 Redial button — Redials the last telephone number or extension that
you called. See Making a Call to a Remote Office
16 Speaker button — Enables you to use the speaker phone feature. Press
the Speaker button before you dial a call, when your telephone is
ringing, or while a call is in progress. To turn the speaker off and resume
the conversation, pick up the handset.
17 Volume control buttons — Enables you to adjust the volume of the
ringer, the speaker, or the handset. See Controlling the Volume
18 Mute button — Use this button to prevent callers from hearing you,
while you can still hear your callers. See Muting Calls
19 Hands Free button — Allows you to answer internal (intercom) calls
without picking up the handset. An external call (a call from outside your
VCX system) rings to your telephone as usual. See Using the Hands Free
Feature. The light next to the Hands Free button remains red as long as
this option is enabled.
.
.
.
.
.
.
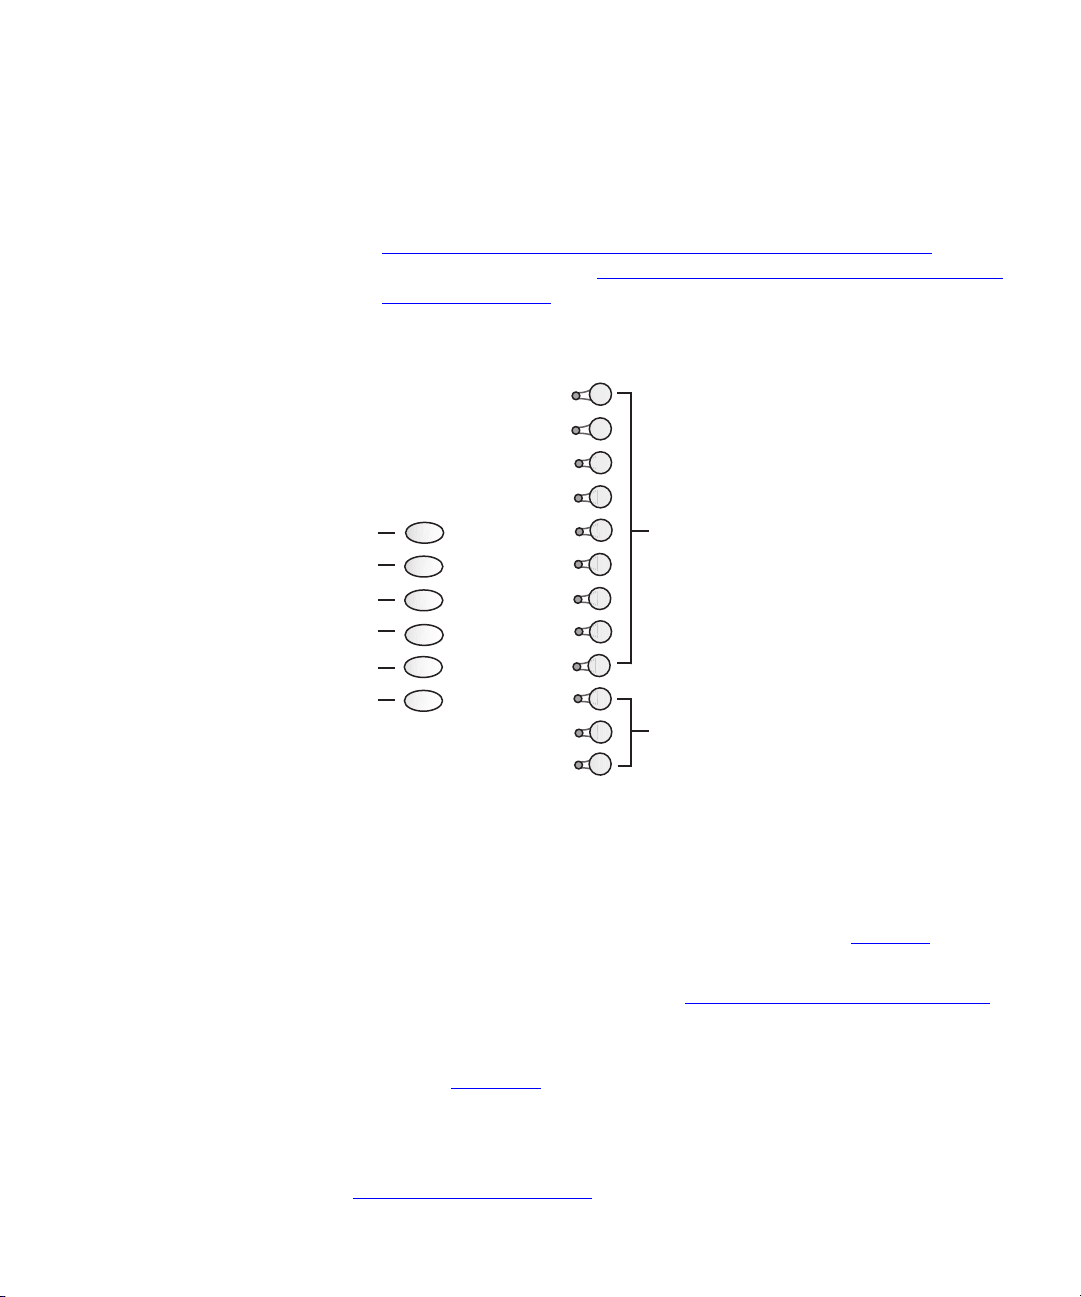
Access Buttons Figure 2 shows the 18 Access buttons.
■ The column of six buttons on the left side (labeled 1 through 6 in the
figure) have programmed functions that cannot be modified. These
buttons do not have associated indicator (status) lights.
■ The column of 12 buttons on the right (labeled 7 and 8 in two groups
in the figure) are assigned default functions (described in the
following list) by 3Com. Your administrator can change these defaults
Page 21
Access Buttons 21
and may allow you to reprogram some or all of the button functions.
Ask your administrator for more information. You can view and
change button assignments through the Telephone User Interface (see
Assigning Model 2102 Access Button Functions Using the TUI
VCX User Interface (see Assigning Access Button Functions Using the
VCX User Interface).
Figure 2 Access Buttons
) or the
Access buttons have the following settings:
1OK — Press the OK button to send a call.
2 Release — Press the Release button to disconnect a call.
3 Call Park — Enables you to place a call in a holding pattern so that it can
be retrieved from another telephone in the system. See Call Park
4 Call History — Enables you to view the last 10 missed, answered, or
dialed calls on the Display Panel. See Using the Telephone Display Panel
5Feature — Enables you to access features that are not directly assigned
to an Access button on your telephone. For more information on feature
codes, see Chapter 6
.
.
.
6 Directory — Lists, in the Display Panel, all the users in your organization
and their extensions. You can use the Soft Buttons to sort the list and
select an entry. Selecting an entry automatically dials the extension. See
Viewing the User Directory
.
Page 22

22 CHAPTER 2: VCX BUSINESS TELEPHONE — MODEL 2102
7 In this button group:
■ The first button, starting from the top, is for the Do Not Disturb
feature. See Activating Do Not Disturb
■ The second button is for the Call Forward All feature. See Call
Forwarding.
■ The next 7 buttons are set to the first seven speed dial codes that you
assign using the VCX User Interface through your web browser or the
telephone keypad. See Speed Dialing
8 These three Access buttons (System Appearance buttons; SA1, SA2, and
SA3) are lines for incoming and outgoing calls.
Line Status Lights The light for each Access button for each line (system appearance)
indicates the status of the button. Ta bl e 3
with the status of each line.
Tab le 3 Status Indicator Lights
Light Status
Off The line is available for use.
Steady The line is in use.
Fast blink The line is ringing.
Slow blink The line is on hold.
.
.
lists the light pattern associated
Assigning Model 2102 Access Button Functions Using the TUI
When you are on a call, you can answer another call while the line status
light is flashing. Put the first call on hold and then press the Access
button for the new incoming call.
This section describes how to use the Telephone User Interface (TUI) to
view, and possibly modify, the VCX features associated with the Access
buttons on your telephone. You can also use the VCX User Interface to
view and modify button mappings (see Assigning Access Button
Functions Using the VCX User Interface).
When a VCX system is configured, your administrator assigns (maps)
default functions for the Access buttons on your telephone. Mapping a
function to a button allows one-touch access to that function. Speed
dialing is one example of a one-touch function.
Page 23

Assigning Model 2102 Access Button Functions Using the TUI 23
Your administrator may allow you to reprogram a button’s function (for
example, create more personal speed dial buttons). Consequently, a
programmable button is one of the following states:
■ Locked — Button function can be changed only by the administrator.
However, if the button function requires additional information (for
example, a speed dial number or a call forward destination number),
you can choose the values for the parameters. There are two
exceptions:
■ BLF (Busy Lamp Field) — Displays the status of another user's
phone. When you press the button associated with the BLF status
light, the BLF function calls the other user’s phone.
■ System Speed Dial — Dials an administrator-configured speed dial
number.
The additional information for these two functions is set by the
administrator and you cannot change the values if the buttons are
in the locked state.
■ Unlocked — Button function and any associated values can be
completely reconfigured by you or the administrator.
Note that, if a button function requires additional information (for
example, a call forward destination number) and you or your
administrator have not configured this information, the system will
prompt you for it when you press the button.
Default Model 2102
Button Assignments
As noted in Access Buttons
Model 2102 phone are located in the right column of 12 buttons. The
buttons are numbered, bottom to top, 1 through 12. The default, 3Com
supplied button functions are shown in Ta bl e 4
these defaults have changed.
Tab le 4 3Com Default Button Mappings for the Model 2102 Telephone
Button Number Feature Additional Information
12 Do Not Disturb None
11 Call Forward All Destination number
10 Personal Speed Dial #1 First personal speed dial
9 Personal Speed Dial #2 Second personal speed dial
, the programmable Access buttons for the
. Ask your administrator if
number
number
Page 24

24 CHAPTER 2: VCX BUSINESS TELEPHONE — MODEL 2102
Tab le 4 3Com Default Button Mappings for the Model 2102 Telephone
Button Number Feature Additional Information
8 Personal Speed Dial #3 Third personal speed dial
7 Personal Speed Dial #4 Fourth personal speed dial
6 Personal Speed Dial #5 Fifth personal speed dial
5 Personal Speed Dial #6 Sixth personal speed dial
4 Personal Speed Dial #7 Seventh personal speed dial
3 System Line #3 Third line for
2 System Line #2 Second line for
1 System Line #1 First line for making/receiving
number
number
number
number
number
making/receiving calls; cannot
be reconfigured
making/receiving calls; cannot
be reconfigured
calls; cannot be reconfigured
Viewing and
Changing Speed Dial
Button Information
To view the personal or system speed dial number that is mapped to a
button or to change the personal speed dial number:
1 Press the Program button to display the Main Menu.
2 Scroll down to the speed dial type.
3 Press the button associated with the speed dial type.
4 Use the Scroll Down button to view the speed dial numbers.
To change the personal speed dial number, refer to Editing Personal
Speed Dial Numbers.
Page 25

VCX BUSINESS TELEPHONE —
3
MODEL 3102
This chapter describes the buttons, controls, and features on the 3Com®
VCX™ Model 3102 Business Telephone.
This chapter includes the following topics:
■ Buttons and Controls
■ Access Buttons
■ Status Lights
■ Assigning Model 3102 Access Button Functions Using the TUI
For information about the Model 2102 Business Telephone, see
Chapter 2
For information about the 3105 Attendant Console, see Chapter 4.
To verify the model number of your telephone, refer to the label under
the phone.
.
Page 26

26 CHAPTER 3: VCX BUSINESS TELEPHONE — MODEL 3102
Buttons and Controls
Figure 3 shows the buttons and controls on the VCX Model 3102
Business Telephone.
Figure 3 VCX Model 3102 Business Telephone
*UNEAM
%XTENSION
1 Soft buttons — Use the soft buttons to navigate through Display Panel
options. A button’s function depends on the option selected. The buttons
are, left to right:
■ Slct (Select) — Use this button to select a displayed item. For example,
you can use this button to automatically dial a previously placed or
received call or a missed call.
■ Back — Use this button to move the cursor backwards one space and
delete the current space). You can also use this button to sort
displayed items.
■ Exit — Use this button to exit the currently displayed option.
2 Message Waiting Indicator (MWI) — When lit, indicates that you have
at least one unreviewed message (voice, e-mail, or fax) in your mailbox.
Also, this indicator flashes when your telephone rings.
Page 27

Buttons and Controls 27
3Display Panel — Displays telephone status messages, Caller ID
information (if enabled), and the number of new messages (voice, e-mail,
and fax) that you have in your mailbox (see Using the Telephone Display
Panel for more information on how message status determines the
message list).
You can also use the Display Panel to view or enable features available
through the Main menu and with feature codes (see Chapter 6
information on using feature codes). You can access the Main menu by
pressing the Program button. The following features are available:
■ User Directory — Displays a directory of the people in your
organization. See Viewing the User Directory
■ Call History — Displays logs of your recent missed, answered, and
dialed calls. See Viewing the Call Logs
■ Personal Speed Dial — Personal speed dial numbers can be
configured at the telephone or through the VCX User Interface, which
is accessed through the web (see Chapter 8
■ System Speed Dial — System speed dial numbers can be configured
at the telephone or through the VCX User Interface, which is accessed
through the web (see Chapter 8
■ Advanced Settings — Configures network parameters.
.
).
.
).
for
CAUTION: This option is for administrator use only. Unauthorized
modification of these parameters will disconnect your phone.
4 Scroll buttons (Up, Down, Left, Right) — Use the Up and Down
buttons to scroll through items in the Display Panel. The Left and Right
buttons are reserved for future use. See Viewing the Call Logs
5 Program button — Use this button to access and view the Display Panel
Main menu.
6 Access buttons — Your administrator assigns default functions for these
buttons and may allow you to reprogram a button’s function (for
example, create more personal speed dial buttons). See Access Buttons
7 Microphone (located on the side of the telephone) — Activated when
the telephone is in speaker phone mode; that is, after you press the
Speaker button) or the Hands Free button. For best results, keep the
area around the microphone free of obstructions.
8 Label area for Access buttons — The telephone label maker utility,
available through the 3Com web site, enables you to define and print a
new label for your Access buttons. See Printing Labels
.
.
.
Page 28

28 CHAPTER 3: VCX BUSINESS TELEPHONE — MODEL 3102
9 Telephone key pad — Use these buttons to dial telephone numbers and
to access additional features.
10 Hold button — Places a caller on hold. See Putting a Call on Hold
11 Transfer button — Sends the currently active call to another telephone.
See Transferring a Call
12 Conference button — Establishes a single call with up to three internal
parties, external parties, or a combination of both. See Setting up a
Conference Call.
13 Redial button — Redials the last telephone number or extension that
you called. See Making a Call to a Remote Office
14 Speaker button — Enables you to use the speaker phone feature. Press
the Speaker button before you dial the call, when your telephone is
ringing, or while a call is in progress. To turn the speaker phone off and
resume the conversation, pick up the handset.
15 FWD MAIL button — Directs all incoming calls, after one ring, to your
call coverage point (by default, voice mail). See Configuring a Call
Coverage Point. The light next to the FWD MAIL button remains red as
long as this option is enabled.
16 MSG (Message) button and Message Waiting Light — Press this
button to access your messages through the voice mail system (refer to
the IP Messaging Module User Guide for information on messaging). The
light next to the MWI light remains red as long as there is at least one
new, unreviewed message (voice, e-mail, or fax) in your mailbox, or in a
mailbox monitored by your phone (for example, a hunt group mailbox or
the mailbox associated with a bridged line).
.
.
.
17 Hands Free button
without picking up the handset. An external call (a call from outside your
VCX system) rings to your telephone as usual. See Using the Hands Free
Feature. The light next to the Hands Free button remains red as long as
this option is enabled.
18 Headset connector — Located on the underside of the telephone, this
RJ-11 connector enables you to plug in a headset so that you can listen to
calls and have your hands free. See Using a Headset
To enable the use of a connected headset, press the Headset button (by
default, button 16 at the top of the right column of buttons).
19 Volume down — Lowers the volume of the ringer, the speaker, the
handset, or the headset. See Controlling the Volume
— Allows you to answer internal (intercom) calls
.
.
Page 29

20 Mute button — Use this button to prevent callers from hearing you,
while still hearing your callers. See Muting Calls
21 Volume up — Raises the volume of the ringer, the speaker, the handset,
or the headset. See Controlling the Volume
22 Handset
Access Buttons Figure 4 shows the 18 Access buttons on the phone.
The buttons are assigned default functions (described in the following
list) by 3Com. Your administrator can change these defaults and may
allow you to reprogram some or all of the button functions. Ask your
administrator for more information.
You can view and change button assignments through the Telephone
User Interface (see Assigning Model 3102 Access Button Functions Using
the TUI) or the VCX User Interface (see Assigning Access Button Functions
Using the VCX User Interface).
Figure 4 Access Buttons
.
.
Access Buttons 29
Access buttons have the following default settings:
1 The first three buttons in this group (starting from the bottom) are lines
for incoming and outgoing calls (System Appearance buttons SA1, SA2,
and SA3). You administrator can assign up to six additional System
Appearance buttons (buttons 2 through 7) to your phone.
2 Personal Speed Dial 6 — See Speed Dialing
3 Personal Speed Dial 5
.
Page 30

30 CHAPTER 3: VCX BUSINESS TELEPHONE — MODEL 3102
4 Personal Speed Dial 4
5 Personal Speed Dial 3
6 Personal Speed Dial 2
7 Personal Speed Dial 1
8Headset — Enables or disables the use of a headset connected to the
telephone. See Using a Headset
9 Do Not Disturb — Enables the Do Not Disturb feature. See Activating
Do Not Disturb.
10 Forward Universal — Allows you for forward all calls to different
destinations. See Call Forwarding
11 Call Park — Allows you to place a call in a “holding pattern” and retrieve
it from any other telephone in the system. See Call Park
12 Call History — Enables you to view the last 10 missed, answered, or
dialed calls on the Display Panel. See Viewing the Call Logs
13 Feature button — Allows you to access features that are not assigned to
an Access button on your telephone. For more information on feature
codes, see Chapter 6
14 Local Directory — Lists, in the Display Panel, all the users in your
organization and their extensions. You can use the Soft Buttons to sort
the list and select an entry. Selecting an entry automatically dials the
extension. See Viewing the User Directory
.
.
.
.
.
.
15 OK button — Press the OK button to send a call.
16 Release button — Press this button to disconnect a call.
Status Lights An Access button that is set up for incoming and outgoing calls is called a
System Appearance button. The light beside each System Appearance
button indicates its status. See Tab le 5
Tab le 5 Status Lights for System Appearance Buttons
If the light is The line is
Off Available for use
Steady In use
Blinking quickly Ringing
Blinking slowly On hold
.
Page 31

Assigning Model 3102 Access Button Functions Using the TUI 31
Assigning Model 3102 Access Button Functions Using the TUI
This section describes how to use the Telephone User Interface (TUI) to
view, and possibly modify, the VCX features associated with the Access
buttons on your telephone. You can also use the VCX User Interface to
view and modify button mappings (see Assigning Access Button
Functions Using the VCX User Interface).
When a VCX system is configured, your administrator assigns (maps)
default functions for the Access buttons on your telephone. Mapping a
function to a button allows one-touch access to that function. Speed
dialing is one example of a one-touch function.
Your administrator may allow you to reprogram a button’s function (for
example, create more personal speed dial buttons). Consequently, a
programmable button is one of the following states:
■ Locked — Button function can be changed only by the administrator.
However, if the button function requires additional information (for
example, a speed dial number or a call forward destination number),
you can choose the values for the parameters. There are two
exceptions:
■ BLF (Busy Lamp Field) — Displays the status of another user's
phone. When you press the button associated with the BLF status
light, the BLF function calls the other user’s phone.
Default Model 3102
Button Assignments
■ System Speed Dial — Dials an administrator-configured speed dial
number.
The additional information for these two functions is set by the
administrator and you cannot change the values if the buttons are
in the locked state.
■ Unlocked — Button function and any associated values can be
completely reconfigured by you or the administrator.
Note that, if a button function requires additional information (for
example, a call forward destination number) and you or your
administrator have not configured this information, the system will
prompt you for it when you press the button.
As noted in Access Buttons
Model 3102 phone are located in two columns on the right side of the
phone.
, the 18 programmable Access buttons for the
Page 32

32 CHAPTER 3: VCX BUSINESS TELEPHONE — MODEL 3102
■ In the left column the buttons are numbered 1 through 9, bottom to
top.
■ In the right column the buttons are numbered 10 through 18, top to
bottom.
The default, 3Com supplied button functions are shown in two tables.
Ask your administrator if these defaults have changed.
■ Ta bl e 6 shows the default button mappings in the left column.
■ Ta bl e 7 shows the default button mappings in the right column.
Each number in the Button Number column corresponds to a button’s
physical position in its column.
Tab le 6 3Com Default Button Mappings for the Model 3102 Telephone – Left
Column
Button Number Feature Additional Information
9 Personal Speed Dial #1 First personal speed dial
8 Personal Speed Dial #2 Second personal speed dial
7 Personal Speed Dial #3 Third personal speed dial
6 Personal Speed Dial #4 Fourth personal speed dial
5 Personal Speed Dial #5 Fifth personal speed dial
4 Personal Speed Dial #6 Sixth personal speed dial
3 System Line #3 Third line for making/receiving
2 System Line #2 Second line for
1 System Line #1 First line for making/receiving
number
number
number
number
number
number
calls; cannot be reconfigured
making/receiving calls; cannot
be reconfigured
calls; cannot be reconfigured
Page 33

Assigning Model 3102 Access Button Functions Using the TUI 33
Tab le 7 3Com Default Button Mappings for the Model 3102 Telephone – Right
Column
Button Number Feature Additional Information
10 Headset Enable/Disable None
11 Do Not Disturb None
12 Call Forward All Destination number
13 Park Park number
14 Call History None
15 Feature None
16 Local User Directory None
17 OK None
18 Release None
Viewing and
Changing Speed Dial
Button Information
To view the personal or system speed dial number that is mapped to a
button or to change the personal speed dial number:
1 Press the Program button to display the Main Menu.
2 Scroll down to the speed dial type.
3 Press the button associated with the speed dial type.
4 Use the Scroll Down button to view the speed dial numbers.
To change the personal speed dial number, refer to Editing Personal
Speed Dial Numbers.
Page 34

34 CHAPTER 3: VCX BUSINESS TELEPHONE — MODEL 3102
Page 35

4
3105 ATTENDANT CONSOLE
The 3105 Attendant Console enables a receptionist to handle high call
volumes efficiently. Although receptionists are the primary users of the
Attendant Console, it can also be used by busy sales representatives and
others who receive a high volume of telephone calls or who make
frequent calls to the same telephone numbers.
This chapter includes the following topics:
■ 3105 Attendant Console — A device that works along with VCX
telephones to increase call handling capability. In many offices, the
Attendant Console is used by a receptionist or switchboard operator,
who is referred to in this guide as “the receptionist.”
Page 36

36 CHAPTER 4: 3105 ATTENDANT CONSOLE
3105 Attendant Console
Access Buttons The 50 Access buttons on an 3105 Attendant Console can each have two
The 3105 Attendant Console has 50 Access buttons and 4
preprogrammed Feature buttons. In effect, the Attendant Console is an
extension of the VCX Business Telephone or VCX Basic Telephone with
which it is associated.
Figure 5
Console.
sets of assignments: 1 through 50, and 51 through 100. To toggle
between the two sets of assignments, press the Shift button.
Your administrator can assign features to each Access button. Possible
features include:
■ Status of internal telephone extensions (busy, available)
In the current release, when you assign a phone extension to an
Attendant Console button, the button assignment does not become
effective until either the Attendant Console is rebooted or the phone
registration interval elapses. The default registration interval is one hour
(3600 seconds).
■ Status of external telephone lines
■ Speed dials for user extensions:
illustrates the buttons and controls on the VCX 3105 Attendant
Feature Buttons The four Feature buttons are programmed for four of the five most
common features needed by a receptionist: Call Transfer, Call Hold,
Conference, Call Park, or Attendant Serial Call. The Shift button does not
affect the operation of the Feature buttons. Your administrator
configures the feature assigned to a particular Feature button using the
VCX User Interface, Central Management Console. The feature-to-button
mappings described in the list following Figure 5
may not correspond to your configuration.
Your administrator also maps telephone extensions to Access buttons
using the VCX Administrator web interface.
Figure 5
Attendant Console.
and the text that follows it describe the features on the 3105
are the defaults and
Page 37

Figure 5 3105 Attendant Console
3105 Attendant Console 37
5
1
2
3
4
8
6
7
1 Transfer button — Enables you to send a call to another telephone. See
Transferring a Call
2 Hold button — Places a caller on hold. See Putting a Call on Hold
3 Conference button — Allows you to set up a 6-party conference call.
See Setting up a Conference Call
.
.
.
4 Call Park button — Places a call in a “holding pattern” so that it can be
retrieved from any other telephone on the system. See Call Park
Attendant Serial Call button — Enables you to send a call to another
telephone like Transfer, but the call rings back to you when the
destination hangs up. You can perform another transfer or other action.
Not mapped to a button by default, your administrator can map
Attendant Serial Call to any of the four buttons. See Serial Transfer
5Labels — You can print labels for your Attendant Console using the label
maker utility, which is available through the 3Com web site. See Printing
Labels.
6 Label cover tabs — Allow you to unsnap the plastic cover to insert
labels.
.
.
Page 38

38 CHAPTER 4: 3105 ATTENDANT CONSOLE
7 Access buttons — If your administrator has mapped an extension to an
Access button, a light next to the button indicates whether the line is
available or in use, or whether an assigned feature is enabled. See
Attendant Console Status Lights
Your administrator uses the VCX Administrator web interface to map
telephone extensions to Access buttons numbers. The interface numbers
each button. For example, the administrator may say that extension 4001
is assigned to button 1, extension 4002 is assigned to button 2, and so
on. On the Attendant Console, the buttons are numbered from top to
bottom, starting in the top left corner. (However, no number physically
appears next to a button.)
■ The first five buttons from the top in the left column correspond to
Access buttons 1 through 5. (The bottom four buttons are always
the Feature buttons.)
■ The second column of nine buttons correspond to Access buttons
6 through 14.
■ The third column of nine buttons correspond to Access buttons 15
through 23.
.
■ The fourth column of nine buttons correspond to Access buttons
24 through 32.
■ The fifth column of nine buttons correspond to Access buttons 33
through 41.
■ The sixth column of nine buttons correspond to Access buttons 42
through 50.
8 Shift button — Enables you to toggle between the two sets of Access
button assignments on the Console. Press the Shift button to switch
between assignments 1 through 50 and assignments 51 through 100.
The Shift button LED is lighted when you have buttons 51 through 100
selected.
Printing Labels To create, print, and save labels for your Attendant Console (or any VCX
telephone):
1 Access the 3Com web site, http://www.3com.com.
2 Click Support & Downloads and select Downloads & Drivers from the
drop-down list box.
Your browser displays the Downloads page.
3 On the Downloads page, select the following options:
Page 39

3105 Attendant Console 39
a In the Criteria-base Search section, in the Type of File list box, select
All Downloads.
b In the Product Category list box, select Convergence/IP Telephony.
c In the Filename text box, enter labels.exe.
d Click Search.
4 When the search results page is displayed, locate the labels.exe file for
3Com VCX V7000 IP Telephony Solution, and download it to your
system.
5 Locate labels.exe on your system and double-click the file icon to start the
LabelMaker program.
6 Find the page in the LabelMaker that has labels for your attendant
console.
7 Edit the label template by clicking any of the label text boxes to highlight
the existing text, and then typing new text.
8 Press Ta b to move to the next text field in the label.
9 Click the Print button at the top of the LabelMaker screen to open the
Print dialog. Specify which page you want to print. Typically, the default is
to print all pages.
10 Click Print.
Attendant Console
Status Lights
11 Cut out the labels and put them in the label holders of your attendant
console.
12 To save the edited LabelMaker, click the Save button at the top of the
LabelMaker screen. Or you can click File > Save As to save the
LabelMaker to a new location.
To reuse your saved LabelMaker, run the file that you saved to your
computer. If you download the LabelMaker from the 3Com web site, you
always get the default version. If you save the default version to the same
place you saved an earlier edited version, you overwrite the earlier
version.
An Access button that is set up for incoming and outgoing calls is called a
System Appearance button. The light beside each System Appearance
button indicates its status. See Tab le 8
.
Page 40

40 CHAPTER 4: 3105 ATTENDANT CONSOLE
Tab le 8 Status Indicator Lights for System Appearance Buttons
If the light is The line is
Off Available for use
Steady In use
Blinking Do Not Disturb is enabled
Blinking quickly Dialing an emergency call
Page 41

5
BASIC TELEPHONE OPERATION
This chapter describes how to use the basic telephone functions available
on all VCX telephone models and includes the following topics:
■ Logging In to Your Telephone
■ Answering a Call
■ Making Calls
■ Terminating Calls
■ Using the Telephone Display Panel
■ Controlling the Volume
■ Using the Hands Free Feature
■ Using a Headset
■ Putting a Call on Hold
■ Transferring a Call
■ Muting Calls
■ Mute Ringer
■ Activating Do Not Disturb
■ Activating Malicious Call Trace
Page 42

42 CHAPTER 5: BASIC TELEPHONE OPERATION
Logging In to Your Telephone
Your administrator assigns an extension (telephone number) and initial
password to your phone.
If you hear a dialtone and the Display Panel on your phone shows the
date, time, and a telephone extension, you are logged in and can make
calls:
Extension: 1001 Feb 17 08:12:00
Note that your administrator initially determines the format for the date
and time display. You can change this format (and time zone location of
your phone) through the VCX User Interface. See VCX User Interface
Overview and the VCX User Interface online Help.
If you do not hear a dialtone and the Display Panel on your phone shows
the following information, you are not logged in and cannot make calls:
Use Program btn to login
Logged out from PBX
To log in to your phone:
1 Press Program + 5 + 6.
For phones without a Program button, press Feature + 410 + 5 + 6.
The Display Panel shows:
Enter Password:
2 Enter your password and press #.
If the password you entered is associated with the phone extension, you
are logged in.
If the Display Panel alternately shows the following information, the
password you entered is not associated with the phone extension or the
extension has not yet been assigned to the phone:
Invalid password:
Then:
Use Program btn to login
Logged out from PBX
Page 43

Logging In to Your Telephone 43
In this case, use the following steps to log in to your phone:
1 Press Program + 5 + 4.
For phones without a Program button, press Feature + 410 + 5 + 4.
The Display Panel shows:
Local Phone Number:
2 Enter your extension and press #.
If the Display Panel shows a previously assigned number that you want to
replace, press the middle soft button under the Display Panel to move the
cursor back one space. Repeat as necessary and then enter your
extension and press #.
3 Enter your password and press #.
Enter Password:
Alternatively to set a password locally, you can use the Password Stored
Locally feature code (434), then enter the password. You can use this
method in place of step 1 above. See Chapter 6
feature codes.
for information on
Changing Your
Password
You can change your password through the VCX User Interface (see
Chapter 8
However, your password is also stored locally on your telephone.
Changing your password through the VCX User Interface does not
change the password stored on the phone. You must use the Telephone
User Interface (TUI) and change the local password to match the
password stored on the call processor by following these steps:
1 Press Program + 5 + 5.
For phones without a Program button, press Feature 410 + 5 + 5.
The Display Panel shows:
2 Enter your new password and press #.
The VCX call processor periodically communicates with each VCX
telephone. If you change your password through the VCX User Interface
but do not change it through the TUI, the VCX call processor detects a
password mismatch and logs you out. If this happens, follow steps 1 and
2 to log in.
). This changes your password on the VCX call processor.
Enter Password:
Page 44

44 CHAPTER 5: BASIC TELEPHONE OPERATION
Answering a Call To answer an incoming call, lift the handset.
Alternatively, you can press the Speaker button. If you have enabled
Handsfree Active on Intercom, you can simply speak to answer internal
calls.
If your phone includes multiple access lines, press the Access button for
the line on which the new call is arriving (the light next to the button will
be flashing).
Unanswered calls are sent to either your call coverage point which, by
default, is your voice mailbox or your configured call forwarding
destination. See Configuring a Call Coverage Point
Forwarding.Answering a Second Call
On 3Com Business Telephones, when a new call arrives while you are on
a call:
1 Press Hold to put the current call on hold.
2 Press the Access button for the line whose status light is blinking,
indicating a new call.
3 To return to the earlier call, hang up the new call, or put it on hold, or
transfer it, and then press the Access button for the original call.
or Call
Making Calls This section describes standard dialing features.
The VCX administrator can configure calling restrictions for some, one, or
all the phones at a site. These restrictions may limit the outbound calls
(external or to another company site) a phone can make. Ask your
administrator if any calling restrictions have been implemented on your
phone system.
Making Internal Calls To dial an internal call:
1 Pick up the handset. On 3Com Business Telephones, you can press the
Speaker button. You hear the dial tone.
2 Dial the extension. Alternatively, you can use the Display Panel to find and
dial the name of the person whom you want to call in the user directory,
call logs, or a speed dial list.
Page 45

3 When you complete the call, hang up the handset. If you pressed the
Speaker button, press it again to end the call.
Redialing a Call To redial a number on a 3Com Business Telephone:
■ Pick up the handset and press Redial to dial the most recent number
that you called.
■ Use the Call Logs on the display panel to redial a recently missed,
answered, or dialed call.
Making External Calls To dial an external call:
1 Pick up the handset. Alternatively, on 3Com Business Telephones, you can
press the Speaker button. You hear the dial tone. If necessary, dial the
number required to access an external line (for example, 9). If one of the
Access buttons is configured to access an external line directly, you can
press that button.
2 Dial the number. Or use the display panel on a 3Com Telephone to scroll
to Placed Calls, Received Calls, or Missed Calls, or a personal or
system-wide speed dial number. If you have programmed one of the
One-Touch buttons, press that button.
3 When you finish speaking, hang up the handset. If you pressed the
Speaker button, press it again to end the call.
Making Calls 45
Making a Call to a
Remote Office
You can dial calls between sites in your organization that are separated
geographically but that are linked by a Wide Area Network (WAN)
connection. Each site must have a VCX system. Typical configurations are
described in the next sections.
Using Unique Extensions
In some companies with geographically separated offices, everyone in the
entire organization has a unique telephone extension. Whenever you
make a call to an extension that is not located at your own site, your VCX
system sets up a connection to the VCX system at the other extension’s
site.
Page 46

46 CHAPTER 5: BASIC TELEPHONE OPERATION
For example, suppose a company has three offices:
■ Phones at the Chicago office use an extension range from 1000
through 1999.
■ Phones at the Atlanta office use an extension range from 2000
through 2999.
■ Phones at the Dallas office use an extension range from 3000 through
3999.
In this example, to call a user in Dallas, a user in Chicago dials a Dallas
extension (3000 through 3999). The dial plan on the Chicago VCX system
sets up the necessary connection to the Dallas VCX system and then to
the extension at that site.
Class of Service
Override
The Class of Service Override feature allows you to apply the capabilities
of your own VCX telephone temporarily to another VCX telephone on
the same local network.
For example, the telephone in a conference room may be configured to
prevent long-distance telephone calls. You may, however, need to place a
long-distance call during a meeting. If the permissions included with the
Class of Service on your phone allow long-distance calling, you can use
the Class of Service Override feature to apply your phone features to the
conference room phone for one call only.
To activate the one-call-only Class of Service Override from any VCX
telephone:
1 Pick up the handset.
2 Press Feature + 433. The Display Panel prompts you for the required
input.
3 Enter your telephone extension.
4 Enter your password and press #.
5 Enter the destination number as you would from your own VCX
telephone.
When you use Class of Service (CoS) Override, any reports that are
generated on the VCX system indicate that the CoS features of your own
VCX telephone were applied temporarily to the telephone on which you
made the call.
Page 47

Terminating Calls 47
Terminating Calls You can terminate a call (hang up) by replacing the handset. Alternatively,
depending on your phone model, you can press the Release button, or if
the call is on Speaker, turn the Speaker off by pressing the Speaker
button.
Using the Telephone Display Panel
The Display Panel shows the current date and time, and your extension
number. It can also show features that you have enabled. For example, if
you enable the feature that forwards all incoming calls to your voice
mailbox, the Display Panel shows
The Display Panel can also list telephone status messages, Caller ID
information (if enabled), and the number of new messages (voice, e-mail,
and fax) that you have in your mailbox.
If the Display Panel contains more than two lines of information, use the
up and down scroll buttons to navigate through the display.
Fwd Voice Mail.
Page 48

48 CHAPTER 5: BASIC TELEPHONE OPERATION
The list of new messages in the Display Panel depends on the status of
each message. A new message can be:
■ Unreviewed — An unreviewed message has never been listened to
or acted upon (saved or deleted).
■ Reviewed — A reviewed message has been listened to but has not
been acted upon (saved or deleted). A message may reach this state if
you listen to the message and then hang up.
The Display Panel shows the number of messages in your mailbox (and
the MWI is lit) only if you have at least one unreviewed message. If you
review the last new message and do not act on it, the Display Panel
shows the date and extension, and MWI is off. If your mailbox then
receives a new message, the Display Panel shows the following (and MWI
2 Msgs 1 New. The 2 Msgs include the just received new,
is lit):
unreviewed message and the other message which is new but reviewed.
1 New indicates the just received new, unreviewed message.
The
The Display Panel also shows the number of missed calls. Missed calls
include unreviewed messages in your mailbox and any other calls that
you did not answer. For example, you can configure your default call
coverage point to be no coverage. In this case, if you do not answer a
call, when the call terminates the caller hears a busy tone and the call is
not forwarded or sent to your mailbox. The Display Panel on your phone
shows
you can scroll through the list of missed calls and to show you the name
of the calling party. Press the first button again to automatically dial the
listed extension.
Missed 1. If you press the first button below the Display Panel,
You can also use the Display Panel to view or enable features available
through the Main menu and with feature codes (see Chapter 6
information on using feature codes). You can access the Main menu by
pressing the Program button. The following features are available:
■ Call History — Displays logs of your recent missed, answered, and
dialed calls. See Viewing the
■ User Directory — Displays a directory of the people in your
organization. See Viewing the User Directory
■ Personal Speed Dial — Personal speed dial numbers can be
configured at the telephone or through the VCX User Interface, which
is accessed through the web (see Chapter 8
Call Logs.
.
). The VCX Model 3101
for
Page 49

Controlling the Volume 49
and 3101SP Basic Telephones have no buttons that can be mapped for
speed dialing.
■ System Speed Dial — System speed dial numbers can be configured
at the telephone or through the VCX User Interface, which is accessed
through the web (see Chapter 8
Basic Telephones have no buttons that can be mapped for speed
dialing.
■ Advanced Settings — Configures network parameters, sets your
phone password and changes your login status.
CAUTION: Network parameter options are for administrator use only.
Unauthorized changes to network parameters will disconnect your
phone.
). The VCX Model 3101 and 3101SP
Controlling the Volume
Use the Volume Control buttons to raise or lower the volume of the
ringer, handset, or speaker.
Adjusting the volume control of one device DOES NOT affect the volume
control of the other devices. For example, lowering the volume of the
speaker has no effect on the handset volume. Changes you make to any
device remain in effect if you reset the phone to its default settings.
■ Ringer Volume — To raise or lower the volume of the ring, press the
up or down Volume Control button repeatedly while your telephone
is ringing, until the volume is at the level that you prefer.
■ Handset Volume — To raise or lower the volume of the dial tone and
the voice level of your callers, lift the handset then press the up or
down Volume Control buttons repeatedly until the volume is at the
level you prefer. You can change the volume during a conversation or
by listening to the dial tone.
■ Headset Volume (Model 3102 only) — During a call, press the up or
down Volume Control buttons repeatedly until the volume is at the
level you prefer.
■ Speaker Volume — To raise or lower the volume of the speaker,
press the Speaker button and then press the up or down Volume
Control button repeatedly until the volume is at the level you prefer.
You can change the volume during a conversation or by pressing
Speaker and listening to the dial tone.
Page 50

50 CHAPTER 5: BASIC TELEPHONE OPERATION
When you press a Volume Control button, the Display Panel shows the
volume setting as a series of dark vertical bars. Repeatedly pressing a
Volume Control button raises the volume (increases the number of
displayed bars) or lowers the volume (decreases the number of displayed
bars.
You can also use Feature Codes to adjust the volume. Pressing
Feature + 102 raises the volume (increases the number of displayed bars
by one). Pressing Feature + 103 lowers the volume (decreases the
number of displayed bars by one).
Using the Hands Free Feature
Using a Headset The Model 3102 Business Telephone has a headset jack located on the
You can use your phone as an intercom. You can answer internal
(intercom) calls without picking up the handset. When you receive an
internal call, your telephone sounds a tone and activates the speaker
phone.
You cannot use this feature with external calls (a call from outside your
local call processor) or Anonymous (blocked caller ID) calls. These calls
ring to your telephone as usual.
If your telephone is part of a bridged extension, see Hands Free and
Bridged Line Calls for additional information.
To enable or disable the Hands Free feature, press the HANDS FREE
button or the button on the phone before calls arrive. The red light
next to the button comes on (enabled) or goes out (disabled). You can
also enable and disable Hands Free by using Feature Code 100. See
Feature Codes
underside of the telephone.
To prepare the headset for all calls:
1 Plug the headset connector into the headset jack on the underside of the
telephone.
.
2 Verify that the indicator light next to the Headset button comes on.
Page 51

Putting a Call on Hold 51
To answer a call when you are using the headset:
1 Put the headset on. When a call comes in, press the System Appearance
button beside the flashing light.You are connected to the call.
The handset can be either on hook or off hook.
2 To end a call when you are using the headset, press the Release button
on the telephone.
Returning to the
Headset After a
Long Delay
Putting a Call on Hold
Certain brands of headsets enter a power-saving mode that prevents the
telephone from ringing for one or more calls when both of these
conditions are true:
■ The headset amplifier buttons for Mute and On are both set to On.
■ The handset is off the phone for a long time (for example, overnight).
It may take a few minutes for your headset to return from the
power-saving mode to the active mode when calls first come in, so your
telephone may not ring until the headset has returned to active mode,
and you may miss a call.
If you plan to not use the headset for a long time, 3Com recommends
that you set the mute and headset buttons on the amplifier to Off and
hang up the handset on your telephone. When you are ready to receive
calls again, set up the headset for receiving calls:
1 Pick up the handset on your telephone and set it on your desk.
2 Put on the headset.
3 On the amplifier, set the headset button to On.
To put a call on hold:
1 While you are on a call, press the Hold button. This message appears in
the Display Panel: Hold
2 To return to the call, press the Hold button again or press the appropriate
Access button.
Music on Hold If configured by the administrator, callers on hold hear music while they
wait.
Page 52

52 CHAPTER 5: BASIC TELEPHONE OPERATION
The VCX system’s WAV file importing capabilities are solely an
accommodation to you and shall not constitute a grant or waiver (or
other limitation or implication) of any rights of the copyright owners in
any audio content, sound recording or underlying musical or literary
composition. Therefore, please be mindful that you are obligated to
comply with all applicable copyright and other intellectual property laws
in both uploading WAV files to the VCX system and your subsequent use
of such WAV files.
Dialing a New Call
While on a Call
Answering a New
Call While on a Call
Transferring a Call When you are on a call, the Transfer feature allows you to send the call
You can put a call on hold, dial a new call, and toggle between the two
calls:
1 Press the Hold button.
2 Press one of the Access buttons not currently being used.
3 When you hear dial tone, dial the second call.
You can put your current call on hold, answer a second call, and then
toggle between the two calls:
1 When a new call arrives, press the Hold button to put the current call on
hold.
2 Press the Access button for the incoming call (its light will be flashing).
3 To toggle between the two calls, put the current call on hold and then
press the Access button for the call you want to resume.
from your telephone to any other internal line. For unattended or
attended transfers, if your call permissions allow, you can send the call to
an external line.
If your telephone is part of a bridged extension, see Call Transfer, Call
Conferencing, and Bridged Line Calls for additional information.
You can also transfer a call to another subscriber’s voice mail. See
Transferring a Call to Another User’s Voice Mail
.
Page 53

Transferring a Call 53
Unattended Transfer In an unattended transfer, you transfer the call without notifying the
recipient. You can either use the Transfer button or the transfer feature
code:
1 While on a call, press Transfer. The call is placed on hold, you hear a dial
tone, and the system prompts you enter a destination number.
2 Dial the number to which you want to transfer the call.
3 Hang up.
The call is disconnected as soon as the transfer starts, which frees up your
line. If the transfer cannot be completed:
■ The call is forwarded to the called party’s call coverage point (by
default, voice mail; see Configuring a Call Coverage Point
■ If the called party’s default call coverage point is No Coverage, the
call is returned to (rings back at) your extension. If you are
unavailable, the call is forwarded to your call coverage point.
Attended Transfer In an attended transfer, you announce the call to the recipient. You can
either use the Transfer button or the transfer feature code.
).
To announce a transfer:
1 While on a call, press Transfer. The call is placed on hold, you hear a dial
tone, and the system prompts you enter a destination number.
2 Dial the extension number to which you want to transfer the call.
The VCX call processor dials the call.
3 If the recipient:
a Answers, announce the call. Note that, at this point you cannot return
to the original caller.
■ If the recipient wants to take the call, press Transfer. Hang up.
■ If the recipient does not want to take the call, hang up the second call
and go back to the first call by pressing the Access button on which
the call originated.
b Does not answer because the line is busy or unreachable, to return to
the original call, hang up the transfer call or press the mapped Release
button to see the original call on Hold. Then press the Hold button to
return to the original call.
Page 54

54 CHAPTER 5: BASIC TELEPHONE OPERATION
Serial Transfer A serial transfer is like an unattended transfer except that when the
destination hangs up at the end of the call, the caller rings back to you as
the attendant who made the transfer. With your help, the caller can
make a single call to the organization and make a series of internal
connections with a series of transfers. You can either use a mapped
button on the Attendant Console or the serial transfer feature code:
Mapped Button Method
1 Press the mapped Attendant Serial Calling button on the Attendant
Console.
2 Press the button mapped to the called party’s extension on the Attendant
Console.
3 Press the mapped Attendant Serial Calling button again on the Attendant
Console to complete the call.
Serial Transfer Feature Code Method
1 While on a call, press Feature + 471. The call is placed on hold, you hear
a dial tone, and the system prompts you to enter a destination number.
2 Dial the number to which you want to transfer the call, and then press #
to complete the call.
3 Hang up.
When the destination phone hangs up, the caller returns to you.
Serial transfers:
■ Apply to a single transfer. Repeat for subsequent transfers even for the
same caller.
■ Can be mapped to a button on an Attendant Console.
■ That cannot be completed return directly to the attendant.
■ If the calling party reaches the called party’s voice mailbox, the calling
party can press 99 to return to the attendant.
Muting Calls You can prevent callers from hearing you by turning off the telephone’s
microphone when you are using the handset or headset, or when your
telephone is in speaker phone mode.
Page 55

Mute Ringer 55
To mute your phone:
1 While you are on a call, press Mute. The light next to the Mute button
comes on. Callers cannot hear you.
2 To turn this feature off, press Mute.
Mute Ringer You can prevent the phone’s ringer from ringing by enabling this feature.
By default, the phone’s ringer is enabled (feature disabled). You can
enable or disable the phone’s ringer at any time while either on the
phone or on-hook, but the change takes effect on the next incoming call.
All non-ringer tones are unaffected. All ring tones, such as, internal
domain, external domain, and anonymous tones are affected for all
primary, bridge, and hunt-group calls. A user with a phone on hands-free
hears the hands-free tone. A user that receives a page hears the page
tone.
If the VCX system or the phone reboots or is upgraded with new
software, the ringer resets to the default ringer enabled (feature disabled)
mode.
To mute the phone ringer:
Activating Do Not Disturb
1 Press Feature + 489. The LCD displays:
Ringer is now muted.
2 To clear the display, press the Release button. The next time you receive
an incoming call, the ringer is muted.
3 To turn this feature off, press Feature + 489 again. The LCD displays:
Ringer is now enabled.
4 To clear the display, press the Release button.
When you enable Do Not Disturb, incoming calls immediately go to the
call coverage point set by you or your administrator. The default call
coverage point is your voice mailbox. The call coverage point is set
through the VCX User Interface (see Chapter 8
When your telephone is in Do Not Disturb mode:
■ An incoming call does not cause your phone to ring. If you are logged
in to multiple phones using the same phone number and one of the
).
Page 56

56 CHAPTER 5: BASIC TELEPHONE OPERATION
phones enables Do Not Disturb, the feature applies to all phones—an
incoming call will not ring on any of the phones.
■ You can use the phone to dial outgoing calls.
■ If you enable Do Not Disturb while one or more calls are ringing, the
pending calls are sent to your call coverage point and Do Not Disturb
is enabled for all subsequent calls.
■ If you are a Hunt Group member and you enable Do Not Disturb,
personal (non-Hunt Group) calls go to your call coverage point.
However, Hunt Group calls always ring on a member’s phone,
regardless of the Do Not Disturb setting.
If your telephone is part of a bridged extension, see Do Not Disturb and
Bridged Line Calls for additional information.
To activate Do Not Disturb:
1 Press the Do Not Disturb Access button on the phone. The red light is lit
next to the Do Not Disturb button (Model 3102 only).
Your telephone is now in Do Not Disturb mode. The display panel shows
DND.
2 To disable Do Not Disturb mode, repeat step 1. The DND message
disappears from the display panel and the red light goes out.
Activating Malicious Call Trace
The Malicious Call Trace feature enables you to notify the system if you
receive a harassing or abusive call. The calling party can be from either an
external or internal source.
Malicious Call Trace cannot be invoked when you are on a conference
call.
To activate malicious call tracing during a call, press Feature + 119.
The Display Panel shows
The results of tracing a malicious call include the following actions:
■ Notification is sent to your network manager.
■ The log for the call includes a malicious call identifier.
■ For external malicious calls, the VCX system sends a message to the
authorities configured by your administrator to receive these reports.
malicious call for 5 seconds.
Page 57

Activating Malicious Call Trace 57
Once you use the Malicious Call Trace feature code during a call, you
cannot revoke it.
Page 58

58 CHAPTER 5: BASIC TELEPHONE OPERATION
Page 59

6
FEATURE CODES
This chapter describes how to use VCX feature codes on a VCX telephone
to enhance the operation of your phone. A feature code is a sequence of
numbers you enter on the telephone keypad to enable a feature that is
not mapped to a button.
This chapter includes the following topics:
■ Feature Code Overview
■ Using Feature Codes
■ Feature Codes
Page 60

60 CHAPTER 6: FEATURE CODES
Feature Code Overview
Some common telephone features are mapped to buttons (Hold, for
example). However, the number of buttons varies on each model of VCX
phone. Furthermore, the number of VCX features exceeds the number of
buttons available on any phone. Feature codes allow the VCX telephone
feature set to be available to all VCX phones, regardless of the number of
buttons on the phone.
Each feature is assigned a unique three-digit feature code. You can
invoke a feature by entering the numeric code assigned to a particular
feature. For example, you can use a feature code to enable call
forwarding and specify a destination number.
For all VCX Basic and Business phones, you can enter any feature code by
pressing the Feature button. This action generates a
the telephone Display Panel. The next step is to enter the appropriate
feature code. If additional information is required, the Display Panel
prompts you.
However, you can invoke some feature codes without pressing the
Feature button by entering special feature code syntax with the
telephone keypad. See Using Feature Codes
feature code entry methods.
The location of the Feature button depends on your telephone. See the
appropriate chapter in this guide for the location of buttons and controls
for your phone.
for information on both
Feature: prompt in
Using Feature Codes
You can invoke a feature by pressing the Feature button and using the
telephone keypad to enter the feature code along with any additional
information (for example, an extension). For example, you can show a list
of local or global users in the Display Panel by pressing the Feature
button followed by the User Directory feature code (461). In this guide,
this method is noted by the following syntax:
Feature + 461
Some feature codes allow you enter the code number without using the
Feature button. For these feature codes, you prepend the code number
with an asterisk (*). For example, you can enable Do Not Disturb using
either of the following methods:
Page 61

Feature Codes 61
Feature + 446
or
*446
Then, either press Ok or press Feature + 120 to complete the command.
Some features require additional information. For example, if you want to
enable call forwarding when your phone is busy, you must designate the
extension to which you want your calls forwarded. The feature code for
Call Forward Busy is 467. To enable this feature, you can use the Feature
button or enter a single command (in the following examples, the
destination extension is 1001):
■ Use the Feature button:
Press Feature + 467.
The Display Panel displays the prompt
Enter the extension to which you want your calls forwarded, in this
case, 1001.
Press OK or #.
■ Enter the feature code and extension with a single command:
*467*1001
You must prepend the feature code with an asterisk (*) and
separate the feature code and extension with another asterisk.
Each element in a feature code command must be prepended with
an asterisk.
Some features occur within the bounds of an existing call, for example,
forwarding a call to the voice mail of another subscriber. In these cases,
the feature requires using the Transfer button. After pressing Transfer,
you enter the transfer destination in the format
*feature_code*<destination>.
Feature Codes Ta bl e 9 lists the features that you can control with feature codes. Features
are listed alphabetically and include the required feature code syntax and,
in most cases, a reference for more information. In the syntax, the
FWD Busy Number.
Page 62

62 CHAPTER 6: FEATURE CODES
notation <parameter> represents a variable that you must supply, for
example, a telephone extension.
Tabl e 9 VCX Feature Codes Alphabetical by Feature or Task
Feature Feature Code Entry Description
Anonymous Now
(Enable/Disable)
Anonymous Next
(Enable/Disable)
Barge In Feature + 428 Used with Silent Monitor. See Silent
Beep — Send Feature + 331 Sends a page (a beep) between phones.
Call Forward Busy Feature + 467, then <destination>
Call Forward Ring No Answer Feature + 466, then <destination>
Call Forward Universal Feature + 465, then <destination>
Call History Feature + 462 See Viewing the Call Logs.
Call Park a Call Feature + 444, then <call park
Call Pickup — Directed Feature + 455, then <security code>,
Camp On Feature + 469, then <destination> Completes call when busy destination
Class of Service (COS)
Override
Feature + 889
Or
*889
Feature + 890, then <destination>
Or
*890*<destination>
Or
*467*<destination>
Or
*466*<destination>
Or
*465*<destination>
extension> (or accept the default)
then <destination>
Or
*455*<security code>*<destination>
Feature + 433, then <your extension>,
then <your mailbox password>+ #, then
<outside party number>
See Controlling Caller ID.
See Controlling Caller ID.
Monitor and Barge In.
The sending phone displays the target
extension. The target extension displays
the sending extension.
See Call Forward Busy Line.
See Call Forward Ring No Answer.
See Call Forward Universal.
See Call Park.
See Directed Call Pickup
extension becomes available. See
Camping on a Busy Extension.
See Class of Service Override.
Page 63

Feature Codes 63
Tab le 9 VCX Feature Codes Alphabetical by Feature or Task (continued)
Feature Feature Code Entry Description
Conference Call Feature + 430, then <destination>, then
Feature + 430
Display Software Version Feature + 837 Displays the current version of VCX
Do Not Disturb
(Enable/Disable)
Hands Free Feature + 100 Enables or disable the Hands-Free
Headset Feature + 112 See Using a Headset.
Hold Feature + 402 See Putting a Call on Hold.
Hunt Group or Calling Group
Login/Logout
Hunt Group Status Feature + 972 See Hunt Groups.
Login/Logout (phone) Feature + 128
Malicious Call Trace Feature + 119 Logs and sends notifications when
Mute Feature + 101 See Muting Calls.
Mute Ringer Feature + 489 See Mute Ringer.
OK Feature + 120 Displays OK in the Display Panel. Used to
Password Stored Locally Feature + 434, then <current password> Stores the password you use to log in to
Program Feature + 410 Displays the Program menu in the
Redial Feature + 401 See Redialing a Call.
Release Feature + 111 Cancels the current operation.
Feature + 446
Or
*446
Feature + 971, then <hunt group
number>
Or
*971*<hunt group number>
See Setting up a Conference Call.
software running on the phone.
See Activating Do Not Disturb.
feature. See Using the Hands Free
Feature.
See Hunt Groups.
entered during a call. See Activating
Malicious Call Trace.
make a call without waiting for the call
completion time-out value to expire.
your telephone on the phone (locally). If
you use the VCX User Interface to
change your password, use this feature
code to set the password stored on the
phone, thus synchronizing the
passwords. See Changing Your
Password and the VCX User Interface
online help for more information.
Display Panel.
Page 64

64 CHAPTER 6: FEATURE CODES
Tabl e 9 VCX Feature Codes Alphabetical by Feature or Task (continued)
Feature Feature Code Entry Description
Remote Call Forward Feature + 468, then <extension to
Retrieve Voice Mail Feature + 600
Scroll Down Button Feature + 109 Simulates pressing the scroll Down
Scroll Up Button Feature + 108 Simulates pressing the scroll Up button
Serial Transfer Feature + 471 Transferred call returns to attendant at
Silent Monitor Feature + 425 See Silent Monitor and Barge In.
Silent Monitor Block Feature + 429 Allows an agent to make a private call by
Soft Button 1 Feature + 105 Simulates pressing the Slct (Select)
Soft Button 2 Feature + 106 Simulates pressing the Back button.
Soft Button 3 Feature + 107 Simulates pressing the Exit button to
Speaker — On/Off Feature + 104 Speak and listen without picking up the
Speed Dial — Display Feature + 464 Lists the configured speed dial numbers
forward> + #, then <destination> + #
Or
*468*<extension to forward>
*<destination>
Or
*600
See Remote Call Forward.
The first entry simulates pressing the
MSG button.
The second entry allows you to leave a
message in another mailbox or access
your own mailbox. Follow the prompts.
button to navigate through items in the
Display Panel.
to navigate through items in the Display
Panel.
the end of the call. See Serial Transfer
blocking an attempt to monitor the
agent phone. See Silent Monitor and
Barge In.
button to select an item in the Display
Panel.
Action depends on contents of the
Display Panel. Either moves the cursor
left one position or sorts listed items.
exit the current function in the Display
Panel.
handset. Not available on Model 3101
Telephones.
in the Display Panel.
.
Page 65

Feature Codes 65
Tab le 9 VCX Feature Codes Alphabetical by Feature or Task (continued)
Feature Feature Code Entry Description
Speed Dial — Personal Feature + 601 + n
Or
*601*n,
where n is the speed dial digit (1 through
9) associated with the number you want
to dial.
Speed Dial — System Feature + 700 + speed dial number
Or
*700*n#, where n is the speed dial
number associated with the number you
want to dial.
Transfer Feature + 420, then <destination> +
hang up
Transfer to Voice Mail
(Enable/Disable)
Transfer to Another User’s
Voice Mail
User Directory Feature + 461 Lists the users in the local user directory
View Personal Speed Dials Feature + 463 Displays the personal speed dial
View System Speed Dials Feature + 464 Displays the system speed dial numbers
Feature + 440
Or
*440
Feature + 441, then <destination>
Or
Transfer, then*441*<destination>, then
Transfer
Allows you to dial a personal speed dial
number. To configure personal speed
dialing, see Speed Dialing
Allows you to dial a system speed dial
number. To configure personal speed
dialing, see Speed Dialing.
This is an unattended transfer. For an
attended transfer, see Transferring a
Call.
When enabled, transfers all calls to the
voice mail. See Forwarding Calls to Voice
Mail.
See Transferring a Call to Another User’s
Voice Mail.
or, if enabled, the users in the global
user directory. See Viewing the User
Directory.
numbers
.
Page 66

66 CHAPTER 6: FEATURE CODES
Tabl e 9 VCX Feature Codes Alphabetical by Feature or Task (continued)
Feature Feature Code Entry Description
Volume — Up or Down Feature + 102 to raise the volume
or
Feature + 103 to lower the volume
Adjusts the volume setting for the
current mode:
■ If the handset is in the cradle and the
speaker is disabled, adjusts the ring
volume setting.
■ If the speaker is enabled, adjusts the
speaker volume setting.
■ If the handset is not in the cradle and
the speaker is disabled, adjusts the
handset volume setting.
See Controlling the Volume
.
Page 67

7
STANDARD FEATURES
This chapter describes the standard VCX telephone features that you can
set up and access through the Telephone User Interface (TUI) on your
telephone.
Chapter 8
through the VCX User Interface.
This chapter contains the following topics:
■ Viewing the Call Logs
■ Viewing the User Directory
■ Controlling Caller ID
■ Setting up a Conference Call
■ Camping on a Busy Extension
■ Transferring Your Phone Settings to Another Phone
■ Forwarding Calls to Voice Mail
■ Transferring a Call to Another User’s Voice Mail
■ Call Waiting
■ Speed Dialing
■ Call Forwarding
■ Call Park
■ Paging
■ Call Pickup
describes the telephone features that require configuration
■ Silent Monitor and Barge In
■ Remote Call Forward
■ Hunt Groups
■ Emergency Phone Number Dialing Service
Page 68

68 CHAPTER 7: STANDARD FEATURES
Viewing the Call Logs
You can use the Call History feature to display your call logs. These are
the logs of the 10 most recent placed calls, received calls, missed calls and
unreviewed calls to and from your telephone. From the call logs you can
select calls and the phone automatically dials them. The VCX User
Interface provides a Call History log
or from your extension and the times of those calls.
To access and use the Call History:
1 Press the Call History button. Optionally, you can press Feature + 462.
The Call History menu appears in the Display Panel.
2 Select one of the follow options:
a For placed calls, press 1.
b For received calls, press 2.
c For missed calls, press 3.
d For unviewed missed calls, press 4.
e To clear the all call logs, press 5.
Use the Scroll buttons to navigate through the list. The Display Panel
always starts with the oldest call in the category you select. That is, the
oldest call appears first and the most recent call appears last.
of the most recent 100 calls made to
The Display Panel scrolls through the calls one at a time. After the last
call, this message appears in the Display Panel for placed and received
calls:
No more call history
This message appears for missed calls:
No more missed calls
The three Soft buttons below the Display Panel have the following
functions when viewing the Call History:
■ To select a call from the list and dial the call automatically, press the
Slct button.
■ To return to the previous menu, press the Back button.
■ To exit the Call History display, press the Exit button.
Page 69

Viewing the User Directory 69
Viewing the User Directory
You can view a list of users in your organization and their extensions in
the Display Panel. When you select a displayed user, your VCX phone
automatically dials the extension.
The Users Directory can be local or global.
■ Local users are typically located in the same office and share the same
call processor.
■ If your VCX system includes multiple sites (for example, regional and
branch offices), each with one or more VCX call processors, you can
display a global directory of all the users in your organization. Note
that this option must be configured by your administrator. By default,
you can view the local user directory.
The global directory is also available through the VCX User Interface
(see Chapter 8
To view the User Directory, use one of the following access options:
■ If you have a Business Telephone (either Model 2102 or 3102), press
the Directory button.
■ Press Feature + 461 and select User Directory from the Main menu.
The Display Panel lists two options for the User Directory:
■ Press 1 to display the Local Directory.
).
■ Press 2 to display the Global Directory. If the Global Directory in not
enabled on your system, the Display Panel shows
The Display Panel shows the first user in the directory. Use the Scroll
buttons to locate a particular user. The three Soft buttons below the
Display Panel have the following functions when viewing the User
Directory:
■ Use the Slct button to select a user and dial that user’s extension.
■ Use the Back button to display sort order options.
■ Press the Slct button to sort by first name.
■ Press the Back button to sort by last name.
■ Press the Exit button to sort by extension.
■ Use the Exit button to return to the default Display Panel.
No listing found.
Page 70

70 CHAPTER 7: STANDARD FEATURES
Controlling Caller ID
This section describes how to enable and use Caller ID privacy features.
By default, the VCX system shows your Caller ID (your name and
extension) on the Display Panel of the telephone receiving your call if that
telephone supports Caller ID. You can control whether the VCX system
sends your Caller ID when you make a call. You can choose one of the
following settings:
■ Select one of the following settings for all your calls:
■ Send Caller ID information (Anonymous Now is disabled).
■ Block Caller ID information (Anonymous Now is enabled).
■ Block Caller ID information for your next call. This setting only applies
when the setting for all calls is set to Send Caller ID information. You
must enter the destination number to call.You can control these
settings by entering the appropriate feature code.
Anonymous Now— When enabled, the system blocks your Caller ID to
all dialed numbers and Anonymous displays on the destination phone.
Anonymous Next — When enabled, the system restricts Called ID
information from displaying only on the next call that you make. This
setting only applies when Anonymous Now is disabled, or the setting for
all calls is set to Send Caller ID information.
If you disable Caller ID, the system sends your Caller ID to all dialed
numbers.
To toggle the current default setting, press Feature + 889. If Caller ID is
enabled, entering this command disables it for all subsequent calls. If
Caller ID is disabled, entering this command enables it for all subsequent
calls.
If transmission of Caller ID information is enabled and you want to block
your Caller ID for the next call only:
1 Pick up the handset.
2 Press Feature + 890.
3 Dial the number. Your ID is not delivered to the caller.
Page 71

Setting up a Conference Call 71
Setting up a Conference Call
Setting up an
Unannounced
Conference
The conference feature enables you to have up to six parties, including
the conference originator, on one conference with the capability to
extend a conference through cascading. Conferences can be multi-site
capable where any endpoint in a conference can be located anywhere
within the VCX system. When you set up a conference call, you cannot:
■ Conference a page group number
■ Be monitored or barged in.
If your telephone is part of a bridged extension, see Call Transfer, Call
Conferencing, and Bridged Line Calls for additional information.
The following sections describe how to set up an unannounced
conference call and an announced conference call. In either type of
conference call, if one of the participants hangs up, the other two
participants remain connected. The following sections also describe how
the conference can drop the last member to join the conference and how
to drop the entire conference.
In an unannounced conference, you conference in the person without
notifying that person:
1 While on a call, press Conference or Feature + 430. The system places
your caller on hold.
Setting up an
Announced
Conference
2 Dial the number of the person you want to conference in.
3 Press Conference or Feature + 430 again. The three-way conference
begins when the recipient answers the call.
In an announced conference, you call the recipient and announce that
you want to conference them into a call. The recipient can then decide
whether to take the call:
1 While on a call, press Conference or Feature + 430. The system places
your caller on hold.
2 Dial the extension of the person you want to conference in, then press
the OK Access button (or press Feature + 120).
3 When the called party answers, announce the conference.
■ If the recipient wants to take the call, press Conference or
Feature + 430. Now three people are on the same call.
Page 72

72 CHAPTER 7: STANDARD FEATURES
■ If the recipient does not want to take the call, hang up the second call
and go back to the first call by pressing the Hold button for that call.
Adding a Recipient to
an Existing
Conference
Creating a Cascaded
Conference
While participating in a conference of three to five people, any recipient
in the conference can add a new recipient. While a new recipient is being
added, the existing recipients in the conference, including the originator,
are still able to communicate, but there is no ring back tone associated
with the new recipient. If a party other than the originator adds a new
recipient, then a cascaded conference is formed. The process to add a
recipient is identical to Setting up an Unannounced Conference
up an Announced Conference.
Once you establish a conference, anyone in the conference, excluding the
originator, can create a cascaded conference by initiating a conference
call to another party or parties. Those parties in turn can initiate another
cascaded conference. For example, phone P1 (originator) calls phones P2,
P3, P4, P5 and P6 to establish a 6-party conference (called C1). Phone P3
then calls phones P7 and P8. Phone P3 creates a cascaded conference
and is the originator of a 3-party conference (called C2). Conference C2 is
now cascaded with C1. Phone P8 then calls P9 to create conference C3
and is cascaded with C2. Cascading can continue until the maximum
number of ports on the conference server has been reached.
0ISTHEORIGINATOROF#
0ISTHEORIGINATOROF#
#
or Setting
Dropping Conference
Recipients
Once a conference has been established, the conference originator can
either drop the last party added to the conference or drop the entire
conference that the originator initiated. In the example above, if P1 the
originator of conference 1 drops All, only P1, P2, P4, P5 and P6 are
dropped. P3 is not dropped because it is the originator of conference 2
and remains connected to conference 2.
#
0ISTHEORIGINATOROF#
#
Page 73

Camping on a Busy Extension 73
To drop conference recipients, follow these steps:
1 While on a conference, the conference originator presses the Drop soft
(right) button. The Conference Drop window displays in the Display
Panel.
2 Scroll to the drop action you want to take, either (1) Last or (2) All, and
press the appropriate number on the keypad. The party (Last) or the
conference (All) is dropped.
Alternately, you can drop recipients from a conference using the
following feature codes:
■ To drop the last party in a conference, enter Feature + 431.
■ To drop all parties in a conference, enter Feature + 435.
If the originator drops the last party in a 3-party conference, the call then
becomes a 2-party non-conference call.
Camping on a Busy Extension
The Camp On feature allows you a call to a busy or an unanswered
internal telephone, and then be automatically called back when the
destination phone becomes available. When you activate camp on, the
system monitors the called telephone. When the extension can receive a
call, the system automatically dials your phone (using a priority ring or
other audible ring tone that is different than your programmed ring tone)
and redials the original called extension.
You can camp on system extensions. You cannot camp on external phone
numbers, hunt groups, pickup groups, or paging groups. If the called
extension does not become free within a time period specified by your
administrator, Camp On expires.
To camp on an extension you call:
1 When you make a call and hear a busy tone, press Feature + 469. The
system camps on the phone you are calling. You can hang up.
2 When the called extension becomes available, the system calls your
phone. When you answer your phone, the called extension begins to
ring.
Page 74

74 CHAPTER 7: STANDARD FEATURES
To camp on an extension when you transfer a call:
1 When you are transferring a call and hear a busy tone, press Feature
+ 469. The system camps on the phone you are calling. Explain to the
person whose call you are transferring that the call will call back. When
you hang up, the person whose call you are transferring is put on hold.
2 When the called extension becomes available, the system calls the
destination extension.
If Camp On expires before the destination becomes available, the system
calls you back and connects you to the person whose call you were
transferring.
Transferring Your Phone Settings to Another Phone
This feature enables you to use any 3Com phone attached to any VCX
system (call processor) in the Enterprise with all your phone’s settings.
It is possible for an administrator to lock an extension to a particular
phone. If this is the case, you cannot program the phone to use your
extension.
To transfer your phone’s settings to another phone:
1 Log out of your own phone by pressing Program + 5 + 6.
If your administrator has enabled the Multiple Contacts feature for your
extension, you do not have to log out of one phone before logging into
another.
2 From the phone that you want to use as yours, enter your phone number
and password:
a Press Program + 5 + 4,enter your phone number, and then press #.
b Press Program + 5 + 5, enter your password, and then press #.
3 When you are finished using the other phone, log out of the phone by
pressing Program + 5 + 6.
4 Log back into your own phone by pressing Program + 5 + 6.
Forwarding Calls to Voice Mail
You can forward incoming calls to your voice mailbox by using the Fwd
Mail button. Alternatively, you forward calls to your mailbox by using a
feature code.
Page 75

Transferring a Call to Another User’s Voice Mail 75
When you forward incoming calls to your voice mailbox:
■ An incoming call rings once on your phone and is then sent to your
voice mailbox. If you are logged in to multiple phones, each using the
same phone number, and one of the phones enables forward to voice
mail, the feature applies to all phones—an incoming call rings once on
all of the phones and is then sent to your voice mailbox.
■ If you enable forward to voice mail while one or more calls are ringing,
whether you are on-hook or off-hook, the pending calls are sent to
your voice mailbox and forward to voice mail is enabled for all
subsequent calls.
■ If you are a Hunt Group member, personal (non-Hunt Group) calls go
to your voice mailbox. However, Hunt Group calls always ring on a
member’s phone, regardless of your personal phone setting.
To forward incoming calls to your voice mailbox for a Business Telephone
(either Model 2102 or 3102):
■ Press Fwd Mail. The red light next to the button comes on. All future
calls are sent to your voice mailbox.
Transferring a Call to Another User’s Voice Mail
■ If forward to voice mail is not enabled, you can send a call that is
ringing (and all subsequent calls) to your voice mailbox by pressing
Fwd Mail.
■ To disable this feature, press Fwd Mail again. The light goes out and
calls ring normally.
To forward incoming calls to your voice mailbox for any VCX phone
(including the Basic phones, which do not have a FWD Mail button):
■ Press Feature + 440. All future calls transfer automatically to your
voice mailbox.
■ If you have not enabled this feature code, you can send a call that is
ringing (and all subsequent calls) to your voice mailbox by pressing
Feature + 440.
■ To disable this feature, press Feature + 440. All calls ring normally.
You can transfer a connected call directly to another subscriber’s voice
mail rather than that subscriber’s phone extension. The subscriber can be
located locally or at a remote site.
Page 76

76 CHAPTER 7: STANDARD FEATURES
To transfer a call to another subscriber’s voice mail:
1 While on a call, press Feature + 441.
The Display Panel shows the following prompt:
Transfer VMail Number:
2 Enter the extension of the subscriber whose mailbox will receive the call.
The caller hears the mailbox greeting of the target subscriber but the
subscriber’s phone does not ring.
Alternatively, you can use the following procedure:
1 While on a call, press Transfer.
2 Enter the transfer to another subscriber’s voice mail feature code in the
following format:
*441*<extension>
<extension>, you can either enter the phone extension of the
For
recipient, press a speed dial button mapped to that extension, or press a
bridge line button (Basic phones do not support bridging) mapped to that
extension.
3 Press the Transfer button again, then hang up.
For example, extension 1001 calls extension 1000. Extension 1000 wants
to transfer the call to the voice mailbox of extension 1002. In this case,
extension 1000 performs the following steps:
Presses Transfer.
*441*1002.
Enters
Presses Transfer.
Hangs up.
Extension 1001 now hears the voice mailbox greeting for extension 1002
but extension 1002 does ring.
Call Waiting The Call Waiting feature in the VCX User Interface allows you to select a
ring tone, or to hear a beep sound in the handset/headset, or to disable
Page 77

Speed Dialing 77
the ringer (but flash the MWI) on your current call to let you know that
another call has arrived on another access line.
1 When you hear a ring tone or see the MWI flashing, press the Hold
button to put the current call on hold.
2 Press the Access button for the incoming call.
3 To toggle between the two calls, put the current call on hold and then
press the Access button for the call you want.
Speed Dialing This section describes the following types of speed dialing:
■ One-Touch Speed Dials — With this type of speed dialing, a
telephone number (internal or external) is mapped to a dedicated
Access button on your phone. Pressing the button dials the call.
■ Personal Speed Dials — With this type of speed dialing, you map a
number (internal or external) to a feature code value using the VCX
User Interface. To use a personal speed dial, you press the Feature
button and enter the appropriate feature code.
Feature code 601 plus 1 through 9 inclusive, are available, which
allows you to use up to 9 personal speed dials. Personal speed dials
allow speed dialing on phones that do not have Access buttons.
Personal speed dials are available on all VCX telephone models.
■ System Speed Dials — With this type of speed dialing, your
administrator maps commonly used numbers (internal or external) to
feature code values. To use a system speed dial, you press the Feature
button and enter the appropriate feature code and the speed dial
number.
The administrator creates system speed dial numbers. System speed
dials can be dialed on all VCX telephone models.
Note that, a configured one-touch speed dial is also mapped to a feature
code (the speed dial number mapped to the first speed dial Access button
is also mapped to feature code 601, the speed dial number mapped to
the second speed dial Access button is also mapped to feature code 601,
and so on). This means that on a phone with four configured speed dial
numbers, you can dial a speed dial number by either pressing an Access
button or entering feature code 601 + an index number 1 through 9.
This section describes how to set up speed dialing through the Telephone
User Interface. You can also enable speed dialing through the VCX User
Page 78

78 CHAPTER 7: STANDARD FEATURES
Interface. See Chapter 8 for information on accessing the VCX User
Interface; see the online Help for information on creating speed dials.
Note that the two interfaces are synchronized. A speed dial created or
modified in one interface appears in the other interface. A speed dial
deleted in one interface is deleted in the other interface.
Configuring Personal
Speed Dial Numbers
You set up speed dialing through the Telephone User Interface using the
Program button. Refer to the chapter that describes the buttons and
controls on your phone for the location of the available speed dial Access
buttons.
To configure a speed dial number using the Program button and the
Speed Dial menu:
1 Press the Program button.
The Main menu appears.
2 Press [3] to access the Speed Dial menu.
The Display Panel lists the first speed dial:
Speed dial 1:
If the speed dial is already configured, the Display Panels show the
configured number, for example:
Speed dial 1:
1001
To locate the speed dial number you want to configure, press the
speed dial number (1 through 9) or use the up and down scroll
buttons
If you assign a number to a speed dial that does not have a
corresponding Access button, you can speed dial the number only by
entering the appropriate feature code.
3 Press the # button, then enter the number you want to associate with this
speed dial. Include all prefix numbers that you would normally dial, such
as a 9 or 8 or 1 to access an outside line, and, if necessary, the country
code or area code.
4 To store the number, press the # button.
Page 79

Speed Dialing 79
Make sure you write the name of the person whose number you have
stored and the corresponding Speed Dial Access button or feature
code.
Alternately, you can configure personal speed dial numbers by following
these steps:
1 Press the SA line button.
2 Enter *601* + <speed dial index number 1 - 9> + * + <extension>.
3 Press the # button to store the number.
Example: SA button + *601*2*12345 + #
Editing Personal
Speed Dial Numbers
Dialing Personal
Speed Dial Numbers
You can change or delete any personal speed dial number that you
previously configured using the Telephone User Interface.
To change or delete a previously configured speed dial number:
1 Press the Program button. The Main menu appears.
2 Press [3] to access the Speed Dial menu.
The Display Panel shows the configured number, for example:
Speed dial 1:
1001
To locate the speed dial number you want to change or delete, press
the speed dial number (1 through 9) or use the up and down scroll
buttons
3 To change or delete an existing speed dial number, press the # key and
then use the second soft button to delete each digit.
4 To store the number, press the # button.
The method you use to dial a configured speed dial number depends on
your phone and whether or not the number is mapped to a speed dial
Access button.
To dial a number configured as a speed dial on a VCX phone with one or
more speed dial Access buttons, press the appropriate button. If the
number is not associated with a button, use the next procedure.
Page 80

80 CHAPTER 7: STANDARD FEATURES
To dial a configured speed dial number on any VCX phone:
1 Pick up the handset. Or press the Speaker button.
2 Press Feature.
3 Enter the feature code associated with the number you want to dial.
For example, if the number you want to speed dial is mapped to
dial 2
Alternatively, you can skip pressing the Feature button and enter:
You can also use the following method to dial a speed dial number on
any VCX phone:
1 Press the Program button.
The Display Panel lists the first speed dial, for example:
2 Press the first soft button under the Display Panel.
To exit the speed dial list in the Display Panel, press the third soft button.
, enter the following through the Telephone User Interface:
Feature + 601 + 2
*601*2
Note that, with this syntax, you cannot enter *602.
Speed dial 1:
1001
Use the up and down scroll buttons to locate the speed dial number
you want to dial.
Your phone dials the number.
Speed
Dialing System Speed
Dial Numbers
In addition to using the Program menu to list personal speed dial
numbers, you can view the personal speed dial numbers configured on
your phone by pressing the Top Right Button next to the Display Panel
or by entering Feature + 463.
The administrator can set up system-wide speed dials for numbers that
are dialed frequently by many internal users. You can view the
system-wide speed dial list through the VCX User Interface (see
Chapter 8
using the telephone display panel.
for information) or you can view and dial numbers from it
Page 81

Call Forwarding 81
To use a system speed dial number:
1 Pick up the handset or press the Speaker button.
2 Press the Feature button plus 700 plus the system-wide speed dial
number for the number that you want to call. Alternatively, you can scroll
to System Speed Dials on the Display Panel, press Slct, scroll to the
number that you want to dial, and press Slct again.
If you dial a speed dial code that has no number assigned to it, the display
panel on your telephone shows the message “Empty speed dial.”
In addition to using the Program menu to list system speed dial numbers,
you can view the system speed dial numbers configured on your phone
by pressing the Middle Right Button next to the Display Panel or by
entering Feature + 464.
Call Forwarding This section describes how to enable and use call forwarding features set
up through the Telephone User Interface (TUI). You can also configure
and enable call forwarding through the VCX User Interface. See Enabling
Call Forwarding.
You can use the TUI on your phone to specify:
■ Where you want your call to be forwarded
■ The condition that results in the system forwarding a call:
■ Ring No Answer — Redirects incoming calls to another
destination when your phone rings for a configured time period
(the default is 20 seconds). You can forward all unanswered calls
by enabling Call Forward Ring No Answer (feature code 466)
and entering the number to which you want the calls forwarded.
■ Busy Line —Redirects incoming calls to another destination when
your phone is busy. If you have multiple lines, busy means that all
lines are in use. You can forward all calls that come in when your
lines are busy by enabling Call Forward Busy (feature code 467)
and entering the number to which you want the calls forwarded.
■ All Calls — Redirects incoming calls to another destination
unconditionally. Use this feature, also called Forward Universal,
when you plan to be away from your phone for an extended
period of time. You can forward all unanswered calls by enabling
Call Forward All (feature code 465) and entering the number to
which you want the calls forwarded.
Page 82

82 CHAPTER 7: STANDARD FEATURES
If your telephone is part of a bridged extension, see Call Forward,
Forward to Voice Mail, and Bridged Line Calls for additional information.
You can also use the VCX User Interface to configure Call Forward, Fall
Back to Coverage. When you enable this feature, a forwarded call that is
not answered at the forwarding destination falls back to your extension's
coverage (either voicemail or Auto Attendant). See Enabling Call
Forwarding.
Call Forward Ring No
Answer
Call Forward Busy
Line
Call Forward
Universal
To forward your calls to another extension when your extension is not
answered:
1 Press Feature + 466.
2 Use the keypad to enter the phone number to which you want to
forward your calls.
To d is a bl e Call Forward Ring No Answer, repeat step 1.
To forward your calls to another extension when all your lines are busy:
1 Press Feature + 467.
2 Use the keypad to enter the phone number to which you want to
forward your calls.
To d is a bl e Call Forward Busy Line, repeat step 1.
To forward all your calls to another extension:
1 Press Feature + 465 (all phones).
2 Use the keypad to enter the phone number to which you want to
forward your calls.
To d is a bl e Call Forward All, repeat step 1.
Call Park Use the Call Park feature to place a call in a holding pattern and make it
available for you or for another user to pick up from any telephone on
the system by dialing the Call Park extension.
Page 83

Call Park 83
The Call Park feature is useful when the recipient is elsewhere in the
building or you want to continue a call on another telephone and
transferring the call does not give you enough time to retrieve it.
When you park a call, you assign it a Call Park extension, which you (or
another user) use to retrieve it. The default Call Park extension numbers
are 800 through 899 inclusive. Ask your administrator to verify the Call
Park extensions for your location. If the specified Call Park extension is in
use or if no extension is specified, VCX selects the next available Call Park
extension.
A call remains parked for 5 minutes. This default value can be adjusted by
your administrator. If the call is not answered 5 minutes after it is parked,
the user who parked the call is called back. If the user is not available, the
parked call is forwarded to the user’s call coverage point.
If your telephone is part of a bridged extension, see Call Park and Bridged
Line Calls for additional information.
To park a call:
1 While you are on a call, press the Call Park button or press
Feature + 444. The Display Panel shows a default Call Park extension.
2 Press the Call Park button (or press Feature + 120) to park the call using
the default extension, or use the telephone keypad to enter a Call Park
extension from the list of extensions at your location. Notify another user
about the parked call.
a Select an Access button for outgoing calls and dial the user’s
extension.
b When the call is answered, tell the user the Call Park extension
number, for example 818.
c Hang up.
The user dials the Call Park number and the system connects the call
automatically.
3 To retrieve a parked call yourself:
a Pick up the handset of any telephone on the system.
b Dial the Call Park extension that was assigned to the call.
The system connects you to the parked call.
Page 84

84 CHAPTER 7: STANDARD FEATURES
Paging Paging lets you activate the speakers and broadcast a message to all of
the available phones in a paging group. Your administrator defines the
members of a paging group and an extension to dial to page that group.
A phone in a group is available to receive pages if it has a speaker, unless:
■ the phone is not logged in
■ the phone has a call ringing, connected, or on hold
■ the phone has Do Not Disturb, Call Forwarding, or Forward to
Voicemail enabled.
Note that you do not need to be a member of a page group to send a
page to that group; you just need to know the extension for that group.
A page is subject to the following restrictions:
■ You cannot park, transfer, hold, conference, or pick up a page.
■ You cannot camp on a page group extension.
■ A page cannot be bridged (see Enabling Bridged Extensions for
information about bridging).
If you are sending or receiving a page, you can drop the page by using
the speaker button to disconnect the page, by picking up and replacing
the receiver, or by pressing the Release button.
Paging a Group You can view the page groups, the group extensions, and the members
of those groups by accessing the VCX User Interface (see Accessing the
VCX User Interface).
To page a group:
1 Pick up the handset.
2 Dial the appropriate page group extension.
When you dial the page group extension, speakers are activated on the
telephones that are members of the group.
3 Speak the message you want to broadcast into the handset.
4 Hang up when you are finished.
Page 85

Call Pickup 85
Call Pickup Use the Call Pickup feature to answer a call that is ringing on another
telephone.
There are two types of call pickup:
■ Directed Call Pickup — Allows you to answer a call ringing on the
phone of a specific user. Both you and the other user must be
members of the same Directed Call Pickup group. Each Directed Call
Pickup group is assigned a security code by the administrator. You
must enter this security code when using Directed Call Pickup to
answer a call.
■ Group Call Pickup — Allows you to answer a call ringing on the
phone of any user who is a member of a configured Group Call Pickup
group. A Group Call Pickup group is a collection of phones that allow
each member of the group to answer another member's calls. Your
administrator can also configure a Group Call Pickup group that
allows non-group members to answer a call ringing on a phone in the
group.
If your telephone is part of a bridged extension, see Call Pickup and
Bridged Line Calls for additional information.
Directed Call Pickup To answer a call that is ringing on a specific user’s telephone:
1 Pick up your handset.
2 Press Feature + 455.
The Display Panel prompts you to enter your group security code.
3 Enter the your group security code.
The Display Panel prompts you to enter the extension of the ringing
phone.
4 Enter the extension number.
Alternatively for steps 2, 3, and 4, you can enter feature code (455),
group security code, and the extension of the ringing phone in the
following format:
*455*<group code>*<extension>
The call is directed to your telephone.
Page 86

86 CHAPTER 7: STANDARD FEATURES
Using One-Touch Pickup:
1 Pick up the handset.
2 Press the Access button that you have assigned to Directed Pickup.
3 Dial the extension number of the ringing telephone.
Group Call Pickup To answer a call that is ringing on a group member’s telephone:
1 Pick up your handset.
2 Dial the Group Call Pickup extension.
The call is directed to your telephone.
Call Pickup
Interaction With
Other Features
This section describes how call pickup interacts with other VCX phone
features. Note the following considerations:
■ Call Forwarding — If both the phone forwarding a call and the
phone receiving the forwarded call belong to the same call pickup
group, then any member of the group may answer the call.
■ Camp On — A call pickup group member or a directed call pickup
user cannot answer a camp on callback call.
■ Conference Calls — A conference call cannot be picked up at
another extension. A conference originator can, however, pick up a
call and add it to the conference call.
■ Display Panel — When you pick up a call, the telephone Display
Panel shows a confirmation message, for example,
PickUp Marie x3434.
■ Hunt Groups — A call pickup group member can also be a member
of a hunt group. Call pickup group members can use either directed
call pickup or group call pick up to answer a call that is ringing at
another group member's telephone.
■ Speed Dials — You or your administrator can assign the following to
a speed dial button:
■ The feature code for directed call pickup (455).
■ Only the feature code for directed call pickup (455).
Silent Monitor and Barge In
The VCX system supports Silent Monitor and Barge In. These two features
are typically used in call centers to allow supervisors to listen to (monitor)
and optionally join (barge in) a conversation between an agent and a
Page 87

Silent Monitor and Barge In 87
customer to ensure proper customer support. Unless the supervisor
barges in, neither the agent or the customer are aware that the
supervisor is monitoring the call.
To invoke Silent Monitor, the supervisor enters a feature code followed by
the extension to be monitored (see Monitoring a Call
this case, is defined as a user who is allowed to invoke the Silent Monitor
feature for that particular extension. Permission to monitor one or more
extensions is configured through the VCX Administrator Interface (see
the VCX Administration Guide). The supervisor must use a phone with a
Display Panel (not a 3Com Model 3100 Entry Telephone). If a supervisor
attempts to monitor an extension without permission, the supervisor
hears an error tone and the LCD shows
and the monitored agent can be located at different sites.
If a supervisor attempts to monitor an agent’s extension, the supervisor
phone LCD will display the error message
■ The agent is not logged in.
■ The agent is not on a call.
Unauthorized. The supervisor
no calls to supervise if:
). The supervisor, in
■ The agent is currently monitored by another supervisor.
While in Silent Monitor mode, the supervisor can join the conversation by
entering the feature code for Barge In. After barging in, the supervisor
can return to Silent Monitor mode by reentering the Silent Monitor
feature code. See Barging In
A user can ensure a private call by blocking Silent Monitor and Barge In.
To make a private call, the user enters a feature code before dialing the
call.
Note the following Silent Monitor and Barge In feature conditions and
restrictions:
■ Multiple supervisors cannot monitor the same extension at the same
time.
■ If an agent parks a monitored call, initiates a conference, or transfers
the call, the supervisor will be disconnected from the session.
■ If a supervisor attempts to park, conference, or transfer a monitored
call, the action will be ignored and the Display Panel shows
supported operation
.
Not
.
Page 88

88 CHAPTER 7: STANDARD FEATURES
■ If a customer or agent terminates a monitored call by hanging up, the
supervisor will be disconnected from the session.
■ Supervisors cannot monitor conference calls.
■ The agent, the customer, and the supervisor can place a monitored
call on hold. The results depend on who places the call on hold and
whether or not Music On Hold (MOH) is enabled.
■ If the VCX call processor fails during an established silent monitoring
or barge in session, the audio is not affected. However, none of the
parties in the call can invoke mid-call features.
■ The supervisor can monitor a Hunt Group call by selecting the
member's extension, not the Hunt Group's extension.
■ Bridge line connected calls can be monitored by selecting the
extension of the connected party (primary or secondary, depending on
who is connected).
Monitoring a Call Silent Monitor allows a supervisor to listen to calls that come in to an
agent’s extension. The supervisor must be granted explicit permission by
the VCX administrator to monitor one or more extensions. If you have
been granted monitoring privileges, your administrator will give you a list
of the extensions you can monitor.
To monitor a call on an agent’s extension by entering a feature code:
1 Pick up the handset.
2 Press Feature + 425.
3 Enter the extension of the agent you want to monitor and press #.
Alternatively you can combine steps 2 and 3 by using the following single
command after picking up the handset:
*425*<extension>
For <extension>, you can either enter the phone extension of the agent,
press a speed dial button mapped to that extension, or press a bridge line
button (Basic phones do not support bridging) mapped to that extension.
To terminate participation in a monitored call, hang up. This has no effect
on agent-customer communication (the agent-customer session remains
active).
If you want to join a monitored call, see the following section, Barging In
.
Page 89

Silent Monitor and Barge In 89
Barging In Barge In allows a supervisor to speak to the agent and customer during a
monitored call. While you are silently monitoring a call, your phone
shows
barge in to the call, the display changes to
You can use Soft button 3 (the button just below Barge In or SilentM to
toggle between silent monitor mode and barge in mode.
Alternatively, to barge in when you are monitoring a call, press Feature +
428. To return to silent monitor mode, press Feature + 425.
To terminate participation in a barged in call, hang up. This has no effect
on agent-customer communication (the agent-customer session remains
active).
Barge In in the lower right corner of the Display Panel. If you
SilentM.
Blocking Call
Monitoring
An agent can prevent a supervisor from monitoring an outgoing call. This
allows the agent to make private call. Monitor blocking can be enabled
for one call at a time. That is, an agent cannot enable the monitor
blocking feature for all subsequent calls. Furthermore, this feature works
for outgoing calls only; the agent cannot block monitoring for an
incoming call.
Note the following blocking considerations for call monitoring
■ Blocking can be invoked before dialing a call or during a call.
■ The monitor blocking feature can be mapped to a button.
■ After invoking monitor blocking for a call, monitoring is blocked for
the duration of that call. If the call is disconnected (during transfer or a
call park, for example), blocking is disabled and the call can be
monitored. If the call is reconnected (for a park timeout, for example),
blocking is disabled and the call can be monitored.
■ Blocking is effective only for calls that can be monitored. For example,
invoking monitor blocking for a conference call has no effect on the
call because conference calls cannot be monitored.
To block call monitoring on an agent extension to make a private call:
1 Pick up the handset.
2 Press Feature + 429.
The Display Panel shows the following prompt:
Page 90

90 CHAPTER 7: STANDARD FEATURES
Enter the phone number:
Press # to complete!
3 Enter the extension of the private call and press #.
Alternatively you can combine steps 2 and 3 by using the following single
command after picking up the handset:
*429*<extension>
For <extension>, you can either enter the private phone extension or
press a speed dial button mapped to that extension.
Remote Call Forward
The Remote Call Forward feature allows you to configure the forwarding
options of a phone from another phone in the network. This is useful if,
for example, a person A is on vacation and all of person A’s calls must be
forwarded to person B. This feature enables person B to configure Call
Forward Universal on the source phone (person A). Note that person A
can be at one site and person B can be at a different site.
The VCX administrator must authorize use of the Remote Call Forward
feature. For example, if the administrator authorizes you to change
person A’s forwarding options, you can enter a feature code (468) and
redirect person A’s calls to any other extension, including your own.
When successfully configured, the remote (destination) phone’s LED (if
available) will flash for all forwarded calls, and the LCD will also display a
call forward message.
To remotely enable a phone to forward calls to another extension:
1 Pick up the handset.
2 Press Feature + 468.
The Display Panel prompts you to enter the remote phone number.
3 Enter the extension of the phone whose calls you want to forward and
press #.
The Display Panel prompts you to enter the extension of the phone that
will receive the forwarded calls.
4 Enter the extension of the phone that will receive forwarded calls and
press #.
Alternatively, you can combine steps 2, 3, and 4 by entering the following
command:
Page 91

Hunt Groups 91
*468*<source extension>*<destination extension>
Remote call forwarding can be disabled either on the phone that set up
remote call forwarding or on the extension whose calls you no longer
want to remotely forward.
For example, extension 1001 has used feature code 468 to specify that all
of extension 1000’s calls be forwarded to extension 1002. You can
disable remote call forwarding on extension 1000 or 1001:
■ On extension 1001:
a Press Feature + 468.
b Enter the extension whose calls you no longer want to remotely
forward (in this case, 1000) and press #.
The Display Panel shows the extension of the phone receiving the
forwarded calls (in this case, 1002).
c Delete the extension number by pressing Soft button 3, followed by
Soft button 2, then press #.
■ On extension 1000, press Feature + 465.
Hunt Groups Your administrator can establish formal and informal call centers so that
incoming calls can be directed to several telephones that have been
associated into hunt groups.
A call center is a general term that refers to any system that accepts
incoming calls to a site, ensures that those calls are sent to the proper
destination within the site, and manages database records on call activity
and distribution. The call center can be used, for example, as a help desk,
a reservations counter, an information hotline, or a customer service
center.
Incoming calls that arrive at your company can go either to:
■ Your extension and the call coverage point you have set up (see
Configuring a Call Coverage Point
■ A hunt group that follows the call coverage path assigned by an
administrator for that group.
A hunt group is a group of VCX phone extensions that are configured
under a virtual extension. An incoming call to the virtual extension rings
).
Page 92

92 CHAPTER 7: STANDARD FEATURES
on the phone of one hunt group member. If that member’s telephone is
in use, or if that member does not answer the call, the system “hunts”
for another member of the group until the call is answered or is
forwarded to the group call coverage point. For example, if there are no
available members of the hunt group, the call might be forwarded to a
group mailbox or to the receptionist. In addition, hunt group members
can be in a distributed environment across multiple sites in the Enterprise.
An administrator can configure a hunt group in which all members are
fax machines. Incoming faxes are routed to an available fax machine.
Depending on the type of hunt group configured, if no fax machine is
available, pending faxes may be queued until a machine becomes
available or they may be sent to the call coverage point.
The method used to hunt for an available hunt group member is
determined by an administrator-configured call coverage pattern for that
group. Pattern types include linear, circular, and calling groups. These
patterns are described in Hunt Group Types
If you dial a hunt group number using SA1, and then press the SA1
button while the call is ringing the hunt group number, the hunt group
call does not disconnect. To disconnect a call while dialing a hunt group,
press the hookswitch or hang up the phone.
.
If you are a member of a hunt group, your administrator should provide
the following information:
■ The type of hunt group to which you belong. The hunt group type
determines the ringing pattern followed by incoming calls. See Hunt
Group Types.
■ Your hunt group number. You need this number to log in to the hunt
group. You must be logged in to receive calls directed to the hunt
group. See Logging In to a Hunt Group
You can be a member of, and logged in to, multiple hunt groups,
which may be of different hunt group types.
As a hunt group member, you should also be aware of how hunt group
calls work with other VCX phone features, such as call conferencing. See
Hunt Group Interaction With Other Features
.
.
Page 93

Hunt Groups 93
Hunt Group Types The type of hunt group to which you belong determines how incoming
calls are allocated to group members. Your administrator can configure a
linear hunt group, a circular hunt group, and a calling group.
To illustrate the differences between hunt group types, assume the
administrator has configured four members for each type: A, B, C, and D.
Note that a member must be logged in to both the VCX system and the
hunt group to receive a call.
■ Linear Hunt Group — An incoming call always rings at the first
member phone of the group, then, if the call is not answered, at the
phone of the next member in the group list.
For example, if A, B, C, and D are all available, an incoming call will
always ring first at member A’s extension. If A does not answer, the
call is routed to member B’s extension, and so on until the last
member of the group is reached. If no member is available, the call is
routed to the call coverage point immediately. When the total timeout
value configured for the group is reached or the last hunt group
member fails to answer (whichever happens first), the call is routed to
the call coverage point (see the discussion of timeout values and call
coverage points later in this section).
■ Circular Hunt Group — An incoming call rings at the member phone
following the member to whom the last call was routed. If the call is
not answered, the call rings at the phone of the next member in the
group list.
For example, if A, B, C, and D are all available and member B received
that last call, the next call will ring at member C’s extension. If C does
not answer, the call is routed to member D’s extension, and so on until
the total timeout value for the group is reached (see the discussion of
timeout values later in this section).
■ Calling Group — An incoming call simultaneously rings on all
member phones that are logged in, even if a member is on another
call.
For example, if A, B, C, and D are all available, an incoming call will
ring simultaneously at all four extensions until the total timeout value
for the group is reached (see the discussion of timeout values later in
this section).
For each hunt group type, your administrator configures two timeout
values:
Page 94

94 CHAPTER 7: STANDARD FEATURES
■ Device Timeout — Specifies how long the VCX call processor rings at
one extension before moving to the next extension if there is no
answer.
■ Total Timeout — Specifies how long the VCX call processor attempts
to make a connection within the hunt group before directing the call
to the hunt group’s default call coverage point. The administrator can
configure the call coverage point to be:
■ A voice mailbox
■ Another hunt group
■ An individual extension
■ An Auto Attendant number
■ An external phone number
Ask your administrator for information on timeout values and your hunt
group’s default call coverage point.
Ta bl e 1 0
summarizes how the three hunt group types route incoming
calls.
Table 10 Hunt Group Behavior
Linear Hunt Group
Condition
No members Go to call coverage. Go to call coverage. Go to call coverage.
All members logged out Go to call coverage. Wait for a member to log
All members busy Go to call coverage. Wait for a member to
All members available Route call to first member
Total timeout reached Go to call coverage. Go to call coverage. Go to call coverage.
Result
in the list.
Hunt Group calls routed to a call coverage point always go to the point
configured for the Hunt Group, not to the point configured for (or by) the
Hunt Group member (that is, the member’s personal call coverage point).
If the member has Do Not Disturb enabled, personal (non-Hunt Group)
Circular Hunt Group
Result
in or until total timeout
reached.
become available or until
total timeout reached.
Route call to the member
following the member to
whom the last call was
routed.
Calling Group
Result
Go to call coverage.
Queue the call and wait
for an available member
or until total timeout
reached.
Ring all member phones.
Page 95

Hunt Groups 95
calls go to the call coverage point. However, Hunt Group calls always ring
on a member’s phone, regardless of the Do Not Disturb setting.
If your telephone is part of a bridged extension, see Hunt Groups and
Bridged Line Calls for additional information.
Logging In to a Hunt
Group
When your administrator gives you your hunt group membership
information, you can log in to your hunt group (or groups if you have
been assigned membership in multiple groups). You must be logged in to
a hunt group to receive calls for that group.
You must be logged in to your VCX system account before you can log in
to a hunt group. If you are not logged in to the VCX system, which
requires password authentication, you cannot log in to a hunt group. See
the overview section for your phone in this guide.
You log in to a hunt group by entering feature code followed by hunt
group number. If you are already logged in, entering the same feature
code and hunt group number logs you out. You can also log in to and log
out of a hunt group through the VCX User Interface (see Viewing Hunt
Group Membership and Status).
To log in to a hunt group using a feature code:
1 Press Feature + 971.
The Display Panel shows a prompt requesting a hunt group number.
2 Enter the hunt group number, then press #.
The Display Panel indicates that your hunt group login status has
changed.
Alternatively, you can combine steps 1 and 2 by entering the following
single command:
*971*<hunt group number>
Hunt Group
Interaction With
Other Features
You can display all the hunt groups you are currently logged in to by
pressing Feature + 972 (see Viewing Hunt Group Membership and
Status).
This section describes how participation in a hunt group interacts with
other VCX phone features. Note the following considerations:
■ A hunt group member that is logged into a hunt group then initiates a
malicious call trace on a call, is immediately logged off of all hunt
Page 96

96 CHAPTER 7: STANDARD FEATURES
groups that they belong to. All directly-dialed internal calls can still be
accepted by that member.
■ With a hunt group, the VCX User Interface Selective Ringing feature
allows you to change the default ring tone to one of 27 ring tones,
delay the ring for a specified number of seconds, or silence the ringer
and only allow the phone to flash.
■ A hunt group call can be added to a conference. The member
receiving the call can conference with another extension or with
another hunt group. Both announced and unannounced conferences
are supported (see Setting up a Conference Call
■ A hunt group call can be put on hold and taken off hold without
losing the caller.
■ If a hunt group member puts a call on hold, that member can
■ A hunt group caller on hold will hear hunt group Music On Hold.
■ A hunt group call can be parked and then picked up by any user on
the same site.
).
receive other calls.
■ If the VCX phone has Hands Free enabled, an incoming call to a hunt
group will not be picked up automatically.
■ A hunt group member’s personal phone settings (for example, Call
Forward, Call Coverage point, and Do Not Disturb) are not invoked on
Hunt Group calls.
■ An external call to a private user (someone not in the hunt group) can
be transferred to a hunt group.
■ Both attended and unattended call transfers are allowed for calls to a
hunt group or from a hunt group.
■ After reaching an Auto Attendant, a caller can enter a hunt group
extension and be transferred to a Hunt Group.
■ Internal and external callers that are forwarded to voice mail can leave
a message and navigate through the voice mail options.
■ If a hunt group call is routed to a voice mailbox or Auto Attendant call
coverage point but the routing fails (for example, because no ports are
available), the call is requeued for the hunt group.
■ Each time a call is put back in a hunt group queue, it is treated like a
new call.
Page 97

Hunt Groups 97
■ If you are a member of one or more hunt groups, the phone message
button acts as a MWI for the hunt group voice mailbox even if you are
not logged in to the hunt group. Pressing the message button displays
a menu which shows number of new messages in each mailbox,
including your personal mailbox. You can use the arrow navigation
keys to locate a voice mailbox. Press the message button to access the
selected mailbox.
Viewing Hunt Group
Membership and
Status
You can use the Telephone User Interface to view the hunt groups you
belong to and your current login status for each group.
To view hunt group information enter the following feature code:
Feature + 972
The Display Panel on the phone displays the hunt groups you belong to
and your current status.
Use the up and down scroll buttons to navigate through the hunt group
list. The first line displays the name and number of the hunt group. The
second line displays your current status.
■ Press soft button 1 below the Display Panel to change your current
login status.
■ Press soft button 2 or 3 below the Display Panel to exit from the hunt
group display.
When you change your login status, the Display Panel shows
Login Enabled
phone number, this message appears on all phone displays. While this
message appears in the Display Panel, press soft button 1 to display the
hunt group list (same effect as pressing Feature + 972) to display the
hunt group list.
HuntGroup
. If you are logged into multiple phones using the same
You can also use the VCX User Interface to view the hunt groups you
belong to and your current login status for each group.
If a hunt group member has a remote phone, that remote phone will not
appear in the VCX User Interface Hunt Group Membership list, but it does
appear in the administrator’s Hunt Group Membership list.
Page 98

98 CHAPTER 7: STANDARD FEATURES
Emergency Phone Number Dialing Service
VCX phones provide the capability to dial an emergency phone number
even when the phone is not logged in to a VCX system. The phone must
be properly configured, connected to an operational VCX system, and the
region must support this service. If the VCX system is not operational, an
emergency call can be routed (optionally) directly through a PSTN media
gateway. Contact your system administrator to determine the appropriate
emergency number for your region.
Page 99

8
USING THE VCX USER INTERFACE
This chapter describes how to access the VCX User Interface application.
It also provides a description of the options available to manage your user
account and VCX telephone from this web-based application. Features
that require configuration through the application and, subsequently, on
the telephone itself are described in more detail.
Your administrator determines whether the features in this chapter are
available for your telephone or for the entire system. Some of these
features may not be available to you.
This chapter includes the following topics:
■ Accessing the VCX User Interface
■ VCX User Interface Overview
■ Enabling Call Forwarding
■ Configuring a Call Coverage Point
■ Enabling Bridged Extensions
■ Logging Out
Page 100

100 CHAPTER 8: USING THE VCX USER INTERFACE
Accessing the VCX User Interface
You can use the VCX User Interface to access and manage advanced VCX
telephone features, change your web login password, and modify your
personal account information.
The VCX User Interface is a web-based application. Before you begin,
obtain the following information from your system administrator:
■ Web login username
■ Web login password
■ Web address (URL) for the VCX User Interface
Your browser must have cookies and Java script support enabled to start
a VCX User Interface provisioning session.
To log in to the VCX User Interface:
1 In your web browser’s address bar, enter the VCX User Interface web
address and press Enter.
2 On the 3Com VCX V7000 Networked Telephony Solution window,
click User Interface. The Login dialog box appears.
3 In the Username field, type your web login name.
4 In the Password field, type your web login password.
To clear the username and password fields, click Reset.
VCX User Interface Overview
5 Click Submit.
The VCX User Interface displays the Welcome window.
The Welcome window illustrates the general structure of the VCX User
Interface.
The left column displays six options:
■ Welcome
■ My Extensions
■ Calling Features
■ Call Coverage
■ Groups
■ Log Out
 Loading...