


2N - VoiceBlue Lite
User Manual
Version: 2.6
b
Dear customer,
let us congratulate you on having purchased the 2N – VoiceBlue
Lite system. This new product has been developed and produced in
order to provide the maximum utility value, quality and reliability
to the user. We hope you will be fully satisfied with our
2N – VoiceBlue Lite.
The manufacturer constantly improves the software
contained in the product (the so-called firmware).
The technology used therein helps you download the
latest firmware version to the 2N – VoiceBlue Lite
VoIP GSM gateway using a common PC anytime.
For the latest firmware version see www.2n.cz. For
necessary instructions refer to Section 7.2 hereof.
We recommend you to apply the latest version to
avoid problems that have already been eliminated.
Grey marked text of this User Guide specifies
functions of VoiceBlue Lite, which will be
supported in newer versions of firmware. You also
find the latest version of the User Manual at
www.2n.cz.
Check your delivery for completeness according to
the packing list and study this manual carefully
efore installing this product. The manufacturer
shall not be responsible for damage caused by any
use of this product in contradiction with the User
Manual. The warranty terms and conditions do not
apply to damage incurred as a result of gross
handling and/or undue storing of the product or
violation of the technical parameters included
herein.
This manual is very much detailed and includes
subsections that are irrelevant for the basic
installation purposes as well as subsections referring
to other VoIP GSM gateway models.

Packing List
Please check your 2N® - VoiceBlue Lite delivery for compliance
with the following packing list.
Item Pieces
2N - VoiceBlue Lite – check the model type according
to the order number, see the type label on the gatew ay
back side
Mains adapter according to t ype 1
Serial laplink cable 1
Ethernet cable (4-wire) 1
USB cable A – B 1
Antenna with a SMA connector 1
1
Wall mounting holder 1
Dowels 2
Screws 2
Warranty certificate 1
Compliance certificate 1
2N product CD 1


Contents
SECTION 1 – PRODUCT PRESENTATION..............................................3
1.1. Purpose.......................................................................................................4
1.2. How to Cut Telephone Costs.....................................................................4
1.3. Other Advantages and Applications..........................................................5
1.4. RF Radiation Safety Precautions...............................................................6
SECTION 2 – INSTALLATION......................................................................7
2.1. Get Started .................................................................................................8
2.2. Brief Installation Guide .............................................................................9
2.3. Proper Mounting......................................................................................11
2.4. PC or LAN Connection............................................................................12
2.5. Antenna Connection ................................................................................15
2.6. Gateway Power Supply............................................................................15
2.7. SIM Card Installation/Removal...............................................................16
2.8. PIN Entering Disable (Optional) .............................................................17
2.9. Status Indicators.......................................................................................17
Power Indicator...................................................................................18
GSM Indicators....................................................................................18
2.10. Lithium Battery Replacement..................................................................20
2.11. Fuse Replacement....................................................................................22
2.12. Antenna Splitter.......................................................................................22
SECTION 3 – 2N - VOICEBLUE LITE INSTALLATION .................24
3.1. Proper Installation Conditions.................................................................25
3.2. VoiceBlue Lite Installation......................................................................25
3.3. Potential GSM Network Problems ..........................................................26
SECTION 4 – VOICEBLUE LITE CONNECTION TO VOIP...........28
4.1. SIP and H.323 Network Interconnection.................................................29
4.2. Point-to-Point Configuration ...................................................................29
4.3. Point-to-Multipoint Configuration...........................................................31
SECTION 5 – IP VOICE TRANSMISSION..............................................32
5.1. Speech Coding Methods..........................................................................33
5.2. SIP Components ......................................................................................35
5.3. SIP Reports..............................................................................................35

CHAPTER 6 MOBILITY EXTENSION....................................................38
6.1. Advantages of function mobility extension.............................................39
6.2. Activation of service mobility extension.................................................39
6.3. Description of service mobility extension...............................................39
Function “Follow me” ........................................................................40
Function “SMS at no answer” ............................................................40
Function of forwarding call................................................................41
Function of quick forwarding of call..................................................42
6.4. Recording announcements for mobility extension..................................43
Recording of announcements using terminal and protocol Xmodem.44
6.5. Permitting service mobility extension.....................................................45
SECTION 7 – 2N VOICEBLUE LITE ROUTING RULES .................46
7.1. Functions Supported by 2N VoiceBlue Lite ...........................................47
7.2. Call Routing Rules ..................................................................................47
7.3. LCR table.................................................................................................47
7.4. Call Routing to GSM via VoiceBlue Lite...............................................48
7.5. Incoming calls from GSM to VoIP network ...........................................50
7.6. DISA Message.........................................................................................53
DISA Message Recording Using Terminal and GSM Phone.............53
Recording DISA using terminal and protocol Xmodem ....................54
SECTION 8 INTRODUCTION OF CONFIGURATION PROGRAM56
8.1. VoiceBlue Lite Configuration Program Installation ...............................57
8.2. VoiceBlue Lite Configuration Program Running....................................57
8.3. Configuration Program Basic menu........................................................60
File......................................................................................................60
Gateway control..................................................................................61
Settings ...............................................................................................61
Help.....................................................................................................63
8.4. Button Bar ...............................................................................................63
8.5. Topic List and Alphabetical Glossary.....................................................63
SECTION 9 CONFIGURATION..................................................................66
9.1. Establishing Communication with VoiceBlue Lite.................................67
Gateway selection...............................................................................67
Communication setting.......................................................................67
9.2. Firmware Identification and Upgrade .....................................................68
Firmware uploading............................................................................69
9.3. Gateway Licencing..................................................................................70
9.4. Gateway control Items.............................................................................71

Login account......................................................................................71
Date/Time............................................................................................71
Firmware / Licence .............................................................................72
Tracing ................................................................................................72
Terminal..............................................................................................73
LOG file..............................................................................................73
Record on calls....................................................................................74
Statistics..............................................................................................74
Voice message.....................................................................................75
GSM diagnostic...................................................................................76
Actual calls..........................................................................................77
9.5. Gateway configuration.............................................................................77
System parameters ..............................................................................78
SIP parameters ....................................................................................80
Basic GSM parameters........................................................................82
GSM groups assignment.....................................................................84
GSM outgoing groups.........................................................................84
GSM incoming groups........................................................................88
Network list.........................................................................................91
LCR table............................................................................................91
Autorouting Table...............................................................................94
Mobility extension ..............................................................................97
9.6. Reset.........................................................................................................99
SECTION 10– CONFIGURATION OF EXTERNAL CALLBACK100
10.1. Introduction to the External Routing Software......................................101
10.2. Installation and configuration of XAPI server.......................................101
10.3. Entering licenses to XAPI server...........................................................104
10.4. Registering of users ...............................................................................105
10.5. Installing and configuration of Callback Centre....................................106
SECTION 11– CONFIGURATION USING TERMINAL...................110
11.1. Serial Communication Setting...............................................................111
11.2. USB Communication Setting.................................................................111
11.3. TCP/IP Communication Setting ............................................................111
11.4. Terminal Communication......................................................................112
11.5. GSM Gateway Behaviour......................................................................112
11.6. List of Terminal AT Commands............................................................112
Basic AT commands.........................................................................112
Extended user commands..................................................................113
Ethernet parameters:..........................................................................114
3

Group parameters: ............................................................................114
Pseudotarif params: ..........................................................................115
Network params:...............................................................................116
Routing params:................................................................................116
Totals ................................................................................................116
Service AT commands:.....................................................................117
Special GSM commands:..................................................................117
Work with SMS................................................................................119
11.7. Records on Operation (LOG)................................................................120
11.8. Records on Calls (example)...................................................................121
11.9. Statistics – Description.......................................................................... 122
SECTION 12 – TECHNICAL PARAMETERS ......................................124

Figures
Fig. 1 – Bottom View...............................................................................................8
Fig. 2 – Top View....................................................................................................9
Fig. 3 – Gateway Holder Wall-Mounting..............................................................11
Fig. 4 – Gateway Hanging .....................................................................................11
Fig. 5 – Direct PC Connection Using USB............................................................13
Fig. 6 – Direct PC Connection Using RS232 ........................................................14
Fig. 7 – LAN Connection.......................................................................................14
Fig. 8 – RJ-45 Wiring for LAN Connection..........................................................14
Fig. 9 – Antenna Connection .................................................................................15
Fig. 10 – Supply Adapter Connection....................................................................16
Fig. 11 – SIM Card Inserting Procedure................................................................17
Fig. 12 – Signalling LEDs .....................................................................................18
Fig. 13 – Motherboard Diagram ............................................................................21
Fig. 14 – SIP – H.323 Network Interconnection....................................................29
Fig. 15 – Point-to-Point Configuration with SIP VoIP Telephone........................30
Fig. 16 – Point-to-Point Configuration with VoIP Gateway .................................30
Fig. 17 – Point-to-Multipoint Configuration..........................................................31
Fig. 18 – SIP Message Sending while Connection Establishing and Terminating37
Fig. 19 - Service mobility extension function “Follow me”.................................40
Fig. 20 - Service mobility extension function “SMS at no answer”......................41
Fig. 21 - Service mobility extension function forwarding call..............................42
Fig.22 - Service mobility extension function quick forwarding...........................43
Fig. 23 – Routing of Outgoing GSM Calls............................................................49
Fig. 24 – Incoming Call Processing Procedure......................................................52
Fig. 25 - Main window of configuration program.................................................57
Fig. 26 - Gateway list selection..............................................................................58
Fig. 27 - Adding of new entry to gateway list .......................................................58
Fig. 28 - gateway control menu .............................................................................61
Fig. 29 – Communication Setting Window ...........................................................62
Fig. 30 – GSM Configuration Program Button Bar...............................................63
Fig. 31 – Topic List (left) and Alphabetical Glossary (right)................................64
Fig. 32 – Communication Setting Window ...........................................................67
Fig. 33 – Firmware Window..................................................................................69
Fig. 34 – Login Account Window .........................................................................71
Fig. 35 – Date and Time Setting Window .............................................................71
Fig. 36 – Tracing Window.....................................................................................73

Fig. 37 – Window of Terminal Integrated in Configuration Program...................73
Fig. 38 - Log window ............................................................................................74
Fig. 39 - Statistics window ....................................................................................74
Fig. 40 – Voice Message Recording Guide...........................................................75
Fig. 41 – Diagnostics.............................................................................................76
Fig. 42 – Call Information Displaying Window....................................................77
Fig. 43 – System Parameters Window...................................................................78
Fig. 44 – Ethernet Parameter Configuring Window..............................................80
Fig. 45 – Basic GSM Parameter Setting Window.................................................82
Fig. 46 – Group Assigning Window......................................................................84
Fig. 47 – Outgoing Group Setting Window...........................................................84
Fig. 48 – Incoming Group Setting Window..........................................................88
Fig. 49 – GSM Calling Group Defining Window.................................................91
Fig. 50 – LCR table ...............................................................................................92
Fig. 51 – LCR table Completion............................................................................92
Fig. 52 – Callback function ...................................................................................95
Fig. 53 - Autorouting table ....................................................................................95
Fig. 54 – Add/edit autorouting numbers..............................................................96
Fig. 55 – Table mobility extension........................................................................97
Fig. 56 – Window of editing table of mobility extension......................................98
Fig. 57 – Scheme of external Routing system.....................................................101
Fig. 58 – Main XAPI server window ..................................................................102
Fig. 59 - Communication configuration ..............................................................102
Fig. 60 - SMS setup window ...............................................................................103
Fig. 61 - Status of GSM modules ........................................................................103
Fig. 62 - Entering the licence..............................................................................104
Fig. 63 - New user window .................................................................................105
Fig. 64 - New user account properties.................................................................106
Fig. 65 - Voice Callback centre settings..............................................................107
Fig. 66 - Communication LOG............................................................................107
Fig. 67 - New user ...............................................................................................108
Fig. 68 - User Groups ..........................................................................................108


SECTION 1 –
Product Presentation
2N - VoiceBlue Lite
1
Here is a survey of what you will find in this section:
Purpose •
How to Cut Telephone Costs
•
•
Other Advantages and Applications
RF Radiation Safety Precautions
•
3

1.1. Purpose
• The 2N - VoiceBlue Lite gateways help interconnect SIP based
• The voice mode, i.e. an outgoing or incoming call, is the basic
• In addition to voice transmission, the 2N - VoiceBlue Lite
• No extra equipment (an external GSM telephone, etc.) is
VoIP networks directly with GSM networks. They can also be
used for a direct connection with a VoIP telephone set.
function of the system. The gateway is equipped with all
functions necessary for such use and provides a very high
comfort in this mode.
gateways enable to send and receive SMS messages.
needed for normal operation. To set the basic parameters use
the configuration software included in the product CD. All
programmable parameters are default-preset in such a manner
that you can commence your telephone traffic the moment you
connect the Ethernet and supply cables, antenna and SIM card
and set the GSM and VoIP parameters.
1.2. How to Cut Telephone Costs
• Once you connect the 2N – VoiceBlue Lite gateway to your
VoIP PBX, you can make all outgoing calls to a mobile
network directly. Thus, you cut your PSTN - mobile network
call costs. All mobile telephone calls from your personnel in
the field are cheaper too.
• You are advised to use the most advantageous rate of your
GSM provider for your GSM gateway because all gateway
user call accounts are added up for billing purposes.
• You can bar selected numbers or groups of numbers in your
gateway. You shall pay nothing for the calls you have
barred.
• 2N - VoiceBlue Lite keeps detailed records on all calls. This
helps you find out easily why your bill is higher than it
should be.
• The Least Cost Router is flexible enough to help you set rules
for GSM calling at the lowest possible operation costs.
4

• The intelligent Callback function enables your personnel to
call at the cost of your GSM gateway SIM cards.
1.3. Other Advantages and Applications
• 2N - VoiceBlue Lite integrates the best of the GSM and VoIP
communication technologies.
• The GSM gateway keeps detailed statistics on incoming and
outgoing calls.
• With the Compact Flash memory you get an almost unlimited
depository for your call records.
• The Intelligent Routing of Incoming Calls function
accelerates the incoming call establishing and provides a higher
calling comfort.
• The DISA function with the option to record easily a welcome
note is available.
• You can use the conditioned or unconditioned call forwarding
function.
2N - VoiceBlue Lite
• You can disable the CLIP function on your GSM telephone set.
• Unlike mobile telephones, this system does not expose you to
the RF electromagnetic field while making calls.
• All functions may be configured through the Ethernet, USB
and serial interfaces.
• With the aid of external software, you can implement your
VoiceBlue Lite gateway into the Unified Messaging system of
your company.
5

b
1.4. RF Radiation Safety Precautions
It is prohibited to use any transmitters, including
VoiceBlue Lite, in areas where explosives are used,
such as quarries.
It is forbidden to use mobile phones and thus
VoiceBlue Lite too at refuelling points.
A GSM gateway may affect sensitive life-saving
devices in medical centres. So it is prohibited to use
mobile phones and thus VoiceBlue Lite here.
In general, any restriction regarding mobile phones
ased on RF energy radiation applies to GSM
gateways.
Where necessary, VoiceBlue Lite may be installed
at a safe distance (in the neighbouring building, e.g.)
and an Ethernet cable may be carried from the GSM
gateway to the original building.
Although GSM gateways are not intended for
aircraft or cars, all relevant restrictions and
regulations regarding mobile phones apply to them
here.
6

SECTION 2 –
Installation
2N - VoiceBlue Lite
2
This section deals mainly with the proper mounting of the 2N VoiceBlue Lite and its connectors. One subsection is devoted to
the lithium battery replacement.
Here is a survey of what you will can in this section:
Get Started •
Brief Installation Guide
•
•
Proper Mounting
PC or LAN Connection •
Antenna Connection •
Gateway Power Supply •
SIM Card Installation/Removal •
PIN Entering Disable (Optional) •
Status Indicators •
7
Lithium Battery Replacement •
Fuse Replacement •
Antenna Splitter •
2.1. Get Started
Before you start installing your VoiceBlue Lite gateway, get
familiar with its physical structure, arrangement of connectors and
status indicators; see
Fig. 1, Fig. 2, and Fig. 12.
Fig. 1 – Bottom View
8
2.2. Brief Installation Guide
• Proper mounting – 2N – VoiceBlue Lite is designed for
suspension on a vertical surface. Fit the holder included in the
delivery on a wall and hang the gateway on it. For details on
the prescribed working position and other recommendations
refer to Subs. 2.3.
2N - VoiceBlue Lite
Fig. 2 – Top View
• Cable connection – connect the gateway using an Ethernet
cable to your VoIP PBX (or any other VoIP terminals). For
more details on proper wiring refer to Subs. 2.4.
• Antenna connection – connect an external antenna cable into
the SMA antenna connector. Place the antenna on a place with
a good GSM signal (refer to Subs. 2.5).
• Gateway power supply – the delivery includes a mains
adapter. Make sure that an antenna has been attached to the
antenna connector before supplying voltage. Plug in the
adapter connector into the GSM gateway and the power
adapter into a wall socket. The gateway turns on immediately
(see Subs.
2.6).
9

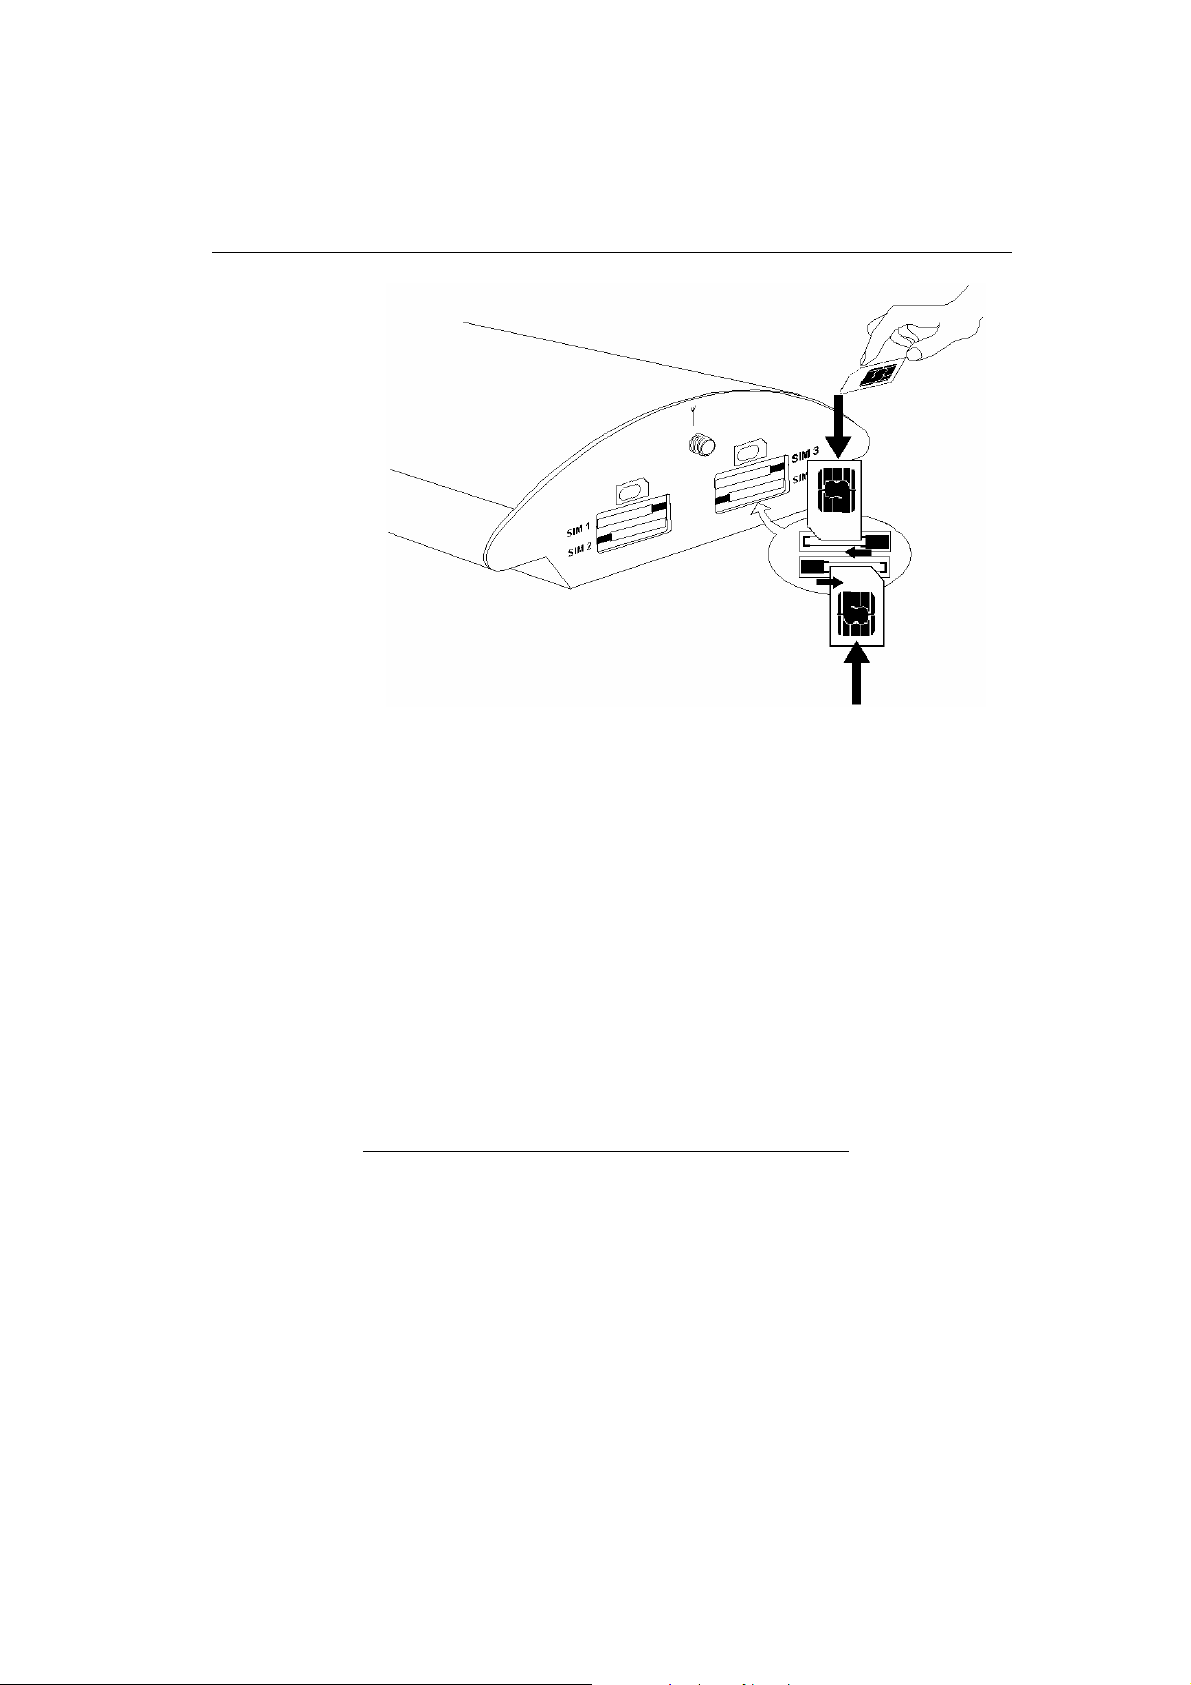
• SIM card insertion – SIM cards are inserted in holders on the
gateway top. The SIM card holder is of the push/pull type,
which means that all you have to do is insert a SIM card and
press the holder gently until it snaps into position (see Subs.
2.7). Secure the SIM card with a latch to avoid incidental
removal. !CAUTION! If you use PIN-asking SIM cards, first
set an identical PIN code for all SIM cards used in the GSM
gateway, save it into the GSM gateway configuration and only
then insert the SIM cards in the GSM gateway.
• PC connection – the gateway parameters are normally set
using the configuration software available on the CD included
in the delivery. To interconnect your PC with 2N - VoiceBlue
Lite use the USB cable
* **
or laplink RS 232 cable included in
the delivery.
• Configuration program installations - run the installation
file from the installation CD on a PC connected to the
gateway and install the VoiceBlue Lite configuration software
(refer to Subs. 0).
• Configuration program - run the VoiceBlue Lite program and
set the serial port communication for your PC - gateway
connection. Establish communication between your PC and the
gateway (refer to Subs. ).
• 2N - VoiceBlue Lite configuration - now use the
configuration software to set all necessary gateway parameters
- VoIP parameters basic GSM parameters and tariff
metering/pricing parameters, routing, restrictions, system
parameters, and input and switch properties. Having set the
required parameters, upload the configuration data to the
gateway via a serial link. For more details on the configuration
software see Section 9.
*
Be sure to install the drivers available on the CD included when you use a USB cable.
**of the same type as used for direct PC-PC connection.
10
2.3. Proper Mounting
• The 2N - VoiceBlue Lite gateway is designed for mounting on
a vertical surface. For this purpose a wall- mounting holder is
available. Just fit the holder with dowels and screws (Fig. 3) to
the wall and hang the gateway as shown in (
2N - VoiceBlue Lite
Fig. 4).
Fig. 3 – Gateway Holder Wall-Mounting
Fig. 4 – Gateway Hanging
• It is possible to operate the VoiceBlue Lite gateway in another
working position (e.g. on a desk) for a short time only, for
example in servicing centres for quick testing purposes.
11

• Exceeding the recommended operating temperature values may
not affect the gateway function immediately but may result in
more rapid ageing and lower reliability. The allowed working
temperature and relative humidity ranges are included in
Section 12.
• The gateway is intended for indoor use. It may not be exposed
to rain, flowing water, condensed moisture, fog, or mist.
• The gateway may not be exposed to aggressive gas, acid
vapours, solvents, etc. or aggressive liquids, during cover
cleaning, for example.
• The VoiceBlue Lite gateway is not designed for high-vibration
environments e.g. means of transport, machine rooms, etc.
• Free space has to be left under and over the gateway for cables
and agitated air to remove operational heat.
• Install the gateway on a place with a good GSM signal.
• A misplacement of the GSM gateway or its antenna near
television, broadcasting or similar RF-sensitive devices may
evoke an adverse effect upon their function.
• Being a source of RF energy emission, the VoiceBlue Lite
gateway antenna should not be located close to human bodies.
The hazard is higher than with mobile telephones because the
gateway is usually used by many people and thus employed
more often.
2.4. PC or LAN Connection
The 2N - VoiceBlue Lite gateway can be connected to a PC using
a USB cable terminated with a USB B connector or a laplink serial
cable with RS 232 connectors. A direct connection of
2N - VoiceBlue Lite and a PC is necessary for the initial gateway
configuration when the gateway IP address is unknown and the
gateway cannot be configured using the LAN.
VoiceBlue Lite supports connection via the Universal Serial Bus
(USB) of version 1.1. In this type of connection, however, it is
necessary to install VoiceBlue Lite drivers into your operating
system (OS). At present, the drivers support the Microsoft
12

2N - VoiceBlue Lite
Windows 98SE/ME/2000/XP OS. While installing the drivers
please following the instructions below:
• Insert the included CD into your PC CD-ROM drive.
• Connect the USB cable to the PC and then to VoiceBlue Lite.
• The Windows OS recognises the connected device
automatically and asks for suitable drivers.
• Find the VoiceBlue Lite drivers on the CD included in the
delivery in the following directory: CDROM:\VoiceBlue\USB
drivers.
• The OS recognizes the right drivers automatically and starts
installing them.
The OS may also require the USB COM port drivers. They are
available in the same CD directory as mentioned above.
The VoiceBlue Lite gateway operates as a modem in the data
mode, communicating through a virtual COM port. The gateway
USB port default parameters are 921,600 bps, 8 data bits, no
parity, 1 stop bit, and no flow control. If you intend to use the USB
cable for distances longer than 5 meters, you are recommended to
use the USB hubs.
.
Fig. 5 – Direct PC Connection Using USB
The serial port transmission rate is 57,600 bps, the remaining
communication parameters are the same. Set the communication
parameters on the PC side identically.
13
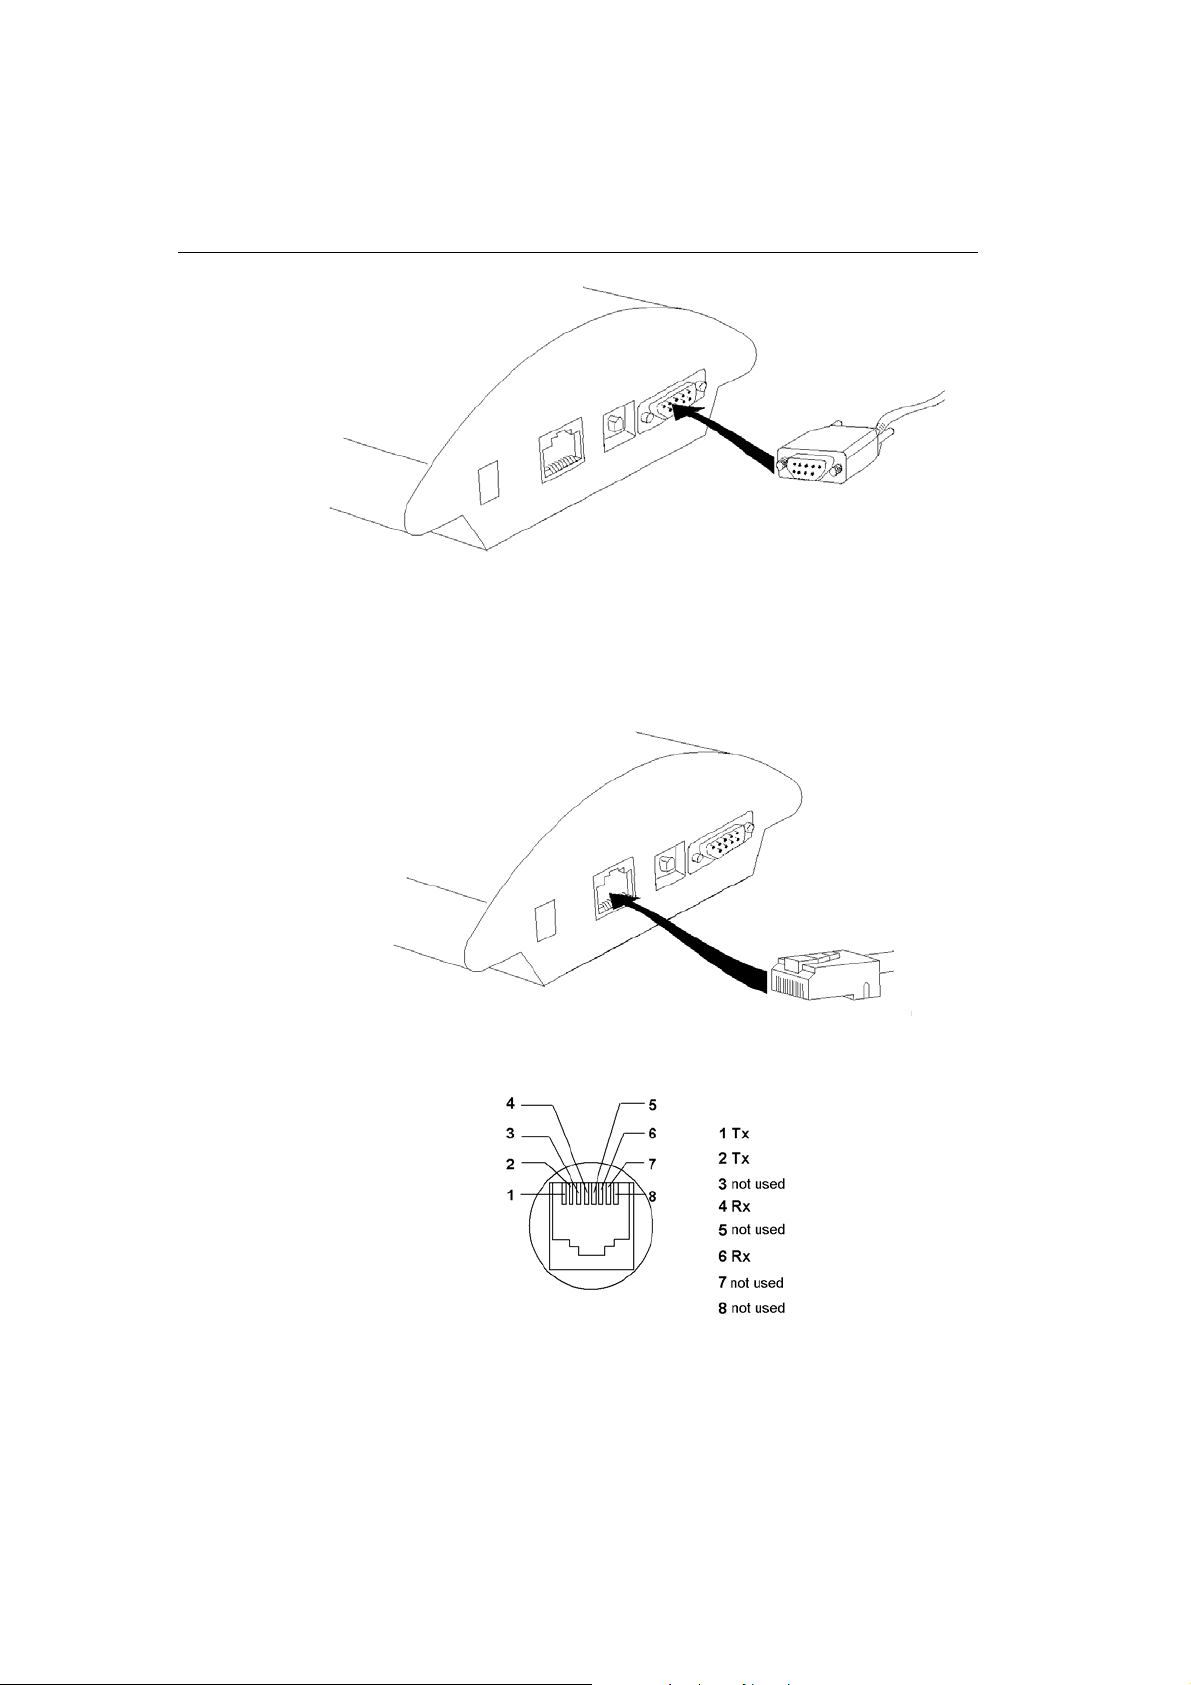
Fig. 6 – Direct PC Connection Using RS232
A standard straight through cable terminated with RJ-45
connectors is sued for connection to the 10BASE-T (Twisted Pair
Ethernet) LAN (Fig. 7 and Fig. 8).
Fig. 7 – LAN Connection
Fig. 8 – RJ-45 Wiring for LAN Connection
14

2.5. Antenna Connection
The VoiceBlue Lite gateway has one SMA antenna connector for
all GSM modules, see Fig. 9. An external antenna cable is
connected to this connector. The external antenna should be
installed vertically on a place with a good GSM signal. For the
technical parameters of the antenna refer to Section 12.
2N - VoiceBlue Lite
Fig. 9 – Antenna Connection
Tighten the antenna connector gently with your hand, never use a
wrench!
2.6. Gateway Power Supply
• Be sure to use only the mains supply adapter that is included in
the gateway delivery.
• Before plugging in the gateway, make sure that the mains
voltage value meets the data given on the mains adapter label.
• Make sure that the antenna has been connected. If you connect
the gateway to the power supply without an antenna, the
GSM module transmitter might get damaged.
• Now plug the supply adapter into a wall socket and after it
connect the adapter connector to the gateway, see Fig. 10. The
status indicators indicate the proper operation. For their
meanings refer to Subs. 2.9.
15

Fig. 10 – Supply Adapter Connection
2.7. SIM Card Installation/Removal
Insert the SIM card into the SIM card slots with your hand as
shown in Fig. 11. Please make sure that the slashed SIM card side
is on a side opposite to the latch. Having inserted the SIM card,
push the card gently until you hear a click signalling that the
push/pull holders have snapped the card. Secure the SIM card by
shifting the latch to the right in order to avoid incidental removal
of the SIM card.
To remove the SIM card take the opposite steps. You can replace a
SIM card even with the gateway on.
16
2N - VoiceBlue Lite
Fig. 11 – SIM Card Inserting Procedure
Each SIM card inserted in the gateway has a unique set of
parameters. Their values are bound to the card IMSI, remain stored
in the gateway even if the SIM card has been removed and thus
need not be reset upon SIM card re-insertion.
2.8. PIN Entering Disable (Optional)
2N - VoiceBlue Lite is set at automatic PIN entering by default
(1234). To disable the PIN use any mobile telephone in which you
insert the given SIM card. By disabling the PIN entering you
invalidate any other VoiceBlue Lite parameters or PIN stored in
the gateway memory. If you do not disable this function,
VoiceBlue Lite will always ask for a PIN by LED signalling,
which must be identical for all SIM cards inserted.
2.9. Status Indicators
There is a panel with five LEDs on the gateway upper cover for a
quick GSM gateway status detection (see Fig. 12). The Power
LED signals that the gateway as a whole is in operation. The
GSM 1 to GSM 4 LEDs indicate the status of the respective GSM
modules.
17
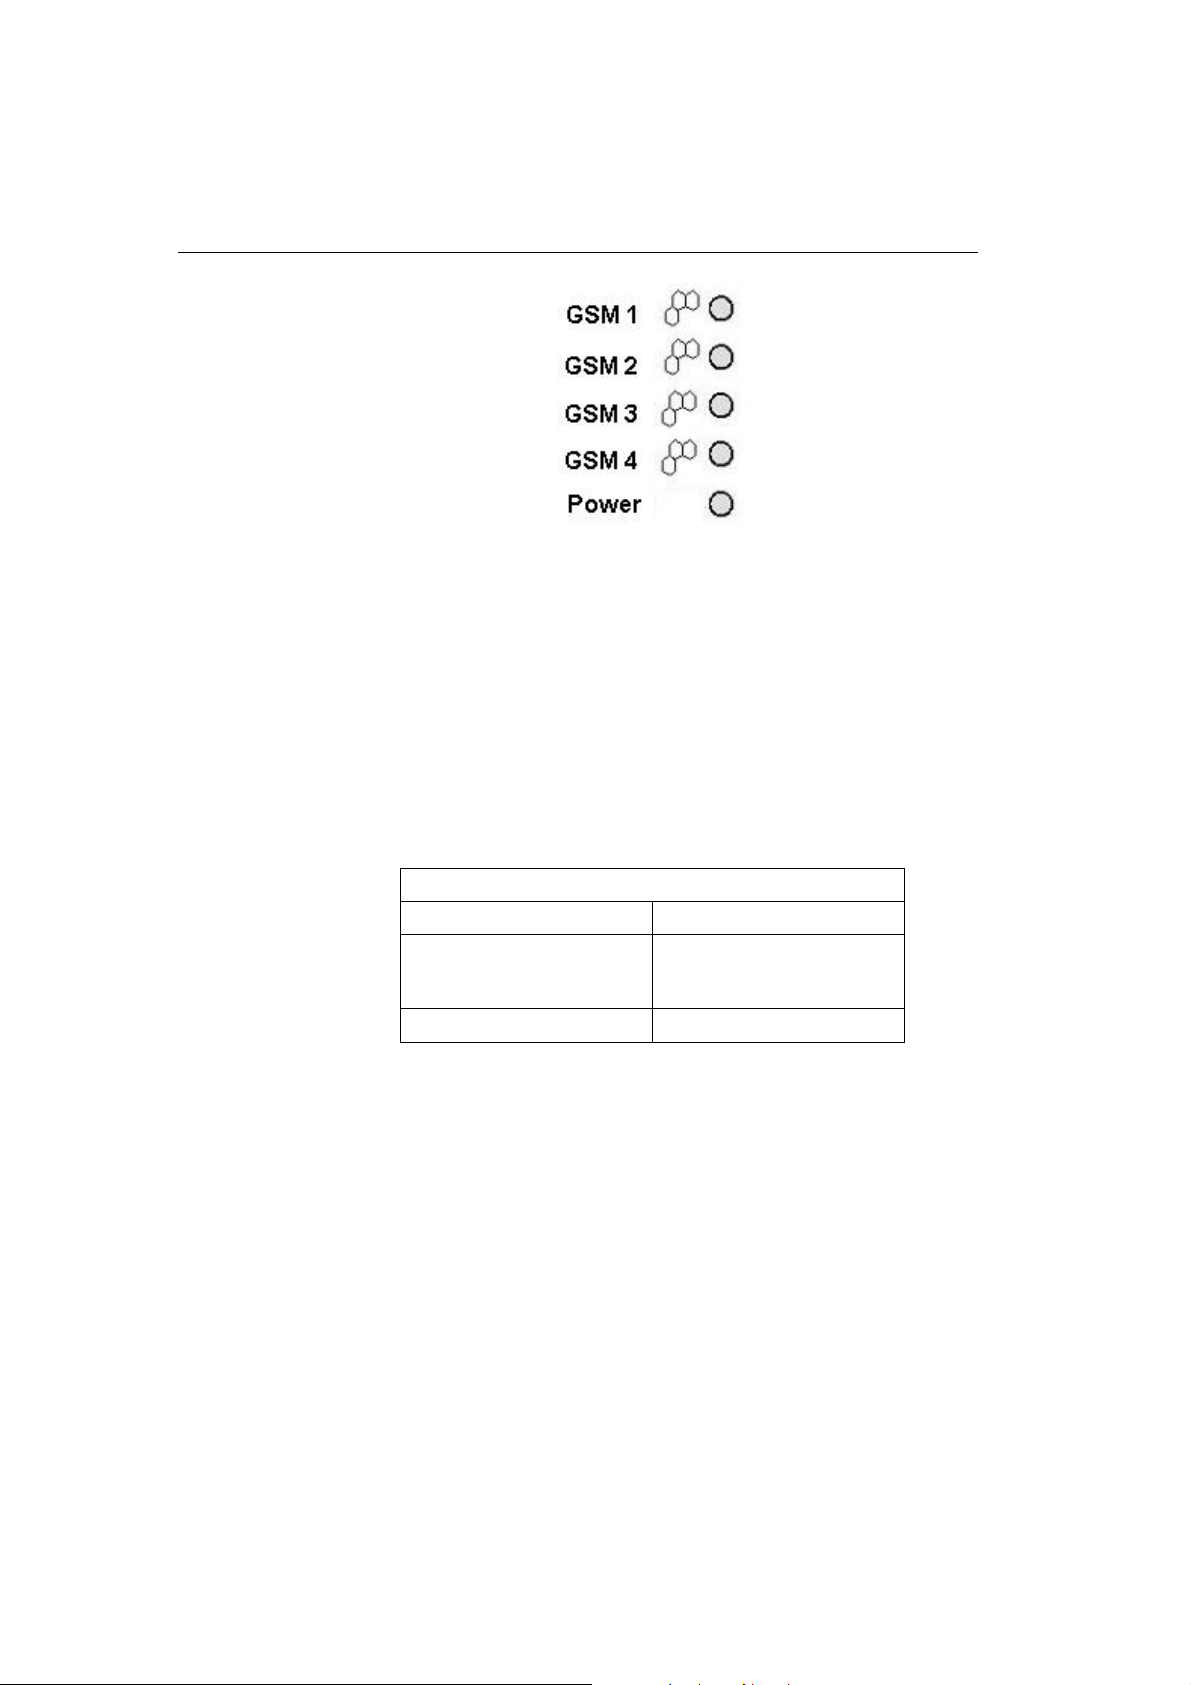
Fig. 12 – Signalling LEDs
Basic diagnostic tests and gateway initialisation are performed
automatically whenever the gateway is connected to supply
voltage. Each test step is signalled by a specific colour
combination of the LEDs. If a test step fails, the indicator
combination related to the failed test remains lighted.
Power Indicator
The Power LED signals whether the VoiceBlue Lite gateway is
supplied or not.
No light The system is not working. /
Continuous light The system is working.
GSM Indicators
The GSM 1 to GSM 4 LEDs signal statuses of the respective GSM
modules. Whenever the 2N - VoiceBlue Lite is started, detection
of the GSM modules is carried out. This process is signalled by a
green LED. If all GSM modules are present and ok, the LED goes
out. After that the firmware and configuration uploading process is
initiated, which is signalled by various LED colour combinations.
The initialisation process is followed by a check of presence of
SIM cards in slots. Quick blinking of the green LED of the
respective GSM module indicates this procedure. If a GSM
Power indicator (blue)
Power LED colour/status
Blown fuse / Wrong power
supply
Tab. 1 – Survey of Power Indicator Statuses
18

2N - VoiceBlue Lite
module or a SIM card is absent, the red LED remains lighted. If a
GSM module is not supplied, the respective GSM LED is blinking
red. Upon a correct GSM module initialisation, the SIM card is
logged in, which is signalled by a quickly blinking green LED. If
the log-in has been successful, the LED goes out. If not, it shines
red continuously.
In normal operation, a continuous green LED indicates an
incoming or outgoing call within the particular GSM module.
19
A survey of GSM module status signalling is included in Tab. 2.
GSM Indicators
GSM 1 to GSM 4 LED Colour/Status
The module is ready No light
Call establishing Green / shining
Currently made call Green / shining
Module initialisation Green / blinking slowly 1:3
SIM card initialisation Green / blinking quickly 1:1
GSM module / SIM card
absent
GSM module not supplied Red / blinking quickly
Tab. 2 – Survey of GSM Module Status Signalling
2.10. Lithium Battery Replacement
Red / shining
Limited warranty on accumulators
The warranty on batteries (accumulators) supplied
separately or as part of a product or together with a
product does not also apply to wear and tear of
accumulators and their components as a result of
normal use (e.g. discharge of the battery, reduction
of the accumulator capacity as a result of wear and
tear) as fact that may not be deemed as a lack of
conformity with the contract of sale in accordance
with Article 2 of Directive 1999/44/EC of the
European Parliament and of the Council.
20

2N - VoiceBlue Lite
WARNING! An incorrect battery replacement
may result in explosion. For replacement, batteries
of the same or equivalent type as recommended by
the manufacturer may be used only. The battery
type is CR2032.
WARNING! Never use metal tools for battery
replacement to avoid short-circuit. Battery shortcircuiting may result in battery destruction or
explosion.
Keep the proper battery polarity.
Dispose of used batteries in accordance with
applicable waste regulations, for example in waste
recycling centres.
Fig. 13 – Motherboard Diagram
It is unnecessary for the gateway function. Its average service life
is approximately 3 years. You are recommended to replace it after
three years for preventive purposes or, at least, check the voltage
with a voltmeter (the value should not drop below 2.9V).
A completely low battery results in the VoiceBlue Lite gateway
losing the time and date information and false data appear in the
trace and also in the service log buffer listing.
21

To replace the lithium battery, first disconnect your VoiceBlue
Lite gateway from the mains and open the cover. Remove the old
battery from the holder using a suitable tool and install a new one.
We recommend you to have this service done by a 2N servicing
centre.
2.11. Fuse Replacement
To exchange the fuse disconnect power adapter cable first. The
location of the fuse on the main board is on the Fig. 13. Open the
cover, remove the faulty fuse and check it. Replace the fuse by a
fuse of the same type only. Close the cover and reconnect the
power adapter cable.
2.12. Antenna Splitter
The antenna splitter is a passive component that enables several
GSM channels to share a single antenna. With VoiceBlue Lite it
joins four antenna ports into one external antenna. This splitter
saves both antenna costs and installation space. It is a passive
element – it has a characteristic signal attenuation that the
connected antenna must compensate. For technical parameters of
the splitter and antennas refer to Section 12.
WARNING! Use only a fuse of the same type.
Disconnect the adapter power while replacing the
fuse.
Fuse can be replaced only by service which is
personnel qualified to check such parameters as
power consumption, DC voltage etc.
If fuse fails again, unit must be returned to
manufacturer for repair
22

2N - VoiceBlue Lite
23

SECTION 3 –
3
2N - VoiceBlue Lite Installation
This section shows how to install the VoiceBlue Lite gateway
properly to avoid gateway operation troubles.
This section includes:
Proper Installation Conditions • VoiceBlue Lite Installation • Potential GSM Network Problems •
24

3.1. Proper Installation Conditions
The following installation conditions must be met for a proper
function of VoiceBlue Lite:
• Sufficient space for VoiceBlue Lite installation.
• Sufficiently strong signal from the GSM network with which
VoiceBlue Lite shall work with (the minimum signal intensity
value is –80dBm). To measure the signal intensity before
VoiceBlue Lite installation you can use a mobile telephone
with the Net monitor function enabled (e.g. SIEMENS,
NOKIA).
• A corresponding capacity of the GSM network (no GSM cell
overloading). Remember that the use of multiple GSM
gateways in one location may overload your current GSM cell
base. This might lead to a permanent or occasional rejection of
calls to GSM networks!
• No strong electromagnetic radiation on the installation site.
2N - VoiceBlue Lite
• No strong reflections on VoiceBlue Lite antenna sites.
• A correct VoIP connection configuration according to SIP
and other VoIP recommendations.
3.2. VoiceBlue Lite Installation
• Place the VoiceBlue Lite GSM gateway to an environment that
meets the gateway working conditions.
• It is recommended to connect the supply adapter with a battery
backup (UPS) and appropriate surge protection.
• Configure the GSM gateway using the VoiceBlue Lite software
available on the product CD enclosed.
• You may use remote GSM gateway administration through the
Ethernet for a comfortable GSM gateway management.
25

3.3. Potential GSM Network Problems
The VoiceBlue Lite GSM gateway is designed for a continuous
100% load. The GSM network may cause the following problems:
• The GSM module(s) cannot log in, log in slowly or log out
occasionally. This might be caused by any of the events below:
• The signal intensity received from the GSM network is too
weak – the recommended minimum value is -80dBm. If
the signal is lower, change the antenna position or type.
• The GSM cell to which the GSM modules log in is
overloaded. Change the antenna position, or reduce the
number of GSM channels connected to the troubled GSM
network.
• One of the GSM modules keeps logged out or is unable to
process an outgoing call – this indicates a potential GSM
network overload on the installation site. To solve this
problem, set the parameter “Relax delay” = 2. If a GSM
module fails to log in or refuses to process a GSM call even
after the gateway restart, check your GSM network provider
for potential SIM card or GSM module blocking.
26

2N - VoiceBlue Lite
27

SECTION 4 –
4
VoiceBlue Lite Connection to VoIP
This section discusses VoIP connection possibilities of the 2N VoiceBlue Lite gateway. Since 2N - VoiceBlue Lite communicates
using the SIP only, the interconnection of SIP and H.323 networks
is mentioned here too. 2N
Point-to-Point or Point-to-Multipoint mode with a SIP Proxy
server.
This section includes:
• SIP and H.323 Network Interconnection
•
Point-to-Point Configuration
•
Point-to-Multipoint Configuration
- VoiceBlue Lite may be operated in the
28

4.1. SIP and H.323 Network Interconnection
SIP-based devices cannot communicate with H.323-based ones
directly but through a SIP/H.323 gateway. This gateway transfers
signalling reports of both the protocols. Using the RTP (Real Time
Protocol) for multimedia data transmission, both SIP and H.323
devices can communicate directly with each other after getting
interconnected by a SIP/H.323 gateway. Therefore,
2N - VoiceBlue Lite may be implemented into the existing H.323
environment using a SIP/H.323 gateway.
2N - VoiceBlue Lite
Fig. 14 – SIP – H.323 Network Interconnection
4.2. Point-to-Point Configuration
In the Point-to-Point mode, VoiceBlue Lite can only communicate
with one SIP VoIP telephone or another SIP VoIP terminal, e.g. a
VoIP gateway. The IP address of the opposite side is always set as
the Proxy server IP address in the VoiceBlue Lite P-T-P mode.
29

The VoiceBlue Lite configuration with one SIP VoIP telephone is
often used for testing purposes before implementation to the VoIP
network. For this connection see Fig. 15.
Fig. 15 – Point-to-Point Configuration with SIP VoIP Telephone
In the Point-to-Point mode using a VoIP gateway, all calls
assigned to GSM are routed to VoiceBlue Lite by the VoIP
gateway. You can either set the IP address of the opposite side as
the Proxy server IP address for the two terminals, or, with an
intelligent VoIP gateway, resend certain calls to the VoiceBlue
Lite IP address directly.
30
Fig. 16 – Point-to-Point Configuration with VoIP Gateway

4.3. Point-to-Multipoint Configuration
The Point-to-Multipoint arrangement means a classical structure of
a distributed VoIP network with one or more SIP Proxy servers
(VoIP gateways). The SIP Proxy is a software PBX version (or a
standard PBX enhanced with VoIP services), which manages all
signalling in the VoIP network. In this mode you can use multiple
source terminals (e.g. VoIP telephones) and multiple destination
terminals (e.g. VoiceBlue Lite). An internal routing algorithm
(LCR) of your SIP Proxy is used for routing calls to GSM and
other networks. GSM calls may be routed through the VoiceBlue
Lite gateway. All signalling (SIP) is managed by the SIP Proxy
and the subsequent voice stream is transmitted by the RTP in the
Point-to-Point mode.
2N - VoiceBlue Lite
Fig. 17 – Point-to-Multipoint Configuration
31

SECTION 5 –
5
IP Voice Transmission
This section explains voice coding in IP networks. Moreover,
essential facts are mentioned on establishing connection between
two SIP-based IP telephones.
This section includes:
• Speech Coding Methods
•
SIP Components
•
SIP Reports
32

5.1. Speech Coding Methods
Voice and signal transmission is strictly separated in VoIP
networks. The RTP (Realtime Transport Protocol) is mostly used
for voice transmission in modern VoIP networks. The purpose of
the RTP is to transmit data from the source to the destination and
ensure the real time data (voice) transmission.
Codecs are used to save capacity of data channels, processing the
voice signal using various algorithms with the aim to minimise the
volume of user data. The degree of compression used by codecs
influences the quality of voice to be transmitted. This means that
the higher voice quality is required, the wider data band
(transmission rate) should be used. The voice transmission quality
is evaluated using the Mean Opinion Score (MOS) where 1 means
the lowest and 5 the best quality. A survey of codecs supported by
VoiceBlue Lite is included in Tab. 3.
Codecs Supported by 2N - VoiceBlue Lite
Standard Algorithm MOS
G.711 PCM 64 4.1
G.726 ADPCM 32 3.85
G.729 CS-ACELP 8 3.92
G.723.1 ACELP 5.3 3.65
Transmission
rate [kb/s]
*
2N - VoiceBlue Lite
Tab. 3 Table of Codecs Supported by 2N® - VoiceBlue Lite
To achieve a high-quality voice transmission requires not only
keeping of a constant necessary transmission rate during the whole
connection but also a constant low data packet transmitting time.
*
Multiple the above mentioned rate by eight (four full duplex calls) and add the transmission rate
necessary for the TCP and IP header to the resultant value for to get a successful 2N
Lite Lite connection.
®
- VoiceBlue
33

• G.711 – this codec us used in digital telephone networks. The
Pulse Code Modulation (PCM) is used for speech signal
coding. The sampled signal is coded by 12 bits and then
compressed to resultant 8 bits using a transformation
characteristic. The A-law compression is used in Europe, and
μ-law compression in North America and Japan. The resultant
data flow is 64 kbps.
• G.726 – this codec uses the Adaptive Differential Pulse Code
Modulation (ADPCM). This algorithm provides compression
of 8-bit samples of codec G.711 into 2, 3, 4 and 5-bit samples
with the resultant transmission rate of 16, 24, 32 and 40 kbps.
• G.729 – this codec uses the Conjugate-Structure Algebraic-
Code-Excited Linear-Prediction (CS-ACELP) with the
resultant transmission rate of 8 kbps. The speech signal is split
up into blocks of 10 ms each. The parameters of these blocks
are then entered into frames of the size of 10 bytes. 2 byte
frames are generated for noise transmission.
• G.723.1 – this codec uses the Multipulse Maximum Likelihood
Quantisation (MP-MLQ). The voice signal is split up into 30
ms blocks and coded into 24 byte frames with the resultant data
flow of 6.3 kbps. Another coding algorithm is the Algebraic
Code-Excited Linear Prediction (ACELP), which provides
coding of 30 ms blocks of speech into 20 byte frames with the
resultant transmission rate of 5.3 kbps. 4 byte frames are used
for noise transmission.
During call establishing, a codec is selected automatically for
voice transmission. 2N - VoiceBlue Lite is ready to use any of the
codecs included in Tab. 3. The type of coding depends on your
VoIP network (terminals) and VoiceBlue Lite GSM gateway
configuration. The primary purpose of 2N - VoiceBlue Lite is to
provide connection to corporate VoIP networks and it tries to meet
the opposite side's codec requirements. If a codec incompatible
with VoiceBlue Lite is required, the call is rejected.
The IETF SIP and ITU-T H.323 protocols are mostly used for
making, maintaining and terminating connections. The
2N - VoiceBlue Lite gateway uses the SIP (Session Initiation
Protocol).
34

5.2. SIP Components
SIP reports are transmitted between the following components:
• UAC (User Agent Client) – a terminal Client that initiates SIP
signalling;
• UAS (User Agent Server) – a terminal Server that responses to
SIP signalling from a UAC;
• UA (User Agent) – a SIP network terminal (SIP telephone, or
gateway to other networks), contains a UAC and UAS;
• Proxy server – receives connection requests from a UA and
transfers them to another Proxy server if the particular station
is beyond its control;
• Redirect server – receives connection requests and sends them
back to the requester including destination data instead of
sending them to the calling party;
• Location server – receives registration requests from the UA
and updates the terminal database with them.
2N - VoiceBlue Lite
All server sections (Proxy, Redirect, Location) are typically
available on a single physical machine called Proxy server, which
is responsible for client database maintenance, connection
establishing, maintenance and termination, and call directing.
The 2N - VoiceBlue Lite gateway is always a UA (has the same
functions as a VoIP telephone), i.e. receives call requests and
directs calls to GSM networks according to the internal LCR.
There are no SIP-defined server sections in the 2N - VoiceBlue
Lite gateway.
5.3. SIP Reports
Here is a list of main signalling reports sent in the SIP
environment:
• INVITE – connection establishing request;
• ACK – acknowledgement of INVITE by the final message
receiver;
• BYE – connection termination;
35

• CANCEL – termination of non-established connection;
• REGISTER – UA registration in SIP Proxy;
• OPTIONS – inquiry of server options.
Replies to SIP messages are in the digital format like in the http
protocol. Here are the most important ones:
• 1XX – information messages (100 – Trying, 180 – Ringing,
183 - Progress);
• 2XX – successful request completion (200 – OK);
• 3XX – call forwarding, the inquiry should be directed
elsewhere (302 – Temporarily moved, 305 – Use Proxy);
• 4XX – error (403 – Forbidden, 486 – Busy here);
• 5XX – server error (500 – Server Internal Error, 501 – not
implemented);
• 6XX – global failure (606 – Not Acceptable);
36

2N - VoiceBlue Lite
Fig. 18 – SIP Message Sending while Connection Establishing and Terminating
37

CHAPTER 6
Mobility extension
6
The function mobility extension (ME) allows the rerouting of a
call from VoIP to the GSM network if a subscriber is unavailable
in the VoIP network. Apart from this function it allows the
holding of a call and forwarding calls from the GSM to VoIP
network.
In this chapter you will find:
Advantages of function mobility extension
•
•
Activation of service mobility extension
Description of service mobility extension •
Recording announcements for mobility extension •
Permitting service mobility extension •
38

6.1. Advantages of function mobility extension
• Never miss an important call, you are always available
• Possibility of sending information text announcement if a call
is missed
• You have the services of rerouting SIP proxy on a mobile
telephone
• Comfort control using DTMF option
• Fully automatic function, it is not necessary to perform any
complex rerouting
• Functional with any SIP proxy
• Installation in place of any VoIP telephone
• Calls to your mobile telephone are free or for a slight charge as
a result of the service VPN
• You need no longer worry about the integration of an
expensive DECT system
2N - VoiceBlue Lite
• High voice quality EFR/AMR
6.2. Activation of service mobility extension
The function mobility extension is an added value of the of
®
VoiceBlue Lite, and it can be activated using a licence key. In
2N
order to receive a licence key, please contact your distributor. The
licence key is entered in the GSM gate from the terminal window
(see chapter 9.4) using an AT order.
6.3. Description of service mobility extension
The service mobility extension allows the rerouting of calls from
the VoIP network to the GSM network in the case of the
unavailability of the subscriber in the VoIP network. If the
function mobility extension is permitted for a given subscriber, it
is possible to switch off/on the rerouting of calls using the DTMF
option from the GSM network.
39

Function “Follow me”
Fig. 19 - Service mobility extension function “Follow me”
Fig. 19 shows the routing of calls in the case of the absence of a
subscriber in the VoIP network. Subscriber A calls subscriber B,
who has the service mobility extension permitted with the active
function “Follow me”. Subscriber B does not take the call in the
VoIP network, so the call is rerouted to his mobile telephone.
Function “SMS at no answer”
In the case of a missed call in the VoIP network, the service
mobility extension allows the sending of an information text
announcement. This function is called “SMS at no answer” and is
described in. In the same way as rerouting of calls, it is possible
using the DTMF option to activate and deactivate the service of
sending text announcements for missed calls.
40

2N - VoiceBlue Lite
SMS
Fig. 20 - Service mobility extension function “SMS at no answer”
Fig. 20 shows the sending of information texts if an incoming call
is not taken.. Subscriber A calls subscriber B, who has the
permitted service of mobility extension with activated services
“Follow me” and “SMS at no answer”. Subscriber B does not take
the call in the VoIP network, and so the call is rerouted to his
mobile telephone. Subscriber B does not take the call even on his
mobile telephone, and so he is sent a text announcement telling
him that the call from subscriber A had been missed.
Function of forwarding call
In addition to the rerouting of calls in the event of absence, the
function mobility extension allows calls to be forwarded within a
VoIP network, which brings the services of the SIP proxy to a
mobile telephone. The description of this function is displayed in
Fig. 21.
41

Fig. 21 - Service mobility extension function forwarding call
In Fig. 21 subscriber A is talking to subscriber C, who has the
permitted service mobility extension. Subscriber A would like to
be forwarded to subscriber B. For this reason subscriber C holds
the call with A (in the default setting 7*), and then calls subscriber
B. He tells B that he will forward the call and then forwards the
call (in the default setting 7*). If subscriber B does not want to talk
to subscriber A, subscriber C terminates the call with B (in the
default setting 9#) and returns to the call with A.
Function of quick forwarding of call
In Fig.22 subscriber A is talking to subscriber C, who has the
permitted service mobility extension. Subscriber A with telephone
number 111 would like to be forwarded to subscriber B with
telephone number 123. Subscriber C wants to forward the call
without having to talk to subscriber B. So subscriber C at first puts
the call with A on hold (in the default setting 7*), and then dials
42

2N - VoiceBlue Lite
the quick forwarding character (default value #) and then dials the
telephone number of subscriber B. He terminates the selection
with the character of end of dialling (default value #). After the
VoiceBlue receives the character of the end of selection, it
terminates the call between A and C and attempts to make a call
between the subscribers A and B. Subscriber A then receives a
ring tone.
=
=
Fig.22 - Service mobility extension function quick forwarding
6.4. Recording announcements for mobility extension
Announcements for mobility extension can be recorded using the
configuration program (see chapter 9.4) or using AT orders and the
protocol X-modem shown below. Announcements of mobility
extension are recorded only for subscribers who have this service
activated (see chapter). The function mobility extension uses the
list of announcements shown in Tab. 4 - list of announcements of
service Mobility extension
1.
43

Announcement number Default file Designation in configuration programme
MESS1 MESS1 - HELLO.wav Announcement “Good day”
MESS2 MESS2 - ME.wav Announcement “Mobile extension”
MESS3 MESS3 - DIAL.wav Announcement “Dial number”
MESS4 MESS4 - TZ.wav Announcement “Text announcement”
MESS5 MESS5 - AC.wav Announcement “Activated”
MESS6 MESS6 - DC.wav Announcement “Deactivated”
MESS7 MESS7 - HOLD.wav Announcement “Hold on”
MESS8 MESS8 - BACK.wav Announcement “Back”
Tab. 4 - list of announcements of service Mobility extension
The format of the recorded announcements must be
Sampling frequency : 8 kHz
Number of bits in sample 8
Audio encoding method: CCITT A-law
Channels: Mono
Length of recording: Max. 4s
Recording of announcements using terminal an d protocol
Xmodem
Recording announcements from PC to VoiceBlue
Run the terminal programme supporting the protocol Xmodem and
use it to connect up with VoiceBlue.
• Using the AT order at!m#=write, where instead of # fill in the
number of the announcement which is meant to be loaded into
VoiceBlue. The value “0” is designated for the announcement
DISA, the numbers of the other announcements are given
in Tab. 4 - list of announcements of service Mobility extension
• . After the insertion of an order you will be called upon to
select an audio file which is to be loaded into VoiceBlue.
• Successful loading is announced by the message
Loading announcements from VoiceBlue to PC
• Run the terminal programme supporting the protocol Xmodem
and use it to connect up with VoiceBlue
44

• Using the AT order at!m#=read, where instead of # fill in the
number of the announcement which is meant to be loaded into
VoiceBlue. The value “0” is designated for the announcement
DISA, the numbers of the other announcements are given in
Tab. 4.
• After the insertion of an order you will be called upon to select
the name of the audio file under which the announcement from
VoiceBlue is to be filed.
Deleting of announcements
You can gain information about a loaded announcements using the
AT order at!m#=view. To delete an announcement, enter the order
at!m#=erese in the terminal window, where instead of # fill in the
number of the announcement.
6.5. Permitting service mobility extension
As has been stated above, in order for the service mobility
extension to be permitted for the individual subscribers it has to be
first activated using a licence key. The permitting of mobility
extension for subscribers can be performed using the mobility
extension table. Its description is given in chapter 9.5. If in this
table the CLIP of a mobile subscriber and his url is not given, this
function is not permitted for the subscriber.
2N - VoiceBlue Lite
45

SECTION 7 –
7
2N VoiceBlue Lite Routing Rules
This section explains how to set the call routing rules to make the
most of the gateway potential and minimise your telephone costs.
This section includes:
Functions Supported by 2N VoiceBlue Lite • Call Routing Rules • LCR table • Call Routing to GSM via VoiceBlue Lite • Incoming calls from GSM to VoIP network • DISA Message •
46

7.1. Functions Supported by 2N VoiceBlue Lite
• Call routing according to time and called destination through
the destination's operator;
• Call re-routing;
• Intelligent incoming CLIP routing (CLIP-based call routing);
• Outgoing call routing by time LCR (Least Cost Routing);
• DISA (tone dial-in);
• CallBack to GSM;
• Dial-in to the operator;
• SMS sending/receiving;
7.2. Call Routing Rules
Calls from a VoIP port to a GSM network are routed according to
the LCR (Least Cost Routing) table to an arbitrary GSM port. If an
outgoing call is routed via a port that is busy, the remaining
available ports are searched for (depending on the configuration)
and if no allowed outgoing port is free, the outgoing call is
rejected.
2N - VoiceBlue Lite
The routing algorithm routes outgoing calls according to the
outgoing call type, current time rate, day in a week, and GSM
provider's free minutes if any.
Incoming calls from a GSM network are routed directly to the
defined SIP address, or the DISA function is enabled. The CLIP
function can be used too.
7.3. LCR table
The LCR (Least Cost Routing) table is the key telephone cost
cutting factor. It helps you set the call routing rules according to
the CLIP, daytime and day in a week. By entering public holidays
into the LCR table you achieve even more remarkable cuts.
To make call routing to external ports based on prefixes and the
LCR table work properly, define the prefix and the total count of
digits to be dialled into GSM in the Network list. The SIM card
inserted in the GSM gateway must be compatible with the defined
47

group. To assign a group to outgoing and incoming calls use the
GSM groups assignment table.
During call establishing, the LCR table is checked line by line
from top to bottom. If the called destination prefix matches the
network prefix included in the Network list (called Network ID in
the LCR table), the call is routed according to the routing group
(Groups in the LCR table) as set in GSM outgoing groups. The call
is connected via the GSM module assigned to the GSM outgoing
group in the GSM groups assignment table.
If the selected GSM module is busy, another routing rule included
in the Groups menu and defined by GSM outgoing groups is used.
Again, an outgoing GSM group is assigned to the GSM module in
the GSM groups assignment table.
The LCR line is processed in the above-mentioned way until a free
GSM module is found. If no suitable GSM module is found (GSM
outgoing group), the call is rejected.
7.4. Call Routing to GSM via VoiceBlue Lite
The outgoing GSM call routing algorithm starts the moment the
SIP Proxy routes an outgoing call to VoiceBlue Lite.
Outgoing calls are routed via VoiceBlue Lite as follows:
• The calling subscriber dials a number that is routed to
VoiceBlue Lite by the SIP Proxy. It depends on your SIP Proxy
configuration whether or not outgoing GSM calls are routed to
VoiceBlue Lite.
• The dialled prefix is first compared with the prefixes included
on the first line of the LCR table. If no match is found, the
following line is used for comparison.
• If the prefix matches a LCR prefix, the call time is checked for
match with the routing rule on the line. Again, if no match is
found, the following LCR table line is searched.
• In case the prefix and call time comply with the routing rules,
the call is routed according to the first routing rule included in
Groups and GSM outgoing groups to the module defined in
GSM groups assignment.
48

2N - VoiceBlue Lite
• If the selected GSM module is busy or has an insufficient
credit, the preceding step is repeated for the following line of
the Groups section. If there is no record, the next LCR table
line is searched.
• In case the selected GSM module is free and has a sufficiently
high credit, the GSM gateway starts dialling the GSM number.
• If the calling subscriber number has an unknown prefix, or all
routes are busy, the GSM gateway rejects the call request.
• An outgoing call is not billed until the called party answers the
call.
• The GSM network signals the off-hook and the GSM gateway
transfers this information to the SIP Proxy.
• You can enable transmission of a connecting tone for
*
outgoing GSM calls, which replaces the silent moment
between the request sending and ringing tone.
*
This posibility is for TC35i modules only
Fig. 23 – Routing of Outgoing GSM Calls
49

7.5. Incoming calls from GSM to VoIP network
Incoming calls from the GSM network are subjected to the
algorithm described in Fig. 24 and the following steps:
An incoming call is handled depending on how the parameter
“Mode” is set in the table “GSM incoming groups”. Here it is
possible to set several possibilities:
• Reject / Ignore of incoming calls – incoming calls will not be
routed to the VoIP network. On the side of the GSM network a
request for connection can either be rejected or ignored (the
caller ringing tone)
• Report to PC – information about an incoming call is sent to a
PC with a servicing program. The caller is then played an
announcement or dial tone. The servicing program then ensures
the remaining routing of the call.
• If none of the above possibilities is set, an enquiry is made as
to whether the function Callback is activated. If for incoming
calls the function Callback is activated, the callback table is
searched. If the callback function is not permitted for the given
CLIP (CLIP is not contained in the table Callback), the call is
either refused or ignored depending on the setting in the menu
GSM incoming groups. If the table does contain the CLIP,
VoiceBlue waits for the end of the call from the GSM
subscriber and then calls back to the subscriber in the GSM
network.
50
• If the function Callback is not active or callback has already
been performed, a test is conducted for the permission of the
service Mobility extension.
• If the service Mobility extension is permitted, the caller is
played the list of announcements Mess 1, Mess 2 and Mess3
(see chapter 6.4). The subscriber may then either activate or
deactivate the function “Follow me” and “SMS at no answer”
or transfer the selection to the subscriber in the VoIP network.
After the connecting of a call it is possible, as a result of the
function, to hold the call, forward it or terminate it as described
in chapter 6.3.

2N - VoiceBlue Lite
• If the service mobility extension is not permitted, the table of
CLIP routings is searched. This contains records such as
AutoCLIP routing and DynamicCLIP routing. If in the table
the record AutoCLIP routing is found for the CLIP of the
caller, the caller is directly routed to the branch the number of
which is entered in the field autodial (see chapter 9.5). If the
function AutoCLIP routing is not activated, or if the number of
the caller is not included in the table of AutoCLIP routing, the
handling of the incoming call continues with a search of the
table DynamicCLIP routing. If the number of the caller is
found in this table, the incoming call is directly routed to the
corresponding branch. The function DynamicCLIP routing can
be set in the menu GSM incoming groups (see chapter.
9.5).
• If even after this the incoming call is not dealt with, the gate
takes the call and either plays an announcement or dial tone to
the caller. Then VoiceBlue Lite waits for the required number
of numerals necessary for the making of a connection. The
minimum and maximum number of numerals of the DTMF
selection can be set in the menu GSM incoming calls.
• If VoiceBlue Lite does not receive the minimum required
number of numerals, and by the time designated by the
parameter Delay when entering DTMF numerals further
numerals doe not come from GSM, the call is rerouted to the
operator in the same way as when the number of the branch
called by the caller is not known.
• If the function of routing to the operator is not active, the
incoming call is refused.
51

52
Fig. 24 – Incoming Call Processing Procedure

7.6. DISA Message
If the DISA function is enabled and a welcome message recorded,
this voice message is replayed to every incoming call whose
number is not included in the CLIP routing table or dynamic CLIP
routing table. After the message is replayed, the gateway waits for
the first DTMF digit for a timeout defined in the GSM incoming
groups – Tout for entering DTMF digits table. Having received the
count of digits defined in GSM incoming groups – Min. digits in
DTMF, the gateway activates the SIP Proxy connection. For more
details on the gateway configuration refer to Subs. 9.5.
It is possible to program the DISA voice message into the gateway
by following ways:
• Record DISA using configuration program (see. sub. 9.4)
• Record DISA using terminal and GSM phone
DISA Message Recording Using Terminal and GSM Phone
2N - VoiceBlue Lite
Recording of DISA message
Open terminal window (see Subs 11).
• Establish connection with your GSM phone using AT
command: at!sg0=phone_number_of_your_GSM_phone
• Accept incoming call from your GSM gateway by GSM phone.
(CLIP of SIM card plugged in SIM card holder 1)
• Enter AT command at!m0=record in terminal window which
results in recording of DISA message (65 s max)
• To stop recording of DISA message press <ENTER>
• Finish the phone call by hanging up or entering of AT
command at!d
Erasing of DISA Message
To get an information on recorded DISA Message enter AT
command at!m0=status. To erase DISA message enter AT
command at!m0=erase in terminal window.
53

Recording DISA using terminal and protocol Xmodem
Recording DISA announcement
Run the terminal programme supporting the protocol Xmodem and
use it to connect up with VoiceBlue.
• Using the AT order at!m#=write, where instead of # fill in the
number of the announcement which is meant to be loaded into
VoiceBlue. The value “0” is designated for the announcement
DISA, the numbers of the other announcements are given
in chapter 6.4.
• After the insertion of an order you will be called upon to select
an audio file which is to be loaded into VoiceBlue.
• Successful loading is announced by a message
Loading DISA announcement
• Run the terminal programme supporting the protocol Xmodem
and use it to connect up with VoiceBlue
• Using the AT order at!m#=read, where instead of # fill in the
number of the announcement which is meant to be loaded into
VoiceBlue. The value “0” is designated for the announcement
DISA, the numbers of the other announcements are given
in chapter 6.4.
• After the insertion of an order you will be called upon to select
the name of the audio file under which the announcement from
VoiceBlue is to be filed.
Deleting DISA announcements
You can gain information about a loaded DISA announcement
using the AT order at!m0=view. To delete a DISA announcement,
enter the order at!m0=erese in the terminal window.
54

2N - VoiceBlue Lite
55

SECTION 8
8
Introduction of Configuration Program
This section introduces the 2N – VoiceBlue Lite configuration
software, which is part of the installation CD supplied together
with the gateway.
Here is what you can find in this section:
• VoiceBlue Lite Configuration Program Installation
•
VoiceBlue Lite Configuration Program Running
•
Configuration Program Basic
56

2N - VoiceBlue Lite
8.1. VoiceBlue Lite Configuration Program Installation
Your 2N - VoiceBlue Lite delivery includes a VoiceBlue Lite
installation CD. By inserting this CD in your CD-ROM drive you
get an introductory page with a survey of 2N products. Select
VoiceBlue Lite and then, in a new window, VoiceBlue Lite
installation. An easy installer helps you install the software. Wait
until the installation has been completed. The guides and
autoupdate program are installed together with the VoiceBlue Lite
software.
8.2. VoiceBlue Lite Configuration Program Running
When the installation has been completed, run the program by
clicking on VoiceBlue Lite control program in your PC software
menu, or clicking on the desktop icon, or opening the VBcp.exe
file that you will find in the respective location installed by you
using any explorer or file browser.
After starting the configuration program the configuration window
shown on Fig. 25 shows up.
Fig. 25 - Main window of configuration program
To facilitate the administration of more than one 2N – VoiceBlue
Lite gateway it is possible to use Gateway selection window. For
57

taking advantage of this function start by editing of new gateway
in Gateway list menu (ALT+F4)
Fig. 26 - Gateway list selection
After selecting of Gateway list the window Gateway selection
window shown on Fig. 27 shows up.
Fig. 27 - Adding of new entry to gateway list
• New - click on Add to open a window with some essential data
necessary for the gateway identification (see
Fig. 27). Enter the
gateway name and complete the Gateway IP address. To get
the LAN connection, enter your Username and Password. You
need not complete these items if you control the GSM gateway
by the USB. Finally, complete the File of gateway parameters
including the directory path and filename. New entry is added
to the gateway list after clicking the “OK” button.
• Edit – used for editing identification data on the gateway
entered. To edit the data, select the required gateway from the
list of used gateways and click on Edit.
• Remove – used for removing a gateway from the list of used
gateways.
58

2N - VoiceBlue Lite
• Remove all - used for removing all gateways from the list of
used gateways.
• Select – click on this button to select a GSM gateway whose
parameters can be set after Close is pressed.
• Connect – by clicking on this button the VoiceBlue Lite
programs attempts to connect to the gateway according to the
setting in “Settings -> Communication settings..”
configuration. If the communication type was not selected, the
program starts to scan COM ports in order to find connected
gateway.
• Close – used for closing the Gateway selection window and
opening the gateway configuration window.
59

8.3. Configuration Program Basic menu
The following items are available in the main configuration
program menu:
• File – for physical work with the configuration file
• Gateway – for selecting of the gateway from gateways list and
interconnecting it with VoiceBlue program.
• Gateway control – contains function for online configuration a
diagnostic of the gateway
• Settings – menu items for Communication settings and
Language setting of the configuration software.
• Help – information on the About application of the
configuration software together with contacts to the technical
support personnel.
File
This menu is accessible under (Alt + f).
• Load – is used for loading of the
configuration file of the selected
gateway to the configuration
program.
• Save – is used for saving of the
configuration to the configuration
file of the selected gataway.
• Load from disk – is used for loading an external file to the
configuration program. Structure of this file is same as of
configuration file which was selected on gateway selection
procedure, but he content is different
• Save as – is used for saving of configuration to an external file
than the one selected on gateway selection procedure.
• Default settings – sets all parameters to default values.
• Close - terminates the configuration program work.
60

Gateway control
This menu is available under (Alt + a). Configuration is possible
with connected gateway only. If the gateway is not connected the
program attempts to establish connection by itself. All items of this
menu are described in section 9.4.
2N - VoiceBlue Lite
Settings
This menu is available under (Alt + s).
• Communication setting - helps set the type of communication
Fig. 28 - gateway control menu
of the 2N – VoiceBlue Lite gateway configuration software. By
clicking on this item you open a configuration window (see
Fig. 29). You can use a serial ro USB cable, LAN or Internet
for communication with the GSM gateway.
61

Fig. 29 – Communication Setting Window
Types of communication:
Serial communication - used for GSM gateway
configuration from your PC using a serial or USB cable.
The serial communication mode is suitable for the initial
setup. USB communication is suitable for detailed tracing
of the gateway. The configuration program offers available
COM ports.
TCP/IP – used for GSM gateway configuration via the
Internet or LAN. Be sure to set the correct gateway IP
address before configuring. For the IP address setting refer
to Subs.
8.2.
LOG communication:
You can set whether and how the PC - GSM gateway
communication should be saved into a file.
By clicking the “OK” button the gateway attempts to
connect to the gateway according to communication
settings.
• Application language - sets the language used for tag names.
62

Help
This menu is available under (Alt + h).
• About - opens a window providing information on the
configuration software version together with contacts to the
technical support personnel.
8.4. Button Bar
The button bar (Fig. 30) displays the most frequently used
commands that make the work with the GSM gateway easier and
quicker.
2N - VoiceBlue Lite
Fig. 30 – GSM Configuration Program Button Bar
8.5. Topic List and Alphabetical Glossary
Select the more convenient of the two arrangements of
configuration program items (Fig. 31). The sections below are
arranged according to the Topic list.
63

Fig. 31 – Topic List (left) and Alphabetical Glossary (right)
64

2N - VoiceBlue Lite
65

SECTION 9
Configuration
9
This section describes the 2N - VoiceBlue Lite gateway setting
using the VoiceBlue Lite configuration software that is part of the
installation CD supplied together with the gateway.
Here what you can find in this section:
Establishing Communication with VoiceBlue Lite • Firmware Identification and Upgrade • Gateway Licencing • Gateway control Items • Gateway configuration • Reset •
66

2N - VoiceBlue Lite
9.1. Establishing Communication with VoiceBlue Lite
The communication establishing procedure is summed up in the
two steps mentioned below, Gateway selection and
Communication setting.
Gateway selection
Select “Gateway -> Gateway list (ALT + F4)” in the Main menu
of the configuration program. From the list of gateways select
gateway to be configured (refer to Subs. 8.2).
Communication setting
In the Main panel select “Settings -> Communication setting“ and
the type of gateway connection.
Use the Communication setting window to select the type of
configuration program communication with 2N - VoiceBlue Lite.
This selection opens a configuration window (see Fig. 32).
You can use a serial cable, USB cable, the LAN or Internet for
communication with VoiceBlue Lite.
Fig. 32 – Communication Setting Window
67

Types of communication:
Serial communication - used for GSM gateway
configuration from your PC using a serial or USB cable.
The serial communication mode is suitable for the initial
setup of the gateway and detailed tracing. Configuration
program offers unused COM ports only.
LAN communication – used for GSM gateway configuration
via the Internet or LAN. Be sure to set the IP address of the
gateway you want to communicate with before
configuration. For the IP address setting procedure refer to
Subs.
8.2. Set the Time to wait for response [ms] for
network communication. The default value of this
parameter is 5,000 ms.
Communication LOG:
In this section is possible to set whether and how the
PC - GSM gateway communication should be saved into a
file.
Click on OK to establish connection between your PC and the
GSM gateway.
9.2. Firmware Identification and Upgrade
If you connect the GSM gateway for the first time, please identify
the current firmware version by clicking on “Gateway control ->
Firmware/Licence”. The Firmware/Licence item offers two
sections. The Firmware section (see
current firmware version and upload a new firmware version from
a PC to the gateway. The Licence section enables to unlock the
GSM gateway (refer to Subs.
9.3).
Fig. 33) helps identify the
68

2N - VoiceBlue Lite
Fig. 33 – Firmware Window
To identify the current firmware version click on Load from the
gate. Compare the firmware version of your VoiceBlue Lite with
the version available on our websites (www.2n.cz).
If your GSM gateway firmware version is older than that
distributed by us, upload the latest firmware version to your GSM
gateway. Please follow the instructions mentioned below.
Since the product is subject to innovations, please check the latest
firmware version on our websites regularly (www.2n.cz).
Firmware uploading
• Establish communication with the gateway (refer to Subs.9.1).
• Click on and find a firmware file in your PC named
P2008-V-*.hex. Click on Open to get the file ready for
uploading into 2N - VoiceBlue Lite.
• Click on to start the firmware uploading
process.
• The program starts uploading the firmware into VoiceBlue Lite
automatically. The gateway is in the reset mode during the
process. Do not interrupt the firmware uploading process to
avoid firmware damage and gateway failure.
69

• Should the firmware uploading process get interrupted, reset
the GSM gateway and re-try to upload the firmware.
• After successful upload of the firmware, please make factory
reset of the gateway.
• CAUTION! Make sure that what you are going to upload is the
original and undamaged file with the latest firmware version as
available at our websites (
9.3. Gateway Licencing
The operation of every new 2N - VoiceBlue Lite gateway is
limited to 850 hours. Every gateway reset reduces the remaining
gateway operation time by one hour. To identify the GSM gateway
status, click on “Gateway control -> Firmware/Licence” in main
menu of the configuration program. The Firmware/Licence item
offers two sections. The Firmware section helps identify the
current firmware version and upload a new firmware version from
a PC to the gateway (refer to Subs.9.2). The Licence section
enables to licence the GSM gateway (see Fig. 33). Please contact
our technical support personnel to get the key.
www.2n.cz).
Enter the received key into Licence for the gateway unlock and
press Set gateway licence. To find whether your gateway has been
unlocked successfully, press Load from the gate.
WARNING! By inserting an invalid key you make the GSM
gateway fail.
70

9.4. Gateway control Items
The items are active only if the VoiceBlue Lite gateway is
connected.
Login account
Fig. 34 – Login Account Window
Using this item you can change the Username
and Password that are required by VoiceBlue Lite for remote
configuration via the Telnet protocol. These login parameters may
not be changed completely for safety reasons if you are connected
to the gateway using the Telnet protocol. In dafult are
2N - VoiceBlue Lite
• Name: 2n
• Password: 2n
Date/Time
Fig. 35 – Date and Time Setting Window
71

This is an item for synchronisation of the system time and
connected VoiceBlue Lite gateway with your PC. To set another
date in your gateway, tick off the Synchronise date/time with PC
item and set the value manually.
Firmware / Licence
Firmware - use this menu to find the firmware and bootware
versions that are currently available in the gateway. Moreover, you
can upload a new firmware version into the gateway with this
item. For more details refer to Subs. 9.2.
Licence - if your VoiceBlue Lite gateway has been blocked for a
certain number of hours, this item helps you send a key that you
have received from the 2N technical support personnel to unlock
the gateway.
WARNING! By inserting an invalid key you make the GSM
gateway fail! For details refer to Subs. 9.3.
Tracing
This item is used for analysis of the GSM gateway behaviour on
each RM OSI model layer. You can assign time stamps to the
records for easier orientation in listings. It is possible to
automatically record listings into a file and, if necessary, sent to
the 2N technical support department. If a detailed VoIP-SIP trace
is required, we recommend you to connect VoiceBlue Lite using a
serial or USB cable. This type of connection allows for a detailed
data transmission in every SIP report.
72

Terminal
The internal terminal of the VoiceBlue Lite control software is
displayed here. This window enables you to communicate with the
VoiceBlue Lite gateway directly using AT commands as
mentioned in Subs. 11.6.
2N - VoiceBlue Lite
Fig. 36 – Tracing Window
Fig. 37 – Window of Terminal Integrated in Configuration Program
LOG file
Used for reading and, if required, saving of LOG information from
the connected VoiceBlue Lite gateway. For description of records
refer to Subs. 11.7.
73

Record on calls
Reading and saving of records on calls from the connected
VoiceBlue Lite gateway.
Fig. 38 - Log window
Statistics
VoiceBlue Lite automatically generates detailed statistics on all
outgoing and incoming calls. Statistical data can be displayed,
saved or reset using this item.
Fig. 39 - Statistics window
74

Voice message
Used for reading and writing of voice messages to the VoiceBlue
Lite gateway. This window is separated in to sections. The “Read /
Write message using COM” is intended for upload and download
of voice messages via the protocol X-modem
2N - VoiceBlue Lite
Fig. 40 – Voice Message Recording Guide
• Write voice message – performed after pressing button
Read/Write recording of message to VoiceBlue
• Read voice message – performed after pressing button
Read/Write download of message to VoiceBlue
• File for reading/writing message – selection of name of file
which is to be loaded into VoiceBlue.
Voice message parameters
Sampling frequency: 8 kHz
Number of bits in sample 8
Audio encoding method: CCITT A-law
Channels: Mono
Length of recording: Max. 4s
• Voice message type:– selection of type of message which is
to be loaded into VoiceBlue. Before loading the voice
message, please check whether the message parameters
correspond to the requirements placed on this message.
75

The section “Writing DISA using GSM” is intended for recording
DISA message using the GSM phone.
• GSM number to be dialled – ether the phone number of
• Erase message before recording – Ensures erasing of the
• Dial – clicking this button starts dialling to the GSM
• Hang up- Hangs up the cal to GSM and stops recording of
GSM diagnostic
Select this item to display information on the GSM modules and
SIM cards inserted in the gateway.
your GSM phone
voice message before dialling to GSM network
network via GSM module 0.
the DISA message.
Fig. 41 – Diagnostics
• Layers 2 and 3 – GSM module status on communication layers
2 and 3.
• GSM Network – name of the GSM network to which the GSM
module has logged.
• Network ID – network MCC+MNC / GSM outgoing group
number / GSM incoming group number. This parameter also
specifies the cause of a GSM channel error if any.
• GSM cell – identifies the cell to which the GSM module has
logged.
Description of displayed numbers:
Network cell: A,BBB,CCC,DDDDD
76

2N - VoiceBlue Lite
A = status:
0 – not registered
1 – registered in home network
2 – not registered, but the GSM module is searching for a
new provider
3 – registration barred
4 – unknown status
5 – registered in roaming network
BBB = first LAC byte (location area code) in decadic format
CCC = second LAC byte in decadic format
DDDDD = cell ID
• Module ID – GSM module type
• Revision ID – GSM module version
• Serial number – GSM module IMEI
SIM ID – SIM card IMSI or SCID
Actual calls
Select this item to display information on currently made calls.
Fig. 42 – Call Information Displaying Window
9.5. Gateway configuration
Here you can modify the VoiceBlue Lite configuration even if the
VoiceBlue Lite gateway is not connected. All settings are stored
into a configuration file set during your gateway selection (refer to
Subs. 8.2).
77

System parameters
Fig. 43 – System Parameters Window
This configuration window has three subgroups. The following
parameters to be configured are explained according to these
subgroups.
• IP setting
• IP address – set the IP address to be assigned to
VoiceBlue Lite;
• Subnet mask – set the subnetwork mask;
• IP router – set the IP address of the gateway that
VoiceBlue Lite uses for connection with another network.
• Modes
• CDR mode – the CDR (Call Detail Report) helps record
data on calls. Select on which calls and whether data
should be recorded in a pull-down menu.
• Unit ID – used for VoiceBlue Lite identification in case
in case there are more devices in the network that
generate the CDR.
78

2N - VoiceBlue Lite
• PIN – enter the PIN code to be entered for new SIM cards
automatically. The PIN codes of once inserted SIM cards are
remembered.
• End of dialling – enter the character to be used as end of
dialling to VoIP network.
• Mobility extension (DTMF settings) – this section defines the
functional keys of the service mobility extension. We
recommend that the fields in this section be left at their default
values
• Start dialling (quick call forwarding) – serves to define
the DTMF numerals of the attribute which will be
allocated to the telephone number to which the calls
should be rerouted during quick call forwarding (see
chapter 6.3)
• End of dialling (quick call forwarding) – serves to define
the DTMF numerals of the attribute which will mark the
end of dialling (see chapter 6.3)
• Hold call – this combination of DTMF numerals allows
the mobile subscriber to put the call in the HOLD mode.
• Hang up call - this combination of DTMF numerals
allows the mobile subscriber to switch the call from the
HOLD mode to the call mode or end an ongoing call.
• “Follow me” activation – combination of DTMF
selection for activating the rerouting of call to the GSM
network if the participant in the VoIP network is not
available (see Fig. 19)
• “Follow me” deactivation – combination of DTMF
selection for cancelling rerouting of call to GSM network
if the participant in the VoIP network is not available (see
Fig. 19)
• “SMS at no answer” activation – combination of DTMF
selection for activating the sending of a text message
when a call is not taken (see Fig. 20)
• “SMS at no answer” deactivation – combination of
DTMF selection for cancelling the sending of a text
message when a call is not taken (see Fig. 20)
79

SIP parameters
All VoiceBlue Lite parameters concerning the VoIP network are
set in this configuration menu. For the configuration window
see Fig. 44.
Fig. 44 – Ethernet Parameter Configuring Window
• Mode/Protocol – set the signalling protocol type .
• Date of deleting statistics – a day in a month on which all
statistical data on the VoIP interface are deleted automatically.
• Voice parameters – set the voice channel parameters:
*
Currently only SIP
80
*

2N - VoiceBlue Lite
• First RTP port – the first RTP port number.
The RTP port number is recommended to be even.
• Last RTP port – the last RTP port number. The RTP port
number is recommended to be even. The recommended
range of RTP port is 10 at least.
• SIP registration – set the parameters of VoiceBlue Lite
registration at the SIP Proxy;
• Registration expires – the timeout after which the
VoiceBlue Lite registration data get expired at the SIP
Proxy.
• Reattempt registration – the timeout after which the
request is resent.
• Registration domain – If the “SIP registrar” field is
empty, VoiceBlue Lite registers to the domain set in this
field.
• Name – user name
• User – user name for authentication
• Password – Password required for authentication with
SIP proxy
• Codecs priority – define which speech coding codec types
should be preferred. Codecs as recommended by ITU-T
G.729, G.711 and G.723.1 might be used (for more details
refer to Subs.
5.1).
• Codecs settings – sets how many speech blocks shall be coded
with the given algorithm at the same time. Coding of a high
number of blocks results in a lower resultant transmission rate
and a higher voice transmission delay.
• SIP protocol setting – used for setting SIP report sending
during establishing connection. In this section is possible to set
replacement of CLIP from GSM by the Name set in the SIP
registration section.
• IP addresses – used for setting IP addresses of interworking
network devices and default port numbers through which
VoiceBlue Lite will communicate with them.
81

• SIP Proxy (GSM->IP) – the IP address of the SIP Proxy
to which VoiceBlue Lite turns in the case of an incoming
GSM call.
• SIP Proxy (IP->GSM) – the IP address of the SIP Proxy
from which VoiceBlue Lite awaits outgoing GSM call
requests.
• SIP registrar – the IP address of the SIP registration
server.
• NAT firewall – the NAT firewall IP address.
• STUN server – IP address of the STUN server (Simple
Traversal of UDP through NAT’s (Network Address
Translation)), which is used for obtaining of public IP
address presented to Internet. It is useful to fill in this
field in case the VoiceBlue Lite is present in a private
network behind the firewall or NAT. Default port for
sending of requests on STUN is 3478.
• Next STUN server request [s] – for setup of time
period between two requests for public IP address
information.
Basic GSM parameters
Fig. 45 – Basic GSM Parameter Setting Window
82

2N - VoiceBlue Lite
• Call delay – the time period between the end of the last call
and beginning of the next call via one and the same GSM
module (all incoming and outgoing calls are rejected during
this time). The recommended value is about 2 s - do not change
this setting please unless absolutely necessary.
• Min. numbers from VoIP – the minimum count of digits dialled
into the GSM network.
• Max. numbers from VoIP – the maximum expected count of
digits dialled into the GSM network.
• Wait for next digit – time during which VoiceBlue Lite waits
for another digit dialled from the VoIP network to GSM.
• SIM number – the SIM Id number to be displayed in the
diagnostic window and records on calls.
• IMSI – International Mobile Subscriber Identity
• SCID – SIM Card Identification number
• Dial tone - selection of dial tones which will be played to the
caller from the GSM network
• Ring tone - selection of control ring tones which are to be
played to the caller from the GSM network.
• Error GSM causes – allows changing of GSM release causes
for call control. Individual causes are transferred to SIP
message number according the chart in “Cause transfer -> Add
-> ?” item.
• Causes transfer – for GSM call control causes change
83

GSM groups assignment
Fig. 46 – Group Assigning Window
The users communicating through VoiceBlue Lite can be divided
into user groups. You can define up to four mutually independent
groups of outgoing and incoming calls that may be assigned
arbitrarily to the GSM modules.
GSM outgoing groups
Fig. 47 – Outgoing Group Setting Window
The 2N - VoiceBlue Lite gateway allows you to work with four
groups of outgoing calls. You can select different settings for each
84

2N - VoiceBlue Lite
of them with respect to establishing connections, count of called
minutes and sent messages within a period. To set the company
parameters use Default. The meanings of the card items are as
follows:
• Roaming enabled for network – an international identification
code of the network for which roaming is enabled. It consists
of two numbers:
• MCC – Mobile Country Code (Czech Republic -
230)
• MNC – Mobile Network Code (T-Mobile 01,
Eurotel 02, Oskar 03)
Thus, the T-Mobile International Identification
Code in Czech Republic is 23001.
To disable roaming leave this field blank.
• CLIR – This parameter defines whether or not the calling SIM
card telephone number shall be displayed to the called party. It
is not recommended to present the telephone number of the
SIM card inserted in the GSM module to the called party to
avoid calling back problems. It is impossible for technical
reasons to transmit telephone numbers of SIP terminals to a
GSM network. One of the following parameters can be set for
each GSM group:
• Factory – default settings of the GSM provider.
• Disable (CLIP on) – the SIM card telephone
number is transmitted to the GSM network.
Contact your GSM provider for activation of this
service if it is not supported automatically.
• Enable (CLIP off) – the SIM card telephone
number is not transmitted to the GSM network.
CAUTION! Some GSM providers do not support
this function, which might lead to rejection of an
outgoing call.
• Max. number of called minutes – defines the maximum number
of minutes called within a moth through the given SIM card.
This parameter is ignored if 0 is selected.
85

• SMS messages number– defines the maximum possible number
of SMS messages sent within a month from the given SIM
card. This parameter is ignored if 0 is selected.
• Date of deleting stats – sets the day in a month on which the
statistic data on Max. number of called minutes and SMS
messages number are deleted. This parameter is ignored if 0 is
selected.
• Minimum length of call after connect – the length of the first
pulse after which pulses are counted according to the value
included in the Precision of couting length of call parameter.
• Precision of couting length of call – the number of seconds per
pulse after the timeout defined in the Minimum length of call
after connection parameter.
Example:
If, from the viewpoint of the GSM provider, a call shorter than
60s is billed as a 60s call, set the Minimum call length at 60s. If
the GSM provider bills calls in seconds after the first 60s, set
the Call length measurement accuracy at 1 s.
• Pseudo tariff – makes the GSM gateway generate tariff rate
pulses itself. The number defines how many pulses the gateway
transmits per minute. The 0 value disables this function.
• Delay for CONNECT [s] – a delay before sending information
on a connected call after reception from the GSM network.
• Delay for ALERTING [s] – a delay before sending information
on ringing start.
• Disconnect call – the currently made call is disconnected in
cases included in a pull-down menu.
• Date of deleting stats in group – defines the day on which
statistic data on disconnected calls are deleted.
86

2N - VoiceBlue Lite
• Default delay for “SMS at no answer” – the service SMS at no
answer makes it possible to send information text messages to
a user to the GSM network who at the time of a call from the
VoIP network was not available. The wording of the text
message can be edited in the field Text SMS (number = %N).
In this field it is possible to designate how long the called
party’s telephone should ring before the text message is sent. If
the value “0” is set here, this function is not switched on.
• Text of the “SMS at no answer” - in this field it is possible to
edit the text which will be sent via a text message if the
subscriber in the GSM network is unavailable.
• CLIP to GSM separator – if not empty, the character separates
Called party number and calling party number in the setup
message to GSM
Example:
“CLIP to GSM separator” = “#”. If the user 999 in VoIP
network dials +420123123123 to GSM, the VoiceBlue Lite
dials +420123123123#999 to GSM network.
87

GSM incoming groups
Fig. 48 – Incoming Group Setting Window
The 2N - VoiceBlue Lite gateway allows you to work with four
groups of incoming calls. You can select different settings for each
of them with respect to establishing incoming calls. To set the
default parameters use the Default button. The meanings of the
card items are as follows:
• Mode – set the way the GSM gateway shall process incoming
calls from the GSM network:
• Reject incoming calls – all incoming calls from the GSM
network are rejected automatically.
• Ignore incoming calls – all incoming calls from the GSM
network are ignored automatically. The calling subscriber
hears the ringing tone.
• Receive incoming calls + voice message – incoming calls
from the GSM network are received and, if defined so,
the voice message is enabled for the incoming call while
awaiting digits in DTMF.
88

2N - VoiceBlue Lite
• Receive incoming calls + dialtone – incoming GSM calls
are received and, if defined so, the simulated dial tone is
enabled for the incoming call while awaiting digits in
DTMF.
• CallBack after ring / Reject – in case the CLIP is
included in the CallBack table, a CallBack is made. The
GSM gateway rejects the incoming call and makes an
automatic CallBack.
• CallBack after ring / Ignore – in case the CLIP is
included in the CallBack table, a CallBack is made. The
incoming call is ignored. If the calling subscriber does
not hang up within the defined timeout (default = 10s),
the CallBack function is ignored and the call is processed
normally (refer to Subs. 7.5).
• Report to PC + voice message – the GSM gateway sends
information on an incoming call to a PC equipped with
call routing software. The DTMF with a voice message
may be enabled for the incoming call.
• Report to PC + dialtone – the GSM gateway sends
information on an incoming call to a PC equipped with
call routing software. The DTMF with a simulated second
dial tone may be enabled for the incoming call.
• Min. digits in DTMF – the minimum number of digits
required by the gateway in the DTMF.
• Max. digits in DTMF – the maximum number of digits
accepted by the gateway in the DTMF.
• Tout for entering DTMF digits [s] – a timeout during which
the GSM gateway waits for the first / another DTMF digit. If
0 is selected, the incoming call is connected automatically to
the numbers included in the List of called numbers.
• Day of deleting incoming stats– defines a day in a month on
which statistical data on incoming calls are deleted. By
setting this parameter at 0 you disable this function.
• Prefix before DISA – a digital prefix to precede the DTMF
automatically.
89

• CLIP – the '+' character from the CLIP shall be replaced
with a sequence of digits included in this field.
• CLIP to VoIP separator – if this field is not empty the
VoiceBlue Lite checks the CLIP from GSM whether
contains character filled in this item. If the character is
present in incoming CLIP VoiceBlue automatically dials
number following this character to VoIP network.
Example:
“CLIP to VoIP separator” = “#”. If the CLIP from GSM is
+420123123123#999 VoiceBlue Lite automatically dials 999
to VoIP network
• Time to keep CLIP in table [hours] – enter the time in hours
for how long should be the incoming calls routing record
kept in the dynamic CLIP routing table. The routing records
are added to the table automatically by establishing of
outgoing call to the GSM network. Incoming calls are routed
to the extension, which called the incoming CLIP as the last.
• Add record only for unconnected call – only unconnected
outgoing calls to the GSM records will be added to the
dynamic CLIP routing table by selecting of this item.
• Delete record for connected answer – dynamic CLIP
routing record will be removed from the table when the
originally called party in the GSM network calls back and
is linked to the originally calling extension in the VoIP
network.
90
 Loading...