

Page 1

!! Preliminary version of user guide v1.8 !!
User Manual for
22NN SSttaarrGGaattee
(( 550077000000EE,, 550077000011EE ,, 550077000022EE,, 55007700110011EE,, 550077001100EE )
22NN BBlluueeSSttaarr
(( 550077220000EE,, 550077221100EE )
22NN BBlluueeTToowweerr
(( 550077331100EE ))
)
)
This user guide contains installation and technical information about three types of 2N
GSM Gateways :
2N StarGate , 2N BlueStar , 2N BlueTower.
In cases that feature will be same for all three types, gateway name will be “PRIGW”. In the
other cases you find information for each type of gateway divided.
Version: 1.8p
Page 2

Page 3

!! Preliminary version of user guide v1.8 !!
Dear customer,
We congratulate you on purchasing your 2N product. This new product was developed
and produced with emphasis on maximum utility value, quality and reliability. Our wish
is to make you satisfied with the StarGate / BlueStar / BlueTower (PRIGW) completely
and for a long time.
! Important !
• The manufacturer is gradually improving the control program that is included in this product
(referred to as firmware and bootware). The used ISP (In System Programming) technology
gives you the possibility to store the most recent control program in your PRIGW by means
of a standard computer. The most recent version of the program together with all that is
necessary can be found in www.2n.cz and necessary instructions in the chapter
“Upgrading the control program” of this manual. It is recommendable to use the most
recent version of the program – thus, you will avoid unnecessary encounters with possible
shortcomings that have been eliminated already.
• If you program parameters of your PRIGW by means of your computer, you will need the
“PRIGW program“. You will find the most recent version of this programming tool in www.2n.cz
as well.
• In www.2n.cz you will also find the most recent version of this manual in the popular PDF
format. We recommend you to use it especially in connection with the control program
upgrade since the new functions are explained here.
• Before you start installing this product, check whether the delivery is complete with the
following packing list and read this manual thoroughly. The manufacturer cannot be held
responsible for any damages that occurred due to incorrect use of this product in
contradiction to this manual. The guarantee terms do not cover damages of the product
caused by rough handling, incorrect storage or by exceeding the quoted technical
parameters.
• Preliminary information about functions that are not available yet are differentiated by light
grey background or by grey letters instead of black ones.
1
!! Preliminary version of user guide v1.8 !!
Page 4

CONTENTS
1. DESCRIPTION - GENERAL DESIGN............................................................................................5
1.1. DIMENSIONS ...................................................................................................................................5
1.1.1. Basic Dimensions...................................................................................................................5
1.1.2. Front Side Division................................................................................................................5
1.1.3. Front side division for gateways with VoIP interface...........................................................6
1.2. AVAILABLE SOFTWARE ..................................................................................................................6
1.3. POWER SUPPLY...............................................................................................................................6
1.3.1. Description ............................................................................................................................6
2. DESCRIPTION – MAIN FEATURES..............................................................................................7
3. DESCRIPTION – PLUG-IN BOARDS...........................................................................................12
3.1. CPU BOARD .................................................................................................................................12
3.1.1. Board Description ...............................................................................................................12
3.1.2. COM1 Serial Interface Parameters.....................................................................................12
3.1.3. Lithium Battery Replacement ..............................................................................................13
3.1.4. Configuration Jumpers........................................................................................................14
3.2. AUX BOARD ................................................................................................................................15
3.2.1. Board Description ...............................................................................................................15
3.2.2. COM2 Serial Port Parameters............................................................................................15
3.2.3. Configuration Jumpers........................................................................................................16
3.3. PRI BOARD...................................................................................................................................17
3.3.1. Board Description ...............................................................................................................17
3.3.2. Configuration Jumpers........................................................................................................18
3.4. VOIP BOARD.................................................................................................................................20
3.4.1. Board Description ...............................................................................................................20
3.5. THIN VOIP BOARD........................................................................................................................20
3.6. GSM BOARD.................................................................................................................................21
3.6.1. Board Description ...............................................................................................................21
3.6.2. Configuration Jumpers........................................................................................................22
3.7. 3G
3.8. 3G
ONE CHANNEL CARD...............................................................................................................24
TWO CHANNEL CARD ..............................................................................................................25
4. ANTENNA SPLITTER.....................................................................................................................26
5. DIRECTIONAL GSM ANTENNA..................................................................................................28
6. DISCREET ANTENNA....................................................................................................................29
7. INSTALLATION...............................................................................................................................30
7.1. FIRMWARE VERSION AND LICENSE................................................................................................30
7.2. GSM NETWORK LIMITATION.........................................................................................................31
7.3. INSTALLATION CONDITIONS .........................................................................................................32
7.4. POTENTIAL GSM NETWORK PROBLEMS.......................................................................................32
7.5. MAIN INSTALLATION....................................................................................................................33
7.5.1. Control Ways.......................................................................................................................33
7.5.2. Configuration Ways.............................................................................................................33
7.5.3. Your first installation (quick step by step guide).................................................................33
7.7. CONFIGURATION OF 12 HP VOIP BOARD......................................................................................35
7.7.1. Main description of VoIP board.........................................................................................35
7.7.2. Default Settings....................................................................................................................35
2
Page 5

!! Preliminary version of user guide v1.8 !!
7.7.3. VoIP Board Configuration (Web Interface)........................................................................36
8.7.3 VoIP Board Firmware Upgrade.................................................................................................37
8. CONFIGURATION OF VOICE CALLBACK CENTER SOFTWARE.....................................42
8.1. SCHEME OF FUNCTION OF VOICE CALLBACK................................................................................42
8.2. INSTALLATION AND LICENSES.......................................................................................................42
8.3. CONFIGURATION OF VOICE CALLBACK CENTER SOFTWARE.........................................................47
9. STARGATE / BLUESTAR / BLUETOWER PROGRAM USER MANUAL.............................49
9.1. PROGRAM INSTALLATION .............................................................................................................49
9.2. PROGRAM RUNNING .....................................................................................................................49
9.3. CONNECTION WITH PRIGW .........................................................................................................50
9.4. MAIN MENU AND BUTTON BAR....................................................................................................50
9.5. CONFIGURATION...........................................................................................................................61
10. ACCOUNTER PROGRAM .........................................................................................................80
11. APPENDIX A - AT COMMANDS FOR COMMUNICATION..............................................84
12. APPENDIX B – LIST OF ALL STATUS CODES.....................................................................90
13. APPENDIX C - DESCRIPTION OF CDR LINE.......................................................................97
14. APPENDIX D - DESCRIPTION OF STATISTICS...................................................................97
15. APPENDIX D - TECHNICAL CONDITIONS FOR INSTALLATION .................................99
3
!! Preliminary version of user guide v1.8 !!
Page 6

2N StarGate / BlueStar / BlueTower
PRIGW is a compact yet highly sophisticated system. It supports full remote supervision
and configuration via an IP network, or using an external modem over a BRI-ISDN and analog
line, or over a B channel in a PRI-ISDN trunk. The system has been designed and works with a
lot of highly sophisticated functions, which make it fully client-oriented and highly reliable in
cooperation with both GSM networks and ISDN. In addition, it provides full monitoring and
comfortable configuration without functional limitations. Configuration alterations can be made
without resetting, i.e. under full operation. Hot-swappable plug-in GSM boards, which can be
swapped under full operation including SIM cards, are a matter of course. The use of up to four
SIM cards per GSM module in combination with an intelligent SIM card switching tool and
detailed statistics upgrade this system into a powerful LCR tool. High product stability is
achieved by the fact that the gateway is programmed in the ASM, i.e. OS-FREE system. Two
independent 30MHz Philips microprocessors provide an error-free operation, high speed,
automatic fault detection, and easy upgrade. The system also features easy installation, simple
operation and easy replacement of defective parts - it is composed of plug-in boards that
communicate along system buses independently. As already mentioned, the system allows for
an easy detection of defective parts, automatic locking against use and easy replacement (hotswap). Thanks to the above mentioned properties, the system can be installed and configured
successfully within one hour!
2N BlueStar
2N StarGate
2N BlueTower
4
Page 7

!! Preliminary version of user guide v1.8 !!
1. Description - General Design
1.1. Dimensions
1.1.1. Basic Dimensions
1.1.1.1 2N StarGate / BlueStar
The system is integrated in a 19’’ subrack of the height of 3U and depth of 360mm. The
front side is open, equipped with guides for plug-in boards with front panels – the panel
including a mains switch is part of the subrack. In case not all GSM boards are plugged in, the
free section of the front side must be covered with a fixed panel (fixed panels).
The back side is completely covered with a panel with a built-in ventilator, which is
switched by a thermostat for higher reliability and longer life. An AC mains supply unit is located
in front of the ventilator. The bottom and upper sides are covered with perforated sheet, the
assembly flanges are provided with handrails.
The system bus is designed as a printed circuit board (PCB) with DIN connectors and
fitted to the inner subrack carrier profiles.
1.1.1.2 2N BlueTower
The system is integrated in a small 19’’ subrack of the height of 3U and depth of 320mm.
The front side is open, equipped with guides for plug-in boards with front panels – the panel
including a mains switch is part of the subrack. In case not all GSM boards are plugged in, the
free section of the front side must be covered with a fixed panel (fixed panels).
The system bus is designed as a printed circuit board (PCB) with DIN connectors and fitted to
the inner subrack carrier profiles
1.1.1.3 2N StarGate 3G Extension rack
To use 2N StarGate with 3G extension card you need an extension rack (part No.
507050E). This 19“ subrack is 6U high and 360mm deep. Its front side open to accept plug-in
boards. There are two antenna connectors for 3G YAGI antennas on its backside. Before
attaching the 3G extension rack you have to replace the existing StarGate GSM cards with 3G
extension cards (part No. 507059E).
1.1.2. Front Side Division
The subrack width is divided into an 8HP-wide mains panel and 19 4HP-wide modules in
the following sequence (from right to left):
Board Type Size StarGate BlueStar BlueTower
8HP fixed panel with a mains switch, fuse
and mains cable socket
CPU board 4HP YES YES YES
AUX board 4HP YES YES YES
PRI board 4HP YES YES YES
GSM board 4HP Up to 16x Up to 8x Up to 4x
3G extension card 4HP Up to 16x NO NO
3G card (one channel) 4HP Up to 16x Up to 8x NO
3G card (two channels) 4HP Up to 16x Up to 8x Up to 2x
Thin VoIP card 4HP YES YES YES
Internal antenna splitter BlueStar 32HP NO YES NO
Internal antenna splitter BlueTower 8HP NO NO YES*
8HP YES YES NO
5
!! Preliminary version of user guide v1.8 !!
Page 8

1.1.3. Front side division for gateways with VoIP interface
The subrack width is divided into an 8HP-wide mains panel and 19 4HP-wide modules in
the following sequence (from right to left):
Board Type Size StarGate BlueStar BlueTower
VoIP board 12HP YES YES NO
CPU board 4HP YES YES YES
AUX board 4HP YES YES YES
PRI board 4HP NO*** NO*** YES
GSM board 4HP Up to 16x Up to 8x Up to 4x
3G card (one channel) 4HP Up to 16x Up to 8x** Up to 4x**
3G card (two channels)** 4HP Up to 16x Up to 8x Up to 2x
Thin VoIP card 4HP YES YES YES
Internal antenna splitter BlueStar 32HP NO YES NO
Internal antenna splitter BlueTower 8HP NO NO YES*
1.2. Available Software
PRIGW program - tool to configure and control of the gateway
Accounter tools - tools for automatic download and handling with CDR information
1.3. Power Supply
1.3.1. Description
The system uses an industrial mains supply unit with primary (input) voltage of 100240VAC 50/60Hz and secondary (output) voltage of 5V/30A or 5V/4A with natural cooling and
an auxiliary external ventilator , which is switched on automatically whenever the power supply
temperature exceeds 70°C. The supply is designed with a 30% reserve even under the
maximum load.
Type of power supply Active cooler StarGate BlueStar BlueTower
Internal 90-260V/50-60Hz = 5V/30A YES YES YES NO
Internal 48DC YES YES YES NO
Internal 90-260V/50-60Hz = 5V/10A NO NO NO YES
*type of power supply depends on order number
6
Page 9

)
!! Preliminary version of user guide v1.8 !!
2. Description – Main Features
Quick unit start – being free of an operating system (programmed in the processor code),
the system is completely ready to work within 30 seconds following its power on/restarting. Of
course, the full function time of all GSM modules depends on the actual load and capacity of
GSM networks to which the PRIGW is connected.
Intelligent call processing – the PRIGW is fully prepared to route PRI-ISDN outgoing
calls into GSM networks or back to second PRI ISDN interface and vice versa. A fully intelligent
LCR (Least Cost Routing) function is the basic tool, allowing to route outgoing ISDN calls to
GSM networks (or ISDN network) both by the called number prefix, and current date and time
and GSM module load in the particular group (LCR function is only on PRI 1 port, all calls to PRI
2 port will be directly rerouted to PRI 1 interface). Functions taken over from dialers, which
enable to replace a part or whole of the dialed number with another number, are a matter of
course. Calls incoming from GSM networks can be ignored (the calling party hears the ringing
tone), fully rejected (the calling party gets the busy tone/voice message), or received. In the
last-named case, the DTMF dialing in combination with voice messages, or direct connection to
the operator(s) can be selected (calls can be routed only to PRI 1 port). Using the 2N RCU (see
later), or XAPI with NQuire support, you can get a highly powerful routing tool, which contains
so-called blacklist charts – barred numbers - and practically unlimited routing charts. This
combination is extremely useful for installation sites with the so-called full telephone number
carryover where a plenty of numbers come into being whose prefixes do not match the official
prefixes of providers.
StarGate
BlueStar
BlueTower*
Customer’s switch/PBX
GSM
network 1
GSM
network 2
PRI2**
Calls 1 and 2 are transparently*
rerouted to defined GSM
network
All incoming calls are
transparently rerouted to PBX
Extension 1 calls number which is presented in
GSM network 1
Extension 2 calls number which is presented in
GSM network 2
PSTN
network
*VoIP interface instead of PRI1 interface is not
available in BlueTower systems
** PRI2 interface is available only with PRI1
inteface (not with 12HP VoIP card)
!! Preliminary version of user guide v1.8 !!
Extension 3 calls number which is presented in
PSTN network 2
Extension 4 calls number with unknown (for
PRIGW
dialed prefix
7
Page 10

Example of call cost reduction with using of PRIGW with Thin VoIP card
(
)
p
GSM
networks
BlueTower
SPAIN
PSTN
network
ISDN
PRI
GSM
networks
FRANCE
PSTN
network
ISDN
PRI
BlueTower
ISDN
PRI
networks
Internet
GSM
PSTN
network
ISDN
PRI
BlueTower
CZECH REP.
ISDN
PRI
SIP
roxy
Company A
Headquaters
Prague
A (Madrid)
PBX
A (Paris)
PBX
- BlueTower with Thin VoIP card you handle with 2xPRI ISDN interfaces, 4xVoIP-SIP
interface and up to 4xGSM interface.
Selection of GSM module use – the PRIGW allows you to select one of three available
ways of GSM module occupation: 1. Any outgoing call is set up via a GSM module according to
the B channel used. This option helps transfer routing functions to a connected PBX router. 2.
This mode allows to occupy GSM modules in groups cyclically, and 3. the last option helps
select GSM modules in a group according to the number of minutes called (the counting mode
can be predefined of course).
GSM network friendly – the PRIGW allows activating the automatic GSM module log-out
in certain time intervals. Using this function you can log out and disable automatically unused
GSM modules at defined time intervals. Since the time between the GSM module activation and
readiness for work is roughly 10-25 seconds, a user-defined hot reserve is maintained, i.e.
some GSM modules keep logged in. This means that any increase in the 2N PRIGW load result
in an automatic activation of other GSM modules so that the hot reserve be maintained. This
feature also reduces the capacity of the GSM network to detect a unit and disconnect it from the
mains.
High connection rate – since GSM networks are not quite reliable and show lack of
capacity occasionally, the PRIGW is equipped with the automatic call forwarding to other GSM
networks or call rejection (without call loss). This function uses the ISDN signaling protocol
where a call SETUP message is sent to the PRIGW first. This message contains the called
number and CLIP if necessary. Having received this message, the 2N PRIGW can either: reject
the call (the other party will route it to another device), REJECT message including reasoning
(CAUSE), or receive and connect the call – SETUP.ACK message.
The device on the other side awaits one of the above mentioned responses for 2 seconds.
During this time, PRIGW has to decide whether it is able to set up the call, tries to find a free
GSM module and establish connection. If the selected GSM module is busy, it must find other
free GSM modules. If it fails to find a free route, it rejects the call request. The CAUSE number
is user-defined. If it succeeds, it receives and sets up the call.
8
Page 11

!! Preliminary version of user guide v1.8 !!
Detailed statistics – provides a detailed overview of the count of incoming and outgoing
calls and their successful connections. The statistic data can be displayed either globally for the
whole PRIGW, or for the selected GSM provider, or the selected GSM module (SIM card).
These data are generated automatically.
Detailed call information – the PRIGW can save information on completed calls
automatically (CDR). Call information includes:
call beginning date and time
call type
I-FD : Not connected incoming call
I-OK : Successfully connected incoming call
O-FD : Unsuccessful outgoing call
O-OK : Successfully connected outgoing call
Relation end reasoning (CAUSE) sent to ISDN interface
Number of B channel used
Number of GSM module used
Number of GSM group used
Connection setup time
Call duration mmm:ss (max. 255:59)
Call cost (if pseudo tariff metering is enabled)
ID of the gateway
Called number
CLIP
SIM card position number
SIM card IMSI or SCID
High number of connected calls – owing to a very short GSM call connecting (routing)
time and intelligent call rerouting in the event of failure, PRIGW features high call time per
month (traffic volume of over 500,000 minutes/month). The connectivity depends on PRIGW
configuration and GSM network capacity of course.
Gateway Traffic volume (minutes/month)
StarGate Over 500.000
BlueStar Over 250.000
BlueTower Over 125.000
SMS receive/send support – PRIGW helps send and receive SMS in the PDU format. An
intelligent SMS sending over a selected GSM network or module and automatic announcement
of incoming SMS are a matter of course.
Up to 8 GSM groups – you can define up to 8 independent SIM card groups in the
system. For example, one GSM group can contain one provider‘s SIM cards.
Up to 16 GSM modules – the PRIGW is a modular system where 1 to 16 GSM boards
with two GSM modules each can be installed. The GSM boards are hot-swappable, i.e. can be
replaced easily during operation.
Gateway Maximum number of GSM modules
StarGate 32
BlueStar 16
BlueTower 8
9
!! Preliminary version of user guide v1.8 !!
Page 12

Up to 64 SIM cards – each GSM board contains 16 SIM card holders. However, two SIM
cards are only connected to the GSM modules at one moment. An intelligent SIM card switching
according to time, at random intervals, according to completed minutes or sent SMS enables a
client-oriented approach. A defective SIM card blocking is a matter of course.
World wide use– GSM/3G boards are currently available with GSM modules from
Siemens TC35i (900/1800MHz), MC55i (850/900/1800/1900MHz) and Wavecom
(850/1900MHz or 900/1800MHz). 3G modules SierraWireless (All UMTS and GSM bands).
Virtual SIM card support – PRIGW supports 2N SIM Star system.
One antenna per system only – One receive/transmission antennas can be used in
combination with an antenna splitter (see below) for all of up to 16 GSM modules.
Gateway Number of antennas with using antenna splitter
StarGate 2
BlueStar 1
BlueTower 1
Hot-swappable boards – as mentioned above, all GSM boards are hot-swappable. As a
matter of course, the access to the GSM board can be restricted upon the user‘s request. This
solution provides an easy SIM card replacement during operation.
Support Callback – PRIGW supports to make call to GSM and after connection make call to
PRI interface and connect both calls. This feature can be controlled by AT command or XAPI server
SW (easy to implement it to some additional callback SW, or you can use 2N callback software)
CLIP routing – according incoming CLIP from GSM network the gateway can route the
call to defined number in PRI ISDN
AutoCLIP routing – PRI GW can store Calling and called numbers in case of outgoing call
to GSM network. In case that somebody calls from GSM network and have CLIP same as stored
Called number, the gateway will automatically reroute the call to defined PRI ISDN number.
2x PRI ISDN interface – is configurable in all available modes, i.e. as Network
Termination (NT), or Terminal Equipment (TE). It can also be set as a Master (synchronization
clock) or a Slave. Using PRI board switches you can easily select RX and TX directions –
hence, you can use a cross-over or not-cross-over cable for the PRIGW <> PBX (Switch)
connection.
VoIP interface – supporting SIP signaling and following codec: G.711, G.723, G.729. With
using VoIP interface you can use only one PRI ISDN interface***.
Easy control and configuration – The PRIGW can be configured locally or remotely. To
do this, you can employ the following types of connection:
• 2 local RS232 interfaces;
• remote control by an external analog, ISDN, or GSM modem connected to
a defined RS232 interface. Automatic detection and configuration capacities make
the modem perfectly available.
• remotely via a 10baseT IP interface, using a simple Telnet protocol;
• remotely by the in-band B channel in the PRI-ISDN interface**.
10
Page 13

!! Preliminary version of user guide v1.8 !!
No SW is necessary for configuration – system communicates through an RS232 interface
and Telnet protocol using standard extended AT commands. However, high-quality software
running under the Windows OS has been designed for user-friendly control and configuration.
Fault diagnostics is very simple too – system informs of a fault both visually (by LED
diodes) and via any interface. A direct display of all processes on ISDN or IP layers is a matter
of course too.
Quality control – you can check the quality of system calls any time by test calls (an
analog headset connector is available for test calling into GSM networks or ISDN interface) or
by-hearing of one of the two current call directions.
Quick and easy update – since PRIGW is not bound to any operating system, any
firmware updating is quick and comfortable and is made by the available software. Updating can
be performed locally or remotely and the process is protected against unintentional
disconnection. The updating process takes a few minutes and the existing configuration is
retained.
** optional part
*** actually not possible, but it will be possible to replace 1. GSM card by 1x PRI card.
11
!! Preliminary version of user guide v1.8 !!
Page 14

3. Description – Plug-In Boards
Warning: GSM boards are always locked for one type of gateway. See table below for
more information:
Plug-in board StarGate BlueStar BlueTower
CPU card StarGate YES NO NO
CPU card BlueStar NO YES NO
CPU card BlueTower NO NO YES
AUX card StarGate YES YES YES
AUX card BlueStar YES YES YES
AUX card BlueTower YES YES YES
PRI card StarGate YES YES YES
PRI card BlueStar YES YES YES
PRI card BlueTower YES YES YES
GSM card StarGate YES NO NO
GSM card BlueStar NO YES NO
GSM card BlueTower NO NO YES
12HP VoIP card YES YES NO
4HP Thin VoIP card YES YES YES
3G two channel card StarGate YES NO NO
3G two channel card BlueStar NO YES NO
3G two channel card BlueTower NO NO YES
3.1. CPU Board
3.1.1. Board Description
The CPU board contains a powerful processor system controlling the whole system. The
board is designed on a 4-layer PCB of the size of 160x100mm. A simple serial interface COM1,
an Ethernet connector (10Base-T), and 5 board status LED indicators are located on the front
panel.
PWR LED
INIT LED
MEM LED
LINK LED
ACT LED
3.1.2. COM1 Serial Interface Parameters
The COM1 interface is used as a local port for temporary connection of a PC (terminal) for
installation and servicing purposes and permanent connection of the SMS server (supervision
PC). It allows to provide local monitoring, configuration, tracing and firmware upgrade.
Transmission rate 57.6 kBd
Bit format start, 8bit, stop (no parity)
Signals RXD,TXD,RTS,CTS,GND
indicates board supply (LED is green in case of PRIGW)
indicates board initialization or error status
indicates call memory full (not shining=empty memory,
blinking 1:1 memory is 50% full, shining = 100% full
memory
indicates connection to Ethernet
indicates activity via Ethernet
12
Page 15

!! Preliminary version of user guide v1.8 !!
3.1.3. Lithium Battery Replacement
WARNING! Incorrect battery replacement may cause explosion. The
battery can be replaced with a battery of the same or equivalent type
only as recommended by the manufacturer. Handle used batteries as
instructed by the manufacturer.
The lithium battery on the CPU board backs up the internal real time clock in case of
supply power outage. Its average life is about three years, then it is advisable to replace it
preventively. Replacing the lithium battery, be sure to turn the subrack power supply off using
the mains switch and, having loosened two fitting screws, push the CPU board out. Remove the
old battery from the holder using a suitable tool and insert a new one. Restore the original
status taking the said steps in the opposite order. Battery type: CR2430.
WARNING! Never use metal tools for battery replacement; neither the
new nor the old battery may be short-circuited! A short-circuit may
result in battery damage or explosion!!!
Dispose of used batteries in accordance with applicable regulations, put them in a recycling
yard, for example.
13
!! Preliminary version of user guide v1.8 !!
Page 16

3.1.4. Configuration Jumpers
There are three configuration jumpers on the CPU board. Jumper JP1 is intended for a change
of the board addressing and is not used at present. It need not be applied during a common
firmware upgrade. By default, jumper JP1 is disconnected. JP2 is intended for switching serial
port between CPU board and optional extension board. By default, jumper JP2 are connected.
14
Page 17

!! Preliminary version of user guide v1.8 !!
3.2. AUX Board
3.2.1. Board Description
The AUX board contains a switching array and system of voice messages, controlled by
an independent processor system separated from the system bus. The AUX port is used for
making testing calls or recording voice messages. The input amplifier is designed for an electret
microphone, the output amplifier for 150ohm earphones. The board is designed on a 4-layer
PCB of the size of 160x100mm. A serial interface COM2, microtelephone or headphone
connector, and 5 board status indictors lead to the front panel.
PWR LED
Lights on Switched on
Lights off Switched off
Blinking Board in sleep mode
INIT LED
Blinks Indicates the initialization of the board
Lights on (45 sec) Indicates duplication of the new firmware
Lights on (still) Board initialization failure
AUX LED
Lights on Waiting for incoming call (AT!W…)
Blinks Indicates the call through the testing AUX interface
Lights off The testing interface on-hooked.
Rx LED
Tx LED
3.2.2. COM2 Serial Port Parameters
The COM2 interface is used a supervision port for remote connection of a PC (terminal)
using ISDN or analog modem (also for loading voice message into the AUX board processor
memory). It allows to provide remote monitoring, configuration, tracing and firmware upgrade.
Transmission rate 57.6 kBd
Bit format start, 8bit, stop (no parity)
Signals complete 9-pin wiring
Indicates board supply
Indicates board initialization or error status
indicates activity on AUX port (analogue interface)
indicates reception via COM2
indicates transmission via COM2
15
!! Preliminary version of user guide v1.8 !!
Page 18

3.2.3. Configuration Jumpers
Default
Default. Please
don’t change
JP4a
2,3 earphone, 1 +MIC, 4 -MIC
JP4b
2,3 earphone, 4 +MIC, 1 -MIC
JP4c
1,4 earphone, 2 +MIC, 3 -MIC
JP4d
1,4 earphone, 3 +MIC, 2 -MIC
Connector for
analog headset
JP3b - DISA Voice upload procedure
JP3a - Operational status
There are four configuration jumpers on the AUX board. Jumper JP1 is intended for a
change of the board addressing and is not used at present. The field of jumpers JP3 helps you
redirect the COM2 interface for upload the DISA voice message. The jumper field JP4 is used
for setting the AUX interface to correspond with the microtelephone or headphone configuration.
Connector K1 is intended for servicing purposes only and may not be used. By default, jumpers
JP1 and JP2 are disconnected, jumper JP3 is connected as shown in Fig. JP3a and jumper JP4
as shown in Fig. JP4a.
16
Page 19

!! Preliminary version of user guide v1.8 !!
3.3. PRI Board
3.3.1. Board Description
The PRI board contains an one or two ISDN interfaces and PCM bus timing circuits. PRI 1
interface is designed as internal (on this port is activated LCR function), PRI 2 port is designed
as external (all calls from the port will be routed to PRI 1 port). The interface can work in the
MASTER or SLAVE mod (via PRIGW program you can set mode of PRI 1 port, PRI 2 port has
always opposite mode!). The output can be configured as TERMINAL or NETWORK by jumpers
(switching of wires – for software switch you have to use PRIGW program!). These jumpers
HAVE TO be set same as PRI configuration – two NT and TE modes will cause malfunction of
PRI board or backup connection* ! The board is designed on a 4-layer PCB of the size of
160x100mm. A PRIMARY ISDN interface and 5 board status indicators are located on the front
panel.
* the PRI board contains four switches (can be deactivated by jumpers) which makes
hardware connection between PRI 1 and PRI 2 in case that system is switched off or has some
software problem.
PWR LED
Lights on Switched on
Lights off Switched off
INIT LED
Blinks Indicates the initialization of the board
Lights on (still) Board initialization failure
LAY3 LED
Lights on active call or channel restart
Lights off No call through PRI ISDN
LAY2 LED
Lights on Established
Lights off Not established
Blinking Not established
LAY1 LED
Lights on synchronized
Lights off Not synchronized (disconnected)
Blinking slowly No frame synchronization
Blinking quickly No multi-frame synchronization
Indicates board supply
Indicates board initialization or error status
indicates layer 3 status
indicates layer 2 status
indicates layer 1 status
17
!! Preliminary version of user guide v1.8 !!
Page 20

3.3.2. Configuration Jumpers
Default. Please
don’t change
Default. Please
don’t change
PRI 2 PRI 1
Active
JP4
RJ45 connector for
PRI-ISDN network
Disable
TE
NT
There are four configuration jumpers on the PRI board. Jumper JP1 is intended for a
change of the board addressing and is not used at present. Jumpers JP2, JP3 is used for
hardware switching of the PRI ISDN connector into the TE or NT configuration. This operation
means only swapping of the transmitting and receiving connector pairs, the interface
configuration must be made by software. With jumper JP4 you can activate/deactivate back-up
connection between PRI1 and PRI2 in case that system is switched off or PRI board isn’t
handled by system . By default, jumpers JP1 is disconnected, jumper JP2 is connected as TE,
jumper JP3 is connected as NT and JP4 is connected.
18
Page 21

p
p
p
p
p
p
p
p
X
!! Preliminary version of user guide v1.8 !!
4
2
1
Fig.: contacts of TE connectors
5
63
7
8
1 RX
1 ne
oužit
2 R
oužit
2 ne
3 Not used
3 Tx
4 Rx
4 TX
5 Rx
5 TX
6 Not used
6 Tx
7 Not used
oužit
7 ne
8 Not used
8 ne
oužit
Pair 1
Pair 2
3
4
2
1
Fig.: contacts of NT connectors
Pair 4
5
63
7
8
1 TX
1 ne
oužit
2 ne
oužit
2 TX
3 Not used
3 Rx
4 RX
4 Tx
5 Tx
5 RX
6 Not used
6 Rx
7 Not used
7 ne
oužit
8 Not used
oužit
8 ne
Best way how to connect PRIGW unit into your telecomm. site:
Your
switch
EuroISDN, Q.931 EDSS1
PRIGW
unit
Port: NT
Synchronization: MASTER
Port PRI 1: TE
Synchronization: SLAVE
TEI : 0
Connection with 2x PRI BOARD (connection to PSTN <> PBX trunk):
Your
Switch
Port: TE
Synchronization: SLAVE
TEI : 0
EuroISDN, Q.931 EDSS1
Port PRI 1: NT
Synchronization: MASTER
TEI : 0
PRIGW
unit
Port PRI 2: TE
Synchronization: SLAVE
TEI : 0
Port: NT
Synchronization: MASTER
TEI : 0
PSTN
network
Connection between two PRI equipments
In case that system is switched off or has some SW problem (uploading firmware), switches on PRI board
automatically disconnect PRIGW and makes direct connection between your switch and PSTN network.
* port mode (NT, TE) and Synchronization (MASTER, SLAVE) must be different on the switch than on the
PRIGW! TEI management number must be same on both equipment units!
19
!! Preliminary version of user guide v1.8 !!
Page 22

3.4. VoIP board
3.4.1. Board Description
The VoIP mainboard contains VoIP card with signaling processors and main control
processor. On mainboard are is located 10/100BaseT Ethernet switch and processor for
convertion of voice streams. The mainboard is designed on a 4-layer PCB of the size of
160x100mm. 5 board status indicators are located on the front panel.
Possible statuses of indication LED diodes (units with firmware 02.09.xx and higher):
PWR LED
Lights on Switched on
Lights off Switched off
Blinking Board in sleep mode
INIT LED
Blinking Indicates the initialization of the desk
Lights on (still) Board initialization failure
Lay 2 LED
Lay 3 LED
VoIP board is configurable by web interface (see chapter VoIP board configuration).
Signalization packets (SIP) must be routed to IP address of CPU, voice stream (RTP packets)
to IP address of VoIP board !
Indicates board supply
Indicates board initialization or error status
Not implemented
Not implemented
3.5. Thin VoIP board
3.5.1. Board Description
New “thin” variant of VoIP card for StarGate*, BlueStar* and BlueTower systems. VoIP
board contains digital signaling processor, license chip. There is also located10/100BaseT
Ethernet switch. The mainboard is designed on a 4-layer PCB of the size of 160x100mm.
5 board status indicators are located on the front panel. Configuration of this type of VoIP
board is completely via standart configuration tool.
Possible statuses of indication LED diodes (units with firmware 02.09.xx and higher):
PWR LED
Lights on Switched on
Lights off Switched off
Blinking Board in sleep mode
INIT LED
Blinking Indicates the initialization of the desk
Lights on (still)* Board initialization failure
Signalization packets (SIP) must be routed to IP address of CPU, voice stream (RTP packets)
to IP address of VoIP board !
*Normal initialization of the board is about 1 minute from start of whole system.
Indicates board supply
Indicates board initialization or error status
20
Page 23

!! Preliminary version of user guide v1.8 !!
3.6. GSM board
3.6.1. Board Description
• In PRIGW you can use seven types of GSM boards (with various GSM modules):
- GSM board with two modules Sony-Ericsson GM22 and two SIM holders.
- GSM board with two modules Sony-Ericsson GM47 and two SIM holders.
- GSM board with two modules Sony-Ericsson GM48 and two SIM holders.
- GSM board with two modules Siemens TC35i and eight SIM holders.
- GSM board with two modules Siemens TC35i and sixteen SIM holders
- GSM board with two modules Siemens MC55i and eight SIM holders.
- GSM board with two modules Siemens MC55i and sixteen SIM holders.
- GSM board with two modules Wavecom Q24CLA and eight SIM holders.
- GSM board with two modules Wavecom Q24CLA and sixteen SIM holders.
- 3G board with two modules SierraWirelless MC8775V and eight SIM holders.
The GSM board contains two GSM modules, circuits for their connection to the PCM bus,
and DTMF receivers. The board is designed on a 4-layer PCB of the size of 160x100mm. Pins 1
and 32 are approximately 1 mm longer in the GSM board system connector and are used for
“hot swap” power feeding, allowing to push the board in and out even during operation. This
feature is handy especially for installation or SIM card replacement. Two FME antenna
connectors (for GSM boards with modules GM22) or two SMA antenna connectors (for GSM
boards with modules TC35 and MC45(6)) and 5 board status indicators are located on the front
panel.
Possible statuses of indication LED diodes (units with firmware 02.09.xx and higher):
PWR LED
Lights on Switched on
Lights off Switched off
Blinking Board in sleep mode
INIT LED
Blinking Indicates the initialization of the desk
Lights on (still) Board initialization failure
SLP LED
GSM1 LED
GSM2 LED
Lights on Proceeding call
Lights off Unused GSM module
Blinking slowly Module is terminating of call (2 seconds)
Blinking quickly Log in GSM network / initialization of SIM card
GSM1 LED
GSM2 LED
Lights on GSM module is blocked or initializing
Blinking quickly GSM module is powered off
Indicates board supply
Indicates board initialization or error status
Both GSM modules are manually switched off
indicates GSM 1 module status
indicates GSM 2 module status
indicates GSM 1 module status
indicates GSM 2 module status
21
!! Preliminary version of user guide v1.8 !!
Page 24

3.6.2. Configuration Jumpers
3.6.2.1 GSM board with 4SIM cards per GSM module
SIM1 for
GSM1
SIM2 for
GSM1
SIM3 for
GSM1
SIM1 for
GSM2
SIM2 for
GSM2
SIM3 for
GSM2
SIM4 for
GSM1
SIM4 for
GSM2
There is just one configuration jumper on the GSM board. Jumper JP1 is intended for a
change of the board addressing and is not applied at present. Connector K2 is designed for
servicing purposes only and may not be connected. Jumper JP1 is disconnected by default.
22
Page 25

!! Preliminary version of user guide v1.8 !!
3.6.2.2 GSM board with 8SIM cards per GSM module
JP1
SIM1_4
SIM1_3
SIM1_2
SIM1_8
SIM1_7
SIM1_6
SIM2_5
SIM2_6
SIM2_7
SIM2_1
SIM2_2
JP2
SIM2_3
JP3
SIM1_1
SIM1_5
SIM2_8
SIM2_4
23
!! Preliminary version of user guide v1.8 !!
Page 26

3.7. 3G One channel card
With one Huaiwei 3G+GSM card
JP1
SIM1_4
SIM1_3
SIM1_2
SIM1_8
SIM1_7
SIM1_6
Not used
SIM2_5
Not used
SIM2_6
Not used
SIM2_7
SIM2_1
Not used
SIM2_2
Not used
JP2
Not used
SIM2_3
JP3
SIM1_1
SIM1_5
Not used Not used
SIM2_8
SIM2_4
24
Page 27

!! Preliminary version of user guide v1.8 !!
3.8. 3G Two channel card
SIM1 for
Ch1
SIM2 for
Ch1
SIM3 for
Ch1
Channel 1
SIM1 for
Ch2
SIM2 for
Ch2
SIM3 for
Ch2
Channel 2
SIM4 for
Ch1
SIM4 for
Ch2
25
!! Preliminary version of user guide v1.8 !!
Page 28

4. Antenna Splitter
4.1. Splitter description
Internal Antenna Splitter for BlueStar
Internal Antenna Splitter for BlueTower
Antenna splitter is the passive unit suitable for GSM gateways. It can combine maximum 16
antenna inputs to one 1 antenna output. Antenna splitter saves antenna cable, number of
outdoor antennas and mounting space on the roof.
As a passive unit it inserts the loss between antenna and the equipment. Splitter configuration
depends on signal level at concrete placing and number of using directions or GSM providers.
Splitter can be external (StarGate) or internal (BlueStar, BlueTower)
four inputs and one output splitter block
two inputs and one output splitter block
4.1.1. Standard configurations of external antenna splitter
External Antenna Splitter for StarGate
NUMBER
OF INPUTS
32 2 < 15 dB 2U
32 4 < 11 dB 2U
32 8 < 8 dB 2U
16 1 < 15 dB 1U
16 2 < 11 dB 1U
16 4 < 8 dB 1U
12 3 < 8 dB 1U
NUMBER
OF OUTPUTS
INPUT – OUTPUT
INSERTION LOSS
26
UNIT
HIGH
Page 29

!! Preliminary version of user guide v1.8 !!
4.1.2. Standard configuration of internal antenna splitter of 3G Extension rack
NUMBER
OF INPUTS
32 2 < 15 dB 6U
4.1.3. Standard configuration of internal antenna splitter for BlueStar
NUMBER
OF OUTPUTS
INPUT – OUTPUT
INSERTION LOSS
UNIT
HIGH
NUMBER
OF INPUTS
16 2
16 1
8 2
8 1
4.1.4. Standard configuration of internal antenna splitter for BlueTower
NUMBER
OF INPUTS
4 1
4.1.5. Technical parameters of antenna splitters
Parameters Value Notice
Connector type
Input connector SMA type, female
Output antenna connector N type, female
RF parameters
Impedance 50 OHM
Frequency 850 – 1900 MHz
Insertion loss < 8, 11, 15 dB According configuration
Isolation between two channels > 20 dB
Output over voltage protection
Device type Gas protector
NUMBER
OF OUTPUTS
NUMBER
OF OUTPUTS
Protected voltage level 90 V
Peak current 10 KA
Insertion loss 0.2 dB
To minimize signal loss, use the dummy load on the free (not used) connectors of the antenna
combiner. If you have not received the dummy loads together with the SMA connector, you can
order them separately.
Results of measurement with and without „dummy load“:
27
!! Preliminary version of user guide v1.8 !!
Page 30

- db
Without dummy load
5. Directional GSM Antenna
Directional antenna basic parameters:
Type CPY 9214
Number of elements 14
Frequency 824 – 896, 1770 – 1880 MHz
Gain 9.5 dB / 13 dB
Cable RG 58, 10m
V.S.W.R < 1.5 : 1
Connector N type, male
- db
With dummy load
Directional antenna
28
Page 31

!! Preliminary version of user guide v1.8 !!
Fig.:The example of the right
installation of directional antennas
Warning:
The antenna has to be placed according to safety rules of overvoltage
protection and grounding.
6. Discreet Antenna
Discreet antenna basic parameters:
Type Car antenna
Gain 3dB
Cable Coax cable 174A (5 m)
Connector SMA (male)
Discreet antenna
29
!! Preliminary version of user guide v1.8 !!
Page 32

7. Installation
7.1. Firmware version and license
Before installation of your PRIGW Gateway please make upload of new FW to the
gateway. Actual version of the firmware + all software you find on enclosed CD, or on our
website www.2N.cz .
FIRMWARE uploading procedure (by local serial port):
− Connect your PC to PRIGW (COM1) via RS232 (serial port).
− Prepare the firmware-containing file into a folder selected by you (Pxxxx-V-xx.xx.xx.hex).
− Run PRIGW program
− In the section “Gateway control” choose item “Firmware/Licence”
− Choose file in “Firmware file” containing new firmware (Pxxxx-V-xx.xx.xx.hex)
− Click on button “Upgrade firmware trough COM”.
− The program now automatically uploads your new firmware (it’s takes about 2 minutes)
– the gateway is reset during this procedure (thus discontinues all current calls and
SMS). Do not interrupt the program during this procedure to avoid errors in firmware
uploading – otherwise the gateway might stop working!
If procedure of uploading firmware was terminated, please make cool reset of the gateway
and re-load PRIGW program and try to upload firmware again.
FIRMWARE uploading procedure (remotely by ethernet)*:
- Run PRIGW program
- In section “Gateway control” choose item “Firmware/Licence”
- Choose file in “Firmware file” containing new firmware (Pxxxx-V-xx.xx.xx.hex)
- Click on button “Upgrade firmware trough Ethernet”.
- The program now automatically uploads your new firmware (it’s takes about 30 seconds)
the gateway is reset during this procedure (thus discontinues all current calls and
SMS). Do not interrupt
firmware uploading – otherwise the gateway might stop working!
*for successful firmware upgrade trough Ethernet you have to :
- grant remote upgrade in configuration of the gateway.
- gateway must contains bootware v02.52 or higher and firmware v02.30.01 or higher
- gateway (CPU) must be connected to Ethernet network.
Firmware license:
The gateway’s firmware is from factory limited for 850 hour* (c. 35 days, every reset of gateway
will add one hour !). After this time the gateway will block the Layer 3 (signalization layer) on the
PRI interfaces !!!
Actual status of limit you can see in status line of connected PRIGW program.
Please contact 2N sales before end of this period. We will send to you new licence key string for
unlock licence limitation of the firmware.
How to add new licence:
- Connect your PC to PRIGW via RS232, ISDN DATA, TCP/IP
- Make cool reset of the gateway
the program during this procedure to avoid errors in
30
Page 33

!! Preliminary version of user guide v1.8 !!
- Run PRIGW program
- In the menu „Gateway control“ choose item „Set keylock“
- Insert correct unlock key (bad unlock key will make block of the gateway!! )
- Wait for restart of gateway
- In status line of PRIGW program you can check actual status of firmware limitation.
7.2. GSM network limitation
GSM boards of your PRIGW can be locked for using only in some GSM networks or there can
be restriction for log-in to some GSM network. Information about this lock you find on PRIGW
package. This limitation is always provided by customer request.
31
!! Preliminary version of user guide v1.8 !!
Page 34

7.3. Installation Conditions
The following conditions must be met during system installation:
- appropriate location (enough free space);
- GSM signal intensity (minimum signal level: –80db). As GSM signal intensity meter you can
use NET monitor on some mobile phone (e.g. Nokia, Siemens)
- un-overloadable GSM cells into which GSM gate modules are logged (please keep in mind
that full traffic will make up to 30 calls in one time (according of configuration of the
gateway)!
- no strong electromagnetic radiation on the system installation site;
- no strong reflections in antennas installation place
- the ISDN PRI connection must be configured properly and m eet ITU-T Q.931-EDSS1 and
related recommendations.
7.4. Potential GSM Network Problems
The PRIGW works reliably even under a 100% load. The following problems may be caused by
GSM networks:
1. The GSM modules cannot log in, log in slowly or log out occasionally. This problem can
have two causes:
• The GSM signal level is low – the recommended minimum signal level is
approximately -80dB, if lower, the GSM antenna location must be changed.
• The GSM cell into which the modules try to log is overloaded – if you use directional
antennas, you can direct them to more GSM cells than one. The possibility to choose
a cell by directing your antenna is considerably limited or eliminated in municipal or
densely populated areas where multiple signal reflections occur. It is also difficult to
select a cell where the cells lie in a straight line before and behind the antenna. If no
selection can be made, you have to use another available GSM provider. CAUTION!
You are recommended to use 32 channels at most on one installation site for one
GSM provider to avoid GSM network overload problems on the installation site.
2. One of the GSM modules is permanently logged-out or fails to receive incoming calls –
this problem indicates a GSM network overload due to heavy traffic. You can eliminate
this problem by the above mentioned solutions or extend the “relaxing time“ – i.e. the
delay between two calls via one GSM module (the recommended value is 2 seconds).
In case any of the GSM modules cannot log in the network even after reset, your GSM
provider may have located the SIM card but refused to log it in the network because
either too many calls are made using this card, or the SIM card keeps logged in the
same GSM cell and the same GSM module for too long. This problem can be solved by
occasional replacement of SIM cards between modules.
32
Page 35

!! Preliminary version of user guide v1.8 !!
7.5. Main Installation
• Place the gateway into an environment that corresponds with its working conditions.
• Configure the gateway properly using the configuration software included.
• The gateway mains supply must be backed-up and overvoltage protected (recommended
is line-interactive or on-line UPS).
• For a more comfortable gateway administration, it is advisable to have one of available
remote control tools on site (ISDN line, analog line, Ethernet).
7.5.1. Control Ways
The system can be supervised and controlled locally or remotely as follows:
A. Local control using a PC connected by a standard full crossed serial cable .
B. Remote control using an analog or ISDN modem connected to the PRIGW COM2
(the modem initialization commands have to be selected correctly – refer to PRIGW
configuration>PRIGW program). For connection between modem and the gateway
please use full straight serial RS232 cable.
C. Remote control over the IP network using a standard Telnet protocol. Here, be sure
to set the IP address and IP mask properly – refer to system configuration>PRIGW
program).
D. Remote control via B-channel of PRI connection**
**This way is optional (needs additional chipset on AUX board)
7.5.2. Configuration Ways
The system can be configured by any of the following two ways:
A. using extended AT commands (refer to Appendix A);
B. using the PRIGW program..
A PC can be used for both the ways, either locally (via a serial cable), or remotely with a
modem, using the Telnet protocol over IP, or via B-channel.
Since the PRIGW is constantly upgraded, you are advised to use the latest PRIGW software
firmware versions.
7.5.3. Your first installation (quick step by step guide)
1/ Connect the gateway with PC via RS232 cable
2/ Install&Run from attached CD the PRIGW program
3/ In top menu open parameter SETTINGS, COMMUNICATION SETTINGS and select right COM port
where is the PRIGW connected (description on page 60 section 9.5)
4/ Section G
9.7.3.1)
- add IP address and IP mask of the PRIGW (In case that you want to make remote
- Set PIN code (for case that you have on SIM cards enabled PIN code)
- Set parameter GENERAL SELECTION OF SIM CARDS to “According to GSM groups”
5/ Section GATEWAY CONFIGURATION, ISDN PARAMETERS (description on page Chyba! Záložka
není definována., section Chyba! Nenalezen zdroj odkazů.)
- Set right setting of PRI ISDN interfaces. Details about installation settings you also
ATEWAY CONFIGURATION, SYSTEM PARAMETERS (description on page 63 section
control via IP)
!!! WARNING – IN CASE THAT YOU HAVE SIM CARD WITH ENABLED PIN - ALL
SIM CARDS MUST HAVE SAME PIN CODE AS PIN CODE DEFINED IN PRIGW !!!
find on page 17 section 3.3. In case that layers 1 and 2 on PRI interface are not
33
!! Preliminary version of user guide v1.8 !!
Page 36

established, please recheck the right configuration of PRIGW and your router/PBX.
For actual status of PRI interface please open item in top menu Gateway Control,
Diagnostics and select PRI.
Description of this window you find on pages 53, section 9.4.3.
6/ Section GATEWAY CONFIGURATION, GSM GROUPS ASSIGMENT (description on page 71, section
9.7.4.2)
- Divide the GSM modules (cards) to outgoing and incoming GSM groups according to
you installation requirements
7/ Section GATEWAY CONFIGURATION, GSM OUGOING GROUPS (description on page 72 section
9.7.4.3)
- for first start select parameter Mode of switching SIM card and last searched SIM to
SIM1 for each GSM group which you are using
8/ Section GATEWAY CONFIGURATION, PREFIXES (descript ion on page Chyba! Záložka není
definována. section Chyba! Nenalezen zdroj odkazů.)
- in case that you using more GSM operator please make delete of all eight Prefix lists
and add to Prefix list 1 prefixes for GSM operator 1, to Network list 2 for GSM
operator 2 etc… Please don’t remember to add also right length of dialed number for
each prefix.
9/ Section GATEWAY CONFIGURATION, LCR TABLE (description on page 78 section 9.7.5)
- here you have possibility set in which time which prefixes (saved in prefix lists) will be
routed to which GSM group. You can select more GSM groups in one line – gateway
will try use second GSM group in case that first GSM group is not available or busy.
Also you can set more tries for one GSM group > for increase ASR…
10/ In top menu in GATEWAY CONTROL, open item DATE/TIME for set right time and date in the
gateway
11/ In top menu in GATEWAY CONTROL, open item LOGIN ACCOUNT to change access rights for
remote control via Telnet or PRI ISDN
12/ Save the configuration to PRIGW
13/ Plug-in the SIM cards and connect antennas and make restart of the gateway.
In case that you have problem with right function please read carefully this manual, check all
parameters. Also you can contact us by e-mail techsupport@2n.cz. To email please write detail
description of problem and also attach the configuration file of the gateway (unnamed.ini)
34
Page 37

!! Preliminary version of user guide v1.8 !!
7.6. Configuration of 12 HP VoIP board
7.6.1. Main description of VoIP board
The VoIP board is designed to process the voice flow from a VoIP environment. The CPU of the
GSM gateway is responsible for signalling (SIP). Therefore, it is necessary to set the signalling
and voice parts separately. To do this, use the StarGate / BlueStar program for signalling and
the web interface for voice.
Each of the two parts has an IP address of its own (see the default settings below) and so it is
necessary to interconnect the CPU and VoIP board during installation with a patch cable
included in the delivery.
7.6.2. Default Settings
Parametr Hodnota
IP address of CPU
IP mask of CPU
Username/password of CPU
IP address of VoIP board
IP mask of VoIP board
Username of VoIP board
Password of VoIP board
192.168.1.100
255.255.255.0
2n/2n
192.168.1.101
255.255.255.0
Admin
Admin
35
!! Preliminary version of user guide v1.8 !!
Page 38

7.6.3. VoIP Board Configuration (Web Interface)
While configuring the system using the web interface keep the default values of the following
parameters.
Trunk configuration:
Protocol type = E1 TRANSPARENT 30
Clock master = Recovered
Framing metod = SUPERFRAME
Line code = HDB3
Control protocol configuration:
Control protocol type = MGCP
Call agent IP = IP address of CPU card (default 10.1.10.15)
Call agent port = 5060
Profile = NORMAL
!!! PLEASE MAKE CHANGE ONLY IP CONFIGURATION PARAMETERS AND CALL AGENT
IP ADDRESS. CHANGING THE OTHERS PARAMETERS MAY CAUSE BAD FUNCTION OF
THE VOIP BOARD !!!
36
Page 39

!! Preliminary version of user guide v1.8 !!
7.6.4 VoIP Board Firmware Upgrade
Refer to www.2n.cz for the latest VoIP board firmware version. If you find a version later than
yours, please upgrade your VoIP board as follows:
- open your web browser and type IP address of VoIP board
- enter right username and password for access
- select item „Software Update – Software upgrate wizard“
!!! PLEASE USE ONLY FIRMWARE FILE WHICH YOU RECEIVE FROM 2N, DIFFERENT
FIRMWARE FILE MAY CAUSE WRONG FUNCTION OF VOIP BOARD !!!
37
!! Preliminary version of user guide v1.8 !!
Page 40

- clict to „Start Software Upgrade and find file which contains new firmware:
- the file will be automaticky loaded to RAM of the VoIP board:
38
Page 41

!! Preliminary version of user guide v1.8 !!
- After successfull upload of the file you will receive following information. Now please
click to buton „Next“.
- When you will receive following text, please click to buton „Reset“.
39
!! Preliminary version of user guide v1.8 !!
Page 42

- After it, the system will save new firmware fo EEPROM memory and makes restart
40
Page 43

!! Preliminary version of user guide v1.8 !!
- Now the version of firmware of VoIP board is upgraded.
41
!! Preliminary version of user guide v1.8 !!
Page 44

7.7. Configuration of 8HP VoIP board
The VoIP card is completely configured by PRIGW program trough CPU card of the gateway.
After any change in configuration of the VoIP card is complete system restart needed.
8. Configuration of Voice Callback Center software
This software is optional part of system. For additional information please contact 2N sales.
8.1. Scheme of function of Voice Callback
User rings GSM
1
number of the gateway
Callback established
4
to the user
Connection to
8
PRIGW
PRIGW
PRIGW
DTMF dialing in
5
(when user picks
Request for user
2
authorization
dialed number
PRI ISDN
Destination authorized
7
Call is connected
according to the dialed
number and
RS232
Request for destination
6
authorization
User authorized
LAN
3
8.2. Installation and licenses
8.2.1. Communication settings of XAPI server
From attached CD, please run the file SETUP.EXE to launch the installation of XAPI server
software. After successful installation, please run it.
As a first thing, you have to setup the connection between your PRI ISDN GATEWAY and PC
(XAPI server).
Close all windows, except main XAPI server window. In main menu click to “Set” and “ModulePBX”. In PBX settings you have to disable COM port by selecting “---“ and click OK.
42
Page 45

!! Preliminary version of user guide v1.8 !!
Now, you have to set the COM port, where your PRI ISDN GATEWAY is connected (for Voice
callback service, serial connection is recommended!).
On the following picture you can see an example of correct connection settings for PRI ISDN
gateway with external Voice Callback:
43
!! Preliminary version of user guide v1.8 !!
Page 46

In case, that you set all parameters correctly, you will see signal status of GSM modules in
status gateway window.
44
Page 47

!! Preliminary version of user guide v1.8 !!
8.2.2. Licenses in 2N XAPI server
To activate Voice Callback center, you have to enter a valid license code to XAPI server. This
license is generated by 2N according to requested service and serial number of CPU card in
your PRI ISDN gateway. The license contains two codes, which you have to enter. Following
picture shows how to add new license:
You have to create a new user, which will be used for communication between the Voice
Callback Center and XAPI server.
Warning: In case, that you have not connected the PRI ISDN gateway, you will not succeed
with adding of license to XAPI server (response will be: BAD LICENCE!) !!!
Creating of new user is very similar to adding of new license. Please follow the next pictures:
Click the USER icon to open window with all
active users. In the next window “Users”, click
the second icon from left and then the icon for
new user.
In USER window select the correct “firm” and
activate attributes “SMR”, add a name and a
password of new user. This username and
password must be put to into Voice callback
center.
45
!! Preliminary version of user guide v1.8 !!
Page 48

8.2.3. Connection settings of Voice Callback Center
After successful installation of Voice Callback center software you have to set the
communication with XAPI server. As shown on the picture below, you have to set username
and password (the same user account as in XAPI server) and IP address of PC, where the
XAPI server runs. In case that XAPI server runs on the same PC you should add IP address of
local host (127.0.0.1).
In case that the XAPI server is correctly configured and access parameters are properly set, the
Voice Callback center software will automatically establish connection with XAPI server.
You may check that also in the LOG of Voice Callback Center where you may see parameters
of connection and type of license.
46
Page 49

!! Preliminary version of user guide v1.8 !!
8.3. Configuration of Voice Callback Center software
8.3.1. How to add new user
In the Voice Callback center you can add as many users as the XAPI license enables.
For each user you have to set CLIP (identification of user phone) and name of this user. You
have to set also for each user amount of credit (tariff) for each group (destination). Automatic
restoring of credit may be activated/deactivated in the settings section. In case that you are
adding a lot of new users ,you can use tariff templates, which may be assigned to a new user.
This templates are defined in section “Tariffs Templates”.
As you can see an example in the picture, user Tom has a phone number +420605215677 and
credit rights for destination Group 1 only from midnight to noon. Credit for a month is 200
minutes. The user was created using template “Tariff 1”.
8.3.2. Tariffs templates
In this section you can prepare Customized tariffs. These
templates you can use for quicker adding of new users.
8.3.3. Groups
Tables of prefixes. Each Group contains real destinations
prefixes of calls (number which the customer dials by DTMF).
Each user can use only defined Group (destination prefixes).
The calls to PRI ISDN interface, which have prefixes restricted
by user settings or which are not defined in these tables will be
rejected !
47
!! Preliminary version of user guide v1.8 !!
Page 50

8.3.4. Prefixes to GSM
Currently not used, please do not change this table
8.3.5. Prefixes to ISDN
Currently not used, please do not change this table
8.3.6. Setting
Before you start to use Voice callback software you have to set parameter X10 in your PRI
ISDN gateway by the following way :
- open the management software (e.g. PRIGW program)
- establish connection with the gateway (over serial interface or TCP/IP)
- in menu Gateway control open " Terminal "
- write a command AT%X10=60 and press enter
If you sent the right command, the gateway responses OK.
Please before using of Voice Callback Center, check at 2N web pages (www.2n.cz/export
latest version of XAPI server and Voice Callback Center software.
If you have a technical question, please contact 2N’s technical support team at
techsupport@2n.cz
) the
48
Page 51

!! Preliminary version of user guide v1.8 !!
9. StarGate / BlueStar / BlueTower Program User Manual
Configuration for StarGate , BlueStar and BlueTower gateways is same. Configuration
program automatically detect type of system. In this section of manual is used abbreviation
“PRIGW program”.
9.1. Program Installation
PRIGW includes an installation CD with the configuration program installation. After the
CD is inserted in your PC CD-ROM, the web browser will start. In section PRI gateway you fing
installation file of configuration tool. Wait until the installation is completed.
*) The program can be run under the MS Windows 98/ME/2000/XP OS only.
9.2. Program Running
When the installation is complete, run the program by clicking on the "PRIGW program" in
your PC menu, clicking on the icon on your desktop, or running the "PRIGW program.exe" file,
which you can find on the appropriate location installed by you using any file explorer,
commander or browser.
Having run the program, you can use:
• the main menu
• the button bar menu (included in the main menu too)
• the card (folder) menu
the Topics with configuration items
the Alphabetical Glossary with configuration items arranged in the alphabetic order
• a window for configuration item editing
49
!! Preliminary version of user guide v1.8 !!
Page 52

9.3. Connection with PRIGW
When the program is running, communication
with the gateway has to be established for
settings. This is done by selecting the "Setting
> Communication" menu items. The basic
setting is shown in the figure. For more details
see section 9.5.
The "Gateway > Connect gateway" menu or
the "Connect gateway" icon on the button bar
can be used for gateway connection and
gateway–PC communication establishing.
Fig.: Connect
Gateway Button
Select the "Modem" function only for remote gateway supervision using a connected modem.
You can use a standard RS232* interface or Ethernet 10baseT (Telnet) connection the
gateway.
*The PRIGW port transmission rate is ALWAYS 57.600bps.
Note: If you have more gateways than one, then follow the gateway communication instructions included
in section 9.4.2.
9.4. Main Menu and Button Bar
The following menus are available here:
File - for physical work with the configuration file
(for saving, loading see 6.4.1)
Gateway – for physical gateway operations (one or more gateways)
(for connection, disconnection, etc. see 9.4.2)
Gateway control – gateway operation commands
(for diagnostics, reset, DISA, etc. see 9.4.3)
Setting – communication and language selections
Help – work with help.
50
Page 53

!! Preliminary version of user guide v1.8 !!
9.4.1. File Menu
Using this menu, you can work with the config.cfg gateway configuration file or default
configuration file, i.e. load, save, ... Contains an item for program end too.
• Load – loads the last-saved configuration file
from the PRIGW program directory. Or
requires loading of default settings upon first
run.
• Save – saves the current settings into the file,
the PRIGW program directory (or into a
folder defined in the List of gateways – refer
to 9.4.2).
• Load from – loads a file from a folder
selected by you.
• Save as – saves a file into a folder selected
by you.
• Default settings – loads the preset default configuration.
• Program end – terminates the program.
9.4.2. Gateway Menu
Used for connecting / disconnecting the gateway. You can select a gateway from the List of
gateways if you use remote control.
• Connect gateway – connects the PRIGW with
your PC and establishes mutual communication via
an RS232 serial interface or using the Telnet
protocol.
Note: The gateway must be connected and the
"Setting > Communication" items have to be
selected properly.
• Disconnect gateway – disconnects the gateway
and discontinues its communication with your PC.
If you communicate with more gateways than one, you are advised to have each
configuration file in a different directory to avoid unintentional rewriting of the
configuration file by another gateway configuration. To do this, use the following menu:
51
!! Preliminary version of user guide v1.8 !!
Page 54

Multi-gateway menu:
ys
• Select gateway from list – select a gateway (directory with the configuration file) to be
connected to the PC.
• Connect gateway from list – get connected to the selected gateway.
• List of gateways – edit the list of gateways including directories.
Fig.: List ofGatewa
52
Page 55

!! Preliminary version of user guide v1.8 !!
9.4.3. Gateway Control Menu
Contains commands for the PRIGW (available only if the PRIGW is connected).
• Diagnostics – information on boards (GSM modules and PRI board), contains 9 cards
whose numbers correspond to those of PRIGW positions (00=PRI board).
PRI board – contains information on statuses of PRI ISDN layers and occupation of B-channels.
- Board status
- Layer status (both PRI interfaces)
- Mode of PRI interface (e.g. NT/M)
- Status of voice B-channels (both PRI interfaces)
53
!! Preliminary version of user guide v1.8 !!
Page 56

GSM board – includes information on statuses and types of GSM modules on the GSM board.
- Board type – type of GSM board
- Layer 2,3 – status of the module communication layers.
- GSM network – name of the network the module is currently logged in.
- Network ID – ID number of the network (MCC+MNC) the module is currently logged in.
- GSM cell – identification number of the GSM cell the module is currently logged into. .
Description of displayed numbers:
NETCELL: A,BBB,CCC,DDDDD
A = status :
0 - not registered
1 - registered to home network
2 - not registered, but ME is searching for a new operator
3 - registration denied
4 - unknown
5 - registered to roaming network
BBB = first byte of LAC (location area code) in dec format
CCC = second byte of LAC in dec format
DDDDD = cell ID
- GSM group – number of actual GSM group.
- Active SIM – Number of active SIM card on this GSM module.
- Module ID - International identification number of the GSM module (IMEI).
- Rev ID – GSM module firmware revision number.
- SIM Number – SIM card serial number.
- ID SIM card– International identification number (IMSI) or SIM serial number (SCID) of SIM
card.
- Signal intensity – the current signal level in the network the module is logged in (minimum
value = -113 db – the module is logged out).
- Sleep button – used for conversion of selected desk into sleep mode
- Block button – block of selected GSM module (unavailable for outgoing and incoming
calls).
- Down button – used for block the module after end of proceeding call
- Reset button – hardware reset of board, or GSM module
54
Page 57

!! Preliminary version of user guide v1.8 !!
Every card features the “Sleep“ (transition into the sleep mode – the boards does not receive
any new calls or SMS and completes correctly the current calls or SMS) and „Reset“ (board
reset) buttons.
If a board is not inserted in the PRIGW , this position (number) shows the „none“ board status.
55
!! Preliminary version of user guide v1.8 !!
Page 58

• Info on actual calls – Information on currently made calls. This information can be arranged
according to the GSM module, by B-channel. Or you can show only calls PRI1<>PRI2 or
unsorted all calls.
• Connection status – status of all possible remote/local PRIGW control ports.
• Buffer status – current buffer status (CDR). The maximum capacity is 511 calls.
• Tracing – item for storing traces from ISDN/IP layers.
56
Page 59

!! Preliminary version of user guide v1.8 !!
• GSM Monitor info – With using this feature you can download information GSM cell where
is GSM module connected.
Description of response parameters from TC35i module:.
Chann
Rs
dBm
PLMN
LAC
Cell
NCC
BCC
PWR
RXLev
C1
TS
timAdv
Q
Chmod
ARFCN (Absolute Frequency Channel Number) of the BCCH(THC)
carrier. If chann is h BTS supports hopping during a connection
RSSI (Received signal strength) of the BCCH carrier from 0 to 63. The
indicated value is composed of the measured value in dBm plus an
offset. This is in accordance with a formula specified in 3GPP TS05.08
Receiving level of the BCCH carrier in dBm
PLMN ID code
Location area code (HEX)
Cell ID code (HEX)
PLMN color mode
Base station color mode
Maximal power level used on RACH channel in dBm or current power
level
Minimal receiving level (in dBm) to allow registration
Coecifient for base station selection
Timeslot number
Timing advance in bits
Receiving quality (0-7)
Channel mode (S_HR: Half rate, S_FR: full rate, S_EFR: Enhanced full
rate)
• Export statistics – used for storing and clearing of statistic data from the PRIGW
connected. For a detailed description of statistic data refer on page 97.
• Data into gateway – sends and saves the configuration file into the gateway, the program
then resets the gateway – for internal configuration updating – and saves the config.cfg file
into the PRIGW program folder (or a folder pre-defined by you if you use the "Multi-gateway
menu“ options).
• Reset – resets the gateway and initializes all PRIGW boards (the gateway communication
is not discontinued but all current calls and SMS to be sent are terminated!).
• Factory reset – resets the gateway, selecting the factory settings for the PRIGW . The
gateway communication is not discontinued upon this command.
• Firmware / Licence – uploads the firmware into the gateway.
57
!! Preliminary version of user guide v1.8 !!
Page 60

FIRMWARE uploading procedure:
− Prepare the firmware-containing file into a folder selected by you (Pxxxx-V-
xx.xx.xx.hex).
− Select "Upload firmware" and open this file.
− The program now automatically uploads your new firmware – the gateways is reset
during this procedure (thus discontinues all current calls and SMS). Do not interrupt the
program during this procedure to avoid errors in firmware uploading – otherwise the
gateway might stop working!
If the procedure of uploading firmware was terminated, please reset the gateway and re-load
the PRIGW program and try to upload firmware again.
CAUTION!: Be sure to use original and undamaged firmware files for the firmware upload to
avoid gateway function problems! For the latest firmware version see our websites
(www.2n.cz).
• Time and date – sets time and date in the gateway.
• Change username and password – sets username and password for access to PRIGW via
TELNET.
• Set keylock – input for licence key (see 7.1 page 30)
• Download trace – saves the gateway operation and error records on the disk.
• Save call data – saves records on calls on the disk (the records will remain in the PRIGW ),
• Save call data and delete – saves records on calls on the disk and clears the call memory.
• Voice message – Used for loading / clearing of following messages:
• Incomming DISA DTMF message (from GSM networks)
• Connection message for 1st, 2nd , 3rd and 4th outgoing GSM groups
• Voice message to PRI2 interface when PRI1 interface is disconnected.
You can upload DISA message by using file* which you prepare in your PC.
Maximum lengths of voice messages is following:
- DISA message = 64 seconds
- Connection messages = 8 seconds for each.
- PRI2 voice message = 16 seconds.
This sequence need temporary jumper reconfiguration of AUX board. In case that you want
to make upload or download disa voice message by this way, please set jumpers on AUX
board to right position (see on page 16 section 3.2.3) and also connect your PC via serial
cable directly to COM2 on PRIGW gateway.
*parameters of voice file : codec ISDN aLAW, 8kHz, mono.
• Test calls – the gateway support test calls (for check voice quality or for check right
configuration).
Test calls can be outgoing to GSM or ISDN interface with using AUX analogue interface
(connected analogue interface), or incoming (incoming call from ISDN or GSM interface will be
connected directly to AUX interface), or with using two GSM modules for make test GSM to
GSM.
58
Page 61

!! Preliminary version of user guide v1.8 !!
In case of proceeding call the gateway atomically generates trace, which you can save for
possible check in case of problems.
59
!! Preliminary version of user guide v1.8 !!
Page 62

9.5. Setting Menu
Contains the communication and program language menus.
Communication
• Direct to COM port – Program communication through serial interface RS232
• Modem – Communication through connected modem.
• ISDN modem – Communication through ISDN modem and PRI card on PRI gateway
• TCP/IP – Communication through TELNET protocol through Ethernet.
• Transmission rate – the recommended and default value is 57.600bps.
9.5.1. Help Menu
Contains a help to the PRIGW program, instructions for use of the help and details on the
program version.
9.5.2. Button Bar
Program end
Run terminal
Select language
Upload configuration to the gateway
Load configuration from the gateway
Select gateway from list
Disconnect from the gateway
Conner with actual gateway
Save configuration to file
Open configuration from file
60
Page 63

!! Preliminary version of user guide v1.8 !!
9.6. Configuration sections
There are two types of configurations parameters in the gateways:
- Online configuration parameters: In this section you find parameters which you can change
only when a PRI gateway is connected (e.g. setting time and date). Possibility to change
parameters you can check by color of icon:
= gateway is disconnected, there is no possibility to change online parameters
= gateway is connected, you can change values of online parameters.
Online section also contains all diagnostics tools.
- Offline configuration parameters: The others parameters which you can set offline (can be
saved to cfg file).
- Reset commands : Section for make reboot of connected gateway, or reboot with load
factory default configuration.
9.7. Configuration
As already mentioned, the program includes the "Topics" and "Alphabetical glossary"
folder menus. These menus contain identical items (as shown in the figures below) and it
depends on the user which menu he or she chooses for easy orientation. You can set
ISDN GSM gateway parameters in these menus.
9.7.1. Topics and Alphabetical Glossary
Fig.: Topics Fig.: Alphabetical Glossary
61
!! Preliminary version of user guide v1.8 !!
Page 64

9.7.2. Status line
In status line of configuration you can find basic information about connected gateway:
Status of connection
And used connection port
Name of connected gateway
CPU type, bootware and
firmware version
Type of the gateway, serial
number of CPU board
Licence status
9.7.3. Offline configuration
All configuration sections contains following buttons:
- Save to gate : Upload all parameters of the section to the gateway
- Load from gate : Download all parameters of the section from the gateway
- Default : Load default values for this section
- Save to file: Save all parameters of the section to selected configuration file
62
Page 65

9.7.3.1
!! Preliminary version of user guide v1.8 !!
System parameters
This window allows you to set the basic parameters of your PRIGW .
- IP address : IP address of the PRIGW’s CPU card Ethernet port
- Subnet mask : IP mask of IP address
- IP router : IP address of network gateway of your Ethernet network
- Init sequence for modem : an AT command sent by the PRIGW via COM2 when it detects
a connected modem.
- Saving call data (CDR) : Type of CDR which gateway will save.
- No calls – the gateway does not record any call information.
- Successful outgoing – gateway records information of all successfully connected
outgoing calls
- Successful outgoing+incoming – gateway records information of all successfully
connected outgoing+incoming calls.
- All outgoing – the gateway records information on all outgoing calls.
- All outgoing+incoming – the gateway records information on all outgoing and
incoming calls.
- PIN : the PIN code that the gateway tries to enter if a SIM card with active PIN is inserted
(this item has no meaning if a SIM card without active PIN is used).
- Gate ID : the number which will be added to call data records line. With this number you can
more easy detect on which PRIGW were CDR generated (in case that you collecting CDR
from more than one PRIGW gateways)
- General selection of SIM cards : selection of SIM card after start/restart of PRIGW
- According to GSM groups –SIM card will be selected by GSM group settings.
- SIM cards in slot X – after start/restart will be chosen SIM card in holder X (In case
that setting in GSM group is different, SIM will be automatically switched according to
GSM group settings)
63
!! Preliminary version of user guide v1.8 !!
Page 66

- Number for remote control: number for remote control via DATA B-channel (this feature is
optional)
- Automatic log-out of GSM modules : This function is used for automatic log out of
modules in selected time. If logged in modules are occupied by a call, the logged out
modules log again in to the net automatically. If the traffic decreases, the modules log out
again from the network at random intervals
- Enable automatic logout – Permission / prohibition of this function.
- Logout Hour –The time when modules start to log out randomly from the GSM
network
- Login Hour – The time when the modules start to log in again to the GSM network
- Min. logged-in modules – The minimal number of GSM modules that remain logged in.
- Automatically move to summer/winter time – for automatic switch summer/winter time
- Gateway will be configured as – By this parameter you can set which protocol will be
activated in the gateway. ISDN-DSS1 must be activated in case that in the ga teway is PRI ISDN
board. VoIP-SIP is for gateway with VoIP board.
64
Page 67

!! Preliminary version of user guide v1.8 !!
9.7.3.2
ISDN parameters
PRI ISDN connection settings.
ISDN
- ISDN PRI 1 port type - defines the type of the PRI 1 ISDN port on the PRIGW PRI ISDN board.
ISDN PRI is a point-to-point connection. The gateway must have an opposite port type than the
device it is connected to*.
PRI 1 port is always set as internal – there is activated LCR function, PRI 2 port is always set as
external – all calls from PRI 2 port will be rerouted to PRI 1 port. PRI 2 port has ALWAYS opposite
mode than PRI 1 port !!
- Synchronization – selects the device to transmit the synchronization clock.
- Master – the gateway sends the synchronization clock, the connected device must
be set to receive the synchronization clock.
- Slave – the gateway receives the synchronization clock from the connected
device.
- TEI management – gateway identification address (0 by default, 62 max.)
- Channel number select – defines way of occupation of B-channels on PRI interface
- Upward > gateway will occupy channels from channel 1 to 32
- Downward > gateway will occupy channels from channel 32 to 1
65
!! Preliminary version of user guide v1.8 !!
Page 68

- Preferred channel > number of first channel which the gateway will try to occupy.
- Progress elements numbers – defines which type of element progress will gateway send in
messages SETUP_ACK, PROGRESS, CALL_PROCEEDING, ALERTING. The number
depends on PBX/ROUTER which you have connected. You have to set right number according
your PBX. In case that you use wrong number or set sending of the element, it can cause
problems on PRI ISDN trunk (no connected calls, no opened B-channel…)
Dec Meaning
1 Call is not end-to-end ISDN or may be in-band information
2 Destination call address is non-ISDN
3 Origination call address is non-ISDN
4 Call has returned to the ISDN
8 Inband treatment has been applied
10 Delay in response at the call interface
- TEI management – gateway identification address (0 by default, 62 max.)
- CRC – Parameter for Activating/deactivating receiving CRC on Layer 1 on PRI ISDN interface. (In
both modes the PRIGW sending CRC).
- Assignment of B-channels – defines how the gateway shall route outgoing calls to the GSM network.
- Cyclical – the gateway routes outgoing calls according to pre-defined groups
(prefixes). The GSM modules are assigned to the groups automatically according
to the GSM provider (GSM network number). If more GMS modules (SIM cards)
are assigned to a group for outgoing calls, these GSM modules are occupied
gradually in a rotating way (1. > 2. > 3. > 4. > 1. > 2. …)
- Locked – the gateway does not provide intelligent outgoing call routing. Calls on
the x-th B-channel are made via the x-th GSM module. However, it is necessary to
define and select so many GSM groups as there are SIM card types in the
gateway.
- According to credit – the gateway routes calls as in the rotating mode but selects
the GSM modules according to the lowest number of called minutes instead of
cyclically.
Caution! Be sure to select the GSM groups according to available providers while
selecting the Assignment of B-channels=locked!
*) If you do not have the appropriate crosses/non-crossed interconnection cable
(depending on the configuration of the equipment connected to the PRIGW ), you can
re-set the gateway PRI board jumpers to achieve functional connection.
- Error ISDN causes – Definition of causes sent to PRI ISDN (in the Release Complete) whenever
an incoming call from PRI ISDN is rejected.
- Few digits on OVERLAP dial mode
– Rejection of an incoming call that does not meet the
required number length (default cause: 102-Timeout).
- Disallowed dial number prefix – Rejection of an incoming call whose prefix does not match
any of the prefixes defined for GSM groups (default cause: 21-Reject)
- Selected module/GSM group are not ready
– Rejection of an incoming call because no free
module has been found in the particular GSM group (the assigned GSM module is not
available for the „Locked Channels“ mode) and no other preferred GSM groups have been
selected (default cause: 41-Tempfail).
- Selected module/GSM groups are not ready
– Rejection of an incoming call because no
free module has been found in the defined GSM group + preferred groups have been
selected for overflow but no free outgoing GSM module has been found here (default cause:
42-Swcongest.
66
Page 69

!! Preliminary version of user guide v1.8 !!
- Cause transfer – List of numbers of releases causes which the PRIGW receive from GSM
networks and which have to be translated to different causes to ISDN PRI interface.
- Allow delete of statistics on PRI every month - Allow/Restrict automatic reset o f PRI statistic
every x. day in month.
- Digits count in SETUP – Sets how many digits will be send in SETUP message (in case of
outgoing call), the others digits will be send in OVERLAP mode.
Example: called party number : 6012345678 , digits count in SETUP = 7
Outgoing signalization messages:
SETUP (contains 6012345)
INFO (6)
INFO (7)
INFO (8)
- Dial tone to NT interface on empty SETUP – With activated this feature, the gateway will send
dial tone in case that receive SETUP message without called party number
- Ring tone – Select type of ring tone in case that there is no open B-channel to GSM/3G network.
- Numbering plan settings – Parameters fo r se t correc t numbering plan pro Called and Calling
party number (default is 0 = unknown)
- Hungarian tone after 2 digits – special feature for Hungary, gateway will send specifics dial tone
after it receive tow digits.
- Generate disconnect tone to PRI (s) – In case of reject a call, gateway will generate busy tone
for defined time, then call will be correctly terminated.
67
!! Preliminary version of user guide v1.8 !!
Page 70

9.7.3.3 VoIP parameters
Setting of VoIP – SIP interface
Date of deleting statistics – a day in a month on which all statistical data on the VoIP
interface are deleted automatically.
SIP registration – set the parameters of PRIGW registration at the SIP Proxy;
Registration expires –
the timeout after which the PRIGW registration
data get expired at the SIP Proxy.
Reattempt registration –
the timeout after which the request is resent.
Username and password – SIP Proxy registration data.
SIP protocol setting – used for setting SIP report sending during establishing connection.
IP addresses – used for setting IP addresses of interworking network devices and default
port numbers through which PRIGW will communicate with them.
SIP Proxy (GSM->IP) – the IP address of the SIP Proxy to which
VoiceBlue Lite turns in the case of an incoming GSM call.
SIP Proxy (IP->GSM) – the IP address of the SIP Proxy from which
VoiceBlue Lite awaits outgoing GSM call requests.
SIP registrar – the IP address of the SIP registration server.
NAT firewall – the NAT firewall IP address.
VoIP card / MGCP gateway: IP address of VoIP card of the gateway
STUN server – IP address of the STUN server (Simple Traversal of UDP
through NAT’s (Network Address Translation)), which is used for
68
Page 71

!! Preliminary version of user guide v1.8 !!
obtaining of public IP address presented to Internet. It is useful to fill in
this field in case the PRIGW is present in a private network behind the
firewall or NAT. Default port for sending of requests on STUN is 3478.
Next STUN server request [s] – for setup of time period between two
requests for public IP address information. This request will gateways
makes each start/restart of system.
Codec priority: The sequence of offered VoIP codec in case of new VoIP call.
69
!! Preliminary version of user guide v1.8 !!
Page 72

9.7.4. GSM
9.7.4.1
Basic settings
Settings of basic parameters of GSM.
Number of digits dialed from ISDN – sets outgoing ISDN dialings into GSM
networks.
− Maximum – the maximum number of digits to be dialed into a GSM network. Any
dialing longer than or equal to this parameter is dialed automatically (without
waiting time).
− Minimum – the minimum number of digits to be dialed into the GSM network.
− Waiting for next digit – time (in seconds) for the PRIGW to wait for the next
dialed digit. After this timeout, the number is dialed automatically into the GSM
network.
Voice parameters of GSM/3G modules – sets parameters of GSM modules.
− Receive/Transmit level – selects the receive/transmit volume. Caution! We
recommend you to keep the default value to avoid negative effects upon other
transmission parameters, such as echo. Do not change these settings unless
absolutely necessary.
Call delay - the minimum timeout between the end of a call and the beginning of
another outgoing call for one GSM module (Incoming and outgoing calls are not
rejected during this timeout). The optimum time is 2 seconds. Unless absolutely
necessary, do not change the default value to avoid system instability.
DTMF number – sensitivity of DTMF receiver from GSM network. Parameter “delay”
means 10*miliseconds which is added to default value 20ms. The total time is
70
Page 73

!! Preliminary version of user guide v1.8 !!
minimal delay between two DTMF chars. Example: DTMF number=30
delay=30*10+20=320
SIM card number – with this parameter you can choice which type of serial number
of SIM card will the gateway read.
• IMSI – International Mobile Subscriber Identity
• SCID – SIM Card Identification number (supports only Siemens GSM
modules)
Text for SMS at no answer – parameter for text which will be send to called party in
case that this feature is activated (see GSM outgoing group settings). If you will add to
the text string %N, this string will be replaced in SMS by Calling party number.
Settings for 3G Motorola phones – specifics dialing parameters for 3G Motorola
mobile terminals.
Disable CLIP from GSM to ISDN – by using this parameter you will disable transfer
incoming identification of calling party from GSM/3G networks.
Generate busy tone to GSM (s) – In case of rejected incoming call the gateway will
generate busy tone during defined time, then it makes disconnect of the call.
Received SMS save to – With this parameter you can select memory where will be
SMS stored (GSM module or SIM card)
Use networks (only 3G modules) – Type of wireless network which you have to use
(GSM, 3G or both types)
Searching priority – Priority for connect to specifics type of wireless network.
9.7.4.2 Assignment to GSM groups
Table of assignment GSM modules to Outgoing (PRI>GSM) and to Incoming (GSM>PRI)
GSM groups. (0. and 1. GSM module is in first GSM board position – on left side next to
PRI board). Number of GSM modules corresponds with type of the gateway.
71
!! Preliminary version of user guide v1.8 !!
Page 74

9.7.4.3 GSM Outgoing Groups
Settings of GSM outgoing groups (and SIM cards*). In this section you can set all rules
for each SIM card in system for outgoing call from ISDN PRI to GSM networks.
*placement of SIM holders on GSM boards you find in the section GSM board in this manual
.
Mode of switching SIM card – method, how SIM cards will be switched in selected GSM group.
- SIMX - active will be the SIM card in position X
- OFF – SIM cards in GSM group is switched-o ff.
- By time – SIM cards will be switched according to time and day (see below “Time of use
SIM”)
- Random – SIM cards will be switched at random time (length of this time will be generated
between two times in parameter “Interval of change SIM card” (see below)
- By time and limit; then SIM 1 – SIM cards will be switched according to time and day and
credit. In case that all SIM card have no credit (counters are empty), the SIM card in position
one will be activated.
72
Page 75

!! Preliminary version of user guide v1.8 !!
- Random and limit ; then SIM 1 – SIM cards will be switched at random time and by credit.
In case that all SIM card have no credit (counters are empty), the SIM card in position one
will be activated
Last searched SIM – (SIM1 – SIM8) : After start the gateway is automatically checking all SIM
position for SIM card. With this parameters you can limit holders which will be tested. SIM cards
which were not tested have in diagnostic window status “(undef)”.
Disconnect call – Setting for forced disconnection of proceeding calls
- SIM limit exceeded – The call will be disconnected immediately when the SIM card’s call
limit is exceeded.
- Switch to another SIM card - The call will be disconnected immediately when the SIM
card will be out of time of use.
Day of delete statistics in group - x. day in month when the statistics of the GSM group will be
deleted.
No ALERTING before CONNECT – by activation this parameter you remove ALE RTING me ssage
from messages sequence of building outgoing calls to GSM.
Delay for send CONNECT (s) – Delay for send ISDN message CONNECT to ISDN PRI interface
(in case that PRIGW is building call from ISDN to GSM).
Timeout for send ALERTING(s) – Timeout for send the ISDN message ALERTING to ISDN PRI
interface (in case that PRIGW is building call from ISDN to GSM). 0= switched off
Timeout for SMS at no answer (sec) – Minimum length of ri nging outgoing call. In case that this
time will be longer that this parameter and call will be not connected, gateway will send to called
party number SMS message with defined text. For right function of this feature you have to have
called party number in defined format – national or international where is “00: instead of “+”.
SIM settings – By this parameter you can change assignment of times from parameters “Time of
use”
- SIM 5-8 is SIM4 - Time limitation of SIM cards 5-8 will be same as SIM cards in position 4.
- SIM 5-8 is SIM1-4 – first time interval in bookmarks SIM1-SIM4 will be used for SIM cards
in positions 1 – 4. Second interval (2nd interval) in these bookmarks will be used for SIM
cards in position 5 -8.
Allow tone detector – Enables ring tone detectors on GSM boards.
‘Minute’ parameter – By this parameter you can change counting of outgoing calls.
- Count of minutes – Gateway will counter time of outgoing calls. You can set maximum
of minutes by parameter Number of called minutes
- Count of calls – Gateway will counter number of outgoing calls. You can set maximum
of outgoing call by parameter Number of called minutes.
Bookmarks SIM1- SIM4-8 – In these bookmarks is necessary right set-up parameters of each SIM
card..
Roaming enabled for network – Whole or part (mask character is “x”) of international ID of
GSM network (MCC+MNC) which is enabled for roaming. Please leave it free for cases that you
don’t want to enable roaming.
73
!! Preliminary version of user guide v1.8 !!
Page 76

Example:
- <empty> ...roaming restricted
- 2300 ...roaming restricted (minimum is five digits)
- 23002 ...roaming enabled only to network code 23002
- 230Xx ...roaming enabled to network codes from 23000 to 23099
- xX001 ...roaming enabled with codes which has last three digits = 001
- xXXxX ...roaming enabled to ANY GSM/3G network code
CLIR – This parameter decides whether the gateway SIM card subscriber number shall be
dialed into the GSM network or not. All PRIGW outgoing calls present the calling line numbers
as inserted in the SIM card in the PRIGW. Technically, it is impossible to transfer number
information from the ISDN into the GSM network (the opposite function is supported, i.e. all
ISDN subscribers can see the GSM calling number). Hence, it is mostly purposeful to restrict
the calling line identification (activate CLIR) to avoid problems with back calls to the gateway in
the case of a missed GSM call, for example. Select this parameter for each GSM group
separately.
− Default - settings according your GSM provider’s network.
− Enabled (CLIP-off)** – The CLIR function is activated, no numbers are sent to the
GSM network. CAUTION! Your GSM provider must support and activate this service!
If not, the number will still be sent to the network and outgoing calls will be impossible
with some providers.
− Disabled (CLIP-on) - the CLIR function is disabled, numbers are sent. Your GSM
provider must support and activate this service! If not, the number will still be sent to
the network and outgoing calls will be impossible with some providers.
**Some GSM network (SIM cards) not support activation CLIR via GM22 GSM modules, in
status window you will see Network: clir-err.
Number of called minutes – Time call limit for one month for the SIM card.
Number of SMS messages – Number of SMS messages sent via the SIM card / one month.
Day of restore limits – Day, when counters “time call limit” and “SMS” will be reset to zero (1 to
31, 32 = limits will be restored every midnight).
First count – length of first count. After this timeout PRIGW uses parameter “next count” to
calculate the length of the call. (1 to 250 seconds).
Next count – length of next counts (1 to 250 seconds) . Next count – length of next counts (1
to 250 seconds) .
Parameters First count and Next count are used for calculating of t he real leng th of th e call fr om the view o f
GSM operator.
Example 1: If your calls are charged second by second set both parameter s to 1.
Example 2: If you are charged immediately afte r answerin g a call for t he whole first minu te and then second
by second set first count to 60 and next count to 1.
Proper setting of these parameters helps you to keep real record of the minutes spent and charged for
each SIM. These parameters are used for limit counters, statistics (not for the CDR).
Time of use SIM – Interval of using selected SIM card. Caution!: If parameter “Time of use will
be overlapped by another SIM (in one GSM group) – in this case can come about unspecified
switching of SIM cards – can be selected another SIM cards !
74
Page 77

!! Preliminary version of user guide v1.8 !!
Unlock on weekends – Permission/prohibition of this group during weekends (Saturday,
Sunday)
Interval of change SIM card – in this interval hours:minutes will be randomly switched SIM
card. (SIM card will be switched after proceeding call hang-up).
75
!! Preliminary version of user guide v1.8 !!
Page 78

9.7.4.4 GSM Incoming groups
Settings for incoming calls from GSM networks to PRI ISDN interface.
Incoming calls to ISDN – setting of the method how PRIGW will processes incoming calls from
GSM network and route to PRI ISDN interface.
Mode – mode, how PRIGW is answering to incoming calls from GSM network.
- Reject incoming calls - by selecting this item you barring GSM incoming calls
(the calling subscriber gets the busy tone*).
- Ignore incoming calls – by selecting this item you ignore GSM incoming calls
(but -the calling subscriber gets the ringing tone).
- Receive incoming calls + voice message – incoming calls will be routed to
ISDN interface according to following parameters.
- Receive incoming calls + dialtone – incoming calls will be routed to ISDN
interface.
- After ring callback / refuse – activated callback (for CLIP with is saved in
Autorouting/Callback table. The others calls will be rejected.
- After ring callback / Ignore - activated callback (for CLIP with is saved in
Autorouting/Callback table. The others calls will be ignored.
- Report to PC + voice message – external callback (for callback centre) with
saved voice message.
- Report to PC + dial tone - external callback (for callback centre) with dial tone.
Minimum digits in DTMF – Minimum of DTMF digits in DTMF dial-in
Maximum digits in DTMF – Maximum number of digits to be DTMF-dialed for incoming
calls. After the last DTMF dialing, which is the maximum, an ISDN call is made automatically
with the currently selected DISA (or DTMF prefix if necessary).
76
Page 79
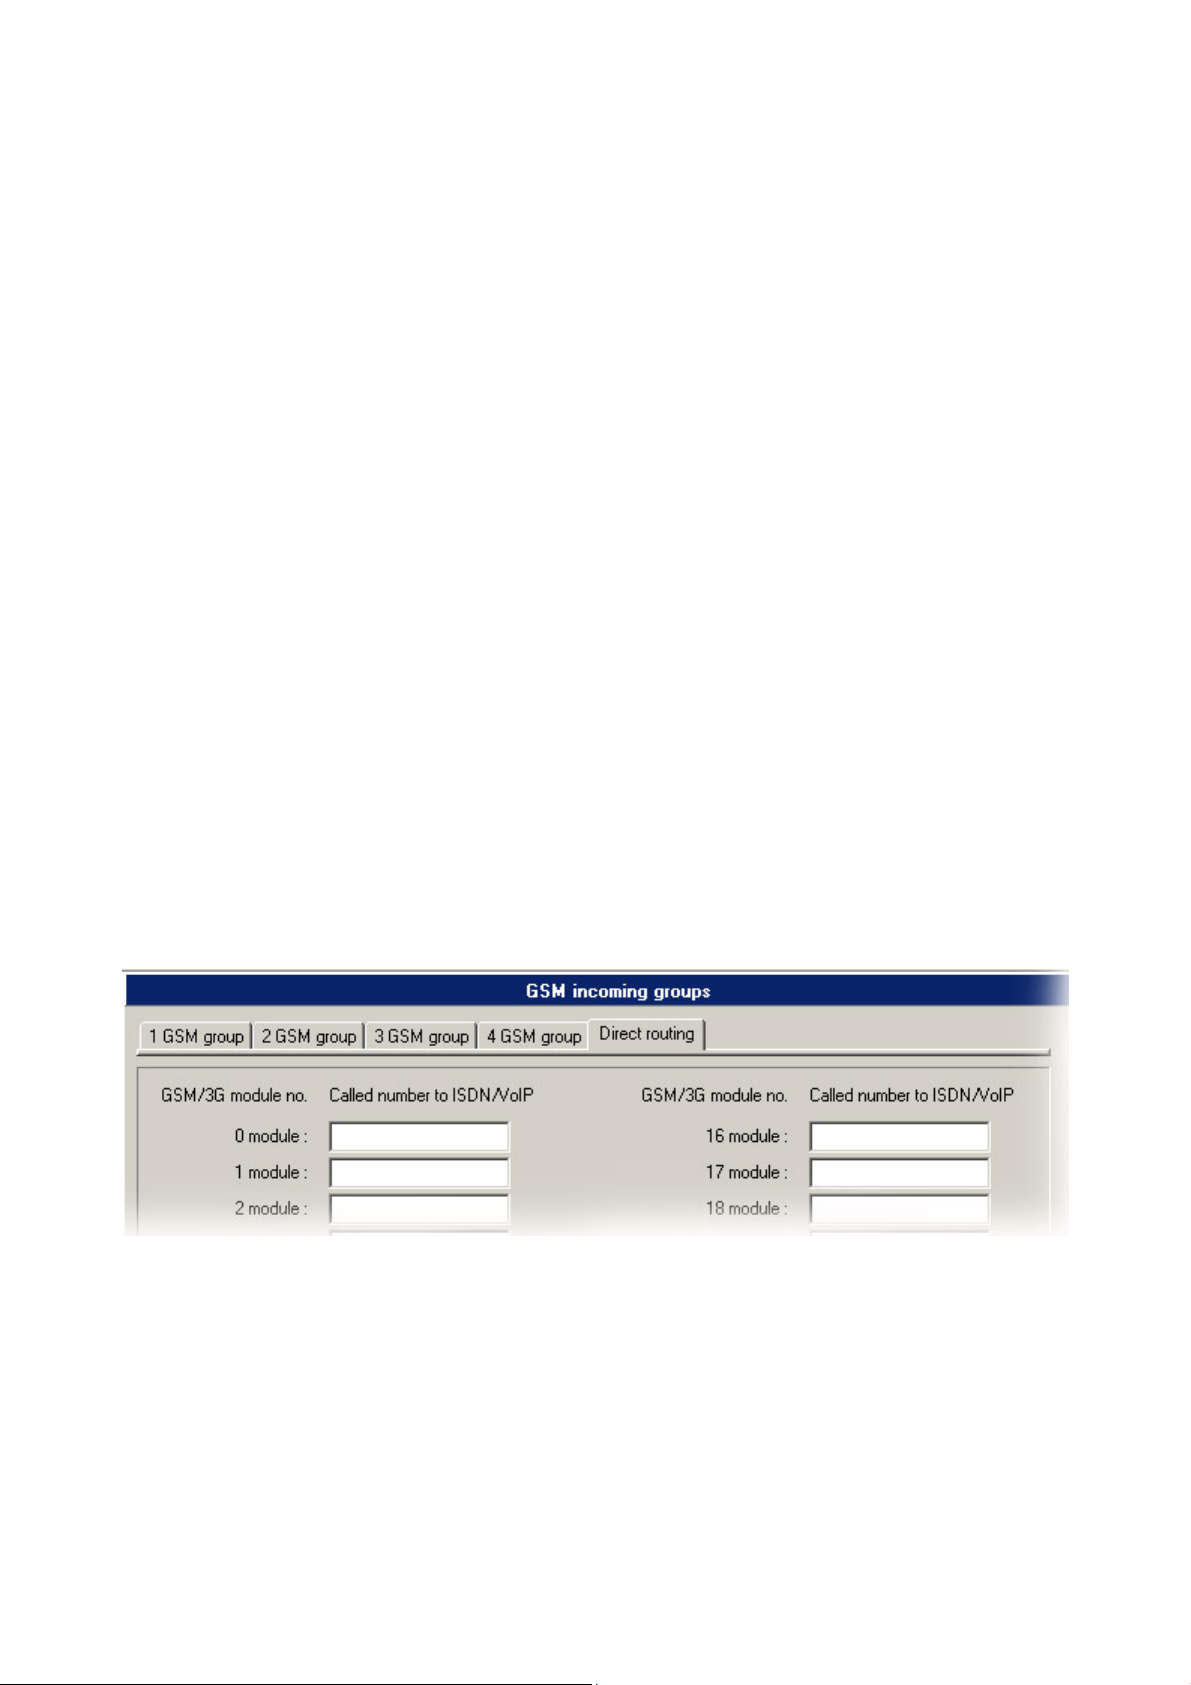
!! Preliminary version of user guide v1.8 !!
Timeout while imputing DTMF digits(s) – time (in seconds) for the PRIGW to wait for the
first and next DTMF digit. After this timeout, either the DTMF number received so far is dialed
into the ISDN or, if no DTMF digit is dialed, a number is dialed from the “List of dialed numbers”.
List of called numbers - list of numbers to dialed automatically gradually (in the case of
unavailability or busy) if no DTMF dialing (DISA) is made.
Prefix before DISA preselection – prefix which the gateway add before dialed DTMF dial in.
For example : received DTFM digits are 487 and this prefix is 6655. The gateway will send to
PRI ISDN interface number 6655487.
CLIP - With this parameter you can change digit „+“ from CLIP by different digit(s). In case that
you leave blank this parameter, the gateway will only remove „+“ from CLIP
Looping of DISA message – setting of automatic repeat of DISA voice message in case of
incoming DTMF dial-in.
Time to keep CLIP in table – parameter for AutoCLIP routing. By this parameter you can set
time how long will be saved information about outgoing call to GSM. 0= switch off AutoCLIP
function.
Add record only for unconnected call – Gateway can save to AutoCLIP routing table only
unconnected outgoing calls or also connected calls.
Delete record for connected answer – Gateway can delete record from AutoCLIP routing
table immediately after connection of the answer call, or only after record expiration sets by
parameter “Time to keep CLIP in table”.
Direct routing – With this group of parameters you can set direct incoming routing to different
destination from each GSM/3G module
77
!! Preliminary version of user guide v1.8 !!
Page 80

9.7.4.5 Prefixes
Tables of prefixes for GSM operators.
Table of replaced prefixes – table of prefix, that are to replaced (in outgoing call from PRI
ISDN to GSM) to another prefixes (e.g. +420 replaced by 0)*
*this change will be made before find right prefix in table of prefixes!
Table of prefix – table of called prefixes from PRI ISDN. At filling-in this table you can set the
length of called number. In case that this parameter you didn’t fill-in, PRIGW use parameter
„Default number of digits“
Network number – ID number of GSM network for these prefixes – only for you info
Prefix change for call from PRI1 to PRI2 – table of prefix, that are replaced (in outgoing call
from PRI 1 ISDN to PRI 2 ISDN) to another prefixes (e.g. +420 replaced by 0).
9.7.5. LCR table
Table of outgoing Least cost routing (LCR). Each outgoing call from PRI 1 interface will be
routed to GSM according to this table. PRIGW at each call check line to line and in case that
called prefix is same as prefix in network list and actual time is time limitation limits, call will
be routed via defined GSM group(s) or via PRI 2 interface.
Network list number – number of “Network list”
Time limitation – validity time of this line
Weekend – parameter determining if these line is valid on weekends and holidays.
78
Page 81

!! Preliminary version of user guide v1.8 !!
Groups - Destination GSM group(s) for outgoing call to GSM (in case that first GSM group will
be unavailable, call will be re-routed via next GSM group, or cancelled (without setup ACK))
Limit - Maximum length of call (in minutes). After this limit will be call disconnected. Maximum is
60 minutes. In case that you set limit=0 the length of call will be unlimited (limited by GSM
network).
9.7.6. Autorouting / Callback table
Table for Callback and Autorouting function.
Callback – In case that you activate in GSM incoming group callback, you can add authorized
CLIP which can use callback function
Autorouting – You can add for each CLIP defined destination in PRI 1, these CLIPs will be
automatically connected directly with defined number on PRI ISDN 1 trunk.
Limit – maximum length of call.
79
!! Preliminary version of user guide v1.8 !!
Page 82

10. Accounter program
The program for remote automatic download cdr information from up to 8* PRIGW units via IP
connection (TELNET).
*only accounter for Windows, for OS Linux is one script for one PRIGW unit.
10.1. Accounter Program Installation
PRIGW includes an installation CD with the Accounter program installation. After the CD
is inserted in your PC CD-ROM (or the diskette is inserted in your PC diskette drive), the
installation will start. If you have not selected the automatic running of CD after insertion (or use
diskettes), run the installation program to start the installation. Wait until the installation is
completed.
*) The program can be run under the MS Windows 95 OSR2/98/ME/2000/XP OS only.
**) For OS LINUX you can use 2N-accounter script
10.2. Accounter Program Running
When the installation is complete, run the program by clicking on the "Accounter program"
in your PC menu, clicking on the icon on your desktop, or running the "Accounter.exe"
file, which you can find on the appropriate location installed by you using any file explorer,
commander or browser.
If you want to use this function on OS Linux you have to use special script with these
functions.
How to install Accounter script in OS LINUX:
- Unzip file: unzip Linux-accounter.tar.gz
- "Untar" file: tar xvf Linux-accounter.tar
- after it you will have directory: Linux-accounter
- Inside this directory, you run file "install" : (./install)
- Script for connect, download cdr and save it to file with format yyyy-mm-dd has name
"2N-accounter". (run type command ./2Naccounter)
- File "run-2N-accounter" will configure Linux utility "cron" to every 20 min run script 2Naccounter. (to run type command ./setup-cron).(Setup will modify Linux CRON program)
- Please, before run file, you must configure IP address, username and password in script
"acounter.pl"
- previous files and files with cdr info and log file you find in directory: /usr/bin/accounter
log file- accounter.log
cdr info file- yyyy-mm-dd
80
Page 83

!! Preliminary version of user guide v1.8 !!
10.3. Description of Accounter program
Program is dedicated for automatic downloading and saving cdr info about calls made via
PRIGW and theirs savings in the text files. The communication with PRIGW is established in
chosen times moments via Ethernet with help of Telnet protocol (port 23) or via connected ISDN
modem.
81
!! Preliminary version of user guide v1.8 !!
Page 84

10.4. Set-up Accounter program
By starting Accounter program click on icon for setting of the program. Here you have
options set in individual flags:
Starts – setting of individual times, when the program will automatically save cdr info
from PRIGW + selection of the method of
saving in the files.
− A Time : 1 time of automatic saving
− B Time : 2. time of automatic saving
− C Time : 3. time of automatic saving
− Repeatedly : Will automatically save
cdr each xx minutes (if set for 0, this
method is off)
− At start program : Automatic save of
cdr by start of the program
− Only one file : If marked, program
saves cdr info in one file
(Dddmmyy.cdr), if not marked , he
differentiate following the method of
saving (1 time – file
DddmmyyABSx.cdr, 2 time –file
DddmmyyB.cdr,3 time – file
DddmmyyCBSX.cdr, Repeatedly –
DddmmyyBSx.cdr, At start- file
DddmmyyABSx.cdr)
− Use : Activation of this flag
List – number of lines that will be represent in the status window.
Login – Log in name, password.
− Name : Log in name in the BS
− Password : Log in password in the BS
− Save pass : Saving of the log in password foe next start of the program
− Login attempts : Number of trials of the program by automatic log in.
Make sure that user’s password and name are identical with n and p which
are saved in connecting PRIGW. By invalid n or p the program will ask for
valid characteristics.
TCP/IP – Parameters for connecting of the program to the BS
− IP : IP address of connecting BS (enter in the right form ! e.g:192.168.50.2)
− Host : Network name connecting BS (available in higher versions of the
firmware - for the present time do not fill out please)
− Port : Number of the remote data port for communication via TELNET
(standard 23).
− Service : Title of the protocol – DO NOT FILL OUT !
82
Page 85

!! Preliminary version of user guide v1.8 !!
10.5. Settings of the Accounter program
The name of the file in witch the program is saving the CDR is derived from actual date (set on
PC on witch is running) in following form:
DddmmyyBSx.cdr (dd – day; mm- month; yy-year; x – no. Of PRIGW unit)
In case you have off option ´´Only one file´´ the program is saving this info in more files with
deference of the last letter.
E.g. D120202A.cdr is file generated at 12.2.2002 and data were saved via automatic
saving in ´´A.Time´´ of the time.
Along files with cdr info is program saving it the file ´´accounter.log´´ info about individual
conditions of the program (if the downloading was successful and etc.)
83
!! Preliminary version of user guide v1.8 !!
Page 86

11. Appendix A - AT Commands for Communication
11.1. Basic Commands
11.1.1. System Information
ATI3
ATI4
System status
AT&S
AT&Spr
AT&Sax
AT&Sxx
AT&S=Info
AT&U
AT!Q
AT&XC
AT&XP
AT&XG
AT&M0
AT&M1
AT&M9
Statistics
AT&T
AT&TIN
AT&TOUT
AT&T##
AT%TPR=mi,ci,mo,co
AT%TG0=mi,ci,0,0
AT%TG#=mi,co,ri,ro
AT%TGALL=mo.co,ri,ro
AT%T##=#,mi,ci,si,mo,co,
so
AT%T##=ALL,mi,ci,si,mo,
co,so
AT%TALL=ALL,mi,ci,si,m
o,co,so
Description of parameters:
! When you change these parameters, all another counters will be resets!!
Firmware version and copyright
Factory number
Status of all inserted boards
Detailed status of PRI ISDN board
Detailed status of AUX board
Detailed status of xx. GSM board (xx=00-7)
Detailed status of one param. on all boards (info=name of
parameter, which you want to show)
Status of logged users on all interfaces
Status of memory log buffer
Status of all proceeding calls
Status of all proceeding calls (sorted by number of B-channel)
Status of all proceeding calls (sorted by number GSM module)
Turning off ANSI terminal color usage
Turning on ANSI terminal color usage
Turns on MATRIX (for testing load of transfer connection)
Statistics of calls via PRI interface
Statistics of incoming calls via GSM modules
Statistics of outgoing calls via GSM modules
Statistics of calls via SIM cards of ##. GSM module
Setting of statistics via PRI
Setting of statistics of incom. calls via all GSM modules
in GSM group 0
Settings of statistics of GSM group no. #
Settings of statistics of all GSM groups
Settings of statistics of SIM card no. # of GSM module
no. ##
Settings of statistics of all SIM cards of GSM module
no. ##
Settings of statistics of all SIM cards of all GSM
modules
Mi/mo > Minutes of incom./outg. calls
Ci/co > number of connected incom./outg. Calls
Ri/ro > number of re-routed incom/outg. Calls in group
Si/so > number of received/sent SMS messages
84
Page 87

GSM modules
AT&Qxx
AT&QALL
AT&Gxx=atcmd
Received GSM signal level (xx=00-15)
Received GSM signal level from all GSM modules
Send command for AT commands directly into GSM module
AT&Gxx=at+cnum – SIM card telephone number
AT&Gxx=at+cpin=”xxxx” – PIN entering
AT&Gxx=at+clck=”sc”,1”xxxx” - PIN request enable
AT&Gxx=at+clck=”sc”,0”xxxx” - PIN request disable
Log file
AT&L
Log file listing (PRIGW awaits pressing of the Space bar after
every 20 lines)
AT&C
Call file listing (PRIGW awaits pressing of any key after every 20
lines)
AT&CR
Call file listing and deleting (PRIGW awaits pressing of the key
“#“ for delete this line /with info about call/ form memory and send
next line)
!! Preliminary version of user guide v1.8 !!
11.2. Configuration Commands
11.2.1. Status Information
AT&V
AT&VI
AT&V0
AT&V#
AT&VALL
AT&N#
AT&NALL
AT&R
11.2.2. Default Reset
AT&FRES
11.2.3. System Settings
AT%S70=x.x.x.x
AT%S71=x.x.x.x
AT%S81=
AT%S90=x
AT%S91=x,y
AT%S93=x
Overview of all system settings
Overview of PRI ISDN settings
Overview of basic GSM settings
Overview of #-the GSM group settings (#=1-8)
Overview of all GSM group settings
Overview of parameters of network list no. # (#=1-8)
Overview of parameters of all network lists
Overview of LCR lines
Reset with gateway factory settings
IP address
IP address mask
Initialization string for setting of mode connected
to the gateway COM2
Type of assignment of B-channels to GSM
modules (0-rotating; 1-locked; 2-according to
credit)
Way of call information recording (0- no record;
1- successfully connected outgoing call; 2successfully connected incoming calls; 3successfully connected incoming and outgoing
calls; 5- all outgoing calls; 6- all incoming calls; 7all incoming+outgoing calls)
Y = to each call add NET info (1) or no (0)
Global selection of SIM card (0= according to
85
!! Preliminary version of user guide v1.8 !!
Page 88

GSM group, 1-8= number of SIM holder)
AT%S98=xxxx
AT%S99=
PIN code for SIM cards inserted in the gateway
Gateway date and time settings
dd.mm.yy.w/hh:mm:ss
AT%X00=hout,hin,min
Automatic logout of GSM modules
hout ...hour when the modules start to log out
randomly
hin ...hour when the modules start to log in
randomly
min ...minimal number of modules in the group
(2..15) which remains always logged in
AT%X80=name/pass
User name/password for access via IP port (this
parameter is only write only- you can’t see its
value)
11.2.4. System control
AT&Bxx=DOWN
Transfer of GSM board No. xx into the sleep
mode
AT&BPR=DOWN
AT&BALL=DOWN
AT&Bxx=RESET
AT&BPR=RESET
AT&BALL=RESET
AT&BSYS=RESET
AT&Gxx=RESET
AT&Gxx=BLOCK
AT&Gxx=DOWN
AT&Gxx=ON
Transfer of PRI board into the sleep mode
Transfer of all GSM boards into the sleep mode
Reset of GSM board No. xx
Reset of PRI board
Reset of all GSM boards
Reset of PRIGW
Reset of GSM module No xx
Block of GSM module No xx
Transfer of GSM module into the sleep mode
Transfer of GSM module into the idle mode
11.2.5. ISDN PRI Board Settings
AT%I00=
AT%I01=x,y
ISDN PRI port type (TE/S ; TE/M ; NT/S ; NT/M)
X - TEI ISDN PRI connections (0-63)
Y – CRC (0=off, 1=on)
AT%I05=c1,c2,c3,c4
Number of causes sent to PRI ISDN (in the
ReleaseComplete) whenever an incoming call from PRI
ISDN is rejected.
AT%I11=
AT%I12=
AT%I04=x,y
AT%I06=c1,c2,c3,c4
AT%i09=day,bits,enb
MSN for remote control via PRI1
MSN for remote control via PRI2
Channel select for PRI 1 / PRI 2
Progress messages
Day- day of reset statistics
Bits – 0= no dialtone 1=continuous 3=discontinuous
Basic GSM settings
AT%G00=rr,gggggg,gggggg,gg
g,r=Number of GSM group for each GSM module
gggg,gggggg,gggggg
AT%G01=mode,atms,atfs
Voice processing settings (for GM22 GSM
modules only)
mode – algorithm (0-none, 1-semiduplex, 2-fullduplex)
86
Page 89

!! Preliminary version of user guide v1.8 !!
atms,atfs – transit, receive gain (3=+5db, 1=+2.5db, 0=0db,
AT%G02=mode,atms,atfs
2=-2.5db, 4=-5d
Voice processing settings (for TC35 GSM
modules only)
mode – algorithm (2-echo canceller)
atms,atfs – transit, receive gain (3=+5db, 1=+2.5db, 0=0db,
AT%G06=mmdd,…mmdd…
2=-2.5db, 4=-5d
List of holiday days (mm-month;dd-day) max
length of line is 63 chars!
AT%G07=mmdd,…mmdd
AT%G08=delay,min,max,tout
Net list of holiday days
Parameters of dial from ISDN to GSM
delay– relax delay between calls
min – minimal length of number dialed from ISDN
max – maximal length of number dialed from ISDN
tout – delay between dial digits
GSM settings (x-GSM group)
AT%G#0=sim
Mode of switching SIM card
sim>
0- OFF – group is turn-off
1-4 – SIM card no. 1-4
5 – switching by time
AT%G#1=netid,clir,min,sms,se
c,sec2,pseudo
AT%G#2=netid,clir,min,sms,se
6 – switching by random time
Basic parameters of SIM card in slot 1
netid-network number
clir – 0=default,1=enabled,2=disabled
min – maximal number of minutes called
sms – maximal number of SMS sent
sec – min length of call (no for cdr info)
sec2 – accuracy of measurement length of call (no for cdr
info)
pseudo – default = 0
Basic parameters of SIM card in slot 2
c,sec2,pseudo
AT%G#3=netid,clir,min,sms,se
Basic parameters of SIM card in slot 3
c,sec2,pseudo
AT%G#4=netid,clir,min,sms,se
Basic parameters of SIM card in slot 4
c,sec2,pseudo
AT%G#5= from/to[/from,to/w+]
Time intervals for use SIM card in slot 1, one or
two intervals (from=to=hh:mm), w+(w-) parameter
„w+“ (all weekend) or „w-„ (no weekend) for
enabled/disabled SIM on weekends. In case that
AT%G#0=6 from/to= min/max limit for generate
random time for switch SIM.
AT%G#6= from/to[/from,to/w+]
AT%G#7= from/to[/from,to/w+]
AT%G#8= from/to[/from,to/w+]
Time intervals for use SIM card in slot 2
Time intervals for use SIM card in slot 3
Time intervals for use SIM card in slot 4
List of Networks
AT%N#0=op/np,…
op/np
AT%N#1=pr/n,…pr
List of prefixes replaced by new prefixes (#-number of netlist;
op-old prefix;np-new prefix)
List of prefix dialed for ISDN (will be use for LCR table)
87
!! Preliminary version of user guide v1.8 !!
Page 90
/n
AT%N#2..7=pr/n,…
pr=prefix n=length of number (parameter /n is optional)
Next 7 list of prefixes dialed for ISDN
pr/n
AT%N#9=net,max
Net-network number, max-default length of number dialed from
ISDN
LCR
AT&R
AT%R##=net,hh:mm/hh:mm/w*
,gr
Commands for Testing via AUX
AT!SPxx=dial
Initiates testing call from AUX interface (xx is the called interface):
1..15, 17-31 B-channel
32-rotaring B-channel
AT!SGxx=dial
Initiates testing call from AUX interface (xx is the called interface):
00..31 GSM module
32- to GSM via GSM module according to call prefix
AT!WPxx
Connects the following call from interface xx to interface AUX.
1..15, 17-31 from B-channel no.
32 first incoming call from ISDN
AT!WGxx
Connects the following call from interface xx to interface AUX.
00..31 from GSM no.
32 first incoming call from GSM
AT!D
Terminates call on AUX interface
Commands for Tracing*
AT!RE
AT!Lx
Start tracing of error messages active interface.
Start tracing of LAN & Telnet on layer x
x=2 – Layers IP,TCP,Telnet
x=3 – Layers TCP, Telnet
x=4 – Layer Telnet
AT!Rx
Start tracing of ISDN PRI & GSM on layer x
x=1 – Layers 1,2,3,4
x=2 – Layers 2,3,4
x=3 – Layers 3,4
x=4 – Layer 4
AT!RR
AT!RX
* Tracing can run only via one port !!
Start tracing (AT!R2) to COM1 interface
Stop tracing (AT!R2) to COM1 interface
Table of LCR
Settings of line ## (0..63) of LCR table
net – number of Network list (0..8)
hh:mm/hh:mm/w* – time limitation for use this line
gr – GSM group numbers
Commands for sending and receiving SMS messages
AT!G=A6
Start low-level controlling for SMS messages (can run
only on one port)
AT!G=55
AT^SX=ch
Stop low-level controlling on used port
Controlling SMS messages
…(sms listing) request to list of all SMS messages and
88
Page 91

AT^SR=ch,ix
AT^SD=ch,ix
AT^SM=ch,len,pdu,csu
m
AT^SG=grp,len,pdu,cs
um
*smsinc: ch,ix,sts
*smsrep: ch,ix
*smsout: ch,ix,ref
*smspdu:
ch,ix,sts,len,pdu,csum
*smsdel: ch,ix
*smserr: ch,ix,req,err
!! Preliminary version of user guide v1.8 !!
status confirmations saved on SIM card. Possible
answers:: *smserr (busy,list) or *smsinc (ix=1..255) for
each saved SMS or status SMS , end of list or empty SIM
card - *smsinc (ix=0).
…(sms read) request to read SMS message or SMS
status saved on SIM card. Possible answers: *smserr
(busy,read) or *smspdu
…(sms delete) request to delete SMS message (or SMS
status message). Possible answers: *smserr (busy,delete)
or *smsdel
…(sms to module) request to send message via GSM
module 0..31 or via any GSM module (ch=32). Possible
answers: *smserr (busy, write) or *smsout
…(sms to group) request to send SMS message via GSM
group 1..8. Possible answers: *smserr (busy, write) or
*smsout
Messages from PRIGW unit
… SMS message was received and saved to SIM card:
• Ch …GSM module number 0..31
• Ix …index number of saved SMS messages 0..255
• Sts …status of SMS message
…SMS status confirmation was received and saved to SIM card (this
message is only for GSM modules TC35 and GM47)
…SMS message was sent and didn’t saved to SIM card:
Ref …reference number of sent SMS 0..255 (will be used in SMS
status confirmation message)
…content of SMS message from status confirmation:
• Len …length of SMS message (number of bytes in pdu)
• Pdu …content message in PDU format
• Csum …Checksum of all PDU bytes (2 hexa digits)
calculated without carry
SMS message or status confirmation was deleted from position ix
response to error command:
• Req …required GSM module or GSM group
• Err …error code (6=busy, 40=write, 41=read, 42=delete,
43=list)
89
!! Preliminary version of user guide v1.8 !!
Page 92

12. APPENDIX B – LIST OF ALL STATUS CODES
12.1.1. Plug-In Boards
Board Types
ID Name Description
0
NONE
1
CPU111
2
PRI130
3
GSM160
4
AUX120
5
GSM161
Board Types
ID Name Description What Follows
0
INIT
1
ERROR
2
POWER
3
OK
4
UNDEF
5
CHECK
6
ERASE
7
PROG
8
DETECT
9
DOWN
10
MODEM0
11
MODEM1
12
DISC
(no board)
(CPU board is not displayed)
1x PRI port NT/TE
2x GSM Ericsson GM22 module + 2x SIM
Switch matrix, voice message generator and AUX port
2x GSM Siemens TC35 module + 8x SIM
HW board reset and init of respective SW parts in
progress
Board in wrong slot or defective board HW board reset
Only upon system power on or AT!Bxx=RESET
command
Rest status, HW is working on board (full
operation)
Empty slot DETECT
Board firmware check (AUX only) ERASE
Board firmware erasing (AUX only) PROF
New board firmware loading (AUX only) OK
New board plug-in detected INIT
Frozen status, HW is working on board but no
new calls are started
Parameter S80 sent to modem (AUX only) MODEM1
Parameter S81 sent to modem (AUX only) OK
Board plug-out detected UNDEF
OK/CHECK
DETECT
DISC
board reset
12.1.2. ISDN Layer Statuses
ISDN Layer 1 Statuses
ID Name Description
0
DEACT
1
ACTIVE
2
SIGNAL
3
SYNC
ID Name Name According to Q.921
0
NOTEI
1
AWTEI
2
AWTEST
3
OKTEI
4
AWEST
5
AWREL
6
OKEST
7
TIMREC
Deactivation – no signal received
Activation – full synchronization achieved (frame,multiframe,crc)
Signal received – no synchronization
Signal received – only partial synchronization (frame)
TEI Unassigned
Assigned Awaiting TEI
Establish Awaiting TEI
TEI Assigned
Awaiting Establishment
Awaiting Release
Multiple Frame Established
Timer Recovery
90
Page 93

!! Preliminary version of user guide v1.8 !!
ISDN Layer 3 Statuses
ID Name Name According to
Q.931
0
NULL
1
CINIT
2
OVSEND
3
OPROC
4
CDELIV
6
CPRES
7
CRECV
8
CONREQ
9
IPROC
10
ACTIVE
11
DISREQ
12
DISIND
19
RELREQ
25
OVRECV
61
RSTREQ
62
RSTART
ISDN Layer Management Statuses
ID Name Description
0
INIT
1
IDLE
2
DISC
Null Rest status, ready for call
Call Initiated Call from PRI indicated Call to PRI started
Overlap Sending Gradual dialing receiv ing Gradual dialing sending
Outgoing Call
Proceeding
Call Delivered Call from PRI ringing Call to PRI ringing
Call Present Call to PRI started Call from PRI indicated
Call Received Call to PRI ringing Call from PRI ringing
Connect Request Call to PRI answered Call from PRI answered
Incoming Call
Proceeding
Active Connected call
Disconnect Request End of call from PRI End of call to PRI
Disconnect
Indication
Release Request Channel release request
Overlap Receiving Gradual dialing sending Gradual dialing
Restart Request Channel restart request sent
Restart Channel restart request received
Initialization upon PRI board reset
Activation – rest status, necessary for layers 2 and 3
Deactivation
NT Description TE Description
Dialing from PRI
terminated
Dialing to PRI terminated Dialing from PRI
End of call to PRI End of call from PRI
Dialing to PRI
terminated
terminated
receiving
12.1.3. GSM Layer Statuses
GSM Layer 2 Statuses
ID Name Description What Follows
0
INIT
1
SIM0
2
PINREQ
3
PINSET
4
BLOCK
5
SETUP
6
SLEEP
7
NWAIT
8
IDLE
9
CALL
10
CMD
13
INFO
GSM Layer 2 Info for BLOCK Status
GSM module initialization start PINREQ
Module switch to internal SIM card INIT
Module PIN request PINSET
PIN value sensing to module INFO
Module blocked temporarily or permanently (see Layer
2 information)
Module configuration running IDLE
Module sleep running (transition to BLOCK status) BLOCK
Awaiting GSM log-in SETUP
Rest status, can start/receive call, execute AT&G
command
Call running (call establishing, connected call, call end) IDLE
Communicating with module upon AT&G command IDLE
Information loading from module and SIM card NWAIT
INIT
CALL/CMD
91
!! Preliminary version of user guide v1.8 !!
Page 94

ID Name Description
41
(block)
42
Netw-reg
43
Clir-err
44
Mod-err
45
Pin-err
46
Sim-err
47
Log-out
48
Puk-req
(undef)
GSM Layer 3 Statuses
ID Name Description
0
NULL
1
CINIT
3
OPROC
4
CDELIV
6
CPRES
7
CRECV
9
IPROC
10
ACTIVE
11
DISREQ
12
DISIND
19
RELREQ
25
OVRECV
38
RELIND
Blocked by AT&G command, terminated by module, board or system
reset
GSM log-in refused (not activated SIM), next attempt in 5..60 minutes
CLIR activation request refused, next attempt in 2..10 minutes
Defective or not connected GSM module, next attempt in 2 minutes
Wrong PIN, permanently in BLOCK status
Defective or not inserted SIM card, next attempt in 2 minutes
Temporarily logged-out according to parameter X00
SIM card requires PUK
This position of SIM card wasn’t checked by gateway
Rest status, ready for call
Request of call to GSM (from Layer 4)
Call to GSM is connected
Call to GSM is ringing
Indication of call from GSM (from Layer 2)
Call from GSM is ringing on ISDN interface
Call from GSM is processed by ISDN interface
Connected call
Disconnection request (to Layer 2)
Indication of disconnection (from Layer 2)
Module release for another call (to Layer 2)
Reading of DTMF dialing from GSM (from Layer 2)
Indication of module release (from Layer2)
12.1.4. Link Layer Statuses
Layer 4 Statuses
ID Name Description
0
1
2
3
4
5
NULL
MORE
SETUP
PROC
ACTIVE
DISC
Rest status, ready for call
Call request received from GSM or ISDN, awaiting further dialing or
timeout
Call request sent to opposite interface
Call request confirmed, awaiting call answer
Connected call
Call disconnection in progress
92
Page 95

!! Preliminary version of user guide v1.8 !!
12.1.5. Command Shell Statuses
Command Shell Statuses
ID Name Description
0
IDLE
1
REQUEST
2
REPORT
3
LOGFILE
4
CALLFILE
5
CALLREAD
6
AUTOFILE
7
QUERY
8
SCREEN
9
MATRIX
10
FUNCFILE
11
LCRFILE
Telnet Layer Statuses
ID Name Description
0
LOGOUT
1
LOGIN
2
PASSW
3
IDLE
12.1.6. Records of Events and Calls
Record Type in Log File
ID Name Description
0
POWER
1
INIT
2
HW-ERR
3
SYSERR
4
BRDIN
5
BRDOUT
6
BRDRES
8
L1-ERR
9
L2-ERR
10
L3-ERR
12
G2-ERR
13
G3-ERR
14
C4-ERR
Record Type in Call File
ID Name Description
0
I-FD
1
I-OK
8
O-FD
9
O-OK
Rest status, awaiting AT commands
Communication with GSM module upon AT&G command is
displayed
Active tracing
Content of log file is being written out
Content of call file is being written out
Call file records are read
Content of incoming call autorouting chart is being written out
(not used so far)
(not used so far)
Active matrix screensaver
Content of debug file is being written out
(not used so far)
User logged-out
User is entering name
User is entering password
User logged-in
System power on, power off or reset
Initialization of EEPROM (configuration) or flash (upgrade)
HW error of plugged-in board
System error (memory error, etc.)
Board plugged-in
Board plugged-out
Board reset using AT!B command
PRI port layer 1 error (ISDN1)
PRI port layer 2 error (ISDN2)
PRI port layer 3 error (ISDN3)
GSM module layer 2 error (gate2)
GSM module layer 3 error (gate3)
Link layer error (call4)
Not connected incoming call attempt
Connected incoming call
Not connected outgoing call attempt
Connected outgoing call
93
!! Preliminary version of user guide v1.8 !!
Page 96

12.2. Abbreviations in Tracing
12.2.1. Identification of Channels and Processes
With tracing activated, internal system messages (transmitted between processes), messages
received on and sent to the PRI port, and AT commands and replies sent to GSM modules are
written out. The listing of a message related to a specific call starts with the B-channel and GSM
module numbers and an arrow showing the message direction. A right arrow (Æ) means a
message received on the interface (PRI, GSM, LAN) or a message directed from the process of
a lower layer to the process of a higher layer (indication, confirmation). A left arrow (Å)
designates a message sent to the interface (PRI, GSM, LAN) or a message directed from the
process of a lower layer to the process of a lower layer (request, response). The message type
(layer 3 messages are shifted by a space to the right, layer 4 messages by two spaces to the
right) and the message content follow.
12.2.2. ISDN Messages
Typically Used ISDN Messages (Q.931)
000h
001h
002h
003h
005h
007h
00Dh
00Fh
046h
Typically Used ISDN Elements (Q.931)
004h
008h
010h
014h
018h
01Ch
01Eh
020h
027h
028h
029h
02Ch
!alertin
!callproc
!progress
!setup
!connect
!setack
!connack
!disconn
!restart
BEA
CAU
CID
CST
CHA
FAC
PRG
NTW
NOT
DSP
DAT
KEY
Alerting 04Dh !release Release
Call proceeding 04Eh !restack Restart acknowledge
Progress 05Ah !relcompl Release complete
Setup 062h !facility Facility
Connect 06Eh !notify Notify
Setup acknowledge 075h !stsenq Status enquiry
Connect acknowledge 07Bh !info Information
Disconnect 07Dh !status Status
Restart
Bearer capability 04Ch CTN Connected party number
Cause 04Dh CTS Connected party subaddress
Call identity 06Ch CGN Calling party number
Call state 06Dh CGS Calling party subaddress
Channel identification 070h CDN Called party number
Facility 071h CDS Called party subaddress
Progress indicator 079h RST Restart indicator
Network-spec facility 07Ch LCO Low layer compatibility
Notification indicator 07Dh HCO High layer compatibility
Display 07Eh USR User-user
Date/time 07Fh ESC Escape for extension
Keypad facility 0A1h SEC Sending complete
94
Page 97

!! Preliminary version of user guide v1.8 !!
Typically Used ISDN Elements - Cause (Q.850)
ID Name Whole Name
1
6
16
17
21
27
28
30
31
34
41
42
44
65
81
88
96
97
99
100
101
102
127
Unassnumb
Unaccchan
Clear
Userbusy
Reject
Destout
Invformat
Stsenqresp
Normal
Noanychan
Tempfail
Swcongest
Noreqchan
Nobearer
Callref
Dest
Elemmiss
Message
Element
Elemerror
Incmess
Timeout
Undefined
Unassigned number
Channel unacceptable
Normal call clearing
User busy
Call rejected
Destination out of order
Invalid number format
Response to StatusEnquiry
Normal, unspecified
No channel available
Temporary failure
Switching equipment congestion
Requested channel not available
Bearer capability not implemented
Invalid call reference value
Incompatible destination
Mandatory information element is missing
Message type non-existent or not implemented
Information element / parameter non-existent or not implemented
Invalid information element contents
Message not compatible with call state
Recovery on timer expiry
Interworking, unspecified
95
!! Preliminary version of user guide v1.8 !!
Page 98

12.2.3. LOG File events
Type Text Description
POWER [Power on] System switched on
[Power off] System switched off
[Warm boot] Restart of system, unknown cause
[Watchdog] Restart of system by watchdog
[BKPT code] CPU error: break code detected
[Stack error] CPU error: stock integrity failure
[Divided by zero] CPU error: dividing by zero
[RETI code] CPU error: illegal using of instruction reti
[NMI intr] CPU error: wrong interrupt
[VOID intr] CPU error: wrong interrupt
[Upgrade reset] Start of upgrade firmware procedure
[Software reset] Reset by AT commands (at&fres…)
INIT Eeprom Initialization of eeprom (configuration)
Flash Initialization of flash memory (firmware)
HW-ERR (##…address of chip, RD…read value/WR…expected
Codec ##,RD/WR Error in initialization of codec on GSM,AUX board
COM2 #####,RD/WR Error in initialization of COM2 on AUX board
Duart #####,RD/WR Error in initialization of serial controller on GSM board
Hscx #####,RD/WR Error in initialization od HDLC controller on AUX board
Pri #####,RD/WR Error in initialization od PRI controller
SYSERR User stack error! SW error: stock integrity failure
BRDIN #08 TYP STS the board inserted (number of gsm board, type, status)
BRDOUT #08 TYP STS the board disconnected
value)
BRDRES #08 TYP STS Reset the board by AT command
ALL GSM RESET CMD Reset of all GSM boards by AT command
SYSTEM RESET CMD Reset of system by command at&bsys
L1-ERR (reserved)
L2-ERR Error of 2. ISDN layer by Q.921
A: unsol.RX(F) Received packed RR,RNR,REJ with unexpected bit F=1
B: unsol.DM(F) Received packed DM with unexpe cted bit F=1
C: unsol.UA(F) Received packed UA with unexpected bit F=1
D: unsol.UA(-) Received packed UA with unexpected bit F=0
E: unsol.DM(-) Received packed DM with unexpected bit F=0
F: peer re-est Received packed SABME in status OKEST
G: repeated SABME Repeated unsuccessful send of packet SABME
H: repeated DM Repeated unsuccessful send of packet DM
I: failed (TIMREC) Unsuccessful breaking-up of status TIMREC
J: N(R) error Received wrong value N(R) – numbering of packets
K: recv.FRMR Received packed FRMR (information about error)
L: undef.frame Received unknown type packed
M: (I field) Received wrong I-packet (numbered packet)
N: frame size Received packed with wrong length
O: N201 error Value N201 was exceeded (max. length of packet)
L3-ERR tout sts # (p##) Error of 3. layer isdn: timeout in status # on channel p##
G2-ERR ATD/ERROR init (g##) Error of 2. layer isdn: restart of module g## after rejected
command ATD by GSM network
GSM Cause 150 (g##) Error of 2. layer isdn: restart of module g## after cause
150 was received (call barred by GSM network)
G3-ERR tout sts # (g##) Error of 3. layer isdn: timeout in status # on module g##
C4-ERR tout sts # (p##/g##) Error of 4. connecting layer: timeout in status # on call
between channel p## and GSM module g##
96
Page 99

!! Preliminary version of user guide v1.8 !!
13. Appendix C - Description of cdr line
Example of successfully connected call:
** 31.07.02/11:07:53 O-OK CAU-016 aux/g02 GRP-1 0:23 001:40 00000.00 1
0608218005 45456060 1/8942019636000065750
• 1. column: **
• 2. column: date/time of start the call
• 3. column: type of call
− I-FD : Unconnected attempt of incoming call (It will be implemented at higher version
of the firmware)
− I-OK : Successfully connected incoming call ( It will be implemented at higher version
of the firmware)
− O-FD : Unconnected attempt of outgoing call
− O-OK : Successfully connected outgoing call
• 4. column: CAUSE sent to ISDN
• 5. column: number of used B-channel/number of used GSM module
• 6. column: used GSM group (C= callback to PRI 1 , E= call via PRI 2 interface)
• 7. column: time of establishing call
• 8. column: duration of call mmm:ss (max. 255:59) or error cause for unconnected calls
• 8. column: cost of call (will be implemented in higher version of firmware)
• 9. column : id of the gateway (optional)
• 10. column: called number
• 11. column: caller number
• 12. column: number of slot/IMSI* of used SIM card
14. Appendix D - Description of statistics
[Statistic of calls on PRI and in groups ]
pri/grp (reset) minutes hhhh:mm:ss calls reject failed c.offs errors
-----------------------------------------------------------------------------#pr out (1.03) 1303 21:43:07 521 1 24 147 2
#pr inc (1.03) 41 0:41:28 24 0 6 1 0
[Statistic of calls on PRI and in groups]
gsm (reset) minutes hhhh:mm:ss calls reject failed c.offs errors
----------------------------------------------------------------------------- #i1 inc (31.12) 0 0:00:00 0 0 0 0 0
#i2 inc (31.12) 0 0:00:00 0 0 0 0 0
#i3 inc (31.12) 0 0:00:00 0 0 0 0 0
#i4 inc (31.12) 0 0:00:00 0 0 0 0 0
gsm (reset) minutes hhhh:mm:ss calls reject failed red.in redout
----------------------------------------------------------------------------- #g1 out (31.12) 0 0:00:00 0 0 0 0 0
#g2 out (31.12) 0 0:00:00 0 0 0 0 0
#g3 out (31.12) 0 0:00:00 0 0 0 0 0
#g4 out (31.12) 0 0:00:00 0 0 0 0 0
#g5 out (31.12) 0 0:00:00 0 0 0 0 0
#g6 out (31.12) 0 0:00:00 0 0 0 0 0
#g7 out (31.12) 0 0:00:00 0 0 0 0 0
97
!! Preliminary version of user guide v1.8 !!
Page 100

#g8 out (31.12) 0 0:00:00 0 0 0 0 0
[ Statistic of incoming calls on all modules ]
modules brd minutes hhhh:mm:ss calls smses minutes hhhh:mm:ss calls smses
--------------------------------------------------------------------------------------------------------------#00 #01 00 0 0:00:00 0 0 0 0:00:00 0 0
#02 #03 01 0 0:00:44 1 0 16 0:16:37 10 0
#04 #05 02 14 0:14:15 7 0 5 0:05:31 3 0
#06 #07 03 4 0:04:21 3 0 0 0:00:00 0 0
#08 #09 04 0 0:00:00 0 0 0 0:00:00 0 0
#10 #11 05 0 0:00:00 0 0 0 0:00:00 0 0
#12 #13 06 0 0:00:00 0 0 0 0:00:00 0 0
*each line is for two GSM modules
[ Statistic of calls on GSM module #0 ]
sim/dir net/grp minutes hhhh:mm:ss calls reject failed c.offs smses
-----------------------------------------------------------------------------#1 inc /1 14 0:14:15 7 0 2 9 0
#2 inc /1 0 0:00:00 0 0 0 0 0
#3 inc /1 0 0:00:00 0 0 0 0 0
#4 inc /1 0 0:00:00 0 0 0 0 0
-----------------------------------------------------------------------------#1 out /1 439 7:19:51 177 0 6 44 0
#2 out /1 0 0:00:00 0 0 0 0 0
#3 out /1 0 0:00:00 0 0 0 0 0
#4 out /1 0 0:00:00 0 0 0 0 0
- Pri/grp : type of calls
- Reset : Date of last reset the statistics
- Minutes : Number of minutes
- Hhhh:mm:ss : Same number converted to time
- Calls : Number of calls
- SMSes : Number of sent SMS messages
- Reject: number of unconnected calls (no available any free GSM module-call rejected with cause 41(42))
- Failed: number of unconnected calls (rejected by GSM network)
- C.offs: number of unconnected calls (terminated by calling party)
- Errors: number of unconnected calls (wrong requests - disallowed prefix etc.)
- Red.in: number of connected calls (rerouted to this GSM group)
- Redout: number of connected calls (rerouted to another GSM group)
98
 Loading...