

Page 1

2N
®
- OMEGA Lite
Configuration instrument
USER MANUAL
Configuration Program
Version 1.6
User’s manual – configuration instrument 1
www.2n.cz
Page 2

2N
®
- OMEGA Lite
Configuration instrument
Dear customer,
Our compliments on buying the 2N - OMEGA Lite. This new product was
developed with an emphasis on the maximum possible use value, quality and
reliability. We hope that you will be utterly satisfied with the 2N - OMEGA Lite for
many years to come.
User’s manual – configuration instrument 2
www.2n.cz
Page 3

2N
®
- OMEGA Lite
Configuration instrument
CONTENTS
1. The PBX configuration instrument menu ........................................................ 5
1.1. Data ...................................................................................................................................... 5
1.2. Windows ............................................................................................................................... 6
1.3. Settings ................................................................................................................................. 6
1.4. Help ...................................................................................................................................... 7
2. Programming tables for the 2N - OMEGA Lite PBX ...................................... 7
2.1. Global data............................................................................................................................ 9
2.1.1. Information ..........................................................................................................................9
2.1.2. Hardware............................................................................................................................ 11
2.1.3. Diagnostics for the PBX and localisation............................................................................. 11
2.1.4. External lines...................................................................................................................... 12
2.1.5. Internal lines....................................................................................................................... 15
2.1.6. Tone parameters ................................................................................................................. 17
2.1.7. Parameters for voicemail .................................................................................................... 18
2.1.8. Authorisation numbers ........................................................................................................ 18
2.1.9. Emergency numbers ........................................................................................................... 20
2.1.10. Passwords .......................................................................................................................... 20
2.1.11. Bank holidays ..................................................................................................................... 20
2.1.12. Charging ............................................................................................................................ 20
2.1.13. Tones and ringing ............................................................................................................... 21
2.1.14. Voices ................................................................................................................................ 23
2.1.15. Modem ............................................................................................................................... 24
2.1.16. GSM Call Volume Levels ................................................................................................... 25
2.1.17. AUDIO Groups .................................................................................................................. 26
2.1.18. AUDIO Relay .................................................................................................................... 26
2.2. Internal lines ........................................................................................................................ 27
2.2.1. Numbering ......................................................................................................................... 27
2.2.2. Access to external lines ....................................................................................................... 28
2.2.3. Permitting services ............................................................................................................. 32
2.2.4. Departments ....................................................................................................................... 35
2.2.5. Allocating to a group and a department ............................................................................... 35
2.2.6. Calling to a department ....................................................................................................... 35
2.2.7. Global data ......................................................................................................................... 35
2.2.8. FLASH settings and the type of dialling .............................................................................. 35
2.2.9. Allow direct dialling to bundles .......................................................................................... 36
2.2.10. Work and private MSN ....................................................................................................... 36
2.2.11. Operating parameters .......................................................................................................... 36
2.3. System lines ........................................................................................................................ 37
2.3.1. Buttons ............................................................................................................................... 37
2.3.2. Description of the buttons ................................................................................................... 45
2.3.3. Allowing services ............................................................................................................... 47
2.4. Virtual lines ......................................................................................................................... 47
2.4.1. Numbering the virtual lines ................................................................................................. 47
2.4.2. Direct selection on the bundles allowed ............................................................................... 48
2.4.3. Tariff credit ........................................................................................................................ 48
2.4.4. Authorisation ...................................................................................................................... 48
2.4.5. Allocating a bundle............................................................................................................. 48
2.4.6. Mask for dialling analysis ................................................................................................... 48
2.5. External lines ...................................................................................................................... 49
2.5.1. Types of lines ..................................................................................................................... 49
User’s manual – configuration instrument 3
www.2n.cz
Page 4

2N
®
- OMEGA Lite
Configuration instrument
2.5.2. Types of digital lines .......................................................................................................... 50
2.5.3. GSM Services .................................................................................................................... 57
2.5.4. Trunks ................................................................................................................................ 58
2.5.5. Trunks for accessing ringing ............................................................................................... 58
2.5.6. Ringing .............................................................................................................................. 58
2.5.7. Ringing table ...................................................................................................................... 60
2.5.8. Global data ......................................................................................................................... 64
2.5.9. Groups and switching ......................................................................................................... 64
2.6. Saving automat ................................................................................................................... 65
2.6.1. Dialling analysis ................................................................................................................. 65
2.6.2. Routes - providers .............................................................................................................. 66
2.6.3. Dialling analysis mask ........................................................................................................ 67
2.7. Groups ................................................................................................................................ 68
2.7.1. Designating lines ................................................................................................................ 68
2.7.2. Switches, Broadcast, Tape Recorder ................................................................................... 69
2.7.3. Intercoms ........................................................................................................................... 70
2.7.4. Switching time ................................................................................................................... 70
2.7.5. Global data ......................................................................................................................... 71
2.8. Numbering .......................................................................................................................... 73
2.8.1. Internal lines....................................................................................................................... 73
2.8.2. Services .............................................................................................................................. 73
2.8.3. DID for the ringing table ..................................................................................................... 73
2.9. Operating parameters.......................................................................................................... 73
2.9.1. Internal lines....................................................................................................................... 73
2.9.2. External lines...................................................................................................................... 74
2.10. Mobility Extension ............................................................................................................... 75
2.10.1. Mobility Extension IN ........................................................................................................ 75
2.10.2. Mobility Extension OUT .................................................................................................... 77
2.10.3. Mobility Extension services ................................................................................................ 79
2.11. CLIP Routing ....................................................................................................................... 80
2.11.1. CLIP Routing - Setting ....................................................................................................... 80
2.12. Short / Speed - Dialling ........................................................................................................ 83
2.12.1. Common Abbreviated Dialling ........................................................................................... 83
2.12.2. Private Abbreviated Dialling ............................................................................................... 84
2.13. Export/Import of Abbreviated Dialling ................................................................................... 85
2.13.1. Common abbreviated dialling Export .................................................................................. 85
2.13.2. Private abbreviated dialling Export ..................................................................................... 86
Abbreviated dialling Import ................................................................................................................ 87
2.13.3. Errors during Abbreviated dialling Import ........................................................................... 88
2.13.4. Creating of Abbreviated dialling file ................................................................................... 89
2.14. REMOTE SUPERVISION .................................................................................................... 90
2.14.1. What Remote Supervision Provides: ................................................................................... 90
2.14.2. What You Need .................................................................................................................. 90
2.14.3. Creating and writing of a gateway remote access code ......................................................... 90
2.14.4. Description of OMEGA Lite Program Menus and Bar Buttons ............................................ 93
2.14.5. Types of Establishing Connection ....................................................................................... 95
2.14.6. AUTOMATIC CONNECTION .......................................................................................... 95
2.14.7. MANUAL CONNECTION ................................................................................................ 98
2.14.8. Downloading Data .............................................................................................................. 99
2.14.9. Panel .................................................................................................................................. 99
2.14.10. Remote Supervision Logistics ......................................................................................... 99
2.14.11. Disconnecting Connection .............................................................................................. 99
2.14.12. Cancelling Connection ................................................................................................. 100
User’s manual – configuration instrument 4
www.2n.cz
Page 5

2N
®
- OMEGA Lite
Configuration instrument
1. The PBX configuration instrument menu
The basic menu for the PBX configuration instrument contains the following items:
1.1. Data
• New Making a new PBX configuration file
• Open… Opening a current configuration file
• Close Closing an open window with a configuration file
• Save Saving a file
• Save as … Saving a file under another name
• Firm values Using the factory settings in the default set up
• From the PBX Reading the configuration from the PBX
• To the PBX Saving a configuration into the PBX
• Reset the PBX Reset the PBX (the same function as turning on and off)
• Time synchronization Setting the time to the PC which is connected to the
PBX
• Upload the PBX software Loading firmware into Flash.
• Reset and boot the PBX from Flash Reset the PBX with firmware
support into Flash and rewriting it into RAM.
• Freezing the PBX The PBX switches to the service regime. Ongoing calls
are completed other calls cannot be started. This state is indicated by the sign
“PBX repairs!” on the system phones. Afterwards it is possible to turn the PBX
off and change the modules. The PBX switches to the operating state after the
command “Unfreeze PBX” or after turning on or off.
• Unfreezing the PBX Returning to the operating state.
• Print actuel window
• Printing sets
• Print setup
• Close the program
User’s manual – configuration instrument 5
www.2n.cz
Page 6

2N
®
- OMEGA Lite
Configuration instrument
1.2. Windows
• Cscade Grouping the windows into a cascade
• Tile Grouping the windows next to each other without overlap
• Arrange icons
• Panel The state of the lines
• Account data Displaying calls
• PBX diagnostics Displaying log system reports
1.3. Settings
Settings for: - local connections -connection to a COM port or a LAN
- modem - remote control /telemonitoring
- confirmation - reading and entering DAT into the PBX
• Select communications device select COM, TCP/IP, UDP
• TCP/IP Setting IP addresses of PC where an XAPI server is
running
• Selecting COM Selecting the COM ports
• COM Baud speed Setting the speed of communication with the PBX
• Select language Choosing the language you want to use
User’s manual – configuration instrument 6
www.2n.cz
Page 7

2N
®
- OMEGA Lite
Configuration instrument
1.4. Help
• Contents help
• Search… for words in help
• Using help general instructions for using help in OS WIN
• About the application information on the SW version of the Program
2. Programming tables for the 2N - OMEGA Lite PBX
The following passages give a detailed description of all of the programming
parameters in the 2N - OMEGA Lite PBX. The chapter is in the same position as
the menu in the PBX configuration device’s themed index.
For access to programme the PBX you need a password.
The PBX configuration instrument enables two types of users to change the PBX
settings.
Password for a Supervisor user
The user with the supervisor authorisation has access to all of the PBX
parameters and can also change the password for a user with user authorisation.
Password for an ordinary User
The user authorisation only allows certain PBX parameters to be changed when
programming and the User password to be changed.
All parameters are available for reading.
The user can change the following parameters
- Authorisation numbers
- Emergency numbers
- Bank holidays
- The name of the VL
- Internal priority lines
- Authorisation without ARS
- Allowing services – all
- Divisions
- Classification into groups and divisions
- Calling to the entire division
- FLASH and the type of choices for VL
- Allowing direct choice for bundles
- Operating parameters for internal and external lines
- Buttons for system telephones
- External lines – name and type of choice
- Bundles for ring retrieval
- Assigning ringing tables into the ringing table for external lines
- Labelling lines
- Switchover times
- Global group data – dialling tone, softening tone, DISA tone
- Quick dialling – joint and personal
User’s manual – configuration instrument 7
www.2n.cz
Page 8

2N
®
- OMEGA Lite
Configuration instrument
The standard password setting for both users is 1111.
Without the password the PBX cannot be programmed. Please remember the
password!
User’s manual – configuration instrument 8
www.2n.cz
Page 9

2N
®
- OMEGA Lite
Configuration instrument
2.1. Global data
2.1.1. Information
This item informs you on the construction of the PBX that you are programming.
Here you will find the number of the SW version in the PBX, the production number of
the PBX to which you are connected, the time for which access to the PBX by remote
control is allowed and a precise labelling of the PBX firmware saved in the RAM and
FLASH memory. This labelling is in accord with the file name used to upgrade the
firmware in the PBX.
Information about licences:
RA Validity - expiring period for remote control with integrated modem to PBX
(according to main board type).
SW valid - SW validity expiring period (it is possible to make only emergency
calls after expiring of this period).
User’s manual – configuration instrument 9
www.2n.cz
Page 10

2N
®
- OMEGA Lite
Configuration instrument
ME valid - licence expiring period of Mobility Extension service.
ME count - maximum count of Mobility Extension service users. (default users
count = 2, without validity limitation).
GSM validity – displays the time before licence expiry for call blocking from
GSM modules (blocking of IMSI or first IMSI part). View the IMSI after the SIM card is
read in the v LogSystem listing.
Last licence - shows the valid licence serial number. It is possible to download
a licence with a serial number higher than the current one. Such a licence may be
entered just once into the PBX.
To enter a licence, push the ‘key’ button on the main bar of the configuration
tool. To create a licence, communicate the licence type, validity time and board
number to the supplier.
Lines - displays the count of available ports for each interface.
Languages - shows the system language to be used (for accounting and
logsystem data listings and ME SMS messages as determined by the FW type: CZ =
FW cz, sk, EN = FW en, de) and available user languages (for the key system menus
and tags, extension names and personal quick dialling labels).
The last changes item provides information on the most recent data entered
into the PBX or a file for each user type.
User’s manual – configuration instrument 10
www.2n.cz
Page 11

2N
®
- OMEGA Lite
Configuration instrument
2.1.2. Hardware
Information on the physical construction of the PBX including the attachment of the
individual types of modules at all positions in the PBX. Individual modules can be
added or taken away thus altering the PBX’s construction. However the simplest
way is to read the actual configuration directly from the PBX along a series port or
through the TCP/IP protocol.
2.1.3. Diagnostics for the PBX and localisation
User’s manual – configuration instrument 11
www.2n.cz
Page 12
2N
®
- OMEGA Lite
Configuration instrument
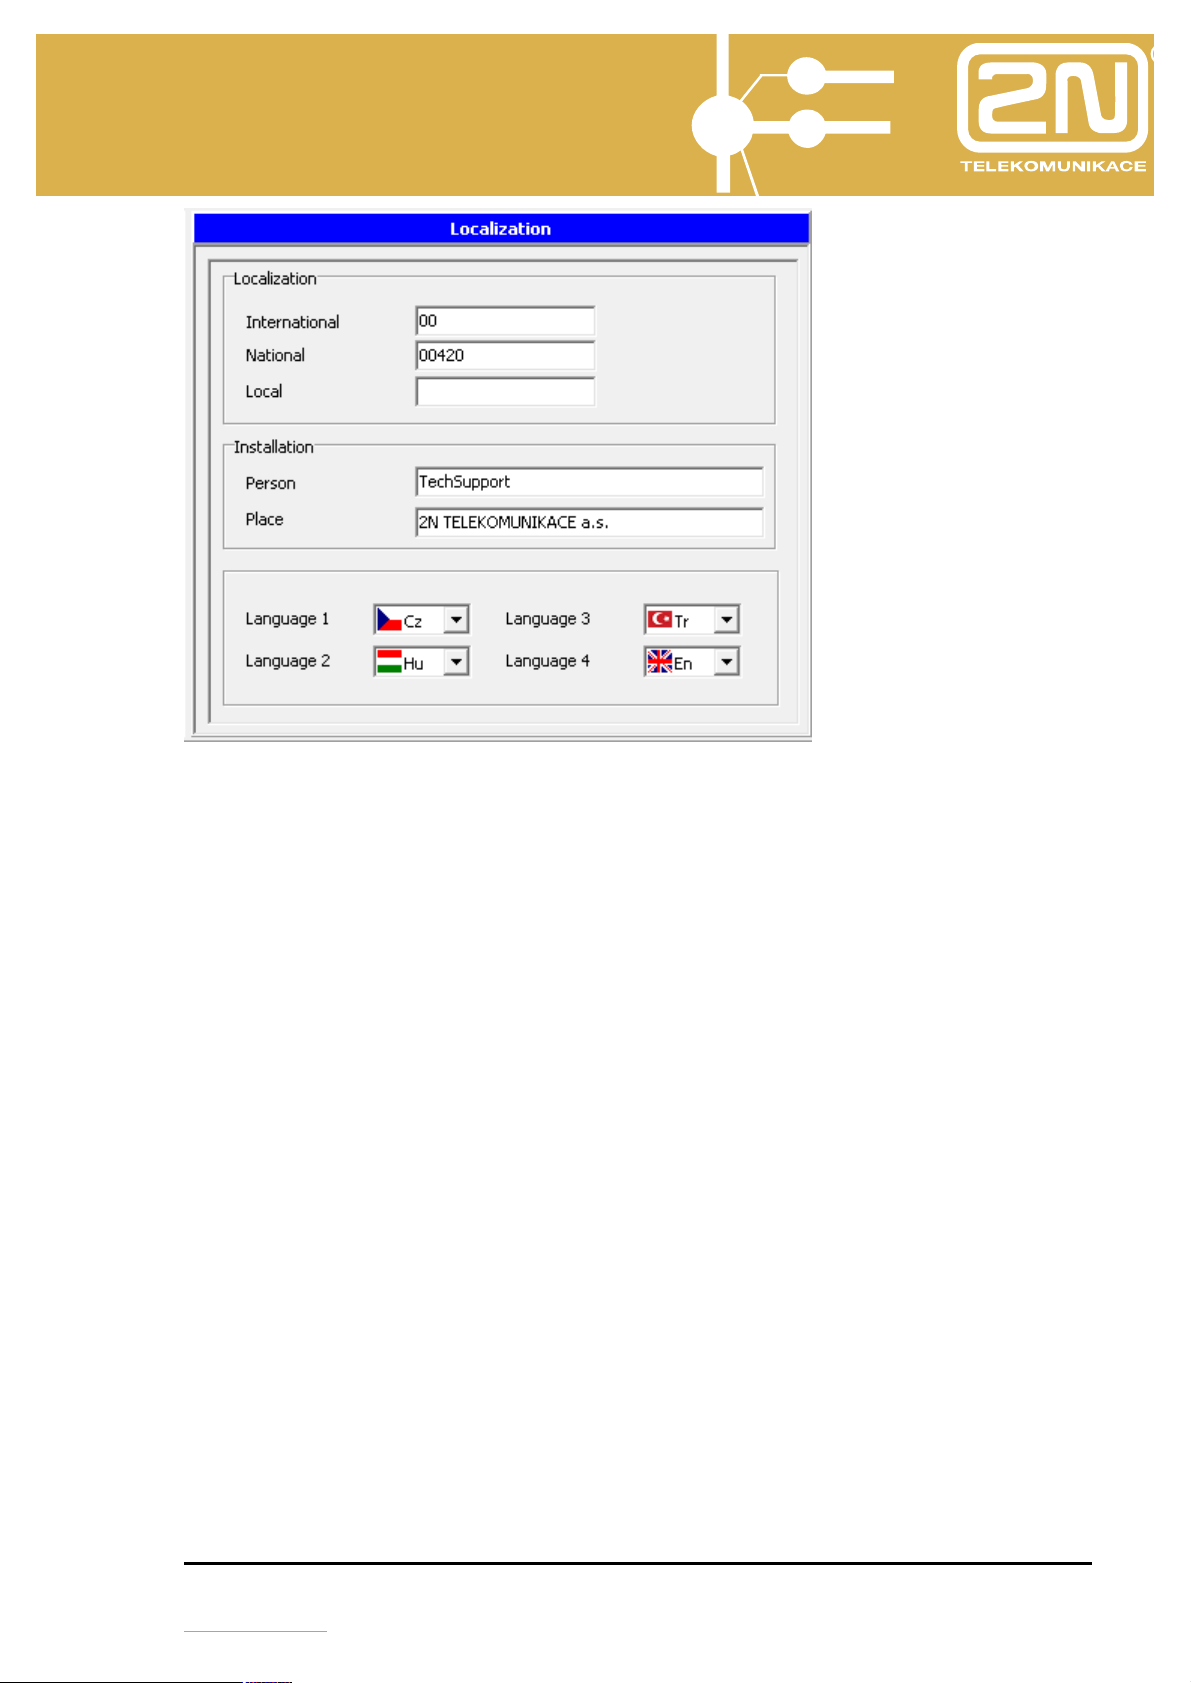
If you use external and internal lines with call identification support, then fill in the
part Localisation:
International – fill in the international calling code (usually 00)
National – fill in the country code in the national network (for the Czech Republic
(CR) it is 00420)
Local – fill in the local transfer number in the ISDN network (usually 0, not used in
the CR)
In the section Installation you assign who and where is installed in the PBX.
Languages
Select 1-4 user languages from the list of user languages (for key system phone
menus and tags, extension names and personal quick dialling labels).
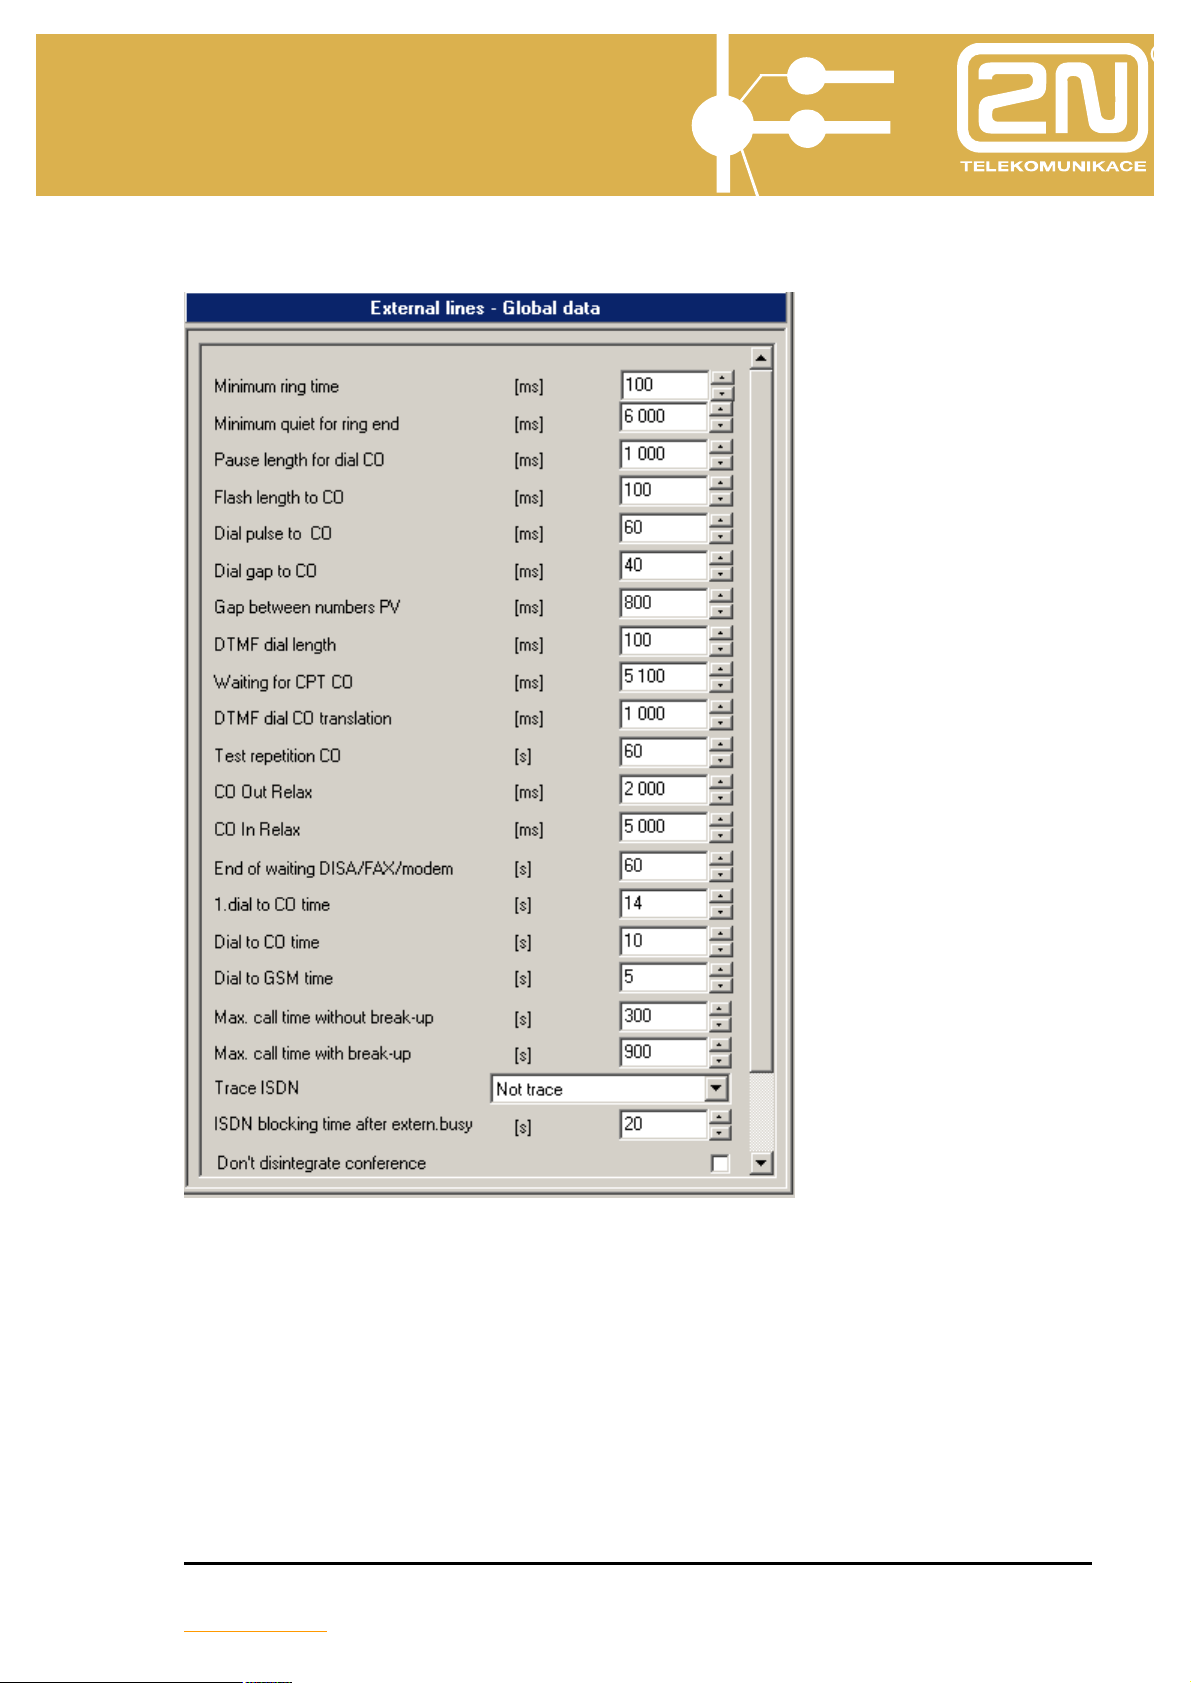
2.1.4. External lines
• Minimum ring time. Determines how long the minimum continuous ringing
from an external line must be detected for the external line to be announced as
ringing.
• Minimum quiet for ring end. It is the pause in the ringing from an external line
after which the ringing from an external line is considered finished.
• Pause length for dial CO. Enables a pause to be entered between the
numbers dialled. Used in complementary numbers after quick dialling and after
detecting routes.
User’s manual – configuration instrument 12
www.2n.cz
Page 13

2N
®
- OMEGA Lite
Configuration instrument
• FLASH length to CO. Enter the length of the FLASH signal generated by the
PBX to the external port.
• Dial pulse to CO. Enter the length of the dial pulse’s impulse to the external
port.
• Dial gap to CO. Serves to set the gap length for pulse dialling to an external
port.
• Gap between numbers PV. Serves to assign the gap length for pulse dialling
sent to an external pulse.
• DTMF dial length. Serves to assign the length of broadcasting the dual tone
multi-frequency (DTMF) dialling to an external port. This value also determines
the DTMF dialling pause.
• Waiting for a CPT CO. Determines the maximum period the PBX spends trying
to detect the external dialling tone used to determine the working of the external
port.
• DTMF dial CO translation. The dialling gap for an internal tonal line to an
external tonal line after which the dialling to the external line is only heard.
• Test Repetition CO. How much a faulty external line test is repeated.
• CO OUT Relax. The minimum time for suspending an external line after an outgoing
call.
• CO In Relax. The minimum time for suspending an external line after an incoming
call.
•
• End of waiting on a DISA/FAX/modem. The time an incoming external call
waits after detection by the CNG (fax signal) or after direct inward calling on a
free or engaged subscriber before hanging up on the external line or carrying on
with another row in the call table.
• 1st dial to CO time. The maximum time for delay when dialling an external line.
If there is no dialling during this time the external number is hung up on.
• Dial to CO time. The maximum time for delaying in dialling an external line. It is
renewed after every new number dialled by the internal user and, after it has
expired; the device switches from dialling to calling. It is permissible for the
expiration of this time to be marked by a short peep. Any other calling after this
time has elapsed is considered to be a call service.
• Dial to GSM time. The maximum time for dialling another call to a GSM line. It
is renewed after every new number dialled by the internal user and, after it has
expired; the device switches from dialling to calling. It is permissible for the
expiration of this time to be marked by a short peep. Any other calling after this
time has elapsed is considered to be a call service
• Max call time without break-up. The maximum time for a call of two external
lines that have connected break up signalling.
• Max call time with break-up. The maximum time for a call of two external lines
that do not have connected break up signalling.
• Trace ISDN. The selection allows the type of diagnostics for the ISDN modules
to be set after restarting the PBX.
• ISDN blocking time after extern. busy. The time for which the ISDN line is not
accessible after a previous occupancy by external equipment (e.g. by an ISDN
modem).
User’s manual – configuration instrument 13
www.2n.cz
Page 14
2N
®
- OMEGA Lite
Configuration instrument
• Don’t disintegrate conference. Allowing no collapse for conferencing between
an internal line and at least two external lines after the internal line has hung up.
User’s manual – configuration instrument 14
www.2n.cz
Page 15

2N
®
- OMEGA Lite
Configuration instrument
2.1.5. Internal lines
• Pulse #. The digit replacing the tone hash on pulse telephones.
• Pulse *. The digit replacing the tone asterisk on pulse telephones.
• Time for 1st dialling. Defines the maximum time waiting for the first number to
be dialled after phone is picked up. The line gets the engaged tone after this
time period has elapsed.
• Time for further dialling. Defines the maximum time spent waiting for the next
number to be dialled from an internal line. After it has lapsed the engaged tone
is heard and the call is cancelled.
• Crossing Time to failure loop. Defines the time period before the engaged
tone is sent following unsuccessful dialling. After the line goes to a fault loop.
• Bad dial key protection. The time period for which the next digit dialled is
ignored after dialling the entire number. It serves to prevent inadvertent call
back after unsuccessful dialling.
• Switching on lock. The time the intercom lock is fastened.
• Regime supervisor is valid. The time period for which the supervisor services
can be called upon after logging in to the Supervisor service
• Ticking after attach. The time for which a ticking can be heard on the call after
connecting. After this period the service cannot be disconnected from the call.
• Back to forwarder. The time the PBX tries to get a connection after
reconnecting with a hung up line. After this time it carries on in getting a
connection but it also starts ringing back to the switcher.
• Back to operator. If the target user does not pick up the phone in this period
the ringing goes back to the operator.
• End of switching over. After this period the PBX considers the call as dead.
The caller is told this by a voice telling them that all lines are unavailable and
the call is cancelled.
• Ringing of holding CO. The time between being notified by tinkling on an
internal line that an external call is on hold.
• End of holding. The time limit for a temporarily held external line to be hung
up.
• Time of back ringing. The time call back lasts for.
• Length of alarm ringing. The time the alarm will ring after activating it on an
internal line.
• Delay from front. The time when a new incoming call is not accepted after
having been hung up.
• Increasing of DTMF resistant for DISA. Min. length of the DTMF sign that is
accepted in the DISA direct inward calling.
• Increasing of DTMF resistant for VMail. Min. length of the DTMF sign that is
accepted in VoiceMail.
• Trace key system phone L2 – enable writing of key system phone layer 2
events into LogSystem listings. To read the data push the ‘dollar’ button on the
main bar of the configuration tool while reading accounting data, for example.
• Trace key system phone ringing – enable writing of key system phone ringing
into LogSystem listings. To read the data push the ‘dollar’ button on the main
bar of the configuration tool while reading accounting data, for example.
User’s manual – configuration instrument 15
www.2n.cz
Page 16

2N
®
- OMEGA Lite
Configuration instrument
•
User’s manual – configuration instrument 16
www.2n.cz
Page 17

2N
®
- OMEGA Lite
Configuration instrument
2.1.6. Tone parameters
DTMF
Increasing of DTMF resistant for DISA. Min. length of the DTMF sign that is
accepted in the DISA direct inward calling.
Increasing of DTMF resistant for VMail. Min. length of the DTMF sign that is
accepted in VoiceMail.
Amplitude of the DTMF L Group: the size of the DTMF sign’s amplitude (as a rule
it is not necessary to change it).
Amplitude of the DTMF H Group: the size of the DTMF sign’s amplitude (as a
rule it is not necessary to change it)
The PBX has two tone generators which can be used as tone sources when setting
Tones. The tone can be formed from up to three varying frequencies. When
forming the tones it is necessary to uphold the rule on the overall size of the
amplitude:
-1st Frequency = Amplitude to 62
User’s manual – configuration instrument 17
www.2n.cz
Page 18

2N
®
- OMEGA Lite
Configuration instrument
-2nd Frequency = Amplitude to 31
-3rd Frequency = Amplitude to 21
Generator 1 (sine 1) -Default frequency 425 Hz.
Generator 2 (sine 2) -Example of forming a “British tone”.
Amplitude of the voice modules
The default value is set at 64 and it is not recommended to change it.
Busy tone detector parameters
Count of CPT periods -minimum count of tones (beeps) according to
ITU-T E.180 before hang-up;
Silence fluctuation -intensity of the silence signal (0-65535).
Jitter period -tone duration tolerance against silence, starting from
tone:silence = 1:1 [ms];
CPT detection threshold behind filter -minimum tone level (0-255) for the tone to
be considered present.
2.1.7. Parameters for voicemail
Voicemail a line (or department) to which the modem of a voice
system is connected, Audio lines (Kerio VoiceMail) and the
ITS voice system lines.
Identification of mailbox selection prefix before the identification sign (the
default setting is a pause of 1s).
DTMF for call clear return from being put through (called subscriber is
engaged)
Increasing of DTMF resistant for VMail. Min. length of the DTMF sign that is
accepted in VoiceMail.
Use protocol ITS permission/prohibition for the voice mail ITS
Use protocol 602 permission/prohibition for the voice mail SW602
2.1.8. Authorisation numbers
Tables A, B, C, D, E, F for programming authorisations. Tables A, B, C, D
are prohibitive and conversely tables E and F are for exemptions and have greater
priority. Every table has 16 rows. Local numbers up to 5 digits can be entered into
tables A and B, the rest take ten digits.
Apart from the numbers it is also possible to add the sign “?”, which presents
all numbers (0-9).
User’s manual – configuration instrument 18
www.2n.cz
Page 19

2N
®
- OMEGA Lite
Configuration instrument
User’s manual – configuration instrument 19
www.2n.cz
Page 20

2N
®
- OMEGA Lite
Configuration instrument
2.1.9. Emergency numbers
A table listing the emergency numbers that the lines can call without
authorisation. 15 numbers are available with a maximum of 16 digits.
2.1.10. Passwords
2.1.10.1. The password for users classified as Supervisor
The table for entering the supervisor’s password. This password is used, for
instance, during the RESET services of the PBX etc.
The user with the Supervisor authorisation has access to all parameters in
the PBX and can also change passwords for users with the User authorisation.
2.1.10.2. The password for users classified as User
The user with the User authorisation has the possibility of changing only some of
the PBX parameters when programming and can change the password for the user
with the User authorisation.
All parameters are available for reading.
2.1.11. Bank holidays
A table in which up to 16 annual bank holidays can be entered. The PBX
behaves as though it were a Sunday.
2.1.12. Charging
A form for entering the types of calls recorded in the call memory.
The entry Record incoming numbers allows a record of the incoming calls to
be made in the accounting rows for ports so enabling this. The entry Record the
entire number of private calls enables the numbers of private calls to be
recorded.
User’s manual – configuration instrument 20
www.2n.cz
Page 21

2N
®
- OMEGA Lite
Configuration instrument
2.1.13. Tones and ringing
In this screen you can change the type of tones and ringing in individual
states. The screen is primarily meant for special applications.
It is necessary to select “Tone source” (left part of the table) and “Tone
cadence” (right part of the table).
The types of tones (heard in the handset) and ringing (heard on the telephone):
Dialling tone
• Special held calls
• Baby call activate the Baby call/dispatcher regime
• Network dial tone simulated tone when using ARS, call back regime, internal
GSM and ISDN in certain cases
Busy tone
• Busy the person called is engaged, the service cannot be provided
• Congestion blocked network (from an external network – the line is
broken, network is blocked, wrong number no credit; calling
internal network – telephone broken, full queue, cannot be
redirected, reject )
User’s manual – configuration instrument 21
www.2n.cz
Page 22

2N
®
- OMEGA Lite
Configuration instrument
• Not allowed service unauthorised entry (entered an unauthorised service or
line, lock, timeout selection, cannot be done)
Ringing from
• An internal line
• The intercom
• An external line
• Call back
• Return from redirection
• Alarm
Waiting tone
• VL calling from an internal line
• SYS calling from a system line
• CO calling from an external line
Ticking
• When connecting
• End CO-CO at the end of a call between two external lines there is a
ticking before break up
Before entering this screen there is a warning about the possible negative effect
operation may have on the PBX after an unprofessional change to the tones.
User’s manual – configuration instrument 22
www.2n.cz
Page 23

2N
®
- OMEGA Lite
Configuration instrument
2.1.14. Voices
Here you can change the voice settings (system, user and music to make
waiting more pleasant).
System voices
The PBX contains 11 systems voices. The voices notify the user about being
redirected, accepting the service dialled, a more expensive call in the LCR (least
cost routing) etc...
In this category there is also “music to make waiting more pleasant –
MusicOnHold“.
It is not recommended to make changes to the system voices.
User voices
They are for notifying the caller in DISA.
After reading the DAT from the PBX this table will display a list of the voices
contained in the PBX.
Pressing the key “Load“ saves the voices in the “Wav“ directory, which are
then automatically formed in the root directory of the installed PBX’s configuration
tool.
If you are going to make changes in the voices settings it is necessary to first
put the voice in this “Wav” directory and then set it here. A voice is a type of wav
and must have the following parameters: MONO - 8bit - 8kHz - unsigned.
The overall capacity of the voices is ca. 3 minutes. The length of the system
voices including the music is ca. 40 sec.
User’s manual – configuration instrument 23
www.2n.cz
Page 24

2N
®
- OMEGA Lite
Configuration instrument
Mess
The name of the voice as it is herein presented in the PBX configuration tool (e.g.
as a DISA parameter in the ringing table).
File
The name of the voice as it is saved in the PBX.
A change to the original voice
-press the key “Load”
-enter the voice created into the “Wav” directory formed.
-right click with the mouse on the voice you want to change.
-select the voice formed that is saved in the “Wav” directory.
-press the key “Save”
Adding a new voice
- press the key “Load”
-enter the voice created into the “Wav” directory formed.
-right click with the mouse in the space for user voices.
- select the command “Add”
- select the voice formed that is saved in the “Wav” directory.
- press the key “Save”
2.1.15. Modem
Changes can be made in the internal modem’s configuration (depending on
the PBX model) for telemonitoring. The basic set up accepts silent running of the
modem. The settings are changed by the AT command. The command is accepted
after carrying out a RESET.
User’s manual – configuration instrument 24
www.2n.cz
Page 25

2N
®
- OMEGA Lite
Configuration instrument
Permission for Modem switch for telemonitoring in the DISA detection is
(according to the ringing table) selected (if it is sited) directly in the modem module.
2.1.16. GSM Call Volume Levels
The table helps adjust the automatic call volume through a GSM module
against other interfaces.
The values are in dB.
Take small steps while changing the settings.
User’s manual – configuration instrument 25
www.2n.cz
Page 26

2N
®
- OMEGA Lite
Configuration instrument
2.1.17. AUDIO Groups
The AUDIO inputs/outputs include eight AUDIO groups to be assigned to the
Broadcast/Tape recorder service in the Groups/Switches, Broadcast, Tape recorder
menu.
2.1.18. AUDIO Relay
Each AUDIO input/output can be assigned one relay. The relay closes when
the given AUDIO channel is used for the Tape recorder/Broadcast service.
Typically, this option is mainly used for Broadcast with the relay activating the
so-called Broadcast exchange.
User’s manual – configuration instrument 26
www.2n.cz
Page 27

2N
®
- OMEGA Lite
Configuration instrument
2.2. Internal lines
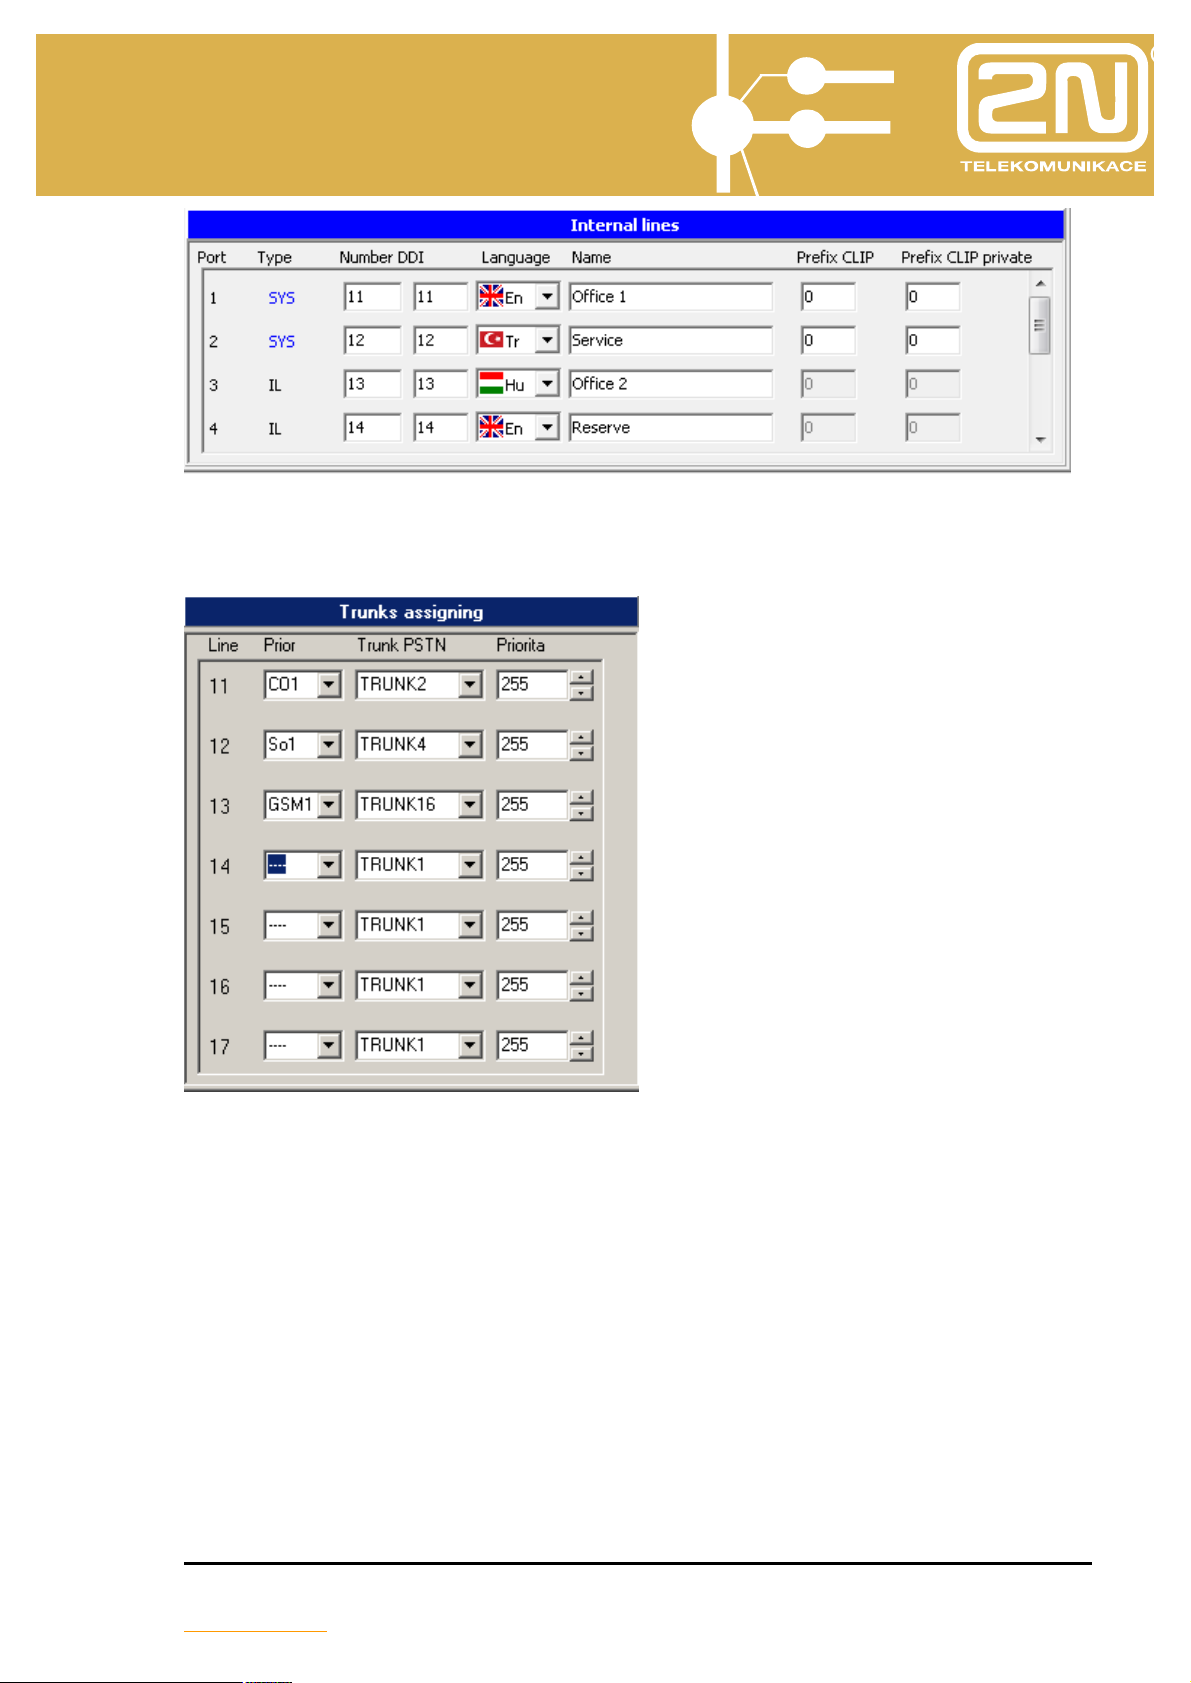
2.2.1. Numbering
This item offers a list of internal subscribers to the PBX. Here the individual ports
are assigned a subscriber number and a name. The name is allowed to up to 14
characters, the numbering is 4 digits at most. Pay attention that no collision with the
numbering of services arises.
In the DDI column enter the DDI number used when phoning an internal line during
DISA, DDI, if it is not set up otherwise in the ringing table.
Select the user language in the Language column to display the key system
phone menus, line names and personal quick dialling labels. Select one of up to 4
languages as preset in the Global data/Localisation menu.
The Prefix CLIP column represents the transition sign to the VTS for internal
lines that identify an incoming call and for system telephones with at least 05.12
firmware. It enables this equipment to accept call back directly from a list of
rejected calls. It can contain up to 4 characters.
The column Prefix CLIP private represents the transition sign to a private
network (an external line denoted as a private one) for internal lines that identify an
incoming call and for system telephones with at least 05.12 firmware. It enables this
equipment to accept call back directly from a list of rejected calls. It can contain up
to 4 characters.
User’s manual – configuration instrument 27
www.2n.cz
Page 28
2N
®
- OMEGA Lite
Configuration instrument
2.2.2. Access to external lines
2.2.2.1. Allocating external lines
This table is for allocating a selection of bundles for external lines to internal
lines (analogue and system) subscribers. If an internal subscriber chooses the
service Access to an external line and the LCR is not activated or they are
returning from it because a different, cheaper route was not found, then for calling
to the VTS the priority external line is first used and if the first choice is not
available then the first free external line selected from the bundle. The priority line
can even be from a disallowed bundle.
If, for instance, we imagine 4 varying privileged groups of subscribers from
the standpoint of their choices for a free external line (ignoring the LCR). The first
circuit will be 2 internal lines to the flat of the building administrator, the second
circuit to the director with an assistant and a company fax, the third circuit will be 4
traders and the fourth circuit the other employees with the lowest set selection for
an external line. In order to meet these requirements we split up the external lines
(except external lines allocated to GSM phones) into, for instance, 4 bundles.
Bundle 1 has 1 external line – for the building administrator’s flat. External lines 2
User’s manual – configuration instrument 28
www.2n.cz
Page 29

2N
®
- OMEGA Lite
Configuration instrument
and 3 – the directorate – are assigned to bundle 2. The external lines 4 and 5 are in
bundle 3 and the last external lines, 6, 7 and 8 are assigned to bundle 7.
Afterwards for starting up an external line we can assign the internal links from the
administrator’s flat just to bundle 1. Like this no one else can get on this external
link. For the director, assistant and fax we assign bundles 2 and 7 for starting up to
the VTS. Like this two calls can be made simultaneously from the directorate on the
private lines and other calls (faxing, other external conference calls , …) choose
one of the free external lines from the last bundle, 7. Similarly the traders’ lines can
be chosen from bundles 3 and 7 for external calls. The other employees can only
use the last bundle, 7. In this case bundle 7 not only serves the group “other
employees” but also as a reserve for the traders and the directorate with a fax. This
selection can be enriched by setting the priorities for the internal and external lines.
For the priorities the valid principle is that an internal subscriber must have the
same or higher priority than an external line so that it can be assigned to him.
2.2.2.2. Authorisations
This table sets the authorisations for calling to a public telephone network in
particular each internal line for the DAY regime, the NIGHT regime and private
calls in an arbitrary regime. Here it is also determined whether a line will obligatorily
use the LRC or not and what level of savings for route selection.
If tables A – F are checked, then it means that the given internal subscriber
controls the selection to an external network on the agreement of the number called
with the values shown in tables A – F. If the number called is in agreement with the
number in the prohibition table, the call is ended. If the caller has the prohibition
table checked, then they can only call the numbers entered into the table. If the
User’s manual – configuration instrument 29
www.2n.cz
Page 30

2N
®
- OMEGA Lite
Configuration instrument
combination and permission tables are combined then the permission table always
has preference.
If the choice Use LCR is not checked, then after selecting the start up
service to an external line the direct free external line is allocated without using
alternate routes in the LCR. Without this choice the PBX behaves as standard. If
this choice is checked so that after selecting the service start up to an external line
no port picks it up, the caller receives a simulated external dialling tone and carries
on. After every number called the selection is compared with the numbers in the
Dialling Analysis table and at the same time the LCR level of the internal
subscriber and the dialling analysis are compared. If a route is found then a call is
made along it. If the route found is engaged or no alternative route is found at all or
the level of the LCR is not in agreement then the call takes place along a standard
external line with the announcement “Attention please, this call is more expensive”
Selecting the Obligatory LCR. If this box is checked it means the same as
in the previous example, that after selecting the start up service to the VTS a
simulated dialling tone is given and the number called is checked to see if it is not
the same as a code in the Dialling Analysis table. If a number is dialled that is not
in the Route Analysis then a connection is made through a standard external link.
If agreement is found and the route is free, then the call is made along this route. In
the event that the route is engaged, the caller is not allowed to make the call and
receives the engaged tone or an announcement that the connection failed.
The selection Mask for Dialling Analysis – Level of Saving. Here up to 4
levels of saving. The individual rows in the Dialling Analysis also have 4 boxes for
ticking the level of saving. So that the internal subscriber can get to the Dialling
Analysis, they must have at least one box ticked for the level of saving in
agreement with the row in the Dialling Analysis.
Note:
• Setting the authorisations is independent of the LCR.
• The selection Obligatory LCR must be selected at the same time as Use LCR.
Example 1: The subscriber is not allowed to call abroad. Then table B is
ticked in which only one row is filled in with the value “00”. The other boxes are not
ticked. Thus if they use “00” as the transfer sign to the international network then
the call is ended.
Example 2: The subscriber is allowed restricted external calls, they are not
allowed 906, they can only get to GMS Paegas through the GMS phoning module.
Then they have Tables A and B ticked, in which only rows are filled in with “00” and
“906” and they also have the boxes Use LCR and Obligatory LCR ticked. At the
same time we assume that they have the first of the four savings levels ticked and
the row Analysis of Savings is also ticked at the first of the four levels. After
dialling 603 it is found that there is agreement with a route though GSM and if the
route is free then the call is made. The route analysis is filled in so that in one row
there is the code 603 followed, for instance, by the number for route 1. Thus the
route number is programmed as to which bundle is used and the entries for adding
and removing numbers are left free (see programming the LCR). If the GSM route
User’s manual – configuration instrument 30
www.2n.cz
Page 31

2N
®
- OMEGA Lite
Configuration instrument
is engaged, then, because the subscriber has the LCR set as obligatory, they hear
the engaged tone and will have to call later.
User’s manual – configuration instrument 31
www.2n.cz
Page 32

2N
®
- OMEGA Lite
Configuration instrument
2.2.2.3. Mask for dialling analysis
This serves to set up one to four levels of saving for individual internal lines after
the service Dialling to the VTS. Details in chapter LCR/Level of Saving.
2.2.3. Permitting services
In this table it is possible to allow or disallow each internal line an individual
service.
In group C it is possible to set three types of levels:
- connection level - for connecting to a call (default service = to call #0). A
line that is at a lower or equal level can be connected to. The level has values from
0 – 15. The default level is 0, no one can call anybody.
- call level – for calling between internal lines. A line that is at a lower or
equal level can be called. The level has values from 0 – 15. The default level is 0,
everybody can call everyone.
- the level in the department – determines the ranking of lines to the
departments. The lines to the departments are ranked from the highest levels to the
lowest. This service is only tied in to automatic logging in to the department using
the DSS key on the system phone. If the department is created by hand using the
PBX configuration instrument then this service is not paid heed. The level has
values from 0 – 15. The default level is 0.
User’s manual – configuration instrument 32
www.2n.cz
Page 33

2N
®
- OMEGA Lite
Configuration instrument
The permission to receive CLIP on an analogue telephone is carried out in the
marker activation.
- CLIP function – by setting this CLIP will be displayed on analogue
telephone (if the analogue telephone’s connection allows this).
- CLIP function without clinking – in certain cases (wireless phones,
MICROCOM, TOPCOM,..) to receive CLIP it is necessary to set the option of
without ringing. This suppresses the first ringing and the accepted CLIP is
displayed on the second ring.
- DTMF – setting this means the identification of the calling CLIP is sent
using DTMF.
- FSK - setting this means the identification of the calling CLIP is sent using
FSK (the majority of telephones with the CLIP display option support it)
If the telephone is connected with the BT CLIP standard then it is necessary to
allow the BT FSK setting.
-Switch on tape recorder - enable this item to connect all
outgoing/incoming calls to the appropriate AUX output as preset in the Global
data/AUX groups and Groups/Switches, Broadcast, Tape recorder menus.
User’s manual – configuration instrument 33
www.2n.cz
Page 34

2N
®
- OMEGA Lite
Configuration instrument
-Call forwarding xxx - select one of the administrator forwarding
settings (always, busy, no answer for Day/Night modes). For call forwarding to the
public switched telephone network, enter the required number into the To PSTN
and ARS line.
Attention: On lines defined as fax, modem or intercom call notifications and peeping,
peeping after the call to an external network has ended and round calls is not automatically
banned. It is necessary to set it up for each individual line separately.
User’s manual – configuration instrument 34
www.2n.cz
Page 35

2N
®
- OMEGA Lite
Configuration instrument
2.2.4. Departments
These tables are used during the Call Department service. In all there are 8
tables with 56 fields available.
2.2.5. Allocating to a group and a department
The table serves to allocate individual internal subscribers to one of two
groups for the purpose of switching from the DAY and NIGHT regimes. One
subscriber cannot be in more than one group. At the same time this is where
individual internal subscribers are allocated to one of eight departments for sorting
ringing. One subscriber can be in more than one department simultaneously.
2.2.6. Calling to a department
If an internal line is using the call a department service, then the call either only
starts on the first free internal line or at the entire department depending on which
group the line belongs to and whether the given department has checked the
parameter Call to the entire department.
2.2.7. Global data
See Global data / internal lines
2.2.8. FLASH settings and the type of dialling
The table is used for setting the minimum and maximum length of the
FLASH on the analogue internal lines. FLASH detection is carried out by windows.
A FLASH signal is only considered to be a disruption to the current by the
subscriber loop that corresponds to the time set in the minimum and maximum
length of the FLASH. By right clicking on the box with FLASH values it is possible
to set the same value in the remaining boxes in the column.
The field “End Flash” is used when it is necessary to detect a break in the
connection to an analogue CO-VL division. The connected analogue CO line must
User’s manual – configuration instrument 35
www.2n.cz
Page 36

2N
®
- OMEGA Lite
Configuration instrument
be modified for detecting a break in the connection using a disruption in the current
loop.
If the box Pulse dialling is not ticked then it only accepts tone dialling.
2.2.9. Allow direct dialling to bundles
This table is used to disable the service of direct dialling to a bundle. The
internal subscriber is only allowed the service to the bundles that they have ticked.
2.2.10. Work and private MSN
Every internal line can be allocated to a different MSN for work and private calls.
This means that during the regular settlement of costs for the operator’s network
costs can be divided up by the individual MSN.
2.2.11. Operating parameters
See Operating data / Internal lines
User’s manual – configuration instrument 36
www.2n.cz
Page 37

2N
®
- OMEGA Lite
Configuration instrument
2.3. System lines
2.3.1. Buttons
In this MENU it is possible to set the programmable buttons for all of the
connectable types of telephones. Two types of analogue system telephones
(OMEGA FCI (no longer made), OMEGA LH ) and a digital system telephone 2N
StarPoint 500 (up to 5 types supplied) can be connected.
If you want to assign one of the functions (HandsFree, Transfer, Mute,..) to a
programmable button, a direct call to an internal line or direct access to an external
line then first left click the mouse on the programmable button that you want to set:
Select Type:
- Line (direct access to external and internal lines)
- Function (the basic function for controlling a system telephone – HF, MUTE, TRF,
CANCEL,..)
User’s manual – configuration instrument 37
www.2n.cz
Page 38

2N
®
- OMEGA Lite
Configuration instrument
- Service (services – e.g. switching from DAY/NIGHT, logging in to a department,
allowing Mobility Extension,..)
This is the procedure to set all of the programmable buttons as you wish.
If you right click with the mouse then you will see:
- Default setting, the programmable buttons’ original setting (stable setting with
regards to the individual types of setups).
User’s manual – configuration instrument 38
www.2n.cz
Page 39

2N
®
- OMEGA Lite
Configuration instrument
- Manager setting, a specific setting for the programmable buttons if at least one
extender is connected.
- Operator setting, a specific setting for the programmable buttons if at least one
extender is connected.
- Reception setting, a specific setting for the programmable buttons if at least one
extender is connected.
- Cancel, annuls the programmable buttons’ settings.
- To clipboard, copies the programmable buttons’ settings.
- From the clipboard, enters programmable buttons settings that have been
copied beforehand.
- Export, exports programmable buttons settings to a “.csv” file.
- Import, imports programmable buttons settings from a “.csv” file.
User’s manual – configuration instrument 39
www.2n.cz
Page 40

2N
®
- OMEGA Lite
Configuration instrument
2.3.1.1. OMEGA FCI
Up to 20 programmable buttons can be set.
User’s manual – configuration instrument 40
www.2n.cz
Page 41

2N
®
- OMEGA Lite
Configuration instrument
2.3.1.2. OMEGA LH
Can also be set with extenders (16 buttons = telephone + 2x20 button Extender),
up to 56 programmable buttons.
User’s manual – configuration instrument 41
www.2n.cz
Page 42

2N
®
- OMEGA Lite
Configuration instrument
2.3.1.3. 2N StarPoint 500
It can also be set with the connected extenders (19 buttons = Advance telephone
type + 1x90 button Extender), up to 109 programmable buttons. Overall number of
all programmable buttons can be up to 460 for the entire system.
For 2N StarPoint telephones it is possible to select from several ringtone melodies.
The melodies for individual types of calls can be assigned in the environment PBX
Configuration tool /system lines /buttons/user settings.
User’s manual – configuration instrument 42
www.2n.cz
Page 43

2N
®
- OMEGA Lite
Configuration instrument
Set:
- Key loudness, allows an acoustic signal when pressing system telephone
buttons.
- Earphone volume, volume control for the earphone.
- Handsfree volume, volume control when using handsfree.
- Ring volume, the volume when ringing.
- LCD contrast, the intensity of the display contrast.
- Internal call, the type of ringing from an internal line.
- External call, the type of ringing from an external line.
- Alarm, the type of alarm call
- Door communicator, the type of ringing from the door communicator.
- Call return, the type of ringtone if a call is returned.
- VIP call, the type of ringtone if an incoming call is from a number in the fast
dialling of the given system telephone.
User’s manual – configuration instrument 43
www.2n.cz
Page 44

2N
®
- OMEGA Lite
Configuration instrument
-Back call, the type of ringtone from a line that was blocked by the person being
called using the “waiting for free line“ service.
- Special call,
User’s manual – configuration instrument 44
www.2n.cz
Page 45

2N
®
- OMEGA Lite
Configuration instrument
2.3.2. Description of the buttons
All of the descriptions of the buttons can be formed and then printed out in the
environment PBX configuration tool /system lines /buttons/prints. After filling in the
functions of the individual buttons in MENU PBX configuration tool /system lines
/buttons/buttons the descriptions are reset, but in PBX configuration tool /system
lines /buttons/prints it is possible to edit them. The number of letters in a text for
individual buttons is given by the width of the individual letters used.
User’s manual – configuration instrument 45
www.2n.cz
Page 46

2N
®
- OMEGA Lite
Configuration instrument
For a “print preview” of the descriptions allow the printing of the individual groups of
buttons and press “preview”.
To “Print” the descriptions allow the printing of the individual groups of buttons and
press “Print”.
User’s manual – configuration instrument 46
www.2n.cz
Page 47

2N
®
- OMEGA Lite
Configuration instrument
2.3.3. Allowing services
This is where the permission for certain services on the pertinent system phones is
done.
- Can pick up remote – remote answering is allowed with the voice call
service. The speaker of a loud telephone is activated and the microphone is muted.
- Loud invitation without MUTE – a similar function as remote answering
but activated by the microphone.
- Can take over from front of other system lines – by pressing a light
button it is possible to take over a queued call from another system telephone.
- Cancel call through the permission it is possible to refuse a call to an
independently ringing system telephone by pressing the Cancel button and then no
longer continuing in the ringing table.
- Call list by allowing this it enables a printout of the calls to be made. We
recommend prohibiting this for system phones that do not support this function
(necessary to have at least the 05,12 version of the system phone).
- Can use the headset this permission enables the “Speaker” (loud
telephone/headset) function to be controlled through the MENU bar when the
headset is connected.
- Automatic answer enabled when activated by the button on the system
telephone it enables automatic answering using the “loud telephone” during an
incoming call.
2.4. Virtual lines
2.4.1. Numbering the virtual lines
This item contains a list of the PBX’s virtual lines. The virtual line is an
extension that does not exist physically. On its account the authorisation, ARS and
other parameters can be set for an outgoing call.
A subscriber number is allocated to individual ports and can be up to four digits
with a four digit PIN, used to identify a virtual line. Attention - a collision with the
numbering of the other lines and services must not arise.
By right clicking the mouse the ports can be automatically numbered.
User’s manual – configuration instrument 47
www.2n.cz
Page 48

2N
®
- OMEGA Lite
Configuration instrument
2.4.2. Direct selection on the bundles allowed
The same set up and intent as with physical lines.
2.4.3. Tariff credit
The same set up and intent as with physical lines.
2.4.4. Authorisation
The same set up and intent as with physical lines except that here only private
authorisations can be set up. It does not distinguish the DAY/NIGHT regime.
2.4.5. Allocating a bundle
The same set up and intent as with physical lines except that here only allocating
the bundle is set up.
2.4.6. Mask for dialling analysis
The same set up and intent as with physical lines.
User’s manual – configuration instrument 48
www.2n.cz
Page 49

2N
®
- OMEGA Lite
Configuration instrument
2.5. External lines
2.5.1. Types of lines
In this table the properties of the individual lines for the analogue external lines is
set up
Analogue external line
• Name – a maximum 14-character name for the external line
• Series – only an incoming external line which has not been tested for correct
working and cannot be entered upon in the outgoing direction
• 16 kHz – an external line with a 16 kHz impulse receiver
• Private – a line connected to a private network, which is not charged.
• Without authorisation – on this line a check of authorisation is not made
• Test CPT. A test for the dialling tone on the external line
• Current test. The other option is to test the line current when answering
• Prefix- a 4-digit prefix, which is automatically chosen as the first (DID through a
superior PBX) after engaging a line. The prefix is not recorded in the charging
row.
• Dialling – setting the type of dialling for an external line
• Announcement tone length– determines how long it must detect an external
dialling tone so that it can designate the line as working. If the value “0” is set
then the tone is never checked and this line will thus never report a fault.
• Time to dial startup determines the minimum time for dialling to be started
after the external dialling tone has been detected
• Min time for accounting – the period deducted from the call time for temporary
charging
• Priority – an internal line must have higher or the same priority so that it can
use this external line.
User’s manual – configuration instrument 49
www.2n.cz
Page 50

2N
®
- OMEGA Lite
Configuration instrument
2.5.2. Types of digital lines
S0 line
• Name - a maximum 14-character name for the external line
• DDI – ISDN line in the PTP connection
• MPT configuration – enables NT1+ analogue telephone equipment to be
connected to an ISDN line with a DID.
• All MSN – reacts to all incoming numbers by a ringing set on the MSN1
User’s manual – configuration instrument 50
www.2n.cz
Page 51

2N
®
- OMEGA Lite
Configuration instrument
• Block Out – only an incoming external line and it cannot be entered on in the
outgoing direction
• Auto TEI
• Without authorisation – checks on authorisation not made on this line
• Private – a line connected to a private network to which charging is not done
• Receive overlap dialling – only for special PTMP applications
• Send CLIP – it is possible to forward the caller’s CLIP to a private ISDN line.
• Synchronising PBX time – during an outgoing call the PBX time is
synchronised with the ISDN operator’s time (if the operator provides this)
• Fax line – labelling an ISDN fax line. Calling is with 3.1 audio signalling.
• Prefix- a 4-digit prefix, which is automatically chosen as the first (DID through a
superior PBX) after engaging a line. The prefix is not recorded in the charging
row.
• Min. time for accounting – the period deducted from the call time for
temporary charging
• Priority – an internal line must have higher or the same priority so that it can
use this external line.
• Series
DID numbers or leave the series empty – if the ISDN network operator only
sends a DID number, for precise information ask the operator of the ISDN
network)
• MSN – the line in the PTMP connection
• MSN
• Main group – dividing up the MSN numbers into two groups for the option of
switching to the DAY/NIGHT regime and other functions related to group 1 / 2.
• Deactivating 2nd layer – by authorising it deactivates the second ISDN layer
after setting the time.
– fill in the series number or numbers (incoming series number without
1-8
– fill in the MSN number 1 to 8
1-8
User’s manual – configuration instrument 51
www.2n.cz
Page 52

2N
®
- OMEGA Lite
Configuration instrument
GSM line
• Name - a maximum 14-character name for the external line
• Series – only an incoming external line which is not tested for correct working
and cannot be entered upon in the outgoing direction
• Private – a line connected to a private network, which is not charged
• Without authorisation – checks on authorisation not made on this line
• Roaming enabled – allowing roaming on the GSM port
• Receive SMS – allowing SMS to be accepted
• Send SMS – allowing SMS to be sent
• SMS after no answered call – the SMS is sent if the called party does not
receive the call (the missed call)
• SMS after accepted call – the SMS is sent if the called party answers the call
(the established call)
• Trace GSM – enable logging of AT communication via a GSM module into
LogSystem listings. By doing so you make the log heavily loaded, so think twice
before enabling.
• SMS at No Answer – The text is used in the SMS if the called party does not
answer the call (the missed call) (text is common with text for MobilityExtension
feature
• SMS after accepted call – The text is used in the SMS if the called party
answers the call (the established call) (text is common with text for
MobilityExtension feature)
%n = Calling party number
User’s manual – configuration instrument 52
www.2n.cz
Page 53

2N
®
- OMEGA Lite
Configuration instrument
%c = Calling party name
• CLIR selection – a choice of sending identification – by operator
- hide number
- show number
• Prefix- a 4-digit prefix, which is automatically chosen as the first (DID through a
superior PBX) after engaging a line. The prefix is not recorded in the charging
row.
• Min. time for accounting – the period deducted from the call time for
temporary charging
• Priority – an internal line must have higher or the same priority so that it can
use this external line.
• PIN – a four digit code for accessing SIM cards
GSM linka-UMTS
This setting is for voice parametres GSM-UMTS module to use it for common
calling. If you want to use also UMTS DATA (internet connection), you have to set it
in the web interface of the VoIP module.
Use your web browser to connect into the the VoIP module. In the Network/Data
connection item enter parametres which you get from your UMTS provider.
User’s manual – configuration instrument 53
www.2n.cz
Page 54

2N
®
- OMEGA Lite
Configuration instrument
• Data connection – enabling of the function
• Connection provider name – Informative name, e.g. provider name
• Dial number (optional) – data access (optional, made by system).
• APN (access point) – login to the provider – parameter requested by
provider
• Initial AT commands (optional) – not necessary
• PPP username (optional) – username for connection to the provider –
parameter requested by provider (not always)
• PPP password (optional) – password for connection to the provider –
parameter requested by provider (not always)
• Description – Informative item
Accept settings by clicking at „Modify“ item (Icon – paper with pen)
Example setting of the VoIP module:
User’s manual – configuration instrument 54
www.2n.cz
Page 55

2N
®
- OMEGA Lite
Configuration instrument
You can check successfull connection in menu „Network / Main configuration“. In
case of successfull connection you can see there IP of the provider.
User’s manual – configuration instrument 55
www.2n.cz
Page 56

2N
®
- OMEGA Lite
Configuration instrument
VoIP
• Name – line name of max. 14 characters
• Without autoris. – the authorisation check will not be performed on this line
• Private – line connected to the private network, no accounting is performed
• Prefix – prefix of up to four digits, which will be automatically called after
outgoing occupation of the line as the first (DIN via the superior central). Prefix
is not recorded into the accounting line.
• Minimum time for accounting – time subtracted from the call time for pseudo-
accounting.
• Priority – internal line must be of higher priority to use the external line.
• CLIP – enter, how should the line be identified in the outgoing direction
• Strip – enter number of digits from the incoming identification, which should be
subtracted in the input direction in order that the remaining digits are the DIN to
the participant of DIN to the ringing table.
• Dial to VoIP – maximal period for delay of the next selection into the VoIP line.
The time survey is reset after each obtained digit from the internal participant
and after its expiring, the dialling mode is changed to the call mode. If it is
activated, the expiring of the period and end of the dialling is announced by a
short beep. Any other dialling is considered a service into the call.
User’s manual – configuration instrument 56
www.2n.cz
Page 57

2N
®
- OMEGA Lite
Configuration instrument
2.5.3. GSM Services
Set the GSM ports for which the GSM CLIP function is to be enabled.
• CLIP In – enter the expected incoming GSM identification format;
• CLIP Out – enter the expected outgoing GSM identification format.
These services are rendered by some GSM providers only.
User’s manual – configuration instrument 57
www.2n.cz
Page 58

2N
®
- OMEGA Lite
Configuration instrument
2.5.4. Trunks
The table serves for allocating individual external lines to a bundle. The
maximum number of external lines in the bundle is 24. There are 16 bundles. Every
external line may be in one or more bundles at once. The first eight bundles can use
the service Internal call through a bundle. A cyclic start up for an external line can
be used in the bundle.
2.5.5. Trunks for accessing ringing
The table serves to allocate individual external lines to a bundle for using the
service accessing ringing from a bundle. Every external line can be in one or more
bundles at once.
2.5.6. Ringing
For every external line you can set up the same or a different ringing table for
the DAY and NIGHT regime. The tables are general and the same table can be
used for various ports.
• DISA – when setting it is possible to call the DTMF by selecting an internal
subscriber
• Internal numbering plan – a number received during DISA DID will be
compared with the subscribers’ internal numbering
• DDI numbering plan – the number during DISA DID will be compared with the
subscribers’ DID numbering
• FAX – when using the DISA command in the ringing table the fax 1100Hz
introductory tone will be detected
• Modem – when using the DISA command in the ringing table the modem
1300Hz introductory tone will be detected
User’s manual – configuration instrument 58
www.2n.cz
Page 59

2N
®
- OMEGA Lite
Configuration instrument
Here you can select where the DISA is entered in the ringing table, so that after an
incoming ringing on an external line it takes into account FAX or Modem tone in the
DTMF selection and connects to the declared internal line in accordance.
Ringing from external lines can elicit a maximum of 500 events.
User’s manual – configuration instrument 59
www.2n.cz
Page 60

2N
®
Action
Parameter
Description
Action
Parameter
Description
- OMEGA Lite
Configuration instrument
2.5.7. Ringing table
One of the following actions can be programmed in each row:
Ring VL VL number or SYS Ringing for a specific number
Ring VL without
a queue
Ring VL without
a queue or jump
Ring VL without
a queue and
jump
Ring VL and set
for voicemail
Don’t ring VL VL number or SYS Ends ringing to a specific number.
Ring accessible None Ringing accessible internal and system lines
Ring accessible
cyclically
Ring accessible
linearly
Ring accessible
cyclically no
queuing
Ring accessible
linearly no
queuing
Ring dept. linear.
Ring dept. cyclic.
Ring entire dept.
Ring dept. linear.
without queue or
jump
Ring dept. cyclic.
without queue or
jump
Ring entire dept.
without queue or
jump
Ring operator None Rings the operator
Ring voicemail VL number or SYS
VL number or SYS
VL number or SYS
VL number or SYS
VL number or SYS
None
None
None
None
Departments 1 to 8 Rings first free number from the department
Departments 1 to 8
Departments 1 to 8
Departments 1 to 8
Departments 1 to 8
Departments 1 to 8
Ringing for a specific number. If engaged
then it does not form a queue. If only one
ringing then it rings on.
Ringing for a specific number. If engaged
then it does not form a queue and carries out
the command two rows below.
Ringing for a specific number and jumps two
rows down. If engaged then no queue formed
and carries on in the ringing table.
Ringing for a specific number and thus
identifying itself even in a voice system (if the
ringing is forwarded).
Cyclic ringing accessible internal and system
lines
Ringing the first of the accessible internal and
system lines
Cyclic ringing accessible internal and system
lines. If it is engaged then it does not form a
queue. If only one ringing then it rings on.
Ringing the first free accessible internal
system line. If it is engaged then it does not
form a queue. If only one ringing then it rings
on.
Cyclically rings first free number from the
department
Rings entire department
Rings first free number from the department.
If internal lines engaged then it does not form
a queue and carries out the command two
rows down.
Rings another free line from the department.
If internal lines engaged then it does not form
a queue and carries out the command two
rows down.
Rings entire department. If internal lines
engaged then it does not form a queue and
carries out the command two rows down
Rings the voice mailbox given by the
parameter
Don’t ring None End all ringing
Wait Time - from 1 to 999 [s]
Wait for the set length of time, 0 = unlimited wait
User’s manual – configuration instrument 60
www.2n.cz
Page 61

2N
®
- OMEGA Lite
Configuration instrument
or until the incoming ringing from an external line
Number of voice from
DISA
DISA End None Ends dialling detection
Voice
Select tone A selection of tones
Table Number of ringing table Ringing tables can be catenated
Automatic
operator
Connect remote
access
Transit DID
Call fast dialling
Hang up None
Go to line Row number Jumps to the selected ringing table row.
Announce
through
broadcast
GSM DTMF test
The number or name of
1 to 10 = 0
Or nothing
Number of voice from
1 to 9
Automatic operator’s
number 0-8
None
VL, SYS number or
virtual
the joint fast dialling
Voice message
None
Attention: The total number of rows in all of the ringing tables cannot exceed 500.
Stops previous ringing to internal lines and
takes an external line to wait for a fax or
modem call or DTMF number
Plays the voice
After lifting an external line with the DISA
service activated a different tone can be
imposed (for special applications)
Rings a given automatic operator voice
system. If module not working then it carries
on with next row in table.
Rings the remote access modem in the PBX.
If the module is not installed then it carries on
with next row in table.
Carries out a start up on the bundle for
outgoing lines to the VTS by parameter. This
allows an outgoing call to be made from
within the PBX on the line account given by
the parameter.
After an incoming external call it dials the
given fast dialling. Which line the call will be
charged to and which lines it will go to the
VTS is determined in the settings External
lines/Identification for transit calls.
Hangs up on an external line and ends all
actions. It is in the last row and cannot be
removed.
Connects the AUX assigned to the
Broadcast service, plays the voice message
and the AUX Broadcast remains connected
until hang-up or the Terminate broadcast
service activation.
While calling to a module equipped with
DTMF detectors (designated as OL2GSMD,
OLGFAX at 2N), you can dial the DTMF
characters during ringing that are displayed
on the PBX.
User’s manual – configuration instrument 61
www.2n.cz
Page 62

2N
®
Action
Parameter
Action
Parameter
Action
Parameter
Action
Parameter
: During incoming
ringing it has to concurrently ring
lines 13, 14, 15 and 16 and all
lines that have ringing from
external lines accessible. All lines
t the same time until one of
them takes the call or the call
During incoming
ringing it starts ringing line 12,
after 10 secs it stops on line 12
and starts on line 14. After another
5 secs it transfers ringing to lines
15. Then all 3 lines ring
until one of them takes the call or
the call ends externally. Of course
it must ring the accessible line
During incoming
ringing it rings the group linearly.
the lines that
m external lines
- OMEGA Lite
Configuration instrument
Here are some working examples for illustration.
Example 1
Call accessible lines
Call VL 13
Call VL 14
Call VL 15
ring a
ends externally.
Example 2:
13 and
first.
Example 3:
Call accessible lines
Call VL 16
Wait 0
Tab. 1
Call VL 12
Wait 10
Don’t call 12
Call VL 14
Wait 5
Call VL 13
Call VL 15
Wait 0
Tab. 2
Again we bear in mind
have ringing fro
accessible.
Example 4: During an incoming call it
rings group 3 cyclically. Accessible
lines don’t ring. If, after 60 secs, no
one answers it ends on the voice mail
of subscriber 11.
Call accessible lines
Call dept. linearly 5
Wait 0
Tab. 3
Call dept. cyclic 3
Wait 60
Don’t call
Call voicemail 11
Wait 0
Tab. 4
User’s manual – configuration instrument 62
www.2n.cz
Page 63

2N
®
Action
Parameter
Parameter
Action
Parameter
- OMEGA Lite
Configuration instrument
Example 5: During an incoming call after 4
secs the external line is picked up, it waits for
the DISA or fax dial tone with the voice signal
number 1. After it subsides it waits another 6
secs and if the DID does not come then it rings
for 20 secs on lines 12 and 13. Afterwards it
forwards the call to the operator and if no one
takes the call after 30 secs it records voice 3
(e.g. you will be connected to the answer
phone), it connects to the answer phone on line
19 and if the answer phone does not accept the
call then it hangs up after 90 secs.
Example 6: Delayed DISA. During an
incoming ringing it rings for 20 secs on the
accessible lines and line 19. If no one picks
it up, then it picks up the external line then it
awaits the DISA or fax DID with the voice
signal number 1. After the signal subsides it
waits 6 secs and if a DID does not come in
that time it rings line 12 and the operator for
30 secs. If no one takes the call in this time
it plays voice 2 to the subscriber and hangs
up.
Wait 4
DISA 1
Wait 6
DISA End
Call VL 12
Call VL 13
Wait 20
Call operator
Wait 30
Don’t call
Voice 3
Call voicemail
Wait 90
Hang up
Tab. 5
Action
Call accessible
lines
Call VL 19
Wait 20
DISA 1
Wait 6
DISA End
Call VL 12
Call operator
Wait 30
Don’t call
Voice 2
Hang up
Tab. 6
11
Example 7: Using CLIP support, ringing from
an external line is directed to internal line 15.
The time it rings on line 15 is not influenced
by the ringing table and is controlled by the
settings in line 15. For this case it is most
important to prearrange the command Wait
with the parameter 2 secs before the actual
command Call VL with the parameter 15.
Wait 2
Call VL 15
Wait 0
Hang up
Tab. 7
User’s manual – configuration instrument 63
www.2n.cz
Page 64

2N
®
- OMEGA Lite
Configuration instrument
IMPORTANT!!
When using the DISA services in the ringing table then the row Wait 0
is not allowed to occur !
2.5.8. Global data
see Global data for external lines.
2.5.9. Groups and switching
Here external lines are allocated to one of the two main groups depending on
which decides whether it is the DAY or NIGHT regime and according to this a
ringing table is selected.
User’s manual – configuration instrument 64
www.2n.cz
Page 65

2N
®
- OMEGA Lite
Configuration instrument
2.6. Saving automat
After dialling the service “access to an external line” none of the external lines are
activated. For lines that use the LCR, the PBX simulates an external dialling tone and
awaits the next number dialled. According to an analysis of the next number dialled the
PBX determines the connection and carries out the connection. For an internal
subscriber entry to the LCR is obligatory, possible or prohibited (as determined in the
Authorisations Table). At the same time it is possible to use up to 4 analysis masks and
these being in combinations that allow or block the analysis of dialling depending on the
individual rows of the Dialling Analysis table.
2.6.1. Dialling analysis
In the rows of this table the number dialled to an external network from a subscriber
who has ticked the choice Use the LCR is compared with the numbers entered here.
This comparison eliminates the rows that are not in agreement in at least one of the four
masks for dialling analysis for an internal subscriber and the Rows of the dialling
analysis. The result is a route number (routes ranging from 0 – 150), though which the
outgoing call will be dispatched.
In the table rows it is also possible to set up a mask for choosing the ARS 1-4
service. These services are primarily used for access to private networks.
The next chapter gives some illustrative examples.
User’s manual – configuration instrument 65
www.2n.cz
Page 66

2N
®
- OMEGA Lite
Configuration instrument
2.6.2. Routes - providers
Here routes are allocated that can be used by the external line bundles to make
a connection. They are always selected in the order of the first external line from
the bundle. At the same time this is where it is defined how many numbers from the
number called are subtracted and what numbers are prearranged – or which
operator will be selected for providing a least cost route.
It is also necessary to enter on what day and hour the given route is to be used.
The selected bundles use it independently of the programmed bundle selection for
the internal subscribers in the authorisation table. It is possible to take away 14
numbers at most and the number of automatically prearranged numbers is not
allowed to exceed 30. The symbol “T” means crossing over to tone dialling, a
comma (,) means a delay in dialling and “W” means switching to tone dialling and
waiting for log in (possible for ISDN, int. GSM or analogue external lines with a tariff
impulse, E&M), if a log on does not come then it carries on with the DTMF dialling
after the set time.
For each route, if ISDN lines are used in the outgoing bundle, then it is possible
to assign identification using the MSN numbers identically as when setting the
services and private MSN numbers for the internal lines. It is particularly beneficial
to use this for outgoing calls to private circuits.
Example 1: How to learn that during outgoing calls to a number starting with 0603
route 0 is used, which goes through the PBX’s GSM module of the operator Paegas.
The dialling to the Paegas mobile network given above has a predetermined route
0. This, for instance, is allocated to bundle 5 in which there is the external line with the
GSM module. None of the numbers have to be added or subtracted as the code 0603
is still in the memory (nowhere was called, it was only used for decoding to allocate the
route) and after being picked up the port in bundle 5 calls to it. The next number
dialled by the internal subscriber is automatically filled in thus achieving cheap calls to
a mobile phone from an internal subscriber though the GSM module.
Example 2: Our PBX is in Prague. If, for instance, the outgoing call starts 05 333666,
which is the number of the firm’s branch in Brno, which also has the module for GSM
User’s manual – configuration instrument 66
www.2n.cz
Page 67

2N
®
- OMEGA Lite
Configuration instrument
telephony, we can determine that this Brno number uses, of instance, route 1, which
also goes through a GSM module and totally replaces the number dialled with the GSM
number of your branch.
Here it is predetermined that the number uses route 1. Bundle 5 (an external line
with the GSM telephony module) also uses this, but here it is necessary to take away all
8 numbers (in the box Subtract the number 8 is entered) and replace them with, for
example, the number 0603234567 (this number will be entered in the column Add),
because this number is the number of the module for the GSM telephony of your Brno
branch. This again gives a cheaper connection from Prague to Brno than through the
land line network.
Example 3: Imagine that the fax line also uses the LCR, but because faxes can’t be
sent through GSM, it is necessary to prevent this. This can be done, for instance, such
that the fax line will have a different dialling analysis mask ticked than the row with the
number of the Brno branch, which alternates the connection through GSM. Thus we
achieve a state in which the fax line cannot “find” a cheaper exit for the Brno branch and
returns from the LCR to make the connection through the standard public network.
2.6.3. Dialling analysis mask
This serves to limit combing through all the rows when calling with the LCR. The
Route Analysis row will only be searched through if the dialling analysis mask is
also ticked for an internal line that is seeking a cheaper route.
Example 1: Two modules for GSM telephony with the operator EuroTel are installed in
the PBX. One belongs to one firm the other to another. In the Route Analysis table one
row will be entered with the number 602 aiming at bundle 5 (the first module for GSM
telephony) and, for example, the dialling analysis mask has 3 ticked. Another row will
also have the number 0602 entered but be directed to bundle 6 (the other module for
GSM telephony) and the mask will have 4. Afterwards the internal subscribers of the first
firm must have mask number three ticked and they are not allowed to tick mask 4. In
contrast subscribers in the other firm must have the number 4 ticked in the dialling
analysis mask and are not allowed to tick 3. This ensures that each firm will only go
through its module for GSM telephony and it won’t contain the neighbour’s. It is also
possible for the director to have both 3 and 4 ticked for the dialling analysis mask on his
lines, which for an outgoing call to GSM EuroTel broadens the opportunity of entering
both modules for GSM telephony. And why not when the PBX can charge these calls
separately for internal subscribers.
Example 2: With the help of the LCR the PBX can save not only money but also time.
Imagine a certain department of people that are allowed to call an external network for
work on numbers (DID) that are often repeated. The DID of the affiliated branches will
be entered in the LCR’s Route Analysis rows, and these calls will have the route with
the largest available amount of external lines in the bundle or bundles. If we set the
internal lines of this department so that for a normal outgoing call (not through the LCR)
then they will only have one bundle that doesn’t have many external lines and they have
the Use LCR ticked, then the frequently dialled numbers of the affiliated firms are easily
called through a well sized bundle in the routes of the LCR, but for unknown DIDs it will
be more difficult as only a very limited number of external lines will be available for this
call.
User’s manual – configuration instrument 67
www.2n.cz
Page 68

2N
®
- OMEGA Lite
Configuration instrument
Example 3: Other authorisation. If an internal line was set to Obligatory use of LCR,
then the numbers of frequently phoned business partners could be entered into it. Then
an internal subscriber calls these DIDs through the LCR route but they cannot call to
other numbers in the public network because if a chosen number is not found in the
LCR table that is obligatory for the subscriber, then the subscriber gets the engaged
tone.
2.7. Groups
2.7.1. Designating lines
It is possible to split subscribers into two groups on the PBX. For each main
group it is possible to define the following privileged subscribers:
• Day - the number of the subscriber working as the operator for the
DAY regime
• Night - the number of the subscriber working as the operator for the
NIGHT regime
• Fax - the number of the subscriber where there is a fax for a group
• Modem - the number of the subscriber where there is a modem for a
group
User’s manual – configuration instrument 68
www.2n.cz
Page 69

2N
®
- OMEGA Lite
Configuration instrument
2.7.2. Switches, Broadcast, Tape Recorder
Enter the port relay for Activate temporary/permanent switch for groups PBX 1
and 2.
• Temporary – activate the switch temporarily = default #85 (the relay is closed
until the dialling timeout expires = 15s, the activation is terminated immediately
by hang-up). If this item is empty, you can enter the required port relay after
dialling the service.
• Permanent – activate the relay permanently = default #83 (the relay is closed
permanently and can be opened using the Deactivate permanent switch service
= default #84). If this item is empty, you can enter the required port relay after
dialling the service.
Assign AUX group to Broadcast and Tape recorder
• Broadcast - the selected AUX ports of the selected AUX group will be used
for the Broadcast=default #20 service at relax and for the Announce through
Broadcast service in the ringing table.
• Tape recorder - the selected AUX ports of the selected AUX group will be used
for the Switch on tape recorder=default #20 service during a call and also
automatically with every call of the extension for which the Switch on tape
recorder service is selected in the Subscriber lines/Service enable /Activation
menu.
Assign the AUX ports into groups in the Global data/AUDIO groups menu.
User’s manual – configuration instrument 69
www.2n.cz
Page 70

2N
®
- OMEGA Lite
Configuration instrument
2.7.3. Intercoms
This table determines the intercoms’ location on the internal lines. It is possible to set
two intercoms for each group. Ringing from this line is characterised by being different
from the usual ringing.
The selection Number enables a DTMF number to be sent to the intercom (e.g. 00
for 2N
relay and select the Activate relay service for activation.
2.7.4. Switching time
®
– INTERCOM.) to open the door.
If the door communicator is not equipped with a door-opening relay, use the module
User’s manual – configuration instrument 70
www.2n.cz
Page 71

2N
®
- OMEGA Lite
Configuration instrument
In this menu it is possible to set two times for automatically switching to the DAY
and NIGHT regimes for each group and for every day. Ticking the box Automatic
gives automatic switching at the requisite times. Not entering anything for the time
means that there is no switching. So, for instance, leaving out one box for DAY and
one for NIGHT only ensures one cycle of automatic switching during one day.
Ticking the box Automatic gives automatic switching at the requisite times. The
selection State, in which the choice of either DAY or NIGHT is entered, ensures the
PBX is started in the given regime if automatic switching is not used. The choice
Change to summer time ensures that the PBX automatically switches over to
“summer or daylight saving time”.
2.7.5. Global data
The choice Number of registered figures determines how many numbers are
entered into the charging rows of work calls. Only the first five numbers of private
calls are automatically displayed thus this choice has no effect on them, unless it is
not set otherwise in the Global data – charging.
The choice Dialling tone enables the type of dialling tome to be selected from
the constant type and the “Morse” type and the type for calling to a state line. The
other types of tones are only for special applications. As a rule it is not necessary to
make changes. If you wish to do so, then first select the tone source and then the
cadence.
Music to make waiting more pleasant. Defines the source of music used
during both internal and external waiting. Other types of tones are only used for
special applications.
User’s manual – configuration instrument 71
www.2n.cz
Page 72

2N
®
- OMEGA Lite
Configuration instrument
The voice at the start of redirecting is used at the start of being redirected to
the VTS.
The voice when exceeding the call period during redirection is used as a
notification that the call must end during redirecting, however at this moment it is
possible to extend the call by 1-10 minutes before the voice gives the notification
again by selecting DTMF (1-10) and selecting the call period.
Examples of voice:
The voice at the start of the redirecting
“Your call will be redirected”
The voice when exceeding the call period during redirection
“You have a limited time for this call, through a tone selection you can extend
the call by one to ten minutes, otherwise your call will be ended“
DISA tone
The tone that is used when calling DISA, if a voice is not played to the caller.
Attention: If you want to use modem detection on an external line where the DISA is activated
without a voice, then you are not allowed to use a continuous dialling tone.
These voices they are not recorded as standard.
User’s manual – configuration instrument 72
www.2n.cz
Page 73

2N
®
- OMEGA Lite
Configuration instrument
2.8. Numbering
2.8.1. Internal lines
See Internal lines /Numbering
2.8.2. Services
• Table for programming the numbering plan of the PBX’s services.
2.8.3. DID for the ringing table
Enables an external subscriber to call through to the ringing table during a DID.
If the DID number is not in agreement with the subscribers’ DID or internal
numbering and agrees with the number in the DID table for the ringing table then
the ringing table is used, here set up with regards to the DAY and NIGHT regime.
Enables the ringing table to be set up during DID (ISDN – Point to Point type,
DISA).
2.9. Operating parameters
2.9.1. Internal lines
2.9.1.1. Redirecting
This table clearly displays all of the redirecting for all of the internal subscribers.
2.9.1.2. Tariff credit
The item Prepaid serves for assigning the maximum number of 16 kHz
impulses received. When the assigned number is reached the call automatically
ends. A new call can be made as soon as a new credit programme is topped up.
2.9.1.3. Blocking
Here it is possible to easily check or set blocking for each internal line including
its password and not stop the service.
2.9.1.4. Alarms
Set up an “alarm” on each line. It is possible to choose between “Single” or
“Repeating”.
2.9.1.5. Account statistics
Clearly displays the costs of the internal lines from outgoing calls through the
external lines that have tariffs. An update is available during each data reading
from the PBX.
User’s manual – configuration instrument 73
www.2n.cz
Page 74

2N
®
- OMEGA Lite
Configuration instrument
2.9.2. External lines
2.9.2.1. Making accessible
The table has as many columns as there are internal subscribers and as many
rows as there are external lines. Thus at intersections it is possible to tick or end an
internal subscriber’s access to each external line.
2.9.2.2. Tariff credit and Blocking
The item Prepaid serves for assigning the maximum number of 16 kHz
impulses received. When the assigned number is reached the call automatically
ends. A new call cannot be made through this external line. Credit must be topped
up through a programme.
The item Blocking enables an external line to be blocked for example during a
breakdown.
User’s manual – configuration instrument 74
www.2n.cz
Page 75

2N
®
- OMEGA Lite
Configuration instrument
2.10. Mobility Extension
Mobility Extension function enables telephone stations (preferably GSM
telephones to share internal line services (switching, dialling VTS,..) outside the
PBX.
Primary setup is made by the PBX administrator.
2.10.1. Mobility Extension IN
Here you set up the conditions for Mobility Extension in the incoming direction
from the external telephone number (preferably from a GSM telephone).
Enter:
Line - internal that should have the Mobility Extension service
(sharing identical services with an external telephone number) activated. One
internal line has one external telephone number allocated. After being allocated in
one of the menu lines offered (according to the ME license inserted) it will not be
displayed in the following ones.
Name - Name of the external telephone number (enter the name without
diacritics). The name is shown on the display of the system telephone.
Number - external telephone number.
Password - personal password of the allocated internal line. It is the same
as the password set up in the “Internal lines/Operating parameters/Blocking“
MENU. If it is allowed to enter a password it is always necessary, when calling from
this external telephone number, to enter the password first and then further dialling
is possible. The user is asked to enter the password with the following message:
“Enter password”.
Order of used common short dial - after entering the Name and
Number, a new common quick dialling is established, whose ordinal number is
displayed. Always the first free common quick dialling is offered.
User’s manual – configuration instrument 75
www.2n.cz
Page 76

2N
®
- OMEGA Lite
Configuration instrument
A common quick dialling established in the Mobility Extension IN/OUT environment
can only be edited here. Direct editing in the “Common quick dialling” MENU is
block for such dialling.
User’s manual – configuration instrument 76
www.2n.cz
Page 77

2N
®
- OMEGA Lite
Configuration instrument
2.10.2. Mobility Extension OUT
Here you set up the conditions for Mobility Extension in the outgoing direction,
the allocated internal line rings.
Editing the settings for the outgoing direction is only possible if Mobility Extension
IN is entered. Otherwise no MENU is offered.
Line and Name of the respective telephone number (respective common
quick dialling) is automatically transferred to this table from the Mobility Extension
IN settings.
Then enter:
Call at day - whether outgoing Mobility Extension should be
activated or not if the PBX is in the DAY mode. The setup parameters are “Never,
Immediately, after 1-9 rings”
Warning: If you select Immediately and the outgoing calls are made via GSM
gateway it will take approximately 10 seconds before the external telephone starts
ringing (because of the connection method within the GSM network).
Call at night - whether outgoing Mobility Extension should be
activated or not if the PBX is in the NIGHT mode. The setup parameters are
“Never, Immediately, after 1-9 rings”.
Warning: If you select Immediately and the outgoing calls are made via GSM
gateway it will take approximately 10 seconds before the external telephone starts
ringing (because of the connection method within the GSM network).
Call Type - enter, over which bundle of external lines the
respective outgoing Mobility Extension should be made. Selected can be only
those bundles that do not include analogue external lines.
Wait for trunk - whether the system should wait until the busy line in the
respective bundle has been released or not. If all lines in the respective bundle are
busy and “Waiting for bundle” is allowed the system waits until the external line in
the bundle is released. Otherwise the outgoing call is not made.
Send SMS - !"# $%$ &'(( ) &'(( *+, -# .#*,:
After accepted ME call - /0((#1 203,4 0*.. ,"# 50(( +* ,"# %6 .,07+* 8 9
50(( '. #.,0-('."#1.
Answered ME - /0((#1 203,4 1+#. *+, 0*. ,"# 50(( +* ,"# %6 .,07+*: -;, 9
,"# 50(( &0. 0*.#1 +* ,"# 30(,#1 #<,#*.'+*.
User’s manual – configuration instrument 77
www.2n.cz
Page 78

2N
®
- OMEGA Lite
Configuration instrument
Answered call - /0((#1 203,4 1+#. *+, 0*. ,"# 50(( +* 0*4 += "'. .,07+*. 9
>%6 +3 5#3,0'* #<,#*.'+*?.
SMS at No Answer – !"# ,#<, '. ;.#1 =+3 $%$ '= ,"# 50((#1 203,4 1+#. *+, 0*.
,"# 50(( >,"# @'..#1 50((? >,#<, '. 5+@@+* &'," ,#<, =+3 0(( +;,A+'*A 50((. ,"3; '*,#3*0(
B$% A0,#&04?.
SMS after accepted call – !"# ,#<, '. ;.#1 =+3 $%$ '= ,"# 50((#1 0*.. ,"# 50((
>,"# #.,0-('."#1 50((? >,#<, '. 5+@@+* &'," ,#<, =+3 0(( +;,A+'*A 50((. ,"3; '*,#3*0( B$%
A0,#&04?.
%n = /0(('*A 203,4 *;@-#3
%c = /0(('*A 203,4 *0@#
User’s manual – configuration instrument 78
www.2n.cz
Page 79

2N
®
- OMEGA Lite
Configuration instrument
2.10.3. Mobility Extension services
These services are executed based on a command from Mobility Extension.
After detecting the DTMF characters entered on the end of the external telephone
number this service is simulated in the PBX.
Here enter:
FLASH - DTMF characters, after which FLASH (a short line interruption) is to
be generated in the call in order to be able to transfer the call or dial another
service.
Double FLASH - DTMF characters, after which FLASH - FLASH (a short line
interruption, twice after each other) is to be generated in the call. Not designed for
direct use in the PBX.
Hang up - DTMF characters, after which:
- in the case of transferring calls, the transfer is made but the
connection of the external telephone number with the external line is not
terminated and it is possible to continue dialling (calling VL, calling VTS,
calling a service).
- in the case of hesitating to dial (time supervision of dialling the first
and the next digit expires – the subscriber hears a congestion tone), the
dialling tone is heard again and the PBX is ready for receiving dialling.
Password repeat count - maximum number of attempts to enter the user
password for the line (if required).
User’s manual – configuration instrument 79
www.2n.cz
Page 80

2N
®
- OMEGA Lite
Configuration instrument
2.11. CLIP Routing
CLIP Routing helps callers from the PSTN to call back the call-establishing
subscriber line in the PBX, overriding the ring table rules for the port used.
2.11.1. CLIP Routing - Setting
Set the parameters in the CLIP Routing/Setup menu.
User’s manual – configuration instrument 80
www.2n.cz
Page 81

2N
®
- OMEGA Lite
Configuration instrument
Set the following:
- Save latest records only -the CallBack database only includes the
last (most recent) calls to the selected PSTN number. If this number was called
by multiple subscriber lines, then the last calling station is only saved and the
CallBack is routed to this station.
- Save also answered calls -the CallBack database also includes answered
calls to the PSTN.
- Erase after answered incoming call -the record is deleted from the CallBack
database if a call coming from the record line is answered. Any subsequent call
is then governed by the ringing table for the given port.
To define how long a record should be saved in the CallBack database, use the
Record validity item.
Set the following:
- Permanent -the record is deleted not on a temporary basis but as defined
above.
- Days/Hours/Minutes the record is deleted as selected. The maximum record
time is 45Days-12Hours-15Minutes.
The CO line Outgoing Call duration - the minimal CO line outgoing call
duration (including ringing), needed the call to be counted as a realized
(successful) from the point of view of the Auto CLIP Routing function. Longer calls
would be saved to the Auto CLIP Routing call history only if „Save even realized
calls“ has been selected.
To add a CallBack ringing to a subscriber line according to the available ringing
table, use the Add ringing table item.
Set the following:
- Immediately –the ringing table is added together with the CallBack ringing to the
subscriber line;
- Never -the ringing table is not applied;
- In - the ringing table is added in a certain number of seconds (1-254).
If older records are saved too (regarding multiple PSTN-calling subscriber
lines), then enable the Add ringing to another subscriber line option. Ringing is
routed to the latest record first and only then older records are added as preset.
Set the following:
- Immediately -ringing to an earlier record is added together with the CallBack
ringing to the subscriber line that created the later record;
- Never –no ringing to an earlier record is applied.
- In -ringing to an earlier record is added to the subscriber line that
created the later record in a selected number of seconds (1-254).
User’s manual – configuration instrument 81
www.2n.cz
Page 82

2N
®
- OMEGA Lite
Configuration instrument
The ringing adding options can be combined. Add ringing to another subscriber
line is applied first, followed by Add ringing table.
User’s manual – configuration instrument 82
www.2n.cz
Page 83

2N
®
- OMEGA Lite
Configuration instrument
2.12. Short / Speed - Dialling
2.12.1. Common Abbreviated Dialling
You can enter up to 200 common abbreviated dialling options into the PBX.
User’s manual – configuration instrument 83
www.2n.cz
Page 84

2N
®
- OMEGA Lite
Configuration instrument
2.12.2. Private Abbreviated Dialling
Key telephone users may enter additional 112 private dialling options that can
be retrieved from the particular key telephone only.
User’s manual – configuration instrument 84
www.2n.cz
Page 85

2N
®
- OMEGA Lite
Configuration instrument
2.13. Export/Import of Abbreviated Dialling
It is possible to Import/Export the Abbreviated Dialling from/to a file. From an
active window you may use Data Export/Data Import in the Menu DATA.
Abbreviated dialling Export:
Abbreviated dialling are exported always from the folder, in which you
currently are (Common abbreviated dialling, private abbreviated dialling).
2.13.1. Common abbreviated dialling Export
- fill in the Common abbreviated dialling and choose Export in Menu Data
User’s manual – configuration instrument 85
www.2n.cz
Page 86

2N
®
- OMEGA Lite
Configuration instrument
-name of the file is automatically given (ShortCom) with a destination (folder,
where OMEGA Lite Program is installed)
- choose the type of columns separation (index number of the dialling, text,
number). Separation may be done using semicolon (.csv), tabulator (.odt) or fixed
length (.odx).
-click on Save to save the abbreviated dialling
2.13.2. Private abbreviated dialling Export
- fill in the Private abbreviated dialling and choose Export in Menu Data
User’s manual – configuration instrument 86
www.2n.cz
Page 87

2N
®
- OMEGA Lite
Configuration instrument
-name of the file is automatically given (ShortLxx) according to the extension
number with a destination (folder, where OMEGA Lite Program is installed)
- choose the type of columns separation (index number of the dialling, text,
number). Separation may be done using semicolon (.csv), tabulator (.odt) or fixed
length (.odx).
-click on Save to save the abbreviated dialling
Abbreviated dialling Import
The abbreviated diallings are always imported into the active window
(Common abbreviated dialling, Private abbreviated dialling) You may also import
them crossways: for example Private abbreviated dialling into Common abbreviated
dialling and the other way round. Of course, it must be taken into account, that
there could be max. 112 Private abbreviated dialling and 200 Common.
-in the desired section (Private, Common abbreviated dialling) choose command
Import in the Menu Data.
-choose the desired file (as a first option are offered those files, which belong to
the give folder (ShortL.* - private, ShotCom.* - common).
-rest of the files may be found according to the name and extension.
User’s manual – configuration instrument 87
www.2n.cz
Page 88

2N
®
- OMEGA Lite
Configuration instrument
-after clicking Open, the abbreviated dialling is imported.
2.13.3. Errors during Abbreviated dialling Import
If a file with abbreviated dialling records is not correctly created or contains
higher number of records, a note is displayed.
-this note means, that the file contains higher number of records, then it is
possible to write in the assigned memory space. This can happen if you try to
Import Common abbreviated dialling into memory space reserved for Private
abbreviated dialling.
User’s manual – configuration instrument 88
www.2n.cz
Page 89

2N
®
- OMEGA Lite
Configuration instrument
-in the file, in column "Text" is used more than 16 chars, which is the max.
possible value.
- in the file, in column "Number" is used not allowed char. Allowed chars are
only "0123456789 ABCD FPT ( ) [ ]".
2.13.4. Creating of Abbreviated dialling file
Abbreviated dialling files have following format and separator:
- semicolon (extension *.scv)
- tabulator (extension *.odt)
- fixed length (extension *.odx)
User’s manual – configuration instrument 89
www.2n.cz
Page 90

2N
®
- OMEGA Lite
Configuration instrument
2.14. REMOTE SUPERVISION
2.14.1. What Remote Supervision Provides:
• instantaneous response to client needs
• 2N
• firmware modification
• ISDN module tracing
• time RESET setting
• PBX port status monitoring
• speech bus traffic monitoring
• call billing DATA downloading
• log-system DATA downloading
2.14.2. What You Need
To establish a modem-based remote connection you need:
• a PC with installed OMEGA Lite Program
• a modem (not winmodem) connected to the PC
• a file (YYMM-XXXXX.PBX) with access licence to the 2N
PBX Modem Setting
programming tool. The modem is set using AT commands (we do not recommend
you to change the factory settings unless absolutely necessary) and the PBX has to
be RESET upon every change. The modem change will be apparent 10s after the
RESET.
®
- OMEGA Lite PBX programming while keeping parameters of a serial link
®
- OMEGA LITE PBX
to be supervised.
The internal modem is configured using the OMEGA LITE Program
2.14.3. Creating and writing of a gateway remote access code
To enable remote control of 2N® - OMEGA LITE PBX, it is necessary to
create an access code and write it into the gateway.
1. Press the „Connect with PBX “ button on the tray.
2. Press button „Create“.
User’s manual – configuration instrument 90
www.2n.cz
Page 91

2N
®
- OMEGA Lite
Configuration instrument
3. you must fill in the PBX Serial number.
4. you must fill in a phone number, which will be used for the remote modem
connection.
5. you may enter information about customer and dealer.
6. click /OK/ for confirmation.
7. choose the correct code from the offered codes and write it into the PBX by
pressing „Store Code“. While writing the code, it is necessary to be connected to
the PBX over serial interface.
8. While writing a new code, you will be notified if a code already exists. By
pressing Ignore button, code will be overwritten.
User’s manual – configuration instrument 91
www.2n.cz
Page 92

2N
®
- OMEGA Lite
Configuration instrument
Note: Always create access codes matching an existing valid serial
number of gateway.
User’s manual – configuration instrument 92
www.2n.cz
Page 93

2N
®
- OMEGA Lite
Configuration instrument
2.14.4. Description of OMEGA Lite Program Menus and Bar Buttons
MENU – WINDOWS
Panel – when the connection with the PBX to be supervised has been established,
the statuses of all lines and speech buses are displayed.
Billing data – when billing and diagnostic lines have been read from the file
(YYMM-XXXXX.ACC), the billing data (calls) are displayed in the window.
PBX diagnostics - when accounting and diagnostic lines have been read from the
file (YYMM-XXXXX.DIA) the diagnostic data (log-system lines) are displayed
in the window
User’s manual – configuration instrument 93
www.2n.cz
Page 94

2N
®
- OMEGA Lite
Configuration instrument
Connect to PBX – the window with a directory tree for selecting a file to
establish connection with the PBX to be supervised.
Disconnect modem connection – disconnects from the supervised PBX,
keeping the selection of the PBX in OMEGA LITE Program.
Recover modem connection – recovers connection with the selected PBX
upon Disconnect modem connection.
Cancel connection with PBX – cancels connection with the supervised
PBX and selection of the PBX in OMEGA LITE Program.
Set communication – displays the window for communication and
connected modem parameter setting.
Download billing and diagnostic lines – downloads call billing and log-
system line DATA.
Trace – downloads tracing lines from ISDN.
Download data from PBX – downloads the configuration of the PBX to be
supervised.
Save data into PBX – saves the configuration of the PBX to be supervised.
User’s manual – configuration instrument 94
www.2n.cz
Page 95

2N
®
- OMEGA Lite
Configuration instrument
2.14.5. Types of Establishing Connection
It is possible to establish connection with an 2N® - OMEGA Lite PBX to be
supervised:
• automatically; or
• manually.
2.14.6. AUTOMATIC CONNECTION
Settings of PBX To Be Supervised
Automatic connection can be used for a PBX provided that:
1. a DDI to the ISDN line ringing chart is reserved for remote supervision;
2. an ISDN MSN line is reserved for remote supervision;
3. a CO line is reserved for remote supervision;
4. the DISA to the ringing chart is used;
5. the modem connection detection is enabled in DISA.
Example of ringing chart set-up for types 1 – 3:
Interconnect remote supervision …
Ring to operator …
Wait 0
Hang up …
Example of ringing chart set-up for types 4 – 5:
DISA …
Wait 6
DISA END …
Ring to operator …
Wait 0
Hang up …
Note: With remote supervision type 5, you have to set the GLOBAL DATA –
MODEM – Modem switch to remote supervision in the programming
tool. The DISA tone may not be dialtone permanently.
User’s manual – configuration instrument 95
www.2n.cz
Page 96

2N
®
- OMEGA Lite
Configuration instrument
Establishing Connection
9. Run the OMEGA Lite Program SW.
10. Press the bar button SET COMMUNICATION (‘tools’ symbol) and check and
set the modem parameters:
− set the COM port connected to the modem;
− select the communication rate (according to the modem capacities);
− select the use of PREFIX (of the master PBX, set the modem connecting tone
transmission (^ or ’up arrow’ symbol (above digit 6) according to the modem
type);
− select the CO dialling type;
− confirm the settings by pressing OK.
11. Press the bar button CONNECT TO PBX (three OMEGA LITE symbols in a
sequence).
12. Click (using your mouse) on the YYMM-XXXXX.PBX file, which is used for
remote supervision.
13. Press the CONNECT MODEM AUTO button.
14. Select the technician responsible for remote supervision, confirm the access
password (or select a new technician by pressing the NEW button) and quit the
dialog window by clicking on OK.
15. Click on the telephone number used for remote supervision (including DISA
number if DISA if used) and press the DIAL button (this dialog window is not
displayed if there is only one telephone number).
User’s manual – configuration instrument 96
www.2n.cz
Page 97

2N
®
- OMEGA Lite
Configuration instrument
16. Now the connection is being established.
17. If everything is OK, the following information will be displayed gradually:
− establishing connection;
− connection established;
− remote supervision password confirmed.
18. The following data are displayed on the bottom bar from the left to the right:
− connection type (MOD);
− time of the PBX to be supervised (activity is indicated by a pulsating target);
− production number of the PBX to be supervised (YYMM/XXXXX connected).
11. Go on as if you used a serial link.
User’s manual – configuration instrument 97
www.2n.cz
Page 98

2N
®
- OMEGA Lite
Configuration instrument
2.14.7. MANUAL CONNECTION
Setting of PBX To Be Supervised
Manual connection is used if :
1. No automatic connection can be made.
Example of ringing chart set-up:
Ring to allowed …
Ring to operator …
Wait 0
Hang up …
Establishing Connection
1. Run the OMEGA Lite Program SW.
2. Press the bar button SET COMMUNICATION (‘tools’ symbol) and check and
set the modem parameters:
− set the COM port connected to the modem;
− select the communication rate (according to the modem capacities);
− select the use of PREFIX (of the master PBX, set the modem connecting tone
transmission (^ or ‘up arrow’ symbol (above digit 6) according to the modem
type);
− select the CO dialling type;
− confirm the settings by pressing OK.
3. Press the bar button CONNECT TO PBX (three OMEGA LITE symbols in a
sequence).
4. Click (using your mouse) on the YYMM-XXXXX.PBX file, which is to be used for
remote supervision.
5. Press the CONNECT MODEM MANUAL button.
6. Select the technician responsible for remote supervision, confirm the access
password (or select a new technician by pressing the NEW button) and quit the
dialog window by clicking on OK.
7. Dial the telephone number to be used for remote supervision on the telephone
set connected to the modem, get transferred by the TRANSFER TO REMOTE
SUPERVISION (default value # # (the operator dials FLASH ## into the call)) ,
and then press the ATA button.
8. Now the connection is being established.
9. If everything is OK, the following information will be displayed gradually:
− establishing connection;
− connection established;
User’s manual – configuration instrument 98
www.2n.cz
Page 99

2N
®
- OMEGA Lite
Configuration instrument
− remote supervision password confirmed.
10. The following data are displayed on the bottom bar from the left to the right:
− connection type (MOD);
− time of the PBX to be supervised (activity is indicated by a pulsating target);
− production number of the PBX to be supervised (YYMM/XXXXX connected).
11. Go on as if you used a serial link.
2.14.8. Downloading Data
With the PBX connected, you can download DATA (billing + system
messages). To download data, press the bar button DOWNLOAD BILLING AND
DIAGN. LINES ($ symbol) of the OMEGA Lite Program tool.
The two DATA types are downloaded together and the course of downloading
is monitored graphically by the so-called thermometer.
To display the DATA, select the WIDNOWS – BILLING DATA menu, or PBX
DIAGNOSTICS.
Data are displayed from the file (YYMM-XXXXX.ACC, or YYMM-XXXXX.DIA)
after being downloaded from the PBX. These files are created upon the first
download in the remote supervision file directory (YYMM-XXXXX.PBX) and
extended with new data upon re-loading.
2.14.9. Panel
Once the connection has been established, you can display the port status
panel of the PBX to be supervised including speech bus configuration by pressing
the WINDOWS – PANEL. With the PBX connected, bus 11 and status ‘call’ shall
always be displayed for the line used for remote supervision.
2.14.10. Remote Supervision Logistics
A record is made on the remote supervision in progress in the RRMMXXXXX.LOG file, including when, how and by which technician the connection was
established and whether the technician downloaded or saved configuration
from/into the PBX.
This file is saved together with the YYMM-XXXXX.PBX file.
2.14.11. Disconnecting Connection
A modem connection can be discontinued (for cost cutting reasons) by
pressing the bar button DISCONNECT MODEM CONNECTION (‘pause’ symbol
(two perpendicular lines in a green field)).
By pressing this button you discontinue the connection keeping the original
connection settings. This means that to recover connection, you just press the bar
button RECOVER MODEM CONNECTION (‘replay’ symbol (black arrow in a green
field)) and the number will be dialled automatically and the connection will be reestablished.
User’s manual – configuration instrument 99
www.2n.cz
Page 100

2N
®
- OMEGA Lite
Configuration instrument
If you used manual connection, you will be invited to dial the telephone
number manually.
2.14.12. Cancelling Connection
To cancel the established connection press the bar button CANCEL MODEM
CONNECTION WITH PBX (cross in a red field). By pressing this button you cancel
the connection and selection of the PBX in the programming tool.
User’s manual – configuration instrument 100
www.2n.cz
 Loading...