

ZYXEL NWD310N User Manual [ru]

NWD310N
Wireless N PCI Adapter
Quick Start Guide
Version 1.00
10/2007
Edition 1
Copyright © 2007. All rights reserved
CONTENTS
ENGLISH 2
DEUTSCH 20
ESPAÑOL 38
FRANÇAIS 56
ITALIANO 74
PУССКИЙ 92
SVENSKA 110

ENGLISH
ENGLISH
Overview
The NWD310N is a wireless network adapter for your desktop
computer. The NWD310N is WPS (Wi-Fi Protected Setup)
compatible.
1 Install the Software
" Install the software from the CD before you
insert the NWD310N. Do not insert the
NWD310N yet.
1 Remove the NWD310N if you already inserted it.
2 Insert the included CD into the CD-ROM drive on your
computer.
2

ENGLISH
3 When the following screen displays, click Setup to install
the ZyXEL utility and driver.
V If the screen does not display, locate and
double-click autorun.exe on the CD.
3
ENGLISH
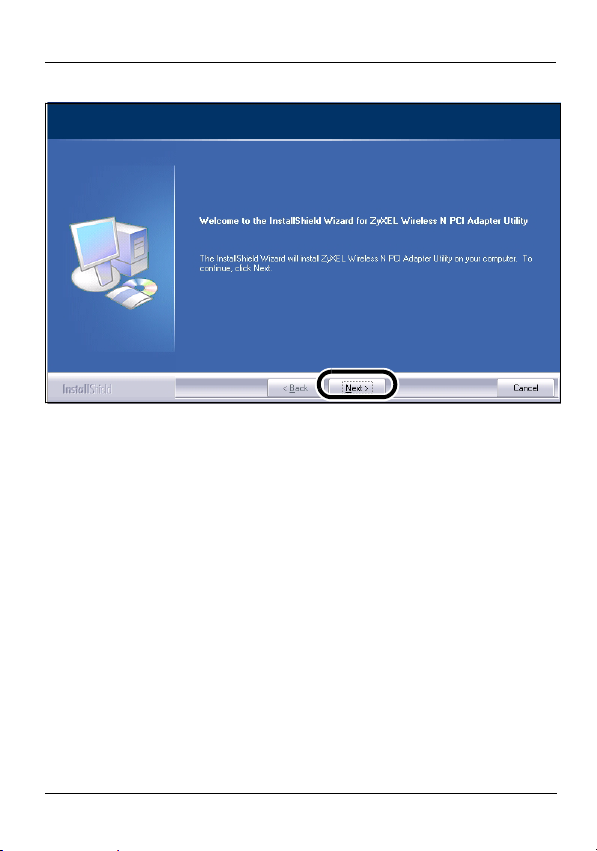
4 When the following screen displays, click Next.
5 Select Driver and Utility to install both the ZyXEL utility
and the driver on your computer. You can still use your
4

ENGLISH
operating system’s wireless network utility, if you choose
not to install the ZyXEL utility.
6 Click Install.
5

ENGLISH
" You will need to shut down your computer after
installing the ZyXEL utility. Make sure you have
saved your work before continuing.
7 When the following screen displays, select No, I will
restart my computer later. You will turn your computer off
when you install the hardware.
Click Finish to complete the software installation.
6

ENGLISH
2 Install the Hardware
" Do not install the hardware until you have
installed the software from the CD.
1 Save your work and close all applications.
2 Turn off the computer and any peripheral device(s), such
as a printer.
3 Unplug the computer from the power source.
" Ground yourself by wearing an anti-static wrist
strap if you have one or touching a grounded
metal object.
4 Remove the computer cover, and then remove the
NWD310N from its packaging.
5 If the antennas are attached to the NWD310N, remove
(unscrew) them.
7

ENGLISH
6 Insert the NWD310N into an available PCI slot. Make sure
the NWD310N's contacts are fully seated in the PCI slot
(A).
A
7 Secure the NWD310N to the computer with a bracket
screw and replace the computer cover.
8 Attach (screw) the antennas onto the NWD310N.
9 Point the antennas up.
10 Connect the power and turn on your computer.
8

ENGLISH
The NWD310N’s Link LED (light) turns on if it is properly
inserted.
V If the NWD310N’s Link LED is not on after you
have installed the software and the NWD310N,
make sure the NWD310N is properly inserted.
11A Found New Hardware Wizard window displays. Select
Install the software automatically (recommended) and
click Next and then click Finish.
9

ENGLISH
3 Connect to a Wireless Network
Using WPS
You can use Wi-Fi Protected Setup (WPS) to add your
desktop computer to a wireless network.
" Go to Section 4 if you want to use the utility to
join a wireless network.
The NWD310N supports two WPS methods for creating a
secure connection:
• Push Button Configuration - create a secure wireless network simply by pressing a button. See section 3.1.
• PIN Configuration - create a secure wireless network by
entering the NWD310N’s PIN (Personal Identification Number) into the configuration screen of an Access Point (AP).
See section 4.2.
3.1 Push Button Configuration
1 Make sure that your wireless AP (Access Point) is turned
on and that it is within range of your desktop computer.
2 Press the WPS button on the NWD310N and on your
wireless AP (ZyXEL’s NWA570N is shown as an
example). It doesn’t matter which button is pressed first.
10

ENGLISH
You must press the second button within two minutes of
pressing the first one.
" Your NWD310N has a WPS button located on its
panel, as well as a WPS button in its configuration
utility. Other WPS enabled devices have a similar
WPS button.
NWD310N
WPS
3 The AP and the NWD310N establish a secure connection.
This can take up to two minutes.
4 You are now ready to connect to the Internet wirelessly
through your NWD310N.
11
AP
Internet

ENGLISH
4 Connect to a Wireless Network via
the ZyXEL Utility
This section shows you how to use the WPS PIN method to
connect to an AP as well as how to configure wireless
settings manually to join a wireless network.
4.1 Open the Utility
1 After you install the
ZyXEL utility and
insert the NWD310N,
an icon appears in the
system tray. Doubleclick the icon.
2 The ZyXEL utility Link
Info screen displays.
12

ENGLISH
V If the icon does not display, uninstall and re-
install the ZyXEL utility. See the User’s Guide
for how to uninstall the utility.
The NWD310N automatically connects to an available
wireless network without security enabled. However, this
wireless network may not be connected to the Internet.
If the icon is green you are already connected to a
wireless network.
If the icon is red, you are not connected to a wireless
network.
4.2 WPS PIN Configuration
1 Click the Adapter tab.
13

ENGLISH
2 The ZyXEL utility Adapter screen displays. In the WPS
section, select WPS and PIN - Use this device’s PIN.
Write down the 8-digit PIN that is displayed in the grayedout text field of the pop-up window. You will need to enter
this PIN in the WPS screen of the AP.
• The PBC (Push Button Configuration) option works
the same way as the physical WPS button (see section
3.1 if you want to use this instead).
• The PIN - Use the PIN from the AP or Wireless
Router option is used when you want to register the
AP’s or wireless router’s PIN with the NWD310N (see
the User’s Guide if you want to use this instead).
3 Launch your AP’s configuration utility, go to the screen
where you can configure the WPS settings and enter the
14

ENGLISH
NWD310N’s PIN (an example screen from ZyXEL’s
NWA570N is shown).
4 Click Start in the NWD310N Adapter screen and Apply or
Start in the AP’s WPS screen within two minutes.
The AP authenticates the NWD310N and sends the proper
configuration settings to the NWD310N. This may take up to
two minutes. The NWD310N is now able to communicate with
the AP securely.
4.3 Connecting to a Wireless Network
1 Double-click the
icon. The ZyXEL utility
Link Info screen
displays. Click the Site
Survey tab.
15

ENGLISH
2 The available wireless
networks display in the
Available Network List.
SSID means Service Set
Identifier and is the name
of the wireless network.
3 If a wireless network has no
security, one of the following icons appears
next to its entry in the list.
If a wireless network has security, one of the
following icons appears next to its entry in
the list.
Choose the network you want to connect to by clicking on it
and clicking Connect.
4 If a network has no security, the Link Info screen displays.
Go to step 6.
5 If a network has security, the security settings screen
appears. You need to enter security information to connect
to the network. Get this information from the network
administrator. Be sure to enter the information exactly as it
was given to you.
16

ENGLISH
6 To access the Internet, open your Internet browser and
enter the URL of a web site in the address bar. The AP
should be connected to the Internet.
If the web site displays correctly, you are successfully
connected to the Internet.
Note for Windows XP Users
If you want to use Windows Zero Configuration (WZC), rightclick the icon and select Use Windows Zero
Configuration as Configuration utility.
To activate the ZyXEL utility again, right-click the icon and
select Use ZyXEL Utility as Configuration utility.
If you want to use WZC only, uncheck Utility during the
ZyXEL utility installation.
17

ENGLISH
Procedure to View a Product’s Certification(s)
1 Go to www.zyxel.com.
2 Select your product from the drop-down list box on
the ZyXEL home page to go to that product's page.
3 Select the certification you wish to view from this
18

ENGLISH
19

DEUTSCH
H
EUTSC
Übersicht
Der NWD310N ist ein WPS-kompatibler
Drahtlosnetzwerkadapter für Ihren Desktop-Computer (WPS
= "Wi-Fi Protected Setup"; Wi-Fi-geschützte Installation).
1 Installation der Software
" Installieren Sie die Software von der CD,
bevor Sie die NWD310N einstecken.
1 Entfernen Sie die NWD310N wieder, falls Sie sie bereits
eingesteckt haben.
2 Legen Sie die mitgelieferte CD in das CD-ROM-Laufwerk
des Computers ein. Bei entsprechender Einstellung Ihres
Betriebssystems startet das Setup Programm
automatisch.
20

DEUTSCH
3 Klicken Sie im folgenden Bildschirm auf Setup, um das
ZyXEL-Utility und den Treiber zu installieren.
V Falls dieses Fenster nicht erscheinen sollte,
navigieren Sie auf der CD zur Datei
autorun.exe und klicken Sie doppelt darauf.
21

DEUTSCH
4 Wenn das folgende Fenster erscheint, klicken Sie auf
Next (Weiter).
5 Wählen Sie Driver (Treiber) und Utility (Utility), um das
ZyXEL Utility Programm und den Treiber auf dem
Computer zu installieren. Wenn Sie nur den Treiber
installieren und die Wireless Zero Configuration (WZC) mit
Windows XP verwenden möchten, wählen Sie nur Driver
(Treiber) (siehe Hinweis für Windows XP-Benutzer). Klicken
Sie auf Next (Weiter), um den vorgegebenen
Standardordner als Speicherort für die Datei zu
22

DEUTSCH
verwenden, oder klicken Sie auf Browse (Durchsuchen),
um einen anderen Ordner auszuwählen.
6 Klicken Sie auf Install (Installieren).
23

DEUTSCH
" Wenn Sie das ZyXEL Utility Programm installiert
haben, muss der Computer neu gestartet
werden. Stellen Sie sicher, dass Sie vor dem
Neustart Ihre Arbeiten sichern!
7 Wenn das folgende Fenster erscheint, wählen Sie die
Option Nein, den Computer später starten. Schalten Sie
den Computer manuell aus, um die Hardware zu
installieren.
Klicken Sie auf Finish (Fertigstellen), um die Installation der
Software abzuschließen.
24

DEUTSCH
2 Installieren der Hardware
" Setzen Sie die Hardware erst ein, wenn Sie die
Software von der CD installiert haben und der
PC vollständig vom Stromnetz getrennt ist.
1 Speichern Sie Ihre Arbeit und schließen Sie alle anderen
Anwendungen.
2 Schalten Sie den Computer und alle angeschlossenen
Peripheriegeräte (z. B. Drucker) aus.
3 Trennen Sie den Computer vom Stromnetz.
4 Erden Sie sich, indem Sie ein antistatisches
Handgelenkband umbinden oder einen geerdeten
Metallgegenstand berühren. Entfernen Sie das Gehäuse
des Computers, und nehmen Sie den NWD310N aus der
Verpackung heraus.
5 Wenn die Antennen am NWD310N befestigt sein sollten,
schrauben Sie diese vor dem Einbau heraus.
25

DEUTSCH
6 Setzen Sie den NWD310N in einen freien PCI-Steckplatz.
Stellen Sie sicher, dass die Kontakte des NWD310N
vollständig im PCI-Steckplatz sitzen(A).
A
7 Schrauben Sie den NWD310N mit einer Schraube an der
Halterung fest.
8 Schrauben Sie die Antennen wieder an den NWD310N.
9 Richten Sie die Antennen nach oben.
10 Schalten Sie den Computer ein.
26

DEUTSCH
Die Link-LED (Anzeige) des NWD310N beginnt zu leuchten,
sobald das Gerät angeschlossen ist.
V Wenn die Link-LED des NWD310N nach dem
Installieren der Software und des NWD310N
nicht leuchtet, prüfen Sie, ob der NWD310N
richtig angeschlossen ist.
11Auf dem Bildschirm erscheint das Fenster Assistent für
das Suchen neuer Hardware. Wählen Sie die Option
Software automatisch installieren (empfohlen) und
klicken Sie auf Weiter. Klicken Sie auf Fertig stellen.
27

DEUTSCH
3 Herstellen der Verbindung zu einem
drahtlosen Netzwerk mit WPS
Mit der WPS-Funktion können Sie Ihren Computer zu einem
Drahtlosnetzwerk hinzufügen.
" Wenn Sie Ihr Gerät mit dieses Programm zu
einem Drahtlosnetzwerk hinzufügen möchten,
gehen Sie zu Abschnitt 4.
Der NWD310N unterstützt zwei WPS-Methoden, um eine
sichere Verbindung herzustellen:
• PBC (Push Button Configuration; Tastenkonfiguration) Sie erstellen ein sicheres Drahtlosnetzwerk, indem Sie auf
eine Taste drücken. Siehe Abschnitt 3.1.
• PIN-Konfiguration - Sie erstellen ein sicheres Drahtlosnetzwerk, indem Sie im Konfigurationsfenster eines APs
(Access Point; Zugriffspunkt) die PIN (Personal Identification
Number; Persönliche Identifikationsnummer) des NWD310N
eingeben. Siehe Abschnitt 4.2.
3.1 Tastenkonfiguration
1 Stellen Sie sicher, dass der drahtlose AP eingeschaltet ist
und sich in der Reichweite Ihres Desktop-Computers
befindet.
28

DEUTSCH
2 Drücken Sie am NWD310N und am drahtlosen AP
(NWA570N von ZyXEL ist ein Beispiel) auf die WPSTaste. Dabei ist es egal, welche Taste Sie zuerst drücken.
Jedoch muss die zweite Taste spätestens zwei Minuten
nach dem Drücken der ersten Taste gedrückt werden.
" Die WPS-Taste des NWD310N befindet sich
sowohl auf dem Bedienfeld, aber es gibt auch eine
WPS-Taste im Konfigurationsprogramm. Andere
WPS-fähige Geräte haben eine ähnliche WPSTas t e.
NWD310N
WPS
3 Der AP und der NWD310N stellen untereinander eine
sichere Verbindung her. Das kann bis zu zwei Minuten
dauern.
4 Sobald dieser Vorgang erfolgreich abgeschlossen ist,
können Sie über Ihren NWD310N eine drahtlose
Verbindung zum Internet herstellen.
29
AP
Internet

DEUTSCH
4 Herstellen der Verbindung zu einem
drahtlosen Netzwerk mit ZyXEL
In diesem Abschnitt wird beschrieben, wie Sie mit der WPS
PIN-Methode die Verbindung zu einem AP herstellen und wie
Sie die Drahtloseinstellungen konfigurieren müssen, um
manuell die Verbindung zu einem Drahtlosnetzwerk
herzustellen.
4.1 Öffnen des Utility-Programms
1 Wenn Sie das ZyXEL
Utility-Programm
installiert und den
NWD310N
angeschlossen
haben, erscheint in
der Taskleiste ein
Symbol. Klicken Sie
doppelt auf das Symbol.
30
 Loading...