

Page 1
ZyXEL MAX-200M1 Series User’s Guide
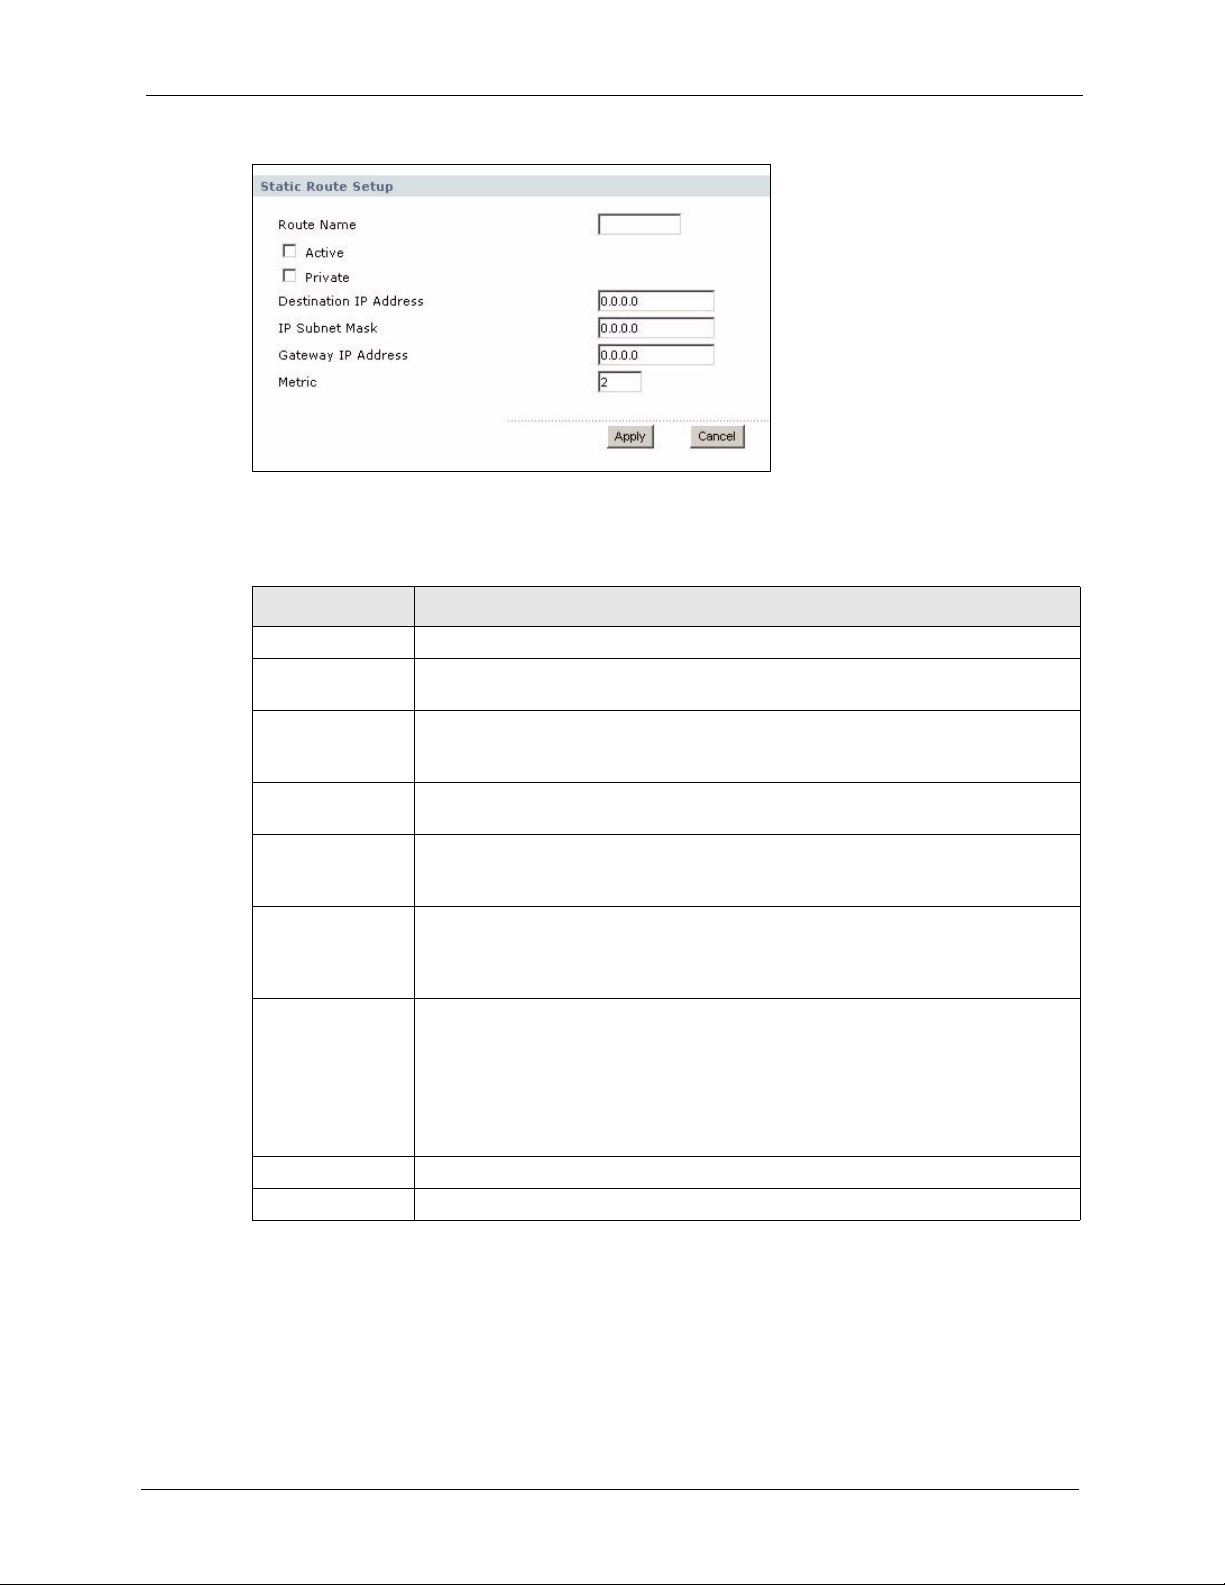
Figure 84 Management > Static Route > IP Static Route > Edit
Each field is described in the following table.
Table 49 Management > Static Route > IP Static Route > Edit
LABEL DESCRIPTION
Route Name Enter the name of the static route.
Active
Private
Destination IP
Address
IP Subnet Mask
Gateway IP
Address
Metric
Apply
Cancel
Select this if you want the static route to be used. Clear this if you do not want the
static route to be used.
Select this if you do not want the ZyXEL Device to tell other routers about this
static route. For example, you might select this if the static route is in your LAN.
Clear this if you want the ZyXEL Device to tell other routers about this static route.
Enter one of the destination IP addresses that this static route affects.
Enter the subnet mask that defines the range of destination IP addresses that this
static route affects. If this static route affects only one IP address, enter
255.255.255.255.
Enter the IP address of the gateway to which the ZyXEL Device should send
packets for the specified Destination. The gateway is a router or a switch on the
same network segment as the device's LAN or WAN port. The gateway helps
forward packets to their destinations.
Usually, you should keep the default value. This field is related to RIP. See Chapter
8 on page 83 for more information.
The metric represents the "cost of transmission". A router determines the best
route for transmission by choosing a path with the lowest "cost". The smaller the
metric, the lower the "cost". RIP uses hop count as the measurement of cost,
where 1 is for a directly-connected network. The metric must be 1-15; if you use a
value higher than 15, the routers assume the link is down.
Click this to save your changes and to apply them to the ZyXEL Device.
Click this to return to the previous screen without saving your changes.
Chapter 15 Static Route 151
Page 2

ZyXEL MAX-200M1 Series User’s Guide
152 Chapter 15 Static Route
Page 3

CHAPTER 16
Remote MGMT
Use these screens to control which computers can use which services to access the ZyXEL
Device on each interface.
16.1 Remote Management Overview
Remote management allows you to determine which services/protocols can access which
ZyXEL Device interface (if any) from which computers.
You may manage your ZyXEL Device from a remote location via:
• Internet (WAN only) • ALL (LAN and WAN)
• LAN only • Neither (Disable).
ZyXEL MAX-200M1 Series User’s Guide
To disable remote management of a service, select Disable in the corresponding Server
Access field.
You may only have one remote management session running at a time. The ZyXEL Device
automatically disconnects a remote management session of lower priority when another
remote management session of higher priority starts. The priorities for the different types of
remote management sessions are as follows.
1 Telnet
2 HTTP
16.1.1 Remote Management Limitations
Remote management over LAN or WAN will not work when:
1 A filter in SMT menu 3.1 (LAN) or in menu 11.5 (WAN) is applied to block a Telnet,
FTP or Web service.
2 You have disabled that service in one of the remote management screens.
3 The IP address in the Secured Client IP field does not match the client IP address. If it
does not match, the ZyXEL Device will disconnect the session immediately.
4 There is already another remote management session with an equal or higher priority
running. You may only have one remote management session running at one time.
Chapter 16 Remote MGMT 153
Page 4

ZyXEL MAX-200M1 Series User’s Guide
16.1.2 Remote Management and NAT
When NAT is enabled:
• Use the ZyXEL Device’s WAN IP address when configuring from the WAN.
• Use the ZyXEL Device’s LAN IP address when configuring from the LAN.
16.1.3 System Timeout
There is a default system management idle timeout of five minutes (three hundred seconds).
The ZyXEL Device automatically logs you out if the management session remains idle for
longer than this timeout period. The management session does not time out when a statistics
screen is polling. You can change the timeout period in the Maintenance > System > General
screen.
16.2 Remote Management Screens
16.2.1 WWW Screen
Use this screen to control HTTP access to your ZyXEL Device. To access this screen, click
Management > Remote MGMT > WWW.
Figure 85 Management > Remote MGMT > WWW
Each field is described in the following table.
Table 50 Management > Remote MGMT > WWW
LABEL DESCRIPTION
Server Port Enter the port number this service can use to access the ZyXEL Device. The
Server Access Select the interface(s) through which a computer may access the ZyXEL Device
Secured Client IP
Address
computer must use the same port number.
using this service.
Select All to allow any computer to access the ZyXEL Device using this service.
Select Selected to only allow the computer with the IP address that you specify to
access the ZyXEL Device using this service.
154 Chapter 16 Remote MGMT
Page 5
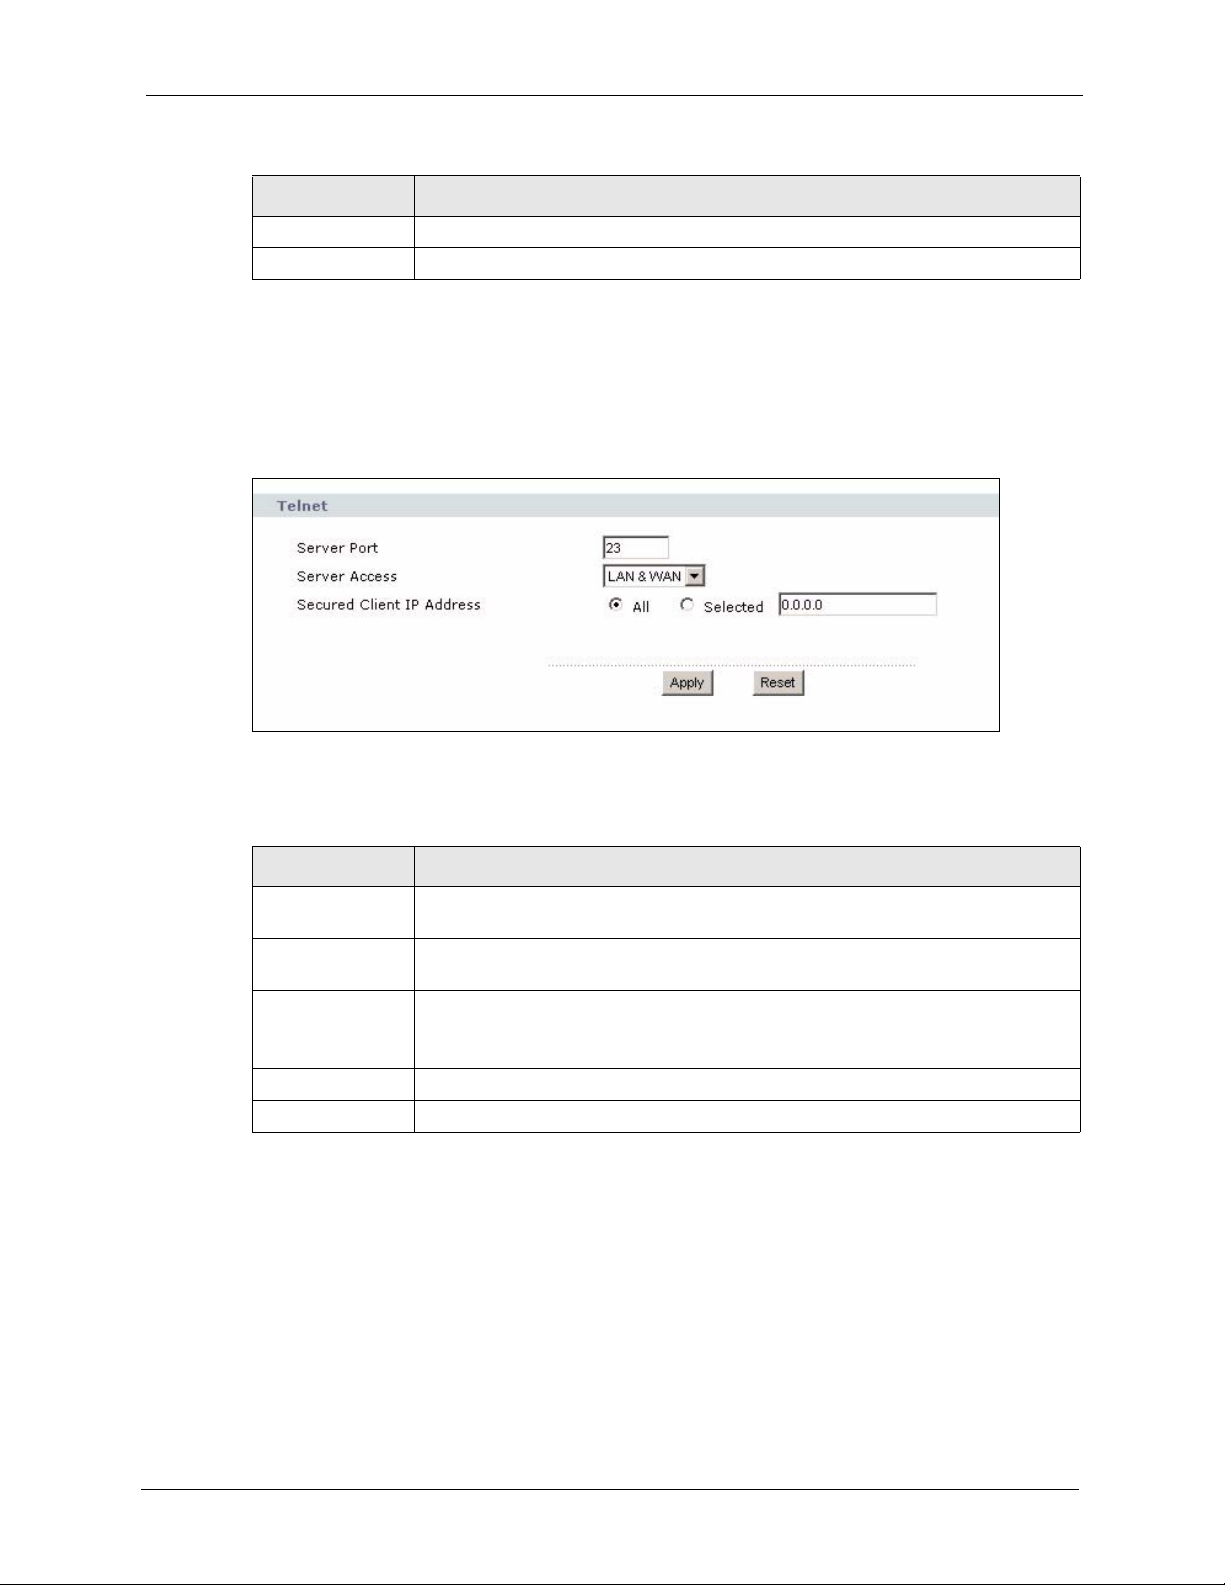
Table 50 Management > Remote MGMT > WWW
LABEL DESCRIPTION
Apply Click this to save your changes.
Reset Click this to set every field in this screen to its default value.
16.2.2 Telnet Screen
Use this screen to control Telnet access to your ZyXEL Device. To access this screen, click
Management > Remote MGMT > Telnet.
Figure 86 Management > Remote MGMT > Telnet
ZyXEL MAX-200M1 Series User’s Guide
Each field is described in the following table.
Table 51 Management > Remote MGMT > Telnet
LABEL DESCRIPTION
Server Port Enter the port number this service can use to access the ZyXEL Device. The
Server Access Select the interface(s) through which a computer may access the ZyXEL Device
Secured Client IP
Address
Apply
Reset Click this to set every field in this screen to its default value.
16.2.3 FTP Screen
Use this screen to control FTP access to your ZyXEL Device. To access this screen, click
Management > Remote MGMT > FTP.
computer must use the same port number.
using this service.
Select All to allow any computer to access the ZyXEL Device using this service.
Select Selected to only allow the computer with the IP address that you specify to
access the ZyXEL Device using this service.
Click this to save your changes.
Chapter 16 Remote MGMT 155
Page 6
ZyXEL MAX-200M1 Series User’s Guide
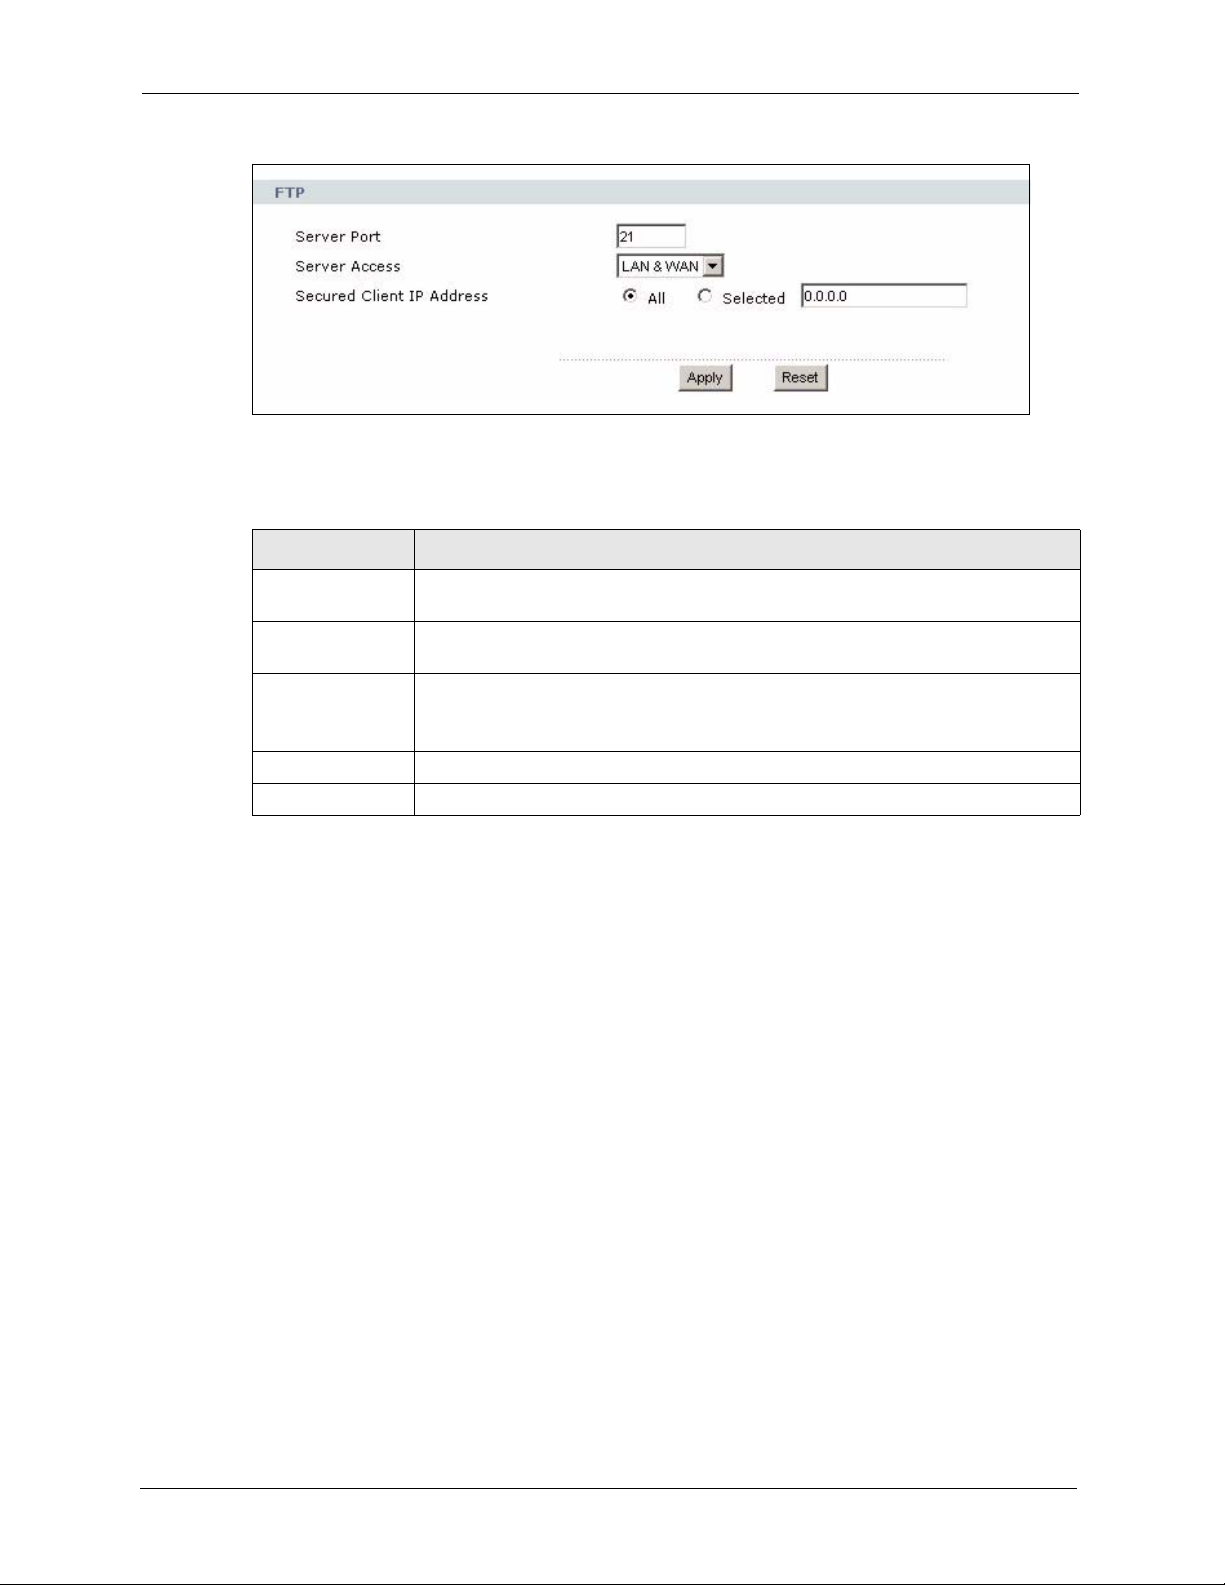
Figure 87 Management > Remote MGMT > FTP
Each field is described in the following table.
Table 52 Management > Remote MGMT > FTP
LABEL DESCRIPTION
Server Port Enter the port number this service can use to access the ZyXEL Device. The
Server Access Select the interface(s) through which a computer may access the ZyXEL Device
Secured Client IP
Address
Apply
Reset Click this to set every field in this screen to its default value.
16.3 SNMP
Simple Network Management Protocol (SNMP) is a protocol used for exchanging
management information between network devices. SNMP is a member of the TCP/IP
protocol suite. Your ZyXEL Device supports SNMP agent functionality, which allows a
manager station to manage and monitor the ZyXEL Device through the network. The ZyXEL
Device supports SNMP version one (SNMPv1) and version two (SNMPv2). The next figure
illustrates an SNMP management operation.
Note: SNMP is only available if TCP/IP is configured.
computer must use the same port number.
using this service.
Select All to allow any computer to access the ZyXEL Device using this service.
Select Selected to only allow the computer with the IP address that you specify to
access the ZyXEL Device using this service.
Click this to save your changes and to apply them to the ZyXEL Device.
156 Chapter 16 Remote MGMT
Page 7
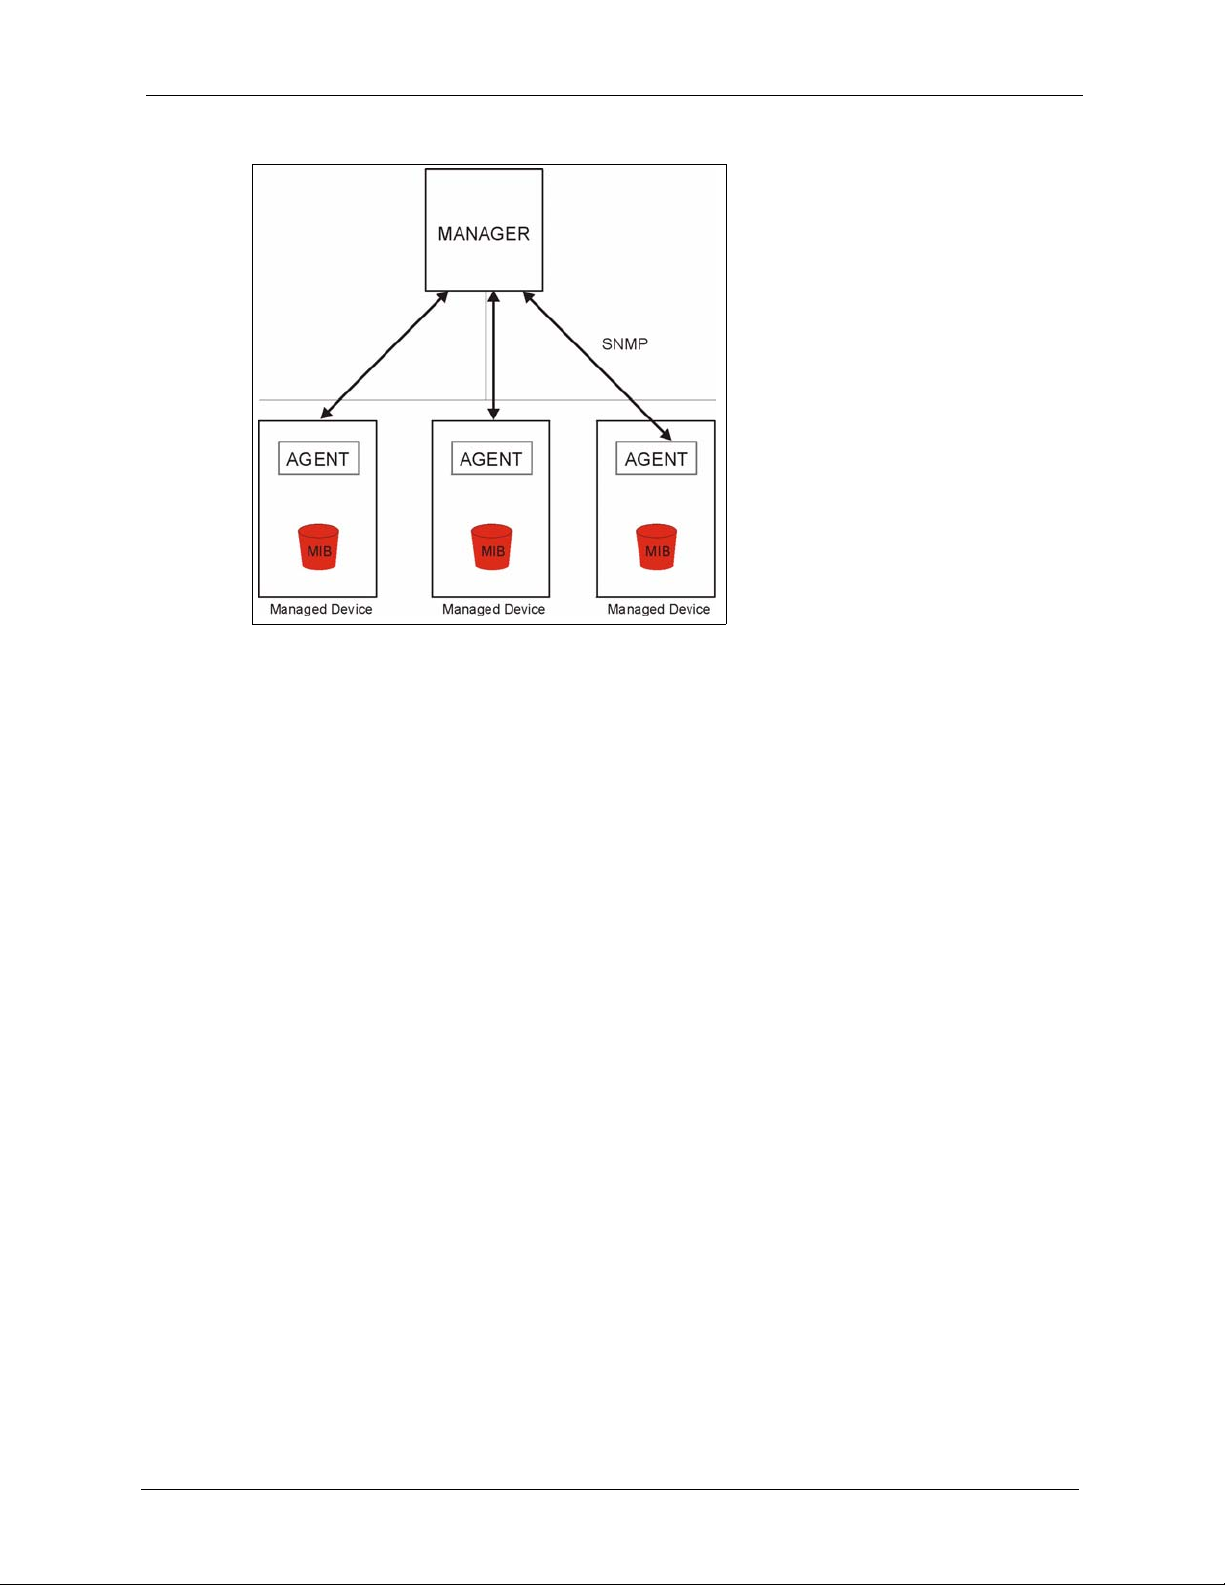
Figure 88 SNMP Management Model
ZyXEL MAX-200M1 Series User’s Guide
An SNMP managed network consists of two main types of component: agents and a manager.
An agent is a management software module that resides in a managed device (the ZyXEL
Device). An agent translates the local management information from the managed device into
a form compatible with SNMP. The manager is the console through which network
administrators perform network management functions. It executes applications that control
and monitor managed devices.
The managed devices contain object variables/managed objects that define each piece of
information to be collected about a device. Examples of variables include such as number of
packets received, node port status etc. A Management Information Base (MIB) is a collection
of managed objects. SNMP allows a manager and agents to communicate for the purpose of
accessing these objects.
SNMP itself is a simple request/response protocol based on the manager/agent model. The
manager issues a request and the agent returns responses using the following protocol
operations:
• Get - Allows the manager to retrieve an object variable from the agent.
• GetNext - Allows the manager to retrieve the next object variable from a table or list
within an agent. In SNMPv1, when a manager wants to retrieve all elements of a table
from an agent, it initiates a Get operation, followed by a series of GetNext operations.
• Set - Allows the manager to set values for object variables within an agent.
• Trap - Used by the agent to inform the manager of some events.
16.3.1 Supported MIBs
The ZyXEL Device supports MIB II that is defined in RFC-1213 and RFC-1215. The focus of
the MIBs is to let administrators collect statistical data and monitor status and performance.
Chapter 16 Remote MGMT 157
Page 8
ZyXEL MAX-200M1 Series User’s Guide
16.3.2 SNMP Traps
The ZyXEL Device will send traps to the SNMP manager when any one of the following
events occurs:
Table 53 SNMP Traps
TRAP #
0 coldStart (defined in RFC-1215) A trap is sent after booting (power on).
1 warmStart (defined in RFC-1215) A trap is sent after booting (software reboot).
4 authenticationFailure (defined in
6 whyReboot (defined in ZYXEL-
6a For intentional reboot: A trap is sent with the message "System reboot by
6b For fatal error: A trap is sent with the message of the fatal code if the
TRAP NAME DESCRIPTION
RFC-1215)
MIB)
16.3.3 Configuring SNMP
To change your ZyXEL Device’s SNMP settings, click Advanced > Remote MGMT >
SNMP. The screen appears as shown.
Use this screen to control FTP access to your ZyXEL Device. To access this screen, click
Management > Remote MGMT > SNMP.
A trap is sent to the manager when receiving any
SNMP get or set requirements with the wrong
community (password).
A trap is sent with the reason of restart before
rebooting when the system is going to restart (warm
start).
user!" if reboot is done intentionally, (for example,
download new files, CI command "sys reboot", etc.).
system reboots because of fatal errors.
158 Chapter 16 Remote MGMT
Page 9
ZyXEL MAX-200M1 Series User’s Guide
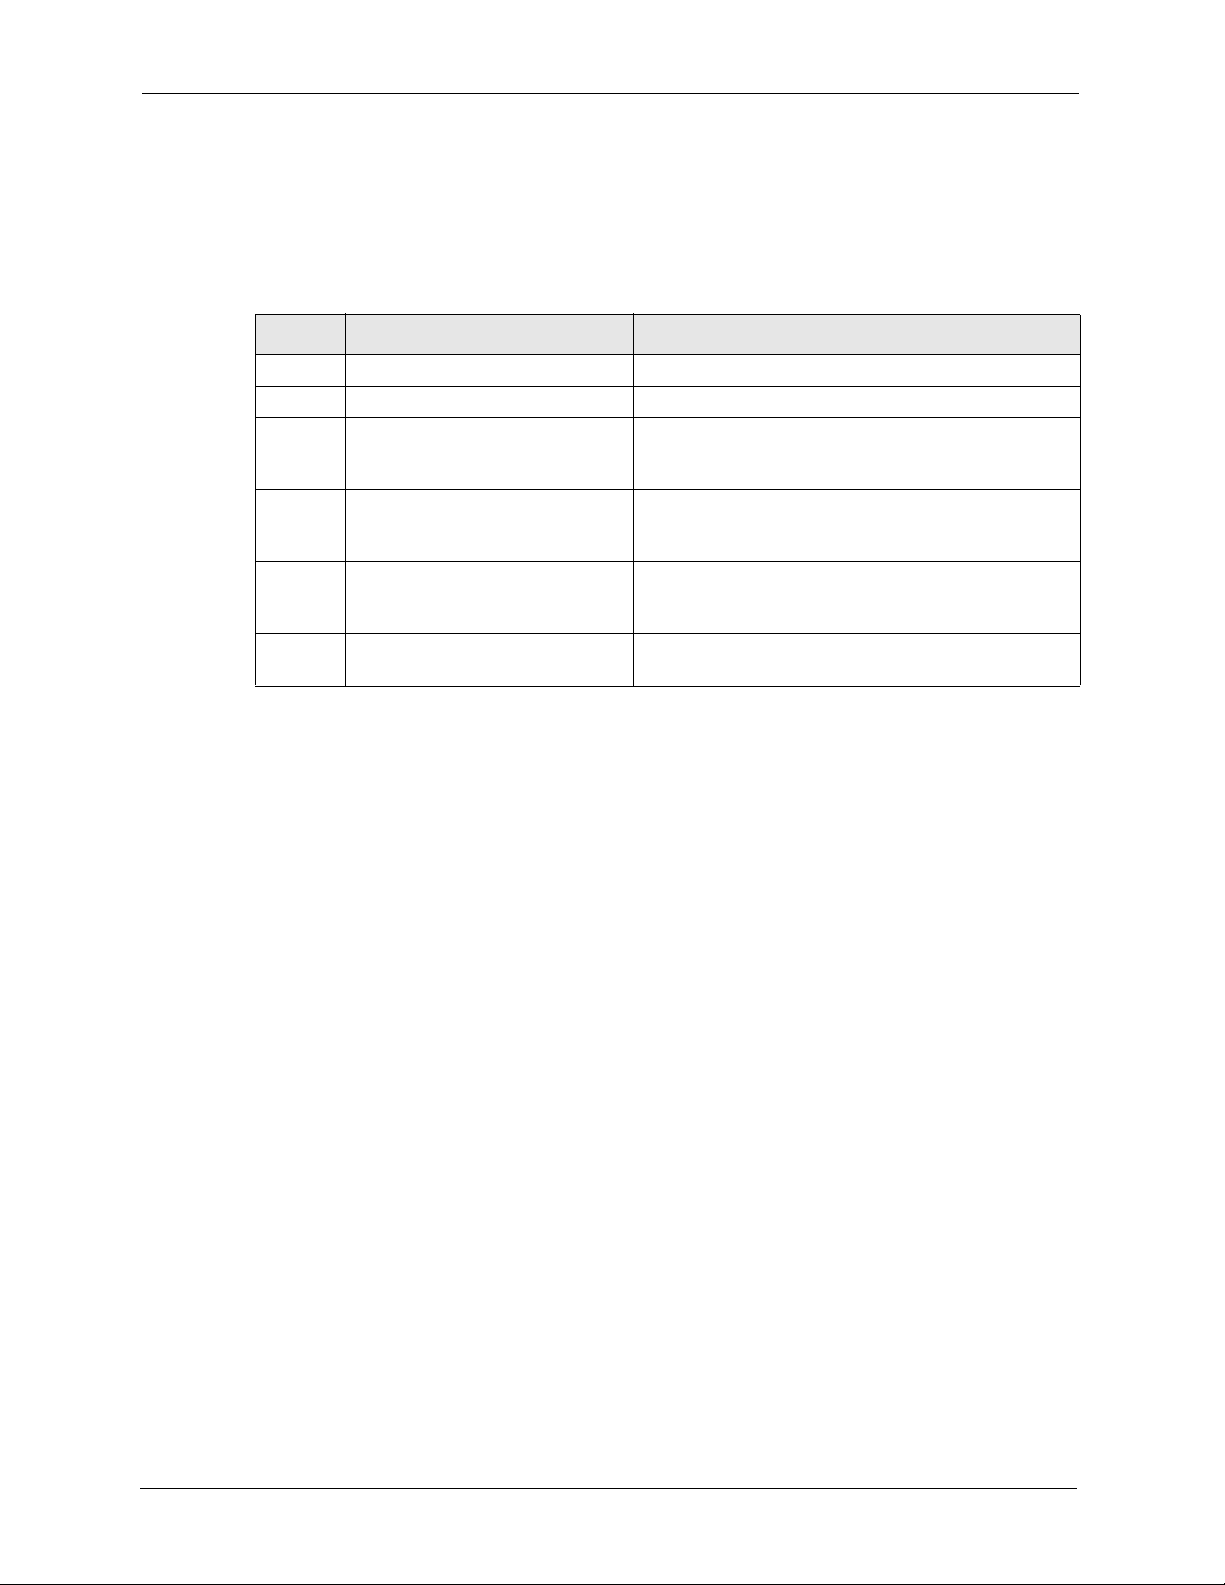
Figure 89 Management > Remote MGMT > SNMP
The following table describes the labels in this screen.
Table 54 Remote Management: SNMP
LABEL DESCRIPTION
SNMP Configuration
Get Community Enter the Get Community, which is the password for the incoming Get and
Set Community Enter the Set community, which is the password for incoming Set requests from
Trap Community Enter the trap community, which is the password sent with each trap to the
Trap Destination Enter the IP address of the station to send your SNMP traps to.
SNMP
Port You may change the server port number for a service if needed, however you
Access Status Select the interface(s) through which a computer may access the ZyXEL Device
Secured Client IP A secured client is a “trusted” computer that is allowed to communicate with the
Apply Click this button to save your customized settings and exit this screen.
Reset Click this button to set each field in this screen to its default value.
GetNext requests from the management station. The default is public and allows
all requests.
the management station. The default is public and allows all requests.
SNMP manager. The default is public and allows all requests.
must use the same port number in order to use that service for remote
management.
using this service.
ZyXEL Device using this service.
Select All to allow any computer to access the ZyXEL Device using this service.
Choose Selected to just allow the computer with the IP address that you specify
to access the ZyXEL Device using this service.
Chapter 16 Remote MGMT 159
Page 10
ZyXEL MAX-200M1 Series User’s Guide
16.3.4 DNS Screen
Use this screen to control DNS access to your ZyXEL Device. To access this screen, click
Management > Remote MGMT > DNS.
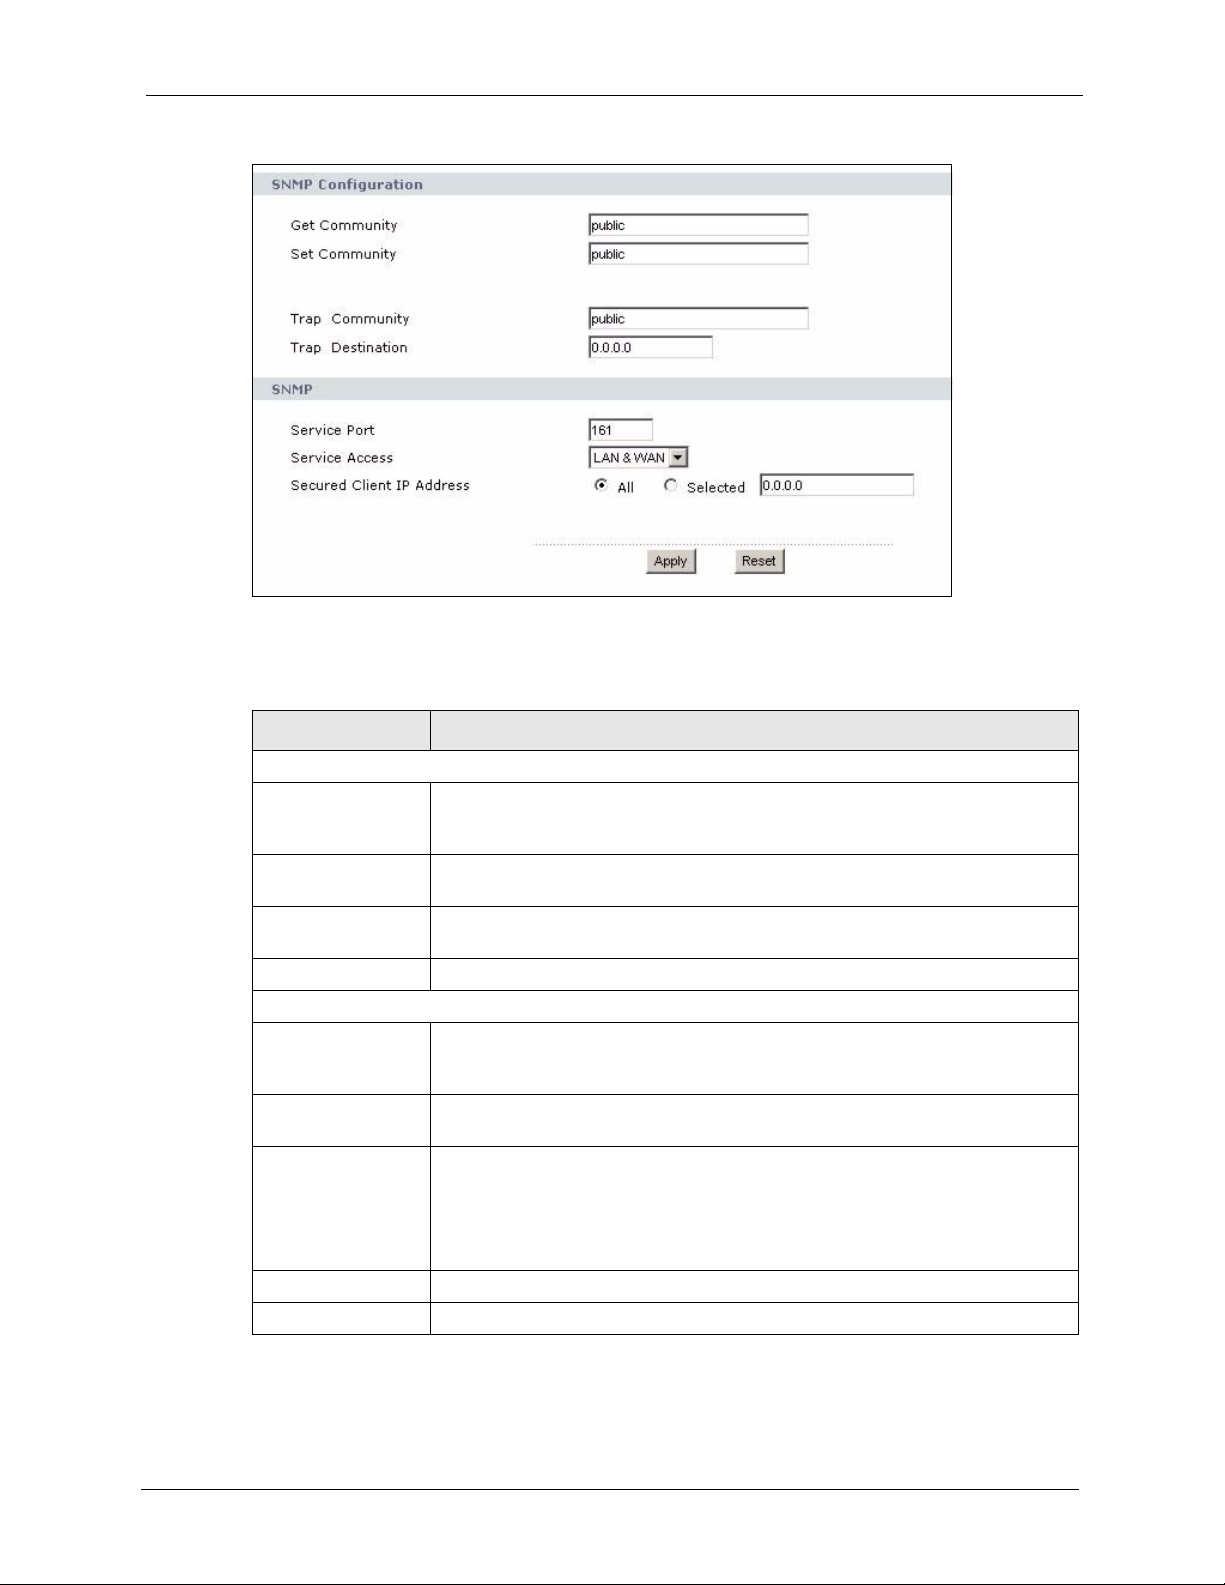
Figure 90 Management > Remote MGMT > DNS
Each field is described in the following table.
Table 55 Management > Remote MGMT > DNS
LABEL DESCRIPTION
Server Port This field is read-only. This field displays the port number this service uses to
Server Access Select the interface(s) through which a computer may access the ZyXEL Device
Secured Client IP
Address
Apply
Reset Click this to set every field in this screen to its last-saved value.
access the ZyXEL Device. The computer must use the same port number.
using this service.
Select All to allow any computer to access the ZyXEL Device using this service.
Select Selected to only allow the computer with the IP address that you specify to
access the ZyXEL Device using this service.
Click this to save your changes.
16.3.5 Security Screen
Use this screen to control how your ZyXEL Device responds to other types of requests. To
access this screen, click Management > Remote MGMT > Security.
160 Chapter 16 Remote MGMT
Page 11
ZyXEL MAX-200M1 Series User’s Guide
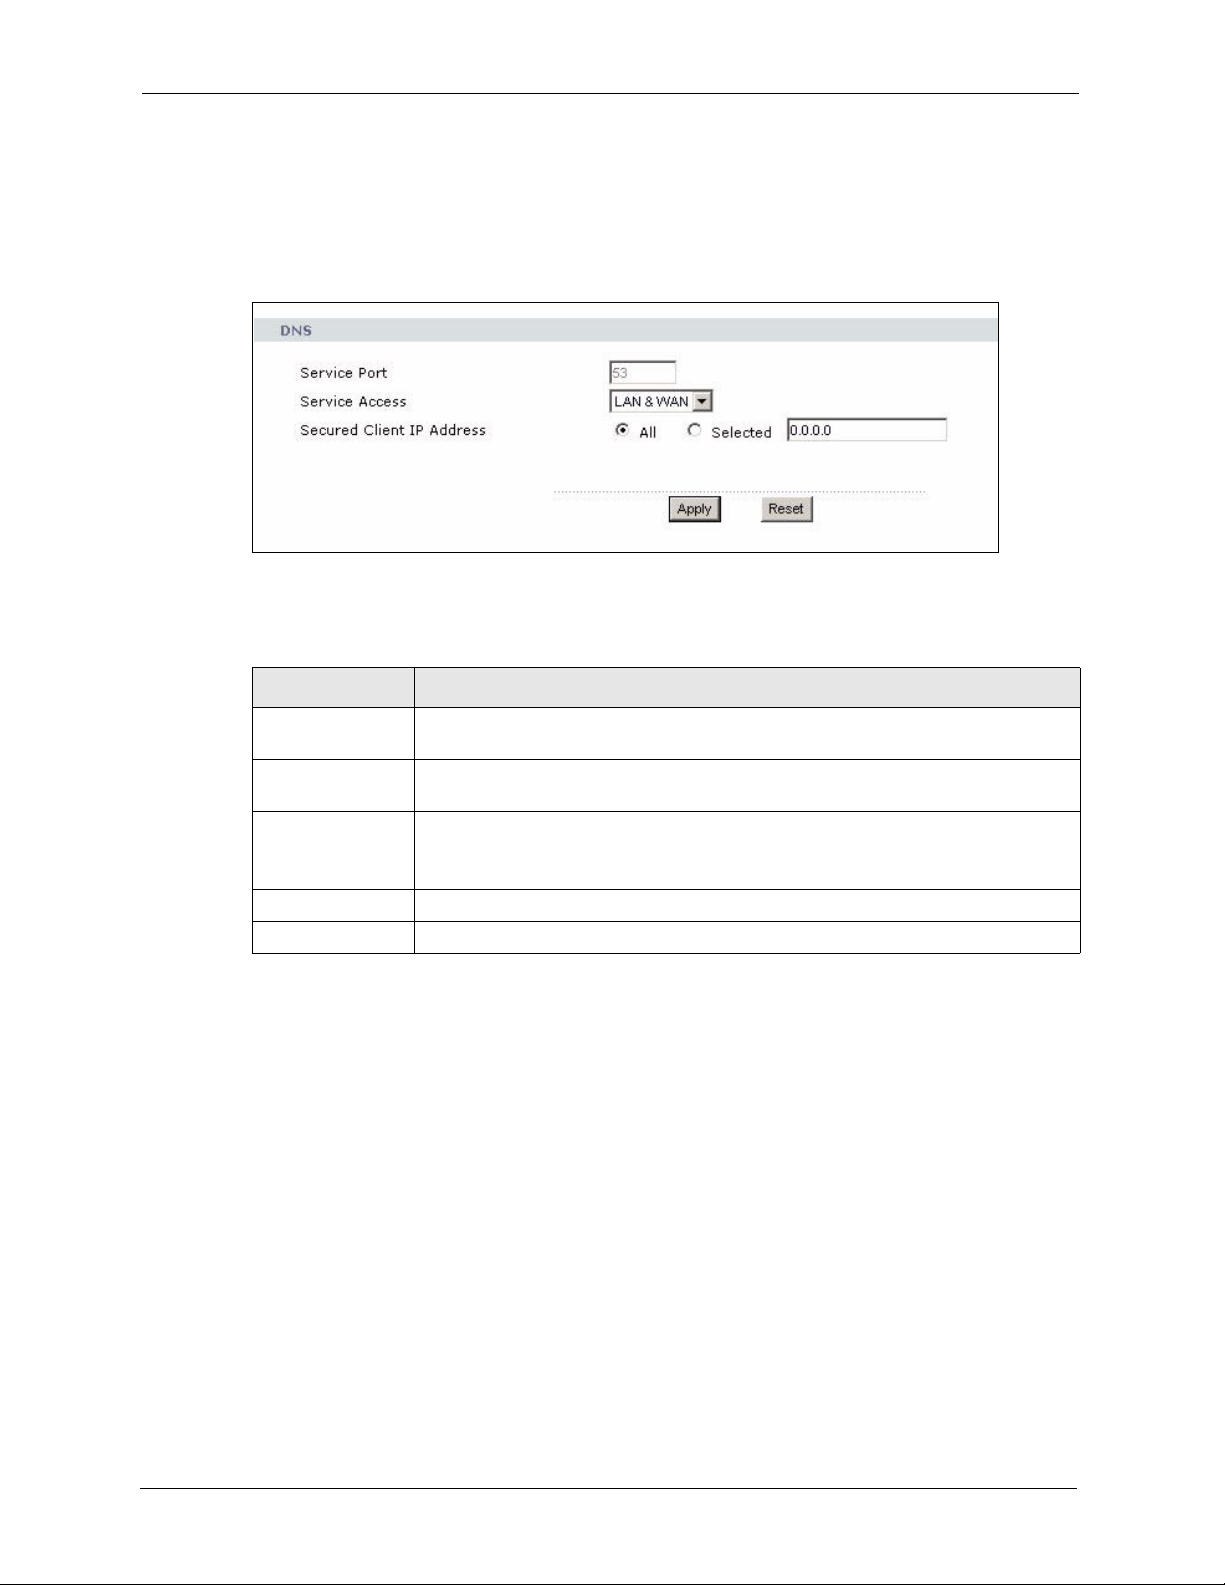
Figure 91 Management > Remote MGMT > Security
Each field is described in the following table.
Table 56 Management > Remote MGMT > Security
LABEL DESCRIPTION
Respond to Ping onSelect the interface(s) on which the ZyXEL Device should respond to incoming
ping requests.
Disable - the ZyXEL Device does not respond to any ping requests.
LAN - the ZyXEL Device only responds to ping requests received from the LAN.
WAN - the ZyXEL Device only responds to ping requests received from the WAN.
LAN & WAN - the ZyXEL Device responds to ping requests received from the LAN
or the WAN.
Do not respond to
requests for
unauthorized
services
Apply
Cancel
Select this to prevent outsiders from discovering your ZyXEL Device by sending
requests to unsupported port numbers. If an outside user attempts to probe an
unsupported port on your ZyXEL Device, an ICMP response packet is
automatically returned. This allows the outside user to know the ZyXEL Device
exists. Your ZyXEL Device supports anti-probing, which prevents the ICMP
response packet from being sent. This keeps outsiders from discovering your
ZyXEL Device when unsupported ports are probed.
If you clear this, your ZyXEL Device replies with an ICMP Port Unreachable packet
for a port probe on unused UDP ports and with a TCP Reset packet for a port
probe on unused TCP ports.
Click this to save your changes.
Click this to set every field in this screen to its default value.
Chapter 16 Remote MGMT 161
Page 12

ZyXEL MAX-200M1 Series User’s Guide
162 Chapter 16 Remote MGMT
Page 13

ZyXEL MAX-200M1 Series User’s Guide
CHAPTER 17
Use this screen to set up UPnP.
17.1 Introducing Universal Plug and Play
Universal Plug and Play (UPnP) is a distributed, open networking standard that uses TCP/IP
for simple peer-to-peer network connectivity between devices. A UPnP device can
dynamically join a network, obtain an IP address, convey its capabilities and learn about other
devices on the network. In turn, a device can leave a network smoothly and automatically
when it is no longer in use.
17.1.1 How do I know if I'm using UPnP?
UPnP
UPnP hardware is identified as an icon in the Network Connections folder (Windows XP).
Each UPnP compatible device installed on your network will appear as a separate icon.
Selecting the icon of a UPnP device will allow you to access the information and properties of
that device.
17.1.2 NAT Traversal
UPnP NAT traversal automates the process of allowing an application to operate through NAT.
UPnP network devices can automatically configure network addressing, announce their
presence in the network to other UPnP devices and enable exchange of simple product and
service descriptions. NAT traversal allows the following:
• Dynamic port mapping
• Learning public IP addresses
• Assigning lease times to mappings
Windows Messenger is an example of an application that supports NAT traversal and UPnP.
See Chapter 9 on page 97 for further information about NAT.
17.1.3 Cautions with UPnP
The automated nature of NAT traversal applications in establishing their own services and
opening firewall ports may present network security issues. Network information and
configuration may also be obtained and modified by users in some network environments.
Chapter 17 UPnP 163
Page 14

ZyXEL MAX-200M1 Series User’s Guide
All UPnP-enabled devices may communicate freely with each other without additional
configuration. Disable UPnP if this is not your intention.
17.1.4 UPnP and ZyXEL
ZyXEL has achieved UPnP certification from the Universal Plug and Play Forum Creates
UPnP™ Implementors Corp. (UIC). ZyXEL's UPnP implementation supports IGD 1.0
(Internet Gateway Device). At the time of writing ZyXEL's UPnP implementation supports
Windows Messenger 4.6 and 4.7 while Windows Messenger 5.0 and Xbox are still being
tested.
The ZyXEL Device only sends UPnP multicasts to the LAN.
See later sections for examples of installing UPnP in Windows XP and Windows Me as well as
an example of using UPnP in Windows.
17.2 UPnP Examples
17.2.1 Installing UPnP in Windows Example
This section shows how to install UPnP in Windows Me and Windows XP.
17.2.1.1 Installing UPnP in Windows Me
Follow the steps below to install the UPnP in Windows Me.
1 Click Start and Control Panel. Double-click Add/Remove Programs.
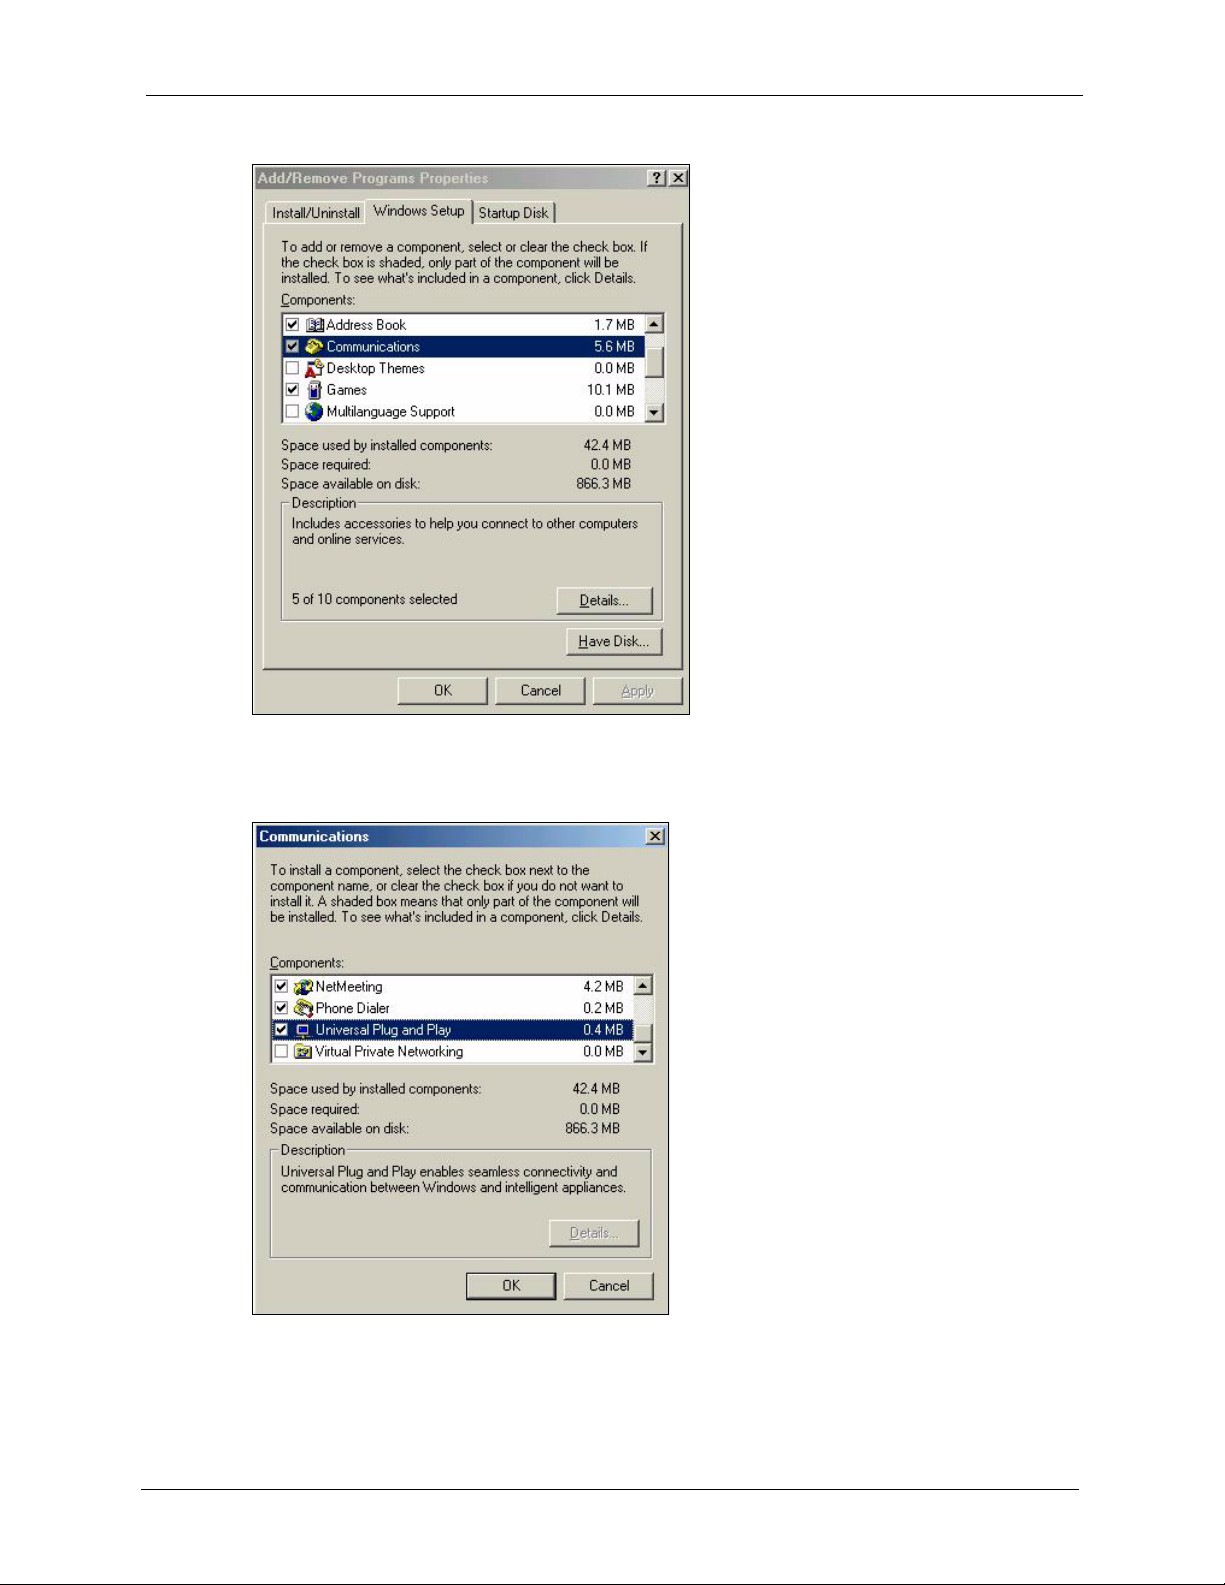
2 Click on the Windows Setup tab and select Communication in the Components
selection box. Click Details.
164 Chapter 17 UPnP
Page 15
ZyXEL MAX-200M1 Series User’s Guide
Figure 92 Add/Remove Programs: Windows Setup: Communication
3 In the Communications window, select the Universal Plug and Play check box in the
Components selection box.
Figure 93 Add/Remove Programs: Windows Setup: Communication Components
4 Click OK to go back to the Add/Remove Programs Properties window and click Next.
5 Restart the computer when prompted.
Chapter 17 UPnP 165
Page 16

ZyXEL MAX-200M1 Series User’s Guide
17.2.1.2 Installing UPnP in Windows XP
Follow the steps below to install the UPnP in Windows XP.
1 Click Start and Control Panel.
2 Double-click Network Connections.
3 In the Network Connections window, click Advanced in the main menu and select
Optional Networking Components ….
Figure 94 Network Connections
4 The Windows Optional Networking Components Wizard window displays. Select
Networking Service in the Components selection box and click Details.
Figure 95 Windows Optional Networking Components Wizard
5 In the Networking Services window, select the Universal Plug and Play check box.
166 Chapter 17 UPnP
Page 17
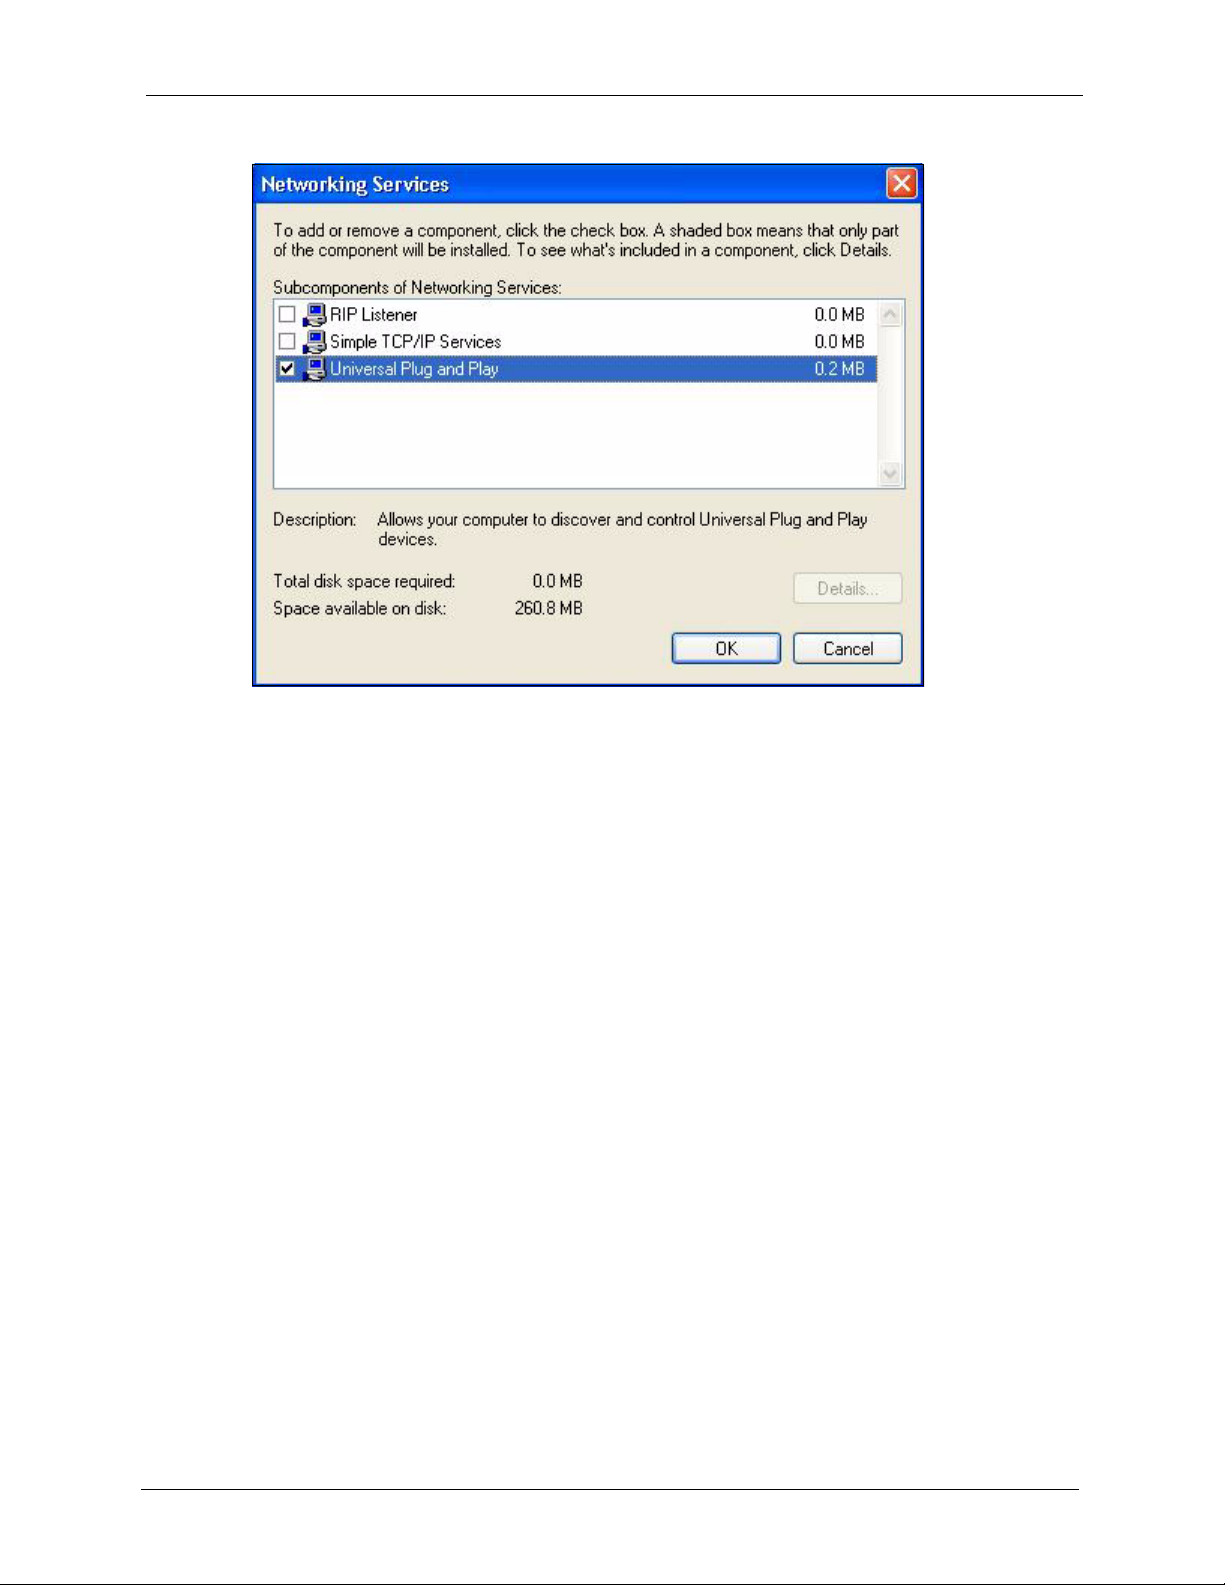
Figure 96 Networking Services
ZyXEL MAX-200M1 Series User’s Guide
6 Click OK to go back to the Windows Optional Networking Component Wizard
window and click Next.
17.2.2 Using UPnP in Windows XP Example
This section shows you how to use the UPnP feature in Windows XP. You must already have
UPnP installed in Windows XP and UPnP activated on the ZyXEL Device.
Make sure the computer is connected to a LAN port of the ZyXEL Device. Turn on your
computer and the ZyXEL Device.
17.2.2.1 Auto-discover Your UPnP-enabled Network Device
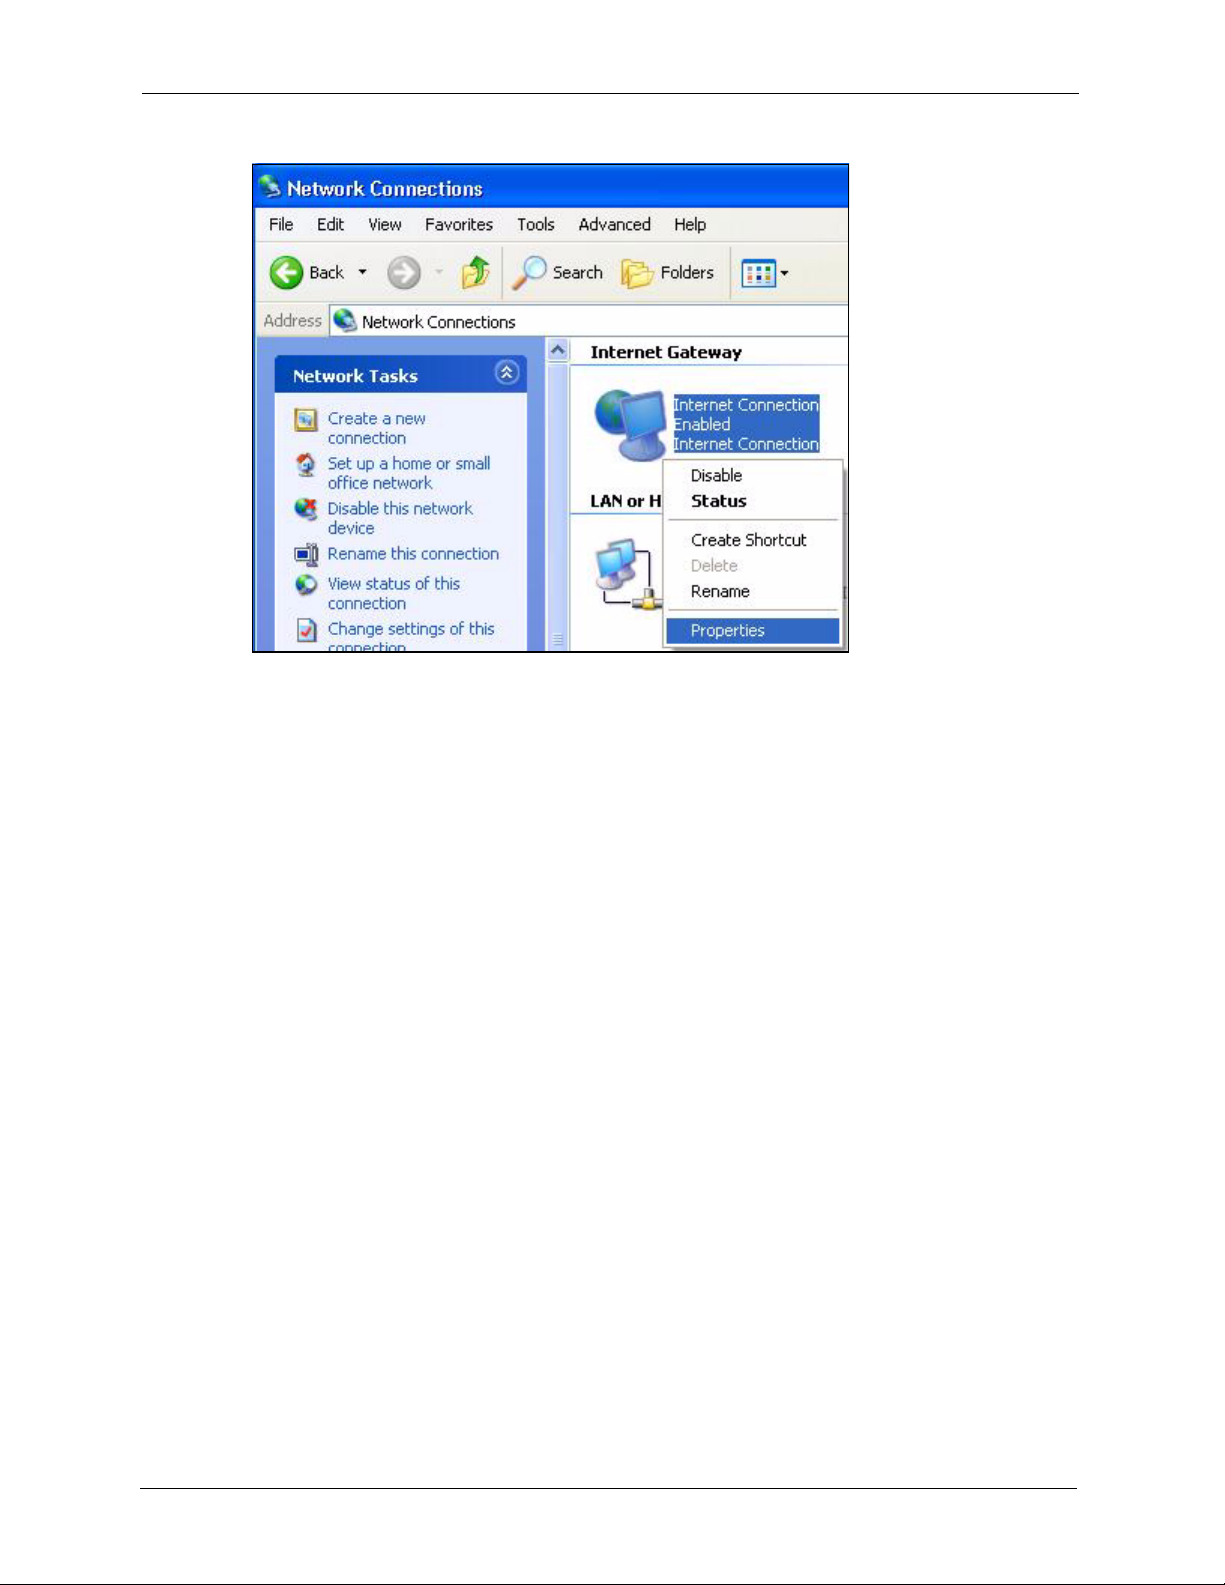
1 Click Start and Control Panel. Double-click Network Connections. An icon displays
under Internet Gateway.
2 Right-click the icon and select Properties.
Chapter 17 UPnP 167
Page 18
ZyXEL MAX-200M1 Series User’s Guide
Figure 97 Network Connections
3 In the Internet Connection Properties window, click Settings to see the port mappings
there were automatically created.
168 Chapter 17 UPnP
Page 19
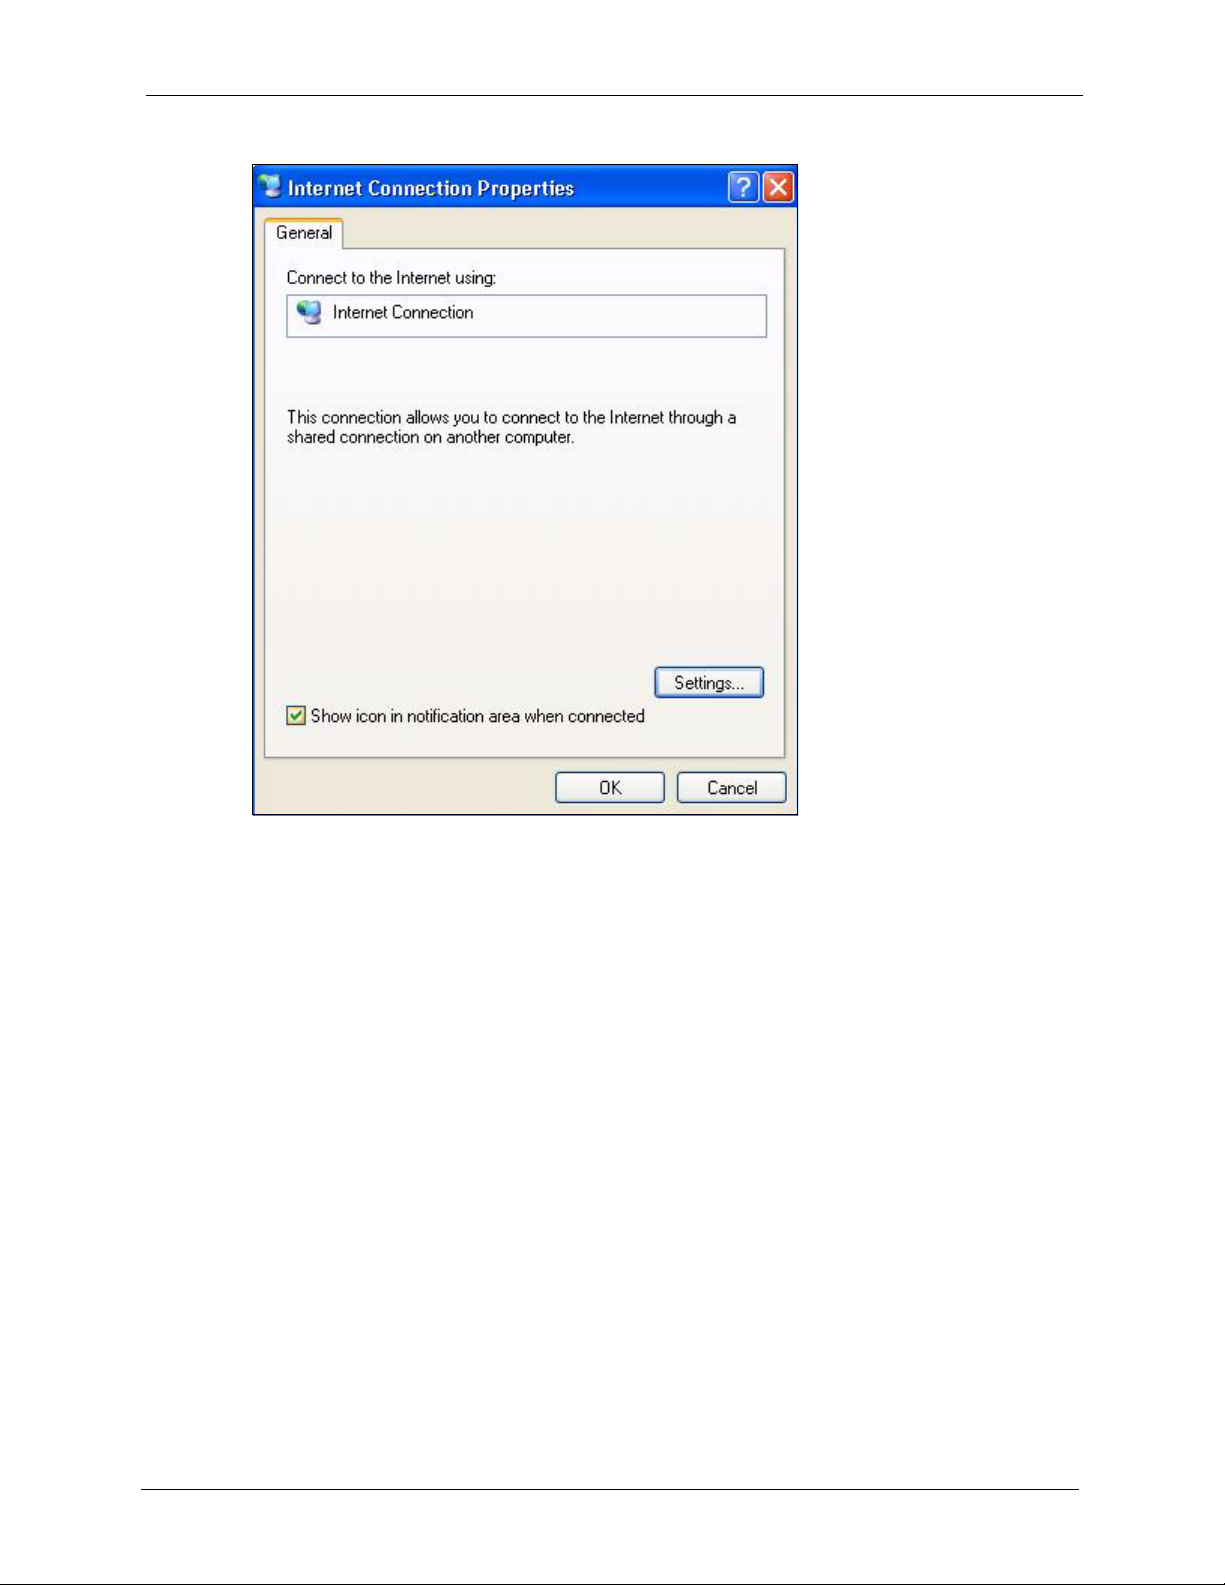
Figure 98 Internet Connection Properties
ZyXEL MAX-200M1 Series User’s Guide
4 You may edit or delete the port mappings or click Add to manually add port mappings.
Chapter 17 UPnP 169
Page 20
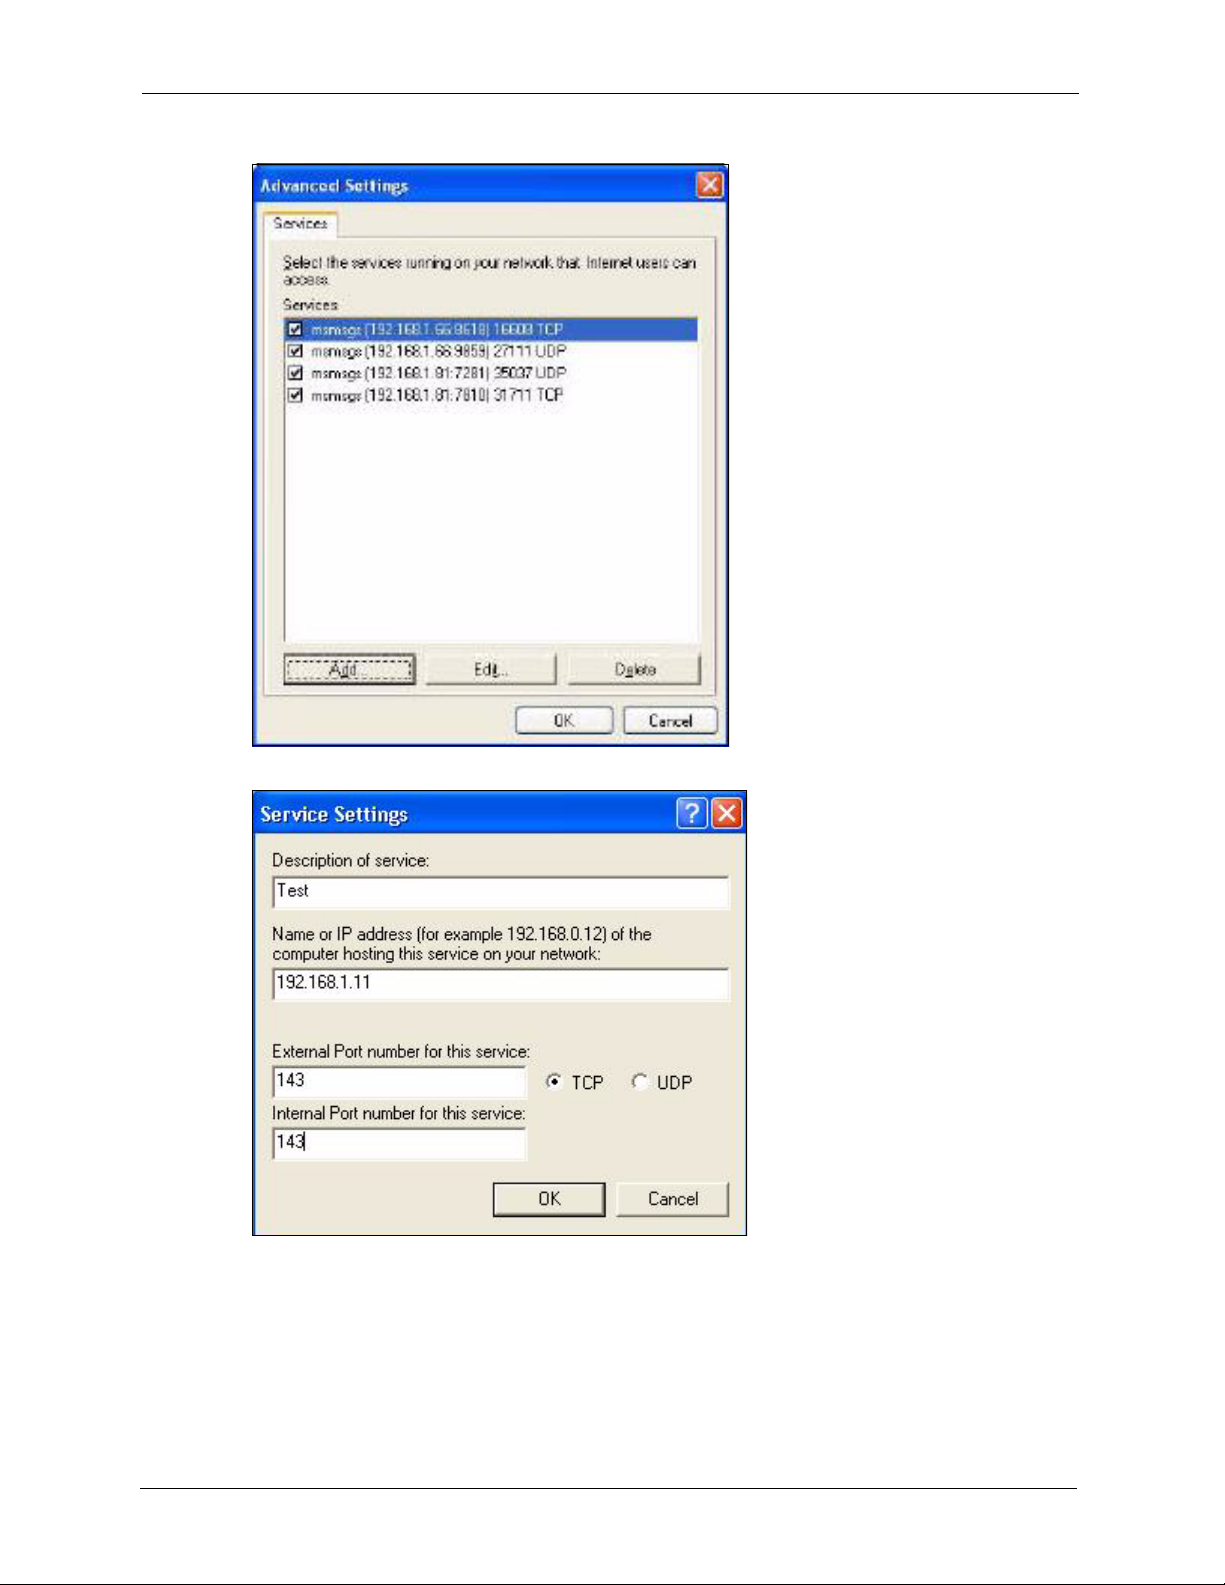
ZyXEL MAX-200M1 Series User’s Guide
Figure 99 Internet Connection Properties: Advanced Settings
Figure 100 Internet Connection Properties: Advanced Settings: Add
5 When the UPnP-enabled device is disconnected from your computer, all port mappings
will be deleted automatically.
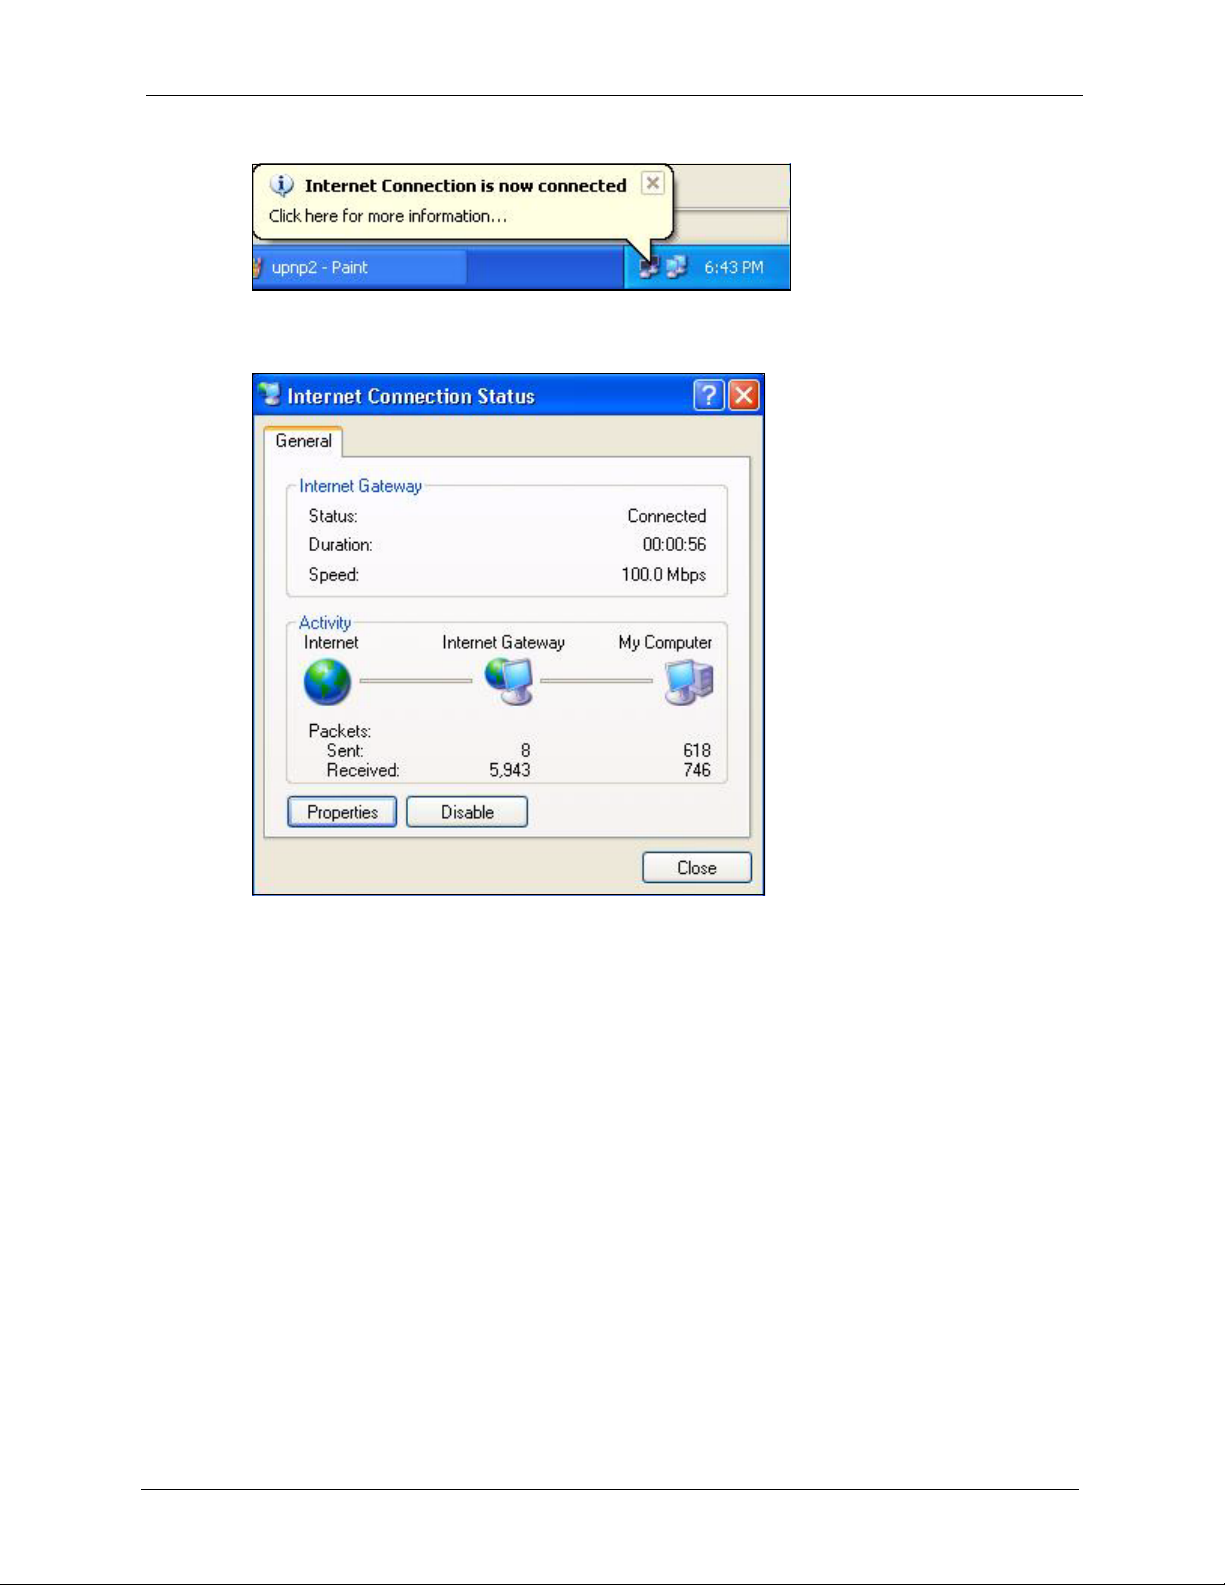
6 Select Show icon in notification area when connected option and click OK. An icon
displays in the system tray.
170 Chapter 17 UPnP
Page 21
ZyXEL MAX-200M1 Series User’s Guide
Figure 101 System Tray Icon
7 Double-click on the icon to display your current Internet connection status.
Figure 102 Internet Connection Status
17.2.2.2 Web Configurator Easy Access
With UPnP, you can access the web-based configurator on the ZyXEL Device without finding
out the IP address of the ZyXEL Device first. This becomes helpful if you do not know the IP
address of the ZyXEL Device.
Follow the steps below to access the web configurator.
1 Click Start and then Control Panel.
2 Double-click Network Connections.
3 Select My Network Places under Other Places.
Chapter 17 UPnP 171
Page 22

ZyXEL MAX-200M1 Series User’s Guide
Figure 103 Network Connections
4 An icon with the description for each UPnP-enabled device displays under Local
Network.
5 Right-click on the icon for your ZyXEL Device and select Invoke. The web configurator
login screen displays.
172 Chapter 17 UPnP
Page 23

ZyXEL MAX-200M1 Series User’s Guide
Figure 104 Network Connections: My Network Places
6 Right-click on the icon for your ZyXEL Device and select Properties. A properties
window displays with basic information about the ZyXEL Device.
Chapter 17 UPnP 173
Page 24

ZyXEL MAX-200M1 Series User’s Guide
Figure 105 Network Connections: My Network Places: Properties: Example
17.3 UPnP Screen
Use this screen to set up UPnP in your ZyXEL Device. To access this screen, click
Management > UPnP.
174 Chapter 17 UPnP
Page 25

ZyXEL MAX-200M1 Series User’s Guide
Figure 106 Management > UPnP
Each field is described in the following table.
Table 57 Management > UPnP
LABEL DESCRIPTION
Device Name This field identifies your device in UPnP applications.
Enable the
Universal Plug and
Play (UPnP)
Feature
Allow users to
make
configuration
changes through
UPnP
Allow UPnP to
pass through
Firewall
Apply
Cancel Click this to set every field in this screen to its default value.
Select this to activate UPnP. Be aware that anyone could use a UPnP application
to open the web configurator's login screen without entering the ZyXEL Device's IP
address. You still have to enter the password, however.
Select this to allow UPnP-enabled applications to automatically configure the
ZyXEL Device so that they can communicate through the ZyXEL Device. For
example, using NAT traversal, UPnP applications automatically reserve a NAT
forwarding port in order to communicate with another UPnP enabled device; this
eliminates the need to manually configure port forwarding for the UPnP enabled
application.
Select this to allow traffic from UPnP-enabled applications to bypass the firewall.
Clear this if you want the firewall to check UPnP application packets (for example,
MSN packets).
Click this to save your changes and to apply them to the ZyXEL Device.
Chapter 17 UPnP 175
Page 26

ZyXEL MAX-200M1 Series User’s Guide
176 Chapter 17 UPnP
Page 27

Use these screens to look at log entries and alerts and to configure the ZyXEL Device’s log
and alert settings.
18.1 Logs Overview
For a list of log messages, see Section 18.3 on page 182.
18.1.1 Alerts
An alert is a type of log that warrants more serious attention. Some categories such as System
Errors consist of both logs and alerts.
ZyXEL MAX-200M1 Series User’s Guide
CHAPTER 18
Logs
18.1.2 Syslog Logs
There are two types of syslog: event logs and traffic logs. The device generates an event log
when a system event occurs, for example, when a user logs in or the device is under attack.
The device generates a traffic log when a "session" is terminated. A traffic log summarizes the
session's type, when it started and stopped the amount of traffic that was sent and received and
so on. An external log analyzer can reconstruct and analyze the traffic flowing through the
device after collecting the traffic logs.
Chapter 18 Logs 177
Page 28

ZyXEL MAX-200M1 Series User’s Guide
Table 58 Syslog Logs
LOG MESSAGE DESCRIPTION
Event Log: <Facility*8 + Severity>Mon dd
hr:mm:ss hostname
src="<srcIP:srcPort>"
dst="<dstIP:dstPort>" msg="<msg>"
note="<note>" devID="<mac address>"
cat="<category>"
Traffic Log: <Facility*8 + Severity>Mon
dd hr:mm:ss hostname
src="<srcIP:srcPort>"
dst="<dstIP:dstPort>" msg="Traffic Log"
note="Traffic Log" devID="<mac
address>" cat="Traffic Log"
duration=seconds sent=sentBytes
rcvd=receiveBytes dir="<from:to>"
protoID=IPProtocolID
proto="serviceName" trans="IPSec/
Normal"
This message is sent by the system ("RAS" displays as the
system name if you haven’t configured one) when the router
generates a syslog. The facility is defined in the Log
Settings screen. The severity is the log’s syslog class. The
definition of messages and notes are defined in the various
log charts throughout this appendix. The “devID” is the MAC
address of the router’s LAN port. The “cat” is the same as
the category in the router’s logs.
This message is sent by the device when the connection
(session) is closed. The facility is defined in the Log
Settings screen. The severity is the traffic log type. The
message and note always display "Traffic Log". The "proto"
field lists the service name. The "dir" field lists the incoming
and outgoing interfaces ("LAN:LAN", "LAN:WAN",
"LAN:DEV" for example).
The following table shows RFC-2408 ISAKMP payload types that the log displays. Please
refer to the RFC for detailed information on each type.
Table 59 RFC-2408 ISAKMP Payload Types
LOG DISPLAY PAYLOAD TYPE
SA Security Association
PROP Proposal
TRANS Transform
KE Key Exchange
ID Identification
CER Certificate
CER_REQ Certificate Request
HASH Hash
SIG Signature
NONCE Nonce
NOTFY Notification
DEL Delete
VID Vendor ID
178 Chapter 18 Logs
Page 29

18.2 Logs Screens
18.2.1 Log Viewer Screen
Use this screen to look at log entries and alerts. Alerts are written in red. To access this screen,
click Maintenance > Logs > View Log.
Figure 107 Maintenance > Logs > View Log
Click a column header to sort log entries in descending (later-to-earlier) order. Click again to
sort in ascending order. The small triangle next to a column header indicates how the table is
currently sorted (pointing downward is descending; pointing upward is ascending). Each field
is described in the following table.
ZyXEL MAX-200M1 Series User’s Guide
Table 60 Maintenance > Logs > View Log
LABEL DESCRIPTION
Display Select a category whose log entries you want to view. To view all logs, select All
Email Log Now Click this to send the log screen to the e-mail address specified in the Log
Refresh Click Refresh to renew the log screen.
Clear Log Click Clear Log to clear all the log entries, regardless of what is shown on the log
#
Time This field displays the time the log entry was recorded.
Message
Source This field displays the source IP address and the port number of the incoming
Destination
Note
Logs. The list of categories depends on what log categories are selected in the
Log Settings page.
Settings page.
screen.
This field is a sequential value, and it is not associated with a specific log entry.
This field displays the reason for the log entry. See Section 18.3 on page 182.
packet. In many cases, some or all of this information may not be available.
This field lists the destination IP address and the port number of the incoming
packet. In many cases, some or all of this information may not be available.
This field displays additional information about the log entry.
18.2.2 Log Settings Screen
Use this screen to configure where the ZyXEL Device sends logs and alerts, the schedule for
sending logs, and which logs and alerts are sent or recorded.
Chapter 18 Logs 179
Page 30

ZyXEL MAX-200M1 Series User’s Guide
To access this screen, click Maintenance > Logs > Log Settings.
Figure 108 Maintenance > Logs > Log Settings
Each field is described in the following table.
Table 61 Maintenance > Logs > Log Settings
LABEL DESCRIPTION
E-mail Log
Settings
Mail Server Enter the server name or the IP address of the mail server the ZyXEL Device
should use to e-mail logs and alerts. Leave this field blank if you do not want to
send logs or alerts by e-mail.
Mail Subject Enter the subject line used in e-mail messages the ZyXEL Device sends.
180 Chapter 18 Logs
Page 31

ZyXEL MAX-200M1 Series User’s Guide
Table 61 Maintenance > Logs > Log Settings
LABEL DESCRIPTION
Send Log to Enter the e-mail address to which log entries are sent by e-mail. Leave this field
blank if you do not want to send logs by e-mail.
Send Alerts to
Log Schedule
Day for Sending
Log
Time for Sending
Log
Clear log after
sending mail
Syslog Logging
Active
Syslog Server IP
Address
Log Facility
Active Log and
Alert
Log Select the categories of logs that you want to record.
Send immediate
alert
Apply
Cancel
Enter the e-mail address to which alerts are sent by e-mail. Leave this field blank if
you do not want to send alerts by e-mail.
Select the frequency with which the ZyXEL Device should send log messages by
e-mail.
•Daily
• Weekly
•Hourly
• When Log is Full
• None.
If the Weekly or the Daily option is selected, specify a time of day when the E-mail
should be sent. If the Weekly option is selected, then also specify which day of the
week the E-mail should be sent. If the When Log is Full option is selected, an
alert is sent when the log fills up. If you select None, no log messages are sent.
This field is only available when you select Weekly in the Log Schedule field.
Select which day of the week to send the logs.
This field is only available when you select Daily or Weekly in the Log Schedule
field.
Enter the time of day in 24-hour format (for example 23:00 equals 11:00 pm) to
send the logs.
Select this to clear all logs and alert messages after logs are sent by e-mail.
Syslog logging sends a log to an external syslog server used to store logs.
Select this to enable syslog logging.
Enter the server name or IP address of the syslog server that logs the selected
categories of logs.
Select a location. The log facility allows you to log the messages in different files in
the syslog server. See the documentation of your syslog for more details.
Select the categories of alerts that you want the ZyXEL Device to send
immediately.
Click this to save your changes and to apply them to the ZyXEL Device.
Click this to set every field in this screen to its last-saved value.
Chapter 18 Logs 181
Page 32

ZyXEL MAX-200M1 Series User’s Guide
18.3 Log Message Descriptions
The following tables provide descriptions of example log messages.
Table 62 System Error Logs
LOG MESSAGE DESCRIPTION
WAN connection is down. The WAN connection is down. You cannot access the network
through this interface.
%s exceeds the max.
number of session per
host!
Table 63 System Maintenance Logs
LOG MESSAGE DESCRIPTION
This attempt to create a NAT session exceeds the maximum
number of NAT session table entries allowed to be created per
host.
Time calibration is
successful
Time calibration failed The device failed to get information from the time server.
WAN interface gets IP: %s The WAN interface got a new IP address from the DHCP or
DHCP client gets %s A DHCP client got a new IP address from the DHCP server.
DHCP client IP expired A DHCP client's IP address has expired.
DHCP server assigns %s The DHCP server assigned an IP address to a client.
Successful WEB login Someone has logged on to the device's web configurator
WEB login failed Someone has failed to log on to the device's web configurator
TELNET Login Successfully Someone has logged on to the router via telnet.
TELNET Login Fail Someone has failed to log on to the router via telnet.
Successful FTP login Someone has logged on to the device via ftp.
FTP login failed Someone has failed to log on to the device via ftp.
NAT Session Table is Full! The maximum number of NAT session table entries has been
Time initialized by Daytime
Server
Time initialized by Time
server
Time initialized by NTP
server
Connect to Daytime server
fail
Connect to Time server fail The device was not able to connect to the Time server.
Connect to NTP server fail The device was not able to connect to the NTP server.
The device has adjusted its time based on information from
the time server.
PPPoE server.
interface.
interface.
exceeded and the table is full.
The device got the time and date from the Daytime server.
The device got the time and date from the time server.
The device got the time and date from the NTP server.
The device was not able to connect to the Daytime server.
182 Chapter 18 Logs
Page 33

Table 63 System Maintenance Logs (continued)
LOG MESSAGE DESCRIPTION
ZyXEL MAX-200M1 Series User’s Guide
Too large ICMP packet has
been dropped
Configuration Change: PC =
0x%x, Task ID = 0x%x
The device dropped an ICMP packet that was too large.
The device is saving configuration changes.
Table 64 Access Control Logs
LOG MESSAGE DESCRIPTION
Firewall default policy: [ TCP |
UDP | IGMP | ESP | GRE | OSPF ]
<Packet Direction>
Firewall rule [NOT] match:[ TCP
| UDP | IGMP | ESP | GRE | OSPF ]
<Packet Direction>, <rule:%d>
Triangle route packet forwarded:
[ TCP | UDP | IGMP | ESP | GRE |
OSPF ]
Packet without a NAT table entry
blocked: [ TCP | UDP | IGMP | ESP
| GRE | OSPF ]
Router sent blocked web site
message: TCP
Exceed maximum sessions per host (%d). The device blocked a session because the host's
Firewall allowed a packet that matched a
NAT session: [ TCP | UDP ]
Attempted TCP/UDP/IGMP/ESP/GRE/OSPF access
matched the default policy and was blocked or forwarded
according to the default policy’s setting.
Attempted TCP/UDP/IGMP/ESP/GRE/OSPF access
matched (or did not match) a configured firewall rule
(denoted by its number) and was blocked or forwarded
according to the rule.
The firewall allowed a triangle route session to pass
through.
The router blocked a packet that didn't have a
corresponding NAT table entry.
The router sent a message to notify a user that the router
blocked access to a web site that the user requested.
connections exceeded the maximum sessions per host.
A packet from the WAN (TCP or UDP) matched a cone
NAT session and the device forwarded it to the LAN.
Table 65 TCP Reset Logs
LOG MESSAGE DESCRIPTION
Under SYN flood attack,
sent TCP RST
Exceed TCP MAX
incomplete, sent TCP RST
Peer TCP state out of
order, sent TCP RST
Chapter 18 Logs 183
The router sent a TCP reset packet when a host was under a SYN
flood attack (the TCP incomplete count is per destination host.)
The router sent a TCP reset packet when the number of TCP
incomplete connections exceeded the user configured threshold.
(the TCP incomplete count is per destination host.)
The router sent a TCP reset packet when a TCP connection state
was out of order.Note: The firewall refers to RFC793 Figure 6 to
check the TCP state.
Page 34

ZyXEL MAX-200M1 Series User’s Guide
Table 65 TCP Reset Logs (continued)
LOG MESSAGE DESCRIPTION
Firewall session time
out, sent TCP RST
Exceed MAX incomplete,
sent TCP RST
Access block, sent TCP
RST
The router sent a TCP reset packet when a dynamic firewall
session timed out.
The default timeout values are as follows:
ICMP idle timeout: 3 minutes
UDP idle timeout: 3 minutes
TCP connection (three way handshaking) timeout: 270 seconds
TCP FIN-wait timeout: 2 MSL (Maximum Segment Lifetime set in
the TCP header).
TCP idle (established) timeout (s): 150 minutes
TCP reset timeout: 10 seconds
The router sent a TCP reset packet when the number of
incomplete connections (TCP and UDP) exceeded the userconfigured threshold. (Incomplete count is for all TCP and UDP
connections through the firewall.)Note: When the number of
incomplete connections (TCP + UDP) > “Maximum Incomplete
High”, the router sends TCP RST packets for TCP connections
and destroys TOS (firewall dynamic sessions) until incomplete
connections < “Maximum Incomplete Low”.
The router sends a TCP RST packet and generates this log if you
turn on the firewall TCP reset mechanism (via CI command:
firewall tcprst
).
sys
Table 66 Packet Filter Logs
LOG MESSAGE DESCRIPTION
[ TCP | UDP | ICMP | IGMP |
Generic ] packet filter
matched (set: %d, rule: %d)
or type and code details, see Table 74 on page 188.
F
Attempted access matched a configured filter rule (denoted by
its set and rule number) and was blocked or forwarded
according to the rule.
Table 67 ICMP Logs
LOG MESSAGE DESCRIPTION
Firewall default policy: ICMP
<Packet Direction>, <type:%d>,
<code:%d>
Firewall rule [NOT] match: ICMP
<Packet Direction>, <rule:%d>,
<type:%d>, <code:%d>
Triangle route packet forwarded:
ICMP
Packet without a NAT table entry
blocked: ICMP
ICMP access matched the default policy and was blocked
or forwarded according to the user's setting.
ICMP access matched (or didn’t match) a firewall rule
(denoted by its number) and was blocked or forwarded
according to the rule.
The firewall allowed a triangle route session to pass
through.
The router blocked a packet that didn’t have a
corresponding NAT table entry.
184 Chapter 18 Logs
Page 35

Table 67 ICMP Logs (continued)
LOG MESSAGE DESCRIPTION
ZyXEL MAX-200M1 Series User’s Guide
Unsupported/out-of-order ICMP:
ICMP
Router reply ICMP packet: ICMP The router sent an ICMP reply packet to the sender.
The firewall does not support this kind of ICMP packets or
the ICMP packets are out of order.
Table 68 CDR Logs
LOG MESSAGE DESCRIPTION
board %d line %d channel %d,
call %d, %s C01 Outgoing Call
dev=%x ch=%x %s
board %d line %d channel %d,
call %d, %s C02 OutCall
Connected %d %s
board %d line %d channel %d,
call %d, %s C02 Call
Terminated
The router received the setup requirements for a call. “call” is
the reference (count) number of the call. “dev” is the device
type (3 is for dial-up, 6 is for PPPoE). "channel" or “ch” is the
call channel ID.For example, "board 0 line 0 channel 0, call 3,
C01 Outgoing Call dev=6 ch=0 "Means the router has dialed
to the PPPoE server 3 times.
The PPPoE or dial-up call is connected.
The PPPoE or dial-up call was disconnected.
Table 69 PPP Logs
LOG MESSAGE DESCRIPTION
ppp:LCP Starting The PPP connection’s Link Control Protocol stage has started.
ppp:LCP Opening The PPP connection’s Link Control Protocol stage is opening.
ppp:CHAP Opening The PPP connection’s Challenge Handshake Authentication Protocol stage is
ppp:IPCP Starting The PPP connection’s Internet Protocol Control Protocol stage is starting.
ppp:IPCP Opening The PPP connection’s Internet Protocol Control Protocol stage is opening.
ppp:LCP Closing The PPP connection’s Link Control Protocol stage is closing.
ppp:IPCP Closing The PPP connection’s Internet Protocol Control Protocol stage is closing.
opening.
Table 70 UPnP Logs
LOG MESSAGE DESCRIPTION
UPnP pass through Firewall UPnP packets can pass through the firewall.
Chapter 18 Logs 185
Page 36

ZyXEL MAX-200M1 Series User’s Guide
Table 71 Content Filtering Logs
LOG MESSAGE DESCRIPTION
%s: Keyword blocking The content of a requested web page matched a user defined keyword.
%s: Not in trusted web
list
%s: Forbidden Web site The web site is in the forbidden web site list.
%s: Contains ActiveX The web site contains ActiveX.
%s: Contains Java
applet
%s: Contains cookie The web site contains a cookie.
%s: Proxy mode
detected
%s: Trusted Web site The web site is in a trusted domain.
%s When the content filter is not on according to the time schedule.
Waiting content filter
server timeout
DNS resolving failed The ZyXEL Device cannot get the IP address of the external content
Creating socket failed The ZyXEL Device cannot issue a query because TCP/IP socket
Connecting to content
filter server fail
License key is invalid The external content filtering license key is invalid.
The web site is not in a trusted domain, and the router blocks all traffic
except trusted domain sites.
The web site contains a Java applet.
The router detected proxy mode in the packet.
The external content filtering server did not respond within the timeout
period.
filtering via DNS query.
creation failed, port:port number.
The connection to the external content filtering server failed.
For type and code details, see Table 74 on page 188.
Table 72 Attack Logs
LOG MESSAGE DESCRIPTION
attack [ TCP | UDP | IGMP
| ESP | GRE | OSPF ]
attack ICMP (type:%d,
code:%d)
land [ TCP | UDP | IGMP |
ESP | GRE | OSPF ]
land ICMP (type:%d,
code:%d)
ip spoofing - WAN [ TCP |
UDP | IGMP | ESP | GRE |
OSPF ]
ip spoofing - WAN ICMP
(type:%d, code:%d)
icmp echo : ICMP
(type:%d, code:%d)
The firewall detected a TCP/UDP/IGMP/ESP/GRE/OSPF attack.
The firewall detected an ICMP attack.
The firewall detected a TCP/UDP/IGMP/ESP/GRE/OSPF land
attack.
The firewall detected an ICMP land attack.
The firewall detected an IP spoofing attack on the WAN port.
The firewall detected an ICMP IP spoofing attack on the WAN port.
The firewall detected an ICMP echo attack.
186 Chapter 18 Logs
Page 37

ZyXEL MAX-200M1 Series User’s Guide
Table 72 Attack Logs (continued)
LOG MESSAGE DESCRIPTION
syn flood TCP The firewall detected a TCP syn flood attack.
ports scan TCP The firewall detected a TCP port scan attack.
teardrop TCP The firewall detected a TCP teardrop attack.
teardrop UDP The firewall detected an UDP teardrop attack.
teardrop ICMP (type:%d,
code:%d)
illegal command TCP The firewall detected a TCP illegal command attack.
NetBIOS TCP The firewall detected a TCP NetBIOS attack.
ip spoofing - no routing
entry [ TCP | UDP | IGMP |
ESP | GRE | OSPF ]
ip spoofing - no routing
entry ICMP (type:%d,
code:%d)
vulnerability ICMP
(type:%d, code:%d)
traceroute ICMP (type:%d,
code:%d)
ports scan UDP The firewall detected a UDP port scan attack.
Firewall sent TCP packet in
response to DoS attack TCP
ICMP Source Quench ICMP The firewall detected an ICMP Source Quench attack.
ICMP Time Exceed ICMP The firewall detected an ICMP Time Exceed attack.
ICMP Destination Unreachable
ICMP
ping of death. ICMP The firewall detected an ICMP ping of death attack.
smurf ICMP The firewall detected an ICMP smurf attack.
The firewall detected an ICMP teardrop attack.
The firewall classified a packet with no source routing entry as an
IP spoofing attack.
The firewall classified an ICMP packet with no source routing entry
as an IP spoofing attack.
The firewall detected an ICMP vulnerability attack.
The firewall detected an ICMP traceroute attack.
The firewall sent TCP packet in response to a DoS attack
The firewall detected an ICMP Destination Unreachable attack.
Table 73 Remote Management Logs
LOG MESSAGE DESCRIPTION
Remote Management: FTP denied Attempted use of FTP service was blocked according to
remote management settings.
Remote Management: TELNET denied Attempted use of TELNET service was blocked according
to remote management settings.
Remote Management: HTTP or UPnP
denied
Remote Management: WWW denied Attempted use of WWW service was blocked according to
Remote Management: HTTPS denied Attempted use of HTTPS service was blocked according to
Attempted use of HTTP or UPnP service was blocked
according to remote management settings.
remote management settings.
remote management settings.
Chapter 18 Logs 187
Page 38

ZyXEL MAX-200M1 Series User’s Guide
Table 73 Remote Management Logs
LOG MESSAGE DESCRIPTION
Remote Management: SSH denied Attempted use of SSH service was blocked according to
Remote Management: ICMP Ping
response denied
Remote Management: DNS denied Attempted use of DNS service was blocked according to
Table 74 ICMP Notes
TYPE CODE DESCRIPTION
0 Echo Reply
0 Echo reply message
3 Destination Unreachable
0 Net unreachable
1 Host unreachable
2 Protocol unreachable
3 Port unreachable
4 A packet that needed fragmentation was dropped because it was set to Don't
Fragment (DF)
5 Source route failed
4 Source Quench
0 A gateway may discard internet datagrams if it does not have the buffer space
needed to queue the datagrams for output to the next network on the route to the
destination network.
5 Redirect
0 Redirect datagrams for the Network
1 Redirect datagrams for the Host
2 Redirect datagrams for the Type of Service and Network
3 Redirect datagrams for the Type of Service and Host
8 Echo
0 Echo message
11 Time Exceeded
0 Time to live exceeded in transit
1 Fragment reassembly time exceeded
12 Parameter Problem
0 Pointer indicates the error
13 Timestamp
0 Timestamp request message
14 Timestamp Reply
remote management settings.
Attempted use of ICMP service was blocked according to
remote management settings.
remote management settings.
188 Chapter 18 Logs
Page 39

Table 74 ICMP Notes (continued)
TYPE CODE DESCRIPTION
0 Timestamp reply message
15 Information Request
0 Information request message
16 Information Reply
0 Information reply message
Table 75 SIP Logs
LOG MESSAGE DESCRIPTION
ZyXEL MAX-200M1 Series User’s Guide
SIP Registration Success
by SIP:SIP Phone Number
SIP Registration Fail by
SIP:SIP Phone Number
SIP UnRegistration
Success by SIP:SIP Phone
Number
SIP UnRegistration Fail by
SIP:SIP Phone Number
The listed SIP account was successfully registered with a SIP
register server.
An attempt to register the listed SIP account with a SIP register
server was not successful.
The listed SIP account’s registration was deleted from the SIP
register server.
An attempt to delete the listed SIP account’s registration from the
SIP register server failed.
Table 76 RTP Logs
LOG MESSAGE DESCRIPTION
Error, RTP init fail The initialization of an RTP session failed.
Error, Call fail: RTP
connect fail
Error, RTP connection
cannot close
A VoIP phone call failed because the RTP session could not be
established.
The termination of an RTP session failed.
Chapter 18 Logs 189
Page 40

ZyXEL MAX-200M1 Series User’s Guide
Table 77 FSM Logs: Caller Side
LOG MESSAGE DESCRIPTION
VoIP Call Start Ph[Phone
Port Number] <- Outgoing
Call Number
VoIP Call Established
Ph[Phone Port] -> Outgoing
Call Number
VoIP Call End Phone[Phone
Port]
Someone used a phone connected to the listed phone port to
initiate a VoIP call to the listed destination.
Someone used a phone connected to the listed phone port to
make a VoIP call to the listed destination.
A VoIP phone call made from a phone connected to the listed
phone port has terminated.
Table 78 FSM Logs: Callee Side
LOG MESSAGE DESCRIPTION
VoIP Call Start from
SIP[SIP Port Number]
VoIP Call Established
Ph[Phone Port] <Outgoing Call Number
VoIP Call End
Phone[Phone Port]
A VoIP phone call came to the ZyXEL Device from the listed SIP
number.
A VoIP phone call was set up from the listed SIP number to the
ZyXEL Device.
A VoIP phone call that came into the ZyXEL Device has terminated.
Table 79 Lifeline Logs
LOG MESSAGE DESCRIPTION
PSTN Call Start A PSTN call has been initiated.
PSTN Call End A PSTN call has terminated.
PSTN Call Established A PSTN call has been set up.
190 Chapter 18 Logs
Page 41

Use these screens to upload new firmware, back up and restore the configuration, and restart
the ZyXEL Device.
19.1 Tools Overview
19.1.1 ZyXEL Firmware
Find firmware at www.zyxel.com in a file that (usually) uses the system model name with a
"*.bin" extension, e.g., "ZyXEL Device.bin". The upload process uses HTTP (Hypertext
Transfer Protocol) and may take up to two minutes. After a successful upload, the system will
reboot.
ZyXEL MAX-200M1 Series User’s Guide
CHAPTER 19
Tools
Note: Only use firmware for your ZyXEL Device’s specific model. Refer to the label on
the back of your ZyXEL Device.
19.2 Tools Screens
19.2.1 Firmware Screen
Use this screen to upload new firmware to the ZyXEL Device. To access this screen, click
Maintenance > Tools > Firmware.
Note: Only use firmware for your ZyXEL Device’s specific model. Refer to the label on
the bottom of your ZyXEL Device.
Chapter 19 Tools 191
Page 42

ZyXEL MAX-200M1 Series User’s Guide
Figure 109 Maintenance > Tools > Firmware
Each field is described in the following table.
Table 80 Maintenance > Tools > Firmware
LABEL DESCRIPTION
File Path Enter the location of the .bin file you want to upload, or click Browse... to find it.
You must decompress compressed (.zip) files before you can upload them.
Browse... Click this to find the .bin file you want to upload.
Upload Click this to begin uploading the selected file. This may take up to two minutes.
See Section 19.2.2 on page 192 for more information about this process.
Note: Do not turn off the device while firmware upload is in
progress!
19.2.2 Firmware Upload Screens
Note: Do not turn off the device while firmware upload is in progress!
When the ZyXEL Device starts to upload firmware, the Firmware Upload in Process screen
appears.
Figure 110 Firmware Upload In Process
The process usually takes about two minutes. The device automatically restarts in this time.
This causes a temporary network disconnect. In some operating systems, you may see the
following icon on your desktop.
192 Chapter 19 Tools
Page 43

ZyXEL MAX-200M1 Series User’s Guide
Figure 111 Network Temporarily Disconnected
After two minutes, log in again, and check your new firmware version in the Status screen.
You might have to open a new browser to log in.
If the upload is not successful, the following screen appears.
Figure 112 Firmware Upload Error
Click Return to go back to the Firmware screen.
19.2.3 Configuration Screen
Use this screen to back up or restore the configuration of the ZyXEL Device. You can also use
this screen to reset the ZyXEL Device to the factory default settings. To access this screen,
click Maintenance > Tools > Configuration.
Chapter 19 Tools 193
Page 44

ZyXEL MAX-200M1 Series User’s Guide
Figure 113 Maintenance > Tools > Configuration
Each field is described in the following table.
Table 81 Maintenance > Tools > Configuration
LABEL DESCRIPTION
Backup
Configuration
Backup Click this to save the ZyXEL Device’s current configuration to a file on your
computer. Once your device is configured and functioning properly, it is highly
recommended that you back up your configuration file before making configuration
changes. The backup configuration file is useful if you need to return to your
previous settings.
Restore
Configuration
File Path Enter the location of the file you want to upload, or click Browse... to find it.
Browse Click this to find the file you want to upload.
Upload Click this to restore the selected configuration file. See Section 19.2.4 on page 194
for more information about this.
Note: Do not turn off the device while configuration file upload is in
progress.
Back to Factory
Defaults
Reset Click this to clear all user-entered configuration information and return the ZyXEL
Device to its factory defaults. There is no warning screen.
19.2.4 Restore Configuration Screens
Note: Do not turn off the device while configuration file upload is in progress.
When the ZyXEL Device has finished restoring the selected configuration file, the following
screen appears.
194 Chapter 19 Tools
Page 45

ZyXEL MAX-200M1 Series User’s Guide
Figure 114 Configuration Upload Successful
The device now automatically restarts. This causes a temporary network disconnect. In some
operating systems, you may see the following icon on your desktop.
Figure 115 Network Temporarily Disconnected
If the ZyXEL Device’s IP address is different in the configuration file you selected, you may
need to change the IP address of your computer to be in the same subnet as that of the default
management IP address (192.168.5.1). See your Quick Start Guide or the appendices for
details on how to set up your computer’s IP address.
You might have to open a new browser to log in again.
If the upload was not successful, a Configuration Upload Error screen appears.
Figure 116 Configuration Upload Error
Click Return to go back to the Configuration screen.
19.2.5 Restart Screen
Use this screen to reboot the ZyXEL Device without turning the power off. To access this
screen, click Maintenance > Tools > Restart.
Chapter 19 Tools 195
Page 46

ZyXEL MAX-200M1 Series User’s Guide
Figure 117 Maintenance > Tools > Restart
This does not affect the ZyXEL Device’s configuration. When you click Restart, the
following screen appears.
Figure 118 Maintenance > Tools > Restart > In Progress
Wait one minute for the device to finish restarting. Then, you can log in again.
196 Chapter 19 Tools
Page 47

Use this screen to set up general system settings, change the system mode, change the
password, configure the DDNS server settings, and set the current date and time.
20.1 System Features Overview
20.1.1 System Name
System Name is for identification purposes. However, because some ISPs check this name
you should enter your computer's "Computer Name".
• In Windows 95/98 click Start, Settings, Control Panel, Network. Click the
Identification tab, note the entry for the Computer Name field and enter it as the
System Name.
• In Windows 2000, click Start, Settings and Control Panel and then double-click
System. Click the Network Identification tab and then the Properties button. Note the
entry for the Computer name field and enter it as the System Name.
• In Windows XP, click Start, My Computer, View system information and then click
the Computer Name tab. Note the entry in the Full computer name field and enter it as
the ZyXEL Device System Name.
ZyXEL MAX-200M1 Series User’s Guide
CHAPTER 20
System
20.1.2 Domain Name
The Domain Name entry is what is propagated to the DHCP clients on the LAN. If you leave
this blank, the domain name obtained by DHCP from the ISP is used. While you must enter
the host name (System Name) on each individual computer, the domain name can be assigned
from the ZyXEL Device via DHCP.
20.1.3 DNS Server Address Assignment
Use DNS (Domain Name System) to map a domain name to its corresponding IP address and
vice versa, for instance, the IP address of www.zyxel.com is 204.217.0.2. The DNS server is
extremely important because without it, you must know the IP address of a computer before
you can access it.
The ZyXEL Device can get the DNS server addresses in the following ways.
Chapter 20 System 197
Page 48

ZyXEL MAX-200M1 Series User’s Guide
1 The ISP tells you the DNS server addresses, usually in the form of an information sheet,
when you sign up. If your ISP gives you DNS server addresses, enter them in the DNS
Server fields in the SYSTEM General screen.
2 If the ISP did not give you DNS server information, leave the DNS Server fields in the
SYSTEM General screen set to 0.0.0.0 for the ISP to dynamically assign the DNS server
IP addresses.
20.1.4 Dynamic DNS
Dynamic DNS allows you to update your current dynamic IP address with one or many
dynamic DNS services so that anyone can contact you (in NetMeeting, CU-SeeMe, etc.). You
can also access your FTP server or Web site on your own computer using a domain name (for
instance myhost.dhs.org, where myhost is a name of your choice) that will never change
instead of using an IP address that changes each time you reconnect. Your friends or relatives
will always be able to call you even if they don't know your IP address.
First of all, you need to have registered a dynamic DNS account with www.dyndns.org. This is
for people with a dynamic IP from their ISP or DHCP server that would still like to have a
domain name. The Dynamic DNS service provider will give you a password or key.
Enabling the wildcard feature for your host causes *.yourhost.dyndns.org to be aliased to the
same IP address as yourhost.dyndns.org. This feature is useful if you want to be able to use,
for example, www.yourhost.dyndns.org and still reach your hostname.
Note: If you have a private WAN IP address, then you cannot use Dynamic DNS.
20.1.5 Pre-defined NTP Time Servers List
The ZyXEL Device uses the following pre-defined list of NTP time servers if you do not
specify a time server or it cannot synchronize with the time server you specified.
Note: The ZyXEL Device can use this pre-defined list of time servers regardless of
the Time Protocol you select.
When the ZyXEL Device uses the pre-defined list of NTP time servers, it randomly selects
one server and tries to synchronize with it. If the synchronization fails, then the ZyXEL
Device goes through the rest of the list in order from the first one tried until either it is
successful or all the pre-defined NTP time servers have been tried.
Table 82 Pre-defined NTP Time Servers
ntp1.cs.wisc.edu
ntp1.gbg.netnod.se
ntp2.cs.wisc.edu
tock.usno.navy.mil
ntp3.cs.wisc.edu
ntp.cs.strath.ac.uk
198 Chapter 20 System
Page 49

Table 82 Pre-defined NTP Time Servers
ntp1.sp.se
time1.stupi.se
tick.stdtime.gov.tw
tock.stdtime.gov.tw
time.stdtime.gov.tw
20.1.6 Resetting the Time
The ZyXEL Device resets the time in the following instances:
• When the ZyXEL Device starts up.
• When you click Apply in the Time Setting Screen.
• 24-hour intervals after starting.
20.2 System Screens
ZyXEL MAX-200M1 Series User’s Guide
20.2.1 General System Screen
Use this screen to change the ZyXEL Device’s mode, set up the ZyXEL Device’s system
name, domain name, idle timeout, and administrator password. To access this screen, click
Maintenance > System > General.
Chapter 20 System 199
Page 50

ZyXEL MAX-200M1 Series User’s Guide
Figure 119 Maintenance > System > General
Each field is described in the following table.
Table 83 Maintenance > System > General
LABEL DESCRIPTION
System Setup
System Name Enter your computer's "Computer Name". This is for identification purposes, but
some ISPs also check this field. This name can be up to 30 alphanumeric
characters long. Spaces are not allowed, but dashes “-” and underscores "_" are
accepted.
Domain Name Enter the domain name entry that is propagated to DHCP clients on the LAN. If you
Administrator
Inactivity Timer
Password Setup
Old Password Enter the current password you use to access the ZyXEL Device.
New Password Enter the new password for the ZyXEL Device. You can use up to 30 characters.
Retype to Confirm Enter the new password again.
Apply
Reset
leave this blank, the domain name obtained from the ISP is used. Use up to 38
alphanumeric characters. Spaces are not allowed, but dashes “-” and periods "."
are accepted.
Enter the number of minutes a management session can be left idle before the
session times out. After it times out, you have to log in again. A value of "0" means
a management session never times out, no matter how long it has been left idle.
This is not recommended. Long idle timeouts may have security risks. The default
is five minutes.
As you type the password, the screen displays an asterisk (*) for each character
you type.
Click this to save your changes and to apply them to the ZyXEL Device.
Click this to set every field in this screen to its default value.
20.2.2 Dynamic DNS Screen
Use this screen to set up the ZyXEL Device as a dynamic DNS client. To access this screen,
click Maintenance > System > Dynamic DNS.
200 Chapter 20 System
Page 51

Figure 120 Maintenance > System > Dynamic DNS
ZyXEL MAX-200M1 Series User’s Guide
Each field is described in the following table.
Table 84 Maintenance > System > Dynamic DNS
LABEL DESCRIPTION
Dynamic DNS
Setup
Enable Dynamic
DNS
Service Provider Select the name of your Dynamic DNS service provider.
Dynamic DNS
Type
Host Name
User Name
Password
Enable Wildcard
Option
Enable offline
option
IP Address Update
Policy
Use WAN IP
Address
Select this to use dynamic DNS.
Select the type of service that you are registered for from your Dynamic DNS
service provider.
Enter the host name. You can specify up to two host names, separated by a
comma (",").
Enter your user name.
Enter the password assigned to you.
Select this to enable the DynDNS Wildcard feature.
This field is available when CustomDNS is selected in the DDNS Type field.
Select this if your Dynamic DNS service provider redirects traffic to a URL that you
can specify while you are off line. Check with your Dynamic DNS service provider.
Select this if you want the ZyXEL Device to update the domain name with the WAN
port's IP address.
Chapter 20 System 201
Page 52

ZyXEL MAX-200M1 Series User’s Guide
Table 84 Maintenance > System > Dynamic DNS
LABEL DESCRIPTION
Dynamic DNS
server auto detect
IP address
Select this if you want the DDNS server to update the IP address of the host
name(s) automatically. Select this option when there are one or more NAT routers
between the ZyXEL Device and the DDNS server.
Note: The DDNS server may not be able to detect the proper IP
address if there is an HTTP proxy server between the ZyXEL
Device and the DDNS server.
Use specified IP
address
Apply
Reset
Select this if you want to use the specified IP address with the host name(s). Then,
specify the IP address. Use this option if you have a static IP address.
Click this to save your changes and to apply them to the ZyXEL Device.
Click this to set every field in this screen to its default value.
20.2.3 Time Setting Screen
Use this screen to set the date, time, and time zone in the ZyXEL Device. To access this
screen, click Maintenance > System > Time Setting.
202 Chapter 20 System
Page 53

Figure 121 Maintenance > System > Time Setting
ZyXEL MAX-200M1 Series User’s Guide
Each field is described in the following table.
Table 85 Maintenance > System > Time Setting
LABEL DESCRIPTION
Current Time and
Date
Time and Date
Setup
Manual Select this if you want to specify the current date and time in the fields below.
New Time Enter the new time in this field, and click Apply.
New Date
Get from Time
Server
Time Protocol Select the time service protocol that your time server uses.Check with your ISP or
Time Server
Address
Time Zone Setup
Time Zone Select the time zone at your location.
This section displays the current date and time.
Enter the new date in this field, and click Apply.
Select this if you want to use a time server to update the current date and time in
the ZyXEL Device.
network administrator, or use trial-and-error to find a protocol that works.
Daytime (RFC 867) - This format is day/month/year/time zone.
Time (RFC 868) - This format displays a 4-byte integer giving the total number of
seconds since 1970/1/1 at 0:0:0.
NTP (RFC 1305) - This format is similar to Time (RFC 868).
Enter the IP address or URL of your time server. Check with your ISP or network
administrator if you are unsure of this information.
Chapter 20 System 203
Page 54

ZyXEL MAX-200M1 Series User’s Guide
Table 85 Maintenance > System > Time Setting
LABEL DESCRIPTION
Daylight Savings Select this if your location uses daylight savings time. Daylight savings is a period
from late spring to early fall when many places set their clocks ahead of normal
local time by one hour to give more daytime light in the evening.
Start Date Enter which hour on which day of which week of which month daylight-savings
time starts.
End Date Enter which hour on the which day of which week of which month daylight-savings
Apply Click this to save your changes and to apply them to the ZyXEL Device.
Reset Click this to set every field in this screen to its last-saved value.
time ends.
204 Chapter 20 System
Page 55

ZyXEL MAX-200M1 Series User’s Guide
CHAPTER 21
Troubleshooting
This chapter covers potential problems and the corresponding remedies.
21.1 Problems Starting Up the ZyXEL Device
Table 86 Troubleshooting Starting Up Your Device
PROBLEM CORRECTIVE ACTION
None of the
lights turn on
when I turn on
the ZyXEL
Device.
Make sure that the ZyXEL Device’s power adaptor is connected to the ZyXEL Device
and plugged in to an appropriate power source. Make sure that the power source is
turned on.
Remove the power jack, then reinsert it.
If the error persists, you may have a hardware problem. In this case, you should
contact your vendor.
21.2 Problems with the LAN
Table 87 Troubleshooting the LAN
PROBLEM CORRECTIVE ACTION
The LAN light
does not turn on.
I cannot access
the ZyXEL
Device from the
LAN.
Check your Ethernet cable connections (refer to the Quick Start Guide for details).
Check for faulty Ethernet cables.
Make sure your computer’s Ethernet Card is working properly.
If Any IP is disabled, make sure that the IP address and the subnet mask of the
ZyXEL Device and your computer(s) are on the same subnet.
Chapter 21 Troubleshooting 205
Page 56

ZyXEL MAX-200M1 Series User’s Guide
21.3 Problems with the WAN
Table 88 Troubleshooting the WAN
PROBLEM CORRECTIVE ACTION
I cannot connect to
the Internet.
The Internet
connection
disconnects.
Check your connection. Look at the LINK and SIGNAL LEDs on the front of the
ZyXEL Device. If the ZyXEL Device cannot detect a signal, follow the steps in
Section 21.4 on page 206 to search for a wireless signal.
Check your security settings. In the web configurator, go to the Status screen.
Click Profile in the WiMAX Information box and make sure that you are using the
correct security settings for your Internet account.
Check your WiMAX settings. The ZyXEL Device may have been set to search the
wrong frequencies for a wireless connection. In the web configurator, go to the
Status screen. Click Site Information in the WiMAX Information box and ensure
that the values are correct. If the values are incorrect, enter the correct frequency
settings in the Network > WAN > WiMAX Frequency screen. If you are unsure of
the correct values, contact your service provider.
Check your IP address settings. You may be using IP address settings
incompatible with your Internet account. If you are unsure of the correct settings,
contact your service provider. See Appendix C on page 223 for information on how
to set up your IP address.
Check your WiMAX link and signal strength using the LINK and SIGNAL LEDs on
the device. See the following section if signal strength is poor or the ZyXEL Device
has no link to a base station.
Contact your ISP if the problem persists.
21.4 Problems with the Link Quality
Table 89 Troubleshooting Link Quality
PROBLEM CORRECTIVE ACTION
Internet access is
slow or
intermittent.
The quality of the ZyXEL Device’s wireless connection to the base station may be
poor.
Poor signal reception may be improved by moving the ZyXEL Device away from
thick walls and other obstructions, or to a higher floor in your building.
There may be radio interference caused by nearby electrical devices such as
microwave ovens and radio transmitters. Move the ZyXEL Device away or switch
the other devices off.
Weather conditions may also affect signal quality.
As well as having an external antenna connector, the ZyXEL Device is equipped
with an internal directional antenna. If you know the location of the base station,
orient the front of the ZyXEL Device (the side with the LEDs) towards the base
station. If you do not know the location of the base station, experiment by moving
the ZyXEL Device while observing the SIGNAL LEDs for an increase in received
signal strength.
206 Chapter 21 Troubleshooting
Page 57

ZyXEL MAX-200M1 Series User’s Guide
21.5 Problems Accessing the ZyXEL Device
Table 90 Troubleshooting Accessing Your Device
PROBLEM CORRECTIVE ACTION
I cannot
access the
ZyXEL Device.
I cannot
access the
web
configurator.
I cannot
remotely
manage the
ZyXEL Device
from the LAN
or WAN.
The default password is “1234”. The Password field is case-sensitive. Make sure that
you enter the correct password, using the proper casing.
If you have changed the password and have now forgotten it, you will need to upload
the default configuration file. This restores all of the factory defaults including the
password.
Make sure that there is not a telnet session running.
Use the ZyXEL Device’s WAN IP address when configuring from the WAN. Refer to
the instructions on checking your WAN connection.
Use the ZyXEL Device’s LAN IP address when configuring from the LAN. Refer to for
instructions on checking your LAN connection.
Your computer’s and the ZyXEL Device’s IP addresses must be on the same subnet
for LAN access.
If you changed the ZyXEL Device’s LAN IP address, then enter the new one as the
URL.
See the following section to check that pop-up windows, JavaScripts and Java
permissions are allowed.
You may also need to clear your Internet browser’s cache.
In Internet Explorer, click Too ls and then Internet Options to open the Internet
Options screen.
In the General tab, click Delete Files. In the pop-up window, select the Delete all
offline content check box and click OK. Click OK in the Internet Options screen to
close it.
If you disconnect your computer from one device and connect it to another device that
has the same IP address, your computer’s ARP (Address Resolution Protocol) table
may contain an entry that maps the management IP address to the previous device’s
MAC address).
In Windows, use arp -d at the command prompt to delete all entries in your computer’s
ARP table.
Refer to Chapter 21 on page 205 for scenarios when remote management may not be
possible.
Use the ZyXEL Device’s WAN IP address when configuring from the WAN.
Use the ZyXEL Device’s LAN IP address when configuring from the LAN.
21.5.1 Pop-up Windows, JavaScripts and Java Permissions
In order to use the web configurator you need to allow:
• Web browser pop-up windows from your device.
• JavaScripts (enabled by default).
• Java permissions (enabled by default).
Note: Internet Explorer 6 screens are used here. Screens for other Internet Explorer
versions may vary.
Chapter 21 Troubleshooting 207
Page 58

ZyXEL MAX-200M1 Series User’s Guide
21.5.1.1 Internet Explorer Pop-up Blockers
You may have to disable pop-up blocking to log into your device.
Either disable pop-up blocking (enabled by default in Windows XP SP (Service Pack) 2) or
allow pop-up blocking and create an exception for your device’s IP address.
21.5.1.1.1 Disable pop-up Blockers
1 In Internet Explorer, select Too ls , Pop-up Blocker and then select Turn Off Pop-up
Blocker.
Figure 122 Pop-up Blocker
You can also check if pop-up blocking is disabled in the Pop-up Blocker section in the
Privacy tab.
1 In Internet Explorer, select Too ls , Internet Options, Privacy.
2 Clear the Block pop-ups check box in the Pop-up Blocker section of the screen. This
disables any web pop-up blockers you may have enabled.
208 Chapter 21 Troubleshooting
Page 59

Figure 123 Internet Options
ZyXEL MAX-200M1 Series User’s Guide
3 Click Apply to save this setting.
21.5.1.1.2 Enable pop-up Blockers with Exceptions
Alternatively, if you only want to allow pop-up windows from your device, see the following
steps.
1 In Internet Explorer, select Too ls , Internet Options and then the Privacy tab.
2 Select Settings…to open the Pop-up Blocker Settings screen.
Chapter 21 Troubleshooting 209
Page 60

ZyXEL MAX-200M1 Series User’s Guide
Figure 124 Internet Options
3 Type the IP address of your device (the web page that you do not want to have blocked)
with the prefix “http://”. For example, http://192.168.1.1.
4 Click Add to move the IP address to the list of Allowed sites.
Figure 125 Pop-up Blocker Settings
210 Chapter 21 Troubleshooting
Page 61

5 Click Close to return to the Privacy screen.
6 Click Apply to save this setting.
21.5.1.2 JavaScripts
If pages of the web configurator do not display properly in Internet Explorer, check that
JavaScripts are allowed.
1 In Internet Explorer, click Tools, Internet Options and then the Security tab.
Figure 126 Internet Options
ZyXEL MAX-200M1 Series User’s Guide
2 Click the Custom Level... button.
3 Scroll down to Scripting.
4 Under Active scripting make sure that Enable is selected (the default).
5 Under Scripting of Java applets make sure that Enable is selected (the default).
6 Click OK to close the window.
Chapter 21 Troubleshooting 211
Page 62

ZyXEL MAX-200M1 Series User’s Guide
Figure 127 Security Settings - Java Scripting
21.5.1.3 Java Permissions
1 From Internet Explorer, click Too ls , Internet Options and then the Security tab.
2 Click the Custom Level... button.
3 Scroll down to Microsoft VM.
4 Under Java permissions make sure that a safety level is selected.
5 Click OK to close the window.
Figure 128 Security Settings - Java
212 Chapter 21 Troubleshooting
Page 63

21.5.1.3.1 JAVA (Sun)
1 From Internet Explorer, click Too ls , Internet Options and then the Advanced tab.
2 make sure that Use Java 2 for <applet> under Java (Sun) is selected.
3 Click OK to close the window.
Figure 129 Java (Sun)
ZyXEL MAX-200M1 Series User’s Guide
21.6 Telephone Problems
Table 91 Troubleshooting Telephone
PROBLEM CORRECTIVE ACTION
The telephone port
won’t work or the
telephone lacks a
dial tone.
I can access the
Internet, but
cannot make VoIP
calls.
Chapter 21 Troubleshooting 213
Check the telephone connections and telephone wire.
Make sure you have the VoIP SIP Settings screen properly configured.
Make sure you have the VoIP SIP Settings screen properly configured.
The VoI P LED should come on. Make sure that your telephone is connected to
the LINE port.
You can also check the VoIP status in the Status screen.
If the VoIP settings are correct, use speed dial to make peer-to-peer calls. If you
cannot make a call using speed dial, there may be something wrong with the SIP
server. Contact your VoIP service provider.
Page 64

ZyXEL MAX-200M1 Series User’s Guide
21.7 Problems With Multiple SIP Accounts
You can set up two SIP accounts on your ZyXEL Device. By default your ZyXEL Device uses
SIP account 1 for outgoing calls, and it uses SIP accounts 1 and 2 for incoming calls. With this
setting, you always use SIP account 1 for your outgoing calls and you cannot distinguish
which SIP account the calls are coming in through. If you want to control the use of different
dialing plans for accounting purposes or other reasons, you need to configure your phone port
in order to control which SIP account you are using when placing or receiving calls.
214 Chapter 21 Troubleshooting
Page 65

ZyXEL MAX-200M1 Series User’s Guide
APPENDIX A
Product Specifications
Table 92 Product Specifications
PHYSICAL AND ENVIRONMENTAL
Product Name ZyXEL MAX-200M1 Series IEEE 802.16e Simple Indoor CPE
Interface Auto-negotiating, auto-MDI/MDI-X 10/100 Mbps RJ-45 Ethernet port
Standards IEEE 802.16e-2005
Antenna Built-in patch antenna: 6dBi, 70° azimuth, 30° elevation
SMA antenna connector, equipped by default with 2dBi omni
antenna, 60°
Operating Temperature 0 ~ 45 degrees Centigrade
Storage Temperature -25 ~ 55 degrees Centigrade
Operating Humidity 10% ~ 90% (non-condensing)
Storage Humidity 10% ~ 100%
Power Supply 18 V DC
Power consumption Worst-case-scenario 10W, peak 15W
Weight 389g
Dimensions 120 x 160 x 50mm
RADIO SPECIFICATIONS
Media Access Protocol IEEE 802.16e
WiMAX Bandwidth MAX-200M1: 2.5 - 2.7 GHz
MAX-210M1: 3.4 ~ 3.6 GHz
MAX-230M1: 2.3 ~ 2.4 GHz
Data Rate Downlink:
Maximum 5 Mbps
Uplink:
Maximum 2 Mbps
Modulation QPSK (uplink and downlink)
16-QAM (uplink and downlink)
64-QAM (downlink only)
Output Power 27dBm (+/- 1dB)
Duplex mode Time Division Duplex (TDD)
SOFTWARE SPECIFICATIONS
Security PKMv2
EAP
CCMP, 128-bit AES
Appendix A 215
Page 66

ZyXEL MAX-200M1 Series User’s Guide
Table 93 Physical Features
FEATURE DESCRIPTION
Auto-crossover 10/100 Mbps
Ethernet Interface
External Antenna The ZyXEL Device is equipped with an attached antenna to provide a
Telephone Port Connect an analog telephone to the ZyXEL Device’s LINE port (RJ-11
Reset Button The reset button is built into the rear panel. Use this button to restore
This interface automatically adjusts to either a crossover or straightthrough Ethernet cable.
clear radio connection with the WiMAX base station.
connector) to take advantage of its Voice over IP (VoIP) features.
the factory default password to 1234; IP address to 192.168.1.1,
subnet mask to 255.255.255.0 and DHCP server enabled with a pool
of 32 IP addresses starting at 192.168.1.33.
Table 94 Non-Physical Features
FEATURE DESCRIPTION
High Speed Wireless Internet
Access
Firewall The ZyXEL Device is a stateful inspection firewall with DoS (Denial of
Content Filtering The ZyXEL Device can block access to web sites containing specified
Any IP The Any IP feature allows a computer to access the Internet and the
Auto Provisioning Your Internet service provider can automatically update your device’s
Auto Firmware Upgrade Your device gives you the option to upgrade to a newer firmware
Network Address Translation
(NAT)
Universal Plug and Play
(UPnP)
The ZyXEL Device is ideal for high-speed wireless Internet browsing.
WiMAX (Worldwide Interoperability for Microwave Access) is a
wireless networking standard providing high-bandwidth, wide-range
secured wireless service. The ZyXEL Device is a WiMAX mobile
station (MS) compatible with the IEEE 802.16e standard.
Service) protection. By default, when the firewall is activated, all
incoming traffic from the WAN to the LAN is blocked unless it is
initiated from the LAN. The ZyXEL Device’s firewall supports TCP/UDP
inspection, DoS detection and prevention, real time alerts, reports and
logs.
keywords. You can define time periods and days during which content
filtering is enabled and include or exclude a range of users on the LAN
from content filtering.
ZyXEL Device without changing the network settings (such as IP
address and subnet mask) of the computer, when the IP addresses of
the computer and the ZyXEL Device are not in the same subnet.
configuration via an auto-provisioning server.
version if it finds one during auto-provisioning. Your VoIP service
provider must have an auto-provisioning server and a server set up
with firmware in order for this feature to work.
Network Address Translation (NAT) allows the translation of an
Internet protocol address used within one network (for example a
private IP address used in a local network) to a different IP address
known within another network (for example a public IP address used
on the Internet).
Your device and other UPnP enabled devices can use the standard
TCP/IP protocol to dynamically join a network, obtain an IP address
and convey their capabilities to each other.
216 Appendix A
Page 67

ZyXEL MAX-200M1 Series User’s Guide
Table 94 Non-Physical Features
FEATURE DESCRIPTION
Dynamic DNS Support With Dynamic DNS support, you can have a static hostname alias for a
dynamic IP address, allowing the host to be more easily accessible
from various locations on the Internet. You must register for this service
with a Dynamic DNS service provider.
DHCP DHCP (Dynamic Host Configuration Protocol) allows the individual
clients (computers) to obtain the TCP/IP configuration at start-up from
a centralized DHCP server. Your device has built-in DHCP server
capability enabled by default. It can assign IP addresses, an IP default
gateway and DNS servers to DHCP clients. Your device can also act
as a surrogate DHCP server (DHCP Relay) where it relays IP address
assignment from the actual real DHCP server to the clients.
Multiple PVC (Permanent
Virtual Circuits) Support
IP Alias IP alias allows you to partition a physical network into logical networks
IP Policy Routing (IPPR) Traditionally, routing is based on the destination address only and the
REN A Ringer Equivalence Number (REN) is used to determine the number
Multiple SIP Accounts You can configure multiple voice (SIP) accounts.
SIP ALG Your device is a SIP Application Layer Gateway (ALG). It allows VoIP
Dynamic Jitter Buffer The built-in adaptive buffer helps to smooth out the variations in delay
Voice Activity Detection/
Silence Suppression
Comfort Noise Generation Your device generates background noise to fill moments of silence
Echo Cancellation You device supports G.168, an ITU-T standard for eliminating the echo
QoS (Quality of Service) Quality of Service (QoS) mechanisms help to provide better service on
Packet Filters Your device’s packet filtering function allows added network security
Your device supports up to 8 Permanent Virtual Circuits (PVCs).
over the same Ethernet interface. Your device supports three logical
LAN interfaces via its single physical Ethernet interface with the your
device itself as the gateway for each LAN network.
router takes the shortest path to forward a packet. IP Policy Routing
(IPPR) provides a mechanism to override the default routing behavior
and alter the packet forwarding based on the policy defined by the
network administrator.
of devices (like telephones or fax machines) that may be connected to
the telephone line. Your device has a REN of three, so it can support
three devices per telephone port.
calls to pass through NAT for devices behind it (such as a SIP-based
VoIP software application on a computer).
(jitter) for voice traffic. This helps ensure good voice quality for your
conversations.
Voice Activity Detection (VAD) reduces the bandwidth that a call uses
by not transmitting when you are not speaking.
when the other device in a call stops transmitting because the other
party is not speaking (as total silence could easily be mistaken for a
lost connection).
caused by the sound of your voice reverberating in the telephone
receiver while you talk.
a per-flow basis. Your device supports Type of Service (ToS) tagging.
This allows the device to tag voice frames so they can be prioritized
over the network.
and management.
Appendix A 217
Page 68

ZyXEL MAX-200M1 Series User’s Guide
218 Appendix A
Page 69

ZyXEL MAX-200M1 Series User’s Guide
APPENDIX B
WiMAX Security
Wireless security is vital to protect your wireless communications. Without it, information
transmitted over the wireless network would be accessible to any networking device within
range.
User Authentication and Data Encryption
The WiMAX (IEEE 802.16) standard employs user authentication and encryption to ensure
secured communication at all times.
User authentication is the process of confirming a user’s identity and level of authorization.
Data encryption is the process of encoding information so that it cannot be read by anyone
who does not know the code.
PKMv2
WiMAX uses PKMv2 (Privacy Key Management version 2) for authentication, and CCMP
(Counter Mode with Cipher Block Chaining Message Authentication Protocol) for data
encryption.
WiMAX supports EAP (Extensible Authentication Protocol, RFC 2486) which allows
additional authentication methods to be deployed with no changes to the base station or the
mobile or subscriber stations.
PKMv2 is a procedure that allows authentication of a mobile or subscriber station and
negotiation of a public key to encrypt traffic between the MS/SS and the base station. PKMv2
uses standard EAP methods such as Transport Layer Security (EAP-TLS) or Tunneled TLS
(EAP-TTLS) for secure communication.
In cryptography, a ‘key’ is a piece of information, typically a string of random numbers and
letters, that can be used to ‘lock’ (encrypt) or ‘unlock’ (decrypt) a message. Public key
encryption uses key pairs, which consist of a public (freely available) key and a private
(secret) key. The public key is used for encryption and the private key is used for decryption.
You can decrypt a message only if you have the private key. Public key certificates (or ‘digital
IDs’) allow users to verify each other’s identity.
219
Page 70

ZyXEL MAX-200M1 Series User’s Guide
RADIUS
RADIUS is based on a client-server model that supports authentication, authorization and
accounting. The base station is the client and the server is the RADIUS server. The RADIUS
server handles the following tasks:
• Authentication
Determines the identity of the users.
• Authorization
Determines the network services available to authenticated users once they are connected
to the network.
• Accounting
Keeps track of the client’s network activity.
RADIUS is a simple package exchange in which your base station acts as a message relay
between the MS/SS and the network RADIUS server.
Types of RADIUS Messages
The following types of RADIUS messages are exchanged between the base station and the
RADIUS server for user authentication:
• Access-Request
Sent by an base station requesting authentication.
• Access-Reject
Sent by a RADIUS server rejecting access.
• Access-Accept
Sent by a RADIUS server allowing access.
• Access-Challenge
Sent by a RADIUS server requesting more information in order to allow access. The base
station sends a proper response from the user and then sends another Access-Request
message.
The following types of RADIUS messages are exchanged between the base station and the
RADIUS server for user accounting:
220
• Accounting-Request
Sent by the base station requesting accounting.
• Accounting-Response
Sent by the RADIUS server to indicate that it has started or stopped accounting.
 Loading...