

Page 1
LTE6100
LTE Outdoor Gateway
Default Login Details
Web
Address
Admin’s
User Name
and
Password
Guest’s
User Name
and
Password
Edition 1, 7/2012
om
http://192.168.1.1
admin / 1234
user / 1234
www.zyxel.com
Copyright © 2012
ZyXEL Communications Corporation
Page 2

IMPORTANT!
Graphics in this book may differ slightly from the product due to differences in operating systems,
operating system versions, or if you installed updated firmware/software for your device. Every
effort has been made to ensure that the information in this manual is accurate.
Related Documentation
•Quick Start Guide
The Quick Start Guide shows how to connect the LTE Device and access the Web Configurator
wizards. (See the wizard real time help for i n formation on configuring each screen.) It also
contains a connection diagram and package contents list.
Note: It is recommended you use the Web Configurator to configure the LTE Device.
LTE6100 User’s Guide2
Page 3

Contents Overview
Contents Overview
User’s Guide .......................................................................................................................................11
Introduction .............................................................................................................................................13
Introducing the Web Configurator ...........................................................................................................17
Technical Reference ..........................................................................................................................23
Connection Status and System Info ........................................................................................................25
Broadband ....................................... ... .... ... ... ... .......................................... ... .... ... ... ... ..............................31
Home Networking ....................................................................................................................................39
Routing .................................. ................................. ................................ .................................................45
Quality of Service (QoS) .................... .... ... ... ... .......................................... ... .... ... ... ... .... ... ... ....................49
Network Address Translation (NAT) ............. ....................................... ................................... .................59
Dynamic DNS ..........................................................................................................................................67
Firewall ...................................... ................................ ................................... ...........................................69
MAC Filter ...............................................................................................................................................79
Parental Control ......................................................................................................................................81
VPN .................................... ................................ .............................. .......................................................85
Logs .......................................................................................................................................................99
Traffic Status ...................................... .... ... ... ... .......................................... ... .........................................101
User Account ................................... ... .... .......................................... ... ... ...............................................105
Remote MGMT ......................................................................................................................................107
System ..................................................................................................................................................109
Time Setting .......................................................................................................................................... 111
Log Setting ...........................................................................................................................................113
Firmware Upgrade ................................................................................................................................115
Backup/Restore .................................. .... ... ... ... ... .......................................... .... ... ... ... .... ........................117
Diagnostic .............................................................................................................................................121
Troubleshooting ....................................................................................................................................123
LTE6100 User’s Guide
3
Page 4

Contents Overview
4
LTE6100 User’s Guide
Page 5

Table of Contents
Table of Contents
Contents Overview ..............................................................................................................................3
Table of Contents .................................................................................................................................5
Part I: User’s Guide ......................................................................................... 11
Chapter 1
Introduction.........................................................................................................................................13
1.1 Overview ................................................ ... .......................................... ... .... .......................................13
1.2 Applications for the LTE Device ........................................................................................................13
1.2.1 Internet Access ................... .......................................... .... ... ....................................................13
1.3 Ways to Manage the LTE Device ............................................................... ... ... ... .... ..........................14
1.4 Good Habits for Managing the LTE Device .......................................................................................14
1.5 LEDs (Lights) ............... ... .... ... ... ... .... .......................................... ... ....................................................14
1.6 The RESET Button ........................... ... ... ... ... .... ... ... .......................................... ... ..............................15
Chapter 2
Introducing the Web Configurator ....................................................................................................17
2.1 Overview ................................................ ... .......................................... ... .... .......................................17
2.1.1 Accessing the Web Configurator .............................................................................................17
2.2 The Web Configurator Layout ...... .......................................... .... ... ... ... ... ...........................................19
2.2.1 Title Bar ........................ ... ... .... ... ... ...........................................................................................19
2.2.2 Main Window ............................................................. ... .... .......................................................20
2.2.3 Traffic Status ........................................................... ... ... .... ... ... ... ..............................................20
2.2.4 User Account .......................................................... ... ... .......................................... .................20
2.2.5 Navigation Panel ... .... ... ... ... .... ... ... ... ... .... .................................................................................21
Part II: Technical Reference............................................................................23
Chapter 3
Connection Status and System Info .................................................................................................25
3.1 Overview ................................................ ... .......................................... ... .... .......................................25
3.2 The Connection Status Screen .........................................................................................................25
3.3 The System Info Screen ....................................................................................................................27
Chapter 4
Broadband...........................................................................................................................................31
LTE6100 User’s Guide
5
Page 6

Table of Contents
4.1 Overview ................................................ ... .......................................... ... .... .......................................31
4.1.1 What Yo u Can Do in this Chapter ............................................................................................31
4.1.2 What You Need to Know .. ... .... ... .......................................... ... ... ... .... ... ....................................31
4.1.3 Before You Begin .......... ... ... .... ... .......................................... ... ... ... .... ... ....................................32
4.2 The Broadband Screen .....................................................................................................................32
4.2.1 Edit Internet Connection ..........................................................................................................32
4.3 The SIM Screen ................................................................................................................................33
4.3.1 PUK Code Screen ...................................................................................................................34
4.4 Technical Reference .................. ... .... ... .......................................... ... ... ... .... ... ... ... .... ... .......................35
Chapter 5
Home Networking...............................................................................................................................39
5.1 Overview ................................................ ... .......................................... ... .... .......................................39
5.1.1 What Yo u Can Do in this Chapter ............................................................................................39
5.1.2 What You Need To Know .............................. .......................................... ... .... ... ... ... .................39
5.2 The LAN Setup Screen .....................................................................................................................41
5.3 The Static DHCP Screen .................................................................. ... ... .... ... ... ... .... ... .......................42
5.3.1 Before You Begin .......... ... ... .... ... .......................................... ... ... ... .... ... ....................................42
5.4 The UPnP Screen .............................................................................................................................43
Chapter 6
Routing ................................................................................................................................................45
6.1 Overview ................................................ ... .......................................... ... .... .......................................45
6.2 Configuring Static Route ............................................... ... ... ... ...........................................................46
6.2.1 Add/Edit Static Route .............................................................................................................47
Chapter 7
Quality of Service (QoS).....................................................................................................................49
7.1 Overview ................................................ ... .......................................... ... .... .......................................49
7.1.1 What Yo u Can Do in this Chapter ............................................................................................49
7.1.2 What You Need to Know .. ... .... ... .......................................... ... ... ... .... ... ....................................49
7.2 The QoS General Screen ................................... ... ... .... ... ... ... .... .......................................................50
7.3 The Queue Setup Screen .................................................................................................................51
7.3.1 Add/Edit a QoS Queue ................................................................ ...........................................52
7.4 The Class Setup Screen .................................................................................................................52
7.4.1 Add/Edit QoS Class ............................................................... ... ... .... ... ... .................................54
7.5 The QoS Monitor Screen .................................................................................................................56
7.6 QoS Technical Reference .................................................................................................................57
7.6.1 DiffServ ............... ... .... ... ... ... .......................................... ...........................................................57
Chapter 8
Network Address Translation (NAT)..................................................................................................59
8.1 Overview .................................................. ... .......................................... .... ... ....................................59
6
LTE6100 User’s Guide
Page 7

Table of Contents
8.1.1 What Yo u Can Do in this Chapter ............................................................................................59
8.1.2 What You Need To Know .............................. .......................................... ... .... ... ... ... .................59
8.2 The Port Forwarding Screen ............................................................................................................60
8.2.1 The Port Forwarding Screen .. ... .................................................................................... ... .......61
8.2.2 The Port Forwarding Edit Screen ............................................................................................62
8.3 The DMZ Screen ...............................................................................................................................63
8.4 The Sessions Screen ........................................................................................................................63
8.5 Technical Reference .................. ... .... ... .......................................... ... ... ... .... ... ... ... .... ... .......................64
8.5.1 NAT Definitions ...... .... ... ... ... .... .......................................... ... ... .................................................64
8.5.2 What NAT Does ......... ... ... ... .... ... .......................................... ... .................................................64
8.5.3 How NAT Works ......................................................................................................................65
Chapter 9
Dynamic DNS ......................................................................................................................................67
9.1 Overview .................................................. ... .......................................... .... ... ....................................67
9.1.1 What You Need To Know .............................. .......................................... ... .... ... ... ... .................67
9.2 The Dynamic DNS Screen ................................................................................................................68
Chapter 10
Firewall ................................................................................................................................................69
10.1 Overview .........................................................................................................................................69
10.1.1 What You Can Do in this Chapter ..........................................................................................69
10.1.2 What You Need to Know ... ............. ............. ............. .......... ............. ............. ............ ..............70
10.2 The General Screen ............ ... ... .... .................................................................................................71
10.3 The Services Screen ......... ... ... .......................................... ... .... ... ... ... ... .... ... ... .................................72
10.3.1 The Add New Services Entry Screen ....................................................................................72
10.4 The Access Control Screen ............................................................................................................73
10.4.1 The Add New ACL Rule/Edit Screen ....................... .......................................................... ....74
10.5 The DoS Screen ..............................................................................................................................75
10.6 Firewall Technical Reference ..........................................................................................................76
10.6.1 Guidelines For Enhancing Security With Your Firewall .........................................................76
10.6.2 Security Considerations ........................... ....................... ...................... ....................... ..........76
Chapter 11
MAC Filter............................................................................................................................................79
11.1 Overview .........................................................................................................................................79
11.1.1 What You Need to Know ........................................................................................................79
11.2 The MAC Filter Screen ....................................................................................................................79
Chapter 12
Parental Control..................................................................................................................................81
12.1 Overview .........................................................................................................................................81
12.2 The Parental Control Screen ............................. ............. ............. ............. ............. ............ ..............81
LTE6100 User’s Guide
7
Page 8

Table of Contents
12.2.1 Add/Edit a Parental Control Rule ...........................................................................................82
Chapter 13
VPN ......................................................................................................................................................85
13.1 Overview .........................................................................................................................................85
13.2 IPSec VPN ......................................................................................................................................85
13.2.1 The General Screen ..............................................................................................................85
13.2.2 IPSec VPN: Add ....................................................................................................................87
13.2.3 The Monitor Screen ...............................................................................................................91
13.3 Technical Reference ................ ....... ...... ...... .... ...... ....... ...... ....... ...... ...... ....... ... ....... ...... ....................92
13.3.1 IPSec Architecture ...................... .................................................... .......................................92
13.3.2 Encapsulation ........................................................................................................................93
13.3.3 IKE Phases ...........................................................................................................................94
13.3.4 Negotiation Mode ..................................................................................................................94
13.3.5 IPSec and NAT ......................................................................................................................95
13.3.6 VPN, NAT, and NAT Traversal .............................................. .................................................95
13.3.7 ID Type and Content ................................................ ....................... ...................... .................96
13.3.8 Pre-Shared Key .....................................................................................................................97
13.3.9 Diffie-Hellman (DH) Key Groups ............................................................................................98
Chapter 14
Logs ....................................................................................................................................................99
14.1 Overview ........................................................................................................................................99
14.1.1 What You Can Do in this Chapter ..........................................................................................99
14.1.2 What You Need To Know ............................................................ ...........................................99
14.2 The System Log Screen ................................................................................................................100
Chapter 15
Traffic Status.....................................................................................................................................101
15.1 Overview .......................................................................................................................................101
15.1.1 What You Can Do in this Chapter ........................................................................................101
15.2 The WAN Status Screen ...............................................................................................................101
15.3 The LAN Status Screen .................................................................................................................102
15.4 The NAT Status Screen .................. ... ... ... ... .... ... ... ... .......................................... .... ... ... ... ...............103
Chapter 16
User Account ....................................................................................................................................105
16.1 Overview .......................................................................................................................................105
16.2 The User Account Screen .............. ... ... ... ... .... ... ... .........................................................................105
Chapter 17
Remote MGMT...................................................................................................................................107
17.1 Overview .......................................................................................................................................107
8
LTE6100 User’s Guide
Page 9

Table of Contents
17.1.1 What You Need to Know ... ............. ............. ............. .......... ............. ............. ............ ............107
17.2 The Remote MGMT Screen ....................... ................................................................. ..................107
Chapter 18
System...............................................................................................................................................109
18.1 Overview .......................................................................................................................................109
18.1.1 What You Need to Know ... ............. ............. ............. .......... ............. ............. ............ ............109
18.2 The System Screen .................... .... ... ... .......................................... ...............................................109
Chapter 19
Time Setting...................................................................................................................................... 111
19.1 Overview ....................................................................................................................................... 111
19.2 The Time Setting Screen ............................................................................................................. 111
Chapter 20
Log Setting .......................................................................................................................................113
20.1 Overview ......................................................................................................................................113
20.2 The Log Setting Screen ................................................................................................................113
Chapter 21
Firmware Upgrade ............................................................................................................................115
21.1 Overview .......................................................................................................................................115
21.2 The Firmware Upgrade Screen ............................ .................................... .....................................115
Chapter 22
Backup/Restore ................................................................................................................................117
22.1 Overview .......................................................................................................................................117
22.2 The Backup/Restore Screen .........................................................................................................117
22.3 The Reboot Screen .......................................................................................................................119
Chapter 23
Diagnostic .........................................................................................................................................121
23.1 Overview .......................................................................................................................................121
23.2 The Ping/TraceRoute Screen ..................... .... .......................................... ... ... ...............................121
Chapter 24
Troubleshooting................................................................................................................................123
24.1 Overview .......................................................................................................................................123
24.2 Power, Hardware Connections, and LEDs ........................ ... .... ... ... ... .......................................... ..123
24.3 LTE Device Access and Login ......................................................................................................124
24.4 Internet Access .............................................................................................................................125
24.5 UPnP .............................................................................................................................................126
LTE6100 User’s Guide
9
Page 10

Table of Contents
Appendix A IP Addresses and Subnetting.......................................................................................127
Appendix B Setting Up Your Computer’s IP Address ......................................................................137
Appendix C Pop-up Windows, JavaScript and Java Permissions...................................................167
Appendix D Common Services........................................................................................................177
Appendix E Legal Information..........................................................................................................181
Index ..................................................................................................................................................185
10
LTE6100 User’s Guide
Page 11

PART I
User’s Guide
11
Page 12

12
Page 13
CHAPTER 1
LAN
WAN
LTE
1.1 Overview
The Device is an LTE (Long Term Evolution) device including an outdoor unit (ODU) and an indoor
unit (IDU). The LTE Device provides a complete security solution with a robust firewall based on
Stateful Packet Inspection (SPI) technology and Denial of Service (DoS).
See the chapter on product specifications for a full list of features.
1.2 Applications for the LTE Device
Here are some example uses for which the LTE Device is well suited.
Introduction
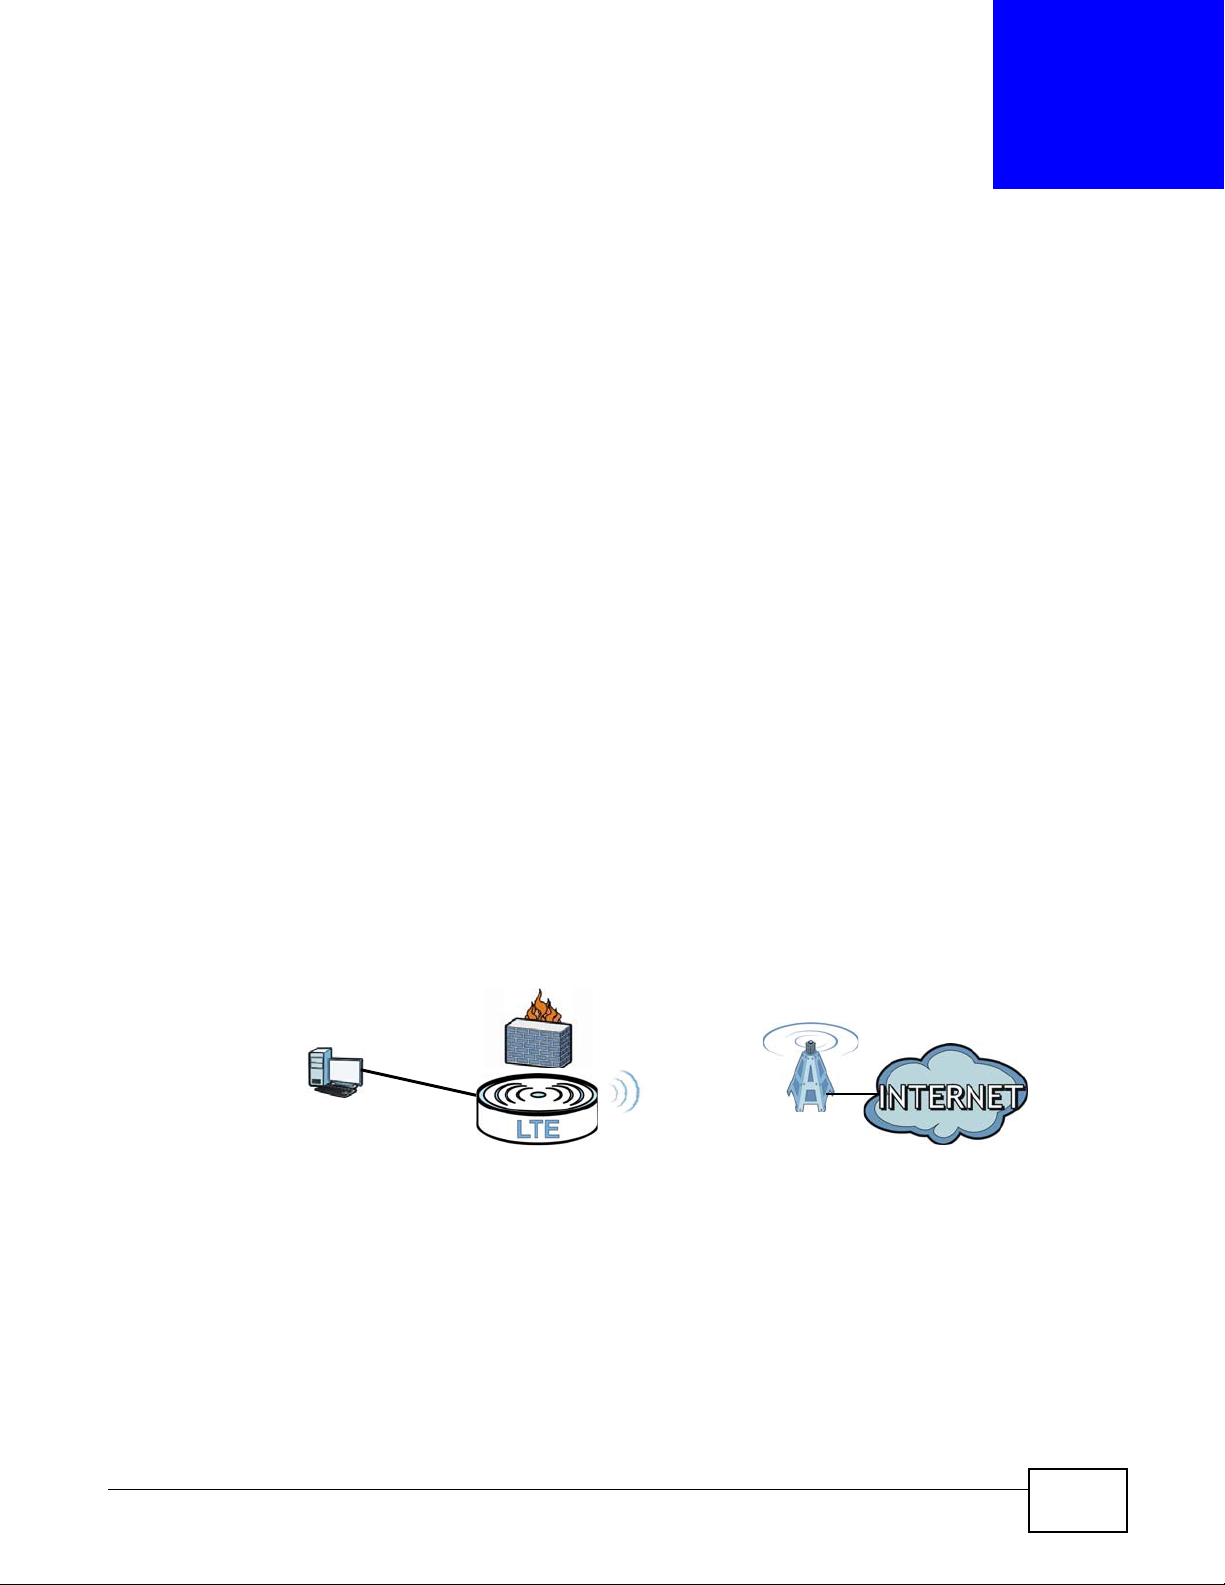
1.2.1 Internet Access
Your LTE Device provides Internet access by connecting to an LTE network wirelessly.
Computers can connect to the LTE Device’s ETHERNET ports.
Figure 1 LTE Device’s Internet Access Application
LTE6100 User’s Guide 13
Page 14
Chapter 1 Introduction
1.3 Ways to Manage the LTE Device
• Web Configurator. This is for management of the LTE Device using a (supported) web browser.
1.4 Good Habits for Managing the LTE Device
Do the following things regularly to make the LTE Device more secure and to manage the LTE
Device more effectively.
• Change the password. Use a password that’s not easy to guess and that consists of different
types of characters, such as numbers and letters.
• Write down the password and put it in a safe place.
• Back up the configuration (and make sure you know how to restore it). Restoring an earlier
working configuration may be useful if the device becomes unstable or even crashes. If you
forget your password to access the Web Configurator, you will have to reset the LTE Device to its
factory default settings. If you backed up an earlier configuration file, you would not have to
totally re-configure the LTE Device. You could simply restore your last configuration. Write down
any information your ISP provides you.
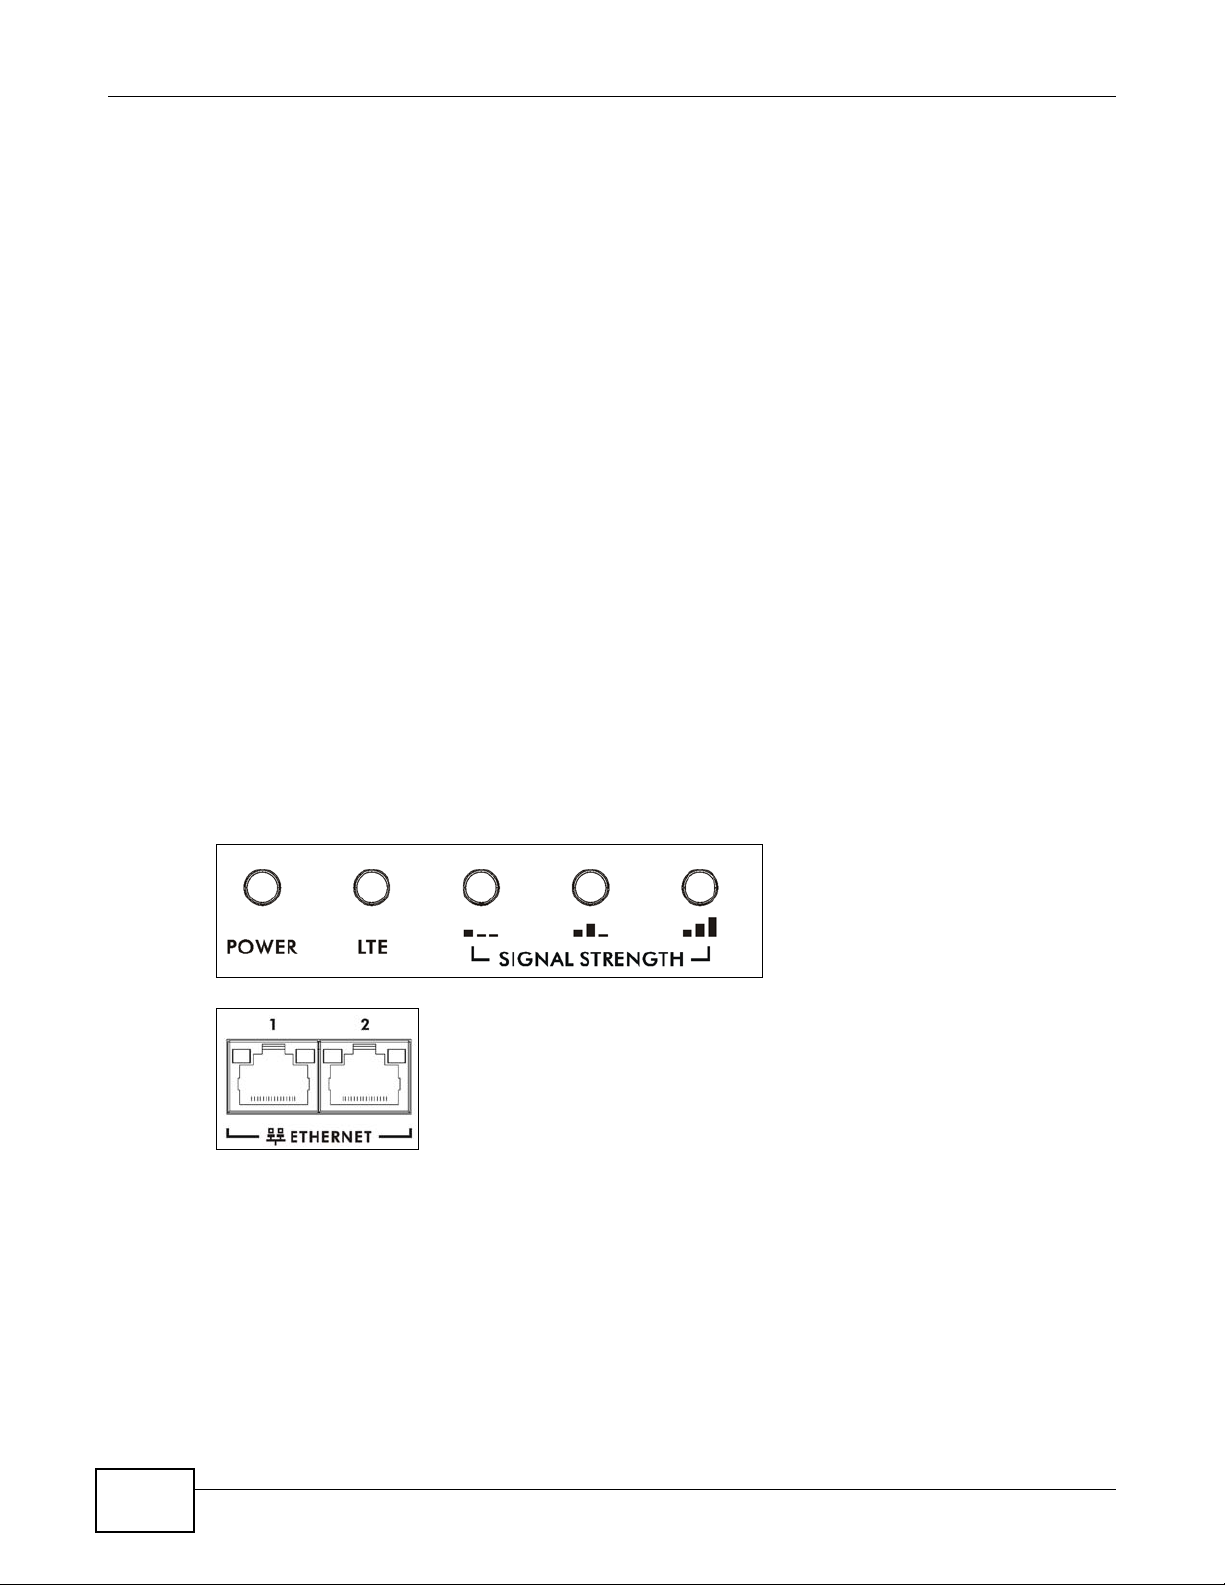
1.5 LEDs (Lights)
The following graphic displays the labels of the LEDs.
Figure 2 LEDs on the Top of the Device
Figure 3 LEDs on the Ethernet Ports
14
LTE6100 User’s Guide
Page 15

Chapter 1 Introduction
None of the LEDs are on if the LTE Device is not receiving power.
Table 1 LED Descriptions (From Left To Right)
LED COLOR STATUS DESCRIPTION
PWR/SYS Green On The LTE Device is receiving power and ready for use.
Blinking The LTE Device is booting up.
Red On The LTE Device detected an error while self-testing, or there is a
Blinking The LTE Device is upgrading the firmware.
Off The LTE Device is not receiving power.
LTE Green On The LTE Device has an LTE connection on the WAN.
Blinking The LTE Device is searching for a frequency channel or is performing
Off The LTE Device does not have an LTE connection on the WAN.
Signal
Strength
No Signal
LEDS
Green Signal 1 OnThe signal strength is less than -90 dBm if signal 1 is on only.
device malfunction.
network entry.
The LTE LEDs display the Received Signal Strength Indication (RSSI)
of the LTE connection. Three signals on at the same time means best
signal quality, two means medium signal quality, and one means low
signal quality.
There is no L T E conn e ct ion .
Signal 2 OnThe signal strength is between -90 dBm and -70 dBm if both signals 1
Signal 3 OnThe signal strength is -70 dBm or greater if three signals are all on.
ETHERNET1-2Yellow
(Giga
Ethernet)
Green (Fast
Ethernet)
Off The LTE Device does not have an Ethernet connection with the LAN.
On The LTE Device has a successful 1000 Mbps Ethernet connection with
Blinking The LTE Device is sending or receiving data to/from the LAN at 1000
On The LTE Device has a successful 10/100 Mbps Ethernet connection
Blinking The LTE Device is sending or receiving data to/from the LAN at 10/
Refer to the Quick Start Guide for information on hardware connections.
1.6 The RESET Button
If you forget your password or cannot access the web configurator, you will need to use the RESET
button at the back of the device to reload the factory-default configuration file. This means that y ou
will lose all configurations that you had previously and the passwords will be reset to the defaults.
and 2 are on.
a device on the Local Area Network (LAN).
Mbps.
with a device on the Local Area Network (LAN).
100 Mbps.
1 Make sure the POWER LED is on (not blinking).
2 T o set the device back to the factory default settings, press the RESET button for 5 seconds o r until
the POWER LED begins to blink and then release it. When the POWER LED begins to blink, the
defaults have been restored and the device restarts.
LTE6100 User’s Guide
15
Page 16

Chapter 1 Introduction
16
LTE6100 User’s Guide
Page 17
2.1 Overview
The web configurator is an HTML-based management interface that allows easy device setup and
management via Internet browser. Use Internet Explorer 6.0 and later versions, Mozilla Firefox 3
and later versions, or Safari 2.0 and later versions. The recommended screen resolution is 1024 by
768 pixels.
In order to use the web configurator you need to allow:
• Web browser pop-up windows from your device. Web pop-up blocking is enabled by default i n
Windows XP SP (Service Pack) 2.
• JavaScript (enabled by default).
• Java permissions (enabled by default).
CHAPTER 2
Introducing the Web Configurator
See Appendix C on page 167 if you need to make sure these functions are allowed in Internet
Explorer.
2.1.1 Accessing the Web Configurator
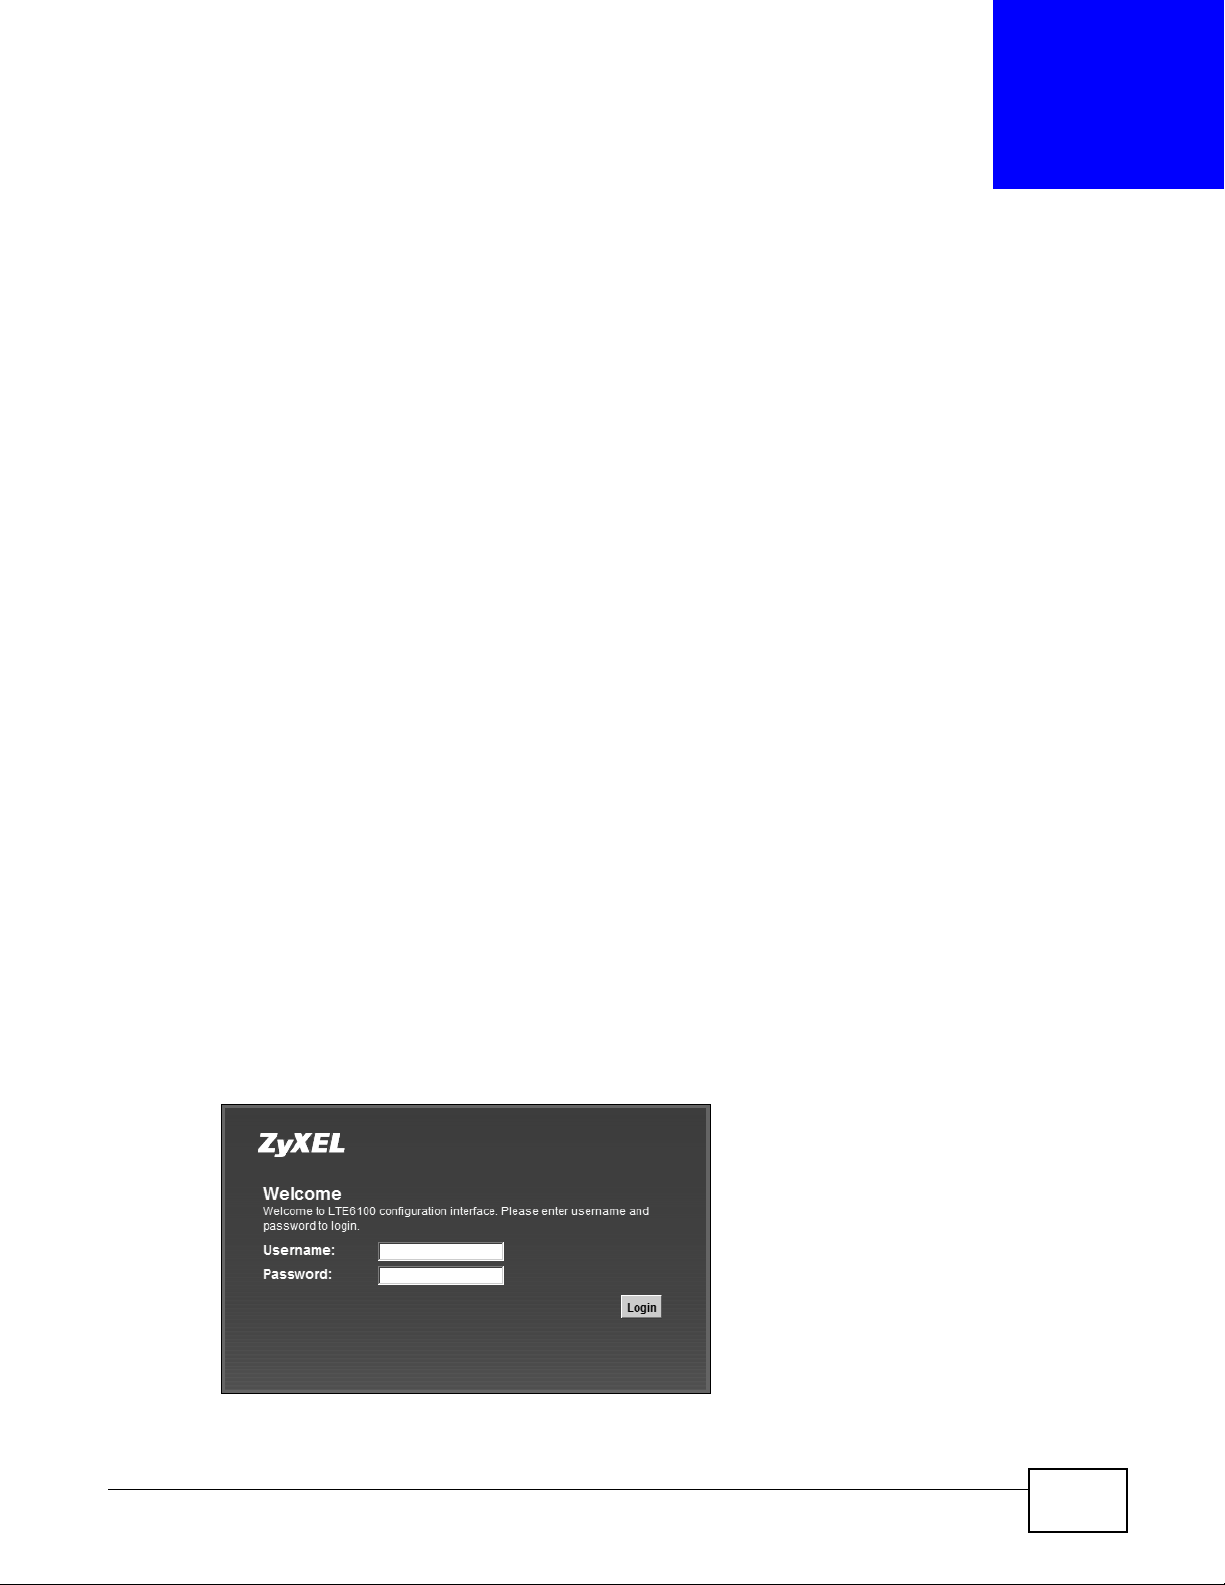
1 Make sure your LTE Device hardware is properly connected (refer to the Quick Start Guide).
2 Launch your web browser.
3 Type "192.168.1.1" as the URL.
4 A password screen displays. Type “admin” as the default Username and “1234” as the default
password to access the device’s W eb Configur ator. Click Login. If you have changed the password,
enter your password and click Login.
Figure 4 Password Screen
LTE6100 User’s Guide 17
Page 18
Chapter 2 Introdu cing the Web Configurator
Note: For security reasons, the LTE Device automatically logs you out if you do not use
the web configurator for five minutes (default). If this happens, log in again.
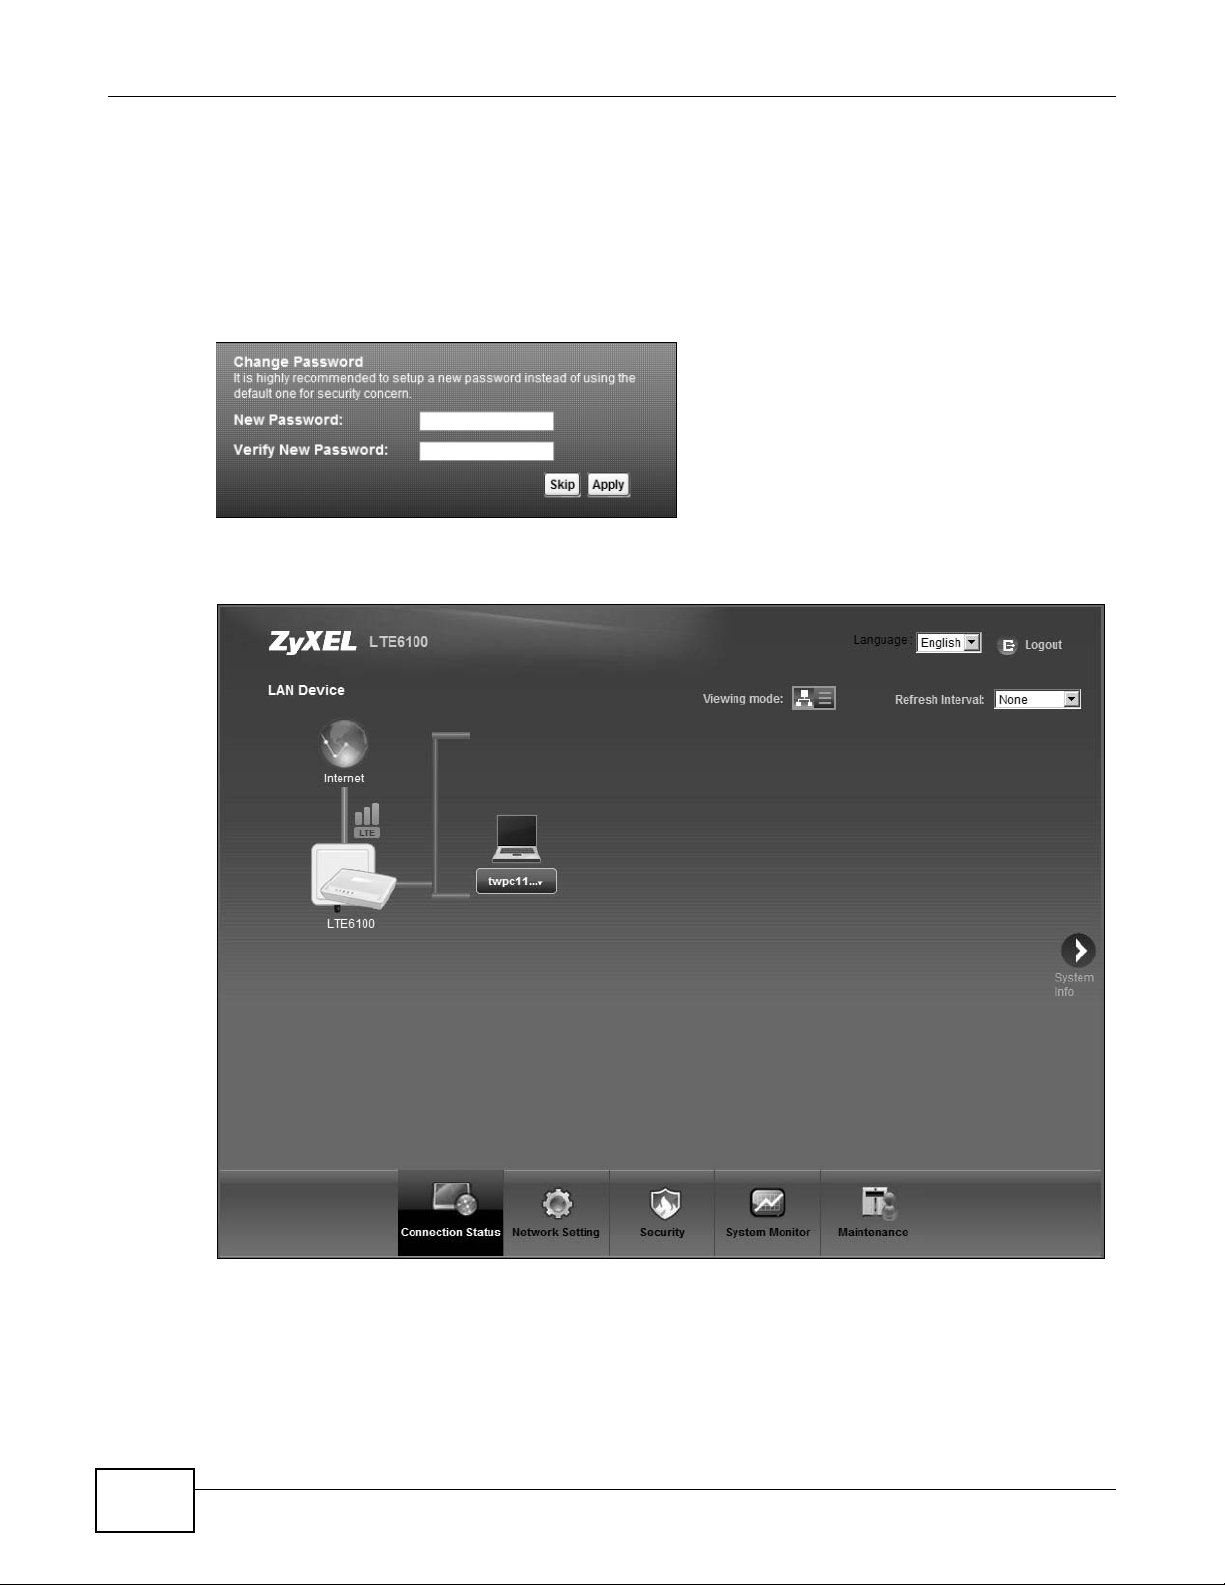
5 The following screen displays if you have not yet changed your password. It is strongly
recommended you change the default password. Enter a new password, retype it to confirm and
click Apply; alternatively click Skip to proceed to the main menu if you do not want to change the
password now.
Figure 5 Change Password Screen
6 The Connection Status screen appears.
Figure 6 Connection Status
7 Click System Info to display the System Info screen, where you can view the LTE Device’s
interface and system information.
18
LTE6100 User’s Guide
Page 19
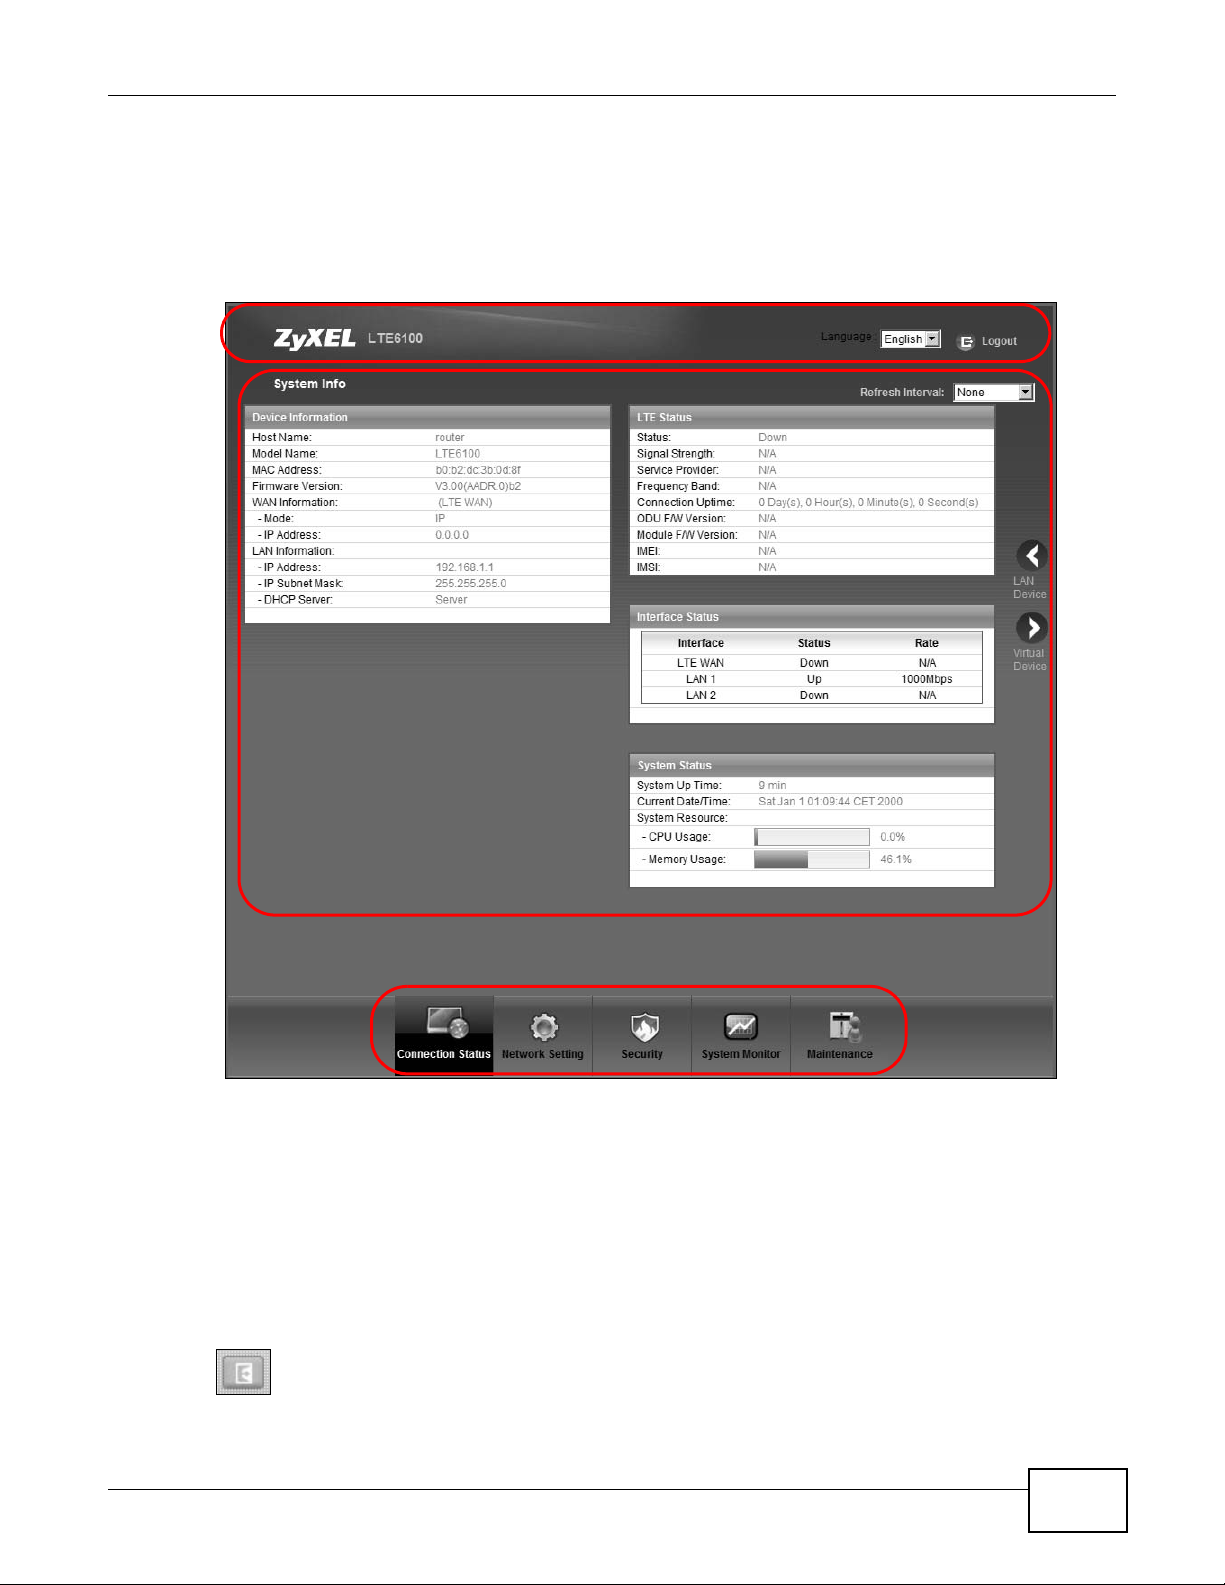
2.2 The Web Configurator Layout
B
C
A
a
b
Click Connection Status > System Info to show the following screen. (See Section 3.3 on page
27 for more information.)
Figure 7 Web Configurator Layout
Chapter 2 Introducing the Web Configurator
As illustrated above, the main screen is divided into these parts:
• A - title bar
• B - main window
• C - navigation panel
2.2.1 Title Bar
The title bar shows the following icon in the upper right corner.
LTE6100 User’s Guide
19
Page 20
Chapter 2 Introdu cing the Web Configurator
Click this icon to log out of the web configurator.
2.2.2 Main Window
The main window displays information and configuration fields. It is discussed in the rest of this
document.
After you click System Info on the Connection Status screen, the System Info screen is
displayed. See Chapter 3 on page 27 for more information about the System Info screen.
If you click LAN Device on the System Info screen (a in Figure 7 on page 19), the Connection
Status screen appears. See Chapter 3 on page 25 for more information about the Connection
Status screen.
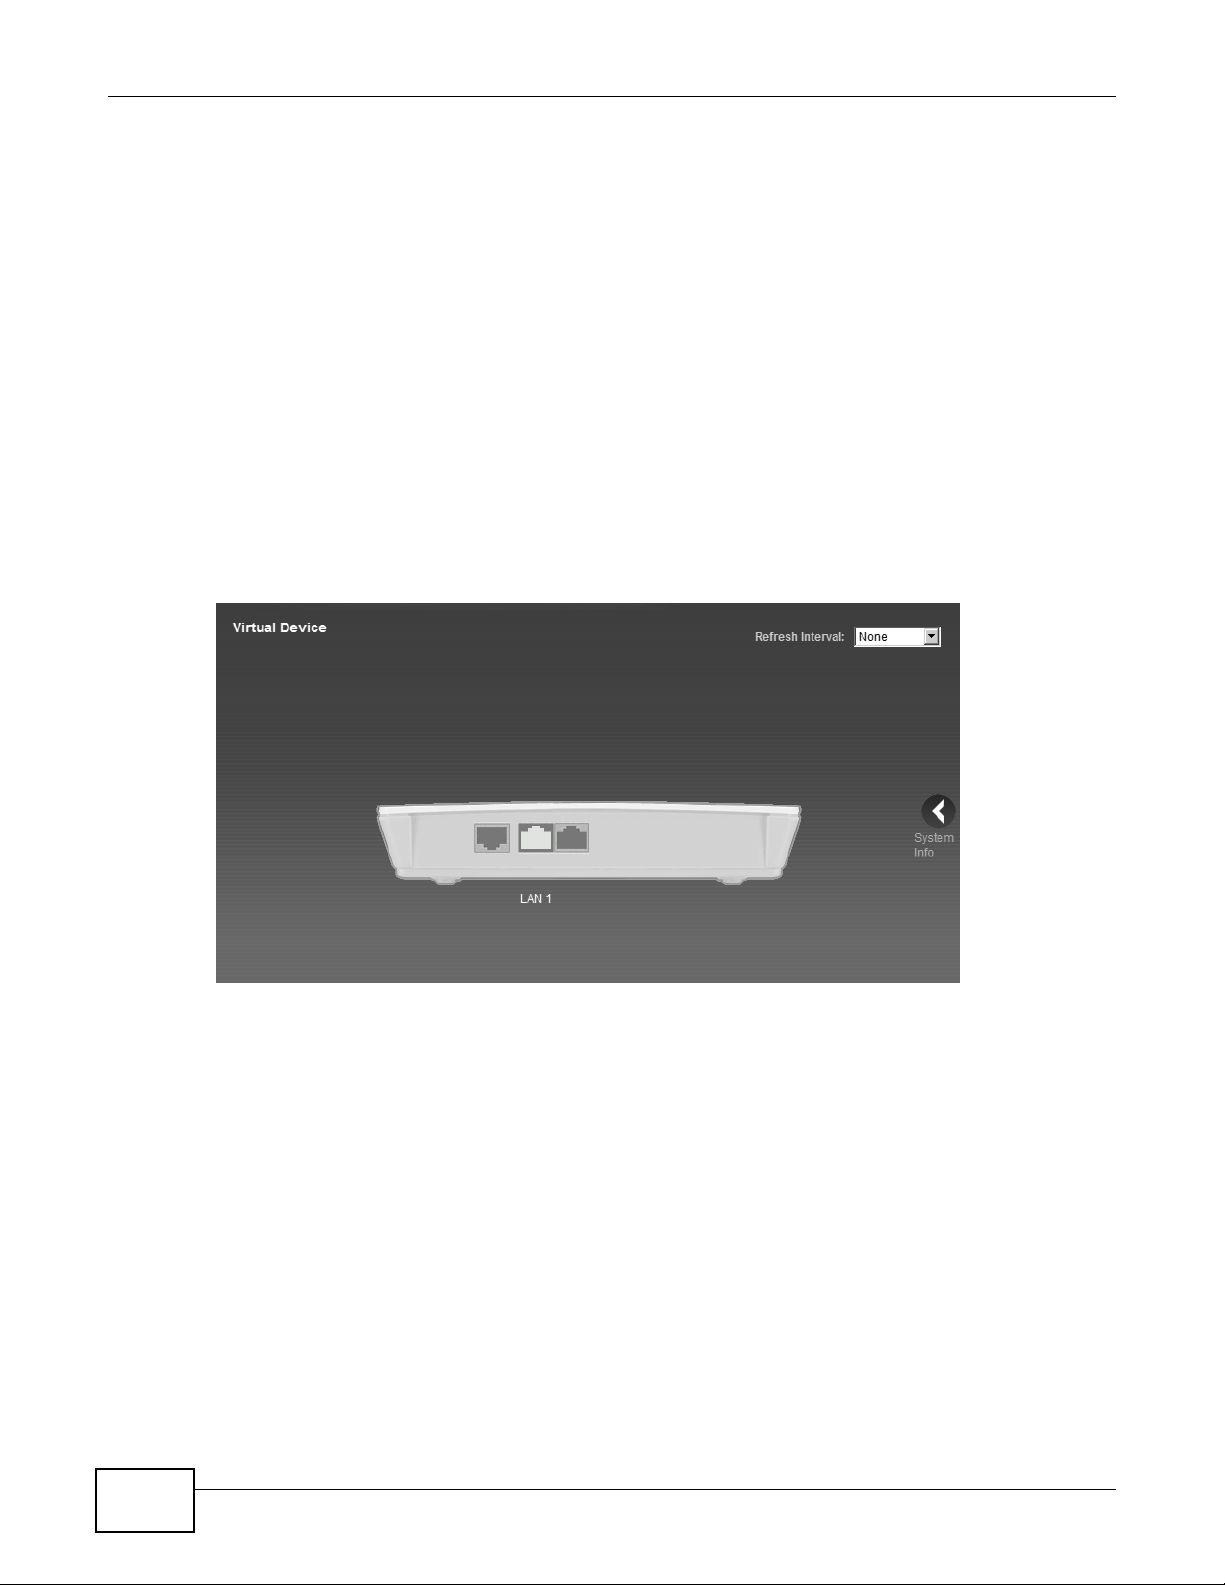
If you click Virtual Device on the System Info screen (b in Figure 7 on page 19), a visual graphic
appears, showing the connection status of the LTE Device’s ports. The connected ports are in color
and disconnected ports are gray.
Figure 8 Virtual Device
2.2.3 Traffic Status
Use the Maintenance > Traffic Status screens to look at network traffic status and statistics of
the WAN, LAN interfaces and NAT. See Chapter 18 on page 109 for more information.
2.2.4 User Account
Use the Maintenance > User Accounts screen to configure system password for different user
accounts. See Chapter 16 on page 105 for more information.
20
LTE6100 User’s Guide
Page 21

2.2.5 Navigation Panel
Use the menu items on the navigation panel to open screens to configure LTE Device features. The
following table describes each menu ite m.
Table 2 Navigation Panel Summary
LINK TAB FUNCTION
Connection Status This screen shows the network status of the LTE Device and
Network Setting
Broadband Broadband Use this screen to view and modify your WAN interface.
SIM Use this screen to enter the PIN of your SIM card.
Home
Networking
Static Route Static Route Use this screen to view and set up static routes on the LTE Device.
QoS General Use this screen to enable QoS and decide allowable bandwidth using
NAT Port Forwarding Use this screen to make your local servers visible to the outside
Dynamic DNS Dynamic DNS Use this screen to allow a static hostname alias for a dynamic IP
Security
Firewall General Use this screen to activate/deactivate the firewall.
MAC Filter MAC Filter Use this screen to allow specific devices t o access the LTE Device.
Parental
Control
VPN Setup Use this screen to configure IPSec VPN connections.
System Monitor
Log System Log Use this screen to view the system logs for the categories that you
LAN Setup Use this screen to configure LAN TCP/IP settings, and other advanced
Static DHCP Use this screen to assign specific IP addresses to individual MAC
UPnP Use this screen to enable the UPnP function.
Queue Setup
Class Setup Use this screen to set up classifiers to sort traffic into different flows
Monitor
DMZ Use this screen to configure the IP address of the LTE Device’s DMZ
Sessions Use this screen to limit the number of NAT sessions a single client can
Services Use this screen to view and configure services.
Access Control Use this screen to view and configure filter rules for incoming and
DoS Use this screen to activate/deactivate Denial of Service (DoS)
Parental Control Use this screen to define time periods and days during which the LTE
Monitor Use this screen to view IPSec VPN connection status.
Chapter 2 Introducing the Web Configurator
computers/devices connected to it.
properties.
addresses.
QoS.
Use this screen to configure QoS queue assignment.
and assign priority and define actions to be performed for a classified
traffic flow.
Use this screen to view each queue’s statistics.
world.
interface.
establish.
address.
outgoing traffic.
protection.
Device performs parental control and/or block web sites with the
specific URL.
select.
LTE6100 User’s Guide
21
Page 22

Chapter 2 Introdu cing the Web Configurator
Table 2 Navigation Panel Summary (continued)
LINK TAB FUNCTION
Traffic Status WAN Use this screen to view the status of all network traffic going through
LAN Use this screen to view the status of all network traffic going through
NAT Use this screen to view the status of NAT sessions on the LTE Device.
Maintenance
Users Account Users Account Use this screen to configure the passwords your user accounts.
Remote MGMT Remote MGMT Use this screen to enable specific traffic directions for network
System System Use this screen to configure the LTE Device’s name, domain name,
Time Setting Time Setting Use this screen to change your LTE Device’s time and date.
Log Setting Log Setting Use this screen to select which logs and/or immediate alerts your
Firmware
Upgrade
Backup/
Restore
Reboot Reboot Use this screen to reboot the LTE Device without turning the power
Diagnostic Ping/TraceRoute Use this screen to test the connections to other devices.
Firmware
Upgrade
Backup/Restore Use this screen to backup and restore your device’s configuration
the WAN port of the LTE Device.
the LAN ports of the LTE Device.
services.
management inactivity time-out.
device is to record. You can also set it to e-mail the logs to you.
Use this screen to upload firmware to your device.
(settings) or reset the factory default settings.
off.
22
LTE6100 User’s Guide
Page 23

PART II
Technical Reference
The appendices provide general information. Some details may not apply to your LTE Device.
23
Page 24

24
Page 25

CHAPTER 3
Connection Status and System Info
3.1 Overview
After you log into the web configurator, the Connection Status screen appears. This shows the
network connection status of the LTE Device and clients connected to it.
Use the System Info screen to look at the current status of the device, system resources,
interfaces (LAN, WAN).
If you click Virtual Device on the System Info screen, a visual graphic appears, showing the
connection status of the LTE Device’s ports. See Section 2.2.2 on page 20 for more information.
3.2 The Connection Status Screen
Use this screen to view the network connection status of the device and its clients. A warning
message appears if there is a connection problem.
LTE6100 User’s Guide 25
Page 26

Chapter 3 Connection Status and System Info
If you prefer to view the status in a list, click List View in the Viewing mode selection box. You
can configure how often you want the LTE Device to update this screen in Refresh Interval.
Figure 9 Connection Status: Icon View
Figure 10 Connection Status: List View
In Icon View, if you want to view information about a client, click the client’ s name and Info . Click
the IP address if you want to change it. If you want to change the name or icon of the client, click
Change name/icon.
In List View, you can also view the client’s information.
26
LTE6100 User’s Guide
Page 27
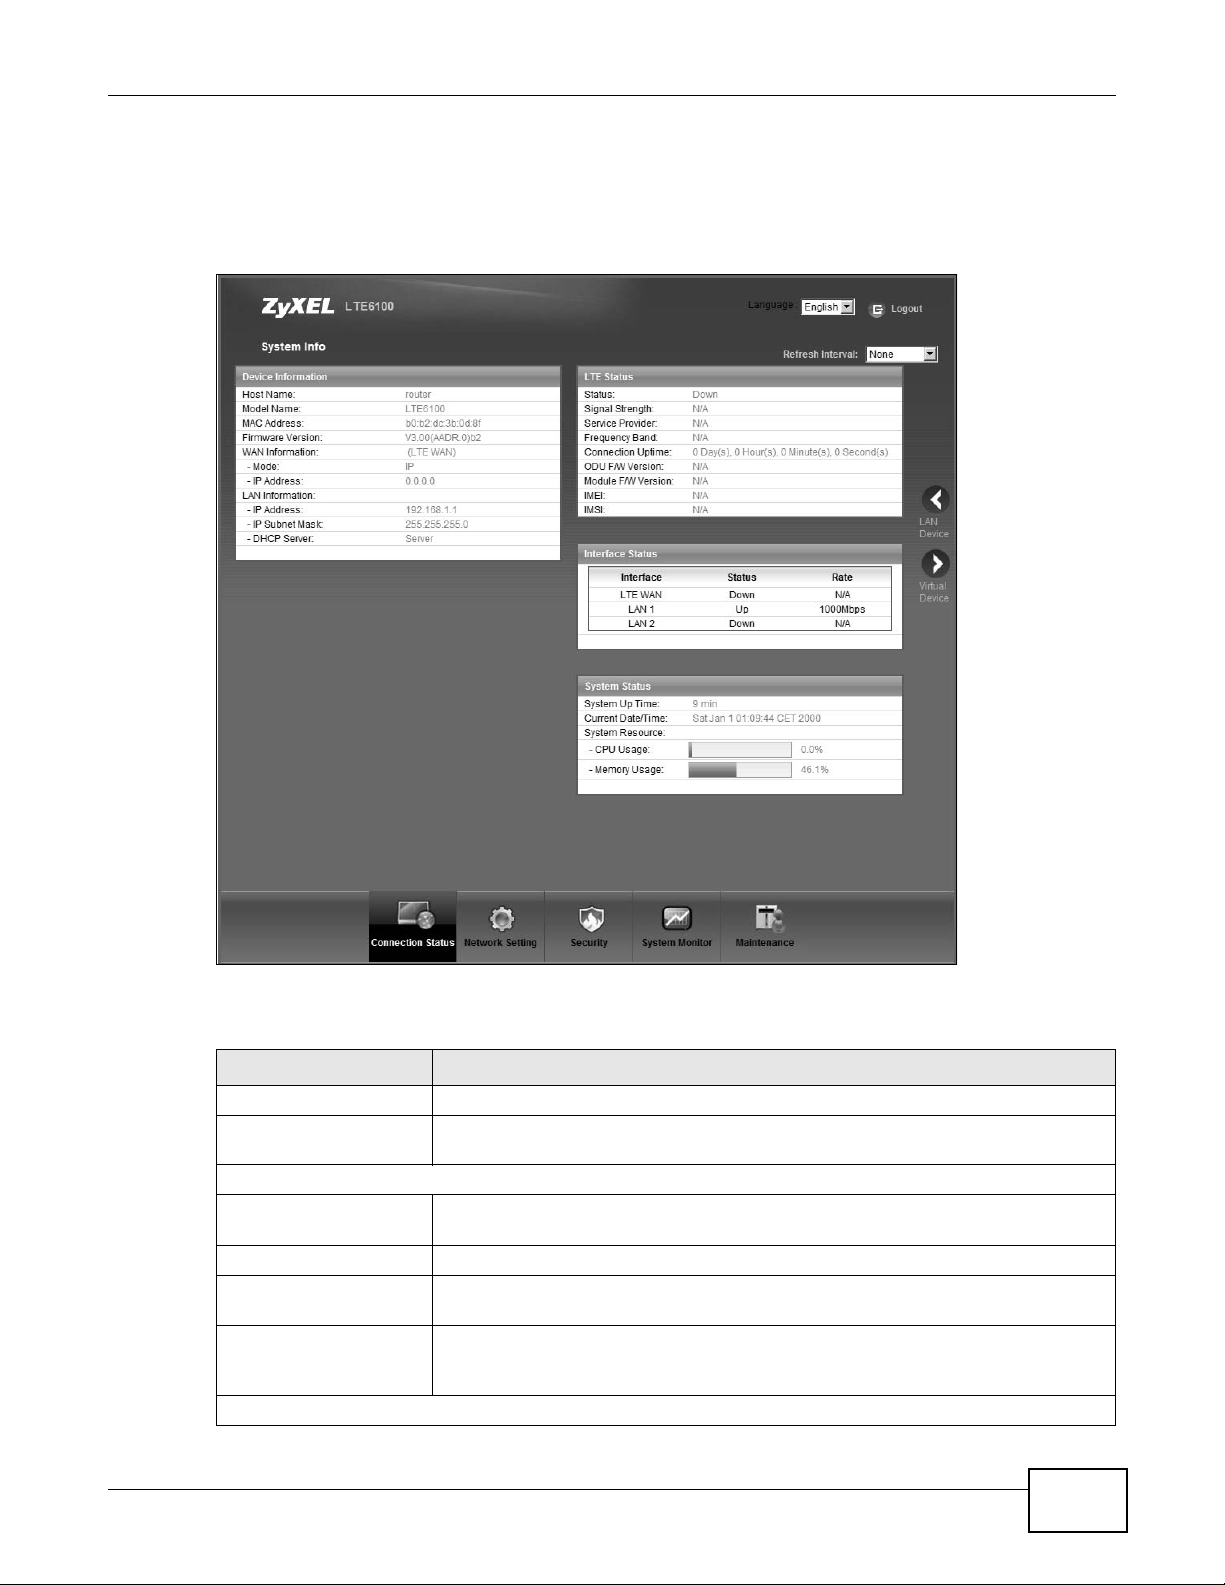
3.3 The System Info Screen
Click Connection Status > System Info to open this screen.
Figure 11 System Info Screen
Chapter 3 Co nnection Status and System Info
Each field is described in the following table.
Table 3 System Info Screen
LABEL DESCRIPTION
Language Select the web configurator language from the drop-down list box.
Refresh Interval Select how often you want the LTE Device to update this screen from the drop-
Device Information
Host Name This field displays the LTE Device system name. It is used for identification. You
Model Name This is the model name of your device.
MAC Address This is the MAC (Media Access Control) or Ethernet address unique to your LTE
Software Version This field displays the current version of the firmware inside the device. It also
WAN Information
LTE6100 User’s Guide
down list box.
can change this in the Maintenance > System screen’s Host Name field.
Device.
shows the date the firmware version was created. Go to the Maintenance >
Firmware Upgrade screen to change it.
27
Page 28

Chapter 3 Connection Status and System Info
Table 3 System Info Screen (continued)
LABEL DESCRIPTION
Mode This is the method of encapsulation used by your ISP.
IP Address This field displays the current IP address of the LTE Device in the WAN.
LAN Information
IP Address This field displays the current IP address of the LTE Device in the LAN.
IP Subnet Mask This field displays the current subnet mask in the LAN.
DHCP Server This field displays what DHCP services the LTE Device is providing to the LAN.
Choices are:
Server - The LTE Device is a DHCP server in the LAN. It assigns IP addresses to
other computers in the LAN.
None - The LTE Device is not providing any DHCP services to the LAN.
LTE Status
Status This displays 4G LTE if there is an LTE connection, otherwise, it displays N/A.
Signal Strength This displays the strength of the LTE connection that the LTE Device has with the
base station which is also known as eNodeB or eNB.
Service Provider This displays the service provider’s name of the connected LTE network.
Frequency Band This displays LTE if there is an LTE connection.
Connection Uptime This displays how long the LTE connection has been available since it was last
established successfully.
ODU F/W Version This displays the firmware version of the outdoor unit.
Module F/W Version This displays the firmware version of LTE module.
IMEI This displays the LTE Device’s International Mobile Equipment Identity number
(IMEI). An IMEI is a unique ID used to identify a mobile device.
IMSI This displays the International Mobile Subscriber Identity (IMSI) of the SIM card
Interface Status
Interface This column displays each interface the LTE Device ha s.
Status This field indicates whether or not the LTE Device is using the interface.
Rate For the LTE WAN interface, this displays 4G LTE if there is an LTE connection.
System Status
System Up Time This field displays how long the LTE Device has been running since it last started
Current Date/Time This field displays the current date and time in the LTE Device. You can change this
System Resource
inserted in the outdoor unit. An IMSI is a unique ID used to identify a mobile
subscriber in a mobile network.
For the LTE WAN interface, this field displays Up when the LTE Device is connected
to an LTE network and Down when the LTE Device does not have an LTE
connection.
For the LAN interface, this field displays Up when the LTE Device is using the
interface and Down when the LTE Device is not using the interface.
For the LAN interface, this displays the port speed and duplex setting.
up. The LTE Device starts up when you plug it in, when you restart it
(Maintenance > Reboot), or when you reset it (see Section 1.6 on page 15).
in Maintenance > Time Setting.
28
LTE6100 User’s Guide
Page 29
Chapter 3 Co nnection Status and System Info
Table 3 System Info Screen (continued)
LABEL DESCRIPTION
CPU Usage This field displays what percentage of the LTE Device’s processing ability is
currently used. When this percentage is close to 100%, the LTE Device is running
at full load, and the throughput is not going to improve anymore. If you want some
applications to have more throughput, you should turn off other applications.
Memory Usage This field displays what percentage of the LTE Device’s memory is currently used.
Usually , this percentage should not increase much. If memory usage does get close
to 100%, the LTE Device is probably becoming unstable, and you should restart
the device. See Chapter 22 on page 119, or turn off the device (unplug the power)
for a few seconds.
LTE6100 User’s Guide
29
Page 30

Chapter 3 Connection Status and System Info
30
LTE6100 User’s Guide
Page 31

4.1 Overview
WAN
LAN
This chapter discusses the LTE Device’s Broadband screens. Use these screens to configure your
LTE Device for Internet access.
A WAN (Wide Area Network) connection is an outside connection to another network or the
Internet. It connects your private networks, such as a LAN (Local Area Network) and other
networks, so that a computer in one location can communicate with computers in other locations.
This LTE Device supports LTE connection for the WAN only.
Figure 12 LAN and WAN
CHAPTER 4
Broadband
4.1.1 What You Can Do in this Chapter
•Use the Broadband screen to view or edit an L TE WAN interface. Y o u can also configure the W AN
settings on the LTE Device for Internet access (Section 4.2 on page 32).
•Use the SIM screen to enter the PIN of your SIM card (Section 4.3 on page 33).
4.1.2 What You Need to Know
The following terms and concepts may help as you read this chapter.
WAN IP Address
The WAN IP address is an IP address for the L TE Device, which makes it accessible from an outside
network. It is used by the LTE Device to communicate with other devices in other networks. It can
be static (fixed) or dynamically assigned by the ISP each time the LTE Device tries to access the
Internet.
LTE6100 User’s Guide 31
Page 32

Chapter 4 Broadband
If your ISP assigns you a static WAN IP address, they should also assign you the subnet mask and
DNS server IP address(es).
APN
Access Point Name (APN) is a unique string which indicates an LTE network. An APN is required for
LTE stations to enter the LTE network and then the Internet.
4.1.3 Before You Begin
You may need to know your Internet access settings such as LTE APN, WAN IP address and SIM
card’s PIN code if the INTERNET light on your LTE Device is off. Get this information from your
service provider.
4.2 The Broadband Screen
The LTE Device must have a WAN interface to allow users to use the LTE connection to access the
Internet. Use the Broadband screen to view or modify a WAN interface.
Click Network Setting > Broadband. The following screen opens.
Figure 13 Network Setting > Broadband
The following table describes the fields in this screen.
Table 4 Network Setting > Broadband
LABEL DESCRIPTION
Internet Setup
Name This is the service name of the connection.
APN This is the name of the LTE network to which the LTE Device will connect.
IPv6/IPv4 Mode This shows whether the connection uses IPv6 or IPv4.
NAT This shows whether NAT is activated or not for this connection. NAT is not available
when the connection uses the bridging service.
Modify Click the Edit icon to configure the connection.
Click the Delete icon to delete this connection from the Device. A window displays
asking you to confirm that you want to delete the connection.
4.2.1 Edit Internet Connection
Use this screen to configure a WAN connection.
32
LTE6100 User’s Guide
Page 33

Chapter 4 Broadband
Click the Edit icon next to the LTE connection, the screen displays as shown next.
Figure 14 Broadband Edit
The following table describes the fields in this screen.
Table 5 Broadband Edit
LABEL DESCRIPTION
Name Specify the name for this WAN interface.
APN Enter the Access Point Name (APN) of an LTE network, which your service provider gave you.
Dial String Enter the dial string for the ISP.
MTU
NAT Enable Select this to activate NAT on the WAN.
Apply as
Default
Gateway
Apply Click Apply to save your changes.
Back Click Back to return to the previous screen.
The Maximum Transmission Unit (MTU) defines the size of the largest packet allowed on an
interface or connection. Enter the MTU for this WAN interface in this field.
Select this option to have the LTE Device use the WAN interface of this connection as the
system default gateway.
4.3 The SIM Screen
Use the SIM screen to enter the PIN of your SIM card.
LTE6100 User’s Guide
If the wrong PIN code is entered 3 times, it will cause the SIM card to be
locked.
33
Page 34

Chapter 4 Broadband
Click Network Setting > Broadband > SIM. The following screen opens.
Figure 15 SIM
The following table describes the fields in this screen.
Table 6 SIM
LABEL DESCRIPTION
PIN Enter the PIN of your SIM card.
Apply Click Apply to save your changes.
Cancel Click Cancel to return to the previous screen without saving.
4.3.1 PUK Code Screen
If the SIM card is locked, use this screen to enter the PUK code.
Note: You may have to ask the service provider for a PUK code to unlock the SIM card.
Figure 16 PUK Code
34
LTE6100 User’s Guide
Page 35

The following table describes the fields in this screen.
Table 7 PUK Code
LABEL DESCRIPTION
PUK code Enter the PUK (Pin Unlock Key) code to unlock the SIM card.
New PIN code Enter the new PIN code for the SIM card.
Apply Click Apply to save your changes.
Cancel Click Cancel to return to the previous screen without saving.
4.4 Technical Reference
The following section contains additional technical information about the LTE Device features
described in this chapter.
Encapsulation
Be sure to use the encapsulation method required by your ISP. The LTE Device supports the
following methods:
Chapter 4 Broadband
IP Address Assignment
A static IP is a fixed IP that your ISP gives you. A dynamic IP is not fixed; the ISP assigns you a
different one each time. The Single User Account feature can be enabled or disabled if you have
either a dynamic or static IP. However the encapsulation method assigned influences your choices
for IP address and default gateway.
DNS Server Address Assignment
Use Domain Name System (DNS) to map a domain name to its corresponding IP address and vice
versa. The DNS server is ex tremely important be ca use without it, you m ust know the IP address of
a computer before you can access it.
The LTE Device can get the DN S server addresses in the following ways.
1 The ISP tells you the DNS server addresses, usually in the form of an information sheet, when you
sign up. If your ISP gives you DNS server addresses, manually enter them in the DNS server fields.
2 If your ISP dynamically assigns the DNS server IP addresses (along with the LTE Device’s WAN IP
address), set the DNS server fields to get the DNS server address from the ISP.
LTE6100 User’s Guide
35
Page 36

Chapter 4 Broadband
LTE Frequency Band Table
See the following table for the frequency bands used in LTE wireless technologies.
Table 8 LTE Wireless Technologies
UPLINK (UL) OPERATING BAND
DOWNLINK (DL) OPERATING BAND
BAND
BASE STATION RECEIVE
CPE TRANSMIT
BASE STATION TRANSMIT
CPE RECEIVE
DUPLEX
MODE
UL (LOW - HIGH) DL (LOW - HIGH)
1 1920 MHz – 1980 MHz 2110 MHz – 2170 MHz FDD
2 1850 MHz – 1910 MHz 1930 MHz – 1990 MHz FDD
3 1710 MHz – 1785 MHz 1805 MHz – 1880 MHz FDD
4 1710 MHz – 1755 MHz 2110 MHz – 2155 MHz FDD
5 824 MHz – 849 MHz 869 MHz – 894MHz FDD
6 830 MHz – 840 MHz 875 MHz – 885 MHz FDD
7 2500 MHz – 2570 MHz 2620 MHz – 2690 MHz FDD
8 880 MHz – 915 MHz 925 MHz – 960 MHz FDD
9 1749.9 MHz – 1784.9 MHz 1844.9 MHz – 1879.9 MHz FDD
10 1710 MHz – 1770 MHz 2110 MHz – 2170 MHz FDD
11 1427.9 MHz – 1447.9 MHz 1475.9 MHz – 1495.9 MHz FDD
12 699 MHz – 716 MHz 729 MHz – 746 MHz FDD
13 777 MHz – 787 MHz 746 MHz – 756 MHz FDD
14 788 MHz – 798 MHz 758 MHz – 768 MHz FDD
15 Reserved Reserved FDD
16 Reserved Reserved FDD
17 704 MHz – 716 MHz 734 MHz – 746 MHz FDD
18 815 MHz – 830 MHz 860 MHz – 875 MHz FDD
19 830 MHz – 845 MHz 875 MHz – 890 MHz FDD
20 832 MHz – 862 MHz 791 MHz – 821 MHz FDD
21 1447.9 MHz – 1462.9 MHz 1495.9 MHz – 1510.9 MHz FDD
...
24 1626.5 MHz – 1660.5 MHz 1525 MHz – 1559 MHz FDD
...
33 1900 MHz – 1920 MHz 1900 MHz – 1920 MHz TDD
34 2010 MHz – 2025 MHz 2010 MHz – 2025 MHz TDD
35 1850 MHz – 1910 MHz 1850 MHz – 1910 MHz TDD
36 1930 MHz – 1990 MHz 1930 MHz – 1990 MHz TDD
37 1910 MHz – 1930 MHz 1910 MHz – 1930 MHz TDD
38 2570 MHz – 2620 MHz 2570 MHz – 2620 MHz TDD
39 1880 MHz – 1920 MHz 1880 MHz – 1920 MHz TDD
40 2300 MHz – 2400 MHz 2300 MHz – 2400 MHz TDD
41 2496 MHz 2690 MHz 2496 MHz 2690 MHz TDD
42 3400 MHz – 3600 MHz 3400 MHz – 3600 MHz TDD
36
LTE6100 User’s Guide
Page 37

Table 8 LTE Wireless Technologies (continued)
UPLINK (UL) OPERATING BAND
DOWNLINK (DL) OPERATING BAND
Chapter 4 Broadband
BAND
BASE STATION RECEIVE
CPE TRANSMIT
UL (LOW - HIGH) DL (LOW - HIGH)
43 3600 MHz – 3800 MHz 3600 MHz – 3800 MHz TDD
Note 1: Band 6 is not applicable
BASE STATION TRANSMIT
CPE RECEIVE
DUPLEX
MODE
LTE6100 User’s Guide
37
Page 38

Chapter 4 Broadband
38
LTE6100 User’s Guide
Page 39

5.1 Overview
WAN
LAN
A Local Area Network (LAN) is a shared communication system to which many computers are
attached. A LAN is usually located in one immediate area such as a building or floor of a building.
The LAN screens can help you configure a LAN DHCP server and manage IP addresses.
CHAPTER 5
Home Networking
5.1.1 What You Can Do in this Chapter
•Use the LAN Setup screen to set the LAN IP address, DHCP, subnet mask, and DNS settings
(Section 5.2 on page 41).
•Use the Static DHCP screen to assign IP addresses on the LAN to specific individual computers
based on their MAC Addresses (Section 5.3 on page 42).
•Use the UPnP screen to enable UPnP (Section 5.4 on page 43).
5.1.2 What You Need To Know
The following terms and concepts may help as you read this chapter.
5.1.2.1 About LAN
IP Address
Similar to the way houses on a street share a common street name, so too do computers on a LAN
share one common network number. This is known as an Internet Protocol address.
LTE6100 User’s Guide 39
Page 40

Chapter 5 Home Networking
Subnet Mask
The subnet mask specifies the network number portion of an IP address. Your LTE Device will
compute the subnet mask automatically based on the IP address that you entered. You don't need
to change the subnet mask computed by the LTE Device unless you are instructed to do otherwise.
DHCP
DHCP (Dynamic Host Configuration Protocol) allows clients to obtain TCP/IP configuration at startup from a server. This LTE Device has a built-in DHCP server capability that assigns IP addresses
and DNS servers to systems that support DHCP client capability.
DNS
DNS (Domain Name System) maps a domain name to its corresponding IP address and vice versa.
The DNS server is extremely important because without it, you must know the IP address of a
computer before you can access it. The DNS server addresses you enter when you set up DHCP are
passed to the client machines along with the assigned IP address and subnet mask.
5.1.2.2 About UPnP
How do I know if I'm using UPnP?
UPnP hardware is identified as an icon in the Network Connections folder (Windows XP). Each UPnP
compatible device installed on your network will appear as a separate icon. Selecting the icon of a
UPnP device will allow you to access the information and properties of that device.
Cautions with UPnP
The automated nature of NAT traversal applications in establishing their own services and opening
firewall ports may present network security issues. Network information and configur ation may also
be obtained and modified by users in some network environments.
When a UPnP device joins a network, it announces its presence with a multicast message. For
security reasons, the LTE Device allows multicast messages on the LAN only.
All UPnP-enabled devices may communicate freely with each other without additional configuration.
Disable UPnP if this is not your intention.
40
LTE6100 User’s Guide
Page 41

5.2 The LAN Setup Screen
Click Network Setting > Home Networking to open the LAN Setup screen. Use this screen to
set the Local Area Network IP address and subnet mask of your LTE Device and configure the DNS
server information that the LTE Device sends to the DHCP client devices on the LAN.
Figure 17 Network Setting > Home Networking > LAN Setup
Chapter 5 Home Networking
The following table describes the fields in this screen.
Table 9 Network Setting > Home Networking > LAN Setup
LABEL DESCRIPTION
LAN IP Setup
IP Address Enter the LAN IP address you want to assign to your LTE Device in dotted decimal notation,
IP Subnet Mask Type the subnet mask of your network in dotted decimal notation, for example
DHCP Server State
DHCP Select Enable to have your LTE Device assign IP addresses, an IP default gateway and DNS
IP Addressing Values
IP Pool Starting
Address
Pool Size This field specifies the size, or count of the IP address pool.
DNS Values
for example, 192.168.1.1 (factory default).
255.255.255.0 (factory default). Your LTE Device automatically computes the subnet mask
based on the IP address you enter, so do not change this field unless you are instructed to
do so.
servers to LAN computers and other devices that are DHCP clients.
If you select Disable, you need to manually configure the IP addresses of the computers
and other devices on your LAN.
When DHCP is used, the following fields need to be set.
This field specifies the first of the contiguous addresses in the IP address pool.
LTE6100 User’s Guide
41
Page 42

Chapter 5 Home Networking
Table 9 Network Setting > Home Networking > LAN Setup (continued)
LABEL DESCRIPTION
DNS Server 1-3 Select From ISP if your ISP dynamically assigns DNS server information (and the LTE
Apply Click Apply to save your changes.
Cancel Click Cancel to restore your previously saved settings.
Device's WAN IP address).
Select DNS-Proxy to have the L TE Device send its own address to the LAN clients for them
to use as the DNS server.
Select User-Defined if you have the IP address of a DNS serv er. Enter the DNS server's IP
address in the field to the right. If y ou chose User-Defined, but leave the IP addres s set to
0.0.0.0, User-Defined changes to None after you click Apply. If you set a second choice
to User-Defined, and enter the same IP address, the second User-Defined changes to
None after you click Apply.
Select None if you do not want to configure DNS servers. You must have another DHCP
sever on your LAN, or else the computers must have their DNS server addresses manually
configured. If you do not configure a DNS server, you must know the IP address of a
computer in order to access it.
5.3 The Static DHCP Screen
This table allows you to assign IP addresses on the LAN to specific individual computers based on
their MAC Addresses.
Every Ethernet device has a unique MAC (Media Access Control) address. The MAC address is
assigned at the factory and consists of six pairs of hexadecimal characters, for example,
00:A0:C5:00:00:02.
5.3.1 Before You Begin
Find out the MAC addresses of your network devices if you intend to add them to the Static DHCP
screen.
Use this screen to change your LTE Device’ s static DHCP settings. Click Network Setting > Home
Networking > Static DHCP to open the following screen.
Figure 18 Network Setting > Home Networking > Static DHCP
42
The following table describes the labels in this screen.
Table 10 Network Setting > Home Networking > Static DHCP
LABEL DESCRIPTION
Add new static
lease
# This is the index number of the entry.
Click this to add a new static DHCP entry.
LTE6100 User’s Guide
Page 43

Chapter 5 Home Networking
Table 10 Network Setting > Home Networking > Static DHCP (continued)
LABEL DESCRIPTION
Status This field displays whether the client is connected to the LTE Device.
Host Name This field displays the client host name.
MAC Address The MAC (Media Access Control) or Ethernet address on a LAN (Local Area Network) is
unique to your computer (six pairs of hexadecimal notation).
A network interface card such as an Ethernet adapter has a hardwired address that is
assigned at the factory. This address follows an industry standard that ensures no ot her
adapter has a similar address.
IP Address This field displays the IP address relative to the # field listed above.
Reserve Select the check box in the heading row to automatically select all check boxes or select
Apply Click Apply to save your changes.
Cancel Click Cancel to restore your previously saved settings.
Refresh Click Refresh to reload the DHCP table.
the check box(es) in each entry to have the LTE Device always assign the selected
entry(ies)’s IP address(es) to the corresponding MAC address(es) (and host name(s)). You
can select up to 128 entries in this table.
If you click Add new static lease in the Static DHCP screen, the following screen displays.
Figure 19 Static DHCP: Add
The following table describes the labels in this screen.
Tab le 11 Static DHCP: Add
LABEL DESCRIPTION
MAC Address Enter the MAC address of a computer on your LAN.
IP Address Enter the IP address that you want to assign to the computer on your LAN with the MAC
Apply Click Apply to save your changes.
Back Click Back to exit this screen without saving.
address that you will also specify.
5.4 The UPnP Screen
Universal Plug and Play (UPnP) is a distributed, open networking standard that uses TCP/IP for
simple peer-to-peer network connectivity between devices. A UPnP device can dynamically join a
network, obtain an IP address, convey its capabilities and learn about other devices on the network.
In turn, a device can leave a network smoothly and automatically when it is no longer in use.
LTE6100 User’s Guide
43
Page 44

Chapter 5 Home Networking
Use the following screen to configure the UPnP settings on your LTE Device. Click Network Setting
> Home Networking > Static DHCP > UPnP to display the screen shown next.
Figure 20 Network Setting > Home Networking > UPnP
The following table describes the labels in this screen.
Table 12 Network Settings > Home Networking > UPnP
LABEL DESCRIPTION
UPnP Select Enable to activate UPnP. Be aware that anyone could use a UPnP application to open
Apply Click Apply to save your changes.
the web configurator's login screen without entering the LTE Device's IP address (although
you must still enter the password to access the web configurator).
44
LTE6100 User’s Guide
Page 45

6.1 Overview
WAN
R1
R2
A
R3
LAN
The LTE Device usually uses the default gateway to route outbound traffic from computers on the
LAN to the Internet. To have the LTE Device send data to devices not reachable through the default
gateway, use static routes.
For example, the next figure shows a computer (A) connected to the LTE Device’s LAN interface.
The L TE Device routes most tr affic from A to the Internet through the LTE Device’s default gatew ay
(R1). You create one static route to connect to services offered by your ISP behind router R2. You
create another static route to communicate with a separate network behind a router R3 connected
to the LAN.
Figure 21 Example of Static Routing Topology
CHAPTER 6
Routing
LTE6100 User’s Guide 45
Page 46

Chapter 6 Routing
6.2 Configuring Static Route
Use this screen to view and configure IP static routes on the LTE Device. Click Network Setting >
Static Route to open the following screen.
Figure 22 Network Setting > Static Route
The following table describes the labels in this screen.
Table 13 Network Setting > Static Route
LABEL DESCRIPTION
Add New Static
Route
# This is the number of an individual static route.
Active This indicates whether the rule is active or not.
Status This shows whether the static route is currently in use or not. A yellow bulb signifies that
Name This is the name that describes or identifies this route.
Destination IP This parameter specifies the IP network address of the final destination. Routing is always
Gateway This is the IP address of the gateway. The gateway is a router or switch on the same
Subnet Mask This parameter specifies the IP network subnet mask of the final destination.
Interface This indicates which interface handles the traffic forwarded by this route.
Modify Click the Edit icon to go to the screen where you can set up a static route on the LTE
Click this to set up a new static route on the LTE Device.
A yellow bulb signifies that this static route is active. A gray bulb signifies that this static
route is not active.
this static route is in use. A gray bulb signifies that this static route is not in use.
based on network number.
network segment as the device's LAN or WAN port. The gateway helps forward packets to
their destinations.
Device.
Click the Delete icon to remove a static route from the LTE Device.
46
LTE6100 User’s Guide
Page 47

6.2.1 Add/Edit Static Route
Click add new Static Route in the Routing screen or click the Edit icon next to a rule. The
following screen appears. Use this screen to configure the required information for a static route.
Figure 23 Routing: Add/Edit
The following table describes the labels in this screen.
Chapter 6 Routing
Table 14 Routing: Add/Edit
LABEL DESCRIPTION
Active Click this to activate this static route.
Route Name Enter the name of the IP static route. Leave this field blank to delete this static route.
Destination IP
Address
IP Subnet Mask Enter the IP subnet mask here.
Gateway IP
Address
Bound Interface You can decide if you want to forward packets to a gateway IP address or a bound
Apply Click Apply to save your changes.
Back Click Back to exit this screen without saving.
This parameter specifies the IP network addres s of the final des tination. Routing is always
based on network number. If you need to specify a route to a single host, use a subnet
mask of 255.255.255.255 in the subnet mask field to force the network number to be
identical to the host ID.
You can decide if you want to forward packets to a gateway IP address or a bound
interface.
If you want to configure Gateway IP Address, enter the IP address of the next-hop
gateway. The gateway is a router or switch on the same networ k segment as the device's
LAN or WAN port. The gateway helps forward packets to their destinations.
interface.
If you want to configure Bound Interface, select the check box and choose an interface
through which the traffic is sent.
LTE6100 User’s Guide
47
Page 48

Chapter 6 Routing
48
LTE6100 User’s Guide
Page 49

7.1 Overview
This chapter discusses the LTE Device’s QoS screens. Use these screens to set up your LTE Device
to use QoS for traffic management.
Quality of Service (QoS) refers to both a network’s ability to deliver data with minimum delay, and
the networking methods used to control the use of bandwidth. QoS allows the LTE Device to group
and prioritize application traffic and fine-tune network performance.
Without QoS, all traffic data is equally likely to be dropped when the network is congested. This can
cause a reduction in network performance and make the network inadequate for time-critical
application such as video-on-demand.
The LTE Device assigns each packet a priority and then queues the packet accordingly. Packets
assigned a high priority are processed more quickly than those with low priority if there is
congestion, allowing time-sensitive applications to flow more smoothly. Time-sensitive applications
include both those that require a low level of latency (delay) and a low level of jitter (variations in
delay) such as Internet gaming, and those for which jitter alone is a problem such as Internet radio
or streaming video.
CHAPTER 7
Quality of Service (QoS)
7.1.1 What You Can Do in this Chapter
•Use the General screen to enable QoS, set the bandwidth, and allow the LTE Device to
automatically assign priority to upstream traffic according to the IP precedence or packet length
(Section 7.2 on page 50).
•Use the Queue Setup screen to configure QoS queue assignment (Section 7.3 on page 51).
•Use the Class Setup screen to set up classifiers to sort traffic into different flows and assign
priority and define actions to be performed for a classified traffic flow (Section 7.4 on page 52).
•Use the Monitor screen to view the LTE Device’s QoS-related packet statistics (Section 7.5 on
page 56).
7.1.2 What You Need to Know
The following terms and concepts may help as you read this chapter.
QoS versus Cos
QoS is used to prioritize source-to-destination traffic flows. All packets in the same flow are given
the same priority. CoS (class of service) is a way of managing traffic in a network by grouping
similar types of traffic together and treating each type as a class. You can use CoS to give different
priorities to different packet types.
LTE6100 User’s Guide 49
Page 50

Chapter 7 Qual ity of Service (QoS)
CoS technology includes DiffServ (Differentiated Services or DS). DiffServ is a new protocol and
defines a new DS field, which replaces the eight-bit ToS (Type of Service) field in the IP header.
Tagging and Marking
In a QoS class, you can configure whether to add or change the DSCP (DiffServ Code Point) v alue in
a matched packet. When the packet passes through a compatible network, the networking device,
such as a backbone switch, can provide specific treatment or service based on the tag or marker.
7.2 The QoS General Screen
Use this screen to enable or disable QoS, set the bandwidth, and select to have the LTE Device
automatically assign priority to upstream traffic according to the IP precedence or packet length.
Click Network Setting > QoS to open the General screen.
Figure 24 Network Setting > QoS > General
The following table describes the labels in this screen.
Table 15 Network Setting > QoS > General
LABEL DESCRIPTION
Active QoS Select the ch eck box to turn on QoS to improve your network performance.
You can give priority to traffic that the LTE Device forwards out through the WAN interface.
Give high priority to voice and video to make them run more smoothly. Similarly, give low
priority to many large file downloads so that they do not reduce the quality of other
applications.
Apply Click Apply to save your changes.
Cancel Click Cancel to restore your previously saved settings.
50
LTE6100 User’s Guide
Page 51

7.3 The Queue Setup Screen
Use this screen to configure QoS queue assignment. Click Network Setting > QoS > Queue
Setup to open the screen as shown next.
Figure 25 Network Setting > QoS > Queue Setup
The following table describes the labels in this screen.
Table 16 Network Setting > QoS > Queue Setup
LABEL DESCRIPTION
Add new
Queue
# This is the index number of this entry.
Status This indicates whether the queue is active or not.
Name This sh ows the descriptive name of this queue.
Interface This shows the name of the LTE Device’s interface through which traffic in this queue passes.
Priority This shows the priority of this queue.
Weight This shows the weight of this queue.
Buffer
Management
Rate L imit
(kbps)
Modify Click the Edit icon to edit the queue.
Click this to create a new entry.
A yellow bulb signifies that this queue is ac tive. A gray bulb signifies that this queue is not
active.
This shows the queue management algorithm used by the LTE Device.
This shows the maximum transmission rate allowed for traffic on this queue.
Click the Delete icon to delete an existing queue. Note that subsequent rules move up by
one when you take this action.
Chapter 7 Qual ity of Service (QoS)
LTE6100 User’s Guide
51
Page 52

Chapter 7 Qual ity of Service (QoS)
7.3.1 Add/Edit a QoS Queue
Use this screen to configure a queue. Click Add new Queue in the Queue Setup screen or the
Edit icon next to an existing queue.
Figure 26 Queue Setup: Add/Edit
The following table describes the labels in this screen.
Table 17 Queue Setup: Add/Edit
LABEL DESCRIPTION
Active Select to enable or disable this queue.
Name Enter the descriptive name of this queue.
Interface This shows the interface of this queue.
Priority Select the priority level (from 1 to 7) o f this queue.
The larger the number , the higher the priority level. Traffic assigned to higher priority queues
gets through faster while traffic in lower priority queues is dropped if the network is
congested.
Weight Select the weight (from 1 to 15) of this queue.
If two queues have the same priority level, the LTE Device divides the bandwidth across the
queues according to their weights. Queues with larger weights get more bandwidth than
queues with smaller weights.
Rate L imit Specify the maximum transmission rate (in Kbps) allowed for traffic on this queue.
Apply Click Apply to save your changes.
Back Click Back to return to the previous screen without saving.
7.4 The Class Setup Screen
Use this screen to add, edit or delete QoS classifiers. A classifier groups traffic into data flows
according to specific criteria such as the source address, destination address, source port number,
destination port number or incoming interface. For example, you can configure a classifier to select
traffic from the same protocol port (such as Telnet) to form a flow.
You can give different priorities to traffic that the LTE Device forwards out through the WAN
interface. Give high priority to voice and video to make them run more smoothly . Similarly, give low
priority to many large file downloads so that they do not reduce the quality of other applications.
52
LTE6100 User’s Guide
Page 53

Chapter 7 Qual ity of Service (QoS)
Click Network Setting > QoS > Class Setup to open the following screen.
Figure 27 Network Setting > QoS > Class Setup
The following table describes the labels in this screen.
Table 18 Network Setting > QoS > Class Setup
LABEL DESCRIPTION
Add new
Classifier
Order This field displays the order number of the classifier.
Status This indicates whether the classifier is active or not.
Class Name This is the name of the classifier.
Classification
Criteria
Forwar d to This is the interface through which traffic that matches this classifier is forwarded out.
DSCP Mark This is the DSCP number added to traffic of this classifier.
To Queue This is the name of the queue in which traffic of this classifier is put.
Modify Click the Edit icon to edit the classifier.
Click this to create a new classifier.
A yellow bulb signifies that this classifier is active. A gray bulb signifies that this classifier is
not active.
This shows criteria specified in this classifier, for example the interface from which traffic of
this class should come and the source MAC address of traffic that matches this classifier.
LTE6100 User’s Guide
Click the Delete icon to delete an existing classifier . Note that subsequent rules move up by
one when you take this action.
53
Page 54

Chapter 7 Qual ity of Service (QoS)
7.4.1 Add/Edit QoS Class
Click Add new Classifier in the Class Setup screen or the Edit icon next to an existing classifier
to configure it.
Figure 28 Class Setup: Add/Edit
54
The following table describes the labels in this screen.
Table 19 Class Setup: Add/Edit
LABEL DESCRIPTION
Class Configuration
Active Select to enable this classifier.
Class Name Enter a descriptive name of up to 32 printable English keyboard characters, including
spaces.
Classification
Order
Select an existing number for where you want to put this classifier to move the classifier to
the number you selected after clicking Apply.
Select Last to put this rule in the back of the classifier list.
LTE6100 User’s Guide
Page 55

Chapter 7 Qual ity of Service (QoS)
Table 19 Class Setup: Add/Edit (continued)
LABEL DESCRIPTION
Forwar d to
Interface
DSCP Mark This field is available only when you select the Ether Type check box in Criteria
To Queue Select a queue that applies to this class.
Criteria Configuration
Use the following fields to configure the criteria for traffic classification.
Basic
From Interface Select whether the traffic class comes from the LTE, Local, or Lan in terface.
Ether Type Select a predefined application to configure a class for the matched traffic.
Source
MAC Address Select the check box and enter the source MAC address of the packet.
MAC Mask Type the mask for the specified MAC address to determine which bits a packet’s MAC
Select a WAN interface through which traffic of this class will be forwarded out. If you select
Unchange, the LTE Device forward traffic of this class according to the default routing
table.
Configuration-Basic section.
If you select Mark, enter a DSCP value with which the LTE Device replaces the DSCP field in
the packets.
If you select Unchange, the LTE Device keep the DSCP field in the packets.
You should have configured a queue in the Queue Setup screen already.
If you select IP, you also need to configure source or destination MAC address, IP address,
DHCP options, DSCP value or the protocol type.
address should match.
Enter “f” for each bit of the specified source MAC address that the traffic’s MAC address
should match. Enter “0“ for the bit(s) of the matched traffic’ s MAC address, which can be of
any hexadecimal character(s). For example, if you set the MAC address to
00:13:49:00:00:00 and the mask to ff:ff:ff:00:00:00, a packet with a MAC address of
00:13:49:12:34:56 matches this criteria.
IP Address Select the check box and enter the source IP address in dotted decimal notation. A blank
source IP address means any source IP address.
IP Subnet
Mask
Port Range If you select TCP or UDP in the IP Protocol field, select the check box and enter the port
Exclude Select this option to exclude the packets that match the specified criteria from this
Destination
MAC Address Select the check box and enter the destination MAC address of the packet.
MAC Mask Type the mask for the specified MAC address to determine which bits a packet’s MAC
IP Address Select the check box and enter the destination IP address in dotted decimal notation. A
IP Subnet
Mask
Enter the source subnet mask.
number(s) of the source.
classifier.
address should match.
Enter “f” for each bit of the specified source MAC address that the traffic’s MAC address
should match. Enter “0“ for the bit(s) of the matched traffic’ s MAC address, which can be of
any hexadecimal character(s). For example, if you set the MAC address to
00:13:49:00:00:00 and the mask to ff:ff:ff:00:00:00, a packet with a MAC address of
00:13:49:12:34:56 matches this criteria.
blank source IP address means any source IP address.
Enter the destination subnet mask.
LTE6100 User’s Guide
55
Page 56

Chapter 7 Qual ity of Service (QoS)
Table 19 Class Setup: Add/Edit (continued)
LABEL DESCRIPTION
Port Range If you select TCP or UDP in the IP Protocol field, select the check box and enter the port
Exclude Select this option to exclude the packets that match the specified criteria from this
Others
IP Protocol This field is available only when you select IP in the Ether Type field.
IP Packet
Length
DSCP This field is available only when you select IP in the Ether Type field.
Exclude Select this option to exclude the packets that match the specified criteria from this
Apply Click Apply to save your changes.
Back Click Back to return to the previous screen without saving.
number(s) of the source.
classifier.
Select this option and select the protocol (service type) from TCP or UDP. If you select
User defined, enter the protocol (service type) number.
This field is available only when you select IP in the Ether Type field.
Select this option and enter the minimum and maximum packet length (from 46 to 1504) in
the fields provided.
Select this option and specify a DSCP (DiffServ Code Point) number between 0 and 63 in
the field provided.
classifier.
7.5 The QoS Monitor Screen
To view the LTE Device’s QoS packet statistics, click Network Setting > QoS > Monitor. The
screen appears as shown.
Figure 29 Network Setting > QoS > Monitor
56
LTE6100 User’s Guide
Page 57

Chapter 7 Qual ity of Service (QoS)
The following table describes the labels in this screen.
Table 20 Network Setting > QoS > Monitor
LABEL DESCRIPTION
Monitor
Refresh
Interval
Status
# This is the index number of the entry.
Name This shows the name of the WAN interface on the LTE Device.
Pass Rate (bps) This shows how much traffic (bps) forwarded to this interface are transmitted successfully.
Queue Monitor
# This is the index number of the entry.
Name This shows the name of the queue.
Pass Rate (bps) This shows how much traffic (bps) assigned to this queue are transmitte d successfully.
Drop Rate (bps) This shows how much traffic (bps) assigned to this queue are dropped.
Select how often you want the LTE Device to update this screen. Select No Refresh to stop
refreshing statistics.
7.6 QoS Technical Reference
This section provides some technical background information about the topics covered in this
chapter.
7.6.1 DiffServ
QoS is used to prioritize source-to-destination traffic flows. All packets in the flow are given the
same priority. You can use CoS (class of service) to give different priorities to different packet
types.
DiffServ (Differentiated Services) is a class of service (CoS) model that marks packets so that they
receive specific per-hop treatment at DiffServ-compliant network devices along the route based on
the application types and traffic flow. Packets are marked with DiffServ Code Points (DSCPs)
indicating the level of service desired. This allows the intermediary DiffServ-compliant network
devices to handle the packets differently depending on the code points without the need to
negotiate paths or remember state information for every flow. In addition, applications do not have
to request a particular service or give advanced notice of where the traffic is going.
DSCP and Per-Hop Behavior
DiffServ defines a new DS (Differentiated Services) field to replace the Type of Service (TOS) field
in the IP header. The DS field contains a 2-bit unused field and a 6-bit DSCP field which can define
up to 64 service levels. The following figure illustrates the DS field.
DSCP is backward compatible with the three precedence bits in the ToS octet so that non-DiffServ
compliant, ToS-enabled network device will not conflict with the DSCP mapping.
LTE6100 User’s Guide
DSCP (6 bits) Unused (2 bits)
57
Page 58

Chapter 7 Qual ity of Service (QoS)
The DSCP value determines the forwarding behavior, the PHB (Per-Hop Behavior), that each packet
gets across the DiffServ network. Based on the marking rule, different kinds of traffic can be
marked for different kinds of forwarding. Resources can then be allocated according to the DSCP
values and the configured policies.
58
LTE6100 User’s Guide
Page 59

Network Address Translation (NAT)
8.1 Overview
NAT (Network Address Translation - NA T, RFC 1631) is the translation of the IP address of a host in
a packet, for example, the source address of an outgoing packet, used within one network to a
different IP address known within another network.
8.1.1 What You Can Do in this Chapter
•Use the Port Forwarding screen to configure forward incoming service requests to the server(s)
on your local network (Section 8.2 on page 60).
•Use the DMZ screen to view and configure the IP address of your network DMZ. (Section 8.3 on
page 63).
•Use the Sessions screen to limit the number of concurrent NAT sessions each client can use
(Section 8.4 on page 63).
CHAPTER 8
8.1.2 What You Need To Know
The following terms and concepts may help as you read this chapter.
Inside/Outside and Global/Local
Inside/outside denotes where a host is located relative to the LTE Device, for example, the
computers of your subscribers are the inside hosts, while the web servers on the Internet are the
outside hosts.
Global/local denotes the IP address of a host in a packet as the packet traverses a router, for
example, the local address refers to the IP address of a host when the packet is in the local
network, while the global address refers to the IP address of the host when the same packet is
traveling in the WAN side.
NAT
In the simplest form, NAT changes the source IP address in a packet received from a subscriber
(the inside local address) to another (the inside global address) before forwarding the packet to the
WAN side. When the response comes back, NAT translates the destination address (the inside
global address) back to the inside local address before forwarding it to the original inside host.
LTE6100 User’s Guide 59
Page 60

Chapter 8 Network Address Translation (NAT)
A=10.0.0.33
D=10.0.0.36
C=10.0.0.35
B=10.0.0.34
WAN
LAN
10.0.0.1
IP Address assigned by ISP
Port Forwarding
A port forwarding set is a list of inside (behind NAT on the LAN) servers, for example, web or FTP,
that you can make visible to the outside world even though NAT makes your whole inside network
appear as a single computer to the outside world.
Finding Out More
See Section 8.5 on page 64 for advanced technical information on NAT.
8.2 The Port Forwarding Screen
Use the Port Forwarding screen to forward incoming service requests to the server(s) on your
local network.
You may enter a single port number or a range of port numbers to be forw arde d , an d the local IP
address of the desired server. The port number identifies a service; for example, web service is on
port 80 and FTP on port 21. In some cases, such as for unknown services or where one server can
support more than one service (for example both FTP and web service), it might be better to
specify a range of port numbers. You can allocate a serv er IP address that corresponds to a port or
a range of ports.
The most often used port numbers and services are shown in Appendix D on page 177. Please refer
to RFC 1700 for further information about port numbers.
Note: Many residential broadband ISP accounts do not allow you to run any server
processes (such as a Web or FTP server) from your location. Your ISP may
periodically check for servers and may suspend your account if it discovers any
active services at your location. If you are unsure, r e fer to your ISP.
Configuring Servers Behind Port Forwarding (Example)
Let's say you want to assign ports 21-25 to one FTP, Telnet and SMTP server (A in the example),
port 80 to another (B in the example) and assign a default server IP address of 10.0.0.35 to a third
(C in the example). You assign the LAN IP addresses and the ISP assigns the WAN IP address. The
NAT network appears as a single host on the Internet.
Figure 30 Multiple Servers Behind NAT Example
60
LTE6100 User’s Guide
Page 61

8.2.1 The Port Forwarding Screen
Click Network Setting > NAT to open the Port Forwarding screen.
See Appendix D on page 177 for port numbers commonly used for particular services.
Figure 31 Network Setting > NAT > Port Forwarding
The following table describes the fields in this screen.
Table 21 Network Setting > NAT > Port Forwarding
LABEL DESCRIPTION
Add new rule Click this to add a new port forwarding rule.
# This is the index number of the entry.
Status This field indicates whether the rule is active or not.
A yellow bulb signifies that this rule is active. A gray bulb signifies that this rule is not
active.
Service Name This is the service’s name. This shows User Defined if you manually added a service. Y ou
can change this by clicking the edit icon.
WAN Interface This shows the WAN interface through which the servic e is forwarded.
Start Port This is the first external port number that identifies a service.
End Port This is the last external port number that identifies a service.
Translation Start
Port
Translation End
Port
Server IP Address This is the server’s IP address.
Protocol This shows the IP protocol supported by this virtual server, whether it is TCP, UDP, or
Modify Click the Edit icon to edit the port forwarding rule.
Apply Click Apply to save your changes.
Cancel Click Cancel to restore your previously saved settings.
This is the first internal port number that identifies a service.
This is the last internal port number that identifies a service.
TCP/UDP.
Click the Delete icon to delete an existing port forwarding rule. Note that subsequent
address mapping rules move up by one when you take this action.
Chapter 8 Network Address Translation (NAT)
LTE6100 User’s Guide
61
Page 62

Chapter 8 Network Address Translation (NAT)
8.2.2 The Port Forwarding Edit Screen
This screen lets you create or edit a port forwarding rule. Click Add new rule in the Port
Forwarding screen or the Edit icon next to an existing rule to open the following screen.
Figure 32 Port Forwarding: Add/Edit
The following table describes the labels in this screen.
Table 22 Port Forwarding: Add/Edit
LABEL DESCRIPTION
Service Name Enter a name to identify this rule using keyboard characters (A-Z, a-z, 1-2 and so on).
WAN Interface This is the WAN interface through which the service is forwarded.
Start Port Enter the original destination port for the packets.
To forward only one port, enter the port number again in the External End Port field.
To forward a series of ports, enter the start port number here and the end port number in
the External End Port field.
End Port Enter the last port of the original destination port range.
To forward only one port, enter the port number in the External Start Port field above
and then enter it again in this field.
To forward a series of ports, enter the last port number in a series that begins with the
port number in the External Start Port field above.
T r anslation Start
Port
Translation End
Port
Server IP
Address
Protocol
Apply Click Apply to save your chang es.
Back Click Back to return to the previous screen without saving.
This shows the port number to which you want the LTE Device to translate the incoming
port. For a range of ports, enter the first number of the range to which you want the
incoming ports translated.
This shows the last port of the translated port range.
Enter the inside IP address of the virtual server here.
Select the protocol supported by this virtual server. Choices are TCP, UDP, or TCP/UDP.
62
LTE6100 User’s Guide
Page 63

8.3 The DMZ Screen
Use this page to set the IP address of your network DMZ (if you have one) for the LTE Device. All
incoming packets received by this LTE Device’s WAN interface will be forwarded to the default
server you set.
Click Network Setting > NAT > DMZ to display the following screen.
Note: The configuration you set in this screen takes priority t han the Network Setting >
NAT > Port Forwarding screen.
Figure 33 Network Setting > NAT > DMZ
The following table describes the fields in this screen.
Table 23 Network Setting > NAT > DMZ
LABEL DESCRIPTION
Default Server
Address
Apply Click Apply to save your changes.
Cancel Click Cancel to restore your previously saved settings.
Enter the IP address of your ne twork DMZ host, if you hav e one. 0.0.0.0 means this feature
is disabled.
Chapter 8 Network Address Translation (NAT)
8.4 The Sessions Screen
Use the Sessions screen to limit the number of concurrent NAT sessions each client can use.
Click Network Setting > NAT > Sessions to display the following screen.
Figure 34 Network Setting > NAT > Sessions
LTE6100 User’s Guide
63
Page 64

Chapter 8 Network Address Translation (NAT)
The following table describes the fields in this screen.
Table 24 Network Setting > NAT > Sessions
LABEL DESCRIPTION
MAX NAT
Session
Apply Click Apply to save your changes.
Cancel Click Cancel to restore your previously saved settings.
Use this field to set a common limit to the number of concurrent NAT sessions each client
computer can have.
If only a few clients use peer to peer applications, you can raise this number to improve
their performance. With heavy peer to peer application use, lower this number to ensure no
single client uses too many of the available NAT sessions.
8.5 Technical Reference
This section provides some technical background information about the topics covered in this
chapter.
8.5.1 NAT Definitions
Inside/outside denotes where a host is located relative to the LTE Device, for example, the
computers of your subscribers are the inside hosts, while the web servers on the Internet are the
outside hosts.
Global/local denotes the IP address of a host in a packet as the packet traverses a router, for
example, the local address refers to the IP address of a host when the packet is in the local
network, while the global address refers to the IP address of the host when the same packet is
traveling in the WAN side.
Note that inside/outside refers to the location of a host, while global/local refers to the IP address
of a host used in a packet. Thus, an inside local address (ILA) is the IP address of an inside host in
a packet when the packet is still in the local network, while an inside global address (IGA) is the IP
address of the same inside host when the packet is on the WAN side. The following table
summarizes this information.
Table 25 NAT Definitions
ITEM DESCRIPTION
Inside This refers to the host on the LAN.
Outside This refers to the host on the WAN.
Local This refers to the packet address (source or destination) as the packet travels on the LAN.
Global This refers to the packet address (source or destination) as the packet travels on the WAN.
NAT never changes the IP address (either local or global) of an outside host.
8.5.2 What NAT Does
In the simplest form, NAT changes the source IP address in a packet received from a subscriber
(the inside local address) to another (the inside global address) before forwarding the packet to the
WAN side. When the response comes back, NAT translates the destination address (the inside
64
LTE6100 User’s Guide
Page 65

global address) back to the inside local address before forwarding it to the original inside host. Note
192.168.1.13
192.168.1.10
192.168.1.11
192.168.1.12
SA
192.168.1.10
SA
IGA1
Inside Local
IP Address
192.168.1.10
192.168.1.11
192.168.1.12
192.168.1.13
Inside Global
IP Address
IGA 1
IGA 2
IGA 3
IGA 4
NAT Table
WAN
LAN
Inside Local
Address (ILA)
Inside Global
Address (IGA)
that the IP address (either local or global) of an outside host is never changed.
The global IP addresses for the inside hosts can be either static or dynamically assigned by the ISP .
In addition, you can designate servers, for example, a web server and a Telnet server, on your local
network and make them accessible to the outside world. If you do not define any servers, NAT
offers the additional benefit of firewall protection. With no servers defined, your LTE Device filters
out all incoming inquiries, thus preventing intruders from probing your network. For more
information on IP address translation, refer to RFC 1631, The IP Network Address Translator (NAT).
8.5.3 How NAT Works
Each packet has two addresses – a source address and a destination address. For outgoing packets,
the ILA (Inside Local Address) is the source address on the LAN, and the IGA (Inside Global
Address) is the source address on the WAN. For incoming packets, the ILA is the destination
address on the LAN, and the IGA is the destination address on the WAN. NAT maps private (local)
IP addresses to globally unique ones required for communication with hosts on other networks. It
replaces the original IP source address (and TCP or UDP source port numbers for Many-to-One and
Many-to-Many Overload NA T mapping) in each packet and then forwards it to the Internet. The LTE
Device keeps track of the original addresses and port numbers so incoming reply packets can have
their original values restored. The following figure illustrates this.
Chapter 8 Network Address Translation (NAT)
Figure 35 How NAT Works
LTE6100 User’s Guide
65
Page 66

Chapter 8 Network Address Translation (NAT)
66
LTE6100 User’s Guide
Page 67

9.1 Overview
This chapter discusses how to configure your LTE Device to use Dynamic DNS.
Dynamic DNS allows you to update your current dynamic IP address with one or many dynamic
DNS services so that anyone can contact you (in applications such as NetMeeting and CU-SeeMe).
You can also access your FTP server or Web site on your own computer using a domain name (for
instance myhost.dhs.org, where myhost is a name of your choice) that will never change instead of
using an IP address that changes each time you reconnect. Your friends or relatives will always be
able to call you even if they don't know your IP address.
First of all, you need to have registered a dynamic DNS account with www.dyndns.org. This is for
people with a dynamic IP from their ISP or DHCP server that would still like to have a domain name.
The Dynamic DNS service provider will give you a password or key.
CHAPTER 9
Dynamic DNS
9.1.1 What You Need To Know
DYNDNS Wildcard
Enabling the wildcard feature for your host causes *.yourhost.dyndns.org to be aliased to the same
IP address as yourhost.dyndns.org. This feature is useful if you want to be able to use, for example,
www.yourhost.dyndns.org and still reach your hostname.
If you have a private WAN IP address, then you cannot use Dynamic DNS.
LTE6100 User’s Guide 67
Page 68

Chapter 9 Dynamic DNS
9.2 The Dynamic DNS Screen
Use the Dynamic DNS screen to enable DDNS and configure the DDNS settings on the LTE Device.
To change your LTE Device’s DDNS, click Network Setting > Dynamic DNS. The screen appears
as shown.
Figure 36 Network Setting > Dynamic DNS
The following table describes the fields in this screen.
Table 26 Network Setting > DNS
LABEL DESCRIPTION
Dynamic DNS Configuration
Active Dynamic
DNS
Service Provider Select the name of your Dynamic DNS service provider.
Dynamic DNS
Type
Host Name Type the domain name assigned to your LTE Device by your Dynamic DNS provider.
User Name Type your user name.
Password Type the password assigned to you.
Apply Click Apply to save your changes.
Cancel Click Cancel to restore your previously saved settings.
Select this check box to use dynamic DNS.
Select the type of service that you are registered for from your Dynamic DNS service
provider.
You can specify up to two host names in the field separated by a comma (",").
68
LTE6100 User’s Guide
Page 69

10.1 Overview
WAN
LAN
3
4
1
2
A
Use the LTE Device firewall screens to enable and configure the firewall that protects your LTE
Device and network from attacks by hackers on the Internet and control access to it. By default the
firewall:
• Allows traffic that originates from your LAN computers to go to all other networks.
• Blocks traffic that originates on other networks from going to the LAN.
The following figure illustrates the default firewall action. User A can initiate an IM (Instant
Messaging) session from the LAN to the WAN (1). Return traffic for this session is also allowed (2).
However other traffic initiated from the WAN is blocked (3 and 4).
Figure 37 Default Firewall Action
CHAPTER 10
Firewall
10.1.1 What You Can Do in this Chapter
•Use the General screen to enable or disable the LTE Device’s firewall (Section 10.2 on page 71).
•Use the Services screen to view the configured firewall rules and add, edit or remove a firewall
rule (Section 10.3 on page 72).
•Use the Access Control screen to view and configure incoming/outgoing filtering rules (Section
10.4 on page 73).
•Use the DoS screen to enable or disable Denial of Service (DoS) protection (Section 10.4 on
page 73).
LTE6100 User’s Guide 69
Page 70

Chapter 10 Firewall
10.1.2 What You Need to Know
DoS
Denials of Service (DoS) attacks are aimed at devices and networks with a connection to the
Internet. Their goal is not to steal information, but to disable a device or network so users no longer
have access to network resources. The LTE Device is pre-configured to automatically detect and
thwart all known DoS attacks.
Firewall
The LTE Device’s firewall feature physically separates the LAN and the WAN and acts as a secure
gateway for all data passing between the networks.
It is designed to protect against Denial of Service (DoS) attacks when activated. The LTE Device's
purpose is to allow a private Local Area Network (LAN) to be securely connected to the Internet.
The LTE Device can be used to prevent theft, destruction and modification of data, as well as log
events, which may be important to the security of your network.
The LTE Device is installed betwe en the LAN and a broadband modem connecting to the Internet.
This allows it to act as a secure gateway for all data passing between the Internet and the LAN.
The LTE Device has one Ethernet WAN port and four Ethernet LAN ports, which are used to
physically separate the network into two areas.The WAN (Wide Area Network) port attaches to the
broadband (cable or DSL) modem to the Internet.
The LAN (Local Area Network) port attaches to a network of computers, which needs security from
the outside world. These computers will have access to Internet services such as e-mail, FTP and
the World Wide W e b. Howev er, "inbound access" is not allowed (by default) unless the remote host
is authorized to use a specific service.
ICMP
Internet Control Message Protocol (ICMP) is a message control and error-reporting protocol
between a host server and a gateway to the Internet. ICMP uses Internet Protocol (IP) datagrams,
but the messages are processed by the TCP/IP software and directly apparent to the application
user.
Finding Out More
See Section 10.6 on page 76 for advanced technical information on firewall.
70
LTE6100 User’s Guide
Page 71

10.2 The General Screen
Use this screen to enable or disable the LTE Device’ s firewall. Click Security > Firewall to open the
General screen.
Figure 38 Security > Firewall > General
Chapter 10 Firewa ll
The following table describes the labels in this screen.
Table 27 Security > Firewall > General
LABEL DESCRIPTION
Firewall Select Enable to activate the firewall. The LTE Device performs access control and
Easy, Medium,
High
Apply Click Apply to save your changes.
Cancel Click Cancel to restore your previously saved settings.
protects against Denial of Service (DoS) attacks when the firewall is activated.
Select Easy to have the firewall allow both LAN-to-WAN and WAN-to-LAN traffic to flow
through the LTE Device.
Select Medium to have the firewall only allow traffic sent from the LAN to the WAN. All
traffic sent or access from the WAN will be blocked.
Select High to have the firewall only allow Telnet, FTP, HTTP, HTTPS, DNS, POP3, and
SMTP traffic sent from the LAN to the WAN. Other traffic will be blocked.
LTE6100 User’s Guide
71
Page 72

Chapter 10 Firewall
10.3 The Services Screen
Use this screen to view the configured service list. T o access this screen, click Secu rity > Firewall
> Services. You have to configure at least one service in this screen before configuring the
Security > Firewall > Access Control > Add New ACL Rule/Edit screen.
Figure 39 Security > Firewall > Services
Each field is described in the following table.
Table 28 Security > Firewall > Services
LABEL DESCRIPTION
Add New Service
Entry
Name
Type This is the protocol type (TCP, UDP, ICMP or Others) of the service.
Port Number This displays a range of port numbers that defines the service.
Modify Click the Edit icon to edit the service.
Click this to define a new service.
This is the name of a configured service.
Click the Delete icon to delete the service. Note that subsequent rules move up by one
when you take this action. Deleting a service rule also deletes the related ACL rules which
are configured in the Security > Firewall > Access Control screen.
10.3.1 The Add New Services Entry Screen
Use this screen to configure a service that you want to use in an ACL rule in the Security >
Firewall > Access Control > Add New ACL Rule/Edit screen. To access this screen, click
Security > Firewall > Services and then the Add New Service Entry button.
Figure 40 Security > Firewall > Services > Add New Service Entry
72
LTE6100 User’s Guide
Page 73

Each field is described in the following table.
Table 29 Security > Firewall > Services > Add New Service Entry
LABEL DESCRIPTION
Name Type a descriptive name for the service.
Type Select the protocol type (TCP, UDP or ICMP or Others) of the service.
Protocol
Number
Source Port,
Destination
Port
Apply Click Apply to save your changes.
Back Click Back to exit this screen without saving your changes.
Enter the protocol number of the service type.
The source port defines from which port number(s) the service traffic is sent. The
destination port defines the port number(s) the destination ho sts use to receive the service
traffic.
Select Single if the service uses one and only one source or destination port, then enter the
port number.
Select Multiple if the service uses two or more source or destination ports, then enter a
port range. For example, suppose you want to define the Gnutella service. Select TCP type
and enter a port range of 6345-6349.
Chapter 10 Firewa ll
10.4 The Access Control Screen
Click Security > Firewall > Access Control to display the following screen. This screen displays a
list of the configured incoming or outgoing filtering rules.
Figure 41 Security > Firewall > Access Control
Each field is described in the following table.
Table 30 Security > Firewall > Access Control
LABEL DESCRIPTION
Rules Storage
Space usage(%)
Add new ACL rule
Name This displays the name of the rule.
Src IP This displays the source IP addresses to which this rule applies. Please note that a blank
Dst IP This displays the destination IP addresses to which this rule applies. Please note that a
Services
This bar shows the percentage of the LTE Device’s space has been used. If the usage is
almost full, you may need to remove an existing filter rule before you create a new one.
Click this to go to add a filter rule for incoming or outgoing IP traffic.
source address is equivalent to Any.
blank destination address is equivalent to Any.
This displays the protocol type and a port range that define the service to which this rule
applies.
LTE6100 User’s Guide
73
Page 74

Chapter 10 Firewall
Table 30 Security > Firewall > Access Control (continued)
LABEL DESCRIPTION
Policy This field displays whether the rule silently discards packets (DROP), discards packets
and sends a TCP reset packet or an ICMP destination-unreachable message to the sender
(REJECT) or allows the passage of packets (PERMIT).
Modify
Click the Edit icon to edit the rule.
Click the Delete icon to delete an existing rule. Note that subsequent rules move up by
one when you take this action.
10.4.1 The Add New ACL Rule/Edit Screen
Click Add New ACL Rule or the Edit icon next to an existing ACL rule in the Access Control
screen. The following screen displays.
Figure 42 Security > Firewall > Access Control > Add New ACL Rule/Edit
74
Each field is described in the following table.
Table 31 Security > Firewall > Access Control > Add New ACL Rule/Edit
LABEL DESCRIPTION
Filter Name Enter a descriptive name of up to 16 alphanumeric characters, not including spaces,
Source Address
Type
Source IP Address
Start
Source IP Address
End
Destination
Address Type
underscores, and dashes.
You must enter the filter name to add an ACL rule. This field is read-only if you are editing
the ACL rule.
Select Single or Range depending on whether you want to enter a single or a range of
source IP address(es) to which the ACL rule applies. Select Any to indicate any source IP
address.
Enter an IP address or the starting IP address of the source IP range.
Enter the ending IP address of the source IP range.
Select Single or Range depending on whether you want to enter a single or a range of
destination IP address(es) to which the ACL rule applies. Select Any to indicate any
destination IP address.
LTE6100 User’s Guide
Page 75

Chapter 10 Firewa ll
Table 31 Security > Firewall > Access Control > Add New ACL Rule/Edit (continued)
LABEL DESCRIPTION
Destination IP
Address Start
Destination IP
Address End
Select Protocol Select the name of a configured service or select Select Service to define a new service
Protocol This field is available when you select Select Service in Select Protocol.
Protocol Number This field is available when you select Others in Protocol.
Source Port This field is displayed only when you select Select Service in Select Protocol and TCP
Destination Port This field is displayed only when you select Select Service in Select Protocol and TCP
Policy Use the drop-down list box to select whether to silently discard (DROP), deny and send
Direction Use the drop-down list box to select the direction of traffic to which this rule applies. The
Apply Click Apply to save your changes.
Back Click Back to exit this screen without saving your changes.
Enter an IP address or the starting IP address of the destination IP range.
Enter the ending IP address of the destination IP range.
in this screen.
Choose the protocol type (TCP, UDP, ICMP or Others) of the service.
Enter the protocol number of the service type to which this ACL rule applies.
or UDP in Protocol.
Select Single or Range and then enter a single port number or the range of port
numbers of the source. Select Any to indicate any source port.
or UDP in Protocol.
Select Single or Range and then enter a single port number or the range of port
numbers of the destination. Select Any to indicate any destination port.
an ICMP destination-unreachable message to the sender of (REJECT) or allow the
passage of (PERMIT) packets that match this rule.
possible options are LAN to DEVICE, LAN to WAN, WAN to LAN, and WAN to
DEVICE.
10.5 The DoS Screen
Click Security > Firewall > DoS to display the following screen. Use this screen to enable or
disable Denial of Service (DoS) protection.
Figure 43 Security > Firewall > DoS
LTE6100 User’s Guide
75
Page 76

Chapter 10 Firewall
Each field is described in the following table.
Table 32 Security > Firewall > DoS
LABEL DESCRIPTION
DoS Protection
Blocking
Apply Click Apply to save the DoS Protection settings.
Cancel Click Cancel to restore your previously saved settings.
DoS (Denial of Service) attacks can flood your Internet connection with invalid packets
and connection requests, using so much bandwidth and so many resources that Internet
access becomes unavailable.
Select Enable to enable protection against DoS attacks or Disable to disable it.
10.6 Firewall Technical Reference
This section provides some technical background information about the topics covered in this
chapter.
10.6.1 Guidelines For Enhancing Security With Your Firewall
1 Change the default password via web configurator.
2 Think about access control before you connect to the network in any way.
3 Limit who can access your LTE Device.
4 Don't enable any local service (such as Telnet or FTP) that you don't use. Any enabled service could
present a potential security risk. A determined hacker might be able to find creative ways to misuse
the enabled services to access the firewall or the network.
5 For local services that are enabled, protect against misuse. Protect by configuring the services to
communicate only with specific peers, and protect by configuring rules to block packets for the
services at specific interfaces.
6 Keep the firewall in a secured (locked) room.
10.6.2 Security Considerations
Note: Incorrectly configuring the firewall may block valid access or introduce security
risks to the LTE Device and your protected network. Use caution when creating or
deleting firewall rules and test your rules after you configure them.
Consider these security ramifications before creating a rule:
1 Does this rule stop LAN users from accessing critical resources on the Internet? For example, if IRC
is blocked, are there users that require this service?
2 Is it possible to modify the rule to be more specific? For example, if IRC is blocked for all users, will
a rule that blocks just certain users be more effective?
76
LTE6100 User’s Guide
Page 77

Chapter 10 Firewa ll
3 Does a rule that allows Internet users access to resources on the LAN create a security
vulnerability? For example, if FTP ports (TCP 20, 2 1) are allowed from the Interne t to the LAN,
Internet users may be able to connect to computers with running FTP servers.
4 Does this rule conflict with any existing rules?
Once these questions have been answered, adding rules is simply a matter of entering the
information into the correct fields in the web configurator screens.
LTE6100 User’s Guide
77
Page 78

Chapter 10 Firewall
78
LTE6100 User’s Guide
Page 79

11.1 Overview
This chapter discusses MAC address filtering.
You can configure the LTE Device to permit access to clients based on their MAC addresses in the
MAC Filter screen. This applies to wired and wireless connections.
11.1.1 What You Need to Know
Every Ethernet device has a unique MAC (Media Access Control) address. The MAC address is
assigned at the factory and consists of six pairs of hexadecimal characters, for example,
00:A0:C5:00:00:02. You need to know the MAC address of the devices to configure this screen.
CHAPTER 11
MAC Filter
11.2 The MAC Filter Screen
Use the MAC Filter screen to allow wireless and LAN clients access to the LTE Device. To change
your LTE Device’s MAC filter settings, click Security > MAC Filter. The screen appears as shown.
Figure 44 Security > MAC Filter
LTE6100 User’s Guide 79
Page 80

Chapter 11 MAC Filter
The following table describes the labels in this menu.
Table 33 Security > MAC Filter
LABEL DESCRIPTION
MAC Address
Filter
Set This is the index number of the MAC address.
Allow Select Allow to permit access to the LTE Device. MAC addresses not listed will be denied
MAC Address Enter the MAC addresses of the wireless statio n and LAN devices that are allowed access to
Apply Click Apply to save your changes.
Cancel Click Cancel to restore your previously saved settings.
Select Enable to activate MAC address filtering.
access to the LTE Device.
If you clear this, the MAC Address field for this set clears.
the LTE Device in these address fields. Enter the MAC addresses in a valid MAC address
format, that is, six hexadecimal character pairs, for example, 12:34:56:78:9a:bc.
80
LTE6100 User’s Guide
Page 81

CHAPTER 12
12.1 Overview
Parental control allows you to block web sites with the specific URL. You can also define time
periods and days during which the LTE Device performs parental control on a specific user.
12.2 The Parental Control Screen
Use this screen to enable parental control, view the parental control rules and schedules.
Click Security > Parental Control to open the following screen.
Figure 45 Security > Parental Control
Parental Control
The following table describes the fields in this screen.
Table 34 Parental Control > Parental Control
LABEL DESCRIPTION
Parental
Control
Add new PCP Click this if you want to configure a new parental control rule.
# This shows the index number of the rule.
Status This indicates whether the rule is active or not.
PCP Name This shows the name of the rule.
Home Network
User (MAC)
Internet Access
Schedule
Network
Service
LTE6100 User’s Guide 81
Select Enable to activate parental control.
A yellow bulb signifies that this rule is active. A gray bulb signifies that this rule is not
active.
This shows the MAC address of the LAN user’s computer to which this rule applies.
This shows the day(s) and time on which parental control is enabled.
This shows whether the network service is configured. If not, None will be shown.
Page 82

Chapter 12 Parental Control
Table 34 Parental Control > Parental Control (continued)
LABEL DESCRIPTION
Website Block This shows whether the website block is configured. If not, None will be shown.
Modify Click the Edit icon to go to the screen where you can edit the rule.
Click the Delete icon to delete an existing rule.
Add Click Add to create a new schedule.
Apply Click Apply to save your changes back to the LTE Device.
12.2.1 Add/Edit a Parental Control Rule
Click Add new PCP in the Parental Control screen to add a new rule or click the Edit icon next to
an existing rule to edit it. Use this screen to configure a restricted access schedule and/or URL
filtering settings to block the users on your network from accessing certain web sites.
Figure 46 Add/Edit Parental Control Rule
82
The following table describes the fields in this screen.
Table 35 Add/Edit Parental Control Rule
LABEL DESCRIPTION
General
Active Select the checkbox to activate this parental control rule.
Parental Control
Profile Name
Enter a descriptive name for the rule.
LTE6100 User’s Guide
Page 83

Chapter 12 Parental Control
Table 35 Add/Edit Parental Control Rule (continued)
LABEL DESCRIPTION
Home Network
User
Internet Access Schedule
Day Select check boxes for the days that you want the LTE Device to perform parental
Start Blocking Time
End Blocking Time
Time Drag the time bar to define the time that the LAN user is allowed access.
Network Service
Network Service
Setting
Add new service Click this to show a screen in which you can add a new service rule. You can configure
# This shows the index number of the rule. Select the checkbox next to the rule to activate
Service Name This shows the name of the rule.
Protocol:Port This shows the protocol and the port of the rule.
Modify Click the Edit icon to go to the screen where you can edit the rule.
Blocked Site/URL
Keyword
Apply Click this button to save your settings back to the LTE Device.
Back Click this button to return to the previous screen without saving any changes.
Select the LAN user that you want to apply this rule to from the drop-down list box. If
you select Custom, enter the LAN user’s MAC address. If you select All, the rule applies
to all LAN users.
control.
Enter the time period of each day, in 24-hour format, during which parental control will
be enforced.
If you select Block, the LTE Device prohibits the users from viewing the Web sites with
the URLs listed below.
If you select Access, the LTE Device blocks access to all URLs except ones listed below.
the Service Name, Protocol, and Port of the new rule.
it.
Click the Delete icon to delete an existing rule.
Click Add to show a screen to enter the URL of web site or URL keyword to which the
L TE Device blocks access. Click Delete to remove it.
LTE6100 User’s Guide
83
Page 84

Chapter 12 Parental Control
84
LTE6100 User’s Guide
Page 85

13.1 Overview
Local Network
Local IP Address
Remote Network
Remote IP Address
Remote
IPSec Router
VPN Tunnel
This chapter shows you how to configure the LTE Device’s VPN settings.
13.2 IPSec VPN
13.2.1 The General Screen
The following figure helps explain the main fields in the web configurator.
Figure 47 IPSec Fields Summary
CHAPTER 13
VPN
Click Security > VPN to open this screen as shown next.
Figure 48 IPSec VPN
LTE6100 User’s Guide 85
Page 86

Chapter 13 VPN
This screen contains the following fields:
Table 36 IPSec VPN
LABEL DESCRIPTION
Add New Tunnel Click this button to add an item to the list.
# This is the VPN policy index number.
Active This displays if the VPN policy is enabled.
Tunnel Name Enter the name of the VPN connection.
Local Address This displays the IP address of the LTE Device.
Remote Address This displays the IP address of the remote IPSec router.
IPSec Algorithm This displays the encryption algorithm being used for the VPN connection.
86
LTE6100 User’s Guide
Page 87

13.2.2 IPSec VPN: Add
Use these settings. Click Security > VPN > Add New Tunnel to open this screen as shown next.
Figure 49 IPSec VPN: Add
Chapter 13 VPN
This screen contains the following fields:
Table 37 IPSec VPN: Add
LABEL DESCRIPTION
IPSEC Setup
Active Select Active to activate this VPN policy.
LTE6100 User’s Guide
87
Page 88

Chapter 13 VPN
Table 37 IPSec VPN: Add
LABEL DESCRIPTION
NAT Traversal Select this if any of these conditions are satisfied.
• This IKE SA might be used to negotiate IPSec SAs that use ESP as the active
protocol.
• There are one or more NAT routers between the L TE Device and remote IPSec
router, and these routers do not support IP Sec pass-thru or a similar feature.
The remote IPSec router must also enable NAT traversal, and the NAT routers
have to forward packets with UDP port 500 and UDP 4500 headers unchanged.
Tunnel Name Enter the name of the VPN connection.
Mode Select the encapsulation mode. When net-net is selected, the connection will
operate in tunnel mode.
Local
Local Address
Type
IP Address
Start
End/Subnet
Mask
Remote
Remote
Address Type
IP Address
Start
End/Subnet
Mask
Address Information
WAN Interface Select the interface for the VPN gateway.
My IP Address Enter the IP address of the LTE Device in the IKE SA.
Secure
Gateway
Address
Local ID Select IP to identify the LTE Device by its IP address.
Select Single or Subnet to specify if the VPN connection begins at an IP address
or subnet.
If Single is selected, enter a (static) IP address on the LAN behind your LTE
Device.
If Subnet is selected, specify IP addresses on a network by their subnet mask
by entering a (static) IP address on the LAN behind your LTE Device. Then enter
the subnet mask to identify the network address.
If Subnet is selected, enter the subnet mask to identify the network address.
Select Single or Subnet to specify if the VPN connection terminates at an IP
address or subnet.
If Single is selected, enter a (static) IP address on the LAN behind the remote
IPSec’s router.
If Subnet is selected, specify IP addresses on a network by their subnet mask
by entering a (static) IP address on the LAN behind the remote IPSec’s router.
Then enter the subnet mask to identify the network address.
If Subnet is selected, enter the subnet mask to identify the network address.
Enter the IP address of the remote IPSec router in the IKE SA.
Select DNS to identify this LTE Device by a domain name.
Select E-mail to identify this LTE Device by an e-mail address.
88
LTE6100 User’s Guide
Page 89

Table 37 IPSec VPN: Add
LABEL DESCRIPTION
Content When you select IP in the Local ID field, type the IP address of your computer
in the Content field. If you configure the Content field to 0.0.0.0 or leave it
blank, the LTE Device automatically uses the Pre-Share Key (refer to the Pre-
Share Key field description).
It is recommended that you type an IP address other than 0.0.0.0 in the
Content field or use the DNS or E-mail ID type in the following situations.
• When there is a NAT router between the two IPSec routers.
• When you want the remote IPSec router to be able to distinguish between
VPN connection requests that come in from IPSec routers with dynamic W AN
IP addresses.
When you select DNS or E-mail in the Local ID field, type a domain name or e-
mail address by which to identify this LTE Device in the Content field. Use up to
31 ASCII characters including spaces, although trailing spaces are truncated.
The domain name or e-mail address is for identification purposes only and can
be any string.
Remote ID Select IP to identify the remote IPSec router by its IP address.
Select DNS to identify the remote IPSec router by a domain name.
Select E-mail to identify the remote IPSec router by an e-mail address.
Content The configuration of the remote content depends on the remote ID type.
Chapter 13 VPN
For IP, type the IP address of the computer with which you will make the VPN
connection. If you configure this field to 0.0.0.0 or leave it blank, the LTE Device
will use the address in the Secure Gateway Addre ss field (refer to the Secure
Gateway Address field description).
For DNS or E-mail, type a domain name or e-mail address by which to identify
the remote IPSec router. Use up to 31 ASCII characters including spaces,
although trailing spaces are truncated. The domain name or e-mail address is for
identification purposes only and can be any string.
It is recommended that you type an IP address other than 0.0.0.0 or use the
DNS or E-mail ID type in the following situations:
• When there is a NAT router between the two IPSec routers.
• When you want the LTE Device to distinguish between VPN connection
requests that come in from remote IPSec routers with dynamic WAN IP
addresses.
Security Protocol
Pre-Shared
Key
Advanced Setting - Phase 1
Type your pre-shared key in this field. A pre-shared key identifies a
communicating party during a phase 1 IKE negotiation.
T ype from 8 to 31 case-sensitive ASCII characters or from 16 to 62 hexadecimal
("0-9", "A-F") characters. You must precede a hexadecimal key with a "0x” (zero
x), which is not counted as part of the 16 to 62 character range for the key. For
example, in "0x0123456789ABCDEF", “0x” denotes that the key is hexadecimal
and “0123456789ABCDEF” is the key itself.
LTE6100 User’s Guide
89
Page 90

Chapter 13 VPN
Table 37 IPSec VPN: Add
LABEL DESCRIPTION
Encryption
Algorithm
Authentication
Algorithm
DH Select which Diffie-Hellman key group you want to use for encryption keys.
Select which key size and encryption algorithm to use in the IKE SA. Choices
are:
DES - a 56-bit key with the DES encryption algorithm
3DES - a 168-bit key with the DES encryption al go rithm
AES128 - a 128-bit key with the AES encryption algorithm
AES192 - a 192-bit key with the AES encryption algorithm
AES256 - a 256-bit key with the AES encryption algorithm
The LTE Device and the remote IPSec router must use the same key size and
encryption algorithm. Longer keys require more processing power, resulting in
increased latency and decreased throughput.
Select which hash algorithm to use to authenticate packet data. Choices are
MD5, SHA1, SHA2-256 and SHA2-512. SHA is generally considered stronger
than MD5, but it is also slower.
Choices are:
Diffie-Hellman Group2 - use a 1024-bit random number
Diffie-Hellman Group5 - use a 1536-bit random number
Diffie-Hellman Group14 - use a 2048-bit random number
The longer the key, the more secure the encryption, but also the longer it takes
to encrypt and decrypt information. Both routers must use the same DH key
group.
SA Life Time Define the length of time before an IPSec SA automatically renegotiates in this
field.
A short SA Life Time increases security by forcing the two VPN gateways to
update the encryption and authentication keys. However, every time the VPN
tunnel renegotiates, all users accessing remote resources are te mporarily
disconnected.
Phase 2
Encryption
Algorithm
Authentication
Algorithm
Select which key size and encryption algorithm to use in the IKE SA. Choices
are:
DES - a 56-bit key with the DES encryption algorithm
3DES - a 168-bit key with the DES encryption al go rithm
AES128 - a 128-bit key with the AES encryption algorithm
AES192 - a 192-bit key with the AES encryption algorithm
AES256 - a 256-bit key with the AES encryption algorithm
The LTE Device and the remote IPSec router must use the same key size and
encryption algorithm. Longer keys require more processing power, resulting in
increased latency and decreased throughput.
Select which hash algorithm to use to authenticate packet data. Choices are
MD5, SHA1, SHA2-256 and SHA2-512. SHA is generally considered stronger
than MD5, but it is also slower.
90
LTE6100 User’s Guide
Page 91

Table 37 IPSec VPN: Add
LABEL DESCRIPTION
SA Life Time Define the length of time before an IPSec SA automatically renegotiates in this
field.
A short SA Life Time increases security by forcing the two VPN gateways to
update the encryption and authentication keys. However, every time the VPN
tunnel renegotiates, all users accessing remote resources are te mporarily
disconnected.
Perfect
Forward
Secrecy (PFS)
DPD Active Select the Dead Peer Detection (DPD) Active check box if you want the LTE
Select whether or not you want to enable Perfect Forward Secrecy (PFS)
PFS changes the root key that is used to generate enc ryption keys for each IPSec
SA. The longer the key, the more secure the encryption, but also the longer it
takes to encrypt and decrypt information. Both routers must use the same DH
key group. Choices are:
Diffie-Hellman Group2 - use a 1024-bit random number
Diffie-Hellman Group5 - use a 1536-bit random number
Diffie-Hellman Group14 - use a 2048-bit random number
Device to make sure the remote IPSec router is there before it transmits data
through the IKE SA. The remote IPSec router must support DPD. If the remote
IPSec router does not respond, the LTE Device shuts down the IKE SA.
If the remote IPSec router does not support DPD, see if you can use the VPN
connection connectivity check.
Chapter 13 VPN
13.2.3 The Monitor Screen
The following figure helps explain the main fields in the web configurator.
Click Security > VPN > Monitor to open this screen as shown next.
Figure 50 Monitor
This screen contains the following fields:
Table 38 Monitor
LABEL DESCRIPTION
# This is the VPN policy index number.
Status This displays if the VPN policy is connected.
Tunnel Name Enter the name of the VPN connection.
IPSec Algorithm This displays the encryption algorithm being used for the VPN connection.
Refresh Click this button to refresh the information on the screen.
LTE6100 User’s Guide
91
Page 92

Chapter 13 VPN
13.3 Technical Reference
This section provides some technical background information about the topics covered in this
section.
13.3.1 IPSec Architecture
The overall IPSec architecture is shown as follows.
Figure 51 IPSec Architecture
IPSec Algorithms
The ESP (Encapsulating Security Payload) Protocol (RFC 2406) and AH (Authentication Header)
protocol (RFC 2402) describe the packet formats and the default standards for packet structure
(including implementation algorithms).
The Encryption Algorithm describes the use of encryption techniques such as DES (Data Encryption
Standard) and Triple DES algorithms.
The Authentication Algorithms, HMAC-MD5 (RFC 2403) and HMAC-SHA-1 (RFC 2404, provide an
authentication mechanism for the AH and ESP protocols.
Key Management
Key management allows you to determine whether to use IKE (ISAKMP) or manual key
configuration in order to set up a VPN.
92
LTE6100 User’s Guide
Page 93

13.3.2 Encapsulation
The two modes of operation for IPSec VPNs are Transport mode and Tunnel mode. A t the time of
writing, the LTE Device supports Tunnel mode only.
Figure 52 Tr an sport and Tunnel Mode IPSec Encapsulation
T ransport Mode
Transport mode is used to protect upper layer protocols and only affects the data in the IP packet.
In Transport mode, the IP packet contains the security protocol (AH or ESP) located after the
original IP header and options, but before any upper layer protocols contained in the packet (such
as TCP and UDP).
Chapter 13 VPN
With ESP, protection is applied only to the upper layer protocols contained in the packet. The IP
header information and options are not used in the authentication process. Therefore, the
originating IP address cannot be verified for integrity against the data.
With the use of AH as the security protocol, protection is extended forward into the IP header to
verify the integrity of the entire packet by use of portions of the original IP header in the hashing
process.
Tunnel Mode
Tunnel mode encapsulates the entire IP packet to transmit it securely. A Tunnel mode is required
for gateway services to provide access to internal systems. Tunnel mode is fundamentally an IP
tunnel with authentication and encryption. This is the most common mode of operation. Tunnel
mode is required for gateway to gateway and host to gateway communications. Tunnel mode
communications have two sets of IP headers:
• Outside header: The outside IP header contains the destination IP address of the VPN gateway.
• Inside header: The inside IP header contains the destination IP address of the final system
behind the VPN gateway. The security protocol appears after the outer IP header and before the
inside IP header.
LTE6100 User’s Guide
93
Page 94

Chapter 13 VPN
13.3.3 IKE Phases
There are two phases to every IKE (Internet Key Exchange) negotiation – phase 1 (Authentication)
and phase 2 (Key Exchange). A phase 1 exchange establishes an IKE SA and the second one uses
that SA to negotiate SAs for IPSec.
Figure 53 Two Phases to Set Up the IPSec SA
In phase 1 you must:
• Choose a negotiation mode.
• Authenticate the connection by entering a pre-shared key.
• Choose an encryption algorithm.
• Choose an authentication algorithm.
• Choose a Diffie-Hellman public-key cryptography key group.
• Set the IKE SA lifetime. This field allows you to determine how long an IKE SA should stay up
before it times out. An IKE SA times out when the IKE SA lifetime period expires. If an IKE SA
times out when an IPSec SA is already established, the IPSec SA stays connected.
In phase 2 you must:
• Choose an encryption algorithm.
• Choose an authentication algorithm
• Choose a Diffie-Hellman public-key cryptography key group.
• Set the IPSec SA lifetime. This field allows you to determine how long the IPSec SA should stay
up before it times out. The LTE Device automatically renegotiates the IPSec SA if there is traffic
when the IPSec SA lifetime period expires. If an IPSec SA times out, then the IPSec router must
renegotiate the SA the next time someone attempts to send traffic.
13.3.4 Negotiation Mode
94
The phase 1 Negotiation Mode you select determines how the Security Association (SA) will be
established for each connection through IKE negotiations.
LTE6100 User’s Guide
Page 95

• Main Mode ensures the highest level of security when the communicating parties are
negotiating authentication (phase 1). It uses 6 messages in three round trips: SA negotiation,
Diffie-Hellman exchange and an exchange of nonces (a nonce is a random number). This mode
features identity protection (your identity is not revealed in the negotiation).
• Aggressive Mode is quicker than Main Mode because it eliminates several steps when the
communicating parties are negotiating authentication (phase 1). However the trade-off is that
faster speed limits its negotiating power and it also does not provide identity protection. It is
useful in remote access situations where the address of the initiator is not know by the responder
and both parties want to use pre-shared key authentication.
13.3.5 IPSec and NAT
Read this section if you are running IPSec on a host computer behind the LTE Device.
NAT is incompatible with the AH protocol in both Transport and Tunnel mode. An IPSec VPN using
the AH protocol digitally signs the outbound packet, both data payload and headers, with a hash
value appended to the packet. When using AH protocol, packet contents (the data payload) are not
encrypted.
A NAT device in between the IPSec endpoints will rewrite either the source or destination address
with one of its own choosing. The VPN device at the receiving end will verify the integrity of the
incoming packet by computing its own hash value, and complain that the hash value appended to
the received packet doesn't match. The VPN device at the receiving end doesn't know about the
NAT in the middle, so it assumes that the data has been maliciously altered.
Chapter 13 VPN
IPSec using ESP in Tunnel mode encapsulates the entire original packet (including headers) in a
new IP packet. The new IP packet's source address is the outbound address of the sending VPN
gateway , and its destination address is the inbound address of the VPN device at the receiving end.
When using ESP protocol with authentication, the packet contents (in this case, the entire original
packet) are encrypted. The encrypted contents, but not the new headers, are signed with a hash
value appended to the packet.
Tunnel mode ESP with authentication is compatible with NAT because integrity checks are
performed over the combination of the "original header plus original payload," which is unchanged
by a NAT device.
Transport mode ESP with authentication is not compatible with NAT.
Table 39 VPN and NAT
SECURITY PROTOCOL MODE NAT
AH Transport N
AH Tunnel N
ESP Transport N
ESP Tunnel Y
13.3.6 VPN, NAT, and NAT Traversal
NAT is incompatible with the AH protocol in both transport and tunnel mode. An IPSec VPN using
the AH protocol digitally signs the outbound packet, both data payload and headers, with a hash
value appended to the packet, but a NAT device between the IPSec endpoints rewrites the source or
destination address. As a result, the VPN device at the receiving end finds a mismatch between the
hash value and the data and assumes that the data has been maliciously altered.
LTE6100 User’s Guide
95
Page 96

Chapter 13 VPN
A
B
NAT is not normally compatible with ESP in transport mode either, but the LTE Device’s NAT
Traversal feature provides a way to handle this. NA T trav ersal allows you to set up an IKE SA when
there are NAT routers between the two IPSec routers.
Figure 54 NAT Router Between IPSec Routers
Normally you cannot set up an IKE SA with a NAT router between the two IPSec routers because
the NAT router changes the header of the IPSec packet. NA T traversal solves the problem by adding
a UDP port 500 header to the IPSec packet. The NAT router forwards the IPSec packet with the UDP
port 500 header unchanged. In the above figure, when IPSec router A tries to establish an IKE SA,
IPSec router B checks the UDP port 500 header, and IPSec routers A and B build the IKE SA.
For NAT traversal to work, you must:
• Use ESP security protocol (in either transport or tunnel mode).
•Use IKE keying mode.
• Enable NAT traversal on both IPSec endpoints.
• Set the NAT router to forward UDP port 500 to IPSec router A.
Finally , NA T is compatible with ESP in tunnel mode because integrity checks are performed ov er the
combination of the "original header plus original payload," which is unchanged by a NAT device. The
compatibility of AH and ESP with NAT in tunnel and transport modes is summarized in the following
table.
Table 40 VPN and NAT
SECURITY PROTOCOL MODE NAT
AH Transport N
AH Tunnel N
ESP Transport Y*
ESP Tunnel Y
Y* - This is supported in the LTE Device if you enable NAT traversal.
13.3.7 ID Type and Content
With aggressive negotiation mode (see Section 13.3.4 on page 94), the LTE Device identifies
incoming SAs by ID type and content since this identifying information is not encrypted. This
enables the LTE Device to distinguish between multiple rules for SAs that connect from remote
IPSec routers that have dynamic WAN IP addresses.
Regardless of the ID type and content configuration, the LTE Device does not allow you to save
multiple active rules with overlapping local and remote IP addresses.
96
With main mode (see Section 13.3.4 on page 94), the ID type and content are encrypted to provide
identity protection. In this case the LTE Device can distinguish between different incoming SA s that
connect from remote IPSec routers that have dynamic WAN IP addresses. The LTE Device can
LTE6100 User’s Guide
Page 97

distinguish different incoming SAs and you can select between differe nt encryption algorithms,
authentication algorithms and key groups when you configure a VPN rule. The ID type and content
act as an extra level of identification for incoming SAs.
The type of ID can be a domain name, an IP address or an e-mail address. The content is the IP
address, domain name, or e-mail address.
Table 41 Local ID Type and Content Fields
LOCAL ID TYPE= CONTENT=
IP Type the IP address of your computer.
DNS Type a domain name (up to 31 characters) by which to identify this LTE Device.
E-mail Type an e-mail address (up to 31 characters) by which to identify this LTE
Device.
The domain name or e-mail address that you use in t he Local ID Content field
is used for identification purposes only and does not need to be a real domain
name or e-mail address.
13.3.7.1 ID Type and Content Examples
Two IPSec routers must have matching ID type and content configuration in order to set up a VPN
tunnel.
Chapter 13 VPN
The two LTE Devices in this example can complete negotiation and establish a VPN tunnel.
Table 42 Matching ID Type and Content Configuration Example
LTE Device A LTE Device B
Local ID type: E-mail Loc al ID type: IP
Local ID content: tom@yourcompany.com Local ID content: 1.1.1.2
Remote ID type: IP Remote ID type: E-mail
Remote ID content: 1.1.1.2 Remote ID content: tom@yourcompany.com
The two LTE Devices in this example cannot complete their negotiation because LTE Device B’s
Local ID type is IP, but LTE Device A’s Remote ID type is set to E-mail. An “ID mismatched”
message displays in the IPSEC LOG.
Table 43 Mismatching ID Type and Content Configuration Example
LTE DEVICE A LTE DEVICE B
Local ID type: IP Local ID type: IP
Local ID content: 1.1.1.10 Local ID content: 1.1.1.2
Remote ID type: E-mail Remote ID type: IP
Remote ID content: aa@yahoo.com Remote ID content: 1.1.1.0
13.3.8 Pre-Shared Key
A pre-shared key identifies a communicating party during a phase 1 IKE negotiation (see Section
13.3.3 on page 94 for more on IKE phases). It is called “pre-shared” because you have to share it
with another party before you can communicate with them over a secure connection.
LTE6100 User’s Guide
97
Page 98

Chapter 13 VPN
13.3.9 Diffie-Hellman (DH) Key Groups
Diffie-Hellman (DH) is a public-key cryptography protocol that allows two parties to establish a
shared secret over an unsecured communications channel. Diffie-Hellman is used within IKE SA
setup to establish session keys. Upon completion of the Diffie-Hellman exchange, the two peers
have a shared secret, but the IKE SA is not authenticated. For authentication, use pre-shared keys.
98
LTE6100 User’s Guide
Page 99

CHAPTER 14
14.1 Overview
The web configurator allows you to choose which categories of events and/or alerts to have the LTE
Device log and then display the logs or have the LTE Device send them to an administrator (as email) or to a syslog server.
14.1.1 What You Can Do in this Chapter
•Use the System Log screen to see the system logs for the categories that you select (Section
14.2 on page 100).
14.1.2 What You Need To Know
Logs
The following terms and concepts may help as you read this chapter.
Alerts and Logs
An alert is a type of log that warrants more serious attention. They include system errors, attacks
(access control) and attempted access to blocked web sites. Some categories such as System
Errors consist of both logs and alerts. You may differentiate them by their color in the View Log
screen. Alerts display in red and logs display in black.
Syslog Overview
The syslog protocol allows devices to send event notification messages across an IP network to
syslog servers that collect the event messages. A syslog-enabled device can generate a syslog
message and send it to a syslog server.
Syslog is defined in RFC 3164. The RFC defines the packet format, content and system log related
information of syslog messages. Each syslog message has a facility and severity level. The syslog
facility identifies a file in the syslog server. Refer to the documentation of your syslog program for
details. The following table describes the syslog severity levels.
Table 44 Syslog Severity Levels
CODE SEVERITY
0 Emergency (EMERG): The system is unusable.
1 Alert (ALERT): Action must be taken immediately.
2 Critical (CR I T): The system condition is critical.
3 Error (ERROR): There is an error condition on the system.
4 Warning (WARNING): There is a warning condition on the system.
5 Notice (NOTICE): There is a normal but significant condition on the system.
LTE6100 User’s Guide 99
Page 100

Chapter 14 Logs
Table 44 Syslog Severity Levels (continued)
CODE SEVERITY
6 Informational (INFO): The syslog contains an informational message.
7 Debug (DEBUG): The message is intended for debug-level purposes.
14.2 The System Log Screen
Click System Monitor > Log to open the System Log screen. Use the System Log screen to see
the system logs for the categories that you select in the upper left drop-down list box.
Figure 55 Sys tem Monitor > Log > System Log
The following table describes the fields in this screen.
Table 45 System Monitor > Log > System Log
LABEL DESCRIPTION
Select the type of the logs that you want to search in the first drop-down list box.
Level Select a severity level from this drop-down list box. This filters search results according to
the severity level you have selected. When you select a severity, the LTE Device searches
through all logs of that severity or higher. See Table 44 on page 99 for more information
about severity levels.
Refresh Click this to renew the log screen.
Clear Logs Click this to delete all the logs.
# This field is a sequential value and is not associated with a specific entry.
Time This field displays the date and time the log was recorded.
Level This field displays the severity level of the logs that the device is to send to this syslog
server.
Message This field states the reason for the log.
100
LTE6100 User’s Guide
 Loading...