

Page 1

GS1910/XGS1910 Series
GbE Smart Managed Switch
Default Login Details
IP Address http://192.168.1.1
User Name admin
Password 1234
Version 1.00
Edition 1, 05/2012
www.zyxel.com
www.zyxel.com
IMPORTANT!
READ CAREFULL Y
BEFORE USE.
KEEP THIS GUIDE
FOR FUTURE
REFERENCE.
Copyright © 2012
ZyXEL Communications Corporation
Page 2

IMPORTANT!
READ CAREFULLY BEFORE USE.
KEEP THIS GUIDE FOR FUTURE REFERENCE.
Note: This guide is a reference for a series of products. Therefore some features or
options in this guide may not be available in your product.
Graphics in this book may differ slightly from the product due to differences in operating systems,
operating system versions, or if you installed updated firmware/software for your device. Every
effort has been made to ensure that the information in this manual is accurate.
Related Documentation
• Web Configurator Online Help
Click the help icon in any screen for help in configuring that screen and supplementary
information.
GS1910/XGS1910 Series User’s Guide2
Page 3

Table of Contents
Table of Contents
Table of Contents .................................................................................................................................3
Chapter 1
Getting to Know Your Switch...............................................................................................................5
1.1 Introduction ............................................ ... ... .............................................. ... ... ... .... ............................5
1.1.1 Bridging Example ............................ ... .... ... ... ... .... ... ... ................................................ ................5
1.1.2 High Performance Switching Example ......................................................................................6
1.1.3 Gigabit Ethernet to the Desktop ................................................................................................7
1.1.4 IEEE 802.1Q VLAN Application Example ..................................................................................7
1.1.5 IPv6 Support ........................... ... ... ... ... .... ... ... ............................................. .... ... ... ... ...................8
1.2 Ways to Manage the Switch ......................... .... ............................................. ... ... .... ... ... ... ...................8
1.3 Good Habits for Managing the Switch .................................................................................................8
Chapter 2
Hardware Installation and Connection.............................................................................................11
2.1 Freestanding Installation ..................................................................................................................11
2.2 Mounting the Switch on a Rack ........................................................................................................12
2.2.1 Rack-mounted Installation Requirements ............................... ....................................... .......... 12
2.2.2 Attaching the Mounting Brackets to the Switch .......................................................................12
2.2.3 Mounting the Switch on a Rack ...............................................................................................13
Chapter 3
Hardware Overview ............................................................................................................................15
3.1 Front Panel Connections ....................................... ... .... ... ... ... .... ... ... ... ... ...........................................15
3.1.1 Ethernet Ports ............ ... ... ... .............................................. ... ... ... ... .... ... ... ... .... ... .......................17
3.1.2 Dual Personality Interfaces ........... ... ... .... ................................................ ... .... ..........................18
3.1.3 SFP/SFP+ Slots ........................... ... ............................................. .... ... ... ... .... ... .......................18
3.1.4 Console Port ............................. ... ... ... .... ... ... ... .... ... ... ..............................................................20
3.2 Rear Panel ....................................... ... ............................................. ... ... .... ... ... ... ..............................20
3.2.1 Power Connector ....................... ... ... ... .... ... ... ... .... ... .................................................................21
3.3 LEDs .............................................................................................................................................22
Chapter 4
The Web Configurator........................................................................................................................25
4.1 Introduction ............................................ ... ... .... ... ... ... .............................................. ..........................25
4.2 System Login .................................................................................................................................25
4.3 The Web Configurator Layout .............. ... ... .... ... ... ... ........................................................................26
4.3.1 Change Your Password ........................................................................................................32
4.4 Switch Lockout .................. ... ... ... .... ... ... ............................................. ... .... ... ... ... ..............................32
GS1910/XGS1910 Series User’s Guide
3
Page 4

Table of Contents
4.5 Logging Out of the Web Configurator ..............................................................................................32
4.6 Help ....... ............................................. ... ... ... .... ............................................. ... ... ..............................32
Chapter 5
Tutorials...............................................................................................................................................33
5.1 How to Change Switch Management IP Address .............................................................................33
5.2 How to Configure Login Accounts and Privilege Levels ......................... ................. ................ ..........34
5.3 How to Manage a Configuration File .................................................................................................36
5.3.1 Backing up a Configuration File ...............................................................................................36
5.3.2 Restoring a Configuration File .................................................................................................37
5.4 How to Create a VLAN . ............................................. .... ... ... ... .... ... ....................................................38
5.4.1 Setting Port VID .......................................................................................................................39
5.5 How to Set Up a Guest VLAN with IEEE 802.1x Authentication .......................................................41
5.5.1 Creating a VLAN for Port which is not IEEE 802.1x enabled ..................................................41
5.5.2 Enabling IEEE 802.1x Port Authentication and Guest VLAN ..................................................42
5.6 How to Use Private VLAN to Do Port Isolation in a VLAN ................................................................44
5.6.1 Creating a Private VLAN .........................................................................................................44
5.6.2 Enabling Port Isolation .............................................................................................................45
5.7 How to Use IP Source Guard and DHCP Snooping to Prevent Spoofed Traffic ...............................45
5.8 How to Use DHCP Relay on the Switch ............................................................................................48
5.8.1 Creating a VLAN ......................................................................................................................49
5.8.2 Configuring DHCP Relay .................... .... ... ... ... ........................................................................49
5.8.3 Troubleshooting ................................................................ ... ... ... ... .... .......................................50
5.9 How to Use Link Aggregation to Group Multiple Ports into One Logical Link ..... .... ... .......................50
5.9.1 Static Port Trunking .................................................................................................................50
5.9.2 Dynamic Port Trunking ........................................ ....................................................................51
5.10 How to Analyze Traffic Using Mirroring ...........................................................................................52
5.10.1 Configuring Mirroring .............................................................................................................53
5.10.2 Configuring Remote Port Mirroring ........................................................................................54
5.11 How to Use IGMP Snooping to Reduce Multicast Traffic Passing through your Switch .................60
5.12 How to Configure Access Control List (ACL) for Packets Filtering .................................................63
5.13 How to Reset the Switch via the Console Port .................. ....... ...... ...... ....... ...... ....... ...... ....... ... .......66
Chapter 6
Troubleshooting..................................................................................................................................69
6.1 Power, Hardware Connections, and LEDs ........................................................................................69
6.2 Switch Access and Login ................................. ... ... ... .... ... ... ... .... ... ... ... ..............................................70
Appendix A Legal Information............................................................................................................73
Index ....................................................................................................................................................75
4
GS1910/XGS1910 Series User’s Guide
Page 5

This chapter introduces the main features and applications of the Switch.
1.1 Introduction
Your S witch is a Gigabit Ethernet (GbE) switch with 20, 44 or 48 10/100/1000 Mbps Ethernet ports.
The GS1910-24, GS1910-24HP, XGS1910-24 or XGS1910-48 also has four GbE dual personality
interfaces. A dual personality interface includes one Gigabit Ethernet port and one slot for a miniGBIC transceiver (SFP module) with one port active at a time. The GS1910-48 and GS1910-48HP
have four SFP slots.
The Ethernet ports on the GS1910-24HP or GS1910-48HP are all IEEE802.3at High Power over
Ethernet (PoE) compliant and can supply power of up to 30W per Ethernet port.
CHAPTER 1
Getting to Know Your Switch
The XGS1910-24 or XGS1910-48 is stackable and provides two or four SFP+ slots for uplink or
stacking. They can operate together with other XGS1910-24 or XGS1910-48 switches and need to
be directly connected for stacking. The configurations are done on the master switch, which then
maintains and manages the slave switches in the stack. You can stack up to eight XGS1910-24 or
XGS1910-48 switches per stack.
With its built-in web configurator, managing and configuring the Switch is easy. In addition, the
Switch can also be managed via third-party SNMP management.
1.1.1 Bridging Example
In this example the Switch connects different company departments (RD and Sales) to the
corporate backbone. It can alleviate bandwidth contention and eliminate server and network
bottlenecks. All users that need high bandwidth can connect to high-speed department servers via
GS1910/XGS1910 Series User’s Guide 5
Page 6

Chapter 1 Getting to Know Your Switch
Backbone
RD
Sales
HQ
Branch
10 Gbps
Trunk
the Switch. You can provide a super-fast uplink connection by using the optional 10 Gigabit uplink
module on the Switch.
Figure 1 Bridging Application
1.1.2 High Performance Switching Example
The Switch is ideal for connecting two geographically dispersed networks that need high bandwidth.
In the following example, a company uses the optional 10 Gigabit uplink modules to connect the
headquarters to a branch office network. Within the headquarters network, a company can use
trunking to group several physical ports into one logical higher-capacity link. Trunking can be used
if for example, it is cheaper to use multiple lower-speed links than to under-utilize a high-speed,
but more costly, single-port link.
Figure 2 High Performance Switching
6
GS1910/XGS1910 Series User’s Guide
Page 7

1.1.3 Gigabit Ethernet to the Desktop
Internet
The Switch is an ideal solution for small networks which demand high bandwidth for a group of
heavy traffic users. You can connect computers and servers directly to the Switch’ s port or connect
other switches to the Switch. Use the optional 10 Gigabit uplink module to provide high speed
access to a data server and the Internet. The uplink module supports a fiber-optic connection which
alleviates the distance limitations of copper cabling.
In this example, all computers can share high-speed applications on the server and access the
Internet. To expand the network, simply add more networking devices such as switches, routers,
computers, print servers and so on.
Figure 3 Gigabit to the Desktop
Chapter 1 Getting to Know Your Switch
1.1.4 IEEE 802.1Q VLAN Application Example
A VLAN (Virtual Local Area Network) allows a physical network to be partitioned into multiple logical
networks. Stations on a logical network belong to one or more groups. With VLAN, a station cannot
directly talk to or hear from stations that are not in the same group(s) unless such traffic first goes
through a router.
For more information on VLANs, refer to Chapter 9 on page 111.
1.1.4.1 Tag-based VLAN Example
Ports in the same VLAN group share the same frame broadcast domain, thus increasing network
performance by reducing broadcast traffic. VLAN groups can be modified at any time by adding,
moving or changing ports without any re-cabling.
GS1910/XGS1910 Series User’s Guide
7
Page 8

Chapter 1 Getting to Know Your Switch
Shared resources such as a server can be used by all ports in the same VLAN as the server. In the
following figure only ports that need access to the server need to be part of VLAN 1. Ports can
belong to other VLAN groups too.
Figure 4 Shared Server Using VLAN Example
1.1.5 IPv6 Support
IPv6 (Internet Protocol version 6), is designed to enhance IP address size and features. The
increase in IPv6 address size to 128 bits (from the 32-bit IPv4 address) allows up to 3.4 x 10
addresses. At the time of writing, the Switch supports the following features.
• Static address assignment and stateless auto-configuration
• Neighbor Discovery Protocol (a protocol used to discover other IPv6 devices in a network)
• Remote Management using ping SNMP, telnet and HTTP services
• ICMPv6 to report errors encountered in packet processing and perform diagnostic functions, such
as "ping”
• IPv4/IPv6 dual stack; the Switch can run IPv4 and IPv6 at the same time
• Multicast Listener Discovery (MLD) snooping and proxy
1.2 Ways to Manage the Switch
Use any of the following methods to manage the Switch.
• Web Configurator. This is recommended for everyday management of the Switch using a
(supported) web browser.
• SNMP. The device can be monitored and/or managed by an SNMP manager.
38
IP
1.3 Good Habits for Managing the Switch
Do the following things regularly to make the Switch more secure and to manage the Switch more
effectively.
8
GS1910/XGS1910 Series User’s Guide
Page 9

Chapter 1 Getting to Know Your Switch
• Change the password. Use a password that’s not easy to guess and that consists of different
types of characters, such as numbers and letters.
• Write down the password and put it in a safe place.
• Back up the configuration (and make sure you know how to restore it). Restoring an earlier
working configuration may be useful if the device becomes unstable or even crashes. If you
forget your password, you will have to reset the Switch to its factory default settings. If you
backed up an earlier configuration file, you would not have to totally re-configure the Sw itch. Y ou
could simply restore your last configuration.
GS1910/XGS1910 Series User’s Guide
9
Page 10

Chapter 1 Getting to Know Your Switch
10
GS1910/XGS1910 Series User’s Guide
Page 11
CHAPTER 2
Hardware Installation and
Connection
This chapter shows you how to install and connect the Switch.
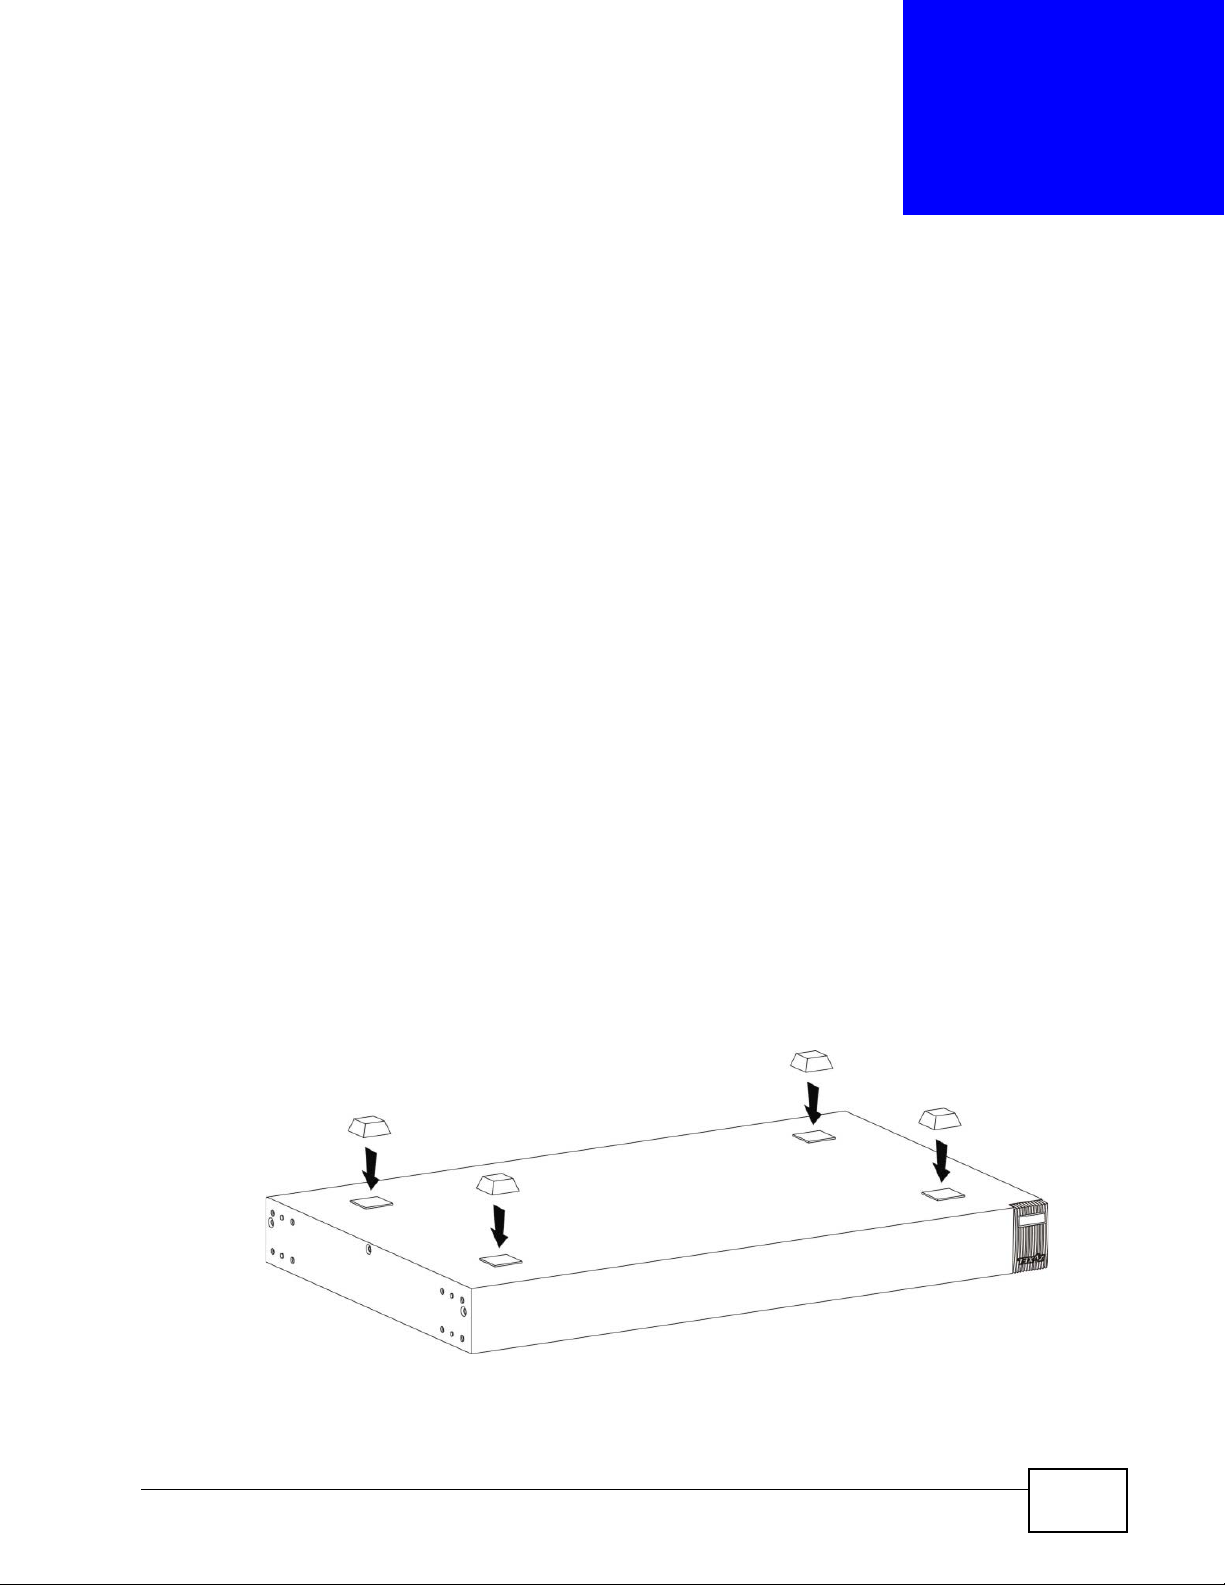
2.1 Freestanding Installation
1 Make sure the Switch is clean and dry.
2 Set the Switch on a smooth, level surface strong enough to support the weight of
the Switch and the connected cables. Make sure there is a power outlet nearby.
3 Make sure there is enough clearance around the Switch to allow air circulation and
the attachment of cables and the power cord.
4 Remove the adhesive backing from the rubber feet.
5 Attach the rubber feet to each corner on the bottom of the Switch. These rubber
feet help protect the Switch from shock or vibration and ensure space between
devices when stacking.
Figure 5 Attaching Rubber Feet
GS1910/XGS1910 Series User’s Guide
11
Page 12

Chapter 2 Hardware Installation and Connection
Note: Do NOT block the ventilation holes. Leave space between devices when
stacking.
Note: For proper ventilation, allow at least 4 inches (10 cm) of clearance at the front
and 3.4 inches (8 cm) at the back of the Switch. This is especially important for
enclosed rack installations.
2.2 Mounting the Switch on a Rack
This section lists the rack mounting requirements and precautions and describes
the installation steps.
2.2.1 Rack-mounted Installation Requirements
• Two mounting brackets.
• Eight M3 flat head screws and a #2 Philips screwdriver.
• Four M5 flat head screws and a #2 Philips screwdriver.
Failure to use the proper screws may damage the unit.
2.2.1.1 Precautions
• Mak e sure the r ack will safely sup port the combined weight of all the equipment
it contains.
• Make sure the position of the Switch does not make the rack unstable or topheavy. Take all necessary precautions to anchor the rack securely before
installing the unit.
2.2.2 Attaching the Mounting Brackets to the Switch
1 Position a mounting bracket on one side of the Switch, lining up the four screw
holes on the bracket with the screw holes on the side of the Switch.
Figure 6 Attaching the Mounting Brackets
12
GS1910/XGS1910 Series User’s Guide
Page 13

Chapter 2 Hardwar e In sta lla tion and Con n ec tion
2 Using a #2 Philips screwdriver, install the M3 flat head screws through the
mounting bracket holes into the Switch.
3 Repeat steps 1 and 2 to install the second mounting bracket on the other side of
the Switch.
4 You may now mount the Switch on a rack. Proceed to the next section.
2.2.3 Mounting the Switch on a Rack
1 Position a mounting br acket (that is already attached to the Switch) on one s ide of
the rack, lining up the two screw holes on the br ack et with the screw holes on the
side of the rack.
Figure 7 Mounting the Switch on a Rack
2 Using a #2 Philips screwdriver, install the M5 flat head screws through the
mounting bracket holes into the rack.
3 Repeat steps 1 and 2 to attach the second mounting bracket on the other side of
the rack.
GS1910/XGS1910 Series User’s Guide
13
Page 14

Chapter 2 Hardware Installation and Connection
14
GS1910/XGS1910 Series User’s Guide
Page 15

CHAPTER 3
10/100/1000 Mbps
RJ-45 Ethernet Ports
Console Port
10/100/1000 Mbps RJ-45 / SFP
Dual Personality Interfaces
10/100/1000 Mbps
RJ-45 PoE Ports
Console Port
10/100/1000 Mbps RJ-45 PoE /
SFP Dual Personality Interfaces
10/100/1000 Mbps
RJ-45 Ethernet Ports
SFP Slots
Hardware Overview
This chapter describes the front panel and rear panel of the Switch and shows y ou
how to make the hardware connections.
3.1 Front Panel Connections
The figure below shows the front panel of the Switch.
Figure 8 Front Panel: GS1910-24
Figure 9 Front Panel: GS1910-24HP
Figure 10 Front Panel: GS1910-48
GS1910/XGS1910 Series User’s Guide
15
Page 16
Chapter 3 Hardwar e Over vie w
10/100/1000 Mbps
RJ-45 PoE Ports
SFP Slots
10/100/1000 Mbps
RJ-45 Ethernet Ports
10/100/1000 Mbps RJ-45 / SFP
Dual Personality Interfaces
Console Port
SFP+ Slot
10/100/1000 Mbps
RJ-45 Ethernet Ports
10/100/1000 Mbps RJ-45 / SFP
Dual Personality Interfaces
SFP+ Slot
Figure 11 Front Panel: GS1910-48HP
Figure 12 Front Panel: XGS1910-24
Figure 13 Front Panel: XGS1910-48
The following table describes the ports.
Table 1 Panel Connections
CONNECTOR DESCRIPTION
10/100/1000
Mbps RJ-45
Ethernet Ports
10/100/1000
Mbps RJ-45 PoE
Ports (GS191024HP and
GS1910-48HP
only)
Connect these ports to a computer, a hub, an Ethernet switch or router.
Connect these ports to a computer, a hub, an Ethernet switch or router.
16
GS1910/XGS1910 Series User’s Guide
Page 17

Chapter 3 Hardware Overview
Table 1 Panel Connections (continued)
CONNECTOR DESCRIPTION
Dual
Personality
Interfaces
SFP Slots
(GS1910-48
and GS191048HP only)
SFP+ Slots
(XGS1910-24
and XGS191048 only)
Console Port At the time of writing, this port is reserved for future use, such as
Each interface has one 10/100/1000Base-T RJ-45 port and one Small
Form-Factor Pluggable (SFP) slot (also called a mini-GBIC (Gigabit
Interface Converter) slot), with one port active at a time.
• 10/100/1000Base-T P orts or 10/100/1000Base-T PoE Ports (GS191024HP and GS1910-48HP only):
Connect these ports to high-bandwidth backbone network Ethernet
switches using Category 5/5e/6 1000Base-T Ethernet cables.
Use an 8-wire Ethernet cable for Gigabit connections. Using a 4-wire
Ethernet cable limits your connection to 100 Mbps. Note that the
connection speed also depends on what the Ethernet device at the
other end can support.
•SFP Slots:
Use SFP transceivers in these ports for 1000Base-X fiber-optic
connections to backbone Ethernet switches.
Use SFP transceivers in these slots for fiber-optic or copper connections
to backbone Ethernet switches.
Use SFP+ transceivers in these slots for fiber-optic connections to
backbone Ethernet switches.
firmware upgrade using an RS-232 cable.
3.1.1 Ethernet Ports
The Switch has 1000Base-T auto-negotiating, auto-crossover Ethernet ports. In
10/100/1000 Mbps Gigabit Ethernet, the speed can be 10Mbps, 100 Mbps or 1000
Mbps. The duplex mode can be both half or full duplex at 100 Mbps and full duplex
only at 1000 Mbps.
An auto-negotiating port can detect and adjust to the optimum Ethernet speed
(10/100/1000 Mbps) and duplex mode (full duplex or half duplex) of the
connected device.
An auto-crossover (auto-MDI/MDI-X) port automatically works with a straightthrough or crossover Ethernet cable.
3.1.1.1 Default Ethernet Settings
The factory default negotiation settings for the Ethernet ports on the Switch are:
• Speed: Auto
•Duplex: Auto
• Flow control: Off
• Dual Personality Interface: Fiber-optic module first
GS1910/XGS1910 Series User’s Guide
17
Page 18

Chapter 3 Hardwar e Over vie w
3.1.2 Dual Personality Interfaces
There are four dual personality interfaces, comprising four 1000Base- T/SFP combo
ports. For each interface you can connect either to the 1000Base- T port or the SFP
slot. If an SFP transceiver is inserted in the SFP slot, the corresponding 1000BaseT port will be disabled.
Note: Connect the 1000Base-T RJ-45 port only after the transceiver is removed from
the corresponding SFP slot.
3.1.3 SFP/SFP+ Slots
These are slots for Small Form-Factor Pluggable (SFP) or SFP+ transceivers. The
SFP is also referred to as a mini-GBIC. The SFP+ (SFP Plus) is an enhanced
version of the SFP and supports data rates of 10 Gbps. A transceiver is a single
unit that houses a transmitter and a receiver. Use a transceiver to connect a fiberoptic cable to the Switch. The Switch does not come with transceivers. You must
use transceivers that comply with the Small Form-Factor Pluggable (SFP)
Transceiver MultiSource Agreement (MSA). See the SFF committee’s INF-8074i
specification Rev 1.0 for details.
You can change transceivers while the Switch is operating. You can use different
transceivers to connect to Ethernet switches with different types of fiber-optic
connectors.
• Type: SFP connection interface
• Connection speed: 1 Gigab it per second ( Gbps) or 10 Gig abit per second (Gbps )
To avoid possible eye injury, do not look into an operating fiberoptic module’s connectors.
3.1.3.1 Transceiver Installation
Use the following steps to install a transceiver (SFP or SFP+ module).
18
GS1910/XGS1910 Series User’s Guide
Page 19
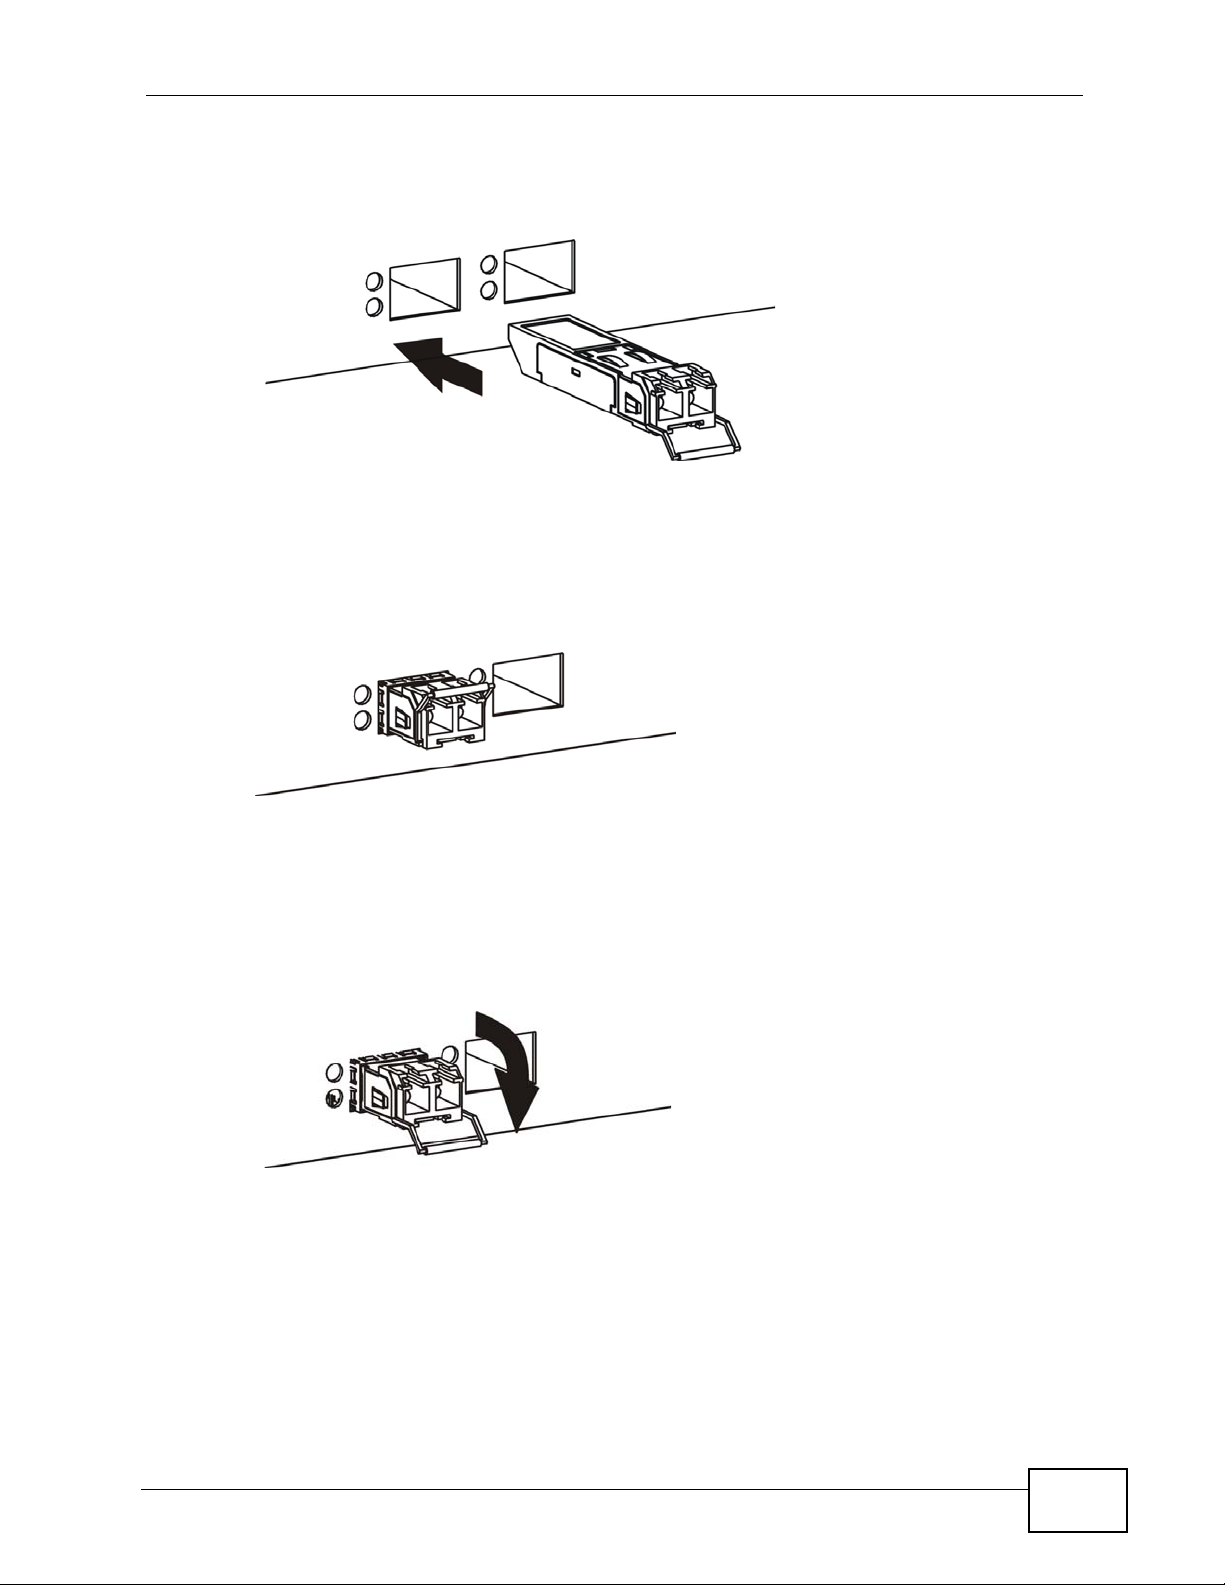
Chapter 3 Hardware Overview
1 Insert the transceiver into the slot with the exposed section of PCB board facing
down.
Figure 14 Transceiver Installation Example
2 Press the transceiver firmly until it clicks into place.
3 The Switch automatically detects the installed transceiver. Check the LEDs to
verify that it is functioning properly.
Figure 15 Installed Transceiver
3.1.3.2 Transceiver Removal
Use the following steps to remove a transceiver (SFP or SFP+ module).
1 Open the transceiver’s latch (latch styles vary).
Figure 16 Opening the Transceiver’s Latch Example
GS1910/XGS1910 Series User’s Guide
19
Page 20

Chapter 3 Hardwar e Over vie w
2 Pull the transceiver out of the slot.
Figure 17 Transceiver Removal Example
3.1.4 Console Port
For local management, you can use a computer with terminal emulation software
configured to the following parameters:
• VT100 terminal emulation
• 115200 bps
• No parity, 8 data bits, 1 stop bit
• No flow control
Connect the male 9-pin end of the RS-232 console cable to the console port of the
Switch. Connect the female end to a serial port (COM1, COM2 or other COM port)
of your computer.
3.2 Rear Panel
The following figure shows the rear panel of the Switch. The rear panel contains a
connector for the power receptacle. The GS1910-48 and GS1910-48HP also have
a console port on the rear panel. The XGS1910-48 has one console port and two
SFP+ slots on the rear panel.
Figure 18 Rear Panel: GS1910-24
20
GS1910/XGS1910 Series User’s Guide
Page 21

Figure 19 Rear Panel: GS1910-24HP
Figure 20 Front Panel: GS1910-48
Figure 21 Front Panel: GS1910-48HP
Figure 22 Front Panel: XGS1910-24
Chapter 3 Hardware Overview
Figure 23 Front Panel: XGS1910-48
3.2.1 Power Connector
Make sure you are using the correct power source as shown on the panel and that
no objects obstruct the airflow of the fans.
Use the following procedures to connect the Switch to a power source after you
have installed it.
1 Connect the female end of the power cord to the power socket of your Switch.
2 Connect the other end of the cord to a power outlet.
Keep the power supply switch and the Switch’s power switch in
the OFF position until you come to the procedure for turning on
the power.
Note: Use only power wires of the required diameter for connecting the Switch to a
power supply.
GS1910/XGS1910 Series User’s Guide
21
Page 22

Chapter 3 Hardwar e Over vie w
3.3 LEDs
The following table describes the LEDs.
Table 2 LEDs
LED COLOR STATUS DESCRIPTION
PoE
(GS191048HP
only)
STACK
(XGS191
0-24 and
XGS1910
-48 only)
PWR Green On The system is turned on.
SYS Green Blinking The system is rebooting and performing self-diagnostic
ALM Red On There is a hardware failure.
10/100/1000 Mbps RJ-45 Ports
LNK/ACT Green Blinking The system is transmitting/receiving to/from a 10/1000
PoE
(GS191024HP and
GS191048HP
only)
SFP Slots
Green On Each Ethernet port’s LED is changed to act as a P oE LED
Green On The Switch is acting as the master in stacking.
Amber On The Switch is acting as the backup master device in
Amber Blinking The system is transmitting/receiving to/from a 100
Green On Power supplied to all PoE Ethernet ports meets the IEEE
Amber On Power supplied to all PoE Ethernet ports meets the IEEE
by using the LED MODE button on the front panel.
Off Each Ethernet port’s LED is changed back to act as a
LNK/ACT LED by using the LED MODE button on the
front panel.
stacking.
Blinking The Switch is acting as a slave member in stacking and
is being selected by the master in its web configurator
stack screen.
Off The S witch is not working in stacking mode.
Off The system is off.
tests.
On The system is on and functioning properly.
Off The power is off or the system is not ready/
malfunctioning.
Off The system is functioning normally.
Mbps Ethernet network.
On The link to a 10/1000 Mbps Ethernet network is up.
Mbps Ethernet network.
On The link to a 100 Mbps Ethernet network is up.
Off The link to an Ethernet network is down.
802.3at standard.
802.3af standard.
Off There is no power supplied.
22
GS1910/XGS1910 Series User’s Guide
Page 23

Chapter 3 Hardware Overview
Table 2 LEDs (continued)
LED COLOR STATUS DESCRIPTION
LNK/ACT Green Blinking The system is transmitting/receiving to/from a 1000
Mbps Ethernet network.
On The link to a 1000 Mbps Ethernet network is up.
Amber Blinking The system is transmitting/receiving to/from a 100
Mbps Ethernet network.
On The link to a 100 Mbps Ethernet network is up.
Off The link to an Ethernet network is down.
10G SFP+ Slots
LNK/ACT Blue On The port has a successful connection.
Blinking The port is receiving or transmitting data.
Off This link is disconnected.
GS1910/XGS1910 Series User’s Guide
23
Page 24

Chapter 3 Hardwar e Over vie w
24
GS1910/XGS1910 Series User’s Guide
Page 25

This section introduces the configuration and functions of the web configurator.
4.1 Introduction
The web configurator is an HTML-based management interface that allows easy Switch setup and
management via Internet browser. Use Internet Explorer 7.0 and later or Firefox 10.0 and later
versions. The recommended screen resolution is 1024 by 768 pixels.
In order to use the web configurator you need to allow:
• Web browser pop-up windows from your device. Web pop-up blocking is enabled by default in
Windows XP SP (Service Pack) 2.
• JavaScript (enabled by default).
• Java permissions (enabled by default).
CHAPTER 4
The Web Configurator
4.2 System Login
1 Start your web browser.
2 Type “http://” and the IP address of the Switch (for example, the default management IP address is
192.168.1.1) in the Location or Address field. Press [ENTER].
GS1910/XGS1910 Series User’s Guide 25
Page 26

Chapter 4 The Web Configurator
A
B
C
3 The login screen appears. The default username is admin and associated default password is
1234.
Figure 24 Web Configurator: Login
4 Click OK to view the first web configurator screen.
4.3 The Web Configurator Layout
The Port State Overview screen is the first screen that displays when you access the web
configurator.
The following figure shows the navigating components of a web configurator screen.
Figure 25 The Web Configurator Layout
26
GS1910/XGS1910 Series User’s Guide
Page 27

Chapter 4 The Web Configurator
A - Click the menu items to open submenu links, and then click on a submenu link to open the
screen in the main window.
B, C - These are quick links which allow you to perform certain tasks no matter which screen you
are currently working in.
B - Click this link to log out of the web configurator.
C - Click this link to display web help pages. The help pages provide descriptions for all of the
configuration screens.
In the navigation panel, click a main link to reveal a list of submenu links.
Table 3 Navigation Panel Sub-links Overview
CONFIGURATION MONITOR DIAGNOSTICS MAINTENANCE
The following table describes the links in the navigation panel.
Table 4 Navigation Panel Links
LINK DESCRIPTION
Configuration
System
Information This link takes you to a screen where you can configure gener al identific ation informati on
and time settings for the Switch.
IP This link takes you to a screen where you can configure the IPv4 address, subnet mask
(necessary for Switch management) and DNS (domain name server) settings.
IPv6 This link takes you to a screen where you can configure the Switch’s IPv6 address and
prefix length.
NTP This link takes you to a screen where you can configure the NTP time servers from which
the Switch gets the time and date.
Log This link takes you to screens where you can setup a system log server.
Power Reduction
EEE This link takes you to a screen where you can enable EEE (Energy Efficient Ethernet)
standard on a port to help reduce power consumption.
GS1910/XGS1910 Series User’s Guide
27
Page 28

Chapter 4 The Web Configurator
Table 4 Navigation Panel Links (continued)
LINK DESCRIPTION
Ports This link takes you to a screen where you can configure speed, flow control, the
Security
Switch This link takes y ou t o scree ns wher e yo u can change the system login password, manage
Network This link takes you to screens where you can set the maximum number of MAC addresses
AAA This link takes you to a screen where you can configure authentication and accounting
Aggregation
Static This link takes you to a screen where you can logically aggregate physical links to form
LACP This link takes you to a screen where you can configure dynamic link aggregation.
Spanning Tree
Bridge
Settings
MSTI Mapping This link takes you to a screen where you can configure the MSTI (Multiple Spanning Tree
MSTI Priorities This link takes you to a screen where you can configure MSTI priority settings.
CIST Ports This link takes you to a screen where you can configure CIST (Common and Internal
MSTI Ports This link takes you to a screen where you can configure MSTI ports.
MVR This link takes you to a screen where you can create multicast VLANs and select the
IPMAC
IGMP
Snooping
MLD Snooping This link takes you to screens where you can configure MLD snooping.
LLDP
LLDP This link takes you to a screen where you can configure LLDP (Link Layer Discovery
LLDP-MED This link takes you to a screen where you can configure Link Layer Discovery Protocol-
MAC Table This link takes you to a screen where you can view the MAC address and VLAN ID of a
VLANs
VLAN
Membership
Ports This link takes you to a screen where you can configure the static VLAN (IEEE 802.1Q)
Private VLANs
maximum frame size and power control settings for individual Switch ports.
the privilege levels for login accounts, and configure SNMP, remote management and
RMON (Remote Network Monitor).
to learn on a port, configure IEEE 802.1x port authentication as well as MAC
authentication for clients communicat ing via the S witch, con figure the acc ess cont rol list,
DHCP snooping, DHCP relay, IP source guard and ARP inspection settings.
services via external servers. The external servers can be either RADIUS (Remote
Authentication Dial-In User Service) or TACACS+ (Terminal Access Controller AccessControl System Plus).
one logical, higher-bandwidth link.
This link takes you to a screen where you can activate one of the STP modes and
configure the STP settings on the Switch.
Instance) to VLAN mapping settings.
Spanning Tree) ports.
receiver port(s) and a source port for each multicast VLAN.
This link takes you to screens where you can configure IGMP snooping.
Protocol) on the Switch. LLDP allows a network device to advertise its identity and
capabilities on the local network. It also allows the device to maintain and store
information from adjacent devices which are directly connected to the network device.
Media Endpoint Discovery (LLDP- MED) for multimedia devices and IP Phones.
device attached to a port. You can also view what kind of MAC address it is.
This link takes you to a screen where you can configure and view 802.1Q VLAN
parameters for the Switch.
settings on a port.
28
GS1910/XGS1910 Series User’s Guide
Page 29

Chapter 4 The Web Configurator
Table 4 Navigation Panel Links (continued)
LINK DESCRIPTION
PVLAN
Membership
Port Isolation This link takes you to a screen where you can enable port isolation on ports in a private
VCL
MAC-based
VLAN
Protocol-based
VLAN
Voice VLAN
Configuration This link takes you to a screen where you can configure a Voice VLAN for voice traffic.
OUI This link takes you t o a screen where you can configure an Organizationally Unique
QoS
Port
Classification
Port Policing This link takes you to a screen where you can configure QoS policers that allow you to
Port Scheduler This link takes you to a screen where you can configure QoS queues for outgoing traffic
Port Shaping This link takes you to a screen where you can configure traffic shaping for a queue and a
Port Tag
Remarking
Port DSCP This lin k takes you to a screen where you can configure whether and how the Switch
DSCP-Based
QoS
DSCP
Translation
DSCP
Classification
QoS Control
List
Storm Control This link takes you to a screen where you can limit the number of unicast, broadcast and
WRED This link takes you to a screen where you can configure the weighted Random Early
Port Mirroring This link takes you to a screen where you can copy traffic from one port or ports to
UPnP This link takes you to a screen to enable UPnP.
Stack This link takes you to a screen to enable stacking and manage other members in the
sFlow This link takes you to a screen where you can co nfig ur e an sFlow receiver (collector) and
Monitor
This link takes you to a screen where you can create private VLANs on the Switch.
This screen is not available on the XGS1910-24 or XGS1910-48.
VLAN or IEEE 802.1Q tagged VLAN to prevent communication between ports in the same
VLAN.
This link takes you to a screen where you can configure a MAC-based VLAN.
This link takes you to a screen where you can configure a protocol-based VLAN.
Identifier (OUI) address table that can be used for telephony devices detecting.
This link takes you to a screen where you can configure QoS classification settings for
incoming traffic on a port.
limit the transmission rate of incoming traffic on a port.
on a port.
port.
This link takes you to a screen where you can configure how the Switch sets the priority
level and drop eligible indicator field in the VLAN tag for traffic on an egress port.
modifies the DSCP value for traffic on a port.
This link takes you to a screen where you can configure the DSCP to Qo S class and drop
precedence level mapping for all incoming traffic.
This link takes you to a screen where you can configure the DSCP translation/mapping
table for incoming and/or outgoing traffic.
This link takes you to a screen where you can configure the DSCP to QoS class mapping
table.
This link takes you to a screen where you can configure a QoS control list to classify and
give different drop precedence levels and DSCP numbers to different packet types.
unknown packets the Switch receives per second on the ports.
Detection (RED) settings for QoS queues 0 to 5.
another port in order that you can examine the traffic from the first port without
interference.
stack.
sFlow data sampling settings on the Switch.
GS1910/XGS1910 Series User’s Guide
29
Page 30

Chapter 4 The Web Configurator
Table 4 Navigation Panel Links (continued)
LINK DESCRIPTION
System
Information This link takes you to a screen that displays general system information.
CPU Load This link takes you to a screen that displays what percentage of the Switch’s processing
Log This link takes you to a screen that displays view system logs for the level that you
Detailed Log This link takes you to a screen that displays an individual log.
HW monitor This link takes you to a screen that displays hardware monitoring information.
Ports
State This link takes you to a screen where you can view the status of the Switch connections.
Traffic
Overview
QoS Statistics This link takes you to a screen where you can view th e Swit ch’s QoS-related packet
QCL Status This link takes you to a screen where you can view the QoS control list status.
Detailed
Statistics
Security
Access
Management
Statistics
Network This link takes you to a screen where you can view the status and settings of port
AAA This link takes you to a screen where you can view the status and statistics for
Switch This link takes you to a screen where you can view the settings or traffic statistics of
LACP
System Status This link takes you to a screen wh ere you can view the Switch’s link aggregation status.
Port Status This link takes you to a screen where you can view the LACP settings on a port.
Port Statistics This link takes you to a screen where you can view LACP statistics on a port.
Spanning Tree
Bridge Status This link takes you to a screen where you can view the status of STP bridage instances.
Port Status This link takes you to a screen where you can view STP port role and port state.
Port Statistics This link takes you to a screen where you can view STP packet statistics on a port.
MVR
Statistics This link takes you to a screen where you can view Multicast VLAN Registration (MVR)
MVR Channel
Groups
MVR SFM
Information
IPMC
IGMP
Snooping
ability is currently used.
selected.
This link takes you to a screen where you can view the port statistics.
statistics.
This link takes you to a screen where you can check detailed performance data about an
individual port on the Switch.
This link takes you to a screen where you can view the packet statistics for access
control.
security, port authentication, access control list, DHCP snooping, DHCP relay, IP source
guard and ARP inspection.
authentication and accounting servers.
RMON groups which contain detailed information about specific activities.
statistics.
This link takes you to a screen where you can view MVR channels (groups) information.
This link takes you to a screen where you can view MVR SFM (Source-Filtered Multicast)
information.
This link takes you to a screen where you can view IGMP snooping status, IGMP group
information and SFM (Source -Filtered Multicast) information.
30
GS1910/XGS1910 Series User’s Guide
Page 31

Chapter 4 The Web Configurator
Table 4 Navigation Panel Links (continued)
LINK DESCRIPTION
MLD Snooping This link takes you to a screen where you can view MLD snooping status, MLD group
information and SFM (Source -Filtered Multicast) information..
LLDP
Neighbours This link takes you to a screen where you can view the LLDP neighboring device
information.
LLDP-MED
Neighbours
EEE This link takes you to a screen where you can view the EEE information exchanged via
Port Statistics This link takes you to a screen where you can view LLDP traffic statistics on the Switch or
MAC Table This link takes you to a screen where you can view the MAC address and VLAN ID of a
VLANs
VLAN
Membership
VLAN Port This link takes you to a screen where you can view detailed VLAN settings on a port.
Stack This link takes you to a screen where you can see whether stacking is enabled on the
VCL
MAC-based
VLAN
sFlow
sFlow Statistics This link takes you to a screen where you can vi ew sFlow receiv er state and sF low packet
Diagnostic
Ping This link takes you to a screen where you can ping IPv4 addresses to test connections.
Ping6 This link takes you to a screen where you can ping IPv6 addresses to test connections.
VeriPHY This link takes you to a screen where you can perform a physical wire-pair test of the
This link takes you to a screen where you can view the LLDP-MED neighboring device
information.
LLDP.
on a port.
device attached to a port. You can also view what kind of MAC address it is.
This link takes you to a screen where you can view status of the VLAN group.
Switch.
This link takes you to a screen where you can view the MAC-based VLAN settings.
statistics on each port.
Ethernet connections on the specified port(s).
VeriPHY® cable diagnostics provide extensive network cable information such as cable
length, termination status, and open/short fault location.
Maintenance
Restart Device This link takes you to a screen where you can reboot the system without turning the
power off.
Factory Defaults This link takes you to a screen where you can to reset the Switch back to the factory
defaults.
Software
Upload This link takes you to a screen where you can upload firmware to the Switch.
Image Select This link takes you to a screen where you can switch to use a second firmware image if
available.
This screen is not available on the XGS1910-24 or XGS1910-48.
Configuration
Backup This link takes you to a screen where you can back up your current Switch configuration
to a computer.
Upload This link takes you to a screen where you can restore a previously saved configuration
from your computer to the Switch.
GS1910/XGS1910 Series User’s Guide
31
Page 32

Chapter 4 The Web Configurator
4.3.1 Change Your Password
After you log in for the first time, it is recommended you change the default administrator
password. Click Configuration > Security > Switch > Users to display the next screen.
Figure 26 Change Administrator Login Password
4.4 Switch Lockout
You could block yourself (and all others) from using in-band-management (managing through the
data ports) if you do one of the following:
1 Delete the management VLAN (default is VLAN 1).
2 Disable all ports.
3 Misconfigure the text configuration file.
4 Forget the password and/or IP address.
5 Prevent all services from accessing the Switch.
6 Change a service port number but forget it.
Note: Be careful not to lock yourself and others out of the Switch.
4.5 Logging Out of the Web Configurator
Click Logout in a screen to exit the web configurator. You have to log in with your password again
after you log out. This is recommended after you finish a management session for security reasons.
4.6 Help
32
The web configurator’s online help has descriptions of individual screens and some supplementary
information.
Click the Help link from a web configurator screen to view an online help description of that screen.
GS1910/XGS1910 Series User’s Guide
Page 33

CHAPTER 5
Tutorials
This chapter provides some examples of using the Web Configurator to set up and use the Switch.
The tutorials include:
• How to Change Switch Management IP Address
• How to Configure Login Accounts and Privilege Levels
• How to Manage a Configuration File
• How to Create a VLAN
• How to Set Up a Guest VLAN with IEEE 802.1x Authentication
• How to Use Private VLAN to Do Port Isolation in a VLAN
• How to Use IP Source Guard and DHCP Snooping to Prevent Spoofed Traffic
• How to Use DHCP Relay on the Switch
• How to Use Link Aggregation to Group Multiple Ports into One Logical Link
• How to Analyze Traffic Using Mirroring
• How to Use IGMP Snooping to Reduce Multicast Traffic Passing through your Switch
• How to Configure Access Control List (ACL) for Packets Filtering
• How to Reset the Switch via the Console Port
5.1 How to Change Switch Management IP Address
The default management IP address of the Switch is 192.168.1.1. You can configure the IP address
to be in the same subnet as your network or have the Switch obtain a dynamic IP address from a
DHCP server in your network. The following figure shows an example.
Figure 27 Initial Setup Example: Management IP Address
GS1910/XGS1910 Series User’s Guide 33
Page 34

Chapter 5 Tutorials
1 Connect your computer to the Switch’s port which is in VLAN1 (the default management VLAN).
2 Open your web browser and enter 192.168.1.1 (the default management IP address) in the address
bar to access the web configurator. See Section 4.2 on page 25 for more information. Your
computer must have an IP address in the range between “192.168.1.2” and “192.168.1.254”.
3 Log in with the admin account.
4 Click Configuration > System > IP in the navigation panel.
5 Enter 172.16.13.5 as the Switch’s new management IP
address, 255.255.255.0 as the subnet mask and
172.16.13.2 as the gateway’s IP address.
Alternatively, you can select the DHCP Client check box to have the Switch act as a DHCP client
and get an IP address from the DHCP server to which the Switch is connected. Click Renew to
update the IP address and DNS server information after you click Save. The IP address assigned by
a DHCP server has priority over the IP address you manually configured.
6 The VLAN ID field lets you enter the ID of the VLAN group to which you want this management IP
address to belong. This is the same as the VLAN ID you configure in the Configuration > VLANs
> VLAN Membership screen. In this example, leave the field at 1.
7 Click Save to save your changes back to the Switch.
Note: The Web Configurator may no longer be accessible unless you log in with the new
IP address. Check the DHCP server for the Switch’s dynamically assigned IP
address when it is working as a DHCP client.
5.2 How to Configure Login Accounts and Privilege Levels
The admin account has a privilege level of 15, so the administrator can perform all types of system
configuration. You cannot change the user name and privilege level of the admin account. You can
create new login accounts the user used to log in to the Switch and manage the privilege levels for
login accounts.
34
GS1910/XGS1910 Series User’s Guide
Page 35

Chapter 5 Tutorials
In this example, you create a login account with the following information.
USER NAME PASSWORD PRIVILEGE LEVEL
user1 qwert12345 10
1 Log into the Switch’s Web Configurator with the admin account.
2 Click Configuration > Security > Switch > Users in the navigation panel. Click Add New User
to create a new login account.
3 Specify the user name, password and privilege level of the login account.
4 Click Save to apply your changes.
GS1910/XGS1910 Series User’s Guide
35
Page 36

Chapter 5 Tutorials
5 By default, you cannot use a login account with a privilege level of 10 to do system maintenance,
such as configuring login accounts, uploading firmware or resetting to the factory defaults. To
change the access privilege level for each feature group, go to Configuration > Security >
Switch > Privilege Levels.
5.3 How to Manage a Configuration File
Configuration files define the Switch’s settings. You can use the Configuration screens to back up
configuration files from the Switch to your computer and restore them from your computer to the
Switch.
5.3.1 Backing up a Configuration File
Backing up your Switch configurations allows you to create v arious “snap shots” of your device from
which you may restore at a later date.
To backup your configuration file,
1 Click Maintenance > Configuration > Save and click Save Configuration.
2 Click Save to display the File Download screen.
36
GS1910/XGS1910 Series User’s Guide
Page 37

Chapter 5 Tutorials
3 Choose a location to save the file on your computer from the Save in drop-down list box and type
a descriptive name for it in the File name list box.
4 Click Save to save the configuration file to your computer.
5.3.2 Restoring a Configuration File
If you want to upload a previously saved configuration file from your computer to the Switch, go to
Maintenance > Configuration > Upload. Select the *.xml file from its path and click Upload.
GS1910/XGS1910 Series User’s Guide
37
Page 38

Chapter 5 Tutorials
After the upload is successful, the following screen displays.
"config" is the name of the configuration file on the Switch, so your backup configuration file is
automatically renamed when you restore using this screen.
5.4 How to Create a VLAN
VLANs confine broadcast frames to the VLAN group in which the port(s) belongs. You can do this
using IEEE 802.1Q tagged static VLAN with fixed port members.
A tagged VLAN uses an explicit tag (VLAN ID) in the MAC header to identify the VLAN membership
of a frame across bridges - they are not confined to the switch on which they were created. The
VLANs can be created statically by hand or dynamically through Multiple VLAN Registration Protocol
(MVRP). The VLAN ID associates a frame with a specific VLAN and provides the information that
switches need to process the frame across the network.
Each port on the Switch is capable of passing tagged or untagged frames. To forward a frame from
an 802.1Q VLAN-aware switch to an 802.1Q VLAN-unaware switch, the Switch first decides where
to forward the frame and then strips off the VLAN tag. To forward a frame from an 802.1Q VLANunaware switch to an 802.1Q VLAN-aware switch, the Switch first decides where to forward the
frame, and then inserts a VLAN tag reflecting the ingress port's default VID. The default PVID is
VLAN 1 for all ports, but this can be changed.
A broadcast frame (or a multicast frame for a multicast group that is known by the system) is
duplicated only on ports that are members of the VID (except the ingress port itself), thus confining
the broadcast to a specific domain.
By default, all ports on the Switch are in VLAN 1. In this example, you want to configure port 1 as a
member of VLAN 2.
Figure 28 VLAN Example
38
GS1910/XGS1910 Series User’s Guide
Page 39

Chapter 5 Tutorials
1 Access the Switch through http://192.168.1.1. Log into the Switch with the admin account.
2 Click Configuration > VLANs > VLAN Membership in the navigation panel. Click Add New
VLAN to create VLAN2.
3 Enter 2 in the VLAN ID field and enter a descriptive name in the VLAN Name field for the VLAN2
network.
4 Since the VLAN2 network is connected to port 1 on the Switch, select port 1’s check box under
Port Members to configure port 1 to be a permanent member of the VLAN.
5 Click Save to save the settings to the Switch.
5.4.1 Setting Port VID
Use PVID to add a tag to incoming untagged frames received on that port so that the frames are
forwarded to the VLAN group that the tag defines.
GS1910/XGS1910 Series User’s Guide
39
Page 40

Chapter 5 Tutorials
In the example network, configure 2 as the port VID on port 1 so that any untagged frames
received on that port get sent to VLAN 2.
Figure 29 Port VID Example
1 Click Configuration > VLANs > Ports in the navigation panel.
2 Set Port VLAN Mode to Specific and enter 2 in the Port VLAN ID field for port 1.
3 To ensure that VLAN-unaware devices (such as computers and hubs) can receive frames properly,
you can either select Untag_all in the TX Tag field to set the Switch to remove any VLAN tags
before sending or leave the TX Tag field at Untag_pvid to have the Switch remove a frame’s VLAN
tag when the frame’s VLAN ID is the same as the PVID of the port on which the frame is
transmitted.
4 click Save to save your changes back to the Switch.
40
GS1910/XGS1910 Series User’s Guide
Page 41

Chapter 5 Tutorials
Internet
Guest VLAN 200
Ports 1, 2, 3 and 10
VLAN 1
5.5 How to Set Up a Guest VLAN with IEEE 802.1x Authentication
All ports on the Switch are in VLAN 1 by default. Say you enable IEEE 802.1x authentication on
ports 1 to 8. Clients that connect to these ports should provide the correct user name and password
in order to access the ports. You want to assign clients that connect to ports 1, 2 or 3 to a guest
VLAN (200 for example) when they fail to authenticate with the authentication server. In this guest
VLAN, clients can surf the Internet through a gateway attached to port 10, but are not allowed to
access other network resources, such as the mail server or local data base.
5.5.1 Creating a VLAN for Port which is not IEEE 802.1x enabled
Follow the steps below to configure port 10 as a member of VLAN 200.
1 Access the web configurator through the Switch’s port which is not in VLAN 200.
2 Click Configuration > VLANs > VLAN Membership in the navigation panel. Click Add New
VLAN to create VLAN2.
3 Enter 200 in the VLAN ID field and enter a descriptive name (VLAN200 for example) in the VLAN
Name field for this VLAN.
4 Configure port 10 to be a permanent member of the VLAN.
GS1910/XGS1910 Series User’s Guide
41
Page 42

Chapter 5 Tutorials
5 Click Save to save the settings to the Switch.
6 Click Configuration > VLANs > Ports in the navigation panel.
7 Set Port VLAN Mode to Specific and enter 200 in the Port VLAN ID field for port 10 to add a tag
to incoming untagged frames received on these ports so that the frames are forwarded to the VLAN
group that the tag defines.
8 To ensure that VLAN-unaware devices (such as computers and hubs) can receive frames properly,
select Untag_all in the TX Tag field to set the Switch to remove VLAN tags before sending frames
out of these ports.
9 click Save to save your changes back to the Switch.
5.5.2 Enabling IEEE 802.1x Port Authentication and Guest VLAN
Follow the steps below to enable port authentication to validate access to ports 1~8 to clients based
on a RADIUS server.
1 Click Configuration > Security > Network > NAS. Select Enabled in the Mode field to activate
IEEE 802.1x authentication on the Switch.
42
GS1910/XGS1910 Series User’s Guide
Page 43

Chapter 5 Tutorials
2 Select the Reauthentication Enabled check box to have a subscriber periodically re-enter his or
her username and password to stay connected to the port.
3 Select the Guest VLAN Enabled check box and enter the guest VLAN ID (200 in this example) to
enable the guest VLAN on the Switch. The Switch will automatically create the guest VLAN and
configure the IEEE 802.1x-enabled ports as a member of the guest VLAN.
4 Set Admin State to Port-based 802.1x for ports 1 to 8 to turn on IEEE 802.1x authentication on
these ports.
5 Select the Guest VLAN Enabled check box on ports 1, 2 and 3. The Switch puts unauthenticated
clients in the specified guest VLAN.
6 Click Save. Clients that attach to port 1, 2 or 3 and fail to authenticate with the RADIUS server now
should be in VLAN 200 and can access the Internet via the Internet access gateway connected to
port 10 which is also in VLAN 200, but cannot communicate with devices in VLAN 1.
GS1910/XGS1910 Series User’s Guide
43
Page 44

Chapter 5 Tutorials
Internet
5.6 How to Use Private VLAN to Do Port Isolation in a VLAN
This tutorial is not applicable to the XGS1910-24 or XGS1910-48.
Port isolation prevents communication between ports. You want to do port isolation in a VLAN but
still allow ports to access the Internet or network resources through the uplink port in the same
VLAN. You use private VLAN to do port isolation in a VLAN instead of assigning each port to a
separate VLAN and creating a different IP routing domain for each individual port.
By default, all ports on the Switch are in VLAN 1 and private VLAN 1. An isolated port is a port on
which port isolation is enabled. An isolated port cannot communicate with other isolated ports even
when they are in the same VLAN and same private VLAN.
In this example, you put ports 2 to 4 and 25 in private VLAN 25 and enable port isolation to block
traffic between ports 2, 3 and 4.
5.6.1 Creating a Private VLAN
Follow the steps below to configure port 2, 3, 4 and 25 as a member of private VLAN 25.
1 Access the web configurator through the Switch’s port on which port isolation will not be enabled.
2 Go to Configuration > Private VLANs > PVLAN Membership. Click Add New Private VLAN.
3 Enter a private VLAN ID (25 for example) in the PVLAN ID field.
4 Select ports 2, 3, 4 and 25 to be members of this private VLAN.
44
GS1910/XGS1910 Series User’s Guide
Page 45

5 Click Save to save the settings to the Switch.
5.6.2 Enabling Port Isolation
Follow the steps below to configure port isolation.
1 Click Configuration > Private VLANs > Port Isolation.
2 Select the check boxes of ports 2, 3 and 4, and click Save to add them to the isolated port list so
that they cannot send traffic to each other.
Chapter 5 Tutorials
From port 2, 3, or 4, you should be able to access the device that attaches to port 25, such as a
server or default gateway.
5.7 How to Use IP Source Guard and DHCP Snooping to Prevent Spoofed Traffic
IP source guard uses a binding table to allow or block IP traffic in your network. When the Switch
receives an IP packet, it looks up the appropriate MAC address, VLAN ID, IP address, and port
number in the binding table. If there is a binding, the Switch forwards the packet. If there is not a
binding, the Switch discards the packet.
The Switch builds the binding table by snooping DHCP packets (dynamic bindings) and from
information provided manually by administrators (static bindings).
Use DHCP snooping to filter unauthorized DHCP packets on the network and to build the binding
table dynamically. This can prevent clients from getting IP addresses from unauthorized DHCP
servers.
GS1910/XGS1910 Series User’s Guide
45
Page 46

Chapter 5 Tutorials
A
B
M
C
VLAN 100
If you want to use dynamic bindings to filter unauthorized ARP packets (typical implementation),
you have to enable DHCP snooping before you enable ARP inspection.
T rusted vs. Untrusted Ports
Every port is either a trusted port or an untrusted port for DHCP snooping.
T rusted ports are connected to DHCP servers or other switches. The Switch learns dynamic bindings
from trusted ports.
Note: The Switch will drop all DHCP requests if you enable DHCP snooping and there are
Untrusted ports are connected to subscribers. The Switch discards DHCP packets from untrusted
ports in the following situations:
• The packet is a DHCP server packet (for example, OFFER, ACK, or NACK).
• The source MAC address and source IP address in the packet do not match any of the current
bindings.
• The packet is a RELEASE or DECLINE packet, and the source MAC address and source port do not
match any of the current bindings.
no trusted ports.
In the following example, you only want DHCP server A connected to port 5 to assign IP addresses
to all devices in VLAN 100. Create a VLAN containing ports 5, 6 and 7. Connect a computer (M) to
the Switch’s port which is not in VLAN 100.
The settings in this tutorial are as the following.
Table 5 Settings in this Tutorial
HOST
DHCP Server (A) 5 1 and 100 100 Yes
DHCP Client (B) 6 1 and 100 100 No
DHCP Client (C) 7 1 and 100 100 No
PORT
CONNECTED
VLAN PVID
DHCP SNOOPING PORT
TRUSTED
1 Access the Switch through http://192.168.1.1. Log into the Switch by entering the username
(default: admin) and password (default: 1234).
2 See Section 5. 4 on page 38 for how to create a VLAN and configure ports to join the VLAN.
46
GS1910/XGS1910 Series User’s Guide
Page 47

Chapter 5 Tutorials
3 Go to Configuration > Security > Network > DHCP > Snooping to activate DHCP snooping on
the Switch.
4 Specify whether ports are trusted or untrusted ports for DHCP snooping. Select Trusted in the
Mode field for port 5 because the DHCP server is connected to port 5. Set ports 6 and 7 to
Untrusted as they are connected to DHCP clients. Click Save.
5 Connect your DHCP server to port 5 and a computer (as DHCP client) to either port 6 or 7. The
computer should be able to get an IP address from the DHCP server. If you put the DHCP server on
port 6 or 7, the computer will not able to get an IP address.
GS1910/XGS1910 Series User’s Guide
47
Page 48

Chapter 5 Tutorials
6 Click Configuration > Security > Network > IP Source Guard > Configuration and enable IP
source guard on the Switch and on ports 6 and 7. Set the maximum number of DHCP clients to
learn dynamically on ports 6 and 7. Click Save.
7 Go to Monitor > Security > Network > IP Source Guard to look at the current dynamic
bindings for DHCP snooping. You should see an IP binding for port 6 or 7 in VLAN 100.
5.8 How to Use DHCP Relay on the Switch
If the DHCP clients and the DHCP server are not in the same broadcast domain, the Switch can help
to relay network information (such as the IP address and subnet mask) between a DHCP client and
a DHCP server. This tutorial describes how to configure your Switch to forward DHCP client requests
to a specific DHCP server. The DHCP server can then assign a specific IP address based on the
information in the DHCP requests.
In this example, you have configured your DHCP server (192.168.2.3) and want to have it assign a
specific IP address (say 172.16.1.18) and gateway information to DHCP client A based on the slot
48
GS1910/XGS1910 Series User’s Guide
Page 49

ID, VLAN ID and port number in the DHCP request. Client A connects to the Switch’ s port 2 in VLAN
VLAN 102
DHCP Server
Port 2
PVID=102
172.16.1.18
A
192.168.2.3
102.
5.8.1 Creating a VLAN
1 Access the web configurator through the Switch’s port which is in VLAN 1.
Chapter 5 Tutorials
2 Configure port 2 as a member of VL AN 102. See Section 5.4 on page 38 for how to create a VLAN
and configure ports to join the VLAN.
5.8.2 Configuring DHCP Relay
1 Click Configuration > Security > Network > DHCP > Relay.
2 Select Enabled in the Relay Mode field to enable DHCP relay on the Switch.
3 Enter the DHCP server’s IP address (192.168.2.3 in this example) in the Relay Server field.
4 Select Enabled in the Relay Information Mode field to allow the Switch to add relay agent
information (such as the VLAN ID) to DHCP requests.
5 Select Replace in the Relay Information Policy field to have the Switch remove the original
DHCP relay agent information (if any) and add new information in the DHCP requests.
6 Click Save to save your changes back to the Switch.
GS1910/XGS1910 Series User’s Guide
49
Page 50

Chapter 5 Tutorials
A
B
7 The DHCP server can then assign a specific IP address based on the DHCP request.
5.8.3 Troubleshooting
Check the client A’s IP address. If it did not receive the IP address 172.16.1.18, make sure:
1 Client A is connected to the Switch’s port 2 in VLAN 102.
5.9 How to Use Link Aggregation to Group Multiple Ports into One Logical Link
Link aggregation (trunking) is the grouping of physical ports into one logical higher-capacity link.
You may want to trunk ports if for example, it is cheaper to use multiple lower-speed links than to
under-utilize a high-speed, but more costly, single-port link.
However, the more ports you aggregate then the fewer available ports you have. A trunk group is
one logical link containing multiple ports.
The beginning port of each trunk group must be physically connected to form a trunk group.
The Switch supports both static and dynamic link aggregation. The Switch supports the IEEE
802.3ad standard for static and dynamic (LACP) port trunking. This standard describes the Link
Aggregation Control Protocol (LACP), which is a protocol that dynamically creates and manages
trunk groups.
Note: In a properly planned network, it is recommended to implement static link
aggregation only. This ensures increased network stability and control over the
trunk groups on your Switch.
5.9.1 Static Port Trunking
This example shows you how to create a static port trunk group for ports 2-5.
1 Make your physical connections - make sure that the ports that you want to belong to the trunk
group are connected to the same destination. The following figure shows ports 2-5 on switch A
connected to switch B.
50
GS1910/XGS1910 Series User’s Guide
Page 51

Chapter 5 Tutorials
2 Configure static trunking - Click Configuration > Aggregation > Static. In this screen select
the traffic distribution type(s) used by this group and select the ports that should belong to this
group as shown in the figure below. Packets from the same source and/or to the same destination
are sent over the same link within the trunk. If the Switch is behind a router, the packet’s
destination or source MAC address will be changed. In this case, set the Switch to distribute traffic
based on its IP address to make sure port trunking can work properly.
Click Save when you are done.
5.9.2 Dynamic Port Trunking
When you enable LACP link aggregation on a port, the port can automatically negotiate with the
ports at the remote end of a link to establish trunk groups. LACP also allows port redundancy, that
is, if an operational port fails, then one of the “standby” ports become operational without user
intervention. Please note that:
• You must connect all ports point-to-point to the same Ethernet Switch and configure the ports for
LACP trunking.
• LACP only works on full-duplex links.
• All ports in the same trunk group must have the same media type, speed, duplex mode and flow
control settings.
To configure the settings:
GS1910/XGS1910 Series User’s Guide
51
Page 52

Chapter 5 Tutorials
Source port
Reflector port
Intermediate port
Intermediate port
Intermediate port
Destination port
Remote Port Mirroring VLAN
Intermediate port
1 Click Configuration > Aggregation > LACP. Enable LACP on ports for which you want to create a
trunk group using LACP. Leave the other fields to their default settings. Click Save.
5.10 How to Analyze Traffic Using Mirroring
With mirroring, you can copy a traffic flow (passing through the source port(s)) to another port (a
destination port you copy the traffic to) in order that you can examine the traffic from the
destination port without interference.
You can also use remote port mirroring to monitor multiple switches across your network. In
remote port mirroring, the traffic from the source port(s) is forwarded to a specific remote port
mirroring VLAN through a reflector port and copied to an intermediate port. Traffic are then carried
over the VLAN and sent to a destination port in a remote switch through the intermediate ports that
connect to other switches.
52
GS1910/XGS1910 Series User’s Guide
Page 53

5.10.1 Configuring Mirroring
2
7
In this example, you are attached to port 2 but want to copy traffic received or transmitted on port
7 for analysis.
1 Access the Switch through http://192.168.1.1. Log into the Switch by entering the username
(default: admin) and password (default: 1234).
2 Go to Configuration > Port Mirroring. Select Enabled in the Mode field to activate mirroring on
the Switch.
3 Set Type to Mirror to do mirroring in one standalone switch.
Chapter 5 Tutorials
4 Configure port 2 to act as a destination port to which the Switch copy traffic from the source
port(s).
5 Select the direction of traffic flow you want to copy (Both in this example) on port 7.
6 Click Save. You then should be able to receive a copy of the traffic passing through port 7 to
examine it in more detail without interfering with the traffic flow on the original port.
GS1910/XGS1910 Series User’s Guide
53
Page 54

Chapter 5 Tutorials
4
Reflector port
Intermediate port
Intermediate port
Intermediate port
10
Remote Port Mirroring VLAN 100
A
B
C
Intermediate port
5.10.2 Configuring Remote Port Mirroring
In this example, there are three switches (A, B and C) in your network. You are connected to port
10 of switch C but want to monitor traffic received or transmitted on port 4 of switch A. The copied
traffic is forwarded to remote port mirroring VLAN 100.
In Switch A:
1 Access the Switch through http://192.168.1.1. Log into the Switch by entering the username
(default: admin) and password (default: 1234).
2 Go to Configuration > Port Mirroring. Select Enabled in the Mode field to activate mirroring on
the Switch.
3 Set Type to Source to configure a source port on Switch A.
4 Enter the remote port mirroring VLAN ID number (100 in this example) and select a reflector port
(Port 7 for example) through which copied traffic is forwarded to the specified VLAN. The Switch
will automatically create the remote port mirroring VLAN and configure the reflector and
intermediate ports as a member of the remote port mirroring VLAN.
5 Select the direction of traffic flow you want to copy (Both in this example) on the source port (port
4 in this example).
6 Configure port 12 to act as an intermediate port to which traffic from the source port is copied that
connects to Switch B.
54
GS1910/XGS1910 Series User’s Guide
Page 55

7 Click Save.
Chapter 5 Tutorials
GS1910/XGS1910 Series User’s Guide
55
Page 56

Chapter 5 Tutorials
8 Click Configuration > Spanning Tree > CIST Ports to disable (R)STP on the reflector port to
prevent the port from entering blocking state.
56
GS1910/XGS1910 Series User’s Guide
Page 57

Chapter 5 Tutorials
9 Go to Configuration > MAC Table to disable MAC address learning on the reflector and
intermediate ports so that the Switch will NOT filter or forward a frame based on the frame’s
destination MAC address, or even drop the frame whose MAC address is not in the MAC address
table on these ports.
In Switch B:
1 Access the Switch through http://192.168.1.1. Log into the Switch by entering the username
(default: admin) and password (default: 1234).
2 Go to Configuration > Port Mirroring. Select Enabled in the Mode field to activate mirroring on
the Switch.
3 Set Type to Intermediate to configure the intermediate ports that help forward traffic.
4 Enter the remote port mirroring VLAN ID number (100 in this example). The Switch will
automatically create the remote port mirroring VLAN and configure the intermediate ports as a
member of this VLAN.
5 Configure ports (3 and 4 for example) to act as the intermediate ports that connect to Switch A and
Switch C.
GS1910/XGS1910 Series User’s Guide
57
Page 58

Chapter 5 Tutorials
6 Click Save.
7 Go to Configuration > MAC Table to disable MAC address learning on the intermediate ports so
that the Switch will NOT filter or forward a frame based on the fr ame’ s destination MAC address, or
even drop the frame whose MAC address is not in the MAC address table on these ports.
58
GS1910/XGS1910 Series User’s Guide
Page 59

Chapter 5 Tutorials
In Switch C:
1 Access the Switch through http://192.168.1.1. Log into the Switch by entering the username
(default: admin) and password (default: 1234).
2 Go to Configuration > Port Mirroring. Select Enabled in the Mode field to activate mirroring on
the Switch.
3 Set Type to Destination to configure the intermediate ports that help forward traffic.
4 Enter the remote port mirroring VLAN ID number (100 in this example). The Switch will
automatically create the remote port mirroring VLAN and configure the intermediate and
destination ports as a member of this VLAN.
5 Configure a port (2 for example) to act as the intermediate port that connects to Switch B.
6 Configure a port (10 for example) to act as the destination port that receives the copy of traffic
from the source port on Switch A for analysis.
7 Click Save.
GS1910/XGS1910 Series User’s Guide
59
Page 60

Chapter 5 Tutorials
8 Go to Configuration > MAC Table to disable MAC address learning on the intermediate and
destination ports so that the Switch will NOT filter or forward a frame based on the frame’s
destination MAC address, or even drop the frame whose MAC address is not in the MAC address
table on these ports.
5.11 How to Use IGMP Snooping to Reduce Multicast Traffic Passing through your Switch
The Switch can passively snoop on IGMP packets transferred between IP multicast routers/switches
and IP multicast hosts to learn the IP multicast group membership. It checks IGMP packets passing
through it, picks out the group registration information, and configures multicasting accordingly.
IGMP snooping allows the Switch to learn multicast groups without you having to manually
configure them.
The Switch forwards multicast traffic destined for multicast groups (that it has learned from IGMP
snooping or that you have manually configured) to ports that are members of that group. IGMP
snooping generates no additional network traffic, allowing you to significantly reduce multicast
traffic passing through your Switch.
The Switch can perform IGMP snooping on up to 32 VLANs. You can configure the Switch to
automatically learn multicast group membership of any VLANs.
60
GS1910/XGS1910 Series User’s Guide
Page 61

Chapter 5 Tutorials
Proxy
R
Follow the steps below to enable IGMP snooping on the Switch and a specific VLAN. You also have
the Switch act as an IGMP proxy to report group changes to a connected multicast router (R).
1 Access the Switch through http://192.168.1.1. Log into the Switch by entering the username
(default: admin) and password (default: 1234).
2 Go to Configuration > IPMAC > IGMP Snooping > Basic Configuration. Select the Snooping
Enabled check box to activate IGMP snooping on the Switch.
3 The Unknown Multicast Flooding Enabled check box is selected by default and the Switch will
send the frame(s) to all ports when the it receives an unknown multicast frame.
4 In the IGMP SSM Range field, specify the source address range of the multicast group the clients
will listen to. The Switch forwards the packets with the configured source address(es) to the clients
that join this group. This help prevent the clients from receiving traffic resulting from unwanted
sources.
5 Set Leave Proxy Enabled and Proxy Enabled to allow the Switch to send a leave message with
its MAC address to the multicast router/switch only when it receives the leave message from the
last host in a multicast group. The Switch also replaces the source MAC address in an IGMP v1/v2
report with its own MAC address before forwarding to the multicast router/switch. When the Switch
receives more than one IGMP v1/v2 join reports that request to join the same multicast group, it
only sends a new join report with its MAC address. This helps reduce the number of multicast join
and leave messages passed to the multicast router/switch.
6 Select a router port (port 1 in this example) that connects to the multicast router or switch. The
Switch forwards IGMP control messages (Query, Join and Leave) to the router port.
7 Enable Fast Leave on the ports that connect to the hosts/clients (ports 7, 8 and 9 in this example).
In fast leave mode, the Switch removes an IGMP snooping membership entry immediately from the
forwarding table when an IGMP leave message is received on the port from a host. This helps speed
up the leave process.
8 Also set the maximum number of multicast groups the ports can join.
GS1910/XGS1910 Series User’s Guide
61
Page 62

Chapter 5 Tutorials
9 Click Save.
10 Configure both the router port and the ports to which the multicast clients connect as a member of
VLAN 1234. See Section 5.4 on page 38 for how to create a VLAN and configure ports to join the
VLAN.
11 Go to Configuration > IPMAC > IGMP Snooping > VLAN Configuration.
12 Select Snooping Enabled for VLAN 1234 to allow the Switch to learn the IP multicast group
membership of this VLAN.
13 Select IGMP Querier for VLAN 1234 to allow the Switch to act as the querier in the VLAN to send
IGMP General Query (GQ) and Group-Specific Query (GSQ) messages to this VLAN. A querier sends
out an IGMP Group-Specific Query (GSQ) message to determine whether the hosts connected to
the port should remain in the specific multicast group.
62
GS1910/XGS1910 Series User’s Guide
Page 63

Chapter 5 Tutorials
10.1.2.0/24
A
Port 9
14 Click Save.
5.12 How to Configure Access Control List (ACL) for Packets Filtering
Access Control List (ACL) can be used as a simple packet filtering firewall to filter incoming traffic
and prevent certain traffic from entering your network. ACL groups traffic into data flows according
to specific criteria such as the source address, destination address, source port number, destination
port number or incoming port number, and also define actions to be performed for a classified
traffic flow.
The Switch checks traffic against the ACL rules in the order you list them.
In this example, you configure an ACL rule to identify all traffic coming from host A connected to
port 9 and restrict the host’s access to a specific IPv4 network.
1 Access the Switch through http://192.168.1.1. Log into the Switch by entering the username
(default: admin) and password (default: 1234).
GS1910/XGS1910 Series User’s Guide
63
Page 64

Chapter 5 Tutorials
2 Go to Configuration > Security > Network > ACL > Access Control List. Click the Add icon
to create a new ACL policy.
3 Select the port on which the matched traffic is received (All ports in this example).
4 Set Policy Filter to Specific and Policy Bitmask to 0xff to give this policy one ID number in the
Policy Value field. You then can apply this policy to a port using this policy ID.
5 Select IPv4 in the Frame Type field.
6 Select Network in the DIP Filter field and specify the destina t ion address and subnet ma sk of
matched traffic in this policy.
7 Set Action to Deny to block all mattached traffic.
64
GS1910/XGS1910 Series User’s Guide
Page 65

Chapter 5 Tutorials
8 Click Save. The ordering of your rules is very important as rules are applied in the order that they
are listed.
This tutorial uses the XGS1910-24 screens as an example. The screens may vary slightly for
different models.
9 Go to Configuration > Security > Network > ACL > Ports. Enter the ID of the ACL policy you
just created in the Policy ID field of the port to which you want to apply this policy, that is, port 9
to which host A is connected in this example.
GS1910/XGS1910 Series User’s Guide
65
Page 66

Chapter 5 Tutorials
10 Click Save. The ACL configurations in the Ports page (such as Action or Rate Limiter ID) apply
only to traffic that does NOT matched the specified ACL policy.
5.13 How to Reset the Switch via the Console Port
If you lock yourself (and others) from the Switch or forget the administrator password, you will
need to reload the factory-default configuration file or reset the S w itch back to the factory defaults.
Uploading the factory-default configuration file replaces the current configuration file with the
factory-default configuration file. This means that you will lose all previous configurations and the
speed of the console port will be reset to the default of 9600bps with 8 data bit, no parity , one stop
bit and flow control set to none. The password will also be reset to “1234” and the IP address to
192.168.1.1.
To upload the configuration file, do the following:
1 Connect to the console port using a computer with terminal emulation software. See Section 3.1.4
on page 20 for details.
2 Disconnect and reconnect the Switch’s power to begin a session. When you reconnect the Switch’s
power, you will see the initial screen.
3 When you see the message “Executing boot script in 3.000 seconds - enter ^C to abort”
press the Ctrl-c key combination to stop the automatic boot and then type default.
4 Type reset after the “Erase from 0x40080000-0x4017ffff: ................” message.
66
GS1910/XGS1910 Series User’s Guide
Page 67

Chapter 5 Tutorials
5 After the Switch restarts, you can use the default user name and password to log in.
>+M25PXX : Init device with JEDEC ID 0xC22018.
Jaguar-1 board detected (VSC7460 Rev. B).
RedBoot(tm) bootstrap and debug environment [ROMRAM]
Non-certified release, version 1_12_2-customized-z-XGS - built 19:04:36, Feb 8 2012
Copyright (C) 2000, 2001, 2002, 2003, 2004, 2005, 2006, 2007, 2008, 2009
Free Software Foundation, Inc.
RedBoot is free software, covered by the eCos license, derived from the
GNU General Public License. You are welcome to change it and/or distribute
copies of it under certain conditions. Under the license terms, RedBoot's
source code and full license terms must have been made available to you.
Redboot comes with ABSOLUTELY NO WARRANTY.
Platform: VCore-III (MIPS32 24KEc) JAGUAR
RAM: 0x80000000-0x88000000 [0x800214d8-0x87fe1000 available]
FLASH: 0x40000000-0x40ffffff, 256 x 0x10000 blocks
== Executing boot script in 3.000 seconds - enter ^C to abort
^C
RedBoot> default
... Erase from 0x40080000-0x4017ffff: ................
RedBoot> reset
+M25PXX : Init device with JEDEC ID 0xC22018.
Jaguar-1 board detected (VSC7460 Rev. B).
RedBoot(tm) bootstrap and debug environment [ROMRAM]
Non-certified release, version 1_12_2-customized-z-XGS - built 19:04:36, Feb 8 2012
Copyright (C) 2000, 2001, 2002, 2003, 2004, 2005, 2006, 2007, 2008, 2009
Free Software Foundation, Inc.
RedBoot is free software, covered by the eCos license, derived from the
GNU General Public License. You are welcome to change it and/or distribute
copies of it under certain conditions. Under the license terms, RedBoot's
source code and full license terms must have been made available to you.
Redboot comes with ABSOLUTELY NO WARRANTY.
Platform: VCore-III (MIPS32 24KEc) JAGUAR
RAM: 0x80000000-0x88000000 [0x800214d8-0x87fe1000 available]
FLASH: 0x40000000-0x40ffffff, 256 x 0x10000 blocks
== Executing boot script in 3.000 seconds - enter ^C to abort
RedBoot> diag -a
Hardware self-test: ... Passed
IS0 TCAM self-test: ... Passed
IS1 TCAM self-test: ... Passed
IS2 TCAM self-test: ... Passed
ES0 TCAM self-test: ... Passed
L3 TCAM self-test: ... Passed
DDR SDRAM: Testing [0x800214d8-0x87fe1000] - Zero Sweep Done
DDR SDRAM: Testing [0x800214d8-0x87fe1000] - Write Sweep .......................
................................................................................
........................ Done
DDR SDRAM: Testing [0x800214d8-0x87fe1000] - Read Sweep .......................
................................................................................
........................ Done
3 tests completed successfully.
RedBoot> fis load -d managed
Image loaded from 0x80040000-0x806a4d20
RedBoot> go
Username:
GS1910/XGS1910 Series User’s Guide
67
Page 68

Chapter 5 Tutorials
68
GS1910/XGS1910 Series User’s Guide
Page 69

CHAPTER 6
Troubleshooting
This chapter offers some suggestions to solve problems you might encounter. The potential
problems are divided into the following categories.
• Power, Hardware Connections, and LEDs
• Switch Access and Login
6.1 Power, Hardware Connections, and LEDs
The Switch does not turn on. None of the LEDs turn on.
1 Make sure the Switch is turned on (in DC models or if the DC power supply is connected in AC/DC
models).
2 Make sure you are using the power adaptor or cord included with the Switch.
3 Make sure the power adaptor or cord is connected to the Switch and plugged in to an appropriate
power source. Make sure the power source is turned on.
4 Turn the Switch off and on (in DC models or if the DC power supply is connected in AC/DC models).
5 Disconnect and re-connect the power adaptor or cord to the Switch (in AC models or if the AC
power supply is connected in AC/DC models).
6 If the problem continues, contact the vendor.
The ALM LED is on.
1 Turn the Switch off and on (in DC models or if the DC power supply is connected in AC/DC models).
2 Disconnect and re-connect the power adaptor or cord to the Switch (in AC models or if the AC
power supply is connected in AC/DC models).
3 If the problem continues, contact the vendor.
GS1910/XGS1910 Series User’s Guide 69
Page 70

Chapter 6 Troubleshooting
One of the LEDs does not behave as expected.
1 Make sure you understand the normal behavior of the LED. See Section 3.3 on page 22.
2 Check the hardware connections. See Section 3.1 on page 15.
3 Inspect your cables for damage. Contact the vendor to replace any damaged cables.
4 Turn the Switch off and on (in DC models or if the DC power supply is connected in AC/DC models).
5 Disconnect and re-connect the power adaptor or cord to the Switch (in AC models or if the AC
power supply is connected in AC/DC models).
6 If the problem continues, contact the vendor.
6.2 Switch Access and Login
I forgot the IP address for the Switch.
1 The default management IP address is 192.168.1.1.
2 Use the console port to log in to the Switch.
3 If this does not work, you have to reset the device to its factory defaults. See Section 5.13 on page
66.
I forgot the username and/or password.
1 The default username is admin and the default password is 1234.
2 If this does not work, you have to reset the device to its factory defaults. See Section 5.13 on page
66.
I cannot see or access the Login screen in the web configurator.
1 Make sure you are using the correct IP address.
• The default management IP address is 192.168.1.1.
• If you changed the IP address, use the new IP address.
70
GS1910/XGS1910 Series User’s Guide
Page 71

Chapter 6 Troubleshooting
• If you changed the IP address and have forgotten it, see the troubleshooting suggestions for I
forgot the IP address for the Switch.
2 Check the hardware connections, and make sure the LEDs are behaving as expected. See Section
3.3 on page 22.
3 Make sure your Internet browser does not block pop-up windows and has JavaScripts and Java
enabled.
4 Make sure your computer is in the same subnet as the Switch. (If you know that there are routers
between your computer and the Switch, skip this step.)
5 Reset the device to its factory defaults, and try to access the Switch with the default IP address.
See Section 5.13 on page 66.
6 If the problem continues, contact the vendor.
I can see the Login screen, but I cannot log in to the Switch.
1 Make sure you have entered the user name and password correctly. The default user name is
admin, and the default password is 1234. These fields are case-sensitive, so make sure [Caps
Lock] is not on.
2 If you have configured a secured client IP address in Configuration > Security > Switch >
Access Management, your computer’s IP address must match it.
3 Disconnect and re-connect the cord to the Switch.
4 If this does not work, you have to reset the device to its factory defaults. See Section 5.13 on page
66.
Pop-up Windows, JavaScripts and Java Permissions
In order to use the web configurator you need to allow:
• Web browser pop-up windows from your device.
• JavaScripts (enabled by default).
• Java permissions (enabled by default).
There is unauthorized access to my Switch via HTTP.
Use the Monitor > System > Log screen to check for unauthorized access to your Switch. To
avoid unauthorized access, configure the secured client setting in the Configuration > Security >
Switch > Access Management screen for HTTP/HTTPS and SNMP. Computers not belonging to
the secured client set cannot get permission to access the Switch.
GS1910/XGS1910 Series User’s Guide
71
Page 72

Chapter 6 Troubleshooting
72
GS1910/XGS1910 Series User’s Guide
Page 73

Copyright
Copyright © 2012 by ZyXEL Communications Corporation.
The contents of this publication may not be reproduced in any part or as a whole, transcribed, stored in a retrieval system, translated into
any language, or transmitted in any form or by any means, electron ic, mecha nical, magneti c, optic al, chemic al, photoc opying, ma nual, or
otherwise, without the prior written permission of ZyXEL Communications Corporation.
Published by ZyXEL Communications Corporation. All rights reserved.
Disclaimer
ZyXEL does not assume any liability arising out of the application or use of any products, or software described herein. Neither does it
convey any license under its patent rights nor the patent rights of others. ZyXEL further reserves the right to make changes in any
products described herein without notice. This publication is subject to change without notice.
Trademarks
Trademarks mentioned in this publication are used for identification purposes only and may be properties of their respective owners.
Certifications
Federal Communications Commission (FCC) Interference Statement
This device complies with Part 15 of FCC rules. Operation is subject to the following two conditions:
• This device may not cause harmful interference.
• This device must accept any interference received, including interference that may cause undesired operations.
APPENDIX A
Legal Information
FCC Warning
This device has been tested and found to comply with the limits for a Class A digital switch, pursuant to Part 15 of the FCC Rules. These
limits are designed to provide reasonable protection against harmful interference in a commercial environment. This device generates,
uses, and can radiate ra dio freq uency energy and, if not ins talle d and used in accordance with the instruction manual, may cause harmful
interference to radio communications. Operation of this device in a residential area is likely to cause harmful interference in which case
the user will be required to correct the interference at his own expense.
CE Mark Warning:
This is a class A product. In a domestic environment this product may cause radio interference in which case the user may be required to
take adequate measures.
Taiwanese BSMI (Bureau of Standards, Metrology and Inspection) A Warning:
Notices
Changes or modifications not expressly approved by the party responsible for compliance could void the user's authority to operate the
equipment.
Cet appareil numérique de la classe A est conforme à la norme NMB-003 du Canada.
CLASS 1 LASER PRODUCT
APPAREIL À LASER DE CLASS 1
PRODUCT COMPLIES WITH 21 CFR 1040.10 AND 1040.11.
PRODUIT CONFORME SELON 21 CFR 1040.10 ET 1040.11.
Viewing Certifications
Go to http://www.zyxel.com to view this product’s documentation and certifications.
ZyXEL Limited Warranty
ZyXEL warrants to the original end user (purchaser) that this product is free from any defects in material or workmanship for a specific
period (the Warranty Period) from the date of purchase. The Warranty Period varies by region. Check with your vendor and/or the
GS1910/XGS1910 Series User’s Guide 73
Page 74

Appendix A Legal Information
authorized ZyXEL local distributor for details about the Warranty Period of this product. During the warranty period, and upon proof of
purchase, should the product ha ve indicati ons of failure due to f aulty workma nship and/or materials, Z yXEL wil l, at its discret ion, repair or
replace the defective products or components without charge for either parts or labor, and to whatever extent it shall deem necessary to
restore the product or components to proper operating condition. Any replacement will consist of a new or re-manufactured functionally
equivalent product of equal or higher value, and will be solely at the discretion of ZyXEL. This warranty shall not apply if the product has
been modified, misused, tampered with, damaged by an act of God, or subjected to abnormal working conditions.
Note
Repair or replacement, as provided under this warranty, is the exclusive remedy of the purchaser. This warranty is in lieu of all other
warranties, express or implied, including any implied warranty of merchantability or fitness for a particular use or purpose. ZyXEL shall in
no event be held liable for indirect or consequential damages of any kind to the purchaser.
To obtain the services of this warranty, contact your vendor. You may also refer to the warranty policy for the region in which you bought
the device at http://www.zyxel.com/web/support_warranty_info.php.
Registration
Register your product online to receive e-mail notices of firmware upgrades and information at www.zyxel.com for global products, or at
www.us.zyxel.com for North American products.
Open Source Licenses
This product contains in part so me fre e soft wa re di strib ute d und er GPL li k e lice nses. Ope n sourc e lice nse s are pro vi ded with the firmware
package. You can download the latest firmware at www.zyxel.com. To obtain the source code covered under those Licenses, please
contact support@zyxel.com.tw to get it.
Safety Warnings
• Do NOT use this product near water, for example, in a wet basement or near a swimming pool.
• Do NOT expose your device to dampness, dust or corrosive liquids.
• Do NOT store things on the device.
• Do NOT install, use, or service this device during a thunderstorm. There is a remote risk of electric shock from lightning.
• Connect ONLY suitable accessories to the device.
• Do NOT open the device or unit. Opening or removing covers can expose you to dangerous high voltage points or other risks. ONLY
qualified service personnel should service or disassemble this device. Please contact your vendor for further information.
• Make sure to connect the cables to the correct ports.
• Place connecting cables carefully so that no one will step on them or stumble over them.
• Always disconnect all cables from this device before servicing or disassembling.
• Use ONLY an appropriate power adaptor or cord for your device. Connect it to the right supply voltage (for example, 110V AC in North
America or 230V AC in Europe).
• Do NOT allow anything to rest on the power adaptor or cord and do NOT place the product where anyone can walk on the power
adaptor or cord.
• Do NOT use the device if the power adaptor or cord is damag ed as it might cause electrocution.
• If the power adaptor or cord is damaged, remove it from the device and the power source.
• Do NOT attempt to repair the power adaptor or cord. Contact your local vendor to order a new one.
• Do not use the device outside, and make sure all the connections are indoors. There is a remote risk of electric shock from lightning.
• Do NOT obstruct the device ventilation slots, as insufficient airflow may harm your device.
• The PoE (Power over Ethernet) devices that supply or receive power and their connected Ethernet cables must all be completely
indoors.
• This product is for indoor use only (utilisation intérieure exclusivement).
Your product is marked with this symbol, which is known as the WEEE mark. WEEE stands for Waste Electronics and
Electrical Equipment. It mean s that used elec tric al and el ectr oni c produ cts shoul d not be mix ed wi th general waste. Used
electrical and electronic equipment should be treated separately.
74
GS1910/XGS1910 Series User’s Guide
Page 75

Index
Index
A
applications
bridging 5
IEEE 802.1Q VLAN 7
switched workgroup 6
B
basic setup tutorial 33
binding 45
binding table 45
building 45
C
certifications
notices 73
viewing 73
changing the password 32
console port
settings 20
copyright 73
E
Ethernet ports 17
default settings 17
F
FCC interference statement 73
front panel 15
G
getting help 32
H
hardware installation 11
mounting 12
hardware overview 15
I
D
DHCP snooping 45
trusted ports 46
untrusted ports 46
disclaimer 73
documentation
related 2
GS1910/XGS1910 Series User’s Guide 75
Installation
Rack-mounting 12
installation
freestanding 11
precautions 12
Internet Protocol version 6, see IPv6
introduction 5
IP source guard 45
DHCP snooping 45
IPv6 8
Neighbor Discovery Protocol 8
ping 8
Page 76

Index
L
LEDs 22
lockout 32
login 25
password 32
M
managing the device
good habits 8
using SNMP. See SNMP.
using the web configurator. See web configurator.
mini GBIC ports 18
connection speed 18
connector type 18
transceiver installation 18
transceiver removal 19
mounting brackets 12
MSA (MultiSource Agreement) 18
S
SNMP 8
status
LED 22
switch lockout 32
T
tagged VLAN 38
trademarks 73
transceiver
installation 18
removal 19
trusted ports
DHCP snooping 46
tutorials 33
DHCP snooping 45
O
other documentation 2
P
password 32
power wires 21
product registration 74
PVID 38
PVID (Priority Frame) 38
R
registration
product 74
related documentation 2
rubber feet 11
U
untrusted ports
DHCP snooping 46
V
ventilation holes 12
VID 38
VLAN
ID 38
W
warranty 73
note 74
web configurator 8, 25
getting help 32
layout 26
login 25
logout 32
navigation panel 27
GS1910/XGS1910 Series User’s Guide76
 Loading...