

ZyXEL GS1200-5HP, GS1200-8HP Quick Start Manual

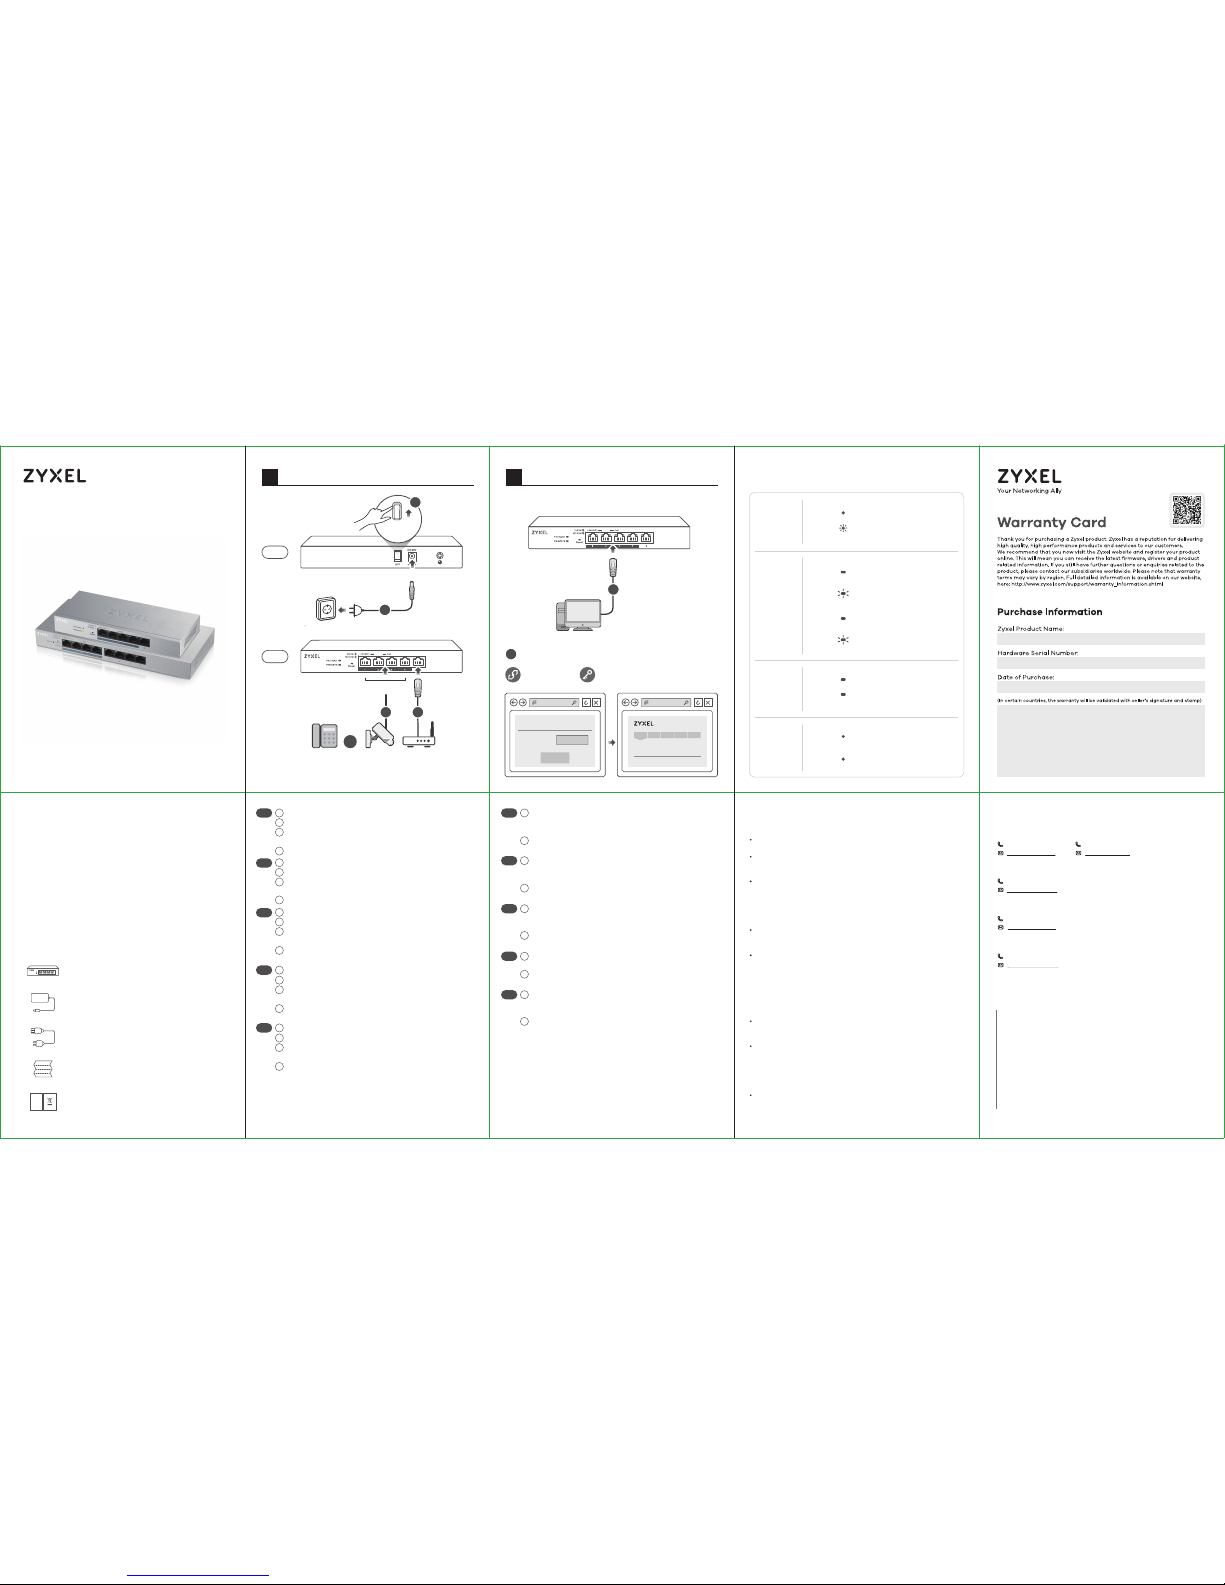
Connect to an appropriate power source.
Set the power switch to the ON position.
Connect PoE ports 1 - 4 to PoE devices (such as IP Cam
and IP phone).
Connect to a modem or router that has internet access.
An eine geeignete Stromquelle anschließen.
Stellen Sie den Ein/Aus-Schalter in die Position ON.
Verbinden Sie PoE Ports 1 - 4 mit den PoE Geräten (z.B. IP
Cam und IP Telefon).
An ein Modem oder einen Router mit Internetanschluss
anschließen.
Connectez-vous à une source d'alimentation appropriée.
Mettez l'interrupteur d'alimentation sur la position ON
(Marche).
Connectez les ports PoE 1 - 4 aux appareils PoE (tels que
Cam IP et téléphone IP).
Connectez-vous à un modem ou un routeur ayant accès
à Internet.Connectez-vous à un modem ou un routeur
ayant accès à Internet.
Collegare ad una fonte di alimentazione appropriata.
Impostare l'interruttore di alimentazione nella posizione
ON.
Collegare le porte PoE 1 - 4 ai dispositivi PoE (ad esempio
IP Cam e telefono IP).
Connettersi a un modem o router con accesso Internet.
Conecte a una fuente de corriente apropiada.
Coloque el interruptor de corriente en la posición de
encendido.
Conecte los puertos PoE 1 - 4 a dispositivos PoE (como IP
Cam o IP phone).
Conectar a un módem o router con acceso a Internet.
1
2
3
4
1
2
3
4
1
2
3
4
1
2
3
4
1
2
3
4
EN
FR
IT
ES
DE
Troubleshooting
LEDs
Declaration of Conformity
Safety Warning
Power Cord
QSG
DoC
Power Adapter
Switch
Package Contents
Quick Start Guide
ENGLISH | DEUTSCH | FRANÇAIS | ITALIANO
ESPAÑOL | NEDERLANDS | DANSK | NORSK
SVENSKA | SUOMI
GS1200-5HP v2 / GS1200-8HP v2
5-Port / 8-Port Web Managed
PoE Gigabit Switch
Connect your computer to the Switch using an Ethernet
cable. Your computer must have an IP address in the
same subnet as the Switch.
Launch your web browser and go to http://192.168.1.3. Enter
1234 as the password. Click SIGN IN.
Verwenden Sie ein Ethernet-Kabel, um den Computer mit
dem Switch zu verbinden. Ihr Computer muss eine
IP-Adresse im gleichen Subnetz wie der Switch selbst
haben.
Starten Sie Ihre Web Browser und gehen Sie auf
http://192.168.1.3. Geben Sie admin als den Anwendernamen und 1234 als das Passwort ein.
Klicken Sie auf SIGN IN.
Connectez votre ordinateur au commutateur à l'aide d’un
câble Ethernet. Votre ordinateur doit disposer d'une
adresse IP dans le même sous-réseau que le
commutateur.
Lancez votre navigateur web et allez à http://192.168.1.3.
Entrez admin comme nom d’utilisateur et 1234 comme
mot de passe. Cliquez sur SIGN IN.
Collegare il computer allo Switch utilizzando un cavo
Ethernet. Il computer deve avere un indirizzo IP nella
stessa sottorete dello switch.
Avviare il browser e inserire l’indirizzo http://192.168.1.3.
Immettere admin come nome utente e 1234 come
password. Fare clic su SIGN IN.
Conecte su ordenador al conmutador usando un cable
Ethernet. Su ordenador debe tener una dirección IP en la
misma subred que el conmutador.
Abra el navegador web y vaya a http://192.168.1.3. Escriba
el nombre de usuario admin y la contraseña 1234. Haga
clic en SIGN IN.
5
6
5
6
5
6
5
6
5
6
EN
FR
IT
ES
DE
Support Information
North America
USA
+ 1 800 255 4101
support@zyxel.com
UK
+ 44 (0) 118 9121 700
support@zyxel.co.uk
Germany
+ 49 (0) 2405 6909 0
support@zyxel.de
France
+ 33 (0)4 72 52 97 97
support@zyxel.fr
Spain
+ 911 792 100
soporte@zyxel.es
Italy
+ 39 011 2308000
support@zyxel.it
Copyright © 2017 Zyxel Communications Corp. All Rights Reserved.
EU Importer
Zyxel Communications A/S
Generatorvej 8D, 2860 Søborg, Denmark.
http://www.zyxel.dk
US Importer
Zyxel Communications, Inc
1130 North Miller Street Anaheim, CA 92806-2001
http://www.us.zyxel.com
See the User's Guide at www.zyxel.com
for more information, including customer
support and safety warnings.
PWR/SYS Green
On - Power on
Blinking - Starting up
PoE Green
On - PoE enabled
Off - PoE disabled or not
supplied
PoE MAX
Amber
On - More than 50W supplied
and approaching maximum
Off - Less than 50W supplied
LINK/ACT
Amber
On
Blinking - Data transmitting
Green
On
Blinking - Data transmitting
- 1000 Mbps
connection ready
- 10/100 Mbps
connection ready
I cannot see or access the Login screen in the Web Configurator.
Make sure you are using the correct IP address.
(The default IP address is 192.168.1.3.)
Make sure your computer is in the same subnet as the Switch. If you
haven’t changed the default IP address, your computer IP address should
be in the 192.168.1.4 ~ 168.1.254 range.
Make sure you have entered the Password correctly. If you have changed
the Password and have forgotten it, you’ll have to reset the Switch to its
factory default.
(The default Password is 1234.)
The PoE LED is off/PoE power is not supplied.
Make sure the Ethernet cable is securely connected to the Switch, and
you're using the correct type of Ethernet cable (Category 5e, 6UTP/STP, or
better Ethernet cable).
Go to System in the Web Configurator to check the amount of PoE power
available. The maximum PoE power is 60W, and the maximum per port is
30W. If the total power required by the PoE-enabled devices exceeds the
maximum PoE power, the last PoE-enabled device connected to the
Switch won’t be powered up (PoE power is allocated in the order the
PoE-enabled devices were connected).
A loop is detected.
A loop may happen in the following example situations:
1. The Switch is connected to another device in a loop state.
2. The Switch is connected to another device with two cables.
Loop Prevention is enabled by default. If a loop happens, the Switch will
block the port in a loop state. If a loop happens on two ports, the Switch
will block the higher-numbered port. For example, if a loop happens on
ports 4 and 5, the Switch will block port 5, and its LED will be off. To restore
a port in a loop state, disconnect it, check the network connections, and
reconnect it.
You can log into the Web Configurator. Go to System in the Web
Configurator to check your port status.
Manage Your Device
2
SIGN IN
Password : 1234
(default)
http://192.168.1.3
Switch IP:
192.168.1.3
PC IP:
192.168.1.4 ~ 192.168.1.254
System Information
Log in
Password 1234
5
6
DC 55V
PoE
Power Outlet
Hardware Installation
1
1
3 4
Back
Front
POWER
ON
Modem / Router
PoE IP CamIP Phone
2
OR
* Non-PoE devices can connect to the PoE ports, but PoE power
is not supplied to them.
Sluit aan op een geschikte stroombron.
Zet de schakelaar op 'ON (AAN)'.
Sluit PoE poorten 1 - 4 aan op PoE apparaten (zoals IP
Cam en IP phone).
Sluit aan op een modem of router met internetverbinding.
Tilslut til en relevant strømkilde.
Sæt strømkontakten til ON-positionen.
Tilslut PoE-port 1 - 4 til PoE-enheder (så som IP-kamera
og IP-telefon).
Tilslut til et modem eller router der har internetadgang.
Koble til en hensiktsmessig strømkilde.
Sett strømbryteren i påslått posisjon.
Koble PoE-port 1 til 4 til PoE-enheter (for eksempel IP
Cam og IP-telefon).
Koble til et modem eller en ruter som har
Internett-tilgang.
Anslut till en lämplig strömkälla.
Konfigurera strömbrytaren till påslagen position.
Anslut PoE-portar 1 - 4 till PoE-enheter (såsom IP Cam
och IP-telefoni).
Anslut till ett modem eller en router som har internetåtkomst.
Liitä laite yhteensopivaan virtalähteeseen.
Aseta virtakytkin ON-asentoon.
Liitä PoE-portit 1–4 PoE-laitteisiin, kuten IP-kameraan tai
IP-puhelimeen.
Liitä laite modeemiin tai reitittimeen, josta on
Internet-yhteys.
1
2
3
4
1
2
3
4
1
2
3
4
1
2
3
4
1
2
3
4
Quick Start Guide
ENGLISH | DEUTSCH | FRANÇAIS | ITALIANO
ESPAÑOL | NEDERLANDS | DANSK | NORSK
SVENSKA | SUOMI
GS1200-5HP v2 / GS1200-8HP v2
5-Port / 8-Port Web Managed
PoE Gigabit Switch
Sluit uw computer aan op de Schakelaar met een
Ethernet-kabel. Uw computer dient een IP-adres te
hebben in hetzelfde subnet als de Schakelaar.
Open uw webbrowser en ga naar http://192.168.1.3. Voer
1234 in als wachtwoord. Klik op AANMELDEN.
Tilslut din computer til switchen ved brug af et
Ethernet-kabel. Din computer skal have en IP-adresse i
det samme undernet som switchen.
Start din webbrowser og gå til http://192.168.1.3. Indtast
1234 som adgangskode. Klik på SIGN IN (Log på).
Koble datamaskinen til bryteren ved hjelp av en
Ethernet-kabel. Datamaskinen må ha en IP-adresse i
samme subnett som bryteren.
Åpne nettleseren og gå til http://192.168.1.3. Angi 1234 som
passord. Klikk på LOGG PÅ.
Anslut datorn till switchen med en Ethernet-kabel. Datorn
måste ha en IP-adress i samma subnät som switchen.
Starta din webbläsare och gå till sidan http://192.168.1.3.
Skriv in 1234 som lösenord. Klicka på LOGGA IN.
Liitä tietokone kytkimeen Ethernet-kaapelilla.
Tietokoneen IP-osoitteen on oltava samassa aliverkossa
kytkimen IP-osoitteen kanssa.
Avaa selain ja siirry osoitteeseen https://192.168.1.3. Kirjoita
salasanaksi 1234. Valitse SIGN IN (KIRJAUDU).
5
6
5
6
5
6
5
6
5
6
NL
NO
SE
FI
DK
NL
NO
SE
FI
DK
Norway
+ 47 22 80 61 80
teknisk@zyxel.no
Sweden
+ 46 8 557 760 60
support@zyxel.se
Finland
+ 358 9 4780 8400
teknisk@zyxel.fi
Netherlands
+31 (0)88-00029112
support@zyxel.nl
Denmark
+ 45 30 55 07 00
support@zyxel.dk
Support Information
Copyright © 2017 Zyxel Communications Corp. All Rights Reserved.
EU Importer
Zyxel Communications A/S
Generatorvej 8D, 2860 Søborg, Denmark.
http://www.zyxel.dk
US Importer
Zyxel Communications, Inc
1130 North Miller Street Anaheim, CA 92806-2001
http://www.us.zyxel.com
See the User's Guide at www.zyxel.com
for more information, including customer
support and safety warnings.
Declaration of Conformity
Safety Warning
Power Cord
QSG
Power Adapter
Switch
Package Contents
DoC
Troubleshooting
I cannot see or access the Login screen in the Web Configurator.
Make sure you are using the correct IP address.
(The default IP address is 192.168.1.3.)
Make sure your computer is in the same subnet as the Switch. If you
haven’t changed the default IP address, your computer IP address should
be in the 192.168.1.4 ~ 168.1.254 range.
Make sure you have entered the Password correctly. If you have changed
the Password and have forgotten it, you’ll have to reset the Switch to its
factory default.
(The default Password is 1234.)
The PoE LED is off/PoE power is not supplied.
Make sure the Ethernet cable is securely connected to the Switch, and
you're using the correct type of Ethernet cable (Category 5e, 6UTP/STP, or
better Ethernet cable).
Go to System in the Web Configurator to check the amount of PoE power
available. The maximum PoE power is 60W, and the maximum per port is
30W. If the total power required by the PoE-enabled devices exceeds the
maximum PoE power, the last PoE-enabled device connected to the
Switch won’t be powered up (PoE power is allocated in the order the
PoE-enabled devices were connected).
A loop is detected.
A loop may happen in the following example situations:
1. The Switch is connected to another device in a loop state.
2. The Switch is connected to another device with two cables.
Loop Prevention is enabled by default. If a loop happens, the Switch will
block the port in a loop state. If a loop happens on two ports, the Switch
will block the higher-numbered port. For example, if a loop happens on
ports 4 and 5, the Switch will block port 5, and its LED will be off. To restore
a port in a loop state, disconnect it, check the network connections, and
reconnect it.
You can log into the Web Configurator. Go to System in the Web
Configurator to check your port status.
LEDs
PWR/SYS Green
On - Power on
Blinking - Starting up
PoE Green
On - PoE enabled
Off - PoE disabled or not
supplied
PoE MAX
Amber
On - More than 50W supplied
and approaching maximum
Off - Less than 50W supplied
LINK/ACT
Amber
On
Blinking - Data transmitting
Green
On
Blinking - Data transmitting
- 1000 Mbps
connection ready
- 10/100 Mbps
connection ready
Manage Your Device
2
SIGN IN
Password : 1234
(default)
http://192.168.1.3
Switch IP:
192.168.1.3
PC IP:
192.168.1.4 ~ 192.168.1.254
System Information
Log in
Password 1234
5
6
DC 55V
PoE
Power Outlet
Hardware Installation
1
1
3 4
Back
Front
POWER
ON
Modem / Router
PoE IP CamIP Phone
2
OR
* Non-PoE devices can connect to the PoE ports, but PoE power
is not supplied to them.
 Loading...