

ZyXEL Auto Provisioning Administrator's Manual

Auto Provisioning
For VoIP Devices
Administrator’s Guide
Ver s i o n 2 . 0
3/2006


Auto Provisioning Administrator’s Guide
Copyright
Copyright © 2006 by ZyXEL Communications Corporation.
The contents of this publication may not be reproduced in any part or as a whole, transcribed,
stored in a retrieval system, translated into any language, or transmitted in any form or by any
means, electronic, mechanical, magnetic, optical, chemical, photocopying, manual, or
otherwise, without the prior written permission of ZyXEL Communications Corporation.
Published by ZyXEL Communications Corporation. All rights reserved.
Disclaimer
ZyXEL does not assume any liability arising out of the application or use of any products, or
software described herein. Neither does it convey any license under its patent rights nor the
patent rights of others. ZyXEL further reserves the right to make changes in any products
described herein without notice. This publication is subject to change without notice.
Trademarks
ZyNOS (ZyXEL Network Operating System) is a registered trademark of ZyXEL
Communications, Inc. Other trademarks mentioned in this publication are used for
identification purposes only and may be properties of their respective owners.
Copyright 3

Auto Provisioning Administrator’s Guide
Please have the following information ready when you contact customer support.
• Product model and serial number.
• Warranty Information.
• Date that you received your device.
• Brief description of the problem and the steps you took to solve it.
Customer Support
METHOD
LOCATION
CORPORATE
HEADQUARTERS
(WORLDWIDE)
CZECH REPUBLIC
DENMARK
FINLAND
FRANCE
GERMANY
HUNGARY
KAZAKHSTAN
NORTH AMERICA
NORWAY
SUPPORT E-MAIL TELEPHONE
SALES E-MAIL FAX FTP SITE
support@zyxel.com.tw +886-3-578-3942 www.zyxel.com
sales@zyxel.com.tw +886-3-578-2439 ftp.zyxel.com
info@cz.zyxel.com +420-241-091-350 www.zyxel.cz ZyXEL Communications
info@cz.zyxel.com +420-241-091-359
support@zyxel.dk +45-39-55-07-00 www.zyxel.dk ZyXEL Communications A/S
sales@zyxel.dk +45-39-55-07-07
support@zyxel.fi +358-9-4780-8411 www.zyxel.fi ZyXEL Communications Oy
sales@zyxel.fi +358-9-4780 8448
info@zyxel.fr +33-4-72-52-97-97 www.zyxel.fr ZyXEL France
+33-4-72-52-19-20
support@zyxel.de +49-2405-6909-0 www.zyxel.de ZyXEL Deutschland GmbH.
sales@zyxel.de +49-2405-6909-99
support@zyxel.hu +36-1-3361649 www.zyxel.hu ZyXEL Hungary
info@zyxel.hu +36-1-3259100
http://zyxel.kz/support +7-3272-590-698 www.zyxel.kz ZyXEL Kazakhstan
sales@zyxel.kz +7-3272-590-689
support@zyxel.com 1-800-255-4101
+1-714-632-0882
sales@zyxel.com +1-714-632-0858 ftp.us.zyxel.com
support@zyxel.no +47-22-80-61-80 www.zyxel.no ZyXEL Communications A/S
sales@zyxel.no +47-22-80-61-81
A
WEB SITE
www.europe.zyxel.com
ftp.europe.zyxel.com
www.us.zyxel.com ZyXEL Communications Inc.
REGULAR MAIL
ZyXEL Communications Corp.
6 Innovation Road II
Science Park
Hsinchu 300
Ta iw a n
Czech s.r.o.
Modranská 621
143 01 Praha 4 - Modrany
Ceská Republika
Columbusvej
2860 Soeborg
Denmark
Malminkaari 10
00700 Helsinki
Finland
1 rue des Vergers
Bat. 1 / C
69760 Limonest
France
Adenauerstr. 20/A2 D-52146
Wuerselen
Germany
48, Zoldlomb Str.
H-1025, Budapest
Hungary
43, Dostyk ave.,Office 414
Dostyk Business Centre
050010, Almaty
Republic of Kazakhstan
1130 N. Miller St.
Anaheim
CA 92806-2001
U.S.A.
Nils Hansens vei 13
0667 Oslo
Norway
4 Customer Support

Auto Provisioning Administrator’s Guide
METHOD
LOCATION
POLAND
RUSSIA
SPAIN
SWEDEN
UKRAINE
UNITED KINGDOM
a. “+” is the (prefix) number you enter to make an international telephone call.
SUPPORT E-MAIL TELEPHONE
SALES E-MAIL FAX FTP SITE
info@pl.zyxel.com +48-22-5286603 www.pl.zyxel.com ZyXEL Communications
+48-22-5206701
http://zyxel.ru/support +7-095-542-89-29 www.zyxel.ru ZyXEL Russia
sales@zyxel.ru +7-095-542-89-25
support@zyxel.es +34-902-195-420 www.zyxel.es ZyXEL Communications
sales@zyxel.es +34-913-005-345
support@zyxel.se +46-31-744-7700 www.zyxel.se ZyXEL Communications A/S
sales@zyxel.se +46-31-744-7701
support@ua.zyxel.com +380-44-247-69-78 www.ua.zyxel.com ZyXEL Ukraine
sales@ua.zyxel.com +380-44-494-49-32
support@zyxel.co.uk +44-1344 303044
08707 555779 (UK only)
sales@zyxel.co.uk +44-1344 303034 ftp.zyxel.co.uk
A
WEB SITE
REGULAR MAIL
ul.Emilli Plater 53
00-113 Warszawa
Poland
Ostrovityanova 37a Str.
Moscow, 117279
Russia
Alejandro Villegas 33
1º, 28043 Madrid
Spain
Sjöporten 4, 41764 Göteborg
Sweden
13, Pimonenko Str.
Kiev, 04050
Ukraine
www.zyxel.co.uk ZyXEL Communications UK
Ltd.,11 The Courtyard,
Eastern Road, Bracknell,
Berkshire, RG12 2XB,
United Kingdom (UK)
Customer Support 5

Auto Provisioning Administrator’s Guide
6 Customer Support

Auto Provisioning Administrator’s Guide
Table of Contents
Copyright .................................................................................................................. 3
Customer Support.................................................................................................... 4
Table of Contents ..................................................................................................... 7
List of Figures ........................................................................................................ 11
List of Tables .......................................................................................................... 13
Chapter 1
Auto Provisioning .................................................................................................. 15
1.1 Auto Provisioning Overview ...............................................................................15
1.2 Provisioning Utility Scenario ..............................................................................15
1.2.1 Provisioning Utility System Usage ............................................................16
1.3 Auto Provisioning Server Scenario ....................................................................17
1.3.1 Requirements for Using the Auto Provisioning Server .............................18
1.3.2 Auto Provisioning Server System Usage ..................................................18
1.3.3 Auto Provisioning Server System - Important Notes ................................19
Chapter 2
Auto Provisioning Commands.............................................................................. 21
2.1 Auto Provisioning Commands ............................................................................21
Chapter 3
Provisioning Utility ................................................................................................ 23
3.1 Provisioning Utility Overview ..............................................................................23
3.2 Account File .......................................................................................................23
3.3 Account Field File ...............................................................................................23
3.4 Common File ......................................................................................................24
3.4.1 The Common File Format .........................................................................24
3.4.2 File Modification - Important Points to Remember ..................................24
3.5 Getting an SPTGEN File ....................................................................................25
3.6 Auto Provisioning Text Files ...............................................................................25
3.6.1 Auto Provisioning Text File Menus Example .............................................26
3.7 Using the Auto Provision Encryption Utility ........................................................37
3.8 Auto Provision Encryption Utility Usage Example 1 ...........................................38
3.9 Auto Provision Encryption Utility Usage Example 2 ...........................................40
Table of Contents 7

Auto Provisioning Administrator’s Guide
Chapter 4
Auto Provisioning Server Installation .................................................................. 43
4.1 System Requirements ........................................................................................43
4.2 Requirements for Installation by Source Code ...................................................43
4.3 Installation Using the Installer CD ......................................................................43
4.4 Manual Installation .............................................................................................47
Chapter 5
Using the Auto Provisioning Server..................................................................... 49
5.1 General Information and Guidelines ..................................................................49
5.2 Web Manager Overview .....................................................................................49
5.3 Web Manager Login ...........................................................................................50
5.4 Navigation Panel ................................................................................................50
5.5 Help ....................................................................................................................52
5.6 Product Type ......................................................................................................52
5.6.1 Edit Setting ...............................................................................................52
5.6.2 View SPTGEN ..........................................................................................54
5.6.3 Delete a Product Type ..............................................................................55
5.6.4 Add a Product Type ..................................................................................56
5.6.5 Import ........................................................................................................57
5.6.6 Note on SPTGEN Files .............................................................................57
5.6.7 Export to SPTGEN ....................................................................................58
5.7 Device Management ..........................................................................................59
5.7.1 Device Search ..........................................................................................59
5.7.2 Edit Device ................................................................................................60
5.7.3 Delete Device ...........................................................................................61
5.7.4 Unlock Device ...........................................................................................62
5.7.5 Lock History ..............................................................................................62
5.8 Account Management ........................................................................................63
5.8.1 Add a Viewer ............................................................................................63
5.8.2 Viewer Search ..........................................................................................63
5.8.3 Edit a Viewer .............................................................................................64
5.8.4 Delete a Viewer ........................................................................................65
5.8.5 Change Password ....................................................................................65
5.9 Information Center .............................................................................................66
5.9.1 System Up Time .......................................................................................66
5.9.2 Loading Statistics ......................................................................................66
5.9.3 New User Info ...........................................................................................67
5.9.4 Registered Device Info .............................................................................67
5.9.5 Login History .............................................................................................68
5.10 System Maintenance .......................................................................................68
5.10.1 Import Unit Device ..................................................................................69
5.10.2 Database Backup ...................................................................................69
8 Table of Contents

Auto Provisioning Administrator’s Guide
5.10.3 Database Restore ...................................................................................70
5.11 Utilities ..............................................................................................................70
5.11.1 Configurations .........................................................................................70
5.11.2 Export Database as SPTGEN .................................................................71
Chapter 6
Using the Auto Provisioning Server..................................................................... 73
Chapter 7
Troubleshooting ..................................................................................................... 75
Appendix A
Auto Provisioning Service Flowchart .................................................................. 77
Appendix B
Auto Provisioning Server System Configuration................................................ 79
Appendix C
Auto Provisioning Server Database Description ................................................ 81
Appendix D
Sample CRM Server Database Description ......................................................... 87
Appendix E
VoIP Provisioning Server SOAP Description ...................................................... 89
setSubScriberRegistered Method ............................................................................ 89
getTotalUnregistered Method................................................................................... 90
getTotalSubScriber Method...................................................................................... 92
getPageUnregisteredUnitDevice Method................................................................. 93
getNewSubScriberByDate Method ........................................................................ 107
Appendix F
Configuration File Example................................................................................. 109
Index.......................................................................................................................111
Table of Contents 9

Auto Provisioning Administrator’s Guide
10 Table of Contents

Auto Provisioning Administrator’s Guide
List of Figures
Figure 1 Provisioning Utility Scenario ................................................................................. 16
Figure 2 Provisioning Utility Set Up ..................................................................................... 16
Figure 3 Auto Provisioning Server Scenario ....................................................................... 17
Figure 4 Auto Provisioning Server Operation ...................................................................... 19
Figure 5 Account File Example ........................................................................................... 23
Figure 6 Account Field File Example .................................................................................. 24
Figure 7 FTP Session Example .......................................................................................... 25
Figure 8 Utility Command Example 1 .................................................................................. 39
Figure 9 Utility Command Example 2 .................................................................................. 41
Figure 10 Auto Install Start ................................................................................................. 44
Figure 11 Disk Partitioning Setup ........................................................................................ 44
Figure 12 Automatic Partitioning: Remove All Partitions ..................................................... 45
Figure 13 Automatic Partitioning Warning ........................................................................... 46
Figure 14 Partitioning .......................................................................................................... 46
Figure 15 Login Screen ....................................................................................................... 50
Figure 16 Navigation Panel ................................................................................................ 51
Figure 17 Product Type List: Edit Setting ............................................................................ 52
Figure 18 Product Type Edit Setting ................................................................................... 53
Figure 19 Parameter Edit Field Example ............................................................................ 53
Figure 20 Parameter Groups .............................................................................................. 54
Figure 21 Product Type List: View SPTGEN ....................................................................... 54
Figure 22 View SPTGEN ..................................................................................................... 55
Figure 23 Product Type List: Delete .................................................................................... 55
Figure 24 Product Type Delete ........................................................................................... 56
Figure 25 Product Type List: Add ........................................................................................ 56
Figure 26 Product Type Add ............................................................................................... 56
Figure 27 Import Product Type ............................................................................................ 57
Figure 28 SPTGEN File Example ....................................................................................... 58
Figure 29 Export Product Type ........................................................................................... 59
Figure 30 Export Product Type Successful ......................................................................... 59
Figure 31 Device Search ..................................................................................................... 60
Figure 32 Device List ..........................................................................................................60
Figure 33 Edit Device ..........................................................................................................61
Figure 34 Delete Device ...................................................................................................... 61
Figure 35 Unlock Device ..................................................................................................... 62
Figure 36 Lock History ........................................................................................................ 63
Figure 37 Add a Viewer ....................................................................................................... 63
Figure 38 Viewer Search ..................................................................................................... 64
List of Figures 11

Auto Provisioning Administrator’s Guide
Figure 39 Viewer List ..........................................................................................................64
Figure 40 Viewer Edit ..........................................................................................................64
Figure 41 Viewer Delete ...................................................................................................... 65
Figure 42 Change Password ............................................................................................... 65
Figure 43 System Up Time .................................................................................................. 66
Figure 44 Loading Statistics ................................................................................................ 67
Figure 45 New User Info ..................................................................................................... 67
Figure 46 Registered Device Info ........................................................................................ 68
Figure 47 Login History ....................................................................................................... 68
Figure 48 Unit Device File Example .................................................................................... 69
Figure 49 Import Device Info ............................................................................................... 69
Figure 50 Database Backup ................................................................................................ 70
Figure 51 Database Restore ............................................................................................... 70
Figure 52 Configuration ....................................................................................................... 71
Figure 53 Export Database as SPTGEN ............................................................................. 71
Figure 54 Database Replication .......................................................................................... 76
Figure 55 Auto Provisioning Flowchart ............................................................................... 77
12 List of Figures

Auto Provisioning Administrator’s Guide
List of Tables
Table 2 Example Auto Provisioning Menus Abbreviations ................................................. 26
Table 3 Menu 4 Internet Access Setup .............................................................................. 27
Table 4 Menu 24.10 Time and Date Setting ....................................................................... 27
Table 5 Menu 24.11 Remote Management Control ............................................................ 28
Table 7 Navigation Panel Summary ................................................................................... 51
Table 8 Device Editing Details ............................................................................................ 61
Table 9 Auto Provisioning Server System Configuration .................................................... 79
Table 10 LockedDevice ...................................................................................................... 81
Table 11 LoginLog .............................................................................................................. 81
Table 12 LoginLog .............................................................................................................. 81
Table 13 PinFailLog ............................................................................................................ 82
Table 14 ProductType ........................................................................................................ 82
Table 15 RequestLog ......................................................................................................... 82
Table 16 ServerConfiguration ............................................................................................. 83
Table 17 SpecifySetting ...................................................................................................... 83
Table 18 Sptgen ................................................................................................................. 83
Table 19 Sptgengroup ........................................................................................................ 84
Table 20 UnLockedDevice ................................................................................................. 84
Table 21 User ..................................................................................................................... 84
Table 22 Creditcard ............................................................................................................ 87
Table 23 Itspphone ............................................................................................................. 87
Table 24 Subscriber ...........................................................................................................87
Table 25 Unitdevice ............................................................................................................ 88
Table 26 setSubScriberRegistered Method Input ............................................................... 89
Table 27 setSubScriberRegistered Method Output ............................................................ 89
Table 28 getTotalUnregistered Method Input ..................................................................... 90
Table 29 getTotalUnregistered Method Output ................................................................... 91
Table 30 getTotalSubScriber Method Input ........................................................................ 92
Table 31 getTotalSubScriber Method Output ..................................................................... 92
Table 32 getPageUnregisteredUnitDevice Method Input ................................................... 93
Table 33 getPageUnregisteredUnitDevice Method Output ................................................ 93
Table 34 getNewSubScriberByDate Method Input ............................................................. 107
Table 35 getNewSubScriberByDate Method Output .......................................................... 107
List of Tables 13

Auto Provisioning Administrator’s Guide
14 List of Tables

Auto Provisioning
1.1 Auto Provisioning Overview
This document is for administrators who need to configure a large number of ZyXEL’s VoIP
ATAs and IADs. Auto provisioning has the VoIP devices periodically download a
configuration text file from a server that you set up and maintain. The VoIP device changes its
configuration to match the configuration file (if they are different). At the time of writing, you
can use TFTP, HTTP or HTTPS
The following sections introduce two scenarios for using auto provisioning with ZyXEL’s
VoIP ATAs and IADs. The first uses a provisioning utility and the second uses an auto
provisioning server.
1
protocol for auto provisioning.
Auto Provisioning Administrator’s Guide
CHAPTER 1
1.2 Provisioning Utility Scenario
For smaller-scale deployments, you can manually use the ZyXEL configuration generator
provisioning utility to generate and encrypt a batch of configuration files. Then store the
configuration files on a server for the ZyXEL Customer Premises Equipment (CPE) VoIP
devices to automatically download and use.
1. HTTPS support is optional and is not supported in the standard release.
Chapter 1 Auto Provisioning 15

Auto Provisioning Administrator’s Guide
Figure 1 Provisioning Utility Scenario
1.2.1 Provisioning Utility System Usage
Use the following steps to set up auto provisioning using the provisioning utility.
Note: You must use the Command Line Interface (CLI)
configure the ZyXEL VoIP devices to get the configuration files from the server
(see Chapter 2 on page 21).
Figure 2 Provisioning Utility Set Up
1 Create an account file containing settings such as the username, password and SIP
number (see Section 3.2 on page 23 for details). You can export data from your Customer
Relationship Management (CRM) database to use in the account file.
autopro command to pre-
2 Create a common file with general SIP settings such as the SIP server’s IP address, port
number, codec and timeout (see Section 3.4 on page 24).
16 Chapter 1 Auto Provisioning
3 Use the provisioning utility to generate and encrypt a batch of configuration files (see
Chapter 3 on page 23). Each includes subscriber specific SIP settings (username,
password and SIP number).
4 Store the configuration files on a TFTP or HTTP server. Subscribers do not need to
configure any SIP settings. After the VoIP device starts and connects to the Internet, it
automatically downloads its unique configuration text file from the provisioning server.
1.3 Auto Provisioning Server Scenario
For large-scale deployments, you can use ZyXEL’s auto provisioning server software for a
automated, end-to-end solution. The auto provisioning server provides the following key
benefits and features.
• Efficient management. The database-centric approach automatically generates and
manages VoIP subscriber device profiles. The auto provisioning server’s database uses
MySQL.
• It is easy to update settings for individual VoIP subscriber devices when you change SIP
parameters.
• PIN code based authentication for enhanced security. The auto provisioning server uses
Hypertext Preprocessor (PHP) to communicate with the VoIP subscriber devices.
• The web-based management interface is easy-to-use.
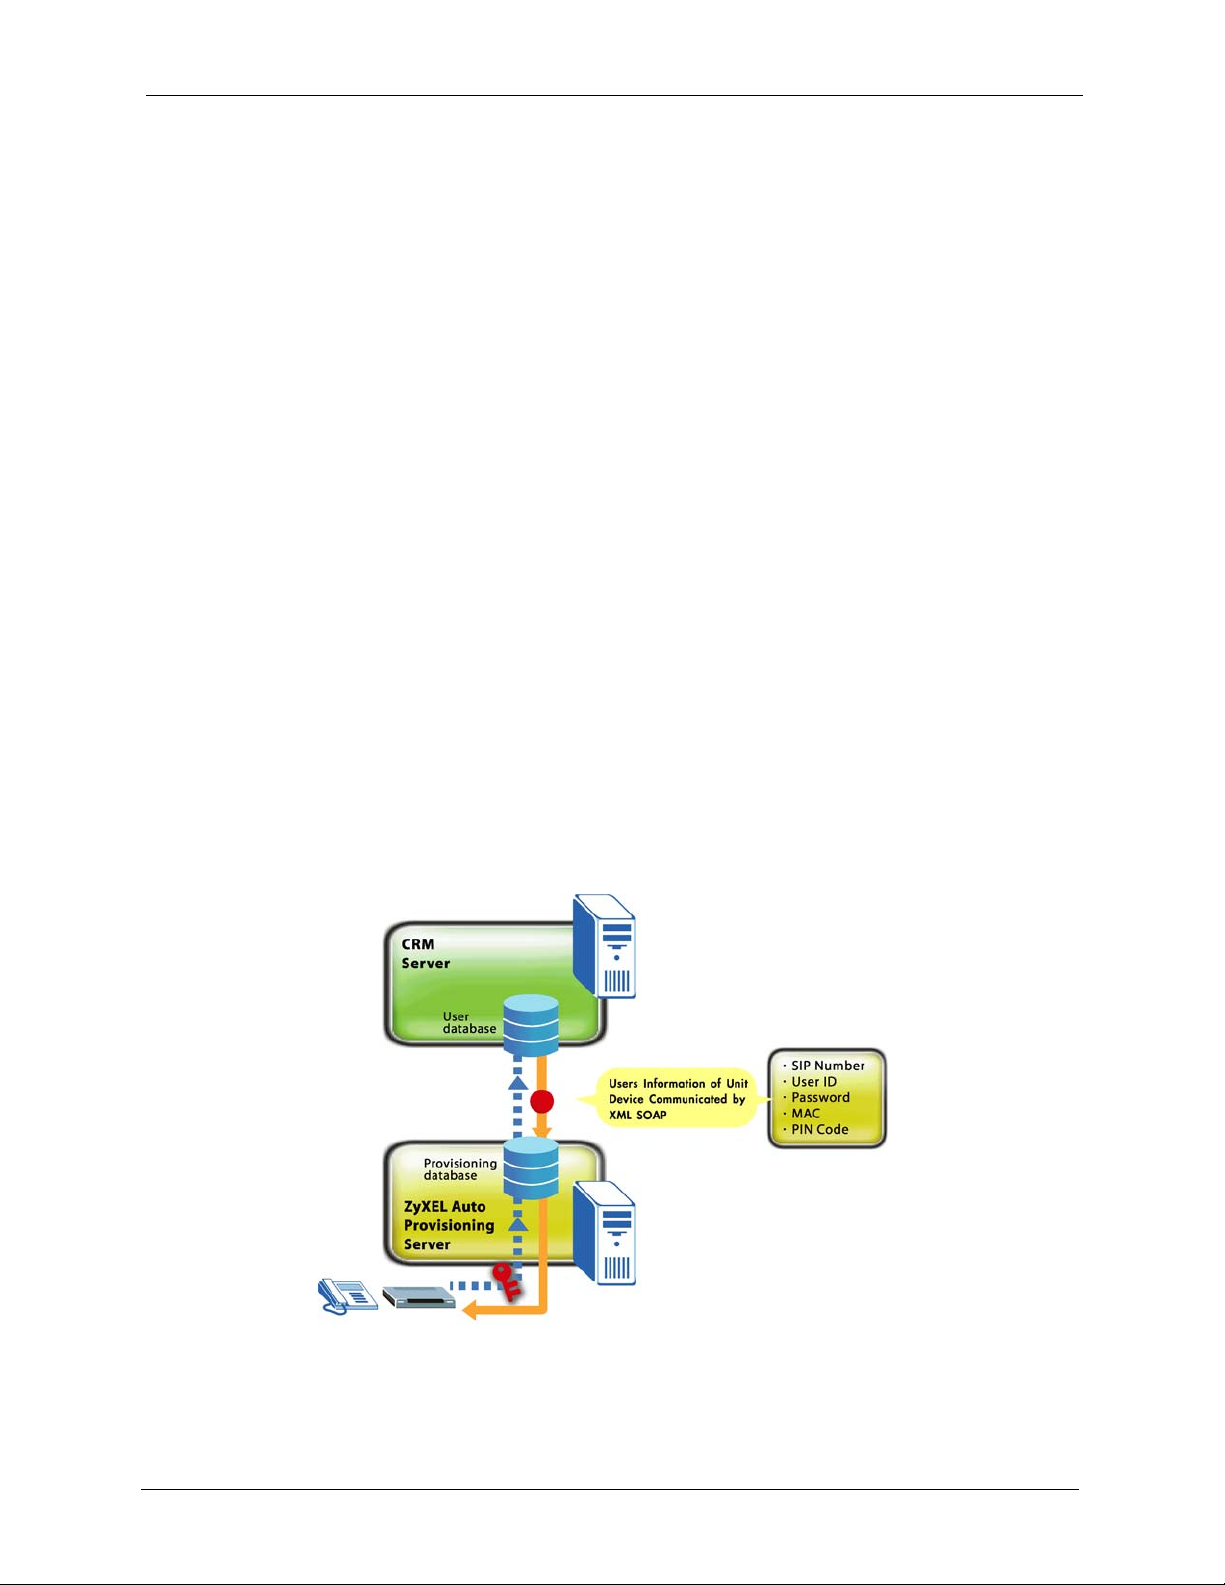
• ZyXEL’s auto provisioning server software supports the XML and Simple Object Access
Protocol (SOAP) to ease integration with your existing CRM database.
Auto Provisioning Administrator’s Guide
Figure 3 Auto Provisioning Server Scenario
Chapter 1 Auto Provisioning 17

Auto Provisioning Administrator’s Guide
1.3.1 Requirements for Using the Auto Provisioning Server
You need to do the following.
• Provide and maintain a CRM system (database) that:
Stores a record of VoIP subscriber device MAC addresses.
Generates a unique PIN code to map to each VoIP subscriber device MAC address.
Stores each subscriber’s SIP number, user ID, password PIN code and MAC address.
Note: The auto provisioning server software package includes sample CRM server
software called the VoIP Subscribing System (VSS). See Appendix D on page
87 for its database structure.
• Install the auto provisioning server software on a server (see Chapter 4 on page 43).
• Integrate the auto provisioning server with the CRM system. See Appendix E on page 89
for how the auto provisioning server uses SOAP to communicate with the CRM system.
• Provide SIP numbers and PIN codes to the subscribers either through a card, information
sheet or other method.
• Use the
ZyXEL VoIP devices to get the configuration files from the server (see Chapter 2 on page
21).
autopro command in the Command Line Interface (CLI) to pre-configure the
1.3.2 Auto Provisioning Server System Usage
The following figure and steps describe how auto provisioning works with the auto
provisioning server.
18 Chapter 1 Auto Provisioning
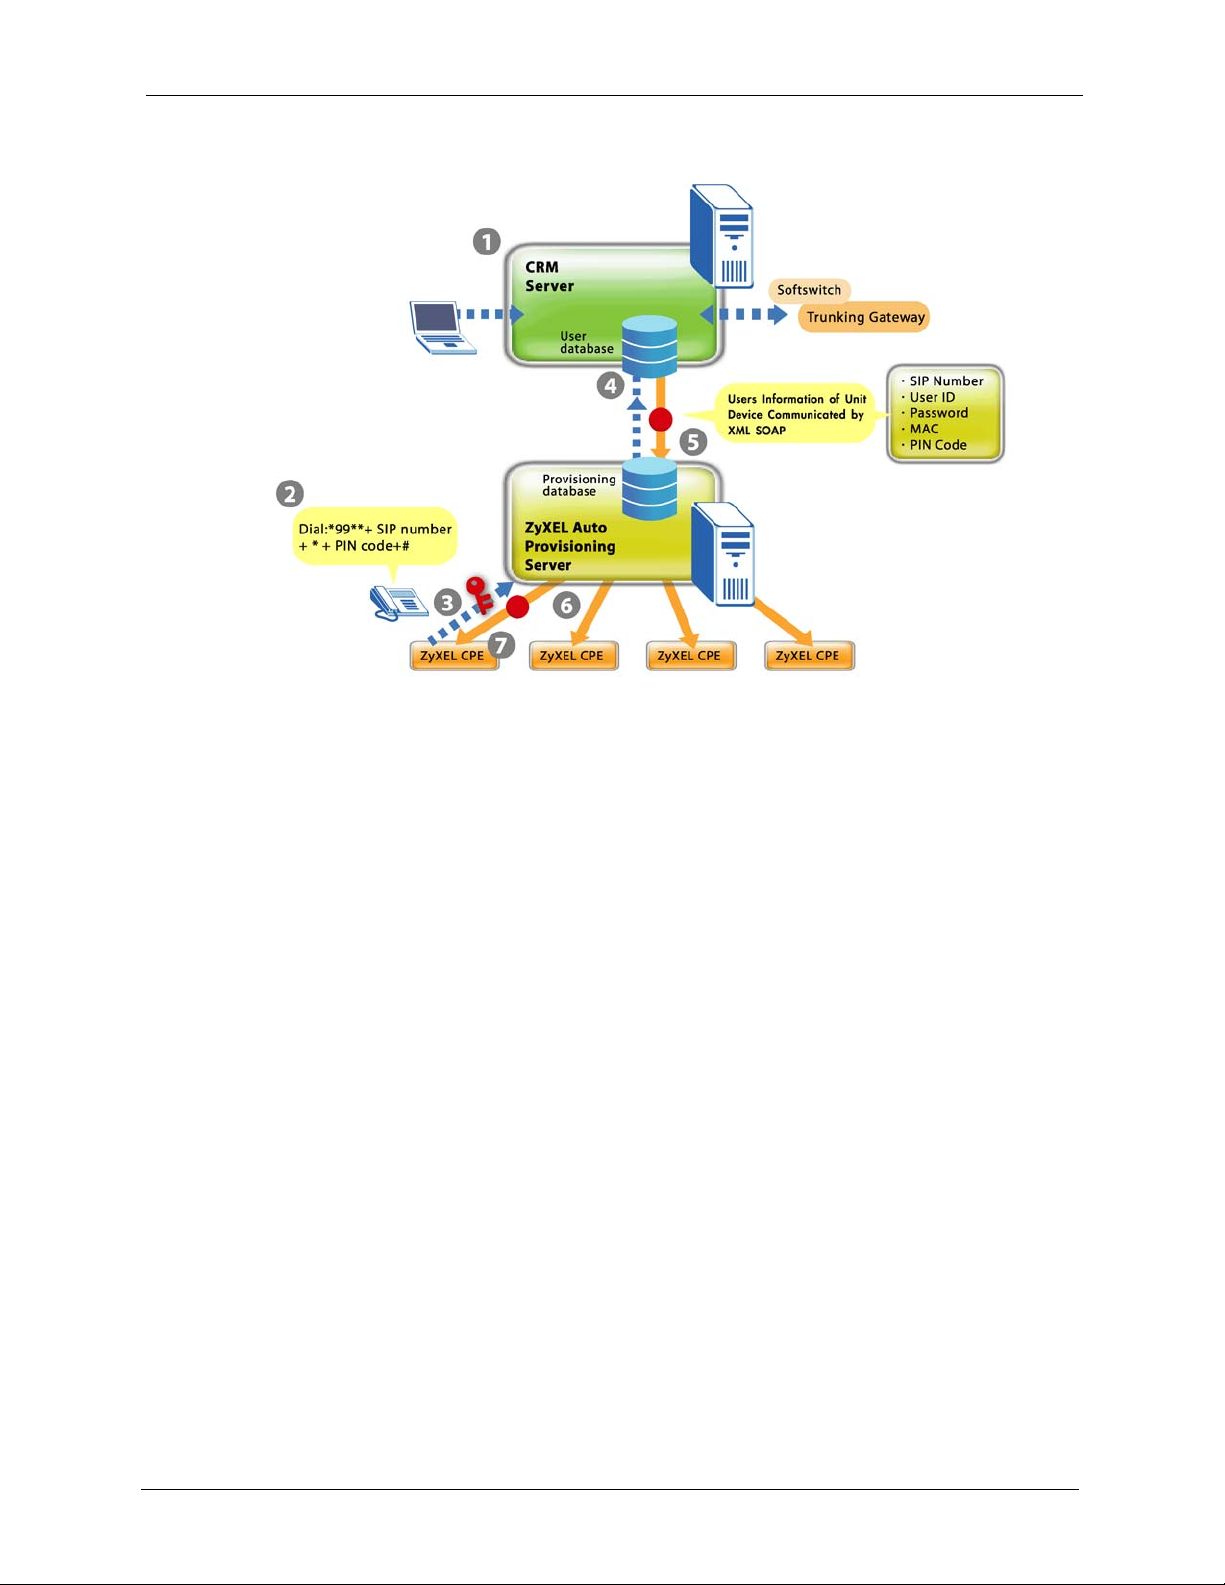
Figure 4 Auto Provisioning Server Operation
Auto Provisioning Administrator’s Guide
1 Register a VoIP subscriber device and create a subscriber profile in the CRM database.
The device’s type and MAC address have to be stored in the CRM database. You could
set it up so that a subscriber uses a credit card on-line to register for VoIP service and the
CRM database creates the subscriber profile and maps it to a device MAC address.
2 The subscriber connects the VoIP device to the Internet and uses the telephone keypad to
enter the assigned SIP number and PIN code. The subscriber must press *99** SIP
number * PIN code #. For example, *99** 10000002 * 1234 #. After the subscriber
enters this information once, the device uses it to get the latest configuration file every
time the device starts and connects to the Internet.
3 The VoIP device uses the SIP number, PIN code and its MAC address and model name to
authenticate with the auto provisioning server.
4 For a new subscriber, the auto provisioning server requests subscriber specific settings
from the CRM database.
5 The CRM server sends the subscriber specific settings to the auto provisioning server.
6 The provisioning server combines the subscriber specific settings with general SIP setting
to make a configuration file.
7 The subscriber’s VoIP device downloads and uses the configuration file.
1.3.3 Auto Provisioning Server System - Important Notes
The default address for accessing the sample CRM server is http://192.168.1.200/ZyXEL/.
Sample VoIP SIP Express Router (SER) software is also included on the auto provisioning
CD. You can use http://192.168.1.200 to access it. See iptel.org for more information on SER
servers.
Chapter 1 Auto Provisioning 19

Auto Provisioning Administrator’s Guide
By default the sample SER server does not enforce any security so a SIP device does not have
to be registered to use it. When you implement the auto provisioning server system, you will
want to have the CRM server and SIP server interact to make sure that only registered SIP
devices can use the SIP server.
20 Chapter 1 Auto Provisioning

Auto Provisioning Administrator’s Guide
CHAPTER 2
Auto Provisioning Commands
Before you deploy the VoIP devices, you need to configure them with your provisioning
server’s IP address and enable the auto provisioning feature.
Use the Command Line Interface (CLI) to configure the VoIP device’s auto provisioning
settings. The VoIP device’s auto provisioning settings are not configurable via the web
configurator. This prevents end users from accidentally changing them.
Do the following to enter the CLI.
1 Log into the device by telnet or the console port.
2 Enter SMT Menu 24.8, the CLI mode.
2.1 Auto Provisioning Commands
Use the following commands to configure the VoIP device’s auto provisioning settings.
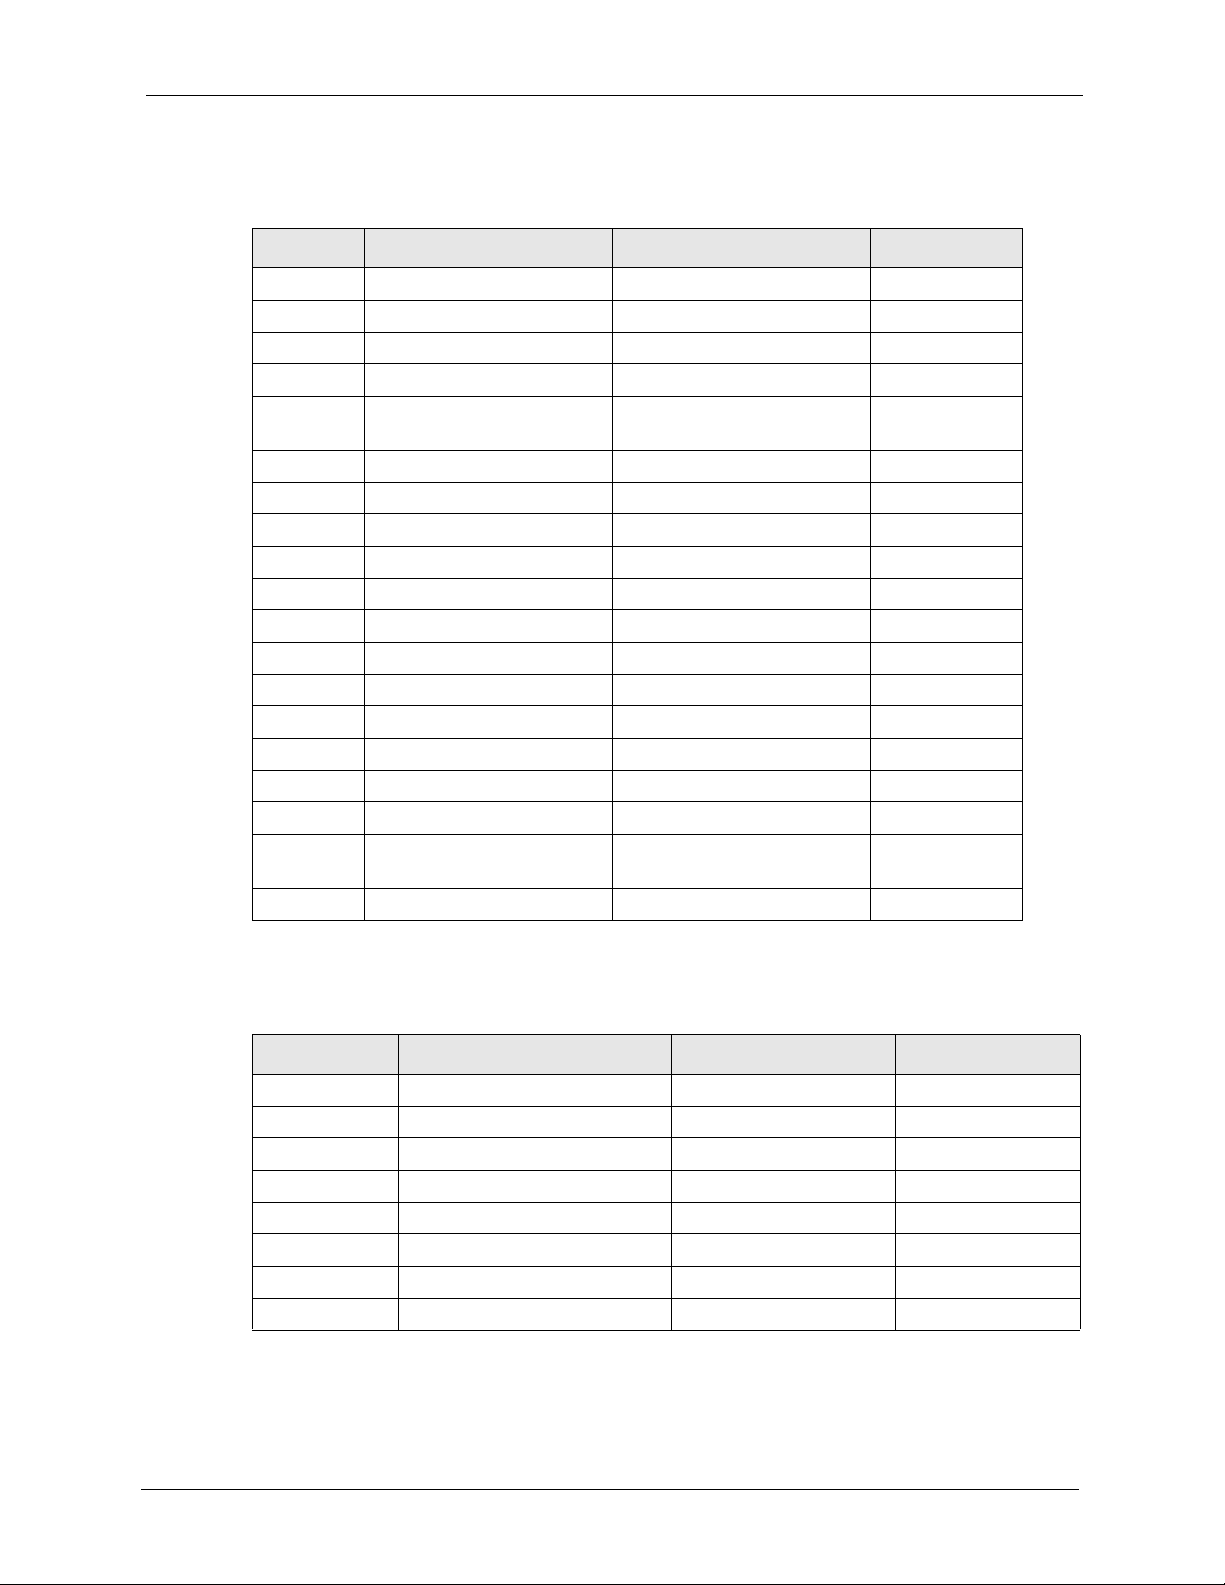
Table 1 Auto Provisioning Commands
COMMAND DESCRIPTION
voice config autopro index <index> Starts an auto provisioning configuration session.
active <index>
<0:off|1:on>
servaddr <index> <ip
address>
timeout <index>
<second>
retry <index>
<second>
method <index>
<0:common|2:
http_pincode
>
protocol <index>
<0:TFTP|1:HT
TP|2:HTTPS>
save <index> Saves the auto provisioning configuration.
Turns auto provisioning on or off.
Sets the IP address of the server.
Sets how long the VoIP device waits after
successfully downloading the configuration file from
the server before downloading it again.
Sets how long the VoIP device waits after a failed
attempt to download the configuration file from the
server before making another download attempt.
This period is usually shorter than the timeout
period.
Use 0 if you are using the provisioning utility. Use 2
if you are using the auto provisioning server.
Sets which protocol to use for auto provisioning.
Chapter 2 Auto Provisioning Commands 21

Auto Provisioning Administrator’s Guide
Table 1 Auto Provisioning Commands (continued)
COMMAND DESCRIPTION
display <index> Displays the auto provisioning configuration
settings.
dumpCfg <index> Displays the auto provisioning settings in the
temporary buffer.
22 Chapter 2 Auto Provisioning Commands

Provisioning Utility
3.1 Provisioning Utility Overview
Use the provisioning utility to create encrypted configuration text files. The utility uses triple
DES encryption for strong security.
Use the correct utility for your operating system (ZyConfigGen_Win32 for Windows or
ZyConfigGen_Linux for Linux).
3.2 Account File
Auto Provisioning Administrator’s Guide
CHAPTER 3
You must create an account file before you use the utility. The account file lists subscriber
specific account information according to the following format. The MAC address must be
listed first.
Syntax
<MAC Address>,<SIP1 Phonenumber>,<SIP1 User ID>,<SIP1 Password>,[SIP2
Phonenumber],[SIP2 User ID],[SIP2 Password]
The account file may be generated from a database. The following example is named
“Account.txt”.
Figure 5 Account File Example
00A0C5891805,52711,user1,111,
00A0C5999897,52293,user3,1234,52294,user4,1234,
00A0C5522903,52295,user5,5555,,,
00A0C5EBEC95,12345,test1234,111111,98765,test0000,222222,
3.3 Account Field File
You must also create an account field file that identifies the fields in the account file. The
fields must be in the same order in the account file and the account field file. The MAC
address is not included in the account field file.
Chapter 3 Provisioning Utility 23

Auto Provisioning Administrator’s Guide
The following example is named “Field.txt”.
Figure 6 Account Field File Example
980101014 = SIP #1 Phone Number
980101012 = SIP #1 UserId
980101013 = SIP #1 Password
980102014 = SIP #2 Phone Number
980102012 = SIP #2 UserId
980102013 = SIP #2 Password
3.4 Common File
You can also include a common file of general settings if you want to change them from the
defaults. A common file is optional.
Use the
voice autopro itemdisplay command with a device to see which fields can be
configured through auto provisioning. It is recommended that you use communications
software (such as a terminal emulation program) that allows you to capture the results.
3.4.1 The Common File Format
This is the format of the configuration text files.
<field identification number = field name = parameter values allowed =
input>,
where <input> is your input conforming to <parameter values allowed>.
It is also the same format that Internal SPTGEN configuration files use. See Section 3.5 on
page 25 for how to get a device’s SPTGEN file.
Note: Make sure you use the
voice autopro itemdisplay command to get the
fields that are configurable via auto provisioning. Even if you use a full Internal
SPTGEN file, auto provisioning only changes the settings that are configurable
via auto provisioning.
3.4.2 File Modification - Important Points to Remember
Each parameter must be preceded by one “=”sign and one space.
Some parameters are dependent on others.
24 Chapter 3 Provisioning Utility

3.5 Getting an SPTGEN File
You can use an internal SPTGEN file to create a common file. Use the following procedure to
get a SPTGEN file from a VoIP device via FTP.
1 Launch the FTP client on your computer.
2 Enter “open”, followed by a space and the IP address of your VoIP device.
3 Press [ENTER] when prompted for a username.
4 Enter your password as requested (the default is “1234”).
5 Enter “bin” to set transfer mode to binary.
6 Use “get” to transfer files from the device to the computer, for example, “get rom-t
SPTGEN.txt” transfers the internal SPTGEN file on the device to your computer and
renames it “SPTGEN.txt”.
7 Enter “quit” to exit the ftp prompt.
The following figure shows an example.
Auto Provisioning Administrator’s Guide
Figure 7 FTP Session Example
C:\>ftp 192.168.1.1
Connected to 192.168.1.1.
220 P2302R FTP version 1.0 ready at Sat Jan 01
00:01:52 2000
User (192.168.1.1:(none)):
331 Enter PASS command
Password:
230 Logged in
ftp> bin
200 Type I OK
ftp> get rom-t P-2302R.txt
200 Port command okay
150 Opening data connection for RETR rom-t
226 File sent OK
ftp: 36107 bytes received in 3.75Seconds
9.63Kbytes/sec.
ftp> quit
221 Goodbye!
3.6 Auto Provisioning Text Files
Auto provisioning uses configuration text files that include subscriber specific SIP settings
(username, password and SIP number). Subscribers do not need to configure any SIP settings.
They only need to connect the VoIP device to the Internet.
Chapter 3 Provisioning Utility 25

Auto Provisioning Administrator’s Guide
Your server must include a database with a different configuration file for each subscriber. The
filename of each configuration file must include the VoIP device’s MAC address, for example:
sip<MAC ADDRESS>.txt. This allows each VoIP device to download its unique
configuration file.
3.6.1 Auto Provisioning Text File Menus Example
The following table explains the labels that have been added to the example auto provisioning
menu tables for identification purposes. These labels do not appear in an actual auto
provisioning configuration file.
Table 2 Example Auto Provisioning Menus Abbreviations
ABBREVIATION MEANING
FIN Field Identification Number (not seen in SMT screens)
FN Field Name
PVA Parameter Values Allowed
INPUT An example of what you may enter
Here are examples of configuration text file menus that auto provisioning uses. This is a
general example, the exact fields vary by product.
Note: You can add comments in a configuration file by adding a a /* before them and
a */ after them.
26 Chapter 3 Provisioning Utility
Auto Provisioning Administrator’s Guide
Note: DO NOT alter or delete any field except parameters in the INPUT column.
Table 3 Menu 4 Internet Access Setup
FIN FN PVA INPUT
40000000 Configured <0(No) | 1(Yes)> 1
40000001 ISP <0(No) | 1(Yes)> 1
40000002 Active <0(No) | 1(Yes)> 1
40000003 ISP's Name 1234
40000004 Encapsulation <2(PPPOE) |
8(Ethernet)| 15(PPTP)>
40000008 Service Name any
40000009 My Login test
40000010 My Password 12345
40000011 Single User Account <0(No) | 1(Yes)> 0
40000012 IP Address Assignment <0(Static)|1(Dynamic)> 0
40000013 Wan IP Address 0.0.0.0
40000014 Remote Gateway 0.0.0.0
40000015 Remote IP subnet mask 0
40000024 ISP PPPoE idle timeout 100
40000025 Route IP <0(No) | 1(Yes)> 1
40000033 Nailed-up Connection <0(No) | 1(Yes)> 0
40000034 LAN IP Address 172.21.3.155
40000035 LAN IP subnet mask
Bits
40000036 LAN Gateway 172.21.0.254
16
8
Table 4 Menu 24.10 Time and Date Setting
FIN FN PVA INPUT
241000001 Time Protocol 3
241000002 Time Server Address 129.132.2.21
241000003 Time Zone 13
241000004 Daylight Saving <0(No) | 1(Yes)> 1
241000005 Start Date (month) 1
241000006 Start Date (day) 0
241000007 End Date (month) 1
241000008 End Date (day) 0
Chapter 3 Provisioning Utility 27
Auto Provisioning Administrator’s Guide
Table 5 Menu 24.11 Remote Management Control
FIN FN PVA INPUT
241100001 TELNET Server Port 23
241100002 TELNET Server Access <0(all)|1(none)|2(Lan)|3
241100003 TELNET Server Secured IP
address
241100004 FTP Server Port 21
241100005 FTP Server Access <0(all)|1(none)|2(Lan)|3
241100006 FTP Server Secured IP
address
241100007 WEB Server Port 180
241100008 WEB Server Access <0(all)|1(none)|2(Lan)|3
241100009 WEB Server Secured IP
address
241100010 SNMP Service Port 161
241100011 SNMP Service Access <0(all)|1(none)|2(Lan)|3
241100012 SNMP Service Secured IP
address
241100013 DNS Service Port 53
241100014 DNS Service Access <0(all)|1(none)|2(Lan)|3
241100015 DNS Service Secured IP
address
1
(Wan)>
0.0.0.0
1
(Wan)>
0.0.0.0
1
(Wan)>
192.168.100.23
3
0
(Wan)>
0.0.0.0
0
(Wan)>
0.0.0.0
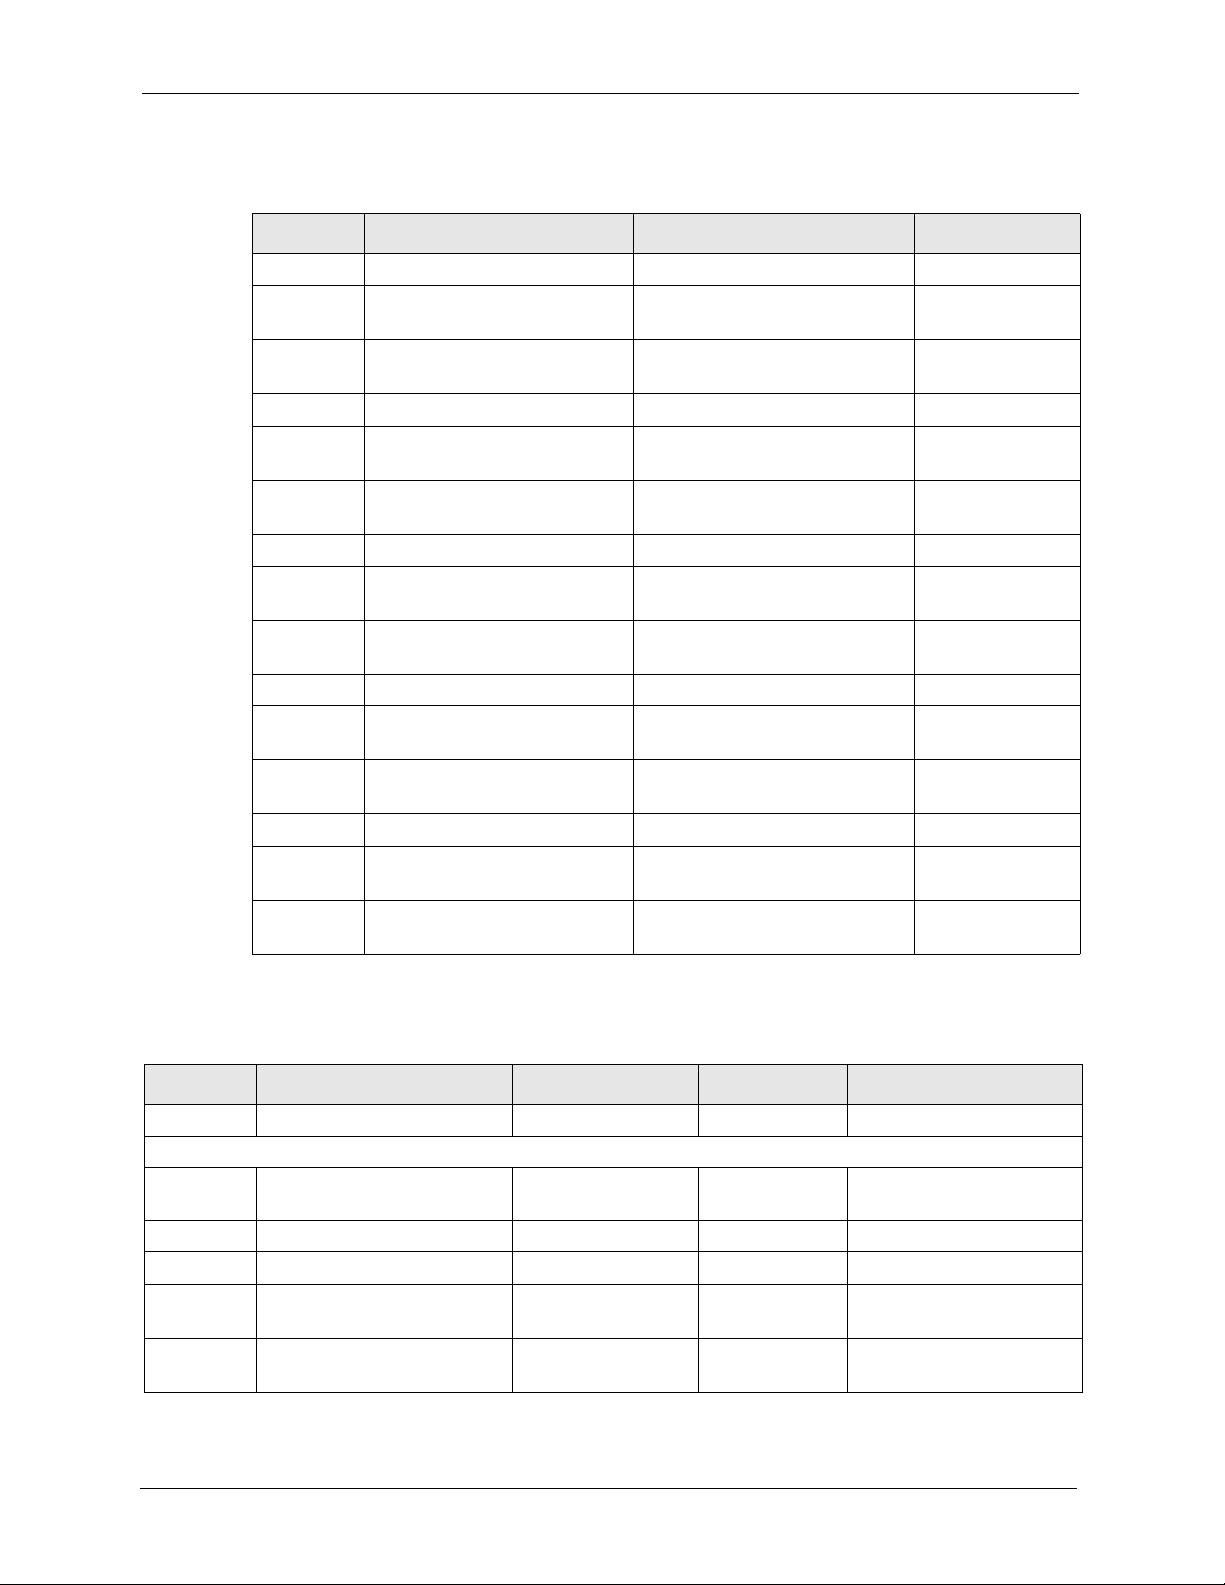
Table 6 Menu 98 VoIP, Phone and Auto Provision Setup
FIN FN PVA INPUT DESCRIPTION
/ Menu 98.1.1 VoIP SIP #1 Setup
980101001 SIP #1 Active <0(No) | 1(Yes)> 1 Enables or disables the SIP
980101002 SIP #1 Server Address 172.22.1.17 SIP server’s address.
980101003 SIP #1 Server Port <1~65535> 5060 SIP server’s listening port.
980101004 SIP #1 Registration
Server IP
980101005 SIP #1 Registration
Server Port
172.22.1.17 SIP register server address.
<1~65535> 5060 SIP register server’s
account’s settings.
listening port.
28 Chapter 3 Provisioning Utility

Auto Provisioning Administrator’s Guide
Table 6 Menu 98 VoIP, Phone and Auto Provision Setup
FIN FN PVA INPUT DESCRIPTION
980101006 SIP #1 Registration
Expiration Time
980101007 SIP #1 Register ReSend
Time
980101009 SIP #1 Local signaling
Port
980101010 SIP #1 RTP Port Range
Start
980101011 SIP #1 RTP Port Range
End
980101012 SIP #1 UserId User1 SIP account user ID.
980101013 SIP #1 Password 111 SIP account password.
980101014 SIP #1 Phone Number 52711 SIP account phone number.
980101017 SIP #1 Domain Name 172.22.1.17 SIP service domain.
980101018 SIP #1 Mapping to POTS
Phone1
980101019 SIP #1 Mapping to POTS
Phone2
980101020 SIP #1 CODEC Type 1 <0(G711mu)
980101021 SIP #1 CODEC Type 2 <0(G711mu)
980101022 SIP #1 DTMF Key Type <0(RFC_2833)
980101023 SIP #1 Transport Type <0(UDP) |1(TCP)> 0 SIP transport type.
980101024 SIP #1 Hide Caller ID <0(No) |1(Yes)> 0 Disables or enables the
980101025 SIP #1 Auto Redial <0(No) |1(Yes)> 0 Disables or enables auto
980101026 SIP #1 STUN Server
Active
980101027 SIP #1 STUN Server
Address
980101028 SIP #1 STUN Server Port <1024~65535> STUN server’s listening
/ Menu 98.1.2 VoIP SIP #2 Setup
980102001 SIP #2 Active <0(No) | 1(Yes)> 0 Enables or disables the SIP
980102002 SIP #2 Server Address 192.168.1.33 SIP server’s address.
<2~65535> 7200 Registration timeout value.
<1~65535> 180 Registration resend timeout
value.
<1025~65535> 5060 Local SIP listening port.
<1025~65535> 50000 RTP start port.
<1025~65535> 65535 RTP end port, should larger
than RTP start port.
<0(No) | 1(Yes)> 1 Map incoming calls to the
first phone port.
<0(No) | 1(Yes)> 1 Map incoming calls to the
second phone port.
18 Primary voice compression
|8(G711A)
|18(G729)>
0 Secondary voice
|8(G711A)
|18(G729)>
0 Sets how DTMF tones are
|1(PCM)
|2(SIP_INFO)
|3(RFC_2833_LIKE
_SIP_INFO)>
<0(No) | 1(Yes)> 0 Turns STUN off or on.
STUN server’s IP address.
type.
compression type.
handled.
sending of caller ID.
redial.
port.
account’s settings.
Chapter 3 Provisioning Utility 29

Auto Provisioning Administrator’s Guide
Table 6 Menu 98 VoIP, Phone and Auto Provision Setup
FIN FN PVA INPUT DESCRIPTION
980102003 SIP #2 Server Port
<1024~65535>
980102004 SIP #2 Registartion
Server IP
980102005 SIP #2 Registartion
Server Port
980102006 SIP #2 Registartion
Expiration Time
980102007 SIP #2 Register ReSend
Time
980102009 SIP #2 Local signaling
Port
980102010 SIP #2 RTP Port Range
Start
980102011 SIP #2 RTP Port Range
End
980102012 SIP #2 UserId ChangeMe SIP account user ID.
980102013 SIP #2 Password 1234567890 SIP account password.
980102014 SIP #2 Phone Number ChangeMe SIP account phone number.
980102017 SIP #2 Domain Name 192.168.1.33 SIP service domain.
980102018 SIP #2 Mapping to POTS
Phone1
980102019 SIP #2 Mapping to POTS
Phone2
980102020 SIP #2 CODEC Type 1 <0(G711mu)
980102021 SIP #2 CODEC Type 2 <0(G711mu)
980102022 SIP #2 DTMF Key Type <0(RFC_2833)
980102023 SIP #2 Transport Type <0(UDP) |1(TCP)> 0 SIP transport type.
980102024 SIP #2 Hide Caller ID <0(No) |1(Yes)> 0 Disables or enables the
980102025 SIP #2 Auto Redial <0(No) |1(Yes)> 0 Disables or enables auto
980102026 SIP #2 STUN Server
Active
980102027 SIP #2 STUN Server
Address
<1~65535> 5060 SIP server’s listening port.
192.168.1.33 SIP register server address.
<1~65535> 5060 SIP register server’s
listening port.
<2~65535> 3600 Registration timeout value.
<1~65535> 180 Registration resend timeout
value.
<1025~65535> 5060 Local SIP listening port.
<1025~65535> 50000 RTP start port.
<1025~65535> 65535 RTP end port, should larger
than RTP start port.
<0(No) | 1(Yes)> 1 Map incoming calls to the
first phone port.
<0(No) | 1(Yes)> 1 Map incoming calls to the
second phone port.
0 Primary voice compression
|8(G711A)
|18(G729)>
18 Secondary voice
|8(G711A)
|18(G729)>
0 Sets how DTMF tones are
|1(PCM)
|2(SIP_INFO)
|3(RFC_2833_LIKE
_SIP_INFO)>
<0(No) | 1(Yes)> 0 Turns STUN off or on.
STUN server’s IP address.
type.
compression type.
handled.
sending of caller ID.
redial.
30 Chapter 3 Provisioning Utility
 Loading...