

Page 1

Check your system requirements
1. Check you have a spare USB port (USB 1.0 or 2.0)
2. You need to be running Windows 2000 / XP / Vista for a
PC or OS X 10.5 and above for a Mac
3. The recommended system requirements are:
CPU 1GHz Pentium or above
Hard Disk 20GB or above
RAM 512M or above
Display 800 x 600 minimum
4. You need to have Administrator rights to install and run
the software
5. We suggest you switch off your anti-virus software before
installing the USB modem. In some cases protection
software can prevent automatic installation. It is possible
to start the installation process manually by clicking the
Autorun icon when it appears.
1
Page 2
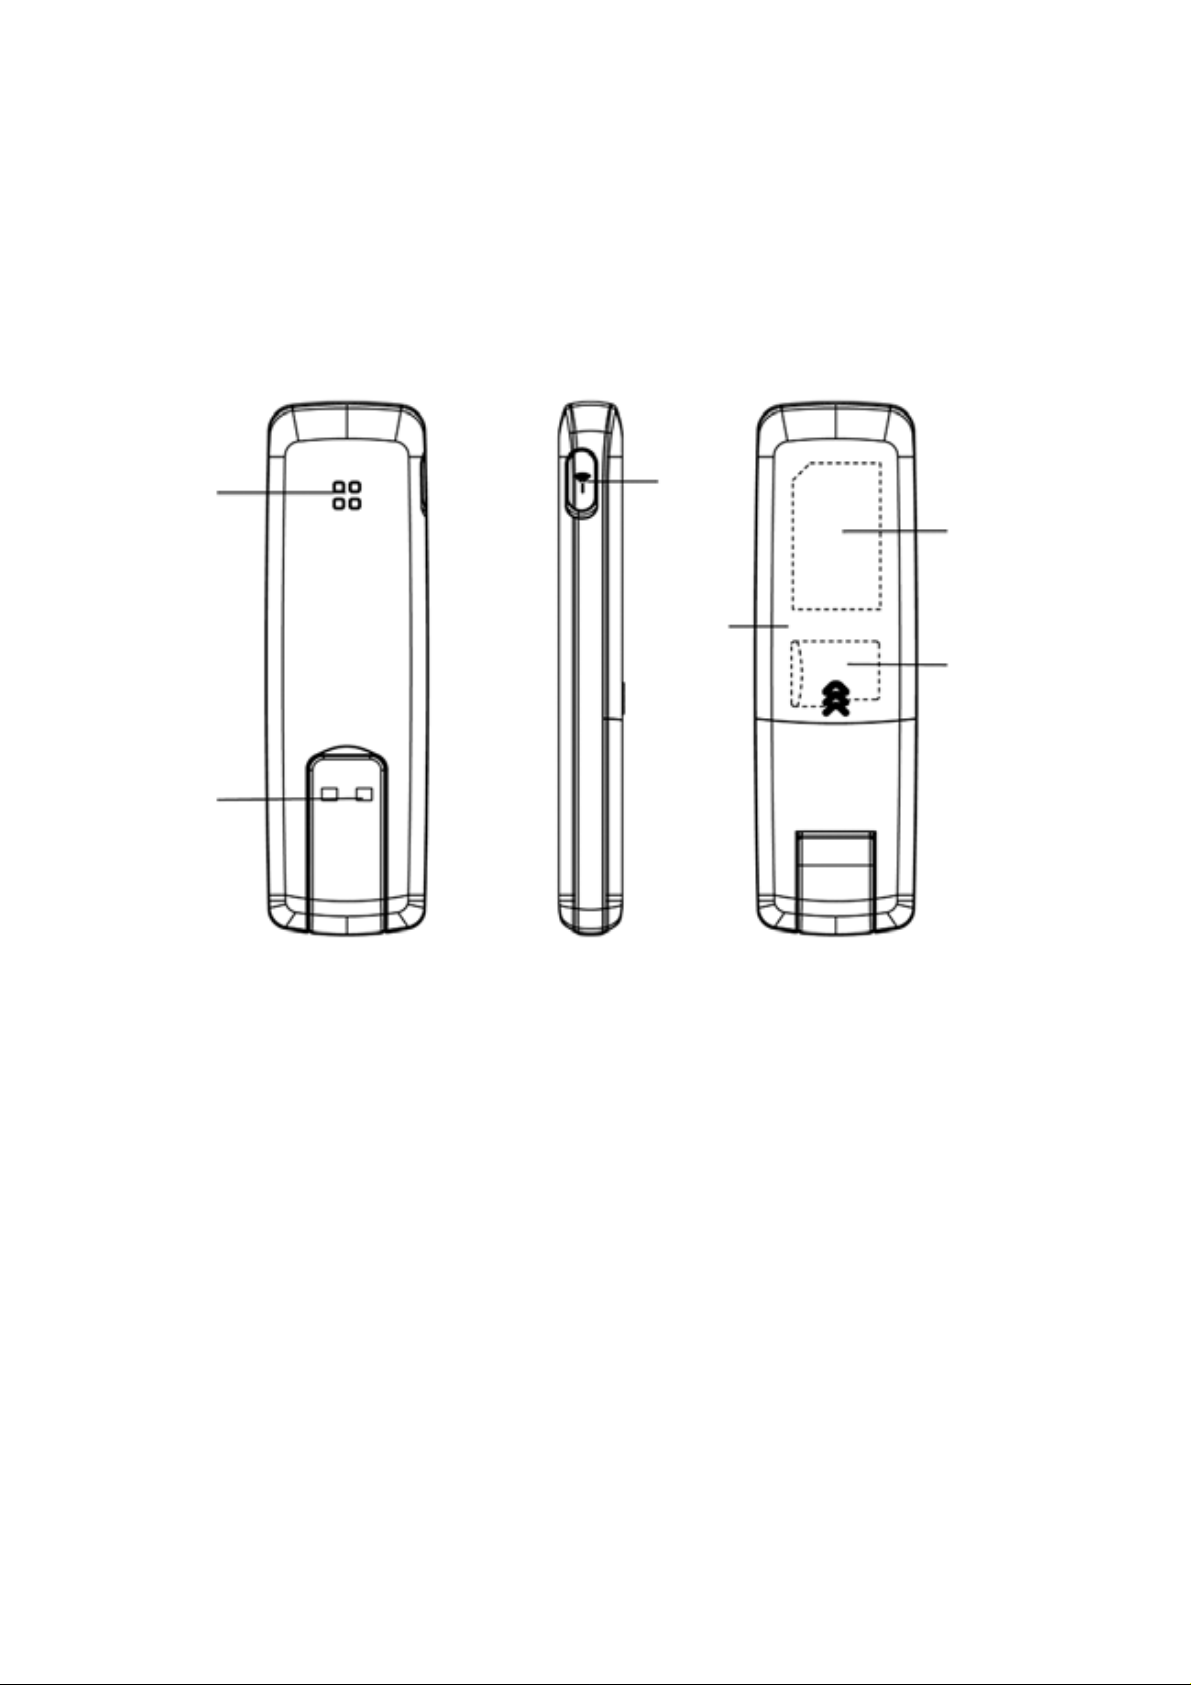
Get to know your USB Modem
1
3
5
4
6
2
1. LED Indicator 2. Rotating USB plug
3. External Antenna Port 4. Back cover
5. SIM Slot 6. MicroSD Slot
2
Page 3
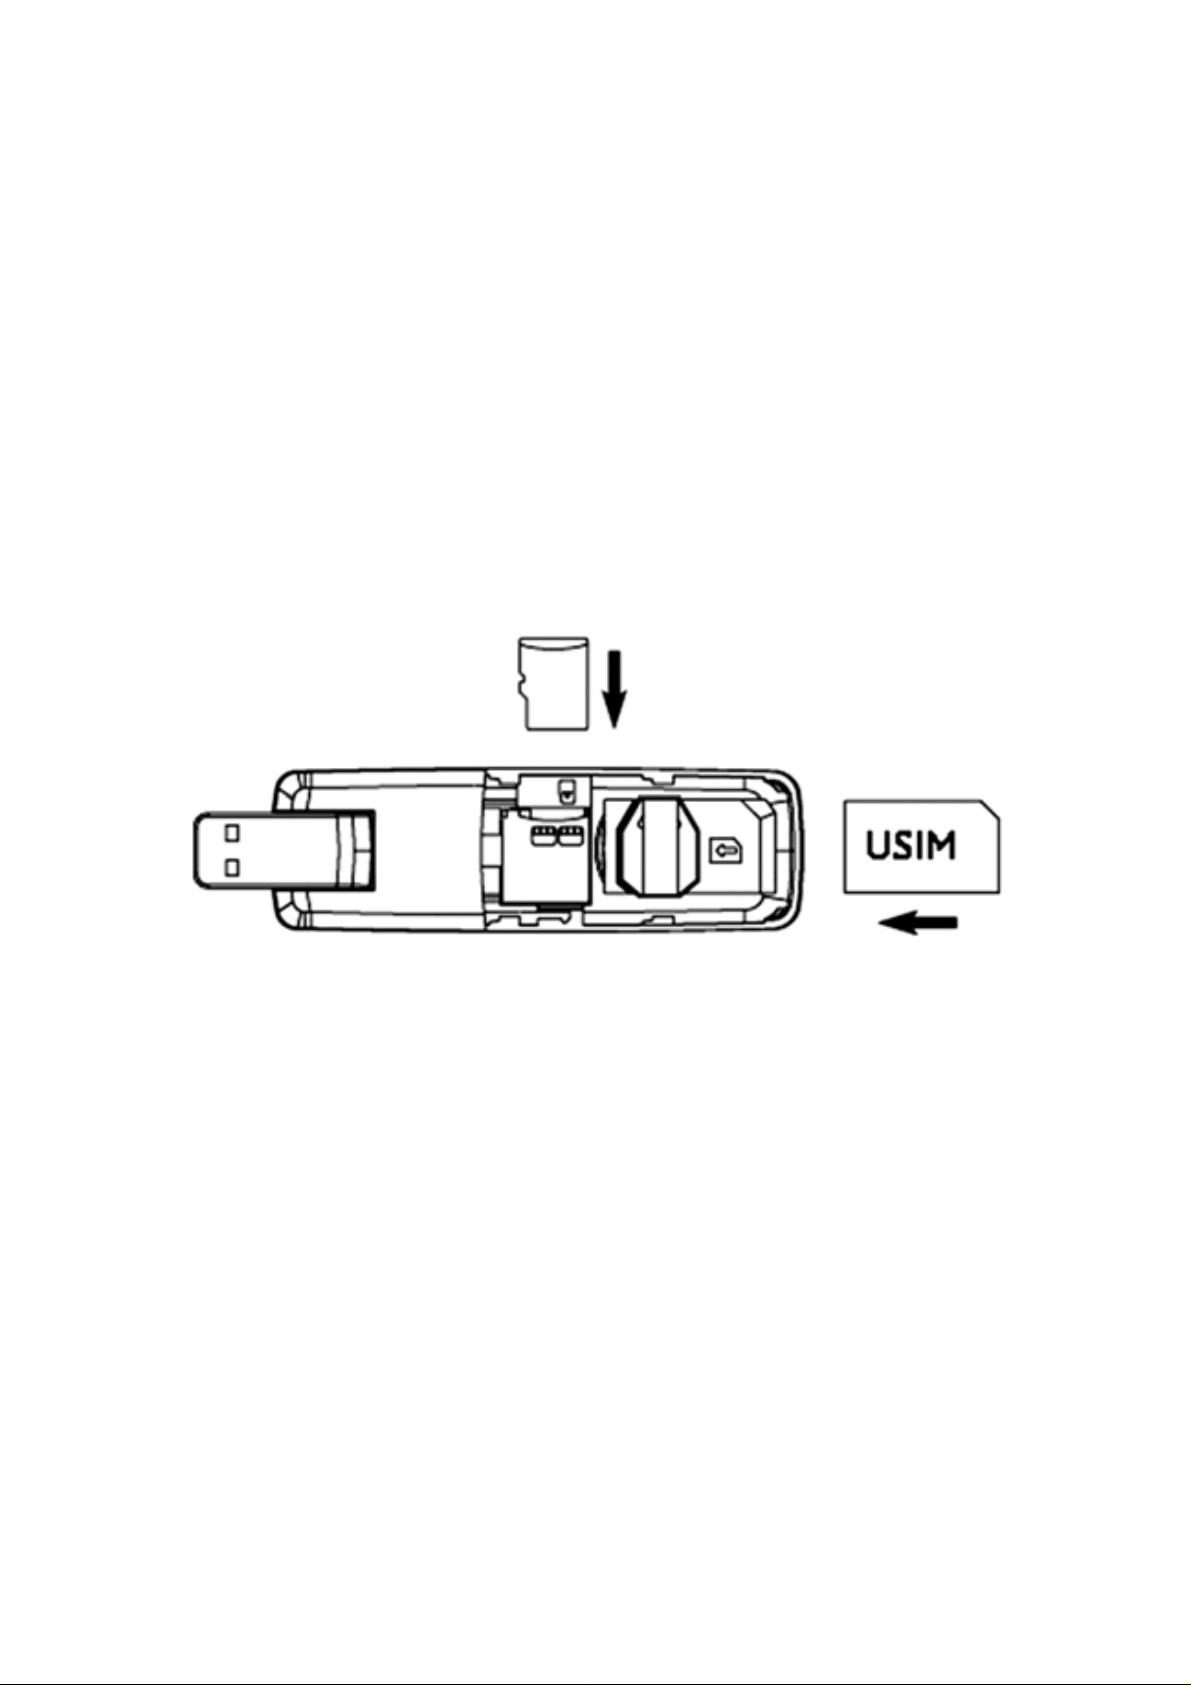
Insert your SIM Card
1. Open the slider panel on the back of your USB modem.
2. Insert your USIM card carefully as shown.
3. If yo u want to add a m emor y card y ou ca n do it no w . Yo ur
USB modem supports up to 4GB MicroSDHC memory.
4. Close the back cover.
Tip
Remember to keep your plastic SIM card holder. It has a
record of your phone number and a PIN number which you
will need later.
3
Page 4

Insert the modem into your computer
The installation and management software is pre-loaded onto
your USB modem. Simply insert your modem into your
computer and follow the instructions on-screen. You’ll be up
and connected in about 5 minutes.
The USB modem is a Plug and Play device. Once inserted
your system will automatically detect the new hardware and
start to install the software. Be patient as it may take some
time for your computer to recognise the modem.
If nothing happens your system configuration may be
preventing Autorun.
Tips to resolve
z Windows users: Double click the Autorun icon to start the
software installation
z MAC users: Open the CD-ROM, ZTE MODEM, and double
click Telstra T urbo Connection Manager icon.
4
Page 5
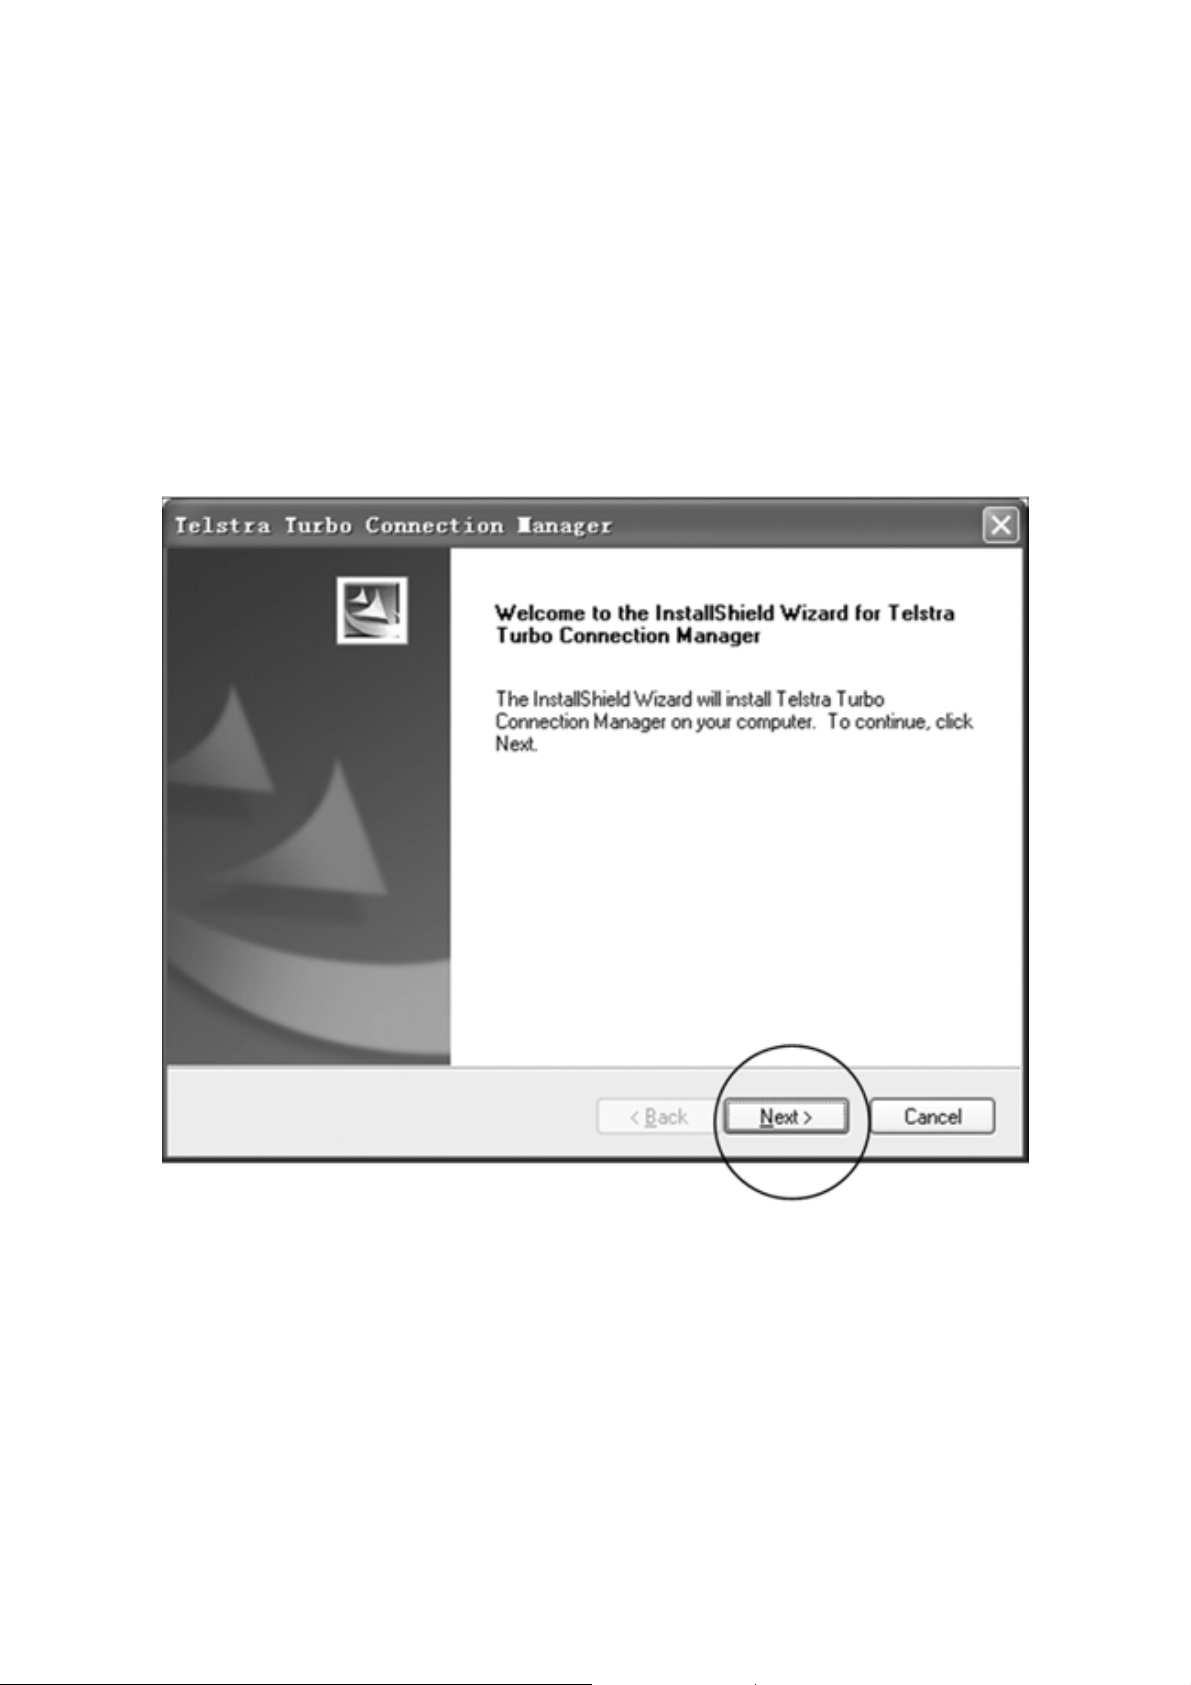
The installation method show n below is for Windows XP.
Other systems will follow a similar but not necessarily identical
installation process:
5
Page 6
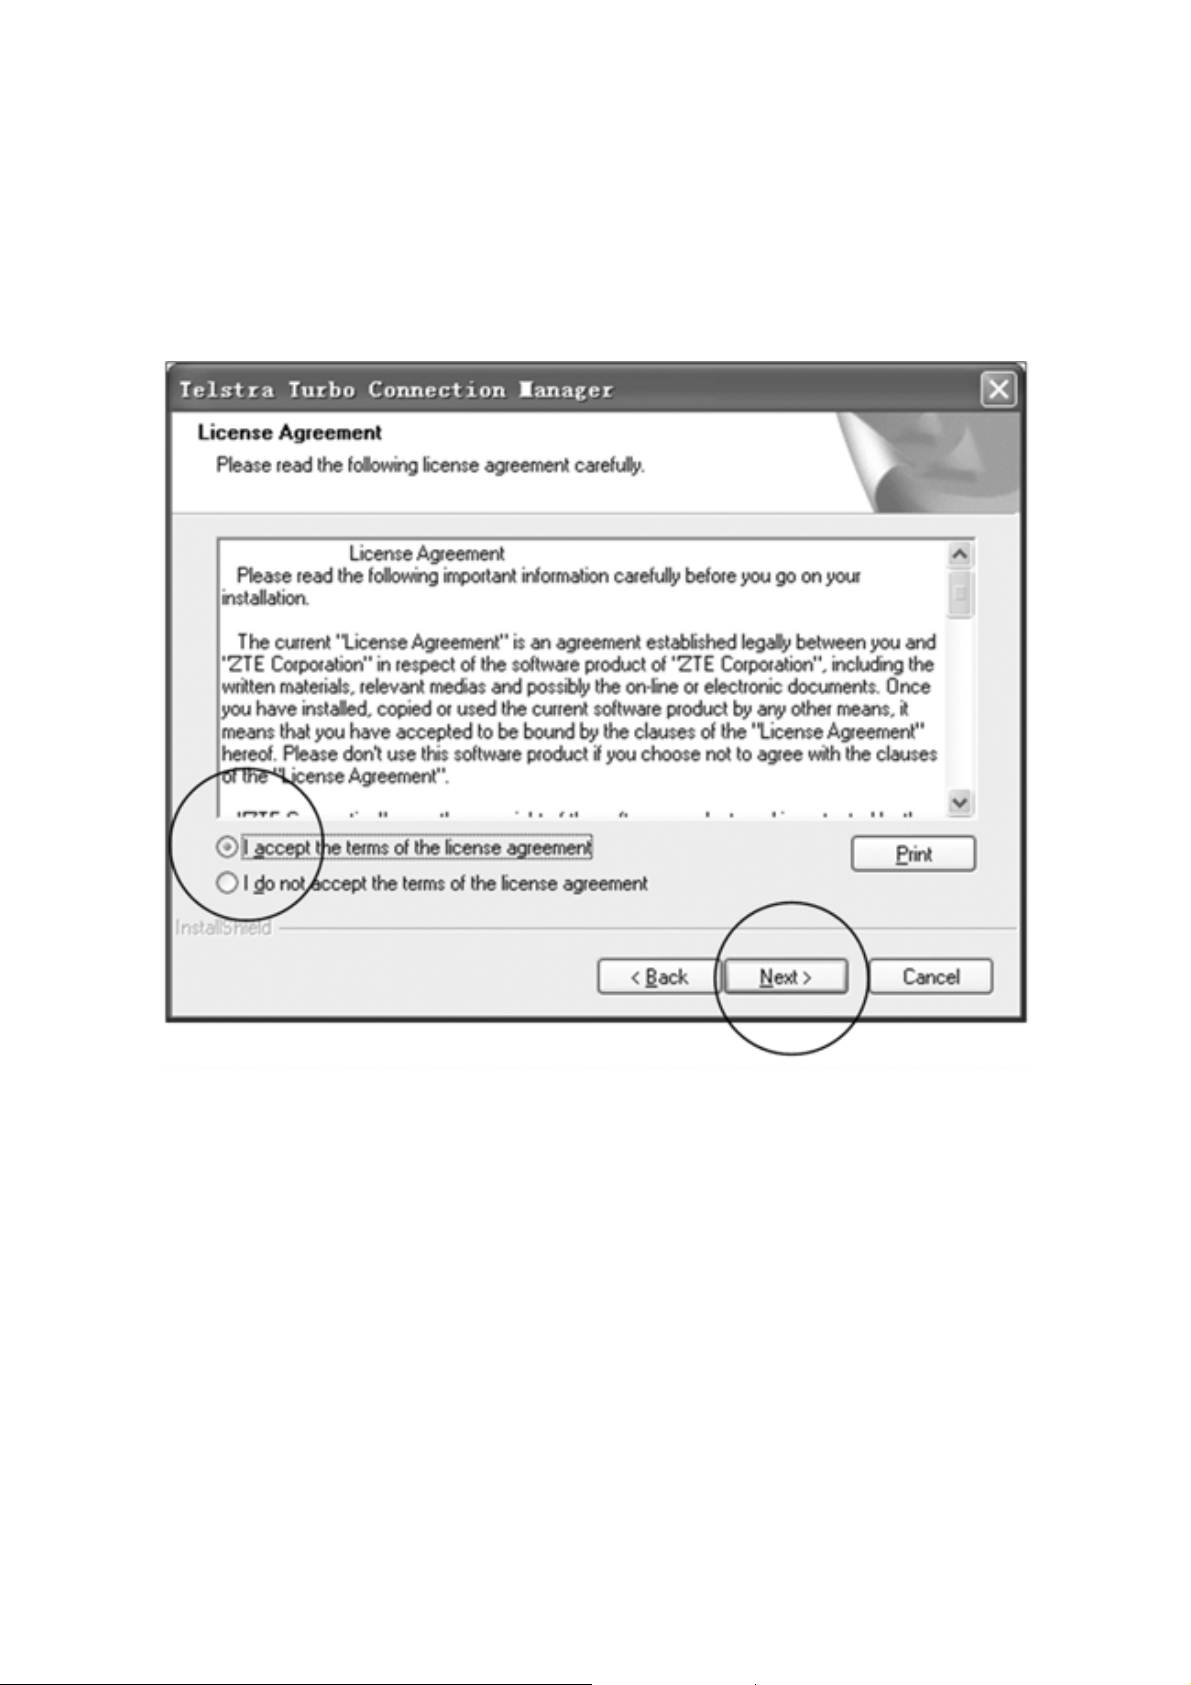
Choose ‘I accept….’, and then click Next to continue.
6
Page 7
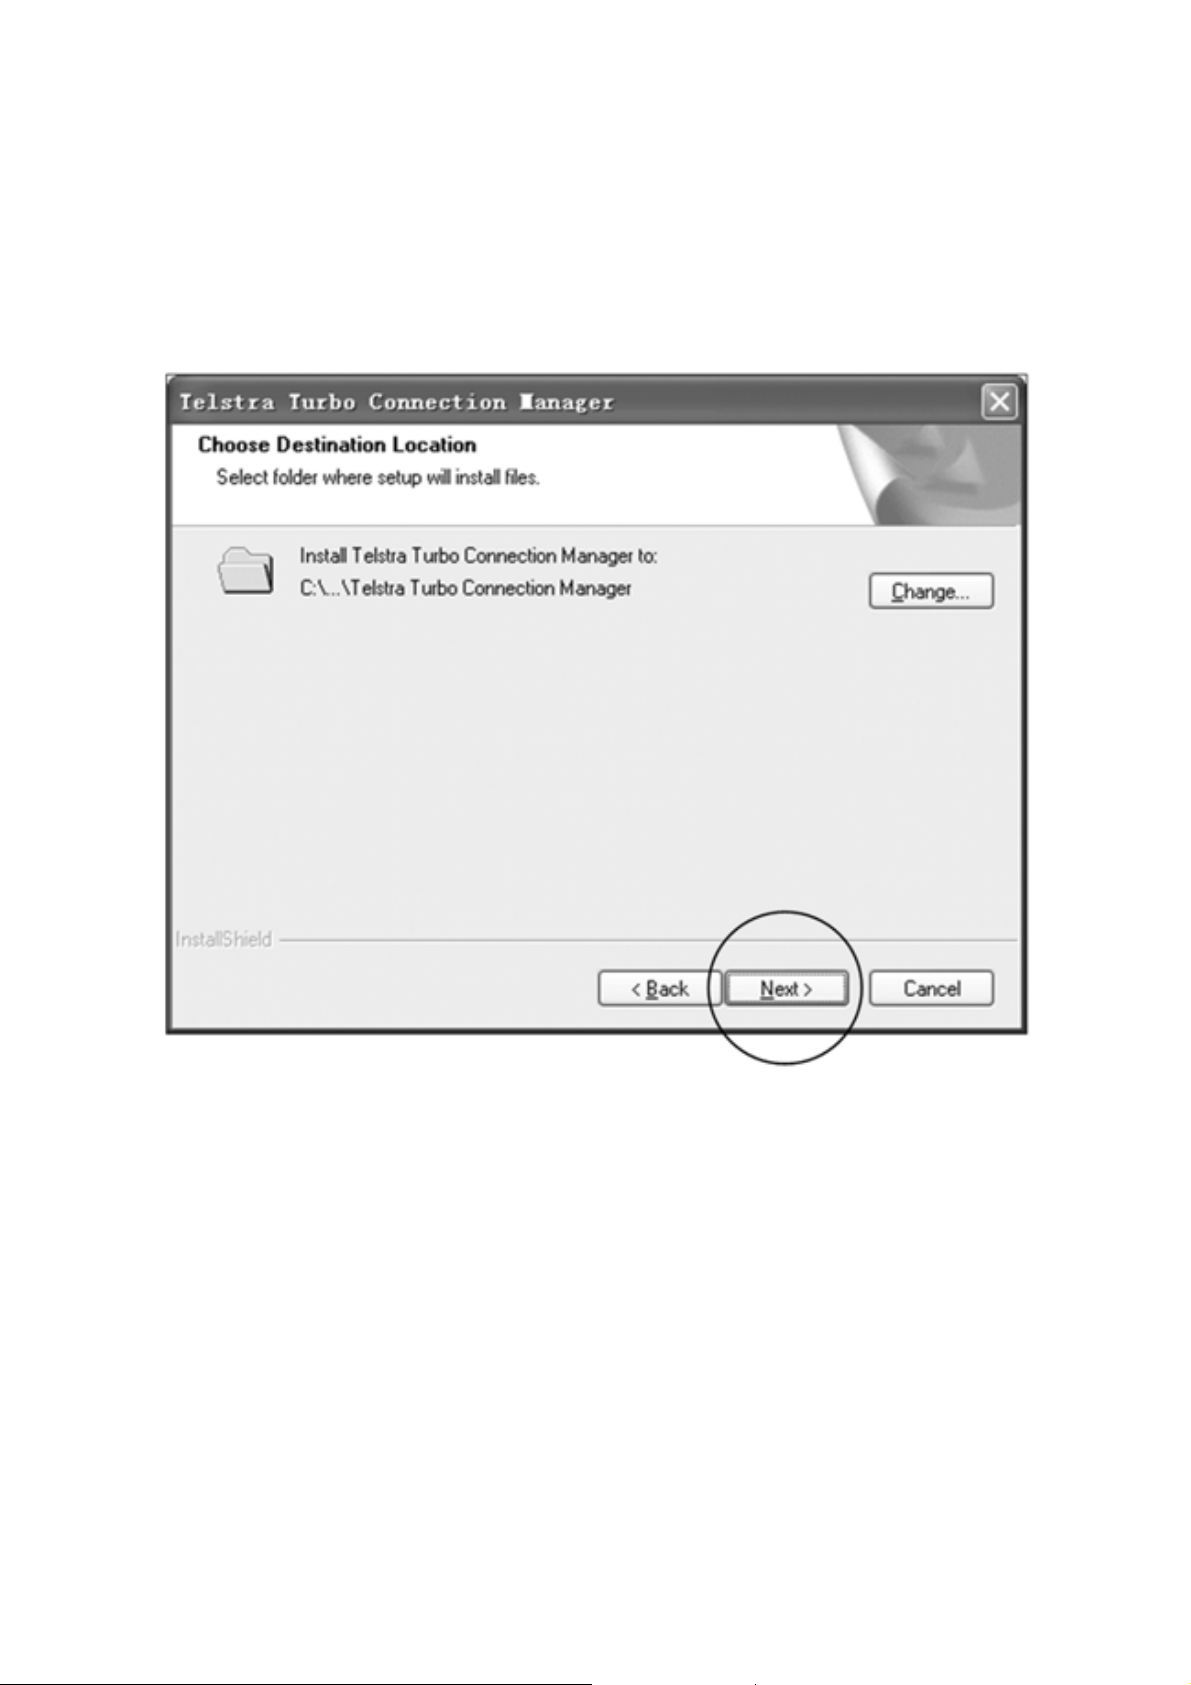
Press Next to accept the default folder location, or press
Change to define y our own path.
7
Page 8
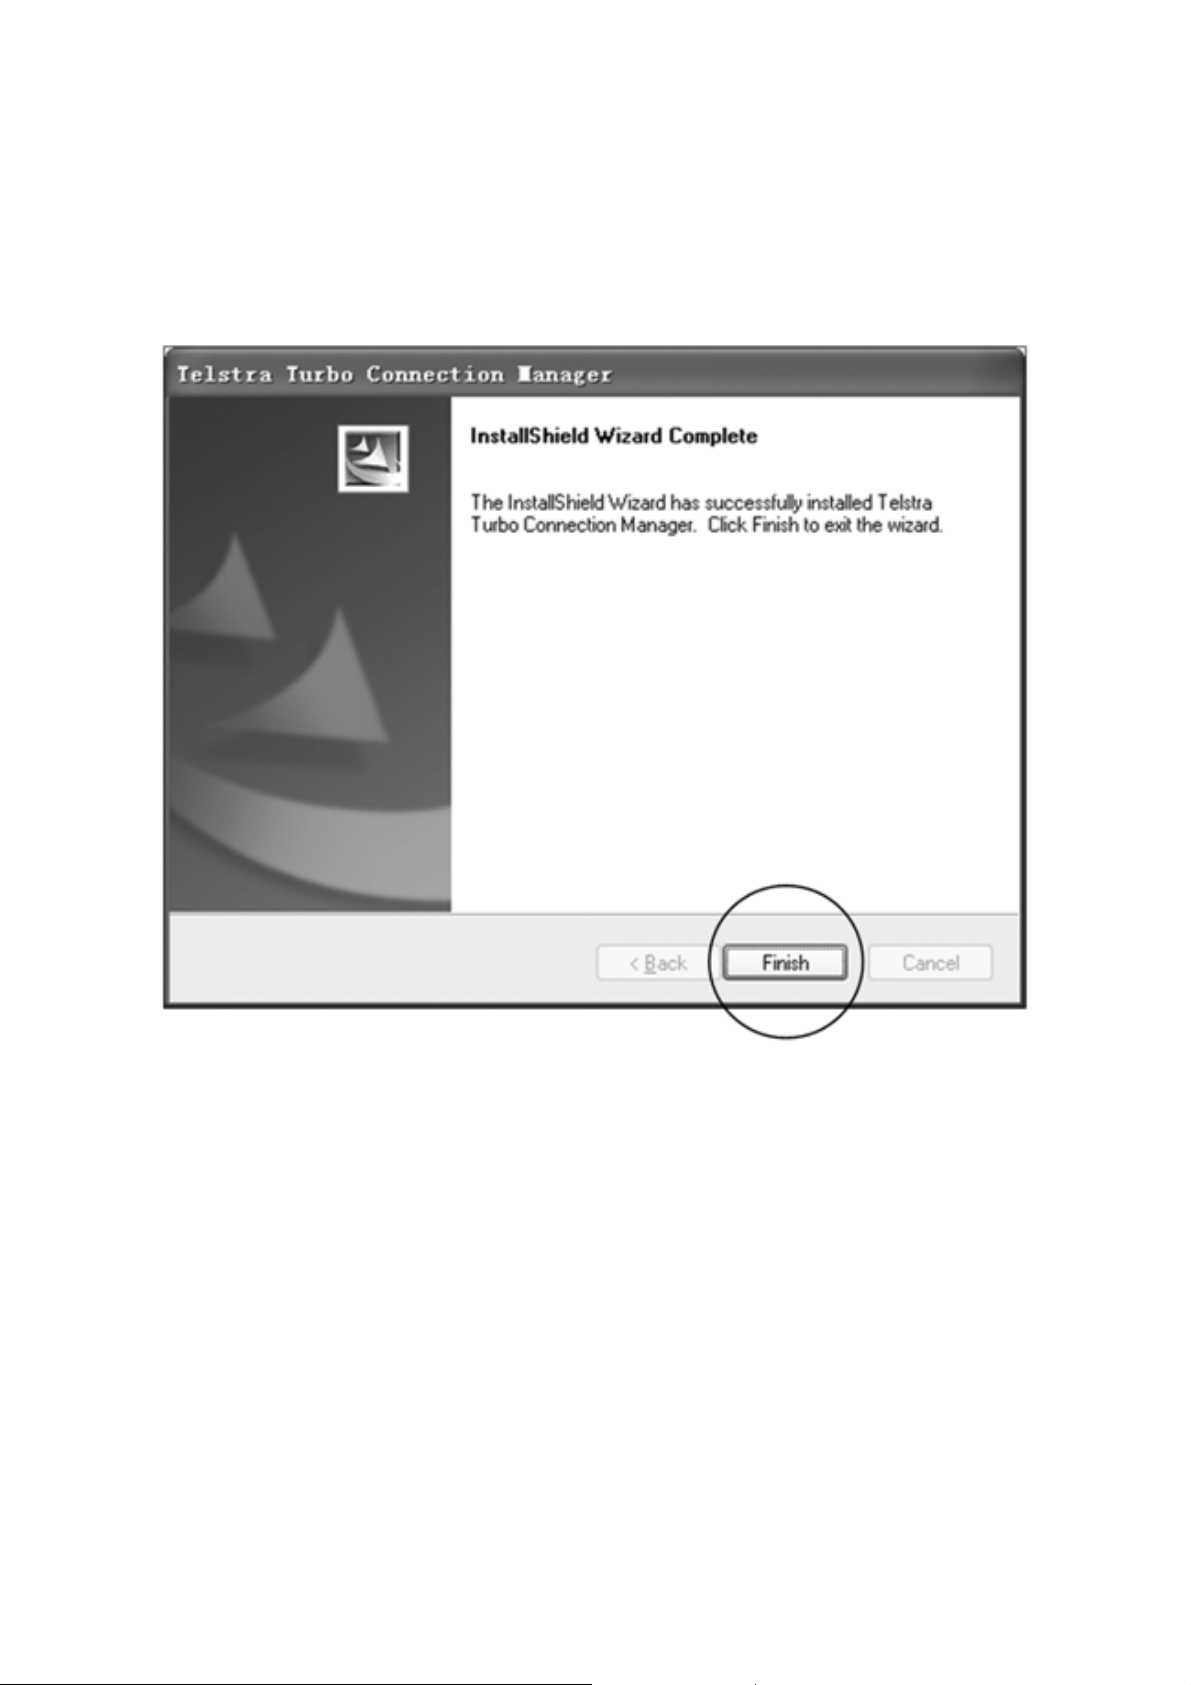
Please wait a few seconds for the installation to proceed…
Click Finish to complete the installation.
8
Page 9
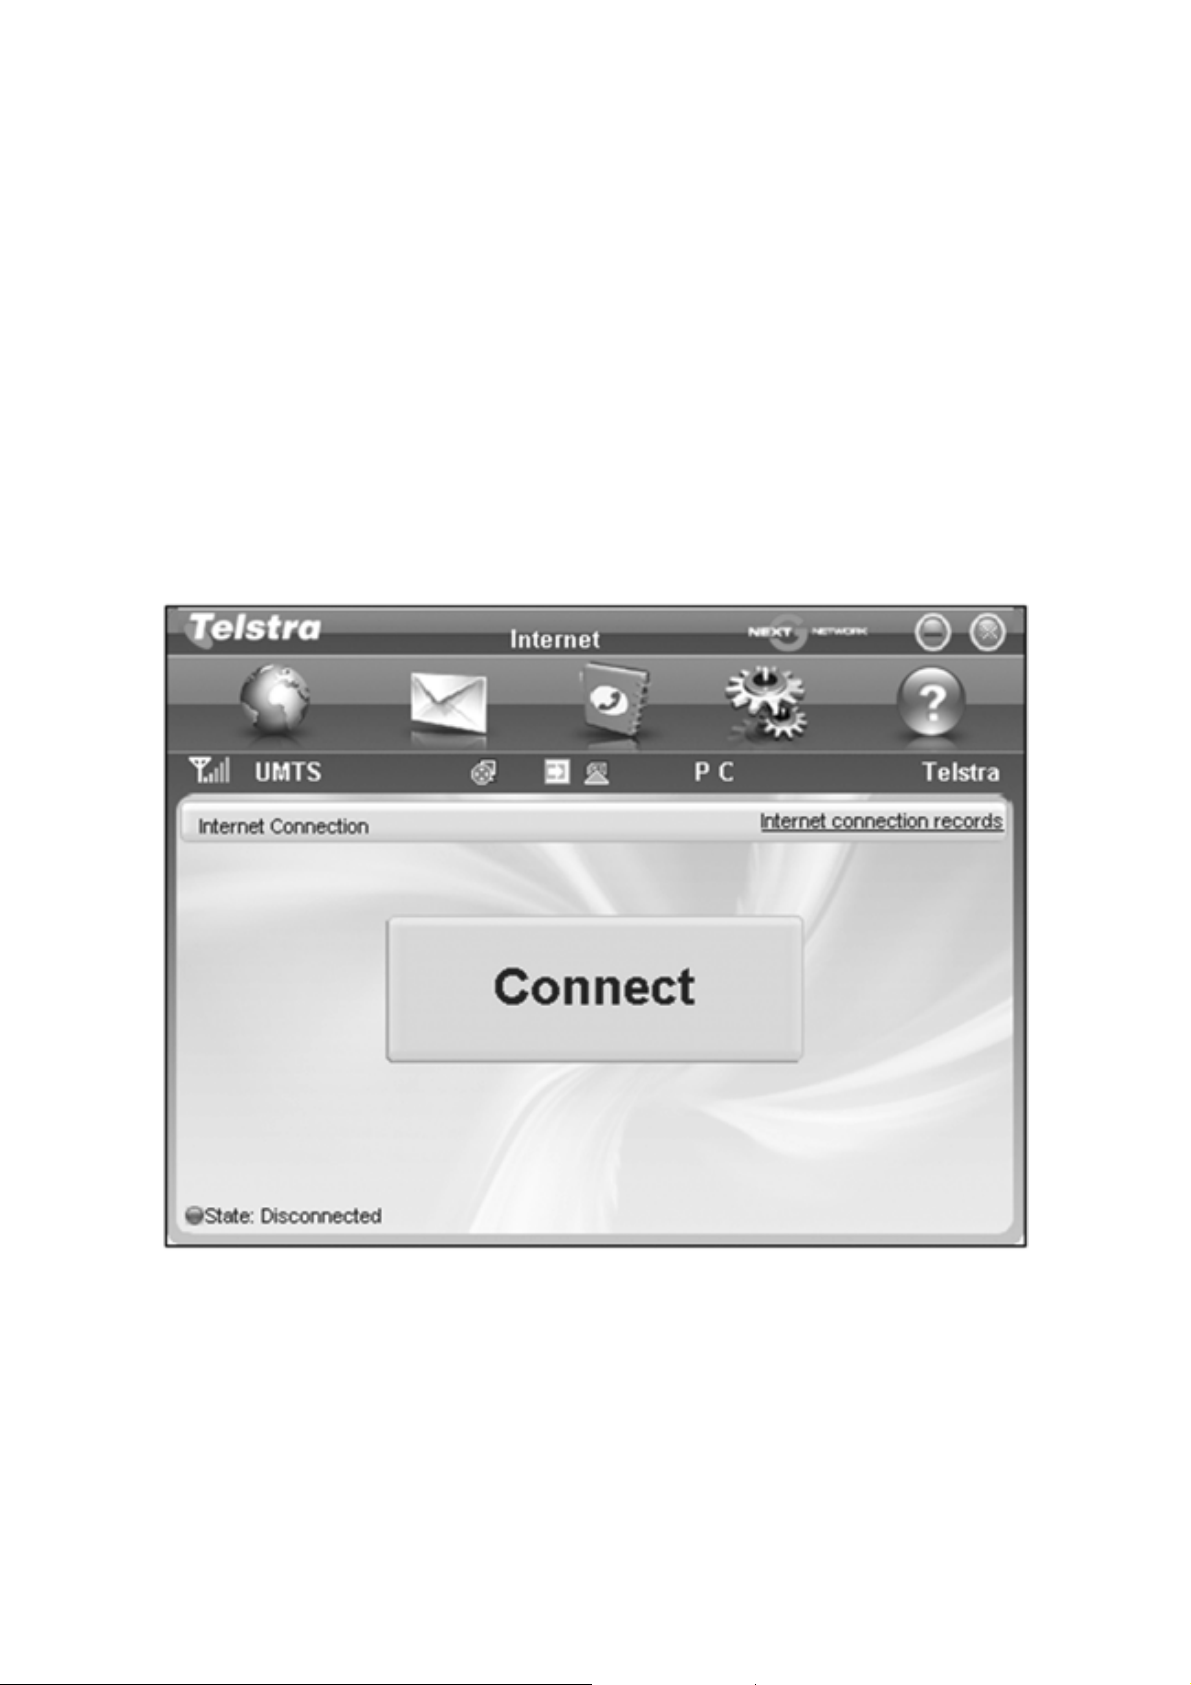
Connect to the internet
After installation the software interface will launch
automatically . Y our modem will continue installing for a couple
of minutes.
Y ou’ll be ready to go as soon as you see the Connect button.
9
Page 10
LED indicator Modem Status
Red Offline.Not registered on the network
Green solid Registered on the 2G network
Green blinking Active data transfer on the 2G network
Blue solid Registered on the 3G network
Blue blinking Active data transfer on the 3G network
z The installation will create a new shortcut on your desktop
and a new program listing under Start-Programs
z You may have to reboot your PC or MAC after installation
is complete
z If you have problems with the installation please contact
your supplier or see our website, www.zte.com.au/ for more
assistance and FAQ’s
z If you can’t connect to the internet check your SIM card is
inserted correctly, contact your service provider and check
your account is active.
10
Page 11

Using your USB Modem
z Press Connect t o est abli sh a dat a connection using your
USB modem
z Launch your browser or other software
z
When you have finished your internet or email connection
remember to re turn to th e so ftw are in terfa ce an d pres s
Disconnect to end your session
z If the software has been minimized then double click the
small icon on the task bar to re-open the application
window. See the task bar icon descriptions on Page 15.
TIP
After the computer wakes from hibernation or standby mode
you may need to remove and insert the modem.
11
Page 12
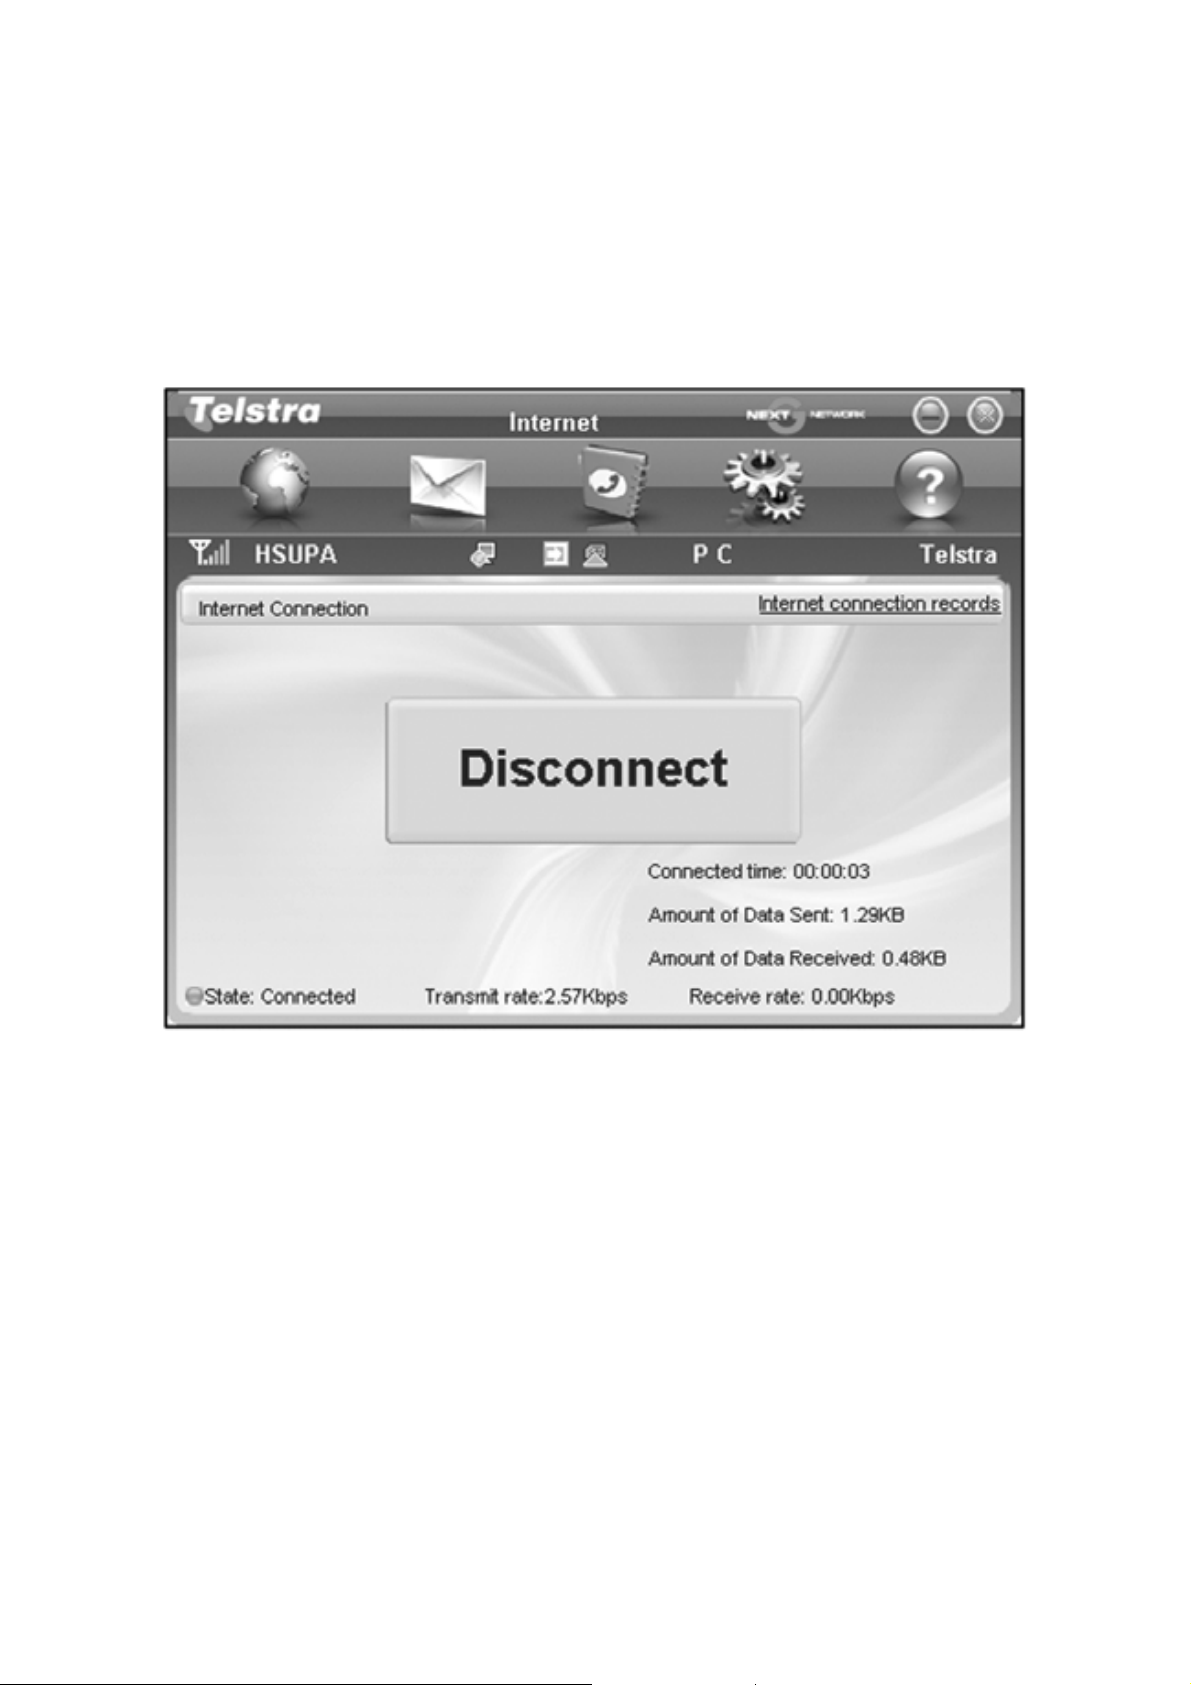
Connected State
Note: The modem is locked to Telstra. If you use a SIM card
from another provider you may not be able to connect to the
network. Consult Telstra for more details or to unlock your
device.
12
Page 13
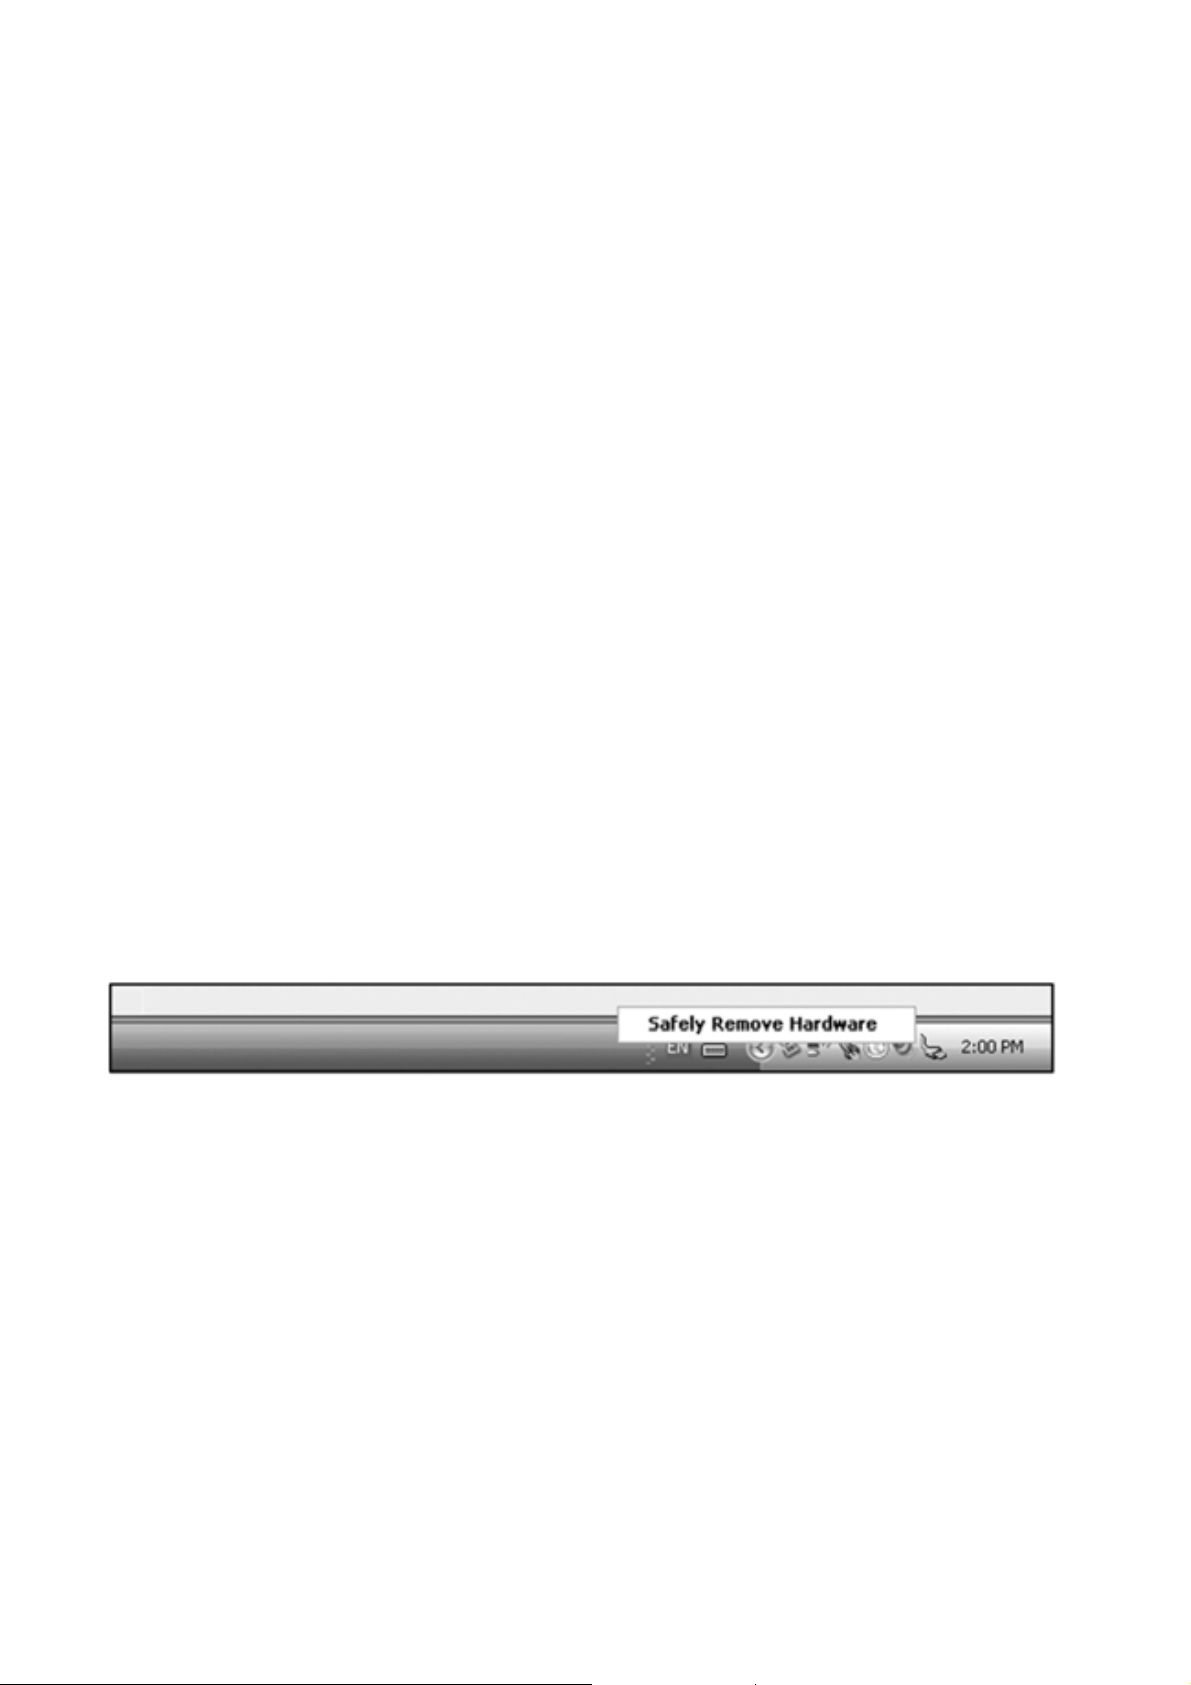
Safe Removal of Hardware
To remove your USB modem from the computer first close
the Connection Manager then use the safe removal of
hardware process. If you remove the USB modem when it is
active the modem software and related information (eg
Phonebook records) may become corrupted.
Safely remove the modem
z Eg in Windows XP, left click the icon on the Windows
taskbar
z Click on Safely Remove Hardware
z Remove the USB modem.
13
Page 14
Using the Card Manager Software
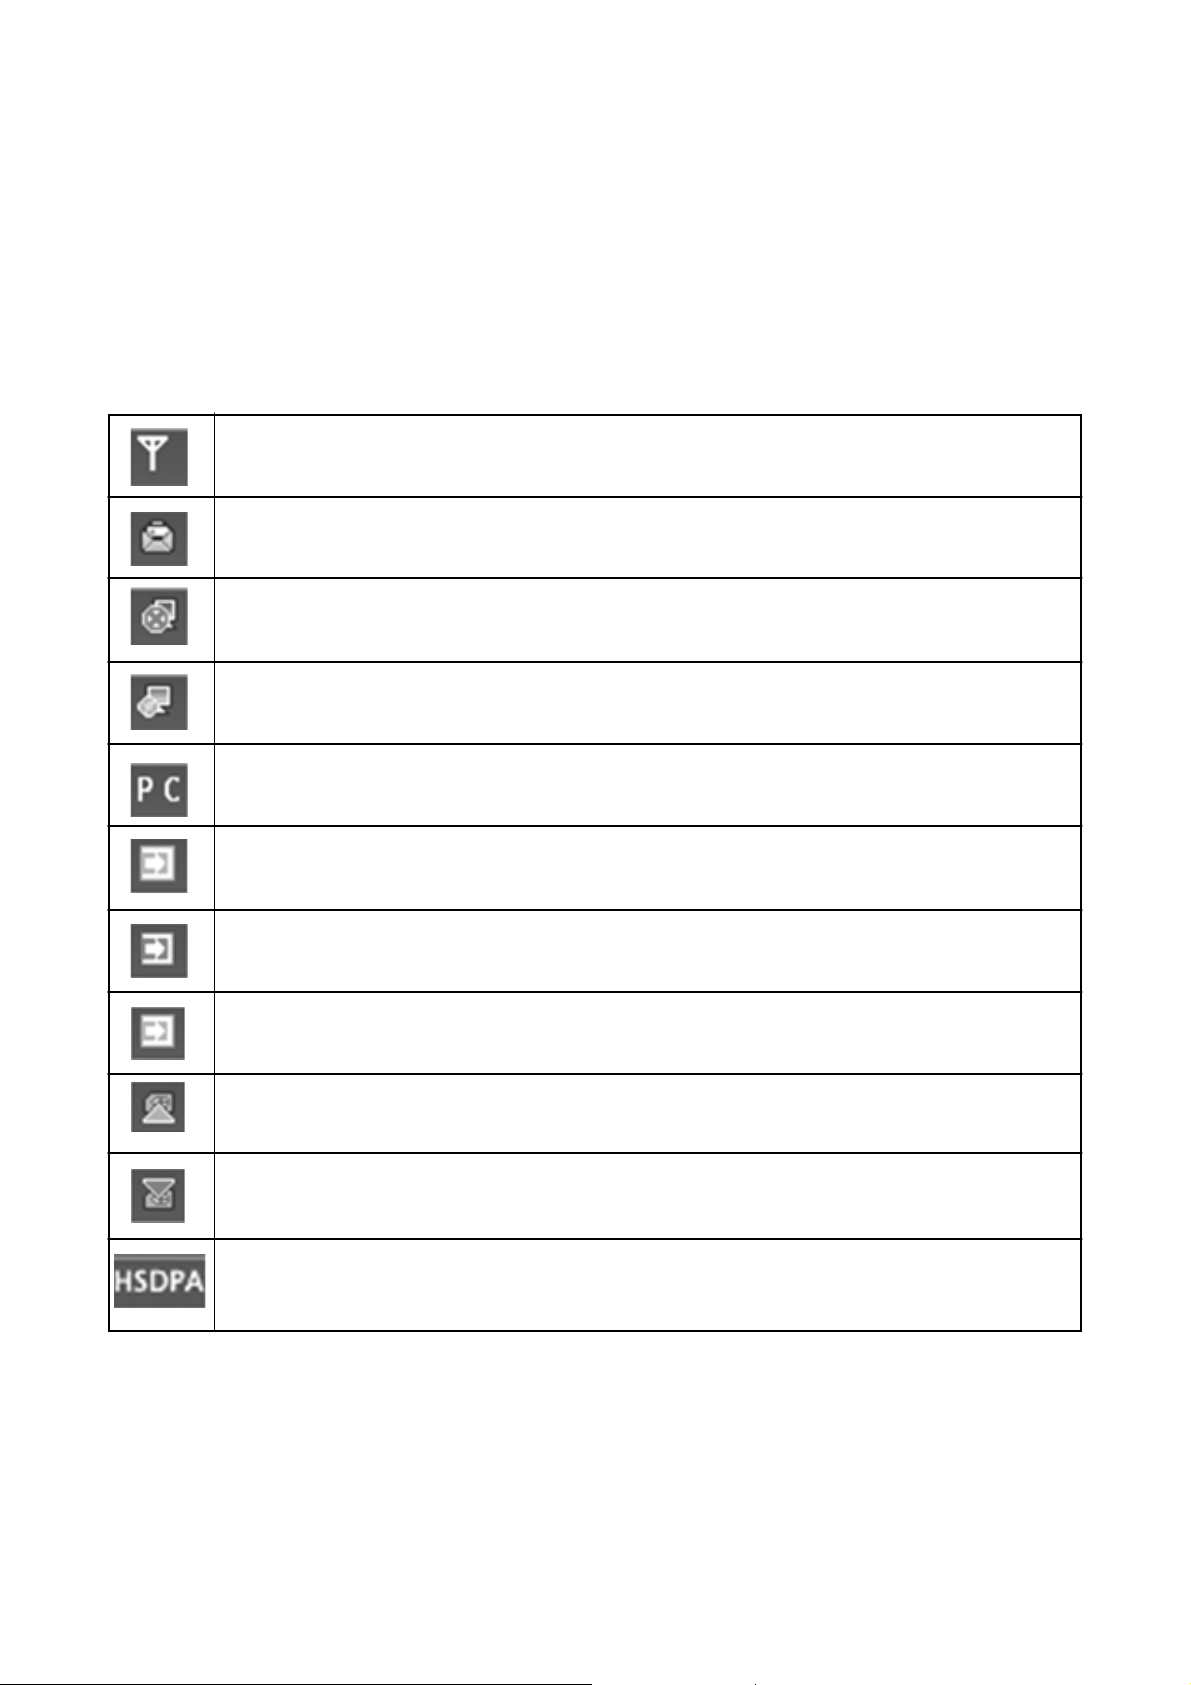
System Icons
Network signal strength
New SMS message
Red Computer icon - internet Not Connected
Green Computer icon - Internet Connected
Connection - P is packet-swi tched, C is circuit switc hed
Green arrow icon - modem inserted into the computer
Red arrow icon - m odem no t i nserted i nto th e com put e r
Orange arrow icon - modem is offline
Green SIM icon – SIM/USIM card is inserted
Red SIM icon - SIM/USIM card is not inserted
Current network connection type
14
Page 15

Task Bar Information
When you minimize the software the window will minimize
to an icon on the system tray. The program is still active in
the background but disappears to free your normal Windows
space. Double click the task bar icon to resize the display.
Task bar icons
Green - Modem is inserted into the computer
Red - Modem is not inserted into the computer
Orange - Modem is Offline
Red - SIM/USIM card is not inserted
No network signal
There is a new message
Modem is ready to connect to Internet
Green - Internet is Connected
15
Page 16

Task bar menu
k
Right Click the task bar icon to access the following menu:
Device offline
Device online
Factory Settings
Help
About
Exit
Disconnect the modem from the networ
Connect the modem to the network
Restore the modem settings to
their original values
Enter the Help interface
View software and hardware versions
Close the software and switch off the
modem
16
Page 17

Internet connection records
From the Connect screen press Internet Connection Records
to show your connection history.
The internet connection records are for information only.
17
Page 18

SMS Interface
Click the SMS icon to use the SMS Interface:
18
Page 19

Read Incoming Messages
Click the Inbox butt on to read your received messages.
19
Page 20

Create a new message
z Click New Message and enter the recipient’s number
z The recipient’s number can be entered directly or by
selecting entries from the Phonebook
z Use ‘;’ to separate multiple recipients.
20
Page 21

z Click into the text field to enter text
z The S MS can be u p to 140 c hara cters , incl udin g symb ols
z The interface will show total characters used
z Click Send to send the message. The prompt screen below
will appear:
z Select Yes to confirm
z After the messag e h as been se n t succ ess fu ll y it wi ll be
saved in the Outbox
z If the message fails to send it will be saved in Drafts.
21
Page 22

SMS General Features
Enter any of the Inbox / Outbox / Drafts to use the tabs at the
bottom of the window:
Read
Read the selected SMS
Reply
Reply to the selected SMS
Forward
Forward the SMS to other recipients
Move
Save the SMS on the PC or SIM card
Delete
Delete the selected SMS
Save
Save the phone number from the message to
the contacts phonebook
Cancel
Return to the SMS interface
Notes
z If you want to select several messages, you can use the
Ctrl or Shift keys (Windows)
z New messages cannot be received when the SIM card is
full
z Th e s ys tem wi ll ind ica te the SI M ca rd is f ull . M ess ages
cannot be saved until some are deleted by the user.
22
Page 23

PhoneBook
Click the PhoneBook button to select the phonebook interface.
23
Page 24

To create a new contact click New New Contact, enter the
details and select OK to finish.
You can choos e the Save location as the PC or the USIM
card.
24
Page 25

PhoneBook Notes:
z If your stored location (Folder) is PC then you can also
create a new Group
z T o create a new group: Click New
New Group and enter
the group name
z Select contacts from the list on the right and drag them to
the group location
If a contact is selected, you can carry out the following
additional steps using the tabs on the bottom of the screen:
View
Delete
SMS
View the selected contact’s information
Delete contacts or groups
Send messages to the mobile phone
Save as
Edit
number selected
Save the contact information to a TXT file
on your PC
Edit the contact information
25
Page 26

Settings
Click the Settings button to select the settings interface
Connection Settings:
26
Page 27

There is no need to change these settings as they are preconfigured for your network. If you change networks or are
roaming you ma y need to modify some se ttings. Consul t
your service provider for more information.
New Connection for Corporate Users and IT Administrators
If you have a private VPN you will need to create a new
connection configuration. This feature is designed for IT
Administrators in a corporate environment and is generally
not required to be changed by end users.
Add
Delete
Edit
Set Default
Add new configuration files
Delete the selected configuration file
Edit the selected configuration file
Set the selected profile as
your default connection
27
Page 28

Security Settin gs
PIN enable - The PIN code is provided with your SIM card.
Consult your service provider if you forget your PIN.
Backup Contacts, Messages and Connection Records
Create a local backup of Phonebook and SMS data.
28
Page 29

Network Settings
These settings are pre-configured for your network. Consult
your service provider for more information.
29
Page 30

Message Settings
These settings are pre-configured for your network. If you
change networks or are roaming you may need to modify
some settings. Consult your service provider for more
information.
30
Page 31

MicroSD card
If y ou u se a Mi cro SD c ard i n your modem your computer will
display a removable disk related to the MicroSD card. You
can then use the modem as a flash drive to store and transfer
files.
MicroSD cards supported to 2GB are F AT 16 format.
MicroSD HC cards supported to 4GB are FAT 32 format.
If you want to remove the modem please use the Safe
Removal of Hardware to stop the remov able di sk fi rst. For
more details see the Safe Removal of Hardware process.
External Antenna Port
Only use the correct antenna as recommended by the
manufacturer. Insert and remove the connection carefully.
Do not pull on the cable to remove the connection.
Help
Click Help button to access the system help and
user gui de.
31
Page 32

Troubleshooting
If you have any problems with your connection or modem
please consult the manual and check this section. If the
problem still exists contact your service provider or check
our website for more details at www.zte.com.au
Problem Possible Causes Suggested Solution
The user interface doesn’t
start after the
modem is
plugged in.
The modem
has no signal.
PC configuration
is not correct.
(No autorun)
The antenna is at
the wrong angle
or position.
You have no
network coverage.
Start the program
manually by going
Start
or use the shortcut on
the desktop.
Adjust the angle and
position of the USB
modem.
Try moving location
until you get good
reception.
Program Files
32
Page 33

Problem Possible Causes Suggested Solution
The modem
has no signal.
Message sent
failed.
Y ou have not entered your PIN
number at start
up
The SMS centre
number isn’t
correct.
Restart the application
and enter your PIN
number. If the PIN is
invalid you cannot connect to the network.
Check with your with
service provider and
enter the correct number in the Message
settings.
Data
connection
failed.
You have no
network coverage.
The APN
configuration is
wrong
Try moving location
until you get good
reception.
Check with your service provider and set
the APN in the configuration settings.
33
Page 34

Problem Possible Causes Suggested Solution
The manual net-
Select the correct netData
connection
failed.
The modem
cannot connect
to the internet
when overseas
No warning
tone
work selection is
wrong.
You are using the
wrong APN.
Y ou don’t have
international
roaming enabled
on your plan.
The PC
soundcard is dis-
work for your service
provider. Restore Au-
tomatic mode.
Consult your network
provider
Consult your service
provider before you go
overseas to enable
roaming.
Check the audio card
and adjust the volume.
The MicroSD
card cannot be
read or is not
found.
34
abled or on low
volume
Re-insert the
MicroSD card.
The maximum capacity is 4GB
SDHC card
Try another MicroSD
card and make sure
the capacity and for-
mat is correct.
Page 35

Software Removal
If you wish to uninstall the application please follow the
procedure below:
Start Programs Telstra Turbo Connection Manager
Uninstall
Follow the prompts and press Yes to continue.
MAC Users - drag the application folder to the Trash bin.
35
Page 36

Precautions and Safety Information
z Some electronic devices are susceptible to
electromagnetic interference. The modem is a t ransmitting
device and may cause inte rference to sensitive electronic
equipment such as audio systems, vehicle systems and
medical equipment. Please consult the manufacturer of
the other device before using the modem.
z Operating of laptop or desktop PCs with the modem may
interfere with medical devices like hearing aids and
pacemakers. Please keep the modem more than 20
centimetres away from such medical devices. Turn the
modem off if necessary. Consult a physician or the
manufacturer of the medical device before using the
modem near such devices.
z Be aware of the regulations when using the modem at
places such as oil warehouses or chemical factories,
where there are explosive gases or explosive
products being processed. Turn off your modem as
instructed.
z Don’t touch the antenna area unnecessarily whilst
connected. This can affect your modem performance and
reduce the signal quality.
z Store the modem out of the reach of children. The modem
may cause injury or get damaged.
36
Page 37

z The modem contains sensitive electronic circuitry. Do not
expose the modem to any liquids, high temperatures or
shock.
z Only use original accessories or accessories that are
authorized by the manufacturer. Using unauthorized
accessories may affect your modem’s performance,
damage your modem and violate related national
regulations.
z Avoid using the modem in areas that emit electromagnetic
waves or in enclosed metallic structures eg lifts.
z The modem is not waterproof. Please keep it dry and store
it in a cool, dry place.
z Don’t use the modem immediately after a sudden
temperature change eg from an air conditioned environment
to high temperature and humidity outside. In such cases
there could be condensing moisture inside the modem
which can cause internal damage. Unplug the modem and
leave it for 30 minutes before use.
z Always handle the modem with care. Be careful not to
drop or bend the modem.
z There are no user servicea ble parts inside the modem .
Unauthorised dismantling or repair will void the warranty.
37
Page 38

Radiation from Electronic Devices
The U SB Wireless modem is a transmitting device with
similar output power to a mobile phone. It uses an internal or
external antenna to connect to the mobile network. To get
the best performance from your device do not cover or shield
the device in any way as this will lead to increased output
power . Always leave a clear space around the device to allow
the transmit and receive signals to propagate. SAR test have
been completed according to the Australian regulatory
requirements.
Declaration of Conformity
We declare under our sole responsibility that the product(s)
detailed in this manual, and in combination
with our accessories, conform with the essential
requirements of The Radio Communications Standard
(Electro-mag netic Radi ation Human Exposure) 2003 and the
Australian Communications and Media Authority Section
376 of the Telecommunications Act 1997.
N14945
38
Page 39

Radio Frequency (RF) Energy
This model MF633+ meets the government’s requirements
for exposur e to ra dio w aves.
This device is designed and manufactured not to exceed the
emission limits for exposure to radio frequency (RF) energy
set by the Federal Communications Commission of the U .S.
Government:
The exposure standard for wireless devices employs a unit
of measurement known as the Spec ific Absorption Rate, or
SAR. The SAR limit set by the FCC is 1.6W/kg. *Tests for
SAR are conducted using standard operating positions
accepted by the FCC with the device transmitting at its
highest certified power level in all tested frequency bands.
Although the SAR is determined at the highest certified
power level, the actual SAR level of the device while
operating can be well below the maximum value. This is
because the device is designed to operate a t mu ltiple pow er
levels so as to use only the poser required to reach the
network. In general, the closer you are to a wireless base
station antenna, the lower the power output.
The highest SAR value for the model device as reported to
the FCC when worn on the body, as described in this user
guide, is 1.16 W/kg (Body-worn measurements differ among
device models, depending upon available enhancements
and FCC requir ement s.)
39
Page 40

While there may be differences between the SAR levels of
various devices and at various positions, they all meet the
government requi rement.
The FCC has granted an Equipment Authorization for this
model device with all reported SAR levels evaluated as in
compliance with the FCC RF exposure guidelines. SAR
information on this model device is on fil e with the FCC and
can be found under the Display Grant section of
http://www.fcc.gov/oet/fccid after searching on
FCC ID: Q78-ZTE MF633P LUS.
For body worn oper ation, this modem has been tes ted and
meets the FCC RF exposure guidelines for use when
plugged into a laptop PC, positions the handset a
maximum of 0.5 cm from the body. Use of other
enhancements may not ensure compliance with FCC RF
exposure guidelines.
40
Page 41

FCC Compliance
z This device complies with part 15 of the FCC Rules.
Operation is subject to the following two conditions: (1)
This device may not cause harmful interference, and (2)
this device must accept any interference received,
including interference that may cause undesired operation.
z This device has been tested and found to comply with the
limits for a Class B digital device, pursuant to Part 15 of
the FCC Rules. These limits are designed to provide
reasonable protection against harmful interference in a
residential installation. This equipment generates uses and
can radiate radio frequency energy and, if not installed and
used in accordance with the instructions, may cause
harmful interference to radio communications. However,
there is no guarantee that interference will not occur in a
particular instal lation If this equipm ent does ca use harmful
interference to radio or television reception, which can be
determined by turning the e quipment off and on, the user
is encouraged to try to correct the interference by one or
more of the following measures:
-Reorient or relocate the receiving antenna.
-Increase the separation between the equipment and
receiver.
-Connect the equipment into an outlet on a circuit different
from that to whi ch the re ceive r is con nected.
Page 42

-Consult the dealer or an experienced radio/TV technician
for help.
Caution:
Changes or modifications not expressly approved by the
party responsible for compliance could void the user‘s
authority to operate the equipment.
z The antenna(s) used for this transmitter must not be co-
located or operating in c onjunction w ith any other an tenna
or transmitter.
Page 43

42
Page 44

Technical Specifications
HSUP A/HSDP A/UMTS 850 MHz
Network and
Band compatibility
Dimensions 86.5mm x 26.6mm x 10.4mm
Weight Approx. 26g
Data Rate
HSUP A/HSDP A/UMTS 1900 MHz
HSUP A/HSDP A/UMTS 2100 MHz
GSM/GPRS/EDGE 850 MHz
GSM/GPRS/EDGE 900 MHz
GSM/GPRS/EDGE 1800 MHz
GSM/GPRS/EDGE 1900 MHz
HSUP A Mode up to 5.76Mbps*
HSDP A Mode up to 7.2Mbps*
UMTS Mode up to 384 Kbps*
Voltage 5V
Current
Consumption
EDGE Mode up to 236.8 Kbps*
GPRS Mode up to 57.6 Kbps*
Resting: 100mA rms
Max: 450mA rms
43
Page 45

Max Emitted
In 3G WCDMA Mode: 250mW
Power
Interface USB 2.0
Operating
systems
Functions Hi gh speed wireless d at a, internet,
MicroSDHC
memory card
Temperature
Range
In 2G GSM/GPRS Mode: 2W
Windows 2000 SP4, XP SP2, SP3,
Vista
Apple MAC OS X 10.5 and above
MicroSD card, SMS
4GB capacity on MicroSDHC card 2GB
on MicroSD
0ºC to +55ºC
* Actual speeds will be less. Speeds may vary due to
congestion, distance from the cell, local conditions, hardware,
software and other factors.
44
 Loading...