

Page 1

ZTE MF608
Wireless Access Terminal
User Manual
Page 2

ii
WELCOME
Thank you for choosing the ZTE MF608 Wireless Access
Ter mina l (modem). Please read this manual carefully to ensure
your modem is always working in its best condition.
The pictures, symbols and contents in this manual are just
for your reference and might not be completely identical with
your modem.
Page 3

iii
Glossary
AC: Alternating Current
APN: Access Point Name
BATT: Rechargeable battery
CID: Caller Identification
DC: Direct Current
DNS: Domain Name System (or Service or Server)
EDGE: Enhanced Data GSM Evolution
Ethernet: A frame-based computer networking technology
for local area networks (LANs).
GSM: Global System for Mobile Communications
GPRS: General Packet Radio Service
HSDPA: High Speed Downlink Packet Access
IP: Internet Protocol
LAN: Local Area Network
LED: Light Emitting Diode
MHz: Megahertz.
PDP: Packet Data Protocol
RSSI: Radio Signal Strength Indicator
SIM: Subscriber Identification Module
WCDMA: Wideband CDMA (Code-Division Multiple
Access).
Page 4

Contents
1 General Information ....................................................... 1
1.1 Best Practice .............................................................. 1
1.2 Cleaning and Maintaining the Modem ...................... 2
1.3 Limited Warranty ....................................................... 3
1.4 Limitation of Liability ............................................... 4
2 Getting started ................................................................. 5
2.1 Parts Supplied ............................................................ 5
2.2 Modem Appearance ................................................... 7
2.2.1 LED indicator .................................................... 7
2.2.2 Switch ................................................................ 9
2.3 Interface and installation ........................................... 9
2.3.1 Interface description........................................... 9
2.3.2 Installation ....................................................... 10
2.4 Power Supply .......................................................... 18
2.5 About SIM card ....................................................... 19
3 Voice Calls ..................................................................... 21
3.1 Making a call ........................................................... 21
3.2 Answering the Call .................................................. 22
4 Internet Accesses ........................................................... 23
Page 5

ii
4.1 Connecting to the Internet ....................................... 23
4.2 Default Settings ....................................................... 24
4.2.1 System Info ...................................................... 25
4.2.2 Network Connect ............................................. 25
4.2.3 Network Select ................................................. 26
4.2.4 APN Configure ................................................ 27
4.2.5 Help .................................................................. 29
4.3 Disconnecting from the Internet .............................. 29
5 Troubleshooting ............................................................ 30
6 Appendix ........................................................................ 36
6.1 Modem Technical parameters .................................. 36
Page 6

1
1 General Information
1.1 Best Practice
Please use the modem far away from TV sets, radio and
other electronic equipment so as to avoid electromagnetic
interference.
The modem is not water-resistant, so do not use it in
places where there is high humidity.
Please use original accessories or accessories that are
authorized by ZTE. Using any unauthorized accessories
may affect your modem’s performance, damage your
modem or even cause danger to your body and violate
related national telecom regulations about modems.
Do not attempt to dismantle the modem by yourself. Non-
expert handling of the device may cause damage.
Do not disassemble or modify the rechargeable battery.
Do not allow the modem, rechargeable battery or
accessories to come into contact with liquids or moisture
at any time. Do not immerse in any liquid.
Do not put any object on the modem to avoid over-
heating.
Do not expose your modem to direct sunlight or store it in
hot areas. High temperatures can shorten the life span of
Page 7

2
electronic devices.
Please do not touch the antenna with your hands while
making a call or browsing the Internet. Covering the
antenna may affect the call quality, may cause the handset
to operate at higher power level than needed, and may
shorten the talk time and standby time.
Do not allow children to play with the modem, charger or
rechargeable battery.
It is highly recommended to charge the rechargeable
battery before initial use. The rechargeable battery might
have been discharged during storage and delivery.
Please switch off the modem if you are not using it.
Please remove the rechargeable battery from the modem
if you will not be using the modem for long periods of
time (ex. 10 days or more).
Keep the length of the cable between the modem and
phone less than 10 meters apart.
1.2 Cleaning and Maintaining the Modem
Use an anti-static cloth to clean the modem. Do not use
chemical or abrasive cleaners as these could damage the
plastic case. Turn off your modem before you clean it.
Use the modem within the temperature range of
-10°C~55°C and the humidity range of 25%~85%.
Do not use your modem during a thunderstorm.
Page 8

3
Do not take out your SIM card if there is no necessity.
The damaged SIM card may cause problems in
maintaining the modem.
1.3 Limited Warranty
This warranty does not apply to defects or errors in the
Product caused by:
(a) Reasonable Modem Appearance Disfiguration;
(b) End User’s failure to follow ZTE’s installation,
operation or maintenance instructions or procedures;
(c) End User’s mishandling, misuse, negligence, or
improper installation, disassemble, storage, servicing or
operation of the Product;
(d) Modifications or repairs not made by ZTE or a ZTE-
certified individual;
(e) Power failures, surges, fire, flood, accident, actions of
third parties or other events outside ZTE’s reasonable
control.
(f) Usage of products of third Parties, or usage in
conjunction with third party products provided that such
defects is due to the combined usage;
(g) Any other cause beyond the range of normal usage for
Products. End User shall have no right to reject, return, or
receive a refund for any Product from ZTE under the
above-mentioned situations.
Page 9

4
This warranty is end user’s sole remedy and ZTE’s sole
liability for defective or nonconforming items, and is in
lieu of all other warranties, expressed, implied or statutory,
including but not limited to the implied warranties of
merchantability and fitness for a particular purpose,
unless otherwise required under the mandatory provisions
of the law.
1.4 Limitation of Liability
ZTE shall not be liable for any loss of profits or indirect,
special, incidental or consequential damages resulting from or
arising out of or in connection with using of this product,
whether or not ZTE had been advised, knew or should have
known of the possibility of such damages, including, but not
limited to lost profits, interruption of business, cost of capital,
cost of substitute facilities or product, or any downtime costs.
Page 10
5
(Cross- RJ45) (1)
2 Getting started
The modem can work under WCDMA/HSDPA network
and GSM/GPRS/EDGE network, and supports both voice and
data service.
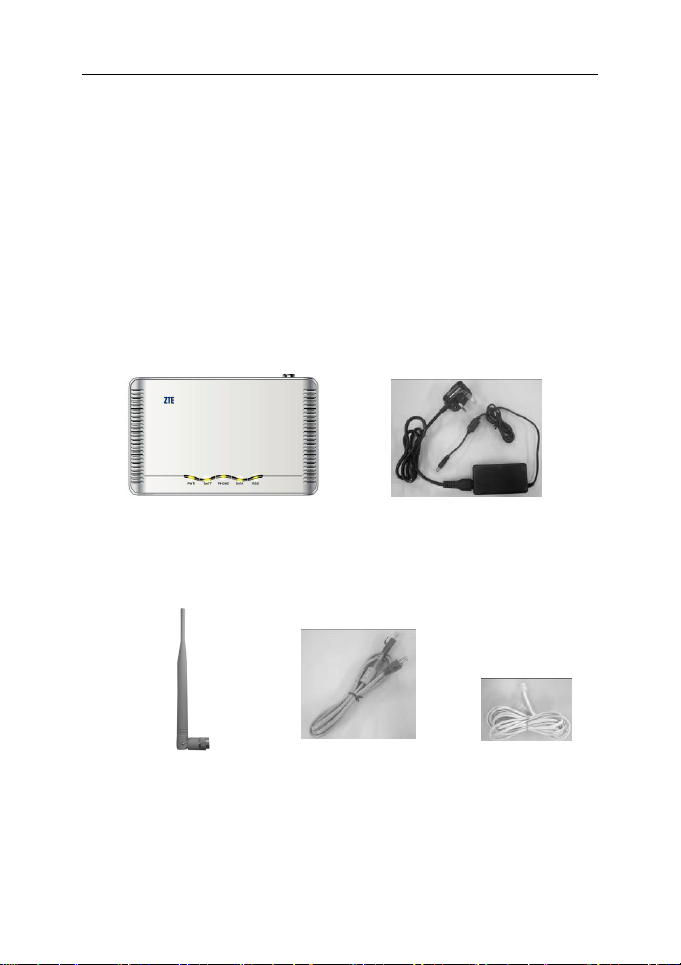
2.1 Parts Supplied
Modem (1)
External power adapter (1)
Antenna (1)
* Ethernet cable
Phone cable (RJ11) (1)
Page 11
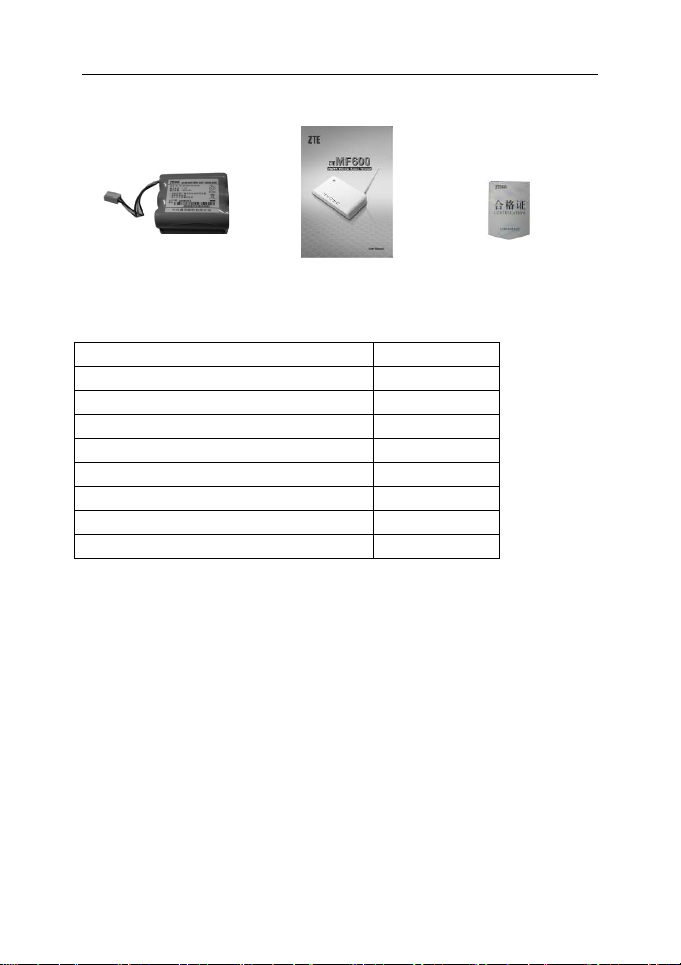
6
Parts
Quantity
Modem
1
Rechargeable battery (Ni-MH)
1
External power adapter
1
Antenna
1
User manual
1
Certificate of quality
1
Phone cable (RJ11)
1
*Ethernet cable(Cross - RJ45)
1
Rechargeable battery
(Ni-MH) (1)
User manual (1)
Certificate of quality (1)
* Please note that this is a Cross Ethernet Cable unlike your
normal Ethernet cable that you might have.
Page 12
7
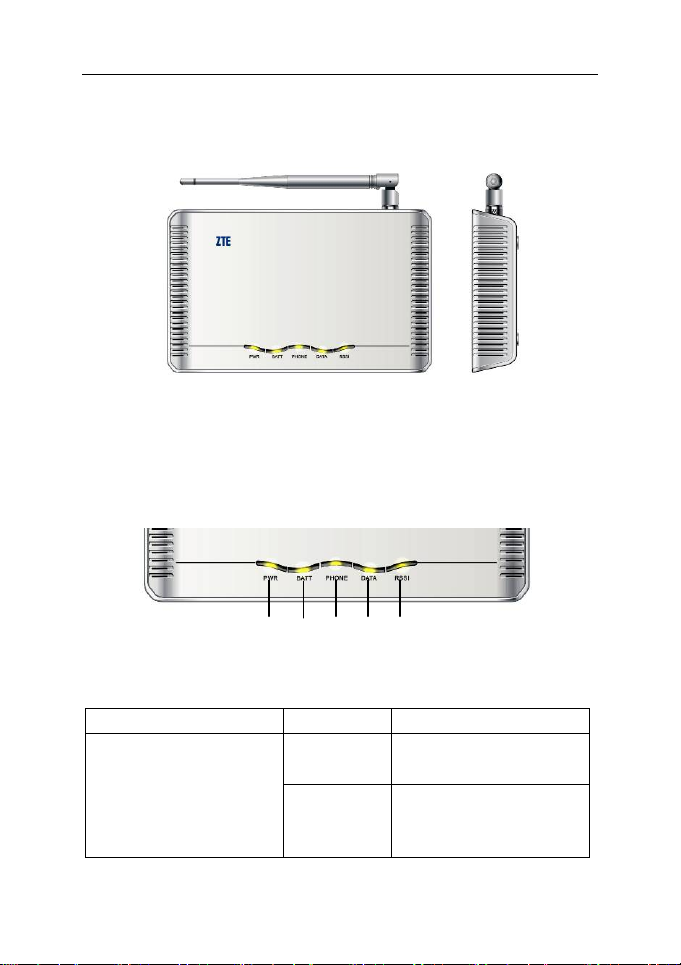
2.2 Modem Appearance
Indicator
State
Description
light on
External power
supply is connected
light off
External power
disconnected.
Chart 2-1 Modem appearance
2.2.1 LED indicator
Top View Left-view
1 2 3 4 5
Chart 2-2 LED indicator
1. PWR (power
indicator)
.
supplied is
Page 13

8
2. BATT
light on
Modem switch is on,
battery only.
blinking
Low voltage alert.
light off
Power is not being
supply.
light on
The phone is off
hook.
light off
The phone is on
hook.
blinking
The modem is
cross Ethernet cable.
light off
DATA interface is
not being used.
light on
RF signal is normal.
blinking
RF signal is poor.
light off
RF signal is not
available.
(Rechargeable
battery
indicator)
3. PHONE
(Phone
indicator)
4. DATA (Data
indicator)
5. RSSI ( Radio
Signal strength
indicator)
and power is supplied
by rechargeable
supplied by
rechargeable battery
but by external power
connected to the
computer with the
Page 14

9
1 2 3 4 5 6
2.2.2 Switch
The modem may be turned “On” or “Off” by using the
power switch
which is located at modems rear side.
To power on, turn it to “∣”;
To power off, turn it to “О”.
The power switch is set to “О” when leaving the factory.
Chart 2-3 Power switch
2.3 Interface and installation
2.3.1 Interface description
Chart 2-4 Rear View of the modem
(1) ANT: Antenna connector (TNC Female on Modem);
Page 15

10
(2) DIAG: Test and diagnostic interface;
(3) PHONE: For connection to a telephone set via the
telephone cable (RJ11);
(4) LAN: For connection to a computer via the Ethernet
cable provided (Cross- RJ45);
(5) Power Socket: For connection to the external power
supply;
: Power switch to turn the modem “On” or “Off”.
(6)
2.3.2 Installation
1. Step 1: Install the antenna provided, to the antenna
connector.
Hold the antenna and rotate the screw cap in clockwise
direction. Do not rotate the antenna directly.
Antenna
Screw cap
Chart 2-5 Antenna installation
Note: Please make sure you DO NOT put anything on top
of the modem or antenna.
Page 16

11
2. Step 2: Install the SIM card to the bottom of the modem.
(a) Lift the cover up to and remove it.
Chart 2-6 Open the cover
(b) Push the SIM holder towards the right (as shown) to
unlock, then lift the SIM holder upwards.
Chart 2-7 Open the holder
(c) Slide the SIM card into the SIM card slot. Make sure that
the golden contacts of the card are facing downwards and that
the beveled corner matches with the SIM slot.
Page 17

12
Chart 2-8 Slide the SIM card in
(d) Close the SIM card holder back and lock the SIM card.
Chart 2-9 Close the holder
(e) Close the back cover.
Page 18

13
Chart 2-10 Close the cover
Warning: Please power off the modem and remove the
external power source before removing or inserting the SIM
card, if not, the modem or SIM card may be damaged.
Note: The SIM card provided to you can only be used
specifically for this modem and not to any other mobile device.
3. Step 3: Install the battery to the modem.
(a) Lift the cover up to and remove it.
Page 19

14
Chart 2-11 Open the cover
(b) Connect the battery connector plug to the pin socket at
the modem.
Chart 2-12 Connect plug and pin
(c) Put the battery into battery box.
Chart 2-13 Put the battery in
Page 20

15
(d) Close the back cover.
Chart 2-14 Close the cover
4.Step 4: Connect the telephone set and the modem using a
phone cable (RJ11) via the PHONE interface as shown.
Chart 2-15 Connect the telephone and the modem
Page 21

16
5. Step 5: Connect your PC and the modem using the cross
Ethernet cable (RJ45) supplied to you via the LAN interface
as shown.
Chart 2-16 Connection of modem and computer
Note: The Phone Cable & Ethernet Cable (Cross) is provided.
Please DO NOT use any other Ethernet Cable to ensure
modem will work.
6. Step 6: Connect the power adaptor to a standard power
outlet, and insert the plug into the socket at the rear of the
modem.
Page 22

17
Chart 2-17 Connect the power adaptor
7. Step 7: Turn the power switch
to“∣”to get started.
Make sure the phone is on hook before powering on.
Chart 2-18 Power on
Note: When the modem is switched off, and if a new call is
coming in, the caller will not hear the prompt “The number
you have dialed is currently unavialble.’’
8. Step 8: Make sure you wait 1 – 2 minutes after switching
the power ON before you use the service. The RSSI, DATA &
PWR indicator should be lit on. Now, you can start using the
service.
Page 23

18
Chart 2-19 Installation is finished
Note: Make sure the RSSI (Radio Signal Strength Indicator)
LED is not blinking but is constantly lit up. If not please move
the modem until you get the RSSI led to be constantly lit up.
The reason why it takes 1-2 minutes is because the modem
needs to initialize, attach to the network and then only obtain
an IP address.
2.4 Power Supply
There are two ways of providing power supply to the
modem:
1. External power supply or/and
2. Rechargeable battery supply
When using the modem, please connect it with the
external power adapter. Use the rechargeable battery of the
modem in case of power failure or when there is no available
Page 24

19
external power supply.
The rechargeable battery will be charged automatically
when external power supply is connected.
When the rechargeable battery is drained, the B ATT
indicator will begin to blink. Please connect the external
power adapter for about 7 hours of charging time.
2.5 About SIM card
Please insert the SIM card provided to you for this
service into the modem before using the service.
Please do not touch the metal surface of the SIM card,
which can cause loss of information or damage to the card.
Keep the SIM card away from any electrical and magnetic
appliances.
Note:If you cannot use the modem after you insert the
SIM card, please make sure:
1) The SIM card provided by the service provider is the
correct SIM.
2) You are in a network coverage provided by your
service provider.
The SIM card provided with this modem CANNOT be
used with any other device besides the modem and likewise
other SIM cards will not work with this modem unless
specified by the service provider.
Page 25

20
Page 26

21
3 Voice Calls
3.1 Making a call
(1) Before making a call, make sure:
a) The PWR or BATT light is on
b) The RSSI light is on;
c) The Telephone cable (RJ11) is connected properly;
d) The PHONE light is on when you pick up the call.
(2) Pick up the handset of the telephone which has been
connected to the modem shown in installation
process;
(3) Key in the telephone number;
(4) You can either press the “#” key on the telephone to
send the call, or wait 4 - 8 seconds for the call to be
connected automatically;
(5) Call will be connected.
If you are making a domestic call, key in the phone
number like this:
Trunk or Mobile Code + Phone Number
e.g. 03-XXXXXXXX or 04XX-XXXXXX
Page 27

22
If you are making an international call, key in the phone
number like this:
International Access Code + Country code + Trunk or
Mobile Code + Phone Number
e.g. 0011 60-3 XXXXXXXX or 0060-12 XXXXXXX
Note: when there is no RSSI indication it indicates weak
RF signal or antenna screw is loose. Change the location of
the modem and make sure nothing is blocking it or recheck the
antenna installation again.
3.2 Answering the Call
When the phone rings, pick up the handset to answer it. If
the telephone has hands-free function, you can also answer the
call by pressing the Hands-free button. Pressing the hands-
free button again or putting the handset back, ends the call and
enables the phone to receive the next incoming call.
Page 28

23
4 Internet Accesses
The modem does NOT require any drivers, and it
supports main operating systems, such as MS Windows 98,
Windows 2000, Windows ME, Windows XP, Windows Vista,
MAC OS X and other Operating systems that support TCP/IP
network connections.
4.1 Connecting to the Internet
Before you begin to enjoy the data service, make sure:
(1) The PWR or BATT light is on;
(2) The RSSI light is on;
(3) The cross Ethernet cable is connected properly;
(4) The DATA light is blinking.
NOTE: Please use the exclusive Ethernet cable (Cross
Ethernet Cable) that was provided to you together with the
modem. Also please note that if the RSSI light is blinking then
you should make sure that the modem is located at a suitable
place and free from obstruction (preferably near a window)
Page 29

24
Web browser requirement:
It is suggested that you use either of these web browsers to
connect to the internet:
IE 6.0 or above
Mozillla Firefox 1.5.0.0
Netscape version 8.1
4.2 Default Settings
Your modem is pre-configured with the default settings
as below as such please DO NOT change any settings unless
informed by your service provider. To make changes to your
settings (NOT Recommended) you will need to make sure the
modem is disconnected from the network. To do this you
would have to:
1) Go to the “Network Connect” Tab (as shown below).
2) Select “Manual Connect”.
3) Select “Disconnect Internet”, then
4) Press on “Submit” button.
To check if your settings are correct please follow the
instructions below:
Page 30

25
4.2.1 System Info
Open a web browser e.g. Internet Explore, enter
http://192.168.0.1” at address column,web page appears as
“
follows:
Chart 4-1 Settings of System Info
It shows network status, hardware version and software
version, etc.
4.2.2 Network Connect
Click “Network Connect”, web page appears as follows:
Page 31

26
Chart 4-2 Settings of Network Connect
Make sure your setting is on “Auto Connecting”.
Auto Connecting: (Default)the modem will auto
connect Internet .
Manual Connecting: Connecting/Disconnect Internet by
yourself.
4.2.3 Network Select
Click “Network Select”, web page appears as follows:
Chart 4-3 Settings of Network Select
Make sure your setting is on “WCDMA Preferred”.
Page 32

27
WCDMA preferred(Default and recommended):
The modem will search valid network according to the
priority: WCDMA→GSM.
GSM preferred:The modem will search valid network
according to the priority: GSM→WCDMA.
Only WCDMA:The modem will only search WCDMA
network.
Only GSM:The modem will only search GSM network.
4.2.4 APN Configure
Click “APN Configure”, web page appears as follows:
Page 33

28
Chart 4-4 Settings of APN Configure
Make sure your settings are as bellow:
APN: “Manual APN”
Dial Num: “*99#”
APN: Provided by carrier
PDP Type: IP
DNS: Auto DNS
PDP: Auto PDP
Press “Submit” button to confirm it.
Page 34

29
The User Name and Password are provided in your
paperwork from Telstra relating to account & connection
settings.
4.2.5 Help
Click “Help”, it will display the modem user guide.
4.3 Disconnecting from the Internet
If you want to end your Internet session, you should:
Select “Disconnect Internet” on Network Connect
page and click “Submit” button to confirm it. (See
Chart 4-2)
Or switch off the modem.
Or Unplug the cross Ethernet cable.
Page 35

30
Possible Problem/
Solution
Please wait for 1~2 minutes
ON since the modem will
IP address from the
There is a prompt/ phone
as I lift the phone off the
hook.
Please make sure the SIM
provided by the service
provider.
5 Troubleshooting
1) Please make sure firstly that all the cables (Phone Cable
and Cross Ethernet Cable) and accessories (SIM, Antenna,
Power Adaptor and Rechargeable battery) are connected
correctly.
2) Please make sure the RSSI, DATA /PHONE and
PWR/B AT T led on the modem is lit on and NOT in a
blinking state or no light.
A) Voice Related Problems
Symptoms
after the modem is powered
No Dial Tone as soon as I
lift the phone off the hook.
alert/ announcement as soon
need to Initialize, Attach to
the Network and finally get
an
network.
card is the valid SIM
Page 36

31
Symptoms
Possible Problem/
Solution
The line might be barred or
There is a prompt/ phone
The dialed number might
not be in service or
currently suspended. To
ensure the number you
is not facing this
The line is noisy/ distorted
Remove any electrical
The cable or phone set
(toot..toot…toot) as soon as
Try to On Hook then Off
Make sure you are not
surfing the net during this
After dialing the last digit I
Please make sure you wait
between 4 to 8 seconds
before the call is connected
or press the # key after
When I get a phone call I
The modem does not
suspended.
alert/ announcement as soon
as I dial the last digit
when I lift the phone off the
hook
I hear a fast engaged tone
I lift the phone off the hook
hear nothing /silence.
called
problem try to call a similar
number.
appliance which is too close
to the phone set or modem.
might be faulty.
Hook again to make a call.
time.
pressing the last digit.
Page 37

32
Symptoms
Possible Problem/
Solution
can’t see the caller’s ID/
support Caller LINE
t access my Voice
Please consult with the
service provider to make
sure the service is
Please consult with the
service provider to make
I can’t make or receive a
Please DO NOT use the
transferred) for 30 seconds
to 1 minute. Than you may
How come when I am on
the phone and there is a
incoming call there is no
indicator to allow me to
pick up the next call.
Please consult with the
service provider to make
Please use the phone set
provided by the service
number.
I can’
Mail
When my friends call and I
am busy the call doesn’t go
to voicemail.
call when I am surfing on
the net.
Identification Presentation
(CLIP).
supported and active.
sure the service is supported
and active.
internet and make sure it is
idle (meaning no packets are
proceed to make a call.
sure the service is supported
and active.
I cannot use my dect phone
or the phone I purchased.
provider.
Page 38

33
Symptoms
Possible Problem/
Solution
initiate a
Please consult with the
service provider to make
Please consult with the
service provider to make
I cannot activate / deactive
some services (ex. Caller
ringtone, USSD Code,
etc….)
Currently we DO NOT
Possible Problem/
Solution
Please check your
so that the modem would
have fully initialized,
connected to the network
and obtained an IP address.
I cannot
conference call to others.
I cannot forward my calls to
another number.
B) Internet Related Problems
Symptoms
sure the service is supported
and active.
sure the service is supported
and active.
support this feature.
I cannot access the internet
at all.
configuration settings as
mentioned.
Please wait for 1~ 2 minutes
after switching on the power
Page 39

34
Symptoms
Possible Problem/
Solution
I cannot access certain
This could be related to
s being
, please
working.
The download or/ and
The speed is depended on
your service
provider.
Possible Problem/
Solution
Check if anything is
devices. Move the modem
ke sure the
antenna is tightened and in a
pages.
upload speeds are very slow.
C) Others
certain web server
congested at that time due to
overwhelming hits
try to visit other pages to see
if the internet connection is
the signal strength and
different networks (for
example, in a HSDPA
network the speeds is much
faster than being in a GPRS
network). For more details,
consult with
Symptoms
The RSSI signal indicator is
always blinking or No Light
blocking the modem or it is
placed near any electrical
to another location near the
window and ma
Page 40

35
Symptoms
Possible Problem/
Solution
upright position.
Page 41

36
6 Appendix
6.1 Modem Technical parameters
Network: GSM900/GSM1800/GSM1900MHz and
WCDMA/HSDPA 850/2100 MHz
LED display: Power indicator/Rechargeable battery
indicator/ Phone indicator/ DATA indicator/ RSSI signal
strength indicator
External interface:
a. External power socket
b. Antenna connector (ANT)
c. Phone interface (PHONE)
d. Data interface (LAN)
e. Test interface (DIAG)
Power adapter:
Input: 90~270V (AC), 50/60Hz
Output: +12V (DC)
Data service:
GPRS supports CLASS10,
EDGE supports MCS12,
WCDMA PS field supports Max 384kbps (down
Page 42

37
link), 384kbps(Up link),
WCDMA CS field support Max 64 kbps,
HSDPA PS field supports Max 3.6Mbps (down link),
384kbps (Up link).
Dimensions (W×H×D): 220mm×140mm×38mm
(Exclude antenna)
Rechargeable battery:
Continuous standby time: Approx. 4 hours (Depending
on the network condition).
Continuous talk time: Approx. 2 hours (Depending on the
network condition).
Please refer to the real objects for the related parameters
about the rechargeable battery and charger.
Page 43

38
Copyright © 2007 by ZTE Corporation
All rights reserved.
No part of this publication may be excerpted, reproduced, translated
or utilized in any form or by any means, electronic or mechanical, including
photocopying and microfilm, without the prior written permission of ZTE
Corporation.
The manual is published by ZTE Corporation. We reserve the right to
make modifications on print errors or update specifications without prior
notice.
Edition: 1st edition, April, 2007
 Loading...