

Page 1
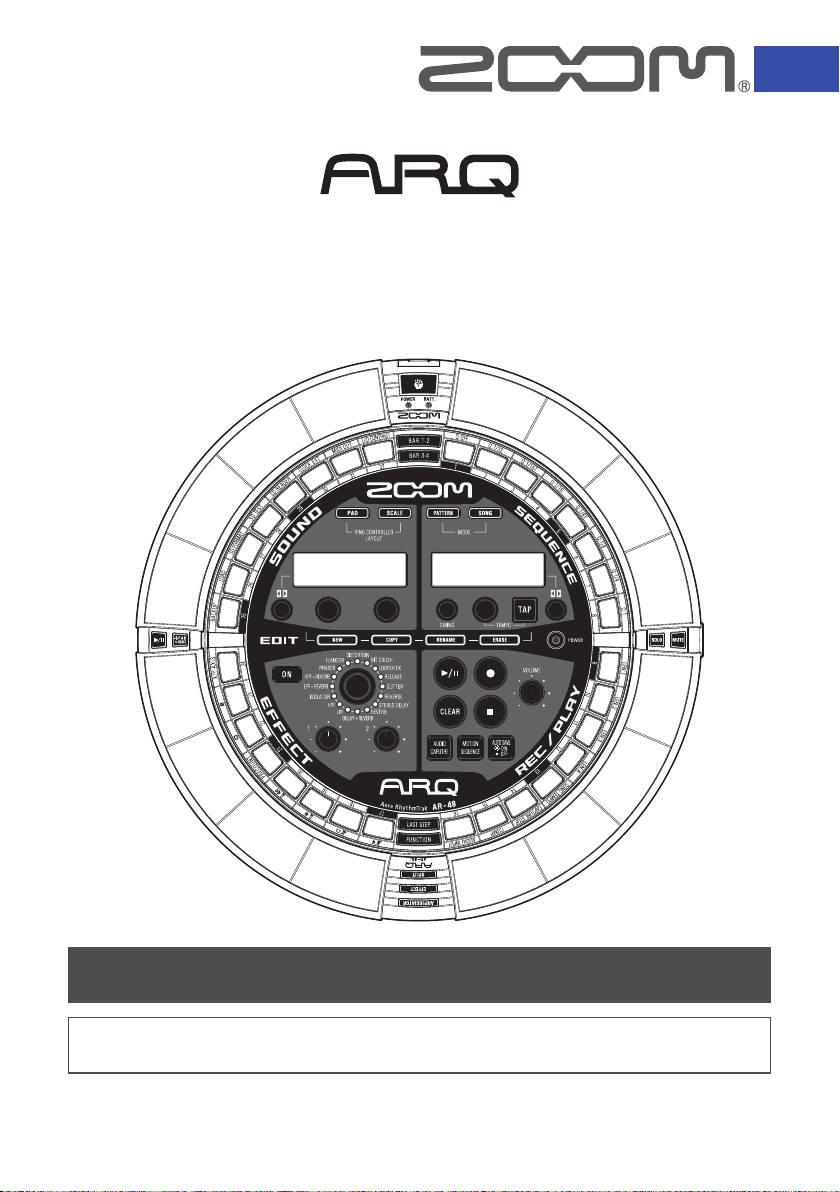
Aero RhythmTrak
A
Quick Guide
The Operation Manual can be downloaded from
the ZOOM website (www.zoom.co.jp/).
© 2017 ZOOM CORPORATION
Copying or reprinting this manual in part or in whole without permission is prohibited.
Page 2

Contents
Using the A ...........................3
Connecting other devices ......................... 3
Preparations
Turning the power on and o .........4
Base Station power ................................... 4
Ring Controller power ............................... 4
Installing SD cards and
BTA-1 units .....................................6
The 4 Base Station areas ...............7
STEP keys ......................................7
SEQUENCE area
SEQUENCE area overview .............8
Creating patterns ............................9
Creating songs .............................10
SOUND area
SOUND area overview.................. 11
Instrument block structure ...........12
Editing instruments.......................14
Common operations................................14
SCALE layout settings ............................. 14
Oscillator .................................................15
Noise .......................................................16
Insert eects ............................................16
Filter.........................................................17
Volume envelope (ADSR) ........................17
Output mixer (OUTPUT) ..........................17
Eect send amount .................................18
LED settings ............................................18
MIDI settings ...........................................18
EFFECT area
EFFECT area overview .................19
Eect settings ...............................20
REC/PLAY area
REC/PLAY area overview .............21
Ring Controller
Ring Controller overview ..............22
Ring Controller operation buttons ...........22
Using the Ring Controller .............23
Arpeggiator ..............................................23
Setting the pad split ................................24
Using the eect .......................................24
Soloing ....................................................25
Muting .....................................................25
Using the grip area ..................................25
Other settings
STEP key setting items ................26
Specications
Specications ...............................27
Page 3
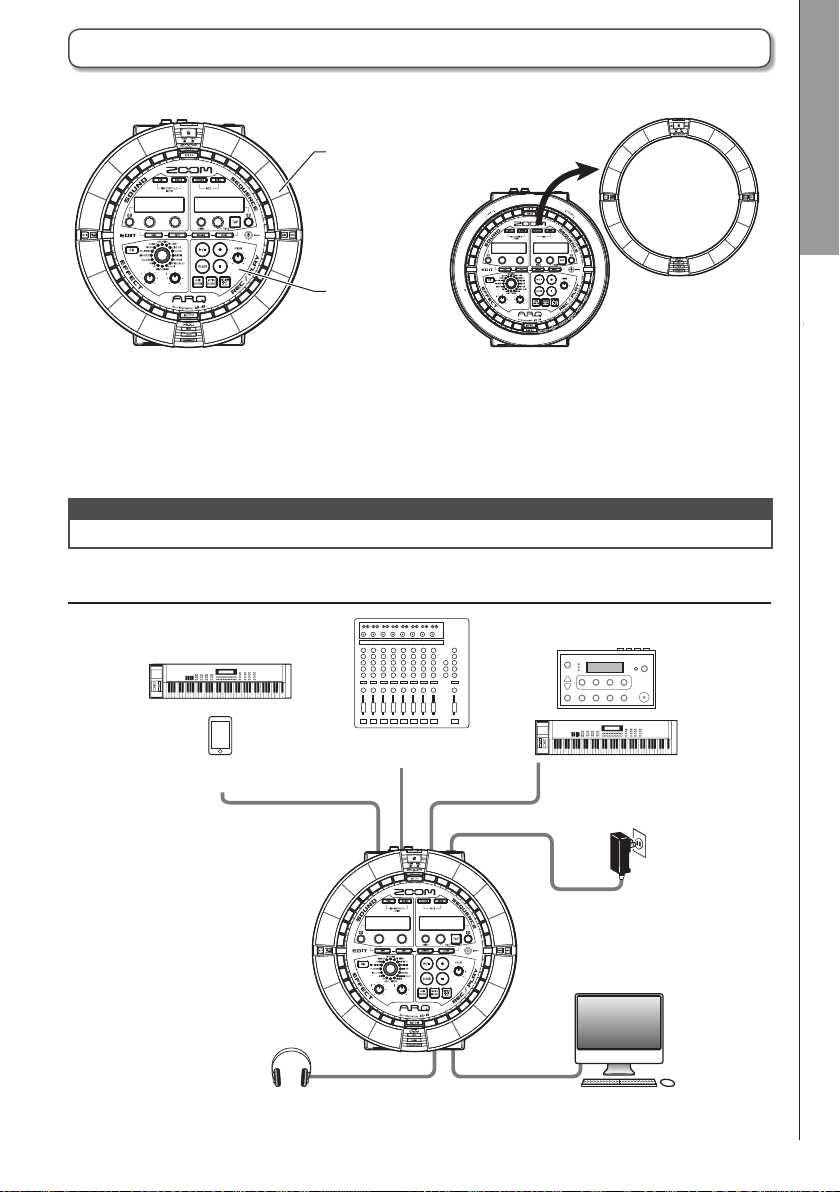
Using the A
The A consists of a Base Station and a Ring Controller.
Ring Controller
Base Station
With the Base Station, you can create and save patterns, songs and other musical pieces, as well as
edit tones, for example. Use the Ring Controller for input when creating music.
Since the Ring Controller can be detached from the Base Station, you can hold it in your hand and
play it like an instrument. You can also connect it by USB or Bluetooth LE to a Mac computer or iOS
device and use it as a MIDI controller.
NOTE
BTA-1 units (sold separately) are necessary to connect by Bluetooth LE.
Connecting other devices
Using the A
Using the A
Audio source
for capture
Headphones
Mixer, audio system or
other playback device
OUTPUT
AUDIO INPUT MIDI OUT
DC IN
A
3
Sound module,
synthesizer or other
MIDI device
AC adapter
Computer
(USB connection)
Page 4
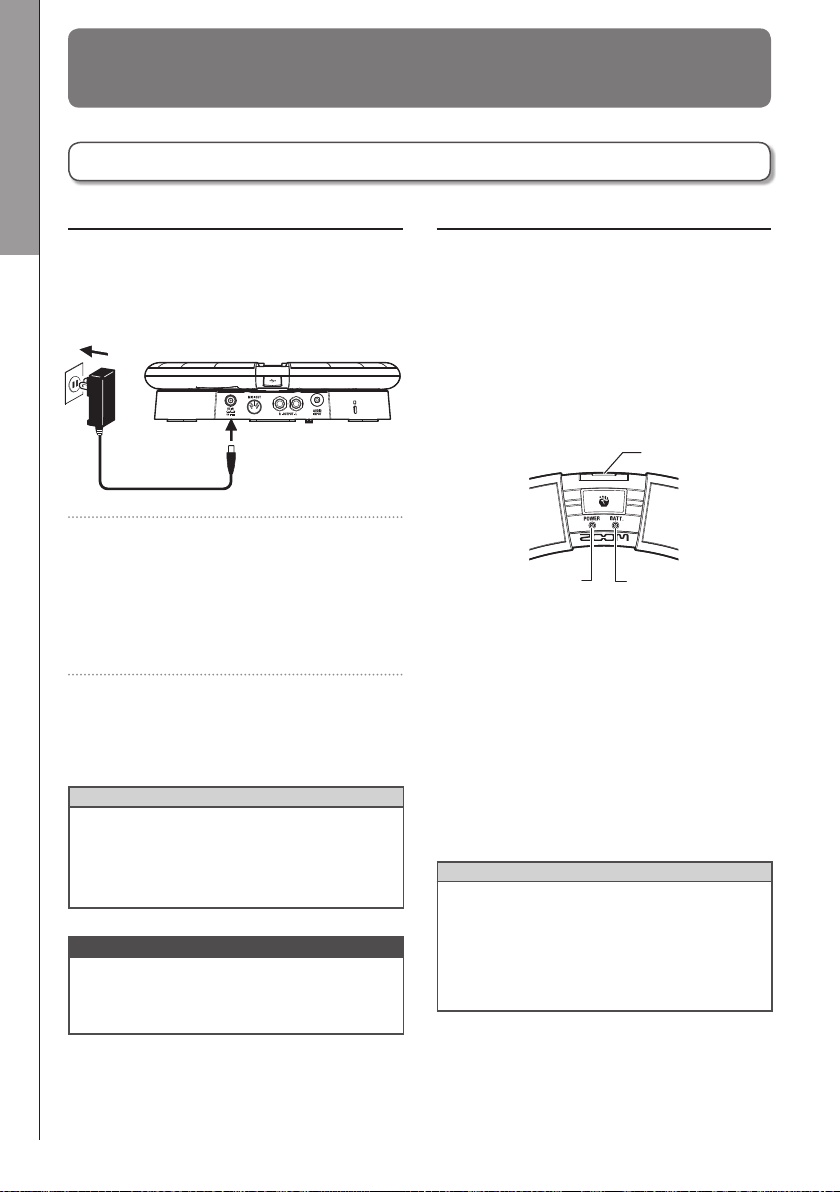
Power button
Preparations
Preparations
Turning the power on and o
Base Station power
Turning the power on and o
1. Connect the included AC adapter
to the Base Station.
2. Press and hold p on the
Base Station.
The Base Station software version
appears on the screen.
3. Press and hold p to turn the
power OFF.
HINT
When the Ring Controller is connected to the
Base Station by USB, turning the Base Station
power ON/OFF will also turn the Ring Control-
ler ON/OFF.
NOTE
Use the AC adapter to power the A even
when it is connected to a computer or other
device by USB.
Ring Controller power
■
When connected by USB
When the Ring Controller is connected to the
Base Station or a computer by USB, it will
automatically turn on and operate on USB bus
power.
When operating on USB bus power, the Ring
Controller POWER LED will light red, and W
will be disabled.
POWER LED BATT LED
■
When using a BTA-1 and connected
by Bluetooth LE
If BTA-1 (sold separately) units have been
installed in the Base Station and Ring Controller
and they are connected by Bluetooth LE, the
Ring Controller will be powered by AA batteries.
In this case, the Ring Controller BATT LED will
light and W will be enabled.
HINT
• Press W to show the Ring Controller
remaining battery charge on the SOUND
display.
• Even if a BTA-1 is installed, it will operate
on USB bus power if connected by a USB
cable.
4
Page 5
Turning the power on and o (continued)
■
Turning the Ring Controller on
1. Press W for at least 2
seconds.
This turns on the Ring Controller.
3. Install the batteries.
Be sure to orient the batteries correctly.
Preparations
■
Turning the Ring Controller o
1. Press W for at least 2
seconds.
HINT
• When connected to the Base Station by
Bluetooth LE, turning o the Ring Controller
will also turn o the Base Station.
• When operating on AA batteries, the BATT
LED will blink when the remaining battery
charge is less than 10%.
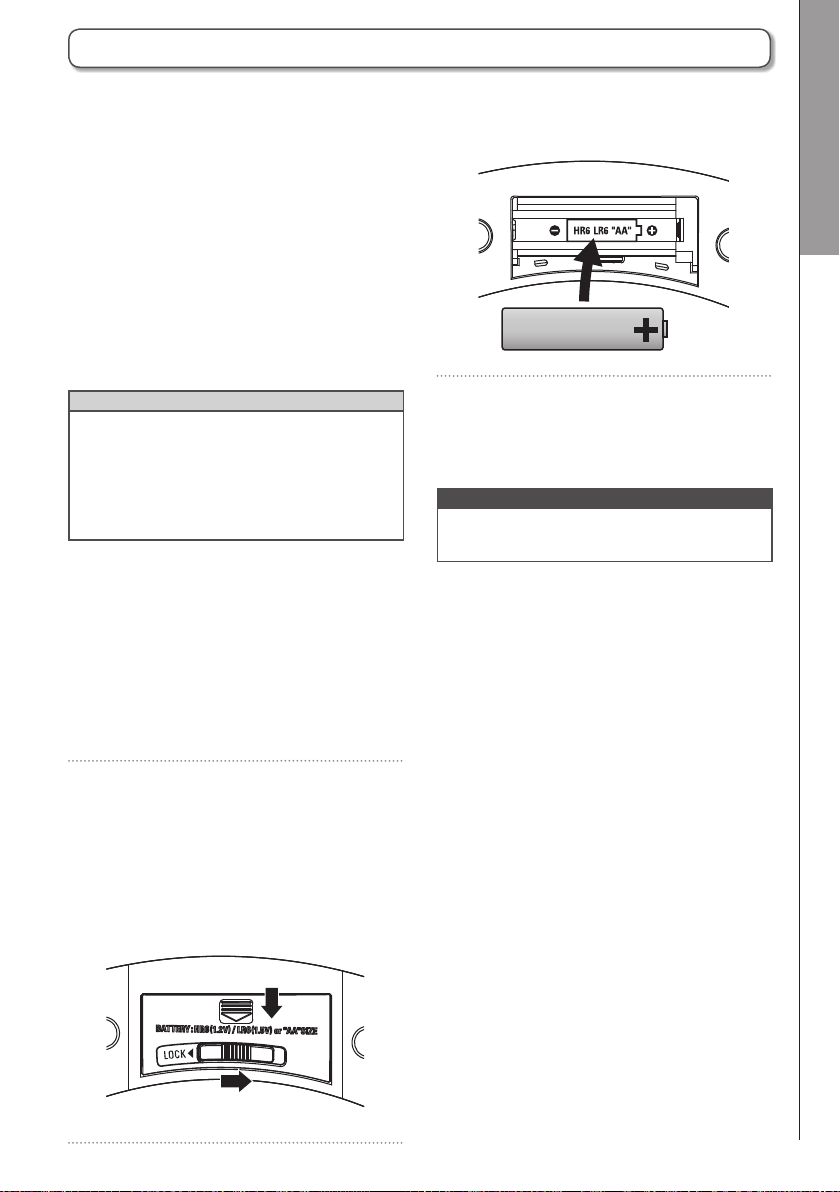
■
Changing the Ring Controller
batteries
The Ring Controller can be powered by two AA
batteries.
1. Turning the Ring Controller o
2. Unlock and remove the battery
compartment covers.
The Ring Controller has battery compart-
ment covers in two places.
Turning the power on and o
4. Replace and lock the battery
compartment covers.
NOTE
Always replace both batteries at the same time
with new batteries.
Ring Controller underside
Remove
Unlock
5
Page 6
Preparations
Installing SD cards and BTA-1 units
■
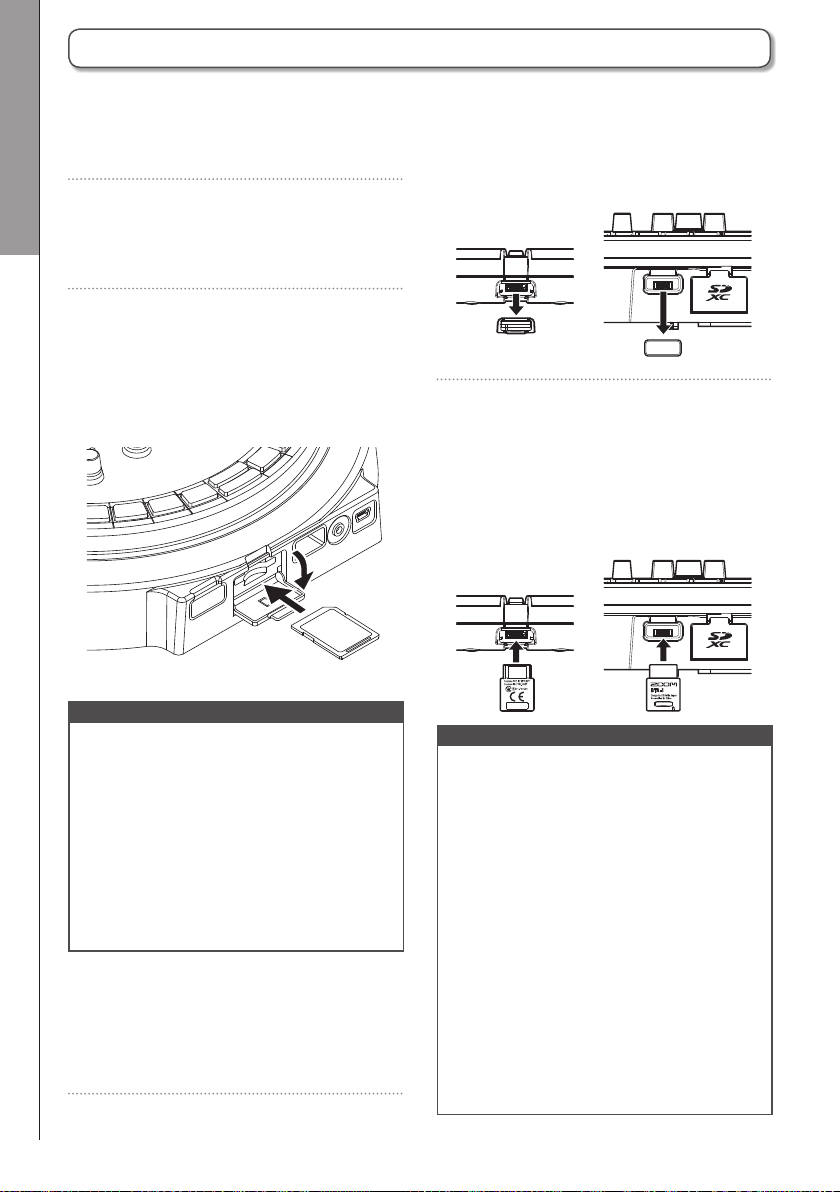
Loading and removing SD cards
2. Remove the BTA-1 connector
1. Turn the power o.
2. Open the SD card slot cover on the
Installing SD cards and BTA-1 units
Base Station.
3. Insert the SD card into the slot.
To eject an SD card:
Push the card further into the slot and
then pull it out.
NOTE
• If no SD card is loaded in the A, cap-
tured data cannot be saved and patterns and
songs that are created cannot be backed up.
• When inserting an SD card, be sure to insert
the correct end with the top side up as
shown.
• Before using SD cards that have just been
purchased or that have been formatted on
a computer, they must be formatted by the
A.
• Formatting SD cards (→ Operation Manual)
■
Installing BTA-1 units
1. Turn the power o.
covers on the Ring Controller and
Base Station.
3. Insert the BTA-1 units into the
connectors.
To remove a unit, pinch it with your fin-
gers and pull it out.
NOTE
• When wireless transmission using BTA-1
units is active, the blue BTA-1 LEDs will light.
• Communication at up to 10 meters is pos-
sible in an unobstructed indoor space with
BTA-1 units. If interference from electromagnetic waves, for example, prevents communication, try the following.
- Bring the Ring Controller and the Base Station closer together.
- Move obstacles between the Ring Controller and the Base Station.
- Stop unnecessary 2.4 GHz transmissions or
move interfering devices further away. (These
include Wi-Fi access points, smartphones
and other devices that use Wi-Fi, as well as
microwave ovens, audio monitors, lighting
controls and other devices that communicate at 2.4 GHz.)
6
Page 7
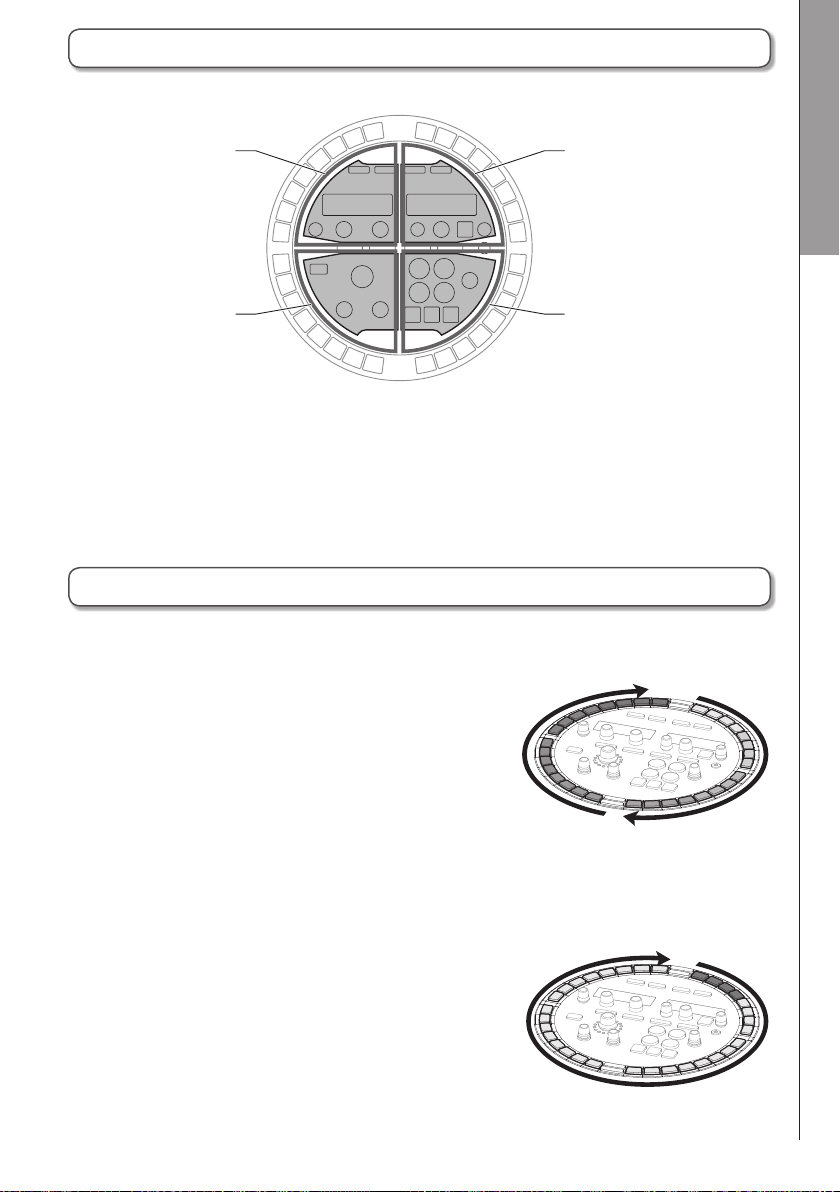
The 4 Base Station areas
The Base Station is divided into four areas according to use.
Preparations
SOUND
area
EFFECT
area
SEQUENCE
area
REC/PLAY
area
Sound area: Used to control the parameters of instruments assigned to pads. Parameters related to
the instrument are shown on the display.
Sequence area: Use to set the tempo and other sequence parameters. The display shows pattern and
song names.
REC/PLAY area: Use to control sequences, including playback and recording.
Eect area: Use to control eects applied to output.
STEP keys
The Base Station also has 32 STEP keys (0) that show pattern sequences and the states of pat-
terns assigned to songs.
31
32
30
Bar 1
Bar 2
Step
1
2
3
4
…
■
PATTERN mode
29
…
Press a Ring Controller pad, to show the sequence for that
instrument on the 0 step keys.
If the pattern is longer than two bars, the 0 indications will
switch every two bars.
To check the sequence, press B for bars 1-2 and b
for bars 3-4.
You can change the last step in one cycle on the Base Station by pressing 0 while pressing L.
For example, you can create patterns in triple time by setting the cycle to 24 steps.
4 Base Station areas/STEP keys
■
SONG mode
In SONG mode, use Base Station 0 to add patterns for
playback in order starting with 0-1.
7
…
1
2
3
4
…
32
31
Pattern playback order
30
29
Page 8
Pattern 1–384 Song 1–99
SEQUENCE area
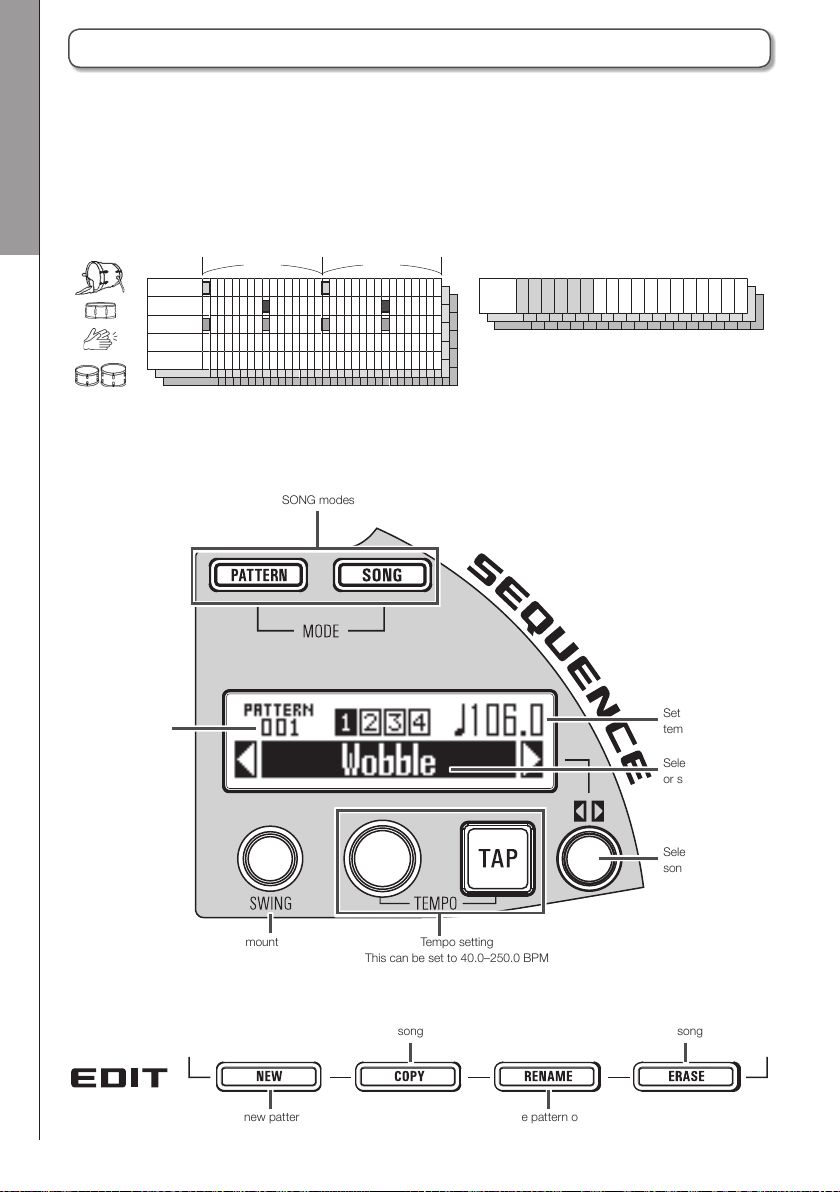
SEQUENCE area overview
The A can save up to 384 patterns and 99 songs.
In patterns, you can use up to 16 instruments (sound sources) and record sequences that are 1–4
bars long. The instruments, sequences, parameters controlled by the Ring Controller, quantization and
other settings are saved for each pattern separately.
In songs, you can combine multiple patterns to create a complete piece of music.
SEQUENCE area overview
Instrument 1
Instrument 1
Instrument 1
Instrument 2
Instrument 2
Instrument 2
Instrument 3
Instrument 3
…
Instrument 3
…
Instrument 16
Instrument 16
Instrument 16
…
Bar 1 Bar 2
Use the SEQUENCE area to work with patterns and songs.
Switch between PATTERN and
SONG modes
Selected
pattern or song
number
Pattern 1
Song
Song sequence
sequence
Song sequence
Pattern 1
Pattern 2
Pattern 1
Pattern 2
Pattern 1
Pattern 2
Pattern 1
Pattern 2
Pattern 1
Pattern 2
Pattern 3
Pattern 2
Pattern 3
Pattern 4
Pattern 3
Pattern 4
Pattern 4
Set
tempo
Selected pattern
or song name
Swing amount
(rhythmic groove) setting
Copy selected pattern or
Create new patterns and
songs
Tempo setting
This can be set to 40.0–250.0 BPM
song
Change pattern or song
name
8
Select pattern or
song
Erase selected pattern or
song
Page 9
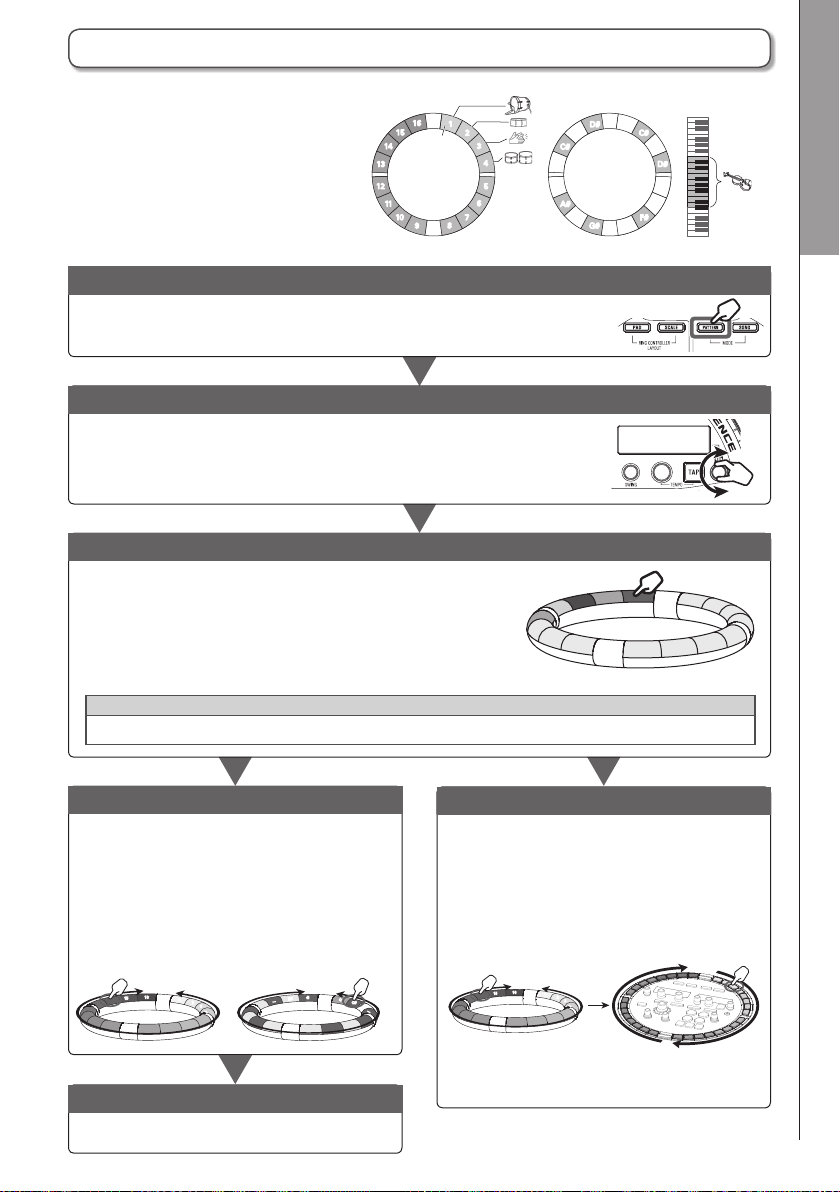
Creating patterns
SEQUENCE area
15
14
13
12
11
10
PAD layout
16
1
Selected
instrument
Instruments
8
9
In PATTERN mode, use the Ring Control-
ler to play instruments.
Use W and X to switch
between PAD layout for playing multiple
instruments and SCALE layout for playing
the selected instrument in a scale.
Enter PATTERN mode
Press Y to enter PATTERN mode.
Select a pattern
Turn H in the SEQUENCE area to select the pattern number.
Conrm the instruments
Tap the pads on the Ring Controller if you want to listen to the
sounds of the input instruments.
When a pad is tapped, its instrument becomes "selected" and
it lights white. The name and parameters of the instrument are
shown on the SOUND display.
Press X to change the Ring Controller to SCALE layout.
SCALE layout
2
3
4
5
6
7
D#
Notes
G#
C#
D
D#
E
F
F#
G
Selected
C2
instrument
C3
D
C#
C
B
A#
A
C1
C
Creating patterns
HINT
By pressing Y as you tap a pad, you can select its instrument without playing its sound.
1 Start real-time input
Press R to enter standby, and press P to
start real-time input.
In PAD layout, tap the pads of instruments
to input them in time with the pattern that is
playing back in a loop.
In SCALE layout, tap the pads of notes to
input them in time with the pattern that is
playing back in a loop.
Instruments
16
15
1
2
3
…
Notes
G
F#
…
C
C#
D
…
While pressing a pad that corresponds to
the instrument to input, press the 0 keys
to edit the sequence for that instrument.
In addition, you can tap pads while pressing
a 0 key to input instruments (in PAD lay-
out) or notes (in SCALE layout) to input them
at that step.
2 Start step input
Instruments
16
15
1
2
3
…
Steps
31
32
30
29
…
End real-time input
Press S to end real-time input.
9
1
2
3
…
4
Page 10

SEQUENCE area
Creating songs
In SONG mode, the pads on the Ring Controller are assigned 16 patterns.
You can change the patterns assigned to each pad.
Tapping a pad starts playback of its assigned pattern.
Creating songs
Enter SONG mode
Press Z to enter SONG mode.
Select a song
Turn H in the SEQUENCE area to select a song.
Select a pattern to play back
Tap the pad on the Ring Controller for the pattern to play
back, and check it.
HINT
If the pattern you want to play back has not been assigned
to a pad, use ! in the SOUND area to select the pattern to
assign to the pad.
16
Pattern
9
1
2
3
4
5
6
7
8
15
14
13
12
11
10
1 Start real-time input
Press R to start
real-time input.
Create a song
Tap pads for patterns to
play them and add them
to the song in real time.
End real-time input
Press S to end real-time input.
2 Start step input
Press the blinking 0 to add a new pattern
at that step.
Press a lit 0 to see information about the
pattern at that position on the SEQUENCE
display. You can edit pattern information,
insert a new pattern, or delete this step, for
example.
Patterns
10
Page 11

SOUND area overview
In PATTERN mode, you can use up to 16 instruments to perform.
A variety of sound sources, including drum sets, percussion instruments, basses and synthesizers, are
already prepared for use.
You can also use WAV les saved on an SD card by a computer as instruments.
In addition to selecting sounds, various settings are available in each instrument. These include enve-
lopes with attack and sustain times, lters and eects.
SOUND area
In SONG mode, the pads on the Ring Controller are assigned 16 patterns.
Tapping a pad starts playback of its assigned pattern.
Change instrument sounds and assigned patterns in the SOUND area.
Changing the Ring Controller layout (PATTERN mode)
PAD: Various instruments can be assigned to the 16 pads and used to
perform.
SCALE: The selected instrument can be played with a musical scale, using the pads like a keyboard.
Name of the instrument or pattern
assigned to the selected pad
Parameters of the instrument or pattern
assigned to the selected pad
Select which pad's information to show
on the display.
You can also tap a pad to select it.
SOUND area overview
Adjust the parameters shown on the display.
Copy the instrument or pattern assigned
to the selected pad to another pad.
11
Erase the instrument or pattern assigned
Edit the name of the
selected instrument
to the selected pad
Page 12

SOUND area
Instrument block structure
Use H, ! and " in the SOUND area to edit instruments and change their sounds.
The instruments are made of the following blocks, which can each be specically set.
Oscillator
Instrument block structure
SCALE layout
settings
Set the scale and
how sound is made
when in SCALE
layout.
This sets the basic
instrument sound.
You can select
from built-in sound
sources, captured
recordings and
WAV les loaded
from the SD card.
See the Operation
Manual for detailed
information about
all the sound
parameters.
Oscillator pitch
modulation
The oscillator pitch
can be altered with
an envelope or
LFO.
Noise
Noise can be
added to the
sound.
Noise level
modulation
The noise level can
be altered with an
envelope or LFO.
Insert
Eect
Sounds can be
altered with eects.
Eect parame-
ter modulation
Insert eect parameters can be altered
with an envelope or
LFO. This cannot
be used with some
eects.
Filter
Sounds can be
altered with lters.
Filter frequency
modulation
The lter frequency
can be altered with
an envelope or
LFO.
12
Page 13

SOUND area
Volume
envelope Output mixer
This sets how
quickly sound starts
when a pad is
tapped, the sound
level while it is being
pressed, and how
quickly it becomes
silent after the pad
is released.
Volume
modulation
The volume can
be altered with an
envelope or LFO.
This sets the
panning (stereo
position) and level.
Pan modulation
The panning can
be altered with an
envelope or LFO.
Eect
send amount LED settings
These set the
amounts sent to the
delay and reverb
eects.
This sets the pad
color and lighting
style.
NOTE
Modulation blocks will not be shown if their modulation destinations are o.
MIDI settings
Use this to set
the MIDI channel
for playing instrument sounds by
USB MIDI and for
outputting playing
sequences from the
MIDI OUT.
Instrument block structure
13
Page 14

SOUND area
Editing instruments
Common operations
1.
Editing instruments
2. Press
HINT
See the Operation Manual for detailed informa-
tion about each block.
CONTROLLER
Tap the pad for the
instrument to be edited.
The selected parameters are shown on
the SOUND display.
Selected parameters
h
and turn H in the
SOUND area to select parameters
to edit.
Use ! and " to adjust the param-
eters shown.
SCALE layout settings
You can set, for example, the octave, scale
and whether only a single sound (monophonic)
or multiple sounds (polyphonic) can be output
when the Ring Controller is in SCALE layout.
■
Octave setting (Octave)
You can change the note range that can be
played on the Ring Controller. The octave shown
will start on pad 1.
■
Changing the scale (Scale)
The layout of notes on the Ring Controller
changes according to the scale set.
This allows you to assign only notes from the
desired scale to the Ring Controller.
Select from the following scales.
CHROMATC (Chromatic), MAJOR (Ionian),
MINOR 1 (Harmonic Minor), MINOR 2 (Melodic
Minor), MINOR 3 (Dorian), PHRYGIAN, LYDIAN,
MIXOLYDN (Mixolydian), AEOLIAN, LOCRIAN
(Locrian), S-LOCRN (Super Locrian), MajBLUES
(Major Blues), MinBLUES (Minor Blues), DIMIN-
ISH (Diminished), COM DIM, MajPENTA (Major
Pentatonic), MinPENTA (Minor Pentatonic),
RAGA 1 (Bhairav), RAGA 2, RAGA 3, ARABIC,
SPANISH, GYPSY, MinGYPSY (Minor Gypsy),
EGYPTIAN, HAWAIIAN, PELOG, HIROJOSI,
IN-SEN, IWATO, KUMOI, MIYAKO, RYUKYU,
CHINESE, WHOLE (Whole tone), WHOLE1/2
(Whole half), 5th
■
Polyphony setting (Mono/Poly)
This sets whether only a single sound (mono-
phonic) or multiple sounds (polyphonic) are
output when multiple pads are pressed at the
same time.
Select Mono or Poly.
■
Setting the glide (Glide)
When a dierent note is triggered, the pitch can
change instantly or gradually over time accord-
ing to this setting.
This can be set from 0 to 100.
The higher this value is set, the more gradual the
change will be.
HINT
Glide is only enabled when the polyphony
mode is Mono.
14
Page 15

SOUND area
■
Changing the key (Key)
You can change the key when the scale is set to
anything other than Chromatic.
You can select from C, C#, D, D#, E, F, F#, G,
G#, A, A# and B.
NOTE
The Ring Controller layout also changes
according to the key setting.
Oscillator
This sets the basic instrument sound.
• Press h in the SOUND area, and use H
to move to the oscillator block.
• Press h.
• Use ! in the SOUND area to select the
oscillator category.
Use H in the SOUND area to select the
oscillator.
■
Selecting captured audio and WAV
les
WAV les saved in the “Capture” subfolder in the
"AR-48" folder on the SD card can be added as
oscillators.
NOTE
When an audio le is selected as an oscillator,
the lter and other parameters will be reset to
default values.
HINT
• Files that meet the following conditions can
be used as oscillators.
– WAV format les that have been recorded
as 16/24-bit PCM audio with 44.1kHz sampling frequency
– Playback time is 6 minutes (12 minutes if
mono) or less
– File name uses only English letters and
numbers
• The total length of audio files that can be
added as instruments on the A is 6
minutes (or 12 minutes if mono). For exam-
ple, if a one-minute stereo audio le has been
added, the total length of additional audio
files that can be added as instruments is 5
minutes (or 10 minutes if mono).
• If an audio file is used in multiple patterns,
this will not change the remaining time for
assigning additional les.
■
Playing audio les
The playback method for audio les can be set.
One Shot: The audio file plays once and
stops.
Toggle: Tapping the pad alternately starts
and stops playback of the audio
le.
Gate: The audio le plays back in a loop
while the pad is being pressed.
Playback stops when it is released.
Editing instruments
• Select FILE as the oscillator category.
• Use H in the SOUND area to select the
audio le on the SD card, and press h.
15
Page 16

SOUND area
Editing instruments (continued)
Noise
Noise can be added to the sound.
■
Type of noise (Type)
You can change the type of noise.
Select O, White or Pink.
Editing instruments
■
Noise level (Level)
You can change the noise volume.
This can be set from 0 to 100.
Insert eects
■
Phaser (PHASER)
This eect adds a bubbly swaying to the sound.
■
Chorus (CHORUS)
This effect mixes the original sound with the
effect sound that has fluctuating pitch to add
movement and thickness.
■
Distortion (DIST)
This eect distorts the sound.
■
Lo-Fi (LO-FI)
This eect intentionally lowers the delity of the
sound.
Sounds can be altered with eects.
■
Compressor (COMP)
The compressor reduces volume variation.
■
Pumper (PUMPER)
This eect adds a pulsing feeling to the sound.
■
Sub Bass (SUB BASS)
This emphasizes low frequencies.
■
Talk Filter (TALK)
This eect creates a sound like a human voice.
■
3Band Equalizer (3BAND EQ)
This is a three-band equalizer.
■
Ring Modulator (RING MOD)
This eect creates a metallic sound.
■
Flanger (FLANGER)
This eect adds movement and a strong swell-
ing to the sound.
HINT
See the Operation Manual for detailed informa-
tion about the insert eects.
16
Page 17

SOUND area
Filter
The frequency and other parameters can be set
for the lter.
■
Type (TYPE)
You can change the lter type.
Peaking Filter (Peaking)
This lter emphasizes a specic range.
High-pass lter (HPF)
This lter cuts low frequencies and allows high
frequencies to pass through.
Low-pass lter (LPF)
This lter cuts high frequencies and allows low
frequencies to pass through.
Band-pass lter (BPF)
This filter only allows a specific range to pass
through.
■
Frequency (FREQ)
This changes the lter frequency.
Volume envelope (ADSR)
This sets how quickly the sound starts and how
quickly it becomes silent, for example.
■
Attack (Attack)
This changes how fast the sound starts.
This can be set from 0 to 100.
■
Decay (Decay)
This changes how long it takes from the attack
to reach the sustain level.
This can be set from 0 to 100.
■
Sustain (Sustain)
This changes the sound level while the pad is
being pressed.
This can be set from 0 to 100.
■
Release (Release)
This sets how long it takes for the sound to stop
after the pad is released.
This can be set from 0 to 100.
Editing instruments
■
Resonance (RESO)
This changes the amount of resonance.
■
Level (LEVEL)
This sets the level after passing through the lter.
Output mixer (OUTPUT)
This sets the panning (stereo position) and level.
■
Panning (Pan)
The left and right output level balance can be
changed.
This can be set from R100 to L100.
■
Level (Level)
The output volume can be changed.
This can be set from 0 to 100.
17
Page 18

SOUND area
Editing instruments (continued)
Eect send amount
The amount of sound sent to the master eect
can be changed.
■
Send amount (Amount)
The volume sent to the eect can be changed.
This can be set from 0 to 100.
Editing instruments
When set to 0, the master effect will not be
used.
LED settings
You can set the color used by the Ring Control-
ler LEDs, as well as how pads light when a pad
is tapped.
■
Color (Color)
You can select from 32 colors. When set to OFF,
LEDs will not light.
■
Animation (Animation)
You can select the animation used when pads
are played.
The animation can be set to O, Moire, Firework,
Cross, Circulation or Rainbow.
MIDI settings
Use this to set the MIDI channel for playing
instrument sounds by USB MIDI and for output-
ting playing sequences from the MIDI OUT.
■
Channel (Channel)
If the unit receives a MIDI message on this chan-
nel by USB, the instrument assigned to the pad
will play at the pitch that corresponds to the note
number.
In addition, if a sequence is recorded for the
selected pad, note numbers will be output on
the set MIDI channel during pattern playback.
This can be set to OFF or from 1 to 16.
The A can output sounds for note num-
bers 0–108.
NOTE
The A cannot record MIDI messages
received by USB as a sequence.
18
Page 19

EFFECT area overview
During the playback of patterns and songs, master eects can be applied to the overall output.
Use the EFFECT area to adjust this eect.
Turn the eect ON/OFF.
This lights when the eect is ON.
The Ring Controller EFFECT key func-
tions the same way.
Select the eect type.
Select one of the 16 eects. The LED
for the selected eect will light.
Eect parameters 1 and 2
EFFECT area
EFFECT area overview
19
Page 20

EFFECT area
Eect settings
Eect settings
■
Eect list
Category Type name
LPF FREQUENCY 20–20000 RESONANCE 0–100
HPF FREQUENCY 20–20000 RESONANCE 0–100
Filter
Modulation
Distortion
Loop/Slicer
Delay/Reverb
Note: See Tempo sync parameters for details about ♪ setting values.
■
Tempo sync parameters
ISOLATOR LOW 0–100 HI 0–100
LPF + REVERB FREQUENCY 20–20000 REVERB MIX 0–100
HPF + REVERB FREQUENCY 20–20000 REVERB MIX 0–100
RELEASE TYPE Brake, Back Spin SPEED 0–100
PHASER RATE
FLANGER RATE
DISTORTION GAIN 0–100 TONE 0–100
BIT CRUSH BIT 4–16 SAMPLE 0–50
LOOPER FX LOOP LENGTH
GLITTER COMPLEX 1–8 MIX 0–100
REVERSE TIME
STEREO DELAY TIME
REVERB DECAY 1–100 MIX 0–100
DELAY + REVERB DELAY MIX 0–100 REVERB MIX 0–100
Parameter name Setting values Parameter name Setting values
Parameter 1 Parameter 2
♪
(Type 1)
♪
(Type 1)
♪
(Type 4)
♪
(Type 2)
♪
(Type 2)
RESONANCE 0–100
DEPTH 0–100
FEEDBACK 0–100
FEEDBACK 0–100
When ♪ appears for a parameter or eect, it is a value that can be synchronized to the tempo.
Type 1 Type 2 Type 3 Type 4
32nd note 16th note 32nd note 32nd note
16th note Quarter note triplet 16th note 16th note
Quarter note triplet Dotted 16th note Quarter note triplet 8th note
Dotted 16th note 8th note Dotted 16th note Quarter note
8th note Half note triplet 8th note Half note
Half note triplet Dotted 8th note Half note triplet 4 quarter notes
Dotted 8th note Quarter note Dotted 8th note 8 quarter notes
Quarter note Dotted quarter note Quarter note
Dotted quarter note Half note Dotted quarter note
Half note 3 quarter notes Half note
3 quarter notes 4 quarter notes 3 quarter notes
4 quarter notes … 4 quarter notes
… 8 quarter notes
19 quarter notes
20 quarter notes
MIX 0–100
20
Page 21

REC/PLAY area overview
Use the REC/PLAY area to control sequences, including playback and recording.
REC/PLAY area
Play/pause the pattern or song.
Stop playback of the pattern or song.
Clear the pattern or song sequence.
Capture audio.
The A can capture (record) as
audio data the sound of patterns and
songs it plays back as well as sounds
input through the AUDIO INPUT jack.
Captured audio data can be used as an
instrument.
Record motion sequences.
Press this button when in PATTERN mode
to record instrument and eect parameter
changes to the sequence. These changes
will be re-created during pattern playback
Use for real-time input of patterns and songs.
Turn the auto save function ON/OFF.
When auto save is ON, this button lights and changes to patterns and songs are automatically saved.
Turning auto save ON can be useful when creating
patterns and songs.
On the other hand, turn auto save OFF when performing with already completed patterns and songs
so that changes are not recorded.
Adjust the level output
from the headphone and
OUTPUT jacks.
REC/PLAY area overview
NOTE
• Captured audio data is saved on the SD
card. Be aware that you will not be able to
use captured recordings if you remove the
SD card or replace it with a dierent SD card.
• The maximum length of captured recordings
and audio les that can be added as instruments on the
A is 6 minutes (or 12 min-
utes if mono).
• For example, when a one-minutes stereo
audio file has been assigned, the remaining
length of audio that can be assigned is 5
minutes if stereo or 10 minutes if mono.
• If a captured recording or an audio file is
used in multiple patterns, this will not change
the remaining time for assigning les.
• If the input level is too high, the AUDIO CAP-
TURE button will flash rapidly. Lower the
volume of the connected device or the input
level.
• Turning effects ON/OFF, changing parame-
ters, playing pads, and changing patterns, for
example, will be recorded while capturing.
• If precount is ON, a click sound will play
before capturing starts.
• If the metronome is ON, its sound will play
during the capture.
21
Page 22

Ring Controller
Ring Controller overview
The A Ring Controller surface has 16 pressure-sensitive touchpads.
Using these pads, you can input and edit patterns and songs and perform in real-time, for example.
Pressure-sensitive
touchpads with
multicolor LED indicators
Ring Controller overview
Ring Controller operation buttons
PAD/SCALE button
Switch between PAD
and SCALE layouts
Touchpad locations
15
14
13
12
11
GRIP button
Set grip area that does
not respond to touch
SOLO button
Play only the selected
instrument
16
10
1
9
Touchpads
2
3
4
5
6
7
8
PLAY/PAUSE button
Play/pause pattern and
song playback
EFFECT button
Turn the effect
ON/OFF
MUTE button
Mute the selected
instrument
SPLIT button
Change the
number of
instruments
assigned to the
Ring Controller
ARPEGGIATOR button
Generate sound from multiple
instruments in order
22
Page 23

Using the Ring Controller
Ring Controller
Arpeggiator
This function can be used to make an instru-
ment play automatically when triggered by a
pad. Pressing multiple pads will trigger multiple
instruments in order.
By pressing chord tones in SCALE layout, the
notes in the chord can be played back one at a
time.
■
Operation procedures
1.
CONTROLLER
The arpeggiator setting screen opens on
the SEQUENCE display.
Press A.
2. Use G to select ON or LATCH.
This enables the arpeggiator.
When ON is selected, sound will be
output automatically while pads are being
pressed.
When LATCH is selected, sounds will
automatically start output when pads are
pressed and stop when their pads are
pressed again.
3. Turn T to change the arpeggiator
style.
The STYLE can be set to REPEAT,
SEQUENCE, UP, DOWN, UP&DOWN, or
RANDOM.
Depending on the selected STYLE, per-
formance types and other detailed set-
tings can be made.
4. If the selected STYLE has parame-
ters 2 and 3, turn H in the
SEQUENCE area.
Use G and T to adjust parameters 2
and 3.
Using the Ring Controller
HINT
Automatic output in LATCH mode can also be
stopped by pressing S.
23
Page 24

Ring Controller
Ring Controller overview (continued)
Setting the pad split
When pad layout is selected, you can change
the number of instruments assigned to the Ring
Controller.
By default, you can play 16 instruments with the
Ring Controller. You can, however, also reduce
the number of instruments to make it easier to
Ring Controller overview
play when performing with it in hand.
1.
CONTROLLER
L lights, and the number of
instruments assigned to the Ring Con-
troller decreases.
While pressing L, use H in
the SEQUENCE area to set the number
of assigned instruments to 8, 4, 2 or 1.
Press L.
Using the eect
1.
NOTE
The LOOPER FX and RELEASE eects will turn
OFF after releasing E.
2.
CONTROLLER
E lights when the eect is ON.
After releasing E, the eect will
stay ON.
CONTROLLER
again to turn the eect OFF.
Press E.
Press E
2. To cancel the split setting, press
L again.
When L is unlit, the number of
instruments assigned to the Ring Con-
troller in PAD layout reverts to 16.
HINT
When the split setting is enabled, the instru-
ments will be assigned to pads in order starting
with instrument number 1.
For example, when set to 4, instruments num-
bered 1–4 will be assigned to pads.
24
Page 25

Ring Controller
Soloing
You can solo the playback of just the selected
instrument.
1.
CONTROLLER
tap the pad for the instrument to
be soloed.
Only the tapped pad lights, and other
instruments stop making sounds.
S stays lit while the solo function is
activated.
While pressing S,
Muting
You can mute just the selected instrument.
1.
CONTROLLER
While pressing M,
Using the grip area
You can set a grip area that does not respond
to touch in order to prevent pads from being
pressed unintentionally when using the Ring
Controller separately from the Base Station.
■
Setting the grip area
1.
2.
CONTROLLER
All the Ring Controller pads will light blue.
CONTROLLER
set as the grip area.
The pads in the grasped range light white
and the grip area is set.
Pads outside the grip area can be used
as normal.
Press G.
Grasp the area to
Ring Controller overview
tap the pad for the instrument to
be muted.
The tapped pad becomes unlit and stops
making sound.
M stays lit while the mute function is
activated.
NOTE
The solo and mute functions can only be used
in PATTERN mode with PAD layout.
HINT
If a grip is not detected for 30 seconds, detec-
tion will automatically cancel.
25
Page 26

X axis
Other settings
STEP key setting items
While pressing F, press a 0 to make a setting.
Key Function name Function
1 Q:OFF
2 Q:1/32
3 Q:1/16T
4 Q:1/16
5 Q:1/8T
6 Q:1/8
STEP key setting items
7 Q:1/4
8 Q:1
9 LEN:1
10 LEN:2
11 LEN:3
12 LEN:4
13 SONG TEMPO Set whether each pattern uses its own tempo setting or all patterns use the same tempo when playing a song.
14 CAPTURE STOP Set whether audio capturing automatically stops a set time after starting, and whether captured audio is saved
15 COMP Set the master compressor to increase the sound pressure.
16 AUDIO INPUT When a signal is being input through the AUDIO INPUT jack, set the input level and the amount sent to the
17 Metronome output Set whether the metronome that plays as a guide during recording is output from the OUTPUT jacks.
18 Metronome to head-
phones
19 Metronome volume - Lower the metronome volume.
20 Metronome volume + Raise the metronome volume.
21 PRECOUNT Set whether a precount plays before real-time input and audio capturing starts.
22 Ring settings Make Ring Controller settings, including pad sensitivity, LED brightness, aftertouch, accelerometer sensitivity,
23 Bluetooth LE setting If a BTA-1 is installed in the Base Station, on the BLE SETTING screen where devices that can be connected
24 X/Y AXIS The Ring Controller accelerometer can be used to control arpeggiator
25 BACK UP The data for patterns and songs created, can be backed up to an SD card.
26 LOAD Backup data created by the
27 SD Format Check the amount of space used on the SD card or format it. Before using SD cards that have just been
28 SD TEST Test whether an SD card can be used with the A. A basic test can be done quickly, while a full test examines
29 SD READER By connecting the A with a computer, you can check and copy data on the SD card loaded in it.
30 CLOCK EXT Set whether the internal clock or an exter nal clock is used when connected to other MIDI devices by USB.
31 MIDI OUT When the Ring Controller pads and Base Station knobs and buttons are used, the Base Station can send MIDI
32 LCD CONTRAST Set the display contrast.
These set the shortest note length that can be input into sequences.
This sets timing correction during real-time input and when input can occur during step input.
F is pressed, the 0 for the current quantize setting will light.
When
These set the pattern length.
When making a pattern longer, you can also copy the sequence you have already input to the lengthened part.
When a pattern is shortened, the already input sequence will not be cleared.
When
F is pressed, the 0 for the current length setting will light.
When
F is pressed, 0-13 will light if the same tempo is being used for the entire song.
as stereo or mono.
F is pressed, 0-15 will light if the master compressor is enabled.
When
master eect.
F is pressed, 0-17 will light if it is set to be output from the OUTPUT jacks.
When
Set whether the metronome that plays as a guide during recording is output from the headphone jack.
F is pressed, 0-18 will light if it is set to be output from the headphone jack.
When
F is pressed, 0-21 will light if the precount is enabled.
When
battery type used, and auto power o.
are shown, select and pair a Ring Controller that has a BTA-1 installed .
timing, eect parameters, and the parameters of the instrument shown on
the SOUND display.
Parameters can be changed by the movement and tilt of the Ring Controller. Up to three parameters each can be assigned to the movement of the X
and Y axes.
You can save all the data at once or choose only some data to save.
You can load all the data at once or choose only some data to load.
purchased or that have been formatted on a computer, they must be formatted by the
all data previously saved on the SD card will be deleted when it is formatted.
the entire SD card. Even if a performance test result is "OK", there is no guarantee that writing errors will not
occur. This information is just to provide guidance.
F is pressed, 0-30 will light if external clock is set to be used.
When
messages from the USB port and MIDI OUT jack. You can edit the MIDI messages output. The A will
output the set MIDI messages without change even if the mode is switched.
These MIDI messages can be used to control DAW software, for example.
Y axis
A can be loaded from an SD card.
A. Be aware that
26
Page 27

Specications
Base Station
Input AUDIO INPUT Connector type Stereo mini jack (unbalanced)
Input gain +10 to −65 dB
Input impedance 10 kΩ
Outputs OUTPUT L/R Connector type Standard mono phone jacks (unbalanced)
Output impedance 100 Ω
PHONES Connector type Stereo mini jack (20mW × 2 into 32Ω load)
Output impedance 10 Ω
Dynamic range ANALOG IN (AD): 92 dB typ (IHF-A)
Recording media 16MB–2GB SD cards, 4GB–32GB SDHC cards, 64GB–512GB
MIDI IN/OUT MIDI OUT (5-pin DIN jack) and USB MIDI
Power 5V 1A AC adapter (AD-14)
Power consumption Base Station: 2 W maximum
External dimensions 259.0 mm (D) × 257.6 mm (W) × 63.0 mm (H)
Weight (unit only) 1123 g
Displays 128×32 dot-matrix LCD × 2
Interface Type B
USB 2.0 MIDI class/
mass storage class operation
Type A
USB 2.0 MIDI class operation
Supported operating
systems
Minimum specications
Ring Controller
Sensors PAD pressure sensors, 3-axis accelerometer
Power USB bus power
Batteries 2 AA alkaline or rechargeable nickel-metal hydride (NiMH) batteries
Battery operation time About 8 hours (when BTA-1 installed)
Power consumption 1 W maximum
External dimensions 280.2 mm (D) × 278.8 mm (W) × 29.7 mm (H)
Weight (unit only) 416 g
Trigger pads Number of pads 16
Velocity curves 4 types
Interface Type B
USB 2.0 MIDI class/
mass storage class operation
MIDI over BLE
(when BTA-1 installed)
Supported operating
systems
Minimum specications
Supported iOS
devices
Supported Macs MacBook, iMac and Mac pro series computers that use Mac OS X
PHONE OUT (DA): 102 dB typ (IHF-A)
MAIN OUT (DA): 106 dB typ (IHF-A)
SDXC cards
When powering Ring Controller: 3 W maximum
Windows 7 (SP1 or later), Windows 8 (including 8.1) or later, Windows 10
Mac OS X 10.8 or later
Chipset that includes USB 2.0 as standard,
Intel Core i3 or faster CPU
For Ring Controller connection
Windows 7 (SP1 or later), Windows 8 (including 8.1) or later, Windows 10
Mac OS X 10.8 or later
Chipset that includes USB 2.0 as standard,
Intel Core i3 or faster CPU
Devices using iOS 8.0 or later
10.10.5 Yosemite or later and support BLE transmission
Specications
Specications
27
Page 28

ZOOM CORPORATION
4-4-3 Kanda-surugadai, Chiyoda-ku, Tokyo 101-0062 Japan
www.zoom.co.jp
Z2I-3018-01
 Loading...