

Page 1

Operation Manual
CONTENTS
USAGE AND SAFETY PRECAUTIONS •••••••••••••••••••••••••••• 2
Introduction
••••••••••••••••••••••••••••••••••••••••••••••••••••••••• 3
Controls and Functions
•••••••••••••••••••••••••••••••••••••••••••• 4
Top Panel ••••••••••••••••••••••••••••••••••••••••••••••••••••••••••• 4
Rear Panel
•••••••••••••••••••••••••••••••••••••••••••••••••••••••••• 4
Preparations •••••••••••••••••••••••••••••••••••••••••••••••••••••••• 6
Inserting Batteries and a SmartMedia card ••••••••••••••••••••••••••• 6
Getting Connected
•••••••••••••••••••••••••••••••••••••••••••••••••• 7
Quick Guide (Let's Play) ••••••••••••••••••••••••••••••••••••••••••• 8
Listening to Patches (Play Mode Operation)
•••••••••••••••••••• 10
Panel Display in Play Mode ••••••••••••••••••••••••••••••••••••••••• 10
Selecting a Patch
•••••••••••••••••••••••••••••••••••••••••••••••••• 10
Using the Tuner Function
•••••••••••••••••••••••••••••••••••••••••• 11
Using the Easy Edit Function
••••••••••••••••••••••••••••••••••••••• 12
Using the Sampler Function
•••••••••••••••••••••••••••••••••••••••• 13
Using the Rhythm Function
•••••••••••••••••••••••••••••••••••••••• 16
Changing the Sound of a Patch (Edit Mode) •••••••••••••••••••• 18
Patch Configuration •••••••••••••••••••••••••••••••••••••••••••••••• 18
Basic Edit Mode Steps
••••••••••••••••••••••••••••••••••••••••••••• 18
Storing and Swapping Patches
••••••••••••••••••••••••••••••••••••• 20
Other Functions ••••••••••••••••••••••••••••••••••••••••••••••••••• 21
Using the Hold Delay Function ••••••••••••••••••••••••••••••••••••• 21
Changing the Patch Call Method
••••••••••••••••••••••••••••••••••• 23
Using the Pedal to Control an Effect
••••••••••••••••••••••••••••••••• 23
Adjusting the Expression Pedal
••••••••••••••••••••••••••••••••••••• 25
Storing Rhythm Patterns and Samples as Part of a Patch
•••••••••••• 26
Assigning a rhythm pattern to a patch •••••••••••••••••••••••••••••••• 26
Assigning a sample to a patch
••••••••••••••••••••••••••••••••••••••• 27
Using a SmartMedia card (Utility Mode) ••••••••••••••••••••••••••••• 28
Basic utility mode operation steps ••••••••••••••••••••••••••••••••••• 28
Utility mode functions
•••••••••••••••••••••••••••••••••••••••••••• 29
All Initialize/Factory Recall •••••••••••••••••••••••••••••••••••••••••• 32
Effect Types and Parameters •••••••••••••••••••••••••••••••••••• 33
BOOSTER Module ••••••••••••••••••••••••••••••••••••••••••••••••• 33
ISOLATOR/COMP (Isolator/Compressor) Module
•••••••••••••••••••• 33
DRIVE Module
••••••••••••••••••••••••••••••••••••••••••••••••••••• 33
EQ (Equalizer) Module
•••••••••••••••••••••••••••••••••••••••••••••• 34
ZNR/D GATE (ZOOM Noise Reduction/D Gate) Module
•••••••••••••• 35
CABINET Module
•••••••••••••••••••••••••••••••••••••••••••••••••• 35
MODULATION Module
••••••••••••••••••••••••••••••••••••••••••••• 35
DLY/REV (Delay/Reverb) Module
••••••••••••••••••••••••••••••••••• 37
TOTAL Module
••••••••••••••••••••••••••••••••••••••••••••••••••••• 38
Troubleshooting ••••••••••••••••••••••••••••••••••••••••••••••••••• 39
Specifications
••••••••••••••••••••••••••••••••••••••••••••••••••••• 39
Patch List ••••••••••••••••••••••••••••••••••••••••••••••••••••••••• 40
Page 2
USAGE AND SAFETY PRECAUTIONS
USAGE AND SAFETY PRECAUTIONS
2
ZOOM 707II GUITAR
In this manual, symbols are used to highlight warnings and
cautions for you to read so that accidents can be prevented.
The meanings of these symbols are as follows:
Please observe the following safety tips and precautions to
ensure hazard-free use of the 707II.
• Power requirements
Since power consumption of this unit is fairly high, we
recommend the use of an AC adapter whenever possible.
When powering the unit from a battery, use only an alkaline
type.
[AC adapter operation]
•Be sure to use only an AC adapter which supplies 9 V DC, 300
mA and is equipped with a "center minus" plug (Zoom AD-
0006). The use of an adapter other than the specified type may
damage the unit and pose a safety hazard.
• Connect the AC adapter only to an AC outlet that supplies the
rated voltage required by the adapter.
• When disconnecting the AC adapter from the AC outlet,
always grasp the adapter itself and do not pull at the cable.
•When not using the unit for an extended period, disconnect the
AC adapter from the AC outlet.
[Battery operation]
• Use four conventional IEC R6 (size AA) batteries (alkaline).
• The 707II cannot be used for recharging.
Pay close attention to the labelling of the battery to make sure
you choose the correct type.
•When not using the unit for an extended period, remove the
batteries from the unit.
• If battery leakage has occurred, wipe the battery compartment
and the battery terminals carefully to remove all remnants of
battery fluid.
• While using the unit, the battery compartment cover should be
closed.
• Environment
Avoid using your 707II in environments where it will be
exposed to:
• Extreme temperature
• High humidity or moisture
• Excessive dust or sand
• Excessive vibration or shock
• Handling
Since the 707II is a precision electronic device, avoid
applying excessive force to the switches and buttons. Also
take care not to drop the unit, and do not subject it to shock
or excessive pressure.
• Alterations
Never open the case of the 707II or attempt to modify the
product in any way since this can result in damage to the
unit.
• Connecting cables and input and output
jacks
You should always turn off the power to the 707II and all
other equipment before connecting or disconnecting any
cables. Also make sure to disconnect all cables and the AC
adapter before moving the 707II.
• Electrical interference
For safety considerations, the 707II has been designed to
provide maximum protection against the emission of
electromagnetic radiation from inside the device, and
protection from external interference. However, equipment
that is very susceptible to interference or that emits powerful
electromagnetic waves should not be placed near the 707II,
as the possibility of interference cannot be ruled out entirely.
With any type of digital control device, the 707II included,
electromagnetic interference can cause malfunctioning and
can corrupt or destroy data. Care should be taken to
minimize the risk of damage.
• Cleaning
Use a soft, dry cloth to clean the 707II. If necessary, slightly
moisten the cloth. Do not use abrasive cleanser, wax, or
solvents (such as paint thinner or cleaning alcohol), since
these may dull the finish or damage the surface.
Please keep this manual in a convenient place
for future reference.
Usage Precautions
SAFETY PRECAUTIONS
This symbol indicates explanations
about extremely dangerous matters. If
users ignore this symbol and handle the
device the wrong way, serious injury or
death could result.
This symbol indicates explanations about
dangerous matters. If users ignore this
symbol and handle the device the wrong way,
bodily injury and damage to the equipment
could result.
Caution
Caution
Caution
Warning
Caution
Warn ing
Caution
Page 3

3
ZOOM 707II GUITAR
●
Versatile effects
The Variable Architecture Modeling System(VAMS) adapts the internal configuration of the unit to
achieve exactly the desired sound. The wide range of choices includes distortion effects, modulation
effects such as chorus and flanger, reverb and delay effects, as well as a booster and cabinet
simulator. A total of 74 effects are available.
●
120 great sounding patches
Effect module setting combinations can be stored as patches. The 707II offers 60 patches which can
be freely modified by the user, plus 60 preset patches. These settings will let you make great music
straight away.
●
Full complement of distortion effects
33 distortion type effects not only recreate the characteristics of famous guitar amps but also
duplicate the sound and operation of renowned compact effects and pedals. Dedicated knobs and
keys assure quick and easy operation.
●
Designed for use on stage
The 707II can be powered from an AC adapter or batteries. With one set of alkaline batteries, the
unit will operate continuously for up to 11 hours. The large display showing patch names, and the
built-in expression pedal for fine-tuning the sound are great for live performances.
●
Knobs provide direct editing feel
Various aspects (effect parameters) that control the sound of a module can be directly modified with
three handy knobs. The Easy Edit feature lets you tweak the knobs for adjusting parameters also
during play. Of course, you can store the results in your own patch.
●
Sampling feature for recording
A guitar phrase or the signal from an input source such as a CD player can be sampled for up to 6
seconds and stored in the internal memory. When using a 16 MB SmartMedia card, you can record
up to 60 samples or 4 minutes of music. A recorded sample can even be played back at a slower
speed without altering the pitch. This is a great tool for enhancing a live performance or for copying
a lick or fast-played phrase.
●
SmartMedia card allows unlimited number of patches and samples
Patches and samples can be stored on separately available SmartMedia cards (up to 60 patches x 5
groups / 60 samples per card). Stored data can be read back into the unit at any time. This gives you
unlimited potential for building a library of patches and samples.
●
Integrated rhythm function
60 built-in rhythm patterns using natural-sounding PCM sources are available, which is great for
practice or a quick jam session.
●
Link samples, rhythm, pedal settings to patches
The selection of rhythm patterns and samples can be stored for each patch individually, allowing
synchronized operation when switching patches. Even the pedal adjustment range can be memorized
for a patch.
In order to get the most out of this sophisticated product, please read this manual carefully before
use.
We recommend that you keep the manual at hand for future reference.
Introduction
Introduction
Thank you for purchasing the
ZOOM 707II GUITAR
(subsequently referred to as "
the 707II
").
The 707II is a sophisticated multi-effect processor for guitar with the following attractive features.
Page 4
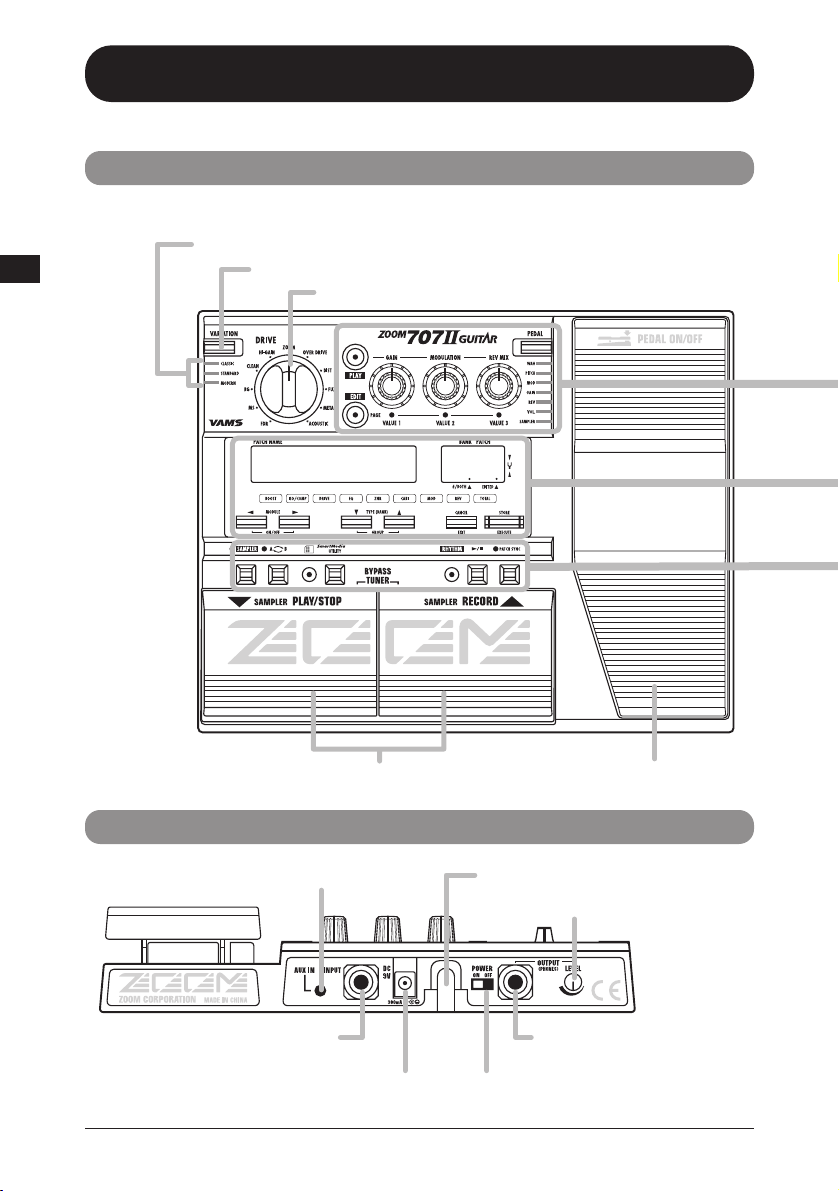
POWER
A0
[W]/[Q] foot switches
Expression pedal
[AUX IN] jack
[INPUT] jack
[DC 9V] (AC adapter) jack [POWER] switch
[OUTPUT] knob
Cable hook
[OUTPUT/PHONES] jack
[DRIVE VARIATION] LEDs
[DRIVE VARIATION] key
[DRIVE] knob
This section identifies the parts of the 707II and describes preparations for use.
Controls and Functions
Controls and Functions
Top Panel
4
ZOOM 707II GUITAR
Rear Panel
Page 5
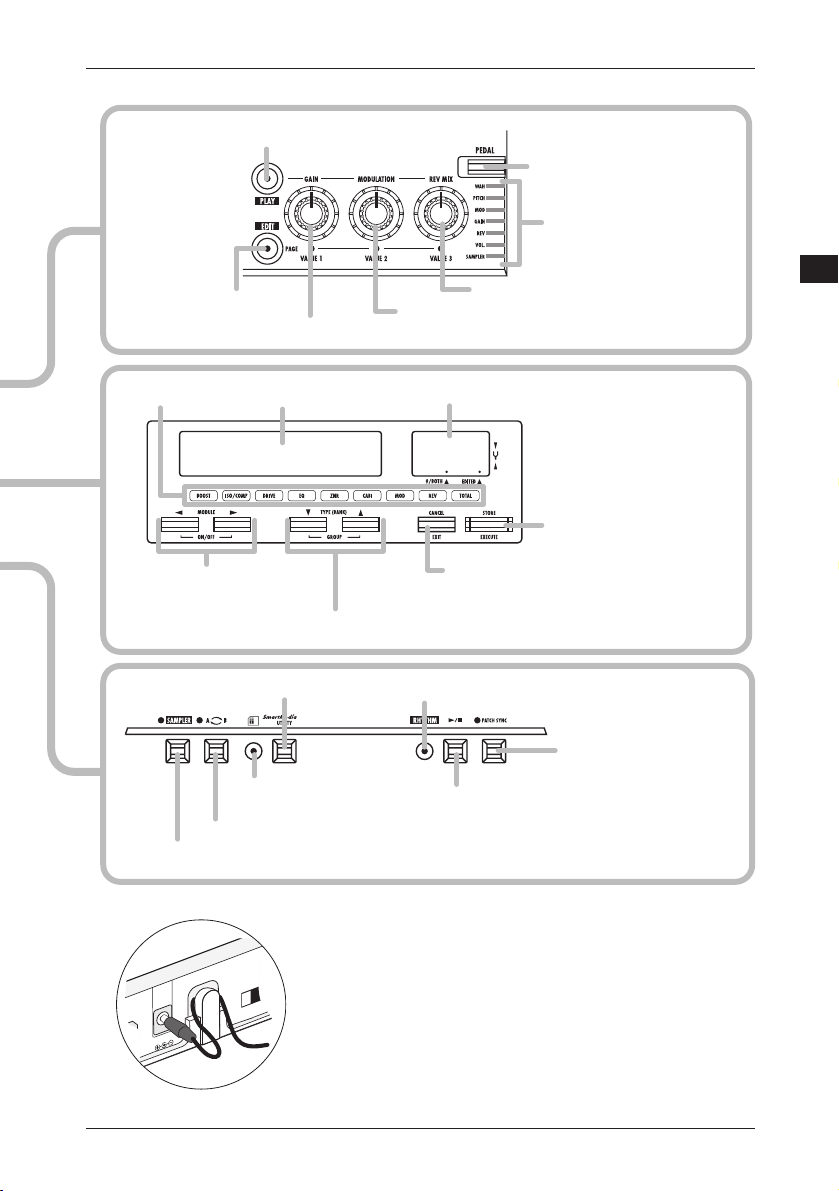
POWER
A0
Display
Module LEDs
MODULE [E]/[R] keys
[BANK/PATCH] indicator
[STORE/EXECUTE] key
[CANCEL/EXIT] key
[PLAY] key
[PEDAL] (pedal assign) key
[PEDAL] (pedal assign)
LEDs
[EDIT] key
Parameter knob 1
Parameter knob 2
Parameter knob 3
TYPE [W]/[Q] (type/bank) keys
[SAMPLER] key
[A→B] (A→B repeat) key
[SMART MEDIA] LED
[UTILITY] key
[PATCH SYNC] key
[RHYTHM] LED
[R/P] (play/stop) key
5
ZOOM 707II GUITAR
Controls and Functions
Loop the cable of the AC adapter
around the hook as shown in the
diagram before connecting it to the
[DC 9V] jack. This will prevent the
plug from being disconnected if the
cable is accidentally pulled.
DC
9V
POWER
IN
)
300mA
OFF
ON
Page 6
Preparations
Preparations
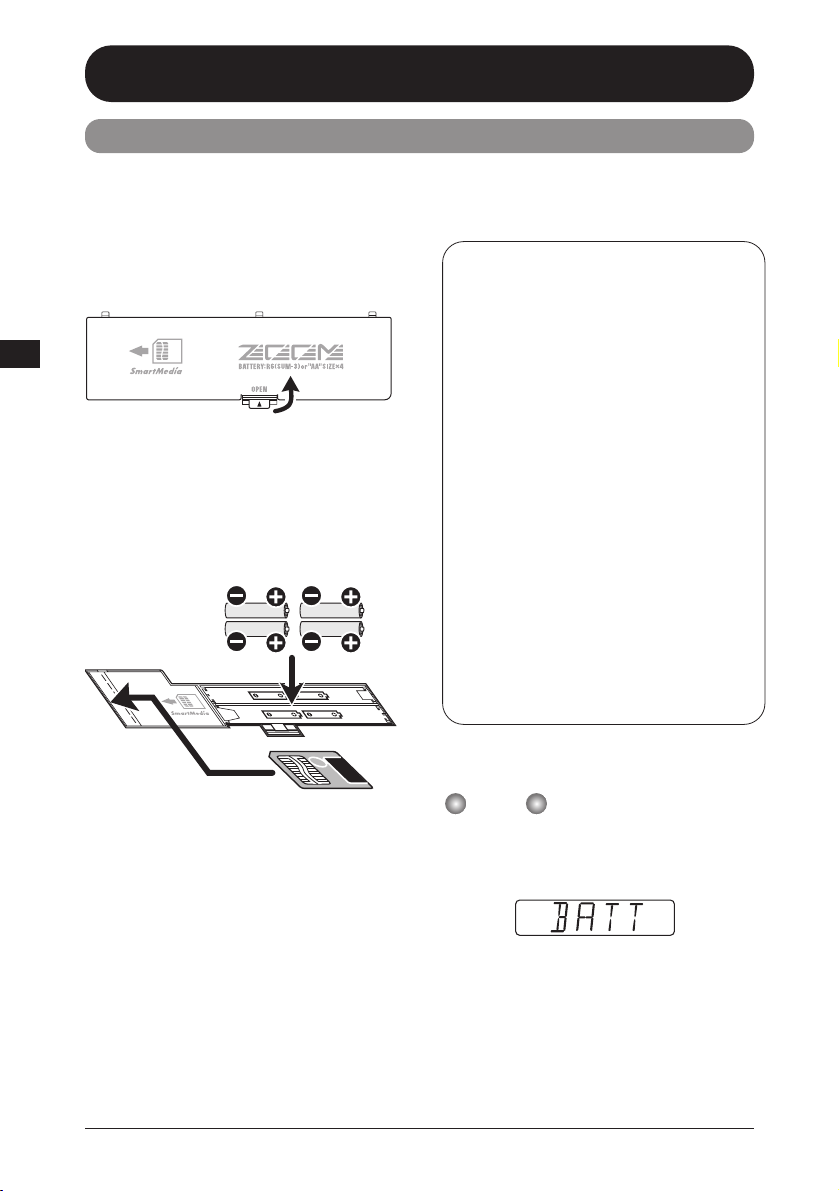
Inserting Batteries and a SmartMedia card
6
ZOOM 707II GUITAR
1.
Turn the unit over and open the
battery compartment cover.
2.
Insert four fresh IEC R6 (size AA)
batteries into the battery compartment.
The use of alkaline batteries is
recommended.
The correct battery orientation is indicated
inside the battery compartment.
3.
To store patch and sample data,
insert a SmartMedia card into the
card slot, as shown above.
◆ Caution ◆
●
If the card is inserted upside down or
with wrong orientation, it does not go
all the way in. Do not try to force the
card in, because this will damage the
card.
●
Never insert or remove the
SmartMedia card while power to the
unit is turned on. Otherwise all data on
the card may be lost.
●
Standard SmartMedia cards (designed
for 3.3V) with a capacity from 16 – 128
MB can be used.
●
When wishing to use a SmartMedia
card that has been formatted in other
equipment such as a computer or
digital camera, you must format the
card again in the 707II, as described
on page 31.
●
To store the contents of a SmartMedia
card in a computer, a SmartMedia
card reader/writer is required.
4.
Close the battery compartment cover.
• If the indication "BATT" appears on the display,
the batteries are exhausted. Replace the
batteries as soon as possible.
• When not using the unit for an extended period,
remove the batteries to prevent the possibility of
damage by leaking battery fluid.
PATCH NAME
NOTE
SmartMedia card
Four IEC R6
(size AA) batteries
When wishing to power the 707II from batteries, insert them as shown below. When wishing
to store patch data or sample data on a SmartMedia card, insert the card as shown below.
Page 7

7
ZOOM 707II GUITAR
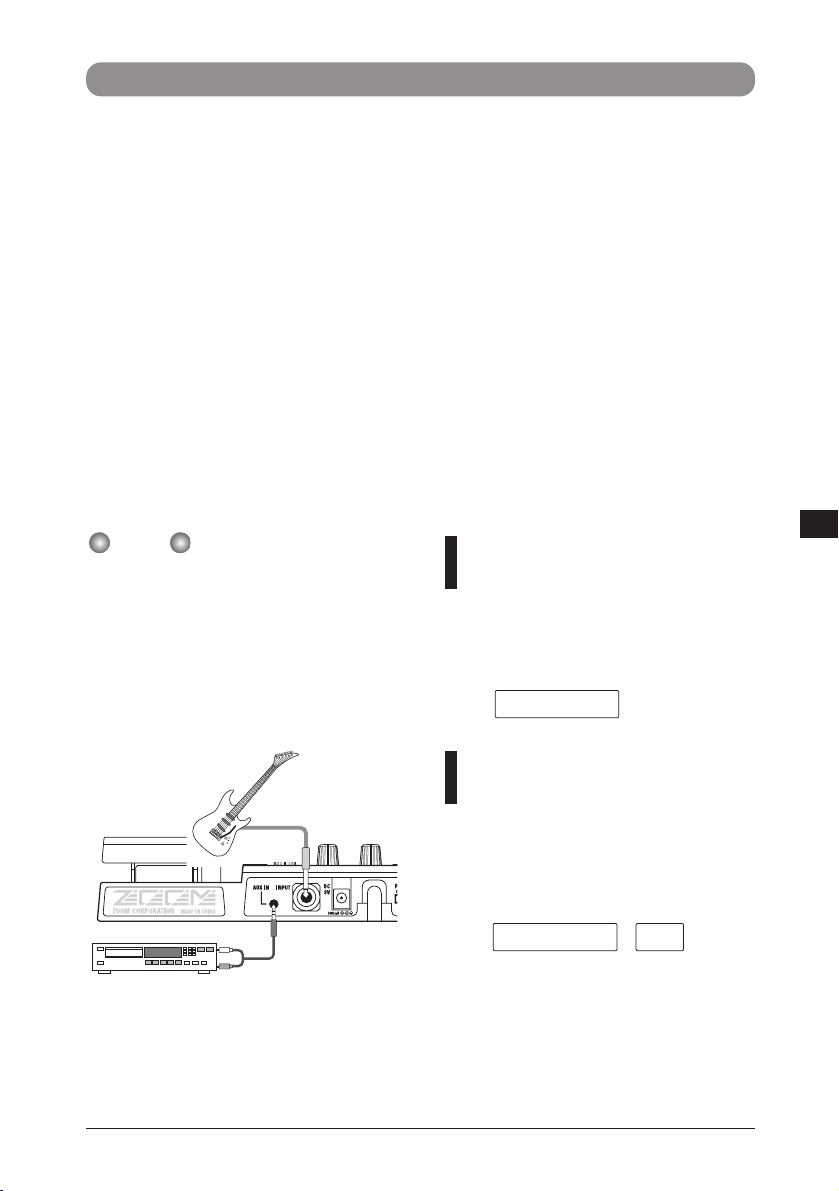
1.
Make sure that the amplifier and the
707II are off.
Turn the volume at the amplifier to minimum.
2.
To power the unit from the AC
adapter, insert the small plug of the
adapter cable into the [DC 9V] jack on
the 707II. Then plug the adapter into
an outlet.
3.
Connect the guitar to the [INPUT] jack
of the 707II, using a mono cable.
4.
Connect the [OUTPUT/PHONES] jack
of the 707II to the guitar amplifier,
using a mono cable.
You can also use a Y cable to supply the signal
in stereo to two amplifiers.
5.
To monitor the sound with headphones,
plug the phones into the [OUTPUT/
PHONES] jack.
6.
Turn power on in the following order:
707II → amplifier.
If you turn the 707II on while the amplifier is
already powered up, damage to the speaker may
result. Always turn power to the amplifier on last.
7.
Raise the volume setting of the
instrument and amplifier, and adjust
the [OUTPUT] knob on the rear panel
of the 707II.
NOTE
Preparations
Getting Connected
Guitar
Guitar amplifier
AC adapter
CD player or similar
Headphones
Page 8
POW
PRESET group
USER group
BANK F
PATCH 1
BANK b
PATCH 0
PATCH 2
PATCH 3
PATCH 4
PATCH 5
PATCH 6
PATCH 7
PATCH 8
PATCH 9
PATCH 1
BANK A
PATCH 0
PATCH 2
PATCH 3
PATCH 4
PATCH 5
PATCH 6
PATCH 7
PATCH 8
PATCH 9
BANK 5
PATCH 1
BANK 1
PATCH 0
PATCH 2
PATCH 3
PATCH 4
PATCH 5
PATCH 6
PATCH 7
PATCH 8
PATCH 9
PATCH 1
BANK 0
PATCH 0
PATCH 2
PATCH 3
PATCH 4
PATCH 5
PATCH 6
PATCH 7
PATCH 8
PATCH 9
Selecting a patch
In play mode, press one of
the [W]/[Q] foot switches.
In play mode, the information shown
at right appears on the display and
the [BANK/PATCH] indicator.
To directly switch the bank, press one of
the TYPE [W]/[Q] keys.
Each push of a key switches to the next bank.
Patches, groups and banks
A combination of 707II effects, each with
distinct parameter settings, is called a patch.
Patches are organized in banks (A - F, 0 - 5)
and patch numbers (0 - 9). It is also possible
to assign a name of up to six characters to a
patch.
The patches of the 707II are stored in two
different groups: the USER group (banks A
- F) for read-and-write patches that can be
freely overwritten by the user, and the
PRESET group (0 - 5) for read-only patches
that cannot be changed by the user. There
are 60 patches in each group, resulting in a
total of 120 patches.
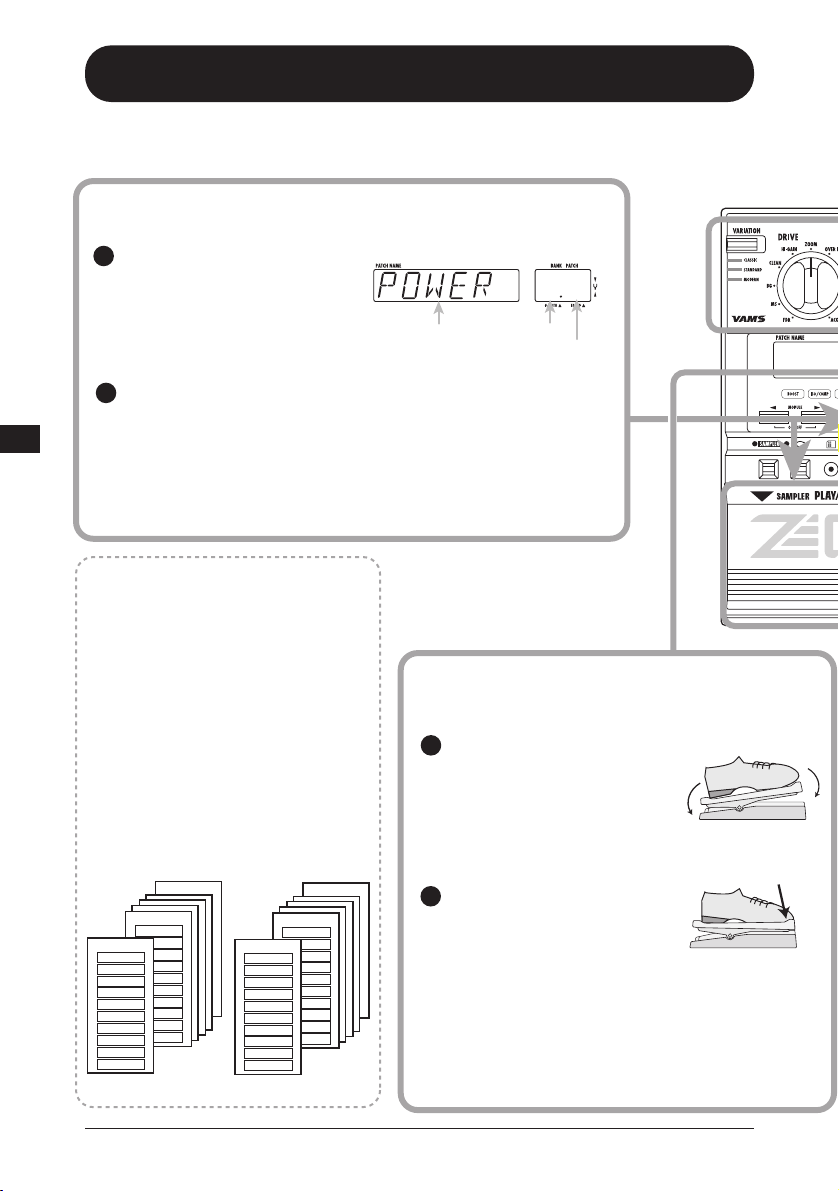
To alter an effect in real
time, move the
expression pedal while
playing your instrument.
The effect depth or volume changes as you move the
pedal. Which parameter changes depends on the patch.
To switch the effect
module on or off, push
the expression pedal
fully down.
The expression pedal also incorporates
a push-down switch that allows on/off
control of a specific effect module.
Move back
and forth
Altering an effect with
the pedal
Push down all
the way
◆
For details on selecting the effect module to be
controlled by the pedal, see p. 23.
◆
For a detailed explanation of patch switching, see p. 10.
◆
To set up the unit so that the patch sound is switched only after
confirmation, see p. 23.
A0
Bank
Patch name
Patch number
1
2
1
2
Quick Guide (Let's Play)
Quick Guide
(Let's Play)
8
ZOOM 707II GUITAR
Immediately after being turned on, the 707II is in the so-called "play mode". The Quick Guide
explains the basic steps in play mode. This will let you use the unit right away.
Page 9
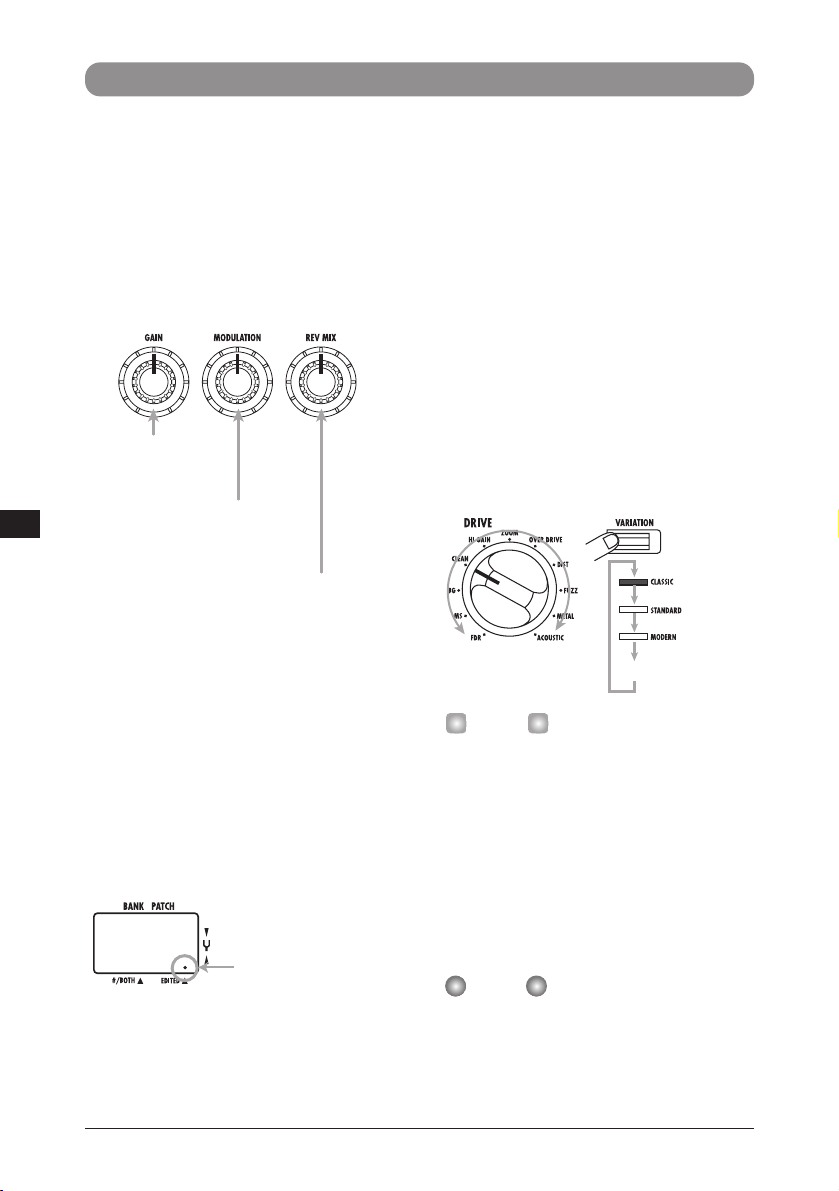
A0
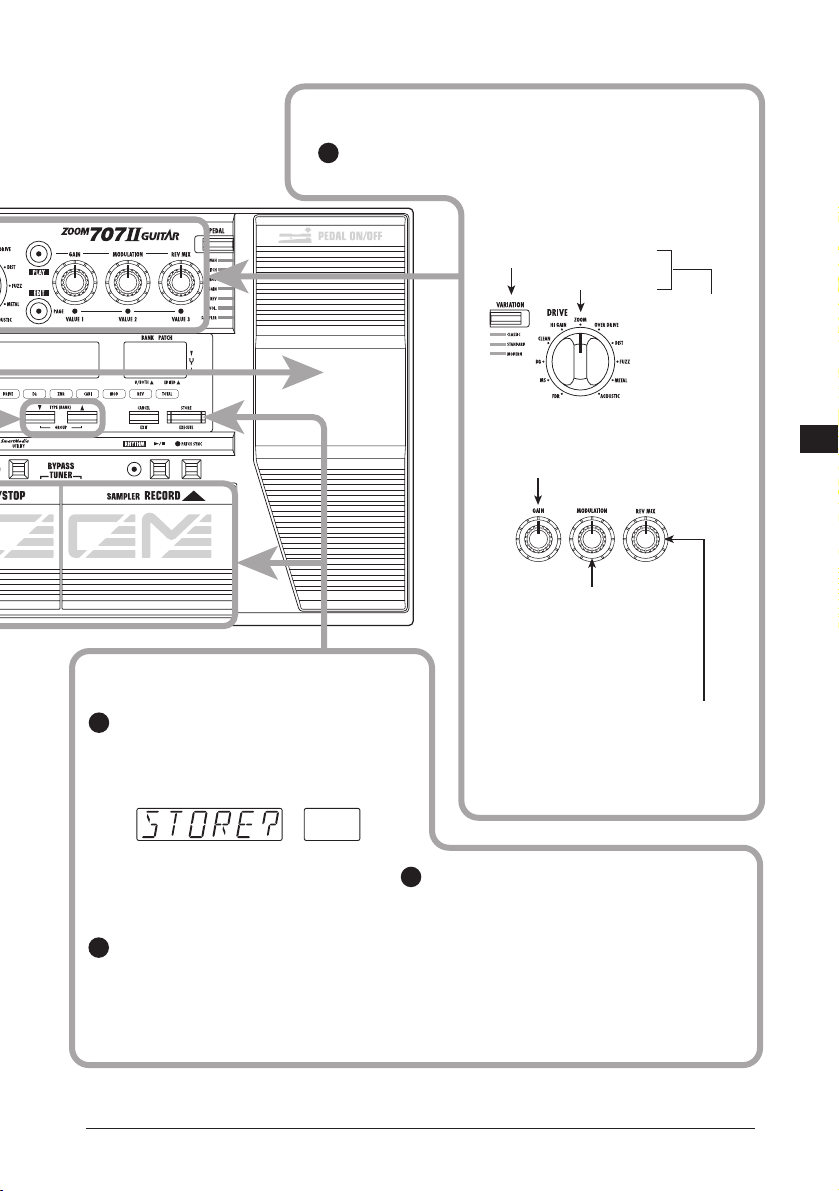
While playing your instrument, operate the
knobs on the panel.
Each knob controls a certain parameter,
as indicated below.
Selects the
distortion type
for the DRIVE
module.
Adjusts the modulation rate of
chorus, flanger, and similar
effects. For some patches, the
knob adjusts the echo level.
◆
For a list of parameters adjusted with the
knobs, see p. 33 – 38.
◆
To edit a patch more in detail, see p. 18.
◆
For a detailed explanation of patch storing, see p. 20.
◆
For information on how to return the USER group
patches to the factory default condition, see p. 32.
Parameter knob 1
Adjusts the distortion level of the
DRIVE module.
Adjusts the reverb and echo level.
Press the [STORE/EXECUTE]
key.
The 707II goes into store standby mode.
If a patch from the PRESET group was
selected, "A0" in the USER group is
automatically selected as store target.
Use the [W]/[Q] foot
switches to select the store
target bank and patch
number.
To carry out the store operation,
press the [STORE/EXECUTE] key
once more.
To cancel the process, press the [CANCEL/
EXIT] key.
[DRIVE VARIATION] key
Parameter knob 2
Changing the sound of a patch
Storing an effect
A0
Parameter knob 3
[DRIVE] knob
1
2
3
1
9
ZOOM 707II GUITAR
Quick Guide (Let's Play)
Page 10
Listening to Patches (Play Mode Operation)
Listening to Patches
(Play Mode Operation)
Panel Display in Play Mode
Selecting a Patch
10
ZOOM 707II GUITAR
1.
In play mode, press one of the
[W]/[Q] foot switches.
Pressing the [Q] foot switch moves to the next
higher patch, and pressing the [W] foot switch
moves to the next lower patch.
2.
To directly switch the bank, use the
TYPE [
W
]/[Q] keys.
Pressing the TYPE [Q] key moves to the next
higher bank, and pressing the TYPE [W] key
moves to the next lower bank.
While playing a rhythm pattern, direct bank
selection is not available.
3.
It is also possible to set up the unit so
that only patches from the USER
group or from the PRESET group are
switched. To do this, press both TYPE
[W]/[Q] keys together.
With each push, the group from which patches
can be selected is toggled as follows.
To set up the unit so that the patch sound is
switched only after confirmation, see p. 23.
HINT
NOTE
A0A1A9B0F9
5
9
0
0010910
USER group
PRESET group
The condition where you call up patches stored in the memory of the 707II and use them for
playing your instrument is called "play mode". This is the condition the unit is in when you
turn the power on. The various operations possible in play mode are described in this
section.
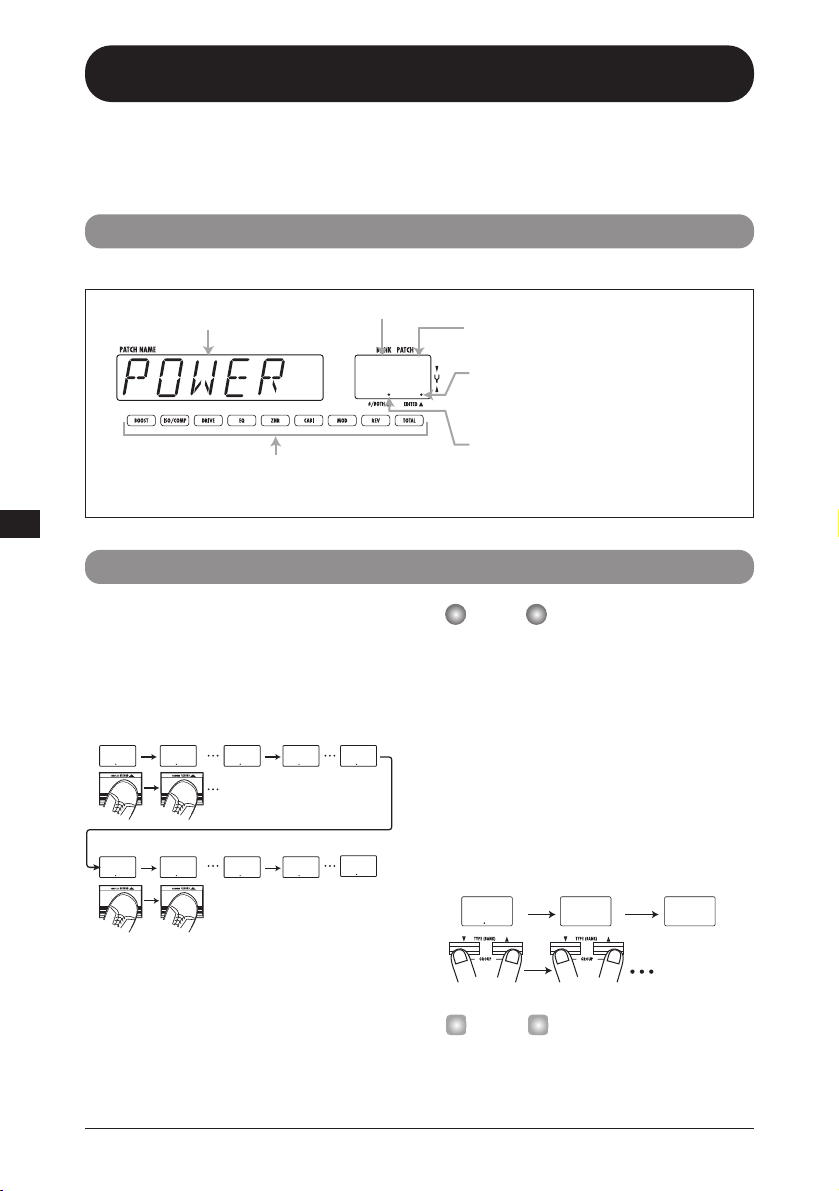
In play mode, the panel shows the following information.
Patch name
Bank (A - F, 0 - 5)
A0
Module LEDs corresponding to modules that
are ON in the currently selected patch are lit.
Patch number (0 - 9)
When a dot (.) is shown here, an
effect parameter has been changed.
When a dot (.) is shown here, patches
can be selected from either the USER
group or the PRESET group.
Both groups
USER group
only
PRESET group
only
02A202
Page 11
11
ZOOM 707II GUITAR
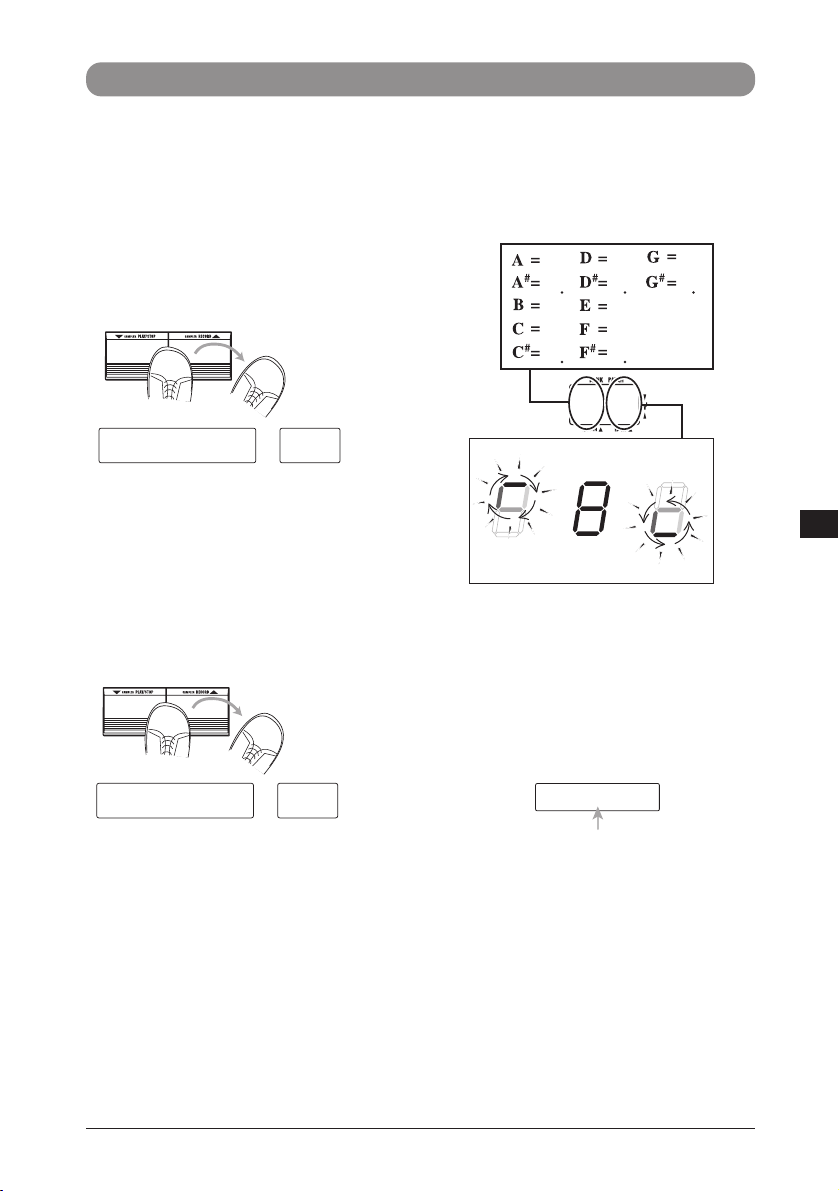
1.
To set the 707II to the bypass (mute)
condition, press and release both
[W]/[Q] foot switches in play mode.
When you press and immediately release both
foot switches, the 707II goes into bypass mode.
While the 707II is in the bypass condition, all
effects are off and only the direct sound is
output. The expression pedal works as a volume
pedal.
When you press and hold both foot switches for
at least 1 second and then release them, the
707II goes into mute mode.
While the 707II is in the mute condition, there is
no sound output from the [OUTPUT/PHONES]
jack.
2.
Play the open string you want to tune.
The [BANK/PATCH] indicator shows the note
which is closest to the current pitch. Tune your
instrument until the note indication shows the
desired note.
3.
To change the reference pitch of the
tuner, use the TYPE [W]/[Q] keys.
The current reference pitch is briefly shown on
the display. The default setting after power-on is
center A = 440 Hz.
4.
While the reference pitch is shown,
you can change the pitch by pressing
the TYPE [W]/[Q] keys.
The available setting range is 435 – 445 Hz in
1-Hz steps. When the 707II is turned off and on
again, it will be reset to 440 Hz.
5.
Press one of the [W]/[Q] foot switches.
The 707II returns to the play mode.
**
MUTE
Press and release
after at least 1 second
**
BYPASS
Release immediately
Listening to Patches (Play Mode Operation)
Using the Tuner Function
The 707II incorporates an auto-chromatic tuner for guitar. To use the tuner function, the builtin effects must be bypassed (temporarily turned off) or muted (direct sound and effect sound
turned off).
The note is shown on the left part of
the indicator
A
A
B
C
C
D
D
G
G
E
F
F
A8
Pitch is sharp Correct pitch Pitch is flat
The more the pitch is off,
the faster the indicator rotates
To the right of the note, a symbol indicates
by how much the tuning is off.
440HZ
Reference pitch value
Page 12
Using the Easy Edit Function
12
1.
To change the sound of a patch in
play mode, operate parameter knobs
1 – 3.
The parameters controlled by the knobs are as
follows.
The actual parameter controlled by parameter
knobs 1 – 3 depends on the effect selected for
the current effect module.
When a knob is turned, the current setting of the
relevant parameter is shown on the
BANK/PATCH indicator, and a dot (.) appears
at the "EDITED" position. This indicates that
the parameter has been changed. If the
parameter is returned to the original setting, the
dot disappears.
2.
Use the [DRIVE] knob and [DRIVE
VARIATION] key to select the effect to
be used for the DRIVE module.
The effects of the DRIVE module can be
directly selected with the [DRIVE] knob and
[DRIVE VARIATION] key.
The [DRIVE] knob selects the general effect
type (amp type or compact effect type), and the
[DRIVE VARIATION] key selects one of
several variations for that effect. Each push of
the [DRIVE VARIATION] key cycles through
the CLASSIC → STANDARD →MODERN
settings, and the corresponding LED lights up.
• For an explanation of DRIVE module effects, see
p. 33.
• In play mode, you can also use the MODULE
[
E
]/[R] keys to edit the PATLVL parameter
(volume level for each patch).
3.
To store an edited patch, carry out the
steps for storing (→p. 20).
Note that if another patch is called up without
storing the edited patch, the edited contents will
be lost.
While playing a rhythm pattern, the parameter
knobs 1 – 3 adjust rhythm parameters.
NOTE
HINT
ZOOM 707II GUITAR
The 707II incorporates a function called "Easy Edit" that allows adjusting some effect
parameters during play. This is done with the parameter knobs 1 – 3, the [DRIVE VARIATION]
key, and the [DRIVE] knob on the front panel.
Listening to Patches (Play Mode Operation)
Parameter knob 1
Adjusts the DRIVE
module distortion
amount.
24
Parameter knob 2
Adjusts a major parameter
of the MOD module (such
as chorus depth).
Parameter knob 3
Adjusts a major parameter of the REV
module (such as echo or reverb
amount).
When a dot (.) is shown
here, the effect
parameter has been
changed.
Lit
(DRIVE module
Off
is off)
Page 13
ZOOM 707II GUITAR
13
1.
When wishing to use a SmartMedia
card, turn power to the 707II off,
insert the SmartMedia card into the
card slot, and then turn power on
again. (For information on inserting a
SmartMedia card, see p. 6.)
• Before using a SmartMedia card in the 707II, it
must be formatted (
→
p.31).
• Never insert or remove the SmartMedia card
while power to the unit is turned on. Otherwise all
data on the card may be lost.
2.
Connect the input source to the
[INPUT] jack or [AUX IN] jack.
3.
Turn power to the 707II on and press
the [SAMPLER] key in play mode.
For patches in which the expression pedal is
assigned to SAMPLER, the sampler function
can also be turned on by pushing the pedal all
the way down (
→ p.24).
The subsequent steps are slightly different,
depending on whether a SmartMedia card is
inserted or not.
SmartMedia card not inserted
The following indication appears on the display,
and the unit goes into the sampler standby
mode. Proceed to step 4.
SmartMedia card inserted
The following indication appears on the display,
and the unit goes into the sampler standby
mode. The sample number is shown on the
[BANK/PATCH] indicator.
When using a SmartMedia card, the samples on
the card are assigned numbers from 1 – 60. If
necessary, use parameter knob 1 to select a
number. Then proceed to step 4.
Using the Sampler Function
The 707II incorporates a sampler function that allows recording the input signal in the internal
memory or on a SmartMedia card.
This can be used to record a phrase from the guitar connected to the [INPUT] jack or the
sound from an external source such as a CD player connected to the [AUX IN] jack. When
using the internal memory, the maximum recording duration is 6 seconds (1 sample). When
using a 16 MB SmartMedia card, up to 4 minutes (maximum 60 samples) can be recorded. A
recorded phrase can also be played at slower speed without changing the pitch. This is
convenient to copy a fast-played phrase from a CD.
For playing a sample, you can choose between two modes: "one-shot playback" where the
sampled phrase is played once when you operate a key or pedal, and "loop playback", where
the sampled phrase continues to play until stopped.
Listening to Patches (Play Mode Operation)
NOTE
Guitar
CD player
INPUT
AUX IN
SAMPLE
SP NO
1
Page 14

14
•If the indication "NO" is followed by a "*", a
sample is recorded in that number.
• If you select a number in which a sample has
already been recorded, the previous sample will
be overwritten. Be careful not to overwrite a
sample that you wish to keep.
• For information on how to assign a sample to a
patch when storing, see p. 27.
• For information on how to delete unwanted
samples from a SmartMedia card, see p. 31
4.
Use the TYPE [W]/[Q] keys to select
"GT" or "AUX" as input source.
When you press one of the TYPE [W]/[Q]
keys, the currently selected input source is
shown on the display. Select one of the
following two sources.
●
GT
Signal from [INPUT] jack
●
AUX
Signal from [AUXI IN] jack
• If "GT" is selected, the signal after passing the
effects is sampled. If "AUX" is selected, the
effects are bypassed.
• When recording from the [AUX IN] jack, you can
minimize noise and distortion by turning the
[OUTPUT] knob up past the midway point and
adjusting the output level of the external source
so that the volume is about equal to that of a
guitar.
• After recording, you can use the SP LVL
parameter to control the playback level of the
sample.
5.
Press the [Q] foot switch and play the
phrase you want to record (or start
playback at the external source
component).
During sampling, the indication "REC" is
shown on the display. The module LEDs on the
panel show the elapsed sampling time.
•When sampling to internal memory, sampling
ends when all module LEDs are lit.
• When sampling to SmartMedia card, the module
LEDs go through the cycle repeatedly.
6.
To stop sampling, press the [W] foot
switch.
If you do not press any key after starting to
sample, sampling automatically ends when the
maximum sampling time is up (6 seconds with
internal memory, 4 minutes with a 16 MB
SmartMedia card).
7.
Use parameter knob 2 to select the
sample playback mode.
When you operate parameter knob 2, the
indication "SPMODE" appears on the display.
The [BANK/PATCH] indicator shows the
playback mode. The following settings are
available.
●
n1
Normal speed playback
●
n2
Half tempo, half pitch playback
●
P2
Half tempo, normal pitch playback
●
n4
Quarter tempo, quarter pitch playback
●
P4
Quarter tempo, normal pitch playback
8.
Use the foot switches and panel keys
to control sample playback (start/
stop/rewind/fast-forward).
While the sampler function is on, you can use
the foot switches and panel keys for one-shot
playback.
NOTE
HINT
HINT
NOTE
SP NO
ZOOM 707II GUITAR
Listening to Patches (Play Mode Operation)
2
6 seconds
SPMODE
N1
Page 15

15
9.
If necessary, you can adjust the
sample playback level with parameter
knob 3.
When you operate parameter knob 3, the
indication "SP LVL" appears on the display.
The [BANK/PATCH] indicator shows the input
signal level, using a range from 0 – 30. Adjust
the level to obtain a suitable playback volume.
You can also adjust the playback level with the
expression pedal.
10.
To carry out loop playback of a
specific interval, play the sample and
press the [A→B] key at the desired
start point.
The [A→B] LED flashes and loop playback is
enabled. The point at which you pressed the
[A→B] key is taken as the loop start point. If no
end point has been set, the end of the sample is
taken as the end point.
11.
If you wish to set the loop end point,
press the [A→B] key once more
during loop playback of the sample.
The [A→B] LED now stays constantly lit, and
the point at which you pressed the [A→B] key
is taken as the loop end point.
When the end point has been set, loop playback
is carried out between the start and end points.
12.
To cancel loop playback, press the
[A→B] key once more (or change the
sample number).
The [A→B] LED goes out, and the unit returns
to normal one-shot playback.
13.
To terminate the sampler function,
press the [SAMPLER] key while the
sampler is stopped, or push the
expression pedal all the way down.
The unit returns to normal play mode.
• The start point and end point settings are reset
when you change the sample nunber or switch
the sampler function off or on.
•The sampler function cannot be used together
with the rhythm pattern function.
• While the sampler function is on, the MOD
module and REV module cannot be used. (They
are automatically set to OFF.)
•When sampling to a SmartMedia card, the
sampled data are stored on the SmartMedia card
automatically. There is no need for the user to
perform any steps for storing.
NOTE
Playback
Start point End point
Playback
Start point
HINT
MODULE [E] Key
y
ZOOM 707II GUITAR
Listening to Patches (Play Mode Operation)
Rewind
Press both keys to return to
the start of the sample
[W] foot switch
Play/Stop
MODULE [R] Ke
Fast-forward
[Q] foot switch
Start sampling
SP LVL
30
Page 16

Using the Rhythm Function
16
ZOOM 707II GUITAR
The 707II incorporates 60 rhythm patterns which can be selected for playback. This is
convenient for parts practice or a quick jam session.
1.
Press the [R/P] key in play mode.
Rhythm pattern playback starts. The display
shows the currently selected pattern, and the
[BANK/PATCH] indicator briefly shows the
pattern number. The [RHYTHM] LED flashes
in sync with the rhythm pattern tempo.
2.
Use parameter knobs 1 – 3 to control
rhythm pattern play.
In play mode, parameter knobs 1 – 3 have the
following functions.
When you operate a parameter knob during
rhythm pattern play, the indication on the
display and [BANK/PATCH] indicator changes
temporarily.
• You can also switch patches during rhythm
pattern playback.
• You can also play a rhythm pattern in the
bypass/mute condition and in the edit mode, but
the parameter knobs cannot be used to control
the rhythm pattern in this case.
•The rhythm pattern type, tempo, and volume
settings revert to the default condition when the
unit is turned off and on again.
• You can also use the TYPE [
W
]/[Q] keys to
change the pattern type.
3.
To stop rhythm pattern playback,
press the [R/P] key once more.
It is also possible to store a rhythm pattern for
specific patches. When you have assigned
rhythm patterns to patches and you set the
[PATCH SYNC] key to On, rhythm patterns
will be switched together with the patches (→ p.
26).
HINT
Listening to Patches (Play Mode Operation)
POWER
Parameter knob 1
Changes the rhythm
pattern type.
Parameter knob 2
Changes the rhythm
pattern tempo.
Parameter knob 3
Changes the rhythm
pattern volume.
A0
8BEAT
Rhythm pattern name
Parameter knob 1
1
BPM120
Parameter knob 2
Rhythm pattern tempo
LVL 20
Parameter knob 3
Rhythm pattern volume
Page 17

ZOOM 707II GUITAR
17
Rhythm pattern list
Listening to Patches (Play Mode Operation)
Rhythm
pattern
8BEAT1
8BEAT2
8BEAT3
8BEATSHUFFLE
16BEAT1
16BEAT2
16BEAT3
16BEATSHUFFLE
3/4
6/8ROCK
5/4
5/4ROCK
ROCK'nROLL1
ROCK'nROLL2
ROCK1
ROCK2
HARDROCK1
HARDROCK2
METAL1
METAL2
THRASH
PUNK
POP1
POP2
DANCE1
DANCE2
DANCE3
FUNK1
FUNK2
BALLAD1
BALLAD2
BLUES1
BLUES2
COUNTRY
BOSSANOVA
JAZZ1
JAZZ2
REGGAE
SKA
LATIN1
LATIN2
Display
indication
8BEAT
8BEAT
8BEAT
8SHUFL
16BEAT
16BEAT
16BEAT
16SHFL
3/4
6/8
5/4
5/4
Rc R
Rc R
ROCK
ROCK
HARD
HARD
METAL
METAL
THRASH
PUNK
POP
POP
DANCE
DANCE
DANCE
FUNK
FUNK
BALLAD
BALLAD
BLUES
BLUES
CONTRY
BOSSA
JAZZ
JAZZ
REGGAE
SKA
LATIN
LATIN
[BANK/PATCH]
indicator
1
2
3
1
2
3
1
2
1
2
1
2
1
2
1
2
1
2
1
2
3
1
2
1
2
1
2
1
2
1
2
Basic
patterns
Rock
patterns
Dance
patterns
Other
genres
Rhythm
pattern
METRO
(triple time)
METRO
(quadruple time)
METRO
(quintuple time)
METRO
INTRO1
INTRO2
INTRO3
INTRO4
INTRO5
INTRO6
INTRO7
INTRO8
INTRO9
ENDING1
ENDING2
ENDING3
ENDING4
ENDING5
ENDING6
Display
indication
METRO
METRO
METRO
METRO
INTRO
INTRO
INTRO
INTRO
INTRO
INTRO
INTRO
INTRO
INTRO
ENDING
ENDING
ENDING
ENDING
ENDING
ENDING
[BANK/PATCH]
indicator
3
4
5
1
2
3
4
5
6
7
8
9
1
2
3
4
5
6
Metronome
patterns
Intro
patterns
Ending
patterns
Page 18

Changing the Sound of a Patch (Edit Mode)
Changing the Sound of a Patch
(Edit Mode)
Patch Configuration
Basic Edit Mode Steps
18
ZOOM 707II GUITAR
Within each module, there are several different but related effects which are called effect types. For
example, the MODULATION module comprises effect types such as CHORUS, PHASER, and WAH.
The elements that determine the sound of a patch are called effect parameters. Each module has several
effect parameters, whose value can be adjusted with the parameter knobs 1 – 3, the [DRIVE] knob,
[DRIVE VARIATION] key, etc.
Also within the same module, different effect types will have different parameters.
NOTE
The edit mode allows you to freely alter the parameters that make up a patch, so that you
can create your own patches. This section describes how to edit patches and how to store
edited patches.
Each patch of the 707II consists of several effects (effect modules), as shown in the
illustration below. A patch is a combination of modules, each with their distinct parameter
settings.
This section describes the basic procedure for editing patches. For information on effect
types and parameters in the various modules, see p. 33 – 38.
1.
In play mode, select the patch you
want to edit.
Patches for editing can be selected from either
the USER group or the PRESET group.
However, the PRESET group does not allow
storing. When you have altered a patch from the
PRESET group and want to store it, "A0" in the
USER group is automatically selected as store
target.
2.
Press the [EDIT] key.
The 707II switches to the edit mode. The LED
of the module currently selected for editing
flashes. (The first time you switch to edit mode
after the unit was turned on, the TOTAL module
will be selected.)
3.
Use the MODULE [E]/[R] keys to
select the module you want to edit.
Modules are switched in the order shown below,
and the respective module LED is flashing.
The display shows the effect type currently
selected for that module. If the effect can be
controlled with the expression pedal, the
indication "Pd" is shown on the [BANK/
PATCH] indicator.
INPUT OUTPUT
BOOSTER
ISO/COMP DRIVE EQ ZNR CABINET MODULATION DLY/REV
BOOSTER
ISO/COMP
DRIVE EQ ZNR CABINET
MODULATION
DLY/REV TOTAL
Page 19

19
ZOOM 707II GUITAR
Because the ISOLATOR, EQ, and TOTAL
modules have many parameters, settings are
divided into several pages. To switch the page,
press the [EDIT] key while the corresponding
module LED is lit.
4.
To switch the on/off status of the
selected module, press both MODULE
[E]/[R] keys together.
When you change the module on/off status,
effect type selection, or a parameter value, a dot
(.) appears at the "EDITED" position of the
[BANK/PATCH] indicator. When this dot is
shown in edit mode, it means that the currently
selected module has been edited. If you return
the module to the original setting, the dot
disappears.
5.
To change the effect type of the
currently selected module, press one
of the TYPE [W]/[Q] keys.
6.
To change a parameter setting, use
the parameter knobs 1 – 3.
Parameter knobs 1 – 3 serve for adjusting three
parameters of the currently selected module.
When you operate a knob, the display shows the
parameter name, and the [BANK/PATCH]
indicator shows the current setting value.
For example, if the effect type ROOM is
selected for the REV module, parameter knobs
1 – 3 control the following parameters.
●
Parameter knob 1:
TIME
●
Parameter knob 2:
TONE
●
Parameter knob 3:
MIX
7.
If you want to check the current
setting without moving the parameter
knob, press the TYPE [W]/[Q] keys
together. With each push of the two
keys, the names of parameters 1 – 3
and the respective settings are
shown.
8.
To directly switch the effect type of
the DRIVE module, use the [DRIVE]
knob and [DRIVE VARIATION] key.
As in play mode, the [DRIVE] knob and
[DRIVE VARIATION] key directly control the
effect type of the DRIVE module.
9.
Repeat steps 3 – 8 to edit other
modules.
10.
When editing is completed, press the
[PLAY] key or the [CANCEL/EXIT] key.
The 707II returns to the play mode. A dot (.)
appears at the "EDITED" position of the
[BANK/PATCH] indicator if any aspect of the
patch has been edited.
If you wish to keep the patch, be sure to perform
the store operation. Otherwise all changes will be
permanently lost as soon as you switch to
another patch. (
→ P. 20)
NOTE
NOTE
HALL
Changing the Sound of a Patch (Edit Mode)
Effect type Shown if selected effect can
24
PD
be controlled by pedal
When a dot (.) is
shown here, the
currently selected
module was edited.
TIME
First push
TONE
Second push
MIX
Third push
20
10
7
Page 20

Changing the Sound of a Patch (Edit Mode)
20
ZOOM 707II GUITAR
Storing and Swapping Patches
This section describes how to store an edited patch in memory, and how to swap patches in
the USER group.
1.
In play mode or edit mode, press the
[STORE/EXECUTE] key.
The 707II enters the store standby condition.
The patch name and the indications "SAVE"
and "SWAP" are shown alternately on the
display. The [BANK/PATCH] indicator shows
the bank and patch number.
To change the name of an edited patch, see p. 38.
2.
Use the MODULE [E]/[R] keys to
select either "SAVE" or "SWAP".
If the original patch is from the PRESET group,
"SWAP" cannot be selected.
3.
Use the TYPE [W]/[Q] keys or the
[W]/[Q] foot switches to select the
target patch for storing.
The name of the newly selected patch and the
indication "STORE?" are shown alternately on
the display. The bank and patch number flash on
the [BANK/PATCH] indicator.
The PRESET group cannot be selected as store
target. If you press the [STORE/EXECUTE] key
while a patch from the PRESET group is selected,
the selection automatically changes to "A0" in the
USER group.
4.
To carry out the store or swap
operation, press the [STORE/
EXECUTE] key once more.
The store or swap operation is performed, and
then the unit returns to the original mode. If the
patch in step 1 was being edited, the editing
changes are stored.
If you press the [CANCEL/EXIT] key instead
of the [STORE/EXECUTE] key, the store/swap
operation is canceled and the unit returns to the
original mode.
NOTE
NOTE
HINT
STORE?
E3
Page 21

Other Functions
Using the Hold Delay Function
21
1.
In play mode, select the patch to use
with hold delay.
2.
Press the [EDIT] key to activate edit
mode, and select "HLDDLY" as effect
type for the DLY/REV module.
3.
Use parameter knob 1 to set the TIME
parameter.
The TIME parameter determines the length of
the recording interval for hold delay. Turning
the knob changes the value as follows.
●
1 – 99:
10 – 990 milliseconds (10-ms units)
●
1.0 – 2.0:
1.0 – 2.0 seconds (100-ms units)
●
Mn (Manual):
Recording starts when you
press the [
Q
] foot switch and ends when you
press the [
Q
] foot switch again (max. 2
seconds).
4.
Use parameter knob 2 to set the
MODE parameter.
The MODE parameter determines how the
recorded phrase is played back. The following
three modes are available.
●
nL (Normal):
Normal direction playback
●
So (Sound-on-sound):
Recorded contents
are played back repeatedly to create an overlay.
If you press the [
Q
] foot switch, the phrase
played until the switch is pressed again is added
to the sound.
●
rS (Reverse):
Reverse direction playback.
5.
Use parameter knob 3 to set the MIX
parameter.
The MIX parameter controls the mixing ratio of
the delayed sound. A setting of 30 results in
equal levels of direct sound and delayed sound.
6.
Press the [PEDAL] key a few times
until the [PEDAL] LED of the REV
module flashes.
The expression pedal can now be used to switch
the hold delay function on and off.
7.
Store the patch and return to play
mode.
When a patch in which hold delay can be used
is selected in play mode, the DLY/REV module
LED and the [PEDAL] LED are flashing.
8.
Push the expression pedal all the way
down.
The hold delay function is switched on and the
unit is in recording standby mode. The
indication "STOP" is shown on the display.
9.
While playing your guitar, press the
[Q] foot switch to start recording.
The indication "REC" is shown on the display.
The actual operation depends on the TIME
parameter set in step 3.
Other Functions
The 707II also incorporates various other convenient functions which are described in this
section.
ZOOM 707II GUITAR
The DLY/REV module comprises a hold delay effect that allows recording and playing a
guitar phrase of up to 2 seconds. You can also play the phrase in reverse or perform loop
playback to create interesting "sound-on-sound" layers.
STOP
Page 22

Other Functions
22
■ If a numeric value is set as TIME
parameter
Recording starts at the moment you push the
[Q] foot switch and continues for the duration
set with the TIME parameter. After recording
ends, loop playback starts automatically.
■ If TIME parameter is set to "Mn"
Recording starts at the moment you push the
[Q] foot switch and continues until you push
the switch again, or until 2 seconds have
elapsed. After recording ends, loop playback
starts automatically.
[Q] foot switch
Effect
sound
Direct
sound
[W] foot switch
Effect
sound
Direct
sound
[Q] foot switch [W] foot switch
Loop playback
TIME
parameter
ZOOM 707II GUITAR
Effect
sound
Direct
sound
[Q] foot switch [Q] foot switch
10.
To stop playback, press the [W] foot
switch.
11.
To turn the hold delay function off,
push the expression pedal once more
all the way down.
The unit returns to the play mode.
■ If TIME parameter is set to "Mn" and
MODE parameter to "So"
When the TIME parameter is set to "Mn" and
the MODE parameter to "So" (sound-on-sound),
pressing the [Q] foot switch adds the currently
played phrase until the switch is pressed again.
Page 23

ZOOM 707II GUITAR
23
1.
To change the patch call method to
preselect, hold down the [Q] foot
switch while turning power to the
707II on.
2.
Select the patch in play mode.
When you select a patch in this condition, the
display and [BANK/PATCH] indicator show
the new patch (flashing), but the sound does not
change.
3.
To confirm the patch change, press
both [W]/[Q] foot switches together.
The display and [BANK/PATCH] indicator stop
flashing, and the unit switches to the new patch,
causing the sound to change.
To return to the default patch selection method,
turn the 707II off and on again.
HINT
confirmed
A3A3
A0 A1 A2 A3
Other Functions
Changing the Patch Call Method
In the factory default condition, patches are switched as soon as you make the selection,
resulting in an immediate change in the sound. If you want to change to a distant patch, all
the intermediate patches will briefly change the sound, which may not be desirable,
especially during a performance. In such a case, you can change to the preselect method.
When the preselect method is enabled, you first select the desired patch, but the sound does
not change until confirmed by you.
Using the Pedal to Control an Effect
You can use the expression pedal of the 707II to control the parameter, on/off status, or
volume level of a specific effect. The pedal adjustment range can be memorized individually
for a patch.
1.
Select a patch in play mode.
2.
Use the [PEDAL] key to select the
module/effect type to be controlled
with the expression pedal.
Each push of the [PEDAL] key cycles through
the [PEDAL] LEDs as shown below.
The [PEDAL] LEDs indicate the module/effect
type assigned to the pedal. The meaning of the
LEDs is explained below.
●
WAH
The expression pedal functions as a pedal wah.
The effect type P-WAH (pedal wah) of the
MODULATION module is assigned to the
pedal, and the FREQ parameter can be adjusted.
Even if another effect type is currently selected
for the MODULATION module, the effect type
is temporarily switched to P-WAH.
●
PITCH
The expression pedal functions as a pitch
shifter. The effect type P-PIT (pedal pitch) of
the MODULATION module is assigned to the
pedal, and pitch can be adjusted. Even if another
effect type is currently selected for the
Lit
Out
(Pedal is inactive)
Page 24

ZOOM 707II GUITAR
24
MODULATION module, the effect type is
temporarily switched to P-PIT.
●
MOD
The effect type currently selected for the
MODULATION module is adjusted by the
pedal. Which parameter is controlled depends
on the effect type.
●
GAIN
The distortion gain is adjusted by the pedal. The
GAIN parameter of the DRIVE module (for
some effect types the RESONANCE/TOP
parameter) is assigned to the pedal.
●
REV
The effect type currently selected for the
DLY/REV module is adjusted by the pedal.
Which parameter is controlled depends on the
effect type.
●
VOL
The master volume is adjusted by the pedal.
●
SAMPLER
The sampler function is switched on/off by the
pedal. Pushing the pedal all the way down
toggles between sampler on ([PEDAL] LED lit)
and sampler off ([PEDAL] LED flashed).
Also if a module is currently off, selecting it
with the [PEDAL] key will cause its [PEDAL]
LED to light and the module will temporarily
come on. If a patch is stored in this condition,
the module will be stored as ON.
The actual parameter that is controlled by the
pedal depends on the effect type. For details, see
p. 33 – 38.
The above procedure for assigning a module/effect
type to the expression pedal can be carried out also
in edit mode.
3.
Press the [EDIT] key to activate the
edit mode.
4.
Use the MODULE [E]/[R] keys to
select the TOTAL module.
5.
Press the [EDIT] key once more.
The key lights up in green. In this condition,
parameter knobs 2 and 3 have the following
functions.
6.
Use parameter knobs 2 and 3 to set
the PDLMIN value (when pedal is fully
raised) and PDLMAX value (when
pedal is fully lowered). The setting
range for both values is 0 – 10.
When you operate parameter knob 2, the
indication "PDLMIN" appears on the display.
When you operate parameter knob 3, the
indication "PDLMAX" appears on the display.
The 0 – 10 value is shown on the [BANK/
PATCH] indicator.
Setting PDLMIN or PDLMAX to 0 means that
the parameter assigned to the pedal will be at
the minimum value. Setting PDLMIN or
PDLMAX to 10 means that the parameter
assigned to the pedal will be at the maximum
value.
When the 707II is in the default condition,
PDLMIN is set to 0 and PDLMAX is set to 10.
As the pedal is depressed, the parameter value
gradually increases from minimum to
maximum.
MAX=10
MIN=0
HINT
Other Functions
Lit
Parameter knob 2
Sets the value for the
fully raised position
of the pedal.
Parameter knob 3
Sets the value for the
fully lowered position
of the pedal.
Page 25

25
For example, when PDLMIN is set to 4 and
PDLMAX to 8, the parameter adjustment range
will be limited as shown in the illustration
below.
When PDLMIN is set to 7 and PDLMAX to 2,
pushing the pedal decreases the parameter
value, and the range is as shown below.
7.
Press the [STORE/EXECUTE] key to
store the patch.
The module which is assigned to the pedal will
automatically be stored as ON.
8.
In play mode, move the pedal while
playing your guitar.
The parameter assigned to the pedal changes.
9.
Push the pedal fully down.
The module which is assigned to the pedal is
switched between on and off. If the pedal is
assigned to the sampler, the sampler function is
switched on or off.
If the pedal is assigned to the volume, pushing
the pedal fully down does not perform any
switching action.
NOTE
MAX=2
MIN=7
MAX=8
MIN=4
ZOOM 707II GUITAR
Adjusting the Expression Pedal
The expression pedal is adjusted for optimum operation at the factory, but sometimes,
readjustment may be necessary. If pushing the pedal fully down does not have a strong
effect, or if the volume or sound changes excessively even when the pedal is only lightly
pushed, adjust the pedal as follows.
1.
Turn power to the 707II on while
keeping the [PEDAL] key depressed.
The indication "MIN" appears on the display.
2.
With the expression pedal fully raised,
press the [STORE/EXECUTE] key.
The display indication changes to "MAX".
3.
Push the expression pedal fully down
and then lift your foot off the pedal.
The pedal goes back a little.
4.
Press the [STORE/EXECUTE] key.
The adjustment is completed, and the unit
returns to the play mode.
• The position of the pedal in step 3 determines the
on/off switching point. If you want the pedal to
perform on/off switching with a lighter touch, set
the pedal to a somewhat higher position.
• If the indication "ERROR" appears, return to step
2 and repeat the procedure.
HINT
Push strongly, so that
pedal touches here.
When foot is lifted,
pedal returns slightly.
MAX
Other Functions
Page 26

Storing Rhythm Patterns and Samples as Part of a Patch
26
By assigning rhythm patterns to patches, you
can have the rhythm change in sync with the
patches.
1.
In play mode, select the patch to
which you want to assign a rhythm
pattern, and press the [EDIT] key.
2.
Use the MODULE [E]/[R] keys to
select the TOTAL module.
3.
Press the [EDIT] key once more.
The [EDIT] key lights up in green. You can
now use parameter knob 1 to select the rhythm
pattern to assign to the patch.
4.
Use parameter knob 1 to select the
desired rhythm pattern.
The pattern name appears on the display. You
can play the pattern by pressing the [R/P] key.
Depending on the rhythm pattern type selected
here (intro, ending, other), the pattern playback
operation when switching patches will differ.
5.
Press the [STORE/EXECUTE] key to
store the patch.
Assign other rhythm patterns to other patches in
the same way.
6.
When all patches have been prepared,
press the [PATCH SYNC] key so that
the LED of the key is lit.
When the [PATCH SYNC] key is set to ON,
patches and rhythm patterns are switched in
sync.
When the [PATCH SYNC] key is set to OFF, the
rhythm pattern assignment to the patches has no
effect.
7.
Call up the patch to which the desired
rhythm pattern was assigned.
When the [PATCH SYNC] key is set to ON, the
operation when switching patches depends on
the type of rhythm pattern that has been
assigned.
●
Intro rhythm pattern (INTRO 1 – 9)
When a patch is switched, rhythm pattern play
starts automatically. The pattern continues to
play until the [R/P] key is pressed or until you
switch to another patch.
●
Ending rhythm pattern (ENDING 1 – 6)
After switching a patch, rhythm pattern play
begins if you press the [R/P] key. The pattern
automatically stops at the end of the pattern.
●
Other rhythm pattern
After switching a patch, rhythm pattern play
begins if you press the [R/P] key. The pattern
continues to play until the [R/P]key is pressed
again or until you switch to another patch.
NOTE
HINT
Assigning a rhythm pattern to
a patch
ZOOM 707II GUITAR
The patches of the 707II can contain not only information about effect type and parameter
settings but also about rhythm patterns and samples stored on a SmartMedia card. Using
this capability, you can quickly switch rhythm patterns on the fly, or you can have the same
sample play every time you call up a certain patch.
Other Functions
Parameter knob 1
Lit
Selects the rhythm pattern
to assign to the patch
Page 27

27
8.
Press the [R/P] key.
The rhythm pattern of the patch selected in step
7 starts to play. (If an intro type pattern has been
assigned, playback starts when the patch is
switched in step 7.)
9.
If necessary, use parameter knobs 2
and 3 to adjust the tempo and volume
of the pattern.
Also when the [PATCH SYNC] key is ON,
parameter knobs 2 and 3 can be used to adjust
the tempo and volume for all patterns. (If
desired, you can also use parameter knob 1 to
switch to manual operation of the pattern.)
10.
Switch the patch.
When you switch the patch while a rhythm
pattern is playing, the pattern continues to play
until the end of the current measure and then
switches to the pattern that is assigned to the
new patch.
Switch to other patches in the same way.
11.
To stop rhythm pattern playback,
press the [R/P] key.
If an ending pattern is assigned to a patch, the
pattern will play when switching to the patch,
and then stop.
12.
Press the [PATCH SYNC] key so that
the LED of the key is out.
By assigning a sample stored on SmartMedia
card to a patch, you can have the sample play
every time you select the patch.
1.
Insert the SmartMedia card into the
707II and sample the phrase or source
material that you want to use.
2.
In play mode, select the patch to
which you want to assign a sample,
and press the [EDIT] key.
3.
Use the MODULE [E]/[R] keys to
select the TOTAL module.
The "PATLVL" (patch level) parameter appears
on the display.
4.
Press the [EDIT] key twice.
The [EDIT] key lights up in orange. You can
now use parameter knobs 1 – 3 to control the
following functions.
For details regarding playback mode, see p. 14.
5.
Use parameter knobs 1 – 3 to select
the sample number, playback method,
and playback level.
HINT
Assigning a sample to a
patch
ZOOM 707II GUITAR
Other Functions
Switch to pattern of patch B
Rhythm
pattern
Patch
Pattern of
patch A
Patch A Patch B
Pattern of
patch A
Pattern of
patch B
Pattern of
patch B
Switch to patch B
Lit
Parameter knob 1
Selects the number
of the sample on
the SmartMedia card.
Parameter knob 2
Selects the sample playback
method (n1, n2, P2, n4, P4).
Parameter knob 3
Sets the sample
playback level (0 – 30).
Page 28

Using SmartMedia card (Utility Mode)
28
If you want to check out the sample, press the
[SAMPLER] key to activate the sampler mode,
and press the [W] foot switch to play the
currently selected sample.
6.
Press the [STORE/EXECUTE] key to
store the patch.
Assign other samples to other patches in the
same way.
7.
When all patches have been prepared,
select a patch in play mode to which a
sample was assigned.
8.
Press the [SAMPLER] key to activate
the sampler mode.
For a patch where the expression pedal is
assigned to SAMPLER, you can also push the
expression pedal fully down to set the sampler
function to ON.
9.
Press the [W] foot switch.
The sample assigned to the patch is played.
10.
Use the MODULE [E]/[R] keys, and
[W]/[Q] foot switches to control play/
stop/rewind/fast-forward.
11.
Press the [SAMPLER] key to turn the
sampler mode off.
ZOOM 707II GUITAR
A SmartMedia card inserted in the 707II can hold up to five groups of patches and 60
samples. This section describes the utility mode that provides various SmartMedia card
related functions.
The steps for various utility mode functions are
similar, as described below.
1.
Verify that a SmartMedia card is
inserted in the card slot.
When a SmartMedia card is inserted, the
[SMART MEDIA] LED is lit. (For information
on how to insert a SmartMedia card, see p. 6.)
2.
In play mode, press the [UTILITY] key.
The 707II enters the utility mode. The
indication "LOAD" appears on the display.
3.
Use the TYPE [W]/[Q] keys to call up
the desired function.
The utility mode comprises the following
functions.
●
LOAD (Load patch)
Loads a single patch stored on a SmartMedia
card into the memory of the unit (USER group).
●
SAVE (Save patch)
Stores a single patch from the memory of the
unit (USER group) on a SmartMedia card.
●
ALLOAD (Load patch group)
Loads an entire patch group stored on a
SmartMedia card into the memory of the
unit (USER group).
●
ALSAVE (Save patch group)
Stores all patches of the USER group from the
memory of the unit on a SmartMedia card.
●
P DEL (Delete patch group)
Deletes a patch group stored on a SmartMedia card.
●
SP DEL (Delete sample)
Deletes a sample stored on a SmartMedia
card.
●
FORMAT
Formats a SmartMedia card card.
Basic utility mode operation
steps
Other Functions
LOAD
Page 29

29
4.
Press the [STORE/EXECUTE] key.
The setting screen for the function selected in
step 3 appears.
The subsequent steps depend on the selected
function. For details, see the respective sections.
Storing a single patch on a
SmartMedia card
You can store a single patch from the internal
memory of the 707II on a SmartMedia card.
1.
In play mode, select the patch from
internal memory that you want to
store.
A patch that is currently being edited cannot be
stored on the SmartMedia card. You must store
the patch in internal memory first.
2.
Activate utility mode and select
"SAVE". Then press the [STORE/
EXECUTE] key.
The indication "GROUP" appears on the
display, and the [BANK/PATCH] indicator
shows the group number (1 – 5) for storing. If a
"*" is shown after "GROUP", there are patches
stored in that group.
3.
Use the TYPE [W]/[Q] keys to select
the patch group (1 – 5) for storing, and
then press the [STORE/EXECUTE]
key.
One SmartMedia card can hold up to five patch
groups (with 60 patches per group). Pressing the
[STORE/EXECUTE] key confirms the store
target group. The indication "SAVE" appears on
the display, and the [BANK/PATCH] indicator
shows the store target bank (A – F) and patch
number (0 – 9).
4.
Use the TYPE [W]/[Q] keys and
[W]/[Q] foot switches to select the
desired bank (A – F) and patch
number (0 – 9) in the patch group.
5.
Press the [STORE/EXECUTE] key.
The indication "SURE?" appears on the display.
6.
To carry out the operation, press the
[STORE/EXECUTE] key once more.
The single patch is stored on the SmartMedia
card. When the process is completed, the unit
reverts to play mode.
If you press the [CANCEL/EXIT] key instead
of the [STORE/EXECUTE] key, the store
operation is canceled.
• Any patch that is present in the target location on
the SmartMedia card will be overwritten. Take
care not to accidentally overwrite a patch that
you want to keep.
• Never insert or remove the SmartMedia card
while power to the unit is turned on. Otherwise all
data on the card may be lost.
• If the target group is empty, all patches of the
USER group are stored.
Loading a single patch from a
SmartMedia card
You can load a single patch from a SmartMedia
card into the internal memory of the 707II.
1.
In play mode, select the patch in
internal memory into which you want
to load the patch.
2.
Activate utility mode and select
"LOAD". Then press the [STORE/
EXECUTE] key.
The indication "GROUP" appears on the
display, and the [BANK/PATCH] indicator
shows the group number (1 – 5) from which to
load.
3.
Use the TYPE [W]/[Q] keys to select
the patch group (1 – 5) on the
SmartMedia card from which to load,
and then press the [STORE/
EXECUTE] key.
The indication "LOAD" appears on the display,
Utility mode functions
ZOOM 707II GUITAR
Other Functions
NOTE
Page 30

30
and the [BANK/PATCH] indicator shows the
load source bank (A – F) and patch number (0 –
9).
4.
Press the [STORE/EXECUTE] key.
The indication "SURE?" appears on the display.
5.
To carry out the operation, press the
[STORE/EXECUTE] key once more.
The single patch is loaded from the SmartMedia
card into the memory of the unit. When the
process is completed, the unit reverts to play
mode.
If you press the [CANCEL/EXIT] key instead
of the [STORE/EXECUTE] key, the load
operation is canceled.
• Any patch that is present in the target location
will be overwritten. Take care not to accidentally
overwrite a patch that you want to keep.
• Never insert or remove the SmartMedia card
while power to the unit is turned on. Otherwise all
data on the card may be lost.
Storing a group on a SmartMedia
card
You can store the USER group of the 707II on a
SmartMedia card as a patch group.
1.
In utility mode, select "ALSAVE" and
press the [STORE/EXECUTE] key.
The indication "GROUP" appears on the
display, and the [BANK/PATCH] indicator
shows the group number (1 – 5) for storing.
2.
Use the TYPE [W]/[Q] keys to select
the patch group (1 – 5) for storing, and
then press the [STORE/EXECUTE]
key.
The indication "SURE?" appears on the display.
3.
To carry out the operation, press the
[STORE/EXECUTE] key once more.
The entire USER group of the 707II is stored on
the SmartMedia card. When the process is
completed, the unit reverts to play mode.
If you press the [CANCEL/EXIT] key instead
of the [STORE/EXECUTE] key, the store
operation is canceled.
Any patch group that was stored on the
SmartMedia card in that position will be
overwritten. Be careful not to overwrite a group
that you wish to keep.
Loading a group from a
SmartMedia card
You can load a patch group stored on a
SmartMedia card into the memory of the unit.
1.
In utility mode, select "ALLOAD" and
press the [STORE/EXECUTE] key.
The indication "GROUP" appears on the
display, and the [BANK/PATCH] indicator
shows the group number (1 – 5) for loading.
2.
Use the TYPE [W]/[Q] keys to select
the patch group (1 – 5) for loading,
and then press the [STORE/
EXECUTE] key.
The indication "SURE?" appears on the display.
3.
To carry out the operation, press the
[STORE/EXECUTE] key once more.
The entire selected patch group is loaded from
the SmartMedia card into the USER group of
the 707II. When the process is completed, the
unit reverts to play mode.
If you press the [CANCEL/EXIT] key instead
of the [STORE/EXECUTE] key, the load
operation is canceled.
All patches currently stored in the USER group of
the unit will be overwritten. Take care not to
accidentally overwrite patches that you want to
keep.
NOTE
ZOOM 707II GUITAR
Other Functions
NOTE
NOTE
Page 31

31
Deleting a group from a
SmartMedia card
You can delete any group stored on a
SmartMedia card.
1.
In utility mode, select "P DEL" and
press the [STORE/EXECUTE] key.
The indication "GROUP" appears on the
display, and the [BANK/PATCH] indicator
shows the group number (1 – 5) for deleting.
2.
Use the TYPE [W]/[Q] keys to select
the patch group (1 – 5) for deleting.
3.
Press the [STORE/EXECUTE] key.
The indication "SURE?" appears on the display.
4.
To carry out the operation, press the
[STORE/EXECUTE] key once more.
The entire selected patch group is deleted from
the SmartMedia card. When the process is
completed, the unit reverts to play mode.
If you press the [CANCEL/EXIT] key instead
of the [STORE/EXECUTE] key, the delete
operation is canceled.
A deleted group cannot be restored. Take care
not to accidentally delete a group that you want
to keep.
Deleting a sample from a
SmartMedia card
You can delete any sample that was stored on a
SmartMedia card while using the sampler
function.
No special steps must be performed by the user
for storing samples on a SmartMedia card.
Samples are stored automatically when the
SmartMedia card is inserted and the sampler
function is used.
1.
In utility mode, select "SP DEL" and
press the [STORE/EXECUTE] key.
The indication "SP NO" appears on the display,
and the [BANK/PATCH] indicator shows the
sample number (1 – 60) for deleting.
2.
Use the TYPE [W]/[Q] keys to select
the sample to erase from the
SmartMedia card.
3.
Press the [STORE/EXECUTE] key.
The indication "SURE?" appears on the display.
4.
To carry out the operation, press the
[STORE/EXECUTE] key once more.
The selected sample is deleted from the
SmartMedia card. When the process is
completed, the unit reverts to play mode.
If you press the [CANCEL/EXIT] key instead
of the [STORE/EXECUTE] key, the delete
operation is canceled.
A deleted sample cannot be restored. Take care
not to accidentally delete a sample that you want
to keep.
Formatting a SmartMedia card
"Formatting" is the process of preparing a
medium such as SmartMedia card for reading
and writing data. Before an off-the-shelf
SmartMedia card can be used in the 707II, it
must first be formatted in the unit.
1.
In utility mode, select "FORMAT" and
press the [STORE/EXECUTE] key.
The indication "EXEC?" appears on the display.
2.
Press the [STORE/EXECUTE] key
once more.
The indication "SURE?" appears on the display.
ZOOM 707II GUITAR
Other Functions
NOTE
NOTE
NOTE
Page 32

32
3.
To carry out the operation, press the
[STORE/EXECUTE] key once more.
The formatting process starts. When the process
is completed, the unit reverts to play mode.
If you press the [CANCEL/EXIT] key instead
of the [STORE/EXECUTE] key, the formatting
operation is canceled.
Formatting erases all data that may be present on
the SmartMedia card. Take care not to
accidentally format a card which already contains
data that you want to keep.
SmartMedia card error messages
While using a SmartMedia card, one of the
following error indications may appear. The
meaning is explained below.
●
[SMART MEDIA] LED does not light
A SmartMedia card with a capacity of less
than 8 MB may have been inserted.
●
ERROR
• The card was removed or inserted (during
sampler operation).
• The card was removed (in utility mode).
●
WP ERR
A write protect seal is attached to the
SmartMedia card. This prevents writing to
the card.
●
FULL
There is not enough free capacity on the
SmartMedia card.
●
NODATA
• There are no sampler data (during sampler
operation).
• There are no patch data or sampler data (in
utility mode).
●
NO USR
Loading cannot be performed, because the
load target is not the USER group (in utility
mode).
●
NO CARD
SmartMedia card is not inserted.
●
CD ERR
The card is defective, not inserted correctly,
or not properly formatted.
ZOOM 707II GUITAR
All Initialize/Factory Recall
The patches in the USER group can be returned to the original condition at any time, even if
you have changed them.
The All Initialize function returns all patches in the USER group to the default condition.
Factory Recall can be used to reset only specific patches in the USER group to the default
settings.
1.
Turn power to the 707II on while
pressing the [STORE/EXECUTE] key.
The indication "ALINIT" appears on the display.
●
To perform All Initialize, proceed to step 2.
●
To perform Factory Recall, use the TYPE
[
W
]/[Q] keys and [W]/[Q] foot switches to
select the patch that you want to return to the
factory default condition. (The bank and patch
number are shown on the [BANK/PATCH]
indicator.)
2.
Press the [STORE/EXECUTE] key
once more.
All Initialize or Factory Recall is carried out. If
All Initialize was carried out, the unit
automatically returns to the play mode.
The contents of patches stored by the user will
be lost when the defaults are restored. To cancel
All Initialize/Factory Recall, press the
[CANCEL/EXIT] key before step 2.
Other Functions
NOTE
Page 33

ZOOM 707II GUITAR
Effect Types and Parameters
33
Universal type compressor that controls attack rate in
two stages.
ATTACK(FAST/SLOW) FS, SL
Adjusts time interval from signal onset to start of
compression.
SENS
0 – 10
Adjusts compressor sensitivity.
LEVEL
1 – 8
Adjusts signal level after passing module.
Isolator that allows cutting or emphasizing a particular
band. There are two pages with parameters. Use the
[EDIT] key to switch between pages.
■ PAGE 1
HIGH
OFF, -12 – 12
Adjusts high-range mix.
MID
OFF, -12 – 12
Adjusts midrange mix.
LOW
OFF, -12 – 12
Adjusts low-range mix.
■ PAGE 2
FREQ L
5 – 8.0, 0.0
(5=50Hz, 8.0=8kHz, 0.0=10kHz)
Adjusts crossover frequency for low and mid range.
FREQ H
5 – 8.0, 0.0
Adjusts crossover frequency for mid and high range.
LEVEL
1 – 8
Adjusts signal level after passing module.
Parameter 3
Parameter 2
Parameter 1
Parameter 3
Parameter 2
Parameter 1
ISOLTR (Isolator)
TYPE 2
Parameter 3
Parameter 2
Parameter 1
COMP (Compressor)
TYPE 1
Effect Types and Parameters
In this section, all effect types and parameters of the modules in the 707II are explained.
The symbol indicates a parameter that is assigned to the expression pedal and can be
changed by moving the pedal (→p. 23). The symbols – indicate the parameters that
can be controlled by parameter knobs 1 – 3 in play mode.
BOOSTER Module
ISOLATOR/COMP (Isolator/Compressor) Module
DRIVE Module
GAIN
1, 2
Selects boost setting.
Parameter 1
BOOSTER
TYPE 1
The isolator allows cutting or emphasizing a particular band. The compressor serves to reduce excessive signal levels.
This module amplifies the input signal. The amount of boost can be set to Low (1) or High (2).
Classic bluesy sound of a built-in tube amp
Clean sound of a built-in tube amp
Drive sound of a built-in tube amp
Old-style sound of a British tube stack amp
Crunch sound of a British tube stack amp
Drive sound of a British tube stack amp
Old-style sound of a tube combo amp with gutsy
midrange
Drive sound of a tube stack amp with gutsy midrange
Metal sound of a tube stack amp with gutsy midrange
Old-style crunch sound
Clean and bright combo amp sound
Warm and powerful combo amp sound
MACHMODERN
JAZZ CSTANDARD
VX CRUCLASSIC
CLEAN
TYPE 4
BG MTLMODERN
BG DRVSTANDARD
BG OLDCLASSIC
BG
TYPE 3
MS DRVMODERN
MS CRUSTANDARD
MS OLDCLASSIC
MS
TYPE 2
FD DRVMODERN
FD CLNSTANDARD
FD BLUCLASSIC
FDR
TYPE 1
This module comprises 30 types of distortion and acoustic simulator effects. The [DRIVE] knob allows choosing the
amplifier or compact effect type, and the [DRIVE VARIATION] key allows choosing the tone or distortion variation.
Page 34

ZOOM 707II GUITAR
Effect Types and Parameters
EQ (Equalizer) Module
34
High-gain tube preamp sound
Tube stack amp sound for heavy metal
Warm and modern tube stack amp sound
ZOOM's original 9002 type sound
ZOOM's traditional rich lead sound
ZOOM's original powerful amp type sound
Dry overdrive sound
Overdrive sound with cabinet character
Overdrive sound with wide application range, from
booster to hard distortion
Characteristic dry distortion sound
Distortion sound with extreme signal boost
Extreme distortion sound
* Parameters for TYPE 1 - 8 are the same.
GAIN
1 – 30
Adjusts distortion intensity.
TONE
0 – 10
Adjusts tone.
LEVEL
1 – 8
Adjusts signal level after passing module.
Older-style, high-gain aggressive fuzz sound
Nostalgic sixties style standard fuzz sound
ZOOM original fuzz sound with oscillation control
* For this type, the action of parameter 2 differs for
WILDFZ/FUZZ and UF 1.
GAIN
1– 30
Adjusts distortion intensity.
(WILDFZ/FUZZ)
TONE 0 – 10
Adjusts tone.
(UF1)
RESO 0 – 10
Adjusts sound character.
LEVEL
1 – 8
Adjusts signal level after passing module.
Traditional metal style sound with prominent midrange
ZOOM's original metal sound with low range and high
range boost
Metal sound for 7-string guitar
GAIN
1 – 30
Adjusts distortion intensity.
TONE
0 – 10
Adjusts tone.
LEVEL
1 – 8
Adjusts signal level after passing module.
Changes the sound of an electric guitar to that of an
acoustic guitar. The [DRIVE VARIATION] key
switches the tone (fat, standard, bright).
TOP
1 – 10
Adjusts characteristic acoustic guitar string sound.
BODY
1 – 10
Adjusts body resonance.
LEVEL
1– 8
Adjusts signal level after passing module.
Parameter 3
Parameter 2
Parameter 1
AC BRIMODERN
AC STDSTANDARD
AC FATCLASSIC
ACOUSTIC (Acoustic Simulator)
TYPE 11
Parameter 3
Parameter 2
Parameter 1
MT 7THMODERN
METALSTANDARD
MTZCLASSIC
METAL
TYPE 10
Parameter 3
Parameter 2
Parameter 2
Parameter 1
UF 1MODERN
FUZZSTANDARD
WILDFZCLASSIC
FUZZ
TYPE 9
Parameter 3
Parameter 2
Parameter 1
HP DSTMODERN
TB DSTSTANDARD
V-DISTCLASSIC
DIST
TYPE 8
PD 1MODERN
ODSTANDARD
V-ODCLASSIC
OVER DRIVE
TYPE 7
Z PWRMODERN
Z LEADSTANDARD
9002CLASSIC
ZOOM (ZOOM original effects)
TYPE 6
SL DRVMODERN
PV DRVSTANDARD
MP 1CLASSIC
HI-GAIN
TYPE 5
This is a 4-band equalizer. There are two pages with parameters. Use the [EDIT] key to switch between pages.
■ PAGE 1
PRESEN
-12 – 12
Adjusts boost/cut in high range (center frequency 8 kHz).
HIGH
-12 – 12
Adjusts boost/cut in mid-high range (center frequency
3.125 kHz).
MIDDLE
-12 – 12
Adjusts boost/cut in midrange (center frequency 800 Hz).
■ PAGE 2
LOW F
1, 2
Selects center frequency for low range. 1 = 63 Hz, 2 =
125 Hz.
Parameter 1
Parameter 3
Parameter 2
Parameter 1
Page 35

ZOOM 707II GUITAR
35
LOW G
-12 – 12
Adjusts boost/cut in low range selected with LOW F.
LEVEL
1 – 8
Adjusts signal level after passing equalizer module.
Parameter 3Parameter 2
Effect Types and Parameters
ZNR/D GATE (ZOOM Noise Reduction/D Gate) Module
CABINET Module
MODULATION Module
This module serves for cutting noise during play pauses. It offers a choice of noise reduction that lowers only noise and a
noise gate that cuts the sound off completely.
The original noise reduction developed by ZOOM cuts
noise during performance pauses without impairing the
sound quality.
Vintage type noise gate with distinctive closure
characteristics.
1 – 8
Adjusts sensitivity. Set the value for maximum noise
reduction without producing an unnatural cut of the
instrument sound.
Parameter 1
D GATE
TYPE 2
ZNR (ZOOM Noise Reduction)
TYPE 1
Simulates a small amp cabinet.
Simulates a cabinet with ZOOM's original sound
character.
Simulates a bright combo amp cabinet.
Simulates a conventional combo amp cabinet.
Simulates an EV speaker in a combo amp cabinet.
Simulates a stack amp cabinet.
Simulates an EV speaker in a stack amp cabinet.
* Parameters for TYPE 1 - 7 are the same.
DEPTH
0 – 10
Adjusts the intensity of the cabinet effect.
Parameter 1
STK+EV (Stack + EV)
TYPE 7
STK (Stack)
TYPE 6
CMB+EV (Combo + EV)
TYPE 5
CMB (Combo)
TYPE 4
BR CMB (Bright Combo)
TYPE 3
Z BOX (ZOOM Box)
TYPE 2
BOX
TYPE 1
Simulates the sound of a speaker cabinet.
Adds vibration and spaciousness to the sound.
DEPTH
0 – 10
Adjusts modulation intensity.
RATE
1 – 30
Adjusts modulation speed.
MIX
0 – 30
Adjusts mixing balance of direct sound and effect sound.
Simulates the warm sound of a vintage effect.
DEPTH
0 – 10
Adjusts modulation intensity.
RATE
1 – 30
Adjusts modulation speed.
MIX
0 – 30
Adjusts mixing balance of direct sound and effect
sound.
Produces a unique, undulating sound.
DEPTH
0 – 10
Adjusts modulation intensity.
RATE
1 – 30
Adjusts modulation speed.
FB
-10 – 10
Adjusts feedback ratio. Higher values in positive or
negative direction result in stronger characteristics.
Produces a swooshing sound.
POSI
AF, bF
Selects connection point of MOD module.
• AF: After CABINET module
• bF: Before DRIVE module
RATE
1 – 30
Adjusts modulation speed.
Parameter 2
Parameter 1
PHASE (Phaser)
TYPE 4
Parameter 3
Parameter 2
Parameter 1
FLANGE (Flanger)
TYPE 3
Parameter 3
Parameter 2
Parameter 1
V-CHO (Vintage Chorus)
TYPE 2
Parameter 3
Parameter 2
Parameter 1
CHORUS
TYPE 1
This module contains modulation type effects such as chorus and flanger, effects that drastically change the sound such
as wow, filter, and ring modulator, and pitch altering effects such as pitch shift and vibrato.
Page 36

ZOOM 707II GUITAR
36
COLOR
1 – 4
Selects sound character.
Periodically varies the level of the sound.
DEPTH
0 – 10
Adjusts modulation intensity.
RATE
1 – 30
Adjusts modulation speed.
CLIP
0 – 10
Adjusts modulation waveform clip. Larger values result
in more intense modulation.
This stereo panning effect periodically moves the sound
back and forth between right and left when two
amplifiers are used. When one amplifier is used, the
effect is a tremolo effect.
WIDTH
0 – 10
Adjusts effect width.
RATE
1 – 30
Adjusts modulation speed.
CLIP
0 – 10
Adjusts modulation waveform clip. Larger values result
in more intense modulation.
This effect gives a varying wah sound that depends on
the picking intensity.
POSI
AF, bF
Selects connection point of MOD module.
• AF: After CABINET module
• bF: Before DRIVE module
RESO
1 – 10
Adjusts wah effect intensity
SENS
-10 – -1, 1 – 10
Adjusts sensitivity. Negative values result in downward
wah.
This effect lets you control wah with the expression pedal.
POSI
AF, bF
Selects connection point of MOD module.
• AF: After CABINET module
• bF: Before DRIVE module
FREQ
1 – 10
Adjusts wah effect center frequency.
DIRMIX
0 – 10
Adjusts direct sound mix.
This is a special effect with step-like filter characteristics.
DEPTH
0 – 10
Adjusts modulation intensity.
RATE
1 – 30
Adjusts modulation speed.
RESO
0 – 10
Adjusts wah effect intensity.
This is a pitch shifter with a range of 2 octave up and 1
octaves down.
SHIFT
-12 – 1, dt, 1 – 12, 24
Sets the pitch shift amount. The "dt" setting results in a
detune effect.
TONE
0 – 10
Adjusts effect tone.
BAL
0 – 30
Adjusts balance between direct sound and effect sound.
Higher values emphasize effect sound.
This effect lets you vary the pitch in real time, using the
expression pedal.
TYPE
1 – 16
Selects the pedal pitch type. Depending on the type, the
pitch differs when pushing the pedal down or when
raising it.
TONE
0 – 10
Adjusts effect tone.
Produces a metallic sound.
POSI
AF, bF
Selects connection point of MOD module.
• AF: After CABINET module
• bF: Before DRIVE module
RATE
1 – 30
Sets frequency for ring modulation effect.
The tone changes depending on the frequency setting.
BAL
0 – 30
Adjusts balance between direct sound and effect sound.
This effect automatically creates a "violin playing"
sound.
POSI
AF, bF
Selects connection point of MOD module.
• AF: After CABINET module
• bF: Before DRIVE module
TIME
1 – 30
Adjusts attack speed.
CURVE
1 – 10
Adjusts attack curve.
Parameter 3
Parameter 2
Parameter 1
SLOW-A (Slow Attack)
TYPE 13
Parameter 3
Parameter 2
Parameter 1
RING M (Ring Modulator)
TYPE 12
Parameter 2
1
2
3
4
5
6
7
8
9
10
11
12
13
14
15
16
-100 cent
Original sound only
DOUBLING
Detune + DRY
0 cent
+1 octave
0 cent
-2 octaves
-1 octave + DRY
+1 octave + DRY
-700 cent + DRY
500 cent + DRY
-∞ (0 Hz) + DRY
+1 octave
-∞ (0 Hz) + DRY
+1 octave + DRY
Original sound only
-100 cent
Detune + DRY
DOUBLING
+1 octave
0 cent
-2 octaves
0 cent
+1 octave + DRY
-1 octave + DRY
500 cent + DRY
-700 cent + DRY
+1 octave
-∞ (0 Hz) + DRY
+1 octave + DRY
-∞ (0 Hz) + DRY
Pedal
minimum value
Pedal
maximum value
P-PIT
TYPE
Parameter 1
P-PIT (Pedal Pitch)
TYPE 11
Parameter 3
Parameter 2
Parameter 1
PITCH (Pitch Shifter)
TYPE 10
Parameter 3
Parameter 2
Parameter 1
STEP
TYPE 9
Parameter 3
Parameter 2
Parameter 1
P-WAH (Pedal Wah)
TYPE 8
Parameter 3
Parameter 2
Parameter 1
A-WAH (Auto Wah)
TYPE 7
Parameter 3
Parameter 2
Parameter 1
A-PAN (Auto-Pan)
TYPE 6
Parameter 3
Parameter 2
Parameter 1
TREMOL (Tremolo)
TYPE 5
Parameter 3
Effect Types and Parameters
Page 37

ZOOM 707II GUITAR
37
This effect tracks the picking action and controls filter
opening accordingly.
POSI
AF, bF
Selects connection point of MOD module.
• AF: After CABINET module
• bF: Before DRIVE module
TIME
1 – 30
Adjusts filter attack speed.
RANGE
1 – 10
Sets adjustable filter range.
Delay effect with a delay time of up to 500 milliseconds.
TIME
1 – 50
Adjusts delay time in 10-ms steps.
FB
0 – 10
Adjusts number of repeat cycles (feedback) for delay
sound.
MIX
0 – 30
Adjusts effect sound level.
Long delay effect (up to 2 seconds) with warm sound.
TIME
1 – 50
Adjusts delay time in 10-ms steps up to 1 second and in
100-ms steps up to 2 seconds.
FB
0 – 10
Adjusts number of repeat cycles (feedback) for delay sound.
MIX
0 – 30
Adjusts effect sound level.
This delay effect varies the delay time according to the
picking intensity.
SENS
1 – 50
Adjusts effect sensitivity.
FB
-10 – 10
Adjusts number of repeat cycles (feedback) for delay
sound.
BAL
0 – 30
Adjusts balance between direct sound and effect sound.
This is a combined tremolo and chorus effect.
TRMRAT
1 – 30
Adjusts tremolo speed.
CHORAT
1 – 30
Adjusts modulation speed of chorus effect.
CHOMIX
0 – 30
Adjusts chorus sound mix.
This is a combined ring modulator and vibrato effect.
RINRAT
1 – 30
Adjusts ring modulation effect frequency.
VIBRAT
1 – 30
Adjusts vibrato effect speed.
VIBDEP
0 – 10
Adjusts vibrato effect depth.
This is an automatic vibrato effect.
DEPTH
0 – 10
Adjusts effect depth.
RATE
1 – 30
Adjusts effect speed.
BAL
0 – 30
Adjusts balance between direct sound and effect sound.
Parameter 3
Parameter 2
Parameter 1
VIBE (Vibrato)
TYPE 20
Parameter 3
Parameter 2
Parameter 1
RINVIB (Ring Modulator + Vibrato)
TYPE 19
Parameter 3
Parameter 2
Parameter 1
TRMCHO (Tremolo + Chorus)
TYPE 18
Parameter 3
Parameter 2
Parameter 1
T-TRIP (Time Trip)
TYPE 17
Parameter 3
Parameter 2
Parameter 1
ECHO
TYPE 16
Parameter 3
Parameter 2
Parameter 1
DELAY
TYPE 15
Parameter 3
Parameter 2
Parameter 1
FILTER
TYPE 14
DLY/REV (Delay/Reverb) Module
This module comprises various spatial effects including delay and reverb.
This is a reverb effect which simulates the acoustics of a
concert hall.
This is a reverb effect which simulates the acoustics of a
room.
This is a reverb effect which simulates a spring type
reverb machine.
* Parameters for TYPE 1 - 3 are the same.
TIME
1 – 30
Adjusts reverb duration (reverb time).
TONE
0 – 10
Adjusts effect tone.
MIX
0 – 30
Adjusts reverb sound mix.
This is a monaural delay with a duration of up to 1.5
seconds.
When two amplifiers are used, this serves as a pingpong delay effect with a duration of up to 1.5 seconds.
When one amplifier is used, the effect is a mono delay.
* Parameters for TYPE 4 and 5 are the same.
TIME
1 – 99, 1.0 – 1.5
Adjusts delay time from 10 ms to 990 ms in 10-ms steps
(1 - 99), and over 1 second in 100-ms steps (1.0 - 1.5).
Parameter 1
PP-DLY (Ping-Pong Delay)
TYPE 5
MN-DLY (Mono delay)
TYPE 4
Parameter 3
Parameter 2
Parameter 1
SPRING (Spring Reverb)
TYPE 3
ROOM (Room Reverb)
TYPE 2
HALL (Hall Reverb)
TYPE 1
Effect Types and Parameters
Page 38

ZOOM 707II GUITAR
38
FB
0 – 10
Adjusts number of repeat cycles (feedback) for delay
sound.
MIX
0 – 30
Adjusts delay sound level.
This is a combined delay and hall reverb effect.
This is a combined delay and room reverb effect.
* Parameters for DLYHAL and DLYROM are the same.
DLYTIM
1 – 50
Adjusts delay time in 10-ms steps.
DLYMIX
0 – 15
Adjusts delay sound mix.
REVMIX
0 – 15
Adjusts reverb sound mix.
This is a hold delay effect that lets you record a phrase
of up to 2 seconds during a performance and play it
back repeatedly.
When "Mn" (Manual) is selected and a foot switch is
pressed, recording is carried out until the switch is
pressed again or until 2 seconds have elapsed.
TIME 1
– 99, 1.0 – 2.0, Mn
Adjusts recording time from 10 ms to 990 ms in 10-ms
steps (1 - 99), and from 1.0 to 2.0 seconds in 100-ms
steps (1.0 - 2.0). When "Mn" (Manual) is selected,
recording is carried out for as long as a foot switch is
depressed (up to the maximum of 2 seconds).
MODE
nL, So, rS
Selects playback mode for recorded phrase.
• nL (Normal): Normal direction playback
• So (Sound-on-sound): Recorded contents are played back
repeatedly to create an overlay.
• rS (Reverse): Reverse direction playback
MIX
0 – 30
Adjusts effect sound mix.
Parameter 3
Parameter 2
Parameter 1
HLDDLY (Hold Delay)
TYPE 8
Parameter 3
Parameter 2
Parameter 1
DLYROM (Delay + Room Reverb)
TYPE 7
DLYHAL (Delay + Hall Reverb)
TYPE 6
Parameter 3
Parameter 2
TOTAL Module
The TOTAL module is not an independent effect module. Rather it serves to set parameters that affect all patches or the
entire 707II. There are three pages with parameters. Use the [EDIT] key to switch between pages.
■ PAGE 1
PATLVL
1 – 30
Sets final patch level. A setting of 25 means that input
signal and output signal levels are equal.
Specifies input position.
Selects a character.
Parameter knobs 2 and 3 let you input or edit a patch
name. Knob 2 specifies the character input position, and
knob 3 selects the alphanumeric character to be input at
that position.
■ PAGE 1
PTN
Pattern name
Selects rhythm pattern to be assigned to a patch. For
details on how to assign rhythm patterns to a patch, see
p. 26.
PDLMIN
0 – 10
Sets minimum parameter value when expression pedal
is fully raised.
PDLMAX
0 – 10
Sets maximum parameter value when expression pedal
is fully lowered.
For details on how to set the pedal range for each patch,
see p. 23.
■ PAGE 3
SP NO
1 – 60
Selects a sample to assign to a patch. For details on how
to assign a sample to a patch, see p. 27.
SPMODE
n1, n2, P2, n4, P4
Selects the sample playback mode, as follows.
• n1 Normal speed playback
• n2 Half tempo, half pitch playback
• P2 Half tempo, normal pitch playback
• n4 Quarter tempo, quarter pitch playback
• P4 Quarter tempo, normal pitch playback
SP LVL
0 – 30
Adjusts sample playback level.
Parameter 3
Parameter 2
Parameter 1
Parameter 3
Parameter 2
Parameter 1
'()*+-/01234
56 78 9<= >?@ABC
DE F GH I J KLMNOP
QR S T UVW XY Z \
(Space)
(Space)
Parameter 3
Parameter 2
Parameter 1
Effect Types and Parameters
Page 39

ZOOM 707II GUITAR
39
■ No sound, or very low volume
•Isthe correct AC adapter connected, and the power
switch set to ON?
Refer to "Getting Connected" on page 7 and turn the
power on.
•Are [INPUT] jack and [OUTPUT/PHONES] jack
connected correctly to the instrument and amplifier?
Refer to "Getting Connected" on page 7 and establish
correct connections. Check volume settings at
instrument and amplifier.
•Isthe shielded cable defective?
Try replacing the cable.
•Is707II set to mute condition?
Cancel the mute condition.
•Is[OUTPUT] knob turned down?
Set knob to suitable position.
•Isexpression pedal raised?
For some patches, the expression pedal controls the
volume. Set it to a suitable position.
■ Cannot record from [AUX IN] jack
Is input source set to "GT"? Set it to "AUX".
■ Sound is unnaturally distorted
• Adjust level and gain parameters of modules.
• Set BOOSTER or COMP/ISOLATOR to OFF.
• When a guitar with high output is used with the
above effects, unwanted distortion may occur
depending on DRIVE module effect type.
■ High noise levels
• Adjust ZNR parameter. If problem persists, try
reducing GAIN.
• If BOOSTER or COMP/ISOLATOR module is used,
lower GAIN parameter of DRIVE module.
■ Cannot play rhythm pattern or volume is
very low
•Isrhythm volume set to low value?
Adjust parameter knob 3 to obtain suitable volume.
■ Expression pedal on/off switching does not
work properly.
•Try the procedure described in "Adjusting the
Expression Pedal" on page 25.
■ SmartMedia card cannot be used
•Is[SMART MEDIA] LED lit?
Turn unit off and check whether SmartMedia card is
inserted properly.
•Iscorrect SmartMedia card used?
The 707II can use SmartMedia cards with a capacity
from 16 to 128 MB (designed for 3.3V).
•Has SmartMedia card been formatted?
Be sure to format the SmartMedia card in the 707II
before use, as described on page 31.
Troubleshooting / Specifications
Troubleshooting
Specifications
◆
Effect Programs
74 types
◆
Effect Modules
6 modules + amp simulator +
ZNR
◆
Sampler Function
Maximum recording duration 6
seconds (without SmartMedia)
16-bit linear record/playback
(MOD and REV modules are
temporarily turned off when
sampler function is used)
◆
Patch Memory
USER: 6 banks x 10 = 60
(rewritable, with store)
PRESET: 6 banks x 10 = 60
Total 120 patches
◆
Sampling Frequency
31.25 kHz
◆
A/D Conversion
20-bit, 64-times oversampling
◆
D/A Conversion
20-bit, 128-times oversampling
◆
Input
Guitar input: standard mono
phone jack (nominal input
level -20 dBm, input
impedance 470 kilohms)
AUX IN: miniature stereo
phone jack (nominal input
level - 20 dBm, input
impedance 20 kilohms)
◆
Output
Combined line/headphone
output
Standard stereo phone jack
(maximum output level = +3
dBm with output load
impedance of 10 kilohms or
higher)
◆
Display
6-position alphanumeric LED
display
2-position 7-segment LED
display
◆
Power Requirements
AC adapter (available
separately)
9 V DC, center minus, 300 mA
(ZOOM AD-0006)
Batteries: IEC R6 (size AA) x
4
Continuous operation: approx.
11 hours (with alkaline
batteries)
◆
External Dimensions
249 mm (W) x 195 mm (D) x
57 mm (H)
◆
Weight
860 g (without batteries)
*0 dBm = 0.775 Vrms
* Design and specifications subject to change without notice.
Page 40

Patch List
ZOOM CORPORATION
NOAH Bldg., 2-10-2, Miyanishi-cho, Fuchu-shi, Tokyo 183-0022, Japan
PHONE: +81-42-369-7116 FAX: +81-42-369-7115
Web Site: http://www.zoom.co.jp
Printed in Japan 707II - 5000-2
BANK A
Patch NAME PEDAL
0
1
2
3
4
5
6
7
8
9
BANK b
Patch NAME PEDAL
0
1
2
3
4
5
6
7
8
9
BANK C
Patch NAME PEDAL
0
1
2
3
4
5
6
7
8
9
DEMO
POWER
Powerful distortion sound
NUANCE
Overdrive sound great for fingerpicking
FATCLN
Fat clean sound
BARK
High-gain sound for hard rock
PEDWAH
Wild pedal sound
HYPER
Smooth, transparent sound
OVERDR
Attractive overdrive sound
BOOTS
Octaver type heavy sound
CLNWAH
Clean wah sound
U-FUZZ
ZOOM compact fuzz sound
COMPACT/PRE
MP 1
Vintage high-gain preamp sound
TS
Dry overdrive sound
PD 1
ZOOM PD-01 sound
FZFACE
Vintage fuzz sound
JMP
Modern high-gain preamp sound
MTZONE
Compact effect sound for metal
SD+CE
Vintage compact effect sound
ANADLY
Analog-like delay sound
TURBO
Turbo boost distortion sound
OLDVIB
Nostalgic VIB tone
MULTI/SFX
ZLEAD
The ultimate lead sound
FLANG
Solid clean flanging sound
HVYCMP
Tight compression sound
VIOLIN
Great for volume playing
JET
Standard jet sound
TAL K
Make the midrange talk
WIND
Noise like the wind
REVERS
Retro style reverse guitar sound
TRILL
Tricky, thrilling sound
STEP
ZOOM original step sound
VOLUME
SPRING
GAIN
CHORUS
WAH
PITCH
GAIN
GAIN
WAH
RESO
VOLUME
ROOM
GAIN
HALL
VOLUME
HALL
V-CHO
SPRING
VOLUME
VIBE
VOLUME
FLANGE
DLYROM
GAIN
FLANGE
T-TRIP
RING-M
FILTER
T-TRIP
VOLUME
BANK d
Patch NAME PEDAL
0
1
2
3
4
5
6
7
8
9
BANK E
Patch NAME PEDAL
0
1
2
3
4
5
6
7
8
9
BANK F
Patch NAME PEDAL
0
1
2
3
4
5
6
7
8
9
LINE
L-DRV
Multi-use distortion sound
D-FEEL
Overdrive line sound
ACOUS
Acoustic line sound
L-FUNK
Funky line sound
AUTO-W
Auto wah line sound
9002LD
ZOOM line sound
BOX
Cabinet line sound
JC CHO
Bright combo line sound
L-FUZY
Line fuzz sound
L-BLUE
Bluesy line sound
ARTIST
GARYBD
Gary style ballad solo sound
BEAT
Mersey beat type crunch sound
PAT-M
Metheney sound simulation
VAI PT
Vai style pitch sound
ARM
Pedal sound for solos
VHALEN
Heavy lead & backing sound
CATS
Rockabilly crunch sound
FUSION
Clean fusion sound
SWEEP
Sweep sound
12STR
12-string acoustic guitar sound
MODELING
MS9000
Majestic stack drive sound
USBLUS
American blues sound
FD TWN
U.S. clean combo amp sound
MARK
Mark series combo amp sound
SLDN
Heavy rock amp sound
AMPDRV
Fat amp sound
MS OLD
Vintage MS sound
MACDRV
Modern clean crunch sound
PV PWR
American hard rock sound
MT 7TH
7-string guitar heavy metal sound
GAIN
SPRING
HALL
PHASE
VOLUME
PP-DLY
GAIN
V-CHO
ECHO
GAIN
MN-DLY
GAIN
DLYHAL
PITCH
WAH
VOLUME
CHORUS
DLYHAL
SPRING
HALL
VOLUME
SPRING
VOLUME
GAIN
GAIN
VOLUME
VOLUME
GAIN
VOLUME
PITCH
 Loading...