


 Loading...


 ZD500 Series™
User’s Guide
Thermal Transfer Printer
P1062653-002 Rev. A

ii
© 2013 ZIH Corp. The copyrights in this manual and the software and/or firmware in the label printer and accessories described therein are owned by ZIH Corp. Unauthorized reproduction of this manual or the software and/or firmware in the label printer may result in imprisonment of up to one year and fines of up to $10,000 (17 U.S.C.506). Copyright violators may be subject to civil liability.
This product may contain ZPL®, ZPL II®, and ZebraLink™ programs; Element Energy Equalizer® Circuit; E3®; and Monotype Imaging fonts. Software © ZIH Corp. All rights reserved worldwide.
ZD500 Series, ZD500R, ZebraLink and all product names and numbers are trademarks, and Zebra, the Zebra logo, ZPL, ZPL II, Element Energy Equalizer Circuit, and E3 Circuit are registered trademarks of ZIH Corp. All rights reserved worldwide.
All other brand names, product names, or trademarks belong to their respective holders.
For additional copyright and trademark information, please see “Copyright” on the Zebra website.
www.zebra.com/copyright
Proprietary Statement This manual contains proprietary information of Zebra Technologies Corporation and its subsidiaries (“Zebra Technologies”). It is intended solely for the information and use of parties operating and maintaining the equipment described herein. Such proprietary information may not be used, reproduced, or disclosed to any other parties for any other purpose without the express, written permission of Zebra Technologies.
Product Improvements Continuous improvement of products is a policy of Zebra
Technologies. All specifications and designs are subject to change without notice.
Liability Disclaimer Zebra Technologies takes steps to ensure that its published Engineering specifications and manuals are correct; however, errors do occur. Zebra Technologies reserves the right to correct any such errors and disclaims liability resulting therefrom.
Limitation of Liability In no event shall Zebra Technologies or anyone else involved in the creation, production, or delivery of the accompanying product (including hardware and software) be liable for any damages whatsoever (including, without limitation, consequential damages including loss of business profits, business interruption, or loss of business information) arising out of the use of, the results of use of, or inability to use such product, even if Zebra Technologies has been advised of the possibility of such damages. Some jurisdictions do not allow the exclusion or limitation of incidental or consequential damages, so the above limitation or exclusion may not apply to you.
P1062653-002 Rev. A |
ZD500 Series™ Thermal Transfer Printer User’s Guide |
1/16/2014 |

iii
Compliance and Regulatory Statements
FCC Compliance Statement (USA)
This device complies with Part 15 rules. Operation is subject to the following two conditions:
1.This device may not cause harmful interference, and
2.This device must accept any interference received, including interference that may cause undesired operation.
This equipment has been tested and found to comply with the limits for Class B Digital Devices, pursuant to Part 15 of the FCC Rules. These limits are designed to provide reasonable protection against harmful interference when the equipment is operated in a residential environment. This equipment generates, uses, and can radiate radio frequency energy and, if not installed and used in accordance with the product manuals, may cause harmful interference to radio communications. However, there is no guarantee that interference will not occur in a particular installation. If this equipment does cause harmful interference to radio or television reception, the user is encouraged to do one or more of the following measures:
•Reorient or relocate the receiving antenna.
•Increase the separation between the equipment and receiver.
•Connect the equipment into an outlet on a circuit different from that to which the receiver is connected.
•Consult the dealer or an experienced RF service technician for help.
Important •
1.The radio must be installed with a minimum 20 cm separation between the user and the antenna.
2.The radio must not be co-located or used in simultaneous transmitting condition with another radio.
3.The host system shall have a label to indicate that the system contains a certified module. An example is “Contains FCC ID : I28MD-EXLAN11N , IC ID: 3798B-EXLAN11N”.
4.The radio is for indoor use only in the 5150-5250 GHz frequency range.
The user is cautioned that any changes or modifications not expressly approved by Zebra Technologies could void the user’s authority to operate the equipment. To ensure compliance, this printer must be used with fully shielded communication cables.
Mexico — NOM-121-SCT1-2009
Este equipo ha sido diseñado para operar con las antenas que enseguida se enlistan y para una ganancia máxima de antena de [x] dB. El uso con este equipo de antenas no incluidas en esta lista o que tengan una ganancia mayor que [x] dB quedan prohibidas. La impedancia requerida de la antena es de [y] ohms.
auden - p/n 220370-09
•Gain = 2.77dbi @ 2.4 GHz
•Gain = 2.69 - 3.19dBi @ 5 GHz
•Impedance = 50 ohms
1/16/2014 |
ZD500 Series™ TThermal Transfer Printer User’s Guide |
P1062653-002Rev. A |

iv
Canadian DOC Compliance Statement
Cet appareil numérique de la classe B est conforme à la norme NMB-003 du Canada. This Class B digital apparatus complies with Canadian ICES-003.
Industry Canada (IC) Warning
Le présent appareil est conforme aux CNR d’Industrie Canada applicables aux appareils radio exempts de licence. L’exploitation est autorisée aux deux conditions suivantes : (1) l’appareil ne doit pas produire de brouillage, et (2) l’utilisateur de l’appareil doit accepter tout brouillage radioélectrique subi, même si le brouillage est susceptible d’en compromettre le fonctionnement.
This device complies with Industry Canada license-exempt RSS standard(s). Operation is subject to the following two conditions: 1) This device may not cause interference., 2) This device must accept any interference, including interference that may cause undesired operation of the device.
Brasil — Aviso da Anatel
Este equipamento opera em caráter secundário, isto é, não tem direito a proteção contra interferência prejudicial, mesmo de estações do mesmo tipo, e não pode causar interferência a sistemas operando em caráter primário.
“Este produto está homologado pela ANATEL, de acordo com os procedimentos regulamentados pela Resolução 242/2000, e atende aos requisitos técnicos aplicados”
Para maiores informações, consulte o site da ANATEL www.anatel.gov.br
This equipment's operation is of a secondary character; that is, it doesn't have the right to protection against damaging interference, even from stations of the same type, nor can it cause interference to systems with a primary operating character.
Este produto utiliza internamente o modulo de RF M6Emicro numero de homologação pela ANATEL 3059-13-8108 e o modulo WYSBMVGXB numero de homologação pela ANATEL 3825-13-9965
Este equipamento opera em caráter secundário, isto é, não tem direito a proteção contra interferência prejudicial, mesmo de estações do mesmo tipo, e não pode causar interferência a sistemas operando em caráter primário.
Japan Restricted Frequencies
5.725 5.825 GHz
For 5.725 - 5.825 GHz, this frequency band will not be available in Japan.
P1062653-002 Rev. A |
ZD500 Series™ Thermal Transfer PrinterUser’s Guide |
1/16/2014 |
v
Taiwan Restricted Frequencies
5.15-5.25 GHz,
For 5.15 - 5.25 GHz, this frequency band will not be available in Taiwan.
Korean Compliance Statement
(B ), .
The equipment is for home use (Class B) and has acquired electromagnetic conformity registration, so it can be used not only in residential area but other areas as well.
This radio device is not allowed to be used for human safety since it has possibility of radio interference during operation.
European Regulatory Information
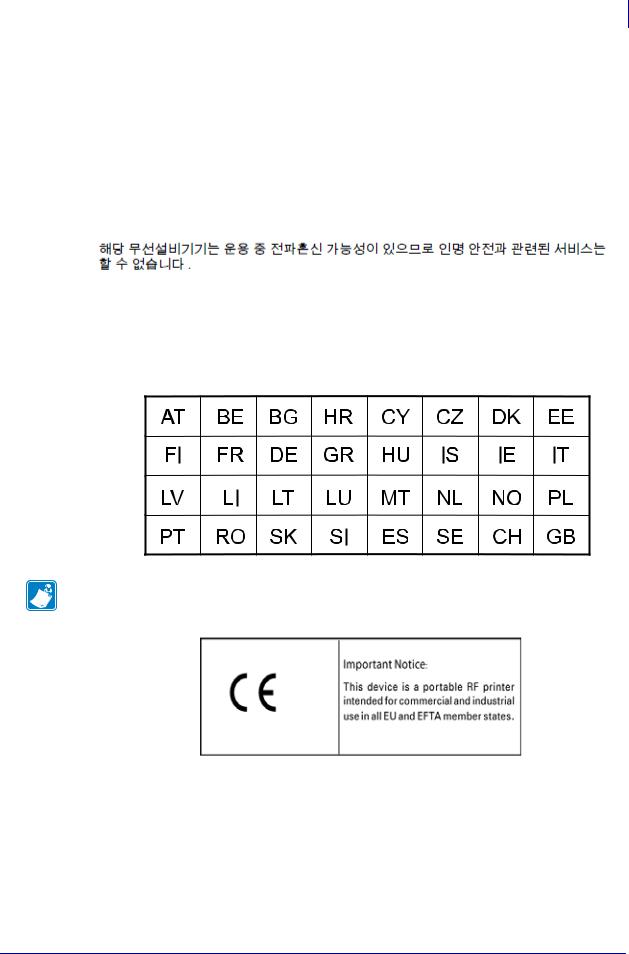
Note • Member states in the EU with restrictive use for this device are crossed out. This device is also authorized for use in all EFTA member states (CH, IS, LI, NO).
1/16/2014 |
ZD500 Series™ TThermal Transfer Printer User’s Guide |
P1062653-002Rev. A |

vi
NCC
須忍受合法通信或工業、科學及醫療用電波輻射性電機設備之干擾。
According to "Administrative Regulations on Low Power Radio Waves Radiated Devices" Without permission granted by the NCC, any company, enterprise, or user is not allowed to change frequency, enhance transmitting power or alter original characteristic as well as performance to an approved low power radio-frequency devices. The low power radiofrequency devices shall not influence aircraft security and interfere legal communications; If found, the user shall cease operating immediately until no interference is achieved. The said legal communications means radio communications is operated in compliance with the Telecommunications Act.
The low power radio-frequency devices must be susceptible with the interference from legal communications or ISM radio wave radiated devices.
P1062653-002 Rev. A |
ZD500 Series™ Thermal Transfer PrinterUser’s Guide |
1/16/2014 |

vii
WLAN Radio Specification
802.11b
•2.4 GHz
•DSSS (DBPSK, DQPSK and CCK)
•RF power 63 mW (ZebraNet n Print Server)
802.11g
•2.4 GHz
•OFDM (16-QAM and 64-QAM with BPSK and QPSK)
•RF power 63 mW (ZebraNet n Print Server)
802.11n
•2.4 GHz
•OFDM (16-QAM and 64-QAM with BPSK and QPSK)
•RF power 63 mW (ZebraNet n Print Server)
802.11a/n
•5.15-5.25 GHz, 5.25-5.35 GHz, 5.47-5.725 GHz, 5.725-5.825 GHz
•OFDM (16-QAM and 64-QAM with BPSK and QPSK)
•RF power 50 mW (ZebraNet n Print Server)
Bluetooth 2.1 + EDR
•2.4 GHz
•FHSS
•RF power 0.4 mW
RFID Radio Specification
•902 - 928 MHz (US); 865 - 868 MHz (EU)
•ISO-18000 - 6B; ISO 18000-6C
•RF power <30 dBm ERP
1/16/2014 |
ZD500 Series™ TThermal Transfer Printer User’s Guide |
P1062653-002Rev. A |
viii
Environmental Management
Environmental Management
Do not dispose of this product in unsorted municipal waste. This product is recyclable, and should be recycled according to your local standards.
For more information, please see our website at:
Web address: www.zebra.com/environment
Document Conventions
Table 1 • Document Conventions
Alternate Color
If you are viewing this guide on-line, you can click the blue text used for cross-references or hyper-links to jump directly to other sections in the guide or to web sites on the Internet.
Command Line Examples, File Names, and Directories
Command line examples, file names, and directories appear in a Typewriter style (Courier) mono-spaced font. For example:
Type ZTools to get to the Post-Install scripts in the /bin directory.
Open the Zebra<version number>.tar file in the /root directory.
Icons and Advisory Words
|
|
|
The following icons and advisory words are used to draw your attention to certain areas of text. |
|
|
|
|
|
|
|
|
|
Caution • Warns you of the potential for electrostatic discharge. |
|
|
|
|
|
|
|
|
|
Caution • Warns you of a potential electric shock situation. |
|
|
|
|
|
|
|
|
|
Caution • Warns you of a situation where excessive heat could cause a burn. |
|
|
|
|
|
|
|
|
|
|
|
|
|
|
Caution • Advises you that failure to take or avoid a specific action could result in physical |
|
|
|
|
harm to you. |
|
|
|
|
|
|
(No icon) |
Caution • Advises you that failure to take or avoid a specific action could result in physical |
|||
harm to the hardware. |
||||
|
|
|
||
|
|
|
|
|
|
|
|
Important • Advises you of information that is essential to complete a task. |
|
|
|
|
|
|
|
|
|
Note • Indicates neutral or positive information that emphasizes or supplements important |
|
|
|
|
points of the main text. |
|
|
|
|
|
|
|
|
|
Tools • Tells you what tools you need to complete a given task. |
|
|
|
|
|
|
P1062653-002 Rev. A |
ZD500 Series™ Thermal Transfer PrinterUser’s Guide |
1/16/2014 |

Contents
Compliance and Regulatory Statements. . . . . . . . . . . . . . . . . . . . . . . . . . . . . . . . . . . . . . . iii Environmental Management . . . . . . . . . . . . . . . . . . . . . . . . . . . . . . . . . . . . . . . . . . . . . . . viii Document Conventions. . . . . . . . . . . . . . . . . . . . . . . . . . . . . . . . . . . . . . . . . . . . . . . . . . . viii
• Contents . . . . . . . . . . . . . . . . . . . . . . . . . . . . . . . . . . . . . . . . . . . . . . . . . . . . . . . . ix 1 • Introduction . . . . . . . . . . . . . . . . . . . . . . . . . . . . . . . . . . . . . . . . . . . . . . . . . . . . 1
ZD500 Series™ Thermal Printers. . . . . . . . . . . . . . . . . . . . . . . . . . . . . . . . . . . . . . . . . . . . 1 The ZD500 Series™ printer features:. . . . . . . . . . . . . . . . . . . . . . . . . . . . . . . . . . . . . . 2 The ZD500 Series™ printer options: . . . . . . . . . . . . . . . . . . . . . . . . . . . . . . . . . . . . . . 2 What’s in the Box? . . . . . . . . . . . . . . . . . . . . . . . . . . . . . . . . . . . . . . . . . . . . . . . . . . . . . . . 4 Unpack and Inspect the Printer . . . . . . . . . . . . . . . . . . . . . . . . . . . . . . . . . . . . . . . . . . 4 Printer Features . . . . . . . . . . . . . . . . . . . . . . . . . . . . . . . . . . . . . . . . . . . . . . . . . . . . . . . . . 5 Control Panel . . . . . . . . . . . . . . . . . . . . . . . . . . . . . . . . . . . . . . . . . . . . . . . . . . . . . . . . . . . 8 Control Panel Display Menu and Status Icons . . . . . . . . . . . . . . . . . . . . . . . . . . . . . . . . . 10 Printer Control Panel Display . . . . . . . . . . . . . . . . . . . . . . . . . . . . . . . . . . . . . . . . . . . . . . .11 Navigating through Screens in the Menu . . . . . . . . . . . . . . . . . . . . . . . . . . . . . . . . . . 12 Control Panel Menu Map . . . . . . . . . . . . . . . . . . . . . . . . . . . . . . . . . . . . . . . . . . . . . . . . . 14
2 • Setup . . . . . . . . . . . . . . . . . . . . . . . . . . . . . . . . . . . . . . . . . . . . . . . . . . . . . . . . . 15
Select a Location for the Printer . . . . . . . . . . . . . . . . . . . . . . . . . . . . . . . . . . . . . . . . . . . . 16 Attaching Power . . . . . . . . . . . . . . . . . . . . . . . . . . . . . . . . . . . . . . . . . . . . . . . . . . . . . . . . 17 Preparing and Handling Media . . . . . . . . . . . . . . . . . . . . . . . . . . . . . . . . . . . . . . . . . . . . . 18 Media Storage Tips . . . . . . . . . . . . . . . . . . . . . . . . . . . . . . . . . . . . . . . . . . . . . . . . . . . 18 Setting the Printer Menu and Report Display Language. . . . . . . . . . . . . . . . . . . . . . . . . . 19 Loading Roll Media . . . . . . . . . . . . . . . . . . . . . . . . . . . . . . . . . . . . . . . . . . . . . . . . . . . . . . 20 Loading Transfer Ribbon. . . . . . . . . . . . . . . . . . . . . . . . . . . . . . . . . . . . . . . . . . . . . . . . . . 23 Test Printing with Configuration Report Printouts . . . . . . . . . . . . . . . . . . . . . . . . . . . . . . . 27
1/16/2014 |
ZD500 Series™ User’s Guide |
P1062653-002 Rev. A |

x Contents
Connecting your Printer to a Computer . . . . . . . . . . . . . . . . . . . . . . . . . . . . . . . . . . . . . . 28 Interface Cable Requirements . . . . . . . . . . . . . . . . . . . . . . . . . . . . . . . . . . . . . . . . . . 28 USB Interface . . . . . . . . . . . . . . . . . . . . . . . . . . . . . . . . . . . . . . . . . . . . . . . . . . . . . . 29 Serial Interface . . . . . . . . . . . . . . . . . . . . . . . . . . . . . . . . . . . . . . . . . . . . . . . . . . . . . . 30 Wired (Ethernet) Interface . . . . . . . . . . . . . . . . . . . . . . . . . . . . . . . . . . . . . . . . . . . . . 31
ZebraNet® Internal Wireless Print Server Option . . . . . . . . . . . . . . . . . . . . . . . . . . . . . . . 33 Configure Using the Connectivity Wizard . . . . . . . . . . . . . . . . . . . . . . . . . . . . . . . . . . . . . 34 Bluetooth Option Configuration. . . . . . . . . . . . . . . . . . . . . . . . . . . . . . . . . . . . . . . . . . . . . 43 Connecting to a Windows Vista® SP2 or Windows 7® Master Device . . . . . . . . . . . 45 After Your Printer is Connected. . . . . . . . . . . . . . . . . . . . . . . . . . . . . . . . . . . . . . . . . . . . . 49
3 • Printer Configuration . . . . . . . . . . . . . . . . . . . . . . . . . . . . . . . . . . . . . . . . . . . |
51 |
Changing Printer Settings . . . . . . . . . . . . . . . . . . . . . . . . . . . . . . . . . . . . . . . . . . . . . . . . . 51
SETTINGS Menu . . . . . . . . . . . . . . . . . . . . . . . . . . . . . . . . . . . . . . . . . . . . . . . . . . . . 52
TOOLS Menu . . . . . . . . . . . . . . . . . . . . . . . . . . . . . . . . . . . . . . . . . . . . . . . . . . . . . . . 56
NETWORK Menu . . . . . . . . . . . . . . . . . . . . . . . . . . . . . . . . . . . . . . . . . . . . . . . . . . . . 61
RFID Menu . . . . . . . . . . . . . . . . . . . . . . . . . . . . . . . . . . . . . . . . . . . . . . . . . . . . . . . . . 65
LANGUAGE Menu . . . . . . . . . . . . . . . . . . . . . . . . . . . . . . . . . . . . . . . . . . . . . . . . . . . 69
SENSOR Menu. . . . . . . . . . . . . . . . . . . . . . . . . . . . . . . . . . . . . . . . . . . . . . . . . . . . . . 71
PORTS Menu . . . . . . . . . . . . . . . . . . . . . . . . . . . . . . . . . . . . . . . . . . . . . . . . . . . . . . . 72
BLUETOOTH Menu . . . . . . . . . . . . . . . . . . . . . . . . . . . . . . . . . . . . . . . . . . . . . . . . . . 74
Manual Calibration - Media . . . . . . . . . . . . . . . . . . . . . . . . . . . . . . . . . . . . . . . . . . . . . . . . 75
RFID Calibration . . . . . . . . . . . . . . . . . . . . . . . . . . . . . . . . . . . . . . . . . . . . . . . . . . . . . . . . 76
4 • Print Operations . . . . . . . . . . . . . . . . . . . . . . . . . . . . . . . . . . . . . . . . . . . . . . . |
77 |
Determining Printer Configuration. . . . . . . . . . . . . . . . . . . . . . . . . . . . . . . . . . . . . . . . . . . 78 Thermal Printing . . . . . . . . . . . . . . . . . . . . . . . . . . . . . . . . . . . . . . . . . . . . . . . . . . . . . 78 Modes of Printing . . . . . . . . . . . . . . . . . . . . . . . . . . . . . . . . . . . . . . . . . . . . . . . . . . . . 78 Setting the Thermal Print Method . . . . . . . . . . . . . . . . . . . . . . . . . . . . . . . . . . . . . . . . 79 Types of Media . . . . . . . . . . . . . . . . . . . . . . . . . . . . . . . . . . . . . . . . . . . . . . . . . . . . . . . . . 79 Determining Thermal Media Types. . . . . . . . . . . . . . . . . . . . . . . . . . . . . . . . . . . . . . . 79 Media Loading . . . . . . . . . . . . . . . . . . . . . . . . . . . . . . . . . . . . . . . . . . . . . . . . . . . . . . . . . 81 Attaching the 3 inch Core Adapters . . . . . . . . . . . . . . . . . . . . . . . . . . . . . . . . . . . . . . 81 Loading 3 inch I.D. Media rolls . . . . . . . . . . . . . . . . . . . . . . . . . . . . . . . . . . . . . . . . . . 82 Removing the 3 inch Core Adapters. . . . . . . . . . . . . . . . . . . . . . . . . . . . . . . . . . . . . . 83 Ribbon Overview. . . . . . . . . . . . . . . . . . . . . . . . . . . . . . . . . . . . . . . . . . . . . . . . . . . . . . . . 84 When to Use Ribbon. . . . . . . . . . . . . . . . . . . . . . . . . . . . . . . . . . . . . . . . . . . . . . . . . . 84 Coated Side of Ribbon . . . . . . . . . . . . . . . . . . . . . . . . . . . . . . . . . . . . . . . . . . . . . . . . 84 Ribbon Test with Adhesive . . . . . . . . . . . . . . . . . . . . . . . . . . . . . . . . . . . . . . . . . . . . . 84 Ribbon Scratch Test . . . . . . . . . . . . . . . . . . . . . . . . . . . . . . . . . . . . . . . . . . . . . . . . . . 85 Replacing Supplies . . . . . . . . . . . . . . . . . . . . . . . . . . . . . . . . . . . . . . . . . . . . . . . . . . . . . . 86 Adding a New Transfer Ribbon. . . . . . . . . . . . . . . . . . . . . . . . . . . . . . . . . . . . . . . . . . 86 Replacing a Partially Used Transfer Ribbon . . . . . . . . . . . . . . . . . . . . . . . . . . . . . . . . 86
P1062653-002 Rev. A |
ZD500 Series™ User’s Guide |
1/16/2014 |
Contents xi
Adjusting the Print Width. . . . . . . . . . . . . . . . . . . . . . . . . . . . . . . . . . . . . . . . . . . . . . . . . . 87 Adjusting the Print Quality. . . . . . . . . . . . . . . . . . . . . . . . . . . . . . . . . . . . . . . . . . . . . . . . . 87 Media Sensing . . . . . . . . . . . . . . . . . . . . . . . . . . . . . . . . . . . . . . . . . . . . . . . . . . . . . . . . . 88 Using the Movable Black Mark Sensor . . . . . . . . . . . . . . . . . . . . . . . . . . . . . . . . . . . . . . . 89 Adjusting the Movable Sensor for Black Marks or Notches . . . . . . . . . . . . . . . . . . . . 90 Adjusting the Movable Sensor for Web (Gap) Sensing . . . . . . . . . . . . . . . . . . . . . . . 92 Printing on Fan-Fold Media. . . . . . . . . . . . . . . . . . . . . . . . . . . . . . . . . . . . . . . . . . . . . . . . 93 Printing with Externally Mounted Roll Media. . . . . . . . . . . . . . . . . . . . . . . . . . . . . . . . . . . 95 Sending Files to the Printer. . . . . . . . . . . . . . . . . . . . . . . . . . . . . . . . . . . . . . . . . . . . . . . . 95 Fonts and Your Printer . . . . . . . . . . . . . . . . . . . . . . . . . . . . . . . . . . . . . . . . . . . . . . . . . . . 96 Identifying Fonts in Your Printer . . . . . . . . . . . . . . . . . . . . . . . . . . . . . . . . . . . . . . . . . 96 Localizing the Printer with Code Pages . . . . . . . . . . . . . . . . . . . . . . . . . . . . . . . . . . . 96 Asian fonts and Other Large Font Sets. . . . . . . . . . . . . . . . . . . . . . . . . . . . . . . . . . . . 97 Getting Asian Fonts . . . . . . . . . . . . . . . . . . . . . . . . . . . . . . . . . . . . . . . . . . . . . . . . . . 97
5 • Printer Options . . . . . . . . . . . . . . . . . . . . . . . . . . . . . . . . . . . . . . . . . . . . . . . . |
99 |
Label Dispenser Option . . . . . . . . . . . . . . . . . . . . . . . . . . . . . . . . . . . . . . . . . . . . . . . . . 100
Cutter Option. . . . . . . . . . . . . . . . . . . . . . . . . . . . . . . . . . . . . . . . . . . . . . . . . . . . . . . . . . 103
Loading Media with the Cutter Option . . . . . . . . . . . . . . . . . . . . . . . . . . . . . . . . . . . 104
ZebraNet® Internal Wireless Print Server Option . . . . . . . . . . . . . . . . . . . . . . . . . . . . . . 106
Bluetooth Option . . . . . . . . . . . . . . . . . . . . . . . . . . . . . . . . . . . . . . . . . . . . . . . . . . . . . . . 107
Printer Network Configuration Status Label . . . . . . . . . . . . . . . . . . . . . . . . . . . . . . . 108
6 • Maintenance . . . . . . . . . . . . . . . . . . . . . . . . . . . . . . . . . . . . . . . . . . . . . . . . . . 109
Cleaning . . . . . . . . . . . . . . . . . . . . . . . . . . . . . . . . . . . . . . . . . . . . . . . . . . . . . . . . . . . . . .110
Cleaning the Printhead . . . . . . . . . . . . . . . . . . . . . . . . . . . . . . . . . . . . . . . . . . . . . . . .111
Media Path Cleaning . . . . . . . . . . . . . . . . . . . . . . . . . . . . . . . . . . . . . . . . . . . . . . . . .112
Sensor Cleaning . . . . . . . . . . . . . . . . . . . . . . . . . . . . . . . . . . . . . . . . . . . . . . . . . . . . .113
Platen Cleaning and Replacement . . . . . . . . . . . . . . . . . . . . . . . . . . . . . . . . . . . . . . .114
Other Printer Maintenance . . . . . . . . . . . . . . . . . . . . . . . . . . . . . . . . . . . . . . . . . . . . .116
RTC Battery . . . . . . . . . . . . . . . . . . . . . . . . . . . . . . . . . . . . . . . . . . . . . . . . . . . . . . . . . . .116
Fuses . . . . . . . . . . . . . . . . . . . . . . . . . . . . . . . . . . . . . . . . . . . . . . . . . . . . . . . . . . . . . . . .116
Replacing the Printhead . . . . . . . . . . . . . . . . . . . . . . . . . . . . . . . . . . . . . . . . . . . . . . . . . .117
7 • Troubleshooting . . . . . . . . . . . . . . . . . . . . . . . . . . . . . . . . . . . . . . . . . . . . . . |
123 |
Error Messages. . . . . . . . . . . . . . . . . . . . . . . . . . . . . . . . . . . . . . . . . . . . . . . . . . . . . . . . 124
Printing Issues . . . . . . . . . . . . . . . . . . . . . . . . . . . . . . . . . . . . . . . . . . . . . . . . . . . . . . . . 126
Ribbon Problems . . . . . . . . . . . . . . . . . . . . . . . . . . . . . . . . . . . . . . . . . . . . . . . . . . . . . . 129
Communications Problems . . . . . . . . . . . . . . . . . . . . . . . . . . . . . . . . . . . . . . . . . . . . . . . 130
Miscellaneous Issues . . . . . . . . . . . . . . . . . . . . . . . . . . . . . . . . . . . . . . . . . . . . . . . . . . . 131
RFID Troubleshooting. . . . . . . . . . . . . . . . . . . . . . . . . . . . . . . . . . . . . . . . . . . . . . . . . . . 132
1/16/2014 |
ZD500 Series™ User’s Guide |
P1062653-002Rev. A |

xii Contents
Printer Diagnostics . . . . . . . . . . . . . . . . . . . . . . . . . . . . . . . . . . . . . . . . . . . . . . . . . . . . . 133
Power-On Self Test. . . . . . . . . . . . . . . . . . . . . . . . . . . . . . . . . . . . . . . . . . . . . . . . . . 133
Configuration Report. . . . . . . . . . . . . . . . . . . . . . . . . . . . . . . . . . . . . . . . . . . . . . . . . 134
Print Quality Report . . . . . . . . . . . . . . . . . . . . . . . . . . . . . . . . . . . . . . . . . . . . . . . . . 135
Reset Printer Factory Defaults . . . . . . . . . . . . . . . . . . . . . . . . . . . . . . . . . . . . . . . . . 138
Reset Network Factory Defaults . . . . . . . . . . . . . . . . . . . . . . . . . . . . . . . . . . . . . . . . 138
Communication Diagnostics Test . . . . . . . . . . . . . . . . . . . . . . . . . . . . . . . . . . . . . . . 139
Sensor Profile . . . . . . . . . . . . . . . . . . . . . . . . . . . . . . . . . . . . . . . . . . . . . . . . . . . . . . 140
A • Appendix: Interface Wiring . . . . . . . . . . . . . . . . . . . . . . . . . . . . . . . . . . . . . |
143 |
Serial Port Interface . . . . . . . . . . . . . . . . . . . . . . . . . . . . . . . . . . . . . . . . . . . . . . . . . . . . 144
Connecting the Printer to a DTE Device . . . . . . . . . . . . . . . . . . . . . . . . . . . . . . . . . 144
B • Appendix: Dimensions . . . . . . . . . . . . . . . . . . . . . . . . . . . . . . . . . . . . . . . . . 145
External ZD500 Series™ Printer Dimensions. . . . . . . . . . . . . . . . . . . . . . . . . . . . . . . . . 146
Label Dispenser . . . . . . . . . . . . . . . . . . . . . . . . . . . . . . . . . . . . . . . . . . . . . . . . . . . . 147
Cutter . . . . . . . . . . . . . . . . . . . . . . . . . . . . . . . . . . . . . . . . . . . . . . . . . . . . . . . . . . . . 147
P1062653-002 Rev. A |
ZD500 Series™ User’s Guide |
1/16/2014 |

1
Introduction
This section introduces you to your new Zebra® ZD500 Series™ desktop thermal label printer. It describes what you get in your shipping box and provides an overview of printer features. It also includes procedures that describe how to open and close the printer and report any problems.
Your printer, when connected to a host computer, functions as a complete system for printing labels, receipts, forms, and tags.
This users guide provides all the information you need to operate your printer on a daily basis.
ZD500 Series™ Thermal Printers
The Zebra® ZD500 Series™ models are desktop thermal label printers with the widest range of features and options including an internal UHF RFID encoder option.
•The 203 dpi (dots per inch print density) version printer provides thermal transfer and direct thermal printing at speeds up to 6 ips (inches per second).
•The 300 dpi version printer provides thermal transfer and direct thermal printing at speeds up to 4 ips.
•These printers support ZPL™ Zebra printer programming language and a wide variety of interface and feature options.
1/16/2014 |
ZD500 Series™ Thermal Transfer Printer User’s Guide |
P1062653-002 Rev. A |

2Introduction
ZD500 Series™ Thermal Printers
The ZD500 Series™ printer features:
•A user display and control panel for easier installation and direct access feature controls typically found only in premium printers.
•OpenAccess™ design for simplified media loading.
•Color-coded operator controls and media guides.
•Zebra™ Global Printing Solution – supports Microsoft Windows keyboard encoding (and ANSI), Unicode UTF-8 and UTF 16 (Unicode Transformation Formats), XML, ASCII (7 and 8 bit used by legacy programs and systems), basic single and double byte font encoding, JIS and Shift-JIS (Japanese International Standards), Hexadecimal encoding, and custom character mapping (DAT table creation, font linking, and character remapping).
•On–The –Fly OpenType and TrueType font scaling and import, Unicode, resident scalable font, and a selection of resident bitmap fonts.
•XML-Enabled printing—allows XML communications for bar code label printing, eliminating license fees and print server hardware and lowering customization and programming costs.
•Movable Sensor: A full width movable black mark or notch sensor, and multi center position transmissive (label gap/web) sensor.
•56 MB of user accessible flash memory for storing forms, fonts, and graphics.
•USB 2.0, Serial RS-232 and bi-directional parallel ports.
•Internal ZebraNet10/100 Print Server—supports 10Base-T, 100Base-TX and fast Ethernet 10/100 auto-switching networks.
•On-board RTC (Real Time Clock).
•Printhead maintenance reporting enabled and customizable by the user.
The ZD500 Series™ printer options:
•Internal UHF RFID Encoder (See the RFID Programmimg Guide 3 for details)
•Label Dispense (Peel-Off Liner and Present Label for Operator).
•General purpose media cutter.
•Wi-Fi (802.11a/b/g/n)
•Bluetooth 3.0
•Pre-loaded Swiss 721 Latin 1 font (for EU zone printers). Font is available for download.
•Asian Language support with printer configuration options for the large Simplified and Traditional Chinese, Japanese, or Korean character sets. Printers sold in China have the Simplified Chinese SimSun font pre-installed.
•Zebra® ZBI 2.0™ (Zebra BASIC Interpreter) programming language. ZBI allows you to create custom printer operations that can automate processes, use peripherals (i.e. scanners, scales, keyboards, Zebra® ZKDU™, etc.) all without being attached to a PC or network.
P1062653-002 Rev. A |
ZD500 Series™ Thermal Transfer Printer User’s Guide |
1/16/2014 |

Introduction 3
ZD500 Series™ Thermal Printers
Your printer, when connected to a host computer, functions as a complete system for printing labels, receipts, forms, and tags. Many printer settings may also be controlled by your printer’s driver or label design software. Refer to the driver or software documentation for more information.
To create label formats, refer to your programming guides or label design applications such as the free label and form design software: ZebraDesigner™.
The printer includes a complete suite of free Link-OS software applications and drivers to configure printer settings, design and print labels and receipts, get printer status, import graphics and fonts, send programming commands, update firmware, and download files.
Clone printer settings and send graphics, files, fonts, and firmware (updates) to one or more Zebra® Ethernet and locally connected printers with ZebraNet™ Bridge.
1/16/2014 |
ZD500 Series™ Thermal Transfer Printer User’s Guide |
P1062653-002 Rev. A |

4Introduction
What’s in the Box?
What’s in the Box?
Save the carton and all packing materials in case you need to ship or store the printer later. After unpacking, make sure you have all parts. Follow the procedures for inspecting the printer to familiarize yourself with printer parts so you can follow the instructions in this book.
Ribbon Core
Documentation |
3in (76.2 mm) I.D. |
Printer |
and Software |
Media Roll Adapters |
|
USB Cable |
Power Cord |
Power |
|
varies by locale or region |
Supply |
Unpack and Inspect the Printer
When you receive the printer, immediately unpack it and inspect for shipping damage.
•Save all packing materials.
•Check all exterior surfaces for damage.
•Open the printer and inspect the media compartment for damage to components.
If you discover shipping damage upon inspection:
•Immediately notify the shipping company and file a damage report. Zebra Technologies Corporation is not responsible for any damage to the printer incurred during shipment, and will not cover the repair of this damage under its warranty policy.
•Keep all packaging material for shipping company inspection.
•Notify your authorized Zebra® reseller.
P1062653-002 Rev. A |
ZD500 Series™ Thermal Transfer Printer User’s Guide |
1/16/2014 |

Introduction 5
Printer Features
Printer Features
Figure 1 shows features on the outside and Figure 2 shows features inside the media compartment of your printer. Depending on the printer model and the installed options, your printer may look slightly different.
Figure 1 • Printer Features
Control Panel
Release
Latches
Release |
Fan-Fold Media |
|
Entry Slot |
||
Latches |
||
|
Interface |
|
|
Connectors |
DC Power |
Power |
|
Receptacle |
Switch |
1/16/2014 |
ZD500 Series™ Thermal Transfer Printer User’s Guide |
P1062653-002 Rev. A |

6Introduction
Printer Features
Figure 2 • Printer Features Continued
Ribbon Roll Holders
Take Up Spindles |
Supply Spindles |
Ribbon Trailer Sensor
(hidden from view) 
Roll Holders and
Media Guides
Media Guide Stop
Adjustment
Movable
Black Mark
Sensor
Printhead |

 Web (Gap)
Sensor
|
Dispenser Option |
|
Platen |
|
|
Roller |
|
|
RFID Antenna |
|
|
(inside) |
|
|
Head-Up Sensor |
|
|
(inside) |
|
|
Dispenser Door |
|
|
(open) |
|
|
Label Taken |
Pinch |
Peel Bar |
Sensor |
Roller |
|
P1062653-002 Rev. A |
ZD500 Series™ Thermal Transfer Printer User’s Guide |
1/16/2014 |
Introduction 7
Printer Features
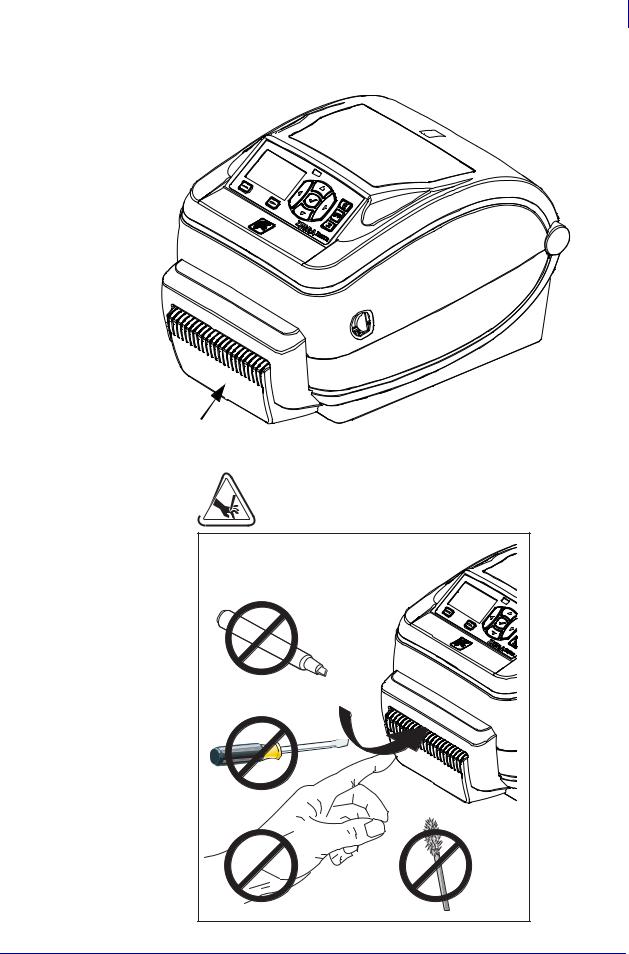
Figure 3 • Printer Features - Cutter Option
|
Media Cutter |
|
|
(Option) |
|
1/16/2014 |
ZD500 Series™ Thermal Transfer Printer User’s Guide |
P1062653-002 Rev. A |

8Introduction
Control Panel
Control Panel
The control panel indicates the printer’s operating status and allows the user to control basic printer operation.
Figure 4 • ZD500 Series™ Control Panel |
1 |
|
2
12 |
|
|
|
3 |
|
|
|
|
|
|
|
|
4 |
|
|
|
|
||
|
11 |
10 |
9 |
8 |
7 |
6 |
5 |
|
|
|
|||||
1 |
STATUS light |
Shows the current status of the printer. For more information, see |
|||||
|
|
Table 1 on page 9. |
|
|
|
|
|
2The PAUSE button starts or stops printer operation when pressed.
3The FEED button forces the printer to feed one blank label each time the button is pressed.
4The CANCEL button cancels print jobs when the printer is paused.
5The RIGHT ARROW button, which is active only in the menu system, navigates to the right through the main menu and to previous items in sub-menus.
6The DOWN ARROW button changes the parameter values. Common uses are to decrease a value or to scroll through choices.
7The SELECT () button operates as follows:
•When on the Home screen, pressing enters the menu system.
•When in the menu system, pressing accepts the values shown.
8The UP ARROW button changes the parameter values. Common uses are to increase a value or to scroll through choices.
9The LEFT ARROW button, which is active only in the menu system, navigates to the left through the main menu and to the next item in sub-menus.
10 |
RIGHT OPTION button |
These buttons execute the actions or commands shown directly above |
|
|
|
them in the display. |
|
11 |
LEFT OPTION button |
||
|
|||
|
|
|
|
12 |
The display shows the printer’s operating status and allows the user to navigate the menu system. |
||
Add
P1062653-002 Rev. A |
ZD500 Series™ Thermal Transfer Printer User’s Guide |
1/16/2014 |
Introduction 9
Control Panel
Table 1 • Printer Status Indicator Light
STATUS light steady green
The printer is ready.
STATUS light steady amber
This indicator light on steady indicates one of the following:
•The printer is not ready.
•The printhead is over temperature.
Caution • The printhead may be hot and could cause severe burns. Allow the printhead to cool.
STATUS light flashing amber
This indicator light flashing indicates one of the following:
•The printhead is under temperature.
STATUS light steady red
This indicator light on steady indicates one of the following:
•The media supply is out.
•The ribbon supply is out.
•The printhead is open.
•Cutter malfunction.
The printer needs attention and cannot continue without user intervention.
STATUS light flashing red
This indicator light flashing indicates one of the following:
•The printer is unable to correctly identify the printhead type.
•The main logic board (MLB) is over temperature.
•The printhead is extremely over temperature.
Caution • The printhead may be hot and could cause severe burns. Allow the printhead to cool.
The printer needs attention and cannot continue without user intervention.
STATUS light flashing amber followed by alternating amber/ green
This status light condition indicates the printer is in Forced Download Mode.
Forced Download Mode is used to download new firmware to the printer. This mode should only be used by trained personnel.
|
|
|
|
|
|
|
|
1/16/2014 |
ZD500 Series™ Thermal Transfer Printer User’s Guide |
P1062653-002 Rev. A |
|

10Introduction
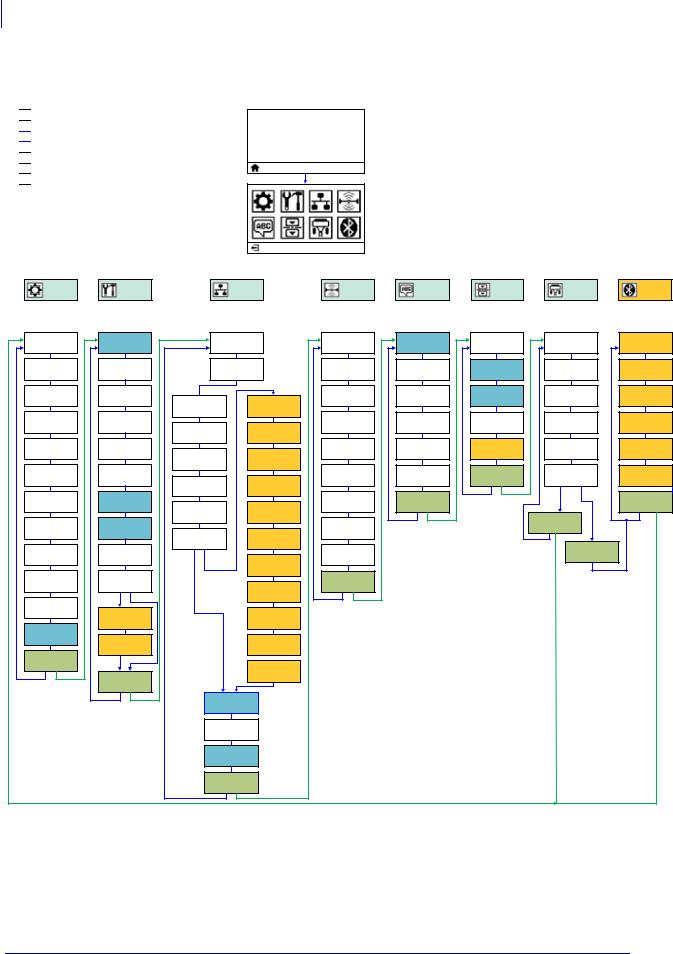
Control Panel Display Menu and Status Icons
Control Panel Display Menu and Status Icons
Figure 5 • Typical Home Menu
Error
Cover Unlocked
Ribbon In
Media In
Data
Ethernet
Bluetooth
Signal Strength
WiFi
Previous Menu Shortcut
Language Menu
Settings Menu
Sensors Menu
Tools Menu
Ports Menu
Network Menu
Bluetooth Menu
RFID Menu
P1062653-002 Rev. A |
ZD500 Series™ Thermal Transfer Printer User’s Guide |
1/16/2014 |
Introduction 11
Printer Control Panel Display
Printer Control Panel Display
The printer’s control panel includes a display, where you can view the printer’s status or change its operating parameters. In this section, you will learn how to navigate through the printer’s menu system and change values for menu items.
After the printer completes the power-up sequence, it moves to the Idle Display (Figure 6). If a print server is installed, the printer cycles through the information shown and the printer’s IP address.
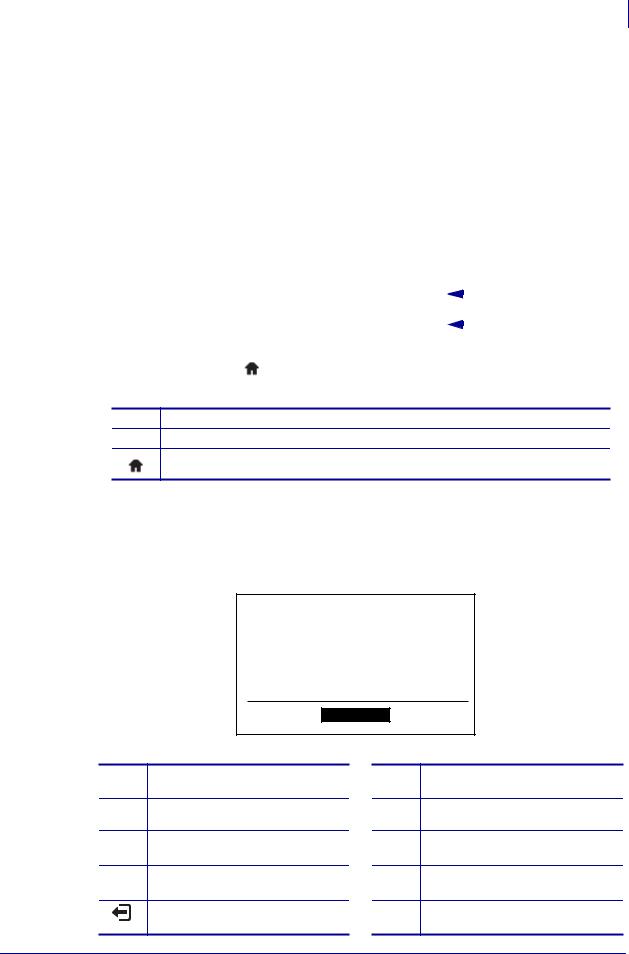
Figure 6 • Idle Display
PRINTER READY |
|
|
1 |
|
|
|
|||
V74.19.1Z |
|
|
2 |
|
|
|
|||
|
|
|
|
|
|
|
|
|
|
1 |
The printer’s current status |
2 |
Information that you set through TOOLS Menu on page 56 - IDLE DISPLAY |
|
Home menu shortcut |
The printer’s operating parameters are organized into several user menus, which you can access through the printer’s Home menu (Figure 7). For detailed information about changing the printer settings, see Printer Configuration on page 51.
Figure 7 • Home Menu
SETTINGS
See SETTINGS Menu on page 52.
See TOOLS Menu on page 56.
See NETWORK Menu on page 61.
See RFID Menu on page 65
Exit and return to the Idle Display (Figure 6).
See LANGUAGE Menu on page 69.
See SENSOR Menu on page 71.
See PORTS Menu on page 72.
See BLUETOOTH Menu on page 74
1/16/2014 |
ZD500 Series™ Thermal Transfer Printer User’s Guide |
P1062653-002 Rev. A |

12Introduction
Printer Control Panel Display
Navigating through Screens in the Menu
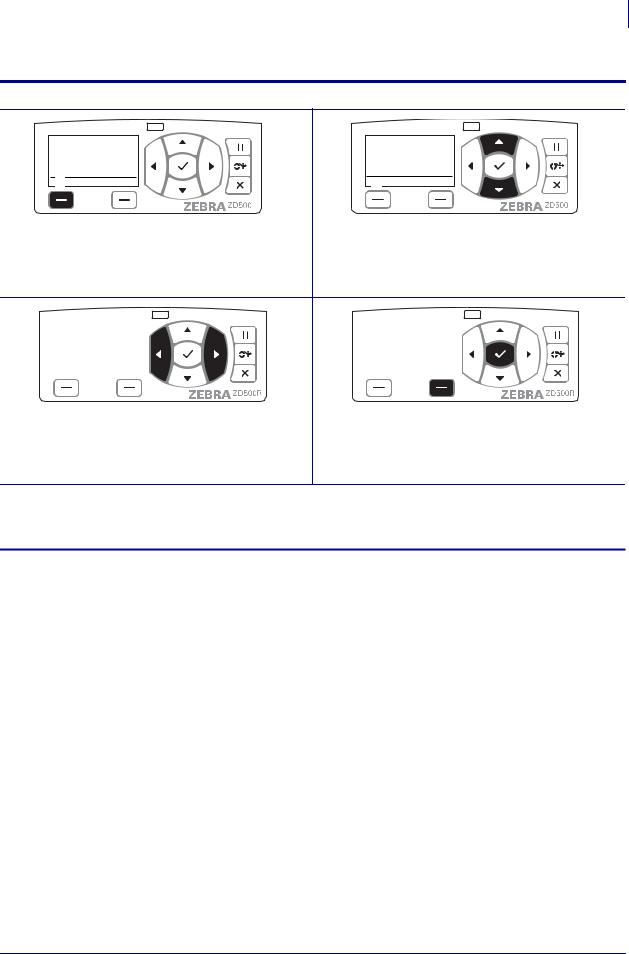
Table 2 shows navigating through the screens in the control panel display.
Table 2 • Navigation
Idle Display
At the Idle Display (Figure 6 on page 11), press LEFT SELECT to go to the printer’s Home menu (Figure 7 on page 11).
Home Menu
To move from icon to icon in the Home menu, press the ARROW buttons.
When an icon is selected, its image reverses to highlight it.
To select the highlighted menu icon and enter the menu, press
SELECT () button.
Press LEFT SELECT to exit the Home menu and return to the Idle Display.
SETTINGS menu icon |
SETTINGS menu icon highlighted |
|
and active for selection. |
|
|
Note • The printer automatically returns to the Idle Display after 15 seconds of inactivity in the Home menu.
P1062653-002 Rev. A |
ZD500 Series™ Thermal Transfer Printer User’s Guide |
1/16/2014 |
Introduction 13
Printer Control Panel Display
Table 2 • Navigation
User Menus
XXXXXXX
Press LEFT SELECT to return to the Home menu. ▼and ▲ indicate that a value can be changed. Any changes that you make are saved immediately.
Press the UP ARROW or DOWN ARROW to scroll through accepted values.
|
|
|
|
|
|
|
|
|
|
|
|
|
|
|
|
XXX |
|
|
|
|
|
|
|
|
|
||||
|
|
|
|
|
|
|
|
||
To scroll through the items in a User menu, press the |
A word in the bottom-right corner of the display |
||||||||
LEFT ARROW or RIGHT ARROW. |
indicates an available action. |
||||||||
|
|
|
|
|
Press SELECT () button or press RIGHT |
||||
|
|
|
|
|
SELECT to perform the action shown. |
||||
Note • The printer automatically returns to the Home menu after 15 seconds of inactivity in a User menu.
1/16/2014 |
ZD500 Series™ Thermal Transfer Printer User’s Guide |
P1062653-002 Rev. A |
14Introduction
Control Panel Menu Map
Control Panel Menu Map

 Home Menu Items
Printer Ready

 Menu Item also in other Menus
V74.xx.xxZ

 Printer Option. May not be present.

 Go to next Menu group
Settings |
Tools |
Network |
RFID |
Language |
Sensors |
Ports |
Bluetooth |
||||
(Menu) |
|||||||||||
|
|
|
|
|
|
|
|
|
|
||
Darkness |
|
Active Print |
|
RFID Status |
Language |
Sensor Type |
Baud Rate |
Bluetooth |
|||
Information |
Server |
|
|
Address |
|||||||
|
|
|
|
|
|
|
|||||
Print Speed |
LCD Contrast |
Primary |
|
|
RFID Calibrate |
ZPL Override |
Manual |
Data Bits |
Mode |
||
Network |
|
|
Calibration |
||||||||
|
|
|
|
|
|
|
|
|
|||
Media Type |
LCD Backlight |
|
|
|
RFID Read |
Command |
Parity |
Discovery |
|||
Wired IP |
|
WLAN IP |
Data |
Character |
Information |
||||||
|
|
|
|
|
|
||||||
|
|
|
Address |
|
Address |
|
Control |
|
Host |
|
|
Print Method |
Idle Display |
|
|
|
RFID Test |
Label Sensor |
Connected |
||||
Wired Subnet |
WLAN Subnet |
Character |
Handshake |
||||||||
|
|
|
|
|
|
||||||
|
Power Up |
Mask |
|
Mask |
RFID Program |
|
|
|
BT Spec |
||
Tear Off |
|
|
|
Delimiter Char |
Take Label |
Parallel Mode |
|||||
Action |
|
Wired |
|
WLAN |
Position |
Version |
|||||
|
|
|
|
|
|
||||||
|
Head Close |
Gateway |
|
Gateway |
RFID Read |
|
|
|
Min Security |
||
Print Width |
|
|
|
ZPL Mode |
Ports Menu |
WML Version |
|||||
Action |
|
Wired IP |
|
WLAN IP |
Power |
Mode |
|||||
|
|
|
|
|
|
||||||
|
|
|
Protocol |
|
Protocol |
RFID Write |
|
|
|
|
|
Print Mode |
Load Defaults |
|
|
|
Sensors Menu |
|
|
Settings Menu |
|||
Wired MAC |
|
WLAN MAC |
Power |
|
|
||||||
|
|
|
|
|
|
|
|
||||
|
Manual |
Address |
|
Address |
RFID Valid |
|
|
Settings |
|
||
Label Top |
|
|
|
|
|
Menu |
|
||||
Calibration |
|
|
|
Count |
|
|
|
||||
|
Wired Port |
|
WLAN Port |
|
|
|
|
||||
|
|
|
|
|
|
|
Bluetooth |
|
|||
Left Position |
Diagnostic |
|
|
|
RFID Void |
|
|
|
|||
|
|
|
|
|
Menu |
|
|||||
Mode |
|
|
|
ESSID |
Count |
|
|
|
|||
|
|
WLAN |
|
|
|
|
|
||||
|
|
|
|
|
|
|
|
|
|||
Reprint Mode |
ZBI Enabled? |
Installed |
|
|
Language |
|
|
|
|
||
|
|
|
Menu |
|
|
|
|
||||
|
|
|
|
|
Channel |
|
|
|
|
||
|
Yes |
No |
|
|
|
|
|
|
|
||
Label Length |
|
|
|
|
|
|
|
|
|||
|
|
No |
|
|
|
|
|
|
|
||
Max |
Run ZBI |
|
|
|
|
|
|
|
|||
WLAN |
|
Signal |
|
|
|
|
|
||||
|
Program |
|
|
|
|
|
|
||||
|
|
|
|
|
|
|
|
|
|||
Language |
Stop ZBI |
|
|
|
|
|
|
|
|
||
|
|
|
IP Port |
|
|
|
|
|
|||
|
Program |
|
|
|
|
|
|
|
|||
|
|
|
|
|
|
|
|
|
|||
Tools Menu |
|
|
|
|
IP Alternate |
|
|
|
|
|
|
|
|
|
|
|
|
|
|
|
|
||
|
Network Menu |
|
|
Port |
|
|
|
|
|
||
|
|
|
|
|
|
|
|
|
|||
|
|
|
|
|
|
|
|
|
|
||
|
|
|
Information |
|
|
|
|
|
|
|
|
|
|
|
Reset Network |
|
|
|
|
|
|
||
|
|
|
Load Defaults |
|
|
|
|
|
|
||
|
|
|
RFID Menu |
|
|
|
|
|
|
|
|
P1062653-002 Rev. A |
|
ZD500 Series™ Thermal Transfer Printer User’s Guide |
|
1/16/2014 |
|||||||

2
Setup
This section assists you in setting up and operating your printer for the first time.
Basic Printer Setup (Overview)
The setup process to can be broken down to two (2) phases: hardware setup and host system (software/driver) setup.
•Place the printer in a safe location with access to power and where cable or the wireless option communications can access your printer.
•Attach the printer to a grounded AC power source.
•Select and prepare media for your printer.
•Load the media.
•Load the transfer ribbon if you are using thermal transfer media.
•Turn the printer ON. Print a ‘Configuration Report’ to verify basic printer operation.
•Turn the printer OFF.
•Choose method to communicate to your printer - Local connection via USB, Serial, or Parallel ports; Local network via Ethernet (LAN); or using the printer’s wireless option that supports Wi-Fi (802.11 a/b/g/n WLAN) and Bluetooth 3.0.
•Attach the printer to the network or host system, and configure the printer as required for communicating to the print system host/network.
For supported Windows Operating systems (most common) with a Local (cabled) connection:
•‘Run’ the Zebra Setup Utilities for systems from the User’s CD.
•Click on ‘Install New Printer’ and run the install wizard. Select ‘Install Printer’ and select the ZD500R from the list of ZDesigner printers.
•Select the port (USB, Serial or Parallel) that you connected to the PC.
•Turn the printer ON and configure printer communications for your interface type.
•Print a Windows driver ‘Test Print’ to verify operation with Windows.
1/16/2014 |
ZD500 Series™ Thermal Transfer Printer User’s Guide |
P1062653-002 Rev. A |

16Setup
Select a Location for the Printer
Select a Location for the Printer
The printer and media need a clean safe area with moderate temperatures to have optimal print operations.
Select a location for the printer that meets these conditions:
•Surface: The surface where the printer will be located must be solid, level, and of sufficient size and strength to hold the printer.
•Space: The area where the printer will be located must include enough space for ventilation, opening the printer (media access and cleaning), and for accessing the printer components and connectors. To allow for proper ventilation and cooling, leave open space on all sides of the printer.
Caution • Do not place any padding or cushioning material under or around the base of the printer because this restricts air flow and could cause the printer to overheat.
•Power: The printer should be within a short distance of an appropriate power outlet that is easily accessible.
•Data communication interfaces: The printer must be within range of your WLAN or Bluetooth radio (if applicable) or within an acceptable range for other connectors to reach your data source (usually a computer).
Data cables should not be routed with or near power cords or conduits, fluorescent lighting, transformers, microwave ovens, motors or other electrical noise and interference sources. These interference sources may interfere with communications, host system operation, and printer functionality.
•Operating conditions: Your printer is designed to function in a wide range of environmental and electrical conditions, including a warehouse or factory floor. Table 4 shows the temperature and relative humidity requirements for the printer when it is operating.
Table 3 • Operating Temperature and Humidity
Mode |
Temperature |
Relative Humidity |
Thermal Transfer |
41° to 104°F (5° to 40°C) |
20 to 85% non-condensing |
|
|
|
Direct Thermal |
32° to 104°F (0° to 40°C) |
|
|
|
|
Table 4 • Non-Operating and Storage Temperature and Humidity |
||
|
|
|
Mode |
Temperature |
Relative Humidity |
|
|
|
Both |
-40° to 140°F (-40° to 60°C) |
5 to 85% non-condensing |
|
|
|
P1062653-002 Rev. A |
ZD500 Series™ Thermal Transfer Printer User’s Guide |
1/16/2014 |
Setup 17
Attaching Power
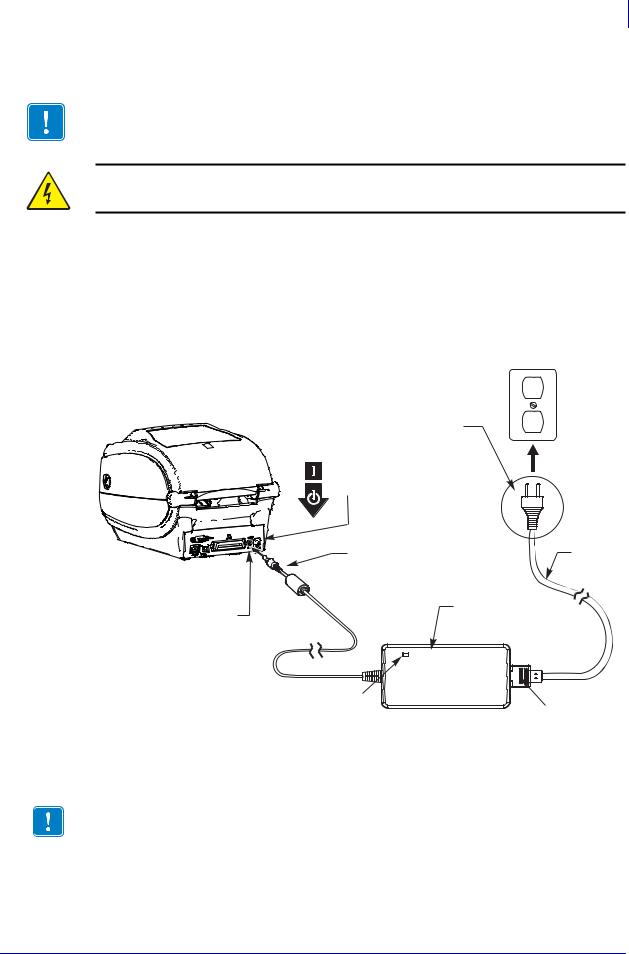
Attaching Power
Important • Set up your printer so that you can handle the power cord easily if needed. To make certain the printer cannot carry electrical current, you must separate the power cord from the power supply receptacle or AC electrical outlet.
Caution • Never operate the printer and power supply in an area where they can get wet. Serious personal injury could result!
1.Make sure the printer’s power switch is in the off position (down).
2.Insert the AC power cord into the power supply.
3.Plug the other end of the cord into an appropriate AC electrical outlet. Note: The active power light will go on if power is on at the AC outlet.
4.Insert the power supply’s power connector into the printer’s power receptacle.
Printer
Plug Varies
by Country
Power
Switch
|
Power |
AC |
|
Power |
|
|
Connector |
|
|
Cord |
|
|
|
|
Power |
|
Power |
|
Supply |
|
Receptacle |
|
|
|
|
|
|
Active Power Light |
IEC 60320 |
|
|
|
|
|
C-13 |
Note • Ensure the appropriate power cord with a three (3) prong plug and an IEC 60320-C13 connector are used at all times. These power cords must bear the relevant certification mark of the country in which the product is being used.
1/16/2014 |
ZD500 Series™ Thermal Transfer Printer User’s Guide |
P1062653-002 Rev. A |

18Setup
Preparing and Handling Media
Preparing and Handling Media
Carefully handling and storing media is important for the print quality in addition to using the right media (such as Genuine Zebra™ Supplies) and the right printer, your Zebra ZD500 Series™ printer. If the media becomes contaminated or dirty, it can damage or degrade the printhead or the printer, as well as, cause defects in the printed image (voids, streaks, discoloration, compromise the adhesive, etc.).
During manufacturing, packaging, handling and storage, the outside length of media may become dirty or contaminated when handled or dusty when stored. To prevent this type of contamination, we ask you to remove the outside layer of the media roll or stack. This will remove any contaminates or adhesive from labels or tape used to secure the media to the roll that may transfer to the printer or printhead.
Media Storage Tips
•Store media in a clean, dry, cool, dark area.
•Direct thermal media is chemically treated to be heat sensitive. Direct sunlight or heat sources may ‘expose’ the media.
•Do not store media with chemicals or cleaning products.
•Leave media in its protective packaging until it is to be placed in the printer for use.
•Many media types and label adhesives have a ‘shelf life’ or expiration date. Always use the oldest, viable (non-expired) media first.
P1062653-002 Rev. A |
ZD500 Series™ Thermal Transfer Printer User’s Guide |
1/16/2014 |
Loading...