


 Loading...
MC93XX
Mobile Computer
Quick Start Guide
MN-003413-01 Rev. A

MC93XX Quick Start Guide
Copyright
ZEBRA and the stylized Zebra head are trademarks of Zebra Technologies Corporation, registered in many jurisdictions worldwide. All other trademarks are the property of their respective owners. ©2019 Zebra Technologies Corporation and/or its affiliates. All rights reserved.
COPYRIGHTS & TRADEMARKS: For complete copyright and trademark information, go to www.zebra.com/copyright.
WARRANTY: For complete warranty information, go to www.zebra.com/warranty.
END USER LICENSE AGREEMENT: For complete EULA information, go to www.zebra.com/eula.
Terms of Use
•Proprietary Statement
This manual contains proprietary information of Zebra Technologies Corporation and its subsidiaries (“Zebra Technologies”). It is intended solely for the information and use of parties operating and maintaining the equipment described herein. Such proprietary information may not be used, reproduced, or disclosed to any other parties for any other purpose without the express, written permission of Zebra Technologies.
•Product Improvements
Continuous improvement of products is a policy of Zebra Technologies. All specifications and designs are subject to change without notice.
•Liability Disclaimer
Zebra Technologies takes steps to ensure that its published Engineering specifications and manuals are correct; however, errors do occur. Zebra Technologies reserves the right to correct any such errors and disclaims liability resulting therefrom.
•Limitation of Liability
In no event shall Zebra Technologies or anyone else involved in the creation, production, or delivery of the accompanying product (including hardware and software) be liable for any damages whatsoever (including, without limitation, consequential damages including loss of business profits, business interruption, or loss of business information) arising out of the use of, the results of use of, or inability to use such product, even if Zebra Technologies has been advised of the possibility of such damages. Some jurisdictions do not allow the exclusion or limitation of incidental or consequential damages, so the above limitation or exclusion may not apply to you.
Warranty
For the complete Zebra hardware product warranty statement, go to www.zebra.com/warranty.
Service Information
Before you use the unit, it must be configured to operate in your facility’s network and run your applications.
If you have a problem running your unit or using your equipment, contact your facility’s Technical or Systems Support. If there is a problem with the equipment, they will contact the Zebra Global Customer Support at www.zebra.com/support.
For the latest version of this guide go to www.zebra.com/support.
2

MC93XX Quick Start Guide
Provide Documentation Feedback
If you have comments, questions, or suggestions about this guide, send an email to EVM-Techdocs@zebra.com.
Configurations
MC93XX used in this guide refers to the MC93XX-G mobile computer with scan trigger. This guide applies to the following Model Numbers: MC930B, MC930P.
Unpacking
Carefully remove all protective material from the device and save the shipping container for later storage and shipping.
Verify the following items are in the box:
•Device
•Lithium-ion battery
•Regulatory Guide.
Inspect the equipment for damage. If any equipment is missing or damaged, contact the Zebra Support Center immediately.
3
MC93XX Quick Start Guide
Device Features
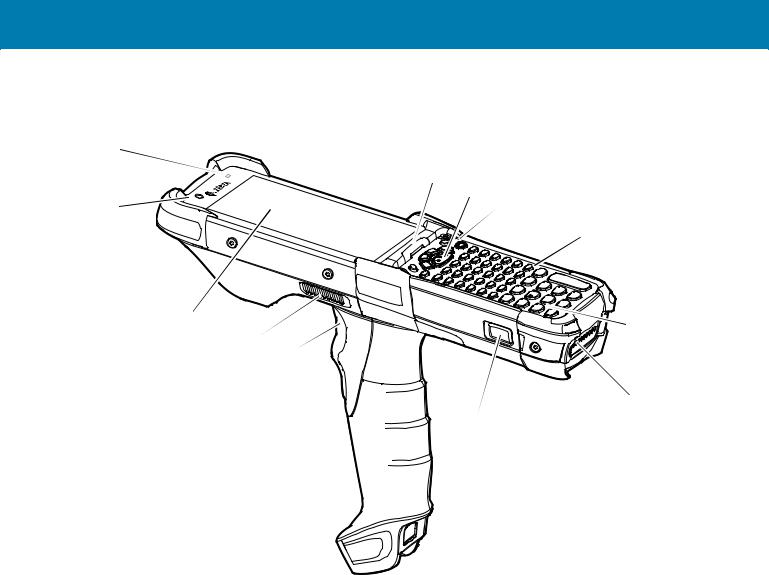
Figure 1 MC93XX Front View
1 |
|
|
|
12 |
|
2 |
11 |
10 |
9
3 |
8 |
|
|
|
4 |
|
5 |
 7
7
6
Table 1 MC93XX Features - Front View
Number |
Item |
Function |
1 |
Ambient Light |
Controls display and keyboard backlight. |
|
Sensor |
|
|
|
|
2 |
Front Facing |
Use to take photos and videos. |
|
Camera |
NOTE: The front camera is available only on the premium configurations. |
|
|
|
3 |
Display |
Displays all information needed to operate the device. |
|
|
|
4 |
Speaker Side |
Provides audio output for video and music playback. |
|
Port |
|
|
|
|
5 |
Trigger |
Initiates data capture when a scan application is enabled. |
|
|
|
6 |
Battery Release |
Releases the battery from the device. |
|
Latch |
NOTE: Press the battery release latch on both the sides of the simultaneously to |
|
|
|
|
|
release the battery. |
|
|
|
7 |
Battery |
Provides power for operating the device. |
|
|
|
8 |
Microphone |
Use for communications in Handset mode. |
|
|
|
4
MC93XX Quick Start Guide
Table 1 MC93XX Features - Front View (continued)
Number |
Item |
Function |
9 |
Keypad |
Use to enter data and navigate on screen functions. |
|
|
|
10 |
Power Button |
Press and hold to turn on the device. Press to turn on or off the screen. |
|
|
Press and hold to select one of these options: |
|
|
Power off - Turn off the device. |
|
|
Restart - Restart the device when software stops responding. |
|
|
|
11 |
Center Scan |
Initiates data capture when a scan application is enabled. |
|
Button |
|
|
|
|
12 |
Charger/Decode |
Indicates battery charging status while charging, app generated |
|
Status LED |
notifications, and data capture status. |
|
|
|
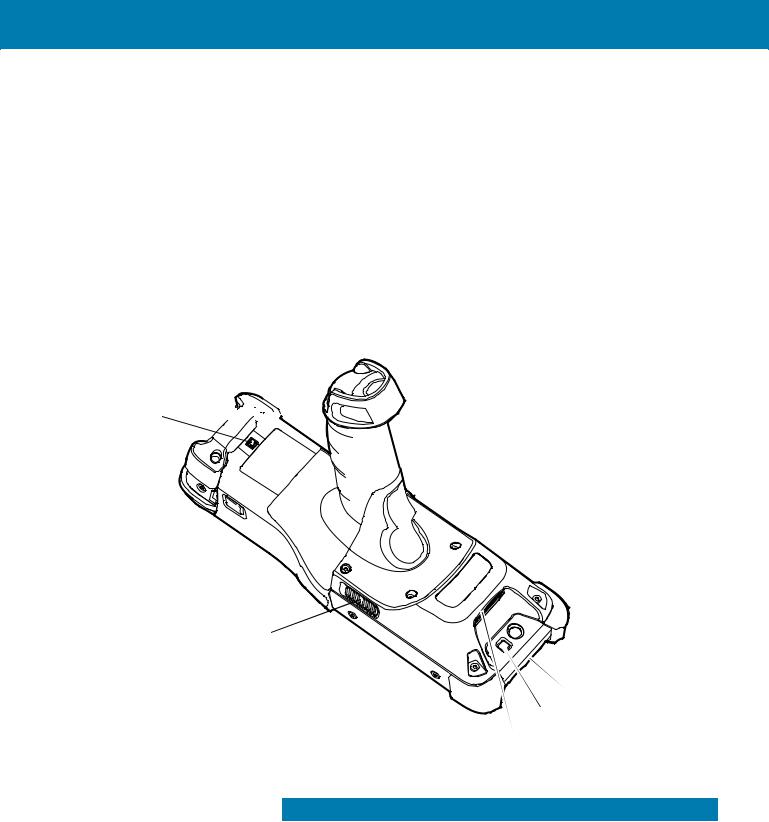
Figure 2 MC93XX Back View
13


14
15
 19
19
18 17
16
Table 2 MC93XX Features - Back View
Number |
Item |
Function |
13 |
Passive NFC Tag |
Provides secondary product label information (configuration, serial |
|
|
number and manufacture data code) in the event that the readable |
|
|
product label is worn or missing. |
|
|
|
14 |
Battery Release |
Releases the battery from the device. |
|
Latch |
|
|
|
|
15 |
Side Speaker |
Provides audio output for video and music playback. |
|
|
|
5
MC93XX Quick Start Guide
Table 2 MC93XX Features - Back View (continued)
Number |
Item |
Function |
16 |
Scanner Exit |
Provides data capture using the scanner/imager. |
|
Window |
|
|
|
|
17 |
Camera Flash |
Provides illumination for the camera. |
|
|
NOTE: Camera is available only on some configurations. |
|
|
|
18 |
NFC Antenna |
Provides communication with other NFC-enabled devices. |
|
|
NOTE: NFC antenna is available only on the premium configurations. |
|
|
|
19 |
Rear Camera |
Takes photos and videos. |
|
|
NOTE: The rear camera is available only on the premium configurations. |
Setup
To start using the device for the first time:
•Install a microSD card (optional)
•Install the battery
•Charge the device
•Power on the device.
Installing a microSD Card
The microSD card slot provides secondary non-volatile storage. The slot is located under the keypad module. Refer to the documentation provided with the card for more information, and follow the manufacturer’s recommendations for use.
CAUTION: Follow proper electrostatic discharge (ESD) precautions to avoid damaging the microSD card. Proper ESD precau- tions include, but are not limited to, working on an ESD mat and ensuring that the operator is properly grounded.
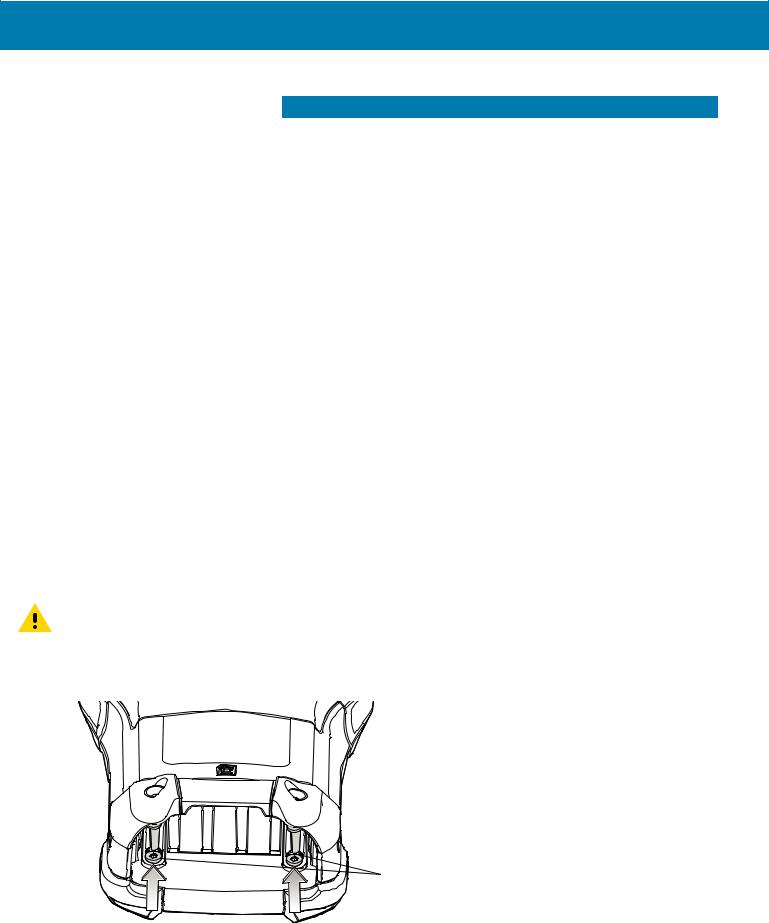
1. Using a Torx T8 screwdriver, remove the two keypad latch screws from inside the battery slot.
Figure 3 Remove Keypad Latch Screws
Keypad Latch Screws
6

MC93XX Quick Start Guide
2. Slide the keypad latches toward the bottom of the device.
Figure 4 Release Keypad Latches
 Screwdriver


 Keypad Latches
NOTE: If the keypad latches are hard to move, use a screwdriver to gently slide them towards the bottom of the device.
3.Turn the device over so that the keypad is visible.
4.Using a Torx T8 screwdriver, remove the two keypad assembly screws from the top of the keypad.
Figure 5 Remove Keypad

 Keypad Screws
Keypad


 microSD Card Holder
7

MC93XX Quick Start Guide
5.Lift the keypad from the device.
6.Slide the microSD card holder to the Open position.
Figure 6 Open microSD Card Holder
7. Lift the microSD card holder.
Figure 7 Lift microSD Card Holder
8.Insert the microSD card into the card holder door ensuring that the card slides into the holding tabs on each side of the door.
Figure 8 Insert microSD Card into Holder
8

MC93XX Quick Start Guide
9. Close the microSD card holder door and slide the door to the Lock position.
Figure 9 Close and Lock microSD Card in Holder
10.Align the keypad with the device.
11.Using a Torx T8 screwdriver, secure the keypad to the device using the two screws. Torque screws to 5.8 kgf-cm or 5.0 lbf-in.
Figure 10 Replace Keypad
 Keypad Screws
12.Turn the device over so that the keypad latches are visible.
9
Loading...