


EPL2

Manual No. 980352-001 Rev. A
©2001 Zebra Technologies Corporation
EPL2
Programmer’s
Manual
Programming for Page Mode
Printing

FOREWORD
This manual provides programming information for printers featuring Zebra’s EPL2 Pro
-
gramming and command language, which are manufactured by Zebra Technologies Corpora
-
tion, Camarillo, California.
COPYRIGHT NOTICE
This documentcontains information proprietary to Zebra Technologies Corporation. This docu
-
ment and the information contained within is copyrighted by Zebra Technologies Corporation
and may not be duplicated in full or in part by any person without written approval from Zebra.
While every effort has been made to keep the information contained within current and accurate
as of the date of publication, no guarantee is given or implied that the document is error-free or
thatitisaccuratewith regardtoany specification.Zebrareserves therightto makechanges,for the
purpose of product improvement, at any time.
TRADEMARKS
Zebra and EPL2 are trademarks of Zebra Technologies Corporation. All other marks are trade-
marks or registered trademarks of their respective holders.
REVISION HISTORY
Rev.A - Thismanual version coincides with Zebraprinters with EPL2 firmware version4.04and
is available from Zebra in electronic form.
See the Zebra web site for information on Zebra Technologies printers at: www.zebra.com
ii
980352-001 Rev.A

Table of Contents
Introduction . . . . . . . . . . . . . . . . . . . . . . 1-1
Command Conventions . . . . . . . . . . . . . . . . 1-2
Basic Command Syntax . . . . . . . . . . . . . . . . 1-3
Command Editor. . . . . . . . . . . . . . . . . . . . 1-3
Placing Elements in the Print Image . . . . . . . . . . 1-4
Text (Fonts) . . . . . . . . . . . . . . . . . . . . . . 1-5
Bar Codes . . . . . . . . . . . . . . . . . . . . . . . 1-7
Programming Sequences Affect Graphic Results . . . . 1-8
Printer Configuration . . . . . . . . . . . . . . . . . 2-1
Printer AutoSense Feature . . . . . . . . . . . . . . . 2-1
Determining Printer Firmware Version . . . . . . . . . 2-2
Programming Mode Configuration . . . . . . . . . . . 2-3
Media Detection . . . . . . . . . . . . . . . . . . . . 2-4
Command Reference . . . . . . . . . . . . . . . . . 3-1
A
Command - ASCII Text . . . . . . . . . . . . . . . . . . . 3-4
Asian Character Font Sets . . . . . . . . . . . . . . . 3-8
AUTOFR
Command - Automatic Form Printing . . . . . . . 3-9
B Command - Bar Code . . . . . . . . . . . . . . . . . . . 3-11
b Command - 2D Bar Code - MaxiCode Specific Options . . 3-16
b Command - 2D Bar Code - PDF417 Specific Options . . . 3-20
C Command - Counter . . . . . . . . . . . . . . . . . . . . 3-27
C Command - Cut Immediate . . . . . . . . . . . . . . . . 3-29
D Command - Density . . . . . . . . . . . . . . . . . . . . 3-30
dump Command - Enable Dump Mode . . . . . . . . . . . 3-31
eR Command - User Defined Error/Status Character . . . . 3-32
EI Command - Print Soft Font Information . . . . . . . . . . 3-33
EK Command - Delete Soft Font . . . . . . . . . . . . . . . 3-34
ES Command - Store Soft Font . . . . . . . . . . . . . . . . 3-35
f Command - Cut Position . . . . . . . . . . . . . . . . . . 3-40
FE Command - End Form Store . . . . . . . . . . . . . . 3-41
FI Command - Print Form Information . . . . . . . . . . . . 3-42
FK Command - Delete Form . . . . . . . . . . . . . . . . . 3-43
FR Command - Retrieve Form . . . . . . . . . . . . . . . . 3-44
FS Command - Store Form . . . . . . . . . . . . . . . . . . 3-45
GG Command - Print Graphics . . . . . . . . . . . . . . . 3-47
GI Command - Print Graphics Information . . . . . . . . . . 3-48
GK Command - Delete Graphics . . . . . . . . . . . . . . . 3-49
GM Command - Store Graphics . . . . . . . . . . . . . . . 3-50
GW Command - Direct Graphic Write . . . . . . . . . . . . 3-52
980352-001 Rev.A
iii

I Command - Character Set Selection . . . . . . . . . . . . . 3-53
JB Command - Disable Top Of Form Backup . . . . . . . . . . 3-55
JF Command - Enable Top Of Form Backup . . . . . . . . . . 3-56
LE Command - Line Draw Exclusive . . . . . . . . . . . . . . . 3-57
LO Command - Line Draw Black . . . . . . . . . . . . . . . . 3-58
LS Command - Line Draw Diagonal . . . . . . . . . . . . . . . 3-59
LW Command - Line Draw White . . . . . . . . . . . . . . . . 3-60
M Command - Memory Allocation . . . . . . . . . . . . . . . 3-61
N Command - Clear Image Buffer. . . . . . . . . . . . . . . . 3-62
o Command - Cancel Software Options . . . . . . . . . . . . 3-63
oB Command - Cancel Auto Bar Code Optimization . . . . . . 3-64
oE Command - Line Mode Font Substitution . . . . . . . . . . 3-65
oH Command - Macro PDF Offset . . . . . . . . . . . . . . . 3-66
oM Command - Disable Initial Esc Sequence Feed . . . . . . . 3-68
oR Command - Character Substitution (Euro) . . . . . . . . . . 3-69
oW Command - Customize Bar Code Parameters . . . . . . . 3-71
O Command - Hardware Options . . . . . . . . . . . . . . . . 3-73
OEPL1 Command - Set Line Mode . . . . . . . . . . . . . . . 3-75
P Command - Print . . . . . . . . . . . . . . . . . . . . . . . 3-76
PA Command - Print Automatic . . . . . . . . . . . . . . . . . 3-77
q Command - Set Label Width . . . . . . . . . . . . . . . . . 3-78
Q Command - Set Form Length . . . . . . . . . . . . . . . . 3-80
r Command - Set Double Buffer Mode . . . . . . . . . . . . . 3-84
R Command - Set Reference Point . . . . . . . . . . . . . . . 3-85
S Command - Speed Select . . . . . . . . . . . . . . . . . . . 3-86
TD Command - Define Date Layout . . . . . . . . . . . . . . . 3-87
TS Command - Set Real Time Clock . . . . . . . . . . . . . . 3-88
TT Command - Define Time Layout . . . . . . . . . . . . . . 3-89
U Command - Print Configuration (General) . . . . . . . . . . 3-90
UA Command - Enable Clear Label Counter Mode . . . . . . . 3-91
UB Command - Reset Label Counter Mode . . . . . . . . . . . 3-92
UE Command - External Font Information Inquiry . . . . . . . 3-93
UF Command - Form Information Inquiry . . . . . . . . . . . . 3-94
UG Command - Graphics Information Inquiry . . . . . . . . . 3-95
UI Command - Host Prompts/Codepage Inquiry . . . . . . . . 3-96
UM Command - Codepage & Memory Inquiry . . . . . . . . . 3-97
UN Command - Disable Error Reporting . . . . . . . . . . . . 3-98
UP Command - Codepage & Memory Inquiry/Print . . . . . . . 3-99
UQ Command - Configuration Inquiry . . . . . . . . . . . . 3-100
US Command - Enable Error Reporting . . . . . . . . . . . . 3-101
V Command - Define Variable . . . . . . . . . . . . . . . . 3-103
W Command - Windows Mode . . . . . . . . . . . . . . . . 3-105
iv
980352-001 Rev.A

xa Command - AutoSense . . . . . . . . . . . . . . . . . 3-106
X Command - Box Draw . . . . . . . . . . . . . . . . . . 3-107
Y Command - Serial Port Setup . . . . . . . . . . . . . . . 3-108
Z Command - Print Direction . . . . . . . . . . . . . . . . 3-109
? Command - Download Variables . . . . . . . . . . . . . 3-110
^@ Command - Reset Printer . . . . . . . . . . . . . . . 3-111
^ee Command - Error Report - Immediate . . . . . . . . 3-112
Appendix A - Character References . . . . . . . . . . A-1
Resident Fonts 1-5 . . . . . . . . . . . . . . . . . . . A-1
Default Character Map Code Page - 437. . . . . . . . A-2
Dump Mode Character Map . . . . . . . . . . . . . . A-3
Appendix B - Cash Drawer Kicker Option . . . . . . . B-1
Cash Drawer Cable Wiring. . . . . . . . . . . . . . . B-2
<Esc>p
Command - Generate Pulse CDK . . . . . . . . . . B-3
<Esc>u Command - CDK Status . . . . . . . . . . . . . . . B-4
980352-001 Rev.A
v

vi
980352-001 Rev.A

Introduction
This section contains information about the ba
-
sic features, command syntax and terminology
oftheEPL2ProgrammingLanguageforZebra's
desktop printers with flash memory architec-
ture. These printers incorporate common pro-
grammingcodesetsandarchitecturalfeatures.
The primary operating mode for the printer is
EPL2, a page description language. It is de-
signed to assemble all the elements of the label
prior to printing to speed the printing process.
EPL2 is an ideal language foryourlabeling and
bar code requirements. The EPL2 is versatile
and is capable of printing a wide range media
and bar codes.
Some printer models also include a legacy
printer compatibility mode, Line Mode. Line
Mode supports our early model EPL program
-
ming language - ELP1. A separate manual is
provided for Line Mode printing
(p/n 980326-001). See the printer's Software
and Documentation CD with the specific
model'sProgrammer' Manualbuttonselector or
visit our web site at: www.zebra.com
980352-001 Rev.A
1-1

Command
Conventions
The manual uses the following typographic
conventions to describe commands.
Example Description
A Commands (Case Sensitive)
p
1
,p
2
,p
3
Required parameters
[p
1
, p
2
, p
3
]
Optional parameters
{Choice 1|Choice 2}
Indicates a mandatory choice be
-
tween two or more items. You
must include one of the items un
-
less all of the items are also en
-
closed in square brackets.
This text should be→
on one line
The line-continuation character
(→) indicates that code is contin
-
ued from one line to the next and
should be typed all on one line.
↵ Line feed character.
“NAME”
The name of a form or graphic in
double quote marks.
“DATA”
The text or bar code data in dou-
ble quote marks.
The (\) character designates that
the character following is a literal
and will encode into the data
field. Refer to the following exam-
ples:
To Print
Enter into Data Field
”\"
“Company” \"Company\"
\\\
\code\ \\code\\
“PROMPT”
An ASCII text field that will be
transmitted to the host (via the se
-
rial interface) each time this com
-
mand is executed.
Attention!!
All commands and alpha character command
parameters are case sensitive!
1-2
980352-001 Rev.A

Basic Command
Syntax
Each command consists of one or two ASCII
(case sensitive) alpha characters to identify the
specific command desired. Some commands
require one or more additional parameters to
supply the printer with sufficient information to
complete the command. Refer to Figure 1- for
the basic command syntax.
Each command line must be terminated with a
Line Feed (LF) character (Dec. 10). Most PC
based systems send CR/LF when the Enter key
is pressed. The Carriage Return (CR) character
is ignored by the printer and cannot be used in
place of LF.
Command Editor One method to createcommandfilesis through
anASCIIbased text editor.IntheDOSenviron-
ment, MS-DOS EDIT or BRIEF are good
choices. To execute the file, use the editor’s
print command or from the DOS prompt, use
the COPY command to send the file directly to
theprinter. Anexampleof the use of the COPY
command is:
COPY “FILENAME.EXT” LPT1↵
or
COPY “FILENAME.EXT” COM1↵
For more information on the use of the COPY
command, refer to your DOS software manual.
Configure the COM port to match the printer’s
serial port setting (typically set to defaults). See
the Y command in section 2 for details.
980352-001 Rev.A
1-3
Ap,p,p,p,p,p,p,"DATA "
1234567
↵
Command Parameters Command
Specific
Data
WRITE TEXT
Command Name
Figure 1-1
Basic Command
Syntax
Placing Elements in
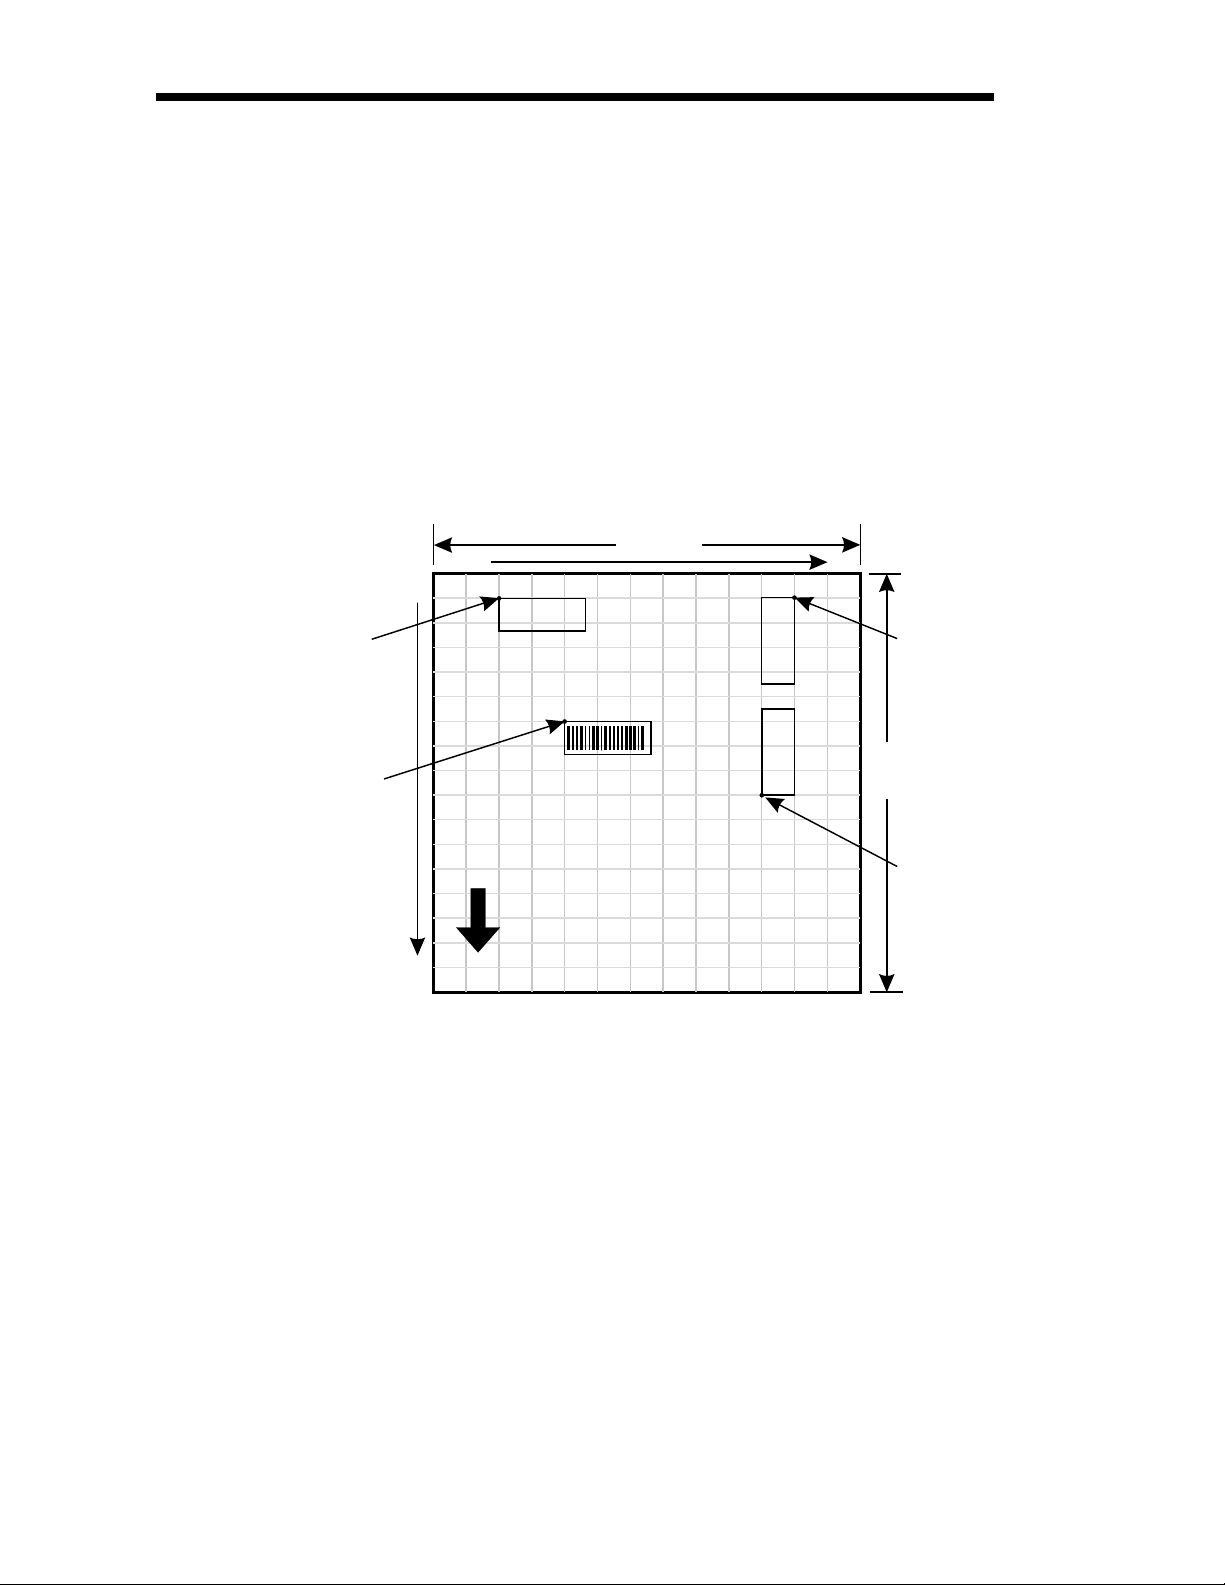
the Print Image
Image elements are located in the image print
buffer on a X-Y grid expressed in dots. The X
value represents thewidth and the Y value rep
-
resents the height of the grid.
The point of origin (the starting point) for a
non-rotated object is the upper left corner. As
anobjectrotates, the point oforiginrotateswith
the object.
These image buffer properties are depicted
graphically in the following illustration.
Sample Format
The minimum non printingmargin on all edges
ofthelabel is 1mm.Printingcloserthan 1mm to
the top or bottom edge of the label may cause
theprinter toadvanceunwantedlabelsor cause
the printer to go into error condition.
1-4
980352-001 Rev.A
"Q"
dots
x axis
y axis
Direction Of Feed
(0,0)
Te x t
Te x t
Te x t
Point of
Origin for
Text Object
Point of
Origin for
Text Object
Rotated 90°
Point of
Origin for
Text Object
Rotated 270
°
Point of
Origin for
BarCode Object
"q" dots
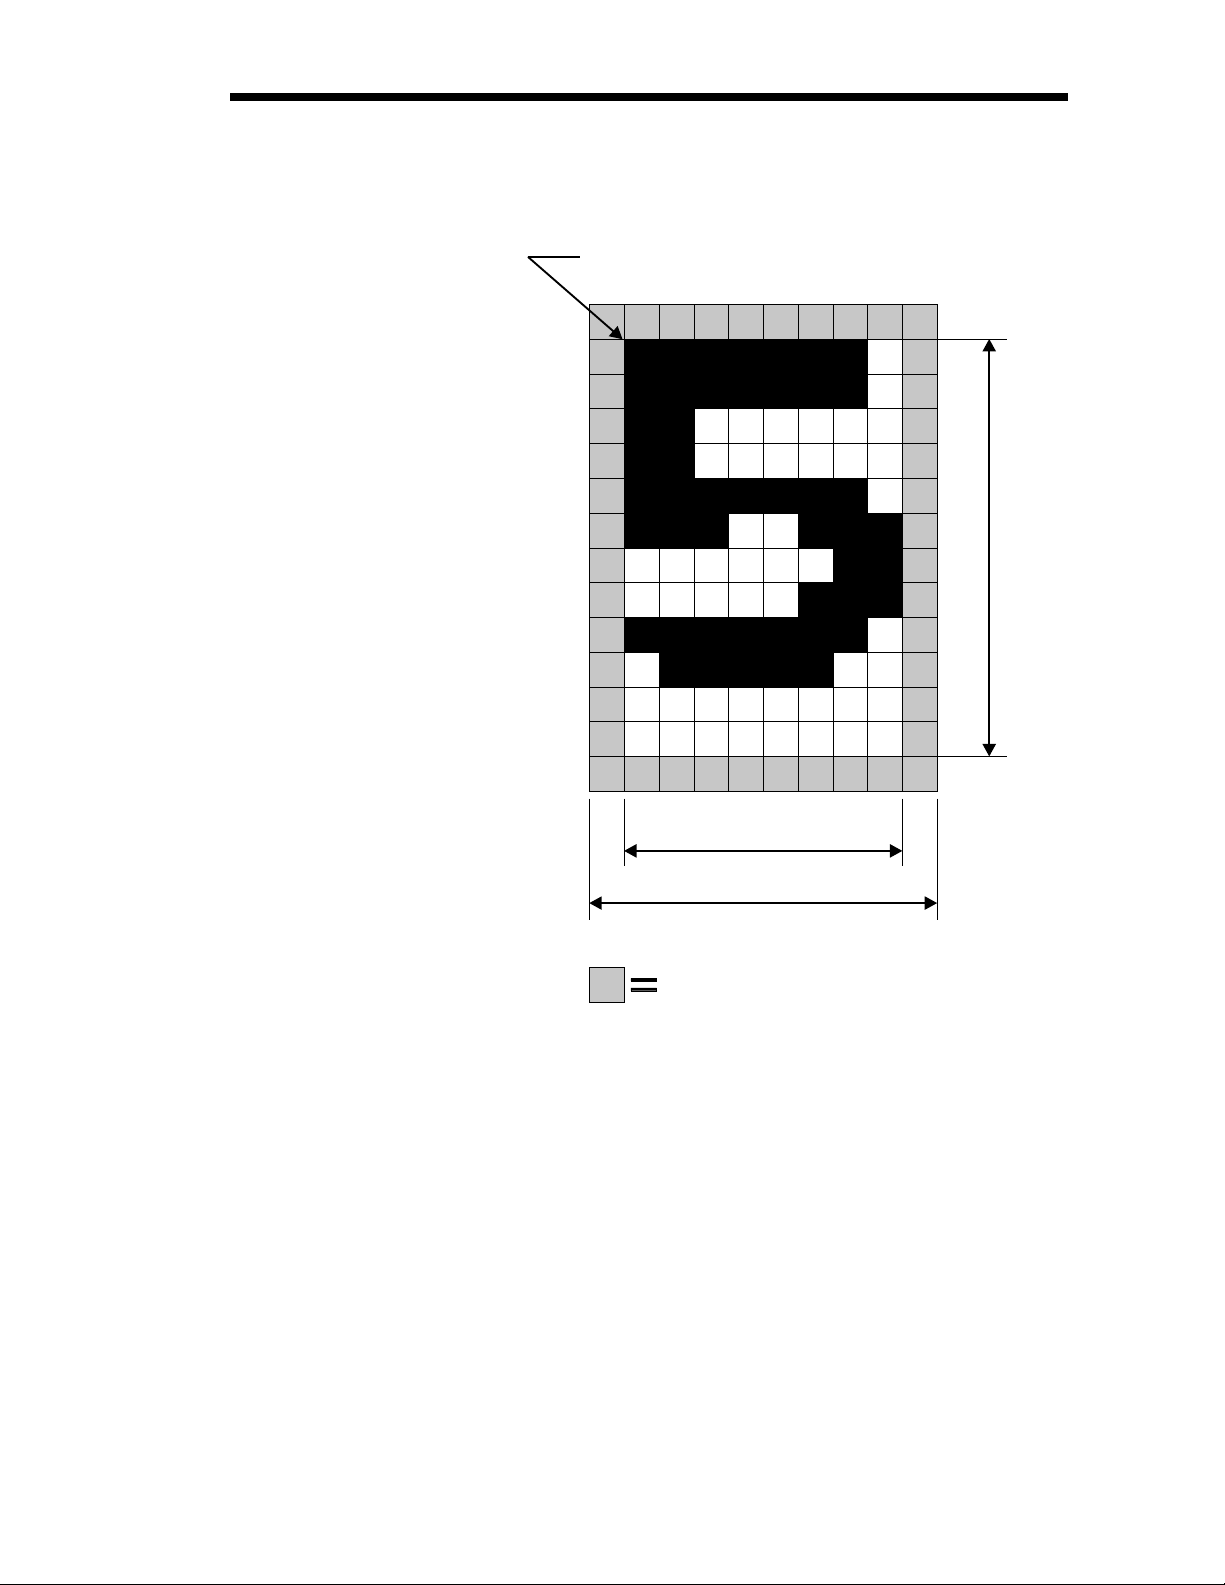
Text (Fonts) The standard EPL2 printer has five (1-5) resi
-
dent mono-spaced dot fonts. Fonts A-Z and a-z
(upper and lower case alpha characters) are re
-
served for downloading soft fonts.
Control text height (in horizontal dots) and
width (in vertical dots) with the horizontal and
vertical multipliers. The textis oriented first and
then the A command’s font multipliers are ap
-
plied.
980352-001 Rev.A
1-5
Inter-character Space
(
actuall
y
white dots
)
12
D
o
t
s
8 Dots
Character Width
Total Character Width
First Character of Text String Reference Point
Thetext is placedintothe image buffer.Seethe
following example.
The reference point of the first character in a text
stringisnotaffectedbythefont sizemultipliervalues.
1-6
980352-001 Rev.A
V
e
r
t
i
c
a
l
D
o
t
s
x axis
y axis
Direction Of Feed
(0,0)
Text
Text
Text
Text
Text
Point of
Origin for
Text Object
Point of
Origin for
Text Object
Point of
Origin for
Text Object
Point of
Origin for
Text Object
Rotated 90°
Point of Origin
for Text Object
Rotated 270°
Horizontal Dots
Text - No Size Multipliers
2x Horizontal Multiplier
2x Vertical Multiplier
2times 2times
First Character of Text
String Reference Point

Bar Codes All bar codes supported by the EPL2 language
have associated industry specifications that the
programmershouldbe aware of and adhere to.
The programmer needs to consider bar code
features and requirements when choosing and
using a bar code for different applications.
Some of the features and requirements that
need consideration are listed below:
❏
Data used by the application are per the bar
code specification (numbers only, alphanu
-
meric, alphanumeric and special characters,
etc.).
❏
Minimum and maximum number of charac
-
ters allowed or required per bar code.
❏Density or magnification of a given bar code
type.
❏White area required around bar codes (the
“Quiet Zone”).
❏The bar code must print within the image
buffer (printable area of the label).
Bar Code Orientation Tip
To help ensure that generated bar codes are read-
able by the widest variety of bar code readers, print
bar codes in the “Picket Fence” orientation versus
the “Ladder” orientation.
980352-001 Rev.A
1-7
V
e
r
t
i
c
a
l
D
o
t
s
x axis
y axis
Direction Of Feed
(0,0)
Horizontal Dots
Picket Fence
Orientation
Ladder
Orientation
Height of
Bar Code
Height of
Bar Code

Programming
Sequences Affect
Graphic Results
Graphic elements can interact andthe resultant
image can be affected by other commands.
Structure command sequences to reduce the
chancesofunexpectedprintresults.Theprinter
will process lines, text, boxes and most bar
codes in command sequence. The printer then
processes the printer control processes, coun
-
ters, variable data, Postnet, and then graphics
last.
1-8
980352-001 Rev.A

Printer Configuration
This section covers the interpret your printer's
configuration setup and setting basic modes.
Printer AutoSense
Feature
Use the printer's AutoSense feature to deter-
mineyourprinter'sconfigurationandoperating
mode. The primary functions that AutoSense
provides are:
❏AdjustmentoftheMediaSensorintheprinter
to the media in use.
❏
Programming Mode - Page (EPL2) or Line
(EPL1emulation) Mode.Note- LineModeis
not available for all printer models.
❏
The printer' serial interface settings.
❏
Reports the printer's configuration status in
-
cluding printer options.
980352-001 Rev.A
2-1
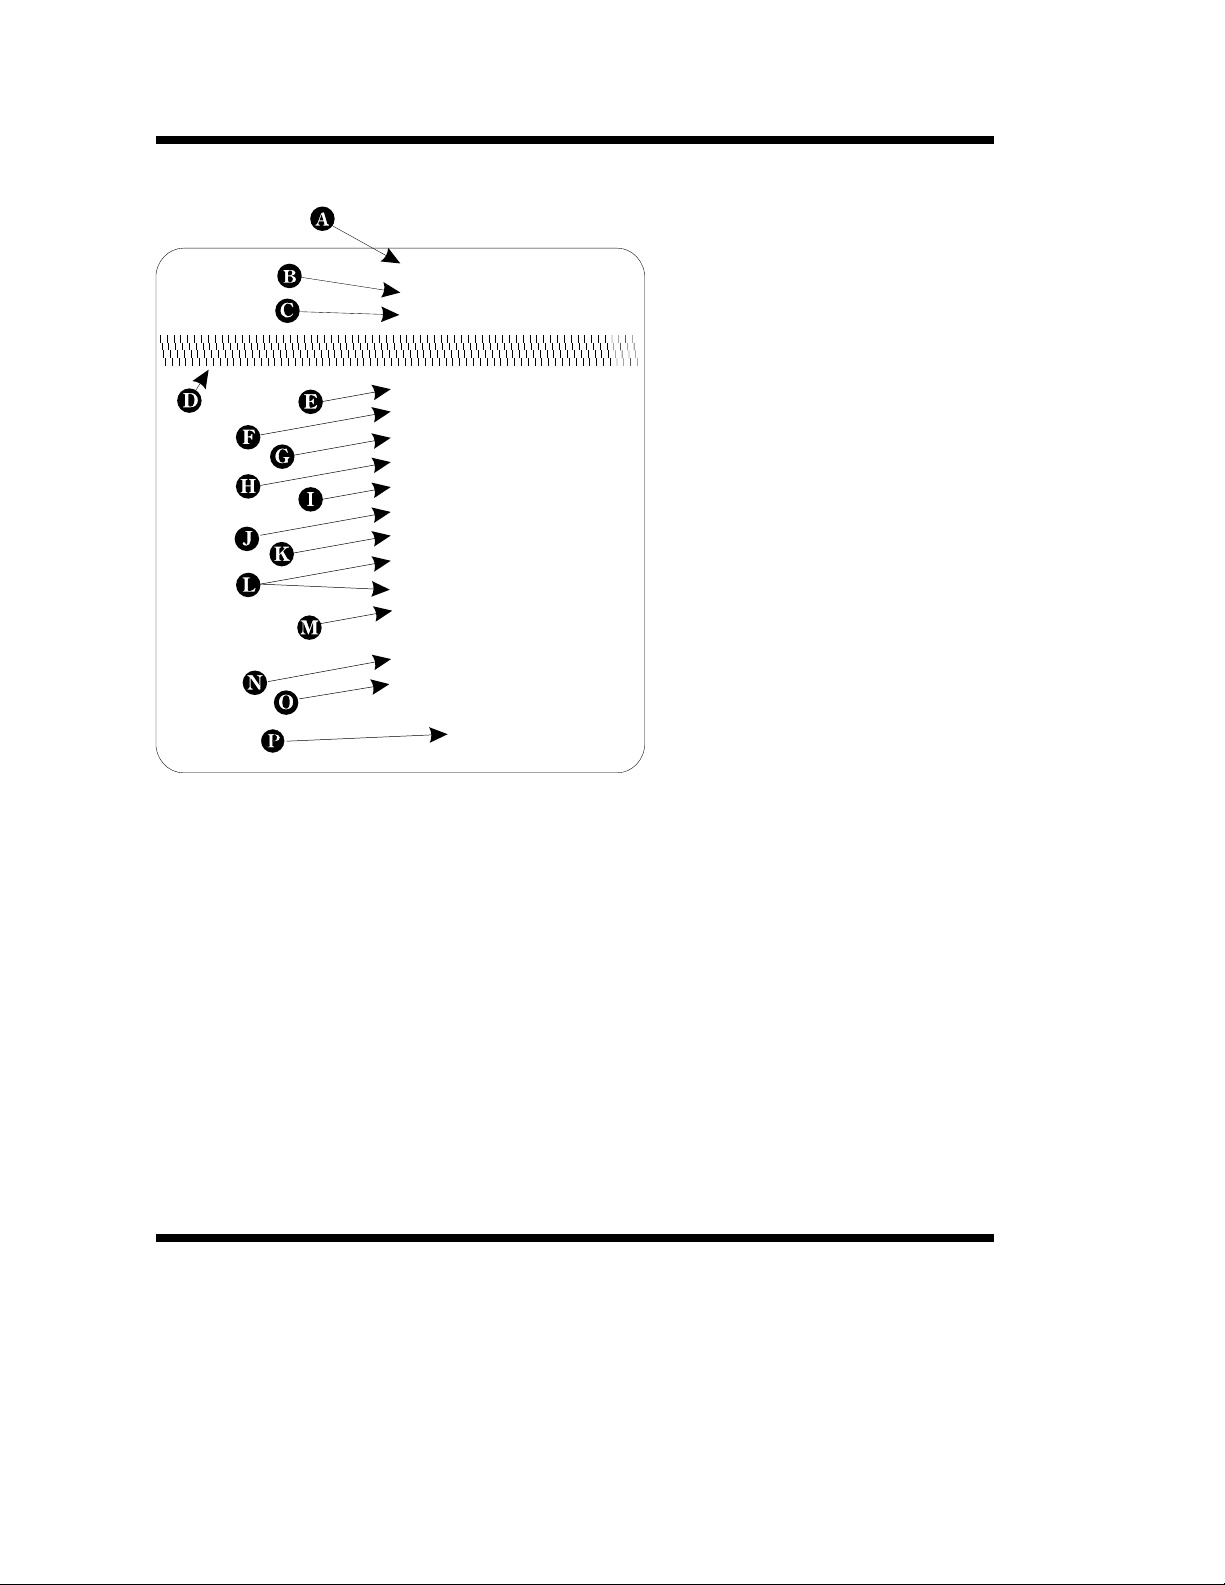
Explanation of the Status Printout
Determining Printer
Firmware Version
The printer version numbers are a code used to
document product function and the feature
support level of the printer. The latest firmware
version and updates can be obtained from our
web site.
2-2
980352-001 Rev.A
4M03351F 16 V3.18
Serial por t:96,N,8,1
Page Mode 200dpi
Image buffer size:0507K
Fmem:000.0K,061.4K avl
Gmem:000K,045K avl
Emem:024K,045K avl
I8,0,001 rY
S4 D00 R128,000 ZT UN
q832 Q1022,029
Option:D,P,C,S
oEw,x,y,z
16 23 31
Date: 10-05-94
Time:01:00:00
A
B
C.
D.
E
F
G
H
I
J
K
L
M
N
O
. Printer I.D.code number and firmware
version number.
. Serial port configuration.
Programming Mode
Print head resolution
USB is printed here ifinstalled
Print head test pattern.
. A mountof memory availablefor the
Image buffer.
.
Formstorage.
.
Graphics storage.
.
. Currently selected CharacterSet ( )
and Image Buffer mode setting ( ).
= Double Buffering Enabled
= Double Buffering Disabled
. Curr entlyselectedPrint Speed ( ),
Heat Density ( ), Reference Point( ),
Print Orientation ( ) and Error Status
().
. Currently selected Form Width ( ) and
Length( ).
. Current Hardware and Software
Option status .
. Curr entAutoSense Through (Gap)
Sensor values. The three numbers
represent;
1. Backing Transparent point
2. Set point
3. Label Transpar entpoint.
. Current time set in Real Time Clock.
This value will only be displayed if
your printer is equippedwith the Real
Time Clock feature.
. Current date set in Real Time Clock.
This value will only be displayed if
your printer is equippedwith the Real
Time Clock feature.
I
r
rY
rN
S
DR
Z
U
q
Q
Amount of memory used and memory
available for
Amount of memory used and memory
available for
Amount of memory used and memory
available for Soft fonts.
Dump Mode Print Sample
Programming Mode
Configuration
Flash based printers are, by default, configured
for Page (EPL2) mode operations. The opera
-
tor must convert the printer to Line Mode prior
tothe initialuseof LineMode.Thisis doneviaa
hardwareselectprocedurewiththeFeedbutton
during printer power-up. See the OEPL1 com
-
mand (page 3-75) for details on switching be
-
tween line and page modes via programming.
As of January 2001, the following printers sup
-
port Line Mode (EPL1 emulation):
·
2443
·
2722
·
2824
·
2844
The Line Mode (and Page Mode) configuration set-
ting is retained after reset has been issued or power
has been cycled.
Manually Setting
Line Mode
TheLineModecapableprinterutilizes the Feed
button during printer power-up to toggle be-
tween the printer personality modes, Line and
Page (EPL2).
1. With printer power off, press and hold the
Feed button while turning the printer on, then
release the button when the LED starts blinking
red.
2.When theindicatorLED startsflashinggreen,
immediately press and hold Feed button.
3. Release the Feed buttonwhen the LED turns
a steady Amber (orange).
4. Verify printer personality with Dump Mode
printout:. Line Mode or Page Mode (EPL2).
5. Press the Feed button to exit the Dump
Mode.
980352-001 Rev.A
2-3

Media Detection Media detection in EPL2 printers is a combina
-
tionofprogrammingandprintermediasensing.
TheQ (SetForm Length) and O (Option) com
-
mands program the media detection method.
The user must configure the printer for the me
-
dia type and the (programmed)form or label in
use.
Theprintercandetectthebeginningandendof
the printable areaon the media by one of three
methods: Gap, Notch (hole), or Black line. The
Gap method detects the difference in optical
density of a label on a liner from the liner only
with the Transmissive (Gap) sensor. The Notch
methodusestheTransmissivesensortodetecta
hole in the media (gap-less labels or tag stock).
The Black line method uses the Reflective sen
-
sor to detect a preprinted black line on the me-
dia back (for gap-less labels or tag stock).
Printing on continuous media requires pro-
gramming to control media positioning.
EPL2 printers also support a “Label Dispense”
modeasaprinterconfigurationoption(formost
models). The printers use a “Label Taken”sen-
sor to detect the removal of a label.
One or more of these sensors may require user
adjustment or configuration for proper opera-
tion. All EPL2 printers have an AutoSense fea
-
ture to optimize label and label gap detection by
the transmissive (gap) sensor. See the printer’s
user’s manual for printer specific sensor adjust
-
ment control.
2-4
980352-001 Rev.A

Command Reference
This section contains a complete listing of all
commands in alphabetical order.
980352-001 Rev.A
3-1
3-2
980352-001 Rev.A
Command Description Page
A ASCII Text 3-4
AUTOFR Automatic Form Printing 3-9
B Bar Code 3-11
b
MaxiCode 3-16
PDF417 3-20
C Counter 3-27
C Cut Immediate 3-29
D Density 3-30
EI Print Soft Font Info. 3-33
EK Delete Soft Font 3-34
eR User Definable Error Response 3-32
ES Store Soft Font 3-35
f Cut/Peel Position 3-40
FE End Form Store 3-41
FI Print Form Info. 3-42
FK Delete Form 3-43
FR Retrieve Form 3-44
FS Store Form 3-45
GG Retrieve Graphics 3-47
GI Print Graphics Info. 3-48
GK Delete Graphic 3-49
GM Store Graphic 3-50
GW Direct Graphic Write 3-52
I Character Set Selection 3-53
JB Disable Top Of Form Backup 3-55
JF Enable Top Of Form Backup 3-56
LE Line Draw Exclusive 3-57
LO Line Draw Black 3-58
LS Line Draw Diagonal 3-59
LW Line Draw White 3-60
M Memory Allocation 3-61
N Clear Image Buffer 3-62
o Cancel Customized Settings 3-63
oB Cancel Customize Bar Code 3-64
oE Line Mode Font Substitution 3-65
oH Macro PDF Offset 3-66
oM Disable Initial Esc Sequence Feed 3-68
oR Character Substitution (Euro) 3-69
oW Customize Bar Code Parameters 3-71
O Options Select 3-73
OEPL1 Set Line Mode 3-75
P Print 3-76
PA Print Automatic 3-77
980352-001 Rev.A
3-3
Command Description Page
Q
Set Form Length
Transmissive (Gap) Sensor
3-80
Black Line Sensor
Continuous Stock
q Set Form Width 3-78
r Set Double Buffer Mode 3-84
R Set Reference Point 3-85
S Speed Select 3-86
TD Define Date Layout (& Print Date) 3-87
TS Set Real Time Clock 3-88
TT Define Time Layout (& Print Time) 3-89
U Print Configuration 3-90
UA Enable Clear Label Counter Mode 3-91
UB Reset Label Counter Mode 3-92
UE External Font Information Inquiry 3-93
UF Form Information Inquiry 3-94
UG Graphic Information Inquiry 3-95
UI Host Prompts/Codepage Inquiry 3-96
UM Codepage & Memory Inquiry 3-97
UN Disable Error Reporting 3-98
UP Codepage & Memory Inquiry/Print 3-99
UQ Configuration Inquiry 3-100
US Enable Error Reporting 3-101
V Define Variable 3-103
W Windows Mode 3-105
xa Sense Media 3-106
X Box Draw 3-107
Y Serial Port Setup 3-108
Z Print Direction 3-109
? Download Variables 3-110
^@ Reset Printer 3-111
^ee Status Report - Immediate 3-112
A Command - ASCII Text
Description Prints an ASCII text string.
Syntax Ap
1
,p
2
,p
3
,p
4
,p
5
,p
6
,p
7
,"DATA"
Parameters p
1
= Horizontal start position (X) in dots.
p
2
=Vertical start position (Y) in dots.
p
3
= Rotation
Value Description
0
No rotation
1
90 degrees
2
180 degrees
3
270 degrees
p
4
= Font selection
Value
Description
203 dpi 300 dpi
1
20.3 cpi, 6 pts,
(8 x 12 dots)
25 cpi, 4 pts,
(12 x 20 dots)
2
16.9 cpi, 7 pts,
(10 x 16 dots)
18.75 cpi, 6 pts,
(16 x 28 dots)
3
14.5 cpi, 10 pts,
(12 x 20 dots)
15 cpi, 8 pts,
(20 x 36 dots)
4
12.7 cpi, 12 pts,
(14 x 24 dots)
12.5 cpi, 10 pts,
(24 x 44 dots)
5
5.6 cpi, 24 pts,
(32 x 48 dots)
6.25 cpi, 21 pts,
(48 x 80 dots)
A - Z
Reserved for
Soft Fonts
Reserved for
Soft Fonts
Fonts 1 - 5 are fixed pitch.
p
5
= Horizontal multiplier, expands the text
horizontally. Values: 1, 2, 3, 4, 5, 6, & 8.
p
6
= Vertical multiplier, expands the text ver
-
tically. Values: 1, 2, 3, 4, 5, 6, 7, 8, & 9.
p
7
=N for normal or R for reverse image
“DATA” = Represents a fixed data field.
3-4
980352-001 Rev.A
A Command - ASCII Text
The backslash (\) character designates the fol
-
lowing character is aliteral and will encodeinto
thedatafield.Refertothefollowingexamples:
To Print
Enter into data field
“ \”
“Company” \”Company\”
\ \\
\code\ \\code\\
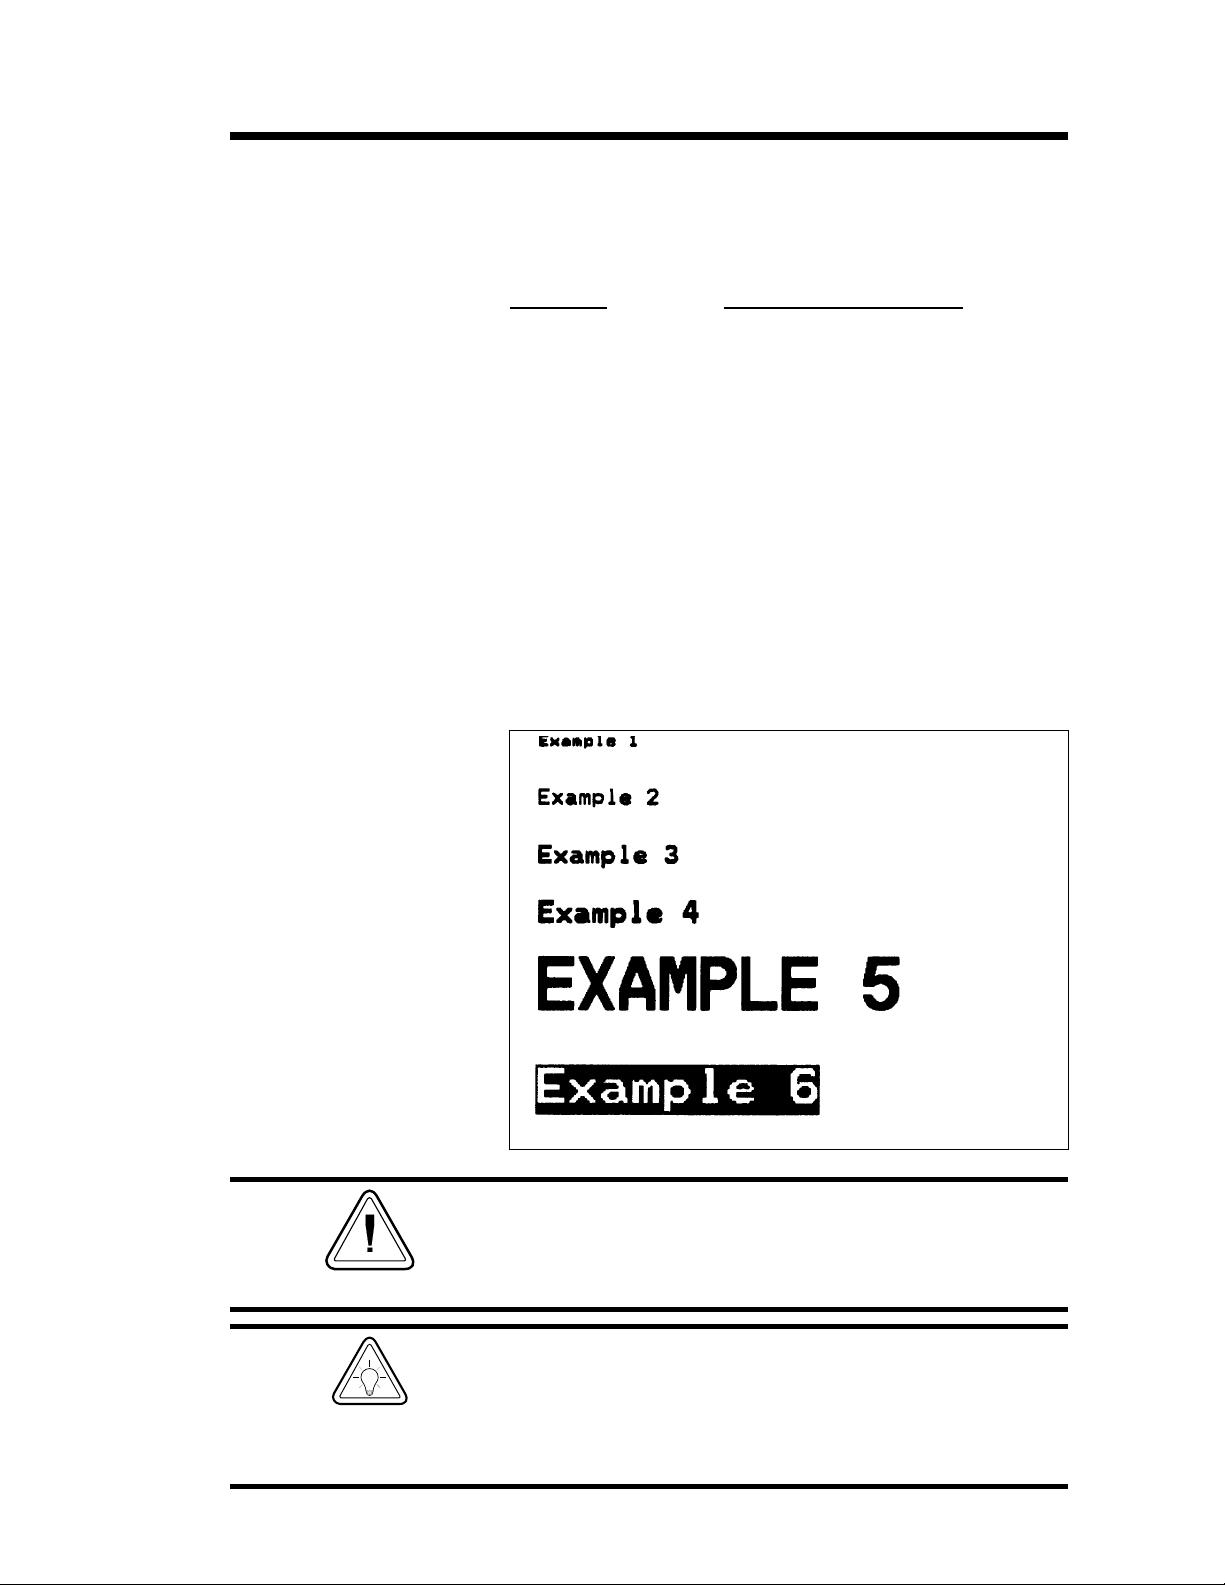
Examples:
¿
N¿
A50,0,0,1,1,1,N,"Example 1"¿
A50,50,0,2,1,1,N,"Example 2"¿
A50,100,0,3,1,1,N,"Example 3"¿
A50,150,0,4,1,1,N,"Example 4"¿
A50,200,0,5,1,1,N,"EXAMPLE 5"¿
A50,300,0,3,2,2,R,"Example 6"¿
P1¿
Will Produce:
As shown in example 5 above, font 5 only supports
upper case characters. Refer to Appendix A for a
complete listing of available fonts and character sets
supported.
Use the LE command to create reverse print text in
-
stead of the “R”intheA command parameter p
7
.
This is the recommend method because it provides
the best size, position and centering of the black line
(rectangle) bordering the reversed text.
980352-001 Rev.A
3-5
HINT

A Command - ASCII Text
Variable Data and
Counter Functions
The “Data” field can be replaced by or com
-
bined with the following commands:
Vnn= Prints the contents of variable “nn” at
this position where nn is a 2 digit num
-
ber from 00 to 99. See the V command,
page
Cn= Prints the contents of counter “n” at this
position where n is a one digit number
from 0 to 9. See the C command, page .
Example:
A50,0,0,1,1,1,N,"DATA"¿ : Writes Text
A50,50,0,2,1,1,N,V01¿: Writes contents of variable 01
A50,100,0,3,1,1,N,C1¿: Writes contents of counter 1
A50,100,0,3,1,1,N,C1+2¿ : Writes contents of counter 1 plus 2
Data with the RTC
Time & Date
Functions
The “Data” field can be replaced by or com-
bined with the following variables:
TT = Prints the current time at this position in
the predefined format. See the TT com-
mand for format selection. This variable
is available only if the printer Time &
Date option is installed.
TD=Prints the current date at this position in
the predefined format. See the TD com-
mand for format selection. This variable
is available only if the printer Time &
Date option is installed.
Examples:
A50,150,0,4,1,1,N,TT↵ : Writes current time
A50,200,0,5,1,1,N,TD↵ : Writes current date
or a combination of several options:
A50,300,0,3,2,2,R,"Deluxe"V01C2"Combo"TDV01TT↵
:Writes the text “Deluxe” followed by the contents of variable 01 fol
-
lowed by the contents of counter 2 followed by the text “Combo” fol
-
lowed by the current date followed by the contents of variable 01
followed by the current time.
3-6
980352-001 Rev.A

A Command - ASCII TEXT
Simple Expressions
in Data Fields
Anadvancedfunctionof the A command allows
addition and subtraction to be performed on
constant and variable values in flash printers.
Syntax Ap
1
,p
2
,p
3
,p
4
,p
5
,p
6
,p
7
,"DATA"[p
8
p
9
p
10
…]
Parameters For the p
1
- p
7
and “DATA” parameters -
See first page of A command, page 3-4.
p
8
= Required. Must be a variable data field
number, e.g. V00, V01 etc.
p
9
= Required. Operator, + or –
p
10
= Required. Variable data field number
or constant value.
Valid Number Ranges:
Constant = 0 to 2147483647
Variable = 0 to 2147483647
Result = -2147483648 to 2147483647
❏The Expression must start with a variable
field.
❏Thecharacter field length defined for the first
variable in the expression will be used to for
-
mat the result. If the result is of a greater
length than the defined character length,
then the result field will contain ‘X’s.
❏
A syntax error will be generated during form
store if the constant value is too large.
❏
Ifanerror occurs during theevaluationofthe
expression, the resultant field will be filled
with ‘X’s.
980352-001 Rev.A
3-7

A Command - Simple Expressions in Data Fields
Example:
¿
FK"1"¿
FK"1"¿
FS"1"¿
V00,10,N,"Enter current mileage"¿
A100,100,0,4,1,1,N,"Current mileage is “V00" miles.”¿
A100,200,0,4,1,1,N,"Change oil at “V00+3000" miles.”¿
FE¿
¿
FK"2"¿
FK"2"¿
FS"2"¿
V00,10,N,"Enter current mileage."¿
V01,10,N,"Enter interval mileage."¿
A100,100,0,4,1,1,N,"Current mileage is “V00" miles.”¿
A100,200,0,4,1,1,N,"Mileage interval is “V01" miles.”¿
A100,200,0,4,1,1,N,"Change oil at “V00+V01" miles.”¿
FE¿
¿
FK"3"¿
FK"3"¿
FS"3"¿
V00,10,N,"Enter value 1."¿
V01,10,N,"Enter value 2."¿
V02,10,N,"Enter value 3."¿
A100,200,0,4,1,1,N,"Answer: “V01+123+V00-10-V02¿
FE¿
Asian Character Font
Sets
The flash based printers support three Asian
languagesets. Asian language support is an op
-
tional feature and requires a special version of
the printer (PCBA) to support the large Asian
character sets.
The Asian character maps and special features
of the A command that support the character
sets can be found on our Internet site or from
CD ROM. Click on the code page reference (in
the electronic manual version) to display the
Addendum and its code pages.
Chinese Addendum - P/N 980095-061
Japanese Addendum - P/N 980095-071
Korean Addendum - P/N 980095-081
3-8
980352-001 Rev.A

AUTOFR Command - Automatic Form Printing
Description This special form process allows you to detach
the printer from the computer and print in a
standalone mode. The EPL2 printer reserves
the form name AUTOFR to allow the printer to
automaticallystarta form whentheprinteris in
-
itialized power-up. This feature can be used in
many ways:.
·
Feed a single label in peel mode and print
multiple labels set to the number of labels on
the roll.
·
Have a form with a variable and enter the
variable with a scanner, terminal, weight
scale, circuit analyzer or any other device ca
-
pable of sending ASCII character data.
Using AUTOFR Download a form to the printer with the name
AUTOFR.
Example:
¿ :Line Feed to initialize the printer
FK"AUTOFR"¿ :Form Kill (delete any existingAUTOFR)
FS"AUTOFR"¿ :Form Save (save file from here to FE at
: the bottom)
V00,8,L,""¿ :Variable field definition
Q254,20¿ :Label height followed by gap width
S2¿ :Speed (2ips)
D7¿ :Density setting
ZB¿ :Print direction (ZTflips it 180 degrees)
A340,20,0,4,1,2,N,"QUANTITY"¿
:Fixed text line
B265,75,0,3,2,4,101,B,V00¿ :Bar code definition
PA1¿ :Print1 labelAutomatically *
FE¿ :FormEnd (Line Feed)
* - If using the CAL TOOLS, CAL WIN, etc. programs to gener
-
ate label files (files with .ejf extensions), then the PA command
must be added manually by editing the .ejf file.
980352-001 Rev.A
3-9

AUTOFR - Automatic Form Printing Feature
AUTOFR treats any incoming data as a variable in
-
tended for printing. This means if you send the
printer a memory partition command, the label will
print, if you send a delete command - the label will
print! So, while you are testing AUTOFR it isbest to
use another name for the form. Once you are satis
-
fied with the form, rename it AUTOFR before you
download it.Thereis no need to specify a file exten
-
sion.
Isolating Data From
the Input Device
Place the printer in the diagnostic dump mode
andsendfromyourdatainput device. All charac
-
tersthedevicesendswillbeprintedonthelabel.
·
If nothing prints, nothing is arriving - check
pin-outs and serial settings.
Disabling AUTOFR Senda XOFF data character (13 hex. or ASCII
19) oraNUL(00hex.orASCII0)totheprinter.
Theformmaynowbedeletedfromtheprinter.
Removing AUTOFR The programmer must send a Delete Form - FK
command to the printer after disabling
AUTOFR.
Example:
FK"AUTOFR"¿
FK"AUTOFR"¿
3-10
980352-001 Rev.A
B Command - Bar Code
Description Usethiscommandtoprintstandardbarcodes.
Syntax Bp
1
,p
2
,p
3
,p
4
,p
5
,p
6
,p
7
,p
8
,"DATA"
Parameters p
1
=Horizontal start position (X) in dots
p
2
= Vertical start position (Y) in dots.
p
3
= Rotation
Value Description
0
No rotation
1
90 degrees
2
180 degrees
3
270 degrees
p
4
= Bar Code selection (see Table 2-1 on
next page).
p
5
=Narrow bar width in dots. (see Table
2-1 on next page).
p
6
=Wide bar width in dots.
Acceptable values are 2-30.
p
7
=Bar code height in dots.
p
8
=Print human readable code.
Values: B=yes or N=no.
“DATA” = Represents a fixed data field. The
data in this field must comply with the selected
bar code’s specified format.
The backslash (\) character designates the fol
-
lowing character is aliteral and will encodeinto
thedatafield.Refertothefollowingexamples:
To Print
Enter into data field
“ \”
“Company” \”Company\”
\ \\
\code\ \\code\\
980352-001 Rev.A
3-11
B Command - Bar Code
3-12
980352-001 Rev.A
Description
P
4
Value
P
5
Value
Code 39 std. or extended
3 1-10
Code 39 with check digit
3C 1-10
Code 93
9 1-10
Code 128 UCC
Serial Shipping Container Code
0 1-10
Code 128 auto A, B, C modes
1 1-10
Code 128 mode A
1A 1-10
Code 128 mode B
1B 1-10
Code 128 mode C
1C 1-10
Codabar
K 1-10
EAN8
E80 2-4
EAN8 2 digit add-on
E82 2-4
EAN8 5 digit add-on
E85 2-4
EAN13
E30 2-4
EAN13 2 digit add-on
E32 2-4
EAN13 5 digit add-on
E35 2-4
German Post Code
2G 3-4
Interleaved 2 of 5
2 1-10
Interleaved 2 of 5 with mod 10 check digit
2C 1-10
Interleaved 2 of 5 with human readable
check digit
2D 1-10
Postnet 5, 9, 11 & 13 digit
P—
Japanese Postnet
J—
UCC/EAN 128*
1E 1-10
UPC A
UA0 2-4
UPC A 2 digit add-on
UA2 2-4
UPC A 5 digit add-on
UA5 2-4
UPC E
UE0 2-4
UPC E 2 digit add-on
UE2 2-4
UPC E 5 digit add-on
UE5 2-4
UPC Interleaved 2 of 5
2U 1-10
Plessey (MSI-1) with mod. 10 check digit
L—
MSI-3 with mod. 10 check digit
M—
* - Use ASCII 06 to delimit variable length fields.
Bar Codes
 Loading...