

Page 1
USB Video Conferencing Endpoint
UVC40
English | 简体中文 | Deutsch |
Español | Français
www.yealink.com
Quick Start Guide(V1.0)
Page 2

Page 3

Table of Contents
English ........................................... 1
简体中文 ......................................... 8
Deutsch ........................................ 13
Español......................................... 20
Français........................................ 27
Page 4

Page 5
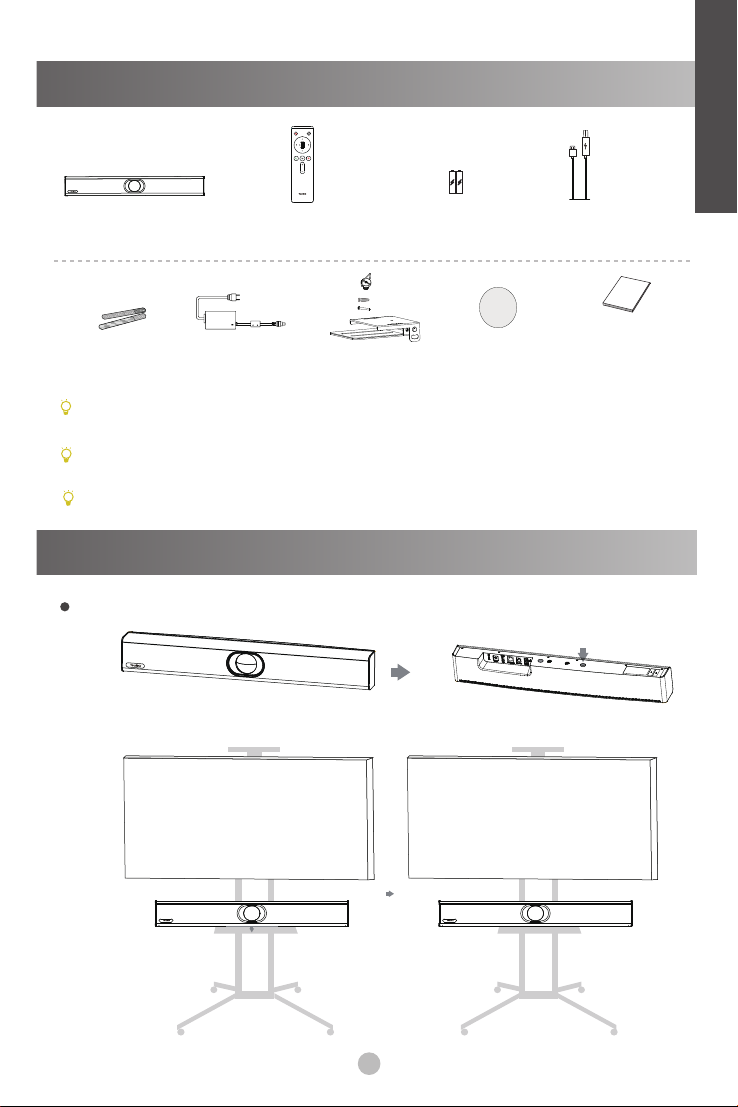
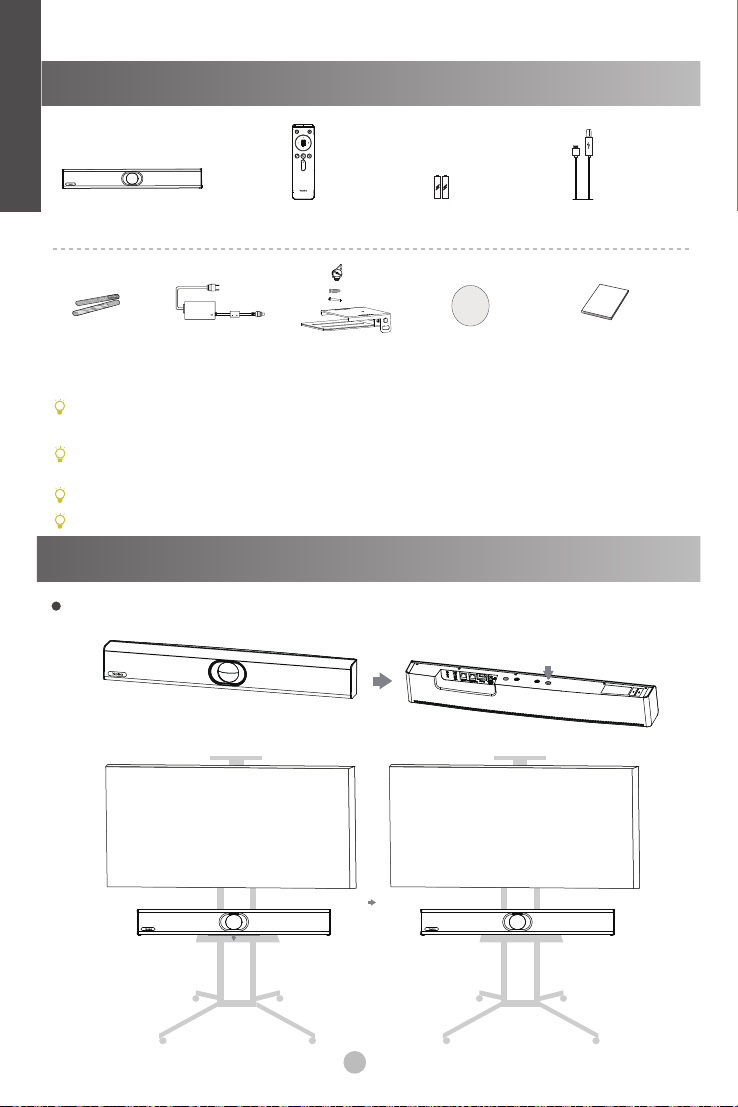
Package Contents
Remote Control
VCR20
E
N
G
L
I
S
H
AAA Battery×2UVC40
×4
×2
×2
7m
USB Cable
Cable Tie×5
We recommend that you use the accessories provided or approved by Yealink. The use of
unapproved third-party accessories may result in reduced performance.
Use the Yealink original power adapter (48V/0.7A) to charge the endpoint only. The use of the
third-party power adapter may cause the damage to the endpoint.
The USB cable in the MVC400/ZVC400 package is 2.5 meters long.
Power Adapter
Mounting Bracket
and Accessories
Silicone Pad×2
Quick Start Guide
UVC40 Installation
Put on a Flat Surface
TV TV
1
Page 6

E
N
Mount on a Wall
G
Placing UVC40
L
I
S
H
TV
H>120cm
Mount the UVC40 below the TV when
the mounting height of the TV is higher than
120cm.
Wall Mounting
Use the bracket to mount your endpoint on a wall. The mounting height affects your
camera view. The recommended height is 1.1m above the ground.
Step1:Assemble the mounting bracket
10cm
H<120cm
Mount the UVC40 above the TV when
the mounting height of the TV is lower
than 120cm.
TV
2
Page 7
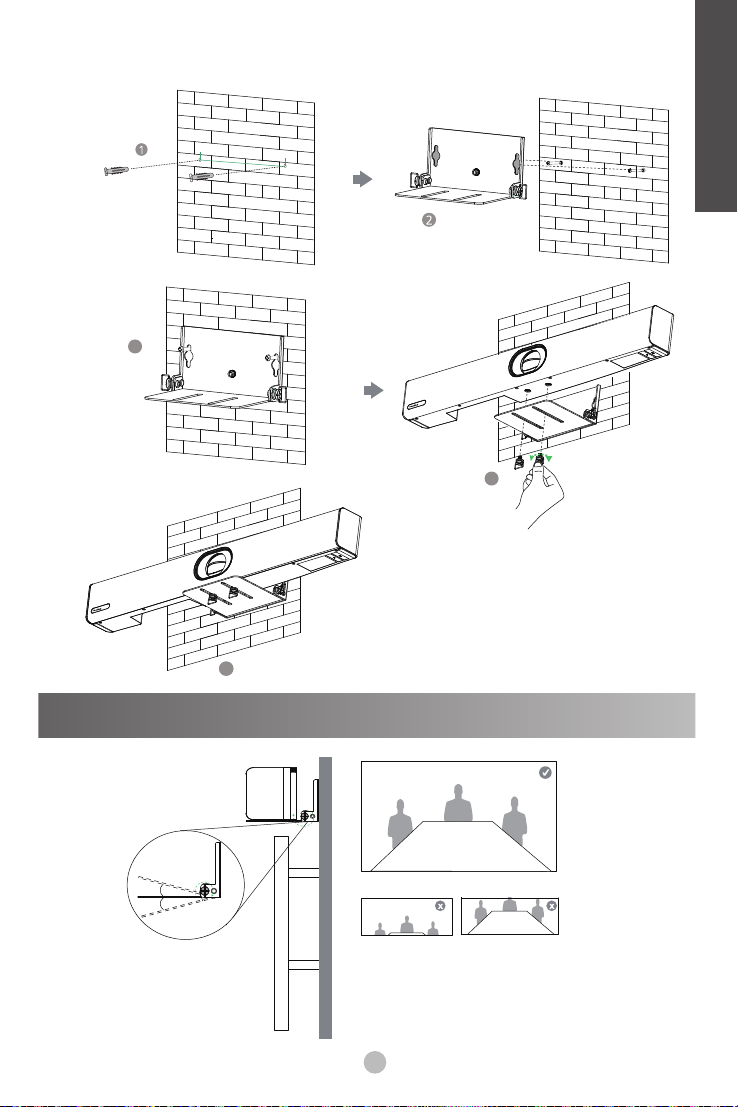
Step2:Mount the UVC40 to the wall
118mm
Hole depth: 30mm
Hole diameter: 6mm
3
E
N
G
L
I
S
H
T4×30 screws
4
5
Adjusting the Camera Tilt
15°
15°
3
Page 8
E
N
Remote Control and Cable Ties Installation
G
L
Remote Control Installation Cable Ties Installation
I
S
H
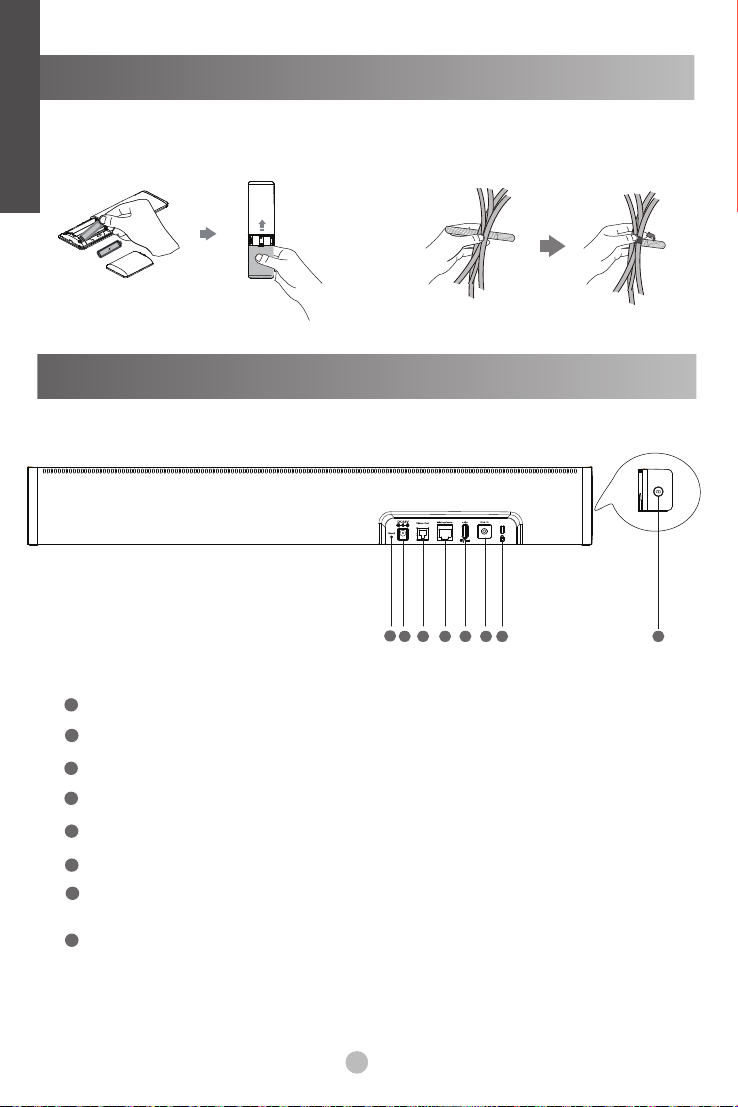
Hardware Interface Instructions
1
2 3 4 5 6 7 8
1
Reset: reset the UVC40 to factory defaults.
2
DC48V: connect to the power adapter.
3
Video Out: connect to a PC as video output.
4
Microphone: connect to the microphone (for exmaple, VCM34).
5
USB: /
Line In: connect a 3.5mm audio connector to use the UVC40 as an audio output device.
6
7
Security slot: connect a universal security cable to the UVC40 so that you can
lock the UVC40 down.
8
Pairing key: press the pairing key to pair the CPW90 wireless microphone.
4
Page 9
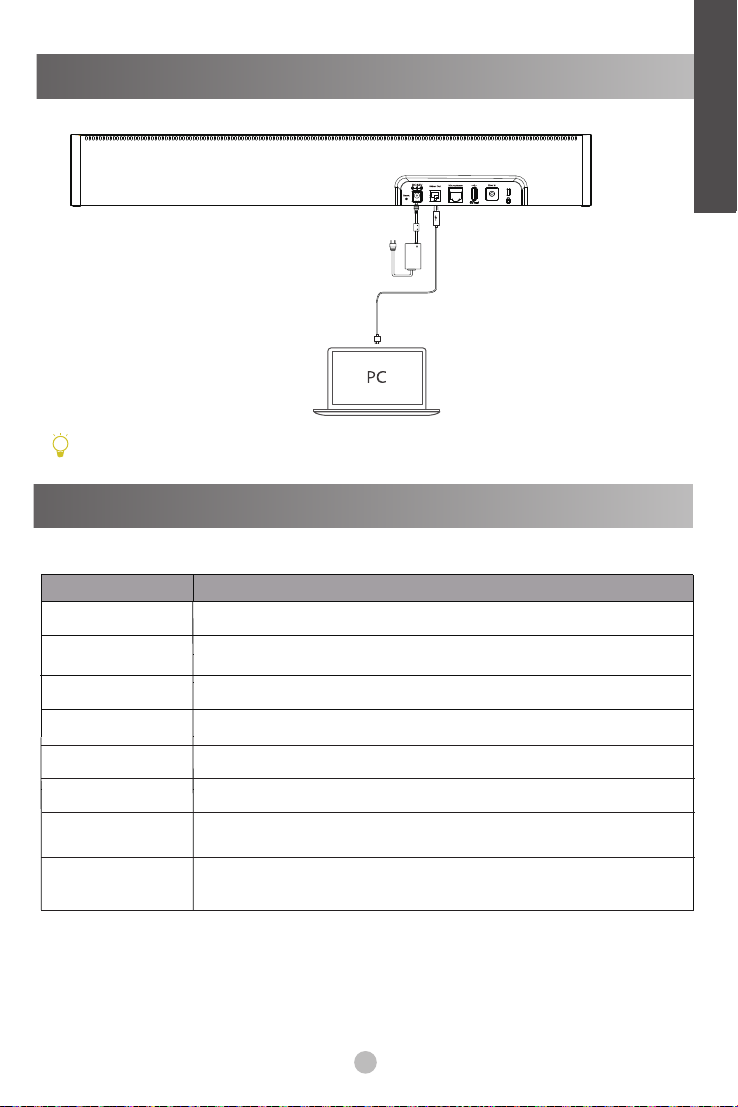
UVC40 Connection
Flashing green
USB cable
The cable should be replaced at once if its skin is broken.
LED Indicator Instructions
LED indicators on the UVC40:
LED Status
Off
The UVC40 is not properly connected to the mini-PC.
There is an incoming call.
Description
UVC40
E
E
N
N
G
G
L
L
I
I
S
S
H
H
Solid green
Solid red The UVC40 is muted.
Flashing orange The UVC40 is upgrading firmware.
Flashing red and
green alternately
Flashing red
The UVC40 is active.
The UVC40 is initializing or in sleep mode.Solid orange
The UVC40 is paired with the CPW90.
The UVC40 is in recovery mode and the firmware has not been
upgraded.
5
Page 10
E
N
Safety instructions
G
L
Operating Ambient Temperatures
I
Operating temperature: +32 to 104°F (0 to 40°C)
Relative humidity: 5% to 90%, noncondensing
S
Storage temperature: -22 to +160°F (-30 to +70°C)
H
Warranty
Our product warranty is limited only to the unit itself, when used normally in accordance with the operating instructions and the system
environment. We are not liable for damage or loss resulting from the use of this product, or for any claim from a third party. We are not
liable for problems with Yealink device arising from the use of this product; we are not liable for financial damages, lost profits, claims
from third parties, etc., arising from the use of this product.
DC symbol
is the DC voltage symbol.
Restriction of Hazardous Substances Directive (RoHS)
This device complies with the requirements of the EU RoHS Directive. Statements of compliance can be obtained by contacting
support@yealink.com.
Safety Instructions
Save these instructions. Read these safety instructions before use!
The following basic safety precautions should always be followed to reduce risk of fire, electrical shock, and other personal injury.
General Requirements
Before you install and use the device, read the safety instructions carefully and observe the situation during operation.
During the process of storage, transportation, and operation, please always keep the device dry and clean.
During the process of storage, transportation, and operation, please avoid collision and crash of the device.
Please attempt not to dismantle the device by yourself. In case of any discrepancy, please contact the appointed maintenance
center for repair.
Without prior written consent, no organization or individual is permitted to make any change to the structure or the safety design
of the device. Yealink is under no circumstance liable to consequences or legal issues caused by such changes.
lease refer to the relevant laws and statutes while using the device. Legal rights of others should be respected as well.
Environmental Requirements
Place the device at a well-ventilated place. Do not expose the device under direct sunlight.
Keep the device dry and free of dusts.
Place the device on a stable and level platform.
Please place no heavy objects on the device in case of damageand deformation caused by the heavy load.
Keep at least 10 cm between the device and the closest object for heat dissipation.
Do not place the device on or near any inflammable or fire-vulnerable object, such as rubber-made materials.
Keep the device away from any heat source or bare fire, such as a candle or an electric heater.
Keep the device away from any household appliance with strong magnetic field or electromagnetic field, such as a microwave
oven or a refrigerator.
Operating Requirements
Do not let a child operate the device without guidance.
Do not let a child play with the device or any accessory in case of accidental swallowing.
Please use the accessories provided or authorized by the manufacturer only.
The power supply of the device shall meet the requirements of the input voltage of the device. Pleaseusethe provided surge
protection power socket only.
Before plugging or unplugging any cable, make sure that your hands are completely dry.
Do not spill liquid of any kind on the product or use the equipment near water, for example, near a bathtub, washbowl, kitchen
sink, wet basement or near a swimming pool.
6
Page 11
Do not tread on, pull, or over-bend any cable in case of malfunction of the device.
During a thunderstorm, stop using the device and disconnect it from the power supply. Unplug the power plug and the
Asymmetric Digital Subscriber Line (ADSL) twisted pair (the radio frequency cable) to avoid lightning strike.
If the device is left unused for a rather long time, disconnect it from the power supply and unplug the power plug.
When there is smoke emitted from the device, or some abnormal noise or smell, disconnect the device from the power supply,
and unplug the power plug immediately. Contact the specified maintenance center for repair.
Do not insert any object into equipment slots that is not part of the product or auxiliary product.
Before connecting a cable, connect the grounding cable of the device first. Do not disconnect the grounding cable until you
disconnect all other cables.
Cleaning Requirements
Before cleaning the device, stop using it and disconnect it from the power supply.
Use a piece of soft, dry and anti-static cloth to clean the device.
Keep the power plug clean and dry. Using a dirty or wet power plug may lead to electric shock or other perils.
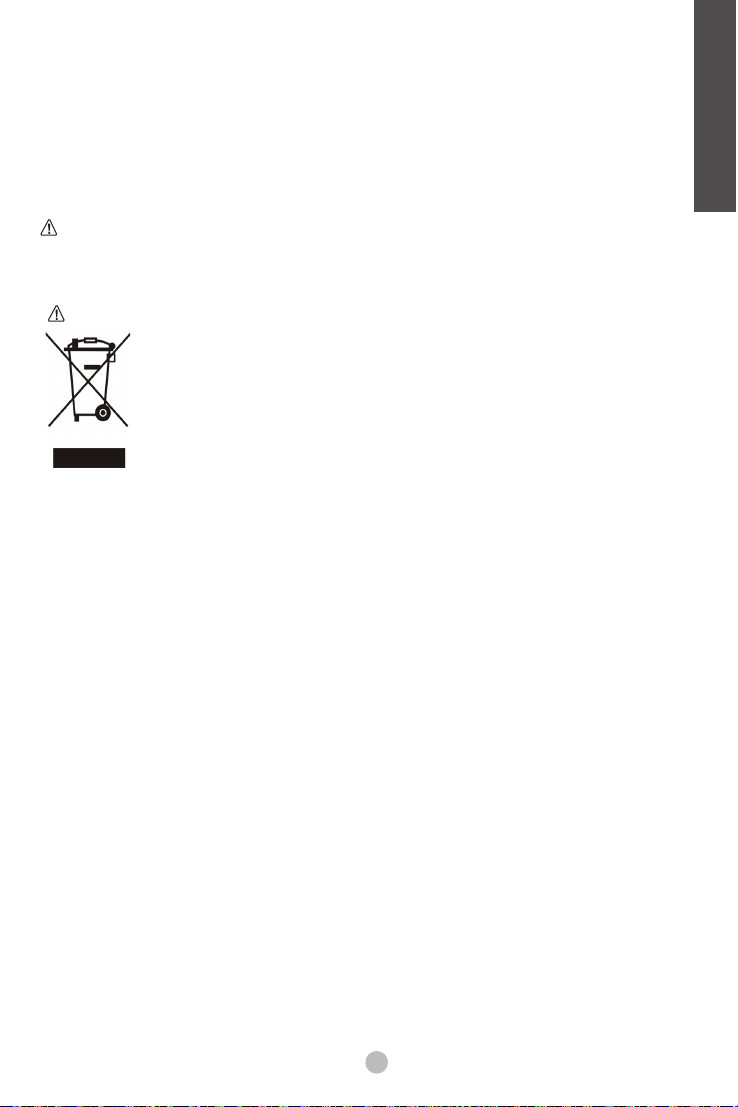
ENVIRONMENTAL RECYCLING
Never dispose of the device with domestic waste
Ask your Town Council about how to dispose of it in an environmentally friendly way. The cardboarc
box, plastic packaging and player components may be recycled in accordance with prevailing
recycling regulations in your country.
Always adhere to prevailing regulations
Those who fail to do so may be fined or prosecuted in accordance with the law. The crossed out
garbage can that appears on the device means that when it has reached the end of its useful life, it
should be taken to a special waste disposal centre and treated separately to general urban waste.
Troubleshooting
The unit cannot supply power to Yealink device.
There is a bad connection with the plug.
1. Clean the plug with a dry cloth.
2. Connect it to another wall outlet.
The usage environment is out of operating temperature range.
1. Use in the operating temperature range.
The cable between the unit and the Yealink device is connected incorrectly.
1. Connect the cable correctly.
You cannot connect the cable properly.
1. You may have connected a wrong Yealink device.
2. Use the correct power supply.
Some dust, etc., may be in the port.
1. Clean the port.
Contact your dealer or authorized service facility for any further questions.
Contact Information
YEALINK NETWORK TECHNOLOGY CO.,LTD.
309, 3rd Floor, No.16, Yun Ding North Road, Huli District, Xiamen City, Fujian, P.R.C
YEALINK (EUROPE) NETWORK TECHNOLOGY B.V.
Strawinskylaan 3127, Atrium Building, 8th floor, 1077ZX Amsterdam, The Netherlands
YEALINK (USA) NETWORK TECHNOLOGY CO., LTD.
999 Peachtree Street Suite 2300, Fulton, Atlanta, GA, 30309, USA
Made in China
E
N
G
L
I
S
H
7
Page 12
VCR20遥控器 7号电池x2UVC40 7米USB线
×4
×2
×2
束线带x5
此为A级产品。在生活环境中,该产品可能会造成无线电干扰。在这种情况下,可能需要用户对干扰采取
切实可行的措施。
我们推荐使用由Yealink提供或经Yealink认可的配件和线缆,使用未经认可的第三方配件和线缆可能会
导致性能的下降。
使用HDMI线前,请套上磁环用于抗电磁干扰。
MVC400/ZVC400产品组合包中标配的USB线长为2.5米。
电源适配器
支架配件
(用于安装主机)
硅胶垫x2
UVC40
快速入门指南
TV TV
8
Page 13

TV
H>120cm
当电视高度高于120cm时,终端安装
在电视下方。
10cm
H<120cm
当电视高度低于120cm时,终端安装
在电视上方。
TV
使用支架将终端安装在墙上。 安装高度会影响你的视野,建议的高度为离地面1.1m。
步骤1:安装支架
步骤2:墙装
打孔直径: 6mm
打孔深度: 30mm
118mm
螺丝规格:T4×30
9
Page 14

3
4
5
15°
15°
10
Page 15

1
2 3 4 5 6 7 8
1
重置键:重置设备到出厂设置。
2
电源接口: 连接电源适配器。
3
视频输出: 连接电脑作为视频输出。
4
麦克风: 连接麦克风(例如:VCM34)。
5
USB: 预留接口。
6
音频线性输入: 连接3.5mm音频接头,将UVC40作为音频输出设备。
7
安全锁孔 : 将主机锁在固定位置。
8
配对键: 按配对键,进入配对蓝牙麦状态。
11
Page 16

如果使用过程中发现线缆破皮,请立即更换。
关闭
绿灯闪烁
绿灯常亮 UVC40处于工作中状态。
红灯常亮
橙色灯常亮 UVC40启动或等待状态。
UVC40没有正确连接到mini-PC上或未处于正常工作状态。
来电中状态。
UVC40处于静音状态。
UVC40
USB线
橙色灯闪烁
红绿灯交替 UVC40和CPW90-BT配对状态。
红灯闪烁 UVC40进入恢复模式,还未固件更新。
UVC40固件更新中。
12
Page 17

Lieferumfang
VCR20
Fernbedienung
Kabelbinder×5
Wir empfehlen Ihnen, nur durch Yealink bereitgestellte oder zugelassene Zubehörteile zu verwenden.
Die Verwendung von nicht zugelassenem Drittanbieter-Zubehör kann zu verminderter Leistungsfähigkeit
führen.
Verwenden Sie ausschließlich das Original-Netzteil von Yealink (48 V/0,7 A) zum Laden des Endpunkts.
Die Verwendung eines Netzteils von einem Drittanbieter kann zur Beschädigung des Endpunkts führen.
Das USB-Kabel im MVC400/ZVC400-Lieferumfang ist 2,5 m lang.
Netzteil
Wandhalterung
und Zubehör
AAA Batterie×2UVC40
×4
×2
×2
Silikonpad×2
7 m USB-Kabel
Kurzanleitung
UVC40-Installation
Aufstellung auf einer flachen Oberfläche
D
E
U
T
S
C
H
TV TV
13
Page 18

Wandmontage
Platzieren der UVC40
D
E
TV
U
T
H>120 cm
S
C
H
Montieren Sie den UVC40 unter dem
TV, wenn die Montagehöhe des TV
höher als 120 cm ist.
Wandmontage
Verwenden Sie die Halterung, um Ihren Endpunkt an einer Wand zu montieren. Die
Montagehöhe beeinflusst Ihre Kameraansicht. Es wird eine Höhe von 1,1 m über dem
Boden empfohlen.
Schritt1:Montieren Sie die Montagehalterung
10 cm
H<120 cm
Montieren Sie den UVC40 über dem
TV, wenn die Montagehöhe des TV
niedriger als 120 cm ist.
TV
14
Page 19

Schritt2:Montieren Sie den UVC40 an der Wand
118 mm
Lochtiefe: 30mm
Lochdurchmesser:
6mm
3
T4×30 Schrauben
4
D
E
U
T
S
C
H
5
Einstellen der Kameraneigung
15°
15°
15
Page 20

Installation der Fernbedienung und der Kabelbinder
Installation der Fernbedienung Installation der Kabelbinder
D
E
U
T
S
C
H
Anleitung für die Hardware-Schnittstelle
1
2 3 4 5 6 7
8
1
Reset: Rücksetzen des UVC40 auf Werkseinstelllungen.
2
DC48V: Anschluss an das Netzteil.
3
Video Out: Verbindung mit einem PC als Video-Ausgang.
4
Microphone: Verbindung mit dem Mikrofon (z. B. VCM34).
5
USB: /
6
Line In: Anschluss eines 3,5 mm-Audiosteckers zur Verwendung des UVC40 als
Audio-Ausgabegerät.
7
Sicherheitsschlitz: Schließen Sie ein universelles Sicherheitskabel an den UVC40
an, damit Sie den UVC40 sperren können.
8
Pairing-Taste: Drücken Sie die Pairing-Taste, um das kabellose Mikrofon CPW90
zu verbinden.
16
Page 21

Verbinden des UVC40
Blinkt grün
USB-Kabel
Bei Beschädigung der Ummantelung ist das Kabel umgehend zu ersetzen.
LED-Anzeigen
LED-Anzeigen am UVC40:
UVC40
D
E
U
T
S
C
H
LED-Status
Aus
Dauerhaft grün
Dauerhaft rot Der UVC40 ist stummgeschaltet.
Blinkt orange Der UVC40 aktualisiert die Firmware.
Blinkt abwechselnd
rot und grün
Blinkt rot
Der UVC40 ist nicht korrekt mit dem Mini-PC verbunden.
Eingehender Anruf.
Der UVC40 ist aktiv.
Der UVC40 wird initialisiert oder ist im Sleep-Modus.Dauerhaft orange
Der UVC40 wird mit dem CPW90 verbunden.
Der UVC40 ist im Recovery-Modus und die Firmware wurde nicht
aktualisiert.
Beschreibung
17
Page 22

Ausführungshinweise für die Produkte von Yealink mit Akku
Betriebsumgebungstemperaturen
Betriebstemperatur: 0 bis 40 °C
Relative Luftfeuchtigkeit: 5 % bis 90 %, nicht kondensierend
Lagertemperatur: -30 bis + 70 °C
Garantie
Unsere Produktgarantie ist auf das Gerät selbst beschränkt, wenn es normal und gemäß den Betriebsanweisungen und der Systemumgebung
verwendet wird. Wir sind weder für Schäden oder Verluste haftbar, die aus der Verwendung dieses Produkts entstehen, noch für Ansprüche eines
Dritten. Wir sind nicht haftbar für Probleme mit dem Yealink Gerät, die aus der Verwendung dieses Produkts entstehen. Wir sind nicht haftbar für
finanzielle Schäden, Gewinnverluste, Ansprüche Dritter etc., die aufgrund der Verwendung dieses Produkts entstehen.
Symbol DC
ist das Symbol für DC-Spannung.
Richtlinie zur Beschränkung der Verwendung bestimmter gefährlicher Stoffe in Elektro- und Elektronikgeräten (RoHS)
D
Das Gerät erfüllt die Anforderungen der RoHS-Richtlinie der EU. Für Bestätigungen der Einhaltung können Sie sich an support@yealink.com
E
wenden.
U
Sicherheitshinweise
T
Bewahren Sie diese Anweisungen auf. Lesen Sie diese Sicherheitshinweise vor der Verwendung!
Die folgenden grundlegenden Vorsichtsmaßnahmen müssen zur Vermeidung von Bränden, Stromschlag und anderen Verletzungen immer
S
befolgt werden.
C
H
Allgemeine Vorschriften
Lesen Sie vor der Installation und Verwendung des Geräts die Sicherheitshinweise sorgfältig durch und beobachten Sie die Situation im
Betrieb.
Halten Sie das Gerät während der Lagerung, dem Transport und dem Betrieb stets sauber und trocken.
Vermeiden Sie während der Lagerung, dem Transport und dem Betrieb stets Zusammenprallen und Stürze des Geräts.
Versuchen Sie nicht das Gerät eigenständig zu demontieren. Wenden Siesich im Falle von Mängeln an das zuständige Wartungscenter für
eine Reparatur.
Ohne vorherige schriftliche Zustimmung dürfen weder Unternehmen noch Einzelperson Änderungen an der Struktur oder dem
Sicherheitskonzept des Geräts vornehmen. Yealink übernimmt unter keinen Umständen die Haftung für Folgen oder Rechtsansprüche, die
auf solche Änderungen zurückzuführen sind.
Beachten Sie bitte die entsprechenden Gesetze und Vorschriften bei der Verwendung des Geräts. Die gesetzlichen Rechte Dritter müssen
ebenfalls beachtet werden.
Umweltvorschriften
Stellen Sie das Gerät an einem gut belüfteten Ort auf. Setzen Sie das Gerät nicht direkter Sonneneinstrahlung aus.
Halten Sie das Gerät trocken und frei von Staub.
Stellen Sie das Gerät auf einen stabilen, ebenen Untergrund.
Bitte legen Sie keine schweren Gegenstände auf das Gerät, da Beschädigung und Verformungen durch zu hohe Last möglich sind.
Halten Sie mindestens 10 cm Abstand zwischen dem Gerät und dem nächsten Objekt ein, um die Wärmeabfuhr zu gewährleisten.
Stellen Sie das Gerät nicht auf oder in der Nähe von entflammbaren oder brandgefährdeten Objekt wie Gummimaterialien auf
Halten Sie das Gerät fern von Hitzequellen und offenem Feuer, wie Kerzen oder einer elektrischen Heizung.
Halten Sie das Gerät fern von jedem Haushaltsgerät mit starkem Magnetfeld oder Elektromagnetfeld, z.B. einem Mikrowellenherd oder
einem Kühlschrank.
Betriebsvorschriften
Lassen Sie das Gerät nicht ohne Aufsicht durch ein Kind verwenden.
Lassen Sie kein Kind mit dem Gerät oder einem Zubehörteil spielen, da Kleinteile verschluckt werden können.
Bitte verwenden Sie ausschließlich Zubehör, das vom Hersteller bereitgestellt oder genehmigt wurde.
Die Stromversorgung des Geräts muss den Anforderungen der Eingangsspannung des Gerätes entsprechen. Bitte verwenden Sie
ausschließlich den bereitgestellten Überspannungsschutz an der Steckdose.
Achten Sie vor dem Anschließen oder Abziehen des Kabels darauf, dass Ihre Hände vollständig trocken sind.
Verschütten Sie keine Flüssigkeiten auf das Gerät und verwenden Sie es nicht in der Nähe von Wasser, beispielsweise in der Nähe
einer Badewanne, Waschschüssel, einem Spülbecken, in einem feuchten Keller oder in der Nähe eines Schwimmbeckens.
18
Page 23

Treten Sie nicht auf das Kabel, ziehen und verbiegen Sie es nicht, da es dadurch zu einer Fehlfunktion des Geräts kommen kann.
Schalten Sie das Gerät bei Gewitter aus und trennen Sie es von der Stromversorgung. Ziehen Sie das Netzkabel und das
ADSL-Twisted-Pair-Kabel (Festnetzkabel) zurVermeidung eines Blitzschlags.
Wenn das Gerät längere Zeit ungenutzt bleibt, trennen Sie es von der Stromversorgung und ziehen Sie den Netzstecker.
Wenn Rauch oder ungewöhnliche Geräusche oder Gerüche aus dem Gerät austreten, trennen Sie das Gerät sofort von der
Stromversorgung und ziehen Sie das Netzkabel. Wenden Sie sich an das angegebene Wartungscenter für eine Reparatur.
Führen Sie keine Gegenstände in Einschübe oder Anschlussöffnungen des Geräts ein, die kein Bestandteil des Produktes oder ein
Zubehörteil sind.
Schließen Sie zuerst das Erdungskabel des Geräts an, bevor Sie ein Kabel anschließen.Trennen Sie das Erdungskabel nicht, bis
nicht alle anderen Kabel entfernt wurden.
Reinigungsvorschriften
Bevor Sie das Gerät reinigen, schalten Sie es aus und trennen Sie es von der Stromversorgung.
Verwenden Sie ein Stück trockenes, weiches und antistatisches Tuch zum R einigen des Geräts.
Halten Sie das Netzkabel sauber und trocken. Über einen schmutzigen oder nassen Netzstecker kann es zu einem elektrischen
Schlag oder anderen Gefahren kommen.
UMWELTFREUNDLICHE VERWERTUNG
Entsorgen Sie das Gerät nicht mit dem Hausmüll.
Erkundigen Sie sich bei Ihrer Stadtverwaltung, wie Sie das Gerät umweltfreundlich entsorgen können Pappkarton,
Kunststoffverpackung und Bauteile des Gerätes können im Einklang mit den geltenden Vorschriften in Ihrem Land
verwertet werden.
Halten Sie stets die geltenden Vorschriften ein.
Deren Nichtbeachtung kann eine Buße oder Verfolgung gemäß dem geltenden Recht nach sich ziehen Die
durchgestrichene Mülltonne auf dem Gerät bedeutet, dass das Gerät am Ende seiner Nutzungsdauer zu einer speziellen
Elektroschrottsammelstelle gebracht und vom Hausmüll gesondert verarbeitet werden muss.
Fehlerbehebung
Die Einheit kann das Yealink Gerät nicht mit Strom versorgen.
Es gibt Probleme mit dem Steckeranschluss.
1. Reinigen Sie den Stecker mit einem trockenen Tuch.
2. Schließen Sie ihn an einer anderen Steckdose an.
Die Umgebungstemperatur liegt oberhalb des Betriebstemperaturbereichs.
1. Verwenden Sie die Einheit innerhalb des Betriebstemperaturbereichs.
Das Kabel zwischen der Einheit und dem Yealink Gerät ist nicht richtig angeschlossen.
1. Schließen Sie das Kabel richtig an.
Das Kabel lässt sich nicht richtig anschließen.
1. Sie haben möglicherweise ein falsches Yealink Gerät angeschlossen.
2. Verwenden Sie die richtige Stromversorgung.
Es befindet sich möglicherweise Staub etc. im Port.
1. Reinigen Sie den Port.
Setzen Sie sich bei weiteren Fragen mit Ihrem Händler oder Ihrer anerkannten Servicestelle in Verbindung.
Kontaktdaten des Ansprechpartners
YEALINK NETWORK TECHNOLOGY CO., LTD.
309, 3rd Floor, No. 16, Yun Ding North Road, Huli District, Xiamen City, Fujian, VR China
YEALINK (EUROPE) NETWORK TECHNOLOGY B.V.
Strawinskylaan 3127, Atrium Building, 8th floor, 1077ZX Amsterdam, Niederlande
YEALINK (USA) NETWORK TECHNOLOGY CO., LTD.
999 Peachtree Street Suite 2300, Fulton, Atlanta, GA, 30309, USA
Hergestellt in China
D
E
U
T
S
C
H
19
Page 24

Contenido del embalaje
Mando a distancia
VCR20
Sujetacables × 5
Utilice siempre accesorios proporcionados o aprobados por Yealink. El uso de accesorios no homologados
puede causar un mal funcionamiento del equipo.
Use unicamente el adaptador de corriente original Yealink (48V / 0.7A) para cargar el equipo. El uso
del adaptador de corriente de terceros puede causar daños en el equipo.
El cable USB en el paquete MVC400 / ZVC400 tiene 2.5 metros de largo .
E
Instalación UVC40
Adaptador de
corriente
Soporte de pared
y accesorios
Batería AAA × 2UVC40
×4
×2
×2
Almohadilla de
silicona × 2
Cable USB
de 7 m
Guía de inicio rápido
S
P
Poner en superficie plana
A
Ñ
O
L
TV TV
20
Page 25

Montaje en pared
Colocación de UVC40
TV
H>120cm
Monte el UVC40 debajo del televisor cuando la
altura de montaje del televisor sea superior a
120cm .
Montaje en pared
Use el soporte para montar el equipo en una pared. La altura de montaje afecta su
vista de cámara. La altura recomendada es de 1,1 m sobre el suelo.
Paso 1: Ensamble el soporte de montaje
10cm
H<120cm
Monte el UVC40 sobre el televisor
cuando la altura de montaje del televisor
sea menor de 120 cm.
TV
E
S
P
A
Ñ
O
L
21
Page 26

Paso 2: monte el UVC40 en la pared
118mm
Profundidad del
agujero: 30 mm
Diámetro del
agujero: 6 mm
3
Tornillos métrica
T4 × 30
E
S
P
A
Ñ
O
5
L
Ajuste de la inclinación de la cámara
4
15°
15°
22
Page 27

Instalación de control remoto y bridas
Instalación de control remoto Instalación de bridas
Instrucciones de interfaz de hardware
1
2 3 4 5 6 7 8
1
Reset: restablece el UVC40 a los valores predeterminados de fábrica.
2
DC48V: conéctelo al adaptador de corriente.
3
Salida de vídeo: conéctese a un PC como salida de vídeo.
4
Micrófono: conéctelo al micrófono (por ejemplo, VCM34).
5
USB: /
Entrada de línea: conecte un conector de audio de 3.5 mm para usar el UVC40 como
6
dispositivo de salida de audio.
7
Ranura de seguridad: conecte un cable de seguridad universal al UVC40 para que
pueda bloquear el UVC40 .
8
Tecla de emparejamiento: presione la tecla de emparejamiento para emparejar el
micrófono inalámbrico CPW90.
E
S
P
A
Ñ
O
L
23
Page 28

Conexión UVC40
Verde intermitente
El cable debe reemplazarse de inmediato si su revestimiento está roto.
Instrucciones de indicador LED
Indicadores LED en el UVC40:
E
S
Estado del LED
P
A
Ñ
O
Verde fijo
L
Rojo fijo
Apagado
El UVC40 no está conectado correctamente al mini PC.
Hay una llamada entrante.
El UVC40 está activo.
El UVC40 está silenciado.
UVC40
Cable USB
Descripción
Naranja fijo
Naranja intermitente
Rojo intermitente y
verde alternativamente
Rojo intermitente
El UVC40 se está inicializando o en modo de suspensión.
El UVC40 está actualizando el firmware.
El UVC40 está emparejado con el CPW90.
The UVC40 is in recovery mode and the firmware has not been
upgraded.
24
Page 29

Notificaciones Reglamentarias: Productos de Yealink con batería
Temperatura ambiente de funcionamiento
Temperatura de funcionamiento: +32 to 104°F (0 to 40°C)
Humedad relativa: 5% to 90%,sin condensación
Temperatura de almacenaje: -22 to +160°F (-30 to +70°C)
Garantía
La garantía del producto está limitada solo a la unidad, cuando se usa normalmente de acuerdo con las instrucciones de operación y el
entorno del sistema. No somos responsables por daños o pérdidas resultantes del uso de este producto, o por cualquier reclamo de un
tercero. No nos hacemos responsables de los problemas con el dispositivo Yealink que surjan del uso de este producto; No nos hacemos
responsables de los daños financieros, pérdidas de beneficios, reclamaciones de terceros, etc., que surjan del uso de este producto.
Símbolo CC
Es el símbolo de voltaje de CC.
Directiva de Restricción de Sustancias Peligrosas (RoHS)
Este dispositivo cumple con los requisitos de la directiva RoHS de la UE. Las declaraciones de
cumplimiento se pueden obtener contactando a support@yealink.com.
Instrucciones de seguridad
Conserve estas instrucciones. ¡Lea estas instrucciones de seguridad antes de usar el dispositivo!
Las siguientes instrucciones básicas de seguridad deben respetarse siempre para reducir el riesgo de incendio, descarga eléctrica y otras
lesiones personales.
Requisitos generales
Lea detenidamente estas instrucciones de seguridad antes de instalar y usar el dispositivo y controle la situación durante el
funcionamiento.
Mantenga siempre el dispositivo seco y limpio durante el proceso de almacenaje, transporte y funcionamiento.
Evite golpes y sacudidas en el dispositivo durante el proceso de almacenaje, transporte y funcionamiento.
No desmonte el dispositivo por su cuenta. En caso de fallos, póngase en contacto con el centro de mantenimiento designado para
su reparación.
No se permite hacer modificaciones en la estructura ni el diseño de seguridad del dispositivo sin previo consentimiento por
escrito. Yealink no será responsable bajo ninguna circunstancia de las consecuencias o problemas legales derivados de dichas
modificaciones.
Consulte las leyes y estatutos pertinentes cuando use el dispositivo. También deben respetarse los derechos legales de terceros.
Requisitos ambientales
Coloque el dispositivo en un lugar bien ventilado. No exponga el dispositivo a la luz del sol directa.
Mantenga el dispositivo seco y libre de polvo.
Coloque el dispositivo sobre una plataforma estable y nivelada.
No coloque objetos pesados sobre el dispositivo para evitar daños o deformaciones causadas por el peso.
Deje al menos 10 cm de distancia entre el dispositivo y los objetos más cercanos para facilitar la disipación del calor.
No coloque el dispositivo encima o cerca de objetos inflamables o vulnerables al fuego, como materiales hechos de goma.
Mantenga el dispositivo alejado de fuentes de calor o fuego vivo, como velas o radiadores eléctricos.
Mantenga el dispositivo alejado de aparatos domésticos con campos magnéticos o electromagnéticos intensos, como hornos
microondas o neveras.
Requisitos de funcionamiento
No permita que los niños utilicen el dispositivo sin supervisión.
No permita que los niños jueguen con el dispositivo ni sus accesorios para evitar asfixia accidental.
Utilice únicamente los accesorios suministrados o autorizados por el fabricante.
La alimentación eléctrica debe cumplir los requisitos de voltaje de entrada del dispositivo. Utilice únicamente una toma de
corriente con protección contra sobretensiones.
Asegúrese de tener las manos completamente secas antes de enchufar o desenchufar los cables.
E
S
P
A
Ñ
O
L
25
Page 30

No derrame líquidos de ningún tipo sobre el producto ni use el equipo cerca de agua, por ejemplo, cerca de una bañera,
palangana, fregadero, sótanos húmedos o piscinas.
No pise, estire ni retuerza los cables para evitar fallos del dispositivo.
En caso de tormenta, deje de usar el aparato y desenchúfelo de la alimentación eléctrica. Desenchufe la clavija eléctrica y el cable
de par trenzado (el cable de radiofrecuencia) de la línea de abonado digital simétrica (ADSL, por sus siglas en inglés) para evitar rayos.
Si deja el dispositivo sin utilizar durante mucho tiempo, desconéctelo de la alimentación eléctrica y desenchufe la clavija eléctrica.
Si sale humo del dispositivo o ruidos u olores anormales, desconecte el dispositivo de la alimentación eléctrica y desenchufe la
clavija eléctrica inmediatamente. Póngase en contacto con el centro de mantenimiento designado para su reparación.
No introduzca ningún objeto que no forme parte del producto o de los accesorios en las ranuras del equipo.
Antes de conectar un cable, conecte el cable de toma de tierra del dispositivo. No desconecte el cable de toma de tierra hasta que
haya desconectado los demás cables.
Requisitos de limpieza
Antes de limpiar el dispositivo, deje de utilizarlo y desconéctelo de la alimentación eléctrica.
Utilice un trapo suave, seco y antiestático para limpiar el dispositivo.
Mantenga el enchufe eléctrico limpio y seco. Si usa un enchufe eléctrico sucio o húmedo podría provocar una descarga eléctrica
y otros peligros.
RECICLAJE AMBIENTAL
Nunca deseche el equipo con los residuos domésticos
Pregunte en su ayuntamiento cómo desecharlo de forma respetuosa con el medio ambiente. Se debe
reciclar la caja de cartón, el embalaje de plástico y los componentes en conformidad con la normativa
de reciclaje vigente en su país.
Respete siempre la normativa vigente
En caso de incumplirla, podría ser multado o procesado en cumplimiento de la ley. El cubo de basura
tachado que aparece en el producto indica que debe llevarse a un centro de eliminación de residuos
especiales y debe tratarse por separado de los residuos urbanos al final de su vida útil.
Problemas y soluciones
La fuente de alimentación no alimentar al dispositivo de Yealink
Hay una mala conexión con el enchufe.
1. Limpie el enchufe con un trapo seco.
E
2. Conecte a una toma de pared diferente.
La temperatura del entorno está fuera del rango de temperatura de funcionamiento.
S
1. Asegúrese de que la temperatura del entorno está dentro de los límites permitidos.
P
El cable entre la unidad y el dispositivo de Yealink no está conectado correctamente.
1. Conecte el cable correctamente.
A
El cable no se puede conectar correctamente.
Ñ
1. Es posible que haya conectado un dispositivo incorrecto.
2. Utilice la fuente de alimentación correcta.
O
El puerto está sucio.
L
1. Limpie el puerto
Póngase en contacto con su distribuidor o centro de atención autorizado para cualquier consulta.
Información de Contacto
YEALINK NETWORK TECHNOLOGY CO.,LTD.
309, 3rd Floor, No.16, Yun Ding North Road, Huli District, Xiamen City, Fujian, P.R.C
YEALINK (EUROPE) NETWORK TECHNOLOGY B.V.
Strawinskylaan 3127, Atrium Building, 8th floor, 1077ZX Amsterdam, The Netherlands
YEALINK (USA) NETWORK TECHNOLOGY CO., LTD.
999 Peachtree Street Suite 2300, Fulton, Atlanta, GA, 30309, USA
Made in China
26
Page 31

Contenu de l'emballage
UVC40
Serre-câbles×5
Nous vous recommandons d’utiliser uniquement des accessoires fournis ou approuvés par Yealink.
L’utilisation d’accessoires tiers est susceptible de réduire les performances de l’appareil.
Utilisez seulement l'adaptateur secteur Yealink d'origine (48 V/0,7 A) pour charger le point de terminaison.
L'utilisation d'un adaptateur secteur tiers peut provoquer des dommages au point de terminaison.
Le câble USB dans l'emballage du MVC400/ZVC400 fait 2,5 m de long.
Télécommande VCR20 Câble USB 7 m
Adaptateur
d’alimentation
Support mural et
accessoires
×4
×2
×2
Pile AAA×2
Support
en silicone×2
Guide de
démarrage rapide
Installation de l'UVC40
Placement sur une surface plane
TV TV
F
R
A
N
Ç
A
I
S
27
Page 32

Montage mural
Placement de l'UVC40
TV
H>120 cm
Montez l'UVC40 en dessous du téléviseur
lorsque la hauteur de montage du
téléviseur est supérieure à 120 cm.
Support mural
Utilisez le support pour monter votre point de terminaison sur un mur. La hauteur de montage affecte
la vue de votre caméra. La hauteur recommandée est de 1,1 m au-dessus du sol.
Étape 1 : Assemblez le support de montage
10 cm
H<120 cm
Montez l'UVC40 au-dessus du téléviseur
lorsque la hauteur de montage du
téléviseur est inférieure à 120 cm.
TV
F
R
A
N
Ç
A
I
S
28
Page 33

Étape 2 : Montez l'UVC40 sur le mur
118mm
Profondeur du trou:
30mm
Diamètre du trou:
6mm
3
Vis T4×30
4
5
Réglage de l'inclinaison de la caméra
15°
15°
29
F
R
A
N
Ç
A
I
S
Page 34

Installation de la télécommande et des serre-câbles
Installation de la télécommande Installation des serre-câbles
Instructions de l'interface matérielle
1
2 3 4 5 6 7 8
1
Reset : réinitialisez l'UVC40 aux réglages par défaut.
2
DC48V : branchez à l'adaptateur secteur.
3
Video Out : branchez à un PC comme sortie vidéo.
4
F
R
A
N
Ç
A
I
S
Microphone : branchez au microphone (par exemple le VCM34).
5
USB : /
6
Line In : branchez un connecteur audio 3,5 mm pour utiliser l'UVC40 comme un
appareil de sortie audio.
7
Emplacement de sécurité : connectez un câble de sécurité universel à l'UVC40 afin
de pouvoir verrouiller l'UVC40.
8
Touche d'appariement : appuyez sur la touche d'appariement pour apparier le
microphone sans fil CPW90.
Page 35

Connexion UVC40
Statut des LED
Vert clignotant
Câble USB
Le câble doit être remplacé immédiatement si son revêtement est détérioré.
Instructions du voyant LED
Voyants LED sur l'UVC40:
Description
Désactivé
L'UVC40 n'est pas correctement connecté au mini-PC.
UVC40
Vert xe
Rouge xe L'UVC40 est en sourdine.
Orange clignotant Le micrologiciel de l'UVC40 est en cours de mise à niveau.
Clignotant rouge et
vert alternativement
Rouge clignotant
Il y a un appel entrant.
L'UVC40 est actif.
Le UVC40 s'initialise ou est en mode veille.Orange xe
F
R
A
L'UVC40 est apparié au CPW90.
L'UVC40 est en mode récupération et le micrologiciel n'a pas été mis à
niveau.
N
Ç
A
I
S
Page 36

Page 37

Avis réglementaires pour les produits Yealink avec batterie
Températures de fonctionnement ambiantes
Température de fonctionnement : +32 à 104 °F (0 à 40 °C)
Humidité relative : 5 % à 90 %, sans condensation
Température de stockage : -22 à +160 °F (-30 à +70 °C)
Garantie
Notre garantie produit est limitée à l’appareil lui-même, lorsqu’il est utilisé normalement selon le mode d’emploi et l’environnement
du système. Nous ne sommes pas responsables des dommages ou pertes découlant de l’utilisation de ce produit ou de toute
réclamation d’un tiers. Nous ne sommes pas responsables des problèmes avec les appareils Yealink découlant de l’utilisation de ce
produit. Nous ne sommes pas responsables pour les dommages financiers, pertes de profits, réclamations de tiers, etc. découlant de
l’utilisation de ce produit.
Symbole DC
est le symbole de tension CC.
Directive sur les substances dangereuses (RoHS)
Ce dispositif est conforme aux exigences de la directive RoHS de l’Union européenne. Vous pouvez obtenir les déclarations de
conformité en envoyant un message à l’adresse : support@yealink.com..
Consignes de sécurité
Gardez ces instructions. Lisez ces consignes de sécurité avant utilisation de l'appareil !
Les précautions de base suivantes doivent toujours être suivies pour réduire le risque d'incendie, d'électrocution et de blessures.
Exigences générales
Avant d'installer et d'utiliser l'appareil, lisez les consignes de sécurité et observez la situation pendant le fonctionnement.
Lorsque l'appareil est rangé, transporté ou utilisé, veuillez le garder toujours propre et sec.
Lorsque l'appareil est rangé, transporté ou utilisé, veuillez éviter tout choc ou toute collision.
Ne tentez pas de désassembler vous-même l'appareil. En cas de mauvais fonctionnement, veuillez contacter le centre de
service désigné.
Sans consentement écrit préalable, aucune organisation ou individu n'est autorisé à apporter des changements à la structure
ou au dispositif de sécurité de l'appareil. Yealink n'est en aucun cas responsable des conséquences ou des problèmesjuridiques
causés par ces changements.
Veuillez vous référer aux lois et règlements pertinents lorsque l'appareil est utilisé. Les droits légaux des tiers doivent également
être respectés.
Exigences environnementales
Placez l'appareil dans un espace correctement ventilé. N'exposez pas l'appareil à la lumière directe du soleil.
Gardez l'appareil propre et sec.
Placez l'appareil sur une surface stable et plate.
Veuillez ne placer aucun objet lourd sur l'appareil risquant d'entraîner dégâts et déformations.
Maintenez une distance d'au moins 10 cm entre l'appareil et l'objet le plus proche afin que la chaleur puisse se dissiper.
Ne placez pas l'appareil sur ou à proximité de tout objet inflammable ou vulnérable au feu, comme des matériaux en
caoutchouc.
Gardez l'appareil loin de toute source de chaleur ou des flammes, comme une bougie ou un radiateur électrique.
Gardez l'appareil loin de tout appareil électroménager avec un fort champ magnétique ou un champ électromagnétique, tel
qu'un four à micro-ondes ou un réfrigérateur.
Exigences d'utilisation
Ne laissez pas des enfants utiliser l'appareil sans surveillance.
F
Ne laissez pas les enfants jouer avec l'appareil ou ses accessoires pour éviter tout risque d'étouffement.
Veuillez uniquement utiliser les accessoires fournis ou autorisés par le fabricant.
R
L'alimentation de l'appareil doit satisfaire aux exigences de la tension d'entrée de l'appareil. Veuillez uniquement utiliser la prise
A
protégée contre les surtensions fournie.
N
Ç
A
I
S
Page 38

Avant de brancher ou de débrancher tout câble, assurez-vous que vos mains sont complètement sèches.
Ne renversez aucun liquide sur le produit et n'utilisez pas l'équipement près de l'eau, par exemple, près d'une baignoire, d'un
lavabo, d'un évier, dans sous-sol humide ou près d'une piscine.
Veuillez à ne pas marcher sur, tirer sur, ou plier les câbles de l'appareil, cela pourrait entraîner son mauvais fonctionnement.
En cas d'orage, n'utilisez pas l'appareil et débranchez-le de son alimentation. Débranchez la prise d'alimentation et l'Asymmetric
Digital Subscriber Line (ADSL) à paire torsadée (le câble de fréquence radio) pour éviter la foudre.
Si l'appareil reste inutilisé pendant une longue période de temps, débranchez-le de l'alimentation électrique et débranchez le
cordon d'alimentation.
Si l'appareil émet de la fumée, des odeurs ou bruits anormaux, débranchez l'appareil de son alimentation et débranchez
immédiatement le cordon d'alimentation. Pour toute réparation, contactez le centre de service spécifié.
N'insérez aucun objet dans les fentes de l'appareil ne faisant pas partie du produit ou n'est pas un produit auxiliaire.
Avant de brancher un câble, connectez d'abord le câble de mise à la terre du de l'appareil. Ne débranchez pas le câble de mise à
la terre jusqu'à ce que tous les autres câbles aient été débranchés.
Exigences de nettoyage
Avant de nettoyer l'appareil, arrêtez de l'utiliser et déconnectez-le de son alimentation.
Utilisez un chiffon doux, sec et antistatique pour nettoyer l'appareil.
Maintenez la prise d'alimentation propre et sèche. Une prise sale ou humide peut causer des chocs électriques et autres dangers.
RECYCLAGE ENVIRONNEMENTAL
Dépannage
L’unité ne peut pas alimenter le dispositif de Yealink.
Mauvaise connexion avec la fiche.
1. Nettoyez la fiche avec un chiffon sec.
2. Branchez-la sur une autre prise murale.
L’environnement d’utilisation est hors de la plage de températures de fonctionnement.
1. Utilisez l’appareil dans sa plage de températures de fonctionnement.
Le câble entre l’appareil et le dispositif Yealink est mal branché.
1. Branchez le câble correctement.
Vous ne pouvez pas brancher le câble correctement.
1. Vous avez peut-être branché le mauvais dispositif Yealink.
2. Utilisez une source d’alimentation appropriée.
Le port contient peut être de la poussière.
1. Nettoyez le port.
Contactez votre revendeur ou un réparateur agréé pour toute autre question.
Informations de contact
YEALINK NETWORK TECHNOLOGY CO.,LTD.
309, 3rd Floor, No.16, Yun Ding North Road, Huli District, Xiamen City, Fujian, Chine
YEALINK (EUROPE) NETWORK TECHNOLOGY B.V.
Strawinskylaan 3127, Atrium Building, 8th floor, 1077ZX Amsterdam, Pays-Bas
YEALINK (USA) NETWORK TECHNOLOGY CO., LTD.
999 Peachtree Street Suite 2300, Fulton, Atlanta, GA, 30309, États-Unis
Fabriqué en Chine
Ne jetez pas cet appareil avec les déchets ménagers
Contactez vos collectivités locales pour savoir comment l'éliminer de façon écologique. La boîte en carton, l'emballage
en plastique et les composants de l'appareil peuvent être recyclés conformément à la réglementation en vigueur dans
votre pays.
Respectez toujours la réglementation en vigueur
Les personnes qui l'enfreignent sont passibles de poursuites judiciaires. Le symbole de poubelle barrée apposé sur
l'appareil signifie que lorsque celui-ci a atteint sa fin de vie utile, il doit être amené à un centre de traitement des
déchets spécial et traité séparément des déchets ménagers ordinaires.
F
R
A
N
Ç
A
I
S
Page 39

YEALINK (XIAMEN) NETWORK TECHNOLOGY CO.,LTD
WWW.YEALINK.COM
Date of Issue: 10th /August/2020
We: YEALINK (XIAMEN) NETWORK TECHNOLOGY CO., LTD,
Address: 309, 3rd Floor, No.16, Yun Ding North Road, Huli District, Xiamen City, Fujian, P.R.C
Declare that the product
Type:
USB Video Conferencing Endpoint
Model: UVC40
meets the essential requirements and other relevant provisions according to the following EC directive
Directive: 2014/30/EU, 2014/35/EU,RED 2014/53/EU
Conformity
The product complies with the following standards:
EN 62368-1:2014+A11:2017
Safety:
EMC:EN 55032:2015
EN 55035:2017
EN61000-3-2: 2014
EN61000-3-3: 2013
Radio: ETSI EN 301 489-1 V2.2.3,
ETSI EN 301 489-3 V2.1.1,
ETSI EN 301 489-17 V3.2.2,
ETSI EN 300 328 V2.2.3;
ETSI EN 301 893 V2.1.1
EN 300 440 V2.2.1
Health:
N 62311:2008;EN62479:2010
Directive 2011/65/EU and (EU)2015/863 of the European Parliament and of the Council of 8 June 2011 and 4 June 2015 on the
Directive 2012/19/EU of the European Parliament and of the Council of 4.July.2012 on Waste electrical and electronic
Regulation (EC) No.1907/2006 of the European Parliament and of the Council of 18.December.2006 on Registration, Evaluation,
restriction of the use of certain hazardous substances in electrical and electronic equipment(RoHS 2.0)
equipment(WEEE)
Declaration of Conformity
Authorization, and Restriction of Chemicals (REACH)
Authorization, and Restriction of Chemicals (REACH)
ber.2006 on Registration, Evaluation,
YEALINK (EUROPE) NETWORK TECHNOLOGY B.V.
Address: Strawinskylaan 3127, Atrium Building, 8th floor,
1077ZX Amsterdam, the Netherlands
Telephone: +31 (0) 64 61 11 373
Email: EUROPE@Yealink.com
Page 40

About Yealink
Yealink is a global leading provider of enterprise communication and collaboration solutions, offering video conferencing service to worldwide
enterprises. Focusing on research and development, Yealink also insists on innovation and creation. With the outstanding technical patents of cloud
computing, audio, video and image processing technology, Yealink has built up a panoramic collaboration solution of audio and video conferencing
by merging its cloud services with a series of endpoints products. As one of the best providers in more than 140 countries and regions including the
US, the UK and Australia, Yealink ranks No.1 in the global market share of SIP phones shipments.
Technical Support
Visit Yealink WIKI (http://support.yealink.com/) for the latest firmware, guides, FAQ, Product documents, and more. For better service, we sincerely
recommend you to use Yealink Ticketing system (https://ticket.yealink.com) to submit all your technical issues.
430104001453
YEALINK (XIAMEN) NETWORK TECHNOLOGY CO.,LTD.
Web: www.yealink.com
Addr: 309, 3rd Floor, No.16, Yun Ding North Road, Huli District,
Xiamen City, Fujian, P.R.C
Copyright©2020 YEALINK(XIAMEN) NETWORK TECHNOLOGY
CO.,LTD. All rights reserved.
 Loading...