

Page 1

Owner's Guide
Spielanleitung
Mode d'emploi
Manual del Propietario
Page 2
Congratulations!
Herzlichen
Glückwunsch
Félicitations!
¡Enhorabuena!
You are the proud owner of a Yamaha
PortaTone. Your PortaTone is a highquality musical instrument that incorpo
rates advanced Yamaha digital technology
and many versatile features. In order to
obtain maximum performance and
enjoyment from your PortaTone, we urge
you to read this Owner's Guide thoroughly
while trying out the various features
described. Keep the Owner's Guide in a
safe place for later reference.
Und vielen Dank für den Kauf des
Yamaha PortaTbnes PSR-28. Bei Ihrem
PortaTone PSR-28 handelt es sich um
ein hochwertiges Keyboard, das auf der
wegweisenden Yamaha Digital
technologie basiert und Dinen zahlreiche
praktische Funktionen bietet.
Bitte lesen Sie sich zunächst diese
Anleitung sorgfältig durch und
probieren Sie gleichzeitig die beschrie
benen Funktionen aus, damit Sie das
großartige Potential dieses Instruments
kennenlemen. Danach sollten Sie diese
Anleitung zur späteren Bezugnahme an
einem sicheren Ort aufbewahren.
Vous voilà à présent le fier propriétaire
d’un PortaTone Yamaha. Votre PortaTone
est un instrument de musique de très
grande qualité incorporant les toutes
dernières innovations de la technologie
numérique de Yamaha et une très grande
variété de fonctions ultra-perfection nées.
Afin d'obtenir des performances
maximales de votre PortaTone et d*en tirer
le plus de satisfactions possibles, nous
vous conseillons de lire très attentivement
ce mode d’emploi tout en essayant les
fonctions qui y sont décrites. Conserver le
mode d'emploi en lieu sûr afin de pouvoir
vous y reporter ultérieurement si besoin
est.
Usted es un orgulloso propietario de un
Yamaha PortaTbne. Su PortaTone es un
instrumento musical de alta calidad que
incorpora la avanzada tecnologia digitai
de Yamaha у muchas versátiles
características. Рага aprovechar al
máximo su rendimiento у disfrutar con
el PortaTone, le aconsejamos que lea
todo este Manual del Propietario
mientras intenta las diversas
características descritas. Guarde el
Manual del Propietario en un lugar
seguro para poderlo consultar en el
futuro.
CONTENTS
BEFORE YOU BEGIN
1.
Power Supply............................
Using Batteries
Using an Optional
Power Adaptor
Remove the Protective Film
Setting Up the Music Stand ......
Taking Care of
Your PortaTone ........................
NOMENCLATURE
2.
Top Panel Controls
Rear Panel Connectors.............
ENJOY THE
3.
DEMONSTRATION
.....................
.......................
...................
..............
......
...................
..................
......
......
......
......
......
......
......
......
......
......
......
INHALT
3
L VOR DEM SPIELEN
3
3
4
4
4
4
6
6
7
8
Stromversorgung
Stromversorgung über
Batterien
Stromversorgung über getrennt
erhältlichen Adapter
Entfernen der Schutzfolie
Anbringen des
Notenständers
Vorsichts maßnahmen
2. BEZEICHNUNG
DER TEILE ..................................6
Bedienelemente
Anschlüsse auf der
Rückseite
3. DEMO-WIEDERGABE
...................
......................
................................
..............
.........
............................
...............
.........................
...................................
...............
TABLE DES MATIERES
3
3
3
4
4
4
4
6
7
8
1. AVANT DE COMMENCER.............3
Alimentation électrique
Fonctionnement sur piles
Utilisation d'un adaptateur en
option.......................................4
Retrait de la pellicule
protectrice...................................4
Mise en place du pupitre
Entretien du PortaTone
2. NOMENCLATURE............................6
Commandes du panneau
supérieur
Prises du panneau arrière
3. ECOUTE DE LA MUSIQUE DE
DEMONSTRATION...........................8
...................................
...............
........
...........
..............
..........
3
3
4
4
6
7
INDICE
L ANTES DE COMENZAR
Alimentación
.............................
Empleo de las pilas
Empleo de un adaptador de
alimentación opcional
Extracción de la película
protectora....................................4
Colocación del
por taparti turas...........................4
Cuidados del PortaTone
2. NOMENCLATURA
Controles del panel
superior.......................................6
Conectores del panel
posterior......................................7
3. DEMOSTRACION........................8
.............
................
............
............
......................
3
3
3
4
4
6
Page 3

4. SELECTING AND PLAYING
VOICES
5. USING THE ACCOMPANIMENT
SECTION......................................14
6. KEYBOARD PERCUSSION ... 27
7. THE CHORD SEQUENCER ... 28
8. OPTIONAL ACCESSORIES ... 33
9. SPECIFICATIONS........................33
........................................
Selecting a Voice
Adjusting the Volume
Adding Effects...........................11
Transposition: Shifting Pitch in
Semitone Steps
Tuning: Fine Pitch Control
Rhythm Acxx>mpaniment
Selecting an
Accompaniment Style................14
Adjusting the
Accompaniment Volume
Setting the Tempo
Starting the Accompaniment
Starting the Accompaniment
with an Introduction
Adding Fill-ins............................18
Stopping the
Accompaniment.........................18
Manual Bass
Auto Bass Chord
Accompaniment
Single Finger
Accompaniment.........................22
Setting the Accompaniment
Volume...................................24
Setting the Tempo
Fingered Accompaniment
Recording .................................29
Playback
...................................
......................
................
.........................
.....................
..................
.............................
........................
.................
.........
.........
...........
....
.........
10
10
11
13
13
14
15
15
17
18
19
21
24
24
31
4. WAHLEN UND SPIELEN
VON STIMMEN
Stimmenwahl
........................
........................
Einstellen der Lautstärke
Zuschalten von Effekten
TVansponierung:
Versetzen der Tbnlage in
Halbtonschritten
......................
Feinstimmen:Die
Feinstimmtasten
......................
5. DIE BEGLEITUNGSFUNKTIONEN
Schlagzeugbegleitung
..........................
..............
Wahl des Begleitungsstils
Einstellen der
Begleitungslautstärke
..............
Einstellen des Ifempos
Auslösen der Begleitung
Beginnen der Begleitung mit
Auftakt
Einfügen von Fill-ins
.....................................
..............
Stoppen der Begleitung ...........18
Manualteilung far manuelle
Baßbegleitung
.........................
Auto-Baß/
Akkordbegleitung
....................
Single Finger-Funktion
Einstellen der
Begleitungslautstärke 24
Einstellen des Tempos
Fingered-Funktion
...................
6. PSRr-28 PERCUSSION
FUNKTIONEN
..........................
7. DIE SEQUENZER
FUNKTION
...............................
Aufzeichnung ..........................29
Wedergabe
8. SONDERZUBEHÖR
9. TECHNISCHE DATEN
..............................
..................
.............
...........
..........
........
............
..........
...........
..........
10
10
11
13
13
14
14
14
15
15
17
18
18
19
21
22
24
24
27
28
31
33
33
11
4. SELECTION ET EXECUTION
DES VOIX....................................10
Sélection d'une voix
Réglage du volume
Addition d'effets........................11
Transposition: Variation de
la hauteur par bonds d’un
demi-ton ...................................13
Accord: Réglage précis de
la hauteur
5. UTILISATION DE LA SECTION
D'ACCOMPAGNEMENT
Accompagnement
rythmiques................................14
Sélection d'un style
d'accompagnement
Réglage du volume de
l'accompagnement
Réglage du tempo
Début de l'accompagnement.... 17
Début de l'accompagnement
avec introduction
Addition de fill-ins
Arrêt de l'accompagnement
Accompagnement manuel.........19
Accompagnement au
automatique
Accompagnement à un
Seul Doigt
Réglage du volume de
l'accompagnement
Réglage du tempo.................24
Accompagnement
à Plusieurs Doigts
6. PERCUSSION
AU CLAVIER
7. SEQUENCEUR
D’ACCORDS
Enregistrement
Reproduction
8. ACCESSOIRES
EN OPTION.................................33
9. FICHE TECHNIQUE....................33
................................
.................................
...............................
...............................
................
..................
............
..................
..................
....................
.....................
.....................
.....
............................
................
...................
.........................
..........................
10
11
13
14
14
15
15
18
18
18
21
22
24
24
27
28
29
31
4. SELECCIONE
INTERPRETACION DE
VOCES
........................................
Selección de una voz
Ajuste del volumen
Adición de efectos
....................
................
...................
Transposición:
Desplazamiento del tono en
pasos de semitono.....................13
Afinación: Control preciso
del tono.....................................13
5. EMPLEO DE LA SECCION DE
ACOMPAÑAMIENTO
................
Acompañamiento rítmico ... 14
Selección de un estilo de
acompañamiento.......................14
Ajuste del volumen del
acompañamiento.......................15
Ajuste del tempo.......................15
Inicio del acompañamiento
.....
Inicio del acompañamiento
con una introducción
...............
Adición de rellenos ..................18
Parada del
acompañamiento.......................18
Acompañamiento de bajo
manual
......................................
Acompañamiento automático
de bajo y acordes
.....................
Acompañamiento de
un dedo
....................................
Ajuste del volumen del
acompañamiento
Ajuste del tempo
...................
..................
Acompañami en to
para acordes ........................... 24
6. PERCUSION DEL
TECLADO ..................................27
7. SECUENCIADOR DE
ACORDES...................................28
Grabación
Reproducción
................................
...........................
8. ACCESORIOS
OPCIONALES
9. ESPECIFICACIONES
...........................
.................
10
10
11
11
14
17
18
19
21
22
24
24
29
31
33
33
Page 4
BEFORE YOU
VOR DEM
AVANT DE
ANTES DE
BEGIN
Power Supply
Your PSR-28 will run either from batteries
or the optional power adaptor. Follow the
instructions below according to the power
source you intend to use.
Using Batteries
Six 1.5V SUM-1, "D" size. R-20 or
equivalent alkaline batteries (sold
separately) must first be installed in the
PSR-28 battery compartment.
1. Open the battery compartment cover
located on the instrument's bottom
panel.
2. insert the six batteries, being careful
to follow the polarity markings on the
inside of the compartment.
3. Replace the compartment cover,
making sure that it locks firmly in
place.
SPIELEN
Stromversorgung
Ihr PSR-28 kann Über Batterien oder
aber über einen getrennt erhältlichen
Netzadapter betrieben werden. Befolgen
Sie die nachfolgenden Anweisungen für
die jeweilig verwendete Stromquelle.
Stromversorgung über Batterien
Legen Sie zunächst sechs 1,5 V SUM-1
Monozellen der Größe 'D', R-20 oder
entsprechende Alkalibatterien (getrennt
erhältlich) in das Batteriefach des
PSR-28 ein.
1. Öffnen Sie den Batteriefachdeckel
auf der Unterseite des PSR-28.
2. Richten Sie die Batteriepole ent
sprechend den Markierungen im
Batteriefach aus und legen Sie die
Batterien ein.
3. Bringen Sie den Batteriefachdeckel
wieder an und achten Sie darauf,
daß er einrstet.
COMMENCER
Alimentation électrique
Le PSR-28 peut être alimenté au moyen
de piles ou au moyen de l'adaptateur en
option. Suivre les instructions appropriées
en fonction de la source d'alimentation
utilisée.
Fonctionnement sur piles
Utiliser six piles de 1,5 V SUM-1, R-20, de
format "D" ou des piles alcalines
équivalentes (vendues séparément) et les
placer dans le compartiment des piles du
PSR-28.
1. Ouvrir le couvercle du compartiment
des piles situé sur le panneau
inférieur de l'instrument
2. introduire les six piles en prenant
bien soin de respecter les indicatbns
de polarité se trouvant à l'intérieur du
compartiment
3. Reposer le couvercle et veiller à ce
qu'il se verrouille bien en place.
COMENZAR
Alimentación
Su PSR-28 funcionará con pilas o con el
adaptador de alimentación opcional.
Siga las instrucciones siguientes de
acuerdo con la fuente de alimentación
que desee utilizar.
Empleo de las pilas
Deben instalarse seis pilas SUM-1,
tamaño "D" de 1,5V o pilas alcalinas
equivalentes (que se venden por
separado) en el compartimiento de las
pilas del PSR-28.
1. Abra la tapa del compartimiento de
las pilas situado en el panel inferior
del instrumento.
2. Inserte seis pilas, teniendo cuidado
de respetar las marcas de las
polaridades del interior del
compartimiento.
3. Vuelva a colocar la tapa del
compautimiento, cerciorándose de
que queda bien cerrada.
Caution:
1. Wfwo batteries run down, replace them
with a complete set of six new batteries.
NEVER mix old and new batteries.
2. Jo prevent possible damage due to battery
les^age, remove the batteries ñrom the
instrument if it is not to be used for an extended
period of tíme.
Aehhing:
1. y/enn die Batterien schwach werden^ stets alle
Batterien zugleich als Satz amtauschen.
NIEMALS alte und neue Batterien zusammen
verwenden.
2. Bei längerem Nichtgebrauch die Batterien
aus dem Keyboard entfernen, um niögliche
Schäden durch auslaufende Batterien zu
verhindern.
Attention:
1. Lorsque les pHes se vident, les rerrgMacer
toutes à la fois. NE JAMAIS utiliser en même
temps des piles neuves et des piles usées.
2. Pour prévervr tout erKkxnms^iement que
pourrait provoquer une fuite des piles, retirer
les piles de l'instrument lorsqu’il ne doit pas être
utilisé pendant une période prolongée.
Precaución:
1. Cuando se gastan las pilas, reemplácelas por
un juego completo de seis pilas nuevas.
NUNCA mezcle pilas usadas y pilas nuevas.
2. Para evitar posibles daños debidos a fugas de
las püas, extraiga las pilas del instrumento si
no tiene la intendi dx utilizarlo durante
períodos largos de tiempo.
Page 5

Using an Optional Power Adaptor For AC Mains Power
Use ONLY a Yamaha PA-1. PA-1 B. PA-3,
PA-4 or PA-40 AC Adaptor to power your
instrument from the AC mains. Refer to
"Rear-panel Jacks" on page 7 for more
details.
Stromversorgung über getrennt
erhältlichen Adapter
Netzadapter
Nur den Yamaha Netzadapter PA-1, PAIB, PA-3, PA-4 oder PA-40 für den
Netzanschluß verwenden. Einzelheiten
hierzu finden Sie unter “An^hlüsse auf
der Rückseite“ auf Seite 7.
Utilisation d'un adaptateur en
option
Fonctionnement sur secteur
SEUL un adaptateur secteur Yamaha PA1, PA-1 B, PA-3. PA-4 ou PA-40 peut être
utilisé pour alimenter l'instrument sur
secteur. Pour plus de détails, voir "Prises
du panneau arrière" à la page 7.
Empleo de un adaptador de
alimentación opcional
Para la red eléctrica de CA
Emplee SOLO un adaptador de CA
Yamaha PA-1, PA-lB, PA-3, PA- 4 o PA40 para alimentar el instrumento con la
red eléctrica de CA Consulte las
"Tbmas del panel posterior" de la página
7 para más detalles.
Remove the Protective Film
Before using your instrument, please
remove the protective film covering the
display sectbn.
Setting Up the Music Stand
Insert the two pegs protruding from the
bottom edge of the music stand into the
two holes located at the top of the PSR-28
control panel.
Taking Care of Your
PortaTone
Your PortaTone will remain in excellent
playing condition if care Is taken
concerning the foltowing.
1. When you use AC power, be sure to
use the optional AC Power РА-1/ PA1В/ РА-3/ РА-4/ PA-40 adaptor.
Before use. read the adaptor
instructions carefully.
In particular, please note that in some
cases the РА-1/ PA-4 is provided with
a voltage selector, so confirm that this
selector is correctly set.
Entfernen der Schutzfolie
Ziehen Sie vor der Inbetriebnahme die
Schutzfolie vom Display ab.
Anbringen des
Notenständers
Führen Sie die zwei Füße an der
Unterseite des Notenständers in die
zwei Löcher oben auf der Bedienkonsole
des PSR-28 ein.
Vorsichts maßnahmen
Wenn Sie die nachfolgenden Hinweise
zur Pflege befolgen, bleiben Aussehen
und Leistung Ihres Keyboards über
Jahre erhalten,
1. Zum Netzanschluß nur den
getrennt erhältlichen Yamaha
Netzadapter PA-1, PA-lB/ PA-3/ PA4/ PA-40 verwenden.
Vor dem Anschluß die Bedienungs
anleitung des Netzadapters lesen.
Außerdem ist zu beachten, daß der
PA-1/ PA-4 für verschiedene
Bestimmungsländer mit einem
Spannungswähler ausgestattet ist.
Daher vor dem Anschließen
sicherstellen, daß der
Spannungswähler korrekt auf die
örtliche Netzspannung eingestellt
ist.
Retrait de la pellicule
protectrice
Retirer la pellicule protectrice recouvrant
l'affichage avant d'utiliser l'instrument.
Mise en place du pupitre
Introduire les deux chevilles se trouvant
sur le bord inférieur du pupitre dans les
orifices situés sur le panneau de
commande du PSR-28.
Entretien du PortaTone
Le PortaTone restera en excellent état si
les points suivants sont observés.
1. En cas d'alimentation sur secteur,
veiller à utiliser un adaptateur secteur
PA-1/ PA-1 B/ PA-3/ PA-4/ PA-40 en
optbn. Lire attentivement le mode
d'emploi de l'adaptateur avant
d'utiliser celui-ci. A noter que dans
certains cas le PA-1/ PA-4 est muni
d'un sélecteur de tension; le cas
échéant, veiller donc à régler
correctement ce sélecteur.
Extracción de la película
protectora
Antes de utilizar el instrumento, saque
la película protectora que cubre la
sección del visualizador.
Colocación del
portapartituras
Inserte los dos apéndices que sobresalen
del borde inferior del portapartituras en
los dos orificios situados en la parte
superior del panel de control del
PSR-28.
Cuidados del Portalbne
El PortaTone permanecerá en excelentes
condiciones de interpretación si se tiene
cuidado con lo siguiente.
1. Cuando emplee la red eléctrica de
CA, cerciórese de utilizar el
adaptador de CA opcional PA-1, PAIB, PA-3, PA-4 o PA-40 . Antes de
su utilización, lea las instrucciones
del adaptador. En particular, tenga
presente que en algunos casos el
PA-1 o PA-4 está provisto de un
selector de tensión, por lo que
deberá confirmar si el selector está
correctamente ajustado.
Page 6

2. Connections made between the
PortaTone and any other device
should be made with both units
turned off.
3. Do not set the MASTER VOLUME
control at MAX when you connect the
PotaTone to a stereo system. Use the
stereo system's volume control to
adjust the sound level.
4. Avoid placing the instrument in
excessively humid areas.
5. Do not subject the unit to physical
shock, and avoid placing an^^hing
heavy on it.
6. The PortaTone should not be placed
in direct sunlight for a bng time.
7. Do not place the instrument near any
heating, appliance, or leave it inside a
car in direct sunlight for any length of
time. Direct sunshine can raise the
interior temperature of a car with
closed doors and wirtdows to as high
as 80^C. Temperatures in excess of
60^C can cause physical and/ or
electrical damage not covered by
warranty.
8. Use a dry or damp cbth for cleaning.
9. When you aren't using the PortaTone,
we recommend keeping it in the case
to protect it.
2. Vor dem Anschluß von
Zusatzgeräten diese Geräte und das
PortaTbne ausschalten.
3. Den MASTER VOLUME-Regler
NICHT auf MAX stellen, wenn das
PortaTbne an eine Stereoanlage
angeschlossen ist. Die Lautstärke
über die Stereoanlage einstellen.
4. Das Gerät vor Feuchtigkeit
schützen.
5. Das Gerät vor Stoß schützen und
keine schweren Gegenstände auf
das Gerät stellen.
6. Das PortaTbne niemals über
längere Zeit direkter
Sonneneinstrahlung aussetzen.
7. Das Gerät nicht in der Nähe von
Wärmequellen aufstellen. Ebenso
das Gerät nicht über längere Zeit in
einem Fahrzeug lassen, das im
prallen Sonnenlicht steht. Direkte
Sonneneinstrahlung kann die
Temperatur im Fahrzeuginnem auf
bis zu 80 Grad erhöhen.
Temperaturen von über 60 Grad
können mechanische und
elektrische Schäden am Instrument
verursachen, die nicht von der
Garantie abgedeckt sind.
8. Zum Reinigen das Instrument mit
einem trockenen oder leicht
angefeuchteten Tuch abwischen.
9. Nach dem Spielen das PortaTbne
zur Aufbewahrung wieder in die
Schutzhülle stecken.
2. Avant de procéder à tout
branchement, veiller à couper
l'alimentation du PortaTone et de
l'autre appareil.
3. En cas de branchement du
PortaTone sur un système de
sonorisatbn stéréo NE JAMAIS
mettre la commande MASTER
VOLUME sur MAX. Utiliser la
commande de volume de la chaîne
stéréo pour régler le niveau sonore.
4. Eviter de placer l'instrument dans un
endroit extrêmement humide.
5. Ne pas soumettre l'instrument à des
chocs et ne pas y placer d'objets
bu rds.
6. Ne pas laisser le PortaTone en plein
soleil pendant longtemps.
7. Ne pas placer l'instrument à proximité
d'un appareil de chauffage et ne
jamais le laisser à l'intérieur d'un
véhicule stationné au soleil. La
température à l'intérieur d'un véhbule
fermé statbnné au soleil peut
atteindre 80^0. Exposer l'instrument
à des températures dépassant 60®C
peut provoquer des dommages
physiques et/ ou électriques qui ne
seront pas couverts par la garantie.
8. Utiliser un chiffon sec ou légèrement
humide pour nettoyer l'instrument.
9. Pour protéger l'instrument, il est
conseillé de le laisser dans son étui
lorsqu'il n'est pas utilisé.
2. Las conexiones efectuadas entre el
PortaTbne y cualquier otro
dispositivo deberán realizarse con
ambos aparatos desconectados.
3. NO ajuste el control MASTER
VOLUMEN en la posición MAX
cuando conecte el PortaTbne a un
sistema estéreo. Emplee el control
de volumen del equipo estéreo para
ajustar el nivel de sonido.
4. No coloque el instrumento en
lugares demasiado húmedos.
5. No someta el aparato a golpes
físicos, y no ponga nada pesado
encima del mismo.
6. El PortaTbne no debe colocarse bajo
la luz directa del sol durante
períodos prolongados,
7. No coloque el instrumento cerca de
aparatos de calefacción, ni lo deje
dentro de un automóvil bajo la luz
directa del sol durante mucho
tiempo. La luz directa del sol puede
elevar la temperatura del interior
del automóvil con las puertas y
ventanillas cerradas hasta a 80®C.
Las temperaturas que excedan 60®C
pueden causar daños físicos y/ o
eléctricos que no quedan cubiertos
por la garantía.
8. Emplee un paño seco o húmedo
para la limpieza.
9. Cuando no utilice el PortaTbne, le
recomendamos que lo guarde en el
estuche para protegerlo.
Page 7
2
NOMENCLATURE
Top Panel Controls
BEZEICHNUNG DER TEILE
Bedienelemente
(p ® (5) @ (6) (p(|)(9)(3J)(|j)
YAMAHLP5R-ÉÎB
Z
__
Ö CD cb CD CD CD en
T T’T’TT'T'TT
CDCDCDCZD I
NOMENCLATURE
Commandes du panneau supérieur
__ _II_
IL_II__ILJ CDCDCDCDCDC30¿3b O CZI-
NOMENCLATURA
Controles del panel
superior
Z
• s
s
POWER SwHch (page S)
©
MASTER VOLUME Control
{page 11)
AUTO BASS CHORD Selector
(page 19, 22, 25)
ACCOMPANIMENT VOLUME
©
Control (page 15)
ACCOMPANIMENT STYLE SELECT
Buttons (page 14)
TEMPO Controls (page 15)
INTRO/ FILL IN Button (page IS)
©
INTRO/ ENDING Button (page 18)
SYNCHRO START Button
®
(page 17)
START Button (page 17)
STOP Button (page 18)
0 Ein/ Aus-Schalter (Seite 8) 0 Interrupteur d'alimentation
0 Lautstärkeregler (Seite 11) (page 8)
0 Auto-Begleitfunktionswähler
(Seite 19, 22, 25) (page 11)
0 Begleitungslautstärkeregler
(Seite 15)
0 Begleitstil-Wahltasten (Seite 14)
0 Tbmporegler (Seite 15)
0 AuRakt/ Zwischentakttasten
(Seite 18)
0 Auftakiy Schlußtakttaste
(Seite 18)
0 Synchronstarttaste (Seite 17)
® Starttaste (Seite 17)
(fl) Stopptaste (Seite 18)
0 Commande de volume principale
0 Sélecteur accords et basses
automatique (page 19,22, 25)
0 Commande de réglage du volume
d'accompagnementh (page 15)
0 Touches de sélection des styles
d'accompagnement (page 14)
0 Commandes de tempo (page 15)
0 Touches d'introduction/ fill-in
(page 18)
0 Touche d'introduction/ finale
(page 18)
0 Touche de début synchronisé
(page 17)
® Touche de début (page 17)
(D) Touche d'arrêt (page 18)
0 Interruptor de alimentación
(página 8)
(D Control de volumen principal
(página 11)
(3) l^lector de acompañamiento
automático de bejo y acordes
(página 19, 22, 25)
0 Botones de volumen de
acompañamiento (página 15)
0 Botones de selección del estilo de
acompañamiento (página 14 )
0 Controles del tempo (página 15)
0 Botones de preludio/ relleno
(página 18)
0 Botón de preludio/ coda
(página 18)
0 Botón de inicio sincronizado
(página 17)
(JJ) ]^tón de inicio (página 17)
(Q) Botón de parada (página 18)
Page 8
VOICE SELECT Buttons (page 10)
SUSTAIN Button (page 11)
DUAL VOICE Button (page 12)
TRANSPOSE Buttons (page 13)
PITCH Buttons (page 13)
CHORD SEQUENCER RECORD
and PLAY Buttons (page 29, 31)
DEMONSTRATION Button
(page 9)
KEYBOARD PERCUSSION Button
(page 27)
Auto Bass Chord Key Section
(page 19)
Keyboard Percussion Key Section
(page 27)
VOICE/TEMPO Display
(page 10, 11, 15, 17)
VOICE LIST (page 10)
stimmen wahltasten (Seite 10)
Nachhalltaste sustain (Seite 11)
Zweistimmentaste (Seite 12)
Transponiertasten (Seite 13)
Feinstimmtasten (Seite 13)
Akkordau&iahme- und
Wiedergabetaste (Seite 29, 31)
Demo-Taste (Seite 9)
Schlagzeugspieltaste
(Seite 27)
Auto-Baß/ Akkordbegleittasten
(Seite 19)
Schlagzeugspiel-Manualbereich
(Seite 27)
Display für Stimmennr., Ibmpo
(Seite 10, 11, 15, 17)
Stimmenliste (Seite 10)
(g) Touche de sélection des voix
(page 10)
® Touche d*effet sustain (page 11)
® Touche deux voix (page 12)
® Touches de transposition (page 13)
® Touches de hauteur tonale
(pagê 13)
(Qi Touches d'enregistrement et
reproduction du séquenceur
d'accords (page 29, 31)
d}) Touche démonstration (page 9)
® Touche de percussion au clavier
(page 27)
® Section accords et basses
automatique (page 19)
(U) Section percussion au clavier
(page 27)
(g) Affichage voix/ tempo
(page 10, 11, 15, 17)
® Liste des voix (page 10)
(g) Botones selectores de voces
(página 10)
@ Botón de sostenido (página 11)
^ Botón de voz doble (página 12)
® Botones de transposición
(página 13)
(g) Botones del tono (página 13)
(Q) Botones de grabación y
reproducción del secuenciador
de acordes (página 29, 31)
(Q) Botón de demostración
(página 9)
® Botón de percusión del teclado
(página 27)
(g) lección de teclas de
acompañamiento automático de
bajo y acordes (página 19)
(g) Sección de teclas de percusión
del teclado (página 27)
® Visualización de voces/ tempo
(página 10, 11, 15, 17)
(g) Lista de voces (página 10)
Rear Panel Connectors
Dqd-12V)IN Jack
The DC output cord from the optional
Yamaha РА-1/ PA-1 В/ РА-3/ РА-4/
PA-40 Power Adaptor should be
plugged in here when the PSR-28 is
to powered from the AC mains supply
(refer to "Power Supply" on page 3
for more details).
Anschlüsse auf der
Rückseite
Gleichspannungsbuchse (DC(9-
12V)IN
An diese Buchse wird das
Ausgangskabel des getrennt
erhältlichen Yamaha Netzadapters
PA-1/ PA-IB/ PA-3/ PA-4/ PA-40
angeschlossen» wenn das PSR-28
über Netz Strom betrieben werden
soll, (Einzelheiten, siehe unter
"Stromversoigung" auf Seite 3).
Prises du panneau arrière
Prise d'entrée CC DC(9-12V)IN
Le cordon de sortie CC de l'adaptateur
secteur Yamaha PA-1/ PA-1 B/ PA-3/
PA-4/ PA-40 fourni doit être branché à
cette prise lorsque le PSR-28 doit être
alimenté par le secteur (Pour plus de
détails, voir "Alimentation électrique" à
la page 3).
Conectores del panel posterior
Toma de entrada de alimentación
exterior (DC (9-12V) IN)
£1 cable de salida de CC del
adaptador de alimentación Yamaha
PA-1, PA-IB, PA-3, PA-4 o PA-40
debe enchufarse a esta toma cuando
se desee alimentar el PSR-28 con la
red eléctrica de CA (consulte
"Alimentación" de la página 3 para
más detalles).
Page 9
® HEADPHONES/ AUX. OUT Jack
A standard pair of stereo headphones
cán be plugged in here for private
practice or late-night playing. The
internal speaker system is automati
cally shut off when a pair of
headphones is plugged into the
HEADPHONE jack. The HEAD
PHONES/ AUX. OUT jack can also be
used to deliver the output of the
PSR-28 to a keyboard amplifier,
stereo hi-fi system, mixing console or
tape recorder, (refer to page 33)
* Use a relatively low MASTER
VOLUME control setting when
connecting the PSR-28 to a stereo
sound system. Use the stereo
system’s volume control to adjust
volume.
® Kopfhörer/ Zusatzausgang
An diese Buchse können Sie für
mitternächtliche Etüden einen
herkömmlichen Stereokopfhörer
anschließen. Beim Anschluß eines
Kopfhörers an die HEADPHONESBuchse wird das interne
Lautsprechersystem des PSR-28
automatisch stummgeschaltet. Die
Buchse HEADPHONES/ AUX. OUT
dient auch zum Anschließen an einen
Keyboard-Verstärker, eine HifiStereoanlage, ein Mischpult oder ein
Cassettendeck. (Siehe Seite 33)
* Beim Anschluß an eine
Stereoanlage den MASTER
VOLUME-Regler des PSR-28 auf
einen relativ niedrigen Wert
einstellen. Die Lautstärke über den
Lautstärkeregler der Stereoanlage
einstellen.
® Prise de sortie aux/ casque d'écoute
Un casque d'écoute stéréo standard
peut être branché à cette prise en cas
d'utilisation de l'instrument la nuit. Les
haut-parleurs internes sont
automatiquement coupés lorsqu'un
casque est branché à la prise
HEADPHONES. La prise
HEADPHONES/ AUX. OUT peut être
également utilisée pour transmettre la
sortie du PSR-28 à un amplificateur
de clavier, une chaîne Hi-Fi stéréo,
une table de mixage ou un
enregistreur de bande. (Voir page 33)
* Le régiage de la commande
MASTER VOLUME doit être
relativement bas lorsque le PSR-28
est connecté à un système de
sonorisation stéréo. Utiliser la
commande de volume du système de
sonorisation stéréo pour régler le
niveau sonore.
® Toma de auriculares/ salida
auxiliar
Pueden enchufarse unos auriculares
normales a esta toma para poder
practicar en privado o para tocar por
la noche. El sistema de altavoces
interino queda automáticamente
desactivado cuando se enchufan los
auriculares a la toma HEADPHONE.
U toma HEADPHONE/ AUX. OUT
también puede utilizarse para
suministrar la salida del PSR-28 a
un amplificador de teclado, sistema
de sonido estéreo de alfa fidelidad,
consola de mezcla o grabadora de
cintas, (consulte la página 33)
* Emplee un ajuste del control
MASTER VOLUME relativamente
bajo cuando conecte el PSR-28 a un
sistema estéreo. Emplee el control
del volumen del sistema para
ajustar el volumen.
ENJOY THE DEMONSTRATION
To give you an idea of the PSR-28*s
sophisticated capabilities, it is pro
grammed with a demonstration sequence
which play automatically while demon
strating a number of the instrument's
voices.
1. Switch ON
Slide the POWER switch 0to the
ON position. The VOICE/TEMPO
display ®will light when the power is
ON.
DEMO
WIEDERGABE
Um Ihnen eine Vorstellung von den
vielseitigen Funktionen des PSR-28 zu
geben, haben wir ein kleines Demostück
einprogrammiert, das automatisch
abgespielt werden kann und Ihnen
einige Stimmen des PSR-28
demonstriert.
L Das Gerät einschaiten
Schieben Sie den POWER-Schalter
(pin die Position ON. Bei
eingeschaltetem Keyboard leuchtet
das VOICE/ TEMPO-Display ® auf.
ECOUTE DE LA
MUSIQUE DE
DEMONSTRATION
Afín de donner une idée des possibilités
sophistiquées de l'instrument, le PSR-28
a été programmé avec une séquence
musicale reproduite automatiquement qui
démontre un certain nombre des voix de
l'instrument.
1. Mise sous tension
Faire coulisser l'interrupteur POWER
0sur la position ON. L'affichage
VOICE/TEMPO ©s'allume lorsque
l'instrument est mis sous tension.
DEMOSTRACION
Para que usted se haga una idea de las
sofisticadas capacidades del PSR-28,
está programado con una secuencia de
demostración que reproduce
automáticamente mientras demuestra
ciertas voces del instrumento.
L Conexión
Deslice el interruptor POWER 0 a
la posición ON. Se encenderá la
visualización de VOICE/ TEMPO @
cuando se conecte la alimentación.
8
Page 10
2. Set an Initial Volume Level
Slide the MASTER VOLUME control
0to a position about half way
between the "MIN" and "MAX"
setting. You can set this control for
the most comfortable volume level
after playback begins.
2. Die Anfangslautstärke ein
stellen
Schieben Sie den MASTER
VOLUME-Regler (2) ungefähr in die
Mitte zwischen "MIN"- und "MAX"Stellung. Nach Spielbeginn können
Sie den Regler dann auf die
gewünschte Lautstärke einstellen.
Réglage d'un niveau de volume initial
Faire coulisser la commande
MASTER VOLUME ©sur une
position à mi-chemin entre les
positions "MIN" et "MAX". Régier
cette commande pour un niveau
d'écoute confortable après le début
de la reproduction.
2* Ajuste un nivel de volumen
inicial
Deslice el control MASTER
VOLUMEN ©a una posición
intermedia entre "MIN" y MAX".
Podrá ajustar este control al nivel
de volumen más apropiado después
de haberse iniciado la reproducción.
3. Press the DEMONSTRATION
Button dj)
The demonstration music will begin
playing as soon as you press the
DEMONSTRATDN button.
The demonstration will play continuo
usly, providing samples of different
voices and accompaniment styles,
until the DEMONSTRATION button is
pressed a second time or the STOP
button ©is pressed.
A different voice can be selected at any
time while the demonstration is playing
(refer to the appropriate sections of this
manual for instructions). Such changes,
however, will only remain in effect until
the next automatic voice.
Die DEMONSTRATION-Taste ®
drücken
Durch Drücken der DEMONSTRATION-Tkste lösen Sie die Demo
Wedergabe aus.
Das Demostück wird kontinuierlich
mit wechselnden Stimmen und
Begleitstilen abgespielt. Zum
Abbrechen der Demo-Wiedergabe
müssen Sie nur die DEMONSTRA-
TION-Thste erneut oder die STOPTaste 3D drücken.
Sie können während der Wiedergabe
andere Stimmen wählen (schlagen Sie
dazu in den entsprechenden Kapiteln
dieser Anleitung nach). Solche
Änderungen wirken jedoch nur bis
zum nächsten automatischen
Stimmen Wechsel.
3. Appuyer sur la touche
DEMONSTRATION ®
La reproduction de la séquence de
démonstration commence dès que la
touche DEMONSTRATION est
enfoncée. La séquence de
démonstration est reproduite d'une
manière continue, donnant un
échantillon des voix et styles
d’accompagnement, jusqu'à ce que la
touche DEMONSTRATION ou la
touche STOP ©soit enfoncée.
> DEMONSTRATION
II est possible de changer la voix
pendant la reproduction de la séquence
de démonstration (voir les instructions
données dans les chapitres de ce
manuel se rapportant à ces fonctions).
Ces changements ne seront effectifs,
toutefois, que jusqu'au changement
automatique suivant de la voix.
3. Presione el botón
DEMOSTRATION ®
Se iniciará la música de
demostración asf que usted presione
el botón DEMOSTRATION. La
demostración se tocará
continuamente, proporcionando
muestras de diferentes voces y
estilos de acompañamiento, hasta
que se presione por segunda vez el
botón DEMOSTRATION o hasta
que se presione el botón STOP ©.
Puede seleccionarse en cualquier
momento una voz mientas se está
reproduciendo la demostración
(consulte las secciones apropiadas de
este manual para ver las
instrucciones.) Sin embargo, estos
cambios, sólo tendrán efecto hasta el
siguiente cambio de voz automática.
Page 11

SELECTING AND
WAHLEN UND
SELECTION ET
SELECCION E
PLAYING VOICES
Selecting a Voice
The PSR-28 provides two methods of
selecting any of its 100 voices:
1) Choose one of the 100 voices—
numbered "00" through "99" —
shown on the VOICE LIST ©then
enter its number using the numbered
VOICE SELECT buttons ®. To
select XYLOPHONE (number 12), for
example, first press "1" and then "2".
The number "12" should then be
displayed on the VOICE display ©.
2) The + and - buttons In the VOICE
SELECT group can be used to
increment (increase by one) or
decrement (decrease by one) the
current voice number. Press the +
button briefly to select the voice one
number higher than the current voice,
or the - button to select the voice one
number bwer than the current voice.
If you hold the + or - button down,
the voice number will increment or
decrement continuously — simply
release the button when the desired
voice number has been reached.
SPIELEN VON
STIMMEN
Stimmenwahl
Beim PSR-28 können Sie auf zwei
verschiedene Arten zwischen den 100
Stimmen wählen:
1) Sie können eine der 100 Stimmen,
die entsprechend der Stimmenliste
©von "00" bis "99" durchnumeriert
sind, durch Eingabe der Stimmen
nummer direkt abrufen. Geben Sie
dazu die Stimmen-nummer mit den
numerischen VOICE SELECTTasten ®ein. Wenn Sie z. B.
XYLOPHONE (Nr. 12) wählen
wollen, müssen Sie zuerst die "1"
und dann "2" antippen. Die
Nummer "12" sollte danach im
VOICE-Anzeigefeld ©erscheinen,
2) Sie können aber auch die Stimmen
mit den Tasten + xmd - im VOICE
SELECT-Tastenfeld der Reihe
nach durchgehen. Durch Drücken
der Taste + wird die Stimme mit
der nächsthöheren Nummer
gewählt, während die Taste - auf
die Stimme mit der nächst
niedrigeren Nummer schaltet.
Wenn Sie die Taste + oder kontinuierlich drücken, erhöht oder
senkt sich die Stimmennummer
fortlaufend. Sie brauchen dann nur
die Taste loslassen, wenn die
Nummer der gewünschten Stimme
angezeigt wird.
EXECUTION DES
VOIX
Sélection d'une voix
Le PSR-28 permet de sélectionner l'une
de ses 100 voix de deux manières
différentes:
1 ) Choisir une des 100 voix
(numérotées de "00" à "99") de la
liste VOICE LIST ©et introduire son
numéro à l'aide des touches VOICE
SELECT®. Pour sélectionner
XYLOPHONE (numéro 12). par
exemple, appuyer d'abord sur la
touche "1" et ensuite sur la touche
"2". "12" sera Indiqué sur l'affichage
VOICE/TEMPO®.
2) Les touches + et - du groupe VOICE
SELECT peuvent être utilisées pour
augmenter (de 1) ou diminuer (de 1)
le numéro de la voix active. Appuyer
brièvement sur la touche -i- pour
sélectionner la voix qui suit la voix
active, ou sur la touche - pour
sélectionner celle qui la précède. Si
les touches + ou - sont maintenues
enfoncées, les numéros défilent
d'une manière continue. Relâcher
simplement la touche + ou - lorsque
le numéro de la voix recherchée est
affiché.
VOfCE/TEMPO
П П
и и
чя
INTERPRETACIO
N DE VOCES
Selección de una voz
El PSR-28 ofrece dos métodos para
seleccionar cualquiera de sus 100 voces:
1) Seleccione ima de las 100 voces,
numeradas de la "00" a la "99",
mostradas en la VOICE LIST ©e
introduzca entonces el número
empleando los botones numerados
VOICE SELECT®. Para
seleccionar SYLOPHONE (el
número 12), por ejemplo,presione
primero el "1" y luego el "2".
Entonces se visualizará el número
"12" en el visualizador VOICE
2) Los botones + y - del grupo VOICE
SELECT pueden usarse para
incrementar (en una) o reducir (en
una) el número de la voz actual.
Presione el botón + brevemente
para seleccionar la voz del número
inmediatamente superior a la
actualmente seleccionada, y el
botón - para seleccionar la
inmediatamente inferior de la
actualmente seleccionada. Si
mantiene presionado el botón + o -,
el número de voz irá incrementando
o reduciéndose continuamente;
suelte el botón cuando se haya
llegado al número de la voz
deseada.
10
Page 12

The selected voice can now be
played on the instrument’s keyboard.
* When the power is initially turned ON,
the PIANO 1 voice is automatically
selected and its number ("OO”) is shown
on the VOICE/TEMPO display
* The PSR-28 features 8-note polyphony,
so up to 8 notes can be played on the
keyboard simultaneously when the
automatic accompaniment or dual voice
features of this instrument are not used.
The above mentioned features all
reduce the number of available notes.
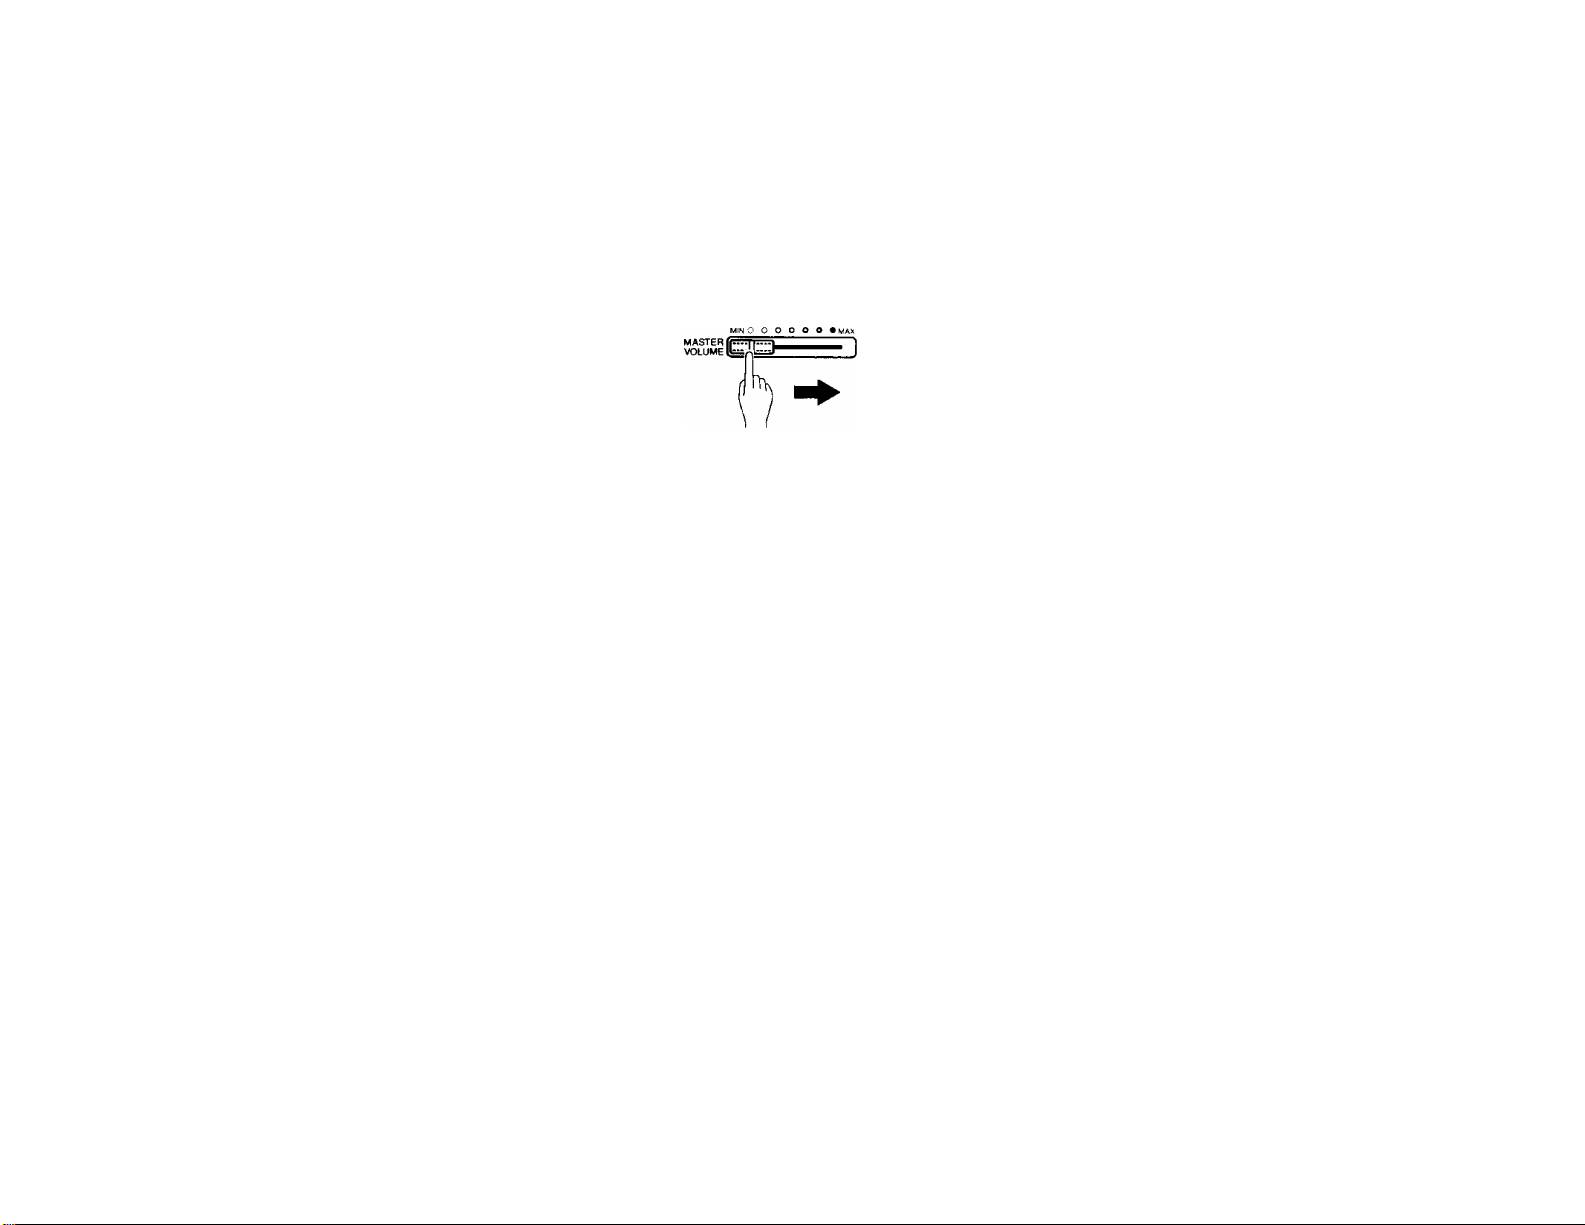
Adjusting the Volume
Adjust the MASTER VOLUME control ®
while playing to set the desired volume
level.
Danach können Sie die gewählte
Stimme auf dem Manual spielen.
* Beim Einschalten des Keyboards wird
die Stimme PIANO 1 automatisch
vorgewählt und deren Nummer ("00")
auf dem VOICE/ TEMPO-Anzeigefeld
® angezeigt.
* Das PSR-28 bietet 8-Noten
Polyphonie, d. h. daß bis zu 8 Noten
gleichzeitig angeschlagen werden
können, falls weder die Auto-Baß/
Akkordbegleitung noch DUAL VOICEFunktion zugeschaltet sind. Wenn
diese Funktionen eingesetzt werden,
verringert sich die Anzahl der
gleichzeitig spielbaren Noten.
Einstellen der Lautstärke
Stellen Sie nun die Lautstärke mit dem
MASTER VOLUME-Regler (2) während
dem Spielen auf den gewünschten Pegel
ein.
MIN O O O O Ö Ö
La voix sélectionnée peut alors être
jouée sur le clavier de l'instrument.
* La voix PIANO 1 est automatiquement
sélectionnée à la mise sous tension de
l'appareil et son numéro ("OO") apparaît
sur l’affichage VOICE/TEMPO (g),
* Le PSR-28 a une polyphonie à 8 notes,
ce qui signifie que 8 notes peuvent être
jouées simultanément sur le clavier,
lorsque les fonctions accompagnement
et deux voix de l'instrument ne sont pas
utilisées. Ces fonctions réduisent le
nombre de notes disponibles.
Réglage du volume
utiliser la commande MASTER VOLUME
0tout en jouant pour régler le niveau du
volume d'ensemble.
La voz seleccionada podrá ahora
interpretarse en el teclado del
instrumento.
* Cuando se conecta la alimentación, la
voz PIANO 1 se selecciona
automáticamente y se visualiza su
número ("00") en el visualizador
VOICE/TEMPO®,
* El PSR-28 tiene polifonía de 8 notas,
por lo que pueden tocarse hasta 8
notas simultáneamente en el teclado
cuando no se usan las características
de acompañamiento automático o voz
doble de este instrumento. Las
características arriba mencionadas
reducen el número de notas
disponibles.
Ajuste del volumen
Ajuste el control MASTER VOLUMEN
Ф mientras toca para ajustar el nivel del
volumen deseado.
Adding Effects
SUSTAIN:
Press the SUSTAIN button (IJonce to turn
the SUSTAIN effect on. and notes played
on the keyboard will decay gradually after
you lift your fingers from the keys. Press
the SUSTAIN button a second time to turn
the sustain effect off. The actual length of
the SUSTAIN effect varies from voice to
voice.
11
Zuschalten von Effekten
SUSTAIN:
Ihr PSR-28 bietet einen SUSTAIN- oder
Nachhalleffekt. Wenn Sie die Tbste
SUSTAIN (Q)einmal antippen (die ent
sprechende Tbstenanzeige leuchtet auf),
klingen die Noten nach dem Loslassen
der Tbsten allmählich aus. Zum
Ausschalten des SUSTAIN-Effekts wird
die SUSTAIN-Taste einfach ein zweites
Mal gedrückt. Dadurch erlischt auch die
Tastenanzeige. Die Abklingzeiten sind
von Stimme zu Stimme unterschiedlich.
Addition d'effets
SUSTAIN:
Appuyer une première fois sur la touche
SUSTAIN C0)pour activer l’effet SUSTAIN.
Les notes jouées sur le clavier chutent
alors graduellement une fois que les
doigts ont quittés les touches. Appuyer
une deuxième fois sur la touche SUSTAIN
pour arrêter l'effet de sustain. La durée de
l'effet SUSTAIN varie selon la voix.
Adición de efectos
SUSTAIN:
Presione el botón SUSTAIN ©una vez y
las notas tocadas en el teclado
disminuirán gradualmente después de
soltar las teclas. Presione otra vez el
botón SUSTAIN para desactivar el
efecto de sostenido. La duración real de
SUSTAIN varía según la voz
seleccionada.
Page 13

The SUSTAIN effect cannot be applied
to accompaniment or rhythm.
Der SUSTAIN-Effekt wirkt nicht auf
Rhythmus- oder Baß/
Akkordbegleitung.
L'effet SUSTAIN ne peut pas être
appliqué à l'accompagnement ou au
rythme.
* El efecto de SUSTAIN no puede
aplicarse al acompañamiento o ritmo.
DUAL VOICE:
The DUAL VOICE feature makes it
possible to select and play two different
voices simultaneously. To activate the
DUAL VOICE feature press the DUAL
VOICE button (3)(the DUAL VOICE button
indicator will light). When the DUAL
VOICE feature is ON, the last two voices
selected will sound simultaneously. For
example, if you selected PIANO 1 and
then HARP, the PIANO 1 and HARP
voices will be combined. If you then select
the VIBES voice. HARP and VIBES will be
combined, and so on. Of course, if you
turn the DUAL VOICE feature OFF (by
pressing the DUAL VOICE button a
second time), only the last selected voice
will sound.
DUAL VOICE:
Dank der DUAL VOICE-Funktion
können Sie zwei Stimmen gleichzeitig
über das ganze Manual legen. Zum
Aktivieren des DUAL VOICE-Effekts
wird die DUAL VOICE-Taste ©einmal
angetippt (die LED-Anzeige über der
Taste leuchtet auf). Bei eingeschalteter
DUAL VOICE-Funktion erklingen die
beiden zuletzt gewählten Stimmen
gleichzeitig. Wenn Sie z. B. zuvor
PIANO 1 und dann HARP gewählt
haben, erklingen diese beiden Stimmen
beim Anschlägen von Noten zusammen.
Wenn Sie danach die Stimme VIBES
abrufen, werden die Stimmen HARP
und VIBES miteinander kombiniert
usw. Wenn Sie die DUAL VOICEFunktion durch erneutes Drücken der
DUAL VOICE-Thste ausschalten, hören
Sie nur noch die zuletzt gewählte
Stimme alleine.
DUAL VOICE:
La fonction DUAL VOICE permet de
sélectbnner et de jouer simultanément
deux voix différentes. Pour activer la
fonction DUAL VOICE, appuyer sur la
touche DUAL VOICE ©{le témoin DUAL
VOICE s’allume). Lorsque la fonction
DUAL VOICE est activée, les deux
dernières voix sélectionnées seront jouées
ensemble. Par exemple, si la voix PIANO
1 et la voix HARP ont été sélectionnées
l'une après l'autre, les voix PIANO 1 et
HARP seront combinées. Si la voix
VIBES est ensuite sélectionnée, les voix
HARP et VIBES seront ators combinées et
ainsi de suite. Il va sans dire que si la
fonction DUAL VOICE est désactivée (en
appuyant une deuxième fois sur la touche
DUAL VOICE), seule la dernière voix
sélectbnnée sera jouée.
DUAL VOICE:
La característica de DUAL VOICE hace
posible seleccionar y tocar dos voces
distintas simultáneamente. Para activar
la función DUAL VOICE presione el
botón DUAL VOICE ©(se encenderá el
indicador DUAL VOICE). Cuando la
función DUAL VOICE esté activada, las
dos últimas voces seleccionadas sonarán
simultáneamente. Por ejemplo, si usted
seleccionó PIANO 1 y luego HARP, las
voces de PIANO 1 y HARP se
combinarán. Si entonces usted
selecciona la voz VIBES, se combinarán
HARP y VIBES, etc. Naturalmente, si
usted desactiva la función DUAL VOICE
(presionando otra vez el botón DUAL
VOICE), sólo sonará la última voz
seleccionada.
DUAL VOICE cannot be applied to
accompaniment or rhythm.
When DUAL VOICE is ON, the number
of notes that can be played simulta
neously is reduced by half.
Der DUAL VOICE-Effekt wirkt nicht
auf Rhythmus- oder Baß/
Akkordbegleitung.
Bei aktiviertem DUAL VOICE-Effekt
reduziert sich die Anzahl der simultan
erzeugbaren Noten auf die Hälfte.
La fonction DUAL VOICE ne peut pas
être appliquée à l'accompagnement ou
au rythme.
Lorsque la fonction DUAL VOICE est
activée, le nombre de notes pouvant
être jouées simultanément est réduit de
moitié.
* DUAL VOICE no puede aplicarse al
acompañamiento ni ritmo.
* Cuando la función DUAL VOICE está
activada, el número de notas que
pueden tocarse simultáneamente se
reduce a la mitad.
12
Page 14

Transposition: Shifting Pitch in Semitone Steps
The PSR-28 TRANSPOSE function
makes it possible to shift the pitch of the
entire keyboard up or down in semitone
intervals up to a maximum of six
semitones. "Transposing" the pitch of the
PSR-28 keyboard makes it easier to play
in difficult key signatures, and you can
simply match the pitch of the keyboard to
the range of a singer or other
instrumentalist.
The TRANSPOSE A and ▼ buttons ®are
used for transposition. Press the ▲ button
to increase the pitch of the keyboard, or
the ▼ button to lower the pitch. The
trans-position range is from -6 semitones
to +6 semitones. Each press on either the
TRANSPOSE A or ▼ button transposes
by one semitone in the specified direction.
The normal pitch of the keyboard (no
transposition) can be recalled at any time
by pressing both the TRANSPOSE A and
▼ buttons at the same time (normal pitch
is automatically selected whenever the
power switch is turned ON).
Transponierung: Versetzen
der Tonlage in
Halbtonschritten
Mit Hilfe der TRANSPOSE-Funktion
des PSR-28 können Sie die Tonlage des
gesamten Manuals in Halbtonschritten
um bis zu 6 Halbtöne erhöhen oder
senken. TVansponieren der Tbnlage des
PSR-28 erleichtert oft das Spielen mit
schwierigen Tonarten. Außerdem kön
nen Sie damit die Tonhöhe des Key
boards an Sänger und Begleitinstru
mente anpassen.
Zum Eingeben des Transponierbetrags
werden die TRANSPOSE-Tasten JJ) A
und ▼ verwendet. Die Thste A erhöht
die Tonlage des Manuals, während ▼ sie
senkt. Der TVansponierbereich liegt
zwischen -6 und +6 Halbtönen, wobei -6
einer Absenkung von 6 Halbtönen
entspricht, während 6 eine Erhöhung
um 6 Halbtöne bedeutet (siehe nachfol
gende Tabelle). Mit jedem Drücken auf
eine der TRANSPOSE-Tasten A oder T
ändert sich die T>nlage um einen
Hidbton. Sie können jederzeit durch
gleichzeitiges Drücken der TRANS
POSE-Tasten A und ▼ auf die Stan
dardtonlage (keine Transponierung)
rückstellen. Nach Einschalten des
PSR-28 ist stets die Standardtonlage
eingestellt.
Transposition: Variation de
ia hauteur tonale par bonds
d'un demi-ton
La fonction TRANSPOSE du PSR-28
permet de monter ou de baisser la hauteur
de tout le clavier par bonds d'un demi-ton
jusqu'à un maximum de six demi-tons. La
"transposition" de la hauteur du clavier du
PSR-28 facilite l'exécution en clefs à
armure difficile et permet d'accorder la
hauteur tonale du clavier sur le régistre
d'un chanteur ou d'un autre
instrumentaliste.
Les touches TRANSPOSE A et ▼ ©sont
utilisées pour la transposition. Appuyer
sur la touche A pour monter la hauteur du
clavier et sur la touche ▼ pour la baisser.
La plage de transposition va de -6 demitons à +6 demi-tons. Chaque pression sur
la touche TRANSPOSE A ou T fait
monter ou baisser la hauteur du clavier
d'un demi-ton selon la touche enfoncée.
La hauteur normale du clavier peut être
rétablie à tout moment en appuyant
simultanément sur les touches
TRANSPOSE A et ▼ (la hauteur normale
est automatiquement rétablie à chaque
mise sous tension de l'instrument).
Transposición:
Desplazamiento del tono
en pasos de semitono
La fundón TRANSPOSE del PSR-28
hace posible cambiar el tono de todo el
teclado ascendente o descendentemente
en intervalos de semitonos hasta un
máximo de seis semitonos. La
"transposidón" del tono del teclado del
PSR-28 facilita la interpretación en
signaturas de clave dififdl, y usted podrá
adaptar de forma simple el tono del
teclado al tono de un cantante o de otro
instrumentista.
Los botones A y ▼ de TRANSPOSE ®
se usan para la transposidón. Presione
el botón A para aumentar el tono del
teclado, o el botón ▼ para redudrlo. El
margen de transposidón es de -6 a +6
semitonos. Cada presión de una de las
teclas A o T de TRANSPOSE
transponen un semitono en la direcdón
espedñcada. El tono normal del teclado
(y no la transposidón) puede reactivarse
en cualquier momento presionando al
mismo tiempo ambos botones A y ▼ de
TRANSPOSE (el valor del tono se ajusta
automáticamente siempre que se
conecta la alimentación).
Tuning: Fine Pitch Controi
Pitch control makes it possible to tune the
PSR-28 over a ±25-cent range in approxi
mately 3-cent intervals. A hundred "cents"
equals one semitone, so the tuning range
provided allows fine tuning of overall pitch
over a range of approxi-mately a quarter
tone. Pitch control is useful for tuning the
PSR-28 to match other instruments or
recorded music.
13
Feinstimmen: Die
Feinstimmtasten
Mittels der PITCH-Thsten können Sie
das PSR-28 in einem Bereich von ±25
Cent in Schritten von ca. 3 Cent fein
stimmen. Da 100 Cent einem Halbton
entsprechen, beträgt der Feinstimm
bereich insgesamt einen Viertelton.
Diese Feinstimmiunktion ist äußerst
praktisch, um das PSR-28 auf andere
Instrumente oder Aufnahmen einzus
timmen.
Accord: Réglage précis de la hauteur
Cette fonction de réglage de la hauteur
permet d'accorder le PSR-28 sur une
gamme de ±25 centièmes par bonds
approximatifs de 3 centièmes. Cent
centièmes égalent un demi-ton, de sorte
qu'il est possible d'accorder avec une
grande précision la hauteur d'ensemble
sur une plage approximative d'un quart de
ton. Cette fonction est utile pour accorder
le PSR-28 sur un autre instrument ou sur
de la musique enregistrée.
Afinación: Control preciso
del tono
El control del tono hace posible afinar el
PSR-28 en un margen de ±25
centésimas en aproximadamente
intervalos de 3 centésimas. Cien
centésimas es igual a un semitono, por
lo que el maleen de afínadón ofrecido
permite la afínadón precisa del tono
general en un margen aproximado de un
cuarto de tono. El control del tono es
útil para afinar el PSR-28 para que
corresponda con otros instrumentos o
música grabada.
Page 15

Press the PITCH A button ®to tune up.
or the PITCH ▼ button to tune down. Each
press on either the PITCH A or T button
shifts the pitch by approximately 3 cents in
the specified direction. The "normal" pitch
value is that at which the A3 key (the A
above middle C) produces "concert pitch":
440 Hertz. Normal pitch can be recalled at
any time by pressing both the PITCH A
and T buttons at the same time (normal
pitch is automatically selected whenever
the power switch is turned ON).
Drücken Sie die Taste PITCH A um
die Ibnlage zu erhöhen und PITCH ▼,
um die Tbnlage zu senken. Jeder
Tastendruck entspricht einer Tbnlagenänderung von ca, 3 Cent in die
entsprechende Richtung. Die Standard
stimmung, bei der die Manualtaste A3
(das A über dem mittleren C) einen
Kammerton A erzeugt, kann jederzeit
durch gleichzeitiges Drücken der
PITCH-Tasten A und ▼ auf die Stan
dardstimmung rückgerufen werden.
Nach Einschalten des PSR-28 ist stets
die Standardstimmung eingestellt.
Appuyer sur la touche PITCH A ©pour
monter rinstrument et sur la touche PITCH
▼ pour le baisser. Chaque pression sur la
touche PITCH A ou ▼ fait monter ou
baisser la hauteur de 3 centièmes selon la
touche sollicitée. La hauteur "normale" est
la hauteur à laquelle la touche La3 (la
touche La au-dessus de la touche Do
centrale) produit la "hauteur de concert", à
savoir 440 Hertz. La hauteur normale
peut être rétablie à tout moment en
appuyant simultanément sur les touches
PITCH A et ▼ (la hauteur normale est
automatiquement rétablie à chaque mise
sous tension de l'instrument).
Presione el botón A de PITCH ©para
afinar más alto, o el botón ▼ de PITCH
para afinar más bajo. Cada presión del
botón A o ▼ de PITCH desplaza el tono
3 centésimas en la dirección
especificada. El valor del tono "normal",
en el que la tecla A3 (la A encima de la C
del medio) produce el "tono de concierto":
440 Hz. El valor de tono normal puede
reactivarse en cualquier momento
presionando al mismo tiempo ambos
botones A y ▼ de PITCH (el valor del
tono se ajusta automáticamente siempre
que se conecta la alimentación).
USING THE
ACCOMPANIMENT
SECTION
Rhythm Accompaniment
Selecting an Accompaniment
Style
The PSR-28 provides 16 different accom
paniment styles that can be selected sim
ply by pressing the appropriate button (5).
DIE
BEGLEITUNGS
FUNKTIONEN
Schlagzeugbegleitung
Wahl des Begleitungsstils
Beim PSR-28 können Sie durch
Drücken der entsprechenden
ACCOMPANI-MENT SELECT-lhste ®
zwischen 16 Begleitstilen wiihlen.
I ACCOMPANIMENT STYLE SELECT
■ TANGO »REGGAE «SALSA ■ RHUMBA «SAMBA
UTILISATION DE
LA SECTION
D'ACCOMPAGNE
MENT
Accompagnement
rythmique
Sélection d'un style
d'accompagnement
Le PSR-28 offre 16 styles
d'accompagnement différents qui peuvent
être sélectionnés en appuyant sur la
touche (Dcorrespondanîe.
iBfG BAND «SWING
EMPLEO DE LA
SECCION DE
ACOMPAÑAMIEN
-TO
Acompañamiento
rítmico
Selección de un estilo de acompañamiento
El PSR-28 ofrece 16 estilos de
acompañamiento distintos que pueden
seleccionarse presionando simplemente
el botón apropiado.
14
Page 16

When the power is initially turned ON,
the DISCO accompaniment style is
automatically selected.
Only one accompaniment style can be
selected at a time.
Beim Einschalten des Keyboards wird
der Stil DISCO automatisch
vorgewählt.
Sie können jeweils nur einen
Begleitungsstil auf einmal wählen.
Le style d'accompagnement DISCO est
automatiquement sélectionné à la mise
sous tension.
Il n'est possible de sélectionner qu'un
seul style d'accompagnement à la fois.
* Cuando se conecta la alimentación, se
selecciona automáticamente el estilo
de acompañamiento DISCO.
* Sólo puede seleccionarse un estilo de
acompañamiento a la voz.
Adjusting the Accompaniment Voiume
The PSR-28 ACCOMPANIMENT
VOLUME control (D lets you
independently adjust the volume of the
accompaniment sound, making it possible
to set the optimum balance between the
accompaniment and notes you play on the
keyboard.
Setting the Tempo
Press the TEMPO A button (Dto increase
the tempo, or the TEMPO ▼ button to
decrease the tempo.
Einstellen der
Begleitungslautstärke
Mit dem ACCOMPANIMENT VOLUME-Regler 0des PSR-28 können Sie
die lÄUtstärke der Begleitung getrennt
einstellen und somit das Lautstärkev
erhältnis zwischen Begleitung und
Keyboardspiel optimal abgleichen.
Einstellen des Tempos
Durch Drücken der TEMPO-Taste A ®
erhöhen Sie und durch die TEMPOTaste T vermindern Sie das Tempo der
Begleitung.
VOICE/TEMPÛ
n Í
U I
01
(J=40)
Réglage du volume de
l'accompagnement
La touche ACCOMPANIMENT VOLUME
0permet de régler indépendamment le
volume de l'accompagnement, ce qui
permet de produire un équilibre optimal
entre le volume de l'accompagnement et
celui des notes jouées sur le clavier.
Réglage du tempo
Appuyer sur la touche TEMPO A ® pour
accélérer le tempo et sur la touche
TEMPO ▼ pour le ralentir.
VOICE/TEMPO
15
16
{J=120)
35
35
(J=280)
Ajuste del volumen del
acompañamiento
El control ACCOMPANIMENT
VOLUME 0del PSR-28 le permite
ajustar independientemente el volumen
del sonido de acompañamiento, siendo
de este modo posible ajustar el balance
óptimo entre el acompañamiento y las
notas que usted toca en el teclado.
Ajuste del tempo
Presione el botón A de TEMPO ©para
aumentar el tempo, o el botón ▼ de
TEMPO para reducirlo.
The selected tempo will be displayed on
the VOICE/ TEMPO display ©while the
TEMPO A or ▼ button (6)is pressed as
foltows:
15
Das gewählte Tfempo wird vom
ACCOMPANIMENT VOICE/ TEMPOE
A Display ©folgendermaßen während
dem Drücken einer der TEMPO ▼
Tasten ® angezeigt:
Le tempo sélectionné est indiqué de la
manière suivante sur l'affichage VOICE/
TEMPO ©pendant que la touche TEMPO
A ou ▼ ® est maintenue enfoncée.
El tempo seleccionado se visualizará en
el visualizador VOICE/ TEMPO ©
mientras se presiona el botón A o ▼ de
TEMPO 0del modo siguiente:
Page 17

01
02
04
05
06
07
08
09
10
12
13
14
15
16
17
40
46
56
64
70
62
92
100
106
112
116
120
126
18
19
21
22
23
24
26
27
29
30
31
33
34
35
132
144
152
160
166
176
184
192
200
208
216
236
246
256
268
The availabte tempo range is from 40 to
280 beats per minute. 120 is the "normal"
tempo value. The normal tempo (120) can
be recalled at any time by pressing both
the TEMPO A and ▼ buttons ® at the
same time (the tempo is automatically set
to 120 whenever the power switch is
turned ON).
* It is also possible to adjust the tempo
after starting playback of the
accompaniment. This allows you to set
the optimum tempo by ear.
* About 1 second after the tempo value
has been set, the display will revert to
the voice number.
Der Einstellbereich liegt zwischen 40
und 280 Thktschlägen pro Minute. Das
Normaltempo, das beim Wählen eines
Stils automatisch eingestellt wird, ist
120 Tbktschläge pro Minute. Das
Normaltempo kann durch gleichzeitiges
Drücken der TEMPO-Thsten A und ▼ (6)
jederzeit rückgerufen werden. Beim
Einschalten des PSR-28 wird
automatisch das Normaltempo von 120
eingestellt.
* Sie können das Tempo auch nach dem
Stairten der Begleitung verändern,
wodurch Sie es optimal nach Gehör
einstellen können,
* Ca. 1 Sekunde nach der Tempoeingabe
zeigt das Display wieder die
Stimmennr.
La plage de réglage du tempo va de 40 à
280 temps par minute, La valeur
"normale" du tempo est de 120. Le tempo
normal (120) peut être rétabli à tout
moment en appuyant simultanément sur
les touches TEMPO A et ▼ 0(à la mise
sous tension le tempo est
automatiquement réglé à 120).
" Il est également possible de régler le
tempo après te début de
Taccompagnement. Ceci permet de
régler le tempo à l'oreille.
" Une fois que le tempo a été réglé
l'affichage revient à l'indication de la voix
au bout de 1 seconde environ.
El margen de tempo disponible es de 40
a 280 tiempos por minuto. 120 es el
valor del tempo "normal".
El tempo normal (120) podrá reactivarse
en cualquier momento presionando los
botones A y ▼ de TEMPO ® al mismo
tiempo (el tempo se ajusta
automáticamente al valor normal de 120
siempre que se conecta el interruptor de
la alimentación).
" Aproximadamente 1 segundo después
de haber ajustado el valor del tempo,
el visualizador volverá al número de
voz.
" También es posible qjustar el tempo
después de haber iniciado la
reproducción del acompañamiento. De
este modo usted podrá sgustar a oído
el tempo más apropiado.
16
Page 18

starting the Accompaniment
Press the START button ®to start the
selected accompaniment immediately, or
press the SYNCHRO START ©button if
you want the accompaniment to start
when you play the first note on the Auto
Bass Chord keys If you press the
SYNCHRO START button, the leftmost dot
in the VOICE/ TEMPO display ©will flash
at the selected tempo.
Auslösen der Begleitung
Wenn Sie die gewählte Begleitung direkt
starten wollen, müssen Sie nur die
START-lhste ®antippen. Falls die
Begleitung jedoch erst mit dem
Anschlägen der ersten Note im AUTO
BASS CHORD @-Manualbereich
einsetzen soll, müssen Sie stattdessen
SYNCHRO START ©drücken. Wenn
Sie die T^te SYNCHRO START
betätigen, blinkt der Punkt ganz links
im VOICE/ TEMPO-Display @im
gewählten Tfempo.
Début de l'accompagnement
Appuyer sur la touche START ®pour
lancer immédiatement l'accompagnement
sélectionné, ou appuyer sur la touche
SYNCHRO START ©pour que
l'accompagnement commence lorsque la
première note est jouée sur la section
AUTO BASS CHORD ®6u clavier.
Lorsque la touche SYNCHRO START a
été sollicitée, le point le plus à gauche de
l'affichage VOICE/ TEMPO @se met à
clignoter au tempo sélectionné.
Inicio del acompañamiento
Presione el botón START (©para iniciar
inmediatamente el acompañamiento
seleccionado, o presione el botón
SYNCHRO START ©si desea que se
inicie el acompañamiento cuando usted
toca la primera nota de las teclas de
AUTO BASS CHORD ®. Si presiona el
botón SYNCHRO START, el punto de la
izquierda del visualizador VOICE/
TEMPO (©parpadeará en el tempo
seleccionado.
1
* The two LED dots at the bottom of the
VOICE/ TEMPO display @ provide a
visual indication of the selected tempo
as follows:
The above 4 beats (one 4/4 measure)
repeat.
If the AUTO BASS CHORD selector ©
is set to OFF, the accompaniment will
consist only of rhythm (drums & percus
sion) sounds. Operatbn of the AUTO
BASS CHORD SINGLE FINGER and
FINGERED modes is described on page
22 and 24.
A different accompaniment style can be
selected at any time while the
accompaniment is playing.
Die zwei LED-Punkte im
ACCOMPANIMENT VOICE/ TEMPODisplay (©geben eine visuelleTempoanleitung, wie folgt:
1st BEAT
VOICE/TEMPO
2nd BEAT
VOICE/TEMPO
Die obigen 4 Taktschläge (ein 4/4Takt) werden wiederholt,
Falls der AUTO BASS CHORDWähler ©auf OFF steht, besteht die
Bereitung nur aus Schlagzeug und
Percussion. Der SINGLE FINGERund FINGERED-Modus der AUTO
BASS CHORD-Funktion sind auf
Seite 22 und 24 erklärt.
Während der Wiedergabe der
Begleitung kann jederzeit auf einen
anderen Begleitungsstil geschaltet
werden.
Les deux LED situées à la partie
inférieure de l'affichage VOICE/ TEMPO
©donnent une indication visuelle du
tempo sélectionné de la manière
suivante:
3rd BEAT
VOJCE/TEMPO
Ces 4 temps (1 mesure de 4/4) se
répètent.
Si le sélecteur AUTO BASS CHORD ©
est mis sur la position OFF,
l'accompagnement ne comprendra que
des sons rythmiques (batterie et
percussion). Les modes
ACCOMPAGNEMENT A UN SEUL
DOIGT et ACCOMPAGNEMENT A
PLUSIEURS DOIGTS sont déaits aux
pages 22 et 24.
Un style d'accompagnement différent
peut être sélectionné à tout moment
pendant que l'accompagnement joue.
4th BEAT
VOICE/TEMPO
Los dos puntos LED de la parte
inferior del visualizador de VOICE/
TEMPO ©proporcionan una
indicación visual del tempo
seleccionado del modo siguiente:
Los cuatro tiempos de arriba (un
compás de 4/4) se repiten.
* El el selector AUTO BASS CHORD ©
se pone en la posición OFF, el
acompañamiento constará sólo del
sonido del ritmo (batería y percusión).
La operación de los modos AUTO
BASS CHORD en SINGLE FINGER y
FINGERED se describe en la página
22 y 24.
* Puede seleccionarse un estilo de
acompañamiento distinto en cualquier
momento mientras se reproduce el
acompañamiento.
17
Page 19

starting the Accompaniment with an Introduction
Any of the PSR-28 accompaniment
patterns can be started with a 1-measure
introductory pattern by pressing either the
INTRO./ FILL IN фог INTRO./ ENDING ф
button before pressing the START ®or
SYNCHRO START ©button.
Beginnen der Begleitung
mit Auftakt
Wenn Sie vor dem Drücken der START-
®oder SYNCHRO START-I^ste ©die
INTR07 FILL IN- ©oder INTROV
ENDING-Tkste ©antippen, beginnt die
Begleitung mit einem 1-taktigen
Auftakt.
Début de l'accompagnement
avec introduction
Tous les styles d'accompagnement du
PSR-28 commenceront avec une
introduction de 1 mesure lorsque la touche
INTRO./ FILL IN ©ou INTRO./ ENDING
©est sollicitée avant la touche START ®
ou la touche SYNCHRO START ©.
Inicio del acompañamiento con una introducción
Cualquiera de los patrones de
acompañamiento del PSR-28 puede
iniciarse con un patrón de introducción
de 1 compás presionando el botón
INTROy FILL IN ©o INTRO./ ENDING
©antes de presionar el botón START ®
o SYNCHRO START ®,
Adding Fill-ins
To add a fill-in (rhythm variation) at any
time while the accompaniment is playing,
press the INTRO./ FILL IN button ®. The
fill-ins have a maximum length of one
measure, but the actual length depends
on precisely when in the current measure
you press a FILL IN button (i.e. the fill-in
lasts from the point at which the button is
pressed until the end of the current
measure). You can stop a fill-in pattern
before the current measure by pressing
the FILL IN button a second time. If you
hold one of the FILL IN buttons, the fill-in
pattern will repeat until the button is
released.
stopping the Accompaniment
An accompaniment in progress can be
stopped immediately by pressing the
STOP button ®, or it can be stopped with
a two-measure ending by pressing the
INTRO./ ENDING button ©. If the
INTRO./ ENDING button is used, the
ending will start from the current measure
if the button is pressed during the first half
of the measure, or from the beginning of
the next measure if the button is pressed
Einfügen von Fill-ins
Sie können jederzeit während der
Begleitung ein Fill-in (Rhythmusvaria
tion) einfögen, indem Sie die INTR07
FILL IN-Taste ©antippen. Das Fill-in
geht maximal über einen ganzen Takt,
die genaue Länge hängt jedoch vom
Zeitpunkt ab, zu dem Sie die Taste
antippen. Das Fill-in dauert vom
Zeitpunkt des Tastendrucks bis zum
Ende des gegenwärtigen Takts. Sie
können ein Fill-in vor dem Taktende
abbrechen, indem Sie die INTR07 FILL
IN-Thste ein zweites Mal drücken. Wenn
Sie die Taste kontinuierlich drücken,
wiederholt sich das Fill-in, bis Sie die
Taste loslassen.
Stoppen der Begleitung
Eine Begleitung kann durch Drücken
der STOP-Taste ©direkt gestoppt
werden. Wenn Sie jedoch INTR07
ENDING ©drücken, wird zunächst ein
zweitaktiger Schlußtakt gespielt, bevor
die Begleitung stoppt. Wenn Sie die
INTROy ENDING-Taste in der ersten
Hälfte des gegenwärtigen Takts
drücken, beginnt die Schlußsequenz in
diesem Takt. Wird
Addition de fiil-ins
Appuyer sur la touche INTRO./ FILL IN ©
pour introduire un fill-in (variation
rythmique) à tout moment pendant la
reproduction d'un accompagnement. Bien
que le fill-in ait une durée maximale de 1
mesure, sa durée réelle dépend du
moment de la mesure où la touche FILL IN
a été sollicitée (le fill-in commence au
moment où la touche est sollicitée et se
termine à la fin de la mesure en cours).
L'addition de fill-in peut être arrêtée avant
la fin de la mesure en appuyant une
deuxième fois sur la touche FILL IN. Si la
touche FILL IN est maintenue enfoncée, le
fill-in sera répété jusqu'à ce que la touche
soit relâchée.
► fill (N
□
Arrêt de l'accompagnement
Un accompagnement peut être arrêté
immédiatement en appuyant sur la touche
STOP ®, ou il peut être arrêté avec un
ending de 2 mesures en appuyant sur la
touche INTRO./ ENDING ©. Si la touche
INTRO./ ENDING est sollicitée pendant la
première moitié d'une mesure, l'ending
commencera pendant cette mesure, alors
qu'il commencera sur le premier temps de
Adición de rellenos
Para añadir un relleno (variación
rítmica) en cualquier momento durante
la intepretación del acompañamiento,
prsione el botón INTRO./ FILL IN ©.
Los rellenos tienen una longitud
máxima de un compás, pero la duración
real depende de la precisión con la que
usted presiona el botón FILL IN en el
compás actual (es decir, el relleno dura
desde el punto en que se presiona el
botón hasta el final del compás actual).
Usted podrá detener un patrón de
relleno antes del compás actual
presionando otra vez el botón FELL IN.
Si usted retiene uno de los botones FIL
IN, el patrón de relleno se repetirá hasta
que se suelte el botón.
Parada del
acompañamiento
Un acompañamiento puede detenerse
inmediatamente presionando el botón
STOP ©, o puede detenerse con un coda
de dos compases presionando el botón
INTROy ENDING ©. Si se usa el botón
INTROy ENDING, la coda se iniciará
desde el compás actual si se presiona el
botón durante la primera mitad del
18
Page 20

during the second half of the current
measure.
die Taste in der zweiten Hälfte des
gegenwärtigen Takts gedrückt, beginnt
der Schlußtakt mit Anfang des nächsten
Takts.
► ending ►stop
QkD
la mesure suivante, si la touche INTRO/
ENDING est sollicitée pendant la
deuxième moitié de la mesure.
compás, o desde el principio del compás
siguiente si se presiona el botón durante
la segunda mitad del compás actual.
Manual Bass
The PSR-28 allows you to play two voices
at once — a bass voice with the left hand
and one with the right. The bass voice can
be played on the Auto Bass Chord keys
®. You can select any of the PSR-28*s
100 voices to play on the upper section of
the keyboard, but the bass voice is
determined by the accompaniment style
you select.
1. Select the MANUAL BASS Mode
Slide the AUTO BASS CHORD
selector (J)to the MANUAL BASS
position.
Manualteilung für
manuelle Baßbegleitung
Mit der BASS MANUAL-Funktion des
PSR-28 können Sie zwei Stimmen
zugleich spielen: eine Melodiestimme im
rechten Manualbereich und eine
Baßstimme im linken. Die Baßstimme
wird in dem durch Auto Bass Chord @.
Für den rechten Manualbereich können
Sie eine der 100 Stimmen des PSR-28
wählen, die Baßstimme ist jedoch durch
Accompagnement manuel
Le PSR-28 permet de jouer deux voix
simultanément; une voix de la main
gauche et une voix de la main droite. La
voix d’accompagnement peut être jouée
sur la section AUTO BASS CHORD ®. Il
est possible de sélectionner n’importe
laquelle des 100 voix du PSR-28 pour la
section haute du clavier, alors que la voix
de la section basse sera déterminée par le
style d'accompagnement sélectionné.
den gewählten Begleitstil vorgegeben.
1. Auf MANUAL-Modus schalten.
Schieben Sie den AUTO BASS
CHORD-Wähler @in die MANUAL
1. Sélectionner le mode MANUAL
BASS
Faire coulisser le sélecteur AUTO
BASS-Stellung. BASS CHORD ® sur la position
MANUAL BASS.
Acompañamiento de bsgo
manual
El PSR-28 le permitirá tocar dos voces a
la vez; una voz de bajo con la mano
izquierda y otra con la derecha. La voz
de bajo puede tocarse en las teclas de
AUTO BASS CHORD ®. Usted podrá
seleccionar cualquiera de las 100 voces
del PSR-28 para tocar en la sección
superior del teclado, pero la voz de bajo
queda determinada por el estilo de
acompañamiento que usted selecciona.
Seleccione el modo de MANUAL
BASS.
Deslice el selector AUTO BASS
CHROD ® a la posición MANUAL
BASS.
19
SINGLE FING
.AUTO BASSI
'chord L
ER FINGERED
1 1 MANUAL BASS
OFF
• • •
O
Page 21

2. Select the Bass Volca
If you intend to use the MANUAL
BASS feature while a rhythm
accompaniment is playing, simply
select the desired accompaniment
style. If you do not intend to use
rhythm accompaniment, try pressing
different ACCOMPANIMENT STYLE
buttons d)and playing a few notes on
the lower (Auto Bass Chord) section
of the keyboard each time. Each
ACCOMPANIMENT STYLE button
will produce a different bass voice, so
try a few until you find the one you
want to use.
3. Select an Upper Keyboard Voice
Select the desired upper voice in the
normal way (if the DUAL effect is
selected, you can select two voices
one after the other).
4. Adjust the Volume Balance
In the MANUAL mode, the volume of
the lower keyboard bass voice is
controlled by the ACCOMPANIMENT
VOLUME control 0. Use the
ACCOMPANIMENT VOLUME and
MASTER VOLUME controls (2)to set
up the desired balance between the
lower and upper keyboard voices.
In the MANUAL BASS mode, the
maximum number of notes that can be
played simultaneously on the upper
keyboard is 4. If the DUAL VOICE
feature is used at the same time, the
maximum number of simultaneous
upper-keyboard notes is 2.
2. Die Baßstimme wählen.
Falls Sie die manuelle
Baßbegleitung zu einer
Rhythmusbegleitung spielen
wollen, müssen Sie nur den
Begleitstil wählen. Falls Sie keine
Rhythmusbegleitung wünschen,
sollten Sie verschiedene
ACCOMPANIMENT STYLE-Thsten
©drücken, und jeweils ein paar
Noten im AUTO BASS CHORDBereich anschlagen. Jeder
Begleitstil resultiert in einer
anderen Baßstimme, weshalb Sie
ein paar Stile versuchen sollten,
bis Sie die richtige Stimme
gefunden haben.
3. Eine Stimme für den oberen
Manualbereich wählen.
Wählen Sie dann die Stimme für
den oberen Manualbereich mit dem
normalen Verfahren. Bei
zugeschaltetem DUAL VOICEEffekt können Sie zwei Stimmen
nacheinander wählen,
4. Abstimmen der Lautstärke von
oberer und unterer Stimme
Im MANUAL BASS-Modus wird die
Lautstärke der Stimme des unteren
Manualbereichs über den
ACCOMPANIMENT VOLUMERegler 0 eingestellt. Verwenden
Sie den ACCOMPANIMENT
VOLUME- und den MASTER
VOLUME-Regler 0, um das
Lautstärkeverhältnis zwischen Baß
und Melodiestimme(n)
abzustimmen.
^ Im MANUAL BASS-Modus können
auf der oberen Manualhälfte maximal
4 Noten zugleich erzeugt werden. Bei
aktiviertem DUAL VOICE-Effekt
reduziert sich die Anzahl der
gleichzeitig spielbaren Noten auf 2,
2. Sélectionner la voix basse
Pour utiliser la fonction MANUAL
BASS pendant la reproduction d'un
accompagnement rythmique,
sélectionner simplement le style
d'accompagnement souhaité.
Appuyer sur diverses touches
ACCOMPANIMENT STYLE ©et
essayer à chaque fois de jouer
quelques notes sur la section basse
(AUTO BASS CHORD) du clavier.
Chaque touche ACCOMPANIMENT
STYLE produit une voix de basse
différente, en essayer donc plusieurs
pour choisir celle qui convient.
3. Sélectionner une voix pour la
section haute
Sélectionner la voix de la section
haute de la manière normale (lorsque
la fonction DUAL a été activée, il est
possible de sélectionner deux voix
l’une après l'autre),
4. Régler l'équilibre du volume
En mode MANUAL, le volume de la
voix de la section basse du clavier
peut être réglé à l'aide de la
commande ACCOMPANIMENT
VOLUME©. Utiliser les
commandes ACCOMPANIMENT
VOLUME et MASTER VOLUME ©
pour établir l'équilibre entre la voix de
la section basse et celle de la section
haute.
En mode MANUAL BASS, le nombre
maximal de notes pouvant être jouées
simultanément sur la section haute du
clavier est de 4. Lorsque la fonction
DUAL VOICE est utilisée, le nombre
maximal de notes pour la section haute
du clavier est de 2.
2. Seleccione la voz de btgo
Si intenta emplear la función
MANUAL BASS mientras se está
tocando un acompañamiento
rítmico, pruebe presionando
botones de ACCOMPANIMENT
STYLE ©distintos y tocando
algunas notas en la sección inferior
(AUTO BASS CHORD) del teclado
cada vez. Cada botón de
ACCOMPANIMNET STYLE
produce una voz de bajo distinta,
por lo que usted podrá probar
algunas hasta que encuentre la que
desea utilizar.
3. Seleccione la voz del teclado
superior
Seleccione la voz del teclado
superior en la forma normal (si se
selecciona el efecto DUAL, usted
podrá selecciona dos voces, una
después de otra).
4. Ajuste el balance del volumen.
En el modo MANUAL, el volumen
de la voz de bajo del teclado inferior
se controla con el control
ACCOMPANIMEN VOLUME 0,
emplee los controles
ACCOMPANIMENT VOLUME y
MASTER VOLUME ©para ajustar
el balance deseado entre las voces
del teclado inferior y superior.
En el modo MANUAL BASS, el
número máximo de notas que pueden
tocarse simultáneamente en el teclado
superior es de 4. Si se usa la función
DUAL VOICE al mismo tiempo, el
número máximo de notas simultáneas
del teclado superior es de 2.
20
Page 22

Try playing this In the Manual Bass mode.
(A Little Brown Jug)
Play the bass part on the lower keyboard
and the melody part on the upper
keyboard.
Panel Settings
Acconripaniment Style: Swing
Tempo: 16( J =120)
AUTO BASS CHORD Selector: MANUAL BASS
position
upper Voice: 30 Clarinet
Melody
Bass ( ^
Versuchen Sie einmal dieses
Stück im SPHT-Modus zu
spielen
(A Little Brown Jug)
Spielen Sie die Baßstinmie im tiefen und
die Melodiestimme im oberen
Manualbereich.
Einstellungen
Begleitungsstil; Swing
Tempo: 16 (
AUTO BASS CHORD-Wähler: MANUAL
BASS-Position
Stimme für oberen Manualbereich: 30
Clarinet
J =120)
ff
Essayer de jouer ceci en mode
BASS MANUAL
(A Little Brown Jug)
Jouer la partie basse sur la section basse
et la mélodie sur la section haute du
clavier.
Réglages de panneau
Style d'accompagnement: Swing
Tempo: 16 ( J =120)
Sélecteur AUTO BASS CHORD: Position
MANUAL BASS
Voix section haute : 30 Clarinet
Intente tocar esto en el modo
MANUAL BASS
(A Little Brown Jug)
Toque la parte del bajo en la sección del
teclado inferior y la parte de la melodía
en el teclado superior.
Ajustes del panel
Estilo de acompañamiento: Swing
Tempo: 16 ( J =120)
Selector AUTO BASS CHORD: Posición
MANUALBASS
Voz superior: 30 Clarinet
G ^ C
f
Auto Bass Chord
Accompaniment
The PSR-28 includes a sophisticated
Auto Bass Chord accompaniment system
that can provide automated bass and
chordal backing in a number of ways.
* The maximum number of notes that can
be played simultaneously on the
PSR-28 keyboard is reduced when the
Auto Bass Chord feature is used.
21
Auto-Baß/
Akkordbegleitung
Das PSR-28 bietet Ihnen interessante
automatische Baß- und
Akkordbegleitimgsfunktionen, die Ihnen
beim Spielen auf verschiedenste Weise
Baß- und Akkordbegleitung liefern.
* Die maximale Anzahl von Noten, die
simultan gespielt werden kann,
verringert sich wenn die AUTO BASS
CHORD-Funktionen aktiviert werden.
Accompagnement
automatique
La PSR-28 offre un système sophistiqué
d'accompagnement automatique AUTO
BASS CHORD permettant de produire un
accompagnement en accords et basses
automatique de diverses manières.
* Le nombre maximal de notes pouvant
être jouées simultanément sur le clavier
du PSR-28 est réduit lorsque la fonction
AUTO BASS CHORD est utilisée.
Acompañamiento
automático de bajo y
acordes
El PSR-28 incluye un sistema de
acompañamiento sofísticado automático
de bajo y acordes que puede
proporcionar el bajo y los £ux>rdes
automáticos de muchas formas.
* El número máximo de notas que
pueden tocarse simultáneamente en el
teclado del PSR-28 se reduce cuando
se usa la característica de bajo y
acordes automáticos.
Page 23

SINGLE FINGER
ACCOMPANIMENT
SINGLE FINGER accompaniment makes
it simple to produce beautifully
orchestrated accompaniment using major,
seventh, minor and minor-seventh chords
by pressing a minimum number of keys in
the Auto Bass Chord Keys section ®of
the keyboard. The bass and chord
accompaniment produced is perfectly
matched to the currently selected
accompaniment style.
SINGLE FINGER
FUNKTION
Mit der SINGLE FINGER-Funktion
können Sie ganz einfach eine
interessante, im Takt erklingende
Orchesterbegleitung aus Dur-, Sept-,
Moll- und Moll-Septakkorden erzeugen,
indem Sie nur maximal drei Tsisten im
AUTO BASS CHORD-Manualbereich
zugleich anschlagen, während eine
Baßlinie automatisch dazu gespielt wird.
Die Baß/ Akkordbegleitung ist exakt auf
den gewählten Begleitungsstil
abgestimmt.
ACCOMPAGNEMENT A UN
SEUL DOIGT
L'accompagnement en mode SINGLE
FINGER permet de produire facilement un
très bel accompagnement orchestral,
utilisant des accords majeur, septième,
mineur et septième mineure, en appuyant
sur un nombre minimal de touches de la
section AUTO BASS CHORD @du
clavier. L'accompagnement en accords et
basses produit s'harmonise toujours
parfaitement au style d'accompagnement
sélectionné.
ACOMPAÑAMIENTO DE
UN DEDO
El acompañamiento SINGLE FINGER
simplifica la producción de bellos
acompañamiento orquestales empleando
acordes mayores, de séptima, menores y
menores de séptima, presionando un
número mínimo de teclas en la sección
de teclas de acompañamiento
automático de bajo y acordes @del
teclado. El acompañamiento de bajo y
acordes producido se adapta
perfectamente con el estilo de
acompañamiento actualmente
seleccionado.
1. Select the SINGLE FINGER Mode
Slide the AUTO BASS CHORD
selector (Dto the SINGLE FINGER
position.
2. Select an Accompaniment Style
Select the desired accompaniment
style in the normal way. Although you
can select the melody (upper
keyboard) voice you intend to use,
the PSR-28 automatically determines
the voices to be used for the
accompaniment bass and chords
according the accompaniment style
you select.
3. Start the Accompaniment
Press the START button
SYNCHRO START button ®or one
of the INTRO, buttons ффхо
determine how the accompaniment
will be started. If you press the
START button, the rhythm will begin
playing immediately without chordal
accompaniment.
L Auf SINGLE FINGER-Modus
schalten.
Schieben Sie den AUTO BASS
CHORD-Wähler ®in die Stellung
SINGLE FINGER.
2. Einen Begleitstil wählen.
Wählen Sie einen Begleitstil, wie an
vorangehender Stelle erklärt. Sie
können zwar für die obere, d. h.
rechte Manualhälfte eine Stimme
wählen, das I^R-28 wählt jedoch
automatisch die Stimmen für Baß-
und Akkordbegleitung
entsprechend dem gewählten
Begleitstil.
3. Die Begleitung starten.
Drücken Sie START ®, SYNCHRO
START ®oder eine der INTRO.-
Tasten ® ®, um festzulegen, wie
die Begleitung einsetzen soll. Wenn
Sie die START-Taste drücken,
beginnt die Rh3d;hmusbegleitung
sofort ohne Akkordspiel.
SINGLE FINGER
1. Sélectionner le mode SINGLE
FINGER
Faire coulisser le sélecteur AUTO
BASS CHORD @sur la position
SINGLE FINGER.
FINGERED
I MANUAL BASS
• •
2. Sélectionner un style d'accompa
gnement
Sélectionner le style d'accompa
gnement de la manière normale. La
voix qui sera utilisée pour la mélodie
(section haute du clavier) peut être
sélectionnée, alors que celle qui sera
utilisée pour l'accompagnement en
accords et basses sera
automatiquement sélectionnée par le
PSR-28 en fonction du style
d'accompagnement sélectionné.
3. Lancer l'accompagnement
Appuyer sur la touche START ®, sur
la touche SYNCHRO START ®, ou
sur l'une des touches INTRO. ®ou
® pour déterminer comment
l'accompagnement sera lancé.
Lorsque la touche START est
sollicitée, le rythme commence
immédiatement sans
accompagnement en accords.
L Seleccione el modo SINGLE
FINGER.
Deslice el selector AUTO BASS
CHORD ®a la posición SINGLE
FINGER.
2. Seleccione un estilo de
acompañamiento
Seleccione el estilo de
acompañamiento deseado de la
forma normal. Aunque usted puede
seleccionar la voz de la melodía
(teclado superior) deseada, el
PSR-28 determina
automáticamente las voces a usarse
para el acompañamiento de bajo y
acordes de acuerdo con el estilo de
acompañamiento seleccionado.
3. Inicie el acompañamiento
Presione el botón START ®, el
botón SHYNCRO START ® o uno
de los botones INTRO, (p®para
determinar cómo se iniciará el
acompañamiento. Si presiona el
botón START, el ritmo se iniciará
inmediatamente sin
acompañamiento de acordes.
22
Page 24

4. Press a Key in the Auto Bass
Chord Keys Section ®
Pressing any of the 19 lowest keys
on the keyboard will cause the
automatic chord and bass
accompaniment to begin. If you press
a "C" key, for example, a C-major
accompaniment will be played. Press
another key in the Auto Bass Chord
Keys section to select a new chord.
The key you press will always
determine the "root" of the chord
played (i.e. "C" for a C chord).
4. Eine Taste im AUTO BASS
CHORD-Manualbereich
anschlagen
Wenn Sie eine der 19 tiefsten
Tasten auf dem Manual
anschlagen, setzt die
Rhythmusbegleitung mit Bass und
Akkorden ein. Wenn Sie z. B, ein
"C" anschlagen, spielt die
Begleitung mit C-Dur Akkorden
und entsprechender Baßlinie. Um
auf einen anderen Akkord zu
wechseln, müssen Sie nur eine
andere Taste im AUTO BASS
CHORD-Feld anschlagen. Die
gedrückte Taste bestimmt jeweils
den Grundton des gespielten
Akkords (z. B. C für C-Akkorde).
4. Appuyer sur uns touche de la
section AUTO BASS CHORD du
clavier ®
Le fait d'appuyer sur l’une des 19
touches graves du clavier lance
l'accompagnement en accords et
basses automatique. Si on appuie
sur une touche "Do", par exemple, un
accompagnement en Do majeur sera
joué. Appuyer sur une autre touche
de la section AUTO BASS CHORD
du clavier pour sélectbnner un autre
accord. La touche enfoncée
détermine toujours la note
fondamentale de l'accord joué (par
ex. "Do" pour un accord en Do).
4. Pulse una tecla de la sección de
acompañamiento automático de
bfgo y acordes ®
Al presionar cualquiera de las 19
teclas inferiores del teclado hará
que se inicie el acompañamiento
automático de bajo y acordes. Si
presiona una tecla "C", por ejemplo,
se tocará un acomp€iñamiento el C
mayor. Presione otra tecla de la
sección de acompañamiento
automático de bajo y acordes para
seleccionar un nuevo acorde. La
tecla que usted presione siempre
determinará la "raíz" del acorde
tocado (es decir, "C" para un acorde
deC).
23
Playing Minor, Seventh, and Minorseventh Chords in the Single-finger
Mode
• For a minor chord, press the root
key and the first black key to its left.
• For a seventh chord, press the root
key and the next white key to its left.
• For a minor-seventh chord, press
the root key and both the next white
and black keys to its left.
Spielen von Moll-, Sept- und MollSeptakkorden im SINGLE
FINGER-Modus.
• Für Moll-Akkorde den Grundton
und die nächste schwarze Taste
links davon anschlagen.
• Für Septakkorde den Grundton
und die nächste weiße Ikste links
davon anschlagen.
• Für Moll-Septakkorde den
Grundton und die nächste weiße
und schwarze Taste links davon
anschlagen.
Exécution d'accords mineur,
septième et septième mineure en
mode SINGLE FINGER
• Pour un accord mineur, appuyer sur
la touche de la note fondamentale
et sur la touche noire
immédiatement à gauche.
• Pour un accord septième, appuyer
sur la touche de la note
fondamentale et sur la touche
blanche immédiatement à gauche.
■ Pour un accord septième mineure,
appuyer sur la touche de la note
fondamentale et sur la touche
blanche et la touche noire
immédiatement à gauche.
CnriT
Interpretación de acordes menores,
de séptima, y menores de séptima
en el modo SINGLE FINGER
• Para un acorde menor, presione la
tecla de raíz y la primera tecla
negra de su izquierda.
• Para un acorde de séptima,
presione la tecla de raíz y la tecla
blanca de su lado de la izquierda.
• Para un acorde menor de séptima,
presione la tecla de raíz y las
teclas blanca y negra de su lado de
la izquierda.
Page 25

* Tha automatic accompaniment will
continue playing even if you lift your
fingers from the Auto Bass Chord
keys You only need to press the
Auto Bass Chord keys when
changing cords.
5. Stop the Auto Accompaniment
Press the STOP button ®or INTRO./
ENDING button ®to stop the
Accompaniment.
* The FILL IN button ®can be used in the
Auto Bass Chord mode to create pattern
variations in exactly the same way that
they are used with rhythm
accompaniment patterns (refer to the
"Adding Fill-ins" section on page 18 for
details).
* Die automatische Begleitung
spielt auch nach Loslassen der
AUTO BASS CHORD-T^ten ®
weiter. Sie müssen nur Tasten
drücken, wenn Sie den Akkord
wechseln wollen.
5. ^Stoppen der automatischen
Begleitung
Zum Stoppen der Begleitung die
STOP-Thste (Jj)oder die INTR07
ENDINGr-Taste ® drücken.
* Die FILL IN-Taste (®kann wie bei der
Rhythmusbegleitung auch während
der AUTO BASS CHORD-Begleitung
zum Variieren der Begleitmuster
verwendet werden (siehe "Hinzufiigen
von Fill-ins" auf Seite 18)
* L'accompagnement automatique se
poursuivra même une fois que les
touches de la section AUTO BASS
CHORD @sont relâchées. Il n'est
nécessaire d'appuyer sur ces
touches que pour changer
d'accords.
5. Arrêter raccompagnement
automatique
Appuyer sur la touche STOP ®ou
INTRO./ ENDING ©pour arrêter
l'accompagnement.
* En mode AUTO BASS CHORD les
touches FILL IN ©peuvent être utilisées
pour créer de nouvelles variations
rythmiques de la manière dont elles sont
utilisées avec les patterns
d'acompagnement rythmiques (Pour
plus de détails, voir "Addition de fill-ins"
à la page 18).
* E1 acomp6iñainiento automático
seguirá aunque usted suelte las
teclas de AUTO BASS CHORD ®.
Usted sólo necesita presionar la
teclas de acompañamiento
automático de bajo y acordes para
cambiar de acordes.
5. Pare el acompañamiento
automático
Presione el botón STOP ®o el
botón INTROy ENDING ©para
detener el acompañamiento,
* El botón FILL IN ©puede usarse en
el modo de acompañamiento
automático de bajo y acordes para
crear variaciones de patrones
exactamente del mismo modo que
cuando se usan patrones de
acompañamiento rítmico (consulte la
sección "Adición de rellenos" en la
página 18 para más detalles).
Setting the Accompaniment Volume
Set the volume of the Auto
Accompaniment sound using the
ACCOMPANIMENT VOLUME control ®.
The MASTER VOLUME control ®can be
used to set the overall volume level.
Setting the Tempo
Use the TEMPO controls ®to set the
desired accompaniment tempo (see
"Setting the Tempo" on page 15 for
details).
FINGERED
ACCOMPANIMENT
The FINGERED mode is ideal if you
already know how to play chords on a
keyboard, since it allows you to supply
your own chords for the Auto Bass Chord
feature.
Einstellen der
Begleitungslautstärke
Die Lautstärke der Begleitung kann mit
dem ACCOMPANIMENTVOLUMERegler ©eingestellt werden. Die
Gesamtlautstärke hingegen wird vom
MASTER VOLUME-Regler ®festgelegt.
Einstellen des Tempos
Stellen Sie das Tfempo der Begleitung
mit den TEMPO-Tasten ®ein (siehe
Einzelheiten hierzu unter "Einstellen
des Tempos" auf Seite 16).
FINGERED-FUNKTION
Der FINGERED-Modus ei^et sich
besonders für diejenigen, die bereits die
Akkordgriffe beherrschen und eigene
Akkorde für die Auto-Baß/
Akkordbegleitung liefern können.
Réglage du volume de raccompagnement
Régler le volume de l'accompagnement
automatique à l'aide de ta touche
ACCOMPANIMENT VOLUME®. La
commande MASTER VOLUME ©peut
être utilisée pour régler le volume
d'ensemble.
Réglage du tempo
Utiliser les commandes TEMPO ©pour
régler le tempo de l'accompagnement
(Pour plus de détails, voir "Réglage du
tempo" à la page 15).
ACCOMPAGNEMENT A
PLUSIEURS DOIGTS
Le mode FINGERED est idéal pour ceux
qui savent déjà jouer des accords sur un
clavier, du fait qu'il permet de produire des
accords personnels pour la fonction
d'accompagnement automatique.
Ajuste del volumen de
acompañamiento
Ajuste el volumen del sonido del
acompañamiento automático empleando
el control ACCOMPANIMENT
VOLUME ®. El control MASTER
VOLUME ©puede usarse para ajustar
el nivel de volumen general.
Ajuste del tempo
Emplee los controles de TEMPO ©para
ajustar el tempo deseado del
acompañamiento (vea "Ajuste del tempo"
de la página 15 para más detalles).
ACOMPAÑAMIENTO
PARA ACORDES
El modo FINGERED es ideal si usted ya
sabe tocar acordes en un teclado, porque
le permitirá suministrar sus propios
acordes para la función de
acompañamiento automático de bajo y
acordes.
24
Page 26

1. Select the FINGERED Mode
Slide the AUTO BASS CHORD
selector® to the FINGERED
position.
L Auf FINGERED-Modus
schalten.
Schieben Sie den AUTO BASS
CHORD-Wähler ®in die Stellung
FINGERED.
■CHORD l
1. Sélectionner le mode FINGERED
Faire coulisser le sélecteur AUTO
BASS CHORD @sur la position
FINGERED.
1. Seleccione el modo FINGERED.
Deslice el selector AUTO BASS
CHORD ®a la posición
FINGERED.
2. Select an Accompaniment Style
Select the desired accompaniment
style in the normal way. Although you
can select the melody (upper
keyboard) voice you Intend to use,
the PSR-28 automatically determines
the voices to be used for the
accompaniment bass and chords
according the accompaniment style
you select.
3. Start the Accompaniment
Press the START button (¡J),
SYNCHRO START button ®or the
INTRO, button ®to determine how
the accompaniment will be started. If
you press the START button, the
rhythm will begin playing immediately
without chordal accompaniment.
4. Play a Chord on the Auto Bass Chord Keys ®
As soon as you play any chord in the
Auto Bass Chord section of the
keyboard, the PSR-28 will
automatically begin to play the chord
along with the selected rhythm and
an appropriate bass line. The
accompaniment will continue playing
even if you release the Auto Bass
Chord keys. When changing chords,
be sure to release all keys before
playing a new chord.
2. Einen Begleitstil wählen.
Wählen Sie einen Begleitstäl, wie an
vorangehender Stelle erklärt. Sie
können zwar für die obere, d. h.
rechte Manualhälfte eine Stimme
wählen, das PSR-28 wählt jedoch
automatisch die Stimmen für Baßund Akkordbegleitung
entsprechend dem gewählten
Begleitstil.
3. Die Begleitung starten.
Drücken Sie START (®, SYNCHRO
START ® oder die INTRO.-Taste ®
, um festzulegen, wie die Begleitung
einsetzen soll. Wenn Sie die STARTTaste drücken, beginnt die
Rhythmusbbegleitung sofort ohne
Akkordspiel.
4. Einen Akkord im AUTO BASS
CHORD-Manualbereich ®
anschlagen.
Sobald Sie im AUTO BASS
CHORD-Manualbereich einen
Akkord anschlagen, beginnt das
PSR-28 diesen Akkord im
gewählten Rhythmus zu spielen
und liefert eine passende Baßlinie
dazu. Die Begleitung setzt sich
auch nach Loslassen der Tasten
fort. Wenn Sie daher einen
Akkordwechsel vornehmen wollen,
müssen Sie zunächst alle
Begleitakkordtasten vor dem
Anschlägen des neuen Akkords
loslassen.
2. Sélectionner un style d'accompa
gnement
Sélectionner le style d'accompa
gnement de la manière normale. La
voix qui sera utilisée pour la mélodie
(section haute du clavier) peut être
sélectionnée, alors que celle qui sera
utilisée pour l'accompagnement en
accords et basses sera
automatiquement sélectionnée par le
PSR-28 en fonction du style
d'accompagnement sélectionné.
3. Lancer l'accompagnement
Appuyer sur la touche START ®, sur
la touche SYNCHRO START ®, ou
sur la touche INTRO, ©pour
déterminer comment
l'accompagnement sera lancé.
Lorsque la touche START est
sollicitée, le rythme commence
immédiatement sans
accompagnement en accords.
4. Jouer un accord sur les touches
AUTO BASS CHORD ®
Dès que l'on joue un accord sur la
section AUTO BASS CHORD du
clavier, le PSR-28 commence
automatiquement à jouer l'accord, en
même temps que le rythme
sélectionné et une ligne de basses
appropriée. L'accompagnement
continue à être joué, même lorsque
les touches AUTO BASS CHORD
sont relâchées. Pour changer
d'accord, relâcher toutes les touches
avant de jouer un nouvel accord.
2. Seleccione un estilo de
acompañamiento
Seleccione el estilo de
acompañamiento deseado de la
forma normal. Aunque usted podrá
seleccionar la voz deseada para la
melodía (teclado superior), el
PSR-28 determinará
automáticamente las voces a
utilizarse para el acompañamiento
de bajo y acordes de acuerdo con el
estilo de acompañamiento
seleccionado.
3. Inicie el acompañamiento.
Presione el botón START el
botón SHYNCRO START ®o el
botón INTRO. ©para determinar
cómo se iniciará el
acompañamiento. Si presiona el
botón START, el ritmo se iniciará
inmediatamente sin
acompañamiento de acordes.
4. Ibque un acorde en las teclas
de la sección de
acompañamiento automático de
bqjo y acordes
Al presionar cualquiera acorde en la
sección AUTO BASS CHORD del
teclado, el PSR-28 iniciará
automáticamente a tocar el acorde
junto con el ritmo seleccionado y
una línea de bajo apropiada. El
acompañamiento seguirá tocando
aunque usted suelte las teclas del
acompañamiento automático de
bego y acordes. Cuando cambie de
acordes, cerciórese de haber soltado
todas las teclas antes de tocar un
nuevo acorde.
25
Page 27

mm mm mm mm
Cm
C7 Cm?
The PSR-28 will accept the following
chord types:
• Major
• Minor
• Major seventh
• Minor seventh
• Minor seventh flat five
• Seventh
• Seventh suspended fourth
* All other FINGERED mode operations
are the same as in the SINGLE FINGER
mode.
Try playing this using the Single
Finger Chord mode or Fingered
mode.
(Brahms' Lullaby)
Play the chord part on the lower keyboard
section and the melody part on the upper
keyboard. Chords can be played using
either the Single Finger or Fingered
method.
Panel Settings
Accompaniment Style: Waltz
Tempo: 17 (J =126)
AUTO BASS CHORD Selector: SINGLE
FINGER or FINGERED position
Upper Voice: 52 Whistle
Das PSR-28 erkennt die folgende
Akkordtypen, obwohl die
resultierende Begleitung stets in
Dur, Moll oder Septimen angelegt
ist.
• Dur
•Moll
• Dur-mit großer Septime
• Moll-Septakkord
• Moll-Septakkord mit verminderter
Quinte
• Dur-Septakkord
• Septakkord mit vorgehaltener
Quarte
* Alle anderen Bedienvorgänge von
FINGERED- und SINGLE
PINGERED-Modus sind identisch.
Versuchen Sie einmal dieses
Stück im SINGLE FINGER- oder
FINGERED-Modus zu spielen.
(Brahms^ Wiegenlied)
Spielen Sie die Akkorde im tiefen
Manualbereich mit SINGLE FINGER
oder FINGERED und die
Melodiestimme im rechten
Manualbereich.
Einstellungen
Begleitstil: Waltz
Tempo: 17 (J =126)
AUTO BASS CHORD-Wähler: SINGLE
FINGER oder FINGERED
Stimme für rechte Manualhälfte: 52 Whistle
Le PSR-28 accepte les types
d’accords suivants:
• Majeur
• Mineur
• Septième majeure
• Septième mineure
• Quinte bémol septième mineure
• Septième
• Quarte suspendue septième
Pour toutes les autres opérations, le
mode FINGERED est identique au
mode SINGLE FINGER.
Essayer de jouer ceci en mode
SINGLE FINGER ou en mode
FINGERED.
(Berceuse de Brahms)
Jouer les accords sur la section basse du
clavier et la mélodie sur la section haute.
Les accords peuvent être joués en mode
SINGLE FINGER ou en mode
FINGERED.
Réglages de panneau
Style d'accompagnement: Waltz
Tempo: 17(J = 126)
Sélecteur AUTO BASS CHORD: Position
SINGLE FINGER ou FINGERED
Voix section haute: 52 Whistle
E1 PSR-28 aceptará los siguientes
tipos de acordes:
• Mayor
• Menor
• Mayor de séptima
• Menor de séptima
• Menor de séptima quinta bemol
• Séptima
• Séptima cuarta suspendida
Todas las otras operaciones del modo
FINGERED son las mismas que en el
modo SINGLE FINGER.
Intente tocar esto empleando el
modo de acordes SINGLE
FINGER o modo FINGERED.
(Brahms^ Lullaby)
Toque la parte de acordes en la sección
del teclado inferior y la parte de melodía
en el teclado superior. Los acordes
pueden tocarse empleando el método
SINGLE FINGER o FINGERED,
.^’listes del panel
Estilo de acompañamiento: Waltz
Tempo: 17 (J =126)
Selector AUTO BASS CHORD: Posición
SINGLE FINGER o FINGERED
Voz superior; 52 Whistle
# -0
P
SINGLE FINGER
CHORD
FINGERED
CHORD
ÎT¥ m
ñ
MIM
G Dm
m
m
miffl mm
muí fflsin
26
Page 28

KEYBOARD
PSR-28
PERCUSSION AU
PERCUSION DEL
PERCUSSION
The 10 highest keys on the PSR-28
keyboard let you play percussion to
accompany other instruments, or add
origlnai rhythm fills and breaks to your
performances. The percussbn instruments
played by each key are identified by
symbols above each key:
PERCUSSION
FUNKTIONEN
Die 10 höchsten Tasten des Manuals des
PSR-28 dienen als “Schlagzeug“, mit
dem Sie andere Instrumente begleiten
oder eigene Rhythmus-Breaks usw. fur
Ihre Darbietung spielen können. Die den
einzelnen Tasten zugeordneten
Schlagzeug- und Percussion-Klänge sind
durch Symbole über den Tasten
angezeigt:
CLAVIER
Les dix touches les plus hautes du davier
du PSR-28 permettent de produire des
sons de percussion pour accompagner
d'autres instruments, ou d'ajouter des
sons et interruptions rythmiques au
morceau exécuté. Les instruments à
percussion reproduits par chaque touche
sont identifiés par les symboles marqués
au-dessus des touches.
TECLADO
Las 10 teclas más altas de teclado del
PSR—28 le permiten tocar percusión
para acompañar a otros instrumentos, o
añadir rellenos y cambios de ritmos
originales a sus interpretaciones. Los
instrumentos de percusión tocados por
cada tecla se identiñcan medíante los
símbolos de encima de cada tecla:
To use the percussion keys @)> simply
press the KEYBOARD PERCUSSION
button (Q), then play the keys as if they
were actual percussion instruments. The
volume of the percussion pads is
controlled by the ACCOMPANIMENT
VOLUME control®.
27
Um auf diese Klänge zuzugreifen,
müssen Sie nur die KEYBOARD
PERCUSSION-Taste ©drücken und
dann die Tasten rhythmisch anschlagen.
Die Lautstärke des "Schlagzeugs" wird
über den ACCOMPANIMENT
VOLUME-Regler ©eingestellt.
Pour utiliser les touches de percussion (g),
appuyer simplement sur la touche
KEYBOARD PERCUSSION ©et utiliser
les touches comme si elles étaient de
vrais instruments à percussion. Le volume
des touches de percussion est réglé au
moyen de la touche ACCOMPANIMENT
VOLUME ®.
VOfCE/TEMPO
PC
Para usar las teclas de percusión ©,
simplemente presione el botón
KEYBOARD PERCUSSION ©, luego
toque las teclas como si fueran
intrumentos de percusión reales. El
volumen de los acdonadores de
percusión se controla mediante el control
ACCOMPANIMENT VOLUME ®.
Page 29

The Keyboard Percussion feature
cannot be used while any of the
PSR-28 preset ACCOMPANIMENT
STYLE rhythms are playing.
If you press the KEYBOARD
PERCUSSION button (Q) while one of
the PSR-28 ACCOMPANIMENT STYLE
rhythms is playing, the rhythm will stop
so you can play your own break or fill
using the KEYBOARD PERCUSSION
keys ®). To restart the the rhythm
accompaniment, press the KEYBOARD
PERCUSSION button (g) again.
* Während dem Spielen von
vorporgrammierten Begleitstilen,
kann die KEYBOARD PERCUSSIONFunktion nicht verwendet werden.
* Wenn Sie die KEYBOARD
PERCUSSION-Taste ® während dem
Abspielen eines der Begleitrhythmen
des PSR-28 drücken, stoppt dessen
Wiedergabe und Sie können Ihr Break
mit den Tasten im PercussionManualbereich ©spielen. Um die
automatische Rh3^hmusbegleitung
wieder fortzusetzen, wird einfach
erneut auf die KEYBOARD
PERCUSSION-Taste ©gedrückt.
* La fonction de percussion au clavier ne
peut pas être utilisée lorsqu'un style de
rythme préprogrammé du PSR-28 est
en cours de reproduction.
* Si latouche KEYBOARD PERCUSSION
©est enfoncée, alors que l'un des
styles de rythme préprogrammés du
PSR-28 est en cours de reproductbn,
le rythme s’arrête, ce qui permet
d'introduire ses propres sons ou
interruptions au moyen des touches de
percussion©. Pour relancer le rythme
d'accompagnement, appuyer à nouveau
sur la touche KEYBOARD
PERCUSSION ©.
* La característica de percusión del
teclado no se puede usar mientras se
esten reproduciendo cualquiera de los
ritmos preajustados
ACCOMPANIMENT STYLE del
PSR-28.
* Si presiona el botón KEYBOARD
PERCUSSION ©mientras se está
reproduciendo alguno de los ritmos
ACCOMPANIMENT STYLE del
PSR-28, el ritmo se parará para que
pueda tocar su propio cambio o relleno
usando las teclas KEYBOARD
PERCUSSION©. Para reiniciar el
acompañamiento rítmico, presione
otra vez el botón KEYBOARD
PERCUSSION®.
THE CHORD SEQUENCER
The PSR-28 CHORD SEQUENCER
allows you to "record" and play back chord
sequences created using the Auto Bass
Chord feature. You can record a complete
accompaniment part, for example, and
then play along with it using both hands —
you're free to use the entire keyboard for
your performance rather than being limited
to only the upper keyboard area.
" Chord sequences containing a
maximum of 40 different chords can be
recorded.
* Material recorded using the CHORD
SEQUENCER will be bst as soon as the
PSR-28 POWER switch (j)is turned
OFF.
DIE
SEQUENZER
FUNKTION
Mit der CHORD SEQUENCERFunktion des PSR-28 können Sie die
mit der AUTO BASS CHORD-Funktion
gespielten Akkorde aufzeichnen und
wiedergeben, Falls Sie die Begleitung
zuerst aufzeichnen, können Sie dann
deren Wiedergabe mit beiden Händen
begleiten und es steht Ihnen dadurch
das gesamte Manual für das
Melodiespiel zur Verfügung.
* Eine Sequenz kann aus max. 40
verschiedenen Akkorden bestehen.
* Aufzeichnungen werden mit
Ausschalten des PSR-28 aus dem
Speicher gelöscht.
SEQUENCEUR
D'ACCORDS
Le séquenceur d'accords du PSR-28
permet "d'enregistrer” et de reproduire des
séquences d'accords créées en utilisant la
fonction AUTO BASS CHORD. Il est
possible, par exemple, d'enregistrer un
accompagement complet, ce qui permet
ensuite d'utiliser la totalité du clavier pour
l'exécution au lieu d'être limité à sa seule
section haute.
" Il est possible d'enregistrer des
séquences comprenant un maximum de
40 accords différents.
" Tous les enregistrements effectués en
utilisant le séquenceur d'accords seront
perdus lorsque le PSR-28 est mis hors
tension.
SECUENCIADOR
DE ACORDES
El CHORD SEQUENCER del PSR-28 le
permite "grabar" y reproducir secuencias
de acordes creadas usando la
característica de acompañamiento
automático de bajo y acordes. Puede
grabar una parte de compañamiento
completo, por ejemplo, y luego tocar
usando ambas manos - usted estará libre
de usar el teclado entero para sus
interpretaciones en lugar de limitarse
sólo a la parte superior del teclado,
* Las secuencias de acordes que
contienen un máximo de 40 acordes
diferentes pueden grabarse.
* El material grabado usando el
CHORD SEQUENCER se perderá tan
pronto como se desconecte el
interruptor POWER 0del PSR-28.
28
Page 30

Recording
1. Select the Desired Accompaniment
Styie
Pick out an accompaniment style that
is appropriate for the type of music
you want to record.
2. Seiect the SINGLE FINGER or
FINGERED Auto Bass Chord Mode
Use the AUTO BASS CHORD
selector (|)to select either the
SINGLE FINGER or FINGERED
mode (if the AUTO BASS CHORD
selector is set to any position other
than FINGERED, the SINGLE
FINGER mode will automatically be
selected when recording is begun).
3. Set the Record Ready Mode
Press the CHORD SEQUENCER
RECORD button ®. This engages
the ’’record ready" mode: the
metronome will sound and the
leftmost dot in the display will flash at
the currently selected tempo, and
recording will begin as soon as you
play a note on the keyboard
(SYNCHRO START type operation).
Aufzeichnung
L Einen Begleitstil wählen
Wählen Sie einen Begleitstil, der
zum aufzuzeichnenden Stück paßt.
2. Zwischen SINGLE FINGERund FINGEKED-Modus wählen
Schieben Sie den AUTO BASS
CHORD-Wähler ©auf SINGLE
FINGER oder FINGERED. (Falls
der AUTO BASS CHORD-Wähler
in einer anderen Position als
"FINGERED" steht, wird am
Aufnahmebeginn automatisch auf
SINGLE FENGER-Modus
geschaltet.)
3. Auf Au&iahmebereitschaft
schalten
Drücken Sie die Taste CHORD
SEQUENCER RECORD ®. Damit
ist auf Aufhahmebereitschaft
geschaltet. Sie hören das Metronom
und der Leuchtpunkt ganz links im
Display blinkt im gewählten Tbmpo.
Die Aufzeichnung startet mit der
ersten von Ihnen angeschlagenen
Note (Synchronstart).
Enregistrement
1. Sélectionner le style
d'accompagnement voulu
Choisir un style d’accompagnement
convenant au type de musique à
enregistrer.
2. Sélectionner le mode SINGLE
FINGER ou FINGERED
Utiliser le sélecteur AUTO BASS
CHORD ©pour sélectionner le mode
SINGLE FINGER ou FINGERED (si
le sélecteur AUTO BASS CHORD est
mis sur une position autre que
FINGERED, le mode SINGLE
FINGER sera automatiquement
sélectionné lorsque l'enregistrement
commence).
3. Mettre en mode prêt à
l'enregistrement
Appuyer sur la touche CHORD
SEQUENCER RECORD ®. Ceci
active le mode "prêt à
l'enregistrement": le métronome
commence à jouer, le point te plus à
gauche de l'affichage se met à
clignoter au tempo sélectionné et
l'enregistrement commence dès
qu'une note est jouée sur le davier
(mode de fonctionnement du type
SYNCHRO START).
Grabación
L Seleccione el estilo de
acompañamiento deseado
Active el estilo de acompañamiento
que es más apropiado para el tipo
de música que quiere grabar.
2. Seleccione el modo de
acompañamiento automático de
b^jo y acordes SINGLE FINGER
o FINGERED
Use el selector AUTO BASS
CHORD (©para seleccionar entre el
modo SINGLE FINGER o
FINGERED (si el selector AUTO
BASS CHORD está ajustado en
otra posición que no sea
FINGERED, el modo SINGLE
FINGER se seleccionará
automáticamente cuando se
empiece la grabación).
3. Ajuste el modo de grabación
preparada
Presione el botón CHORD
SEQUENCER RECORD®. Esto
activa el modo "grabación
preparada": el metrónomo sonará y
el punto más hacia la izquierda
parpadeará en el tempo
seleccionado actual, y la grabación
empezará tan pronto empiece a
tocar una nota en el teclado
(operación tipo SYNCHRO START).
4. Set the Tempo
29
Before actually beginning to record,
you should select a tempo that will be
easy to record at.
4. Das Tempo einstellen.
Sie sollten ein leicht zu spielendes
Tempo bereits vor der Aufnahme
einstellen.
4. Régler le tempo
Avant de commencer effectivement à
enregistrer, il est nécessaire de régler
le tempo à une valeur qui facilitera
l'enregistrement.
4. Ajuste el tempo
Antes de empezar la grabación,
debe seleccionar el tempo con el que
sea más fácil de grabar.
Page 31

5. Choose an Alternative Start Mode
If Necessary
If you do not perform this step,
recording will begin as soon as you
play a chord on the keyboard. At this
point, however, you can choose to
start recording immediately by
pressing the START button ®, or
start recording immediately with an
introduction by pressing one of the
INTRO, buttons (J)®.
6. Start Recording
If you haven't already started
recording as in step 5, above,
recording will begin automatically as
soon as you begin playing. Play the
chord sequence you require for your
accompaniment.
7. Stop Recording
Press either the STOP button ®or
INTRO./ ENDING button ®to stop
recording. Recording actually ends
the instant the rhythm
accompaniment stops playing. It is
also possible to stop recording
immediately by pressing either the
RECORD or PLAY button ®.
Recording will stop automatically if
you exceed the PSR-28's memory
capacity (40 chords).
* Whenever you record using the
CHORD SEQUENCER, any
previously recorded material will be
erased.
* If you make a mistake while
recording, simply press the
SYNCHRO START button ® and
begin again from step 5, above.
5. Erforderlichenfalls auf anderen
Startmodus schalten.
Falls Sie diesen Schritt nicht
durchführen, beginnt die Aufnahme
mit der ersten gespielten Note, Sie
können jedoch die Aufnahme direkt
starten, indem Sie die START-Taste
©drücken. Falls Sie die Aufnahme
mit einem Intro einleiten wollen,
müssen Sie eine der INTRO.-Tksten
® ® drücken.
6. Aufnahme beginnen.
Falls Sie die Aufnahme nicht schon,
wie unter 5 erläutert, ausgelöst
haben, wird sie durch Anschlägen
der ersten Note gestartet, Spielen
Sie nun die Akkordsequenz.
7. Aufiiahme stoppen.
Drücken Sie dazu entweder die
STOP-Taste ©oder die INTRO./
ENDING-Taste ®, Die Aufnahme
stoppt im Grunde genommen, wenn
die Begleitung aufhört. Sie können
die Aufnahme auch direkt stoppen,
indem Sie die RECORD- oder
PLAY-Taste ©drücken. Bei
Überschreiten der
Speicherkapazität (max. 40
Akkorde) des PSR-28 stoppt die
Aufnahme automatisch.
* Bei jeder Neuaufnahme werden
vorangehende Aufnahmen im
CHORD SEQUENCER gelöscht.
* Falls Sie einen Fehler gemacht
haben, müssen Sie SYNCHRO
START ® drücken und zu Schritt
5 zurückgehen.
5. Choisir un autre mode de début, si
nécessaire
Lorsque cette opération n'est pas
effectuée, l'enregistrement
commencera dès qu'une note ou un
accord est joué sur le clavier. Il est
possible, cependant, de choisir de
commencer l’enregistrement
instantanément, en appuyant sur la
touche START ®, ou de commencer
l'enregistrement avec une
introduction, en appuyant sur l'une
des touches INTRO. ®ou ®.
6. Lancer l'enregistrement
Si l'enregistrement n'a pas été lancé
de la manière décrite à l'étape 5. il
commencera automatiquement en
même temps que l'exécution.
Commencer à jouer la séquence
d'accords d'accompagnement.
7. Arrêter l'enregistrement
Appuyer sur la touche STOP ©ou
sur la touche INTRO./ ENDING ®
pour arrêter l'enregistrement.
L'enregistrement s'arrête au moment
précis où l'accompagnement s'arrête.
Il est également possible d'arrêter
l'enregistrement instantanément en
appuyant sur la touche RECORD ou
PLAY ®. L'enregistrement s'arrêra
automatiquement lorsque la capacité
de la mémoire du PSR-28 est
atteinte (40 accordes).
* Tous les matériaux précédemment
enregistrés seront effacés lorsque la
fonction sequenceurs d'accords est
utilisée.
* En cas d'erreur en cours
d'enregistrement, appuyer
simplement sur la touche
SYNCHRO START® et
recommencer à partir de l'étape 5.
5. Elga si es necesario un modo de
inicio alternativo
Si no realiza este paso, la grabación
empezará tan pronto toque un
acorde en el teclado. En este punto,
sin embargo, puede elegir entre
iniciar la grabación inicialmente
presionando el botón START ®, o
iniciar la grabación
inmediatamente con una
introducción presionando uno de los
botones INTRO. ®®,
6. Inicio de la grabación
Si todavía no ha iniciado la
grabación como en el paso 6,
encima, la grabación empezará
automáticamente tan pronto
empiece a tocar. Tbque la secuencia
de acorde que requiera para el
acompañamiento.
7. Parada de la grabación
Presione entre el botón STOP ©o
el botón INTROy ENDING ® para
parar la grabación. También es
posible parar la grabación
inmediatamente presionando el
botón RECORD o PLAY ©. La
grabación se parará
automáticamente si se excede de la
capacidad de la memoria del
PSR-28 (40 acordes).
* Siempre que grabe usando el
CHORD SEQUENCER, cualquier
material grabado previamente se
borrará.
* Si realiza algún error mientras
graba, presione simplemente el
botón SYNCHRO START ® y
empiece de nuevo desde el paso 5
de encima.
30
Page 32

Playback
1. Engage the Start Ready Mode
Press the CHORD SEQUENCER
PLAY button ®to engage the start
ready mode.
Wiedergabe
L Auf Wiedergabebereitschaft
schalten.
Drücken Sie CHORD SEQUENCER
PLAY Cß), um auf
Wedergabebereitschaft zu schalten.
Reproduction
1. Mettre en mode prêt à la
reproduction
Appuyer sur la touche CHORD
SEQUENCER PLAY ©pour activer
le mode prêt à la reproduction.
Reproducción
L Active el modo de inicio
preparado
Presione el botón CHORD
SEQUENCER ©para activar el
modo de inicio preparado.
2. Start Playback
Press the START button ©or a key
on the keyboard to begin playback.
Your chord sequence will begin with
an introduction if you start playback
by pressing one of the INTRO,
buttons (5®.
3. Play Along If You Like
Play along on the PSR-28 keyboard
if you like. You can also add fill-ins
using the INTRO./ FILL IN button ®,
or change the tempo during playback.
4. Stop Playback
Playback will stop automatically when
the end of the recorded sequence is
reached. You can also stop playback
at any time by pressing the STOP ®
or INTRO./ ENDING ©button.
* When playback is stopped, the
CHORD SEQUENCER re-enters
the playback ready mode. This can
be exited by pressing the PLAY
button ®.
2. Auf Wiedergabe schalten.
Drücken Sie die Taste START ©
oder schlagen Sie eine Taste auf
dem Manual an,'um die Wiedergabe
auszulösen.Die )A^edergabe beginnt
mit einem Intro, falls Sie zum
Starten eine der INTRO.-Tasten ®
® antippen.
3. Die Wiedergabe begleiten.
Falls Sie wollen, können Sie die
'ÌA^edergabe auf dem Manual
begleiten. Außerdem können Sie
mit der INTROy FILL IN-Thste ®
Fill-ins einfagen oder das Tfempo
der Wiedergabe verändern.
4. Wiedergabe stoppen
Die TOedergabe stoppt automatisch
am Ende der Aufzeichnung. Sie
können die \^^edergabe durch
Drücken der STOP ®- oder der
INTROy ENDING- ®Thste
abbrechen.
* Bei gestoppter l^edergabe geht
der CHORD SEQUENCER in
\Wedergabebereitschaft über. Sie
können auf Normalbetrieb
schalten, indem Sie erneut die
PLAY-Taste ©drücken.
2. Lancer la reproduction
Appuyer sur la touche START ©ou
sur une des touches du clavier pour
lancer la reproduction. La séquence
d'accords commencera avec une
introduction lorsque la reproduction
est lancée en appuyant sur une des
touches INTRO. ®ou ®.
3. Jouer pendant la reproduction
Il est possible de jouer au clavier du
PSR-28 pendant la reproduction. Il
est également possible d'ajouter des
fill-ins en utilisant la touche INTRO./
FILL IN ® et de changer le tempo
pendant la reproductbn.
4. Arrêt de la reproduction
La reproduction s'arrêtera
automatiquement à la fin de la
séquence enregistrée. Il est
également possible d'arrêter la
reproduction à tout moment en
appuyant sur la touche STOP ©ou
sur la touche INTRO./ ENDING ®.
* Lorsque la reproduction est arrêtée,
le séquenceur d'accords revient au
mode prêt à la reproduction. Il est
possible de sortir de ce mode en
appuyant sur la touche PLAY ©.
2. Inicio de reproducción
Presione el botón START ©o una
tecla del teclado para empezar la
reproducción. La secuencia de
acordes empezará con una
introducción si inicia la
reproducción presionando uno de
los botones INTRO. ®o ®.
3. Ibque tanto como quiera
Ibque tanto como quiera en el
teclado del PSR-28. También
puede añadir rellenos usando el
botón INTROy FILL IN @o
cambiando el tempo durante la
reproducción.
4. Parada de la reproducción
La reproducción se parará
automáticamente cuando se alcance
el fin de la secuencia grabada.
Thmbién puede parar la
reproducción en cualquier
momento, presionando el botón
STOP ©o INTROy ENDING ®,
* Cuando se para la reproducción, el
CHORD SEQUENCER se
reintroduce en el modo de
reproducción preparada. También
puede salir presionando el botón
PLAY©.
31
Page 33

Try recording chords using the
CHORD SEQUENCER function.
(When The Saints Go
Marching in)
Record the chords in CHORD
SEQUENCER, then play the melody on
the keyboard as the CHORD
SEQUENCER play back. Chords can be
played using either the Single Finger or
Fingered method.
Panel Settings
Accompaniment Style: Big Band
Tempo: 20 (J =144)
AUTO BASS CHORD Selector: SINGLE
FINGER or FINGERED position (OFF during
playback)
Upper Voice: 37 TRUMPET
Versuchen Sie einmal dieses
Stück mit der CHORD
SEQUEN CER-Funkt ion
aufzuzeichnen.
(When The Saints Go
^Marching In)
Nehmen Sie die Begleitakkorde mit dem
CHORD SEQUENCER auf. Geben Sie
dann das Stück wieder und spielen Sie
die Melodie dazu.
Akkorde können mit SINGLE FINGER
oder FINGERED gespielt werden.
Einstellungen.
Begleitstil: Big Band
Tempo: 20 ( J =144)
AUTO BASS CHORD-Wähler: SINGLE
FINGER oder FINGERED (während
Wiedergabe OFF)
Stimme fttr rechte (upper) Manualhälfte: 37
TRUMPET
Essayer d'enregistrer le morceau
suivant au moyen de la fonction
MUSIC PROGRAMMER
(When The Saints Go
Marching In)
Enregistrer les accords en utilisant le
séquenceur d'accords et jouer ensuite la
mélodie sur le clavier pendant la
reproduction de la séquence d'accords.
Les accords peuvent être joués en mode
SINGLE FINGER ou en mode
FINGERED.
Réglages de panneau
Style d'accompagnement: Big Band
Tempo: 20 ( J =144)
Sélecteur AUTO BASS CHORD: Position
SINGLE FINGER ou FINGERED (OFF pendant
la reproduction)
Voix section haute; 37 TRUMPET
Pruebe a grabar acordes usando
la función de CHORD
SEQUENCER.
(When The Saints Go
Marching In)
Grabe los acordes en CHORD
SEQUENCER y luego toque la melodía
en el teclado como la reproducción de
CHORD SEQUENCER. Loe acordes
pueden tocarse usando entre el método
SmGLE FINGER o FINGERED,
fuetes del panel
Estilo de acompañamiento: Big Band
Tempo: 20 (J =144)
Selector AUTO BASS CHORD; Posición
SINGLE FINGER o FINGERED (en OFF
durante la reproducción)
Voz superior: 37 TRUMPET
Melody
32
Page 34

OPTIONAL
SONDER ACCESSOIRES
ACCESORIOS
ACCESSORIES
• AC Power Adaptor
(PA-1/ PA-1 B/ PA-3/ PA-4/ PA-^)
Transforms AC voltage to DC voltage.
• Headphones (HPE-3/ HPE-^)
. Stand (L-2/ L-4)
• Bench (BC-6)
• Stereo Connection Cord (PSC-3)
Use this cord to connect your PSR-28
to a stereo hi-fi system.
• Stereo Conversion Plug (PCP-1)
Converts stereo pin jacks to a stereo
phone plug.
ZUBEHÖR
• Netzadapter
(PA-1/ PA^IB/ PA-3/ PA-4/ PA-40)
Wandelt Netzspannung in
Gleichspannung um.
• Kopfhörer (HPE-3/ HPE-5)
• Ständer (L-2/ L-4) * Support (L-2/L-4)
• Bank (BC-6)
• Stereokabel (PSC-3)
Zum Anschluß des PSR-28 an eine
Hi Pi -Stereoanlage.
• Stereo-Adapterstecker (PCP-1)
Dieser Stereo-Klinkenstecker erlaubt
den Anschluß Über StereoCJinchstecker.
EN OPTION
• Adaptateur secteur
(PA-1/ PA-1 B/ PA-3/ PA-4/ PA-40)
Transforme le œurant alternatif en
courant continu.
* Casque d'écoute (HPE-3/ HPE-5)
• Banc (BC-6)
• Câble de reccordement stéréo
(PSC-3)
Utiliser ce câble pour connecter le
PSR-28 à une chaîne Hi-Fi stéréo.
• Connecteur stéréo (PCP-1)
Pour brancher des prises à broche
stéréo à une prise de jack stéréo.
OPCIONALES
• Adaptador de alimentación de CA
(PAr-l/ PA-IB/ PA-3/ PA-4/ PA-40)
Transforma la tensión de CA en
tensión de CC.
• Auriculares (HPE-3/HPË-5)
• Soporte (L-2/ L-^)
• Banqueta (BC-6)
• Cable de conexión estéreo (PSC-3)
Emplee este cable para conectar el
PSR-28 a un sistema estéreo de alta
ñdelidad.
• Clav^a de conversion estéreo
(PCP-1)
Convierte las clavijas normales
estéreo a clavijas telefónicas estéreo.
* Some optional accessories may not be avail^e in
ail areas. Bestimmungsländern nicht erhältlich. disponibles dans certaines régions.
SPECIFICATIONS
k«yboard
49 keys (C1-C5)
Voicn (00-99)
Piano 1, Piano 2, Honky-Tonk Piano, Elec. Piano 1, Elec. Piano
33
* Manches Sonderzubehör ist in ^wissen
TECHNISCHE
DATEN
Manual
49 Tksten CC1-C5)
Stimmen (00-99)
Piano 1, Piano2, Honky-Tbnk Piano, Elec. Piano l,Elec.
' Certains accessoires peuvent ne pas é/re
FICHE TECHNIQUE
Clavier
49 touches (Do1-Do5)
Voix (00-99)
Piano 1, Piano 2. HonKr-Tonk Piano, Elec. Piano 1. Elec. Piano
Algunos accesorios opcionales no están
disponibles en todos los países.
ESPECIFICACIO
NES
l^clado
49 teclsB (C1-C5)
Voces (00-99)
Piano 1, Piano 2, Honky-Tbnk Piano, Elee. Piano 1, Elee.
Page 35

2, Harpsichord, Ctavi, Synth Clavl, Celesta, Toy Piano, Vibes,
Chimes. Xylophone, Marimba, Bamboo Marintba, Timpani,
Steel Drum, Kaiimba, Gamelan, Music Box, Strings, Pizz.
Strings, Synth Strings 1, Synth Strings 2. Violin, Celo, Harp,
FkJte, Pan Fhrte, Recorder, Clarinet, Oboe, Bassoon,
Saxophone, Harmonica, Accordion, B^pipe, Trumpet, Mute
Trumpet, Trombone, Horn, Tuba, Brass Enseirtole, Symh Brass
1, Synth Brass 2, Pipe Organ, Jazz Organ, Rock Organ. Street
Organ, Reed Organ, Human Vox, Synth Vox, Whistle, Classic
Guitar, Folk Guitar, Jazz Guitar, Rock Guitar, Distortion Guitar,
Mute Guitar, Banjo, Mandolin, Sitar, Koto, Shamisen, Acoustic
Bass, Bowed Bass, Eiec. Bass, Slap Bass, Fretless Bass, ^nth
Bass 1, Synth Bass 2, Synth Bass 3, Analog Synth. Reed
Synth, Synth Music Box, Space Flute, Aqua, Landscape, Fuzz
Brass, Metallic Reed, Crystal. Ice Block, Synth Tom, Samba
Whistle, African Percuss, Birds, Digi Sweep, Hammer Shot,
Crystal Block, Invader, Shock Alarm, Owl, Water Drop,
Emergency, Zing, Racing Circuit. Scrape, Construction, Wave,
Orchestra Hit
Control«: Voice Select Buttons (0-9, +, -}, Voice List (00-99)
Effects
Sustain, Dual Vbice
Accompanfmsnt Styles
Disoo. Pops, 16 Beal, RodCn Roll. Big Band, Swing, Slow Rock.
Country, Tango, Reggae, Salsa, Rhumba, Samba, Bossanova,
March/ Polka, Waltz
Control«:
Accompaniment Style Select Buttons, Tempo Control Buttons
(A, T), Acoompaniment Volume, Synchro Stan Button, Stan
Button. Stop Button, Introy Fill In Button. IntroJ Ending Button
Keyboard Percussion
Bass Drum, Low Tom. High Tom, Snare Drum, Rimshot, Closed
Hi-Hat, Open HFHat, CyrrOal, Claves, Claps
Controls;
Keyboard Percussion Button, Keyboard Percussion Keys
Auto Bass Chord
Controle;
Auto Bass Chord Selector (Off, Single Finger, Fingered, Manual
Bass)
Chord Sequencer
Coneoi«:
Record Button, Play Button
Displays
Voice/ Tempo/ Beat Display
Other Controls
Power Switch, Master Volume. Transpose (A, T), Pitch
(A, ▼). Demonsttation Button
Auxiliary Jacks
HEADPHONES/AUX. OUT. DC(B-12V)IN
Main Amplifier
asw x 1 (RMS)
Speaker
12cm(4-3/4")x2
Rated VoHage
DC 9V(Six SUM-1, "CT size, R-20 or equivalent batteries), AC
Power Adaptor(PA-1. PA-1B, PA-3. PA-4, PA-40)
Dimen^ons (W x D x H)
9e2mm X 291mm X 112mm (33-11/16-X 11-7/16-X 4-7/16")
Weight
4.5 kg (9.9 bs)
Spedffcations are subject to change without notice.
Piano 2, Harpsichord, Clavi, Synth Clavi, Celesta, Toy Piano,
Vibes, Chimes, Xylophone, Marimba, Bamboo Marimba,
Timpani, Sted Drum, Kaiimba, Gamelan, Music Box,
Strings, Pizx. Strings, Synth Strings 1, Sjrath Strings 2,
Volin, Cello, Harp, Flute, Pan Piute, Recorder, Clarinet,
Oboe, Bassoon, Flute, Pan Flute, Recorder, Clarinet, Oboe,
Bassoon, Saxophone, Harmonica, Accordion, Bagpipe,
Trumpet, Mute Triunpet, lirombone. Horn, Tuba, Brass
Ensemble, Synth Brass 1, Synth Brass 2, Pipe Organ, Jaxz
Organ, Bock Organ. Street Organ, Reed Organ, Human Vox,
Synth Vox, Whistle, Classic Guitar, Folk Guitar, Jazx Guitar,
Rock Guitar, Distorti<m Guitar, Mute Guitar, Вад]о,
Mandolin, Sitar, Koto, Shamisen, Acoustic Bass, Bowed Bass,
Elec. Bass, Slap Bass, Fretless Bass, Synth Bass 1, Synth
Bass 2, Synth Bass 3. Analog Synth, Reed Synth, Synth
Music BoK, Space Flute, Aqua, Landscape, Fuzz Brass,
Metallic Reed, Crystal, Ice Block, Synth Ibm, Samba
Whistle, Afirican Percuss, Birds, Digi Sweep, Hammer Shot,
Crystal Block, Invader, Shock AJarm, Owl, Water Drop,
Emergency, Zing, Racing Circuit, Scrape, Construction,
Wave, Orchestra Hit
VOICE SELECT-Ihste (0-9, +, Stimmenliste (00-99)
EITekte
SUSTAIN, DUAL VOICE
Begleitetlle
Disco, Pops, 16 Beat, Rock'n Roll, Big Band, Swing, Slow
Rock, Country, Tkngo, Reggae, Salsa, Rhumba, Samba,
Bossanova, March/ Polka, Waltz
ACCOMPANIMENT STYLE SELECT-WahlUsten, TEMPOTasten ( A , ▼ ), ACCOMPANIMENT VOLtJME-Regler,
SYNCHRO START-Tbste, START-Tbste, STOP-Taste,
INTRO/ FILL IN-Tbste, INTRO/ ENDING-Tbste
Keyboard Perenssion
Bass Drum, Low Ibm, Hi^ Tom, Snare Drum, Rimshot,
Closed Hi-Hat, Open Hi-Hat, Cymbal, Claves, Claps
Bedien el ementet
KEYBOARD PERCUSSION-Taste, Pereussion-Tbsten
Auto Base Chord
Bedleneleinente:
AUTO BASS CHORDS Wähler (OFF, SINGLE FINGER,
FINGERED, MANUAL BASS)
Chord Sequencer
Bedien el ementet
MCORD-Tbste, PLAY-Taste
Display»
Stimme/ Tempo/ Taktschlag
Andere Bedienelemente
POWER-Schalter, MASTER VOLUME, TRANSPOSETasten ( A , ▼ ), PITCH-lbsten ( A , T ),
DEMONSTRATION-Tbste
Zusatzbuchsen
HEADPHONES/AUX. OUT, DC(9-12V)IN
Haoptverstarker
2,5W X 1 (RMS)
Lautsprecher
12 cm X 2
Stromversorgung^
9V Gleichspannung (sechs SUM-1, Monozdlen, CMBe “D*
oder entsprechend), Netzadapter (PA-1, FA-IB, PA-3, PA-4,
PA-40)
Abmessui^n (B x H x T>
982 mm x 291 mm x 112 mm (33-lU 16" x 11-7/ 16" x 4-7/16')
Gewicht
4,5 kg
* Das Hecht zu Änderungen ohne Vorankündigung
bleibt Vorbehalten.
2, Harpsichord. Clavi, Clavi, Celesta, Toy Piano, Vbes,
Chimes, Xylopfxme, Marlrriba, Bamboo Marinrba, Timpani,
Steel Drum, Kaiimba. Gamelan, Music Box, Stringa, Pizz.
Strings, Synth Strings 1, Synth Strings 2, Vnlirt. Cello, Harp,
Flute, Pan Flute, Recorder. Clarinet, Oboe, Bassoon,
Saxophone, Harmonica, Accordion, Bagpipe, Trumpet, Mute
Trumpet. Trombone. Horn. Tuba, Brass Ensemble, Synth Brass
1. Synth Brass 2, Pipe Organ. Jazz Organ. Rock Organ. Street
Organ, Reed Organ, Human Vox, Syrtth Vòx, Whistle, Classic
Guitar, Folk Guitar, Jazz Guitar. Rock Guitar, Distortion Guitar,
Mute Guitar, Banjo. Mandolin, Sitar, Koto. Shamisen, Acoustic
Bass, Bowed Bass, Elec. Bass. Slap Bass, Fratless Bass, Synth
Bass 1, Synth Bass 2, Synth Bass 3, Analog Synth. Reed
Synth, Symh Music Box, Space Flute, Aqua. Landscape, Fuzz
Brass, Metallic Reed, Crystal, ice Block, Synth Tom, Samba
Whistle, African Percuss, Birds, Digi Sweep, Hammer Shot,
Crystal Block, invader. Shock Alarm, Owl, Water Drop,
Emergency. Zing, Racing Circuit, Scrape, Construction. Wave,
Orchestra Hk
Commende«:
Touches de sélection des voix (0 - 9, -i-, -),
Liste des voix (00-99)
Effets
Sustain, Dual Voice
Styles d* accompagnsmsfit
Disco, Pops. 16 Beat, Rockn Roll, Big Band, Swing, Slow Rock,
Country, Tango, Reggae, Stasa. Rhurnba, SanrPa. Bossanova.
March/ Polka, Waltz
Commande«:
Touches de sélection des styles (TaccorTpagnement, touchas
de réglage du tempo ( A, ▼ ), touche de réglage du volume
d'accoirpagnemem, touche de début synchronisé, touche de
début, touche (farrât, touche Intro/ FUI in, touche Intro/ Ending
Percussion au clavier
Grosse-caisse, Torn lew, Tom high. Caisse-claire, Hl-Hst close,
Hi-Hat open, CyrtPala, Claves, Battemem des mains
Touche de percussion au clavier. Touches de percussion du
davier
Accords St basses automatiques
Sélecteur accords et basses automatiques (Off, Single Finger,
Fingered, Manual Bass)
Séquenceur d'accords
Commande«;
Touche d'enregistremant, touche de reproduction
Affichages
Affichage Voix/ Tennps/ Tenpo
Autres commandes
Interrupteur d'alimentation. Master Votume, touches
Transposition ( A, V ), Hauteur ( A, T ), Touche de
Prises auxiliaires
HEADPHONES/ AUX. OUT, DC(9-12V)IN
AmpliHcataur principal
2,5Wx 1(eff.)
Haut-parteura
12cm X 2
Tension nominafe
CC, 9V (six piles SUM-1, R-20, de format "D* ou des piles
équivalentes), adaptateur secteur (PA-1, PA-1 B, PA-3, PA-4,
PA-40)
Dimensions (L x P x H)
982mm X 291mm x 112mm (33-11/ 16- x 11-7/ 16T x 4-7/ 16")
Poids
4,5 kg
' Les spécifications sont susceptibles d'être nxjdifiées
sans autre forme d'avts.
Piano 2, Harpsichord, Clavi, Synth Clavi, Celesta, Toy Piano,
Vibes, Chimes, Xyl<^hone, Marimba, Bamboo MariintMi,
Umponi, Steel Drum, Kaiimba, Gamelan, Music Box,
Strings, Pizz. Strings, Synth Strings 1, Synth Strings 2,
Violin, Cello, Harp, Flute, Pan Flute, Recorder, Clarinet,
Oboe, Bassoon, Saxophone, Harmonica, Accordion, Bagpipe,
Trumpet, Mute TVumpet, Trcmibone, Horn, Tuba, Brass
Ensemble, Synth Brass 1, Synth Brass 2, Pipe Organ, Jazz
Organ, Rock Organ, Strert Organ, Reed Organ, Human Vox.
I^th Vox, Whistle, Classic Guitar, Folk Guitar, Jazz Guitar,
Rock Guitar, Distortion Guitar, Mute Guitar, Banjo,
Mandolin, Sitar, Koto, Shamisen, Acoustic Bass, Bowed Bass,
Elec. Bass, Slap Bass, Fretless Bass, Synth Bass 1, Synth
Bass 2, Synth Bass 3, Analog Synth, Reed Synth, Synth
Muñe Boac, Space Flute, Aqua, Landscape, Fuzz Brass,
Metallic Reed, Crystal, Ice Block, Synth Tom, Samba
Whistle, African Percuss, Birds, Digi Sweep, Hammer Shot,
Crystal Block, Invader, Shock Alarm, Ow!, Water Drt^,
Emergency, Zing, Racing Circuit, Scrape, Constructim,
Wave, Orchestra Hit
Controle«
Botones selectores de vocee (0-9,-i-, -), lista de voces ((X)-99)
Efectos
Sostenido, voz doble
Estilos de ac<Mnpanamiento
Disco, Pops, 16 Beat, Rock'n Roll, Big Band, Swing, Slow
Rock, Country, Tango, Reggae, Salsa, Rhumba, Samba,
Bossanova, March/ Polka, Waltz
Controle«
Botones de selección de estilo de aemnpañamiento, botones
de control de tempo (A , T ), volumen del acompañamiento,
botón de inicio sincronizado, botón de inicio, botón de parada,
botones de introducciñi/ relleno, botón de preludio/ coda
Percusión del teclado
Bass Drum, Low Tfam, High Ibm, Snare Drum, Rimshot,
Closed Hi-Hat, Open Hi-Hat, Cymbal, Claves, Claps
Controle«
Botones de percusión dèi teclado, teclas de percuñón del
teclado
Af^ompañamiento automático de b^fo y acordes
Controle«
Selector de acompañamiento auUundtico de bqjo y acordes
(Off, Single Finger, Fingered, Manual Bass)
Secuenciador de acordes
Controle«
Botón de grabación, botón de reproducción
Vlsualizaciones
Vsualizaciones de voz/ tempo/ tiempo
Otros controles
Interruptor de alimentaci^, volumen principal,
transpoñción ( A . T ), tono ( A , ▼ ), botón MIDI, botón de
demostración.
Ibmas auxiliares
HEADPHONE» AUX. OUT, DC (9-12V) IN
Amplificador principal
2,5W X 1 (RMS)
Altavoz
12 cm X 2
Tensión nominal
DC 9V (seis SUM-1, tamaño “D", R-20 o pilas equivalentes),
Adaptador de alimentación de CA (PA-1, PA-lb, PA-3, PA-4 o
PA-40)
Dimensiones (An x Prf x Al)
982 mm X 291 mm X 112 mm (33-11/ 16" x 11-7/16' x 4-7/
16")
Peso
4,5 kg
* Las especificaciones están sujetas a cambios sin
previo aviso.
34
Page 36

FCC INFORMATION
(MPORTANT NOTICE ; DO NOT MODIFY THIS UNIT!
This product, when installed, as indicated in the instructions
contained in this manual, meets FCC requirements. Modifications
not expressly approved by Yamaha may void your authority, granted
by the FCC, to use the product.
IMPORTANT :
When connecting this produa to accessories and/or another product
use only high quality shielded cables. Cable/s supplied with this
product MUST be used. Follow all installation instructions.
Failure to follow instructions could void your FCC authorization to
use this product in the USA.
NOTE:
This product has been tested and found to comply with the
requirements listed in FCC Regulations, Part 15 for Class "B" digital
devices. Compliance with these requirements provides a reasonable
level of assurance that your use of this product in a residential
environment will not result in harmful interference with other
electronic devices. This equipment generates/uses radio frequencies
and, if not installed and used according to the instructions found in
the users manual, may cause interference harmful to the operation
* This applies only to products distributed by Yamaha Corporation of America.
* Dies bezi^t sich nur auf die von der Yamaha Corporation of America vetriebenwi Produkte.
* Ceci ne s'applique qu'aux produits distribués par Yamaha Corporation of America.
* Esto se aplica solam«ite a productos distribuidos por Yamaha Coporation of America.
of other electronic devices. Compliance with FCC regulations does
not guarantee that interference will not occur in all installations. If this
product is found to be the source of interference, which can be
determined by turning the unit "OFF" and "ON", please try to \
eliminate the problem by using one of the following measures: j
Relocate either this product or the device that is being affected by
the interference.
Utilize power outlets that are on different branch (circuit breaker or
fuse) circuits or install AC line filters.
In the case of radio of TV interference, relocate/reorient the antenna.
If the antenna lead-in is 300 ohm ribbon lead, change the lead-in to
co-axial type cable.
If these corrective measures do not produce satisfactory results,
please contact the local retailer authorized to distribute this type of
product. If you can not locate the appropriate retailer, please contact;
Yamaha Corporation of America, Electronic Service Division, 6600
Orangethorpe Ave, Buena Park CA,90620
I
j
YAMAHA
YAMAHA CORPORATION
P.O.Box 1, Hamamatsu, Japan
Wichitiger Hinweis für die Benutzung in der Bundesrepublik Deutschland.
Bescheinigung des Importeurs
Hiermit wird bescheinigt, daß der/die/das
Musikinstrument Typ PSR-28
(Gerät, ТУр, Bezeichnung)
in Übereinstimmung mit den Bestimmungen der
VERFräüXG 10^84_
(Amteblattverfiigung)
fiink-entstört ist.
Der Deutschen Bundespost wurde das Inverkehrbringen dieses Gerätes
angezeigt und die Berechtigung zur Überprüfung der Serie auf Einhal-tung
der Bestimmungen eingeräumt.
This applies only to products distributed by Yamaha Europa GmbH.
Dies bezieht sich nur auf die von der Yamaha Europa GmbH vertriebenen Produkte.
Ced ne s'applique qu'aux produits distribués par Yamaha Europa GmbH.
Esto se aplica solamente a productos distribuidos por Yamaha Europa GmbH.
THIS DIGITAL APPARATUS DOES NOT EXCEED THE “CUSS B" LIMITS FOR RADIO
NOISE EMISSIONS FROM DIGITAL APPARATUS SET OUT IN THE RADIO
INTERFERENCE REGULATION OF THE CANADIAN DEPARTMENTOF COMMUNICATIONS.
LE PRESENT APPAREIL NUMERIQUE N’EMET PAS DE BRUITS RADIOELECTRIQUES
DEPASSANT LES LIMITES APPLICABLES AUX APPAREILS NUMERIQUES DE LA
"CLASSE B" PRESCRITES DANS LE REGLEMENT SUR LE BHOUILUGE
RADIOELECTRIQUE EDICTE PAR LE MINISTERE DES COMMUNICATIONS DU CANADA.
This applies only to products distributed by Yamaha Canada Music Ltd.
Dies bezieht sich nur auf die von der Yamaha Canada Music Ltd. vertriebenen
Produkte.
Ceci ne s'applique qu'aux produits distribués par Yamaha Canada Music Ltd.
Esto se aplica solamente a productos distribuidos por Yamaha Canada Music Ltd.
The serial number of this product may be found on
I the bottom of the unit. You should note this serial
; number in the space provided below and retain this
; manual as a permanent record of your purchase to
aid identification in the event of theft.
! Mode! No. PSR-28
Serial No.
Concerning the Warranty
This product was made for international distribution,
and since the warranty for this type of product varies
from marketing area to marketing area, please
contact the selling agency for information
concerning the applicable warranty and/or service
policies.
Die Seriennummer befindet sich an der
Unterseite des Instruments. Wir empfehlen, diese
Nummer sicherheitshalber an der unten
vorgesehenen Stelle einzutragen, um sie auch im
Falle eines Diebstahls jederzeit zur Hand zu
haben.
Model-Nr. PSR-28
Serien-Nr.
Hinweis zur Garantie
Dieses Produkt wird international vertrieben,
und die Garantiebedingungen sind von
Vertriebsland zu Vetriebsland verschieden, Ihr
Händler gibt Ihnen gerne ganauere
Informationen zu den in Ihrem Land gültigen
Garantie und/oder ServTcebedingungen..
Le numéro de série de ce produit figure sur le socle
de l'appareil. Il conviendra de noter ce numéro de
série dans l'espace réservé ci-dessous et de
conserver ce manuel: celui-ci constitue le document
permanent de votre achat et permet l'identification
en cas de vol.
Modèle No. PSR-28
No. de série;
Remarqua relative à la garantie
Ce modèle est destiné à être distribué à l'échelle
internationale. Etant donné que les conditions de
garantie pour ce type de produit varient en fonction
des zones de commercialisation, prière de prendre
contact avec t'agence chargée des ventes pour tous
renseignements relatifs aux conditions de garantie
eide service après-vente.
E1 número de serie de este producto se encuentra
en la parte inferior de la unidad. Sírvase anotar
este número de serie en el espacio proporcionado
debajo y guarde este manual como comprobante
de compra para ayudar a la identificación en caso
de robo.
N“ de modelo PSR-28
№ de serie
Concerniente a la garantía
Este producto ha sido fabricado para ser
distribuido internacionalmente y, como la
garantía para este tipo de producto varía en
relación a su área de comercialización, sírvase
consultar con el agente de ventas sobre la
información en tomo a la garantía aplicable y/o
políticas de servicio.
9004 VJ42630 Printed in Japan (g)^
 Loading...