

Page 1

マルチタムスタンド
Stand Multi-Tom/
/
Multitom Stand/
组鼓支架
MTS-810B
マルチタムスタンド
Stand Multi-Tom/
マーチングバスドラムスタンド /
Stand de grosse caisse de marche/
マーチングスネアドラムスタンド /
Stand de tambour de marche/
取扱説明書
/ Owner’s Manual / Mode d’emploi /
ご使用の前にこの取扱説明書をお読みいただき、末永くご愛用ください。
Please read this Owner’s Manual throughly before use.
Prenez soin de lire ce mode d’emploi en entier avant d’utiliser le stand.
使用前,请详尽阅读本使用手册。
/
Multitom Stand/
组鼓支架
Marching Bass Drum Stand/
行进大鼓支架
Marching Snare Drum Stand/
行进小鼓支架
MTS-810B
MTS-410A
MBS-810A
MSS-810A
使用手册
MTS-410A
MBS-810A
MSS-810A
Page 2

安全上のご注意
ご使用の前に、必ずこの「 安全上のご注意」をよくお読みください。
ここに示した注意事項は、製品を安全に正しくご使用いただき、
お客様やほかの方々への危害や財産への損害を未然に防止するためのものです。必ずお守りください。
お子様がご使用になる場合は、保護者の方が以下の内容をお子様にご徹底くださいますようお願いいたします。
お読みになったあとは、使用される方がいつでも見られる所に必ず保管してください。
■ 記号表示について
この製品や取扱説明書に表示さ れている記号には、下表
のような意味があります。
「 ご注意ください」という注意喚起を示し
ます。
~しないでくださいという「 禁止」を示し
ます。
「必ず実行」してくださいという強制を示し
ます。
警告 注意
設置
設置場所は床面が平らで丈夫な所にしてください。
床が傾いていたり、段差がありますと不安定となり、
転倒するおそれがあります。
組み立て
[MTS-410A] 楽器の取り付け・取り外しの際に、タム
ホルダーフレームだけを持って抜き差しすることは、危
険ですのでおやめください。
楽器の重量バランスを崩さないように、タム本体をお持
ちください。
固定用ネジはしっかり締め付けてください。
転倒、落下等によりけがの原因となります。
高さの調整および角度の調整の際、急にネジを緩めない
でください。
ドラムが落下したり、パイプが滑り落ちて手や指を挟む
等、けがの原因となります。
取り扱い
先端が鋭利な部分には触れないでください。
また遊びの道具として使用しないでください。
お子様がスタンドのまわりで遊ばないようにしてください。
スタンドのまわりで遊びますと、顔や頭をぶつけるおそ
れがあります。
地震の際にはスタンドに近づかないようにしてください。
地震による強い揺れでスタンドが移動したり転倒するおそ
れがあります。
■ 「 警告」と「注意」について
以下、誤った取 り扱いをすると生じることが 想定される
内容を、危害や 損害の大きさと切迫の程度を 明示するた
めに、「警告」と「 注意」に区分して掲載しています。
この 表示 の欄は、「 死亡 する可 能性
警告
注意
または重傷を負う可能性が想定され
る」内容です。
この 表示 の欄は、「 傷害 を負う 可能
性または物的損害が発生する可能性
が想定される」内容です。
組み立て
組立の手順は、必ず本取扱説明書の組立
手順の通りに行なってください。
誤った手順で組み立てると、けがの原因
となったり、機能が十分に働かない原因
になったりします。
[MTS-410A] 上パイプの上端を曲げて
ありますので、取り付け・取り外しの際は、
パイプの角度に合わせて平行に抜き差し
をおこなってください。
スタンド等の脚を折りたたむ際、指に注
意してください。
指が挟まれてけがをするおそれがあります。
取り扱い
パイプの端面および内面にご注意ください。
バリ等でけがをするおそれがあります。
故意もしくは不必要に指を突っ込まない
でください。
シンナー、ベンジン等は絶対に使わない
でください。
普段のお手入れも、乾いた柔らかい布で
お拭きください。
水に注意
雨天時には 極力 使用 しな いでください。
濡れた場合は、すぐに乾いた柔らかい布
でお拭きください。
● 不適切な使用や改造により故障した場合の保証は致しかねます。
2
Page 3

CAUTION
Before using the stand, please thoroughly read the following
•
instructions and the Owner’s Manual.
Always place the stand on a flat, stable surface. Placing the
•
stand on uneven surfaces such as uneven flooring or stairs
may cause the stand to become unstable or overturn.
[MTS-410A]
•
not push/pull on the tom holder frame alone (this is dangerous!). Please hold the tom itself to keep the weight balance
of the whole instrument.
Always check to make sure that all screws are tightened
•
firmly. The instrument may also overturn or suddenly drop,
etc., resulting in injury.
When making adjustments to the height or angle of the
•
stand, do not loosen the screws abruptly. The stand or drum
may suddenly overturn or drop, pinching hands or fingers in
the stand’s framework, resulting in injury.
Pipe ends have sharp edges so be careful when handling the
•
stand around its edges. Never use the stand as a toy, etc..
Strong earthquakes may cause the stand to move about or
•
overturn. Stay away from the stands during earthquakes.
When attaching/removing the instrument, do
ATTENTION
Avant d’utiliser le stand, lisez attentivement les instructions
•
ci-après et l’ intégralité de ce mode d’ em-ploi.
Placez toujours le stand sur une surface plane et stable. Le
•
placer sur une surface inégale, par exemple un sol instable
ou un escalier, peut entraîner sa chute.
[MTS-410A]
•
ne poussez ou ne tirez pas uniquement le châssis du support de toms (ce serait dangereux !). Tenez toujours les toms
pour ne pas déséquilibrer l’ensemble.
Vérifiez systématiquement que toutes les vis de l’ensemble
•
sont bien serrées. Un défaut à ce niveau pourrait également
entraîner la chute de l’instr ument et entraîner des dommages corporels.
Lorsque vous réglez la hauteur ou l’angle du stand, ne des-
•
serrez pas les vis de façon soudaine. Le stand ou les toms
pourraient chuter, vous pourriez vous pincez les mains ou
les doigts dans le châssis, etc.
Les extrémités des tubes du châssis ont des bords coupants
•
; soyez donc prudents lorsque vous vous tenez à proximité
d’elles. N’utilisez en aucun cas le stand comme un jouet, etc.
Les tremblements de terre peuvent entraîner le déplacement
•
ou le renversement du stand. Éloignez-vous de l’instrument
lors des tremblements de terre.
Lorsque vous montez ou démontez l’instrument,
Do not rough play
•
face or head may result by falling onto the stand. Also, keep
children from playing around the stand.
[MTS-410A]
•
ing/pulling direction should be matched accordingly when
attaching/removing the holder.
When folding the stand, watch your fingers so they do not
•
become pinched in the folding supports. Fingers pinched in
the framework may result in injury.
Be careful around the ends and insides of the pipe. The pipe
•
tubing has rough edges and slivers that may fall out and
cause injury if care is not taken. Do not purposely put fingers
into the ends of the pipe.
Do not use the stand in the rain. If the stand becomes wet,
•
use a soft dry cloth to wipe the stand as soon as possible.
Always use a soft, dry cloth to clean the stand as a part of
•
periodic maintenance. Never use thinner, benzene, or other
similar solvents to clean the stand.
Ne laissez pas d’enfants jouer de façon turbulente autour du
•
stand. Une chute sur celui-ci pourrait entraîner des blessures
à la tête ou à au visage.
[MTS-410A]
•
ment courbé, le sens dans lequel vous poussez ou tirez doit
épouser cette courbe lorsque vous montez ou démontez le
stand.
Lorsque vous repliez le stand, faites attention de ne pas
•
mettre vos doigts entre les tubes. Vous risqueriez de les
blesser.
Méfiez-vous des extrémités et de l’intérieur des tubes. Les
•
tubes comportent des bords coupants et des copeaux de
métal qui pourraient s’en échapper et vous blesser si vous
n’êtes pas attentif. N’introduisez pas exprès vos doigts dans
les extrémités des tubes.
N’utilisez pas le stand sous la pluie. Si le stand est mouillé,
•
utilisez un chiffon doux et sec pour l’essuyer aussi rapidement que possible.
Utilisez toujours un chiffon doux et sec pour nettoyer le stand
•
dans le cadre de son entretien régulier. N’utilisez jamais de
white spirit, de benzine ou d’autres solvants du même type
pour nettoyer le stand.
in the vicinity of the stand. Injury to the
Since the upper pipe is slightly bent, the push-
Étant donné que le tube supérieur est légère-
使用支架之前,请仔细阅读下述说明和使用手册。
•
请务必在平坦、稳 定的表 面上放置支架。如果将支架放置 在
•
不平坦的 地面或 楼梯等不平坦的 表面上,可能会使支架变 得
不稳或倾翻。
[MTS-410A]
•
(这种做法非常 危险!)。请握 住组鼓本身以保持整个乐器的
重力平衡。
请务必检查确 保所有螺钉已旋紧。乐器 也可能出现倾翻或突
•
然跌落等情况,造成损伤。
进行支架的高度或角 度调整 时,请勿 突然松开螺钉。支架或
•
鼓可能会突然倾翻或跌落,使手部或手指被鼓架框架挤伤,
从而造成伤害。
管的末端有锐利的边缘,因此,在支架的边缘操作时应小心。
•
切勿将支架用作玩具等。
安装 / 拆卸乐器时,请勿单独推 / 拉组鼓座框架
注意
强烈的地震可能会使支架四处移动或倾翻。地震期间应远离支架。
•
请勿在支架附近做危 险的动 作。否则, 撞上支架可能导致脸
•
部或头部受伤。此外,不要让儿童在支架周围玩耍。
[M TS -4 10A ]
•
拉方向应与之相符。
合拢支架时,请注意不 要让合 拢的支 撑件挤伤手指。手指可
•
能会被框架夹伤。
在管的末端附 近和内部应多加小心。管 道有粗糙的边缘并可
•
能掉出碎片,如不小心操作,可能 会受到 伤害。请 勿故意 将
手指插入管的末端。
请勿在雨中使用支架。如果支架变湿,应尽快用柔软、 干燥
•
的布擦拭支架。
作为定期维护的一部分,请务必使用柔软、干燥的布清洁支架。
•
切勿使用稀释剂、苯或其他类似的溶剂清洁支架。
3
由于上管略弯,因此,安装 / 拆卸鼓座时的推 /
Page 4

MTS-810B
組立手順 /
Assembly Procedure
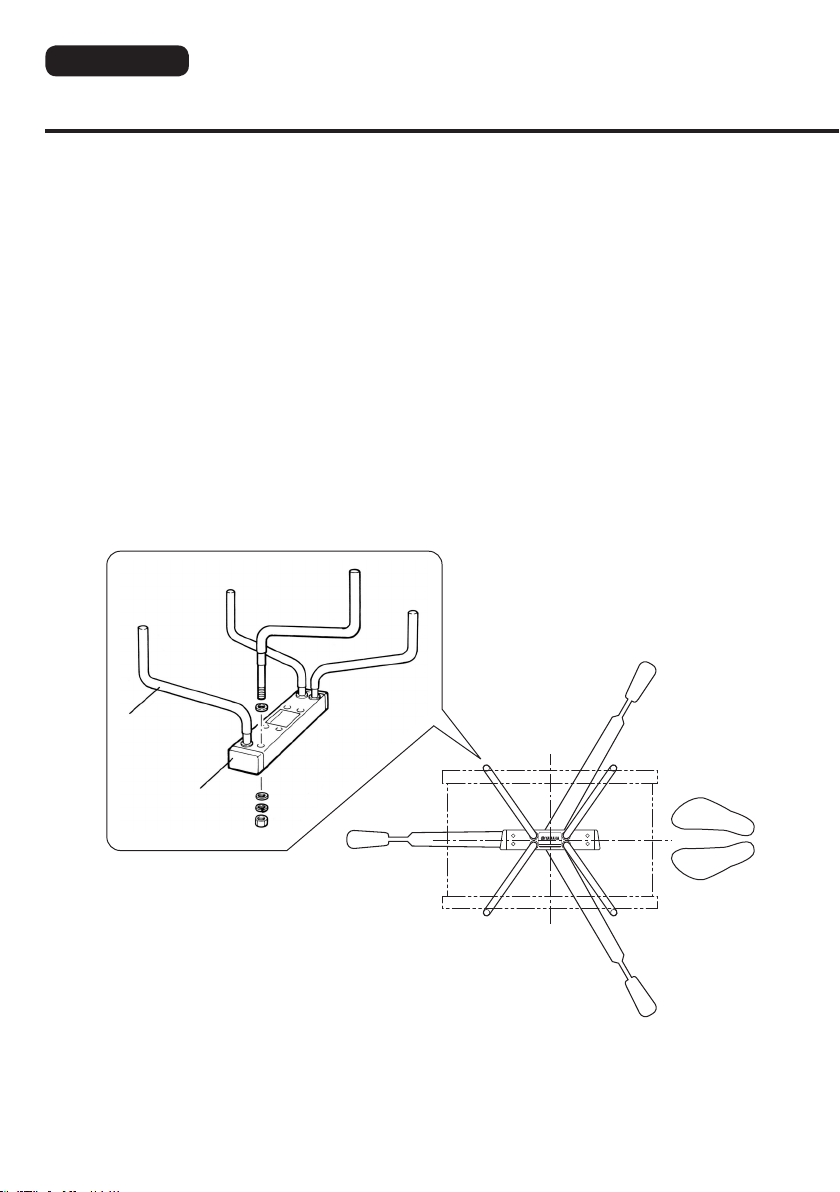
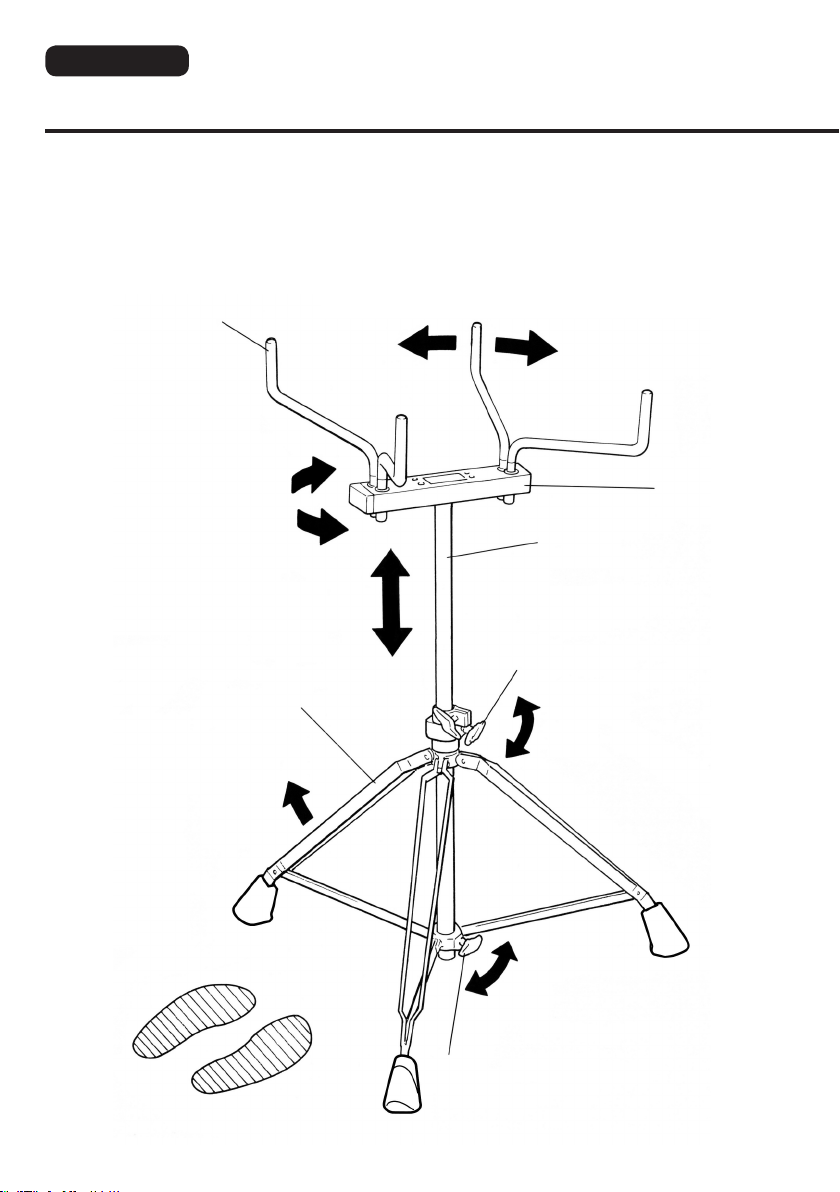
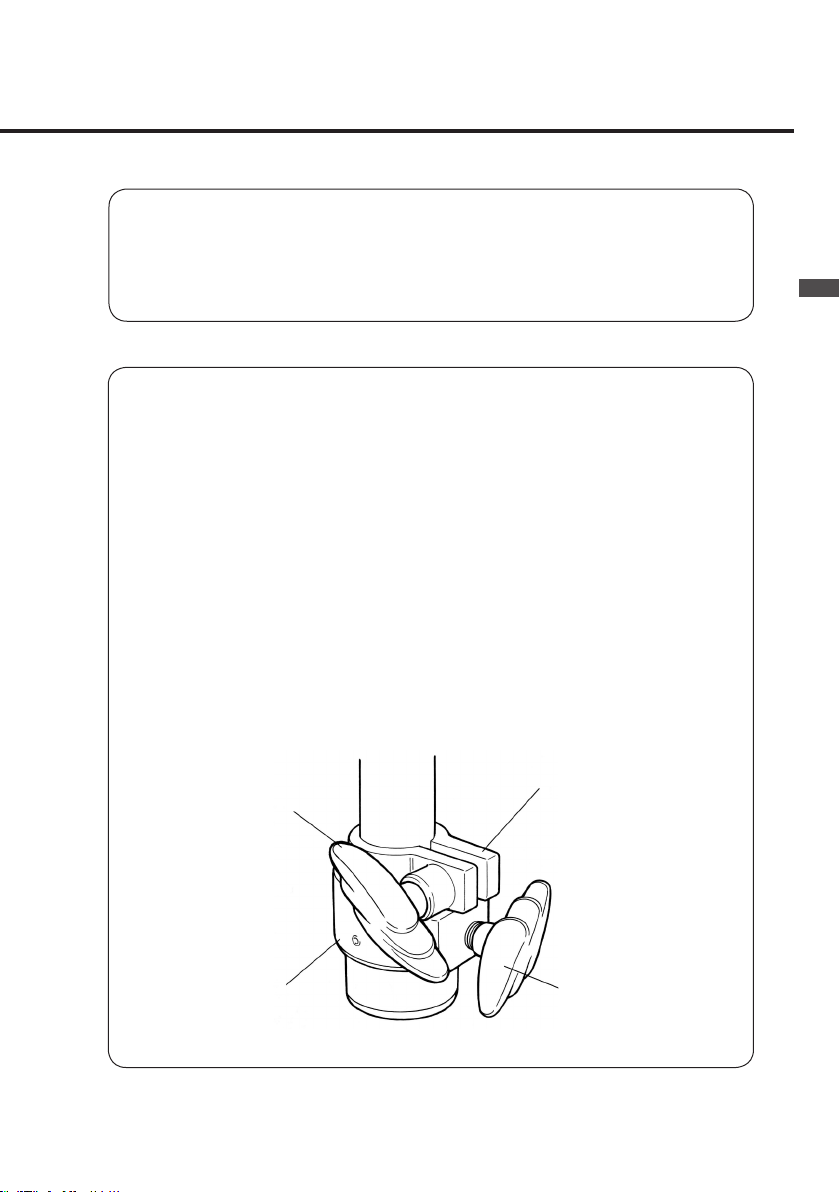
スタンドの組み立て
脚を開き、ウイングボルト(A)をしっかりと締め付けます。
1.
※脚の向きは、右図のようにしてください。
スタンド上部のパイプを下部パイプに差し込み、希望す
2.
る高さでウイングボルト(B)を締め付けます。
Stand Mounting
Spread the legs and fasten wing bolt (A) tightly.
1.
* The directions of the legs to be spreaded should be
done according to the diagram on the right.
Insert the pipe of the upper stand into the pipe of the
2.
lower stand. Adjust the ideal position and fasten wing
bolt (B) tightly.
スタンド上部
Sand (Upper)
アーム
Arms
奏者
Player
アーム
Arms
スタンド下部
Sand (Lower)
ウイングボルト(B)
Wing Bolt (B)
ウイングボルト(A)
Wing Bolt (A)
脚
Leg
奏者
Player
4
Page 5
Assembly Procedure
アーム
Arms
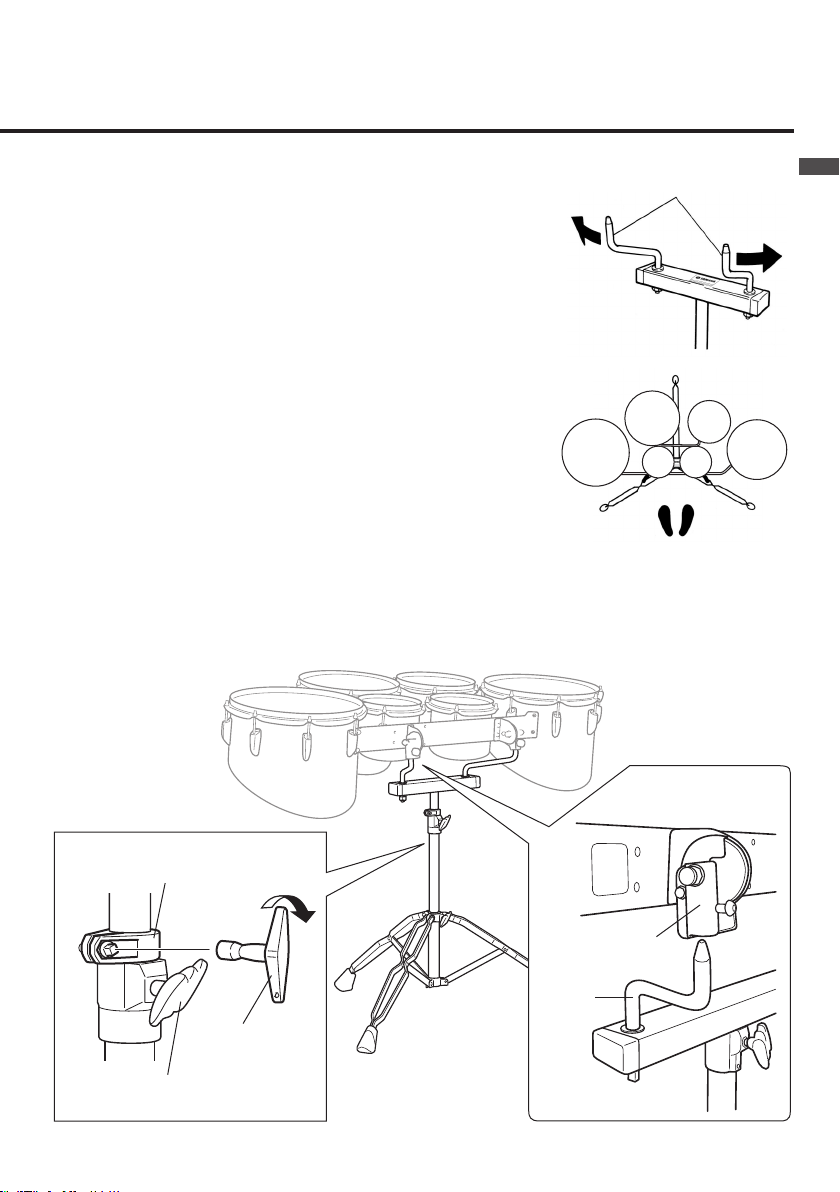
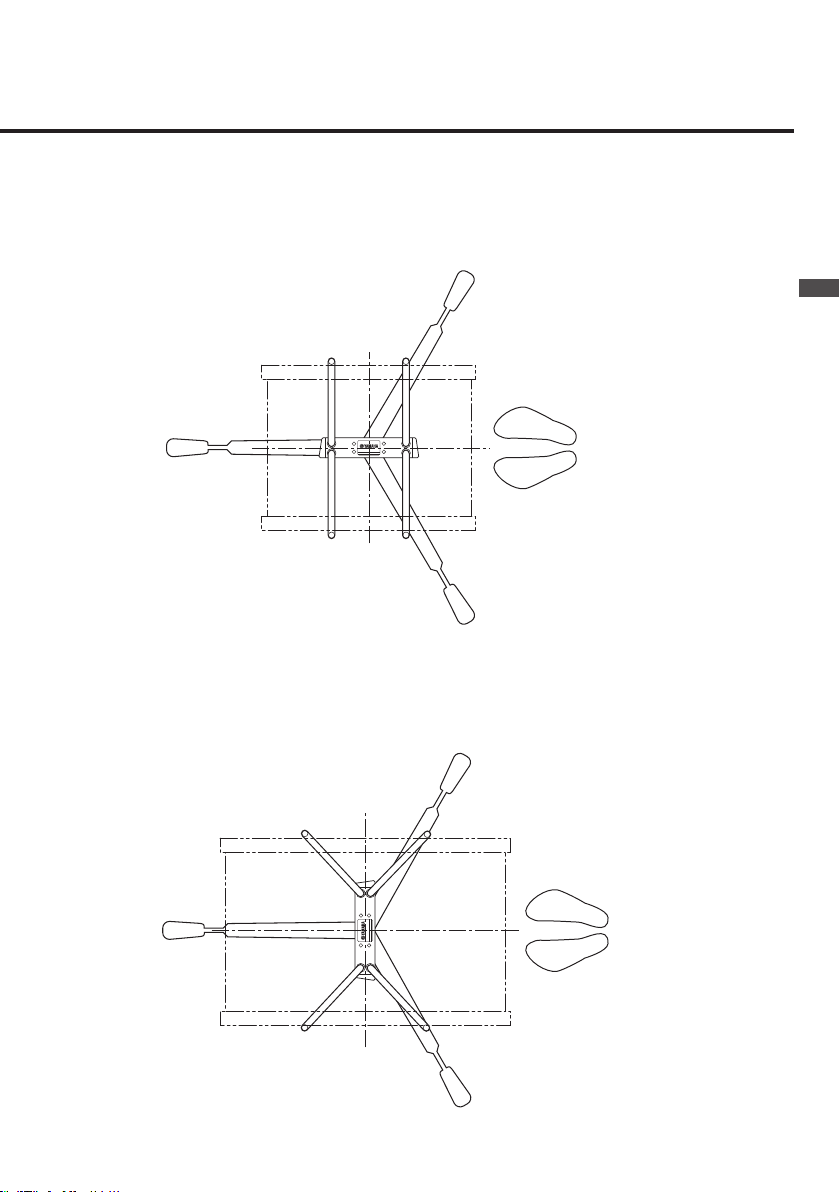
マルチタムの取り付け
マルチタムキャリアのピボットの間隔に合わせて、スタンド
1.
のアームを開きます。(右図参照)
スタンドのアームにキャリアのピボットを合わせて、しっか
2.
りと奥まで差し込みます。(下図参照)
スタンド上部を上下してタムの打面高さを調節したら、ウイ
3.
ングボルト (B) をしっかり締め、さらに位置決めストッパー
のネジをドラムキーを使ってしっかり締めます。(下図参照)
組立手順 /
Multi Tom Mounting
Adjust the arms of the stand to match the space between
1.
the two pivots of the multi tom carrier. (diag. on the right)
Adjust the arms to the pivot positions and insert them
2.
firmly and completely. (see diag. below)
Adjust the height of the multi toms by moving the upper stand up and down and fasten
3.
it with wing bolt (B), then fasten the screw of the position clamp with a drum key. (see
diag. below)
MTS-810B
位置決めストッパー
Position Clamp
ドラムキー
Drum Key
ウイングボルト(B)
Wing Bolt (B)
ピボット
Pivot
アーム
Arms
5
Page 6

MTS-410A
組立手順 /
まず、スタンドの上部と下部を組み立てます。(下図参照)
Mount the upper stand on the lower stand. (refer to diagram below)
脚を開き、ウイングボルト(A)をしっ
1.
かりと締め付けます。
Spread the legs of the stand and se-
1.
cure them by tightening wing bolt (A).
ウイングボルト(B)をゆるめ、上パイ
2.
プを適当な高さに調整します。調整後、
ウイングボルト(B)はしっかりと締め
ておいてください。
※脚と上パイプの向きは下図のようにし
てください。(上パイプは上端が曲げ
てあります。向きに注意してください。)
Loo sen wing bolt (B) to adjust the
2.
height of the upper pipe. After adjustment, re-tighten wing bolt (B).
* Position the feet and the catcher as
shown in the illustration below. (The
upper end of the pipe is bent slightly.
Make sure to set it correctly.)
Assembly Procedure
キャッチャー
Catcher
Upper Pipe
・トリオ/Trio
位置決めストッパー
Position Clamp
上パイプ
※ スタンドに取付時、
ホルダーを外しても
かまいません。
When the toms
※
are attached to the
stand, the holder can
be removed.
奏者
Player
・クオード/Quad
ウイングボルト(B)
Wing Bolt (B)
脚
Leg
奏者
Player
ウイングボルト(A)
Wing Bolt (A)
8
Page 7

組立手順 /
Assembly Procedure
スタンドのキャッチャーにマルチタ
3.
ムホ ルダー のフレームを合わせ て、
しっかりと奥まで差し込みます。
● クオード /
キャッチャー/
ウイングボルト(B)をゆるめ、上パイプを上下してタムの打面高さを調整します。
4.
Quad
タムホルダーフレーム
Tom Holder Flame
Catcher
Align the frame of the multi tom hold-
3.
er with the catcher on the stand and
insert the holder until it stops.
● トリオ /
Trio
タムホルダーフレーム
Tom Holder Flame
キャッチャー/
Catcher
調整 後、ウイングボルト(B)をしっかりと締め付けておきます。さらに、演奏時
にタムが下がらないように、位置決めストッパーを締付ベースに合わせた後、ドラ
ムキーを使ってネジをしっかりと締め付けておきます。
Loosen wing bolt (B) to adjust the height of the drum-heads by raising or lowering
4.
the upper pipe, and re-tighten wing bolt (B) securely after adjustment. Furthermore, to prevent the toms from slipping down during performance, push the position clamp against the mounting base and securely tighten its screw using a drum
key.
位置決めストッパー
Position Clamp
MTS-410A
締付ベース
Mounting Base
ドラムキー
Drum Key
ウイングボルト(B)
Wing Bolt (B)
9
Page 8
MBS-810A
ドラム取付図 /
バスドラムのサイズによりスタンドのセッティングが異なりますので、図をよくご覧になり、
お手持ちのバスドラムに合った取り付け方をしてください。
The proper setting of the stand depends on the size of the bass drum. Please refer to the following illustrations when mounting your bass drum on the stand.
● MB-4000, 400 シリーズ:全サイズの場合
※MB-4000, 400 シリーズ用にお使いになる場合は、アームの取付位置を変更する必
要があります。下図に従ってアームを 4 本共外側から内側へ付け替えてからドラムを
セットしてください。
●
For all MB-4000 or 400 series drum sizes
* To mount a MB-4000 or 400 series bass drum, the arm mounting position
needs to be changed. Attach the four arms at the inner holes of the stand, referring to the illustration below.
Drum Mouning Illustrations
アーム
Arm
アームベース
Arm Base
奏者
Player
12
Page 9
ドラム取付図 /
Drum Mouning Illustrations
● MB-8300, 800, 6300, 600 シリーズ:16" 〜 28" の場合
For MB-8300, 800, 6300 or 600 series: 16"–28"
●
奏者
Player
● MB-8300, 800 シリーズ:30", 32" の場合
For MB-8300 or 800 series (30" and 32")
●
MBS-810A
13
奏者
Player
Page 10
MBS-810A
組立手順 /
※説明イラストは、MB-8300,800,6300,600 シリーズ
(16" 〜 28")を取り付ける場合です。
* The illustrations show mounting of an MB-8300,
800, 6300 or 600 series bass drum (16"–28").
Assembly Procedure
アーム
Arm
2
2
脚
Leg
3
アームベース
Arm Base
上パイプ
Upper Pipe
ウイングボルト(B)
Wing Bolt (B)
2
奏者
Player
1
1
ウイングボルト(A)
Wing Bolt (A)
16
Page 11

組立手順 /
脚をいっぱいに開き、ウイングボルト(A)をしっかりと締め付けます。
1.
Fully spread the legs of the stand and secure them by tightening wing
1.
bolt (A).
ウイングボルト(B)をゆるめ、上 パイプを適 当な高さに調整します。
2.
調整後、ウイングボルト(B)はしっかりと締めておいてください。
※脚とアームベースの向きは、ドラム取付図(左図)によりご確認ください。
Loosen wing bolt (B) to adjust the height of the stand. After adjust-
2.
ment, re-tighten wing bolt (B).
* Position the legs and the arm base as shown in the illustration (left).
バスドラムの胴幅に合わせて、4 本のアームを開きます。バスドラムの
3.
サイズによりアームベースの向きおよびアームの取付位置が異なります
ので、ドラム取付図(左図)をよくご覧になりドラムに合ったセッティン
グをしてください。
Assembly Procedure
MBS-810A
Spread the four arms according to the width of the bass drum. The
3.
proper arm base direction and arm mounting position depend on the
size of the bass drum. Refer to the drum mounting illustrations (left)
for proper setting of the drum stand.
17
Page 12

組立手順 /
Assembly Procedure
4
アーム
Arm
アームベース
Arm Base
奏者
Player
脚
Leg
上パイプ
Upper Pipe
ウイングボルト(B)
Wing Bolt (B)
5
ウイングボルト(A)
Wing Bolt (A)
18
Page 13
組立手順 /
ドラムをスタンドに載せ、アームを閉じて固定します。
4.
Place the drum on the stand and position the arms tightly against the
4.
drum.
演奏時にドラムが下がらないように、位置決めストッパーを締 付ベース
5.
に合わせた後、ウイングナットをしっかりと締め付けておきます。
ドラムの高さを調整する場合は、ドラムをスタンドからおろしてから、
ウイングボルト(B)をゆるめ、上パイプを上下してください。調整後は、
ウイングボルト(B)および位置決めストッパーのウイングナットをしっ
かりと締め付けておきます。
To prevent the upper pipe from sliding down during performance, push
5.
the position clamp tightly against the mounting base and securely
tighten its wing nut.
To adjust the drum height, first remove the bass drum from the stand
and then loosen wing bolt (B). After adjustment, re-tighten wing bolt (B)
and the wing nut of the position clamp.
Assembly Procedure
MBS-810A
ウイングナット
Wing Nut
締付ベース
Mounting Base
位置決めストッパー
Position Clamp
ウイングボルト(B)
Wing Bolt (B)
19
Page 14

MSS-810A
ドラム取付図 /
スネアドラムのサイズによりスタンドのセッティングが異なりますので、図をよくご覧
になり、お手持ちのスネアドラムに合った取り付け方をしてください。
The proper setting of the stand depends on the size of the snare drum. Please refer to the
following illustrations when mounting your snare drum on the stand.
● 14" スネアドラムの場合 ● 13" スネアドラムの場合
For 14" snare drum
●
Drum Mouning Illustrations
奏者
Player
For 13" snare drum
●
奏者
Player
24
Page 15

ドラム取付図 /
Drum Mouning Illustrations
また MSS-810A は、MB-2000, 200, 100 シリーズバスドラム用スタンドとしても
ご使用になれます。その場合もシリーズによりスタンドのセッティングが異なりますので、
お手持ちのバスドラムに合った取り付け方をしてください。
The MSS-810A stand can also be used for MB-2000, 200 or 100 series bass drums.
For these drums the mounting method also depends on the drum size. Please refer to the
following illustrations.
● MB-2000, 200 シリーズの場合
●
For MB-2000 or 200 series bass drums
奏者
Player
● MB-100 シリーズバスドラムの場合
For MB-100 series bass drums
●
※MB-100 シリーズバスドラム用にお使いになる場合は、アームの取付位置を外側から内側
へ 4 本共付け替えてから、ドラムをセットしてください。
* To mount a MB-100 series bass drum, attach the four arms at the inner holes of the
stand.
MSS-810A
アーム取付位置の変更
Changing the arm mounting
position
アーム
Arm
アームベース
Arm Base
奏者
Player
25
Page 16

MSS-810A
組立手順 /
※説明イラストは、14" または 13" スネアドラムを取
り付ける場合です。
* The illustrations show mounting of a 14” or 13”
snare drum.
Assembly Procedure
アーム
Arm
アームベース
Arm Base
上パイプ
Upper Pipe
2
3
2
ウイングボルト(B)
Wing Bolt (B)
奏者
Player
1
脚
Leg
2
1
ウイングボルト(A)
Wing Bolt (A)
28
Page 17

組立手順 /
脚をいっぱいに開き、ウイングボルト(A)をしっかりと締め付けます。
1.
Fully spread the legs of the stand and secure them by tightening wing
1.
bolt (A).
ウイングボルト(B)をゆるめ、上 パイプを適 当な高さに調整します。
2.
調整後、ウイングボルト(B)はしっかりと締めておいてください。
※脚とアームベースの向きは、ドラム取付図(左図)によりご確認ください。
Loosen wing bolt (B) to adjust the height of the stand. After adjust-
2.
ment, re-tighten wing bolt (B).
* Position the legs and the arm base as shown in the illustration (left).
ドラムのサイズに合わせて、4 本のアームを開きます。ドラムの種類・
3.
サイズによりアームベースの向きおよびアームの取付位置が異なります
ので、ドラム取付図(左図)をよくご覧になりドラムに合ったセッティン
グをしてください。
Assembly Procedure
MSS-810A
Spread the four arms according to the size of the drum. The proper
3.
arm base direction and arm mounting position depend on the kind and
the size of the drum. Refer to the drum mounting illustrations (left) for
proper setting of the drum stand.
29
Page 18

組立手順 /
Assembly Procedure
アームベース
Arm Base
奏者
Player
アーム
Arm
Upper Pipe
上パイプ
脚
Leg
4
ウイングボルト(B)
Wing Bolt (B)
5
ウイングボルト(A)
Wing Bolt (A)
30
Page 19

組立手順 /
ドラムをスタンドに載せ、アームを閉じて固定します。
4.
Place the drum on the stand and position the arms tightly against the
4.
drum.
ウイングボルト(B)をゆるめ、上パイプを上下してドラムの高さを調整
5.
します。調整後、ウイングボルト(B)をしっかりと締め付けておきます。
さらに、演奏時にドラムが下がらないように、位置決めストッパーを締
付ベースに合わせた後、ドラムキーを使ってネジをしっかりと締め付け
ておきます。
Loosen wing bolt (B) to adjust the drum height. After adjustment, re-
5.
tighten wing bolt (B). Furthermore, push the position clamp against the
mounting base and securely tighten its screw using a drum key to prevent the upper pipe from sliding down during performance.
位置決めストッパー
Position Clamp
Assembly Procedure
MSS-810A
締付ベース
Mounting Base
ドラムキー
Drum Key
ウイングボルト(B)
Wing Bolt (B)
31
Page 20
ご相談窓口のご案内
製品についての機能や取扱については、最寄の特約店または下記ヤマハお客様コミュニケーション
センターへお問い合わせください。修理に関するお問合せはご購入店へお申し出ください。
■ お客様コミュニケーションセンター 管弦打楽器ご相談窓口
ナビダイヤル
(全国共通番号)
上記番号でつながらない場合は、053-411-4744 におかけください。
受付: 月〜金曜日 10:00 〜 17:00
(土曜、日曜、祝日およびセンター指定の休日を除く)
ホームページ
*都合により、電話番号・名称・URL などが変更になる場合がございますが、予めご了承ください。
0570-013-808
※固定電話は、全国市内通話料金でご利用いただけます。通話料金は音声案内で確認できます。
http://jp.yamaha.com/support/
2501013 15xx R3 Printed in Japan
〒 430-8650 静岡県浜松市中区中沢町 10 番 1 号
 Loading...