

Page 1
New Functions in MOTIF XF Version 1.10
NOTICE
Yamaha has upgraded the MOTIF XF firmware to Version 1.10, adding a number of new functions. This supplement to the Owner’s
Manual describes these changes.
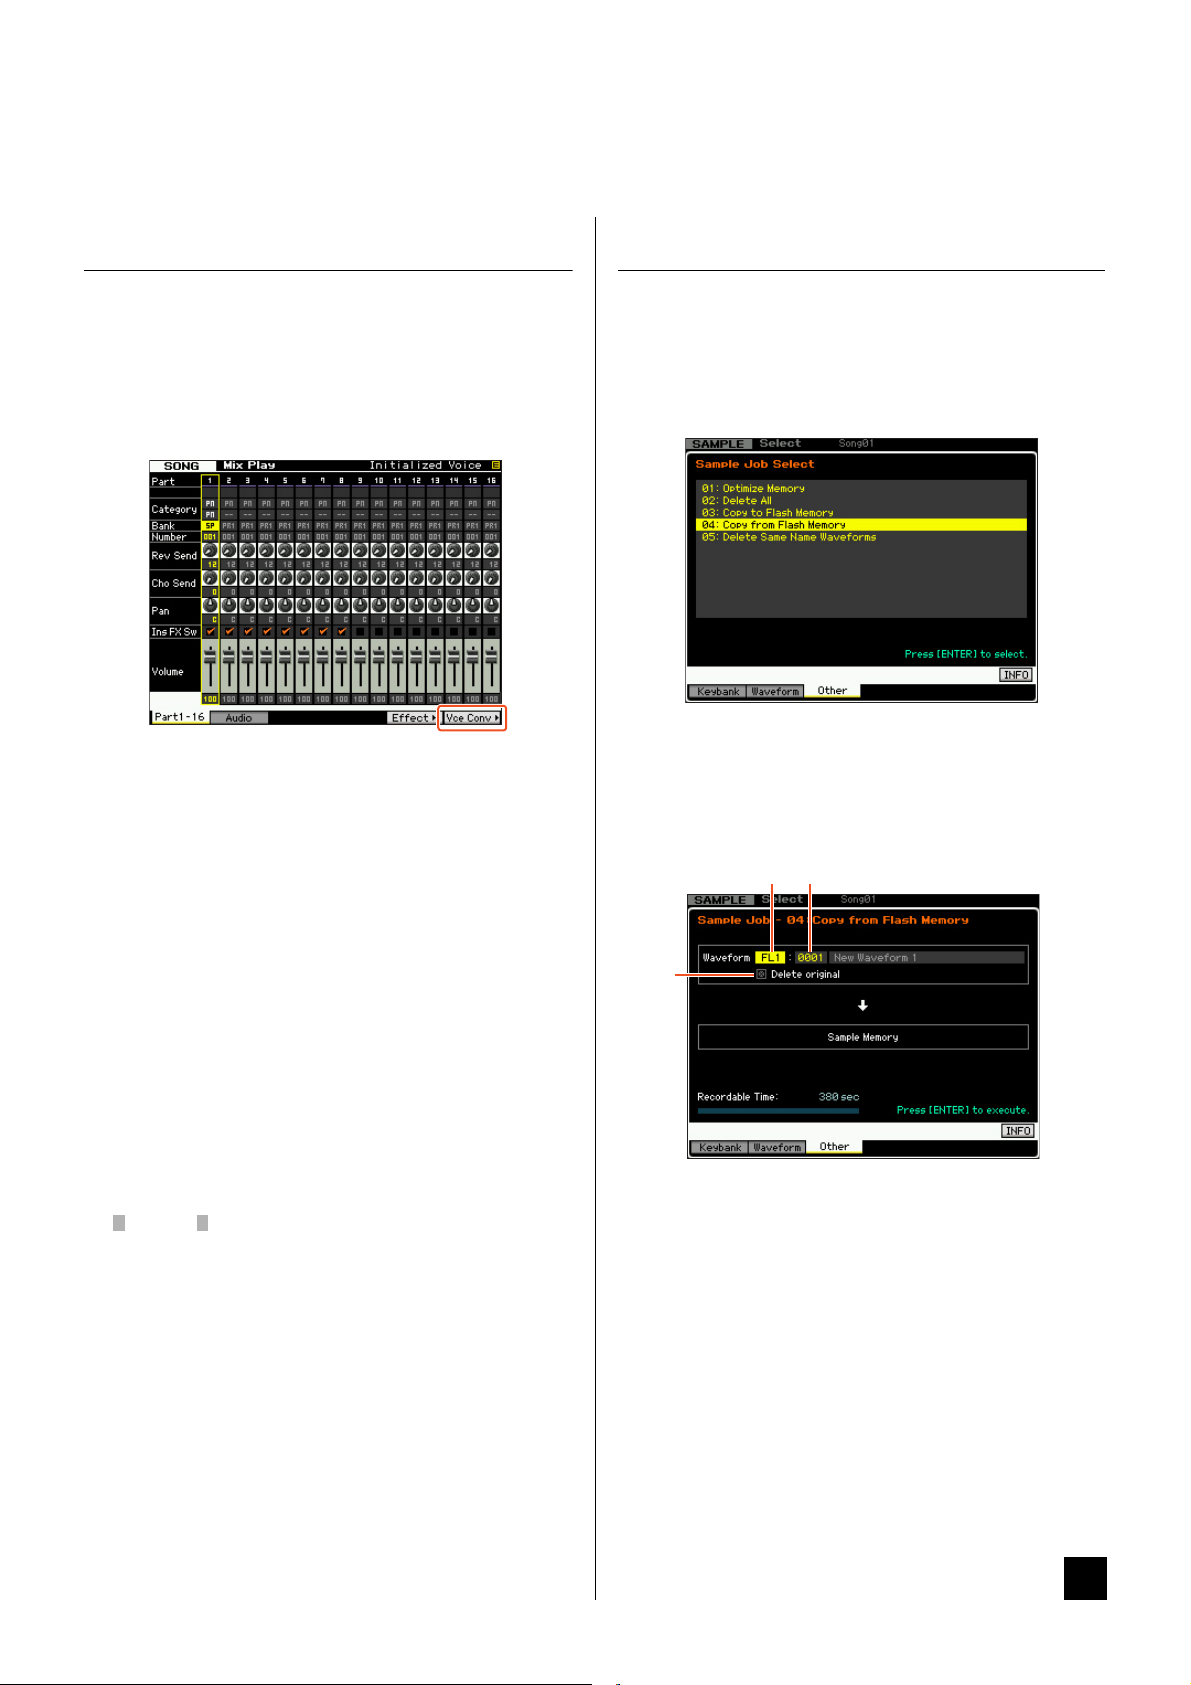
Editing and storing a Sample Voice as a Mixing Voice
You can now convert a Sample Voice to a Mixing Voice in the
Mixing Play display of the Song/Pattern mode, allowing you to
then edit the sampled audio as a Voice.
1 From the Mixing Play display, select a Part to which
a Sample Voice is assigned.
“VceConv” appears at the tab corresponding to [F6].
2 Press [F6] VceConv to convert a Sample Voice of
the selected Part to a Mixing Voice.
Completion of conversion calls up the Mixing Voice Store
window.
3 Use the data dial or [INC/YES]/[DEC/NO] to select a
Store destination number in the Mixing Voice Store
window.
NOTE Only the MIXV (Mixing Voice Bank) is available.
Editing a Waveform on the optional Flash Memory Expansion Module
You can edit a Waveform on the optional Flash Memory
Expansion Module by using the newly added Sampling Job.
1 From the [F3] Other display of the Sampling Job,
select “04:Copy from Flash Memory” then press
[ENTER].
2 Copy a Waveform from the Module to the Sampling
memory.
At 1, select the source memory (FL1 or FL2). At 2, select a
Waveform. At 3, select whether or not the original wave is to be
deleted. After these operations, press [ENTER].
132
4 Press [ENTER] to call up the Confirmation dialog.
To cancel the Store operation, press [DEC/NO] to return to the
original display.
5 Press [INC/YES] to execute the Store operation.
After the Store has been completed, a “Completed” message
appears and operation returns to the Mixing Voice Play display.
You can confirm that the stored Mixing Voice is assigned to the
Part selected in step 1.
After the above operations, make sure to execute the Song/
Pattern Store. Otherwise, the Mixing Voice assignment will be
lost when turning the power off or selecting the different Song/
Pattern.
NOTE
This operation will cancel the link between all the Voices and the
original Waveform, then make a new link between the same
Voices and the Waveform copied to the Sampling memory.
3 Edit the Waveform in the sampling memory by
using the Sampling Edit and Sampling Job
operations.
4 From the [F3] Other display of the Sampling Job,
select “03:Copy to Flash Memory” then press
[ENTER].
5 Copy the edited Waveform from the sampling
memory to the Flash Memory Expansion Module.
At 1, confirm that the edited Waveform number is shown. At 2,
select whether or not the original wave on the Sampling Memory
is to be deleted. At 3, select the destination memory
(FL1 or FL2). After these operations, press [ENTER].
EN
New Functions in MOTIF XF Version 1.10 1
Page 2

NOTE This operation will cancel the link between all the Voices and the
NOTICE
1
2
3
12
3
edited Waveform on the Sampling Memory, then make a new link
between the same Voices and the Waveform copied to the Flash
Memory Expansion Module.
Additional menus in Sampling Edit/Sampling Main display
With this new version, “[F3] Normalize,” “[F4] Slice,” and “[F5]
Remix” have been added to the Sampling Edit display and
Sampling Main display respectively, allowing you to more easily
call up these displays.
2 Select the target memory (“USR”, “FL1” or “FL2”)
at 1, then select the Waveform number at 2.
All the Waveforms having the same name are listed on the
“Same Name Waveforms” section of the display.
This Job will delete all Waveforms with the same name except for
the selected Waveform, even if they contain different data.
3 Press [ENTER] to execute the Job.
This operation will delete all the Waveforms with the same name
except for the selected Waveform.
NOTE
This operation will cancel the link status between the Voices and
deleted Waveforms, then make a new link between the same
Voices and the undeleted Waveforms respectively.
Increasing the available memory of the Flash Memory Expansion Module
A new Sampling Job now lets you increase the available
memory of the Flash Memory Expansion Module.
1 From the [F3] Other display of the Sampling Job,
select “05: Delete Same Name Waveforms” then
press [ENTER].
Revision of Key Bank number assignment after Sampling
The method of the Key Bank number assignment has been
changed from the previous version. In the previous version, “1”
was assigned to the Key Bank of the latest Sampling and the
rest of the Key Bank numbers were increased by 1. In this new
version, the next number is assigned to the Key Bank of the
latest Sampling.
2 New Functions in MOTIF XF Version 1.10
Page 3

Loading WAV/AIFF files and assigning each of
NOTICE
NOTICE
3
4
2
1
Favorite window
them to the keys
assignment will be lost when turning the power off or selecting a
different Song/Pattern.
With this new version, you can load WAV or AIFF files in a single
folder at the same time. The loaded files will be assigned to the
keys in alphabetical order from the specified key. This allows you
to easily create your own custom Waveforms.
1 Connect the USB storage device containing the
desired WAV/AIFF files in a single folder to the USB
TO DEVICE terminal.
2 Enter the mode according to the destination to
which the Waveform is to be assigned.
When you want to assign the files to a User Voice:
Enter the Voice mode then select a Drum or Normal Voice.
Or alternately, enter the Performance mode then select the
Performance having an empty User Voice.
When you want to assign the files to a Sample Voice:
Enter the Song mode or Pattern mode.
3 Press [FILE] then [F1] File.
4 Make the settings for the Load operation.
At 1, select “WAV” or “AIFF.” At 2, select the desired folder
(directory) then any of the files. At 3, select the head Key to
which the first WAV/AIFF file is assigned. At 4, select the
destination memory of the Load operation.
When entering the Voice mode in step 2, select an Element to
which the Waveform is to be assigned. When entering other
modes in step 2, select a Part to which the empty User Voice is
assigned.
Additional option in file loading operation
With this new version, you can load the file without the
Waveforms, even if the corresponding file contains Waveforms.
If you select “None” at “FL1” and “FL2,” the Load operation will
load the file, but not the Waveforms, to the Flash Memory
Expansion Module.
Category Search for Arpeggio Types
With this new version, you can use the Category Search function
to conveniently find desired Arpeggio Types.
1 Call up the Category Search window for the
Arpeggio Type.
Press [CATEGORY SEARCH] to call up the Category Search
window for the Arpeggio Type from any of the following displays:
• [F4] Arpeggio display of the Voice Play mode or Performance
Play mode
• [F2] ARP Main or [F3] ARP Other display of the Voice
Common Edit, Performance Part Edit, or Mixing Part Edit
mode
5 Press [F6] Load multi to execute the Load
operation.
6 Confirm the result of the Load operation.
When entering the Voice mode or Performance mode in
step 2:
Exit from the File mode then play the corresponding Voice or
Performance to check the sound.
After the above operations, make sure to execute the Voice Store
operation. Otherwise, the Voice will be lost when turning the
power off or selecting a different Voice.
When entering the Song mode or Pattern mode in step 2:
Exit from the File mode, select the corresponding Part of the
Song or Pattern then play the keyboard to check the sound.
After the above operations, make sure to execute the Song/
Pattern Store operation. Otherwise, the Sampling Voice
2 Find the desired Arpeggio Type on the Arpeggio
Category Search window.
Select the Main Category at 1, then select the Sub Category at
2 to call up the listed Arpeggio types at 3 Arpeggio List. Move
the cursor to the desired Arpeggio Type then press [ENTER] to
finalize your selection.
12 3
[F1] Main
Pressing this will move the cursor to 1 Main column.
[F2] Sub
Pressing this will move the cursor to 2 Sub column.
New Functions in MOTIF XF Version 1.10 3
Page 4

[F3] List
Favorite window
Pressing this will move the cursor to 3 Arpeggio List.
[F4] Favorite
Pressing this will call up the Favorite window.
[F5] Set/Clear
Pressing this will register the current Arpeggio Type to the
Favorite Category, or remove the current Arpeggio Type from the
Favorite Category. With the checkboxes listed at left, you can
confirm whether or not each Arpeggio Type is registered.
[F6] All Clear
By pressing this then [INC/YES], you can remove all the
registered Arpeggio Types from the Favorite Category.
[SF1] ARP1 – [SF5] ARP5
Pressing each of these will change the Arpeggio Type from the
current one.
[SF6] All / Filtered
Pressing this will toggle the indication between “All” and
“Filtered.”
Pressing [SF6] All will show all the Arpeggio types of the current
Category on the 3 Arpeggio List. Pressing [SF6] Filtered will
show only representative Types picked up from all Types on the
3 Arpeggio List.
Favorite window
Indicates the Arpeggio Types registered to the Favorite
Category.
Pressing [F4] Category will return to the Arpeggio Category
Search display.
Category Search for the Waveforms
12 3
[F1] Main
Pressing this will move the cursor to 1 Main column.
[F2] Sub
Pressing this will move the cursor to 2 Sub column.
[F3] List
Pressing this will move the cursor to 3 Waveform List.
[F4] Favorite
Pressing this will call up the Favorite window.
[F5] Set/Clear
Pressing this will register the current Waveform to the Favorite
Category, or remove the current Waveform from the Favorite
Category. With the checkboxes listed at left, you can confirm
whether or not each Waveform is registered.
[F6] All Clear
By pressing this then [INC/YES], you can remove all the
registered Waveforms from the Favorite Category.
[SF6] All / Filtered
Pressing this will toggle the indication between “All” and
“Filtered.”
Pressing [SF6] All will show all the Waveforms of the current
Category on the 3 Waveform List. Pressing [SF6] Filtered will
show only representative Waveforms picked up from all
Waveforms on the 3 Waveform List.
Favorite window
Indicates the Waveforms registered to the Favorite Category.
Pressing [F4] Category will return to the Waveform Search
display.
With this new version, you can use the Category Search to find
desired Waveforms in the Normal Voice Element Edit mode and
Drum Key Edit mode.
1 Call up the Category Search window for the
Waveforms.
From the [F1] Oscillator display of the Normal Voice Element Edit
mode or Drum Voice Key Edit mode, press [CATEGORY
SEARCH] to call up the Category Search window for the
Waveforms.
2 Find the desired Waveform on the Category Search
window.
Select the Main Category at 1, then select the Sub Category at
2 to call up the listed Waveform types at 3 Waveform List.
Move the cursor to your desired Waveform then press [ENTER]
to finalize your selection.
4 New Functions in MOTIF XF Version 1.10
U.R.G., Digital Musical Instruments Division
© 2010 Yamaha Corporation
WW47430
008MW-A0
 Loading...