

Page 1

English
Application for iPhone/iPod touch/iPad
Disklavier Controller
User’s Guide
Page 2
Introduction
Thank you for downloading the Disklavier Controller!
This exciting application allows you to control many of the basic functions of your Disklavier
Mark IV or Disklavier E3. Please read this guide before operating this application.
Compatible devices (as of September 1, 2010)
This application is compatible with the following Apple products (iOS 3.0 or later is required).
• iPhone
• iPod touch
• iPad
Requirements
• The rmware of your Disklavier must be Version 4.00 or later for Mark IV, or Version 3.00 or
later for E3. Refer to the Disklavier operating manual and update the rmware.
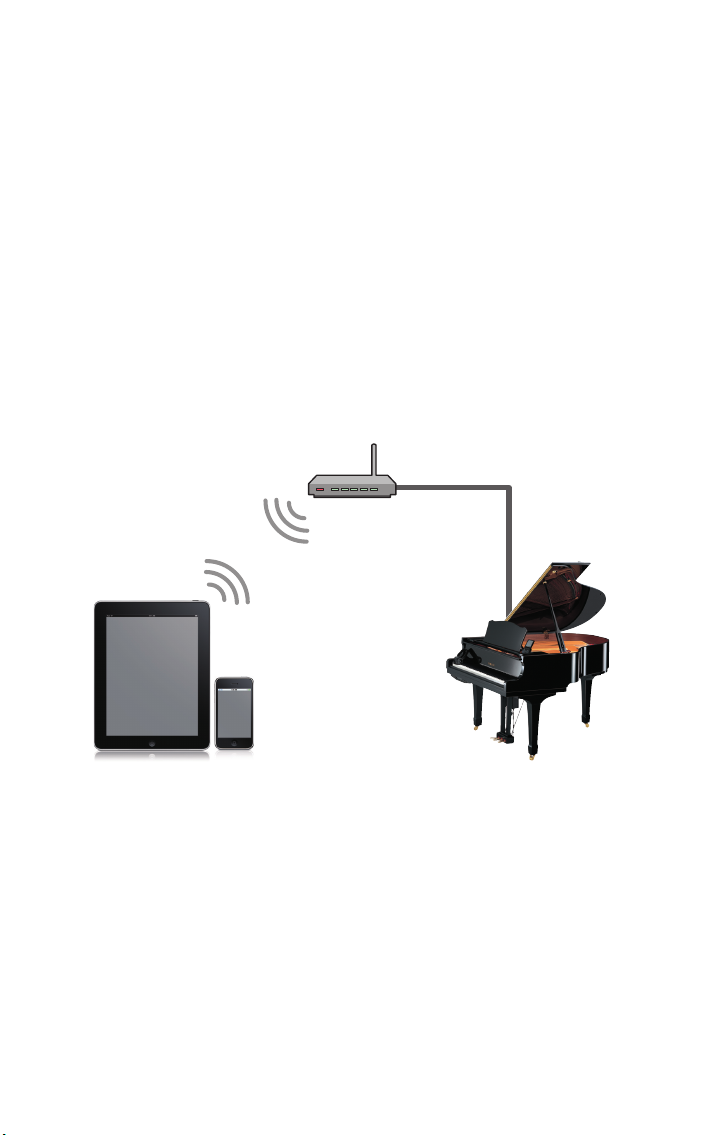
• Your iPhone/iPod touch/iPad must be connected to the Disklavier through a wireless
router.
Wireless router
Wireless LAN
LAN cable
Disklavier Mark IV/Disklavier E3iPhone/iPod touch/iPad
Introduction
ii
Page 3

Table of Contents
Chapter 1 Getting Started
2 Screen Menu Structure
3 Starting the Application
4 Searching for a Piano
5 Connecting to a Piano
6 Entering Your Passcode
7 Putting the Disklavier in Standby Mode
8 Reactivating from Standby Mode
Chapter 2 Song Playback
10 Selecting a Song
13 Operation during Playback
Chapter 3 DisklavierRadio Playback
16 Selecting a Channel
18 Operation during DisklavierRadio Playback
Chapter 4 Recording Songs
20 Starting Recording
21 Stopping Recording
22 Titling a Song
Chapter 5 Other Functions
24 Adjusting Sound Source Volume Balance
25 Transposing Songs
26 Changing Song Tempo
27 Cancelling Parts
28 Using Shortcuts
Chapter 6 Related Information
30 Notes on the Passcode Setting
31 Troubleshooting
32 Trademarks and Copyrights
Table of Contents
iii
Page 4

1
Getting Started
Introduction
1
Page 5
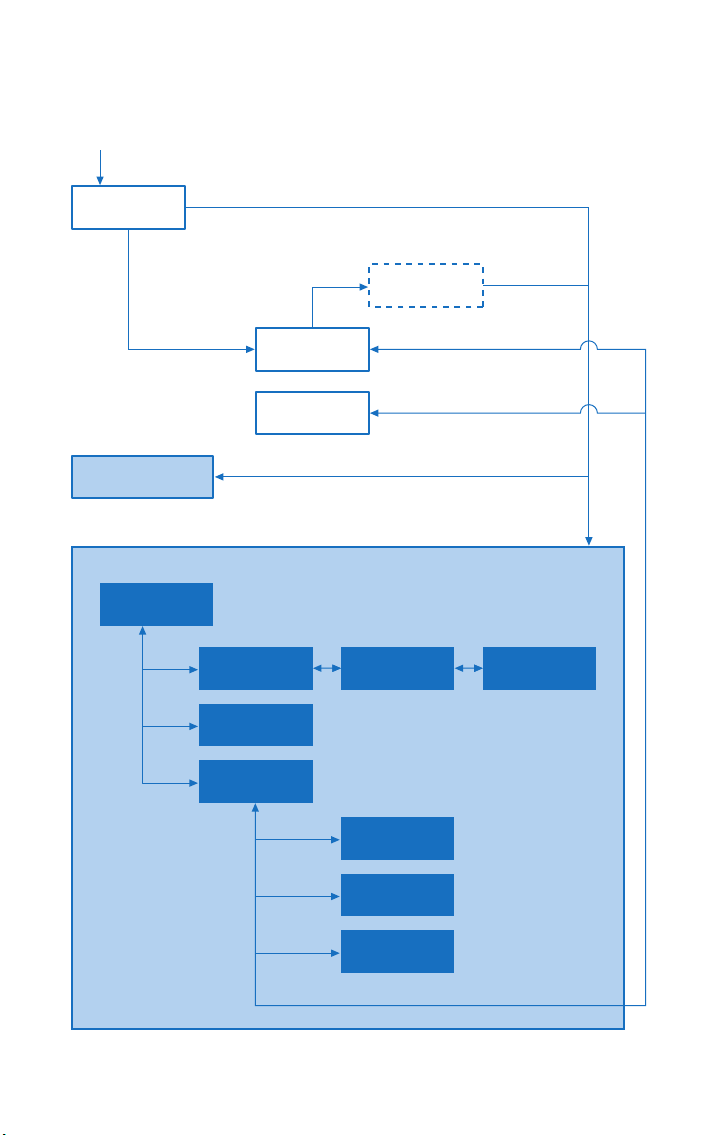
Screen Menu Structure
The following is an approximate representation of the screen menus.
Start application
Opening
When rst started
Main (horizontal)
Top
[Select]
[Balance]
[More]
When a connection has previously been established
Passcode*
Piano Search
Standby Mode
Change device orientation
[Piano Search]
[Standby]
Main (vertical)
Source/Media
Album Song
Balance
More
Authentication
[Record]
[Play Function]
[Short Cut]
* This screen appears when connecting to a piano with the passcode set.
Record
Play Function
Short Cut
Chapter 1 Getting Started
2
Page 6
Starting the Application
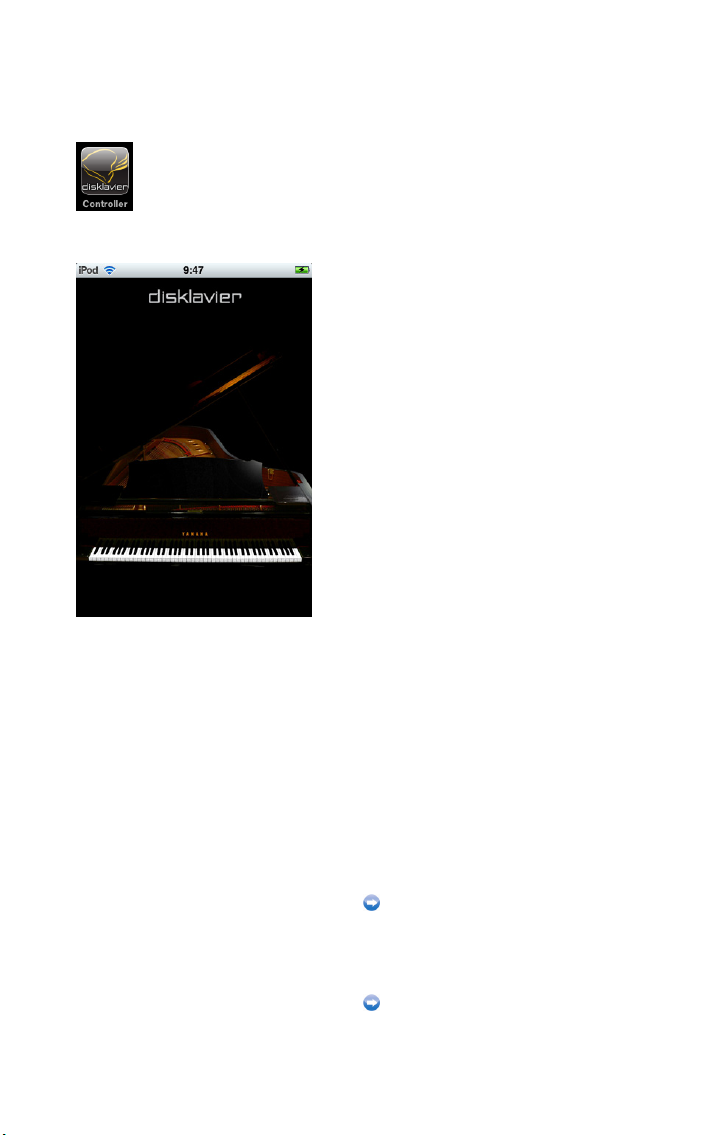
Tap on the application icon.
The opening screen appears.
When you have previously connected to a
piano:
The application connects to that piano
automatically.
Operation during playback (page 13)
When connecting to a piano for the rst
time:
The application searches for a piano.
Searching for a piano (page 4)
Chapter 1 Getting Started
3
Page 7
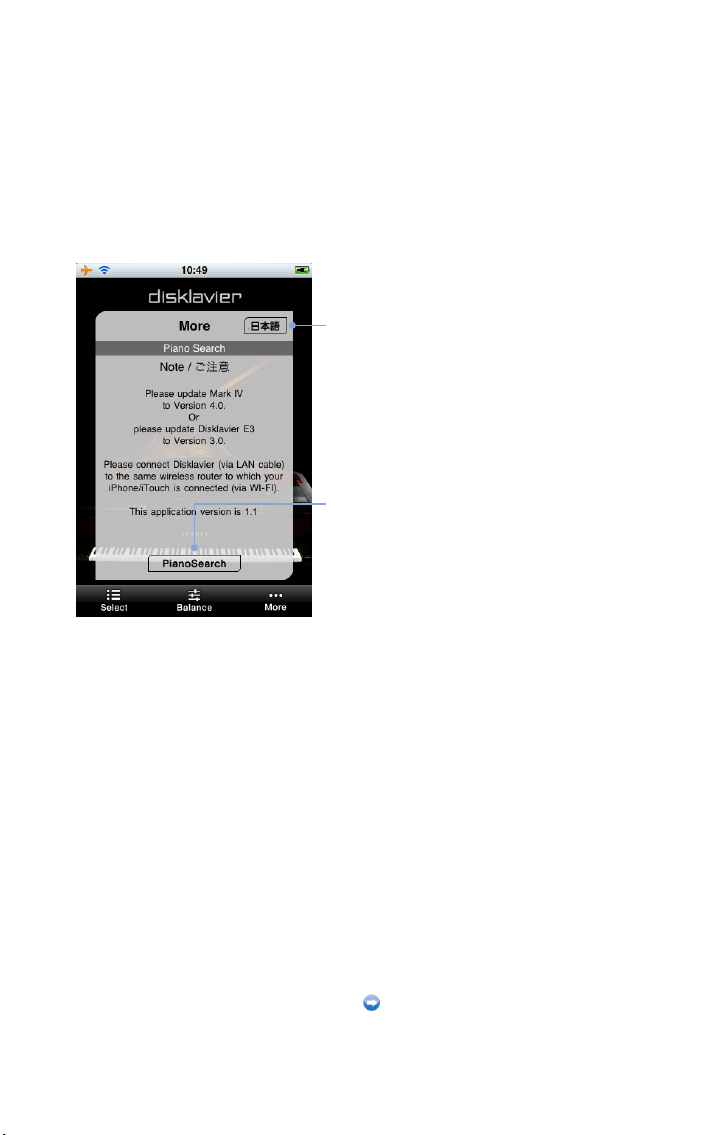
Searching for a Piano
When connecting to a piano for the rst time, you must rst nd the piano to which you want
to connect.
Tap on [Piano Search].
Language switch
Switches the language displayed in this screen
between English and Japanese.
[Piano Search]
Starts searching for pianos.
Once the search is complete, select the piano
to which you want to connect.
Connecting to a piano (page 5)
Chapter 1 Getting Started
4
Page 8

Connecting to a Piano
A list of pianos the application found appears.
Select from the list the piano to which you wish to connect.
Tap on the piano you wish to connect to.
Piano list
[Demo Mode]*
Switches to the demonstration mode, in which
you can check the operations on the Disklavier
Controller even when no pianos are found.
* Operations in demonstration mode are the same as those when
connected to the Disklavier Mark IV.
After completion, perform passcode
authentication if required.
Entering your passcode (page 6)
Setting the passcode (page 30)
Otherwise, start song playback.
Operation during playback (page 13)
Chapter 1 Getting Started
5
Page 9
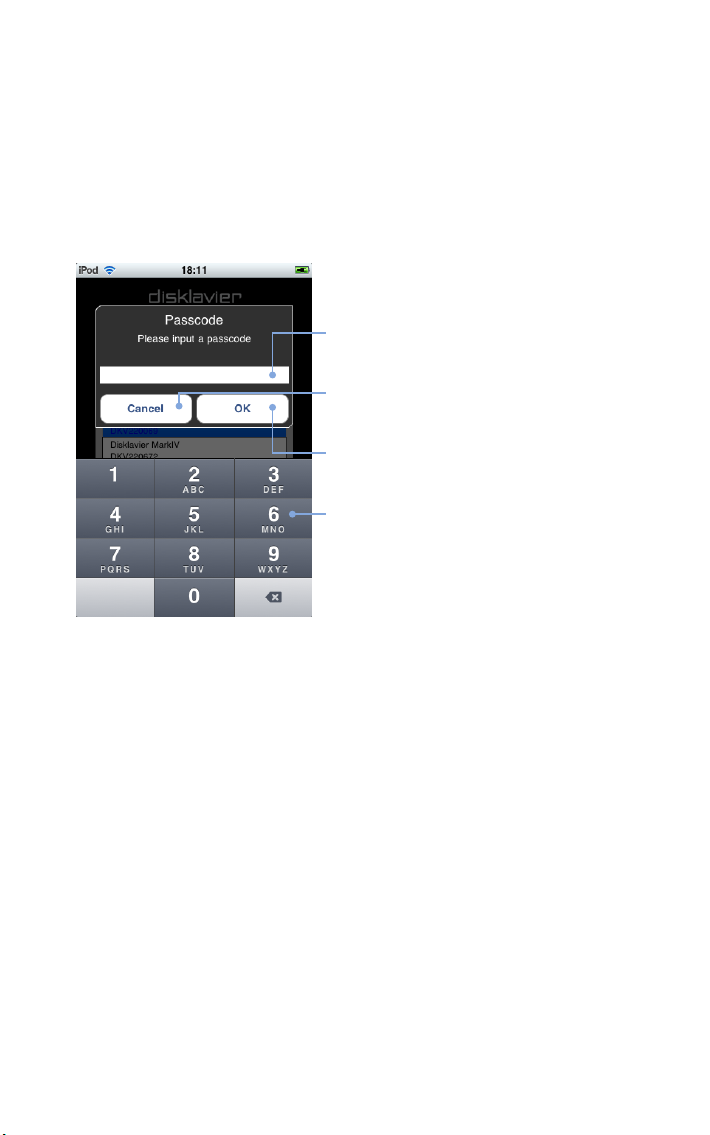
Entering Your Passcode
After connection is complete, carry out authentication by entering your 4-digit passcode.
Enter the passcode you set on the Disklavier.
Enter 4-digit passcode and tap on [OK].
Passcode entry eld
[Cancel]
Returns to piano search.
[OK]
Begins passcode authentication.
Numeric keys
Chapter 1 Getting Started
6
Page 10
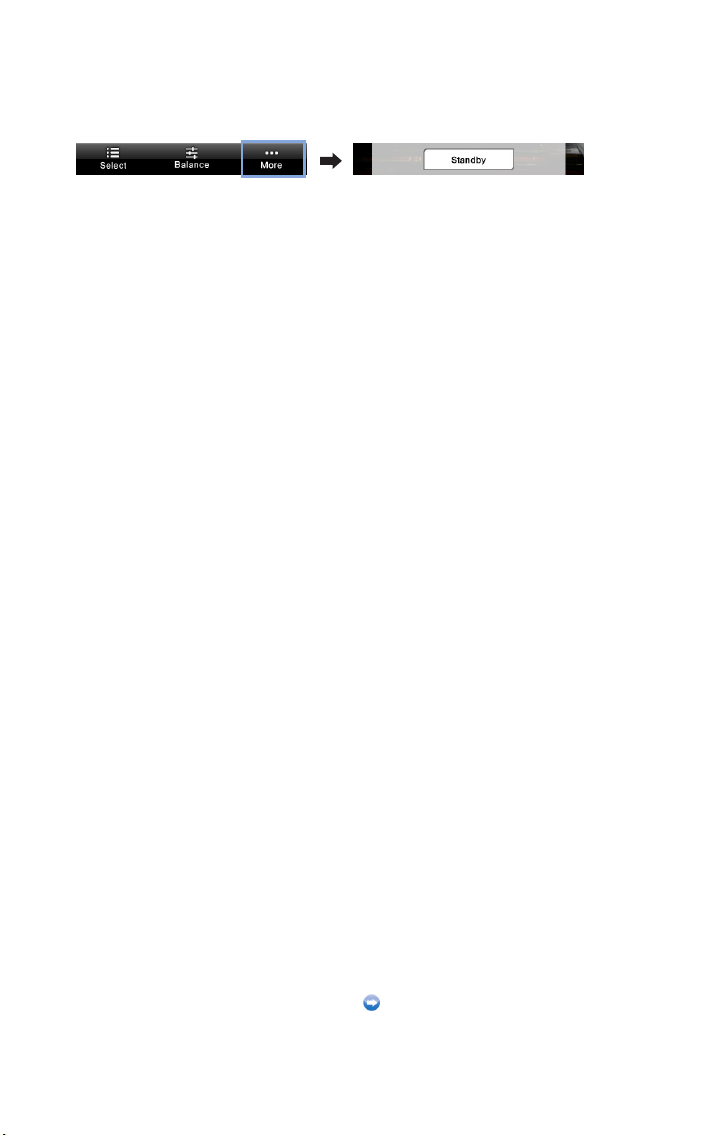
Putting the Disklavier in Standby Mode
Tap on [More] in the toolbar, then on [Standby] in the More screen that appears.
To reactivate your Disklavier…
Reactivating from Standby Mode (page 8)
Chapter 1 Getting Started
7
Page 11
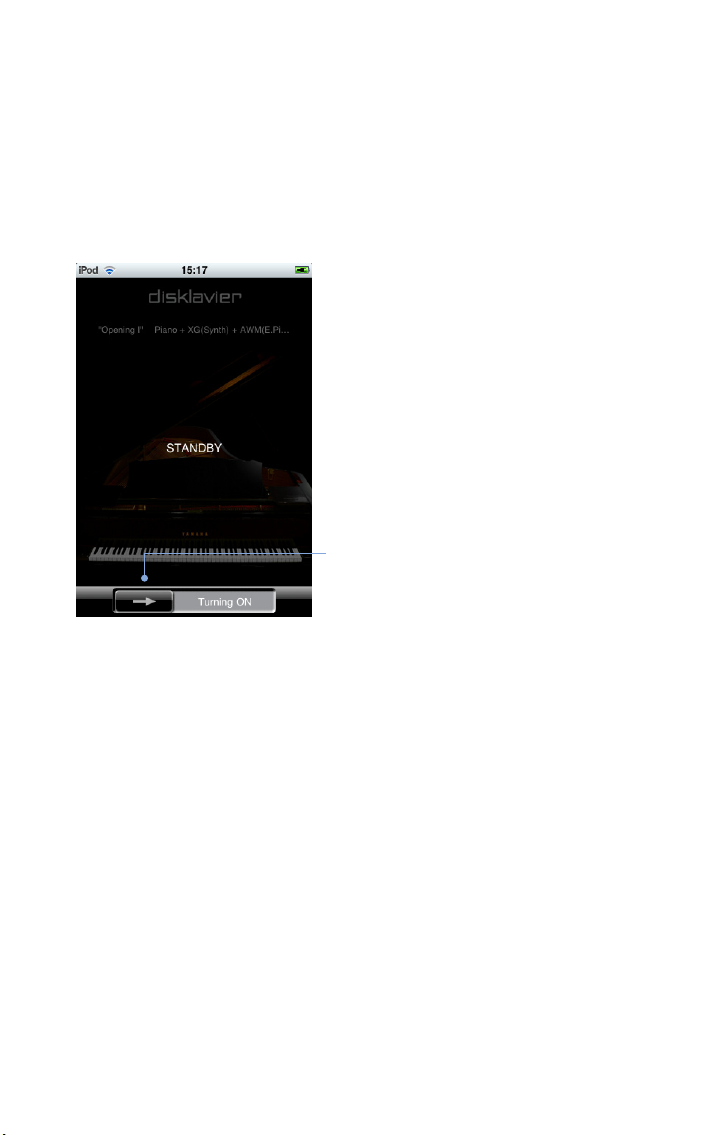
Reactivating from Standby Mode
Use the following screen to reactivate your Disklavier from Standby mode.
Slide the switch to the right.
Switch
Reactivates your Disklavier from Standby mode.
Chapter 1 Getting Started
8
Page 12

Song Playback
2
Introduction
9
Page 13

Selecting a Song
Tap on [Select] in the toolbar.
Tap on the desired source/media.
Source list
Media list
Next, select an album.
Selecting an album (page 11)
Chapter 2 Song Playback
10
Page 14

Selecting a Song (continued)
Tap on the desired album.
[Source]
Returns to source selection.
Album list
[Media]
Returns to media selection.
Album list
Next, select a song.
Selecting a song (page 12)
Chapter 2 Song Playback
11
Page 15

Selecting a Song (continued)
Tap on the desired song.
[Album]
Returns to album selection.
Song list
[Album]
Returns to album selection.
Song list*
* Displaying the list may take time if there are many songs.
The selected song is played back.
Operation during playback (page 13)
Chapter 2 Song Playback
12
Page 16

Operation during Playback
Tapping on the screen during song playback shows the song control panel for various
operations.* Display of the song control panel cycles on and off every time you tap on the
screen.
Tap on the screen during playback.
Song title
[ ] (skip / fast forward)
Skips to the next song when tapped briey (less
than one second).
Fast-forwards through the current song when
tapped for a longer period (at least 1 second).
[ ] (play / pause)
Starts or pauses playback.
Song position
Displays the playback position.
[ ] (skip back / rewind)
Skips to the previous song when tapped briey
(less than one second).
Rewinds through the current song when tapped
for a longer period (at least one second).
* Operations in this application may not always take effect on your
Disklavier immediately.
Chapter 2 Song Playback
13
Page 17

Operation during Playback (continued)
Tap on the screen during playback.
Repeat mode
Cycles through the repeat mode.
: Repeat off
: Single repeat mode
: All repeat mode
: Random repeat mode
Main volume
Adjusts the main volume.
Quiet status*
1
Cycles through the quiet status.
: Acoustic mode
: Quiet mode
: Headphone mode*
*1 You cannot change quiet status when connected to some
models of the Disklavier E3.
*2 For Disklavier E3 upright pianos, this does not appear. For
Disklavier E3 grand pianos and Disklavier Mark IV, the quiet
status is locked to Headphone mode when you connect
headphones.
2
Chapter 2 Song Playback
14
Page 18

DisklavierRadio
Playback
3
Introduction
15
Page 19

Selecting a Channel
Tap on [Select] in the toolbar.
Tap on [DisklavierRadio] or [D-Radio].
[Disklavier Radio]
[D-Radio]
Next, select a channel.
Selecting a channel (page 17)
Chapter 3 DisklavierRadio Playback
16
Page 20

Selecting a Channel (continued)
Tap on the desired channel.
[Source]
Returns to source selection.
Channel list*
* To select channels other than the two complimentary channels,
you must rst log into the Internet Direct Connection (IDC) service
on the Disklavier.
[Media]
Returns to media selection.
Channel list*
* To select channels other than the two complimentary channels,
you must rst log into the Internet Direct Connection (IDC) service
on the Disklavier.
The selected channel is played back.
Operation during playback (page 18)
Chapter 3 DisklavierRadio Playback
17
Page 21

Operation during DisklavierRadio Playback
Tapping on the screen during DisklavierRadio playback shows the song control panel for
various operations.*1 Display of the song control panel cycles on and off every time you tap
on the screen.
Tap on the screen during playback.
Channel title / song title
[Mute Off] / [Mute On]
Cycles the mute function on and off.
Main volume
Adjusts the main volume.
[Back]
Returns to channel selection.
Quiet status*
2
Cycles through the quiet status.
: Acoustic mode
: Quiet mode
: Headphone mode*
*1 Operations in this application may not always take effect on your
Disklavier immediately.
*2 You cannot change quiet status when connected to some
models of the Disklavier E3.
*3 For Disklavier E3 upright pianos, this does not appear. For
Disklavier E3 grand pianos and Disklavier Mark IV, the quiet
status is locked to Headphone mode when you connect
headphones.
3
Chapter 3 DisklavierRadio Playback
18
Page 22

Recording Songs
4
Introduction
19
Page 23

Starting Recording
Tap on [More] in the toolbar, then on [Record] in the More screen that appears.
Tap on [Rec Start] and play the Disklavier.
Counter
[Rec Start]
Starts recording.
[Cancel]
Cancels recording.
Recording will start by playing the Disklavier,
and the counter starts to advance.
Stopping recording (page 21)
Chapter 4 Recording Songs
20
Page 24

Stopping Recording
Tap on [Stop].
[Stop]
Stops recording.
Next, title the song you have just recorded.
Titling the recorded song (page 22)
Chapter 4 Recording Songs
21
Page 25

Titling a Song
After recording the song, you can add a title to that song.
We recommend entering titles in alphanumeric characters.
in titles may not be displayed correctly on your Disklavier.
Enter a title to the recorded song and tap on [OK].
Title entry eld
[Cancel]
Cancels the title entry.
[OK]
Conrms the title entered.
Keyboard
Non-alphanumeric characters
Chapter 4 Recording Songs
22
Page 26

Other Functions
5
Introduction
23
Page 27

Adjusting Sound Source Volume Balance
Tap on [Balance] in the toolbar.
Use the slider to adjust the volume for each sound source.
[Voice]
Adjusts the volume of the piano part.
[TG]
Adjusts the volume of the ensemble part from the
internal tone generator.
[Audio]
Adjusts the volume of software (audio CD, etc).
[Mic]
Adjusts the microphone level.
[Voice]
Adjusts the volume of the piano part.
[TG]
Adjusts the volume of the ensemble part from the
internal tone generator.
[Audio]
Adjusts the volume of software (audio CD, etc).
Chapter 5 Other Functions
24
Page 28

Transposing Songs
Tap on [More] in the toolbar, then on [Play Function] in the More screen that appears.
Use [Transpose ] / [Transpose ] to transpose.
[Transpose ] / [Transpose ]
Adjusts the key in half steps, 24 half-steps lower
or higher (i.e. 2 octaves in either direction).
Chapter 5 Other Functions
25
Page 29

Changing Song Tempo
Tap on [More] in the toolbar, then on [Play Function] in the More screen that appears.
Use the slider to adjust the tempo.
[Tempo]
Adjusts the tempo over the following range:
Disklavier Mark IV: -50% to +20%
Disklavier E3: -50% to +50%
[Reset]
Returns to the default tempo (0%).
Chapter 5 Other Functions
26
Page 30

Cancelling Parts
Tap on [More] in the toolbar, then on [Play Function] in the More screen that appears.
Use [Part Cancel] to switch parts on and off.
[Part Cancel]
Switches the left (L) or right (R) parts on and off.
Chapter 5 Other Functions
27
Page 31

Using Shortcuts
Tap on [More] in the toolbar, then on [Short Cut] in the More screen that appears.
Tap on the desired shortcut.
Shortcut list*
* Shortcuts can only be assigned, edited or deleted on the
Disklavier.
Chapter 5 Other Functions
28
Page 32

Related Information
6
Introduction
29
Page 33

Notes on the Passcode Setting
To prevent others from controlling your Disklavier with the Disklavier Controller, you can set
the passcode on your Disklavier.
Default setting
No passcode is set as default, which means any Disklavier Controller can control your
Disklavier.
How to set the passcode
The passcode can be set in the passcode setting screen of your Disklavier.
For Disklavier Mark IV users:
You can access this screen by tapping
on , then on . Refer
to the Advanced Operating Manual for
more information.
Set the 4-digit number as the passcode.
You can control your Disklavier with the Disklavier Controller by entering the passcode set in
this screen (see page 6).
Forgot passcode?
Delete or reset the passcode in the screen above.
For Disklavier E3 users:
You can access this screen by pressing
[SETUP] on the remote control, then
selecting “Passcode.” Refer to the
Operation Manual for more information.
Chapter 6 Related Information
30
Page 34

Troubleshooting
If you have problems operating the Disklavier, see if any of the symptoms listed below apply
to your problem and follow the recommended remedy.
The Disklavier Controller does not function at all.
♫
Your iPhone/iPod touch/iPad and the Disklavier may not be connected in a wireless
environment. Make sure that your iPhone/iPod touch/iPad is connected to a WiFi access
point that is on the same network as your Disklavier for this application to function.
♫
The rmware of your Disklavier may be earlier than Version 4.00 for Mark IV or Version 3.00
for E3. Check the version of rmware you are using and update the rmware if necessary.
You cannot nd or connect to the desired piano.
♫
You may be using the iPhone/iPod touch/iPad too far from the wireless router to which
your Disklavier is connected. Make sure that your iPhone/iPod touch/iPad is within the
specied communication range.
The Disklavier Controller does not respond even when you tap on the buttons.
♫
Restart your iPhone/iPod touch/iPad.
♫
Uninstall the Disklavier Controller from your iPhone/iPod touch/iPad, and then reinstall it.
Chapter 6 Related Information
31
Page 35

Trademarks and Copyrights
• Yamaha and Disklavier are trademarks of Yamaha Corporation.
• Apple, iPhone, and iPod touch are trademarks of Apple Inc., registered in the U.S. and
other countries. iPad is a trademark of Apple Inc.
Chapter 6 Related Information
32
Page 36

Copyright © 2010 by Yamaha Corporation
P.O.Box 1, Hamamatsu, 430-8650 Japan
Sep-10
 Loading...