

Page 1

CLP-170/CLP-150
CLP-170
CLP-150
Owner's Manual
IMPORTANT
Check your power supply
Make sure that your local AC mains voltage matches the voltage specified on the name plate
on the bottom panel. In some areas a voltage selector may be provided on the bottom panel of
the main keyboard unit near the power cord. Make sure that the voltage selector is set for the
voltage in your area. The voltage selector is set at 240V when the unit is initially shipped. To
change the setting use a "minus" screwdriver to rotate the selector dial so that the correct voltage
appears next to the pointer on the panel.
Page 2
Introduction
SPECIAL MESSAGE SECTION
PRODUCT SAFETY MARKINGS:
products may have either labels similar to the graphics
shown below or molded/stamped facsimiles of these
graphics on the enclosure. The explanation of these
graphics appears on this page. Please observe all cautions
indicated on this page and those indicated in the safety
instruction section.
Y amaha electronic
CAUTION
RISK OF ELECTRIC SHOCK
DO NOT OPEN
CAUTION: TO REDUCE THE RISK OF ELECTRIC SHOCK.
DO NOT REMOVE COVER (OR BACK).
NO USER-SERVICEABLE PARTS INSIDE.
REFER SERVICING TO QUALIFIED SERVICE PERSONNEL.
See bottom of Keyboard enclosure for graphic symbol markings
The exclamation point within the
equilateral triangle is intended to alert
the user to the presence of important
operating and maintenance (servicing) instructions in the literature
accompanying the product.
The lightning flash with arrowhead
symbol, within the equilateral triangle, is intended to alert the user to the
presence of uninsulated “dangerous
voltage” within the product’s enclosure that may be of sufficient magnitude to constitute a risk of electrical
shock.
Battery Notice:
rechargable battery which (if applicable) is soldered in
place. The average life span of this type of battery is
approximately five years. When replacement becomes
necessary, contact a qualified service representative to
perform the replacement.
Warning:
incinerate this type of battery. Keep all batteries away
from children. Dispose of used batteries promptly and as
regulated by applicable laws. Note: In some areas, the
servicer is required by law to return the defective parts.
However, you do have the option of having the servicer
dispose of these parts for you.
Disposal Notice:
beyond repair, or for some reason its useful life is considered to be at an end, please observe all local, state, and
federal regulations that relate to the disposal of products
that contain lead, batteries, plastics, etc.
NOTICE:
edge relating to how a function or effect w orks (when the
unit is operating as designed) are not covered by the manufacturer’ s warranty, and are therefore the owners responsibility. Please study this manual carefully and consult
your dealer before requesting service.
NAME PLATE LOCATION:
cates the location of the name plate. The model number,
serial number, power requirements, etc., are located on
this plate. You should record the model number, serial
number, and the date of purchase in the spaces provided
below and retain this manual as a permanent record of
your purchase.
This product MAY contain a small non-
Do not attempt to recharge, disassemble, or
Should this product become damaged
Service charges incurred due to lack of knowl-
The graphic below indi-
IMPORTANT NOTICE:
are tested and approved by an independent safety testing
laboratory in order that you may be sure that when it is
properly installed and used in its normal and customary
manner, all foreseeable risks have been eliminated. DO
NOT modify this unit or commission others to do so
unless specifically authorized by Yamaha. Product performance and/or safety standards may be diminished.
Claims filed under the expressed warranty may be denied
if the unit is/has been modified. Implied warranties may
also be affected.
SPECIFICATIONS SUBJECT TO CHANGE:
information contained in this manual is believed to be
correct at the time of printing. Howev er , Yamaha reserves
the right to change or modify any of the specifications
without notice or obligation to update existing units.
ENVIRONMENTAL ISSUES:
duce products that are both user safe and environmentally
friendly. We sincerely believe that our products and the
production methods used to produce them, meet these
goals. In keeping with both the letter and the spirit of the
law, we want you to be aware of the following:
All Yamaha electronic products
The
Yamaha strives to pro-
CLP-170
Model
Serial No.
Purchase Date
CLP-150
92-469
1
Page 3
PRECAUTIONS
PLEASE READ CAREFULLY BEFORE PROCEEDING
* Please keep this manual in a safe place for future reference.
W ARNING
Always follo w the basic precautions listed belo w to av oid the possibility of serious injury or even death
from electrical shock, short-circuiting, damages, fire or other hazards. These precautions include, but
are not limited to, the following:
Power supply/Power cord
• Only use the voltage specified as correct for the instrument.
The required voltage is printed on the name plate of the
instrument.
• Check the electric plug periodically and remove any dirt or
dust which may have accumulated on it.
• Use only the supplied power cord/plug.
• Do not place the power cord near heat sources such as
heaters or radiators, and do not excessively bend or otherwise
damage the cord, place heavy objects on it, or place it in a
position where anyone could walk on, trip over , or roll an ything
over it.
Do not open
• Do not open the instrument or attempt to disassemble the
internal parts or modify them in any way. The instrument
contains no user-serviceable parts. If it should appear to be
malfunctioning, discontinue use immediately and have it
inspected by qualified Yamaha service personnel.
CAUTION
Water warning
• Do not expose the instrument to rain, use it near water or in
damp or wet conditions, or place containers on it containing
liquids which might spill into any openings.
• Never insert or remove an electric plug with wet hands.
Fire warning
• Do not put burning items, such as candles, on the unit.
A burning item may fall over and cause a fire.
If you notice any abnormality
• If the power cord or plug becomes frayed or damaged, or if
there is a sudden loss of sound during use of the instrument,
or if any unusual smells or smoke should appear to be caused
by it, immediately turn off the power switch, disconnect the
electric plug from the outlet, and have the instrument
inspected by qualified Yamaha service personnel.
Always follow the basic precautions listed below to avoid the possibility of physical injury to you or
others, or damage to the instrument or other property. These precautions include, but are not limited
to, the following:
Power supply/Power cord
• When removing the electric plug from the instrument or an
outlet, always hold the plug itself and not the cord. Pulling by
the cord can damage it.
• Remove the electric plug from the outlet when the instrument
is not to be used for extended periods of time, or during
electrical storms.
• Do not connect the instrument to an electrical outlet using a
multiple-connector. Doing so can result in lower sound quality,
or possibly cause overheating in the outlet.
Assembly
• Read carefully the attached documentation explaining the
assembly process. Failure to assemble the instrument in the
proper sequence might result in damage to the instrument or
even injury.
Location
• Do not expose the instrument to excessive dust or vibrations,
or extreme cold or heat (such as in direct sunlight, near a
heater, or in a car during the day) to prevent the possibility of
panel disfiguration or damage to the internal components.
• Do not use the instrument in the vicinity of a TV, radio, stereo
equipment, mobile phone, or other electric devices.
Otherwise, the instrument, TV, or radio may generate noise.
• Do not place the instrument in an unstable position where it
might accidentally fall over.
• Before moving the instrument, remove all connected cables.
• Do not place the instrument against a wall (allow at least 3 cm/
one-inch from the wall), since this can cause inadequate air
circulation, and possibly result in the instrument overheating.
(1)B-7
1/2
CLP-170/150
3
Page 4
Connections
• Before connecting the instrument to other electronic
components, turn off the power for all components. Before
turning the power on or off for all components, set all volume
levels to minimum. Also, be sure to set the volumes of all
components at their minimum levels and gradually raise the
volume controls while playing the instrument to set the desired
listening level.
Maintenance
• In the case of a model with a polished finish, gently remove
dust and dirt with a soft cloth. Do not wipe too hard since
small particles of dirt can scratch the instrument's finish.
• When cleaning the instrument, use a soft, dry or slightly damp
cloth. Do not use paint thinners, solvents, cleaning fluids, or
chemical-impregnated wiping cloths.
Handling caution
•Take care that the key cover does not pinch your fingers, and
do not insert a finger or hand in any gaps on the key cover or
instrument.
•Never insert or drop paper, metallic, or other objects into the
gaps on the key cover, panel or keyboard. If this happens, turn
off the power immediately and unplug the power cord from the
AC outlet. Then have the instrument inspected by qualified
Yamaha service personnel.
• Do not place vinyl, plastic or rubber objects on the instrument,
since this might discolor the panel or keyboard.
• In the case of a model with a polished finish, bumping the
surface of the instrument with metal, porcelain, or other hard
objects can cause the finish to crack or peel. Use caution.
• Do not rest your weight on, or place heavy objects on the
instrument, and do not use excessive force on the buttons,
switches or connectors.
• Do not operate the instrument for a long period of time at a
high or uncomfortable volume level, since this can cause
permanent hearing loss. If you experience any hearing loss or
ringing in the ears, consult a physician.
Using the bench (If included)
• Do not place the bench in an unstable position where it might
accidentally fall over.
• Do not play carelessly with or stand on the bench. Using it as
a tool or step-ladder or for any other purpose might result in
accident or injury.
• Only one person should sit on the bench at a time, in order to
prevent the possibility of accident or injury.
• In the case of a model which the height adjustable bench
included, do not attempt to adjust the bench height while
sitting on the bench, since this can cause excessive force to
be imposed on the adjustment mechanism, possibly resulting
in damage to the mechanism or even injury.
• If the bench screws become loose due to extensive long-term
use, tighten them periodically using the included tool.
Saving data
Saving and backing up your data
• Current data (see page 46) is lost when you turn off the power
to the instrument. Save the data to a floppy disk (CLP-170)/
the storage memory (see page 46).
Saved data may be lost due to malfunction or incorrect
operation. Save important data to a floppy disk (CLP-170).
Backing up the floppy disk (CLP-170)
•To protect against data loss through media damage, we
recommend that you save your important data onto two floppy
disks.
Yamaha cannot be held responsible for damage caused by improper use or modifications to the instrument, or data that is lost or
destroyed.
Always turn the power off when the instrument is not in use.
(1)B-7 2/2
4 CLP-170/150
Page 5
Thank you for choosing the Yamaha Clavinova CLP-170/150. In order to make the most of your
Clavinova’s performance potential and features, please read this Owner’s Manual thoroughly,
and keep it in a safe place for later reference.
About this Owner’s Manual and Reference Booklet
This manual consists of four main sections: “Introduction,” “Basic Operation,” “Detailed Settings,” and “Appendix.”
Also, a separate “Reference Booklet” is provided.
Introduction:
Basic Operation:
Detailed Settings:
Appendix:
Reference Booklet:
• The models CLP-170/150 will be referred to as the CLP/Clavinova in this Owner’s Manual.
• The illustrations and LCD screens as shown in this Owner’s Manual are for instructional purposes only,
and may appear somewhat different from those on your instrument.
• Copying of the commercially available software is strictry prohibited except for your personal use.
COPYRIGHT NOTICE
This product incorporates and bundles computer programs and contents in which Yamaha owns copyrights or with respect to which it has license to use others’ copyrights. Such copyrighted materials include,
without limitation, all computer software, MIDI files, WAVE data and sound recordings. Any unauthorized
use of such programs and contents outside of personal use is not permitted under relevant laws. Any violation of copyright has legal consequences. DON’T MAKE, DISTRIBUTE OR USE ILLEGALCOPIES.
Please read this section first. In the “Application Index” section on page 10 and “Features” on
page 14, you can learn how to use the Clavinova and its functions in particular situations.
This main section explains how to use the basic functions. Refer to this section while you
play the Clavinova. If you have questions or come across the words you do not know, refer
to the section entitled “Questions about Operations and Functions” on page 102, or the
“Index” on page 118.
This section explains how to make detailed settings for the Clavinova’s various functions.
Refer to this section as necessary.
This section introduces troubleshooting, a description of preset voices, and other reference
material.
XG Vo ice List, MIDI Data Format, etc.
■ Trademarks
• Apple and Macintosh are trademarks of Apple Computer, Inc., registered in the U.S. and other countries.
• Windows is the registered trademark of Microsoft® Corporation.
All other trademarks are the property of their respective holders.
“The Clavinova-Computer Connection,”
what you can do with your Clavinova and a personal computer and how to set up a Clavinova-Computer
system (the manual is not written for any specific models). The document is available as a PDF file (in
English) at the following Internet address:
Clavinova Web site (English only): http://www.yamahaclavinova.com/
Yamaha Manual Library: http://www2.yamaha.co.jp/manual/english/
is a supplementary guidebook that describes, for beginners,
CLP-170/150
5
Page 6

Table of contents
Introduction.......................................................... 2
PRECAUTIONS........................................................................................................................................ 3
About this Owner’s Manual and Reference Booklet..................................................................................................... 5
Table of contents ................................................................................................................................... 6
Application Index................................................................................................................................. 10
Handling the Floppy Disk Drive (FDD) and Floppy Disk (CLP-170).................................................... 12
Maintenance ........................................................................................................................................ 13
Included Accessories ............................................................................................................................ 13
Features ................................................................................................................................................ 14
Before Using the Clavinova.................................................................................................................. 16
About the key cover ...................................................................................................................................................... 16
About the music rest..................................................................................................................................................... 16
About the music braces................................................................................................................................................. 16
Turning the power on................................................................................................................................................... 17
Adjusting the display contrast ...................................................................................................................................... 18
Setting the volume ........................................................................................................................................................ 18
Using headphones......................................................................................................................................................... 18
Performing the iAFC automatic adjustment (CLP-170) ............................................................................................ 18
Basic Operation .................................................. 19
Part Names........................................................................................................................................... 20
Listening to the Demonstration Tunes................................................................................................ 22
Listening to 50 Piano Preset Songs ..................................................................................................... 24
Playing the 50 piano preset songs ................................................................................................................................ 24
Practicing a one-hand part using 50 preset songs ....................................................................................................... 26
Selecting and Playing Voices ...............................................................................................................28
Selecting Voices............................................................................................................................................................. 28
Using the pedals ............................................................................................................................................................ 29
Adding variation to the sound [BRILLIANCE]/[REVERB]/[CHORUS].................................................................. 30
To enhance the acoustic realism of the sound ...[iAFC (Instrumental Active Field Control)] (CLP-170) ............. 32
Combining two voices (Dual mode)............................................................................................................................ 33
Splitting the keyboard range and playing two different voices (Split mode) ............................................................ 35
Using the metronome................................................................................................................................................... 37
Recording Your Performance............................................................................................................... 38
Recording a New Song.................................................................................................................................................. 38
Recording to [TRACK 1]........................................................................................................................................ 38
Re-recording TRACK 1........................................................................................................................................... 40
Re-recording TRACK 1 partially............................................................................................................................ 41
Recording to [TRACK2]......................................................................................................................................... 42
Recording to the third or more tracks [EXTRA TRACKS] .................................................................................. 43
Other recording techniques.......................................................................................................................................... 43
6
CLP-170/150
Page 7

Table of contents
Changing a voice or tempo after recording........................................................................................................... 44
Adjusting the volume balance between playback and your performance [SONG BALANCE] ......................... 45
Recording in Dual or Split mode ........................................................................................................................... 45
Saving Recorded Songs and Handling the Files...[FILE]...................................................................... 46
Clavinova memory.................................................................................................................................................. 46
Basic file operation.................................................................................................................................................. 47
Saving recorded or other songs to Clavinova Storage memory...[SaveToMemory]................................................. 48
Saving recorded or other songs to floppy disk...[SaveToDisk] (CLP-170)................................................................ 49
Deletes a song from the Clavinova’s save memory or (CLP-170 only) from a floppy disk...[DeleteSong]............. 50
Renaming a song...[RenameSong]............................................................................................................................... 51
Copying data from one floppy disk to another...[CopyDisk] (CLP-170).................................................................. 52
Formatting a floppy disk...[FormatDisk] (CLP-170).................................................................................................. 53
Automatically open a song when the disk is inserted [FloppyDiskSongAutoOpen] (CLP-170) .............................54
Changing the type of characters on screen...[CharacterCode]................................................................................... 54
Playing Back Recorded Songs and Commercially-available Music Data............................................. 55
Playing back a song ....................................................................................................................................................... 55
Turning track playback on and off............................................................................................................................... 57
Supported song data type ............................................................................................................................................. 57
Connections ......................................................................................................................................... 59
Connectors .................................................................................................................................................................... 59
Connecting a personal computer................................................................................................................................. 61
Detailed Settings ................................................ 67
Detailed Settings.................................................................................................................................. 68
Parameter List ............................................................................................................................................................... 68
Making detailed settings ...............................................................................................................................................71
Detailed settings for recording and playback [SONG SETTING] ........................................................ 73
Correcting note timing [Quantize].............................................................................................................................. 73
Specifying whether playback starts immediately along with the first voicing [QuickPlay]...................................... 74
Auditioning the channels [ChannelListen] ................................................................................................................. 74
Deleting data from each channel [ChannelClear]....................................................................................................... 74
Specifying the range and playing back repeatedly [FromToRepeat] ......................................................................... 74
Playing back the phrase specified by the phrase number [PhraseMark] ................................................................... 75
Playing back a song repeatedly [SongRepeat] .............................................................................................................75
Detailed settings for the metronome METRONOME [SETTING]........................................................ 76
Setting the metronome time signature [TimeSignature]............................................................................................ 76
Setting the metronome volume level [MetronomeVolume]...................................................................................... 76
Selecting the metronome voice [MetronomeSound] ................................................................................................. 76
Detailed settings for the voices [VOICE SETTING].............................................................................. 77
Setting the octave [Octave]........................................................................................................................................... 78
Setting the volume level [Volume] .............................................................................................................................. 78
Setting the position of right and left channels [Pan] .................................................................................................. 78
Make fine adjustments to the pitch (only in Dual mode) [Detune].......................................................................... 78
Selecting the reverb type [ReverbType]....................................................................................................................... 79
CLP-170/150
7
Page 8

Table of contents
Setting the reverb depth [ReverbSend]........................................................................................................................ 79
Selecting the chorus type [Chorus Type]..................................................................................................................... 79
Setting the chorus depth [ChorusSend] ...................................................................................................................... 79
Setting the chorus on/off [ChorusOnOff]................................................................................................................... 80
Selecting the DSP type [DSP Type (DSP)] ..................................................................................................................80
Setting the speed of the vibraphone vibrato effect [VibeRotorSpeed]....................................................................... 80
Turning the vibraphone vibrato effect on/off [VibeRotorOnOff (RotorOnOff)] ....................................................81
Setting the rotation speed of the rotary speaker [RotarySpeed (Rot.Speed)]............................................................ 81
Adjusting the depth of the DSP effect [DSPDepth].................................................................................................... 81
Adjusting the brightness of the sound [Brightness].................................................................................................... 81
Adjusting the resonance effect [HarmonicContent (Harmonic)] .............................................................................81
Adjusting the low-range frequency of the equalizer [EQ LowFreq. (EQ L.Freq)]....................................................82
Adjusting the low-range gain (amount of boost/cut) of the equalizer [EQ LowGain]............................................. 82
Adjusting the high-range frequency of the equalizer [EQ HighFreq. (EQ H.Freq)] ................................................ 82
Adjusting the high-range gain (amount of boost/cut) of the equalizer [EQ HighGain].......................................... 82
Setting the touch sensitivity [TouchSense].................................................................................................................. 83
Setting the right pedal function [RPedal].................................................................................................................... 83
Setting the center pedal function [MPedal] ................................................................................................................ 83
Setting the left pedal function [LPedal]....................................................................................................................... 84
Setting the auxiliary pedal function [AuxPedal] ......................................................................................................... 84
Detailed settings for iAFC [iAFC SETTING] (CLP-170)......................................................................... 85
Selecting the iAFC type [iAFC Type]........................................................................................................................... 85
Adjusting the iAFC depth [iAFC Depth]..................................................................................................................... 85
Calibration (automatic adjustment) [Calibration]..................................................................................................... 86
Restoring the default iAFC settings [iAFC Default].................................................................................................... 86
MIDI [MIDI SETTING]........................................................................................................................... 87
About MIDI................................................................................................................................................................... 87
Setting the MIDI transmit channel [MidiOutChannel] ............................................................................................. 88
Setting the MIDI receive channel [MidiInChannel]................................................................................................... 88
Setting Local control on/off [LocalControl]................................................................................................................ 89
Selecting performance from the keyboard or song data for MIDI transmission [MidiOutSelect].......................... 89
Selecting a type of data received via MIDI [ReceiveParameter]................................................................................. 89
Selecting a type of data transmitted via MIDI [TransmitParameter] ........................................................................ 89
Transmitting the initial settings on the panel [InitialSetup]...................................................................................... 90
Executing voice data bulk dump [VoiceBulkDump].................................................................................................. 90
Other settings ...................................................................................................................................... 91
Selecting a touch response [TouchResponse] ............................................................................................................. 91
Fine tuning the pitch [Tune]........................................................................................................................................ 91
Selecting a tuning curve for a piano voice [PianoTuningCurve]............................................................................... 91
Selecting a scale [Scale]................................................................................................................................................. 92
Specifying the Split Point [Split Point]........................................................................................................................ 92
Changing the key [Transpose] ..................................................................................................................................... 92
Adjusting the depth of the Soft pedal [SoftPedalDepth] ............................................................................................ 93
Depth of string resonance [StringResonanceDepth] .................................................................................................. 93
Depth of sustain sampling for the damper pedal [SustainSamplingDepth].............................................................. 93
Specify the volume of the key-off sound [KeyOffSamplingDepth] ........................................................................... 93
Selecting a pedal function for vibraphone [VibraphonePedalMode]........................................................................ 93
Assign the SONG [START/STOP] function to the pedal [PedalStart/Stop]............................................................. 94
Selecting a type of auxiliary pedal [AuxPedalType].................................................................................................... 94
Setting the point at which the damper pedal starts to affect the sound [HalfPedalPoint] ....................................... 94
8
CLP-170/150
Page 9

Table of contents
Pitch bend range [PitchBendRange]............................................................................................................................ 94
Switch the speaker on/off [Speaker] ............................................................................................................................ 95
Selecting items saved at shutdown [MemoryBackUp] ............................................................................................... 95
Restoring the normal (default) settings [FactorySet] ................................................................................................. 95
Other method for restoring the normal settings......................................................................................................... 95
Message List ......................................................................................................................................... 96
Questions about Operations and Functions...................................................................................... 102
Appendix .......................................................... 105
Troubleshooting................................................................................................................................. 106
Data Compatibility............................................................................................................................. 107
Preset Voice List ................................................................................................................................. 109
Voice Combination Examples (Dual and Split) ................................................................................. 111
CLP-150: Keyboard Stand Assembly.................................................................................................. 112
CLP-170: Keyboard Stand Assembly.................................................................................................. 115
Index................................................................................................................................................... 118
CLP-170/150
9
Page 10
Application Index
Use this index to find reference pages that may be helpful for your application and situation.
Listening
Listening to demo songs...............................................“Listening to the Demonstration Tunes” on page 22
“Playing the 50 piano preset songs” on page 24
Listening to demo songs with different voices............“Listening to the Demonstration Tunes” on page 22
Listening to songs from “50 greats for the Piano” ..............“Playing the 50 piano preset songs” on page 24
Listening to my recorded performance ............................................ “Recording to [TRACK 1]” on page 38
“Playing back a song” on page 55
Listening to songs in a floppy disk (CLP-170) .......................................... “Playing back a song” on page 55
Playing
Using three pedals.............................................................................................“Using the pedals” on page 29
Playing an accompaniment that matches pitch .......................“Changing the key [Transpose]” on page 92
Changing tonal color
Viewing the list of voices................................................................................ “Preset Voice List” on page 109
Simulating a concert hall........................................................................................... “[REVERB]” on page 31
Combining two voices ..................................................... “Combining two voices (Dual mode)” on page 33
Playing different sounds with left and right hands
...........................“Splitting the keyboard range and playing two different voices (Split mode)” on page 35
Making a voice brighter and sharper, or softer and smoother ........................“[BRILLIANCE]” on page 30
Adding spread to the sound.................................................................................... “[CHORUS]” on page 31
Making the sound three-dimensional
........................................................... “[iAFC (Instrumental Active Field Control)] (CLP-170)” on page 32
Practicing
10
Muting the right- or left-hand part ........... “Practicing a one-hand part using 50 preset songs” on page 26
Practicing with an accurate and steady tempo.......................................“Using the metronome” on page 37
Practicing using your recorded song ..........................................“Recording Your Performance” on page 38
“Turning track playback on and off” on page 57
Recording
Recording your performance...................................................... “Recording Your Performance” on page 38
Saving recorded songs to floppy disks (CLP-170) or memory
...........................................................“Saving Recorded Songs and Handling the Files...[FILE]” on page 46
CLP-170/150
Page 11
Application Index
Use this index to find reference pages that may be helpful for your application and situation.
Settings
Making detailed settings for recording and playback
............................................“Detailed settings for recording and playback [SONG SETTING]” on page 73
Making detailed settings for the metronome
......................................... “Detailed settings for the metronome METRONOME [SETTING]” on page 76
Making detailed settings for the voices
................................................................. “Detailed settings for the voices [VOICE SETTING]” on page 77
Making detailed settings for MIDI ....................................................“MIDI [MIDI SETTING]” on page 87
Making detailed settings for the Clavinova.........................................................“Other settings” on page 91
Connecting the Clavinova to other devices
What is MIDI?......................................................................................................... “About MIDI” on page 87
Recording your performance “AUX OUT [R][L] Pin jacks (LEVEL FIXED), [R][L/L+R] Phone jacks” on
page 60
Raising the volume .. “AUX OUT [R][L] Pin jacks (LEVEL FIXED), [R][L/L+R] Phone jacks” on page 60
Outputting other instruments’ sound from the Clavinova.......... “AUX IN [R], [L/L+R] jacks” on page 60
Connecting a computer........................................................ “Connecting a personal computer” on page 61
Assembling
Assemble/disassemble the Clavinova............................ “CLP-150: Keyboard Stand Assembly” on page 112
........................................................................................ “CLP-170: Keyboard Stand Assembly” on page 115
Quick solution
What the Clavinova offers............................................................................. “Application Index” on page 10
“Features” on page 14
Returning to the main screen.................................................................................“EXIT button” on page 20
Resetting the Clavinova to the default setting
................................................................“Restoring the normal (default) settings [FactorySet]” on page 95
Meaning of the messages........................................................................................ “Message List” on page 96
If you have questions about operations and functions
............................................................................“Questions about Operations and Functions” on page 102
Troubleshooting............................................................................................. “Troubleshooting” on page 106
CLP-170/150
11
Page 12

Handling the Floppy Disk Drive(FDD)
and Floppy Disk (CLP-170)
Precautions
Be sure to handle floppy disks and treat the disk drive with
care. Follow the important precautions below.
Compatible Disk Type
3.5" 2DD and 2HD type floppy disks can be used.
Inserting/Ejecting Floppy Disks
To insert a floppy disk into the disk drive:
Hold the disk so that the label of the disk is facing upward and
the sliding shutter is facing forward, towards the disk slot.
Carefully insert the disk into the slot, slowly pushing it all the
way in until it clicks into place and the eject button pops out.
Drive lamp
To eject a floppy disk:
Before ejecting the disk, be sure to confirm that the floppy
disk drive is stopped. If the disk drive is operating (during
the [SaveToDisk] (P53), [DeleteSong] (P53), [RenameSong]
(P54), [CopyDisk] (P55), or [FormatDisk] (P56) operation), the Clavinova displays [Executing].
Never attempt to remove the disk or turn the power off
when the disk drive is operating. Doing so can damage the
disk and possibly the disk drive.
Press the eject button slowly as far as it will go; the disk will
automatically pop out. When the disk is fully ejected, carefully remove it by hand.
Eject button
Be sure to remove the floppy disk from the disk drive before
turning off the power. A floppy disk left in the drive for
extended periods can easily pick up dust and dirt that can
cause data read and write errors.
Cleaning the Disk Drive Read/Write Head
• Clean the read/write head regularly. This instrument
employs a precision magnetic read/write head which,
after an extended period of use, will pick up a layer of
magnetic particles from the disks used that will eventually
cause read and write errors.
• To maintain the disk drive in optimum working order
Yamaha recommends that you use a commercially-available dry-type head cleaning disk to clean the head about
once a month. Ask your Yamaha dealer about the availability of proper head-cleaning disks.
• Never insert anything but floppy disks into the disk drive.
Other objects may cause damage to the disk drive or
floppy disks.
About the Floppy Disks
• To handle floppy disks with care:
• Do not place heavy objects on a disk or bend or apply
pressure to the disk in any way. Always keep floppy disks
in their protective cases when they are not in use.
• Do not expose the disk to direct sunlight, extremely high
or low temperatures, or excessive humidity, dust or liquids.
• Do not open the sliding shutter and touch the exposed
surface of the floppy disk inside.
• Do not expose the disk to magnetic fields, such as those
produced by televisions, speakers, motors, etc., since
magnetic fields can partially or completely erase data on
the disk, rendering it unreadable.
• Never use a floppy disk with a deformed shutter or housing.
• Do not attach anything other than the provided labels to
a floppy disk. Also make sure that labels are attached in
the proper location.
If the eject button is pressed too quickly, or if it is not
pressed in as far as it will go, the disk may not eject properly.
The eject button may become stuck in a half-pressed position with the disk extending from the drive slot by only a few
millimeters. If this happens, do not attempt to pull out the
partially ejected disk, since using force in this situation can
damage the disk drive mechanism or the floppy disk. To
remove a partially ejected disk, try pressing the eject button
once again, or push the disk back into the slot and then
repeat the eject procedure.
CLP-170/150
12
Page 13
Handling the Floppy Disk Drive(FDD) and Floppy Disk
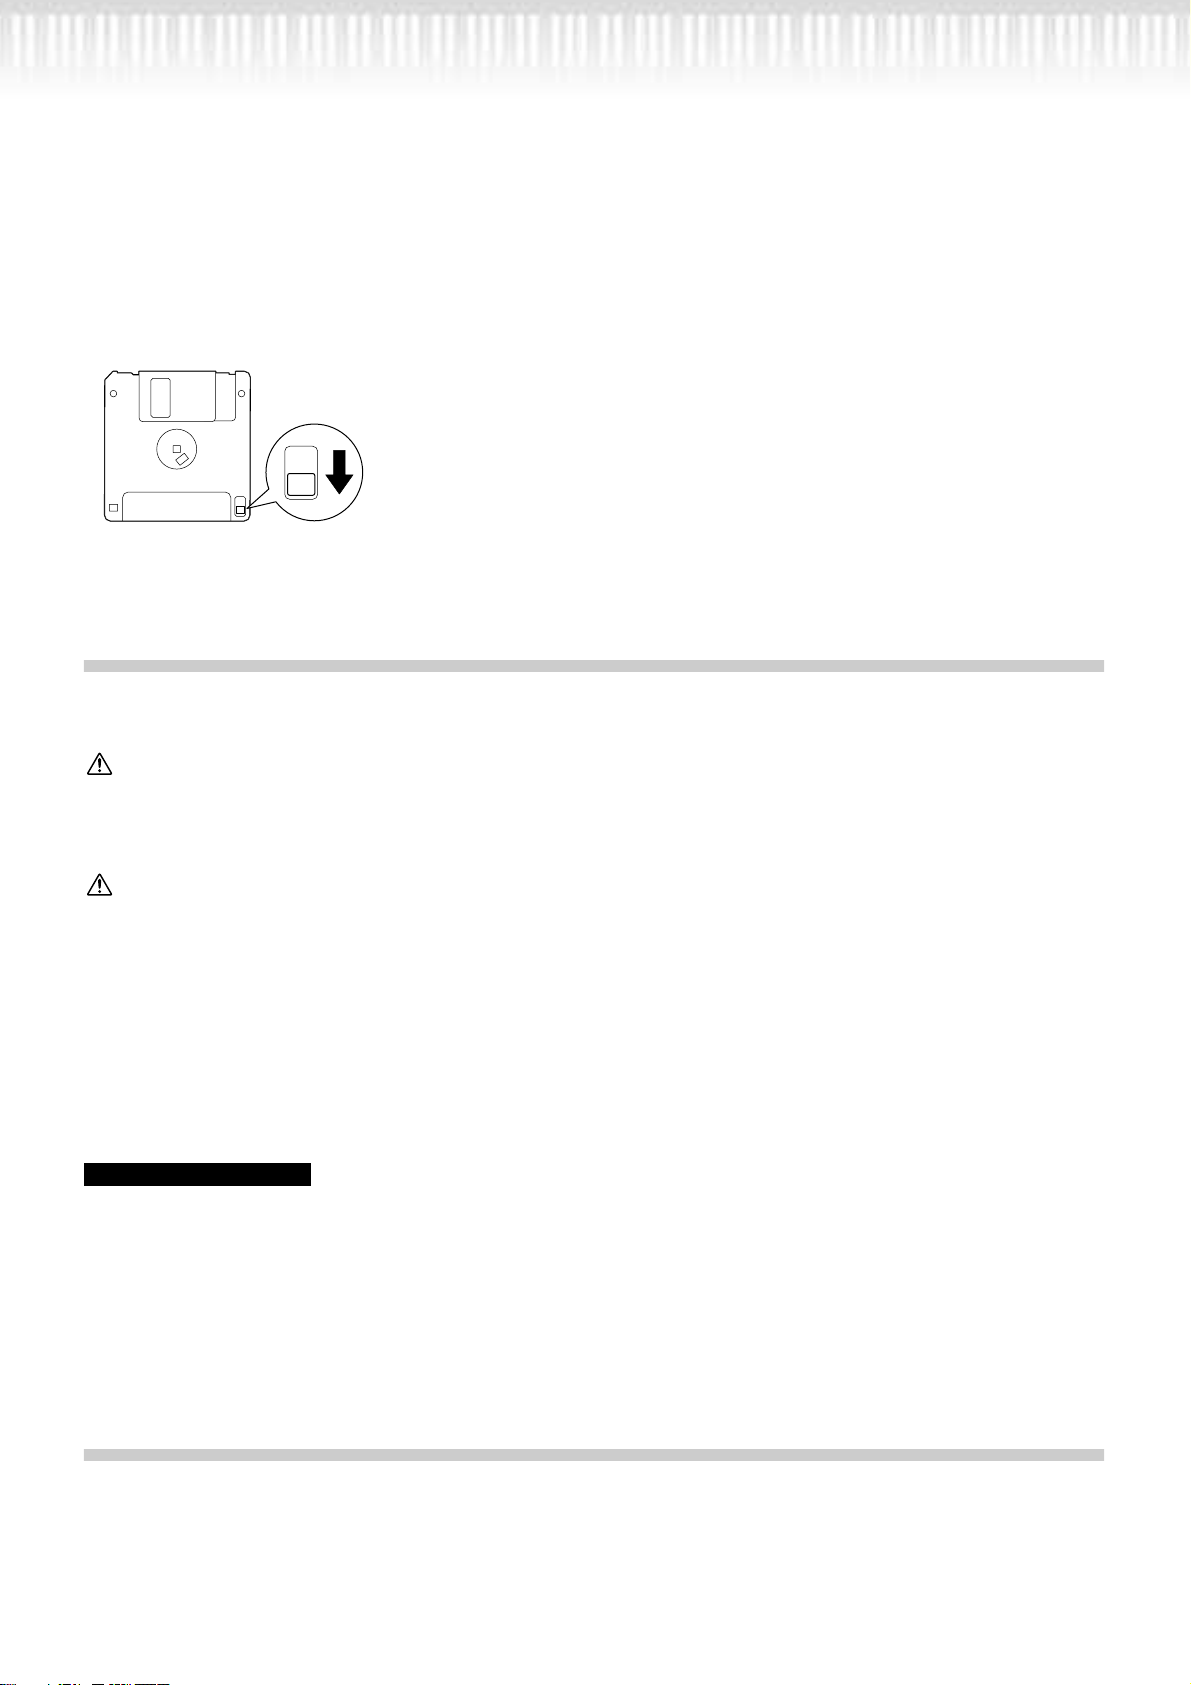
• To protect your data (Write-protect Tab):
• To prevent accidental erasure of important data, slide the
disk’s write-protect tab to the “protect” position (tab open).
write-protect tab open
(protect position)
• Data backup
• For maximum data security Yamaha recommends that
you keep two copies of important data on separate floppy
disks. This gives you a backup if one disk is lost or damaged. To make a backup disk use the Copy Disk function
on page 52.
Maintenance
Clean the instrument using a dry or slightly damp soft cloth (wring well).
CAUTION
Do not use benzene, thinner, detergent, or chemically-treated cloth for cleaning. Do not place vinyl, plastic or rubber
products on the instrument.
Otherwise, the panel or keys may become discolored or degraded.
CAUTION
Before using the Clavinova, be sure to read “Precautions” on pages 3-4.
Tuning
Unlike an acoustic piano, the Clavinova does not need to be tuned. It always stays perfectly in tune.
Transporting
If you move to another location, you can transport the Clavinova along with your other belongings. You can move
the unit as it is (assembled) or you can disassemble the unit.
Transport the keyboard horizontally. Do not lean it up against a wall or stand it up on its side. Do not subject the
instrument to excessive vibration or shock.
TIP
The CLP-170 features an iAFC (Instrumental Active Field Control) effect. This produces sound from the speaker located on the
rear of the Clavinova, enhancing the reverberation and spaciousness of the sound.
In order to take full advantage of iAFC, we recommend that you do the following.
• Place the Clavinova so that its rear panel is at least 10 cm away from the wall.
• After you move the Clavinova to a different location, perform the automatic adjustment. (page 86)
Included Accessories
“50 greats for the Piano” Score Collection
Owner’s Manual
Reference Booklet
Recording disk (CLP-170)
Save your recorded performance to this disk. (page 49)
Bench
(included or optional depending on locale)
CLP-170/150
13
Page 14
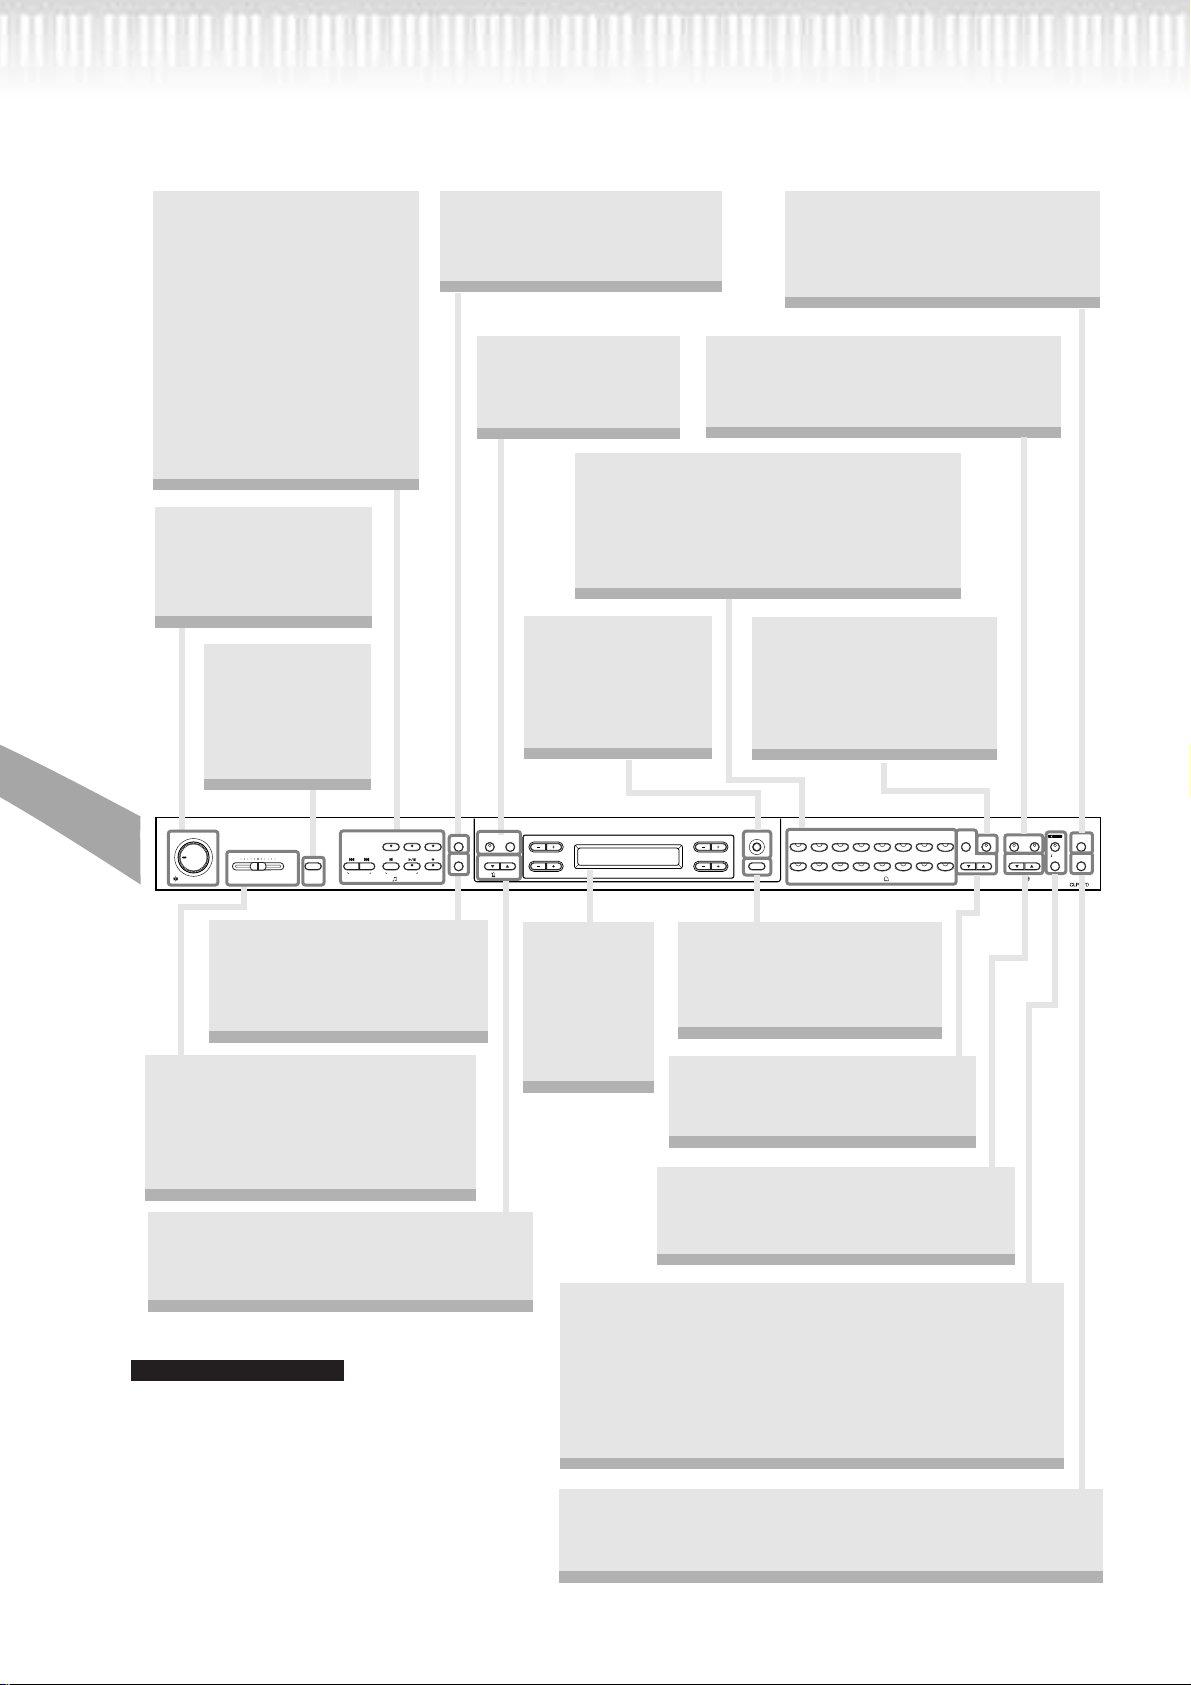
Features
The Yamaha CLP-170/150 Clavinova features rich sounds produced by Yamaha’s proprietary “AWM dynamic stereo
sampling” tone generator system, a “Graded Hammer” keyboard (CLP-150) that varies the key weight according to
the key range, and a “GH3” keyboard (CLP-170) that enhances the graded hammer keyboard by allowing you to play
a note to be played repeatedly without pressing the pedal, giving these electronic pianos a “playing-feel” that is very
close to the keyboard of a genuine grand piano. The CLP-170/150 GrandPiano1 voice features 3 velocity-switched
samples (Dynamic Sampling), “String Resonance” (page 93) that recreates resonance of piano strings, special “Sus-
tain Sampling” (page 93)that samples the unique resonance of an acoustic grand piano’s soundboard and strings
when the damper pedal is pressed, and “Key-off Samples” that add the subtle sound produced when the keys are
released. The CLP-170/150 comes much closer to the sound of a true acoustic piano.
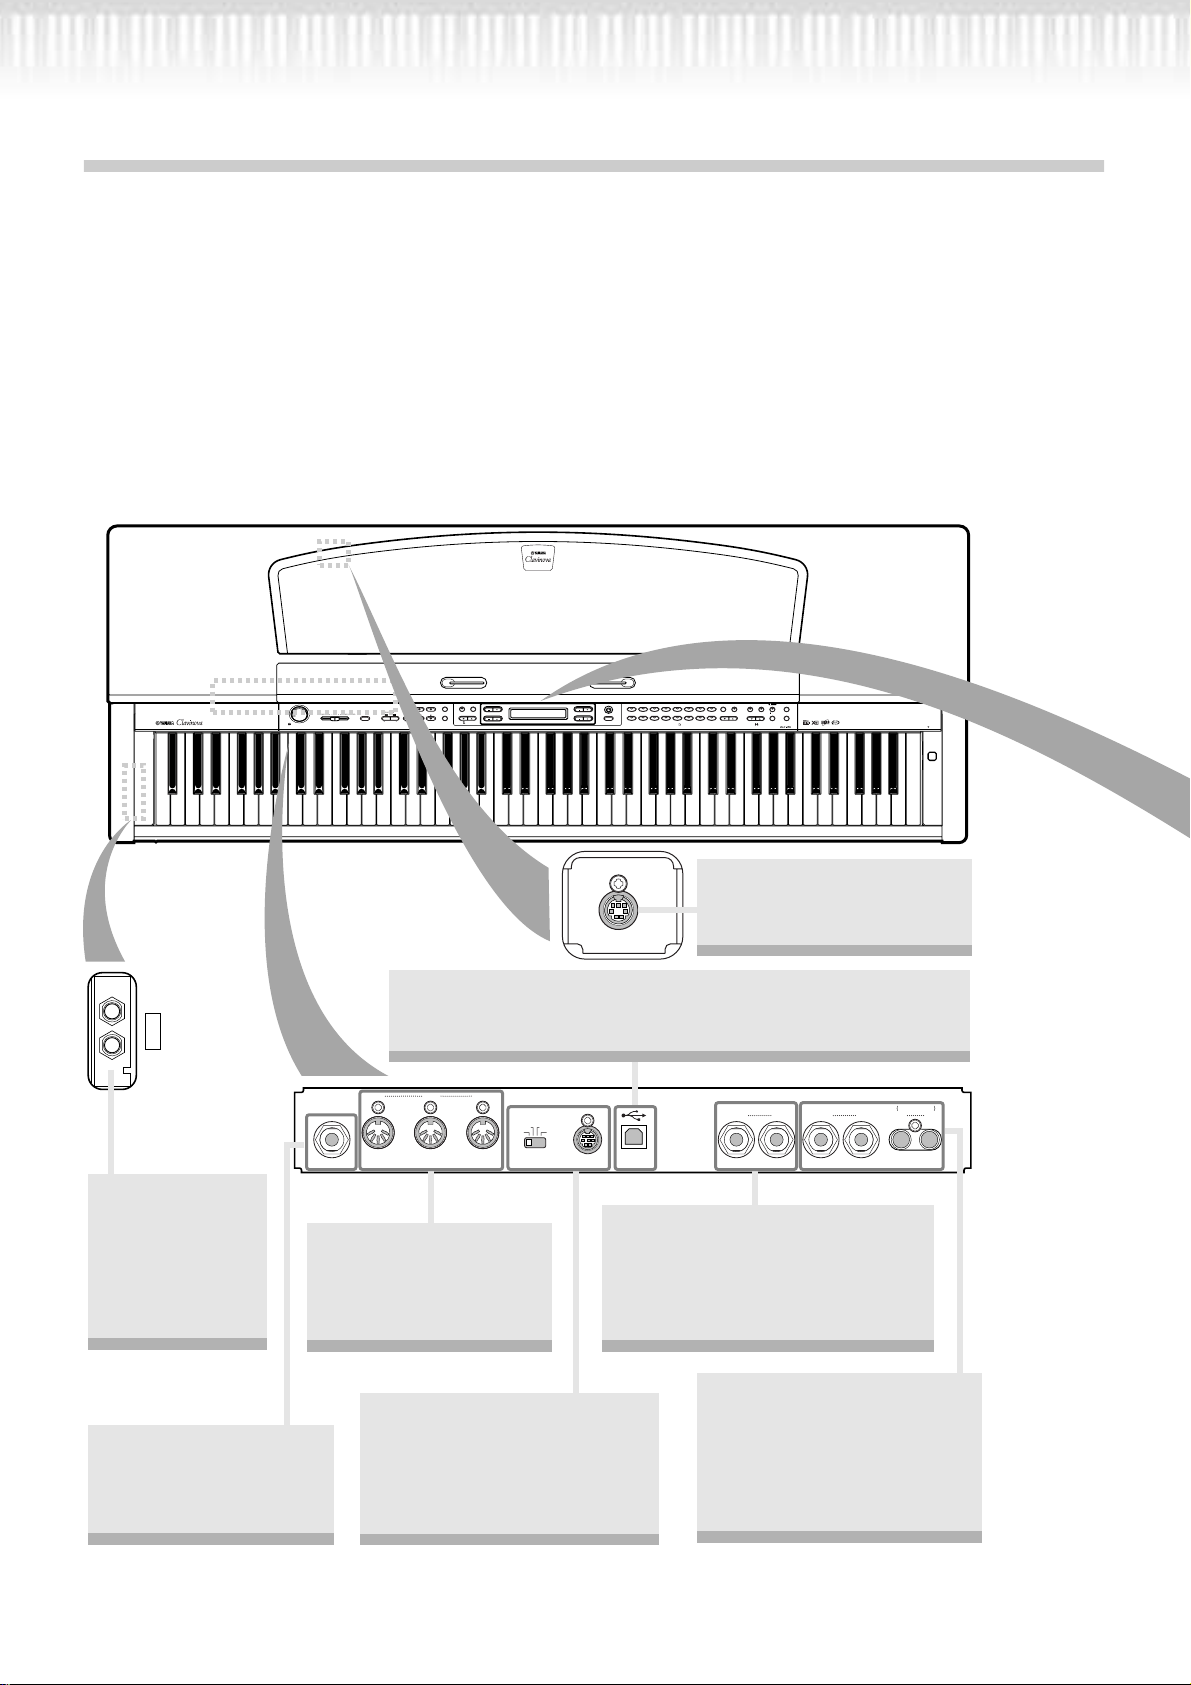
The illustration shows the CLP-170
PHONES
A set of standard
stereo headphones can be
plugged in here
for private practice. (page 18)
METRONOME
TRACK
EXTRA
TRACK
FILE
MASTER VOLUME
MAXMIN
SONG KEYBOARD
SONG BALANCE
1
SONG SELECT
TOP
NEW SONG
SYNCHRO START
DEMO
SETTINGSTART/STOP
TRACKS
2
SONG
START
/
STOP
REC
SETTING
UP
DOWN
TEMPO
SONG
This connector can be connected to your computer, allowing you
to transfer MIDI data between the Clavinova and the computer.
(page 59)
OUTIN
AUX PEDAL
MIDI
Connect a MIDI device
here to use various MIDI
functions. (page 59, 64)
(About MIDI—page 87)
AFC
GRAND
E.PIANO
GRAND
A
C
CONTRAST
B
PIANO 1
1
NO YES
PIANO 2
CHURCH
JAZZ
ORGAN
ORGAN
STRINGS
EXIT
D
VOICE
E.PIANO
HARPSI-
VIBRA-
E.CLAVI-
SETTING
2
CHORD
PHONE
CHORD
GUITAR
SYNTH.
WOOD
VARIATION
PAD
BASS
CHOIR
E.BASS XG
VOICE
MIDI
SETTING
CHORUS ON
/
OFFREVERB
SPLIT
OTHER
AFC
BRILLIANCE
SETTING
SETTING
BRIGHTMELLOW
EFFECT
POWER
Connect the pedal cord here
to use the Clavinova’s
PEDAL
THRU
MacPC-2
MIDI
USB
TO HOST USBHOST SELECT
pedals. (page 110–115)
L/L+R R
L/L+R R RL
LEVEL FIXED
AUX OUTAUX IN
These jacks allow you to connect
an external tone generator to
reproduce the sound via the
Clavinova’s internal sound system
and speakers. (page 60)
Connect an optional pedal
here and assign one of
the various functions to
the pedal. (page 59)
14 CLP-170/150
This jack and selector switch allow direct connection to a personal computer for sequencing
and other music applications.
(page 61–66)
You can output the sound of
the Clavinova from an external audio system, or connect
it to a cassette tape recorder
etc. and record your playing.
(page 60)
Page 15
Features
The Clavinova includes
50 preset songs.
This section enables you to
listen to these songs, practice using a convenient
practice function, play back
Clavinova music data (sold
in music stores), and record and play back your
performance.
(page 24, 38, 55)
[MASTER VOLUME]
Adjust the volume
level using this dial.
(page 18)
[DEMO]
Demonstration
playback is
available for each
voice. (page 22)
[FILE]
Save recorded songs and
manage song files. (page 46)
[METRONOME]
Use the metronome
functions. (page 37)
Voice group buttons
You can choose from sixteen groups of
voices, including grand piano.
You can also combine two sounds and use
them together. (page 28)
[CONTRAST]
Adjust the brightness of the display
using this control.
(page 18)
[MIDI SETTING]
Make detailed MIDI settings,
such as MIDI receive/transmit
channels. (page 87)
[REVERB] / [CHORUS]
Add reverb (reverberation) and spread
(chorus) to the sound. (page 31)
[SPLIT]
You can play different
voices on the left- and
right-hand sections of the
keyboard. (page 35)
METRONOME
SETTINGSTART/STOP
FILE
SONG
REC
SETTING
UP
DOWN
TEMPO
SONG KEYBOARD
MAXMIN
TRACK
EXTRA
TRACK
1
TRACKS
2
TOP
/
SYNCHRO START
SONG
STOP
START
SONG SELECT
NEW SONG
SONG BALANCEMASTER VOLUME
DEMO
[SONG SETTING]
Make detailed settings for
song recording and playback.
(page 73)
[SONG BALANCE]
This lets you adjust the volume
balance between the song playback
and the sound you are playing on
the keyboard. (page 45)
TEMPO [DOWN] [UP]
You can change the song tempo (speed).
(page 25, 37, 39, 55)
TIP
In order to obtain optimal results from iAFC (CLP-
170), we recommend that you do the following:
•
Position the Clavinova so that its rear panel is
at least 10 cm away from the wall.
•
Perform the automatic adjustment after you
turn on the power of the Clavinova for the first
time, and after each time you re-locate the
Clavinova.
GRAND
E.PIANO
E.PIANO
A
C
The display
allows accurate control
and opera-
NO YES
CONTRAST
B
D
GRAND
PIANO 1
PIANO 2
CHURCH
JAZZ
ORGAN
ORGAN
EXIT
STRINGS
[EXIT]
The screen returns to its
main display when you
press this button. (page 21)
E.CLAVI-
HARPSI-
VIBRA-
1
2
CHORD
CHORD
WOOD
SYNTH.
BASS
PAD
CHOIR
VOICE
PHONE
E.BASS XG
GUITAR
VOICE
SETTING
VARIATION BRIGHTMELLOW
tion.
(page 21)
[VOICE SETTING] / [VARIATION]
You can make detailed settings for
tone and effects. (page 77)
BRILLIANCE [MELLOW] [BRIGHT]
Adjust the brightness of the tone
using these buttons. (page 30)
[iAFC ON/OFF] (CLP-170)
This enhances the acoustic realism of the sound produced
from the Clavinova, similar to the sound of an acoustic instrument. (page 32)
[iAFC SETTING] (CLP-170)
You can select the iAFC type and make other detailed
settings for iAFC. (page 85)
[OTHER SETTING]
This lets you make detailed settings, such as adjusting the keyboard touch or making fine adjustments to the pitch. (page 91)
SPLIT CHORUS ON/OFFREVERB
BRILLIANCE
AFC
MIDI
SETTING
OTHER
AFC
SETTING
SETTING
EFFECT
CLP-170/150 15
Page 16
Before Using the Clavinova
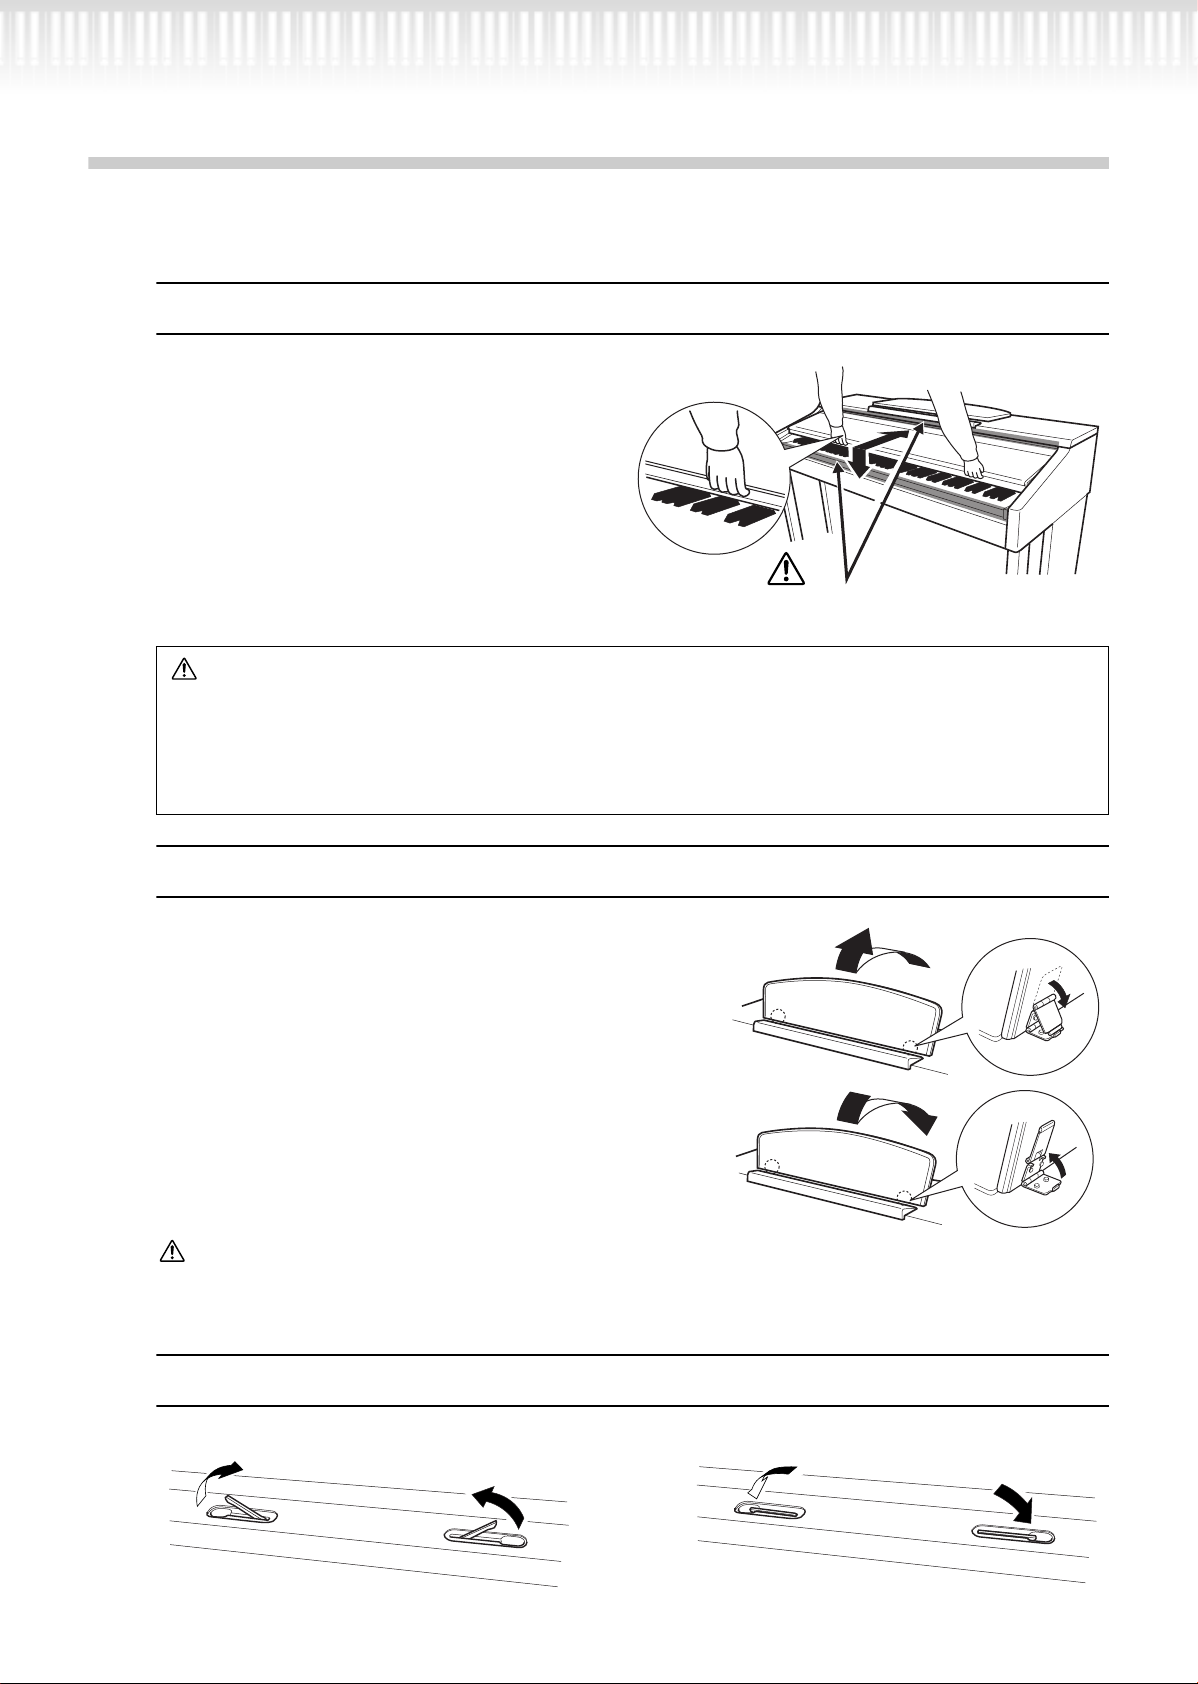
About the key cover
To open the key cover:
Lift the cover slightly, then push and slide it open.
To close the key cover:
Slide the cover toward you and gently lower the
cover over the keys.
Be careful to avoid catching your fingers
when opening or closing the cover.
CAUTION
Hold the cover with both hands when opening or closing it. Do not release it until it is fully opened or closed. Be
careful to avoid catching fingers (yours or others, especially children’s) between the cover and the unit.
Do not place objects such as a piece of metal or paper on top of the key cover. Small objects placed on the key
cover may fall inside the unit when the cover is opened and may be nearly impossible to remove. This could
cause electric shock, short circuit, fire or other serious damage to the instrument.
About the music rest
To raise the music rest:
1. Pull the music rest up and toward yourself as far as it will go.
2. Flip down the two metal supports at the left and right on the
rear of the music rest.
3. Lower the music rest so that it rests on the metal supports.
To lower the music rest:
1. Pull the music rest toward yourself as far as it will go.
2. Raise the two metal supports (at the rear of the music rest).
3. Gently lower the music rest backward until it is all the way
down.
CAUTION
Do not try to use the music rest in a half-raised position. When lowering the music rest, do not release your hands
from the music rest until it is all the way down.
About the music braces
These braces are for holding the pages of music books in place.
To open
To close
16
CLP-170/150
Page 17
Before Using the Clavinova
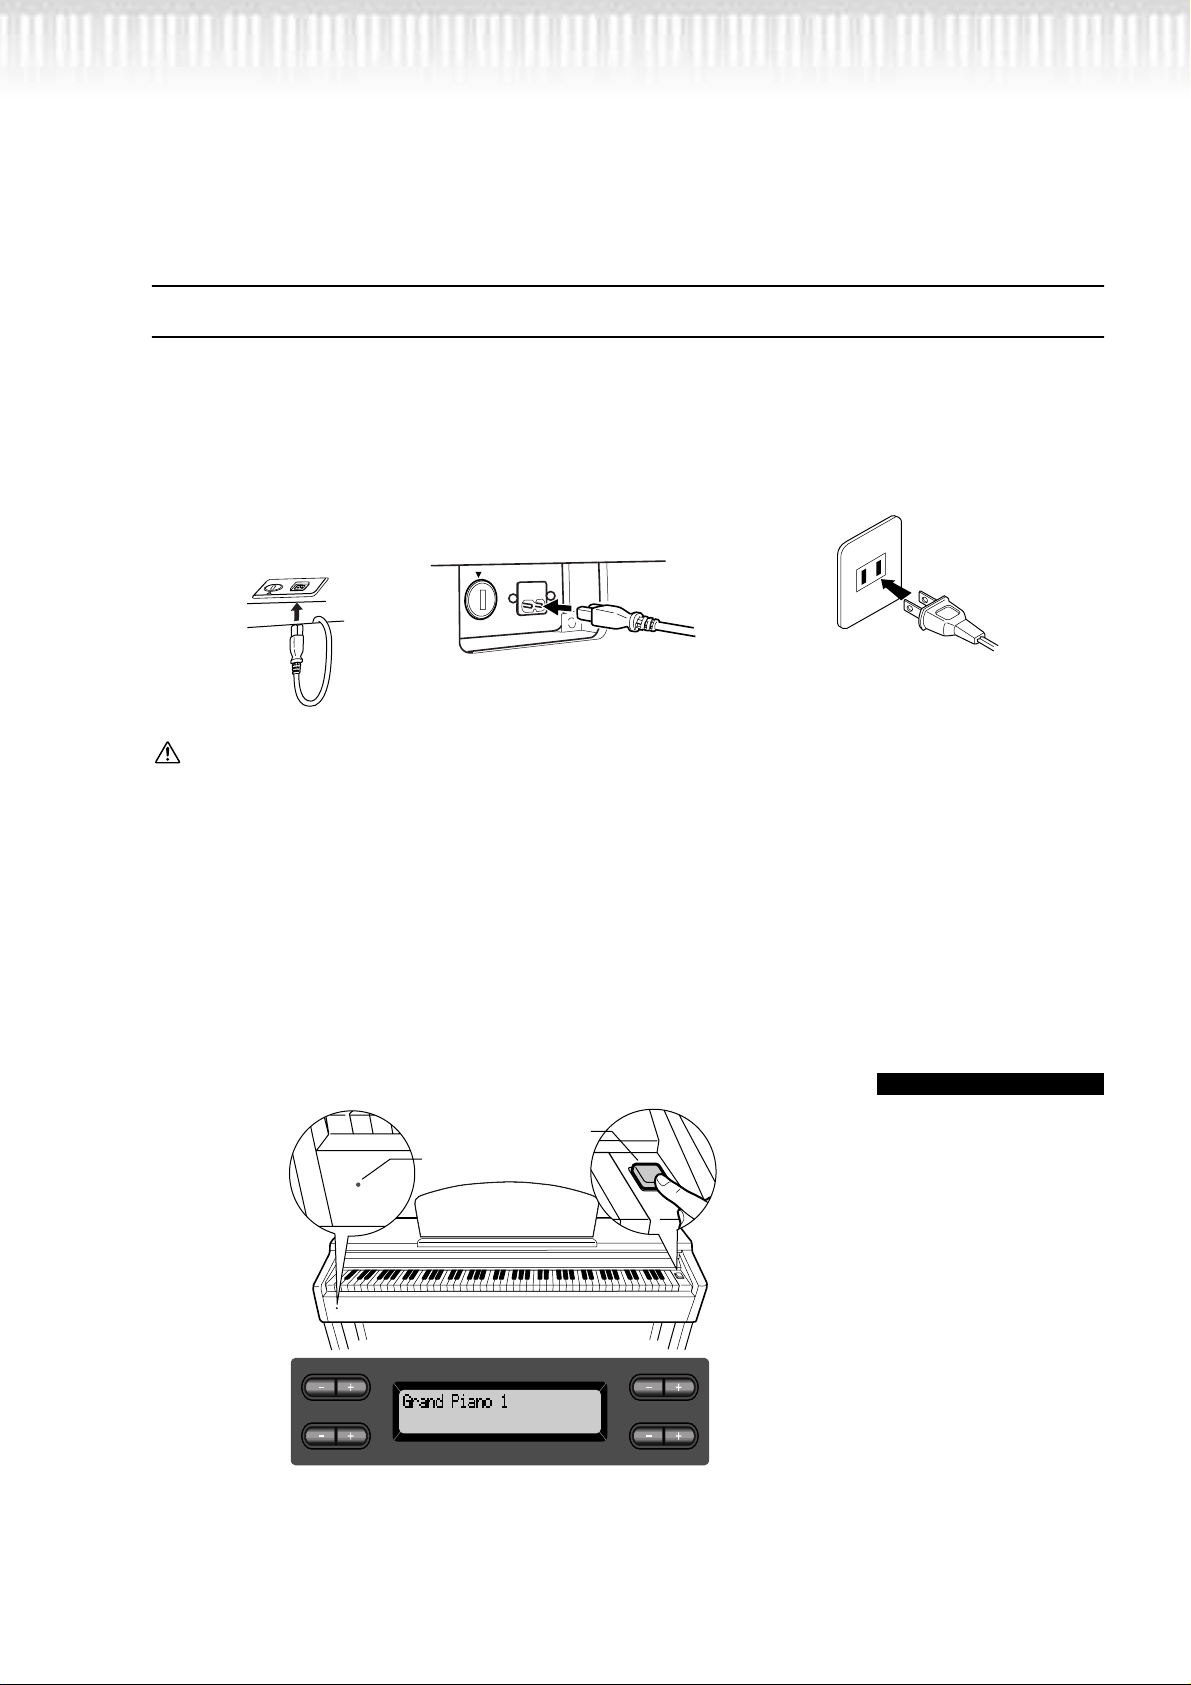
Turning the power on
1. Connect the power cable.
First insert the plug of the power cable into the AC connector on the Clavinova, then plug the other end of
the cable into the proper AC outlet on the wall.
In some areas a plug adaptor may be provided to match the pin configuration of the AC wall outlets in
your area.
12
WARNING!
Make sure your CLP-170/150 is rated for the AC voltage supplied in the area in which it is to be used (voltage rating appears on
the name plate on the bottom panel). In some areas, a voltage selector may be provided on the bottom panel of the main keyboard unit near the power cord. Mak e sure that the voltage selector is set for the voltage in your area. Connecting the unit to the
wrong AC supply can cause serious damage to the internal circuitry and may even pose a shock hazard!
Use only the AC power cord supplied with the CLP-170/150. If the supplied cord is lost or damaged and needs to be replaced,
contact your Yamaha dealer. The use of an inappropriate replacement can pose a fire and shock hazard!
The type of AC power cord provided with the CLP-170/150 may be different depending on the country in which it is purchased.
(In some areas a plug adaptor may be provided to match the pin configuration of the AC w all outlets in your area.) Do NOT modify the plug provided with the CLP-170/150. If the plug will not fit the outlet, have a proper outlet installed by a qualified electrician.
CLP-150
(buttom surface)
CLP-170
(rear panel)
(The shape of plug differs
depending on locale.)
2. Turn on the power to the Clavinova.
Press the [POWER] switch located on the right of the keyboard to turn the power on.
• The screen located in the center of the front panel and the power indica-
tor located below the left end of the keyboard lights up.
[POWER]
Power indicator
Power indicator
If you close the key cover
without turning the power
off, the power indicator
remains lit, indicating that
the power is still on.
TIP
A
C
When you turn on the power to the Clavinova, a voice name
appears on the screen.
B
NO YES
D
Press the [POWER] switch again to turn off the power to the Clavinova.
• The screen and the power indicator turn off.
CLP-170/150 17
Page 18
Before Using the Clavinova
buttom surface
standard stereo phone plug
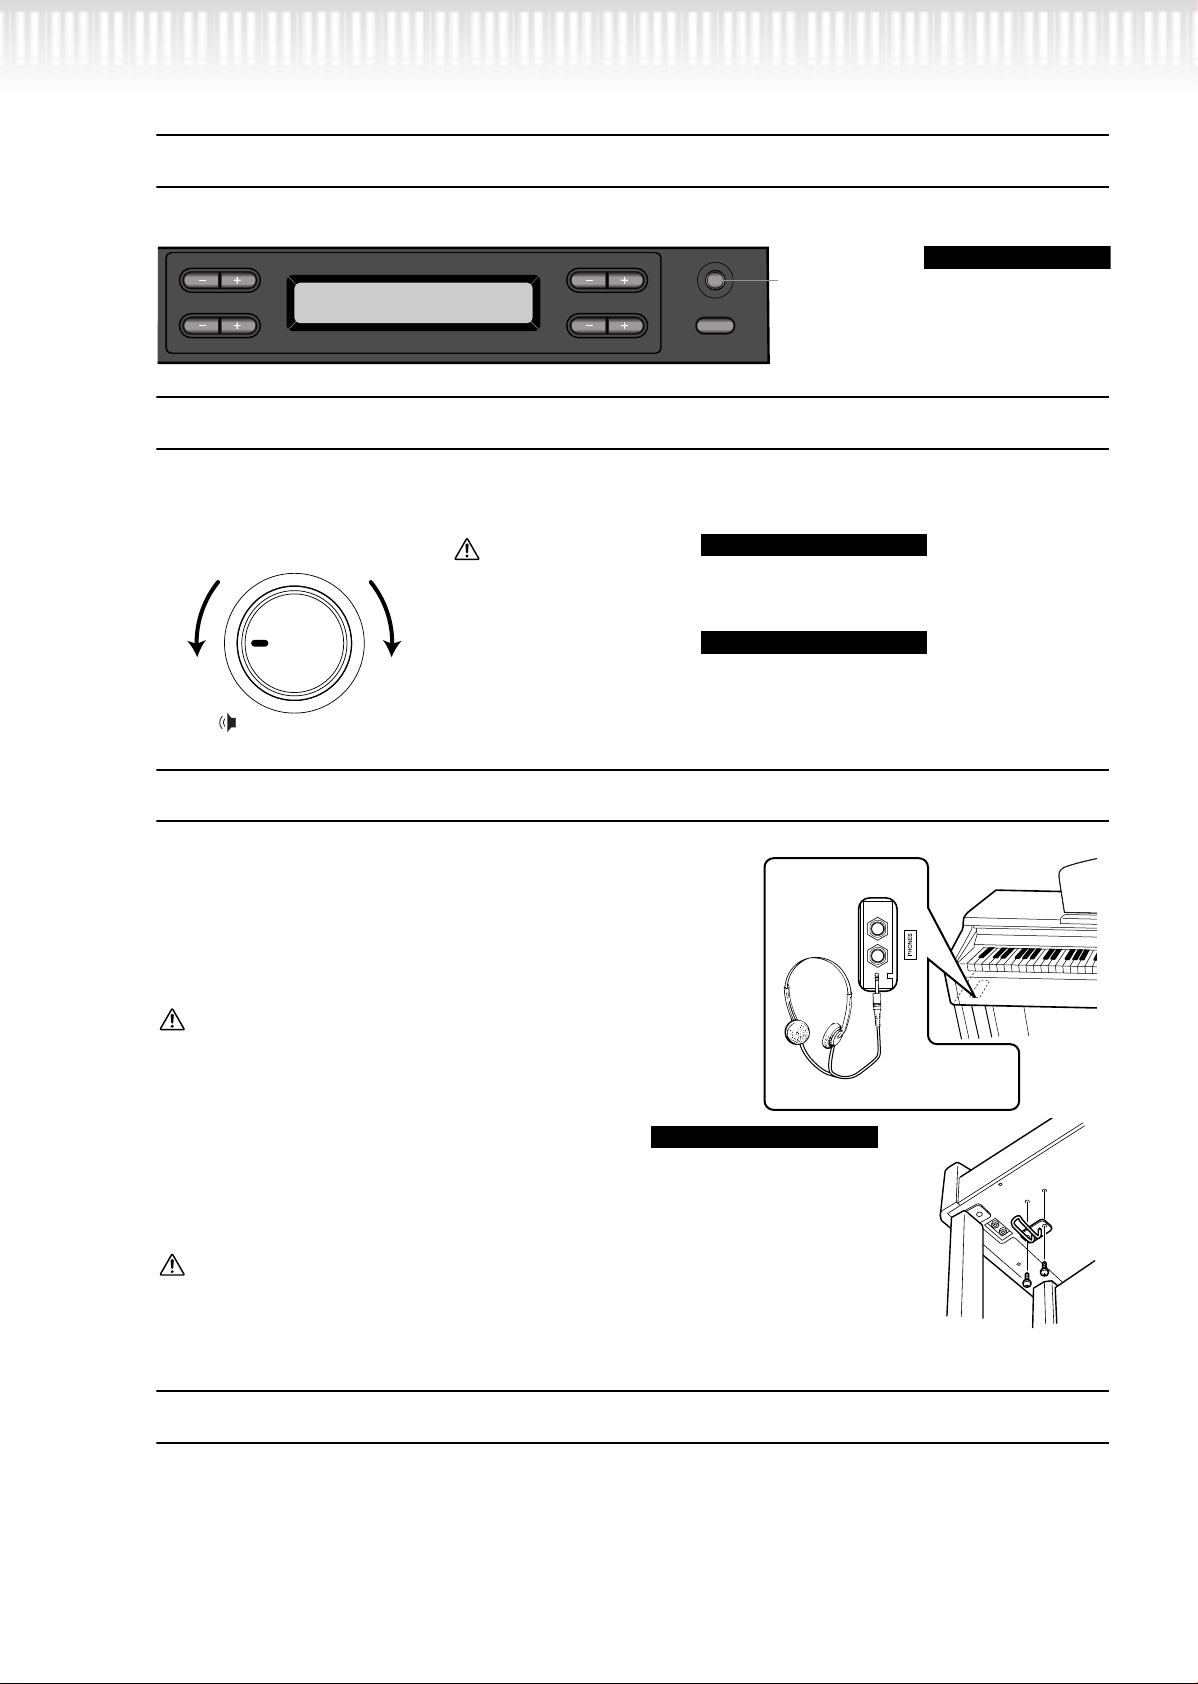
Adjusting the display contrast
You can adjust the contrast of the display by turning the [CONTRAST] knob located to the right of the LCD.
A
C
Setting the volume
To adjust the volume, use the [MASTER VOLUME] located at the left of the panel. Play the keyboard to actually produce sound while you adjust the volume.
B
NO YES
D
CONTRAST
EXITEXIT
Use this knob.
TERMINOLOGY
CONTRAST:
difference between
brightness and darkness
The level
decreases.
The level
increases.
CAUTION
Do not use the Clavinova at a high volume
MASTER VOLUME:
The volume level of the entire keyboard sound
level for a long period of
time, or your hearing
may be damaged.
MAXMIN
MASTER VOLUME
You can also adjust the [PHONES] output level, the
AUX IN input level and the AUX OUT [L/L+R][R]
output level using the [MASTER VOLUME] dial.
Using headphones
Connect a pair of headphones to one of the [PHONES] jacks.
When the headphones are plugged into either of the [PHONES]
jacks, the internal speaker system is automatically shut off.
Tw o [PHONES] jacks are provided. Two sets of standard stereo
headphones can be plugged in. (If you are using only one pair of
headphones, you can plug them into either of these jacks.)
CAUTION
Do not use headphones at a high volume for an extended period of time.
Doing so may cause hearing loss.
TERMINOLOGY
TIP
Using the Headphone Hanger
A headphone hanger is included in the CLP-170/150
package so that you can hang the headphones on the
Clavinova. Install the headphone hanger using
included two screws (4 × 10mm) as shown in the figure.
CAUTION
Do not hang anything other than the headphones on the hanger. Otherwise, the Clavinova or the hanger may be damaged.
Performing the iAFC automatic adjustment (CLP-170)
The CLP-170 features an iAFC (Instrumental Active Field Control) effect. This produces sound from the
speaker located on the rear of the Clavinova, enhancing the reverberation and spaciousness of the sound.
In order to take full advantage of iAFC, perform the automatic adjustment. (page 86)
18
CLP-170/150
TIP
Optional headphones
HPE-160 Yamaha headphones.
Page 19

Basic Operation
CLP-170/150 19
Page 20

Part Names
S
2
T
SONG KEYBOARD
MAXMIN
U
1
START
SONG
6
TRACK
2
/
E.PIANO
CHOIR
STOP
2
G
EXTRA
TRACKS
REC
9
HARPSICHORD
SYNTH.
PAD
VOICE
7
FILE
SONG
SETTING
0
E.CLAVICHORD
WOOD
BASS
VIBRA-
PHONE
E.BASS XG
A
METRONOME
DOWN
TEMPO
B
GUITAR
SETTINGSTART/STOP
UP
SETTING
EFFECT
N P
iAFC
iAFC
SETTING
H
VOICE
VARIA TION BRIGHTMELLOW
J K
I
SPLIT CHORUS ON/OFFREVERB
BRILLIANCE
L M O Q
C D
A
C
MIDI
SETTING
OTHER
SETTING
CD
B
NO YES
D
SONG BALANCEMASTER VOLUME
3
E
CONTRAST
EXIT
F
DEMO
4
GRAND
PIANO 1
CHURCH
ORGAN
SONG SELECT
NEW SONG
5
GRAND
PIANO 2
JAZZ
ORGAN
E.PIANO
STRINGS
TRACK
1
TOP
SYNCHRO START
8
(CLP-170)
R
PHONES
METRONOME
TRACK
EXTRA
TRACK
A
FILE
SETTINGSTART/STOP
1
TRACKS
2
SONG SELECT
SONG
/
STOP
TOP
START
SONG KEYBOARD
MAXMIN
SONG BALANCE
MASTER VOLUME
C0 D0 E0 F0 G0 A0 B0 C1 D1 E1 F1 G1 A1 B1 C2 D2 E2 F2 G2 A2 B2 C3 D3 E3 F3 G3 A3 B3 C4 D4 E4 F4 G4 A4 B4
B-1A-1
REC
SETTING
DOWN
NEW SONG
DEMO
UP
SYNCHRO START
C
TEMPO
SONG
GRAND
GRAND
CONTRAST
B
PIANO 1
PIANO 2
NO YES
CHURCH
JAZZ
ORGAN
ORGAN
EXIT
D
E.PIANO
E.PIANO
E.CLAVI-
HARPSI-
VIBRA-
SETTING
1
2
CHORD
CHORD
PHONE
GUITAR
WOOD
SYNTH.
BASS
PAD
E.BASS XG
STRINGS
CHOIR
VOICE
C5 D5 E5 F5 G5 A5 B5 C6 D6 E6 F6 G6 A6 B6 C7
_
AFC
MIDI
VOICE
SETTING
CHORUS ON
/
OFFREVERB
SPLIT
OTHER
AFC
BRILLIANCE
VARIATION
SETTING
SETTING
BRIGHTMELLOW
EFFECT
a
POWER
1
Top panel
[POWER]..............................................P17
1
2 [MASTER VOLUME].............................P18
3 SONG BALANCE..................................P45
4 [DEMO] ...............................................P22
5 SONG SELECT [ ] [ ].........P24, 38, 55
6 [TRACK1] [TRACK2] /
[EXTRA TRACKS] ............... P26, 38–43, 57
7 [FILE] ...................................................P46
8 [TOP] / SONG [START/STOP]
................................................P24, 39, 56
9 [REC]....................................................P37
0 [SONG SETTING] ................................P73
A METRONOME [START/STOP] /
[SETTING]......................................P37, 76
B TEMPO [DOWN] [UP] .......P25, 37, 39, 56
C LCD buttons A [–] [+] / B [– (NO)] [+ (YES)] /
C [–] [+] / D [–] [+]...............................P21
D LCD screen ..........................................P21
Center “C”
E [CONTRAST] knob...............................P18
F [EXIT]...................................................P21
G Voice group buttons ...........................P28
H [VOICE SETTING] ................................P77
I [SPLIT] .................................................P35
J [REVERB]..............................................P31
K [CHORUS]............................................P31
L VARIATION [▼] [▲] .............................P28
M BRILLIANCE [MELLOW] [BRIGHT].......P30
N iAFC [ON] / [OFF] (CLP-170)...............P32
O [iAFC SETTING] (CLP-170) ..................P85
P [MIDI SETTING]...................................P87
Q [OTHER SETTING] ...............................P91
R [PHONES] ............................................P18
S Soft pedal............................................P29
T Sostenuto pedal ..................................P29
U Damper pedal .....................................P29
20 CLP-170/150
Page 21

Connectors
Part Names
V [AUX PEDAL] ..................................... P59
W MIDI [IN] [OUT] [THRU] .................... P59
X HOST SELECT..................................... P59
Y [TO HOST] ......................................... P59
CLP-170
THRU
OUTIN
MacPC-2
MIDI
USB
AUX PEDAL
V
]
[PEDAL].....................................P113, 116
Floppy disk drive (CLP-170)...............P12
_
a
Panel logos
MIDI
W
X
TO HOST USBHOST SELECT
Y
Z
GM System Level 1
“GM System Level 1” is an addition to the MIDI
standard which guarantees that any data conforming to the standard will play accurately on
any GM-compatible tone generator or synthesizer from any manufacturer.
L/L+R R
[
L/L+R R RL
Z [USB] ..................................................P59
[ AUX IN ...............................................P60
\ AUX OUT............................................ P60
CLP-150
AUX OUTAUX IN
\
LEVEL FIXED
]
PEDAL
V
\
LEVEL FIXED
W
OUTIN
MIDIAUX PEDAL
[
L/L+RRL/L+RRRL
AUX INAUX OUT
MacPC-2
MIDI
HOST SELECT
X
USB
TO HOST
Y
THRU
`
USB
Z
a
XG Format
XG is a new Yamaha MIDI specification which significantly expands and
improves on the “GM System Level 1” standard with greater voice handling capacity, expressive control, and effect capability while retaining full
compatibility with GM.
DOC (Disk Orchestra Collection) (CLP-170)
This is a sound map format supported by Clavinovas and many other
Yamaha MIDI instruments. Tone generators and music data compatible
with this format carry the DOC logo.
iAFC (Instrumental Active Field Control) (CLP-170)
This is functionality that uses a multi-channel speaker system to generate
three-dimensional acoustical effects from musical instruments.
LCD buttons
C
D
LCD
Use the LCD button A, B, C, or D to select the contents displayed on the LCD.
Check the screen located in the center of the top panel after
every operation. A voice name appears on the screen when
you turn on the power to the unit.
[EXIT] button
F
When you press this button, the unit returns to the default screen (the
screen that indicates a voice name(s) and is displayed when the power is
turned on).
A
C
B
NO YES
D
CLP-170/150
21
Page 22

Listening to the Demonstration
Tunes
For each voice group, the Clavinova contains one demo song that shows off the character of the voices.
This section explains how to listen to the demo songs for the voice groups listed below.
Demonstration tunes
Voice group Tunes Composer
GRAND PIANO1 Consolation No.3 F.Liszt
HARPSICHORD Gavotte J.S.Bach
The demonstration pieces listed above are short rearranged excerpts the original
compositions.
All other songs are original (©2002 Yamaha Corporation).
1 4
TRACK
EXTRA
TRACK
1
TRACKS
2
FILE SETTINGSTART/STOP
SONG
START
TOP
/
SONG KEYBOARD
MAXMIN
SONG SELECT
NEW SONG
SONG BALANCEMASTER VOLUME
DEMO
SYNCHRO START
SONG
STOP
REC
SETTING
3
Procedure
1. Engage the demo mode.
Press the [DEMO] button to engage the demo mode.
The indicators of the voice group buttons will blink in succession.
METRONOME
2 3
GRAND
GRAND
A
UPDOWN
C
TEMPO
CONTRAST
B
EXITEXIT
D
PIANO 2
PIANO 1
JAZZ
CHURCH
ORGAN
ORGAN
Voice
group buttons
HARPSI-
E.PIANO
STRINGS
E.CLAVI-
E.PIANO
CHORD
CHORD
1
2
SYNTH.
WOOD
PAD
BASS
CHOIR
VOICE
VIBRA-
PHONE
E.BASS XG
GUITAR
VOICE
SETTING
SPLIT CHORUSREVERB
VARIATION BRIGHTMELLOW
BRILLIANCE
AFC
MIDI
SETTING
ON/OFF
AFC
OTHER
SETTING
SETTING
EFFECT
4
TERMINOLOGY
Mode:
A mode is a status under
which you can execute a
certain function. In demo
mode, you can play back
demonstration tunes.
22 CLP-170/150
Page 23

Listening to the Demonstration Tunes
2. Select a tune and start playback.
Press the voice group button for the demo song that you
want to hear.
The indicator of the voice group button you pressed will light, and the
demo song will begin playing. Subsequently, the demo songs will play
back consecutively from the upper left voice group button until you
stop the playback.
3. Stop the playback.
Press the button of the voice group being played or the
SONG [START/STOP] button.
4. Exit from demo mode.
Press the [DEMO] or [EXIT] button to exit from demo
mode.
By holding down [DEMO] and pressing A[–][+] to get the [PianoDemo] display, you can hear the piano demo / iAFC demo (CLP-
170). The piano demo lets you compare the result of enabling/disabling each sampling technology.
The iAFC demo (CLP-170) lets you compare three iAFC types. The
demo songs are assigned to the sound buttons as follows.
NOTE
To adjust the volume level of
the demo songs, use the
[MASTER VOLUME] dial.
TIP
To adjust the volume balance between the song
playback and the sound you
are playing on the keyboard,
use the [SONG BALANCE]
slider (page 45) .
GRAND PIANO1 ................. Stereo Piano (stereo sampling)
GRAND PIANO2 ................. Mono Piano (mono sampling)
E.PIANO1............................ mezzo piano (dynamic sampling,
mezzopiano)
E.PIANO2............................ mezzo forte (dynamic sampling, mez-
zoforte)
HARPSICHORD.................. forte (dynamic sampling, forte)
E.CLAVICHORD.................. with Sustain (with sustain sampling)
VIBRAPHONE..................... no Sustain (without sustain sampling)
GUITAR ............................... with KeyOff (with key-off sampling)
CHURCH ORGAN............... no KeyOff (without key-off sampling)
JAZZ ORGAN...................... with StringRes (with string reso-
nance)
STRINGS............................. no StringRes (without string reso-
nance)
GHOIR (CLP-170)............... with iAFC SEE(iAFC spatial ensem-
ble effect)
SYNTH.PAD (CLP-170)....... with iAFC NSB (iAFC natural sound-
board)
WOOD BASS (CLP-170)..... with iAFC DDE (iAFC dynamic
damper effect)
CLP-170/150 23
Page 24

Listening to 50 Piano Preset
Songs
The Clavinova provides performance data of 50 piano songs. You can just listen to these songs (page 24) or
use them for practice (page 26). You can also refer to the included “50 greats for the Piano” that contains the
scores for 50 piano preset songs.
Playing the 50 piano preset songs
1
TRACK
TRACK
1
START
TOP
SONG KEYBOARD
MAXMIN
SONG BALANCEMASTER VOLUME
SONG SELECT
NEW SONG
SYNCHRO START
DEMO
SONG
23 4
Procedure
1. Select a song.
Press one of the [SONG SELECT] buttons repeatedly to
select the desired piano song from P-001 to P-050.
Song select screen
A
C
The song number appears on the display.
2. Play a preset song.
Press the SONG [START/STOP] button to start playback.
A
C
METRONOME [START/STOP]
REC
FILE SETTINGSTART/STOP
SONG
SETTING
METRONOME
A
UPDOWN
C
TEMPO
EXTRA
TRACKS
2
/
STOP
TEMPO [DOWN] [UP]
NO YES
the number of measures
NO YES
AFC
VIBRAPHONE
E.BASS XG
GUITAR
VOICE
SETTING
SPLIT CHORUSREVERB
VARIATION BRIGHTMELLOW
BRILLIANCE
B
D
PIANO 2
PIANO 1
JAZZ
CHURCH
ORGAN
ORGAN
EXITEXIT
GRAND
GRAND
CONTRAST
HARPSI-
E.PIANO
STRINGS
E.CLAVI-
E.PIANO
CHORD
CHORD
1
2
SYNTH.
WOOD
PAD
BASS
CHOIR
VOICE
MIDI
SETTING
ON/OFF
AFC
OTHER
SETTING
SETTING
EFFECT
TERMINOLOGY
Song:
On the Clavinova, performance data is called a
“Song.” This includes dem-
B
D
onstration tunes and piano
preset tunes.
TIP
• You can also use the C
[–]/[+] buttons to select a
song after pressing the
[SONG SELECT] button.
B
• [P-000: NewSong] is a
blank song provided for
you to record your performance. (See page 38.)
D
• Use the SongRepeat
parameter in the “SONG
SETTING” menu to
select repeat playback of
all songs or repeat playback of a single song.
(See page 75.)
24 CLP-170/150
TIP
You can play the keyboard
along with the preset song
playback. You can change the
voice playing on the k eyboard.
Page 25

Adjusting the tempo
Listening to 50 Piano Preset Songs
You can use the TEMPO [DOWN]/[UP] buttons to adjust the playback
tempo as required. The default tempo (the song’s original tempo) is set when
you press the [DOWN] and [UP] buttons simultaneously.
Press either of the SONG SELECT [ ]/[ ] buttons to return to the song
select screen.
A
A
C
C
B
B
NO YES
D
D
3. Stop the song playback.
When playback is complete, it automatically stops and the Clavinova
locates the top of the song. To stop playback in the middle of a song,
press the [TOP] button. You can also pause playback by pressing the
SONG [START/STOP] button. Playback stops when you press the
button.
Fast forward and rewind
You can perform the following operations in the song select screen:
• Use the B [–]/[+] buttons to move back and forth (rewind and fast forward) through the song while the song is played or stopped.
• Press the SONG SELECT [ ] or the C [–] button during playback to
restart playback from the top of the song.
• Press the SONG SELECT [ ] or the C [+] button during playback to
start playback from the next song.
• Press the SONG SELECT [ ] or the C [–] button while playback is
stopped in the middle of the song to locate the top of the song.
TIP
You can also use the D[–]/[+]
buttons to change the tempo.
NOTE
Resetting the tempo
Whenever you select a new
preset song, the tempo is
automatically reset to the
song’s original value.
TIP
If you have selected a disc
song (CLP-170) and there is
a folder before the song, the
folder will appear on the display when you press the
SONG SELECT [ ] [ ]
buttons or C [–]/[+] buttons
during song playback.
4. Return to the default screen.
Press the [EXIT] button.
TERMINOLOGY
Default screen:
The default screen is a voice
select screen (page 28) that
appears when you turn on
the power to the Clavinova.
CLP-170/150 25
Page 26

Listening to 50 Piano Preset Songs
Practicing a one-hand part using 50 preset songs
The 50 preset songs have separate left- and right-hand parts on individual tracks. You can turn the left- and
right-hand parts on or off as required so you can practice the corresponding part (the part that is turned off)
on the keyboard. The right-hand part is played by [TRACK 1] and the left-hand part is played by [TRACK 2].
1
SONG KEYBOARD
MAXMIN
TRACK
EXTRA
TRACK
1
TRACKS
2
START
TOP
/
SYNCHRO START
SONG
STOP
SONG SELECT
NEW SONG
SONG BALANCEMASTER VOLUME
DEMO
REC
FILE SETTINGSTART/STOP
SONG
SETTING
METRONOME
A
UPDOWN
C
TEMPO
B
D
23
procedure
1. Turn off the playback part you wish to practice.
After you select a song to practice, press the [TRACK1] or
[TRACK2] button to turn off the corresponding part.
When you first select a song, both [TRACK1] and [TRACK2] indicators light up, indicating that you can play back both parts. When you
press one of the buttons to turn off playback, the corresponding button indicator turns off and the corresponding part playback is muted.
Pressing the buttons repeatedly toggles between playback on and off.
2. Start playback and playing.
Press the SONG [START/STOP] button to start playback.
Play the part you just turned off.
CONTRAST
AFC
HARPSI-
VIBRA-
GRAND
GRAND
E.PIANO
PIANO 2
PIANO 1
JAZZ
CHURCH
ORGAN
ORGAN
EXITEXIT
STRINGS
E.CLAVI-
E.PIANO
CHORD
CHORD
1
2
SYNTH.
WOOD
PAD
BASS
CHOIR
VOICE
PHONE
E.BASS XG
GUITAR
VOICE
SETTING
SPLIT CHORUSREVERB
VARIATION BRIGHTMELLOW
BRILLIANCE
MIDI
SETTING
ON/OFF
AFC
OTHER
SETTING
SETTING
EFFECT
TIP
You can turn parts on or off,
even during playback.
26 CLP-170/150
Starting playback automatically as you start playing the
keyboard (Synchro Start)
You can cause playback to begin when you play the keyboard (Synchro Start).
Hold down [TOP] and press SONG [START/STOP]. The SONG
[START/STOP] indicator will blink, and the Clavinova will wait for
Syncro Start.
Now when you play the keyboard, playback will begin at the same
moment.
If you press [TOP] while waiting, Synchro Start will be cancelled.
TERMINOLOGY
Synchro:
Synchronous;occurring at the
same time
Page 27

3. Stop playback.
Listening to 50 Piano Preset Songs
When playback is complete, it automatically stops and the Clavinova
locates the top of the song. If you wish to stop playback in the middle
of a song, press the [TOP] button. You can also pause playback by
pressing the SONG [START/STOP] button. Playback stops when you
press the button.
You can also assign a phrase in a song to repeatedly practice that part. Refer to
the [FromToRepeat] option in the “SONG SETTING” menu on page 74.
TIP
Resetting the part playback
Both parts are automatically
turned ON whenever you
select a new song.
CLP-170/150 27
Page 28

Selecting and Playing Voices
Selecting Voices
Voice
2
1
group buttons
2
SONG KEYBOARD
MAXMIN
REC
FILE SETTINGSTART/STOP
SONG
SETTING
METRONOME
A
UPDOWN
C
TEMPO
B
D
TRACK
EXTRA
TRACK
1
TRACKS
2
START
TOP
/
SYNCHRO START
SONG
STOP
SONG SELECT
NEW SONG
SONG BALANCEMASTER VOLUME
DEMO
CONTRAST
GRAND
PIANO 1
CHURCH
ORGAN
EXITEXIT
Procedure
1. Select a voice group.
Press a voice group button.
2. Select a voice.
Use VARIATION [
If you select XG
If you select XG, you can select the XG voice group first, then select the
desired voice.
2-1. Simultaneously press the [–][+] screen buttons located
beside the XG voice name display, to access a screen
where you can select XG voices.
2-2. Use A [–][+] to select the voice group.
▼][▲] or A [–][+] to select a voice.
AFC
VIBRAPHONE
E.BASS XG
GUITAR
VOICE
SETTING
SPLIT CHORUSREVERB
VARIATION BRIGHTMELLOW
BRILLIANCE
HARPSI-
GRAND
E.PIANO
PIANO 2
JAZZ
ORGAN
STRINGS
E.CLAVI-
E.PIANO
CHORD
CHORD
1
2
SYNTH.
WOOD
PAD
BASS
CHOIR
VOICE
MIDI
SETTING
ON/OFF
AFC
OTHER
SETTING
SETTING
EFFECT
TERMINOLOGY
Voice
On the Clavinova, a voice
means “tone” or “tonal color.”
TIP
You can also switch between
voices in the same group by
pressing a voice group button repeatedly.
TIP
To learn characteristics of
the voices, listen to demo
songs for each voice group
(page 22). Refer to “Preset
V oice List” on page 109 for
more information on characteristics of each preset voice.
2-3. Use C [–][+] to select the desired voice.
V oice gr oup Voice name V oice gr oup Voice name
GrandPiano1
GRANDPIANO1
MellowPiano PipeOrganTutti
RockPiano PipeOrganFlute1
CHURCHORGAN
HonkyTonkPiano PipeOrganFlute2
GRANDPIANO2
E.PIANO1
E.PIANO2
HARPSICHORD
E.CLAVICHORD
VIBRAPHONE
GUITAR
GrandPiano2
BrightPiano RotaryOrgan
JAZZORGAN
E.Piano1 MellowOrgan
SynthPiano
E.Piano2 SynthStrings
STRINGS
Vintage E.Piano SlowStrings
Harpsichord8'
Harpsichord8'+4' SlowChoir
CHOIR
E.Clavichord Scat
Wah Clavi.
Vibraphone SynthPad2
Marimba
Celesta Bass&Cymbal
NylonGuitar
SteelGuitar FretlessBass
SYNTH.PAD
WOOD BASS
E.BASS
XG XGVoice
• For details on XG voices, refer to “XG voice list” (the separate data list booklet).
PipeOrganPrincipal
JazzOrgan
Strings
Choir
SynthPad1
WoodBass
ElectricBass
TIP
Y ou can control the loudness of
a voice by how hard y ou pla y
the keyboard, although different playing styles (touch sensitivities) have little or no effect
with the sound of certain musical instruments. Ref er to “Preset Vo ice List” on page 109.
TIP
XG is a major enhancement
of the GM System level 1
format, and was developed
by Yamaha specially to provide more voices and variations, as well as greater
expressive control over
voices and effects, and to
ensure compatibility of data
well into the future.
TIP
If you select XG and then
simultaneously press the
VARIATION [
▼][▲] buttons,
the XG voice select screen
will appear.
28 CLP-170/150
Page 29

Using the pedals
The Clavinova has three foot pedals: damper pedal (right), sostenuto
pedal (center), and soft pedal (left) that produce a range of expressive
effects similar to those produced by the pedals on an acoustic piano.
Selecting and Playing Voices
Damper (right) pedal
When you press the damper pedal, the notes
you play have a longer sustain.
When you select Grand Piano 1, pressing the
damper pedal activates the instrument’s special
“Sustain Samples” to accurately recreate the
unique resonance of an acoustic grand piano’s
soundboard and strings.
Sostenuto (center) pedal
If you play a note or chord on the keyboard
and press the sostenuto pedal while holding
the note(s), the notes will sustain as long as
the pedal is held. All subsequent notes will
not sustain.
q
.
q
.
q
.
h
When you press the damper
pedal here, the notes you
play before you release the
pedal have a longer sustain.
q
.
q
.
q
.
h
When you press the sostenuto
pedal here while holding the
note(s), the notes will sustain
as long as you hold the pedal.
TIP
If the damper pedal doesn’t
work, or notes are sustained
even when the pedal is not
pressed, make sure that the
pedal cord is properly
plugged into the PEDAL jack
on the unit (see step 5 on
page 113 (CLP-150), see
step 6 on page 116 (CLP-
170)). Also, make sure that
the RPedal parameter in the
“VOICE SETTING” menu is
set to ON (see page 83).
TIP
You can adjust the depth of
the resonance produced by
the “Sustain Samples” using
the Sustain Sampling Depth
parameter in the “OTHER
SETTING” menu. (See
page 93.)
Soft pedal (left)
The soft pedal reduces the volume and slightly changes the timbre of notes
played while the pedal is pressed. (The soft pedal will not affect notes that are
already playing when it is pressed. Press the pedal immediately before you
play the target notes.)
With the Vibraphone and Jazz Organ voices, this pedal turns vibrato on and
off or toggles the speed of vibrato. (See page 93.)
TIP
You can assign a function to
each pedal via the “R
Pedal”, “M Pedal”, and “L
Pedal” parameters in the
“VOICE SETTING” menu.
(See pages 83, 84.)
TIP
The center and left pedals
can also be assigned to
song start/stop operation
(START/STOP function) via
the “PedalStart/Stop”
parameter in the “OTHER
SETTING” menu (on
page 94).
CLP-170/150 29
Page 30

Selecting and Playing Voices
Adding variation to the sound
[BRILLIANCE]/[REVERB]/[CHORUS]
The Effect function enables you to add expression to the sound. The Clavinova effects include Brilliance,
Reverb, and Chorus.
SONG KEYBOARD
MAXMIN
SONG BALANCEMASTER VOLUME
SONG SELECT
NEW SONG
DEMO
TRACK
1
TOP
SYNCHRO START
[REVERB]
[CHORUS]
REC
FILE SETTINGSTART/STOP
SONG
SETTING
METRONOME
A
UPDOWN
C
TEMPO
CONTRAST
B
EXITEXIT
D
EXTRA
TRACK
TRACKS
2
START
/
STOP
SONG
GRAND
GRAND
PIANO 2
PIANO 1
CHURCH
ORGAN
ORGAN
HARPSI-
VIBRA-
E.PIANO
JAZZ
STRINGS
E.CLAVI-
E.PIANO
CHORD
CHORD
1
2
SYNTH.
PAD
CHOIR
VOICE
VOICE
PHONE
SETTING
GUITAR
WOOD
BASS
E.BASS XG
SPLIT CHORUSREVERB
VARIATION BRIGHTMELLOW
BRILLIANCE
AFC
MIDI
SETTING
ON/OFF
AFC
OTHER
SETTING
SETTING
EFFECT
BRILLIANCE [MELLOW] / [BRIGHT]
[BRILLIANCE]
You can use this control to adjust the brilliance of the tone and change the tonality to suit your preference.
Procedure
Press one of the BRILLIANCE [MELLOW]/ [BRIGHT] buttons
to select the desired tonality.
A
C
Mellow3
Mellow2
Mellow1
Soft and mellow tone.
The sound becomes more mellow and rounder as the
number increases.
Normal........... Standard tone
Bright1
Bright2
Bright tone.
The sound becomes brighter as the number increases.
Bright3
B
NO YES
D
Press the [EXIT] button to return to the main screen.
You can press BRILLIANCE
[MELLOW] [BRIGHT], and
then use D [–][+] to select
the desired tonality.
Normal setting = Normal
Normal setting:
The “Normal setting” refers
to the default setting (factory
setting) obtained when you
first turn on the power to the
Clavinova.
If you select [Bright1],
[Bright2] or [Bright3] as the
type of brilliance, the volume
level will increase slightly.
Under this condition, if you
raise the [MASTER VOLUME] dial setting, the sound
may become distorted. In
this case, lower the volume
accordingly.
TIP
TIP
TERMINOLOGY
NOTE
30 CLP-170/150
Page 31

Selecting and Playing Voices
[REVERB]
This control adds reverberation to the sound by simulating the natural reverberation of a concert hall.
Procedure
Pressing the [REVERB] button repeatedly toggles the reverb
on and off.
Even if the reverb effect is turned off, a “soundboard reverb” effect
will be applied when the GrandPiano1 or GrandPiano2 voice is
selected.
[CHORUS]
This control adds spread and spaciousness to the sound.
Procedure
Pressing the [CHORUS] button repeatedly toggles the chorus on and off.
You can turn the chorus effect on and off by pressing the [CHORUS]
ON/OFF buttons on the panel and by setting the Chorus On Off
parameter in the VOICE SETTING menu (see page 80). The [CHORUS] ON/OFF button setting on the panel is temporary. That is, if
you select another voice, the chorus setting for the previous voice is
cancelled. The Chorus On Off parameter setting is saved for each
voice. That is, if you select a given voice, the chorus setting is automatically turned on or off according to the saved chorus setting.
TIP
You can select a reverb type
via the Reverb Type parameter in the “VOICE SETTING” menu, and adjust the
reverb depth f or the selected
voice via the Reverb Send
parameter. (See page 79.)
TIP
Normal setting = ON
TIP
You can select a chorus type
via the Chorus Type parameter in the “VOICE SETTING” menu, and adjust the
chorus depth for the
selected voice via the
Reverb Send parameter . You
can also turn chorus on or
off via the Chorus On Off
parameter. (See page 79.)
TIP
Normal Setting
The normal chorus on/off
setting is different for each
voice.
CLP-170/150 31
Page 32

Selecting and Playing Voices
To enhance the acoustic realism of the sound ...[iAFC
(Instrumental Active Field Control)] (CLP-170)
When iAFC is engaged, the Clavinova will sound deeper and more resonant, similar to an acoustic musical
instruments.
Perform the automatic adjustment after you turn on the power of the Clavinova for the first time,
and after each time you move the Clavinova. (page 86)
iAFC [ON/OFF]
Procedure
iAFC will toggle on or off each time you press iAFC [ON/
OFF] switch.
TIP
How iAFC works
Sounds picked up by a mic
and sounds produced internally by the Clavinova are
processed and output from
the rear speaker to enhance
acoustic realism of the sound.
iAFC uses Yamaha’s EMR
(Electronic Microphone
Rotator) technology to
ensure stability against
acoustic feedback.
TIP
iAFC cannot be used in
the following cases.
• When the Speaker setting
is Normal, and headphones are connected.
• When the Speaker setting
is Off.
32
CLP-170/150
TIP
When using iAFC, do not
block the speaker located on
the rear panel of the Clavinova. The optimal iAFC
effect cannot be obtained if
this speaker is blocked.
TIP
[iAFC SETTING] lets you
select the type of iAFC and
adjust the depth of the
effect. (page 85)
TIP
Normal setting = ON
Page 33

Selecting and Playing Voices
Combining two voices (Dual mode)
You can play two voices simultaneously across the entire range of the keyboard. In this way, you can simulate
a melody duet or combine two similar voices to create a thicker sound. Refer to “Voice Combination Examples (Dual and Split)” on page 111 for examples of effective voice combinations.
The numbers on the upper row indicate the steps
METRONOME
2
A
UPDOWN
C
TEMPO
2
in Dual mode using voices from different groups.
TRACK
EXTRA
TRACK
FILE SETTINGSTART/STOP
TRACKS
2
SONG
START
/
STOP
REC
SETTING
SONG
MAXMIN
SONG KEYBOARD
SONG BALANCEMASTER VOLUME
1
TOP
SONG SELECT
NEW SONG
DEMO
SYNCHRO START
The numbers on the bottom row indicate the steps
in Dual mode using voices from the same group.
Dual mode using voices in different voice groups
Procedure
1. Enter Dual mode.
Press two voice group buttons simultaneously.
Voice 1 Voice 2
A
C
B
NO YES
D
Voice
2
CONTRAST
B
D
1 3
group buttons
AFC
HARPSI-
VIBRAPHONE
E.BASS XG
GUITAR
VOICE
SETTING
SPLIT CHORUSREVERB
VARIATION BRIGHTMELLOW
BRILLIANCE
E.PIANO
GRAND
GRAND
PIANO 1
PIANO 2
CHURCH
JAZZ
ORGAN
ORGAN
EXITEXIT
STRINGS
1 43
E.CLAVI-
E.PIANO
CHORD
CHORD
1
2
SYNTH.
WOOD
PAD
BASS
CHOIR
VOICE
Voice
group buttons
MIDI
SETTING
ON/OFF
AFC
OTHER
SETTING
SETTING
EFFECT
TIP
If you want to select Dual
mode for the left-hand area
when the entire keyboard is
divided into left and right
areas (page 35), hold down
[SPLIT] and simultaneously
press two voice group buttons.
2. Select a voice.
Use the A [–]/[+] buttons and B [–]/[+] buttons to select a
voice.
The voices listed in the upper row in “Preset Voice List” on page 109
are called voice 1, and those listed in the bottom row are called
voice 2.
3. Exit Dual mode and return to normal play mode.
Press any voice group button.
TIP
You can also use the VARIATION [▼]/[▲] buttons to
select the voice 1.
TIP
Refer to page 28 for details
on how to select XG voices.
CLP-170/150 33
Page 34

Selecting and Playing Voices
Dual mode using voices in the same voice group
Procedure
1. Select a voice group.
In normal play mode, press the desired voice group button.
2. Select a voice.
Use the A [–]/[+] buttons to select a voice.
3. Select another voice.
Use the B [–]/[+] buttons to select another voice in the
same voice group.
To use the identical voices, press the B [–]/[+] buttons once. To use
different voices within the same voice group, press the B [–]/[+] buttons repeatedly.
A
C
TIP
If you want to select Dual
mode for the left-hand area
when the entire keyboard is
devided into left and right
areas (page 35), press D [–]
[+].
B
NO YES
D
4. Exit Dual mode and return to normal play mode.
Press any voice group button.
34 CLP-170/150
Page 35

Selecting and Playing Voices
Splitting the keyboard range and playing two different voices (Split mode)
Split mode enables you to play two different voices on the keyboard — one with the left hand and another
with the right hand. For example, you can play a bass part using the [WOOD BASS] or [E. BASS] voice with
the left hand, and a melody with the right hand. Refer to “Voice Combination Examples (Dual and Split)” on
page 111 for examples of effective voice combinations.
2 3 1 3 4 5
Procedure
1. Enter Split mode.
Press [SPLIT].
2. Select a voice for the right hand.
Use the voice group buttons and VARIATION [
select the voice for the right-hand area.
3. Select a voice for the left hand.
Hold down [SPLIT], and press a voice group button to
select the voice group for the left-hand area.
Use C [–][+] to select a voice.
4 23
▼][▲] to
Voice
group buttons
TIP
You can also use A [–][+] to
select a voice for the righthand area.
TIP
Refer to page 28 for details
on how to select XG voice.
CLP-170/150 35
Page 36

Selecting and Playing Voices
4. Specify the split point (the border between the right-
and left-hand range).
The normal setting of the split point is “F2.”
F 2
To change the split point setting:
Hold down [SPLIT], then use the D [–]/[+] to specify the
split point.
(Optional) Press and hold down the [SPLIT] and play the
key you wish to assign as the split point.
A
C
Release the [SPLIT] button to return to the main screen.
Center “C”
B
NO YES
D
TIP
A specified “split point” key
is included in the left-hand
range.
TIP
The split point can also be
set by the [OTHER SETTING] parameter [SplitPoint]. (page 92)
5. Exit Split mode and return to normal play mode.
Press [SPLIT].
You can use Dual (see page 33) in each area (right-hand and left-hand) of Split
mode.
A
C
B
NO YES
D
36 CLP-170/150
Page 37

Selecting and Playing Voices
Using the metronome
The Clavinova is built-in metronome (a device that keeps an accurate tempo) is a convenient feature for
practice.
1 2
SONG KEYBOARD
MAXMIN
TRACK
EXTRA
TRACK
1
TRACKS
2
START
TOP
/
SYNCHRO START
SONG
STOP
SONG SELECT
NEW SONG
SONG BALANCEMASTER VOLUME
DEMO
REC
FILE SETTINGSTART/STOP
SONG
SETTING
METRONOME
UPDOWN
TEMPO
TEMPO [DOWN] [UP]
Procedure
1. Start the metronome.
Press the METRONOME [START/STOP] button.
When the metronome is sounding, the beat indicator flashes at the
current tempo.
Adjusting the tempo
Press the TEMPO [DOWN] or [UP] button.
A
A
C
C
AFC
HARPSI-
VIBRA-
A
C
CONTRAST
B
EXITEXIT
D
PIANO 2
PIANO 1
JAZZ
CHURCH
ORGAN
ORGAN
STRINGS
GRAND
E.PIANO
GRAND
E.CLAVI-
E.PIANO
CHORD
CHORD
1
2
SYNTH.
WOOD
PAD
BASS
CHOIR
VOICE
PHONE
E.BASS XG
GUITAR
VOICE
SETTING
SPLIT CHORUSREVERB
VARIATION BRIGHTMELLOW
BRILLIANCE
MIDI
SETTING
ON/OFF
AFC
OTHER
SETTING
SETTING
EFFECT
TIP
B
B
NO YES
D
D
The default tempo is 120. (If
a song has been selected,
the song tempo is used.)
To adjust the tempo (number of beats per minute: 10–500), use the TEMPO
[DOWN]/[UP] or the D [–]/[+] buttons. To reset the tempo to the normal
(default) setting, press the [DOWN] and [UP] keys or the D [–] and [+] keys
simultaneously.
Press the [EXIT] button to return to the normal screen.
2. Stop the metronome.
Press the METRONOME [START/STOP] button.
TIP
You can set the time signature, metronome volume,
and metronome tone using
the METRONOME [SETTING] button. (See page 76.)
CLP-170/150 37
Page 38

Recording Your Performance
This chapter explains how to record your performance using the Clavinova
recording function.
You can, for example, play back what you have played on the Clavinova keyboard for an effective practice aid. You can also record just the left-hand part,
then practice the right-hand part while playing back the recorded left-hand
part.
You can record your performance (audio data) to a cassette tape recorder or other
recording devices via the
AUX OUT connector. (see
page 60.)
TIP
Since you can record up to sixteen tracks separately, you could record the leftand right-hand parts separately, or record each part of a four-handed performance or ensemble song one by one to build a song.
TERMINOLOGY
The format of performance data recorded on a cassette tape differs from that of data recorded on the Clavinova. A cassette tape records audio signals. On the other hand, the Clavino v a “sa v es” inf ormation regarding note timing, voices , and
a tempo value, but not audio signals. When you play back recorded songs, the Clavinova produces sound based on the
saved information. Therefore, recording on the Clavinova may be more accurately called “saving information.” However,
this book often uses the word “recording” because it seems to make more sense.
Recording vs. Saving:
A message (information or confirmation dialog) sometimes appears on the screen to facilitate operation.
Refer to the “Message List” on page 96 for an explanation of each message, appropriate actions to take, and
troubleshooting information.
Recording a New Song
Recording to [TRACK 1]
1 3
SONG KEYBOARD
MAXMIN
TRACK
EXTRA
TRACK
1
TRACKS
2
START
TOP
/
SYNCHRO START
SONG
STOP
SONG SELECT
NEW SONG
SONG BALANCEMASTER VOLUME
DEMO
REC
FILE SETTINGSTART/STOP
SONG
SETTING
METRONOME
A
UPDOWN
C
TEMPO
4 54
Procedure
1. Select “NewSong” for recording.
Press the SONG SELECT [ ] [ ] buttons simultaneously.
New Song screen
A
B
NO YES
2
AFC
VIBRAPHONE
E.BASS XG
GUITAR
VOICE
SETTING
SPLIT CHORUSREVERB
VARIATION BRIGHTMELLOW
BRILLIANCE
B
EXITEXIT
D
PIANO 2
PIANO 1
JAZZ
CHURCH
ORGAN
ORGAN
GRAND
GRAND
CONTRAST
HARPSI-
E.CLAVI-
E.PIANO
E.PIANO
CHORD
CHORD
2
1
SYNTH.
WOOD
PAD
BASS
CHOIR
STRINGS
VOICE
NOTE
If you select a song other
than “P-000: NewSong” and
record on a track that already
has data, the existing data on
the track will be lost.
MIDI
SETTING
ON/OFF
AFC
OTHER
SETTING
SETTING
EFFECT
38 CLP-170/150
C
D
Page 39

Recording Your Performance
2. Select a voice.
Select a voice (or voices) for recording (see page 28).
Set the other parameters, such as reverb and chorus.
Adjust the [MASTER VOLUME] dial to set the volume level to suit
your preference. You can also use the dial to adjust the level during
playback.
After you set the tempo or if the record standby screen does not
appear, press one of the SONG SELECT [ ] [ ] buttons once to
return to the New Song screen.
3. Enter record mode and select a recording track.
Press and hold down the [REC] button and press the
[TRACK 1] button.
The [TRACK 1] indicator flashes in red. (To cancel recording, press
the [REC] or [TOP] button.)
Record standby screen
A
C
B
NO YES
D
NOTE
Set the tempo in Step 3.
NOTE
See page 45 for more information on recording in Dual/
Split mode.
Set the tempo, if necessary.
If this record standby screen does not appear, press one of the SONG
SELECT [ ] [ ] buttons once.
4. Start and stop recording.
Recording begins automatically as soon as you play a
note on the keyboard.
(Optional) Press the SONG [START/STOP] button to start recording.
The recording screen displays the current measure number.
Record screen
A
C
Measure number in recording
To stop recording, press the [TOP] button. The Clavinova
locates the top of the song.
The [TRACK 1] indicator lights up in green. (Record mode is automatically cancelled.)
B
NO YES
D
TIP
You can record data while
using the metronome. The
metronome is not recorded.
TIP
When you press the SONG
[START/STOP] button during recording, recording is
paused. To resume recording, press the SONG
[START/STOP] button again
or play a note on the keyboard.
TIP
When you press the [REC]
button, recording pauses.
CLP-170/150 39
Page 40

Recording Your Performance
5. Play back the recorded performance.
Press the SONG [START/STOP] button to play back the
recorded performance.
When playback is complete, it automatically stops and the Clavinova
locates the top of the song. To stop playback in the middle of a song,
press the [TOP] button. You can also pause playback by pressing the
SONG [START/STOP] button. Playback stops when you press the
button.
When you turn off the power to the Clavinova, the recorded performance
data will be lost. If you wish to keep the recording, save the data using the
SaveToMemory parameter (page 48) or SaveToDisk parameter (CLP-170)
(page 49) in the File menu.
Re-recording TRACK 1
This section explains how to record again in case your performance was not satisfactory.
Procedure
To erase recorded data from
a track, use the Channel
Clear parameter in the
“SONG SETTING” menu.
(See page 74.)
NOTE
1. Select a voice or voices for recording, if necessary.
Repeat Step 2 on page 39 if you wish to change the previous settings.
Follow the procedure from Step 3 on page 39 to re-record.
The original performance data will be overwritten by new performance data.
40 CLP-170/150
Page 41

Re-recording TRACK 1 partially
This section explains how to record part of a song again.
Procedure
Recording Your Performance
1.
2.
3.
Pause the song at the beginning of the part you wish
to re-record.
Use the B [–]/[+] buttons while the playback screen is displayed to move through the measures or play back the
recording and press the SONG [START/STOP] button to
locate a point slightly prior to the beginning of the part
you wish to re-record.
Playback screen
A
C
B
NO YES
D
Select a voice or voices for recording, if necessary.
Repeat Step 2 on page 39 if you wish to change the previous settings.
Select the recording method and enter record mode.
NOTE
If the playback screen is not
displayed, press one of the
SONG SELECT [ ] [ ]
buttons once.
3-1
Press and hold down the [REC] button, and press the
C [–]/[+] buttons repeatedly to specify how the
recording should start and press the D [–]/[+] buttons
repeatedly to specify how the recording should end.
While you are holding down the [REC] button, the following recording method select screen appears.
A
C
Starting methods:
Norm (Normal) — The existing data will be erased after re-recording
starts.
Key On — Data that exists prior to the point where you start playing a
note will not be erased.
B
NO YES
D
CLP-170/150
41
Page 42

Recording Your Performance
Ending methods:
Replace – The data after the point you stop recording will also be
erased.
Punch Out — The data after the point you stop recording will remain.
3-2 Keep holding down the [REC] button and press the
[TRACK 1] button.
The [TRACK 1] indicator flashes in red.
(To stop recording, press the [REC] button again or press the [TOP]
button.)
Follow the procedure beginning with Step 4 on page 39.
Recording to [TRACK2]
This section explains how to record another part on the second track.
2
SONG KEYBOARD
MAXMIN
SONG BALANCEMASTER VOLUME
Procedure
TRACK
EXTRA
TRACK
1
TRACKS
2
START
TOP
/
SYNCHRO START
SONG
STOP
SONG SELECT
NEW SONG
DEMO
REC
FILE SETTINGSTART/STOP
SONG
SETTING
METRONOME
A
UPDOWN
C
TEMPO
CONTRAST
B
EXITEXIT
D
TIP
If you cancel recording by
pressing the [REC] button,
recording stops when you
press the button. If you cancel recording by pressing
the [TOP] button, the Clavinova locates the top of the
song.
1
AFC
VIBRAPHONE
E.BASS XG
GUITAR
VOICE
SETTING
SPLIT CHORUSREVERB
VARIATION BRIGHTMELLOW
BRILLIANCE
HARPSI-
GRAND
E.PIANO
GRAND
PIANO 2
PIANO 1
JAZZ
CHURCH
ORGAN
ORGAN
STRINGS
E.CLAVI-
E.PIANO
CHORD
CHORD
1
2
SYNTH.
WOOD
PAD
BASS
CHOIR
VOICE
MIDI
SETTING
ON/OFF
AFC
OTHER
SETTING
SETTING
EFFECT
1. Select a voice.
Select a voice (or voices) for recording.
Repeat Step 2 on page 39.
2. Enter record mode and select a recording track.
Press and hold down the [REC] button and press the
[TRACK 2] button.
The [TRACK 2] indicator flashes in red. (To cancel recording, press
the [REC] or [TOP] button.)
Make the recording by following the procedure beginning with Step 4 on page 39.
You can record a new part while listening to playback of the recorded [TRACK 1] data.
TIP
Pressing the [TRACK 1] button repeatedly toggles
between playback on (the
indicator lights up in green)
and off (the indicator turns
off).
42 CLP-170/150
Page 43

Recording Your Performance
Recording to the third or more tracks [EXTRA TRACKS]
You can continue recording other parts into tracks 3–16 [EXTRA TRACKS] one by one.
Procedure
1. Hold down the [REC] button in step 2 in the “Record-
ing to [TRACK2]” on page 42 and use the B [–]/[+] buttons to select a recording track (3–16).
select a recording track (3-16)
A
B
NO YES
C
D
2. While holding down the [REC] key, press the [EXTRA
TRACKS] button.
Then, follow the procedure beginning with Step 4 on page 39.
Other recording techniques
Adding data to or recording over an existing song
The previous section explains how to record your performance from the beginning by selecting a blank “P000: NewSong.” You can also add your performance to or overwrite existing songs (such as 50 preset songs
[P-001—P-050], commercially-available music data [see page 58], or your old recorded performances [see
page 46]).
Procedure
1. Select a song for recording (P-001 – P-050).
Select one of the preset songs (P-001–P-050) instead of “P-000:
NewSong” as described in Step 1 of “Recording to [TRACK1]” on
page 38. To select a song from commercial music data sold in stores or
from already-recorded data, see Steps 1 and 2 on page 55.
If you record on a track that
already has data, the existing data on the track will be
lost.
NOTE
To continue recording, follow the procedure described in “Recording a New Song” from page 38 to 43.
CLP-170/150 43
Page 44

Recording Your Performance
Changing a voice or tempo after recording
You can change the voice and tempo after recording to change a song’s feel or to set a more suitable tempo.
You can also change these elements in the middle of a song.
Procedure
1.
2.
3.
4.
Select a song you wish to change by using the SONG
SELECT [ ] [ ] buttons.
To change the voice or tempo in the middle of the
song, specify the measure to change using the B [–]/
[+] buttons.
Change the settings (voice, reverb, etc.).
For example, if you wish to change the recorded E.Piano1 voice to E.
Piano2, use the voice group buttons and the A [–]/[+] buttons to
select E.Piano2.
When the setting is complete, press one of the SONG SELECT [ ]
[] buttons once to return to the song select screen.
Press and hold down the [REC] button and select the
track to change.
The indicator for the selected track lights up in red.
Change the tempo setting now, if necessary.
At this point, do not play the keyboard or press the SONG [START/
STOP] button. Otherwise, recording will start, erasing the recorded
data.
NOTE
Before changing a voice or
tempo, set the starting
method to “Normal.”
(page 41)
When the starting method is
set to “KeyOn,” you cannot
change a voice or tempo.
TIP
Refer to “Questions about
Operations and Functions”
on page 102 for information
on the settings that can be
changed here.
TIP
Change the tempo in Step 4.
CAUTION
The edited settings (except
for the tempo setting) will be
saved in memory and you
will not be able to restore the
previous settings. Proceed
with caution.
44
5.
CLP-170/150
Press the [TOP] or [REC] button to exit record mode.
Page 45

Recording Your Performance
Adjusting the volume balance between playback and your performance [SONG
BALANCE]
While recording multiple parts into tracks one by one, you can adjust the volume balance between the playback of the recorded parts and your current performance.
Procedure
1. Move [SONG BALANCE] to the left or right to make
adjustments.
SONG KEYBOARD
The song playback volume will be lower.
SONG BALANCE
Your playing volume
will be lower.
Some commercially-available music data contains
extremely high volumes.
When using such data,
please adjust the song balance.
The song balance setting is
also used during playback.
(See page 55.)
TIP
TIP
Recording in Dual or Split mode
When you record in Dual or Split mode, the Clavinova records each voice onto a separate track. The following table shows how tracks are assigned to each voice.
CAUTION
When you record multiple parts into tracks one by one, or when you record new data over an existing song (see
page 43), the existing data will be erased. Proceed with caution.
In the following example, Tracks 1, 2, and EXTRA TRACKn have been selected for recording.
Tracks assigned for
recording
TRACK1 TRACK2
Dual Split Split+Dual
EXTRA
TRACKn
TRACK1 TRACK2
↓↓↓ ↓↓↓ ↓↓↓
MAIN
(voice 1)
Tracks
used for
recording
Note: TRACKn = TRACK 3 – TRACK 16
If “n+1,” “n+2,” and “n+3” exceed 16, TRACKs 1, 2, and 3 are used.
Switching between Dual and Split mode in a song is not recorded.
LEFT
(voice 1)
MAIN
(voice 2)
LEFT
(voice 2)
TIP
TRACK1 TRACK2 TRACKn TRACK1 TRACKn TRACK1 TRACKn
–
TRACK3 TRACK4
––
TRACKn
+2
–
EXTRA
TRACKn
TRACK2 TRACKn+1 TRACK2 TRACKn +1
TRACK1 TRACK2
TRACK3 TRACKn +2
TRACK4 TRACKn +3
EXTRA
TRACKn
CLP-170/150 45
Page 46

Saving Recorded Songs and
Handling the Files...[FILE]
File screens (accessed via the [FILE] button) enables you to handle song files
(e.g., save, delete, and rename recorded songs), copy and format disks (CLP-
170), and change the characters on the screen.
The following parameters are provided for these operations:
Settings
Saves recorded and other songs in Clavinova
memory
Saves recorded and other songs on floppy disks
(CLP-170)
Deletes a song from the Clavinova’s save memory
or (CLP-170 only) from a floppy disk
Changes the title of songs RenameSongs 51
Copies data from floppy disk to floppy disk(CLP-170)
Formats a floppy disk(CLP-170) FormatDisk 53
Automatically open a song when the disk is
inserted (CLP-170)
Change the type of characters on the screen CharacterCode 54
Parameter
name
SaveToMemory 48
SaveToDisk 49
DeleteSong 50
CopyDisk 52
FloppyDisk
SongAutoOpen
Reference
page
54
Clavinova memory
The Clavinova has the following three types of memory:
• Current memory:
This is a temporary memory area where you can temporarily place and edit
the currently-selected song before playback or recording.
• Preset song memory:
This read-only memory area saves 50 piano preset songs.
• Storage memory:
This memory area enables you to save recorded songs or song data loaded
from floppy disk (CLP-170).
TERMINOLOGY
File
A file contains a group of
data. On the Clavinova, a
song file includes song data
and a song number.
Memory
Memory is a location inside
the Clavinova in which you
can save and edit data.
Formatting (Initializing)
(CLP-170)
Floppy disks are a convenient media that allow you to
save various data for personal computers and other
devices. There are many
ways (formats) to save data
on floppy disks, depending
on the device. Therefore,
you need to prepare a floppy
disk by assigning a format
before you can use it on a
particular type of device.
This operation is called “formatting.”
Character code
Type of characters
TIP
Please note that the copy
features are intended for
your personal use only.
When you select a song in the song select screen, it is loaded from Preset song
memory, Storage memory, or floppy disk (CLP-170), into Current memory.
You will use Current memory to play back and record songs. When you turn
off the power to the Clavinova, songs saved in Preset song memory and Storage memory are not erased. On the other hand, songs in Current memory are
lost. If you wish to keep a song in Current memory, you must save it in Storage memory or on a floppy disk (CLP-170) (see pages 48, 49).
In this manual, a song located in a song recorded in Current memory, is
referred to as a “Current song,” a song in Storage memory is a “Memory
song,” and a song on a floppy disk is a “Disk song” (CLP-170).
46 CLP-170/150
Preset song
memory
Current memory
Clavinova
Storage memory
Floppy disk
(CLP-170)
Page 47

Saving Recorded Songs and Handling the Files...[FILE]
Basic file operation
A message (information or confirmation dialog) sometimes appears on the screen to facilitate operation.
Refer to the “Message List” on page 96 for an explanation of each message, appropriate actions to take.
2 3 3
SONG KEYBOARD
MAXMIN
TRACK
EXTRA
TRACK
1
TRACKS
2
START
TOP
/
SYNCHRO START
SONG
STOP
SONG SELECT
NEW SONG
SONG BALANCEMASTER VOLUME
DEMO
REC
FILE SETTINGSTART/STOP
SONG
SETTING
METRONOME
A
UPDOWN
C
TEMPO
B
D
Procedure
1. Select a song / (CLP-170 only) Prepare a disk.
Select a song you wish to save or rename.
(Optional) Insert a floppy disk for copying or formatting into the disk
drive (CLP-170).
2. Access the File menu.
Press the [FILE] button.
A
C
To close the File menu, press the [EXIT] button once or twice.
B
NO YES
D
CONTRAST
54
AFC
VIBRAPHONE
E.BASS XG
GUITAR
VOICE
SETTING
SPLIT CHORUSREVERB
VARIATION BRIGHTMELLOW
BRILLIANCE
GRAND
GRAND
PIANO 2
PIANO 1
JAZZ
CHURCH
ORGAN
ORGAN
EXITEXIT
HARPSI-
E.PIANO
STRINGS
E.CLAVI-
E.PIANO
CHORD
CHORD
1
2
SYNTH.
WOOD
PAD
BASS
CHOIR
VOICE
MIDI
SETTING
ON/OFF
AFC
OTHER
SETTING
SETTING
EFFECT
3. Select the desired parameter.
Press the [FILE] or A [–]/[+] buttons repeatedly to display the desired
item from the following:
“SaveToMemory”, “SaveToDisk” (CLP-170), “DeleteSong”, “RenameSong”, “CopyDisk” (CLP-170), “FormatDisk” (CLP-170), “FloppyDiskSongAutoOpen” (CLP-170), “CharacterCode”.
4. Set the parameter or execute the command.
Use the B [– (NO)]/[+ (YES)], C [–]/[+], D [–]/[+] buttons.
For more information regarding this procedure, refer to the corresponding section below.
5. Close the File menu.
Press the [EXIT] button.
CLP-170/150 47
Page 48

Saving Recorded Songs and Handling the Files...[FILE]
Saving recorded or other songs to Clavinova Storage
memory...[SaveToMemory]
If you record a song, then turn off the power to the Clavinova, the song will be erased. To save the recorded
song, you must save it into the Clavinova Storage memory or to a floppy disk (CLP-170). (To save a song to a
floppy disk, refer to the next section [SaveToDisk].) You can also save the preset songs, disk songs, and additional or overwriting recordings (page 43) to Storage memory.
A
C
B
NO YES
D
Procedure
See page 47 the basic operation information. The following is a detailed procedure of Step 4.
4-1 Name the song.
To move the cursor (a small underline), use the C [–]/[+] buttons.
To insert a space, press the C [–]/[+] buttons simultaneously.
To select a character on the cursor, use the D [–]/[+] buttons.
To delete a character, press the D [–]/[+] buttons simultaneously.
You can use up to 58 characters for a song name. If the name is longer
than the screen, use the C [–]/[+] buttons to move the cursor and
scroll the name.
4-2 Execute the operation.
Press the B [+ (YES)] button located next to “Execute?→”.
“Sure?
→” appears on the screen. Press the B [+ (YES)] button again
to confirm the operation. (To cancel the operation, press the B [–
(NO)] button.)
The Clavinova displays “Executing” on the screen during the operation. When the operation is complete, “Completed” appears.
The song is automatically numbered as “M—,” where “M” means
“Memory” and “—” is a number.
TIP
• Y ou can change the type
of characters on the
screen using the CharacterCode parameter.
• When you select a saved
song later, the name with
an extension “.MID” will
appear.
TERMINOLOGY
“Execute?→”: Do you wish
to execute the operation?
“Sure?→”: Are you sure?
“Executing”: The Clavinova
is executing the operation.
“Completed”: The operation
is complete.
If Storage memory contains one or more songs, and you save a new song, the Clavinova automatically sorts the songs alphabetically and renumbers them.
48 CLP-170/150
TIP
CAUTION
Do not turn off the power
while the screen displays
“Executing.”
Page 49

Saving Recorded Songs and Handling the Files...[FILE]
Saving recorded or other songs to floppy
disk...[SaveToDisk] (CLP-170)
Songs you record, memory songs, or recordings you added or recorded over (page 43) previously-recorded
memory songs can be saved on a floppy disk.
A
C
B
NO YES
D
Procedure
See page 47 for basic operation information. The following is a detailed procedure of Step 4.
4. Make sure that a formatted floppy disk (page 53) is
inserted in the disk drive.
Follow the steps for the [SaveToMemory] operation (see page 48) to
name and save the song.
The song is automatically numbered as “D—,” where “D” means
“Disk” and “—” is a number.
TIP
The song data is saved in
the SMF format (format 0).
Therefore, you can play the
disk on instruments that
support the SMF format.
TIP
To specify a folder on the
disk as the save location ...
When the “Sure?->” display
appears, press either C [–]
to display the folder. Use C
[–][+] to select the folder.
You can use D [+] to enter a
folder. Press D [–] to return
to the previous (higher)
level.
[+]
CAUTION
Do not turn off the power or
eject the floppy disk while
the screen displays “Executing.”
CLP-170/150 49
Page 50

Saving Recorded Songs and Handling the Files...[FILE]
Deletes a song from the Clavinova’s save memory or
(CLP-170 only) from a floppy disk...[DeleteSong]
This deletes a song from memory or (CLP-170 only) from disk. It is not possible to delete a preset song or the current song.
A
C
B
NO YES
D
Procedure
See page 47 for basic operation information. The following is a detailed procedure of Step 4.
4-1 Select a song to delete.
Use the C [–]/[+] buttons to select a song.
4-2 Execute the operation.
Press the B [+ (YES)] button located next to “Execute?→.”
Follow the instructions on screen.
TIP
To delete a Current song,
select “ALL” for the ChannelClear parameter in the
“SONG SETTING” menu
(page 74). Alternatively,
press the SONG SELECT
[ ]/[ ] buttons simultaneously to display “Song
Changed Save?”. This
means “A song has been
edited. Do you wish to save
the change?” Press the B [–
(NO)] button. The Current
song is deleted and a blank
“NewSong” is selected.
TIP
If you select a Memory song
or Disk song, deleting the
song does not erase song
data from Current memory.
Howev er, if you return to the
song select screen, song
information other than the
song name is replaced by
“--------------”.
TIP
After you delete a song, the
Clavinova automatically
updates the song numbers.
50 CLP-170/150
TIP
When you delete a folder from
disk, all files within that folder
will be deleted. (CLP-170)
TIP
If a folder is displayed for a
disk song (CLP-170), the [ /
→
] indicator is displayed in
the lower right of the screen.
In this case, you can use the
D [+] key to open the folder.
Press the D [–] key to return
to the previous (upper) level.
CAUTION
Never turn off the power or
remove the floppy disk while
[Executing] is displayed.
→
Page 51

Saving Recorded Songs and Handling the Files...[FILE]
Renaming a song...[RenameSong]
You can change a song’s title except for the preset songs and [P-000: NewSong].
A
C
B
NO YES
D
Procedure
See page 47 for basic operation information. The following is a detailed procedure for Step 4.
4. Name the song as described in the [SaveToMemory]
section (page 48).
CAUTION
Do not turn off the power or
eject the floppy disk while
the screen displays “Executing.”
TIP
After you rename a song,
the Clavinova sorts songs
alphabetically and renumbers them.
CLP-170/150 51
Page 52

Saving Recorded Songs and Handling the Files...[FILE]
Copying data from one floppy disk to
another...[CopyDisk] (CLP-170)
You can copy the entire contents of one floppy disk to another floppy disk.
A
C
B
NO YES
D
Procedure
See page 47 for basic operation information. The following is a detailed procedure for Step 4.
4-1 Make sure that a formatted floppy disk is inserted in
the disk drive.
4-2 Press the B [+ (YES)] button located next to “Exe-
cute?→.”
4-3 When the screen indicates “Insrt Target Disk”, eject
the source disk and insert the destination disk.
When the copy operation is complete, the Clavinova displays “Completed.”
TIP
Use the same type of disk
(2DD or 2HD) for the destination disk as the source
disk.
TERMINOLOGY
Insrt Tar get Disk:
Insert the destination (target) disk.
CAUTION
Do not turn off the power or
eject the floppy disk while
the screen displays “Executing.”
52 CLP-170/150
Page 53

Saving Recorded Songs and Handling the Files...[FILE]
Formatting a floppy disk...[FormatDisk] (CLP-170)
You can format a floppy disk so that it can be used with the Clavinova.
A
C
B
NO YES
D
Procedure
Refer to page 47 for the basic procedure.
Perform the following operations in step 4.
4-1 Make sure that the formatted floppy disk is inserted in
the disk drive.
4-2 Press the B [+ (YES)] button located next to “Exe-
cute?→.”
Follow the instructions on screen.
CAUTION
Do not turn off the power or
eject the floppy disk while
the screen displays “Executing.”
CLP-170/150 53
Page 54

Saving Recorded Songs and Handling the Files...[FILE]
Automatically open a song when the disk is inserted
[FloppyDiskSongAutoOpen] (CLP-170)
Specify whether a song will automatically be opened when you insert a disk.
Procedure
Refer to page 47 for the basic procedure.
Perform the following operation in step 4.
4 Use D [–][+] to select ON or OFF.
Changing the type of characters on screen...[CharacterCode]
You can change the type of characters that appear on screen.
The default setting is “International.” To input katakana, change this setting to “Japanese.”
A
C
Options: International, Japanese
Character list
[International]
B
NO YES
D
[Japanese]
54 CLP-170/150
Page 55

Playing Back Recorded Songs and
Commercially-available Music Data
You can play back songs recorded using the Record function (page 38) as well
as commercially-available music data. You can also play the keyboard along
with the playback.
TIP
Songs containing a large amount of data may not be able to be read properly by the
instrument, and as such you may not be able to select them. The maximum capacity is
about 200–300KB, however this may differ depending on the data contents of each
song.
See page 57 for information
on the types of song data
that can be played on the
Clavinova.
Change the Clavinova’s
character type ([CharacterCord]) as appropriate for the
selected song.
Playing back a song
If you want to play back a disk song on the CLP-170, insert the floppy disk into the disk drive.
TEMPO [DOWN] [UP]
SONG KEYBOARD
MAXMIN
SONG BALANCEMASTER VOLUME
[SONG BALANCE]
Procedure
DEMO
1 2-2
TRACK
1
TOP
SONG SELECT
NEW SONG
SYNCHRO START
EXTRA
TRACK
TRACKS
2
FILE SETTINGSTART/STOP
SONG
START
/
STOP
REC
SETTING
SONG
32-2 54
METRONOME
2-1
VIBRAPHONE
E.BASS XG
VOICE
SETTING
GUITAR
A
UPDOWN
C
TEMPO
CONTRAST
B
EXITEXIT
D
PIANO 2
PIANO 1
JAZZ
CHURCH
ORGAN
ORGAN
GRAND
GRAND
HARPSI-
E.CLAVI-
E.PIANO
E.PIANO
CHORD
CHORD
2
1
SYNTH.
WOOD
PAD
BASS
CHOIR
STRINGS
VOICE
TIP
TIP
SPLIT CHORUSREVERB
VARIATION BRIGHTMELLOW
BRILLIANCE
AFC
MIDI
SETTING
ON/OFF
AFC
OTHER
SETTING
SETTING
EFFECT
1. Display the song select screen.
Press either the SONG SELECT [ ]/[ ] buttons.
Song select screen
A
C
B
NO YES
D
2. Select the desired song.
2-1 Use the A [–]/[+] buttons to select the song type: “Pre-
setSong,” “MemorySong,” or “DiskSong” (CLP-170).
If the internal Storage memory contains one or more songs, the Clavinova displays “MemorySong.” If a floppy disk that contains song data is
inserted in the drive, the Clavinova displays “DiskSong” (CLP-170).
2-2 Use the C [–]/[+] or SONG SELECT [ ]/[ ] buttons to
select a song.
TIP
You can enjoy ensemble
performance by yourself.
Record the parts for a fourhanded song or a piano
duet, then play the recorded
part while playing the other
part on the keyboard.
TIP
Use the SongRepeat
parameter in the “SONG
SETTING” menu (page 75)
to select repeat playback of
all songs or repeat playback
of a single song.
TIP
If a folder is displayed for a
disk song (CLP-170), the [ /
→
] indicator is displayed in
the lower right of the screen.
In this case, you can use the
D [+] key to open the folder.
Press the D [–] key to return
to the previous (upper) level.
TIP
If the song name extends
beyond what can be displayed in the screen, you
can press D [+] to move
toward the right in steps of
one character. Press D [–] to
move back to the left in
steps of one character.
→
CLP-170/150 55
Page 56

Playing Back Recorded Songs and Commercially-available Music Data
3. Start playback.
Press the SONG [START/STOP] button.
Starting playback automatically as you start playing the keyboard (Synchro Start)
You can start playback as soon as you start playing the keyboard. This is called
the “Synchro Start” function.
To enter Synchro Start standby mode, press and hold down the [TOP] button
and press the SONG [START/STOP] button. The SONG [START/STOP]
indicator flashes.
Now play the keyboard. Playback starts simultaneously.
To cancel the Synchro Start function, press the [TOP] button while the Clavinova is in Synchro Start standby mode.
You can move back and forth (rewind and fast forward) through the bars by
using the B [–]/[+] buttons in the song select screen while the Clavinova is
playing or stopped.
The bar number in playback
A
C
B
NO YES
D
You can play the keyboard while the Clavinova is playing back a song. You can
also play the notes in a voice different from the playback voice by selecting the
voice from the panel, and adjusting the volume balance between the playback
parts and your current performance using the [SONG BALANCE] slider. (See
page 45.)
Press either of the SONG SELECT [ ]/[ ] buttons to return to the song
select screen.
Adjusting the tempo
You can use the TEMPO [DOWN]/[UP] buttons to adjust the playback
tempo as required before or during playback. The default tempo (the song’s
original tempo) is set when you press the [DOWN] and [UP] buttons simultaneously.
Press either of the SONG SELECT [ ]/[ ] buttons to return to the song
select screen.
4. Stop playback.
When playback is complete, the Clavinova automatically stops and
locates the top of the song. To stop playback in the middle of a song,
press the [TOP] button. You can also pause playback by pressing the
SONG [START/STOP] button. Playback stops when you press the
button.
TERMINOLOGY
Bar: measure
TIP
You can play the metronome
along with the song playback. When you stop playback, the metronome is also
stopped.
TIP
In the song select screen:
• Press the SONG
SELECT [ ] or the C[–
] button while playback is
stopped in the middle of
the song to locate the
top of the song.
However, if you have
selected a disc song
(CLP-170) and there is a
folder before the song,
the folder will appear on
the display when you
press the SONG
SELECT [ ] [ ] buttons or C [–]/[+] buttons
during song playback.
• Press the SONG
SELECT [ ] or the C[–
] button during playback
to restart playback from
the top of the song.
• Press the SONG
SELECT [ ] or the
C[+] button during playback to start playback
from the next song.
56 CLP-170/150
Page 57

Playing Back Recorded Songs and Commercially-available Music Data
5. Return to the main screen.
Press the [EXIT] button.
Eject the floppy disk from the disk drive if you have been playing a
disk song (CLP-170).
Turning track playback on and off
When you select a song on the Clavinova, the indicators for tracks that contain data ([TRACK 1], [TRACK 2], [EXTRA TRACKS]) are lit in green. While
the Clavinova is playing or stopped, pressing these track buttons turn off the
indicators, and the data on those tracks will not be played. Pressing the track
buttons toggles track playback on and off. You can play the part that is turned
off.
Supported song data type
Data formats that can be played on the CLP-170/150
The Clavinova CLP-170/150 plays song data in the following formats:
Floppy disk format (CLP-170)
3.5-inch 2DD disks in the MS-DOS 720KB format
3.5-inch 2HD disks in the MS-DOS 1.44MB format
Sequence format
SMF (Standard MIDI File) formats 0 and 1
ESEQ
Performance data recorded on the CLP-170 is saved in the SMF format 0 in a floppy disk.
TIP
You can practice a part or
phrase using the FromToRepeat (page 74) and PhraseMark parameters (page 75)
in the “SONG SETTING”
menu.
TERMINOLOGY
Disk format (CLP-170):
A structured method for writing data to disk.
TERMINOLOGY
Sequence format:
A structured method for
recording performance data.
CLP-170/150 57
Page 58

Playing Back Recorded Songs and Commercially-available Music Data
Vo i ce arrangement format
XG voice arrangement
GM system level 1 voice arrangement
DOC voice arrangement (CLP-170)
Performance data recorded with preset XG voices on the CLP-170/150
can be played on other XG-compatible instruments.
See page 6 of the separate “Reference Booklet” for the XG voice list.
Refer to “Data compatibility” on page 107 for more information on
formats.
TERMINOLOGY
Voice arrangement format:
A structured method for
numbering the voices for
assignment.
58
CLP-170/150
Page 59

Connections
Connectors
CAUTION
Before connecting the Clavinova to other electronic components, turn off the power to all the components. Before
turning the power on or off to all components, set all volume levels to minimum (0). Otherwise, electrical shock or
damage to the components may occur.
THRU
CLP-170
AUX PEDAL
1
MIDI
2
OUTIN
MacPC-2
MIDI
USB
TO HOST USBHOST SELECT
4
3
5
L/L+R R
6
L/L+R R RL
LEVEL FIXED
AUX OUTAUX IN
7
7
6
L/L+RRL/L+RRRL
AUX INAUX OUT
MacPC-2
MIDI
USB
THRU
HOST SELECT
TO HOST
3
CLP-150
1
LEVEL FIXED
OUTIN
MIDIAUX PED AL
2
1 AUX PEDAL jack
A separately sold FC7 foot controller or FC4/FC5 foot switch can be connected to this jack. By using an FC7 you can control the volume while playing
to add expression to your performance, or control various other functions. By
using an FC4/FC5, you can switch various selected functions on/off. To select
the function that will be controlled, use the [VOICE SETTING] parameter
[AuxPedal] (See page 84). The SONG [START/STOP] function can also be
assigned to a foot switch (See page 94).
2 MIDI [IN], [OUT], [THRU] connectors
Use MIDI cables to connect external MIDI devices to these connectors.
Make sure you set the HOST SELECT switch (described on the privious page)
to MIDI when you use these connectors.
3 HOST SELECT switch
This switch should be set according to the type of connected MIDI device or
personal computer. (Refer to “Connecting a personal computer” on page 61
for more information.)
4 TO HOST jack
This jack allows direct connection to a personal computer. (Refer to “Connecting a personal computer” on page 61 for more information.)
5 USB jack
This jack allows direct connection to a personal computer. (Refer to “Connecting a personal computer” on page 61 for more information.)
USB
4
5
Connect or disconnect the
pedal when the power is off.
TIP
CLP-170/150 59
Page 60

Connections
6 AUX IN [R], [L/L+R] jacks
The stereo outputs from another instrument can be connected to these jacks,
allowing the sound of an external instrument to be reproduced via the Clavinova’s speakers. Refer to the diagram below and use audio cables for connection.
CAUTION
When the Clavinova’s AUX IN jacks are connected to an external device, first
turn on the power to the external divice, then to the Clavinova. Reverse this order
when you turn the power off.
Clavinova
phone plug
(standard)
AUX IN
L/L+RR
AUX IN
audio cable
Tone Generator
Plug shape depends
on the divece.
AUX OUT
7 AUX OUT [R][L] Pin jacks (LEVEL FIXED), [R][L/L+R] Phone jacks
These jacks let you connect the Clavinova to your stereo system etc. to play at
higher volumes, or connect a cassette recorder etc. to record your playing.
Use audio cables to make connections as shown in the diagram.
CAUTION
When the Clavinova’s AUX OUT jacks are connected to an external audio system, first turn on the power to the Clavinova, then to the external audio system.
Reverse this order when you turn the power off.
Clavinova
phone plug
(standard)
To powered speakers
L/L+R R RL
AUX OUT
LEVEL FIXED
RCA
pin plug
audio cable
Stereo
AUX IN
RCA
pin plug
TIP
The Clavinova’s [MASTER
VOLUME] dial setting affects
the input signal from the AUX
IN jacks, but the [REVERB],
[CHORUS], and BRILLIANCE [MELLOW]
[BRIGHT] (page 30) settings
do not.
TIP
If you connect the Clavinova to a monaural device,
use only the AUX IN [L/L+R]
jack or AUX OUT [L/L+R]
jack.
CAUTION
Do not route the output from
the AUX OUT jacks to the
AUX IN jacks. That is, when
you connect an external
audio device to the AUX
OUT jacks, do not connect
the audio device to the
Clavinova’s AUX IN jacks. If
you make this connection,
the signal input at the AUX
IN jacks will be output from
AUX OUT. This creates an
audio loop, causing audio
oscillation and abnormal
playback, and leading to
malfunction of both pieces
of equipment.
TIP
Use audio cables and adaptor plugs with no resistance.
TIP
The Clavinova’s [MASTER
VOLUME] setting will not
affect the sound that is output from AUX OUT (LEVEL
FIXED).
When these are connected (with standard phone plugs), you can use the
[MASTER VOLUME] control to adjust
the volume of the sound output to the
external device.
60 CLP-170/150
When these are connected (with RCA pin
plug; LEVEL FIXED), the sound is output to
the external device at a fixed level, regardless
of the [MASTER VOLUME] control setting.
Page 61

Connections
Connecting a personal computer
You can connect the [TO HOST], MIDI [IN][OUT][THRU], or [USB] connector of the Clavinova to your
personal computer and enjoy using the Clavinova in conjunction with musical software on your computer.
“The Clavinova-Computer Connection,”
what you can do with your Clavinova and a personal computer and how to set up a Clavinova-Computer
system (the manual is not written for any specific models). The document is available as a PDF file (in
English) at the following Internet address:
Clavinova Web site (English only): http://www.yamahaclavinova.com/
Yamaha Manual Library: http://www2.yamaha.co.jp/manual/english/
is a supplementary guidebook that describes, for beginners,
There are the three methods by which to connect the Clavinova to a personal computer:
1. Connecting the serial port on the computer to the Clavinova’s TO HOST jack (page 59)
2. Using a MIDI interface and the Clavinova’s MIDI connectors (page 59)
3. Connecting the USB port on the computer to the Clavinova’s USB jack (page 59)
For more information, refer to the following pages.
TIP
When connecting the Clavinova to a personal computer, first turn off the power to both the Clavinova and the computer
before connecting any cables and setting the HOST SELECT switch. After making connections and switch settings, turn
on the power to the computer first, then to the Clavinova.
TIP
If you are not using the connection between the Clavinova and your computer, you must disconnect the cable from the
[TO HOST] jack or [USB] jack. The Clavinova may not operate correctly if a cable is left connected.
TIP
The connectors that can be used will depend on the setting of the HOST SELECT switch.
HOST SELECT switch setting Usable connectors
[MIDI] [MIDI] connectors (all: [IN][OUT][THRU])
[PC-2], [Mac] [TO HOST] jack
[USB] [USB] jack
CLP-170/150
61
Page 62

Connections
1.
Connecting the serial port on the computer to the Clavinova’s TO HOST jack
Connect the computer’s serial port (RS-232C or RS-422) to the Clavinova’s TO HOST jack.
In this connection, the Clavinova functions as a MIDI interface. Therefore, you do not need a special
MIDI interface.
Connection
Use a special serial cable (page 63) to connect the computer’s serial port (RS-232C or RS-422) to the Clavinova’s TO HOST jack.
Clavinova
MacPC-2
MIDI
USB
TO HOSTHOST SELECT
TO HOST
RS-232C (D-sub 9-pin)
Windows Macintosh
Note for Windows users (regarding the MIDI driver)
modem port
To transfer data via the computer’s serial port and the Clavinova’s TO HOST jack, you need to install a
specific MIDI driver (the Yamaha CBX driver for Windows). You can download this driver from XG
Library on the Yamaha Web site (http://www.yamaha-xg.com) or install from the Accessory CD-ROM
included with the Clavinova.
62
CLP-170/150
 Loading...