

Page 1

Operating Instructions
HVS 1.1 - HVS 1.2
HVS 3.2 - HVS 3.4
Sensorless
V 201203A
771079102 Manual HVS1.3-3.4 ENGLISH
Page 2

Page 3
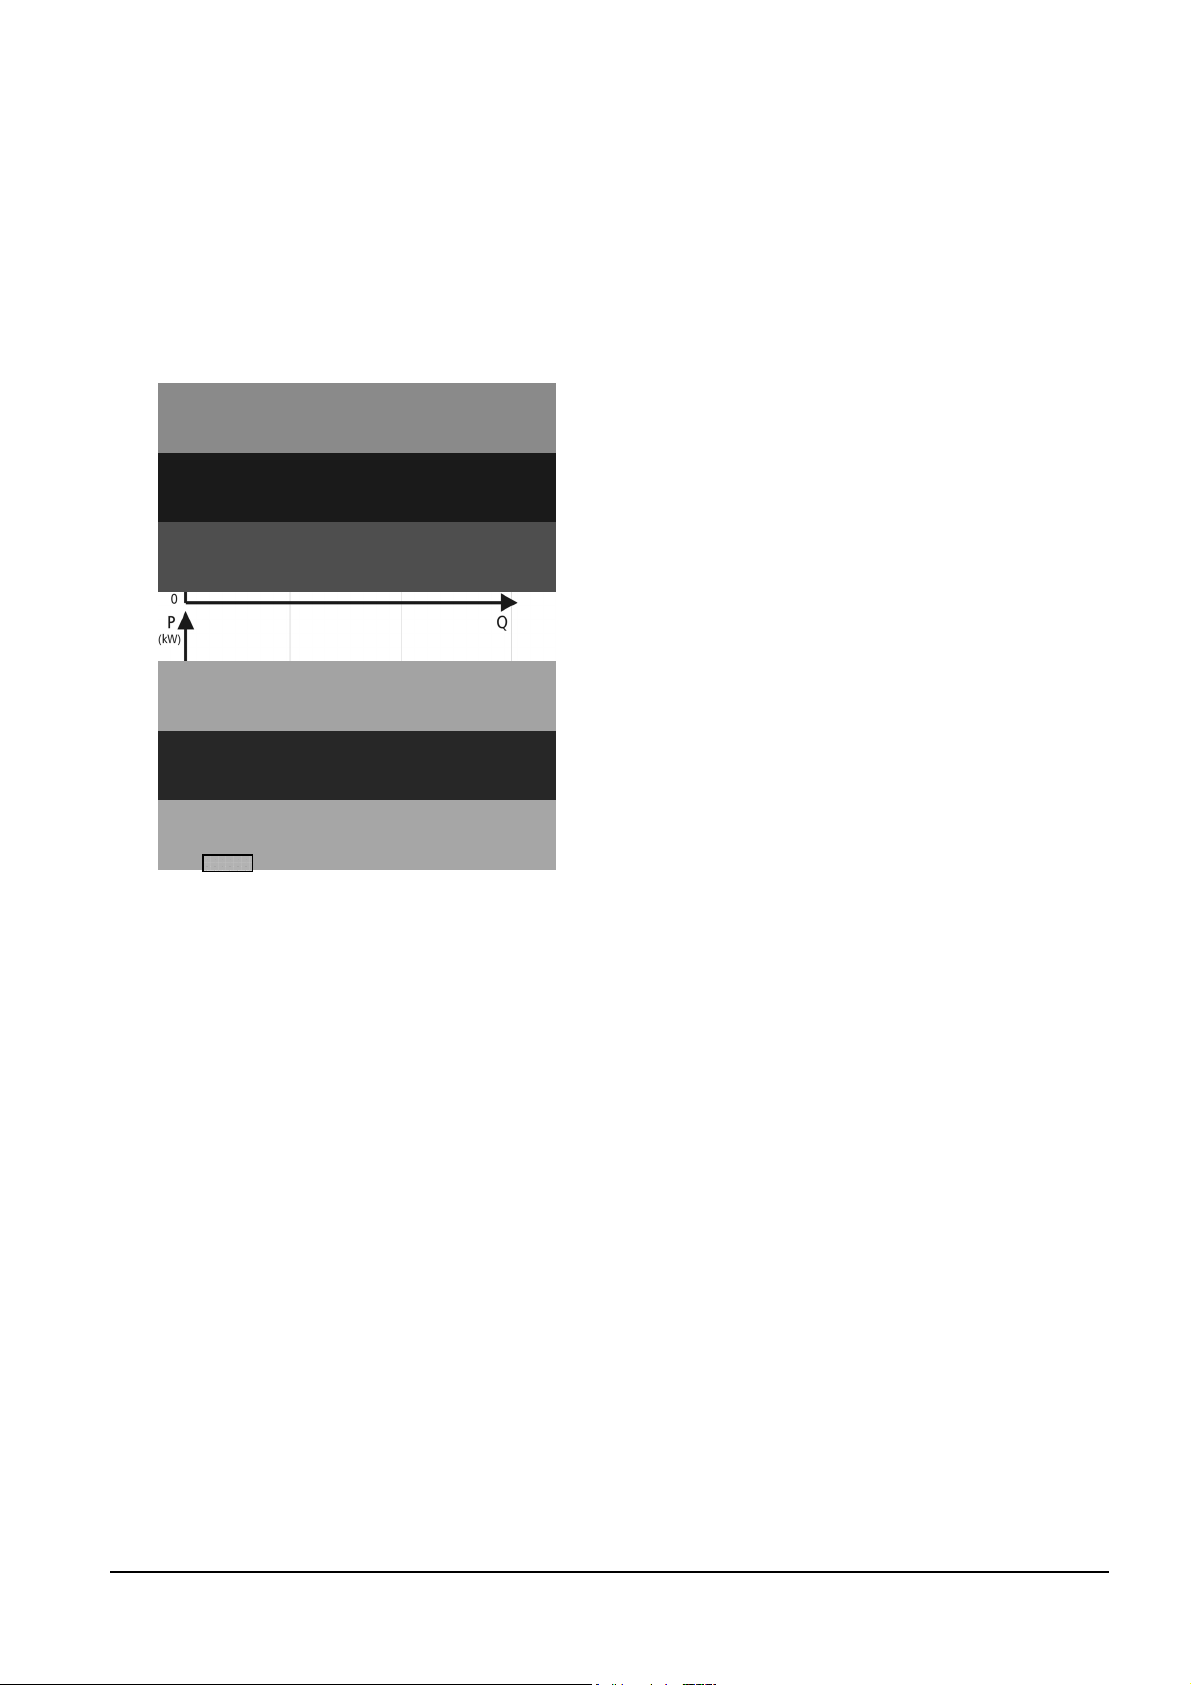
HYDROVAR sensorless
The idea is to control the pump speed
Energysavings
according to the power consumption of
the motor instead to the head of the
pump.
Each working point at a defined speed on
the curve of required pump head in the
hydraulic diagram (A,B,C) has also a
corresponding point in the electric
performance diagram (D,E,F).
Each of these points is defined by the
power consumption at the same speed.
All these points of power consumption at
different speeds results in a pretended
curve of power consumption at different
speeds.
If the controller varies the speed of the
pump at different flow values so that the
power consumption moves along this
curve and the working point of the pump
in the hydraulic diagram will also move
along the corresponding curve of pump
head but without measuring this head.
3
Page 4

Index
1. IMPORTANT SAFETY INSTRUCTIONS ................................................................................................6
2. TECHNICAL DATA - HYDROVAR SENSORLESS AND GENERAL DATA................................................8
2.1 DIMENSIONS ............................................................................................................................................9
3. HYDROVAR SENSORLESS MOUNTING............................................................................................10
3.1 MOUNTING THE HYDROVAR SENSORLESS ON THE PUMP ..........................................................................................10
3.1.1 Included components ................................................................................................................10
3.1.2 Mechanical mounting ................................................................................................................11
3.1.3 Mounting the Thermistor...........................................................................................................13
3.2 ELECTRIC INSTALLATION AND WIRING.....................................................................................................................14
3.2.1 Means of protection ..................................................................................................................14
3.2.2 Wiring the Hydrovar sensorless to the motor.............................................................................14
3.3 MAIN PART OVERVIEW .......................................................................................................................................15
3.4 CONNECTING THE POWER CABLES .........................................................................................................................16
3.4.1 Control Terminals.......................................................................................................................17
3.5 FRONT PLATE .................................................................................................................................................19
4 FUNCTION BUTTONS OF THE HYDROVAR SENSORLESS.................................................................20
5 LEARNING A SYSTEM CURVE TO ADAPT THE SYSTEM’S REQUIREMENTS......................................21
6 SETTINGS AT THE SUBMENU – PROGRAMMING DEVICE ...............................................................23
7 SETTINGS AT THE SUBMENU-PARAMETER .................................................................................................24
7.1 AUTO START .................................................................................................................................................24
7.2 SUBMENU INVERTER..........................................................................................................................................25
7.2.1 Maximum Frequency..................................................................................................................25
7.2.2 Boost .........................................................................................................................................25
7.2.3 Fixed Speed ...............................................................................................................................25
7.3 SUBMENU CONTROLLER .....................................................................................................................................26
7.3.1 Function Mode...........................................................................................................................26
7.3.2 Window Hz - Interpolation ........................................................................................................26
7.3.3 Window Fx - Function mode ......................................................................................................26
7.3.4 Shift – Function mode................................................................................................................ 26
7.3.5 Accel high..................................................................................................................................27
7.3.6 Decel high..................................................................................................................................27
7.3.7 Accel Low ..................................................................................................................................27
7.3.8 Decel Low. .................................................................................................................................27
7.4 SUBMENU REFERENCE CURVE ..............................................................................................................................28
7.4.1 Reference Curve.........................................................................................................................28
7.4.2 Power / Frequency .....................................................................................................................28
7.4.3 Coefficients A / B / C .................................................................................................................. 28
7.5 SUBMENU TEST-RUN .........................................................................................................................................29
7.5.1 Start Test Run ............................................................................................................................29
7.5.2 Enable Test Run .........................................................................................................................29
7.5.3 Test Frequency...........................................................................................................................29
7.5.4 Boost Test Run...........................................................................................................................29
7.6 SUBMENU ECONOMY ........................................................................................................................................30
7.6.1 Currency ....................................................................................................................................30
7.6.2 Rated Power ..............................................................................................................................30
7.6.3 Costs / kWh................................................................................................................................30
7.6.4 Clear Savings .............................................................................................................................30
4
Page 5

7.7 MODE CONTROLLER .......................................................................................................................................... 31
7.8 SWITCH INTERVAL.............................................................................................................................................31
7.9 SET PASSWORD................................................................................................................................................31
7.10 LEARNING .................................................................................................................................................31
7.11 DEFAULT .................................................................................................................................................31
7.12 SUBMENU DIAGNOSIS – “READ ONLY” PARAMETERS ..............................................................................................32
7.12.1 Pump Runtime .........................................................................................................................32
7.12.2 Pump Address..........................................................................................................................32
7.12.3 Error memory...........................................................................................................................32
7.12.4 Software Version .....................................................................................................................32
8 CONTROLLER MENU OF THE PROGRAMMING DEVICE ..................................................................33
8.1 CONTROLLER MENU CONFIGURATION ....................................................................................................................33
8.1.1 Automatic connection to the programming device....................................................................33
8.1.2 Software Version .......................................................................................................................33
8.2 SUBMENU ADDRESS ..........................................................................................................................................34
8.2.1 Change of pump address...........................................................................................................34
9 POSSIBLE ERROR MESSAGES .........................................................................................................35
9.1 OVERHEATING – MOTOR ....................................................................................................................................35
9.2 OVERVOLTAGE .................................................................................................................................................35
9.3 UNDERVOLTAGE ............................................................................................................................................... 35
9.4 OVERLOAD .................................................................................................................................................35
9.5 OVERHEATING OF THE HEAT SINK..........................................................................................................................36
9.6 ERROR POWER MEASUREMENT.............................................................................................................................36
9.7 ADDITIONAL INTERNAL PROCESSOR ERROR MESSAGES: ..............................................................................................36
10 POSSIBLE INDICATIONS OF THE LED ON THE HYDROVAR SENSORLESS...................................................37
11 MAINTENANCE .........................................................................................................................................38
5
Page 6

1. Important safety instructions
Read and follow the operating instructions
and safety instructions carefully before
starting operations! All modifications must be
done by qualified technicians!
In addition to the instructions contained in these operating instructions please pay
attention to universal safety and accident prevention regulations.
Warns that failure to observe the precaution may cause electric shock.
Warns that failure to observe the precaution may cause personal injury
or damage to property.
The HYDROVAR sensorless has to be disconnected from the power supply before any work
can be carried out in the electrical or mechanical part of the system.
Installation, maintenance and repair work may only be carried out by trained, skilled and
qualified personnel.
Unauthorised modifications or changes to the system make all guarantees null and void.
When in operation the motor can be stopped by remote control, where by the HYDROVAR
sensorless and the motor remain under voltage. For safety reasons, the unit must be
disconnected from the power supply when carrying out work on the machinery as locking
out the equipment by switching off the release mechanism or set value cannot prevent
accidental starting of the motor.
When the HYDROVAR sensorless is connected to power supply, the
components of the power unit as well as certain components of the master
control unit are also connected to the power supply.
Touching these components seriously endangers life!
Before removing the HYDROVAR sensorless cover the system must be
disconnected from the power supply. After switching off the power supply
wait at least 5 minutes before starting work on or in the HYDROVAR
sensorless (the capacitors in the intermediate circuit have to be discharged
by the installed discharge resistors first).
Voltages of up to 400 volts are possible (if there are faults it can be higher).
6
Page 7
All work carried out when the HYDROVAR sensorless is open may only be
performed by qualified authorised staff.
Furthermore, care must be taken not to short circuit the neighbouring
components when connecting the external control wires and that open
cable ends which are not in use are insulated.
The HYDROVAR sensorless contains electronic safety devices which switch
off the control element in the event of faults, whereby the motor has zero
current but remains energised and comes to a halt. The motor can also be
halted by mechanical blocking. If it is switched off electronically the motor
is disconnected from the mains voltage through the electronics of the
HYDROVAR sensorless but is not potential-free in the circuit.
In addition voltage fluctuations, especially power failures can cause the
system to switch off itself.
Repair of faults can cause the motor to start up again.
The system may only be put into operation when it has been earthened. In addition,
equipotential bonding of all pipes must be ensured.
The operating instructions have to be read, understood and followed by the operating
personnel. We point out that we accept no liability for damage and operating disorders
which are the result of non-compliance with the operating instructions.
NOTICE!
High voltage tests of the inverter or the motor may damage the
electronic components! Hence bridge before the in- and outgoing
terminals L -N -- U- V-W.
To avoid incorrect metering by capacitors incorporated in the
electronic part isolate the motor from the HYDROVAR sensorless.
Preliminary Inspection
Visual Inspection
Upon delivery, check the integrity of the packaging.
After you have removed the external packaging, visually inspect the converter to make sure
it has suffered no damage during transport. If any damage is visible, inform your
distributor within 8 days from the delivery date.
Handling and Storage
The product must be lifted and handled carefully.
During transport and storage, protect the converter from humidity and mechanical damage
caused by impacts, falls, etc...
ATTENTION:
Dispose of all packing materials and the unit in accordance with local regulations.
7
Page 8

2. Technical Data - Hydrovar sensorless and General Data
HYDROVAR
sensorless
Type
HVS
Rated
output
Hydrovar sensorless
output to the Motor
Voltage Max.
current
Supply Voltage (Uin) Prefuse
min.
Mains frequency
[A] Ampere
48-62 [Hz]
1.1 1,1 kW 3x0-Uin 4,8 A 1x220-240V ±15% 10
1.15 1,5 kW 3x0-Uin 7,0 A 1x220-240V ±15% 16
1.2 2,2 kW 3x0-Uin 10,0 A 1x220-240V ±15% 20
3.2 2,2 kW 3x0-Uin 5,7 A 3x380-460V ±15% 10
3.3 3 kW 3x0-Uin 7,3 A 3x380-460V ±15% 13
3.4 4 kW 3x0-Uin 9 A 3x380-460V ±15% 16
Output voltage: 3x 0...Uin VAC / 0-70 Hz
(depends on the input voltage)
Min. frequency: 0 – max. frequency
Electrical efficiency: > 95%
Protection against: Short circuit, over- and undervoltage, overheating of the
electronics (overload) and additional external protective functions
via PTC (motor temperature) and low water switch.
A mains filter is fitted to ensure interference immunity.
The Hydrovar sensorless complies with the general EMC provisions and has been tested
according to the following standards:
• Disturbance voltage: EN 55011
• EMC – Immunity: EN 61000-4-3 and ENV 50204
• Electrostatic discharge: EN 61000-4-2
Ambient temperature: 5° C ... + 40°C
Storage temperature: -25° C ... + 55° C
(+70°C during max. 24 hours.)
Humidity: rH max. 50% at 40°C, unlimited
rH max. 90% at 20°C, max. 30 days per year
Condensation not permitted !
Air pollution:
The air may contain dry dust as found in workshops where
there is no excessive quantity of dust due to machines.
Excessive amounts of dust, acids, corrosive gases, salts etc.
are not permitted
Altitude: max. 1000m above sea level
At sites over 1000 m above sea level, the maximum output
power is derated by 1% for every additional 100m.
If the installation site is higher than 2000 m above sea level,
please contact your local distributor.
Class of protection: IP55
8
Page 9
∅
∅
2.1 Dimensions
HVS 1.1:
closing cap
HVS 1.15/1.2/3.2/3.3/3.4
12
7
cable
gland
closing cap
Type: WM-Kit
Weight Weight
[Kg] [Kg]
HVS 1.1 2,00 1
HVS 1.15 4,70 1
HVS 1.2 4,70 1
HVS 3.2 4,70 1
HVS 3.3 4,70 1
HVS 3.4 4,70 1
cable entries
2x for M20
2x for M16
3x for M12
Dimensions for Hydrovar sensorless with wall mounting unit
Type High Wide Deep
[mm] [mm] [mm]
HVS1.1 235 155 155
HVS1.15-1.2 235 155 155
HVS3.2-3.4 265 195 195
9
Page 10

p
3. HYDROVAR sensorless mounting
3.1 Mounting the HYDROVAR sensorless on the pump
3.1.1 Included components
Variant for HVS 1.1:
mounting and distance ring
screw
washer
Variant for HVS 1.15/HVS 1.2/HVS 3.2/HVS 3.3/HVS 3.4:
thermistor
cable gland
screw M5x50
thermistor
cable gland
mounting clam
10
Page 11

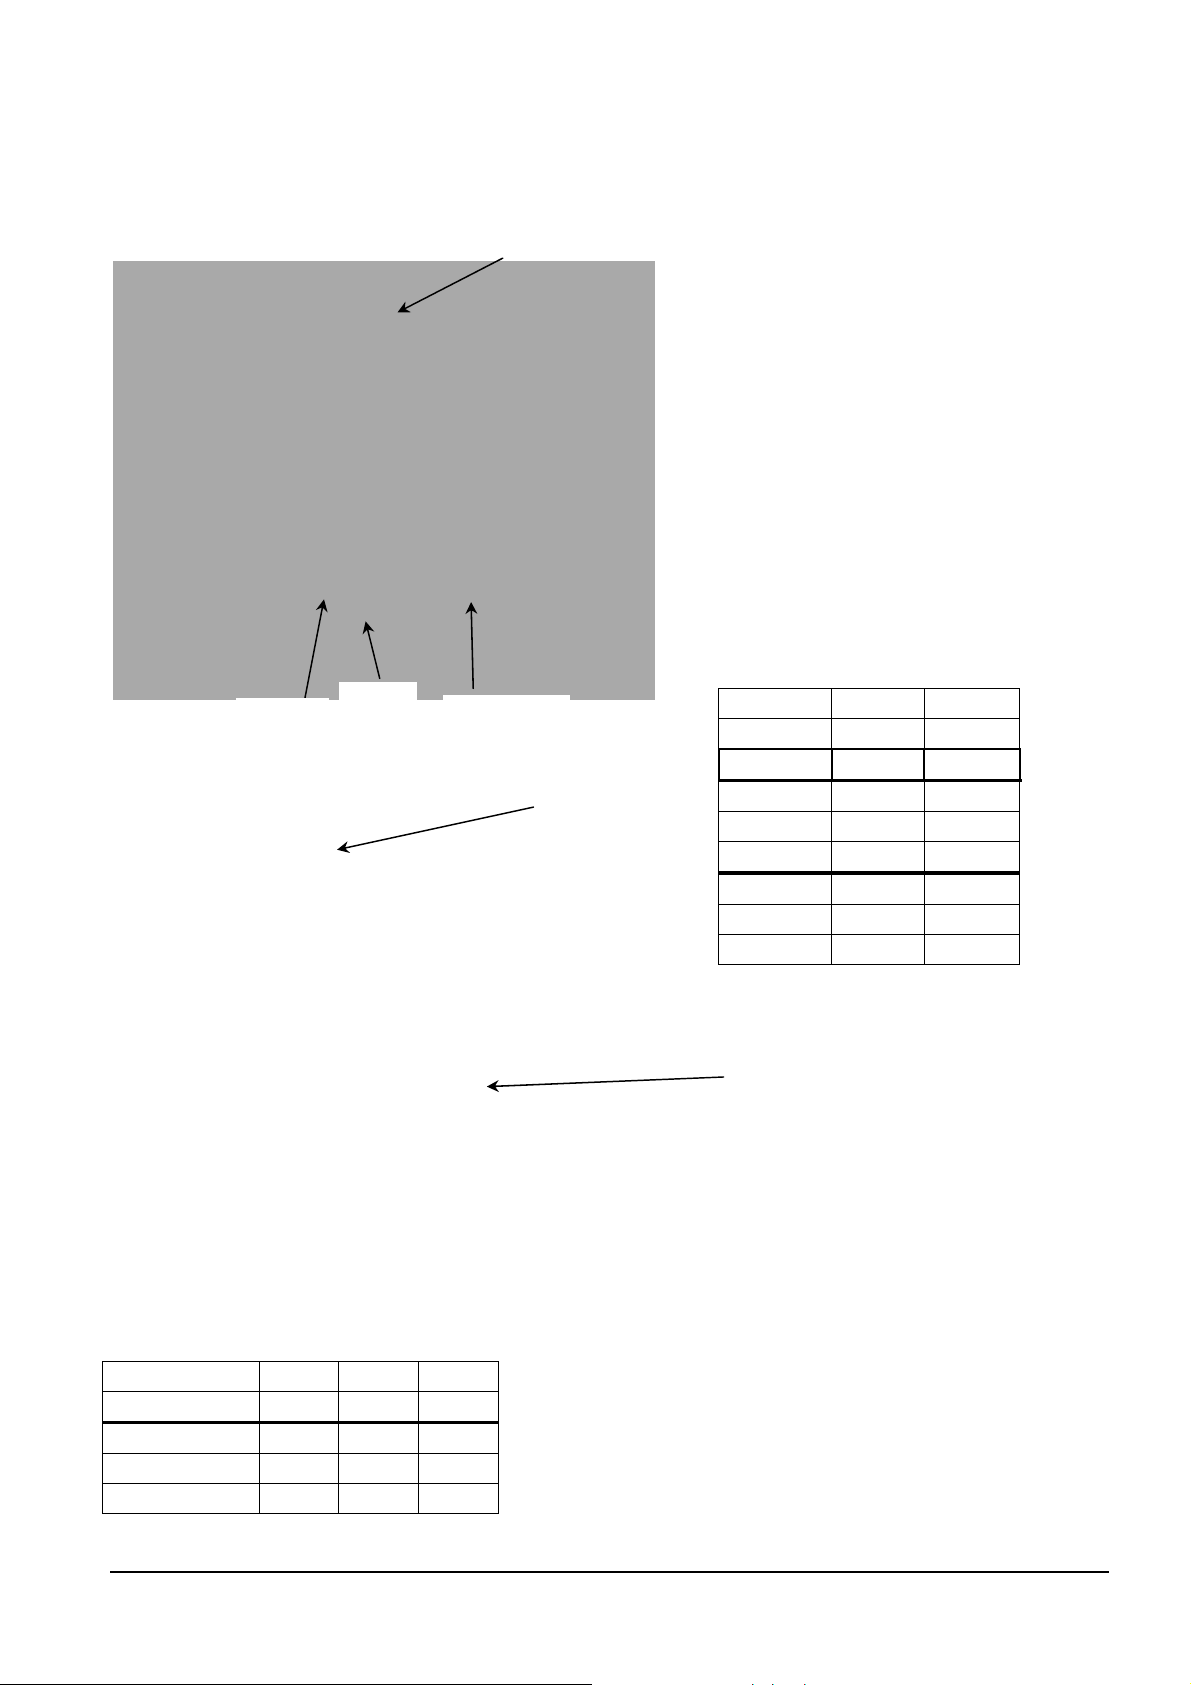
sensorless
3.1.2 Mechanical mounting
Variant for HVS 1.1
Hydrovar
1. Remove the motor fan cover from
your 3-phase motor by removing the
mounting screws.
2. Put the mounting and distance ring
(1) between the fan cover and the
Hydrovar sensorless and fix them
together with the screw (3) by using
the included washer (2).
3. Use the fan cover screws to mount
(1) mounting
and distance
ring
the fan cover/Hydrovar sensorless
combination to the motor
motor fan
cover
(2) washer
(3) screw
CAUTION!:
Don’t forget the washer between the screw and the motor fan cover!
11
Page 12

Variant for HVS 1.15/HVS 1.2/HVS 3.2/HVS 3.3/HVS 3.4:
Screws with
Gasket
4 screws
M5x50
Centre bit
4 mounting
clamps
CAUTION!
Don’t forget the gaskets
for the 3 screws.
Ensure that there is no
water on the unit before you
open the cover.
Connection
Motor conduit box
Thermistor
Mounting ring
CAUTION!
If you use a motor with plastic fan cover, you have to
a mounting ring.
use
Mounting:
Remove the 3 screws holding the HVS
cover.
Place the centre bit in the HVS fan cover.
Place the HVS fan cover on the motor.
Hang the 4 clamps by the motor fan
cover and fix them with the 4 screws.
Mount the cover with the 3 screws.
12
Page 13

3.1.3 Mounting the Thermistor
Variant A:
Motor
Thermistor
Terminal block
Rubber gasket
Cover of the
conduit box
Variant B:
Thermistor
Open the cover of the conduit box and remove also the terminal block inside.
Fix the Thermistor (Variant A or B)
Electrical connection of the motor cables
13
Page 14

3.2 Electric installation and wiring
NOTICE!
All installations and maintenance have to be performed by
trained and qualified personnel with proper tools!!
WARNING!
In case of a failure, disconnect and lockout electrical power and wait
five minutes for capacitor discharge before servicing the Hydrovar
sensorless.
3.2.1 Means of protection
Ask your power supply company which means of protection are required.
Applicable: AC and DC current-operated circuit breaker (FI), TN systems, protective
circuits.
When using a FI protection switch, make sure that it also releases in the event of
a DC fault, use for each Hydrovar sensorless a separate FI-switch!
3.2.2 Wiring the Hydrovar sensorless to the motor
Remove the 3 screws holding the top of the Hydrovar sensorless. Carefully lift the top,
loose the earth screw and put the Hydrovar sensorless cover aside.
Now you can see the 2 main parts:
(1) control card with all terminals for the control signals and the RS485 interface
(2) main card with all power components and terminals for power supply and motor
14
Page 15

)
3.3 Main part overview
HVS 1.1:
Motor
connections
Cable
introduction for
motor cable
(at least
11,5mm)
Cable introduction for control
cable (at least 5mm)
HVS 1.15/HVS 1.2/HVS 3.2/HVS 3.3/HVS 3.4:
control card (1
control card (1)
main supply
connections
main board (2)
Cable gland
(for power
supply 5-10mm)
main board (2)
main supply
connections
motor
connections
cable introduction for
control cable
15
Page 16

3.4 Connecting the power cables
a) motor cable:
Locate the motor connections inside the Hydrovar sensorless. Connect wires to the
terminals and rout the cable through the cable gland.
You must take a motor cable at least Ø 11.5mm if you want protection IP55. (only HVS 1.1)
The earth-wire of the cable has to be fixed with the screws with the earth-symbol to the
cooling body of the Hydrovar sensorless.
b) Connections in the conduit box
The connection of the motor cable depends on the type of the motor and can be done in
star or delta connection:
(you have to use the connection for a motor voltage of 3x230V shown on the motor label)
Star-connection
Delta-connection
c) supply cable
The main power cable is connected to the terminals labelled L1, N for the 230 VAC, single
phase unit; or L1, L2, L3 for the 3x400VAC, three phase unit.
16
Page 17

Control terminals
terminals of the
RS485 interface
control terminals
HVS 1.1
Power supply 220V
HVS 1.15, 1.2
HVS 3.2, 3.3, 3.4
3.4.1 Control Terminals
All external used cables have to be shielded. Do not connect the mass of the electronic
components to other higher potentials.
All electronic ground and GND of the RS 485-interface are connected internal.
For external off/on and low water, switch contacts suitable for <10 V are necessary.
The control cable must be at least Ø 5mm.
If unshielded control cables are used, signal interference may occur and interfere
with the function of the inverter.
17
Page 18

Control-Terminals:
12
max. 500mA/125V
11
10
NC
CC
NC
Error relay – X2/10 and
X2/11 is closed if there is an
error or no power supply
Motor Thermistor
Internal Power measurement
External ON/OFF
Fixed Speed
Electronic Ground
+5 V
2
X
3
X
9
8
7
6
5
4
3
2
1
4
+ 5V SIO
GND
3
2
SIO +
1
SIO -
White wire
Black wire
Red wire
RS 485 Interface
Internal connected to
Power measurement
X2/3 is used for internal
power measurement
To run with Fixed Speed
close X2/2 and X2/3
Connect X3/1-2-3 to
Master / Slave unit
18
Page 19

3.5 Front plate
HVS 1.1-1.2:
HVS 3.2/3.3/3.4:
connection of the programming device
indication LED
START / +
STOPP / -
19
Page 20

4 Function buttons of the HYDROVAR SENSORLESS
CAUTION!
Before you start the system, the pump has to be filled and all wiring and
piping has to be done!
The Hydrovar sensorless is delivered with the following settings as default:
Learning: enabled – allows to learn a reference curve
Auto Start: enabled – after power supply automatic start
Other possibilities to use the push buttons of the Hydrovar sensorless:
START – Press ▲ button (if Autostart is disabled, the pump can be started by
pressing the ▼ button and then the ▲ button at the first start up or after a
power supply failure) or
STOP - Press the ▼ button.
Both buttons are located on the front plate of the Hydrovar sensorless
• Set Frequency for constant speed
For changing the speed without the external programming device, you have to do the
following:
1.) Press button ▼ to stop pump
2.) Press the ▲ and ▼ buttons together for more than 10 sec, the colour of the LED
changes to orange after 5 seconds and after further 5 seconds the LED changes to
orange fast flashing.
3.) Now you can change the speed of the pump by using the button ▲ (higher
frequency) or ▼ (lower frequency).
(If the external programming device is connected with HYDROVAR SENSORLESS, the
power as well as the frequency is shown on the display and you can also change the
frequency with the ▲ and ▼
buttons of the programming device.)
4.) When you have selected the right frequency, don’t press a button for 5 seconds and
that speed is saved automatically. Also after power supply fault the pump will run on
this speed.
5.) Press the ▲ and ▼ buttons together for 5 seconds the pump will stop.
If you have stored system points the HYDROVAR SENSORLESS start with automatic
mode.
20
Page 21

5 Learning a System Curve to adapt the system’s requirements
CAUTION!
The learning of the system’s required curve depends on the saved system points. It is
necessary to start at flow=0 and to save at least four system points up to a maximum
of 12 points.
Before you start the system, the pump has to be filled and all wiring and
piping has to be done!
Learning:
Before you start to learn, it is important that the motor was running with constant speed
to reach the operation temperature. Then you can choose between learning the first point
and select one of the pre programmed reference curves (only by using the external
programming unit) or learn 3 up to 12 points to run along the optimum system curve.
a) Using one of the pre programmed reference curves 2...7
1.) connect the external programming device to select your favourite reference curve
2.) Stop the pump while pressing the button ▼ on the HYDROVAR SENSORLESS.
3.) Press the ▲ and ▼ buttons together for 5 sec, the colour of the LED
changes from green to orange. The pump is now ready to learn.
4.) Set now the first system point at flow=0. You can change the speed of the pump
by using the button ▲ (higher frequency) or ▼ (lower frequency).
Check the difference pressure on an important point of the system to set the
required frequency.
On the display of the programming device, you can see the power and the
frequency.
5.) To save the learned point press the ▲ and ▼ buttons together, until the
LED will begin to start fast flashing. The Hydrovar sensorless stops automatically.
This saved point is now the min. point of your selected reference curve, but it can be used
for all other reference curves also.
21
Page 22

b) Learning a complete system curve = reference curve 0 [Default]
(no external programming device required)
1.) Stop the pump while pressing the button ▼ on the HYDROVAR SENSORLESS.
2.) Press the ▲ and ▼ buttons together for 5sec, the colour of the LED
changes from green to orange. The pump is now ready to learn.
3.) Set now the first system point at flow=0. You can change the speed of the pump
by using the button ▲ (higher frequency) or ▼ (lower frequency).
Check the difference pressure on an important point of the system to set the required
frequency.
If external programming device is connected with HYDROVAR SENSORLESS, you can see
the power and the frequency on the display.
4.) To save the learned point press the ▲ and ▼ buttons together, until the
LED will begin to start fast flashing.
5.) Increase now the flow of the pump up to 20-30% of the maximum flow.
Increase also the frequency by using the button ▲ (higher frequency) or ▼ (lower
frequency) to reach the required value.
6.) To save this point press the ▲ and ▼ buttons together (-> 4.)
Learn now the next points up to the maximum flow.
7.) To save the last system point and to end the learning mode you have to press the ▲ and
▼ button together after setting the last frequency, until the pump stops automatically
and the LED starts shining green.
Now the required system curve is stored.
8.) If “Autostart” function is disabled start the automatic mode by pressing button ▲. The
Hydrovar sensorless increases now the speed till it reaches the right point depending
on the system curve.
With the programming device you are now able to change ramps and windows for a better
controlling.
22
Page 23
6 Settings at the Submenu – Programming Device
You are always able to connect the programming device to HYDROVAR SENSORLESS.
The LED will change the colour to orange, when connection was successful.
POWER X.X %
SPEED X.X Hz
POWER SAVING
X.XX KW
TOTAL SAVINGS
XX.XX EUR
The actual Power [%] and the actual output
frequency [Hz] are displayed.
Shows the actually saved energy [kW]
Shows the whole saved energy costs
(in EUR / USD / GBP / CHF)
General for operating with the external programming device:
With Í and Î you can select the different parameters in the menu.
To enter a submenu, press the Ð button. To leave the submenu, you have to press the
buttons Í or Î for longer than 3 sec.
With Ï or Ð you can change the parameters.
Each change in the settings is saved after leaving this parameter with the buttons
Í or Î.
When you have changed a parameter and you leave it, the LCD shows you the following
message
SAVE
PARAMETER
SUBMENU
PARAMETER
PASSWORD
0000
NOTICE!
The Password protection prevents untrained personnel from accidentally changing the
base settings
PASSWORD
0066
Hold the Î button down to reach the next display
for about 2 sec.
From the 1
st
display, press the Î button to reach
Then press the Ð button and the display will change to
Press the Ï button until you reach the number 0066
23
Page 24

7 Settings at the Submenu-Parameter
IMPORTANT!
Before entering the secondary menu these instructions must be read
carefully to prevent incorrect settings which will cause malfunction.
Parameter settings on the end of the manual with the number of the side and place for the
changing Parameters.
7.1 Auto start
Auto Start
Enabled
Autostart Enabled means that the pump starts again automatically after an interruption of
the power supply (power failure).
If Autostart Disabled is set, the pump has to be restarted manually after a power failure,
by pressing Ð and Ï.
You can select between Ð Disabled and Ï Enabled
24
Page 25

7.2 Submenu Inverter
Submenu
Inverter
To enter this menu you have to press the Ð button, to
leave the menu, press the Îbutton longer than 3 sec.
7.2.1 Maximum Frequency
Max. Frequency
50.0 Hz
Attention: Settings higher than 50 Hz may overload the motor!
Settings of 10% above nominal frequency cause 33% more power consumption!
Possible setting between min. 40 and max. 70 Hz.
7.2.2 Boost
B O O S T
5.0 %
Setting of the motor starting voltage in % of rated voltage.
Settings of 0...25% of maximum output voltage are possible. However, care should
be taken that settings are kept as low as possible so that the motor does not
become thermally overloaded.
The stated value determines the course of the
U/f-curve.
7.2.3 Fixed Speed
FIXED SPEED
30.0 HZ
This speed is activated if the Digital Input (X2-2/3) is closed
or
if it is a single pump and there is ERROR POWERMEASURE detected.
This speed should be set to maintain a minimum flow (e.g. night consumption)
The energy savings are also activated with the Fixed Speed.
This speed is to run the motor with constant speed.
25
Page 26

7.3 Submenu Controller
Submenu
Controller
To enter this menu you have to press the Ð button, to
leave the menu, press the Îbutton longer than 3 sec.
7.3.1 Function Mode
Function Mode
Enabled / Disabled
Enabled: Function Mode activated, control along a calculated system curve
Disabled: Interpolation (Point to Point control) – only for special applications
7.3.2 Window Hz - Interpolation
7.3.3 Window Fx - Function mode
7.3.4 Shift – Function mode
Required Settings 0....1,5 Hz
Settings to high: oscillation is possible
This function activate an increase and decrease of speed around the actual system
point.
Window
2 Hz
Window Fx
2 %
Shift
0.0 Hz
Window, if function mode is disabled
Window, if Function Mode is enabled
Oscillation of the learned system curve, if Function
mode is enabled
26
Page 27

Time setting will influence the control of the pump and SHOULD NOT BE CHANGED at
normal operation. Possible settings for each ramp 0,05 - 1000 sec.
7.3.5 Accel high
Accel. High
10 Sec
Excessively fast running up time may overload the
inverter.
7.3.6 Decel high
Decel. High
10 Sec
Excessively slow running down time tends to generate over pressure.
Excessively fast running down time tends to cause
oscillation or hunting or can cause an error
(OVER VOLTAGE) during pump down of the pump.
7.3.7 Accel Low
Accel. Low
70 Sec
Excessively fast running up time tends to cause
oscillation.
7.3.8 Decel Low.
Decel. Low
70 Sec
A too fast setting leads to oscillation.
27
Page 28

7.4 Submenu Reference Curve
Submenu
Reference Curve
To enter this menu you have to press the Ð button, to
leave the menu, press the Îbutton longer than 3 sec.
7.4.1 Reference Curve
Reference Curve
0 - 7
This parameter allows selecting different pre programmed curves.
0... Learned curve with 3 up to 12 system-points
1... previous learned system curve
2... Selection A
3... Selection B
4... Selection C
5... Selection D
6... Selection E
7... Selection F
By using reference curve 2...7 it is only necessary to
learn one point at zero flow. You are also able to
change the reference curve while pump is running to
find the best suitable curve.
The different curves depending on the type of pump
and the duty point.
Change the curve by pressing Ï or Ð
7.4.2 Power / Frequency
POWER xxx
FREQ xx.x HZ
This parameter allows only the control of the learned points.
Check the learned points by using Ï and Ð.
(Learned points 1-12)
7.4.3 Coefficients A / B / C
These coefficients define the actual reference curve 0-7.
To change the coefficients it is necessary to know a special password.
A changing without knowledge about pump curve and power will produce a
malpractice of the pump.
COEFF A / B / C
x.xxx
Change value using Ï and Ð. Press the Î button
to save and change to next coefficient.
28
Page 29

7.5 Submenu Test-Run
Submenu
Testrun
To enter this menu you have to press the Ð button, to
leave the menu, press the Îbutton longer than 3 sec.
7.5.1 Start Test Run
Start Test Run
Ï + Ð
After starting this test run, the pump will speed up with the fasten ramp 1 to the set
speed and then will ramp down with the fasten ramp 2.
By simultaneously pressing Ï + Ð a test run will be
released even if the test cycle is not set.
7.5.2 Enable Test Run
Enable Test Run
100 h
the last stop for 20 seconds with the set speed.
Deactivating test run: Set 0 hours, by using Ï and Ð.
Repeating the test run: Select the test run and set the desired hours using the Ï
button.
Adjustable between 1...100 hours.
The test run starts the pump at the set time after
7.5.3 Test Frequency
Test Frequency
30.0 Hz
Frequency for manual and automatic test run.
Can be set from 0 Hz up to 70 Hz.
7.5.4 Boost Test Run
BOOST Test Run
10.0 %.
Start voltage in % of rated voltage in order to ensure
that the motor starts safely.
29
Page 30

7.6 Submenu Economy
Submenu
Economy
To enter this menu you have to press the Ð button, to
leave the menu, press the Îbutton longer than 3 sec.
7.6.1 Currency
CURRENCY
Change the currency using Ï or Ð.
EUR
This parameter allows you to change between EUR / USD / GBP / CHF.
This function is only important to show the right cost savings.
7.6.2 Rated Power
RATED POWER
Xx KW
To measure the correct energy savings it is necessary to input the maximum
power rate of the unit.
Maximum Power Rate of the used Hydrovar
sensorless
7.6.3 Costs / kWh
Input the correct energy costs for 1 kWh.
7.6.4 Clear Savings
COSTS / KWH
Xx EURO
CLEAR SAVING
Ï and Ð
Energy costs per kWh
Press both buttons to reset the actual energy saving to
0.
30
Page 31

7.7 Mode Controller
MODE
Single pump
Single
Select with the Ï and Ð “Single” (Single pump) or “Master-Slave” (up to 4 pumps).
7.8 Switch Interval
Switch Interval
0024
Adjustable between 0 (de activated) and 250 hours.
For changing the MASTER pump
7.9 Set Password
Set Password
0066
7.10 Learning
Learning
Enabled / Disabled
7.11 Default
Default
Ï + Ð
The pre-set password can be changed if necessary
with the Ï and Ð buttons.
Enabled – you allow to learn system points
Disabled – Learn mode is deactivated
To load DEFAULT – PARAMETER, press buttons Ï + Ð
together, till the timer is run down.
31
Page 32

7.12 Submenu Diagnosis – “read only” Parameters
Submenu
Diagnosis
To enter this menu you have to press the Ð button, to
leave the menu, press the Îbutton longer than 3 sec.
7.12.1 Pump Runtime
Pump Runtime
0000 Std.
Shows the running hours of the pump.
7.12.2 Pump Address
Pump-Address
1
This window shows the adjustment of the pump
address (only readable).
7.12.3 Error memory
The last three error messages are always saved in an internal memory. The
error signals can not be deleted!
Last Error
Shows the last error
........................
2nd Error
Shows the Error before the last error
........................
3rd Error
Shows the Error before Error 2
........................
7.12.4 Software Version
Software
CP – VOG: 004
This parameter shows you the used software version
of the HYDROVAR SENSORLESS.
32
Page 33

8 Controller menu of the programming device
To reach the controller menu, you have to press Î on the controller for longer than 3 sec.,
when the
1st display POWER X.X %
SPEED X.X Hz
is shown. Then the display will change to
Address 01
P1:run
P1 ...Master run ... HVS running
P2 ...Slave disabled ... HVS is not ready / extern on /off
P. ... not active stop ... HVS is ready, but not running
Error ... Error message or no supply voltage
Then press Í on the controller to change to
The actual values are displayed.
The actual pump-address is shown
8.1 Controller menu Configuration
Submenu
Configuration
To enter this menu you have to press the Ð button, to
leave the menu, press the Îbutton longer than 3 sec.
8.1.1 Automatic connection to the programming device
Auto Connecting
Enabled
! Only valid for programming device!
Auto connecting enabled: after plug in the programming device, it changes
automatically to the inverter menu. During this auto connection the programming
device is looking for a valid address and “SCAN CONNECTION” is shown on the
display.
Auto connecting disabled: there is no automatic connecting with the pump (choose
the address)
Auto connecting will be saved after leaving the submenu Configuration
8.1.2 Software Version
Software:
Software: VOGREM-XXX
In the second line of the display, there is shown the
version of the software of the programming device
and also the date of programming of this software.
33
Page 34

8.2 Submenu address
Submenu
Address
To enter this menu you have to press the Ð button, to
leave the menu, press the Îbutton longer than 3 sec.
8.2.1 Change of pump address
Address Change
00--> 00 *
To change the address it is not necessary to cut the interface connection to other
HYDROVAR SENSORLESSS.
On the left side there is shown the address of the HYDROVAR SENSORLESS, which
you want to select (select the address by using the buttons Ï or Ð). On the right
side, you can select a new address also with the buttons Ï and Ð. You only can
select an address, which is not used in the pump group!
To change between left and right side, press button Í or Î. The star shows the
actual used side.
If you have selected mode “MASTER-SLAVE” it is important that each Hydrovar
sensorless has it’s own address from 01 to 04
To save the new selected address press both buttons (Í and Î) together for 2 sec.
If it was successfully you will see the same address on both sides.
To leave the submenu press the Î key for 3 sec.!
Addresses from 01 to 04 can be set in this
parameter.
34
Page 35

9 Possible Error messages
You have to connect the programming unit to read the error message on the display.
After the cause has been remedied, the malfunction has to be reset by cutting off the
power supply for >30 seconds.
The last 3 error messages are saved in SUBMENU DIAGNOSIS
9.1 Overheating – Motor
XXX
Error-Mot-Temp
Possible causes: insufficient cooling, ambient temperature is too high or motor
overloaded.
9.2 Overvoltage
XXX
Error-Overvolt
Possible causes: Check mains supply, supply voltage too high, peak voltage owing to
switch heavy loads on the network, or RAMP 2 is to fast! Find the cause and take
countermeasures (e.g. network filter, RC-elements).
9.3 Undervoltage
XXX
Error-Undervolt
Possible cause: Check mains supply, faulty fuse or phase unsymmetry.
9.4 Overload
XXX
Error Overload
Possible causes: false data settings or the pump is working at a capacity significantly in
excess of its performance data.
Ramp 1 to fast
Max. frequency to high
Boost to low
35
Page 36

9.5 Overheating of the heat sink
XXX
Error KK-Temp
The thermal sensor, mounted on the cooling body of the HYDROVAR SENSORLESS
indicates over temperature.
Possible causes: insufficient cooling, ambient temperature is too high or motor
overloaded.
9.6 Error Power measurement
XXX
Error Powermeas
No detected signal from the power measurement.
Possible causes: wrong connection on the control card
9.7 Additional internal processor Error messages:
ERROR 1 :
ERROR 2 : Not used
ERROR 3 : Processor RAM error
ERROR 4 : Not used
ERROR 5 : Processor ROM error
ERROR 6 : Watchdog error
ERROR 7 : Timer error (quartz)
ERROR 8 : Programme error
These ERROR signals are acknowledged by disconnecting the power supply for
> 30 seconds.
If the error signal should appear again, contact customer service and provide a
detailed description of the error.
EEPROM-ERROR
(corresponding data block malfunction)
36
Page 37

10 Possible indications of the LED on the HYDROVAR SENSORLESS
.) Green shining ⇒ Motor stopped
(via external stop with terminals X2/4; X2/5
or the unit is stopped with the ▼ button on the front
plate)
.) Green slow flashing ⇒ Inverter is active, but the motor has stopped
.) Green fast flashing ⇒ Motor runs
.) Orange/green flashing ⇒ connected external programming device
.) Orange shining ⇒ LEARNING – change speed with the buttons ▲ and ▼,
or the external programming device is connected and the
pump is stopped with the button ▼ on the Hydrovar
sensorless or with the external release input (terminals
X2/4 and X2/5).
.) Orange fast flashing ⇒ EMERGENCY MODE - speed can be changed with the
buttons ▲ and ▼
.) Red shining ⇒ error signalling (type of the Error is shown on the
display of the external programming device)
.) Red flashing ⇒ signalling of a fatal error (HYDROVAR SENSORLESS has
to be disconnected from the power supply!)
37
Page 38

24 25 26 27 29
29
27 27
26 26 26
11 Maintenance
The Hydrovar sensorless control unit does not require special maintenance.
However, the cooling fan and the vent should be freed of dust occasionally.
Fur further information, please ask your distributor!
12 Parameter
POWER
SPEED
POWER
SAVING
TOTAL
SAVINGS
SUBMENU
PARAMETER
SUBMENU
DIAGNOSIS
Seite 33
PASSWORD AUTOSTART
SUBMENU
INVERTER
SUBMENU
CONTROLLER
FUNCTION
MODE
SUBMENU
REFERENCE
CURVE
REFERENCE
CURVE
WINDOW HZ
PUMP
RUNTIME
PUMP
ADDRESS
MAX.
FREQUENCY
LAST ERROR 2ND ERROR 3RD ERROR SOFTWARE
BOOST FIXED SPEED
38
Page 39

31 32 32 32 32 32
31 31 31 31
30 30 30 30
29 29 29 29 29
27 27 28 28 28 28
SUBMENU
TESTRUN
START TEST
RUN
POWER FREQ. PASSWORD 2 COEFF A COEFF B COEFF C
WINDOW Fx SHIFT ACCEL HIGH DECEL HIGH ACCEL LOW DECEL LOW
SUBMENU
ECONOMY
30
CURRENCY RATED POWER COSTS/KWH CLEAR
ENABLE TEST
RUN
MODE
CONTROLLER
TEST
FREQUENZY
SWITCH
INTERVAL
BOOST TEST
RUN
SET
PASSWORD
SAVINGS
LEARNING DEFAULT
Order no.
HYDROVAR
SENSORLESS
Pump
Note:
Date / Name
39
Page 40

XYLEM WATER SOLUTIONS AUSTRIA GMBH
Ernst-Vogel Strasse 2
2000 Stockerau
Österreich
Telefon: +43 (0) 2266 / 604
Telefax: +43 (0) 2266 / 65311
e-mail: info.austria@xyleminc.com
web: www.xylemaustria.com
Xylem Water Solutions Austria GmbH reserves the right to make modifications without prior notice.
© 2012 Xylem, Inc
 Loading...