

Page 1

Xerox Multifunction Devices
r
Customer Tips
dc07cc0418
March 15, 2007
This document applies
to these Xerox
products:
X WC 4150
X WCP 32/40
X WCP 35/45/55
X WCP 65/75/90
X WCP 165/175
X WCP 232/238
X WCP 245/255
X WCP 265/275
X WCP C2128/2636/3545
X WC 7655/7665
… for the use
Xerox Network Scanning WIA Configuration
Purpose
This document contains the procedure to configure the Xerox multifunction device and
user workstations to enable network scanning using the WIA (Windows Image
Acquisition) driver. Microsoft has no plans to add this functionality to operating systems
older than XP.
Background
The Xerox WIA driver for Microsoft® Windows XP® provides users with a method to
quickly scan jobs at the Xerox multifunction device and retrieve the images at their PC
desktop. The WIA driver enables scanning without the use of a scan server. For system
administrators familiar with the creation of scan templates via CentreWare Internet
Services, the WIA driver automatically creates a scan template on the Xerox device that
points to a folder on the Windows XP workstation.
Configuring the Xerox multifunction device for network
scanning using the WIA Driver
(For WCP 232/238/245/255/265/275; WC 7655/7665; WC 4150 devices only. For all
others, proceed to the driver installation instructions on page 4.)
To enable WIA scanning on the Xerox multifunction device there are a number of items
that need to be configured for this functionality to work. They are:
• Creation of a device digital certificate
• Enabling of the SSL (Secure Socket Layer) protocol
• Scan Template Management enabled
Verify Device Settings via the Configuration Report
At the Machine
1. Press the [Machine Status] button.
2. Touch the [Print Reports] button.
3. Touch the [Configuration Report] button.
dc07cc0418
Customer Support Page 1
Page 2

4. On the configuration report verify that within the:
• TCP/IP Settings section that TCP/IP is Enabled, with an existing Host Name
and IP Address.
• HTTP Setting section that HTTP is Enabled.
Retain the Configuration Report as the IP address will be used in subsequent steps.
Creation of a Device Digital Certificate
To enable SSL on a device, it needs to have its own digital certificate. When clients make
a request to the device, it exports the certificate to provide an encrypted channel.
There are two options available to obtain a server certificate for the device:
• Have the device create a Self Signed Certificate
▬ A self signed certificate means that the device signs its own certificate as
trusted and creates the public key for the certificate to be used in SSL
encryption.
• Create a request to have a Certificate Authority sign a certificate that can be
uploaded to the device
▬ A certificate from a Certificate Authority or a server functioning as a
Certificate Authority can be uploaded to the device.
A
A separate request is required for each device.
The Internet Services Machine Digital Certificate Management screen allows you to
choose your method to create a new certificate.
Accessing the Machine Digital Certificates Configuration Screen
1. Open your Web browser and enter the TCP/IP address of the WorkCentre in the
Address bar. Press [Enter].
2. Click the [Properties] tab, select [Security] and click on the [Machine Digital
Certificate] link.
3. Click [Create New Certificate]. You have the option to create a self signed
certificate for the machine, or download a request for a certificate from a Certificate
Authority.
dc07cc0418
Customer Support Page 2
Page 3

Creating a Self Signed Certificate
1. Click [Self Signed Certificate] then [Continue].
2. Complete the Self Signed Certificate form with your 2 Letter Country code,
State/Province Name, Locality Name (optional), Organization Name, Organization
Unit, E-mail Address and Days of Validity (optional).
3. Click [Apply]
4. If prompted, enter the current tools administrator user name and password. The
default is [admin] and [1111].
5. If successful, the Current Status will show A Self Signed Certificate is
established on this machine.
Create a Request for a Certificate from a Certificate Authority
1. In the Machine Digital Certificate screen click [Certificate Signing Request].
2. Click [Continue].
3. Complete the Certificate Signing Request form with your 2 Letter Country code,
State/Province Name, Locality Name, Organization Name, Organization Unit and
E-mail Address.
4. Click [Apply].
5. If prompted, enter the current tools administrator user name and password. The
default is [admin] and [1111].
6. The Certificate Signing Request (CSR) form will appear. Click [Save As...].
7. Select the file type for the form. The options are: X.509 (Privacy Enhanced Mail
.pem) or DER (Distinguished Encoding Rules).
8. Click [Save].
9. Click [Save] and save the file to your PC.
10. Send the request to your Certificate Authority for digital signing.
11. When you receive the signed certificate back from the Certificate Authority, upload
the certificate to the device. To do this click the [Machine Digital Certificate] link
located in the Security menu.
12. Click [Uploa d Signed Certificate].
13. Browse to the signed certificate file on your PC and click [Open].
14. Click [Upload Certificate].
15. If successful, the Current Status will show A Signed Certificate is established on
this machine.
16. To view installed certificates click the Trusted Certificate Authorities link in the
Internet Services menu. The installed certificate should appear in the list.
dc07cc0418
Customer Support Page 3
Page 4

Enable the SSL (Secure Socket Layer) protocol
1. In the Internet Services Properties menu, click [Connectivity, Protocols, HTTP].
2. In the HTTP Security Mode menu click [Require SSL].
3. Click [Apply] and close the acknowledgement window that opens.
4. Close your web browser and then access the Internet Services screen again. The
Security warning will display. Self-signed certificates usually cause browsers to
display messages which question the trust of the certificate. Click [OK] to continue.
Verify Scan Template Management Enabled
1. Click [Services, Scan Template Management].
2. Verify that the Scan Template Management - Enabled box is checked, if it hasn’t
been enabled automatically, check the box now.
3. If prompted, enter the current tools administrator user name and password. The
default is [admin] and [1111].
Xerox WIA Drivers
Installation Requirements
The following are required for installing WIA drivers:
• The workstation must be running the Microsoft Windows XP Professional
Operating System.
• You must possess Administrator rights on the workstation to install the driver.
• Domain and local user accounts are supported.
• The workstation must have TCP/IP and HTTP enabled.
• Simple File Sharing must be disabled on the workstation to allow for proper device
dc07cc0418
Customer Support Page 4
authentication.
Page 5

• The device must have the network scanning option enabled.
• The device must be configured with the SNMP GET community string set to
"public" or the WIA driver will not detect the device properly.
Windows XP Professional Service Pack 2 has Windows Firewall turned on by default
or your site may have Windows Firewall enabled for security reasons. If Windows
Firewall is enabled, you must set up Exceptions for print and file sharing to ensure
that scanning with the WIA driver works properly.
Obtaining the Driver Installation Files
To ensure that the latest release of the driver is installed, it is recommended to
download the latest driver from the Xerox support web site.
1. Within your browser window type
http://www.xerox.com
2. Select [Support and Drivers], enter the product number in the field provided and
select [Search].
3. Select [Drivers & Downloads] for your specific product.
4. Select the WIA Scan Driver that is listed within the Drivers section.
5. Review the End-User License Agreement, and select either [Accept] or [Decline].
6. Clicking Accept will cause a File Download window to appear.
7. Select [Save] and download the file to a known location on your workstation.
Installing the WIA Driver
If the driver is not installed automatically upon download, follow the steps below.
1. Logged on to the workstation as an administrator, open the Windows Control
Panel.
2. Click [Scanners and Cameras]. Click [Add an imaging device].
3. The Scanners and Camera Installation Wizard opens. Click [Next].
4. Click [Have Disk] and browse to the location of the installation files.
5. Select the appropriate .inf file and click [Open, OK].
6. Select the WorkCentre Scanner from the model list. Click [Next].
7. Accept the default scanner name or enter a new name. Click [Next].
8. Click [Finish]. Files are copied to the PC.
9. The Hardware Update Wizard opens. Click [Next].
dc07cc0418
Customer Support Page 5
Page 6
10. Enter the Host Name or IP Address of the desired scanner. Click [Confirm].
If you do not identify a specific scanner at this time, you can select one on the
Device Settings tab in driver properties.
11. If prompted, select [Yes] to disable Simple File Sharing.
12. Click [Next] and then click [Finish] to complete the installation.
Configuring the WIA Driver
Once you install the driver, you must establish a user profile, which must have an
associated password. You should be logged onto the PC with your personal Windows
user account when you establish your profile. Common names such as Administrator
or Guest cannot be used.
To set your profile and access driver properties:
1. Logon to the workstation with your personal Windows users account.
2. Select [Scanners and Cameras].
3. Right-click the scanning icon for the WorkCentre and choose [Properties].
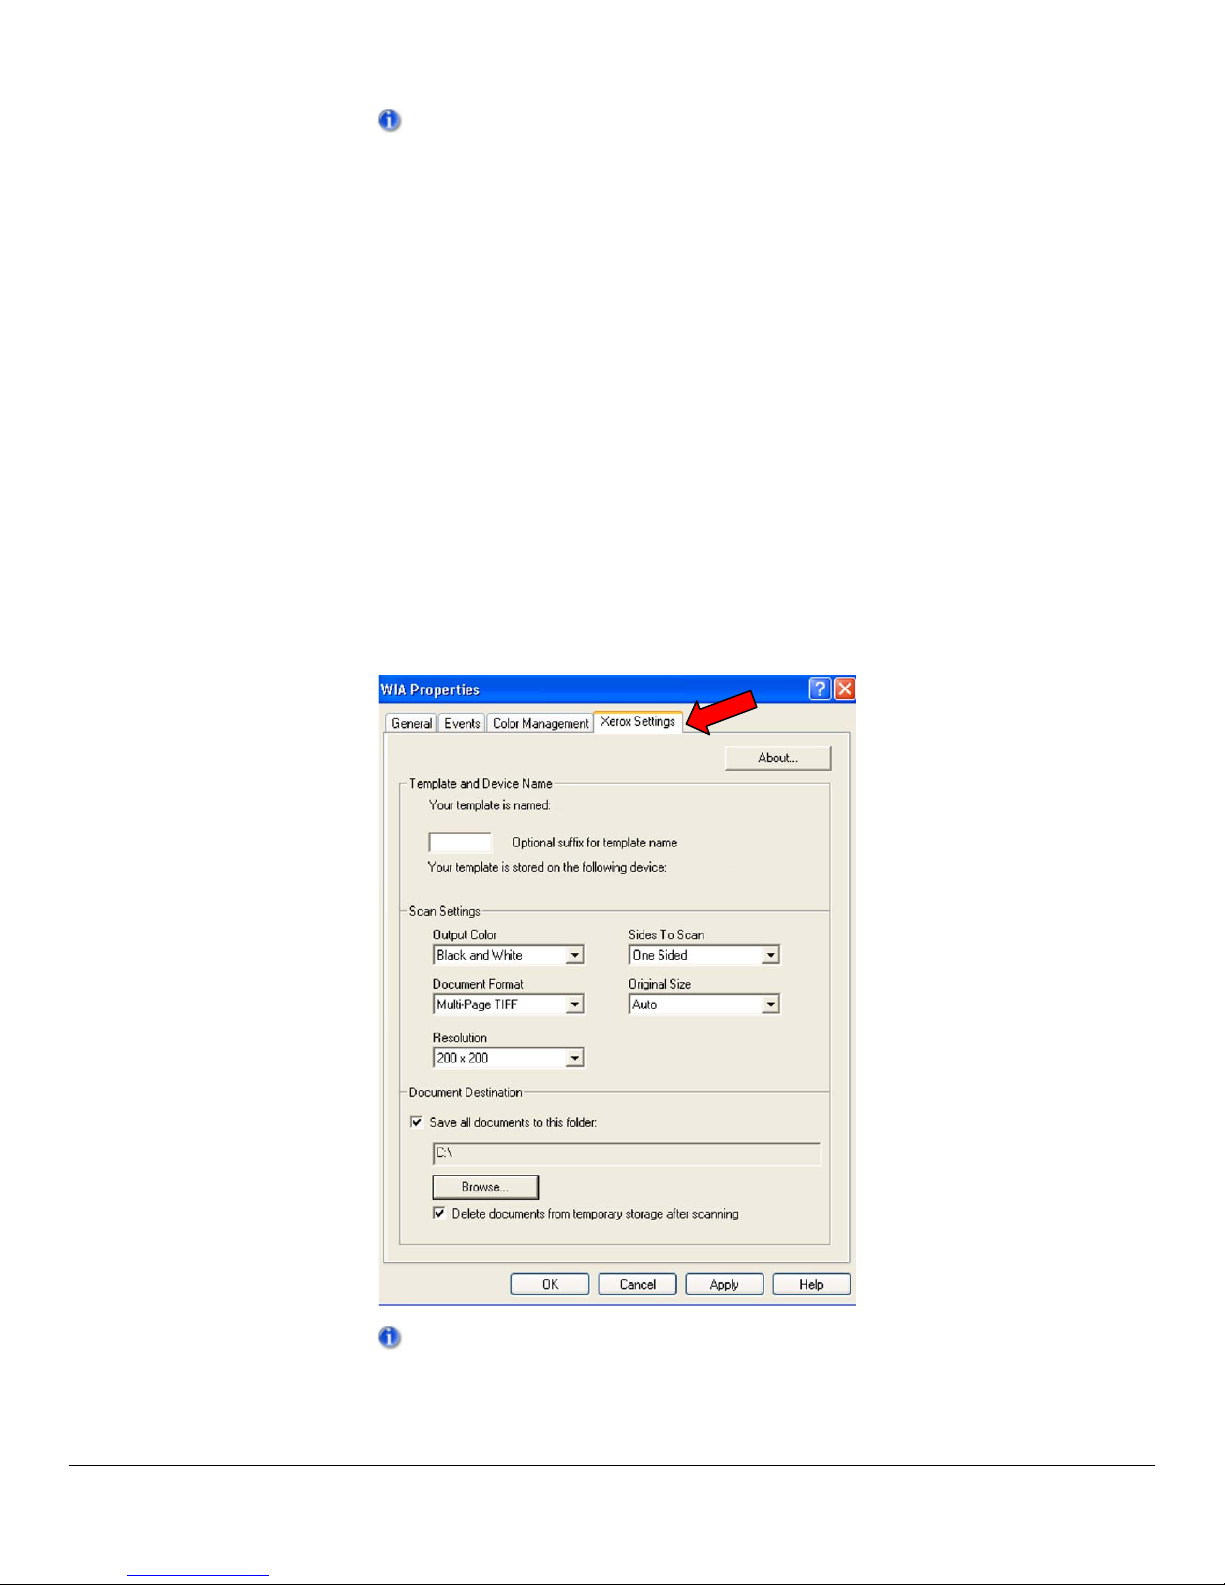
4. Select the [Xerox Settings] tab. This tab displays the default settings for your scan
template. A scan template is automatically created on the device and is named
based on your Windows logon name. The template name begins with an "@"
symbol. Any existing templates of the same name will be overwritten.
dc07cc0418
Customer Support Page 6
If you would like an identifying suffix added to the template name, enter it in the
‘Optional suffix for template name’ field.
Page 7

5. Select the default settings for your scan template. Any of these settings can be
overridden directly at the WorkCentre.
Output Color: Select whether you want scanned documents saved in color,
grayscale (shades of gray to depict color variances), or black and white.
Document Format: Select the file format in which your scanned documents
should be saved.
▬ JPG: A graphic format ideal for complex pictures or photographs. Each
document page becomes a separate JPG image. (Color scanners only.)
▬ TIFF: A file format for bitmap images; simulates grayscale shading. Each
document page becomes a separate TIFF image.
▬ Multi-Page TIFF: TIFF file output in which all pages of a document are
scanned into a single file.
▬ PDF: A universal file format that preserves all fonts, formatting, graphics, and
color in a source document regardless of the application and platform used to
create it. All pages in the document are saved in a single file. Documents
saved in this format should be saved to a specific storage location.
Resolution: The resolution setting affects the amount of detail reproduced on
scanned images.
Sides To Scan: Select whether your original document is one-sided or two-
sided.
Original Size: If you scan a document from the platen glass rather than the
document feeder, you can specify a particular scan size. This enables you to
scan only a specific portion of a document page.
6. If you want to scan with a different device and have Administrator rights on the PC,
click the Device Settings tab.
Note that you can only change the IP address or host name if one was not specified
during the installation. Once a valid IP address or host name is entered, changes are
not permitted.
Enter the host name or the IP address of the device you want to configure. Click
[Apply] or [OK] when finished. All templates created from that PC will be updated
and configured to work with the new device.
You can remove templates from the device by selecting ‘When I Turn Off My
Computer, Delete My Templates from the Device’.
7. All scanned documents are saved to a temporary storage directory on the PC. By
default, they are also copied to My Documents and then deleted from the
temporary storage directory. You can change the default behavior when logged in
as a user.
To copy documents to a directory other than My Documents, select [Save All
Documents to this Folder], click [Browse], and specify a new directory. Any
documents saved to specific folders must be opened manually.
Documents can be kept in the temporary storage directory by deselecting Delete
Documents from Temporary Storage after scanning.
Retaining documents in temporary storage enables you to set up scan-compatible
applications to automatically import documents saved to the temporary directory.
Any users of the same PC can view all documents saved to the temporary
directory. To maintain privacy, use the Document Destination options to delete the
documents from temporary storage and specify an alternate Save location.
dc07cc0418
Customer Support Page 7
Page 8

Scanning a Document
To scan using the driver:
1. Your PC must be on and you must be logged on using the same user account you
used when you created your user profile.
2. At the device, touch [All Services, Network Scanning], then select the desired
template.
3. When prompted at the WorkCentre touch screen, enter the password for your
Windows account.
4. Place your originals on the platen, or document feeder, and hit the Start button.
Processing Scanned Images
Scanned documents are named based on the template used and a numbering
sequence (for example, Doc001, Doc002). Documents automatically copied to a new
directory are saved with a date and time stamp.
You can configure your workstation to specify the manner in which scanned images will
be processed.
By selecting an option on the Scanners and Cameras Events tab, you can specify
whether:
▬ a particular software program should start,
▬ you want to be prompted for which program to run, or
▬ you want no action to occur when an image is scanned.
Scanned documents copied to another directory open like a norm al file.
Caveats
Windows XP WIA Driver for WorkCentre Scanners
• Microsoft has no plans to add this functionality to operating systems older than
Windows XP.
• Since the WorkCentre WIA driver uses the SMB protocol for scan to file, enter the IP
address of the WorkCentre in the Hostname field if your WorkCentre is on a different
subnet than your Windows XP workstation. Enter either the IP address or hostname
in the Hostname field if your WorkCentre is on the same subnet as your Windows XP
workstation.
• The WorkCentre WIA driver does not allow you to configure a Document Centre for
scanning. Therefore, if you use both WorkCentre and Document Centre devices for
scanning, you must install WIA drivers for both families on your workstation.
Security and Network Impact
Using the WIA driver has the following impacts:
• The protocols used are:
¾ SNMP for discovery and setup of each Xerox device
¾ HTTP for setup
¾ SMB for file transfer
• The user’s login is used to deliver scanned images to the workstation or server.
• Simple File Sharing is disabled
dc07cc0418
Customer Support Page 8
Page 9

• The scan data is sent to a folder on the Windows XP workstation during scan to file
operation. The desktop does
not poll the Xerox device for scan data.
• When you logon to the Windows XP workstation, a user template is sent to the Xerox
device using the logon ID. When you logoff the Windows XP workstation, the scan
template is removed from the Xerox device, if configured as such within the driver.
Additional Information
Xerox Customer Support welcomes feedback on all documentation - send feedback via
e-mail to:
You can reach Xerox Customer Support at 1-800-821-2797 (USA);
TTY 1-800-855-2880 or at
Other Tips about Xerox multifunction devices are available at the following URL:
http://www.office.xerox.com/support/dctips/dctips.html.
XEROX ®, The Document Company ®, the digital X ®, and all Xerox product names are trademarks of
XEROX CORPORATION. Other trademarks belong to their respective owners.
Copyright © XEROX CORPORATION 2007. All Rights Reserved.
USA.DSSC.Doc.Feedback@mc.usa.xerox.com.
http://www.xerox.com.
dc07cc0418
Customer Support Page 9
 Loading...