

Page 1

Version 1.0
November 2020
702P08368
Xerox
®
Versant
®
Quick Start Guide
4100 Press
Page 2

© 2020 Xerox Corporation. All rights reserved. Xerox®, Xerox and Design®, and Versant®are trademarks of Xerox
Corporation in the United States and/or other countries.
®
Adobe
and the Adobe logo, InDesign®, Illustrator®, PageMaker®, Photoshop®, Acrobat®, Distiller®, PostScript, and the
Acrobat logo are either registered trademarks or trademarks of Adobe Systems Incorporated in the United States and/
or other countries.
Macintosh, Mac OS, Power Macintosh, TrueType, and Mac are registered trademarks of Apple Computer, Inc. in the
United States and/or other countries.
Microsoft
®
Windows 2000®, Windows XP, Windows 7, Windows 10, and Microsoft®Windows are trademarks of
Microsoft Corporation in the United States and/or other countries.
Mozilla and Firefox are trademarks of The Mozilla Foundation
PANTONE
®
, PANTONE Goe™, PANTONE MATCHING SYSTEM®, PMS®, and X-Rite PANTONE®are either registered
trademarks or trademarks of Danaher Corporation.
The CentOS Marks are trademarks of Red Hat, Inc.
Changes are periodically made to this document. Changes, technical inaccuracies, and typographic errors will be
corrected in subsequent editions.
Page 3

Table of Contents
1 Getting Started.......................................................................................................................... 5
Press Components..... ............. ........ .... .... .... ................. .... .... .... .... ................. .... .... .... ................ 6
Internal Components.. .... ..................... .... .... .... ..................... .... .... .... ......................... .... .... 7
Locating the Press Serial Number . ............. .... .... .... .... .... ................. .... .... .... ..................... ... 8
Power On or Off the Press...... .... .... .... ..................... ........ .... .... .... ................. .... .... .... .... ............. 9
Power Saver Mode .. .... ..................... .... .... .... ................. .... .... .... .... .... ..................... .... .... .... .... 10
Low Power Mode. .... .... ..................... .... .... .... ..................... .... .... .... ..................... .... .... .... .. 10
Sleep Mode............ .... .... .... ..................... .... .... .... ..................... .... .... .... ..................... .... ... 10
Exiting Power Saver Mode... ..................... .... .... .... ..................... .... .... .... .... ..................... .. 10
2 Paper and Media ....................................................................................................................11
Loading Paper... .... .... .... ..................... .... .... .... ..................... .... .... .... ..................... .... .... .... ...... 12
Loading Paper in Trays 1, 2, and 3.............. .... .... .... ..................... .... .... .... ..................... .... 12
Loading Paper in Trays 6 and 7 ... .... ......................... .... .... .... ..................... .... .... .... ........... 13
Loading Paper in Tray 5 (Bypass) ....... .... .... .... .... ..................... .... .... .... ..................... .... .... 14
Matching the Tray and Stock Information...... .... .... .... ................. .... .... .... .... .... ..................... .. 16
Paper Feed Performance in Trays 6 and 7 ...... .... .... .... ..................... .... .... .... ..................... .... ... 17
Improving Paper Feed Performance in Trays 6 and 7 ........... .... .... .... ..................... .... .... .... 17
3 Maintenance ...........................................................................................................................23
Cleaning the Press .. .... ..................... .... .... .... ........ ............. .... .... .... .... ..................... .... .... .... .... 24
Cleaning the Exterior ............. .... .... .... ..................... .... .... .... .... ............. ........ .... .... .... ........ 24
Replacing Consumable Supplies ..................... .... .... .... ..................... .... .... .... .... ..................... .. 25
Ordering Supplies.... .... .... ..................... .... .... .... ..................... .... .... .... ......................... .... .. 25
Checking the Status of Consumables .... .... .... .... .... ..................... .... .... .... ..................... .... . 27
Replacing the Tray 5 Feed Rolls .... .... .... ..................... .... .... .... ..................... .... .... .... .......... 28
Replacing the Feed Rolls for Tray 6 and 7 . ..................... .... .... .... ................. .... .... .... .... ...... 32
Replacing a Dry Ink/Toner Cartridge.... .... .... .... ..................... .... .... .... ..................... .... .... ... 36
Replacing the Dry Ink/Toner Waste Bottle ........... .... .... .... ........ ............. ........ .... .... .... ........ 37
Replacing a Drum Cartridge ... .... .... .... ..................... .... .... .... .... ..................... .... .... .... ........ 40
4 Troubleshooting......................................................................................................................43
Paper Jams . .... .... ................. .... .... .... .... ................. .... .... .... ..................... .... .... .... .... .... ............ 44
Clearing Jams in Area 2 ............ .... .... .... ..................... .... .... .... ................. .... .... .... .... .... ..... 44
Clearing Jams in Areas 3, 4, and 5............... .... .... .... ..................... .... .... .... ........ ............. ... 48
Paper Jams in Trays 1-3 ............ .... .... .... ..................... .... .... .... ..................... .... .... .... .... ..... 55
Paper Jams in the Bypass (Tray 5)........ .... .... .... ..................... .... .... .... ........ ................. .... .. 56
Jam Clearance of OHCF ..................... .... .... .... .... ..................... .... .... .... ..................... .... .... 57
Fault Information . .... .... ..................... .... .... .... ..................... .... .... .... ..................... .... .... .... ...... 63
Xerox®Versant®4100 Press
Quick Start Guide
3
Page 4

Table of Contents
Obtaining Fault Information from the Press Touch Screen ........... .... .... .... ..................... .... 64
Fault Messages ... .... .... .... .... ................. .... .... .... ..................... .... .... .... ........ ................. .... .. 65
4
Xerox®Versant®4100 Press
Quick Start Guide
Page 5

1
Getting Started
This chapter contains:
• Press Components............... .... .... .... .... ..................... .... .... .... ..................... .... .... .... ................. .... .. 6
• Power On or Off the Press... .... .... .... ................. .... .... .... .... .... ..................... .... .... .... ..................... ... 9
• Power Saver Mode....... .... .... .... ..................... .... .... .... .... ..................... .... .... .... ..................... .... .... 10
Xerox®Versant®4100 Press
Quick Start Guide
5
Page 6
Getting Started
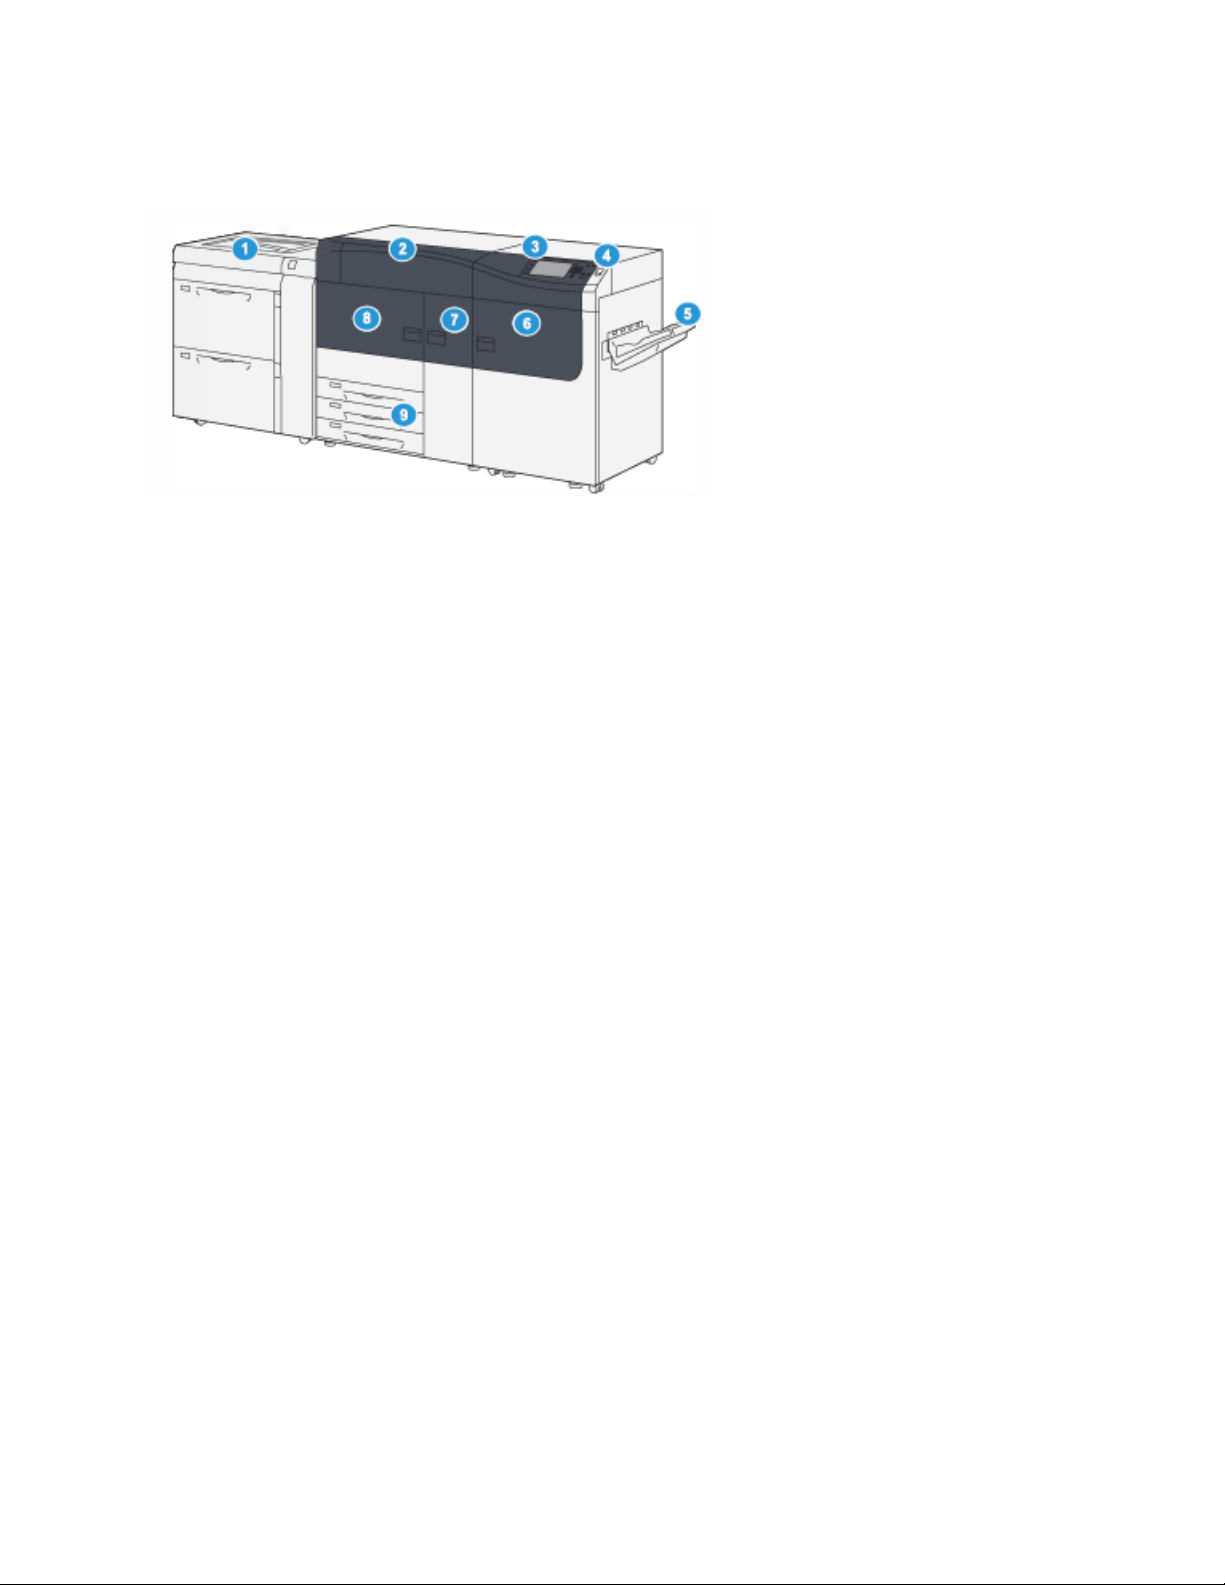
Press Components
1. Advanced Oversized High Capacity Feeder
(Trays 6 and 7), with Tray 5 (Bypass)
2. Dry Ink/Toner Cover
3. Control Panel and Touch Screen
4. Power Button
5. Offset Catch Tray (OCT)
6. Right Front Door
7. Center Front Door
8. Left Front Door
9. Paper Trays 1, 2, and 3
6
Xerox®Versant®4100 Press
Quick Start Guide
Page 7
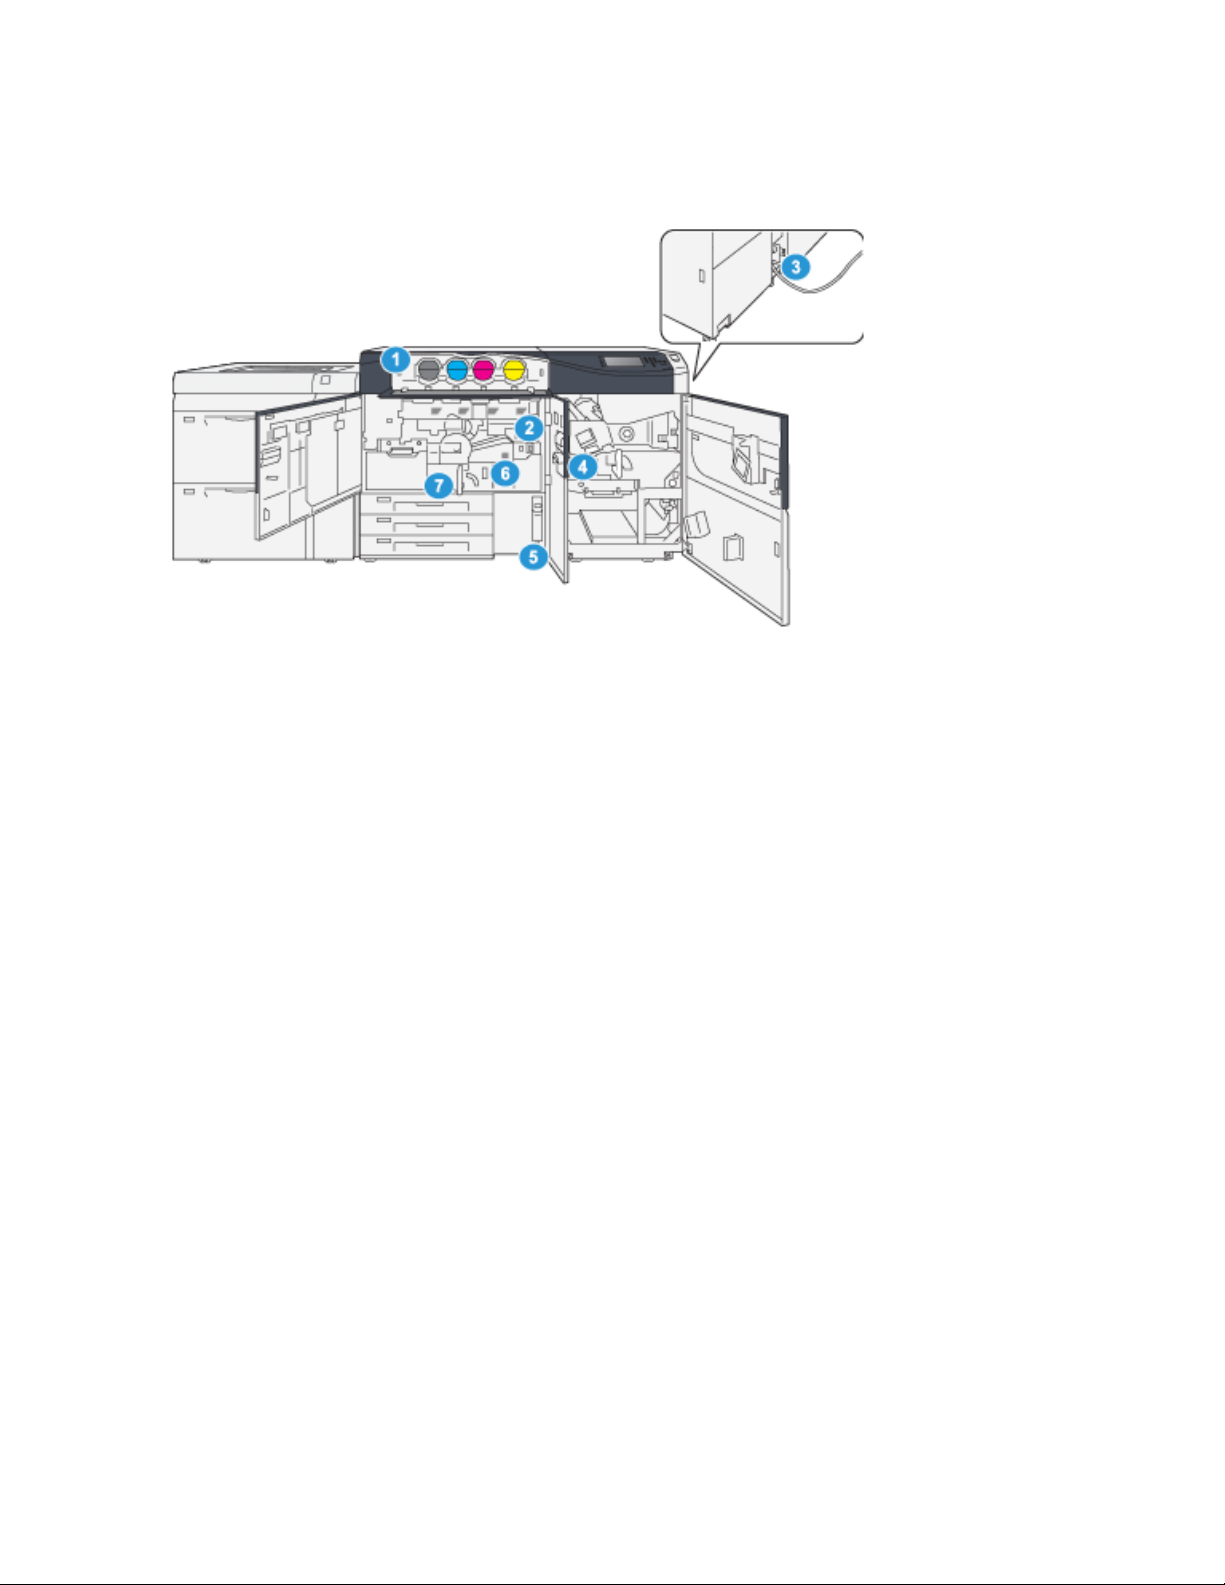
IInntteerrnnaall CCoommppoonneennttss
Getting Started
1. Dry Ink/Toner Cartridges
2. Main Power Switch
3. Circuit Breaker Switch (on rear of press)
4. Paper Cooling Module
5. Dry Ink/Toner Waste Bottle
6. Fuser Module
7. Transfer Module
Xerox
®
Versant®4100 Press
Quick Start Guide
7
Page 8

Getting Started
LLooccaattiinngg tthhee PPrreessss SSeerriiaall NNuummbbeerr
The press serial number can be accessed from the User Interface (UI) or by locating the serial number
plate on the inside frame of the first feeder tray (Tray 1).
1. Press the Machine Status button on the UI.
2. From the Machine Status screen, ensure that the Machine Information tab is displayed.
The press serial number is displayed under General Information.
3. If there is a loss of power and it is not possible to access the Machine Status screen, the press
serial number can also be found on the inside frame of the press near paper Tray 1:
a. At the press, fully open paper Tray 1.
b. At the left of the feeder tray, on the press frame, locate the plate with the serial number
(SER#).
8
Xerox®Versant®4100 Press
Quick Start Guide
Page 9

Getting Started
Power On or Off the Press
1. To switch on the press, check that the Main Power switch behind the Center Front Door is On.
2. Press the Power button on top of the press to the ON position.
The Ready Indicator light displays green.
A screen message advises of a short wait while the fuser warms up and the press runs a system
check. You can set features for a job during this time and the printing process will start
automatically when the press is ready.
3. To switch off, press the Power button to the Off position.
Note: Allow the press to remain off for a minimum of 10 seconds before switching on the
power again.
Xerox
®
Versant®4100 Press
Quick Start Guide
9
Page 10

Getting Started
Power Saver Mode
The Power Saver feature allows the press to enter a reduced power consumption mode when all print
jobs have completed and there are no jobs currently processing. There are two power saving modes:
Low Power and Sleep.
• Low Power: After remaining inactive for a preset time period, the press enters the Low Power
mode.
• Sleep: After entering Low Power mode and remaining inactive for another preset time period, the
press enters the Sleep mode.
By default, the press automatically enters the Low Power mode after 15 minutes of inactivity. After
30 minutes of inactivity, the press then enters Sleep mode. These time intervals for both modes can
be changed by the system administrator.
Refer to the following example:
• Low Power Mode is set to 1 minute.
• Sleep Mode is set to 10 minutes.
• Sleep Mode activates after 10 minutes of total inactivity, and not 10 minutes after the Low Power
Mode begins.
LLooww PPoowweerr MMooddee
In this mode, the power to the Control Panel and fuser unit is lowered to save power. The display goes
out and the Power Saver button on the Control Panel lights.
To exit the Low Power Mode, press the Power Saver button. The Power Saver button is no longer lit,
indicating that the Power Saver feature is canceled.
SSlleeeepp MMooddee
In this mode, the power is lowered more than in the Low Power mode. The display goes out and the
Power Saver button on the Control Panel lights.
To exit the Sleep Mode, press the Power Saver button. The Power Saver button is no longer lit,
indicating that the Power Saver feature is canceled.
EExxiittiinngg PPoowweerr SSaavveerr MMooddee
The press exits Power Saver mode by pressing the Power Saver button on the Control Panel or when
receiving print data from an incoming job.
10
Xerox®Versant®4100 Press
Quick Start Guide
Page 11

2
Paper and Media
This chapter contains:
• Loading Paper.... .... .... ................. .... .... .... .... ................. .... .... .... ..................... .... .... .... ........ ......... 12
• Matching the Tray and Stock Information... .... .... ..................... .... .... .... .... ..................... .... .... .... . 16
• Paper Feed Performance in Trays 6 and 7 ... .... .... .... ..................... .... .... .... ................. .... .... .... ...... 17
Xerox®Versant®4100 Press
Quick Start Guide
11
Page 12

Paper and Media
Loading Paper
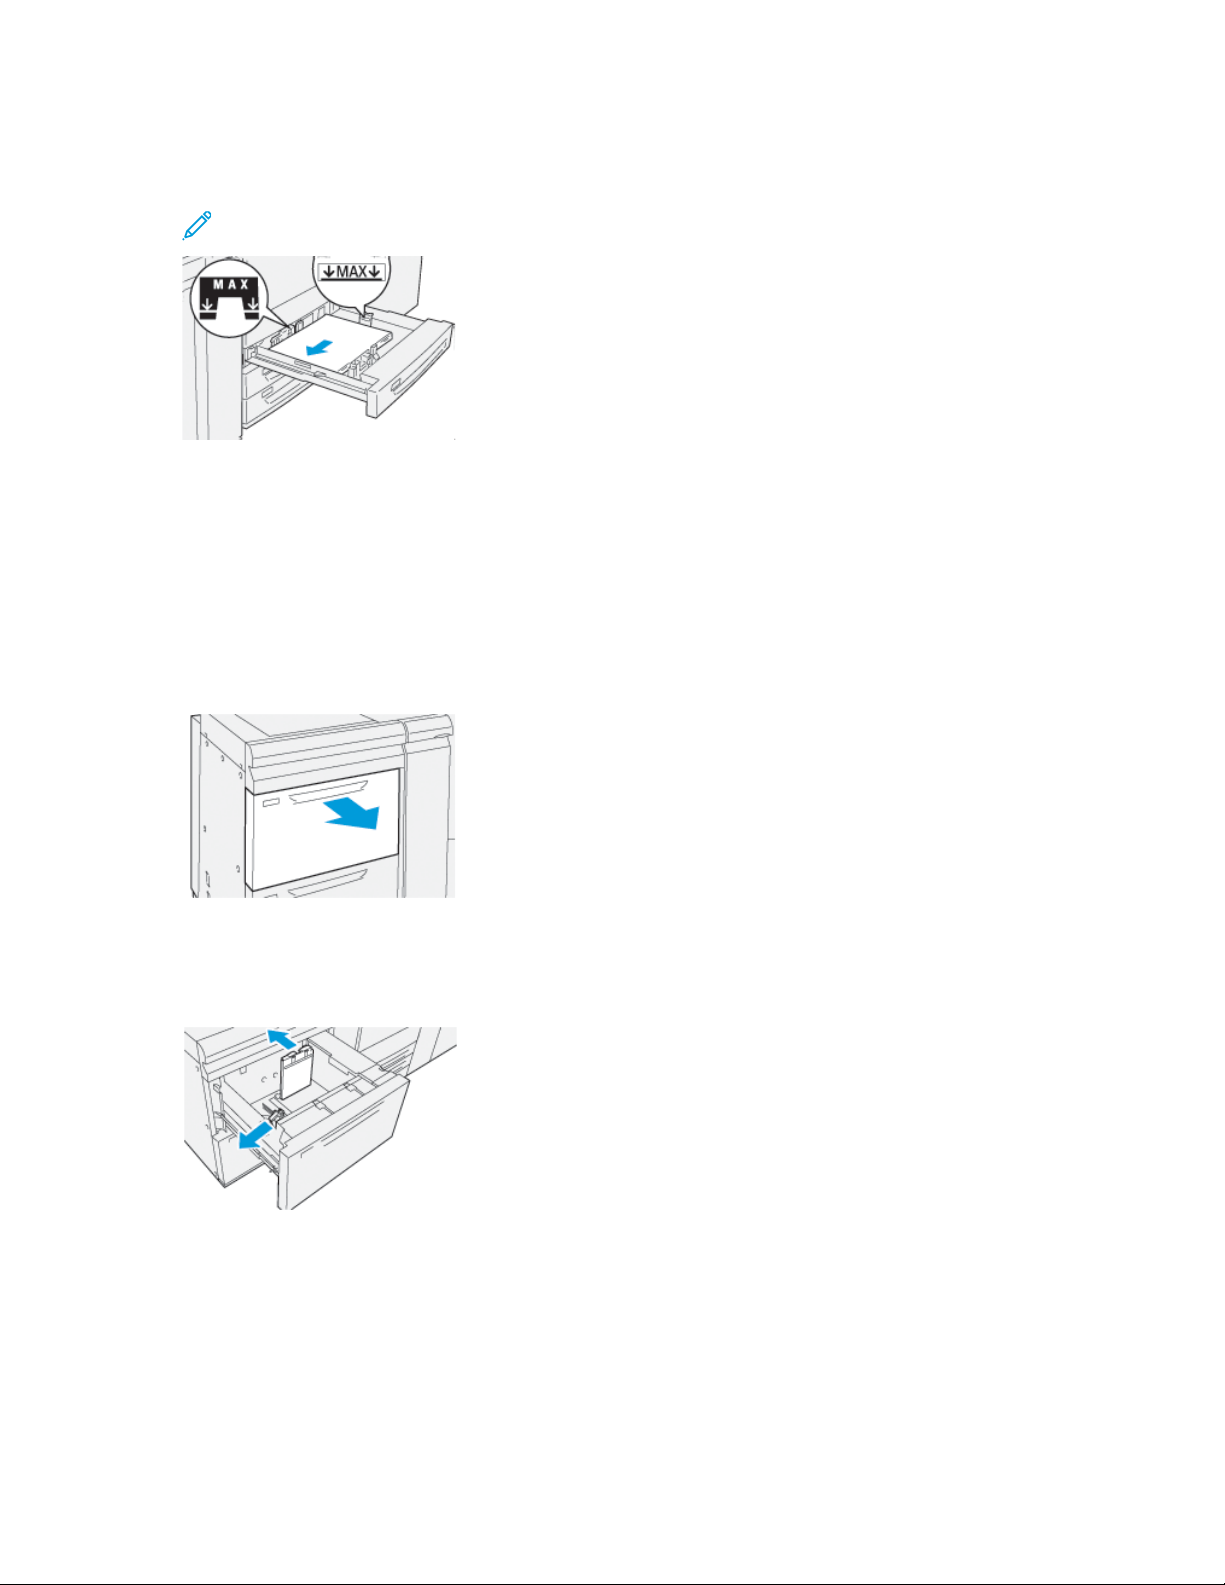
LLooaaddiinngg PPaappeerr iinn TTrraayyss 11,, 22,, aanndd 33
Note: A paper jam may occur if a tray is opened while it is being used to feed stock.
1. Select the appropriate paper stock for your print job.
2. Pull out the tray slowly until it stops.
3. Open the ream of paper with the seam side facing up.
4. Fan the sheets before loading them into the tray.
5. Extend the paper guides outward until they stop.
6. Load and align the edge of the paper against the left edge of the tray.
Paper can be loaded in the LEF or portrait, or SEF or landscape direction.
12
Xerox®Versant®4100 Press
Quick Start Guide
Page 13
Paper and Media
7. Adjust the paper guides by pressing in the guide releases and carefully moving the guides until
they lightly touch the edges of the material in the tray.
Note: Do not load materials above the MAX line located on the guides.
8. Gently push in the tray until it comes to a stop.
The Stock Wizard opens on the print server.
9. Scan the barcode on the stock, then to set up the stock, follow the steps in the Stock Wizard.
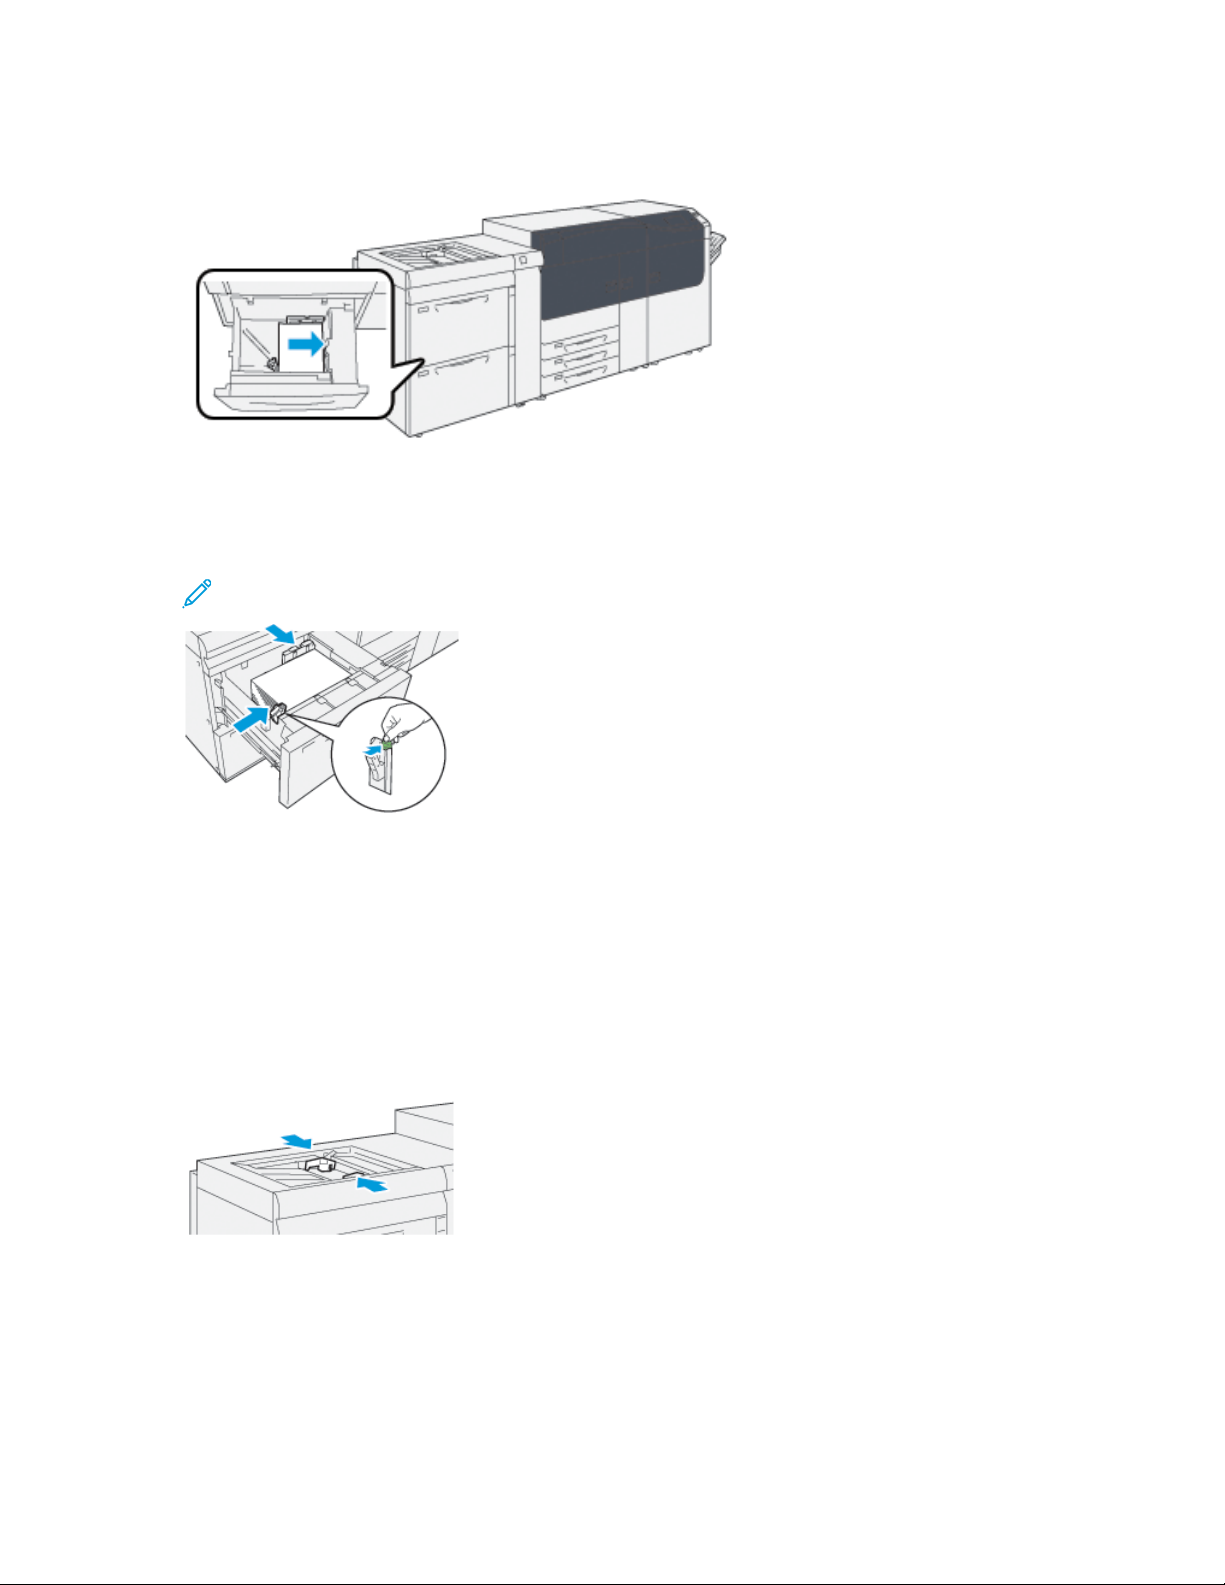
LLooaaddiinngg PPaappeerr iinn TTrraayyss 66 aanndd 77
1. Select the appropriate paper stock for your print job.
2. Pull out the tray slowly until it stops.
3. Open the ream of paper with the seam side facing up.
4. Fan the sheets before loading them into the tray.
5. Extend the paper guides outward until they stop.
Xerox®Versant®4100 Press
Quick Start Guide
13
Page 14
Paper and Media
6. Load and align the edge of the paper against the right edge of the tray.
Paper can be loaded in the LEF or portrait, or SEF or landscape direction.
7. Adjust the paper guides by pressing in the guide releases and carefully moving the guides until
they lightly touch the edges of the material in the tray.
Note: Do not load materials above the MAX line located on the guides.
8. Gently push in the tray until it comes to a stop.
The Stock Wizard opens on the print server.
9. Scan the barcode on the stock, then to set up the stock, follow the steps in the Stock Wizard.
LLooaaddiinngg PPaappeerr iinn TTrraayy 55 ((BByyppaassss))
1. Slide the paper guides outward to the desired paper size.
2. Select the appropriate paper stock for your print job.
3. Open the ream of paper with the seam side facing up.
4. Fan the sheets before loading them into the tray.
5. Insert the paper or media into the tray until it stops.
The Stock Wizard opens on the print server.
14
Xerox®Versant®4100 Press
Quick Start Guide
Page 15

Paper and Media
6. Adjust the paper guides so that they touch the edges of the stack.
Note: Do not load materials above the MAX line located on the guides.
7. Scan the barcode on the stock, then to set up the stock, follow the steps in the Stock Wizard.
Xerox
®
Versant®4100 Press
Quick Start Guide
15
Page 16

Paper and Media
Matching the Tray and Stock Information
Important: To ensure maximum productivity and successful job completion, always verify that
the Tray Properties information on the PredictPrint Media Manager application on the print
server matches the actual stock or media that is loaded in the tray being used for the print job.
Before running a print job, check for any of the following conditions:
• Modifications were made to the Stock Library, such as:
– Adding a stock
– Copying a stock
– Creating a new stock
– Editing an existing stock
• Stock or media was loaded into the selected tray for the print job
• The tray selected for the print job was opened or closed
Note: If any of these conditions apply, verify that the Tray Properties information matches the
actual tray contents.
If the stock loaded in the tray does not match the information on the Tray Properties window, then a
message may appear on one or more of the following screens:
• The press User Interface
• The PredictPrint Media Manager application
• The print server
Tip: Stock or tray mismatch information and how it is displayed is dependent on the individual
print server. If stock is changed in a tray, a message may not be displayed. Therefore it is
important to perform the following steps always before running a print job.
1. Check for a tray mismatch message on the press User Interface. If a mismatch message is
displayed, select it.
A new message displays and explains what media is required and the tray location.
2. Go the print server and check the main or home window for a similar message:
• If a message exists, follow the information provided on the print server to correct the stock
mismatch issue, then continue to the next step.
• If a message does not exist, continue to the next step.
3. Load the stock in the tray.
If the User Interface on the press displays a mismatch message, to correct the mismatch, use the
Stock Wizard.
4. Close the tray.
The Stock Wizard opens.
5. To change the Tray Properties to match the contents of the tray, follow the stock setup steps in
the Stock Wizard.
6. Resolve all tray and stock mismatch messages.
7. Start your print job.
16
Xerox®Versant®4100 Press
Quick Start Guide
Page 17
Paper and Media
Paper Feed Performance in Trays 6 and 7
If misregistration or skew occurs on printed output that was fed from Trays 6 or 7, manual
adjustment of the paper-feed levers may improve and correct the printed output.
Important: For most print jobs, these levers should remain in their default position. The
position of these levers should be changed only if there is a skew problem when running a
specific print job or media type. Changing the levers can cause more skew problems when
running certain media types such as coated, label, tab stock, hole-punched paper, transparency,
film, postcards, and envelopes.
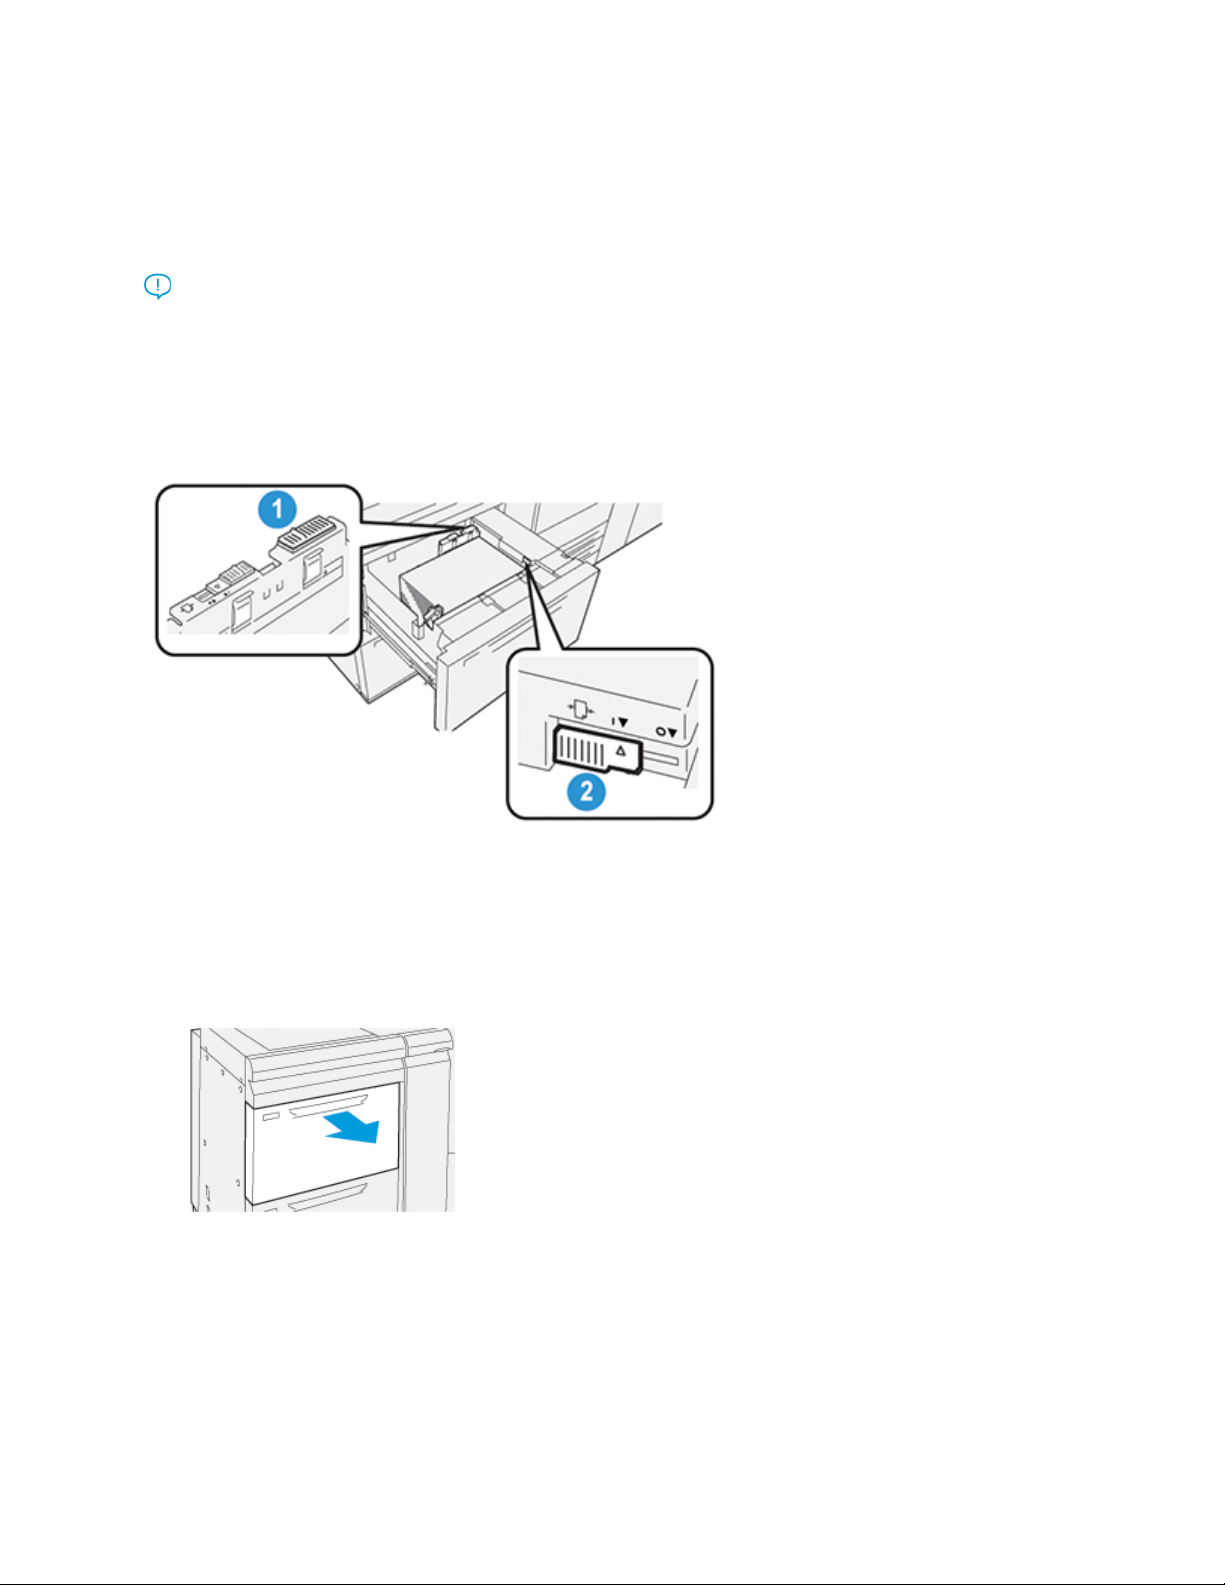
The paper-feed adjustment levers are found in Trays 6 and 7. These levers are used to improve paper
feed accuracy and to reduce paper skew problems.
1. Rear Paper-feed Adjustment Lever 2. Right-side Paper-feed Adjustment Lever
IImmpprroovviinngg PPaappeerr FFeeeedd PPeerrffoorrmmaannccee iinn TTrraayyss 66 aanndd 77
1. Open the tray by pulling it out slowly until it stops.
2. Ensure that the desired paper is loaded into the tray.
3. Go to the PredictPrint Media Manager application on the print server. On the Tray Properties
window, verify the correct paper information, such as size, type, weight, and paper curl or
alignment option for the tray.
Xerox
®
Versant®4100 Press
Quick Start Guide
17
Page 18
Paper and Media
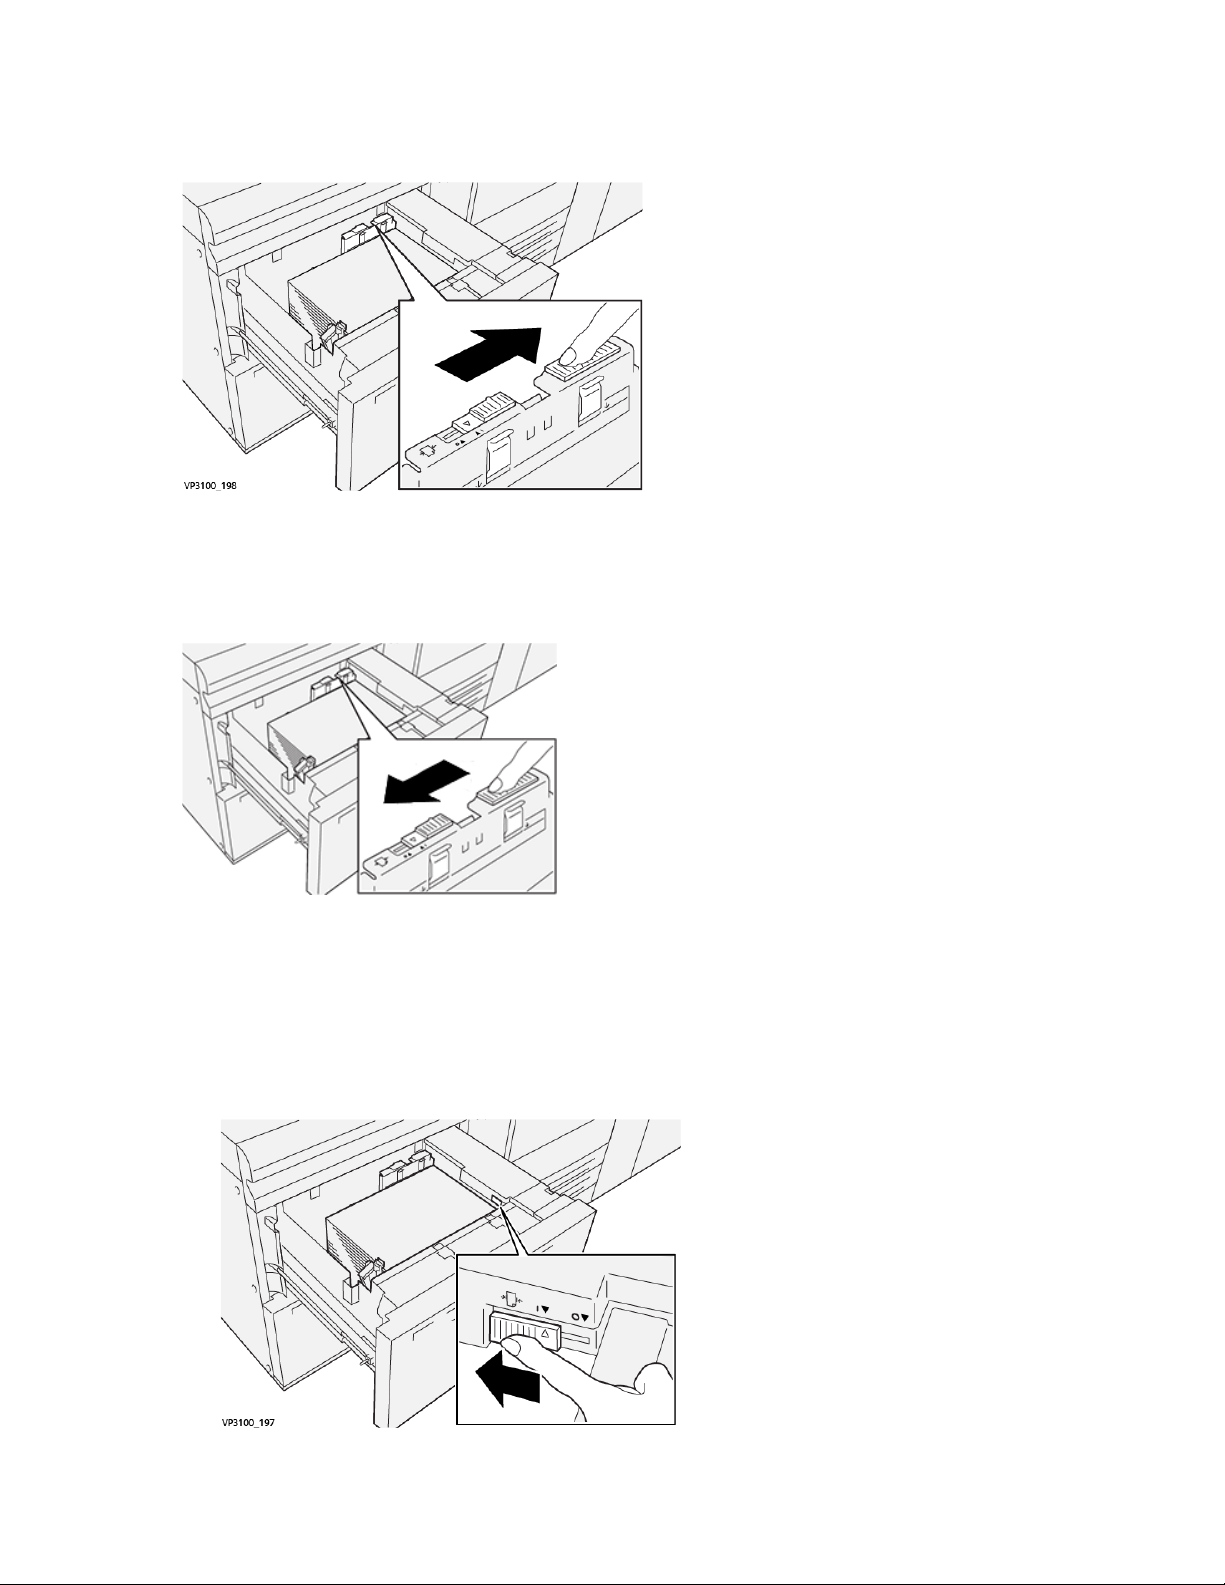
4. On the tray, slide the rear paper-feed adjustment lever to the right.
5. Close the tray by slowly pushing it in until it comes to a stop.
6. Run your print job.
7. After the print job finishes, open the tray and return the rear paper-feed adjustment lever to its
default position by sliding it to the left.
Leave the tray open and continue to the next step.
8. Retrieve and evaluate the printed output; choose one of the following:
• The paper is fed accurately without skew and the printed output is satisfactory. Close the tray
and your task is completed.
• The paper is skewed and the printed output is unsatisfactory; proceed to the next step.
9. Adjust the right-side paper-feed lever:
a. On the tray, slide the right-side paper-feed adjustment lever toward the rear of the tray.
18
Xerox®Versant®4100 Press
Quick Start Guide
Page 19

Paper and Media
b. Close the tray and verify the tray settings from the PredictPrint Media Manager application
on the print server.
c. Run your print job.
10. Retrieve and evaluate the printed output; choose one of the following actions:
• If the paper is fed accurately without skew and the printed output is satisfactory, perform the
following:
1. Open the tray.
2. Return the right-side paper-feed adjustment lever to its default position by sliding it
toward the front of the tray.
3. To complete the task, close the tray.
• If the paper is skewed and the printed output is unsatisfactory, proceed to the next step.
11. Adjust both levers:
a. Open the tray and slide the rear paper-feed adjustment lever to the right.
Xerox®Versant®4100 Press
Quick Start Guide
19
Page 20

Paper and Media
b. Ensure that the right-side paper-feed adjustment lever still is in the rear position.
c. Close the tray and verify the tray settings from the PredictPrint Media Manager application
on the print server.
d. Run your print job.
12. After the print job finishes, open the tray and return both levers to their default positions:
a. Return the rear paper-feed adjustment lever to its default position by sliding it to the left.
b. Return the right-side paper-feed adjustment lever to its default position by sliding it toward
the front of the tray.
c. Close the tray and continue to the next step.
20
Xerox®Versant®4100 Press
Quick Start Guide
Page 21

Paper and Media
13. Retrieve and evaluate the printed output; choose one of the following:
• The paper is fed accurately without skew and the printed output is satisfactory; your task is
completed.
• The paper is skewed and the printed output is unsatisfactory; continue to the next step.
14. If you are still having skew adjustment problems, refer to the Advanced Stock Setup information
on the PredictPrint Media Manager on the print server. If necessary, to resolve the problem,
perform one of the following:
• Create or use an Alignment Profile
• Adjust the Aligner Roll Pressure
• Adjust the Regi-Loop
If the problem continues, contact the Customer Support Center.
Important: If using an Advanced Stock Setup feature, always return the feature to its
default setting before using the press.
Xerox
®
Versant®4100 Press
Quick Start Guide
21
Page 22

Paper and Media
22
Xerox®Versant®4100 Press
Quick Start Guide
Page 23

3
Maintenance
This chapter contains:
• Cleaning the Press ... ................. .... .... .... .... ................. ........ .... .... .... ..................... .... .... .... ........... 24
• Replacing Consumable Supplies .. .... .... .... ..................... .... .... .... ..................... .... .... .... ........ ......... 25
Xerox®Versant®4100 Press
Quick Start Guide
23
Page 24

Maintenance
Cleaning the Press
Read and adhere to the following information when cleaning the press:
• Before you start to clean the press, be sure to switch off the power using the circuit breaker switch
and unplug the press.
WARNING: Cleaning the press without switching off the power may cause an electric
shock.
• Always use a dry lint-free cloth for all cleaning actions unless otherwise directed.
Caution: Do not use benzene, paint thinner, other volatile liquids, or spray insect
repellent on the press as doing so may discolor, deform, or crack covers.
• If a moistened cloth is used, wipe afterwards with a dry lint-free cloth.
Caution: Cleaning the press with an excessive amount of water can cause the press to
malfunction and damage the documents during printing.
CClleeaanniinngg tthhee EExxtteerriioorr
1. Wipe the exterior with a soft cloth moistened with water. If dirt is difficult to remove, try gently
wiping with a soft cloth moistened with a small amount of neutral detergent.
2. Wipe off any excess water from the exterior with a soft cloth.
24
Xerox®Versant®4100 Press
Quick Start Guide
Page 25
Maintenance
Replacing Consumable Supplies
Note: Refer to www.xerox.com for the latest consumable part numbers.
The following items are the Customer Replaceable Units (CRU) for the press. It is recommended that
you have a supply of these items available to eliminate down time when they need to be replaced.
• Dry Ink/Toner cartridges (C, M, Y, K)
• Drum cartridges (C, M, Y, K)
• An empty Waste Dry Ink/Toner bottle
• Trays 5–9 feed rolls
• Suction Filter
Note: Store supply items and Xerox parts in their original packages in a convenient location.
Always recycle / dispose the used CRU according to the disposal instructions supplied with the
new CRU.
OOrrddeerriinngg SSuupppplliieess
Xerox supplies, paper, and throughput material can be ordered from the website www.xerox.com and
clicking the Supplies link. For any item that is not orderable from the website, contact your Xerox
Service Representative.
Note: The cleaning pads used with the Raster Output Scanner Window cleaning wand are not
orderable. Contact your Xerox service representative for any additional cleaning pads.
Approximate Print Yield
CRUs Supply Item Reorder Quantity
Black Dry Ink/Toner Cartridge 2 per box 50,000*
Cyan Dry Ink/Toner Cartridge 1 per box 55,000*
Magenta Dry Ink/Toner Cartridge 1 per box 51,000*
Yellow Dry Ink/Toner Cartridge 1 per box 51,000*
Waste Dry Ink/Toner Bottle 1 45,000
* Dry Ink/Toner yield projections are based on 7.5 percent-area coverage per color (4 colors = 30 percent) at
standardized conditions on A4 or 8.5 x 11 in., for Xerox Digital Color Xpressions+, 24 lb. (90 g/m
Colotech Plus 90 g/m
Suction Filter 1 200,000
2
reference paper.
(Full Color 8.5x11, A4 Prints)
2
) and for
Drum Cartridge (R1) 1 per box 348,000
Drum Cartridge (R2) 1 per box 348,000
Drum Cartridge (R3) 1 per box 348,000
Drum Cartridge (R4) 1 per box 348,000
Xerox®Versant®4100 Press
25
Quick Start Guide
Page 26

Maintenance
Approximate Print Yield
CRUs Supply Item Reorder Quantity
Feed Roll Kit (Trays 5–9)** 1 kit 500,000
**Each tray requires its own feed roll kit. Each kit contains all the required items for replacing the feed rolls.
(Full Color 8.5x11, A4 Prints)
Important: Two feed roll kits are available:
• Reorder number: 008R13196 for Tray 5
• Reorder number: 008R13169 for Trays 6-9, 2-Tray Advanced Oversized High Capacity Feeder or
Dual Advanced Oversized High Capacity Feeder; 1 roll kit is required for each tray
For more information, contact the Customer Support Center.
26
Xerox®Versant®4100 Press
Quick Start Guide
Page 27

Maintenance
CChheecckkiinngg tthhee SSttaattuuss ooff CCoonnssuummaabblleess
The Supplies area of the Home window on the press control panel displays an overview of the level
of dry ink/toner remaining in each cartridge. As the dry ink/toner is used, the colored line representing
each cartridge becomes shorter.
When a consumable is reaching the time it needs to be replaced, a message is displayed on the
control panel touch screen. This indicates when it is time to order or install a new consumable item.
With some customer replaceable units (CRUs), the screen indicates that the press may continue to
run print jobs without immediately replacing the item. Otherwise, when it is time to replace it, a
message appears and the press stops running.
To check the status of your consumables:
1. Press the Home button on the control panel.
Notice the Supplies area showing a 1-to-100% indicator bar that shows the remaining amount
of dry ink/toner.
Note: Remaining dry ink/toner is updated in 10-percent increments.
2. To display the exact percentage of remaining dry ink/toner for each cartridge, touch the
Information button.
The Supplies screen displays.
®
Xerox
Versant®4100 Press
Quick Start Guide
27
Page 28

Maintenance
3. From the menu, select Other Consumables to see the status of other consumables.
The Other Consumables window displays and provides information about the percentage of
remaining life for each consumable.
4. Use the up or down arrows to see additional consumables, such as the drum cartridges, the dry
ink/toner waste container, trays 6–9 feeder rolls, and consumables for any additional optional
devices that are configured with the press.
Note: The status of the suction filter is not shown, but a message displays when it requires
replacement.
RReeppllaacciinngg tthhee TTrraayy 55 FFeeeedd RRoollllss
To perform this procedure, the feed roll kit is required. The kit contains all the required items for
replacing the feed rolls.
28
Xerox®Versant®4100 Press
Quick Start Guide
Page 29

Maintenance
Tip: Perform the following procedure when Tray 5 is installed on top of Trays 6 and 7.
Replace the feed rolls for Tray 5 (Bypass) when experiencing frequent multifeeds, single feeds, or
blank prints in the stack of the output prints.
1. Feed Roll
3. Separator Roll
2. Nudger Roll
1. Locate Tray 5 (Bypass) on top of Trays 6 and 7.
2. Lift up and open the bypass tray cover to access the feed roll components.
3. Remove the feed roll and install a new one.
Xerox
®
Versant®4100 Press
Quick Start Guide
29
Page 30

Maintenance
a. Remove the feed roll by squeezing the metal shaft at both ends and lifting it up and out of
the tray.
b. Install a new feed roll by squeezing the metal shaft at both ends and sliding it into place.
4. Remove the nudger roll and install a new one.
a. Remove the nudger roll by squeezing the metal shaft at both ends and lifting it up and out
of the tray.
30
Xerox®Versant®4100 Press
Quick Start Guide
Page 31

Maintenance
b. Install a new nudger roll by squeezing the metal shaft at both ends and sliding it into place.
5. Remove the separator roll and install a new one.
a. Remove the separator roll by squeezing the metal shaft at both ends and lifting it up and
out of the tray.
b. Install a new separator roll by squeezing the metal shaft at both ends and sliding it into
place.
6. Close the bypass tray cover.
7. Verify that the tray is operating correctly by feeding paper from the bypass tray.
8. Log in as the administrator or ask the administrator to perform the following steps to reset the
High Frequency Service Item (HFSI) count to zero (0):
a. At the control panel, press the Tools button.
b. From the screen that displays, select the Tools icon.
c. Select System Settings→Common Service Settings→Maintenance.
d. Use the arrow buttons to access the next Maintenance screens.
Xerox
®
Versant®4100 Press
Quick Start Guide
31
Page 32

Maintenance
e. Select the Technical Key Operator (TKO) icon.
The Technical Key Operator feature displays.
f. Log in to the Technical Key Operator mode.
Attention
If you cannot log in as TKO, or do not have the TKO password, call your Customer Service
Engineer.
g. Select the bypass roll items that corresponds with the newly-replaced components.
h. Select Reset Current Value. The system resets the High Frequency Service Item (HFSI) to 0.
i. Exit the administrator mode by pressing the Log In / Out button on the control panel.
When prompted, select Logout.
RReeppllaacciinngg tthhee FFeeeedd RRoollllss ffoorr TTrraayy 66 aanndd 77
To perform this procedure, the feed roll kit is required. The kit contains all the required items for
replacing the feed rolls.
Important: If replacing the feed rolls for both trays, ensure to obtain two feed roll kits (one for
each tray).
Replace the tray feed rolls every 300,000 prints or when experiencing frequent multifeeds, single
feeds, or blank prints in the stack of the output prints.
The tray feed rolls include the following components:
1. Nudger Roll
2. Feed Roll
3. Separator Roll
32
Xerox®Versant®4100 Press
Quick Start Guide
Page 33

1. To access the feed components , pull out the tray slowly until it stops.
2. Replace the nudger roll:
a. Remove the nudger roll by pushing down on the black tab with one hand (which raises the
roll upward) and then squeezing the metal shaft on both ends with your other hand.
Maintenance
b. Lift out the nudger roll.
c. Install a new nudger roll by squeezing both ends of the metal shaft and while pushing down
on the black tab, insert and release the roll ends into the notches.
3. To access the separator roll, remove the separator roll assembly at the side of the tray:
Xerox
®
Versant®4100 Press
Quick Start Guide
33
Page 34

Maintenance
a. Unscrew the three thumbscrews.
b. Slide the separator roll assembly all the way to the left so it is out of the slots.
c. Pull the assembly out towards you until completely removed from the tray and set aside the
assembly.
4. With the separator roll assembly out, replace the feed roll:
a. To remove the feed roll, squeeze both ends of the metal shaft and lift out.
b. To install a new feed roll, squeeze both ends of the new roll shaft, insert and release the roll
ends into the notches.
5. Replace the separator roll:
34
Xerox®Versant®4100 Press
Quick Start Guide
Page 35

Maintenance
a. To remove the roll from the assembly, squeeze the shafts of the separator roll and lift out of
the assembly.
b. To install a new separator roll, squeeze both ends of the new roll shaft, insert and release the
roll ends into the notches on the separator roll assembly.
6. Reinstall the separator roll assembly into the tray.
a. Align the cutout holes of the assembly with the frame of the tray so the pin holes match up.
b. Insert the assembly into the frame.
c. Slide the assembly all the way to the right using the pin as a guideline.
d. Ensure the device is all the way into the slots and the three screw areas align.
e. Screw in the three thumbscrews to attach the assembly. Do not over tighten.
7. Close the tray and verify that the tray is operating successfully by feeding paper using that tray.
8. Log in as the administrator or ask the administrator to perform the following steps to reset the
High Frequency Service Item (HFSI) counters to zero (0) for each component.
Xerox
®
Versant®4100 Press
Quick Start Guide
35
Page 36
Maintenance
a. At the control panel, press the Tools button.
b. From the screen that displays, select the Tools icon.
c. Select System Settings→Common Service Settings→Maintenance.
d. Use the arrow buttons to access the next Maintenance screens.
e. Select the Technical Key Operator icon.
The Technical Key Operator feature displays.
f. Log in to the Technical Key Operator mode.
Attention
If you cannot log in as TKO or do not have the TKO password, call your Customer Service
Engineer.
g. Select the item that corresponds with the newly-replaced components.
h. Select Reset Current Value. The system resets the High Frequency Service Item (HFSI) to 0.
i. Repeat the previous steps until the counters for all three components are reset to zero (0).
j. Exit administrator mode by pressing the Log In or Out button on the control panel.
When prompted, select Logout.
RReeppllaacciinngg aa DDrryy IInnkk//TToonneerr CCaarrttrriiddggee
Note: The dry ink/toner cartridge can be replaced while a job is printing.
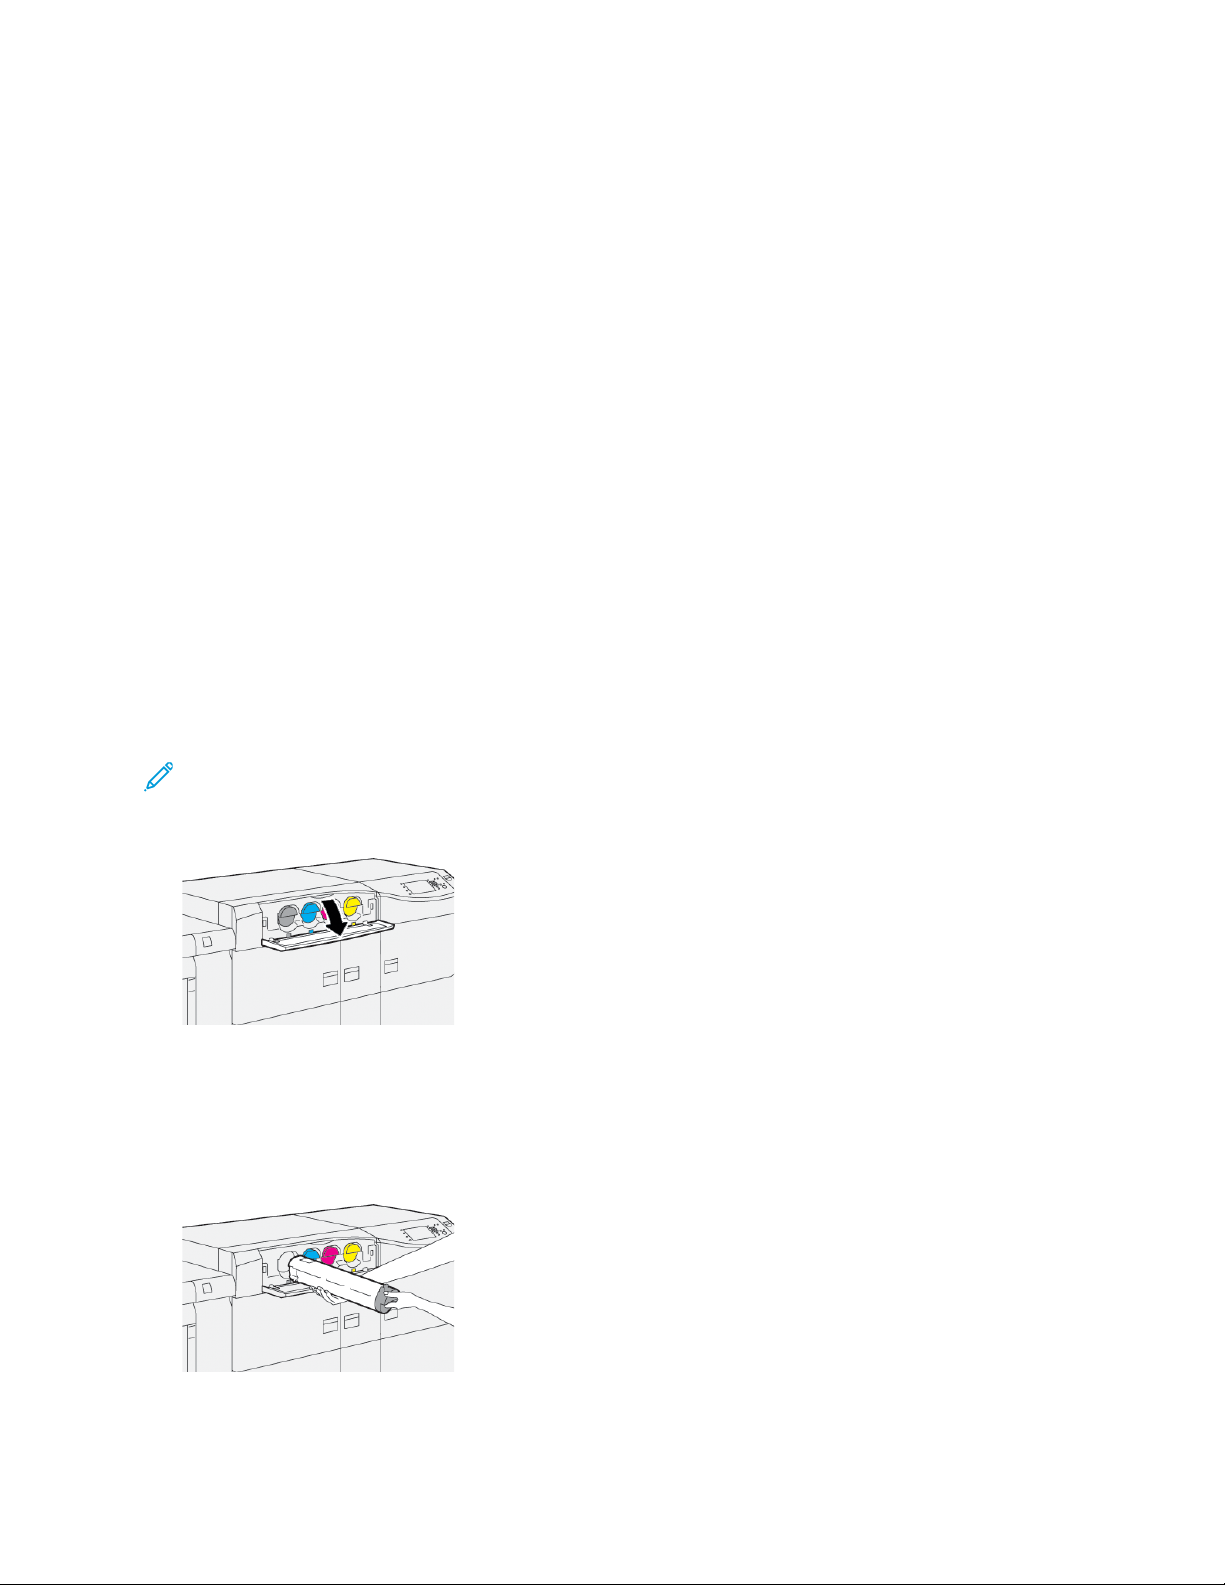
1. Open the dry ink/toner cover, located just above the press front door or cover.
2. Lay paper on the floor before removing the cartridge. This will allow any excess dry ink/toner to
fall on the paper.
3. Slowly remove the dry ink/toner cartridge by placing fingers under the end of the cartridge and
gently pulling it straight out. While pulling out, hold the bottom of the cartridge with your other
hand to give it support.
Ensure that you remove the same cartridge that matches the color as indicated in the message.
36
Xerox®Versant®4100 Press
Quick Start Guide
Page 37

Maintenance
4. Dispose of or recycle the cartridge per your local authorities and regulations.
In the United States, also refer to the Electronic Industries Alliance website: www.eiae.org. For
more information about Xerox environmental programs, go to www.xerox.com/environment.
5. Remove the new dry ink/toner cartridge from its packaging.
6. Prepare the cartridge for installation:
Note: The dry ink/toner material inside the new cartridge is compact. Loosen and
redistribute the dry ink/toner material before placing into the dry ink/toner slot.
a. With one hand on either side of the cartridge, vigorously shake and rotate the new cartridge
up and down and then left and right for 30 seconds.
b. Test whether the dry ink/toner material is distributed sufficiently by turning the auger on the
end of the cartridge.
c. If the auger does not turn easily, continue to shake the cartridge and loosen the dry ink/toner
material. When the auger turns without resistance, the dry ink/toner cartridge is ready for
installation.
7. Install the dry ink/toner cartridge by aligning it straight out from the press and gently sliding in
until it stops.
8. Close the dry ink/toner cover.
If the cover does not close completely, make sure the cartridge is in the lock position and is
installed into the appropriate dry ink/toner location.
Note: After you replace a dry ink/toner cartridge, the system automatically resets the High
Frequency Service Item (HFSI) usage counter for this CRU to zero (0). Check the
consumables Supplies screen to verify the reset and new status.
RReeppllaacciinngg tthhee DDrryy IInnkk//TToonneerr WWaassttee BBoottttllee
The dry ink/toner waste bottle collects dry ink/toner that accumulates during the printing process.
Note: When the waste bottle is full, a message displays on the press touch screen informing
you to exchange the full bottle with an empty one.
®
Xerox
Versant®4100 Press
Quick Start Guide
37
Page 38

Maintenance
1. Ensure that the press is not in operation (not running any jobs).
2. Open the center front door and locate the waste bottle.
3. Grasp the handle of the dry ink/toner waste bottle and slowly pull it halfway out of the press.
Slowly pulling out the bottle prevents any dry ink/toner from spilling.
4. Continue slowly pulling out the bottle until it is removed from the press:
a. While grasping the handle with one hand, grip the top of the bottle with the other hand.
The waste bottle may be heavy. Support the bottle with both hands to ensure that no dry
ink/toner is spilled while removing the bottle.
38
Xerox®Versant®4100 Press
Quick Start Guide
Page 39

Maintenance
b. Continue slowing pulling out the bottle from the press until it is completely removed.
Caution: Never use a vacuum cleaner when cleaning up any spilled dry ink / toner. Use
a broom or a cloth moistened with a neutral detergent.
5. Place the full waste bottle into the plastic bag provided with the bottle.
6. Remove a new, empty waste bottle from the packaging.
7. Hold the center part on the top of a new bottle and insert it gently into the press until it comes to
a stop.
8. Close the center front door.
Note: After you replace the dry ink/toner waste bottle, the system automatically resets the
High Frequency Service Item (HFSI) usage counter for this CRU component to zero (0).
Check the consumables Supply screen to verify the reset.
Xerox
®
Versant®4100 Press
Quick Start Guide
39
Page 40

Maintenance
RReeppllaacciinngg aa DDrruumm CCaarrttrriiddggee
Other than replacing a drum cartridge after 348,000 prints, you may need to replace a drum
cartridge if a drum cartridge is damaged by light, or if you are experiencing spots and streaks on the
printed output.
Note: All four Drum cartridges are interchangeable.
Important: After replacing the drum cartridge, the system automatically resets the High
Frequency Service Item (HFSI) usage counter of this CRU component to zero (0). Check the
Consumables screen for the reset and new status.
Caution: Do not leave the Drum Cartridge Drawer open for more than one minute. Exposing
the drum cartridges to direct sunlight or strong light from indoor fluorescent lighting for more
than one minute may cause image quality defects.
Caution: Replace drum cartridges while the press is powered ON.
1. Ensure that the press is not in operation and not currently printing jobs.
2. Open the press Left and Center Front doors.
3. Turn the R1-R4 Drum Drawer Handle clockwise to the unlock position.
40
Xerox®Versant®4100 Press
Quick Start Guide
Page 41

Maintenance
4. Grasp the Release Handle and pull out the Drum Drawer until it stops.
5. Remove the old drum cartridge by holding the finger rings provided at the both ends of the drum
cartridge and gently lifting up.
Caution: Drums are light sensitive. Do not leave the Drum Cartridge Drawer open for more
than one minute when replacing cartridges. Exposing the drum cartridges to direct sunlight
or strong light from indoor fluorescent lighting for more than one minute may cause image
quality defects.
6. Clean under drum cartridge area:
a. With the Drum Cartridge Drawer open, look for dry ink/toner waste on the bottom of the
catch pan under the drum cartridges.
b. Use a clean cloth to wipe down the catch pan.
7. Open the bag containing the new drum cartridge. Place the new drum cartridge near the press.
Caution: Do not touch or scratch the surface of the drum when you take it out from the
bag.
8. Unwrap the sheet covering the new drum cartridge and place it under the cartridge.
Note: Some drum cartridges may include a protective film. If the film is present, remove
the film on the drum cartridge.
®
Xerox
Versant®4100 Press
Quick Start Guide
41
Page 42

Maintenance
9. Using the finger rings, install the new drum cartridge into the press with the side marked front
facing the front.
10. Press both ends of the drum cartridge to place it in a horizontal position.
11. Immediately close the drum cartridge drawer to protect the other drums from light.
12. Return the Release Handle to its original position.
13. Return the R1-R4 handle to the original position and close the press left and center front doors.
14. Insert the used drum cartridge into an empty container for recycling.
42
Xerox®Versant®4100 Press
Quick Start Guide
Page 43

4
Troubleshooting
This chapter contains:
• Paper Jams ....... .... .... .... .... ..................... .... .... .... ..................... .... .... .... ................. .... .... .... .......... 44
• Fault Information.. .... .... ..................... .... .... .... ..................... .... .... .... ..................... .... .... .... .......... 63
Xerox®Versant®4100 Press
Quick Start Guide
43
Page 44
Troubleshooting
Paper Jams
If a paper jam occurs, a fault screen displays a message on the press control panel indicating in which
area the jam is situated. Follow the instructions provided for clearing the jam and resuming press
operation.
For more information, refer to Fault Messages.
CClleeaarriinngg JJaammss iinn AArreeaa 22
Important: Before opening any press doors, ensure that the press has stopped printing.
The transfer drawer includes the following jam clearance areas:
• Registration and alignment transport
• Registration roll
• Duplex transport
• Fuser entrance
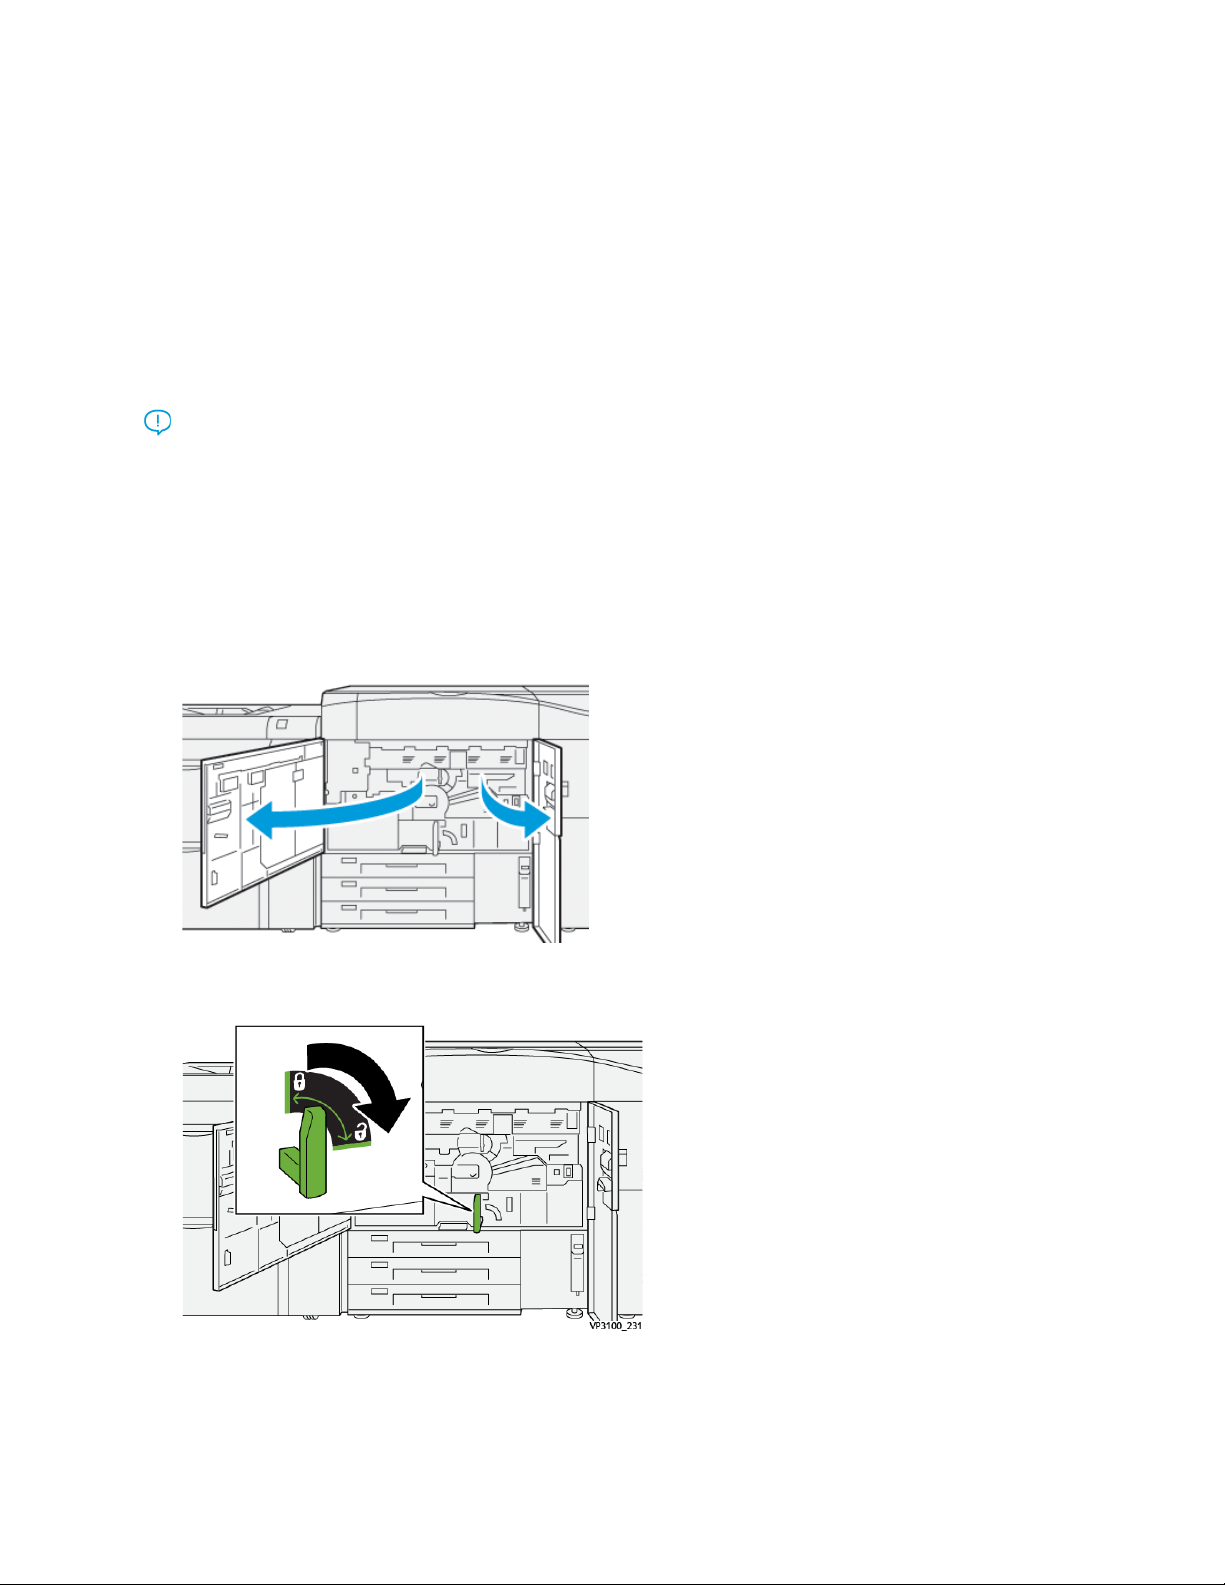
1. Open the left and center front doors.
2. To unlock transfer drawer, locate the green handle 2 and rotate it clockwise (right) to the
horizontal position.
44
Xerox®Versant®4100 Press
Quick Start Guide
Page 45

Troubleshooting
3. Slowly pull out the transfer drawer until it stops.
Note: If paper is jammed in the drawer while pulling it out, stop pulling when the jammed
paper is visible. Hold down the paper with one hand and continue pulling out the drawer.
4. If paper is jammed at the top of the transfer drawer, remove paper from area 2a by pulling it
straight out.
5. Open lever 2b upward and remove any jammed paper.
Xerox®Versant®4100 Press
Quick Start Guide
45
Page 46

Troubleshooting
6. Return lever 2b to its original position.
7. Locate area 2c and pull any jammed paper out towards the left.
8. Open lever 2d upward (1) and lever 2e to the right (2) and remove any jammed paper (3).
46
Xerox®Versant®4100 Press
Quick Start Guide
Page 47

9. Return levers 2d and 2e to their original positions.
10. Open lever 2f lever downward and remove any jammed paper.
Troubleshooting
11. Return lever 2f to its original position.
Xerox®Versant®4100 Press
Quick Start Guide
47
Page 48

Troubleshooting
12. To close the transfer drawer, grasp handle 2 and gently push in the drawer completely (1), then
turn the green handle to the left to lock the drawer in place (2).
13. Close the left and center front doors completely. The press does not operate when doors or covers
are open.
CClleeaarriinngg JJaammss iinn AArreeaass 33,, 44,, aanndd 55
Important: Before opening any press doors, ensure that the press has stopped printing.
1. Open the right front door.
2. Open lever 3a upward (1) and remove any jammed paper (2).
48
Xerox®Versant®4100 Press
Quick Start Guide
Page 49

Troubleshooting
3. If there is difficulty in removing the jammed paper, rotate knob 3b clockwise (right) (1), and
remove the jammed paper (2).
Note: There may be extra sheets remaining in the press. To ensure all sheets are removed,
rotate knob 3b clockwise (right) three times.
4. Return lever 3a to its original position.
5. Open lever 5a downward and remove any jammed paper .
Xerox®Versant®4100 Press
Quick Start Guide
49
Page 50

Troubleshooting
6. If there is difficulty in removing the jammed paper, rotate knob 5b clockwise (right) (1), and
remove the jammed paper (2).
7. Return lever 5a to its original position.
8. Open lever 5c downward (1) and remove any jammed paper (2).
50
Xerox®Versant®4100 Press
Quick Start Guide
Page 51

Troubleshooting
9. If there is difficulty in removing the jammed paper, rotate knob 5d clockwise (right) (1), and
remove the jammed paper (2).
10. Return lever 5c to its original position.
11. To open the exit module drawer, grasp handle 4 and rotate handle to the right to the horizontal
position.
Xerox®Versant®4100 Press
Quick Start Guide
51
Page 52

Troubleshooting
12. Slowly pull out the exit module drawer until stops.
13. Remove any jammed paper from the top of the module (area 4a) by pulling it straight out.
14. If there is difficulty in removing the jammed paper, rotate knob 4a clockwise (right) (1), and
remove the jammed paper (2).
52
Xerox®Versant®4100 Press
Quick Start Guide
Page 53

Troubleshooting
15. Open lever 4b to the right (1) and remove any jammed paper (2).
16. If there is difficulty in removing the jammed paper, open lever 4d to the right (1), and remove
the jammed paper (2).
17. Return levers 4b and 4d to their original positions.
Xerox®Versant®4100 Press
Quick Start Guide
53
Page 54

Troubleshooting
18. Open lever 4c to the right (1) and remove any jammed paper (2).
19. Return lever 4c to its original position.
20.
21. To close the exit module, grasp handle 4, gently push in the exit module completely (1), and
rotate handle to the left (2) to lock the module in place .
22. Close the right front door completely. The press does not operate if a door is open even slightly.
54
Xerox®Versant®4100 Press
Quick Start Guide
Page 55

Troubleshooting
PPaappeerr JJaammss iinn TTrraayyss 11--33
Note: Paper is sometimes torn and remains inside the press if you open a tray without checking
the paper jam position. This may cause a malfunction. Check where the paper jam occurred
before clearing the problem.
1. Open the tray where the paper jam occurred.
2. Remove the jammed paper.
3. Push the tray in gently until it comes to a stop.
Xerox®Versant®4100 Press
Quick Start Guide
55
Page 56

Troubleshooting
PPaappeerr JJaammss iinn tthhee BByyppaassss ((TTrraayy 55))
PPaappeerr JJaammss WWhheenn tthhee BByyppaassss iiss IInnssttaalllleedd oonn TTrraayyss 66 aanndd 77
Tip: Always ensure that all paper jams, including any small, ripped pieces of paper, are cleared
before proceeding with any print jobs.
1. Remove the paper currently loaded in the Bypass (Tray 5).
2. Lift and open the Top Cover of the Bypass (Tray 5).
3. Remove any jammed paper.
Note: If paper is torn, check inside the press and remove it.
56
Xerox®Versant®4100 Press
Quick Start Guide
Page 57

4. Close the Top Cover of the Bypass (Tray 5).
5. Reload paper into the tray and resume printing.
JJaamm CClleeaarraannccee ooff OOHHCCFF
CClleeaarriinngg OOHHCCFF JJaammss ((TTrraayyss 66 aanndd 77))
Troubleshooting
Nip Release levers inside of the Transport area of the Feeder hold back large size sheets (such as A3,
11 x 17 inches, 12 x 18 inches) to reduce the chance of jamming as paper enters the print engine.
Note: Follow the jam clearance instructions displayed on the touch screen. Always ensure that
all paper jams, including any small ripped pieces of paper, are cleared before proceeding with
your print jobs.
Xerox
®
Versant®4100 Press
Quick Start Guide
57
Page 58

Troubleshooting
PPaappeerr JJaammss iinnssiiddee TTrraayyss 66 aanndd 77
1. Pull out the tray where the paper jam occurred.
2. Remove the jammed paper.
Note: If paper is torn, check inside the machine and remove it.
3. Gently push in the tray until it comes to a stop.
58
Xerox®Versant®4100 Press
Quick Start Guide
Page 59

Troubleshooting
TTrraayyss 66 aanndd 77 PPaappeerr JJaammss aatt LLeevveerr 11aa aanndd KKnnoobb 11cc
1. Open the front cover of the feeder module.
2. Move the lever 1a to the right and turn the knob 1c to the right. Remove the jammed paper.
Note: If paper is torn, check for any torn pieces of paper inside the machine.
3. Return the lever 1a to the original position.
4. Close the front cover of the feeder module.
Note: If the front cover of the feeder module is not completely closed, a message will
appear and the press will not operate.
Xerox
®
Versant®4100 Press
Quick Start Guide
59
Page 60

Troubleshooting
TTrraayyss 66 aanndd 77 PPaappeerr JJaammss aatt LLeevveerr 11bb aanndd KKnnoobb 11cc
1. Open the front cover of the feeder module.
2. Move the lever 1b to the right and turn the knob 1c to the right. Remove the jammed paper.
Note: If paper is torn, check for any torn pieces of paper inside the machine.
3. Return the lever 1b to the original position.
4. Close the front cover of the feeder module.
Note: If the front cover of the feeder module is not completely closed, a message will
appear and the press will not operate.
60
Xerox®Versant®4100 Press
Quick Start Guide
Page 61

TTrraayyss 66 aanndd 77 PPaappeerr JJaammss aatt LLeevveerr 11dd aanndd KKnnoobb 11cc
Note: If paper is torn, check for any torn pieces of paper inside the machine.
1. Open the front cover of the feeder module.
2. Move the lever 1d upward and remove the jammed paper.
Troubleshooting
3. If the paper cannot be removed, turn the knob 1c clockwise, then remove the jammed paper.
Xerox®Versant®4100 Press
Quick Start Guide
61
Page 62

Troubleshooting
4. Return the lever 1d to the original position.
5. Close the front cover of the feeder module.
Note: If the front cover of the feeder module is not completely closed, a message will
appear and the press will not operate.
62
Xerox®Versant®4100 Press
Quick Start Guide
Page 63

Troubleshooting
Fault Information
The following occurs when there is a fault, such as paper jams, open doors or covers, or a press
malfunction:
• The press stops running and a fault message displays on the press touch screen.
• The message includes a graphical illustration showing the location of the fault along with a brief
explanation of corrective actions for clearing the fault.
• Paper jams may occur in multiple areas of the press and any optional devices connected to the
press. When this happens, the graphical illustration changes to show the multiple locations and
the required corrective actions.
• Additionally, if a fault occurs with an optional device, an indicator lights on that device control
panel and shows the corresponding area on the device where the fault occurred.
Always refer to the following information when clearing paper jams:
• Do not power off the press when removing paper jams.
• Paper jams can be removed with the press still powered on. When the power is turned off, all
information stored to the system memory will be erased.
• Clear all paper jams before resuming print jobs.
• Do not touch components inside the press. This can cause print defects.
• Ensure that all paper jams, including any small ripped pieces of paper, are cleared before
proceeding with print jobs.
• Gently remove the paper taking care not to tear it. If paper is torn, be sure to remove all torn
pieces.
• After removing paper jams, close all doors and covers. The press cannot print when doors or covers
are open.
• After clearing a paper jam, printing automatically resumes from the state before the paper jam
occurred.
• If all paper jams are not cleared, an error message continues to display on the press touch screen.
To clear any remaining jams, refer to the press touch screen for instructions and information.
Xerox
®
Versant®4100 Press
Quick Start Guide
63
Page 64

Troubleshooting
OObbttaaiinniinngg FFaauulltt IInnffoorrmmaattiioonn ffrroomm tthhee PPrreessss TToouucchh
SSccrreeeenn
When a fault occurs, such as paper jams, open doors or covers, or a press malfunction, the press stops
printing and a message appears on the press touch screen. Use the following procedure to obtain
information and instructions about the correcting the fault.
1. From Home on the press touch screen, select the Faults button.
• If there is only one fault, a Fault screen displays.
• If there are multiple faults, a list displays underneath the graphical illustration on the Home
screen; refer to the illustration in the next step.
64
Xerox®Versant®4100 Press
Quick Start Guide
Page 65

2. Select the first, top item from the displayed list.
Note: Multiple faults are listed in descending order with the top fault being number one.
Correct them in the order they listed starting with the top one and working down the list.
Troubleshooting
A Fault screen displays.
3. To correct a fault, following the instructions provided on the Fault screen.
When finished, select Close.
4. Repeat the previous steps until all faults are cleared.
If a fault cannot be cleared, contact the system administrator.
FFaauulltt MMeessssaaggeess
When a fault occurs, such as paper jams, open doors or covers, or a press malfunction, the press stops
printing and a message appears on the press touch screen. A graphical illustration shows the location
of the fault with a brief explanation of corrective actions for clearing the fault. If a fault occurs in
more than one location, the illustration changes to indicate the multiple locations and the required
corrective actions.
Note: For more information, refer to Obtaining Fault Information from the Press Touch Screen.
®
Xerox
Versant®4100 Press
Quick Start Guide
65
Page 66

Troubleshooting
Detailed information and instructions about the correcting a fault is available by selecting the Faults
button on the Home screen. The Fault screen displays.
Find the code for the fault listed at the bottom of the Fault screen.
66
Xerox®Versant®4100 Press
Quick Start Guide
Page 67

Page 68

 Loading...