

Page 1

Version 1.0
November 2020
702P08365
Xerox
®
Versant
®
4100 Press
User Documentation
Page 2

© 2020 Xerox Corporation. All rights reserved. Xerox®, Xerox and Design®, and Versant®are trademarks of Xerox
Corporation in the United States and/or other countries.
®
Adobe
and the Adobe logo, InDesign®, Illustrator®, PageMaker®, Photoshop®, Acrobat®, Distiller®, PostScript, and the
Acrobat logo are either registered trademarks or trademarks of Adobe Systems Incorporated in the United States and/
or other countries.
Macintosh, Mac OS, Power Macintosh, TrueType, and Mac are registered trademarks of Apple Computer, Inc. in the
United States and/or other countries.
Microsoft
®
Windows 2000®, Windows XP, Windows 7, Windows 10, and Microsoft®Windows are trademarks of
Microsoft Corporation in the United States and/or other countries.
Mozilla and Firefox are trademarks of The Mozilla Foundation
PANTONE
®
, PANTONE Goe™, PANTONE MATCHING SYSTEM®, PMS®, and X-Rite PANTONE®are either registered
trademarks or trademarks of Danaher Corporation.
The CentOS Marks are trademarks of Red Hat, Inc.
Changes are periodically made to this document. Changes, technical inaccuracies, and typographic errors will be
corrected in subsequent editions.
Page 3

Table of Contents
1 Learning About.......................................................................................................................... 7
Safety. ....................... . . . . . ....................... . . ....................... . . . . . ........................ . . ....................... . . . 8
Product Symbols . . . . ....................... . . . . . ....................... . . ....................... . . . . . ........................ . .. 8
Notices and Safety................... . . ........................ . . . . ....................... . . . ....................... . . . . ..... 11
Electrical Safety . ....................... . . . . . ....................... . . . ....................... . . . . . ....................... . . ... 11
Laser Safety...................... . . ........................ . . . . ....................... . . . ....................... . . . . ............ 13
Operational Safety.. . . . . . ........................ . . ....................... . . . . . ....................... . . ..................... 13
Maintenance Information.......... . . . . ....................... . . . ....................... . . . . . ....................... . . ... 14
Consumable Information .. . . ........................ . . . ....................... . . . . ....................... . . . ............. 15
Battery Safety............... . . . ....................... . . . . . ....................... . . ........................ . . . . ............... 15
Environmental, Health, and Safety Contact Information .. . . . . . ....................... . . .................. 16
Press Overview .................. . . . . . ....................... . . ....................... . . . . . ....................... . . .................. 17
Press Components. ....................... . . . . ....................... . . . . ....................... . . . ....................... . . . . 17
PredictPrint Media Manager Overview....................... . . . . ....................... . . . . ....................... . . . . ... 25
Print Server Overview .. . . . . ....................... . . ....................... . . . . . ....................... . . ........................ . 26
Specifications . . ........................ . ........................ . . . . . ....................... . . ....................... . . . . . ........... 27
Performance Specifications .......... . . . . ........................ . . . ....................... . . . . ....................... . . . 27
Environmental Specifications .................... . . . ........................ . . . ....................... . . . . .............. 28
Getting Help .. . . ....................... . . ........................ . . . . ....................... . . . ....................... . . . . . ........... 29
Help on the Xerox Website...................... . . ....................... . . . . . ....................... . . .................. 29
Print Server Documentation ................. . . . . . ....................... . . . ....................... . . . . .................. 29
More Information................. . . . . ....................... . . . ........................ . . . ....................... . . . . ....... 29
Regulatory Information ......... . . . ........................ . . . . ....................... . . . ....................... . . . . ............ 31
Basic Regulations. . ....................... . . ....................... . . . . . ....................... . . . ....................... . . . . . 31
Copy Regulations ........................ . . . ....................... . . . . ....................... . . . . ....................... . . . . . 35
Safety Certification...................... . . . ........................ . . . . ....................... . . . ....................... . . . . 37
Safety Data Sheets ....... . . . ....................... . . . . . ....................... . . ........................ . . . . ............... 38
Recycling and Disposal............. . . ....................... . . . . . ....................... . . . ....................... . . . . ........... 39
All Countries .................. . . . . . ........................ . . ....................... . . . . . ....................... . . .............. 39
North America .. . . . . ....................... . . . ........................ . . . . ....................... . . . ....................... . . . . 39
European Union. . . ....................... . . . ....................... . . . . . ....................... . . . ....................... . . . . . 40
Other Countries..................... . . . . . ........................ . ........................ . . . . . ....................... . . ....... 40
2 Working With...........................................................................................................................41
Power On or Off ..... . . . . . ....................... . . . ....................... . . . . . ....................... . . ....................... . . . . . 42
Power Switches .................. . . ....................... . . . . . ....................... . . . ....................... . . . . ........... 42
Power On or Off the Press .. . ....................... . . ........................ . . . . . ....................... . . .............. 43
Power Saver Mode ........................ . . . . . ....................... . . ....................... . . . . . ........................ . 44
Job and Machine Status........... . . . . ....................... . . . ....................... . . . . ....................... . . . ........... 45
Job Status............... . . . . ....................... . . . ........................ . . . ........................ . . . ..................... 45
Xerox®Versant®4100 Press
User Documentation
3
Page 4

Table of Contents
Machine Status..................... . . . ........................ . . . ........................ . . . ....................... . . . . ....... 46
Paper and Media.................. . . . ....................... . . . . ........................ . . ....................... . . . . . .............. 52
Paper and Media Overview.................. . . ........................ . . . . ........................ . . ..................... 52
Supported Paper....................... . . ....................... . . . . . ....................... . . . ....................... . . . . . ... 54
Loading Paper..... . . ....................... . . . . . ....................... . . . ....................... . . . . ....................... . . . 60
Matching the Tray and Stock Information... . ........................ . . . . . ....................... . . .............. 63
Paper Feed Performance in Trays 6 and 7 ...................... . . ....................... . . . . . ..................... 64
Printing on Special Media ................ . . . . ........................ . . ........................ . . . . ...................... 69
Loading Media in Optional Devices ............. . . . . ....................... . . . ....................... . . . . ............ 86
PredictPrint Media Manager.................... . . . . ........................ . . ........................ . . . . ..................... 87
Desktop Shortcuts. ....................... . . . ....................... . . . . . ....................... . . . ....................... . . . . 87
PredictPrint Cloud Server . . ....................... . . . . . ........................ . . ....................... . . . . . .............. 88
Backing Up and Transferring the Stock Library .............. . . . ....................... . . . . ..................... 89
Stock Wizard. . ....................... . . ....................... . . . . . ....................... . . ........................ . . . . . ....... 90
Administration........ . . . ........................ . . . ........................ . . . ....................... . . . . ..................... 98
Stock Management... . . . ........................ . . . ....................... . . . . ....................... . . . . ................. 105
Tray Properties. . ....................... . . ........................ . . . . ....................... . . . ....................... . . . . . .. 113
Test Print ............ . . ....................... . . . . . ....................... . . . ....................... . . . . ........................ 116
Advanced Stock Setup . ........................ . . . . . ....................... . . ....................... . . . . . ................ 118
Paper Curl Correction ................. . . . . ....................... . . . ....................... . . . . . ....................... . . . 129
Profiles.. ....................... . . . . ....................... . . . ....................... . . . . ........................ . . . .............. 135
Alignment Profiles...... . . ........................ . . . . ....................... . . . ....................... . . . . . ................ 136
Fold Adjustments ................... . . . . ........................ . . ........................ . . . . ....................... . . . .... 144
Print Job Submission ............ . . . ....................... . . . . ........................ . . ....................... . . . . . ............ 160
Information to Know Before Printing a Job............ . . ....................... . . . . . ....................... . . . . 160
How to Submit a Print Job................ . . . ....................... . . . . ........................ . . ...................... 160
Printing from Your Computer......... . . . . . ....................... . . ....................... . . . . . ....................... 161
Printing from the EX or EX-P Print Server........ . . . ....................... . . . . ........................ . . ......... 161
Information about Printing on Tabs .. . . ....................... . . . . ........................ . . ...................... 162
Feeding Devices ....................... . . ........................ . . . . ....................... . . . ....................... . . . . ......... 163
Dual Advanced Oversized High Capacity Feeder (Trays 8 and 9) ....................... . . . . . ......... 163
Paper and Media for Trays 8 and 9... . . ....................... . . . . . ........................ . . ...................... 165
Trays 8 and 9 Specifications...... . . . . ....................... . . . ....................... . . . . ....................... . . . . . 179
Finishing Devices ..................... . ........................ . . . . . ....................... . . ....................... . . . . . ......... 180
Interface Decurler Module (IDM) ............... . . ........................ . . . . ....................... . . . ............ 180
Inserter Device.. . . . . ....................... . . . . ....................... . . . . ....................... . . . ....................... . . 185
®
AdvancedPunch™Pro.................. . . . . . ....................... . . . ....................... . . . . ................ 191
GBC
High Capacity Stacker (HCS) ...... . . . . ....................... . . . ....................... . . . . . ....................... . . . 192
Crease and Two-Sided Trimmer. . ....................... . . ........................ . . . . ........................ . . ..... 196
C/Z Folder .. . ....................... . . . . . ....................... . . ....................... . . . . . ........................ . . ........ 198
Production Ready (PR) Finishers ............. . . . ....................... . . . . . ....................... . . ................ 201
SquareFold
®
Trimmer Device............. . . . . ........................ . . . ....................... . . . . ................... 213
Job Workflows................... . . . . . ....................... . . ....................... . . . . . ........................ . ................ 221
Printing Extra-Long Sheets ................... . . ....................... . . . . . ....................... . . ................... 221
Printing Saddle-stitched Booklets with Full Bleed, Trimmed Edges, and Inserting
Preprinted Covers.................. . . . ....................... . . . . ........................ . . . ....................... . . . . ..... 222
Adjusting Booklet Fold and Staple Positions .. . ....................... . . . . ....................... . . . . .......... 225
Producing Simple Folded Sheets and Inserting Folded Sheets into a Document .............. 227
4
Xerox®Versant®4100 Press
User Documentation
Page 5

Table of Contents
Using the Inserter Device to Include Sheets or Tabs into the Printed Output. ................ . . 229
Using the GBC
®
AdvancedPunch®Pro...................... . . . ....................... . . . . ....................... . 230
Maintenance . . . ........................ . . . ....................... . . . . ....................... . . . ....................... . . . . ......... 232
General Precautions and Warnings....................... . . . ....................... . . . . . ....................... . . . . 232
Cleaning the Press ... . . . . ........................ . . . ....................... . . . . ....................... . . . .................. 232
Calibrating the Press ............. . . . . ....................... . . . ........................ . . . ........................ . . . ..... 236
Replacing Consumable Supplies ................ . . . ........................ . . . . ....................... . . . ............ 238
Tray 8 and 9 Maintenance ........... . . . . . . ....................... . . ....................... . . . . . ....................... 261
Finishing Devices Maintenance .................. . . ........................ . . . . ....................... . . . ............ 271
3 Troubleshooting................................................................................................................... 285
General Troubleshooting . . . ....................... . . . ........................ . . . ....................... . . . . ................... 286
Press Does Not Power On ... . . . . ....................... . . . ....................... . . . . ....................... . . . ......... 286
Cannot Obtain the Press Serial Number from the Machine Status Screen ................ . . . . . .. 286
Press Control Panel Is Not Working.............. . . . . ........................ . . ....................... . . . . . ......... 287
Press Does Not Complete a Print Job ................ . . . ........................ . . . ....................... . . . . ..... 287
Time Interval Between Print Jobs Is Longer Than 1 Minute ....................... . . ................... 287
Print Output Contains Corrupted Text...... . . . . ....................... . . . ........................ . . . . ............. 288
Trays Do Not Recognize the Media.............. . . . . . ....................... . . ....................... . . . . . ......... 288
Prints Are Not on Desired Paper Size ..................... . . . . . . ....................... . . ....................... . . . 288
Paper Jams or Wrinkles in the Fuser Area .............. . . . ....................... . . . . . ....................... . . . 288
Repeated Paper Misfeeds, Jams, or Wrinkles.......... . . . . . ....................... . . . ....................... . . . 289
Multiple Sheets Fed From the Same Tray....................... . . . . ....................... . . . ................... 289
Excessive Paper Curl on Printed Output .................. . . . . . ....................... . . . ....................... . . 290
Reducing Dry Ink/Toner Consumption ..... . . . . ....................... . . . ........................ . . . .............. 291
Image Quality (IQ) Troubleshooting........... . . . ....................... . . . . ....................... . . . . ................. 292
Contamination on the Back Side of Prints ..................... . . . ....................... . . . . ................... 292
Banding on Prints. . ....................... . . ....................... . . . . . ....................... . . . ....................... . . . 293
Color Nonuniformity on Prints..................... . . . ....................... . . . . ....................... . . . ........... 294
Random White or Dark Spots on Prints. . ........................ . . . . . ....................... . . ................... 294
Repeating Defects at Regular Intervals on Prints ... . . . . ....................... . . . . ....................... . . . 295
Streaks or Lines on Prints.............. . . . ....................... . . . . . ....................... . . . ....................... . . 296
Edgewear or Gloss Differential on Prints...... . . . . . ....................... . . ....................... . . . . . ......... 298
Halo or Smudges on Prints ................... . . . . . ....................... . . ....................... . . . . . ................ 298
Image Density...................... . . ....................... . . . . . ....................... . . ........................ . . . . . ..... 299
Image-on-Paper Registration .. . . . ....................... . . ........................ . . . . ....................... . . . ..... 300
Unfused Prints or Fuser Offset..................... . . ........................ . . . . ....................... . . . ........... 301
Trail-Edge Deletions .. ....................... . . ....................... . . . . . ........................ . ....................... 302
PredictPrint Media Manager Troubleshooting.............. . . . ....................... . . . . . ....................... . . . 304
Faults during the Setup Routines in the Stock Wizard ......... . . . ........................ . . . . ............. 304
Unable to Load a Stock in the Stock Wizard .......... . . . . ....................... . . . . ....................... . . . 304
Multifeeds, Misfeeds, and Paper Jams in Trays 6–9...................... . . . . . ....................... . . ..... 304
Paper Curl .... . . ....................... . . . . . ........................ . ........................ . . . . . ....................... . . ..... 306
Uneven Density or Mottle ....................... . . . . . ........................ . . ....................... . . . . . ............ 307
Image Registration, Perpendicularity, Skew, and Magnification ... . ........................ . . . . . ..... 308
Unfused Dry Ink or Toner on Output ..................... . . . . ....................... . . . . ....................... . . . 311
Edge Damage........... . . . ........................ . . . ....................... . . . . ....................... . . . .................. 312
Fold Adjustment ...... . . . . ........................ . . . ....................... . . . . ....................... . . . .................. 313
Xerox®Versant®4100 Press
User Documentation
5
Page 6

Table of Contents
Smear 208 mm from the Lead Edge...................... . . ....................... . . . . . . ....................... . . . 314
Trail Edge Deletions .... . . . . ....................... . . . ....................... . . . . . ....................... . . ................ 315
PredictPrint Media Manager Default Settings....................... . . . . ....................... . . . ............ 315
Paper Jams . . . ....................... . . . . ....................... . . . ........................ . . . ........................ . . . ............ 324
Paper Jam Information . . . . ....................... . . . . . ....................... . . ........................ . . . . ............. 324
Clearing Jams in Area 2 ............. . . . . ....................... . . . ....................... . . . . . ....................... . . . 324
Clearing Jams in Areas 3, 4, and 5........... . . ....................... . . . . . ........................ . . ............... 328
Paper Jams in Trays 1-3 ............. . . . . ....................... . . . ....................... . . . . . ....................... . . . 335
Paper Jams in the Bypass (Tray 5)...................... . ........................ . . . . . ....................... . . ..... 337
Jam Clearance of OHCF ................... . . . ....................... . . . . ........................ . . . ..................... 338
Fault Information . . . ........................ . . ....................... . . . . . ....................... . . ....................... . . . . . . . 343
Obtaining Fault Information from the Press Touch Screen .... . . . . . ....................... . . ............ 343
Fault Messages ....... . . . ....................... . . . . ........................ . . ....................... . . . . . ................... 345
Trays 8 and 9 Troubleshooting ...................... . . ....................... . . . . . ........................ . . ............... 347
Trays 8 and 9 Troubleshooting ................... . . ........................ . . . . ....................... . . . ............ 347
Troubleshooting Finishing Devices ............. . . . . . ....................... . . ....................... . . . . . ................ 354
Interface Decurler Module Troubleshooting...................... . . ....................... . . . . . ................ 354
Inserter Module Troubleshooting . . . ....................... . . . . ....................... . . . . ....................... . . . 357
High Capacity Stacker Troubleshooting............... . . . . ....................... . . . ....................... . . . . . . 363
Crease and Two-Sided Trimmer Troubleshooting................... . . . . ....................... . . . ........... 373
C/Z Folder Troubleshooting ..................... . . . . ....................... . . . ........................ . . . .............. 388
Production Ready Finishers Troubleshooting......................... . . . ....................... . . . . ............ 394
®
SquareFold
Trimmer Troubleshooting. . ........................ . . . . ....................... . . . ................... 418
Troubleshooting Help.................... . . . ........................ . . . . ....................... . . . ....................... . . . . ... 424
Locating the Press Serial Number ....................... . . . . ....................... . . . ....................... . . . . . .. 424
Calling for Service ....................... . . . ....................... . . . . ....................... . . . . ....................... . . . 424
4 For Administrators................................................................................................................ 427
6
Xerox®Versant®4100 Press
User Documentation
Page 7

1
Learning About
This chapter contains:
• Safety........ . . . ........................ . . . ....................... . . . . ....................... . . . . ....................... . . . .................... 8
• Press Overview . . . . . ........................ . . ....................... . . . . . ....................... . . . ....................... . . . . ........... 17
• PredictPrint Media Manager Overview....... . . . ....................... . . . . ........................ . . ........................ . 25
• Print Server Overview ............ . . ....................... . . . . . ....................... . . . ....................... . . . . .................. 26
• Specifications ..... . . ....................... . . . . . ....................... . . . ....................... . . . . ........................ . . .......... 27
• Getting Help .......... . . ....................... . . . . . ........................ . . ....................... . . . . . ....................... . . ....... 29
• Regulatory Information.............. . . . ........................ . . . ....................... . . . . ....................... . . . . ............ 31
• Recycling and Disposal...................... . . . ........................ . . . ........................ . . . ....................... . . . . ..... 39
Xerox®Versant®4100 Press
User Documentation
7
Page 8
Learning About
Safety
Your press and the recommended supplies have been designed and tested to meet strict safety
requirements. Attention to the following information ensures the continued safe operation of your
®
Xerox
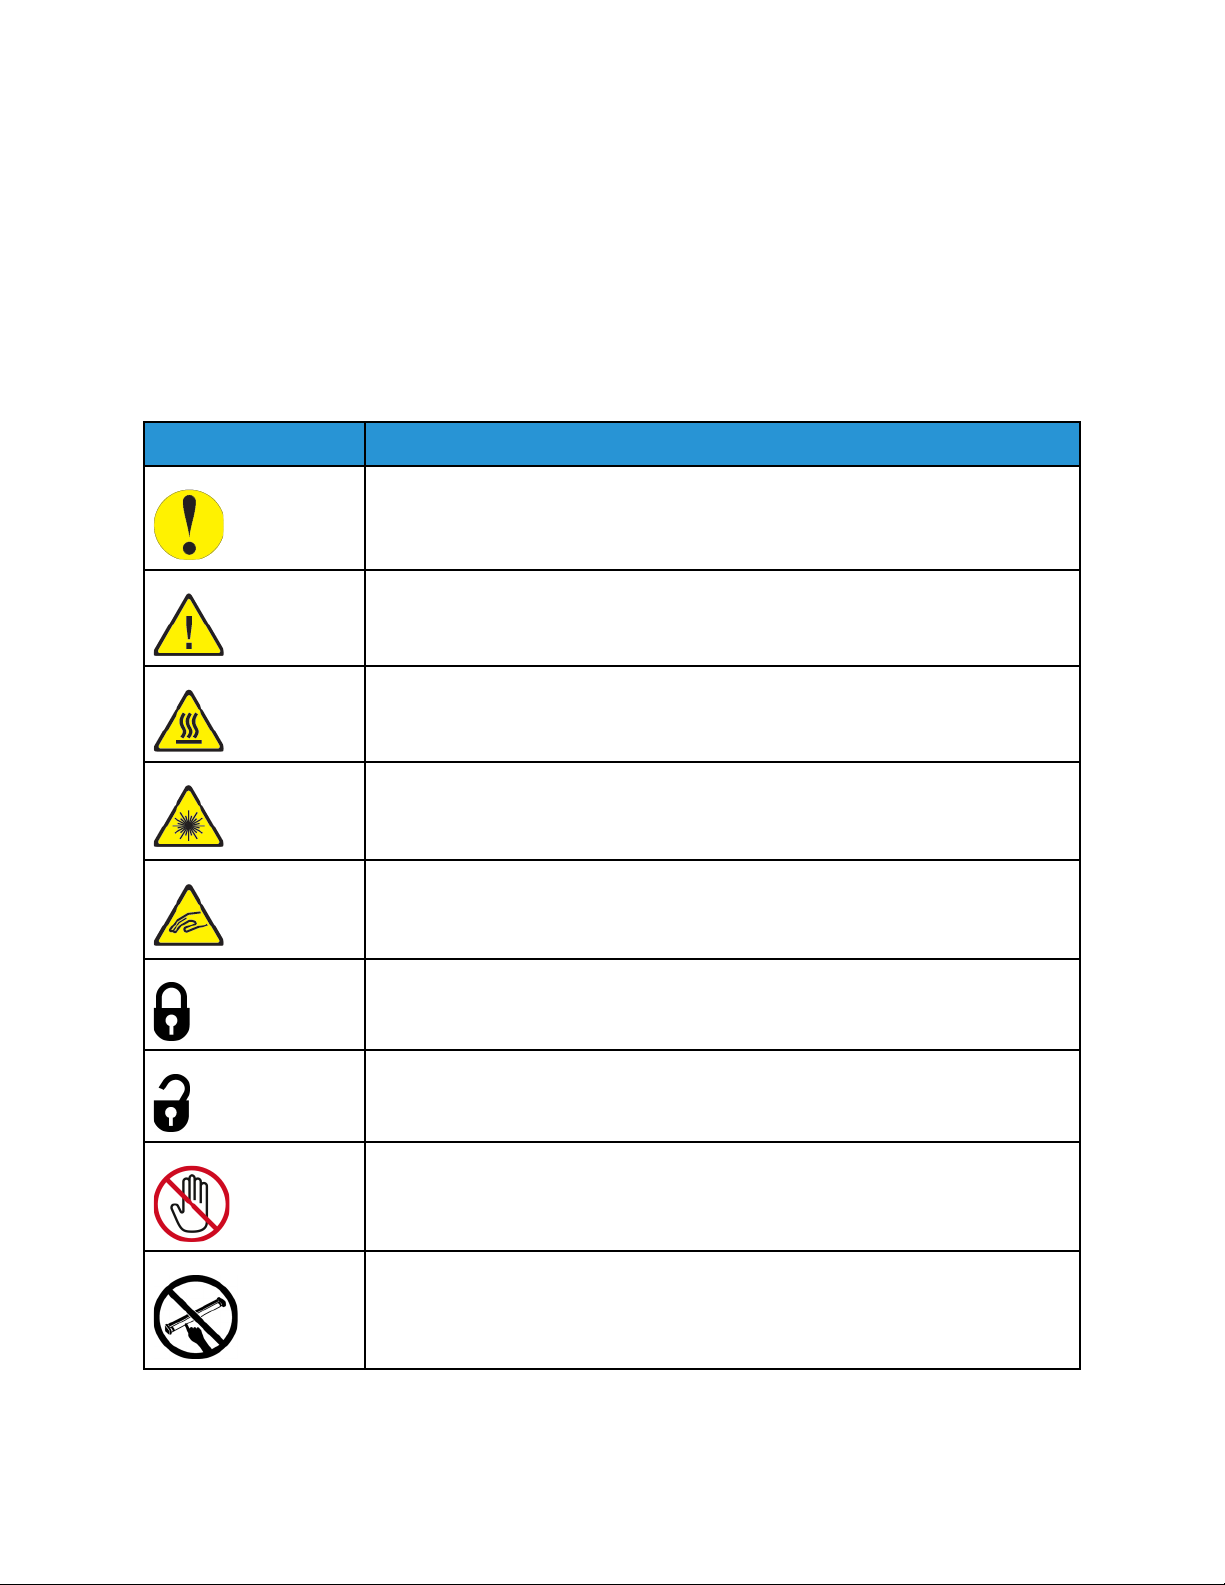
PPrroodduucctt SSyymmbboollss
This product uses a variety of symbols; refer to the following table for a list of these symbols and their
definitions.
Press.
Symbol Name and Definition (if required)
Caution
This symbol indicates a mandatory action to take in order to avoid damage to
these areas.
Warning
This symbol alerts users to areas where there is the possibility of personal injury.
Hot Warning
This symbol alerts users to areas where there are heated surfaces which should not
be touched.
Laser Warning
This symbol indicates a laser is being used and alerts the user to refer to the
appropriate safety information.
Pinch Hazard
This warning symbol alerts users to areas where there is the possibility of personal
injury.
Lock
Unlock
Do Not Touch
Do Not Touch the Drum Cartridge
To avoid damage, do not touch the surface of the Drum Cartridge.
8
Xerox®Versant®4100 Press
User Documentation
Page 9

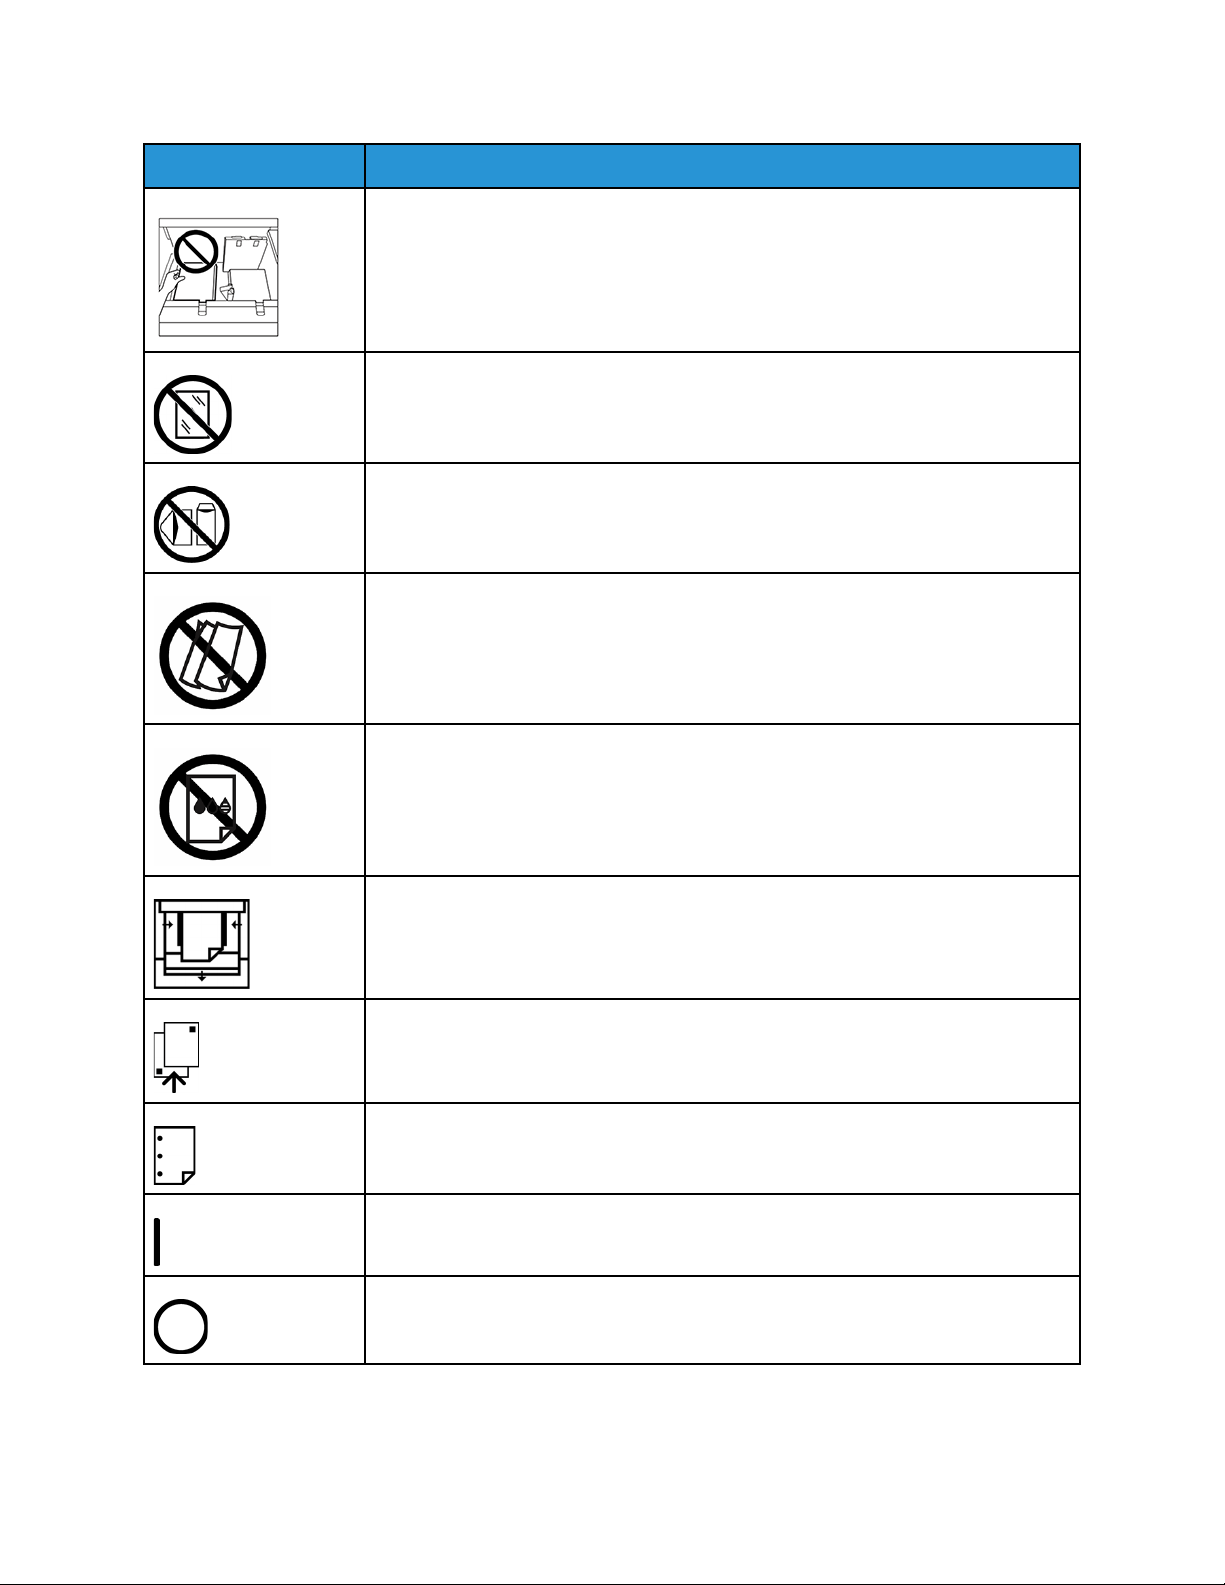
Symbol Name and Definition (if required)
Do Not Dispose into an Open Flame or Incinerate
Do Not Incinerate the Toner Cartridge
Always refer to the recycling instructions for your region or marketplace for correct
disposal information and procedures.
Do Not Incinerate the Toner Waste Bottle
Always refer to the recycling instructions for your region or marketplace for correct
disposal information and procedures.
Do Not Incinerate the Drum Cartridge
Always refer to the recycling instructions for your region or marketplace for correct
disposal information and procedures.
Learning About
Do Not Incinerate the Second Bias Transfer Roll
Always refer to the recycling instructions for your region or marketplace for correct
disposal information and procedures.
Flicker Label with 100 Amp Current
This symbol indicates usage only in premises that have a service current capacity
equal to or greater than 100 Amps per phase.
Ground, Common, or Earth Terminal
LAN
Local Area Network
USB
Universal Serial Bus
Keep Area Clear
Do not store any objects in this location.
Keep Area Clear
Do not store any objects in this location.
Xerox®Versant®4100 Press
User Documentation
9
Page 10
Learning About
Symbol Name and Definition (if required)
Keep Area Clear
Do not store any objects in this location.
Do Not Use Transparencies with a White Strip or Overhead Projector Sheets
with a White Strip
Do Not Use Open Envelopes
Do Not Use Folded, Creased, Curled, or Wrinkled Paper
Do Not Use Ink Jet Paper
Tray Guides Must Touch Media
Load Postcards in the Indicated Direction
Load Hole-punched Paper as Indicated
On
This symbol indicates the main power switch is in the ON position.
Off
10
This symbol indicates the main power switch is in the OFF position.
Xerox®Versant®4100 Press
User Documentation
Page 11
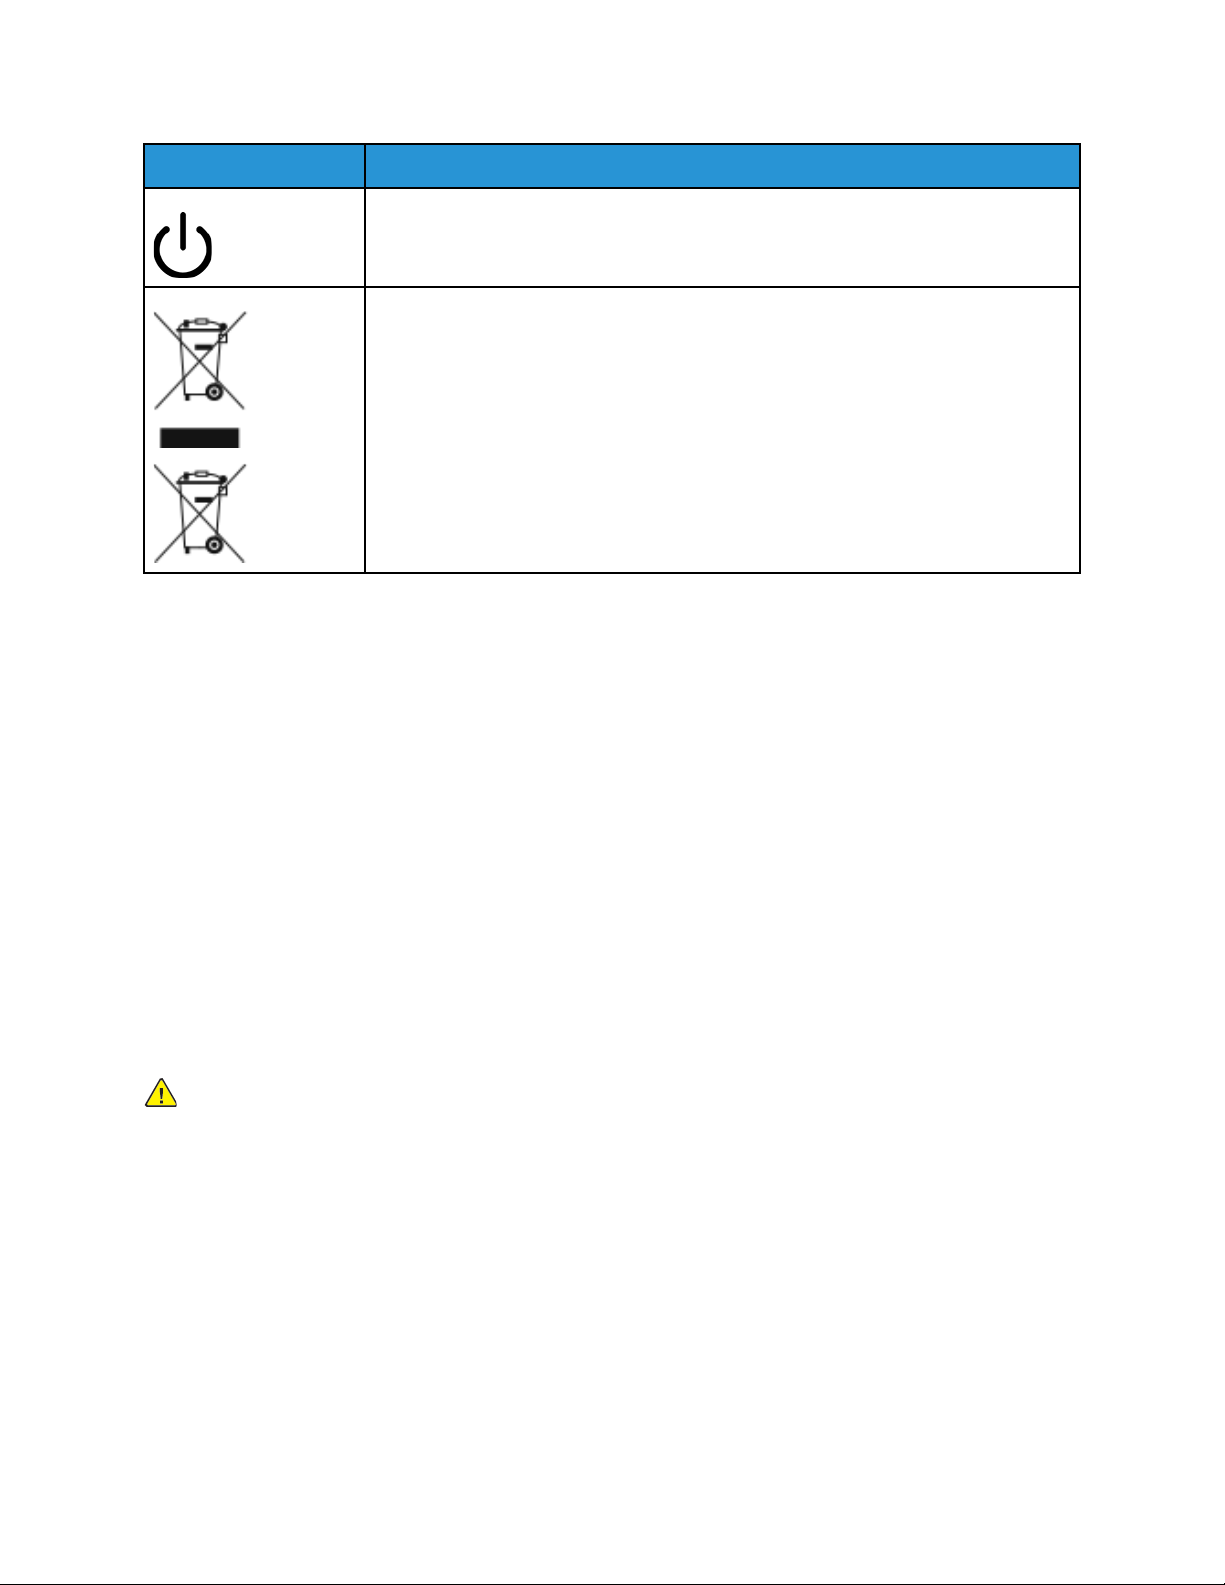
Symbol Name and Definition (if required)
Standby
This symbol indicates the secondary power switch is in the Standby position.
Do Not Dispose in Normal Household Waste Stream
• Application of this symbol is confirmation that you should not dispose of items,
such as Customer Replaceable Units (CRUs), in the normal household waste
stream. You must dispose of these items in compliance with agreed national
procedures.
• This symbol often accompanies batteries and indicates that used electrical and
electronic products and batteries should not be mixed with general household
waste.
• For more information about collection and recycling, please contact your local
municipality, your waste disposal service, or the point of sale where you
purchased the items.
NNoottiicceess aanndd SSaaffeettyy
Learning About
Carefully read the following instructions before operating your press. Refer to these instructions to
ensure the continued safe operation of your press.
Your Xerox
requirements include safety agency evaluation and certification, and compliance with
electromagnetic regulations and established environmental standards.
The safety and environment testing and performance of this product have been verified using Xerox
materials only.
Unauthorized alterations, which can include the addition of new functions or connection of external
devices, can affect the product certification. For more information, contact your Xerox representative.
®
press and supplies are designed and tested to meet strict safety requirements. Safety
EElleeccttrriiccaall SSaaffeettyy
GGeenneerraall GGuuiiddeelliinneess
WARNING: Read the following warnings.
• Do not push objects into slots or openings on the press. Touching a voltage point or shorting out a
part could result in fire or electric shock.
• Do not remove the covers or guards that are fastened with screws unless you are installing
optional equipment and are instructed to do so. Switch off the press when performing these
installations. Disconnect the power cord when removing covers and guards for installing optional
equipment. Except for user-installable options, there are no parts that you can maintain or service
behind these covers.
®
EEmmeerrggeennccyy PPoowweerr OOffff
The following are hazards to your safety:
Xerox
®
Versant®4100 Press
User Documentation
11
Page 12

Learning About
• The power cord is damaged or frayed.
• Liquid is spilled into the press.
• The press is exposed to water.
• The press emits smoke, or the surface is unusually hot.
• The press emits unusual noise or odors.
• The press causes a circuit breaker, fuse, or other safety device to activate.
If any of these conditions occur, do the following:
1. Turn off the printer immediately.
2. Disconnect the power cord from the electrical outlet.
3. Call an authorized service representative.
PPoowweerr CCaabbllee aanndd EElleeccttrriiccaall SSuuppppllyy
• Use the power cords that are supplied with your press.
• Do not remove or modify the power cord.
• The electrical outlet must be near the printer and must be easily accessible.
• Plug the power cable directly into a properly grounded electrical outlet. Ensure that each end of
the cable is connected securely. If you do not know if an outlet is grounded, ask an electrician to
check the outlet.
WARNING: To avoid risk of fire or electrical shock, do not use extension cords, power
strips, or power plugs. Always adhere to national and local building, fire, and electrical
codes regarding length of cord, conductor size, grounding, and protection.
• Do not use a ground adapter plug to connect the press to an electrical outlet that does not have a
ground connection terminal.
• The electrical supply for the press must meet the requirements stated on the data plate located
on the rear of the press. If necessary, consult your local electricity provider or a licensed
electrician.
• Do not place the press in an area where people can step on the power cable.
• Do not place objects on the power cable.
• Do not plug or unplug the power cable while the power switch is in the On position.
• If the power cable becomes frayed or worn, replace it.
• To avoid electrical shock and damage to the cable, grasp the plug when unplugging the power
cable.
DDiissccoonnnneecctt DDeevviiccee
The power cable is the disconnect device for this equipment. To remove all electrical power from the
machine, disconnect the power cable from the electrical outlet.
12
Xerox®Versant®4100 Press
User Documentation
Page 13

Learning About
LLaasseerr SSaaffeettyy
NNoorrtthh AAmmeerriiccaa LLaasseerr SSaaffeettyy
This product complies with safety standards and is certified as a Class 1 Laser product under the
Center for Devices and Radiological Health (CDRH) of the United States Food and Drug
Administration (FDA) implemented regulations for laser products. This product complies with FDA
performance standards for Laser products except for deviations pursuant to Laser Notice No. 50
dated June 24, 2007. These regulations apply to laser products marketed in the United States. The
label on the Production Press indicates compliance with CDRH regulations and must be attached to
laser products marketed in the United States. This product does not emit hazardous laser radiation.
Laser Warning: Use of controls or adjustments or performance of procedures other than those
specified herein may result in hazardous exposure of laser light.
Since radiation emitted inside this product is completely confined within the protective housing and
external covers, the laser beam cannot escape from the Production Press during any phase of the user
operation.
This product contains laser warning labels. These labels are intended for use by the Xerox Service
Representative and are placed on or near panels or shields that require special tools for removal. Do
not remove any of the panels. There are no operator serviceable areas in these covers.
EEuurrooppeeaann UUnniioonn ((EEUU)) LLaasseerr SSaaffeettyy
This product complies with IEC safety standard EN 60825-1: 2014.
The equipment complies with laser product performance standards set by governmental, national,
and international agencies as a Class 1 Laser Product. It does not emit hazardous radiation as the
beam is totally enclosed during all phases of customer operation and maintenance.
WARNING: Use of controls or adjustments or performance of procedures other than those
specified herein may result in hazardous radiation exposure.
If you need additional safety information about the product or Xerox supplied materials, you can
email request to EHS-Europe@xerox.com.
OOppeerraattiioonnaall SSaaffeettyy
Your Xerox equipment and supplies were designed and tested to meet strict safety requirements.
These include safety agency examination, approval, and compliance with established environmental
standards.
Your attention to the following safety guidelines will help ensure the continued safe operation of your
Press:
• Do not remove any trays when the Press is printing.
• Do not open the doors when the Press is printing.
• Keep hands, hair, neckties, and so on, away from the exit and feed rollers.
• Covers, which require tools for removal, protect the hazard areas within the Press. Do not remove
the protective covers.
®
Xerox
Versant®4100 Press
User Documentation
13
Page 14

Learning About
• Do not attempt to remove paper that is jammed deeply inside the Press. Switch off the Press
promptly and contact your local Xerox representative.
• To avoid a tip hazard, do not push or move the device with all of the paper trays extended.
• Do not place the Press in locations susceptible to vibrations.
• For optimum performance, use the Press at the Altitude specified in Environmental Specifications
section of the User Documentation.
• Use the materials and supplies specifically designed for your Press. The use of unsuitable materials
may result in poor performance of the Press and possibly a hazardous situation.
• Follow all warnings and instructions that are marked on or supplied with the Press.
• Place the Press in a room that provides adequate space for ventilation and servicing.
• Place the Press on a level, solid surface, not on a thick pile carpet, that has adequate strength to
support the weight of the Press.
• Do not attempt to move the Press. A leveling device that was lowered when your Press was
installed may damage the carpet or floor.
• Do not set up the Press near a heat source.
• Do not set up the Press in direct sunlight.
• Do not store or operate the Press in an extremely hot, cold, or humid environment.
• Do not set up the Press in line with the cold air flow from an air conditioning system.
• Do not place containers of coffee or other liquid on the Press.
• Do not block or cover the slots and openings on the Press.
• Do not attempt to override any electrical or mechanical interlock devices.
Hot Warning: Be careful when working in areas identified with this warning symbol. These
areas may be very hot and should not be touched.
If you need any additional safety information concerning the Press or materials, contact your Xerox
representative.
OOzzoonnee IInnffoorrmmaattiioonn
This product produces ozone during normal operation. The ozone is heavier than air, and the quantity
is dependent on print volume. Install the system in a well-ventilated room.
For more information, refer to Facts about ozone and Fact about ventilation at www.xerox.com/EHS or
www.xerox.com/EHS-eu.
MMaaiinntteennaannccee IInnffoorrmmaattiioonn
Do not carry out any maintenance on this product which is not described in the customer
documentation.
WARNING: Do not use aerosol cleaners. Aerosol cleaners can be explosive or flammable when
used on electromechanical equipment.
Use supplies and cleaning materials only as directed.
Do not remove the covers or guards that are fastened with screws. Customer service items are not
14
Xerox®Versant®4100 Press
User Documentation
Page 15

Learning About
located behind these covers.
Note: Your Xerox Production Press is equipped with an power saving device to conserve power
when the Production Press is not in use. The Production Press can be left on continuously.
Hot Warning: The metallic surfaces in the fuser area are hot. Use caution when you remove
paper jams from this area and avoid touching any metallic surfaces.
VVaaccuuuumm CClleeaanneerr UUssee ffoorr DDrryy IInnkk//TToonneerr SSppiillllss
Use a broom or a wet cloth to wipe off spilled dry ink/toner. Sweep slowly to minimize generation of
dust during clean up. Avoid using a vacuum. If a vacuum must be used, the unit should be designed
for combustible dusts (for example, explosion rated motor and non-conductive hose).
CCoonnssuummaabbllee IInnffoorrmmaattiioonn
WARNING: Use of non-Xerox supplies is not recommended. The Xerox Warranty, Service
Agreement, and Total Satisfaction Guarantee do not cover damage, malfunction, or
degradation of performance caused by use of non-Xerox supplies, or the use of Xerox supplies
not specified for this Production Press. The Total Satisfaction Guarantee is available in the
United States and Canada. Coverage can vary outside these areas. For more details, contact
your Xerox representative.
WARNING: When handling cartridges such as ink or fuser, avoid skin or eye contact. Eye
contact can cause irritation and inflammation. Do not attempt to disassemble the cartridge.
This can increase the risk of skin or eye contact.
Store all consumables in accordance with the instructions given on the package or container.
Keep all consumables away from the reach of children.
Never throw dry ink/toner, print cartridges, or dry ink/toner containers into an open flame.
For information on Xerox
• For the United States or Canada: www.xerox.com/recycling
• For Europe and other markets: www.xerox.com/recycling-eu
®
supplies recycling programs, go to:
BBaatttteerryy SSaaffeettyy
One or more circuit boards in this printer contain a lithium battery.
Do not attempt to repair or replace the lithium battery. If there is a problem with the battery, contact
an authorized service representative to correct the problem.
The lithium battery in this printer contains Perchlorate material. For information about the special
handling procedures associated with Perchlorate material, refer to www.dtsc.ca.gov/hazardouswaste/
perchlorate.
WARNING: If the battery on a circuit board is installed incorrectly, there is a risk of explosion.
Xerox
®
Versant®4100 Press
User Documentation
15
Page 16

Learning About
EEnnvviirroonnmmeennttaall,, HHeeaalltthh,, aanndd SSaaffeettyy CCoonnttaacctt
IInnffoorrmmaattiioonn
For more information on Environment, Health, and Safety in relation to this Xerox®product and
supplies, contact the following:
• United States and Canada: 1-800-ASK-XEROX (1-800-275-9376)
• Email request to Europe: EHS-Europe@xerox.com.
• Web address: www.xerox.com/environment or www.xerox.com/environment_europe.
16
Xerox®Versant®4100 Press
User Documentation
Page 17
Learning About
Press Overview
The Xerox®Versant®4100 Press is a full color or black and white, auto-duplex press that operates at a
speed of 100 prints per minute, when printing on 8.5 x 11 inch or A4 paper.
The system configuration consists of the Advanced Oversized High Capacity Feeder (Trays 6 and 7),
the print engine with internal feeding trays (Trays 1-3), and an embedded Control Panel and touch
screen (the user interface). A print server is also part of the configuration, which includes the
PredictPrint Media Manager application used for stock and tray setup, and print job submission. An
Offset Catch Tray can be connected to the press or other optional inline finishing devices are
available.
Note: With the exception of the Offset Catch Tray, all other finishing devices require the
Interface Decurler Module.
The press includes the 4 dry ink/toner and drum cartridges, transfer belt and fuser or ROS system, Full
Width Array calibration feature, decurler, registration and paper path, and paper inverter.
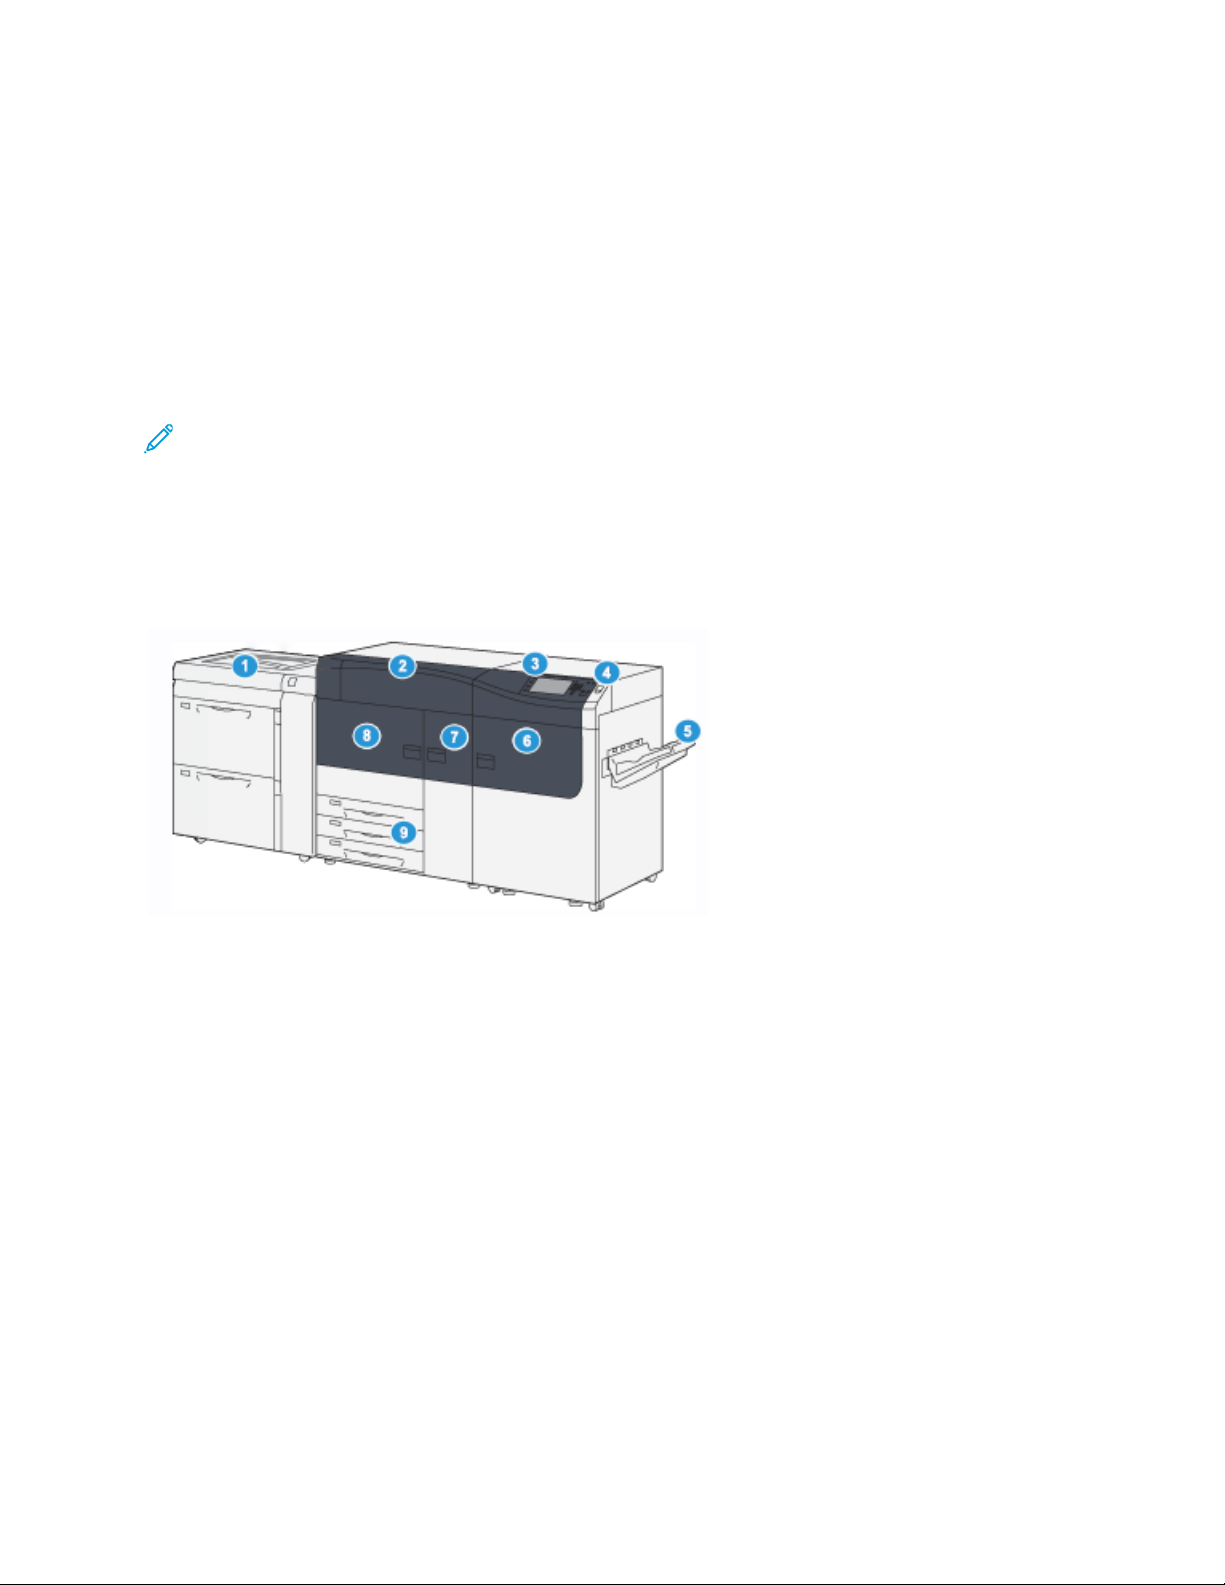
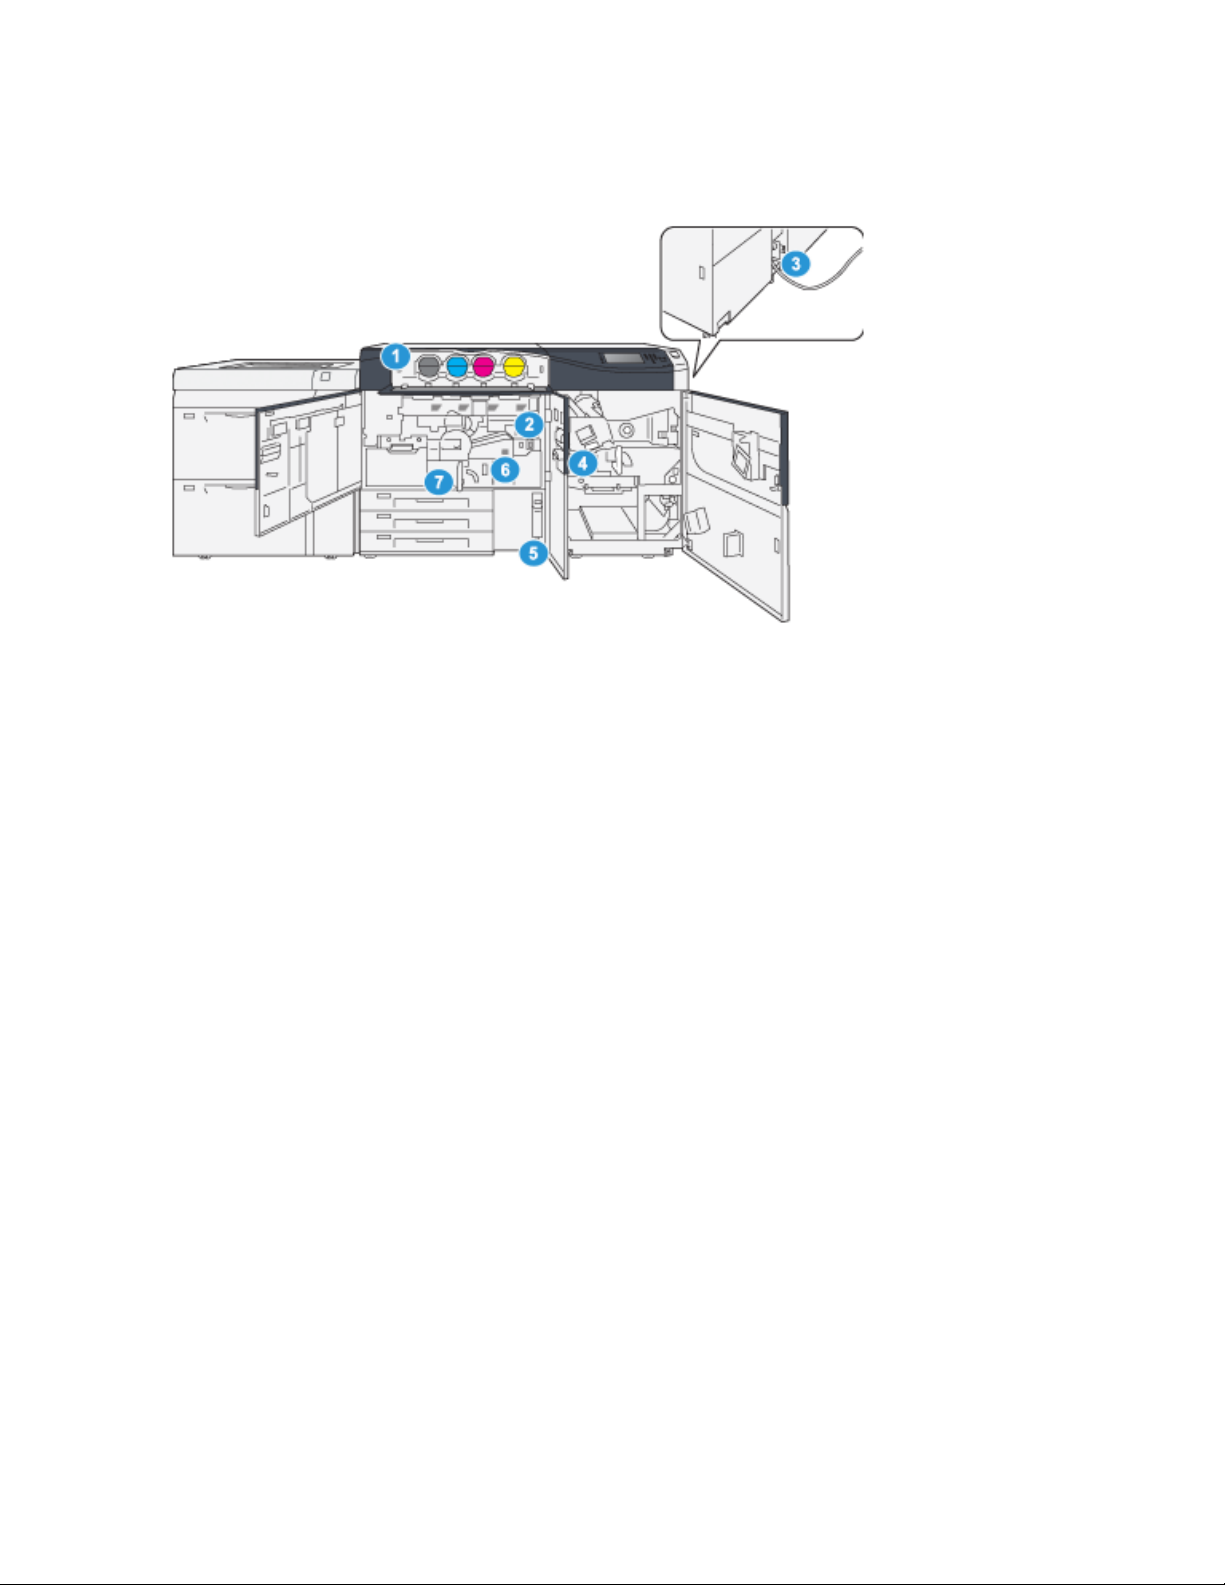
PPrreessss CCoommppoonneennttss
1. Advanced Oversized High Capacity Feeder
(Trays 6 and 7), with Tray 5 (Bypass)
2. Dry Ink/Toner Cover
3. Control Panel and Touch Screen
4. Power Button
5. Offset Catch Tray (OCT)
6. Right Front Door
7. Center Front Door
8. Left Front Door
9. Paper Trays 1, 2, and 3
®
Xerox
Versant®4100 Press
User Documentation
17
Page 18
Learning About
IInntteerrnnaall CCoommppoonneennttss
1. Dry Ink/Toner Cartridges
2. Main Power Switch
3. Circuit Breaker Switch (on rear of press)
4. Paper Cooling Module
5. Dry Ink/Toner Waste Bottle
6. Fuser Module
7. Transfer Module
18
Xerox®Versant®4100 Press
User Documentation
Page 19

Learning About
LLooccaattiinngg tthhee PPrreessss SSeerriiaall NNuummbbeerr
The press serial number can be accessed from the User Interface (UI) or by locating the serial number
plate on the inside frame of the first feeder tray (Tray 1).
1. Press the Machine Status button on the UI.
2. From the Machine Status screen, ensure that the Machine Information tab is displayed.
The press serial number is displayed under General Information.
3. If there is a loss of power and it is not possible to access the Machine Status screen, the press
serial number can also be found on the inside frame of the press near paper Tray 1:
a. At the press, fully open paper Tray 1.
b. At the left of the feeder tray, on the press frame, locate the plate with the serial number
(SER#).
AAddvvaanncceedd OOvveerrssiizzeedd HHiigghh CCaappaacciittyy FFeeeeddeerr ((TTrraayyss 66 aanndd 77))
Tip: The Advanced Oversized High Capacity Feeder is part of the standard press configuration.
The Advanced Oversized High Capacity Feeder contains Trays 6 and 7. These trays feed a variety of
stock sizes, including standard, heavyweight, and large-sized stocks up to 330 x 488 mm (13 x 19.2
in.) in size and weighing between 52 g/m
uncoated stock.
Note: For Versant®4100 Press, the Advanced Oversized High Capacity Feeder (Trays 6 and 7)
includes the Tray 5 (Bypass). It is a part of the standard press configuration.
The following illustration show the Trays 6 and 7 with the Tray 5 (Bypass).
2
and 400 g/m2. Each tray holds 2,000 sheets of coated and
Xerox
®
Versant®4100 Press
User Documentation
19
Page 20
Learning About
Trays 6 and 7 with Tray 5
Trays 6 and 7 Components
1. Paper Jam and Error Indicator Panel
2. Paper Level Indicators
3. Feeder Front Cover
20
Xerox®Versant®4100 Press
User Documentation
4. Tray 6
5. Tray 7
6. Circuit Breaker Switch
Page 21
Learning About
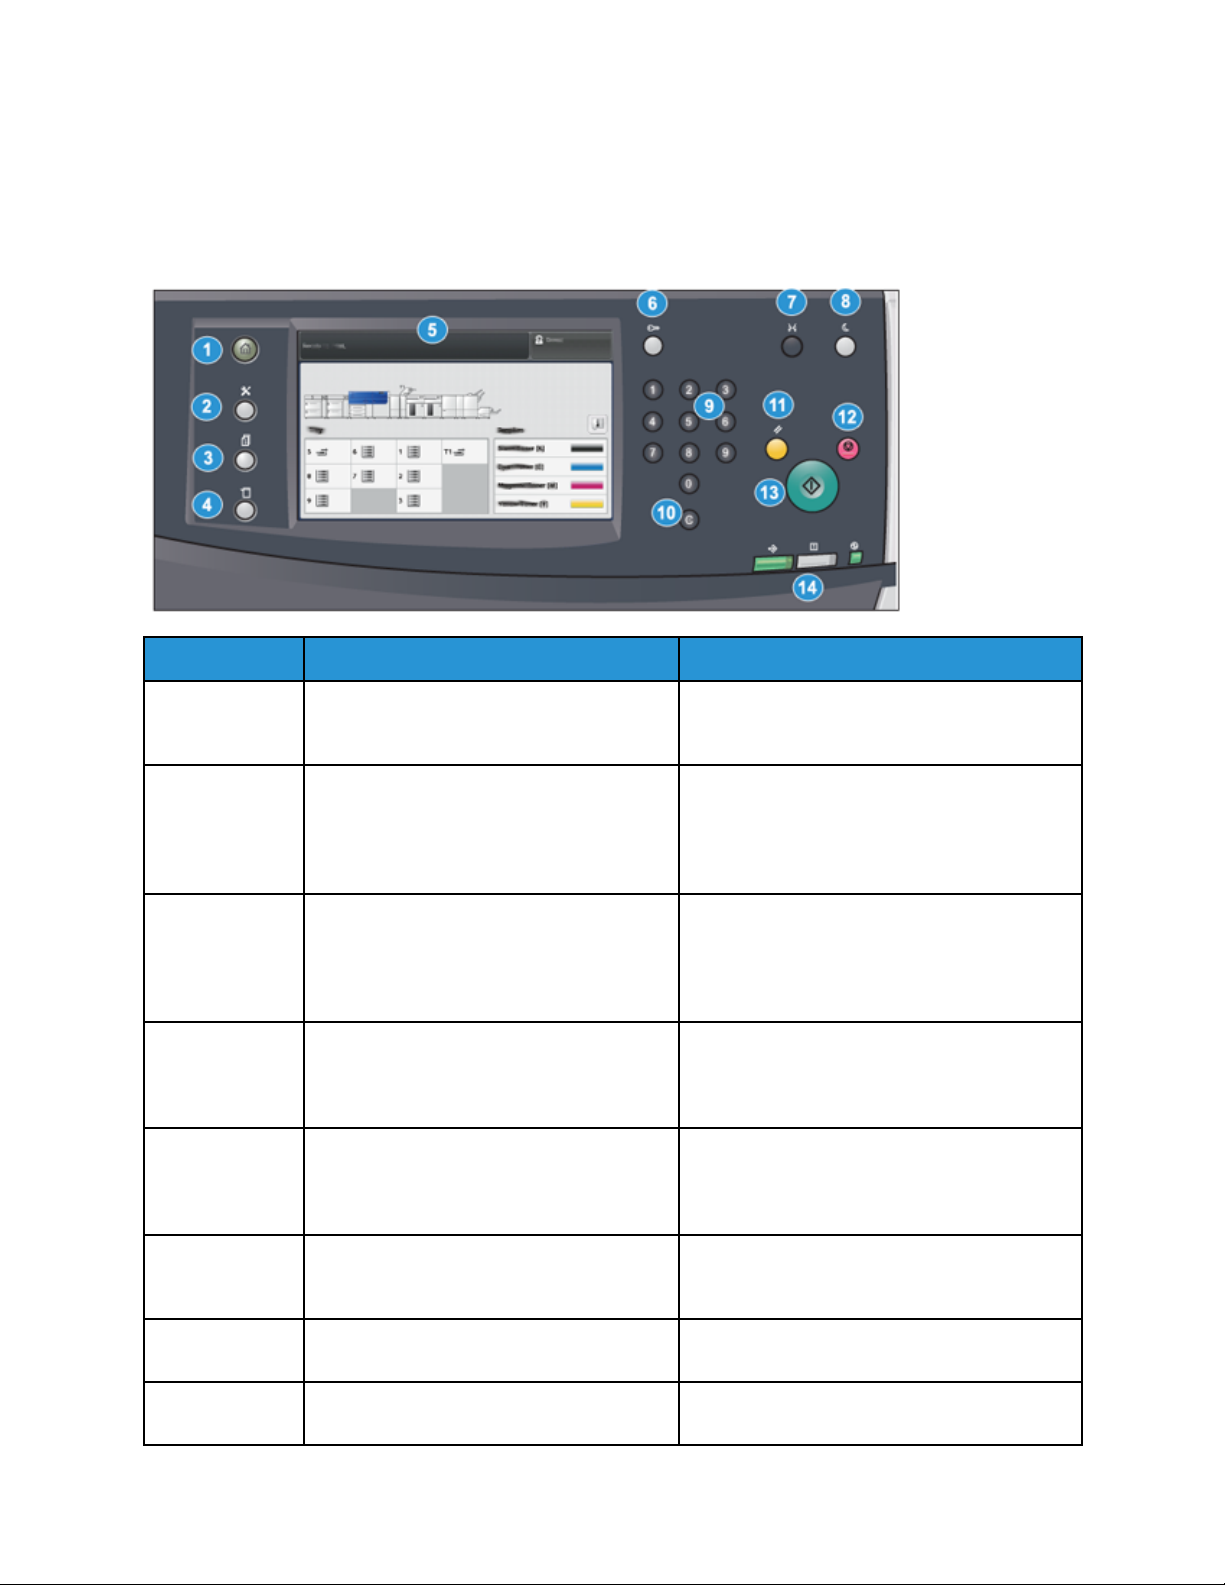
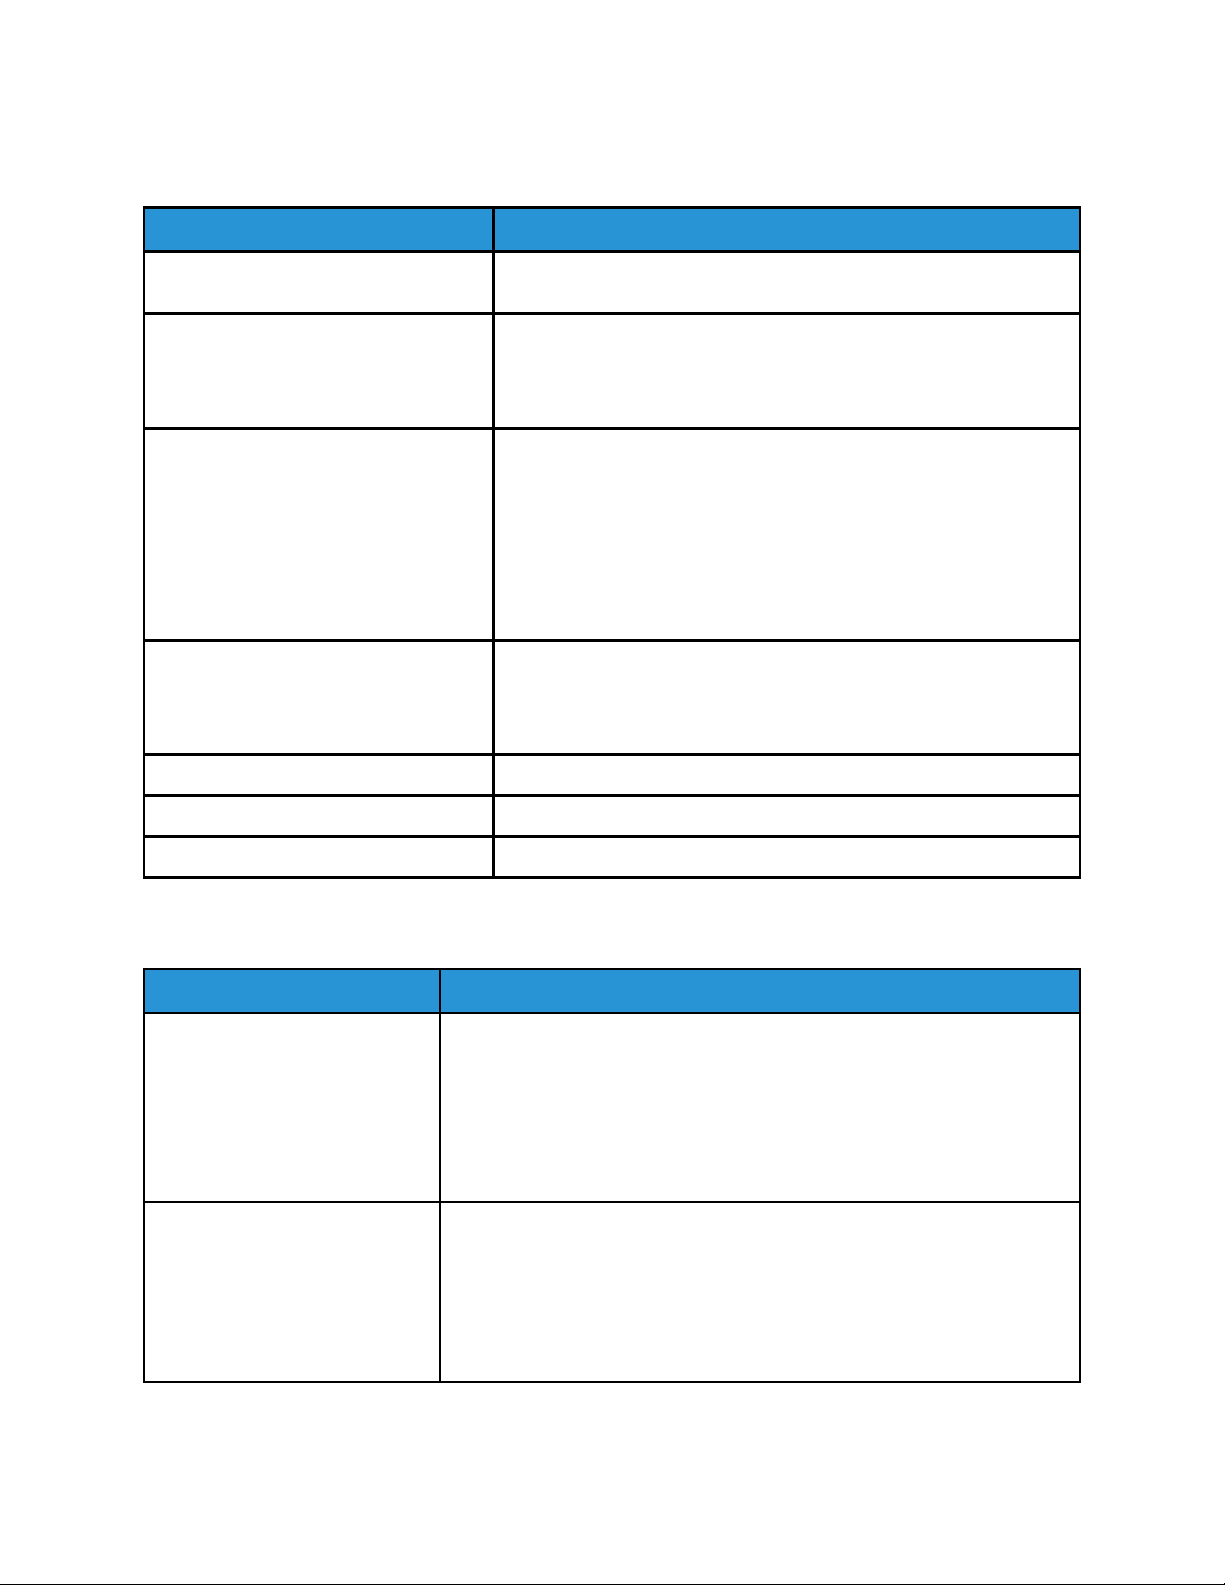
CCoonnttrrooll PPaanneell
The embedded Control Panel on the press includes an LCD touch screen, keypad and feature buttons.
The touch screen displays instructions, faults, and informational messages. Select the Control Panel
buttons to log in, perform job setup functions, and view job, press, and supply statuses.
Item Number Name
1 Home button Displays the main menu. Provides access to
2 Tools button Displays the Tools mode screen. For the
3 Job Status button Use to check the progress of active jobs and
4 Machine Status button Use to check the press configuration, the
5 Touch Screen Directly touch the screen to select and set
Description
view the supplies and trays available on the
press and the status of consumables.
operator, select the Tools icon to view billing
information and to perform press calibration
such as Full Width Array color uniformity
adjustments.
detailed information about completed jobs or
pending jobs. This area also allows you to
delete a job (cancel printing) and to pause
jobs.
software version, the press billing meter and
counter information, and to access and print
job history or error reports.
features. Displays instructional and
informational messages, fault clearance
procedures and general press information.
6 Log In / Out button Use to log in and out of Administrator mode
or Authentication mode with user ID and
password.
7 Language button Use to select a different language for the
touch screen options.
8 Power Saver button Use this button if the press has been inactive
and the touch screen is dark (system is in
Xerox®Versant®4100 Press
User Documentation
21
Page 22
Learning About
Item Number Name
9 Numeric Keypad Use to enter alphanumeric characters. The
10 Cancel Entry button Use this button to cancel the previous entry
11 Clear All button Use this button to return all selections to the
12 Stop button Press to stop and pause the print job in
13 Start button Press to start and print a selected report. Also
14 Press Status Lights The three indicator lights that identify: data
Description
Power Saver mode). This button manually
exits the system from Power Saver mode; it
does not place the press in Energy Save
mode.
‘C’ Cancel Entry cancels the previous entry
made on the numeric keypad.
made on the numeric keypad.
same state as when the press was powered
on. Press once to clear a current entry. Press
twice to return to default settings.
progress.
used by the Customer Service Engineer
during diagnostic routine procedures.
transmission in progress, the press is
experiencing an error, and main power is on.
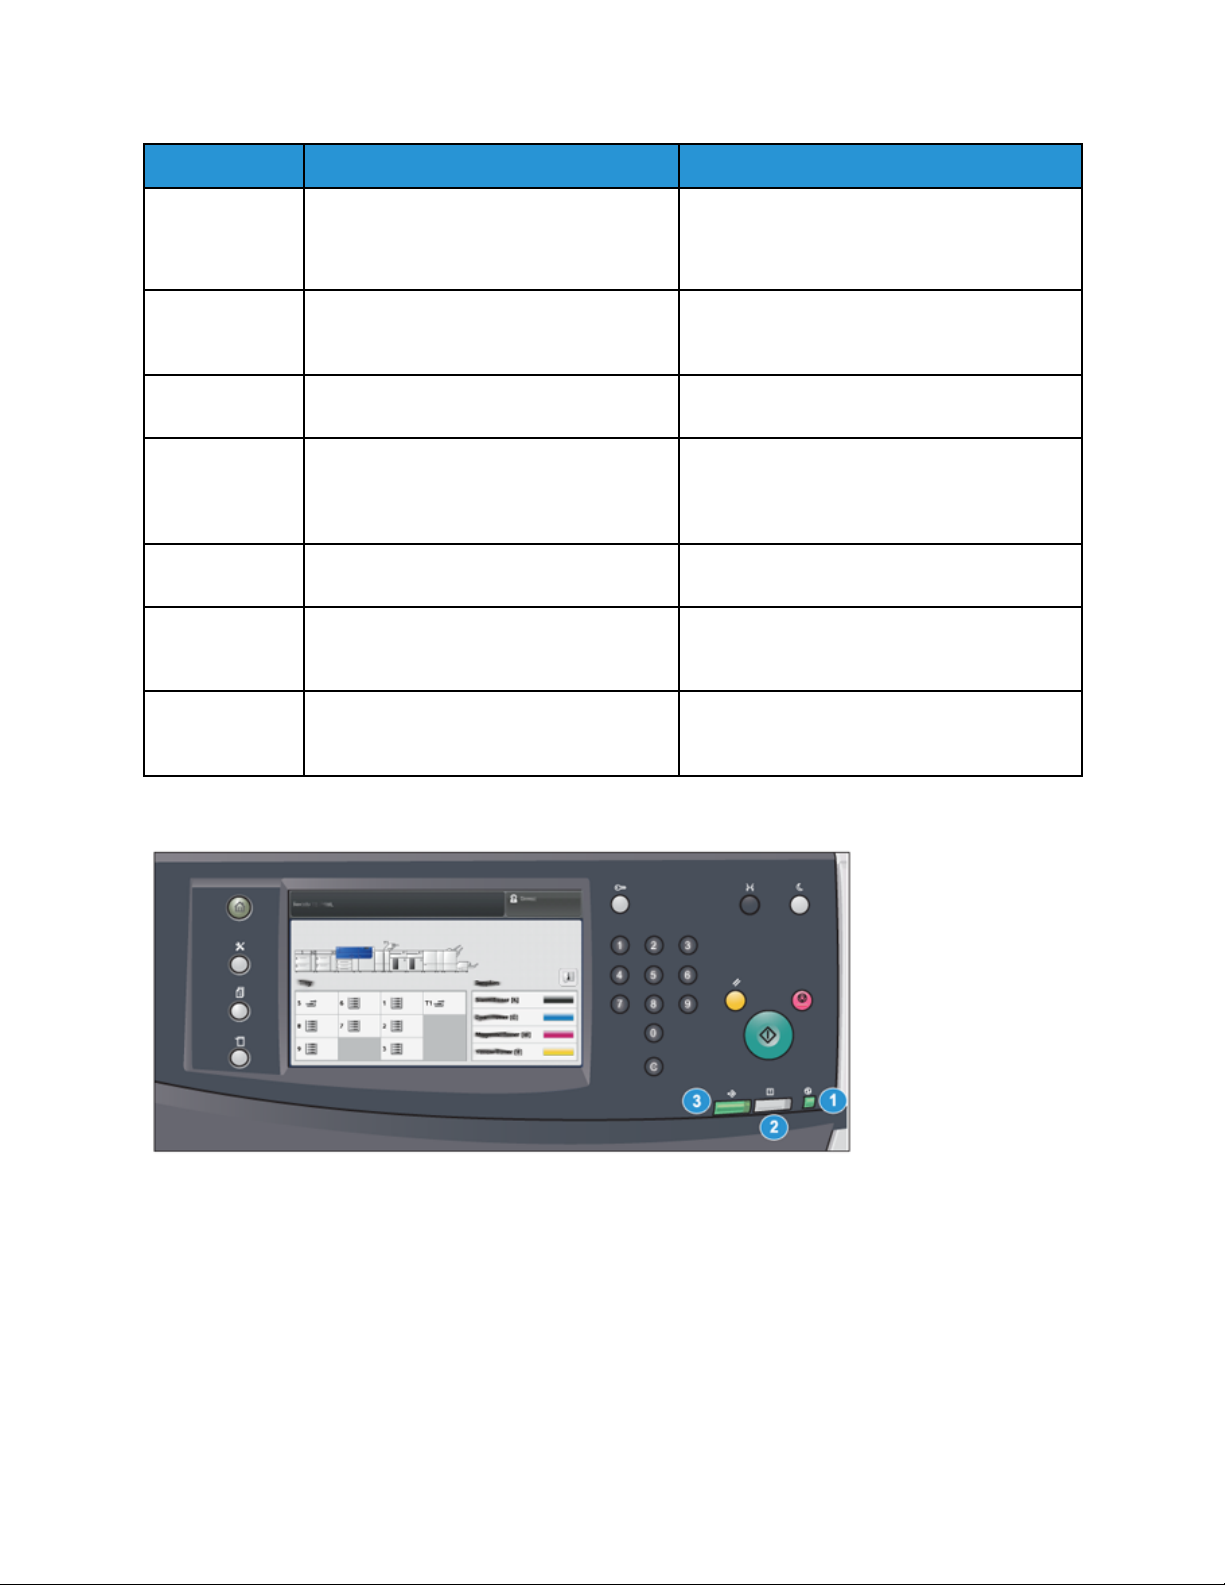
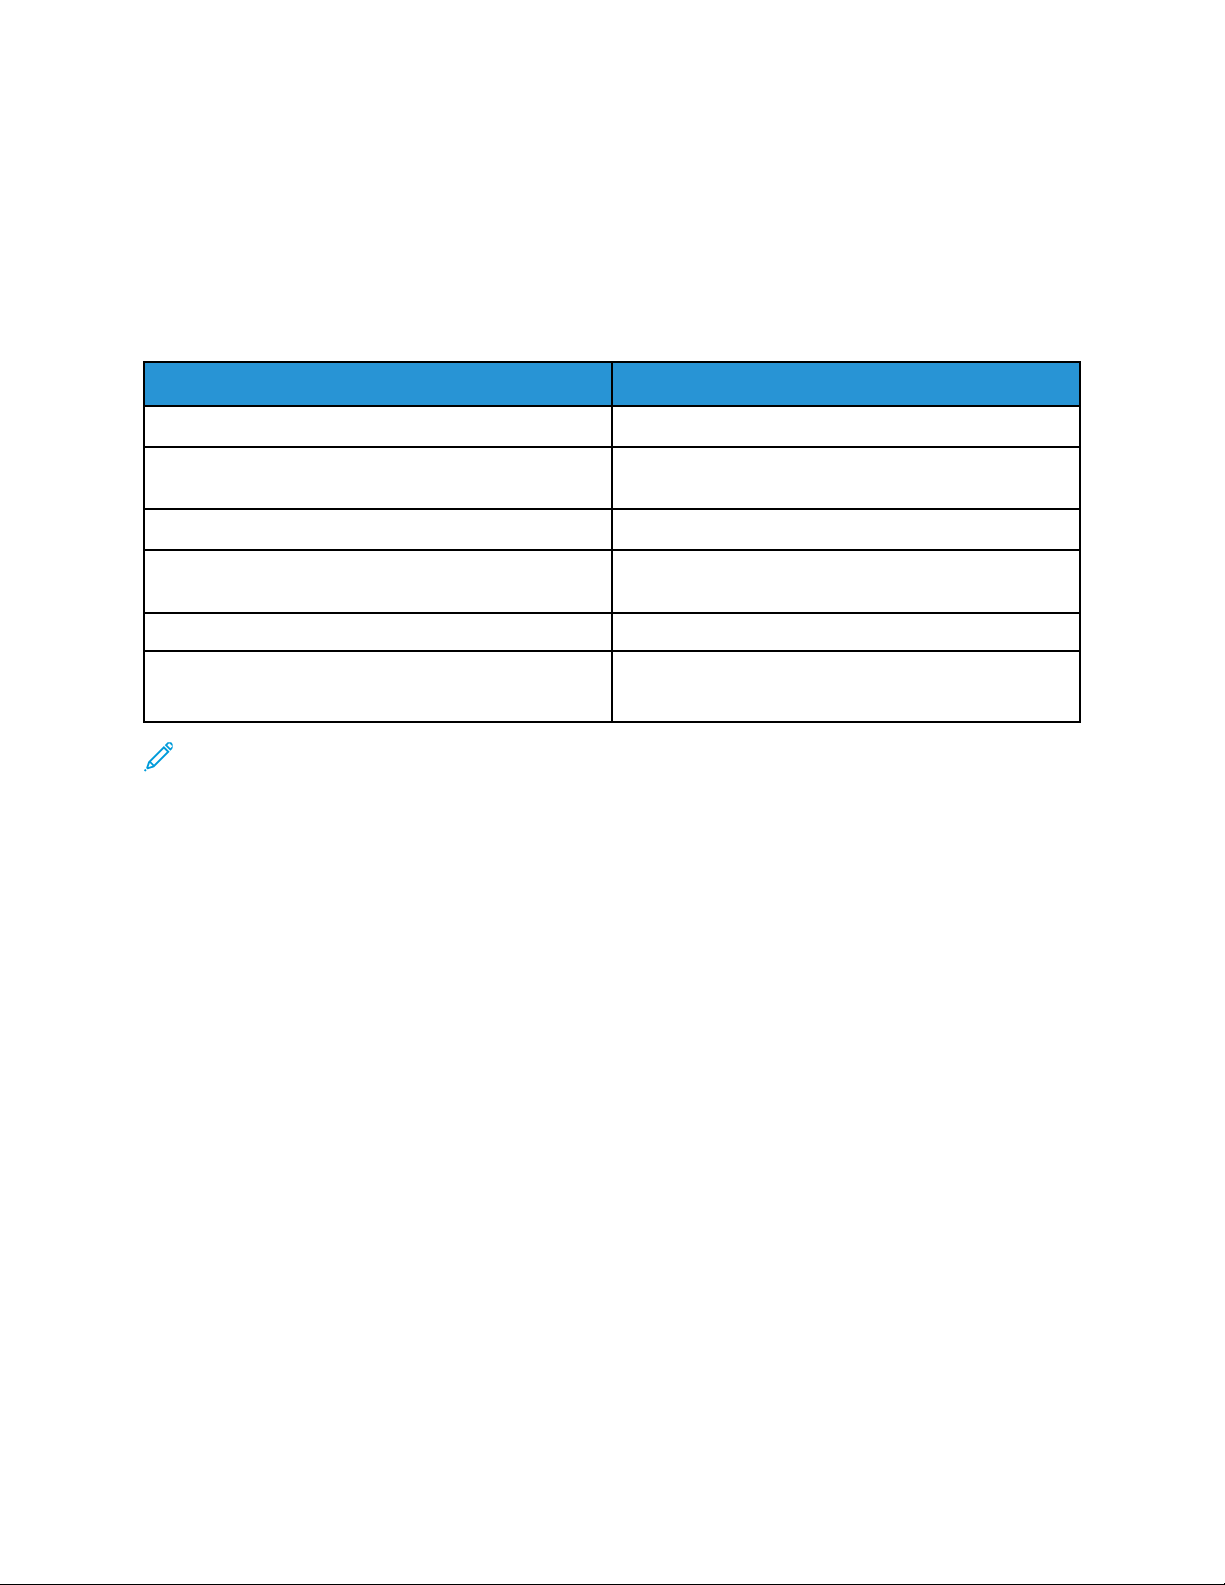
Status Lights
There are three status lights on the press directly below the Control Panel. From right to left, they are:
22
Xerox®Versant®4100 Press
User Documentation
Page 23
Item
Number Name
1 Main Power Status LED This is a steady green light indicating
2 Error Status LED This is a steady orange light indicating
3 Data Transmission Status LED This is a flashing green light indicating
Description
the main power to the system is on.
the press is experiencing faults and
errors.
that the transmission of an incoming
print job is in process.
Login
Learning About
There are two login levels:
• Guest or Operator: This is the default login user. You are automatically logged in as Guest.
• Administrator: This login level is required to customize the system and network defaults for your
press and to customize particular print jobs by setting or changing parameters for certain features.
Press the Guest button or the Log in button on the Control Panel to access the Login screen.
Note: Refer to the System Administrator Guide for more information on the Administrator
features.
Language
Note: The number of languages available on your system depends on what was installed
during the initial installation process.
Selecting a particular Language button immediately changes the language. No confirmation is
required.
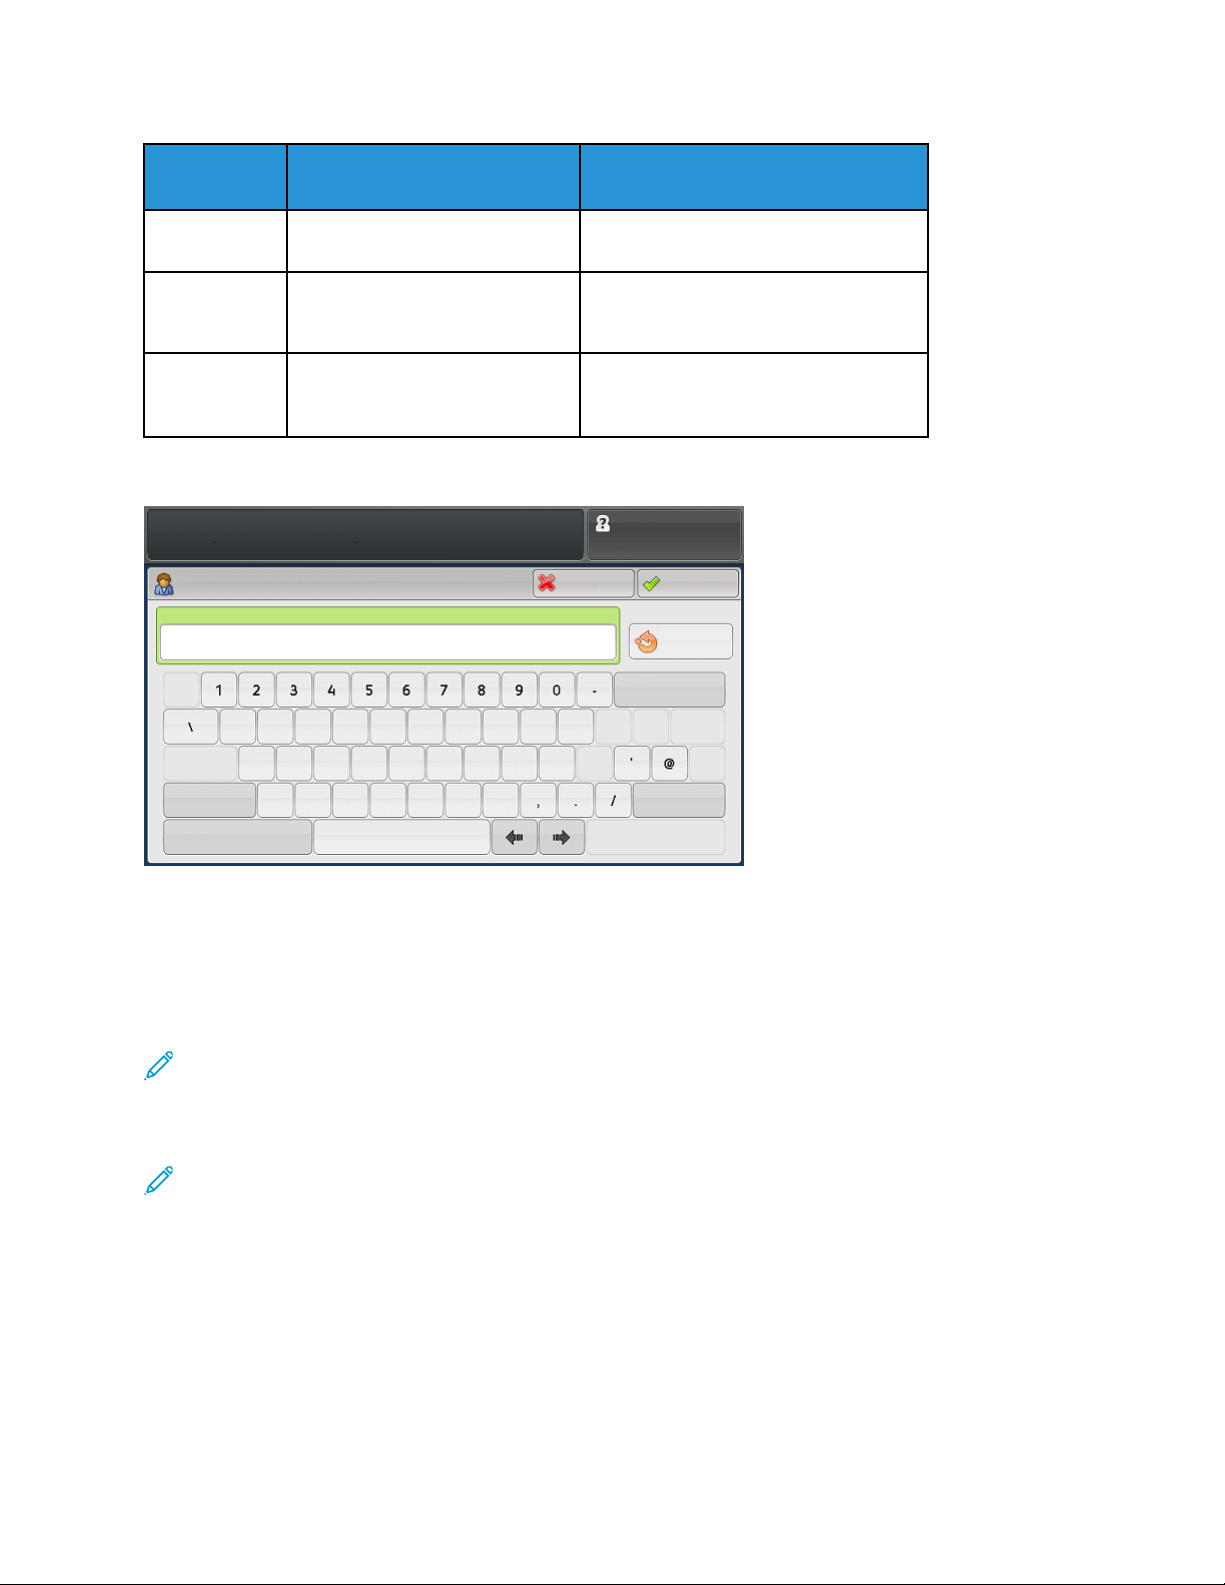
Changing the Language
1. Press the Language button on the press Control Panel.
The Language window displays on the touch screen.
®
Xerox
Versant®4100 Press
User Documentation
23
Page 24
Learning About
2. Select the desired language from the list and select Save.
The language on the screen changes to the new language and closes the Language window.
3. Select the Cancel button to return to the main screen.
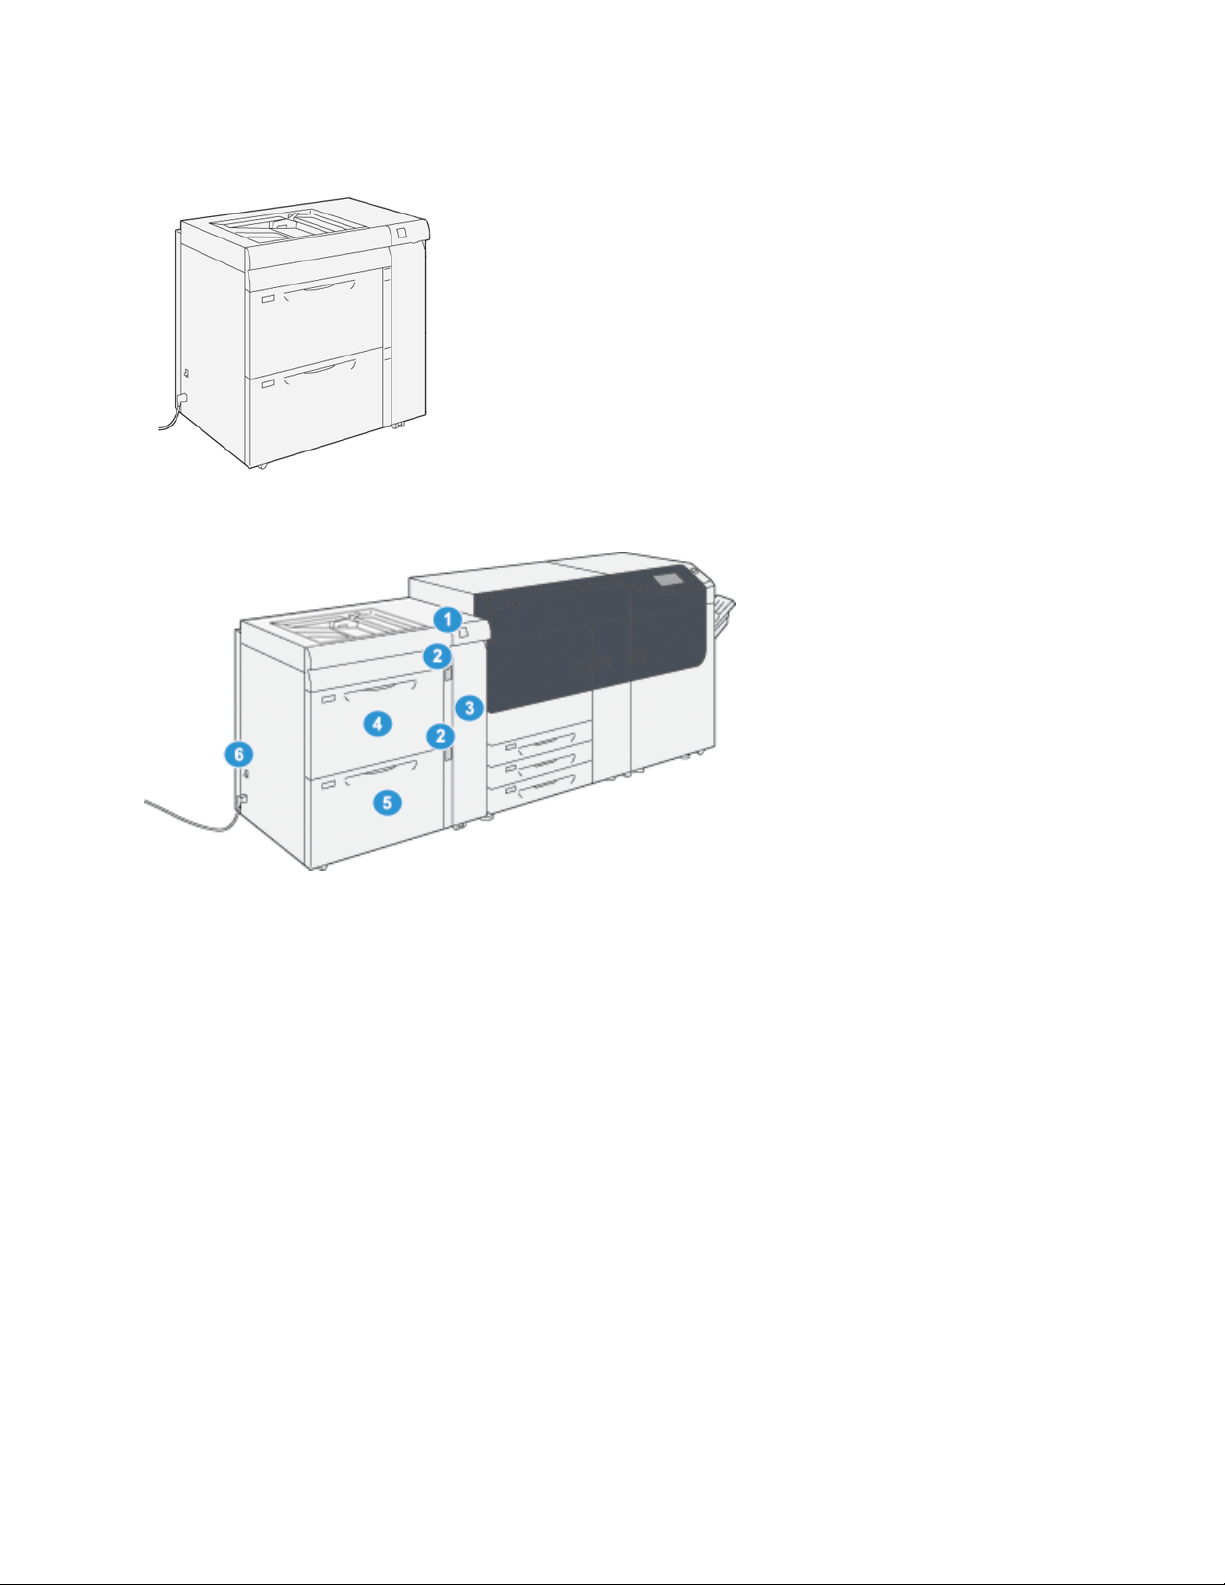
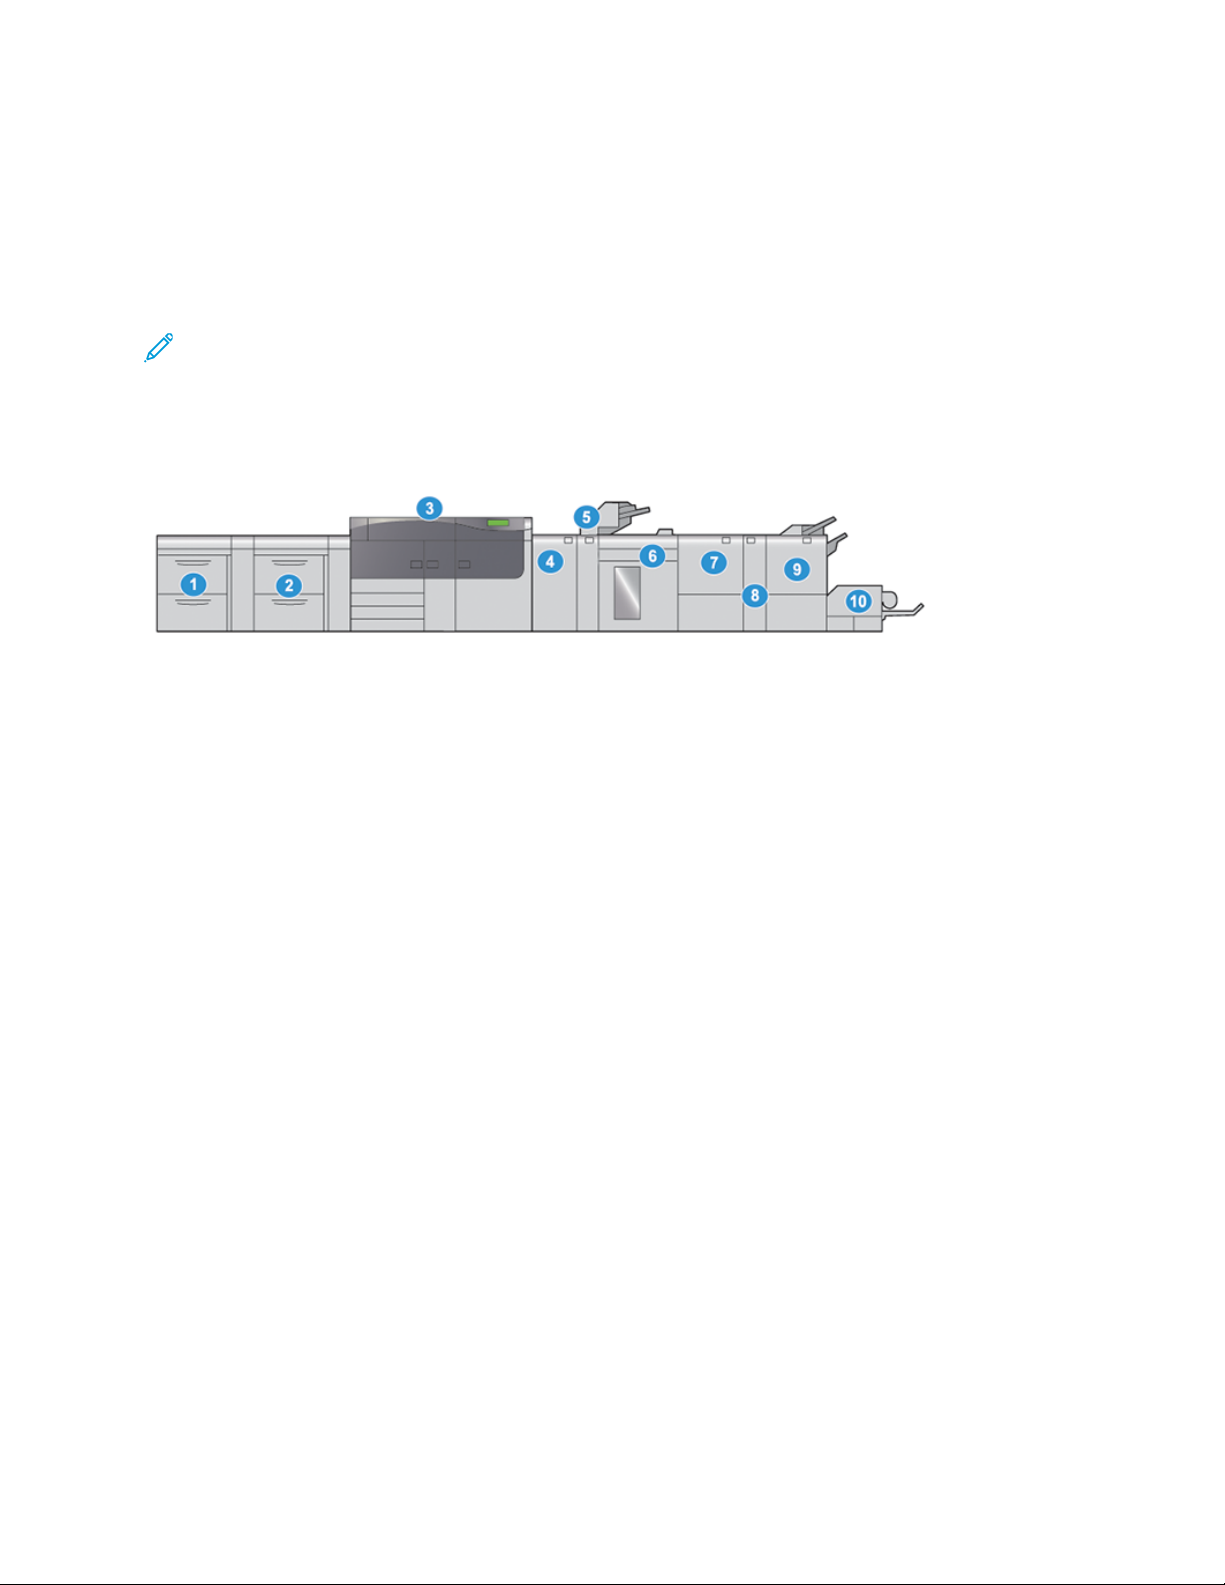
FFuullll SSyysstteemm CCoonnffiigguurraattiioonn
Note: Full system configurations will vary depending on which optional devices are attached to
the press. For detailed information about an optional device, refer to the appropriate device
chapter in this guide.
The following illustration shows an example of a full system configuration with optional devices
attached. This is only one example.
1. Dual Advanced Oversized High Capacity
Feeder (Trays 8 and 9)*
2. Advanced Oversized High Capacity Feeder
(Trays 6 and 7), with Tray 5 (Bypass)
3. Press
4. Interface Decurler Module (IDM)*
5. Inserter*
* Numbers 1 and 4-10 indicate optional devices.
6. High Capacity Stacker*
7. Crease and Two-sided Trimmer*
8. C/Z Folder*
9. Production Ready (PR) Booklet Maker
Finisher*
10. SquareFold
®
Trimmer*
24
Xerox®Versant®4100 Press
User Documentation
Page 25

Learning About
PredictPrint Media Manager Overview
PredictPrint Media Manager is a hardware and software solution for Xerox®Production Presses that
provides simple, step-by-step guidance through setup routines for printing optimization. With the
Stock Wizard feature of PredictPrint Media Manager, and with the use of a handheld barcode
scanner, you can do the following:
• Program the paper trays with specific stock properties for a job
• Perform print engine adjustments to optimize print performance for the stock
• Complete Calibration and Profiling for the stock to maximize image quality and color output
For Versant Presses, the PredictPrint Media Manager application is on the EX or EX-P Print Server,
powered by Fiery
application manages the stocks that the press uses. The PredictPrint Media Manager application
connects to the PredictPrint Cloud server when a barcode is scanned, and retrieves all of the stock
properties and recommended setup routines.
®
. With the help of PredictPrint Cloud Server, the PredictPrint Media Manager
1. Main Menu
2. Login (for Administrator access)
3. Trays
4. Profiles
For more information on PredictPrint Media Manager, refer to PredictPrint Media Manager.
5. Stock Library
6. Stock Wizard
7. Display screen
Xerox
®
Versant®4100 Press
User Documentation
25
Page 26

Learning About
Print Server Overview
The Production Press is configured with a digital print server, the Xerox®EX or EX-P Print Server,
Powered by Fiery
®
.
One of the following print servers can be used with your press:
• Xerox
®
EX 4100 Print Server, Powered by Fiery
• Xerox®EX-P 4100 Print Server, Powered by Fiery
®
®
The print server accepts, processes, and manages document files for job submission to the press.
The PredictPrint Media Manager application is installed on the print server. For information on setting
up stocks and custom profiles, and paper trays that the press uses, refer to PredictPrint Media
Manager.
Note: For detailed information on your specific print server, refer to the customer
documentation that was delivered with it.
26
Xerox®Versant®4100 Press
User Documentation
Page 27
Specifications
Learning About
Feature
Rated Speed 100 pages per minute of Letter (8.5 x 11 in.) or A4 paper size (full
Print Modes Two print modes are supported and are specified at the print
Maximum Printable Area
Printing Resolution
Paper Size Ranges For information, refer to Paper Size Ranges.
Description
color or black only)
server:
• 4 Color Mode: Cyan, Magenta, Yellow, Black (CMYK)
• Black and White Mode (Grayscale)
• Default Border: 4 mm on the leading edge and 2 mm on the
remaining sides
• Print Image Quality Assurance Area: 317 mm x 482 mm (12.48
x 18.98 in.)
• For Trays 1, 2 or 3: 323 x 482 mm (12.72 x 18.98 in.)
• Tray 5 (Bypass): 326 x 482 mm (12.83 x 18.98 in.)
• Advanced High Capacity Feeder (Trays 6 and 7): 326 x 482 mm
(12.83 x 18.98 in.)
• Print Engine Imaging Resolution: 2400 x 2400 dots-per-inch
(dpi)
• Print Server Raster-Image-Processing (RIP) Resolution (print
server to print engine): 1200 x 1200 dpi
Paper Tray Information For information, refer to Paper Tray Information.
Productivity Information For information, refer to Press Productivity Information.
PPeerrffoorrmmaannccee SSppeecciiffiiccaattiioonnss
Feature
Press Warmup Time The press warmup times vary depending on the current state or mode of
Time of First Print Out of Press This is the minimum time from when the press receives a job from the
Description
the press. Warmup times are listed as follows:
• From a cold start (power on or power saver mode), less than 5 minutes
• From Sleep Mode or Power Saver, less than 5 minutes
• From Standby Mode, less than 1 minute
• When switching print modes (such as from black only to full color),
approximately 2 minutes
print server to the time when the trail edge of the first print passes
through the press exit sensor.
• From a cold start (power on or power saver), the system takes less
than 5 minutes to start printing
• From standby mode, the system usually takes less than 1 minute to
the start printing
Xerox®Versant®4100 Press
User Documentation
27
Page 28
Learning About
EEnnvviirroonnmmeennttaall SSppeecciiffiiccaattiioonnss
The press enters the Power Saver mode after 15 minutes of inactivity. The factory default time of 15
minutes can be changed when you are logged in as the administrator. For more information, refer to
the System Administrator Guide.
For the press system to operate, the temperature and relative humidity of the room where the press is
located needs to be within the minimum and maximum allowable temperature and relative humidity
limits.
Operating Environment
Required Temperature Range 10–32° C (50–90° F)
Ambient temperature for optimal image quality and
paper handling performance
Required Relative Humidity Range 15%–85% Relative Humidity (RH)
Relative humidity for optimal image quality and
paper handling performance
Altitude (above sea level) 0–2500 meters (0–8200 feet)
Sound Pressure Levels
Versant 4100 Press
20–24° C (68–76° F)
45% RH
• Running: 65 dBA
• Standby: 40.8 dBA
Note: The press can operate outside of this range, but the performance cannot be guaranteed.
28
Xerox®Versant®4100 Press
User Documentation
Page 29

Learning About
Getting Help
HHeellpp oonn tthhee XXeerrooxx WWeebbssiittee
For technical support, Xerox supplies, customer documentation, and answers to frequently-asked
questions, go to www.xerox.com. Find the latest documentation and online support under Customer
Support→All Support and Drivers. Use the Contact Us link for specific contact information and
telephone numbers in your area.
Note: Periodically check the website for the latest information on your press.
It is helpful to know your press serial number before calling for support. The press serial number is
shown on the Machine Information tab: Machine Status→Machine Information.
PPrriinntt SSeerrvveerr DDooccuummeennttaattiioonn
The EX or EX-P Print Server Help menu on the Command WorkStation window is designed to provide
information on specific workflows when using the Command WorkStation. Additional user
documentation supplied by EFI Fiery is available from www.xerox.com in the Support and Drivers link
for your press.
MMoorree IInnffoorrmmaattiioonn
Refer to the following sources for more information about your press and its capabilities.
Resource Location
Other documentation for your printer Print Server Documentation: For more information, refer to the
documentation, such as USB, that shipped with the print server.
After installation is complete, it is recommended that you or
your System Administrator print the print server documentation
for later reference www.xerox.com/VERSANT_4100docs.
PredictPrint Media Manager Cloud Server Go to https://www.xerox.com/predictprintmedia.
Recommended Media List United States: www.xerox.com/rmlna
Europe: www.xerox.com/rmleu
Technical support information for your
printer; including online technical support,
Online Support Assistant, and print driver
downloads.
Information Pages To print from the control panel, press the Machine Status
Go to www.xerox.com/VERSANT_4100support.
button, then touch Machine Information.
To print from the CentreWare
then on the Online Support, click Connect.
®
Internet Services, click Support,
Order supplies for your printer Go to www.xerox.com/office/VERSANT_4100supplies.
Local sales and Technical Customer
Support
Printer registration Go to www.xerox.com/register.
Go to www.xerox.com/office/worldcontacts.
Xerox®Versant®4100 Press
User Documentation
29
Page 30

Learning About
It is recommended that you print all customer documentation and keep it close to the machine.
Note: For the latest documentation updates for your Xerox Digital Press, go to www.xerox.com/
VERSANT_4100docs or www.xerox.com/VERSANT_4100support.
Before you contact Xerox for support, ensure that you have the serial number of your Xerox press. To
locate the press serial number, refer to Locating the Press Serial Number.
30
Xerox®Versant®4100 Press
User Documentation
Page 31

Learning About
Regulatory Information
BBaassiicc RReegguullaattiioonnss
Xerox®has tested this printer to electromagnetic emission and immunity standards. These standards
are designed to mitigate interference caused or received by this printer in a typical office
environment.
Changes or modifications to this device not specifically approved by the Xerox
the user's authority to operate this equipment.
FFCCCC RReegguullaattiioonnss iinn tthhee UUSSAA
This product has been tested and found to comply with the limits for a Class A digital device,
pursuant to Part 15 of the Federal Communications Commission (FCC) Rules. These limits are
designed to provide reasonable protection against harmful interference when the equipment is
operated in a commercial environment. This equipment generates, uses, and can radiate radio
frequency energy and, if not installed and used in accordance with the instruction manual, may cause
harmful interference to radio communications. Operation of this equipment in a residential area is
likely to cause harmful interference in which case the user will be required to correct the interference
at his or her own expense.
Changes or modifications to this equipment not specifically approved by the Xerox
void the user’s authority to operate this equipment.
®
Corporation may void
®
Corporation may
To maintain compliance with FCC regulations, shielded cables must be used with this equipment.
Operation with non-approved equipment or unshielded cables is likely to result in interference to radio
and TV reception.
This device complies with Part 15 of the FCC Rules. Operation is subject to the following two
conditions:
1. This device may not cause harmful interference, and
2. This device must accept any interference received, including interference that may cause
undesired operation.
Responsible Party: Xerox
Address: 800 Phillips Road, Webster, NY 14580
®
Corporation
CCaannaaddaa
This Class A digital apparatus complies with Canadian ICES-003 and ICES-001.
Cet appareil numérique de la classe A est conforme à la norme NMB-003 et NMB-001 du Canada.
This device complies with Industry Canada’s license-exempt RSSs. Operation is the subject to the
following two conditions:
1. This device may not cause interference, and
2. This device must accept any interference, including interference that may cause undesired
operation of the device.
Le présent appareil est conforme aux CNR d’Industrie Canada applicables aux appareils radio
®
Xerox
Versant®4100 Press
User Documentation
31
Page 32

Learning About
exempts de licence. L’exploitation est autorisée aux deux conditions suivantes:
1. l’appareil ne doit pas produire de brouillage, et
2. l’utilisateur de l’appareil doit accepter tout brouillage radioélectrique subi, même si le brouillage
est susceptible d’en compromettre le fonctionnement.
There are operational restrictions for License-Exempt Local Area Network (LE-LAN) devices: the device
for operation in the band 5150-5250 MHz is only for indoor use to reduce the potential for harmful
interference to co-channel mobile satellite systems.
Il y a des restrictions opérationnelles pour dispositifs de réseaux locaux exempts de licence (RL-EL): les
dispositifs fonctionnant dans la bande 5 150-5 250 MHz sont réservés uniquement pour une
utilisation à l’intérieur afin de réduire les risques de brouillage préjudiciable aux systèmes de satellites
mobiles utilisant les mêmes canaux.
This transmitter must not be co-located or operating in conjunction with any other antenna or
transmitter. This equipment must be installed and operated with a minimum distance of 20
centimeters between the radiator and your body.
Cet émetteur ne doit pas être Co-placé ou ne fonctionnant en même temps qu’aucune autre antenne
ou émetteur. Cet équipement devrait être installé et actionné avec une distance minimum de 20
centimètres entre le radiateur et votre corps.
EEuurrooppeeaann UUnniioonn aanndd EEuurrooppeeaann EEccoonnoommiicc AArreeaa CCoommpplliiaannccee
The CE mark applied to this product indicates compliance to applicable EU
Directives. You can find the full text of the EU Declaration of Conformity in www.
xerox.com/environment_europe.
EEuurrooppeeaann UUnniioonn LLoott 44 IImmaaggiinngg EEqquuiippmmeenntt AAggrreeeemmeenntt
Xerox®has agreed to design criteria for energy efficiency and environmental performance of our
products that are in scope of the European Union (EU) Energy Related Products Directive, specifically
the Lot 4 - Imaging Equipment.
In scope products include Household and Office equipment that meet the following criteria:
• Standard monochrome format products with a maximum speed less than 66 A4 images per
minute.
• Standard color format products with a maximum speed less than 51 A4 images per minute.
32
Xerox®Versant®4100 Press
User Documentation
Page 33

To learn more about Go to
Learning About
• Power Consumption and Activation Times
• Default Power Saver Settings
• Benefits of purchasing ENERGY STAR
qualified products
• Environmental Benefits of Duplex
Printing
• Benefits of using lighter paper weights
(60 g/m
• Cartridge disposal and treatment
• Xerox participation in sustainability
initiatives
2
) and Recyclability
User Documentation or Systems Administrators Guide
www.xerox.com/VERSANT_4100docs
®
www.energystar.gov
www.xerox.com/environment or www.xerox.com/
environment_europe
Environmental Benefits of Duplex Printing
Most Xerox®products have duplex printing, also known as 2-sided printing, capability. This enables
you to print on both sides of the paper automatically, and therefore helps to reduce the use of
valuable resources by reducing your paper consumption. The Lot 4 Imaging Equipment agreement
requires that on models greater than or equal to 40 ppm color or greater than or equal to 45 ppm
monochrome the duplex function has been auto-enabled, during the setup and driver installation.
Some Xerox models below these speed bands may also be enabled with 2-sided printing settings
defaulted on at the time of install. Use of the duplex function will reduce the environmental impact
of your work. However, you must require simplex or 1-sided printing, you can change the print
settings in the print driver.
Paper Types
You can use this product to print on both recycled and virgin paper, approved to an environmental
stewardship scheme, which complies with EN12281 or a similar quality standard. Lighter weight
paper (60 g/m
2
), which contains less raw material and thus saves resources per print, can be used in
certain applications. We recommend you to check if this is suitable for your printing needs.
ENERGY STAR
The ENERGY STAR program is a voluntary scheme to promote the development and
purchase of energy-efficient models, which help to reduce environmental impact.
Details on the ENERGY STAR program and models qualified to ENERGY STAR can be
found at the following website: www.energystar.gov.
The ENERGY STAR and ENERGY STAR mark are registered United States trademarks.
The ENERGY STAR Imaging Equipment Program is a team effort between United States,
European Union, Japanese governments, and the office equipment industry to promote energyefficient copiers, printers, fax, multifunction printers, personal computers, and monitors.
Reducing product energy consumption helps combat smog, acid rain, and long-term changes to
the climate by decreasing the emissions that result from generating electricity.
For more information on energy or other related topics, go to:
• www.xerox.com/environment or
• www.xerox.com/environment_europe
Xerox
®
Versant®4100 Press
User Documentation
33
Page 34

Learning About
Power Consumption and Activation Time
The amount of electricity that a device consumes depends on the way the device is used. This device
is designed and configured to enable you to reduce your electricity usage.
Power Saver modes are enabled on your device to reduce energy consumption. After the last print,
the device goes to Ready mode. In this mode, the device can print again immediately. If the device is
not used for a specified period, the device goes to Low Power mode, then to Sleep mode. In these
modes, to enable reduced-power consumption, only essential functions remain active. The device
takes longer to produce the first print after it exits the Power Saver modes than it takes to print in
Ready mode. This delay is the result of the system waking up and is typical of most imaging devices
on the market.
To save power, you can enable Auto Power Off mode on your device. If Auto Power Off mode is
enabled, you can configure the mode as follows:
• Always Allowed: The device powers off automatically after the specified time, and the cumulative
Low Power mode and Sleep mode time outs have elapsed.
• Allowed ONLY When the Conditions are Met: The device automatically powers off only after
time outs have elapsed. The device also powers off if USB Drive, and Wired and Non-Wired
Network are not activated.
To change the Power Saver settings, refer to the User Documentation at www.xerox.com/VERSANT_
4100docs. For more details, contact your System Administrator or refer to the System Administrator
Guide.
To enable Auto Power Off mode, contact your System Administrator. For details, refer to the System
Administrator Guide at www.xerox.com/VERSANT_4100docs.
To learn more about Xerox participation in sustainability initiatives, go to:
• www.xerox.com/environment or
• www.xerox.com/environment_europe
Default Power Saver Settings
This device is ENERGY STAR
Equipment. The Low-Power mode time can be configured up to 30 minutes. The default value is 15
minutes. The Sleep mode time can be configured up to 30 minutes. The default value is 30 minutes.
Sleep mode begins after the configured time of inactivity rather than time after Low-Power mode.
To change the Default Power Saver settings, contact your System Administrator, or refer to the
System Administrator Guide at www.xerox.com/VERSANT_4100docs.
Note: Changing the default Power Saver activation times can result in an overall higher energy
consumption of the device. Before you turn off Power Saver modes or set a long activation
time, consider the increase in device power consumption.
®
qualified under the ENERGY STAR Program Requirements for Imaging
EEuurraassiiaann EEccoonnoommiicc UUnniioonn CCoommpplliiaannccee
The EAC mark applied to this product indicates certification for use on the markets of
the Member States of the Customs Union.
34
Xerox®Versant®4100 Press
User Documentation
Page 35

Learning About
TTuurrkkeeyy RRooHHSS RReegguullaattiioonn
In compliance with Article 7(d), we hereby certify “it is in compliance with the EEE regulation EEE
yönetmeliğine uygundur.” (Compliant with EEE Regulations).
UUkkrraaiinnee RRooHHSS CCoommpplliiaannccee
Обладнання відповідаєвимогам Технічного регламенту щодо обмеження
використання деяких небезпечних речовин в електричному та електронному
обладнані, затвердженого постановою Кабінету Міністрів України від 3 грудня 2008 № 1057
(The equipment complies with requirements of the Technical Regulation, approved by the Resolution
of Cabinet of Ministry of Ukraine as of December 3, 2008, in terms of restrictions for the use of
certain dangerous substances in electrical and electronic equipment.)
CCooppyy RReegguullaattiioonnss
UUnniitteedd SSttaatteess
Congress, by statute, has forbidden the reproduction of the following subjects under certain
circumstances. Penalties of fine or imprisonment can be imposed on those guilty of making such
reproductions.
1. Obligations or Securities of the United States Government, such as:
• Certificates of Indebtedness
• National Bank Currency
• Coupons from Bonds
• Federal Reserve Bank Notes
• Silver Certificates
• Gold Certificates
• United States Bonds
• Treasury Notes
• Federal Reserve Notes
• Fractional Notes
• Certificates of Deposit
• Paper Money
• Bonds and Obligations of certain agencies of the government, such as FHA and so on
• Bonds. United States Savings Bonds can be photographed only for publicity purposes for the
campaign of the sale of such bonds
• Internal Revenue Stamps. If it is necessary to reproduce a legal document on which there is a
canceled revenue stamp, this can be done provided the reproduction of the document is
performed for lawful purposes
®
Xerox
Versant®4100 Press
User Documentation
35
Page 36

Learning About
• Postage Stamps, canceled or uncanceled. For philatelic purposes, Postage Stamps can be
photographed, provided the reproduction is in black and white and is less than 75% or more
than 150% of the linear dimensions of the original document
• Postal Money Orders
• Bills, Checks, or Drafts of money drawn by or upon authorized officers of the United States
• Stamps and other representatives of value, of whatever denomination, which have been or
can be issued under any Act of Congress
• Adjusted Compensation Certificates for Veterans of the World Wars
2. Obligations or Securities of any Foreign Government, Bank, or Corporation
3. Copyrighted materials, unless permission of the copyright owner has been obtained or the
reproduction falls within the fair use or library reproduction rights provisions of the copyright law.
Further information of these provisions can be obtained from the Copyright Office, Library of
Congress, Washington, D.C. 20559. Ask for Circular R21.
4. Certificate of Citizenship or Naturalization. Foreign Naturalization Certificates can be
photographed.
5. Passports. Foreign Passports can be photographed.
6. Immigration papers
7. Draft Registration Cards
8. Selective Service Induction papers that bear any of the following Registrant information:
• Earnings or Income
• Court Record
• Physical or mental condition
• Dependency status
• Previous military service
• Exception: United States military discharge certificates can be photographed
9. Badges, Identification Cards, Passes, or Insignia carried by military personnel, or by members of
the various Federal Departments, such as FBI, Treasury, and so on, unless the head of such
department or bureau orders a photograph.
Reproducing the following items is prohibited in certain states:
• Automobile Licenses
• Driver Licenses
• Automobile Certificates of Title
The above list is not all-inclusive, and no liability is assumed for its completeness or accuracy. If there
is doubt, consult your attorney.
For more information about these provisions, contact the Copyright Office, Library of Congress,
Washington, D.C. 20559. Ask for Circular R21.
36
Xerox®Versant®4100 Press
User Documentation
Page 37

Learning About
CCaannaaddaa
Parliament, by statute, has forbidden the reproduction of the following subjects under certain
circumstances. Penalties of fine or imprisonment may be imposed on those guilty of making such
reproductions:
• Current bank notes or current paper money
• Obligations or securities of a government or bank
• Exchequer bill paper or revenue paper
• The public seal of Canada or of a province, or the seal of a public body or authority in Canada, or
of a court of law
• Proclamations, orders, regulations or appointments, or notices thereof (with intent to falsely cause
same to purport to have been printed by the Queen’s Printer for Canada, or the equivalent printer
for a province)
• Marks, brands, seals, wrappers or designs used by or on behalf of the Government of Canada or of
a province, the government of a state other than Canada or a department, board, Commission or
agency established by the Government of Canada or of a province or of a government of a state
other than Canada
• Impressed or adhesive stamps used for the purpose of revenue by the Government of Canada or
of a province or by the government of a state other than Canada
• Documents, registers or records kept by public officials charged with the duty of making or issuing
certified copies thereof, where the reproduction falsely purports to be a certified copy thereof
• Copyrighted material or trademarks of any manner or kind without the consent of the copyright
or trademark owner
This list is provided for your convenience and assistance, but it is not all-inclusive, and no liability is
assumed for its completeness or accuracy. In case of doubt, consult your solicitor.
OOtthheerr CCoouunnttrriieess
Copying certain documents may be illegal in your country. Penalties of fine or imprisonment may be
imposed on those found guilty of making such reproductions.
• Currency notes
• Bank notes and checks
• Bank and government bonds and securities
• Passports and identification cards
• Copyright material or trademarks without the consent of the owner
• Postage stamps and other negotiable instruments
This list is not inclusive and no liability is assumed for either its completeness or accuracy. In case of
doubt, contact your legal counsel.
SSaaffeettyy CCeerrttiiffiiccaattiioonn
This device is compliant with IEC and EN product safety standards certified by a National Regulatory
Test Laboratory (NRTL).
®
Xerox
Versant®4100 Press
User Documentation
37
Page 38

Learning About
SSaaffeettyy DDaattaa SShheeeettss
For Material Safety Data information regarding your printer, go to:
• Web address: www.xerox.com/sds or www.xerox.co.uk/sds_eu
• United States and Canada: 1-800-ASK-XEROX (1-800-275-9376)
• For other markets, send email request to: EHS-Europe@xerox.com
38
Xerox®Versant®4100 Press
User Documentation
Page 39

Learning About
Recycling and Disposal
AAllll CCoouunnttrriieess
If you dispose your Xerox product, note that the printer may contain lead, mercury, perchlorate, and
other materials whose disposal may be regulated due to environmental considerations. The presence
of these materials is fully consistent with global regulations applicable at the time that the product
was placed on the market. For recycling and disposal information, contact your local authorities.
Perchlorate Material: This product may contain one or more perchlorate-containing devices, such as
batteries. Special handling may apply. For more information, go to www.dtsc.ca.gov/hazardouswaste/
perchlorate.
BBaatttteerryy RReemmoovvaall
Only a manufacturer approved service facility can replace the batteries.
NNoorrtthh AAmmeerriiccaa
Xerox operates an equipment take-back and reuse or recycle program. Contact your Xerox
representative (1-800-ASK-XEROX) to ensure that this Xerox product is part of the program. For more
information about Xerox environmental programs, go to www.xerox.com/environment.
For recycling and disposal information, contact your local authorities.
Xerox
®
Versant®4100 Press
User Documentation
39
Page 40

Learning About
EEuurrooppeeaann UUnniioonn
These symbols indicate that this product is not to be disposed of with your
household waste, according to the Waste Electrical and Electronic Equipment
(WEEE) Directive (2012/19/EU), the Battery Directive (2006/66/EC) and national
legislation implementing those Directives.
If a chemical symbol is printed beneath the symbol shown above, in accordance with the
Battery Directive, this indicates that a heavy metal (Hg = Mercury, Cd = Cadmium, Pb =
Lead) is present in this battery or accumulator at a concentration above an applicable
threshold specified in the Battery Directive.
Some equipment can be used in both a domestic or household and a professional or
business application. Private households within European Union can return used electrical
and electronic equipment to designated collection facilities free of charge. For more
information about collection and recycling of old products and batteries, contact your
local municipality, your waste disposal service or the point of sale where you purchased
the items. In some member states, when you purchase new equipment, your local retailer
may be required to take back your old equipment free of charge. For more information,
contact your retailer.
Business Users in the European Union, in accordance with European legislation, end of life
electrical and electronic equipment subject to disposal must be managed within agreed
procedures. If you discard electrical and electronic equipment, contact your dealer or
supplier, local reseller or Xerox representative for end of life take-back information prior to
disposal.
Improper handling of this type of waste can have a possible impact on the environment
and human health due to potentially hazardous substances that are generally associated
with EEE. Your cooperation in the correct disposal of this product will contribute to the
effective usage of natural resources.
DDiissppoossaall OOuuttssiiddee ooff tthhee EEuurrooppeeaann UUnniioonn
These symbols are only valid in the European Union. If you want to discard these items, contact your
local authorities or dealer and ask for the correct method of disposal
OOtthheerr CCoouunnttrriieess
Contact your local waste management authority to request a disposal guidance.
40
Xerox®Versant®4100 Press
User Documentation
Page 41

2
Working With
This chapter contains:
• Power On or Off ................ . . . . ....................... . . . ........................ . . . ....................... . . . . ..................... 42
• Job and Machine Status...................... . ........................ . . . . . ....................... . . ....................... . . . . . .... 45
• Paper and Media. . . . . ....................... . . . ....................... . . . . ....................... . . . ........................ . . . . ........ 52
• PredictPrint Media Manager.... . . . ....................... . . . . ....................... . . . ........................ . . . . ............... 87
• Print Job Submission ...................... . . . ....................... . . . . ....................... . . . ........................ . . . . ...... 160
• Feeding Devices ..... . . . . ........................ . . ........................ . . . . ....................... . . . ....................... . . . . ... 163
• Finishing Devices .. ....................... . . . . . ....................... . . . ....................... . . . . ........................ . . ........ 180
• Job Workflows.. . . . . ........................ . . . ....................... . . . . ....................... . . . ....................... . . . . ......... 221
• Maintenance ...... . . . ........................ . . . ....................... . . . . ....................... . . . ........................ . . . ....... 232
Xerox®Versant®4100 Press
User Documentation
41
Page 42

Working With
Power On or Off
PPoowweerr SSwwiittcchheess
There are three power switches involved with the press:
• Circuit Breaker Switch
• Main Power Switch
• Power Button
Important: To power off, always press the power button first. Wait until the lights on the user
interface stop blinking, to allow the fuser to finish cooling. Move the main power switch to the
off position.
CCiirrccuuiitt BBrreeaakkeerr SSwwiittcchh
The Circuit Breaker Switch located at the rear of the press. Initially check to make sure this switch is
set to On when the press is shipped.
MMaaiinn PPoowweerr SSwwiittcchh
The Main Power Switch located inside the Center Front Door.
Note: Switching off the Main Power also shuts off the Main Power Status LED.
42
Xerox®Versant®4100 Press
User Documentation
Page 43

Working With
Tip: Before switching off the press, ensure that it is not in Power Saver Mode.
This switch is used mainly by the Xerox Service Representative when servicing the press. In rare
troubleshooting situations, you may be directed to power off the press with this switch.
PPoowweerr BBuuttttoonn
The power button is located on the right side of the Control Panel. Use this button to power ON or
OFF the press.
PPoowweerr OOnn oorr OOffff tthhee PPrreessss
1. To switch on the press, check that the Main Power switch behind the Center Front Door is On.
®
Xerox
Versant®4100 Press
User Documentation
43
Page 44

Working With
2. Press the Power button on top of the press to the ON position.
The Ready Indicator light displays green.
A screen message advises of a short wait while the fuser warms up and the press runs a system
check. You can set features for a job during this time and the printing process will start
automatically when the press is ready.
3. To switch off, press the Power button to the Off position.
Note: Allow the press to remain off for a minimum of 10 seconds before switching on the
power again.
PPoowweerr SSaavveerr MMooddee
The Power Saver feature allows the press to enter a reduced power consumption mode when all print
jobs have completed and there are no jobs currently processing. There are two power saving modes:
Low Power and Sleep.
• Low Power: After remaining inactive for a preset time period, the press enters the Low Power
mode.
• Sleep: After entering Low Power mode and remaining inactive for another preset time period, the
press enters the Sleep mode.
By default, the press automatically enters the Low Power mode after 15 minutes of inactivity. After
30 minutes of inactivity, the press then enters Sleep mode. These time intervals for both modes can
be changed by the system administrator.
Refer to the following example:
• Low Power Mode is set to 1 minute.
• Sleep Mode is set to 10 minutes.
• Sleep Mode activates after 10 minutes of total inactivity, and not 10 minutes after the Low Power
Mode begins.
LLooww PPoowweerr MMooddee
In this mode, the power to the Control Panel and fuser unit is lowered to save power. The display goes
out and the Power Saver button on the Control Panel lights.
To exit the Low Power Mode, press the Power Saver button. The Power Saver button is no longer lit,
indicating that the Power Saver feature is canceled.
SSlleeeepp MMooddee
In this mode, the power is lowered more than in the Low Power mode. The display goes out and the
Power Saver button on the Control Panel lights.
To exit the Sleep Mode, press the Power Saver button. The Power Saver button is no longer lit,
indicating that the Power Saver feature is canceled.
EExxiittiinngg PPoowweerr SSaavveerr MMooddee
The press exits Power Saver mode by pressing the Power Saver button on the Control Panel or when
receiving print data from an incoming job.
44
Xerox®Versant®4100 Press
User Documentation
Page 45

Working With
Job and Machine Status
JJoobb SSttaattuuss
The Job Status feature allows the user to check active, pending, and completed jobs. The ability to cancel printing or pause jobs is also available from Job Status.
JJoobb SSttaattuuss AArreeaa
The Job Status button on the press control panel displays the progress and status of any currently
printing jobs and lists all completed jobs.
1. Select the Active Jobs tab to view the status of currently pending or in-progress print jobs on the
system.
2. Select the Completed Jobs tab to view a list of all jobs that have printed successfully.
3. Select the Group Parent Jobs checkbox to list and display the jobs according to a parent and child
relationship hierarchy.
AAccttiivvee JJoobbss TTaabb
1. Press the Job Status button on the control panel.
2. Select the Active Jobs tab.
3. From the displayed list, select the applicable job to view.
Use the up or down buttons to navigate the list.
4. If required, select Display Time to show the time required to process the job.
5. To delete a job or change the execution order, select a job from the list.
6. From the pop-up menu, you can select one of the following option:
• Delete: This option cancels the current or pending job.
• Job Progress: This option shows the progress of the job that is currently printing or copying.
• Details: This option shows the details of the selected document.
• Close Menu: This option closes the pop-up menu.
CCoommpplleetteedd JJoobbss TTaabb
1. Press the Job Status button on the Control Panel.
Xerox
®
Versant®4100 Press
User Documentation
45
Page 46

Working With
2. Select the Completed Jobs tab.
A list of the completed or deleted jobs appear. Use the scroll bar to navigate the list.
3. To verify the details of a job, select the job from the displayed list.
4. From this Status window, select one of the following to print a history of this job.
a. To print the job details, select Print this Job Report button.
b. To print the history of parent and child jobs, select Print this Job History Report button.
5. After verifying the job details, select Close.
MMaacchhiinnee SSttaattuuss
Press the Machine Status button on the Control Panel to access the Machine Status information, including press configuration, faults, billing information, maintenance, and reporting features.
MMaacchhiinnee IInnffoorrmmaattiioonn TTaabb
This tab provides general information about the press such as the currently installed software version
and the press serial number. This area also allows you to print reports and view details that apply to
billing impressions.
46
Xerox®Versant®4100 Press
User Documentation
Page 47
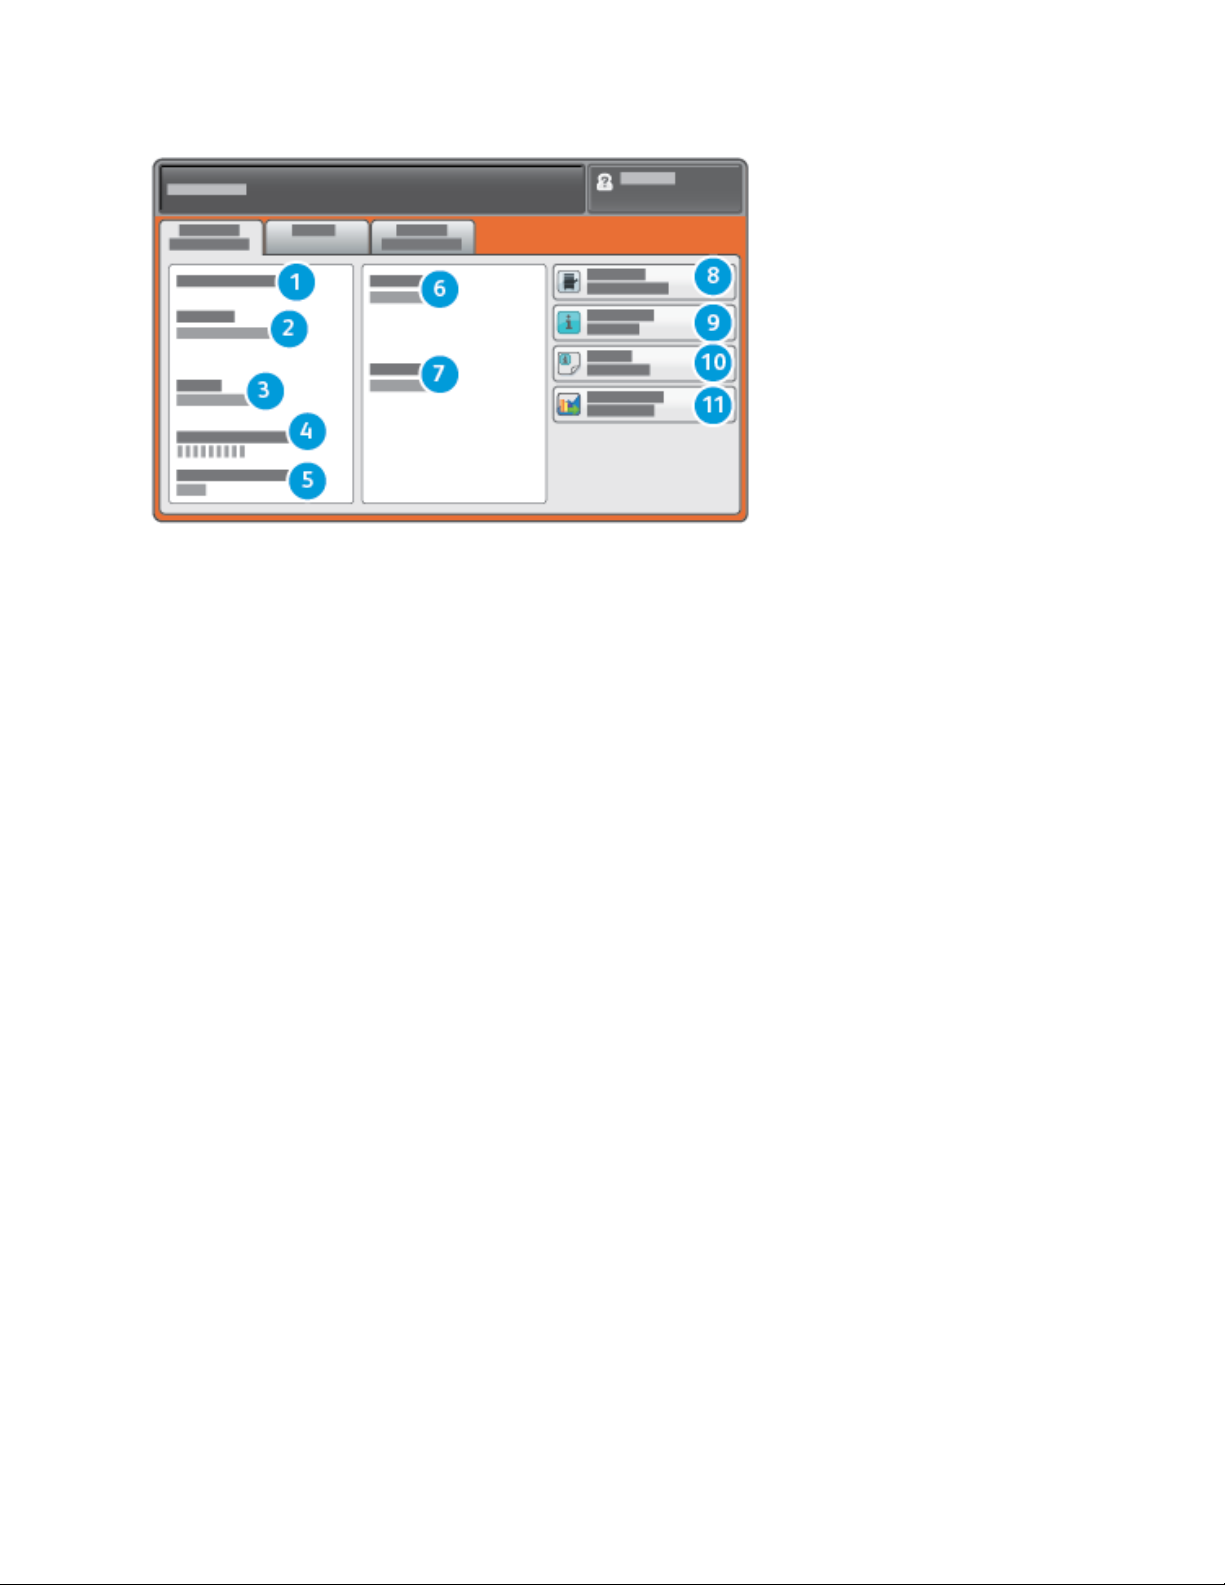
Working With
1. General Information
2. Xerox Website
3. Model
4. Machine Serial Number
5. Current System Software
6. IP Address
7. Host Name
8. Machine Configuration
9. Software Version
10. Print Reports
11. Maintenance Assistant
Machine Serial Number
The Machine Serial Number is displayed in the General Information area on the Machine
Information tab. Use this number when calling Xerox for technical information or assistance.
Current System Software
The version of the system software that is currently installed on the press is displayed under the
Current System Software title.
IP Address and Host Name
This is the unique Internet Protocol (IP) address and host name that identifies the press to the
specific network to which it is connected.
Machine Configuration
Select the Machine Configuration tab to display a list of the various hardware components and
options that are available on the press as well as their status. Hardware components and options
include any optional feeding and finishing devices attached to the press.
Software Version
Select the Software Version tab to display a list of the software versions for the various system
components, including any optional feeding and finishing devices.
®
Xerox
Versant®4100 Press
User Documentation
47
Page 48

Working With
Maintenance Assistant
Select the Maintenance Assistant tab to send the Xerox Remote Print Services diagnostic
information or SMart eSolutions Data on the press to Xerox Support.
PPrriinntt RReeppoorrttss
This Print Reports button is enabled by the system administrator. From the various reports available, select a report on the touch screen and then select the Start button to print. Some reports are only available in the system administrator mode. From the Print Reports screen, select the desired report to print.
Job Status
From the Job Status screen, select the desired history report to print.
• Job History Report: This report lists the status, attributes, input source and output destination of
every print job completed, deleted or shutdown.
• Error History Report: This report lists the most recent errors and faults that occurred on the press.
Printer Reports
From the Printer Reports screen, select Configuration Report. The Configuration Report lists the
hardware configuration, devices and software installed, and the network settings on the system such
as port and proxy settings. Print and place this report near the press for easy access to information
such as the press serial number.
Network Controller Jobs Report
Network Controller Jobs Report includes the following reports:
• Job History Report
• Error History Report
• Font List
• Configuration Report
Job Counter Report
The Job Counter Report is available only when from the system administrator mode. This report
identifies the total number of minutes the press has been in various operating modes, the billing
counters for various size impressions printed from each tray, and a summary of the number of jobs
printed with various page counts.
Auditron Report/Meter Report
The Auditron Report/Meter Report is available only when from the system administrator mode.
Note: This Auditron Report/Meter Report is not applicable to a print-only system.
FFaauullttss TTaabb
The Faults tab provides a list of faults that occurred on the press. Access this tab by pressing the
Machine Status button on the control panel and then selecting the Faults tab.
48
Xerox®Versant®4100 Press
User Documentation
Page 49

The Faults tab displays the following information about faults that occurred on the press:
1. Fault Code: This column identifies the code number assigned to the fault message.
2. Date and Time: These columns indicate the day and time the fault occurred.
3. Image Count: This column indicates the total number of printed impressions.
Working With
BBiilllliinngg IInnffoorrmmaattiioonn TTaabb
Accessing Billing Information
To view billing impressions and counters (or meters) information recorded by the press, access the
Machine Status area of the press Control Panel.
1. Press the Machine Status button on the Control Panel.
2. Select the Billing Information tab.
The Billing Information screen displays.
3. To view the Billing Impression Mode, press the Tools button on the Control Panel, select the
Tools icon, and select Setup→Billing Impression Mode.
Billing Impressions Information
The Billing Information screen allows you to view the total number of impressions (prints) recorded by
the press, including a category of the number of color prints only, black prints only and large media
prints. It also displays specific usage counter information. The counters display the impression
amount for all printed jobs.
All meters that may be used for billing purposes are displayed on the Billing Information screen:
• Color Impressions: This value (number) represents the total number of color impressions that
have been printed.
• Black Impressions: This value (number) represents the total number of black-only impressions
that have been printed.
• Total Impressions: This value (number) represents the total number of ALL impressions. It is the
sum of the Color Impressions and the Black Impressions.
®
Xerox
Versant®4100 Press
User Documentation
49
Page 50

Working With
• Color Large Impressions: This value (number) represents the total number of large color
impressions. These impressions are one side of one sheet of large media (for example 11 x17 in.,
A3). Large Impressions are any prints that are larger than 145 sq. in., 935 sq. cm.
Note: This meter is NOT added to the Total Impressions meter since it is already added
to the Color Impressions meter.
• Extra Long Impressions: For this impression type, the meter increases for any media with a length
between 491 mm (19.33 in.) and 661 mm (26 in.).
Billing Impression Mode
The Billing Impression Mode defines how the press tracks and records impressions made on large-size
paper such as A3 or tabloid. The type of Billing Impression Mode used by your press is set during
system installation. A Xerox Sales Representative can confirm the Billing Impression Mode applicable
for your press.
There are two types of Impression Modes:
• A3 Impression Mode - For all media sizes (including large-sized), counts all impressions equally.
• A4 Impression Mode - Counts large impressions on media such as A3 and 11 x 17 inches (media
that is larger than 8.5 x 14 inches), as their A4 equivalent.
To view the current Billing Impression Mode in effect on the press:
• Press the Tools button on the Control Panel, select the Tools icon, and select Setup→Billing
Impression Mode.
Usage Counters
Select the Usage Counters button to view even more detail on billing and counts being tracked on
the press such as the number of 1-sided vs 2-sided print jobs.
From the Counters drop-down list you can select the desired counter to view:
• Impression Counters
• Sheet Counters
• All Usage Counters
Impression Counters
This view displays the total impression amount. In other words, impression is the image on one
side of one sheet of media. This counter shows the total impression amount for color and blackonly impressions.
• Total Impressions: This number represents the total number of impressions for all color and
black-only print jobs.
• Black Impressions: This number represents the total number of impressions for all black and
white print jobs.
• Black Large Impressions: These impressions are one side of one sheet of a large black-only
document (such as 11 x17 in., A3). Large Impressions are any prints that are larger than 8.5
x14 in., B4.
• Color Impressions: This number represents the total number of impressions for all color print
jobs.
50
Xerox®Versant®4100 Press
User Documentation
Page 51

Working With
• Color Large Impressions: These impressions are one side of one sheet of a large color
document (such as 11 x17 in., A3). Large Impressions are any prints that are larger than 8.5
x14 in., B4.
Sheet Counters
This counter provides information on the total number of sheets the press feeds to the output
area. Each sheet counts as one click on the counter (regardless of size or whether it is a one-sided
or two-sided print job).
All Usage Counters
This view provides a complete total of all the counters, including the totals from the Impression
Counters and Sheet Counters.
Update Button
Select this button to refresh and update the counts.
Xerox
®
Versant®4100 Press
User Documentation
51
Page 52

Working With
Paper and Media
PPaappeerr aanndd MMeeddiiaa OOvveerrvviieeww
Before loading paper, consider the following:
• To define attributes for a stock, to add a new stock to the Stock Library, or to assign a stock to a
paper tray for the print job, access the Stock Wizard in the PredictPrint Media Manager
application on the print server. If you have restricted access, contact your System Administrator.
Note: The PredictPrint Media Manager is an application that is loaded onto the print
server and is used to manage the stocks and paper trays for your press.
– By default, the Stock Library feature is available to both the operator and system
administrator modes.
– Your System Administrator may restrict user access to change or add stocks.
– When you are loading paper, the Stock Wizard opens in the PredictPrint Media Manager
application. The Stock Wizard guides you through the steps to set up the stock assigned to
that tray.
Note: If the Administrator has disabled the Stock Wizard, then the Tray Properties
window for the tray appears.
• The press supports the ability to pull different stock sizes and paper types from various trays and
assemble them as part of a single job. To select multiple paper trays and insert different papers
within one job, program this custom job at the print server using features such as special pages.
• The press supports Automatic Tray Switching, which allows a job to switch automatically from an
empty tray to a full tray containing the same size paper, orientation, and stock type. For details on
how to enable this feature and prioritize the order of trays to search on and use, refer to the
System Administrator Guide.
GGeenneerraall PPaappeerr LLooaaddiinngg GGuuiiddeelliinneess
• Fan paper before loading it in the paper tray.
• Do not overfill the paper trays. Do not load paper above the indicated maximum fill line in the
tray.
• Adjust the paper guides to fit the paper size.
• If excessive jams occur, use paper or other approved media from a new package.
• Do not print on label media after a label has been removed from a sheet.
UUnnssuuppppoorrtteedd MMeeddiiaa
Some paper and other media types can cause poor output quality, increased paper jams, or damage
the press. Do not use the following:
• Rough or porous paper
• Inkjet paper
• Paper that is business-card size
52
Xerox®Versant®4100 Press
User Documentation
Page 53

• Paper that is folded or wrinkled
• Paper that is curled more than 0.47 in., 12 mm
• Paper with cutouts or perforations
• Stapled paper
• Damp paper
• Thermal or heat-transfer paper
• Envelopes with windows, metal clasps, side seams, or adhesives with release strips
• Padded envelopes
• Envelopes
Note: For envelopes, use Trays 5, 6, or 7.
Note: In addition to the above list, there may be other media that is not recommended or
supported. For details, please contact your local Xerox representative.
PPaappeerr aanndd MMeeddiiaa SSttoorraaggee GGuuiiddeelliinneess
Working With
Storing paper and other media properly contributes to optimum print quality.
• Store paper in dark, cool, relatively dry locations. Most paper is susceptible to damage from
ultraviolet and visible light. Ultraviolet light, from the sun and fluorescent bulbs, is particularly
damaging to paper.
• Reduce the exposure of paper to strong lights for long periods of time.
• Maintain constant temperatures and relative humidity.
• Avoid storing paper in locations that are damp or collect moisture.
• Store paper flat on pallets, cartons, shelves, or in cabinets.
• Avoid food or drinks in the area where paper is stored or handled.
• Do not open sealed packages of paper until you are ready to load the paper into the trays. Leave
stored paper in the original packaging. The paper wrapper protects the paper from moisture loss
or gain.
• Some special media is packaged inside resealable plastic bags. Store the media inside the bag
until you are ready to use it. Keep unused media in the bag and reseal it for protection.
Xerox
®
Versant®4100 Press
User Documentation
53
Page 54

Working With
SSuuppppoorrtteedd PPaappeerr
PPaappeerr SSiizzee RRaannggeess
Tray
Trays 1, 2, and 3 140 x 182 mm (5.51 x 7.17 in.) 330.2 x 488 mm (13 x 19.2 in.)
Tray 5 (Bypass) 98 x 146 mm (3.86 x 5.75 in.) 330.2 x 488 mm (13 x 19.2 in.)
Trays 6 and 7, or Trays 8
and 9
Minimum Size Maximum Size
Extra Long Sheets (XLS):
1–Sided 330.2 x 660.4 mm (13 x 26 in.)
98 x 146 mm (3.86 x 5.75 in.) 330.2 x 488 mm (13 x 19.2 in.)
PPaappeerr SSppeecciiffiiccaattiioonnss ffoorr AAllll TTrraayyss
Note: Always refer to the Recommended Media List (RML) or Tested Substrate List (TSL) for a
comprehensive list of supported media. You can access the latest RML or TSL version from
www.xerox.com and https://www.xerox.com/predictprintmedia.
Feed Direction
Paper Type Paper Size
Plain paper
(coated and
uncoated)
Hole-punched
paper (coated
and uncoated)
Recycled paper
(coated and
uncoated)
Embossed
(coated and
uncoated)
• B5
• A4
• A4 Cover
• B4
• A3
• SRA3
• 7.25 x 10.5 in.
• 8 x 10 in.
• 8.46 x 12.4 in.
• 8.5 x 11 in.
• 8.5 x 13 in.
• 8.5 x 14 in.
• 9 x 11 in.
• 11 x 15 in.
• 11 x 17 in.
• 12 x 18 in.
• 12.6 x 19.2 in.
• 13 x 18 in.
• 16-kai (TFX)
• 16-kai (GCO)
• Pa-kai (TFX)
• Pa-kai (GCO)
(LEF and SEF*)
• SEF and LEF
• SEF and LEF
• SEF and LEF
• SEF
• SEF
• SEF
• SEF and LEF
• SEF and LEF
• SEF
• SEF and LEF
• SEF and LEF
• SEF
• SEF and LEF
• SEF
• SEF
• SEF
• SEF
• SEF
• SEF and LEF
• SEF and LEF
• SEF
• SEF
Trays Weight (g/m
All Trays
All Trays 64–105
All Trays
• Trays 1, 2, and 3: 52–
256
• Trays 5, 6, and 7: 52–
400
• Trays 1, 2, and 3: 106–
256
• Trays 5, 6, and 7: 106–
400
2
)
Transparency 8.5 x 11 in. (A4) LEF All Trays —
54
Xerox®Versant®4100 Press
User Documentation
Page 55

Paper Type Paper Size
Feed Direction
(LEF and SEF*)
Working With
Trays Weight (g/m2)
Postcard (coated
and uncoated)
GovernmentLegal
Double-Thick (DT)
Special A4
Double-Thick (DT)
Special A3
Envelopes For supported
Labels (coated
and uncoated)
Tabs and Dividers 9 x 11 in. LEF All Trays 163
LEF = Long Edge Feed; SEF = Short Edge Feed
4 x 6 in., A6 SEF Trays 5
(Bypass),
6, and 7
215.9 x 330.2 mm
(8.5 x 13 in.)
226.0 x 310.0 mm
(8.90 x 12.20 in)
310.0 x 432.0 mm
(12.20 x 17.00 in)
envelope sizes, refer
to the Customer
Expectation and
Installation Guide.
8.5 x 11 in., A4 LEF All Trays
SEF and LEF All Trays —
SEF and LEF All Trays —
SEF All Trays —
— Trays 5
(Bypass),
6, and 7
106–400
—
• Trays 1, 2, and 3: 106–
• Trays 5, 6, and 7: 106–
256
400
PPaappeerr TTrraayy IInnffoorrmmaattiioonn
Paper Tray Information for Trays 1, 2, and 3
Trays 1, 2, and 3 are identical. When the press is first installed, the tray size setting for Trays 1 and 3
are set at 8.5 x 11 in. or A4 (LEF). The tray size setting for Tray 2 is set at 11 x 17 in. or A3 (SEF).
Note: Each feeder tray has a stock loading label. When loading media into the tray, refer to the
labels on the inside panel of the feeder tray for the correct orientation of that stock type.
When the PredictPrint Media Manager application is installed on the print server, the default for all
trays is Letter (8.5 x 11 in.). At the PredictPrint Media Manager, the operator can change those
default tray sizes different stock size settings.
Note: The sizes selected from the PredictPrint Media Manager application for all trays must
match the paper sizes that are loaded in the trays.
The specifications for each tray are:
• Maximum of 550 sheets of 24 lb. (90 g/m
coated stock
• Paper weight range of 18 lb. Bond to 95 lb. Cover (64 g/m
• Paper sizes starting at 140 x 182 mm (5.51 x 7.17 in.) to a maximum of 330.2 x 488 mm (13 x
19.2 in.)
• Stock types include transparencies, heavyweight, coated and uncoated, hole-punched, and tabs
2
) uncoated paper; 28-80 lb. cover (105-120 g/m2)
2
to 256 g/m2)
Xerox
®
Versant®4100 Press
User Documentation
55
Page 56

Working With
• Loading paper Long Edge Feed (LEF) or portrait or Short Edge Feed (SEF) or landscape dependent
on the actual paper size
• Auto size detection capability
• Automatically adjusts the tray position in the front and back based on the paper size; this is done
once the tray is closed
Paper Tray Information for Trays 6 and 7
Note: Each feeder tray has a stock loading label. When loading media into the tray, refer to the
labels on the inside panel of the feeder tray for the correct orientation of that stock type.
The specifications for each tray are:
• Maximum of 2,000 sheets of 24 lb. (90 g/m
sheets of 64 g/m
2
• Paper weight range of 52 to 400 g/m
• Stock types include transparencies, heavyweight, coated and uncoated, hole-punched, and tabs
Tip: Transparencies perform best when printed from Trays 6 and 7.
• It is recommended that you use Tray 5 (Bypass) to feed envelopes. However, Trays 6 and 7 may
also be used for feeding envelopes.
2
) uncoated paper; 2,100 sheets of 82 g/m2and 2,300
2
– If you use Trays 6 or 7, envelopes must be fed with the Postcard Bracket or with the installed
optional Envelope Support Kit.
– If the Postcard Bracket is used, the stack height is limited to 200 envelopes.
Postcard Bracket
The postcard bracket is delivered with Trays 6 and 7 from manufacturing. The postcard bracket allows
you to print on smaller size media without requiring post-processing cutting or sorting. The postcard
bracket accommodates 101.6 x 152.4 mm (4 x 6 in.) SEF media and smaller. For more information,
refer to Paper Size Ranges.
Note: For more information, refer to Postcards.
Optional Envelope Support Kit
The Envelope Support Kit enables a greater quantity of envelopes to be loaded and printed from
Trays 6 or 7. This optional kit consists of two plastic pieces that fit into the bottom of the tray and a
postcard bracket that attaches to the side of the tray. The plastic pieces lift one side of the stack of
envelopes to offset the extra thickness of the flaps. This keeps the stack level for feeding and enables
more envelopes to be fed from the tray.
Note: For more information, refer to Envelopes.
Paper Tray Information for Tray 5 (Bypass)
Note: Depending on system configuration, optional Tray 5 (Bypass) is located on the top of
Trays 6/7 or optional Trays 8/9).
This tray is used primarily when using a small quantity and special media (such as envelopes). When
56
Xerox®Versant®4100 Press
User Documentation
Page 57

Working With
you use the Tray 5 (Bypass), refer to the following information:
• Maximum of 250 sheets of 24 lb. (90 g/m
2
m
) coated stock
• Paper weight range of 52 g/m
2
(uncoated) to 300 g/m2(coated)
2
) uncoated paper; 28 lb. to 110 lb. cover (106-300 g/
• Stock types include transparencies, heavyweight, coated and uncoated, hole-punched, and tabs
• Program the stock job properties using the Stock Wizard.
• Do not load mixed-size paper into the bypass tray.
• Do not load materials above the MAX line as indicated on the tray.
• It is recommended that you use Tray 5 (Bypass) to feed envelopes.
PPrreessss PPrroodduuccttiivviittyy IInnffoorrmmaattiioonn
The following tables show the maximum print speed of the press across the full range of paper sizes
that the press supports. Unless otherwise noted, the print speed is identical for full-color or black-andwhite-only prints.
Process and print speed is based on 1-Sided or 2-Sided mode, paper type, paper weight, paper size,
and feeding tray.
Note: The references to Bond and Cover weight ranges are approximations based on
conversion to the nearest standard paper weight and type.
Productivity Information for Trays 1–3, 6, 7, 8, and 9
The Postcard size is supported only with optional Trays 6 and 7, Trays 8 and 9, and Tray 5 (Bypass). To
support Postcard size, Trays 6 and 7, and Trays 8 and 9, require a postcard bracket. Trays 1, 2, and 3
support only 52–256 g/m
Note: The ideal room temperature is 16° C (60.8° F) or higher.
Important: Media heavier than 256 g/m2(90 lb. Cover) cannot be fed from Trays 1–3.
Paper Size
Postcard SEF Uncoated,
8.5 x 11 in., A4 LEF Uncoated,
8.5 x 11 in. SEF Uncoated,
8.5 x 14 in., A4,B4SEF Uncoated,
Paper Feed
Direction
2
paper.
Paper Type Paper Weight
2
2
2
2
2
2
2
2
Coated, and
Matte Coated
Coated, and
Matte Coated
Coated, and
Matte Coated
Coated, and
Matte Coated
52–300 g/m
301–400 g/m
52–300 g/m
301–400 g/m
52–300 g/m
301–400 g/m
52–300 g/m
301–400 g/m
Prints Per Minute (ppm)
1–Sided 2–Sided
100 ppm
80 ppm
100 ppm
80 ppm
80 ppm
64 ppm
60 ppm
51 ppm
50 ppm
40 ppm
50 ppm
40 ppm
50 ppm
40 ppm
30 ppm
25.5 ppm
Xerox®Versant®4100 Press
User Documentation
57
Page 58

Working With
Paper Size
Paper Feed
Direction
Paper Type Paper Weight
11 x 17 in., A3 SEF Uncoated,
Coated, and
Matte Coated
12 x 18 in.,
SRA3
SEF Uncoated,
Coated, and
Matte Coated
330.2 x 488
mm (13 x 19.2
in.)
SEF Uncoated,
Coated, and
Matte Coated
8.5 x 11 in., A4 LEF Labels, Cast
Coated,
Embossed/
Textured, Film
8.5 x 11 in. SEF Labels, Cast
Coated,
Embossed/
Textured, Film
8.5 x 14 in., A4,B4SEF Labels, Cast
Coated,
Embossed/
Textured, Film
52–300 g/m
301–400 g/m
52–300 g/m
301–400 g/m
52–300 g/m
301–400 g/m
52–400 g/m
52–400 g/m
52–400 g/m
Prints Per Minute (ppm)
1–Sided 2–Sided
2
52 ppm
2
44 ppm
2
47 ppm
2
39 ppm
2
47 ppm
2
39 ppm
2
40 ppm —
2
32 ppm —
2
25 ppm —
30 ppm
22 ppm
23.5 ppm
19.5 ppm
23.5 ppm
19.5 ppm
11 x 17 in., A3 SEF Labels, Cast
Coated,
Embossed/
Textured, Film
12 x 18 in.,
SRA3
SEF Labels, Cast
Coated,
Embossed/
Textured, Film
330.2 x 488
mm (13 x 19.2
in.)
SEF Labels, Cast
Coated,
Embossed/
Textured, Film
Productivity Information for Tray 5 (Bypass)
Paper Size
Postcard SEF Uncoated,
8.5 x 11 in.,A4LEF Uncoated,
Paper Feed
Direction
Paper Type Paper Weight
Coated, and
Matte Coated
Coated, and
Matte Coated
52–400 g/m
52–400 g/m
52–400 g/m
52–300 g/m
301–350 g/m
52–300 g/m
301–400 g/m
2
22 ppm —
2
20 ppm —
2
19 ppm —
Prints Per Minute (ppm)
1–Sided 2–Sided
2
70 ppm
2
70 ppm
2
59 ppm
2
57 ppm
35 ppm
35 ppm
35 ppm
35 ppm
58
Xerox®Versant®4100 Press
User Documentation
Page 59

Working With
Paper Size
Paper Feed
Direction
Paper Type Paper Weight
8.5 x 11 in. SEF Uncoated,
Coated, and
Matte Coated
8.5 x 14 in.,
A4, B4
SEF Uncoated,
Coated, and
Matte Coated
11 x 17 in.,
A3
SEF Uncoated,
Coated, and
Matte Coated
12 x 18 in.,
SRA3
SEF Uncoated,
Coated, and
Matte Coated
330.2 x 488
mm (13 x
19.2 in.)
SEF Uncoated,
Coated, and
Matte Coated
8.5 x 11 in.,A4LEF Labels, Cast
Coated,
Embossed/
Textured, Film
52–300 g/m
301–400 g/m
52–300 g/m
301–400 g/m
52–300 g/m
301–400 g/m
52–300 g/m
301–350 g/m
52–220 g/m
221–350 g/m
52–300 g/m
Prints Per Minute (ppm)
1–Sided 2–Sided
2
59 ppm
2
57 ppm
2
50 ppm
2
47 ppm
2
44 ppm
2
40 ppm
2
41 ppm
2
37 ppm
2
40 ppm
2
36 ppm
2
40 ppm —
29.5 ppm
28.5 ppm
26 ppm
23.5 ppm
22 ppm
20 ppm
20.5 ppm
18.5 ppm
20 ppm
18 ppm
8.5 x 11 in. SEF Labels, Cast
Coated,
Embossed/
Textured, Film
8.5 x 14 in.,
A4, B4
SEF Labels, Cast
Coated,
Embossed/
Textured, Film
11 x 17 in.,
A3
SEF Labels, Cast
Coated,
Embossed/
Textured, Film
12 x 18 in.,
SRA3
SEF Labels, Cast
Coated,
Embossed/
Textured, Film
330.2 x 488
mm (13 x
19.2 in.)
SEF Labels, Cast
Coated,
Embossed/
Textured, Film
52–300 g/m
52–300 g/m
52–300 g/m
52–300 g/m
52–300 g/m
2
32 ppm —
2
25 ppm —
2
22 ppm —
2
20 ppm —
2
19 ppm —
Xerox®Versant®4100 Press
User Documentation
59
Page 60

Working With
LLooaaddiinngg PPaappeerr
LLooaaddiinngg PPaappeerr iinn TTrraayyss 11,, 22,, aanndd 33
Note: A paper jam may occur if a tray is opened while it is being used to feed stock.
1. Select the appropriate paper stock for your print job.
2. Pull out the tray slowly until it stops.
3. Open the ream of paper with the seam side facing up.
4. Fan the sheets before loading them into the tray.
5. Extend the paper guides outward until they stop.
6. Load and align the edge of the paper against the left edge of the tray.
Paper can be loaded in the LEF or portrait, or SEF or landscape direction.
60
Xerox®Versant®4100 Press
User Documentation
Page 61

Working With
7. Adjust the paper guides by pressing in the guide releases and carefully moving the guides until
they lightly touch the edges of the material in the tray.
Note: Do not load materials above the MAX line located on the guides.
8. Gently push in the tray until it comes to a stop.
The Stock Wizard opens on the print server.
9. Scan the barcode on the stock, then to set up the stock, follow the steps in the Stock Wizard.
Note: For details on setting up the stock in the Stock Wizard, refer to Scanning a Media
Barcode.
LLooaaddiinngg PPaappeerr iinn TTrraayyss 66 aanndd 77
1. Select the appropriate paper stock for your print job.
2. Pull out the tray slowly until it stops.
3. Open the ream of paper with the seam side facing up.
4. Fan the sheets before loading them into the tray.
5. Extend the paper guides outward until they stop.
Xerox®Versant®4100 Press
User Documentation
61
Page 62

Working With
6. Load and align the edge of the paper against the right edge of the tray.
Paper can be loaded in the LEF or portrait, or SEF or landscape direction.
7. Adjust the paper guides by pressing in the guide releases and carefully moving the guides until
they lightly touch the edges of the material in the tray.
Note: Do not load materials above the MAX line located on the guides.
8. Gently push in the tray until it comes to a stop.
The Stock Wizard opens on the print server.
9. Scan the barcode on the stock, then to set up the stock, follow the steps in the Stock Wizard.
Note: For details on setting up the stock in the Stock Wizard, refer to Scanning a Media
Barcode.
LLooaaddiinngg PPaappeerr iinn TTrraayy 55 ((BByyppaassss))
1. Slide the paper guides outward to the desired paper size.
2. Select the appropriate paper stock for your print job.
3. Open the ream of paper with the seam side facing up.
4. Fan the sheets before loading them into the tray.
62
Xerox®Versant®4100 Press
User Documentation
Page 63

Working With
5. Insert the paper or media into the tray until it stops.
The Stock Wizard opens on the print server.
6. Adjust the paper guides so that they touch the edges of the stack.
Note: Do not load materials above the MAX line located on the guides.
7. Scan the barcode on the stock, then to set up the stock, follow the steps in the Stock Wizard.
Note: For details on setting up the stock in the Stock Wizard, refer to Scanning a Media
Barcode.
MMaattcchhiinngg tthhee TTrraayy aanndd SSttoocckk IInnffoorrmmaattiioonn
Important: To ensure maximum productivity and successful job completion, always verify that
the Tray Properties information on the PredictPrint Media Manager application on the print
server matches the actual stock or media that is loaded in the tray being used for the print job.
Before running a print job, check for any of the following conditions:
• Modifications were made to the Stock Library, such as:
– Adding a stock
– Copying a stock
– Creating a new stock
– Editing an existing stock
• Stock or media was loaded into the selected tray for the print job
• The tray selected for the print job was opened or closed
Note: If any of these conditions apply, verify that the Tray Properties information matches the
actual tray contents.
If the stock loaded in the tray does not match the information on the Tray Properties window, then a
message may appear on one or more of the following screens:
• The press User Interface
• The PredictPrint Media Manager application
• The print server
Tip: Stock or tray mismatch information and how it is displayed is dependent on the individual
print server. If stock is changed in a tray, a message may not be displayed. Therefore it is
important to perform the following steps always before running a print job.
®
Xerox
Versant®4100 Press
User Documentation
63
Page 64

Working With
1. Check for a tray mismatch message on the press User Interface. If a mismatch message is
displayed, select it.
A new message displays and explains what media is required and the tray location.
2. Go the print server and check the main or home window for a similar message:
• If a message exists, follow the information provided on the print server to correct the stock
mismatch issue, then continue to the next step.
• If a message does not exist, continue to the next step.
3. Load the stock in the tray.
If the User Interface on the press displays a mismatch message, to correct the mismatch, use the
Stock Wizard.
4. Close the tray.
The Stock Wizard opens.
5. To change the Tray Properties to match the contents of the tray, follow the stock setup steps in
the Stock Wizard.
6. Resolve all tray and stock mismatch messages.
7. Start your print job.
PPaappeerr FFeeeedd PPeerrffoorrmmaannccee iinn TTrraayyss 66 aanndd 77
If misregistration or skew occurs on printed output that was fed from Trays 6 or 7, manual
adjustment of the paper-feed levers may improve and correct the printed output.
Important: For most print jobs, these levers should remain in their default position. The
position of these levers should be changed only if there is a skew problem when running a
specific print job or media type. Changing the levers can cause more skew problems when
running certain media types such as coated, label, tab stock, hole-punched paper, transparency,
film, postcards, and envelopes.
The paper-feed adjustment levers are found in Trays 6 and 7. These levers are used to improve paper
feed accuracy and to reduce paper skew problems.
64
Xerox®Versant®4100 Press
User Documentation
Page 65

Working With
1. Rear Paper-feed Adjustment Lever 2. Right-side Paper-feed Adjustment Lever
IImmpprroovviinngg PPaappeerr FFeeeedd PPeerrffoorrmmaannccee iinn TTrraayyss 66 aanndd 77
1. Open the tray by pulling it out slowly until it stops.
2. Ensure that the desired paper is loaded into the tray.
3. Go to the PredictPrint Media Manager application on the print server. On the Tray Properties
window, verify the correct paper information, such as size, type, weight, and paper curl or
alignment option for the tray.
4. On the tray, slide the rear paper-feed adjustment lever to the right.
5. Close the tray by slowly pushing it in until it comes to a stop.
Xerox
®
Versant®4100 Press
User Documentation
65
Page 66

Working With
6. Run your print job.
7. After the print job finishes, open the tray and return the rear paper-feed adjustment lever to its
default position by sliding it to the left.
Leave the tray open and continue to the next step.
8. Retrieve and evaluate the printed output; choose one of the following:
• The paper is fed accurately without skew and the printed output is satisfactory. Close the tray
and your task is completed.
• The paper is skewed and the printed output is unsatisfactory; proceed to the next step.
9. Adjust the right-side paper-feed lever:
a. On the tray, slide the right-side paper-feed adjustment lever toward the rear of the tray.
b. Close the tray and verify the tray settings from the PredictPrint Media Manager application
on the print server.
c. Run your print job.
66
Xerox®Versant®4100 Press
User Documentation
Page 67

Working With
10. Retrieve and evaluate the printed output; choose one of the following actions:
• If the paper is fed accurately without skew and the printed output is satisfactory, perform the
following:
1. Open the tray.
2. Return the right-side paper-feed adjustment lever to its default position by sliding it
toward the front of the tray.
3. To complete the task, close the tray.
• If the paper is skewed and the printed output is unsatisfactory, proceed to the next step.
11. Adjust both levers:
a. Open the tray and slide the rear paper-feed adjustment lever to the right.
Xerox®Versant®4100 Press
User Documentation
67
Page 68

Working With
b. Ensure that the right-side paper-feed adjustment lever still is in the rear position.
c. Close the tray and verify the tray settings from the PredictPrint Media Manager application
on the print server.
d. Run your print job.
12. After the print job finishes, open the tray and return both levers to their default positions:
a. Return the rear paper-feed adjustment lever to its default position by sliding it to the left.
b. Return the right-side paper-feed adjustment lever to its default position by sliding it toward
the front of the tray.
c. Close the tray and continue to the next step.
68
Xerox®Versant®4100 Press
User Documentation
Page 69

Working With
13. Retrieve and evaluate the printed output; choose one of the following:
• The paper is fed accurately without skew and the printed output is satisfactory; your task is
completed.
• The paper is skewed and the printed output is unsatisfactory; continue to the next step.
14. If you are still having skew adjustment problems, refer to the Advanced Stock Setup information
on the PredictPrint Media Manager on the print server. If necessary, to resolve the problem,
perform one of the following:
• Create or use an Alignment Profile
• Adjust the Aligner Roll Pressure
• Adjust the Regi-Loop
If the problem continues, contact the Customer Support Center.
Important: If using an Advanced Stock Setup feature, always return the feature to its
default setting before using the press.
PPrriinnttiinngg oonn SSppeecciiaall MMeeddiiaa
TTrraannssppaarreenncciieess
Guidelines for Printing on Transparencies
Always refer to the following guidelines before using transparencies:
• For optimum system performance and image projection, use Xerox removable stripe transparency
materials. These premium transparencies are specifically designed to provide optimum print
quality.
• Use of other transparencies may cause press damage and result in excessive service calls.
• Transparencies can be printed from all trays.
• Use only transparency stock listed in the Tested Substrate List (TSL).
• Do not intermix paper with individual transparencies in a tray. Jams can occur.
• Do not load more than 100 transparencies in a paper tray at one time.
• Load 8.5 x 11 in., A4 transparencies long edge feed only (portrait).
• Fan the transparencies to stop them from sticking together before loading.
• Load transparencies on top of a small stack of same-size paper.
• At the PredictPrint Media Manager, ensure that you select Transparency as the Paper or Media
Type and select the tray that contains the transparencies as the Paper Source.
• The maximum output stack height should not exceed 100 transparencies.
Loading Transparencies in Trays 1, 2, and 3
Load the transparencies in the LEF (portrait) direction and align the edge of the transparencies
against the left edge of the tray, with the side to be printed on facing up.
®
Xerox
Versant®4100 Press
User Documentation
69
Page 70

Working With
Loading Transparencies in Trays 6 and 7
Load the transparencies in the LEF (portrait) direction and align the edge of the transparencies
against the right edge of the tray, with the side to be printed on facing up.
Loading Transparencies in Tray 5 (Bypass)
Load the transparencies in the LEF (portrait) direction and align the edge of the transparencies
against the right edge of the tray, with the side to be printed on facing up.
70
Xerox®Versant®4100 Press
User Documentation
Page 71

Working With
HHoollee--ppuunncchheedd PPaappeerr
Guidelines for Printing on Hole-punched Paper
Hole-punched paper is defined as having two or more holes along one edge for use in ring binders
and notebooks.
Always refer to the following guidelines before using hole-punched paper:
• Paper with punched holes can be printed from all trays.
• Hole-punched paper can be loaded in the LEF or portrait or SEF or landscape direction.
• Position the holes along the feed edge, as shown on the image on the front of the tray.
• Load hole-punched paper with the side to be printed on facing up.
• To prevent jams or damage, ensure that no plugs (pieces cut out of the paper to create the holes)
remain in the stack.
Loading Hole-punched Paper in Trays 1, 2, and 3
Load and align the edge of the hole-punched paper with the holes against the left edge of the tray.
Loading Hole-punched Paper in Trays 6 and 7
Long-edge (LEF) Feed Direction
Load and align the paper against the right side of the tray for LEF direction.
®
Xerox
Versant®4100 Press
User Documentation
71
Page 72

Working With
Short-edge (SEF) Feed Direction
Load and align the paper against the right side of the tray for SEF direction.
Loading Hole-punched Paper in Tray 5 (Bypass)
Load and align the edge of the hole-punched paper with the holes against the right edge of the tray.
72
Xerox®Versant®4100 Press
User Documentation
Page 73

Working With
TTaabb SSttoocckk
Guidelines for Printing on Tab Stock
Always refer to the following guidelines before using tab stock:
• Tab Stock can be printed from all trays.
• Tabs are loaded in the tray only in the long-edge feed (LEF) direction.
• Tab stock is loaded so the straight edge of the stock is in the feed direction.
• You can load single straight collated or single reverse collated tab stock.
• Refer to the print server documentation for more detailed information on how to set up a tab job
at your print server.
• If a jam occurs while running tabbed sets, cancel the job and start again.
Loading Tab Stock in Trays 1, 2, and 3
Load the tab stock LEF (portrait) and align the straight edge of the tab stock against the left edge of
the tray and with the side to be printed on facing down.
Loading Straight Collated Tabs
Load straight collated tabs with the first blank tab cutout toward the rear of the tray.
Loading Reverse Collated Tabs
Load reverse collated tabs with the first blank tab cutout toward the front of the tray.
Xerox
®
Versant®4100 Press
User Documentation
73
Page 74

Working With
Loading Tab Stock in Trays 6 and 7
Load the tab stock LEF, with the side to be printed on facing down; align the straight edge of the tab
stock against the right edge of the tray and the tabs to the left.
Loading Straight Collated Tabs
Load straight collated tabs with the first blank tab cutout toward the front of the tray.
Loading Reverse Collated Tabs
Load reverse collated tabs with the first blank tab cutout toward the rear of the tray.
74
Xerox®Versant®4100 Press
User Documentation
Page 75

Working With
Loading Tab Stock in Tray 5 (Bypass)
Load the tab stock LEF, with the side to be printed on facing up; align the straight edge of the tab
stock against the right edge of the tray and the tabs to the left.
Loading Straight Collated Tabs
Load straight collated tabs with the first blank tab cutout toward the front of the tray.
Loading Reverse Collated Tabs
Load reverse collated tabs with the first blank tab cutout toward the rear of the tray.
Xerox
®
Versant®4100 Press
User Documentation
75
Page 76

Working With
LLaabbeellss
Guidelines for Printing on Labels
Always refer to the following guidelines before using labels:
• Labels can be printed from all trays.
• When you submit your print file, select Labels as the Paper Type, then select the tray containing the labels as the Paper Source.
• Use labels designed for laser printing.
• Follow these weight guidelines:
– Trays 1, 2, and 3 can hold a maximum of 256 g/m
– Tray 5 (Bypass) can hold a maximum of 300 g/m
– Trays 6 and 7 can hold a maximum of 400 g/m
2
2
2
• Do not use vinyl labels or dry gum labels.
• Only print on one side of the sheet of labels.
• Do not use any sheet where labels are missing as it may damage the press.
• Store unused labels flat in their original packaging.
• Leave the label sheets inside the original packaging until ready to use.
• Return any unused sheets of labels to their original packaging and reseal.
• Do not store labels in extremely dry, humid, hot, or cold conditions.
• Rotate stock frequently.
• Long periods of storage in extreme conditions can cause labels to curl and jam in the press.
Loading Labels in All Trays
Refer to the following when loading labels in the paper trays.
• Load labels in Trays 1, 2 and 3 with the labels face down.
• Load labels in Trays 5 (Bypass), 6 and 7 with the labels face up.
76
Xerox®Versant®4100 Press
User Documentation
Page 77

Working With
GGlloossssyy PPaappeerr
Guidelines for Printing on Glossy Paper
Glossy Paper is a type of coated paper that can be printed from all trays.
Always refer to the following guidelines before using glossy paper:
• Select Coated as the Paper Type, then select the tray containing the glossy paper as the Paper
Source.
• Select the correct Paper Weight and Size.
• Do not open sealed packages of glossy paper until you are ready to load them into the press.
• Store glossy paper flat in the original packaging.
• Remove all other paper from the tray before loading glossy paper.
• Load only the amount of glossy paper you plan to use. Remove the unused portion from the tray
when you have finished printing.
• Replace the unused portion in the original wrapper and seal for later use.
• Rotate stock frequently.
• Long periods of storage in extreme conditions can cause glossy paper to curl and jam in the press
PPoossttccaarrddss
Guidelines for Printing on Postcards
Always refer to the following guidelines before using postcard stock:
Tip: When printing postcards in Trays 6 or 7, the Postcard Bracket is required. Always install the
postcard bracket before loading and printing postcards from these trays.
• Postcards can be printed from Trays 5, 6, and 7.
• Do not open sealed packages of postcard stock until you are ready to load them into the press.
• Store postcard stock flat in the original packaging.
• Remove all other paper from the tray before loading postcard stock.
• Load only the amount of postcard stock you plan to use. Remove the unused portion from the tray
when you are finished printing.
• Replace the unused portion in the original wrapper and seal for later use.
• If using Trays 6 or 7, always remove and store the Postcard Bracket when you are finished
printing.
• Rotate the postcard stock frequently.
• Long periods of storage in extreme conditions can cause postcard stock to jam in the press.
®
Xerox
Versant®4100 Press
User Documentation
77
Page 78

Working With
Supported Postcard Sizes
Postcard Size Feed Direction
101.6 x 152.4 mm (4 x 6 in.) Short Edge Feed (SEF)
A6, 148 x 105 mm (5.8 x 4.1 in.) Short Edge Feed (SEF)
Loading Postcards in Trays 6 and 7
Note: Install the postcard bracket before printing postcards.
1. Slowly open one of the paper trays until it stops and remove the paper.
2. Move the paper guides out to their largest position.
3. To remove the postcard bracket, loosen the screw on the left side of the tray (1) and remove the
bracket (2).
78
Xerox®Versant®4100 Press
User Documentation
Page 79

Working With
4. Install the postcard bracket:
a. Sit the bracket on the locating pins on the upper frame and in the grooves on the bottom of
the tray.
b. Tighten the thumb screw so it locks the postcard bracket in place.
5. Load the postcard stock SEF and against the right side of the tray.
6. Adjust the paper guides against the stock.
7. Close the paper tray and confirm the new settings at the print server.
8. Run your print job.
9. Upon completion of your print job, remove the postcard stock and the postcard bracket from the
tray.
®
Xerox
Versant®4100 Press
User Documentation
79
Page 80

Working With
10. Store the postcard bracket by inserting it into the storage area on the left side of the tray (1) and
tightening the screw (2).
Loading Postcards in Tray 5 (Bypass)
Load postcards SEF, with the side to be printed on facing up.
EEnnvveellooppeess
Guidelines for Printing on Envelopes
For envelope guidelines and limitation information, refer to the Customer Expectation and
Installation Guide.
Supported Envelope Sizes
For supported envelope sizes, refer to the Customer Expectation and Installation Guide.
Loading Envelopes in Trays 6 and 7 with the Postcard Bracket
Note: Install the postcard bracket before printing envelopes.
1. Slowly open one of the paper trays until it stops and remove the paper.
80
Xerox®Versant®4100 Press
User Documentation
Page 81

Working With
2. Move the paper guides out to their largest position.
3. To remove the postcard bracket, loosen the screw on the left side of the tray (1) and remove the
bracket (2).
4. Install the postcard bracket:
a. Sit the bracket on the locating pins on the upper frame and in the grooves on the bottom of
the tray.
b. Tighten the thumb screw so it locks the postcard bracket in place.
®
Xerox
Versant®4100 Press
User Documentation
81
Page 82

Working With
5. Load the envelope in the short-edge-feed (SEF) or long-edge-feed (LEF) direction:
• When loading envelopes SEF, ensure the flaps are closed and face down and position the
flaps along the front of the tray.
• When loading envelopes LEF, ensure the flaps are closed and face down and position the flaps
along the right of the tray.
6. Adjust the paper guides against the stock.
7. Close the paper tray and confirm the new settings at the print server.
8. Run your print job.
9. Upon completion of your print job, remove the remaining envelopes and the postcard bracket
from the tray.
10. Store the postcard bracket by inserting it into the storage area on the left side of the tray (1) and
tightening the screw (2).
11. Store the remaining envelopes in their original packaging.
82
Xerox®Versant®4100 Press
User Documentation
Page 83

Working With
Loading Envelopes in Trays 6 and 7 with the Optional Envelope Support Kit
Note: If available, use the optional Envelope Support Kit to feed and print envelopes from
Trays 6 or 7.
The Envelope Support Kit enables a greater quantity of envelopes to be loaded and printed from the
tray.
1. Slowly open one of the paper trays until it stops and remove the paper.
2. Move the paper guides out to their largest position.
3. Locate the Envelope Support Kit.
4. Install the L-shape envelope bracket:
a. Sit the bracket on the locating pins on the upper frame and in the grooves on the bottom of
the tray.
b. Tighten the thumb screw so it locks the L-shape envelope bracket in place.
Xerox
®
Versant®4100 Press
User Documentation
83
Page 84

Working With
5. Locate the larger of the plastic pieces and place it in the bottom of the tray so that it fits around
the ends of the inboard paper guide.
6. Locate the shorter plastic piece install it in the tray:
a. Place the shorter plastic piece in the bottom of the tray so that it fits along the right side of
the tray and into the corner, to the right of the envelope bracket that you installed.
b. Place the magnet at the end of the piece into the corner of the tray and facing down.
The raised portion of the piece at the other end should be facing up and on top of the cork
pad on the tray bottom.
84
Xerox®Versant®4100 Press
User Documentation
Page 85

Working With
7. Load the envelopes SEF on top of the plastic inserts, with the flaps closed and facing down.
Note: The flaps should always be down and positioned along the front of the tray.
8. Adjust the paper guides against the stock.
9. Close the paper tray and confirm the new settings at the print server.
10. Run your print job.
11. Upon completion of your print job, remove the envelope stock and the envelope supply kit
components from the tray.
12. Place the envelope supply kit components into storage.
13. Store the remaining envelopes in their original packaging.
Loading Envelopes in Tray 5 (Bypass)
Load envelopes in Tray 5 in the short edge feed (SEF) or long edge feed (LEF) direction.
Loading Envelopes in Tray 5 in the SEF Direction
When you load envelopes in the SEF direction, ensure that the flaps are closed and face down and
position the flaps along the front of the tray.
®
Xerox
Versant®4100 Press
User Documentation
85
Page 86

Working With
Loading Envelopes in Tray 5 in the LEF Direction
When you load the envelopes in the LEF direction, ensure that the flaps are closed and face down,
and position the flaps along the right of the tray.
LLooaaddiinngg MMeeddiiaa iinn OOppttiioonnaall DDeevviicceess
LLooaaddiinngg MMeeddiiaa iinn tthhee OOppttiioonnaall DDuuaall AAddvvaanncceedd HHiigghh CCaappaacciittyy
FFeeeeddeerr ((TTrraayyss 88 aanndd 99))
For information, refer to Dual Advanced Oversized High Capacity Feeder (Trays 8 and 9).
LLooaaddiinngg PPoosstt--PPrroocceessss MMeeddiiaa iinn tthhee OOppttiioonnaall IInnsseerrtteerr
For information, refer to Inserter Device.
LLooaaddiinngg PPoosstt--PPrroocceessss MMeeddiiaa iinn OOppttiioonnaall GGBBCC®®AAddvvaanncceeddPPuunncchh
PPrroo
For loading tabs into the GBC®AdvancedPunch™Pro, refer to the User Documentation, or go to www.
xerox.com/gbc-advancedpunch-pro.
™™
86
Xerox®Versant®4100 Press
User Documentation
Page 87

Working With
PredictPrint Media Manager
Important: Access the PredictPrint Media Manager application on the Fiery EX or EX-P Print
Server. It cannot be accessed from the press.
Note: Information shown on the PredictPrint Media Manager main window varies depending
on system configuration.
Use the PredictPrint Media Manager application to do the following:
• Use the Stock Wizard feature to get automated media management for the press.
• Log in as Administrator.
• Choose specific System and Stock Wizard setting options associated with stocks and feeder trays.
The System and Stock Wizard setting features are available when you are logged in as
Administrator.
• Change the language that is displayed in the PredictPrint Media Manager application.
• Manage profiles that are associated with stocks, including creating, editing, and deleting profiles.
Profiles include alignment, folder adjustment (optional), and third-party finishing devices
(optional).
• Manage stocks that the press uses, including assigning specific stocks to feeder trays, and adding,
copying, editing, creating, and deleting stocks from the Stock Library.
• View Tray Properties, assign a specific stock to a tray, and set various parameters for that assigned
stock.
Note: The administrator specifies whether the Stock Library feature appears on the main
window of the PreditPrint Media Manager application. The administrator sets this feature in
Administration→System. If the Stock Library feature is not displayed on the PredictPrint
Media Manager main screen, the administrator has restricted access to the feature to
administrators only. In this case, contact your administrator for more information.
DDeesskkttoopp SShhoorrttccuuttss
Two desktop shortcut icons are provided on the print server for easy and quick access to the
PredictPrint Media Manager application and to the customized Stock Library list. During the
installation of the PredictPrint Media Manager application, two icons are created on the desktop of
Fiery print server. These icons are shortcuts to the following items:
• PredictPrint Media Manager application: This shortcut icon allows the user to open quickly and
easily start the application.
• PredictPrint Media Manager Profiles folder: This shortcut icon displays as a folder on the print
server desktop. The shortcut allows the user to access the customized Stock Library files.
To use the desktop shortcuts, perform the following steps:
1. Access the desktop of the print server.
2. Locate the two icons:.
• PredictPrint Media Manager
• PredictPrint Media Manager Profiles
Xerox
®
Versant®4100 Press
User Documentation
87
Page 88

Working With
3. To open and access either the PredictPrint Media Manager application or the PredictPrint Media
Manager Profiles folder, double click the appropriate icon.
Depending on which icon is selected, either the PredictPrint Media Manager application opens or
the folder that contains the Stock Library files opens.
PPrreeddiiccttPPrriinntt CClloouudd SSeerrvveerr
PPrreeddiiccttPPrriinntt CClloouudd SSeerrvveerr OOvveerrvviieeww
The PredictPrint Cloud Server stores the stock attributes including recommended setup routines. The
PredictPrint Media Manager application connects to the PredictPrint Cloud server when a barcode is
scanned, and retrieves all of the stock properties and recommended set points and setup routines.
DDoowwnnllooaaddiinngg aa SSttoocckk LLiisstt ffrroomm PPrreeddiiccttPPrriinntt CClloouudd SSeerrvveerr
If your press is connected to the Internet, the stock information is updated on your system
automatically, each time you scan the barcode. If the press is not connected to the Internet, you can
download the stock lists from the PredictPrint Cloud Server.
1. Open a Web browser, then go to https://www.xerox.com/predictprintmedia.
2. Click Download Stock List.
A webpage appears with download options for different types of stock lists.
3. Select an option:
• To download the entire stock and media list (SML), click Download Full Stock & Media List.
• To download the Recommended Media List (RML), click Download Recommended Media
List.
• To download the Tested Substrate List (TSL), click Download Tested Media List.
The Download Media List page appears, where you can select the printer family.
4. Select Xerox VERSANT 4100 Press, then click OK.
5. In the Save As window, select a location for the stock list file, then click Save.
The stock list file downloads to your computer.
6. Extract the .xml file from the .zip file.
7. Insert a USB storage device into a USB port on the computer, then copy the .xml file to the USB
storage device.
8. Insert the USB storage device into a USB port on the Fiery Print Server.
9. From the USB storage device, upload the file with the stock list information for the PredictPrint
Media Manager application.
After uploading the media list, the stock information appears automatically in the stock list when
the barcode is scanned.
88
Xerox®Versant®4100 Press
User Documentation
Page 89

Working With
BBaacckkiinngg UUpp aanndd TTrraannssffeerrrriinngg tthhee SSttoocckk LLiibbrraarryy
Stocks that are created, copied, and stored in the Stock Library list can be backed up and transferred
to another PredictPrint Media Manager application. This is accomplished by using an external USB
flash drive.
The backup or transfer of Stock Library information is important only for systems that are not
connected to the Internet. When connected to the Internet, there is no need for a local backup. When
a stock barcode is scanned, the PredictPrint Cloud Server downloads all stock data to the PredictPrint
Media Manager application, including recommended setup routines.
Important: The PredictPrint Media Manager application resides on the print server that is
connected to the press. The application can be accessed only from the print server and cannot
be accessed from the press.
1. Insert the USB flash drive into a USB port on the print server.
2. From the print server desktop, open the PredictPrint Media Manager Profiles folder, which is the
shortcut icon on the desktop.
3. Browse to the stock directory.
The .stock extension distinguishes the stocks that were created, copied, and stored in the
library.
4. Select all the files in the stock directory with the .stock extension.
5. Select either Edit→Copy or Ctrl→C.
6. Open the directory of the USB flash drive.
7. Select either Edit→Paste or Ctrl→V.
The files are copied to the USB flash drive.
8. Close both directories.
9. Remove the USB flash drive from the print server.
The .stock files can remain on the USB flash drive as a backup copy.
10. Choose one of the following:
• Store the USB flash drive in a safe, secure location.
• Copy the files onto a different PredictPrint Media Manager application of the print server,
then go to the next step.
11. Copy the files onto a different PredictPrint Media Manager application of the print server.
Perform the following steps:
a. Insert the USB flash drive into a USB port on the second print server.
b. Open the directory of the USB flash drive, and browse to the folder that contains the backed-
up files.
c. Select all the files with the .stock extension.
d. Select either Edit→Copy or Ctrl→C.
e. From the second print server desktop, open the PredictPrint Media Manager Profiles folder.
f. Select either Edit→Paste or Ctrl→V.
The files are copied to the PredictPrint Media Manager Profiles folder.
g. Close both directories.
®
Xerox
Versant®4100 Press
User Documentation
89
Page 90

Working With
h. Remove the USB flash drive from the print server.
12. Store the USB flash drive in a safe, secure location.
DDoowwnnllooaaddiinngg CCuurrrreenntt MMeeddiiaa IInnffoorrmmaattiioonn
For current stock and paper guidelines, go to https://www.xerox.com/predictprintmedia and download
the appropriate list for your press.
SSttoocckk WWiizzaarrdd
When you open a paper tray or scan a barcode, the PredictPrint Stock Wizard opens. The Stock
Wizard instantly loads stock properties to a tray and provides a simple, step-by-step guidance through
setup routines for printing optimization. The setup routines are automatic, semi-automatic, or
manual, and are provided by the PredictPrint Media Manager application.
SSttoocckk WWiizzaarrdd OOvveerrvviieeww
The Stock Wizard is a feature that automates media management for the digital presses. You can
scan the media barcode using the barcode scanner, then load the paper in the tray, or you can load
the paper, then scan the barcode. When you scan the barcode, the PredictPrint Media Manager
application connects to the PredictPrint Cloud server and retrieves all the stock properties and
recommended setup routines for the stock.
The Stock Wizard performs all the advanced settings recommended to optimize print performance for
each stock. When a stock is loaded for the first time, to maximize image quality and color output, the
Stock Wizard runs a fully automated calibration and profiling process.
The Stock Wizard uses the following processes:
Scan
On the Scan screen, you scan the barcode of a specific media with a barcode scanner. When you
scan the barcode, the Stock Wizard connects to the PredictPrint Cloud Server and downloads all
the stock attributes, set points, and recommended setup routines for the stock.
Define
If you have an unknown barcode or are creating a custom barcode, the Define screen opens.
When you create a custom barcode or scan a barcode that is not known by the cloud server, you
90
Xerox®Versant®4100 Press
User Documentation
Page 91

Working With
need to define the media attributes manually.
Note: The stock only needs to be defined once. After you set up the stock for the first time,
the data is stored in the PredictPrint Cloud Server. You can scan the associated barcode to
obtain the stock information automatically.
Load
On the Load screen, you can specify the trays where you have loaded the stock. The paper tray
options are Trays 1–3, 6–9, Tray 5 (Bypass), or Inserter Tray T1. You can load the media before or
after you scan a barcode or define the stock properties. For multiple tray loading, you can load all
trays or scan the barcodes in any order. You can load all trays or scan the barcodes in any order, as
follows:
• If you scan the barcodes first: Scan all barcodes. To load the media in the correct trays, follow
the Stock Wizard.
• If you load the trays first: Load all stocks in the appropriate trays. To verify the barcodes for the
loaded stocks, follow the Stock Wizard screens.
Setup
On the Setup screen, you can verify that the stock properties are correct. You can select the
orientation of the paper that feeds into the press: Long Edge Feed or Short Edge Feed. On the
Setup screen, the Stock Wizard performs automatic setup routines that are recommended for the
stock. The automatic setup routines include:
• Tray Programming
• Alignment Setup
• Secondary Transfer Voltage Adjustment
• Calibration and Profiling
Advanced
On the Advanced screen, the Stock Wizard performs semi-automatic setup routines that are
recommended for the stock. The advanced setup routines include:
• Advanced Alignment for Multiple Profiles
• Trail Edge Transfer Output Adjustment
• Aligner Roll Pressure Adjustment
• Paper Speed Transfer Adjustment
• Fuser Temperature Adjustment
• Regi-Loop Adjustment
• Pre Gate Roll Control
• Tray Air Assist Adjustment
• Tray Heater Adjustment
Note: If there are no semi-automatic setup routines to perform, the Calibration and
Profiling process is done on the Setup screen.
Done
When the semi-automatic and automatic advanced setup routines are complete, the Done screen
shows a list of the manual setup routines that are recommended after you exit the Stock Wizard.
®
Xerox
Versant®4100 Press
User Documentation
91
Page 92

Working With
You can complete the manual setup routines in the Stock Library. Manual setup routines include:
• Fusing Speed Adjustment
• Multifeed Detection
For more information, refer to Advanced Stock Setup Options.
An example of a Stock Wizard workflow using these processes, when the press is connected to the
Internet, is:
Scan/Define→Load→Setup→Advanced→Done.
SSccaannnniinngg aa MMeeddiiaa BBaarrccooddee
A barcode scanner is provided with your press.
1. When you power on the Fiery Print Server, the PredictPrint Media Manager application starts
automatically. If the PredictPrint Media Manager application is not already open, to open the
application, on your Fiery Print Server screen, click PredictPrint Media Manager.
2. To launch the Stock Wizard, you can scan the media barcode using the barcode scanner, or on
the PredictPrint Media Manager screen, click Stock Wizard.
When you log in for the first time, a Welcome screen appears.
3. You can also load the media first, then scan the barcode.
If the barcode is registered already in the PredictPrint Cloud server, after you scan the barcode,
the Stock Wizard displays the stock properties and the press automatically receives the settings
for the best printing values for the job.
4. If you did not load the media before you scanned the barcode, to load the media into one or
more paper trays, click Next.
DDeeffiinniinngg oorr CCrreeaattiinngg aa CCuussttoomm BBaarrccooddee iinn tthhee SSttoocckk WWiizzaarrdd
When you power on the Fiery Print Server, the PredictPrint Media Manager application starts
automatically. If the PredictPrint Media Manager application is not already open, to open the
application, click PredictPrint Media Manager on your Fiery Print Server screen.
When the stock does not have a barcode, you specify the stock attributes and create a custom
barcode using the Define screen:
1. On the PredictPrint Media Manager screen, click Stock Wizard.
When you log in for the first time, a Welcome screen appears.
92
Xerox®Versant®4100 Press
User Documentation
Page 93

2. On the Stock Wizard screen, click Define New Stock and Create Barcode.
The Define screen appears.
3. On the Define screen, describe the following items for your stock:
• Name
• Manufacturer
• Size
• Type
• Modulus (if needed)
• Preprinted Stock (required for the stocks printing from T1)
• Color
• Coating
• Grain
• Weight
• Hole Punched
Working With
For more information, refer to Stock Attributes.
4. To save the changes and go to the next step, click Next.
Note: If you want to print the custom barcode, load Letter or A4 size paper in any tray
other than the one you are currently programming with the stock. If no Letter or A4 size
paper is loaded in the press, you cannot print the barcode during the setup process in the
wizard. You can also print your custom barcodes from the PredictPrint Stock Library at any
time.
LLooaaddiinngg MMeeddiiaa wwiitthh tthhee SSttoocckk WWiizzaarrdd
To load your media in the paper tray, perform the following:
1. Open a paper tray. Based on your media, select from Trays 1–3, 6–9, Tray 5 (Bypass), or Inserter
Tray T1.
2. Load the media, then close the paper tray.
3. On the Stock Wizard Load screen, select from the following options:
• Trays 1–3 or 6–9
• Tray 5 (MSI)
• Tray T1
Note: The available tray options are dependent on the configuration of your system. The
options appear in accordance with the feeders and finishing devices that are attached to
your press.
4. To complete the setup, on the Stock Wizard screen, click Next.
The Setup screen appears. Follow the steps in the Stock Wizard to complete the setup.
5. At any time during the process, to change the information on the previous screen, click Go Back.
®
Xerox
Versant®4100 Press
User Documentation
93
Page 94

Working With
SSeettttiinngg UUpp MMeeddiiaa iinn tthhee SSttoocckk WWiizzaarrdd
You can set up the media or stock in the Stock Wizard with or without a barcode. Refer to:
• Setting Up Media with a Barcode in the Stock Wizard
• Setting Up Media without a Barcode in the Stock Wizard
• Setting Up Media with a Custom Barcode in Offline Mode
Setting Up Media with a Barcode in the Stock Wizard
1. On the Stock Wizard Setup screen, select the paper orientation:
• Long Edge Feed
• Short Edge Feed
2. Click Next.
3. The Stock Wizard performs the recommended automatic setup routines. After each setup, click
Accept and Next. The automatic setup routines include:
• Tray Programming
• Basic Alignment Setup
• Secondary Transfer Voltage Adjustment
• Calibration and Profiling: This automatic setup is performed after the semi-automatic
adjustments, and before any manual adjustments. For more information, refer to Calibration
and Profiling.
Note: It is important to remember that these setup routines and all of the other print
engine adjustments are performed only if needed. If the PredictPrint Cloud Server
Intelligence determines that they are not needed, the PredictPrint Stock Wizard skips them.
4. At any time during the process, to change the information on the previous screen, click Go Back.
5. At any time during the process, to cancel the stock setup routines, click Cancel Setup.
Note: The Cancel Setup option stops any additional setup routines from running in the
wizard, at that time. Cancelling setup routines does not cancel the assignment of the stock
to the tray.
6. To go to the next setup routine, click Accept and Next.
Setting Up Media without a Barcode in the Stock Wizard
To get a barcode for the media, ensure that the tray is loaded with the stock for which you need a
barcode.
1. On the Stock Wizard Setup screen, select the paper orientation:
• Long Edge Feed
• Short Edge Feed
2. Click Next.
A barcode appears on the next screen.
94
Xerox®Versant®4100 Press
User Documentation
Page 95

Working With
3. To print the barcode, click Print Barcode.
Note: If you want to print the custom barcode, load Letter or A4 size paper in any tray
other than the one you are currently programming with the stock. If no Letter or A4 size
paper is loaded in the press, you cannot print the barcode during the setup process in the
wizard. You can also print your custom barcodes from the PredictPrint Stock Library at any
time.
4. To scan the barcode as needed in the future, keep the printed barcode for reference.
5. Click Accept and Next.
The Stock Wizard starts a series of automatic setup routines.
6. The Stock Wizard performs the recommended automatic setup routines. After each setup
routine, click Accept and Next. The automatic setup routines include the following:
• Tray Programming
• Basic Alignment Setup
• Secondary Transfer Voltage Adjustment
• Calibration and Profiling: This automatic setup is performed after the semi-automatic
adjustments, and before any manual adjustments.
Note: It is important to remember that these setup routines and all of the other print
engine adjustments are performed only if needed. If the PredictPrint Cloud Server
Intelligence determines that they are not needed, the PredictPrint Stock Wizard skips them.
7. At any time during the process, to change the information on the previous screen, click Go Back.
8. At any time during the process, to cancel the stock setup routines, click Cancel Setup.
Note: The Cancel Setup option stops any additional setup routines from running in the
wizard, at that time. Cancelling setup routines does not cancel the assignment of the stock
to the tray.
9. To go to the next setup routine, click Accept and Next.
Setting Up Media with a Custom Barcode in Offline Mode
When the stock does not have a barcode and the press is not connected to the Internet, the Stock
Wizard cannot communicate with the PredictPrint Cloud Server to generate a barcode. Before you
generate a custom barcode, ensure that you have a portable USB storage device.
Note: If the press is not connected to the Internet, you can download the Stock Lists from the
PredictPrint Cloud Server. To download the Stock Lists from the PredictPrint Cloud Server, refer
to Downloading a Stock List from PredictPrint Cloud Server.
1. On the Stock Wizard Setup screen, select a Paper Edge Feed option:
• Long Edge Feed
• Short Edge Feed
2. Click Next.
3. To get a barcode and complete the stock setup, insert a USB storage device into the Fiery Print
Server. Click Copy Stock File.
4. Save the stock file on the USB storage device.
®
Xerox
Versant®4100 Press
User Documentation
95
Page 96

Working With
5. From a browser on an Internet-connected device, go to https://www.xerox.com/predictprintmedia.
The PredictPrint Media Manager opens. Click Get New Barcode.
6. Upload the stock file from the USB storage device to the PredictPrint Cloud Server. The
PredictPrint Cloud Server generates a new barcode with stock setup routines. Save the setup and
barcode information to the USB storage device.
7. Ensure that the tray is loaded with the stock for which you need a barcode.
8. Insert the USB storage device into a USB port on the Fiery Print Server. On the Stock Wizard
Setup screen, click Load Barcode File.
9. From the USB storage device, copy the file with stock setups and the barcode information to the
PredictPrint Media Manager application. Click Next.
A barcode appears on the next screen.
10. To print the barcode, click Print Barcode.
11. To scan the barcode as needed in the future, keep the printed barcode for reference.
12. Click Accept and Next.
The Stock Wizard starts the series of automatic setup routines.
AAddvvaanncceedd SSttoocckk SSeettuupp iinn tthhee SSttoocckk WWiizzaarrdd
On the Advanced screen, the PredictPrint Stock Wizard guides you through a series of advanced
settings that include semi-automatic and automatic setup routines.
For any semi-automatic setup routine, you can print a sample, inspect the sample, and make
adjustments, if needed. The semi-automatic setup routines include:
• Advanced Alignment for Multiple Profiles
• Trail Edge Transfer Output Adjustment
• Aligner Roll Pressure Adjustment
• Paper Speed Transfer Adjustment
• Fuser Temperature Adjustment
• Regi-Loop Adjustment
• Pre Gate Roll Control
• Tray Air Assist Adjustment
• Tray Heater Adjustment
The automatic setup includes Calibration and Profiling. If there are no semi-automatic setup routines
to run, the Calibration and Profiling process is done on the Setup screen. If there are semi-automatic
setup routines recommended for the stock, the Calibration and Profiling process is done on the
Advanced screen. For more information, refer to Calibration and Profiling.
1. To view the instructions about adjusting a specific semi-automatic setup routine, click Get
Instructions. For more information, refer to Advanced Stock Setup Options.
2. To verify the printed output, click Print Sample. Make adjustments to the setup routine, as
needed.
96
Xerox®Versant®4100 Press
User Documentation
Page 97

Working With
3. After each semi-automatic setup routine, to perform the next setup routine, click Accept and
Next.
Note: It is important to remember that these setup routines and all of the other print
engine adjustments are performed only if needed. If the PredictPrint Cloud Server
Intelligence determines that they are not needed, the PredictPrint Stock Wizard skips them.
4. At any time during the process, to cancel the stock setup routines, click Cancel Setup.
5. To go to the previous setup, click Go Back.
CCaalliibbrraattiioonn aanndd PPrrooffiilliinngg
Color Calibration and Profiling is a fully automated process within the Stock Wizard. The Stock Wizard
passes the stock information to the Fiery Print Server. Calibration and Profiling is not performed with
the other automatic setup routines. This automatic setup routine is performed always after the semiautomatic adjustments and before any manual adjustments.
The need for calibration and profiling is not determined by the PredictPrint Cloud Server, but by the
Fiery Print Server. The need for calibration is time-based. If more than 7 days pass after the last
calibration, the Stock Wizard performs a calibration check. For profiling, each stock is profiled on the
first setup routine only.
When the calibration and profiling is done through the PredictPrint Stock Wizard, the process uses Full
Width Array and requires 60 pages. If needed, you can perform additional calibration or profiling
outside of the Stock Wizard using the handheld Spectrophotometer on the Fiery Print Server.
You can change the default 7-day time setting for calibration, which is set on the print server. On the
Fiery Print Server Device Center, click General→Tools→Calibrator, then click the small gear icon at
the bottom of the page. The Calibration Notification window opens, where you can set the time limit
for the next calibration check.
Calibration and Profiling proceeds as follows:
1. On the Advanced screen, after the semi-automatic setup routines are complete, the Stock Wizard
starts the Calibration and Profiling process automatically.
Note: If there are no semi-automatic setup routines to perform, the Calibration and
Profiling process is done on the Setup screen.
2. The PredictPrint Stock Wizard coordinates with the Fiery Print Server. The Color Profiling and
Calibration Check is done automatically, and the progress appears on the Fiery Color Xpress
window.
3. To cancel the Calibration and Profiling process, on the Fiery Color Xpress window, click Cancel.
4. When the Calibration and Profiling process is complete, a Success message appears and the
Fiery Color Xpress window closes automatically.
5. After the Calibration and Profiling process completes, the Done screen appears.
Xerox
®
Versant®4100 Press
User Documentation
97
Page 98

Working With
EExxiittiinngg tthhee SSttoocckk WWiizzaarrdd
After the advanced semi-automatic and automatic setup routines are complete, the Stock Wizard
displays the list of manual setup routines that are required. To make manual adjustments, exit the
Stock Wizard, then go to Advanced Setup for the stock in the Stock Library.
Manual setup routines are performed last. Manual setup routines include:
• Fusing Speed Adjustment
• Multifeed Detection
1. After the Calibration and Profiling process is complete, on the Stock Wizard Advanced screen,
click Accept and Next.
The Done screen appears.
2. The Done screen displays the list of manual setup routines that are required. To perform the
manual setup routines, exit the Stock Wizard. Click Done and Close.
To perform the manual setup routines, refer to Manual Stock Setup.
Manual Stock Setup
To view the list and perform the required manual setup routines, in the PredictPrint Media Manager
application, do the following:
1. Click Trays.
The Trays screen appears. A yellow triangle icon appears on the tray that is loaded with the stock
you are setting up.
2. Hover the cursor over the yellow triangle icon.
The list of required manual setup routines appears.
3. To perform the manual setup routines, go to the Stock Library. In the Stock Library list, select the
stock that requires the manual setup routines. To access the stock properties, on the Stock
Library menu bar, click the pencil icon for Edit. To access the manual adjustments, click
Advanced Setup.
Note: For details on how to perform the manual step routines, refer to Advanced Stock
Setup Options.
AAddmmiinniissttrraattiioonn
The PredictPrint Media Manager Administrator mode allows you to set the default settings for your
Production Press to fit your individual requirements. You can change the settings for various features,
such as the Language, Date and Time, the Administrator password, creating custom paper and
alignment profiles, and more.
The Administrator mode includes:
• Stock Wizard tab
• System tab
LLooggggiinngg IInn aass AAddmmiinniissttrraattoorr
1. On the PredictPrint Media Manager screen, click Login.
98
Xerox®Versant®4100 Press
User Documentation
Page 99

Working With
2. From the Login screen, select Administrator.
3. Type the Administrator password. The default administrator password is five ones, 11111.
4. Click OK.
Important: To prevent unauthorized access to the Administrator mode, after installing the
Production Press, change the Administrator password as soon as possible. For more
information, refer to Changing the Administrator Password.
5. To exit the Administrator mode, click User: Administrator, then click Log Out.
SSttoocckk WWiizzaarrdd TTaabb
As an Administrator, the Stock Wizard tab allows you to make changes to the following features:
• Stock Wizard
• Guided Stock Setup
– Paper Calibration and Profiling
– Alignment Profile Setup
– Secondary Transfer Voltage Setup
– Other Routines
• Custom Stock Name
• Private Stock Sharing
• Stock Wizard Timeout
• PredictPrint Database
• Load Database from Device
Accessing the Stock Wizard Tab
1. From the main window of the PredictPrint Media Manager application, log in as administrator.
Refer to Logging In as Administrator.
2. Click Administration.
The Stock Wizard window appears.
Xerox
®
Versant®4100 Press
User Documentation
99
Page 100

Working With
3. To make changes to the following features, click the On/Off toggle buttons for each feature. The
toggle button changes color, and a label indicates whether the feature is On or Off.
• Stock Wizard: When this feature is disabled, the Stock Wizard does not appear on the main
window of the PredictPrint Media Manager application. For more information, refer to
Managing Access to the Stock Wizard from Administration.
• Guided Stock Setup: By default, when you scan and load a stock, the PredictPrint Cloud
Server guides you through recommended setup routines for the stock. You can choose to
disable guided stock setup completely, or you can choose to disable the following elements of
guided stock setup:
• Paper Calibration and Profiling: To enable or disable the Calibration and Profiling setup
routines, for Paper Calibration and Profiling, select the On/Off toggle button.
• Alignment Profile Setup: Basic Alignment Setup and Advanced Alignment Setup are
automatic setup routines, but their parameters are set in Administration. An Administrator
can select the following options:
– Off: To disable automatic alignment profile setup, select Off.
– Basic (set up once): To enable the basic Alignment Profile setup routine, select Basic
(set up once). Basic Alignment runs only when the stock is set up for the first time.
This setting is managed on the PredictPrint Cloud Server.
– Advanced (multiple profile): To enable the advanced Alignment Profile setup routine,
select Advanced (multiple profile). Advanced Alignment runs every time you scan the
barcode for the stock. You can select the Print Density and Alignment Profile.
• Secondary Transfer Voltage Setup: To enable or disable the automatic setup for
secondary transfer voltage, for Secondary Transfer Voltage Setup, select the On/Off
toggle button
• Other Routines: To enable or disable the automatic setup for other routines, for Other
Routines, select the On/Off toggle button.
• Custom Stock Name: To restrict the operator from adding a custom name for a scanned
stock, for Custom Stock Name, select the On/Off toggle button.
• Private Stock Sharing: You can create a unique, minimum 4-digit code that all locations in
your company can use to share custom stocks and their barcodes. To enable or disable private
stock sharing, for Private Stock Sharing, select the On/Off toggle button. If you enabled
private stock sharing, type a sharing code that has at least four digits.
• Stock Wizard Timeout: To modify or change Stock Wizard Timeout, refer to Stock Wizard
Timeout.
• PredictPrint Database: To load PredictPrint Database from other devices, refer to Load
PredictPrint Database from Device.
4. To exit the Stock Wizard tab settings and return to the PredictPrint Media Manager main
window, select either Apply or Cancel.
5. To exit the administrator mode, click User: Administrator, then click Log Out.
Managing Access to the Stock Wizard from Administration
The administrator can manage whether the Stock Wizard icon appears on the PredictPrint Media
Manager main screen. By default, the Stock Wizard icon always appears on the main screen. The
administrator can choose to restrict access to the Stock Wizard. When access is restricted, the Stock
Wizard does not appear on the PredictPrint Media Manager main screen.
1. From the PredictPrint Media Manager screen, click Login, then log in as the Administrator.
2. Click Administration.
100
Xerox®Versant®4100 Press
User Documentation
 Loading...